This walkthrough is a suggested path through Limgrave, and is designed to guide you through the area in a relatively efficient manner, and ensures you collect the majority of useful items (though there may be a few we still haven’t found!). If you just want to progress the main story, you can skip straight to the Stormgate section of the guide, and ignore everything but the directions for reaching Margit the Fell Omen.
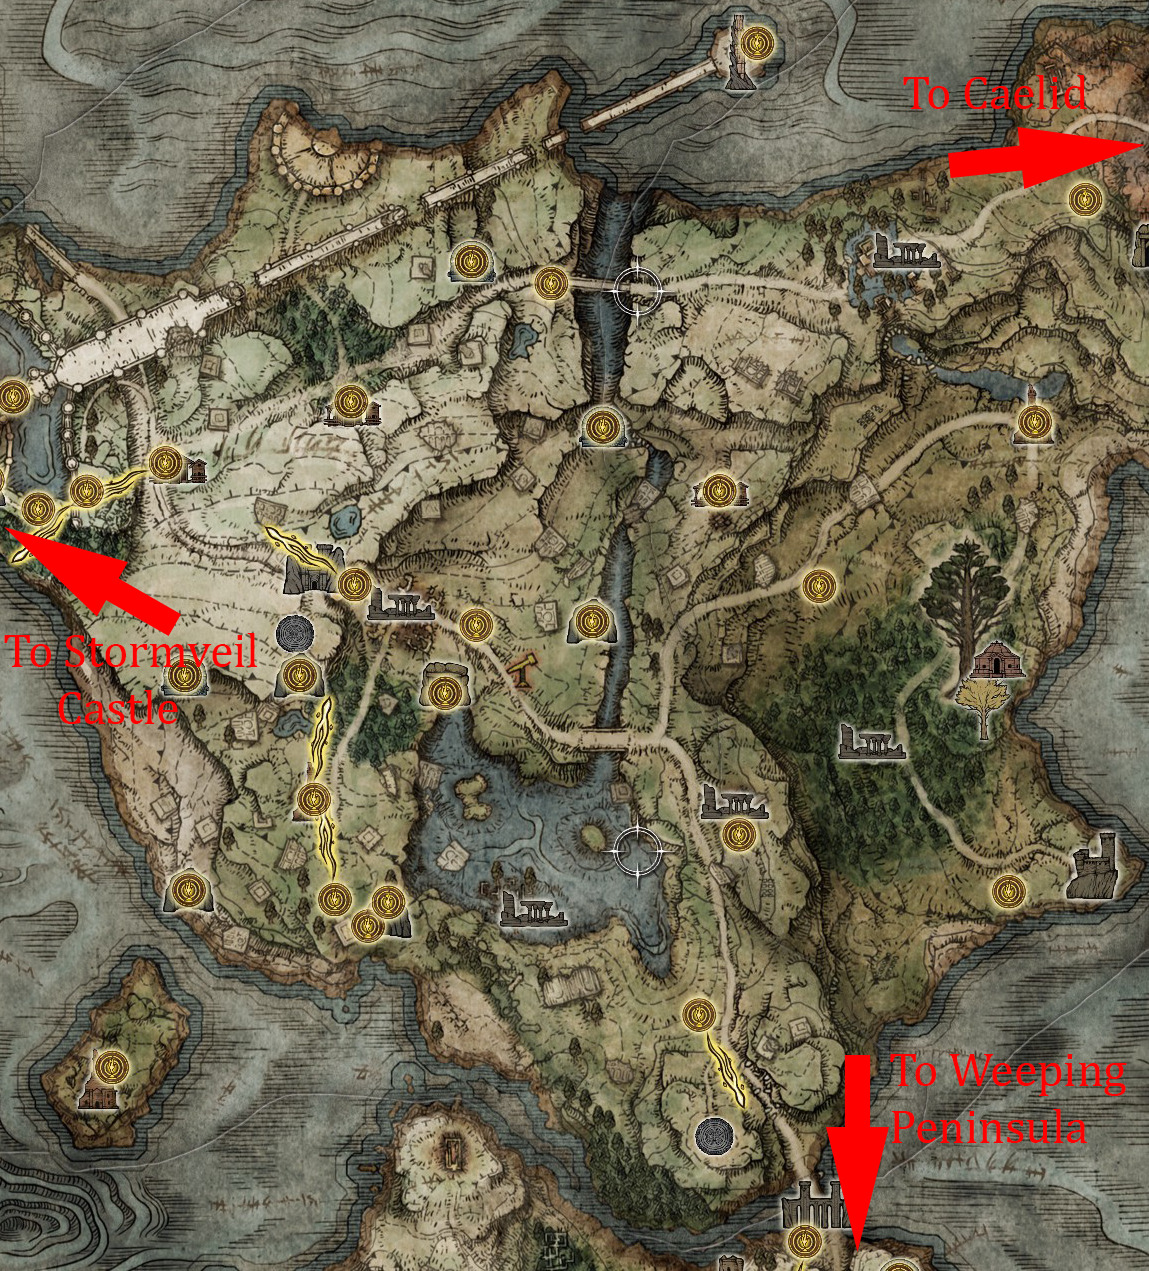
Also note that at any point, you can head southeast to the Bridge of Sacrifice and explore the Weeping Peninsula — we recommend completing both Limgrave and the Weeping Peninsula before continuing to Margit and Stormveil Castle.
Western Limgrave
Next to the very first site of grace, Stranded Graveyard, you might notice a fog gate and an imp statue nearby. The fog gate leads to Fringefolk Hero’s Grave, the very first dungeon that you will find during your playthrough. However, while it’s the first one, it’s not recommended to venture there at the very start of the game, and you will need 2x Stonesword Key to gain access to it, which you may not have at the start either.
This dungeon is entirely optional and you can skip it for now. There is however a Golden Seed, the Banished Knight Oleg spirit ashes, and the Dragon Communion Seal, so make sure to come back here later on to grab all of this dungeon’s goodies.
Once you’re done with the tutorial area, you will find yourself in the first open-world area: Limgrave. First and foremost, make sure to interact with the site of lost grace next to the NPC. Sites of lost grace serve as respawn points, allow you to fast travel between other sites of grace that you discovered, and later on you will be able to use them to level up your character. Then chat with White Mask Varre, who stands behind the site of grace and has some friendly advice for you. Talk to him until he starts repeating himself — this is known as “exhausting dialog“, and you should do it with every NPC you meet if you want to advance their questlines (it isn’t always necessary, but better safe than sorry!).
Next, if you take a look north (using the compass on the top of the screen), you will see a ruined church nearby, which will be your next destination. On your way there, you might encounter an optional boss patrolling in front of the church, the Tree Sentinel.
Whether you defeated or decided to skip this boss, proceed inside the Church of Elleh and grab the site of lost grace. Next, speak to Merchant Kalé sitting nearby, and purchase a Crafting Kit. The Crafting Kit will allow you to craft useful items like Fire Pots and Furlcalling Finger Remedies. Note that the Crafting Kit only comes with a few recipes — you’ll need to find various Cookbooks to unlock the ability to craft more items.
From the church, head northeast through the forest and follow the dirt road until you reach Gatefront Ruins. Note that the enemy that patrols the road here carries a horn to call for reinforcement. Rather than fighting these guys, head towards the gate to the west of the enemy encampment in the ruins, and grab the sight of lost grace there.
This site is especially important as it allows you to meet Melina, an NPC that gives you the ability to level up. Now, any time you rest at a site of grace, you’ll have the option to Level Up on the site of grace menu. Melina also gives you a Spectral Steed Whistle. This will allow you to summon Torrent, a mount who’ll help you cross vast distances quickly, and also has a double jump that can be helpful when climbing.
Once you’ve spoken with Melina, head east on the road and you’ll see a small monument that has a map of Limgrave West in front of it. Unless you pick up a map of the current area, you won’t be able to see much except for fast travel locations and dungeon entrances, so make sure you do this. You can grab a Flail and Lordsworn’s Greatsword in the huge carts in this area, not to mention the Ash of War: Storm Stomp and the Whetstone Knife (which allows you to put new Weapon Arts on your armaments) — this is hidden down some stairs on the eastern side of the camp. Grab it all before you continue.
The Whetstone Knife and an Ash of War are down these easy-to-miss stairs
Now it’s time to head back south to the forest — follow the rocks, keeping them on your right, and you’ll soon find your first dungeon: Groveside Cave.
Having completed the second dungeon, travel back to the Church of Elleh (you can do this by opening your map and selecting the site of lost grace you want to go to). As long as it’s night, you’ll meet Ranni at this point, and she’ll give you the Lone Wolf Ashes as well as the Spirit Calling Bell, which will let you use your Spirit Ashes. If it isn’t night yet, rest at the site of grace and pass time until night. Next, purchase a Torch from Merchant Kalé before heading south-southwest. Continue in that direction until you reach the edge of the cliff. First, jump down on the small platform underneath, and then jump further down to the ruins of a building before descending to the beach.
Under these ruins, you can find a Nomadic Merchant selling various items. From there, head northwest until you reach the entrance to another dungeon: the Coastal Cave. Enter the dungeon to grab the site of lost grace and then head back out — we’ll come back soon to actually do this dungeon. For now, continue to head northwest on the beach until you find a small invisible enemy, leaving a white trail in its path. If you manage to kill it by swinging at the right time or using something like Dragonfire, it will drop the Ash of War: Stamp (Sweep). It runs the same route every time, so stand in its path and swing when its nearing you — you can run to the other side of the loop if you miss. Once you get it, it’s time to head back to explore the Coastal Cave dungeon.
Once you’re out of the cave, head west and then south, deeper into the island and grab the Church of Dragon Communion site of lost grace. On the southern edge of the island, you will find another rolling enemy that will drop the Somber Smithing Stone [1] when killed. On the southeastern side of the island, climb the broken wall all the way to the top. There, loot the corpse on the right to get the Exalted Flesh.
Central Limgrave
Fast travel back to The First Step site of lost grace and head east until you stumble upon the Dragon-Burnt Ruins in Agheel Lake. In these ruins, along with several weak enemies, you will find two passages leading underground. One will lead to a room with a trapped chest that will transport you to Sellia Crystal Tunnel, while the other will have a chest containing the Twinblade. To tell these chests apart, the passage leading to the trapped chest will be guarded by rats, while the Twinblade won’t have any enemies guarding it.
The Sellia Crystal Tunnel area is particularly difficult, so it’s not recommended to venture there yet. However if you decide to dip your toes in there and grab some loot, make sure to get rid of your runes by either leveling up or purchasing items, because you will most likely die several times.
If you opened the trap chest, you will have to go down to find an exit out of this dungeon. On your way out, grab the site of lost grace, and continue out of the dungeon to be able to teleport back to Limgrave and make your way back to the Dragon-Burnt Ruins. Make sure to loot everything in these ruins before moving on.
From these ruins, head north-northwest through the lake to the location of the next dungeon. When crossing the Agheel Lake however, the Flying Dragon Agheel boss will land to defend its territory. This is a tough fight, so if you haven’t leveled up a bit, you may want to skip it — go ahead and try it once to see how much damage you do before you decide. Note that you can (and probably should) come back to this boss after collecting the Lance Talisman, which is acquired later in this guide but can be easily grabbed at any point.
North-northwest in Agheel Lake (you can see the cave entrance on the upper left-most edge of the lake) you will find the entrance to another dungeon: Limgrave Tunnels. Grab the Limgrave Tunnels site of lost grace inside the dungeon. If you defeated Flying Dragon Agheel and obtained the Dragon Heart, fast travel back to the Church of Dragon Communion — you can “Perform Dragon Communion” using the altar next to the dragon carcass, which will allow you to trade the Dragon Heart for several incantations.
When you’re ready, head into the Limgrave Tunnels (or teleport back to the site of grace).
Coming back out from the Tunnels, head east and pass under the bridge into the ravine. While running through, you will be invaded by Bloody Finger Nerijus, and Yura, another NPC, will come to your aid. Nerijus has both fast attacks as well as ranged ones, and will often roll out of harm’s way. Take your time, avoid long attack chains, and try to rely on Yura to defeat Bloody Finger Nerijus. You can often catch Nerijus coming in to attack with a light attack of your own. Always strafe left or right to avoid his ranged attack. When he’s targeting Yura, you can get backstab off. Once your foe is defeated, you’ll receive a Furlcalling Finger Remedy and Reduvia.
Once he’s defeated, enter the nearby Murkwater Cave and grab the site of grace, then continue into the cave.
Upon leaving Murkwater Cave, continue north through the ravine until you reach a darker area under a collapsed structure. There you will find Yura, the NPC that helped you against Bloody Finger Nerijus. Exhaust his dialogue before going deeper in the ravine. In the next area, pick up the Poisonbloom in the middle and either deal with enemies on the way, or run through the ravine until you find the entrance to Murkwater Catacombs. Along the way, you’ll pass your first Spiritspring Jump — we’ll return to this later.
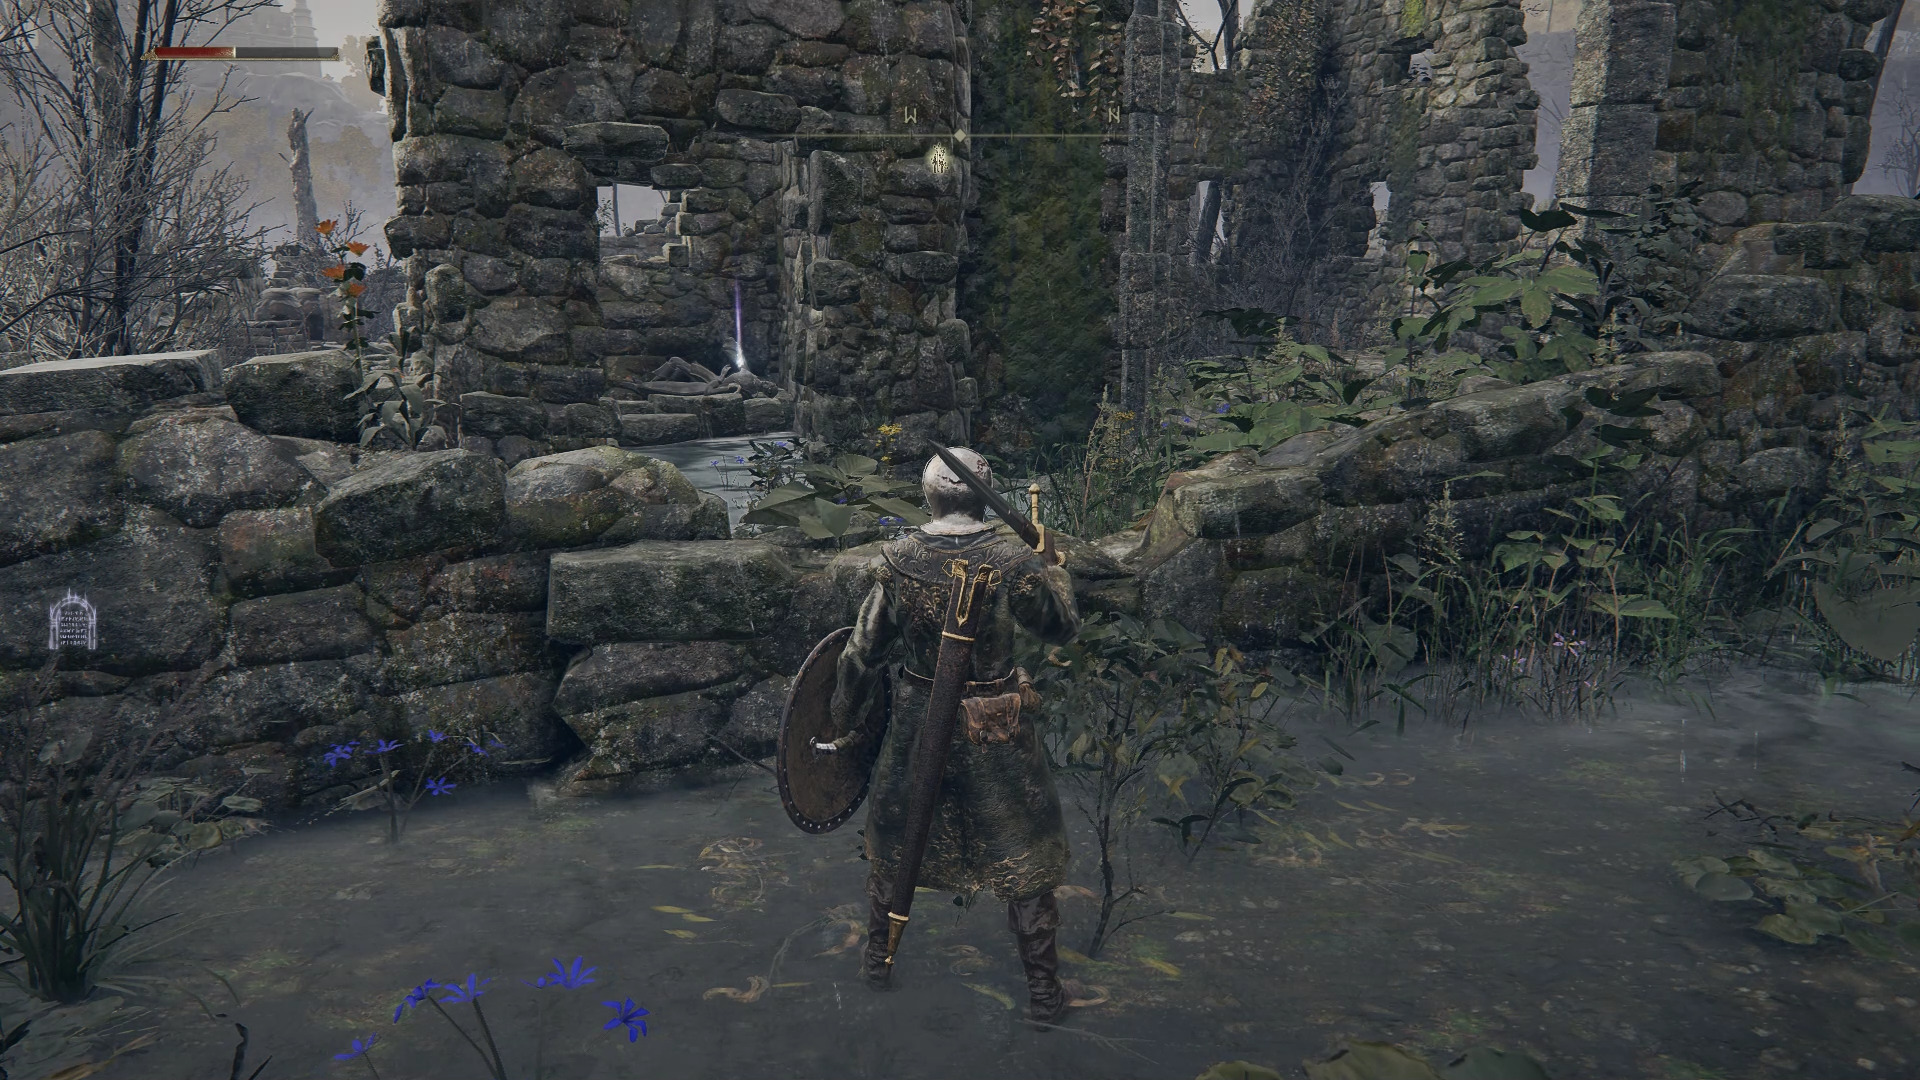
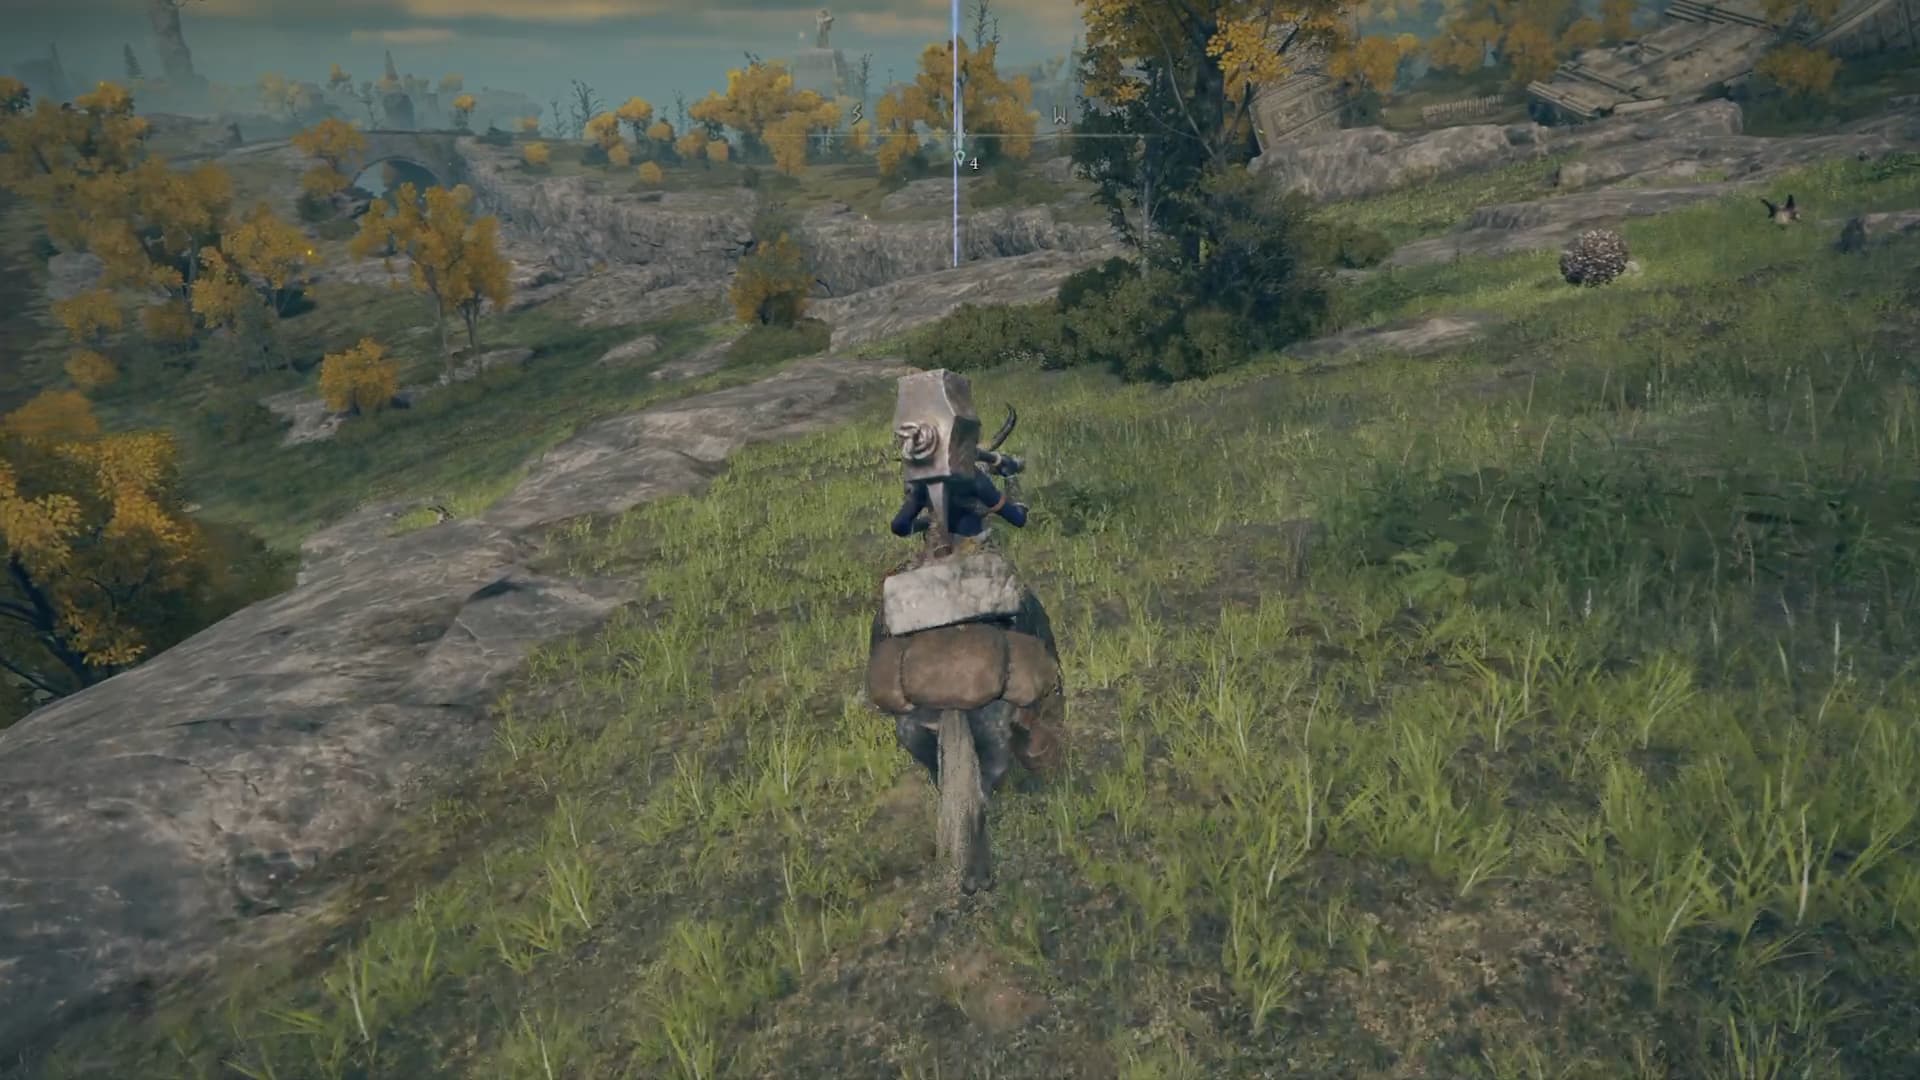
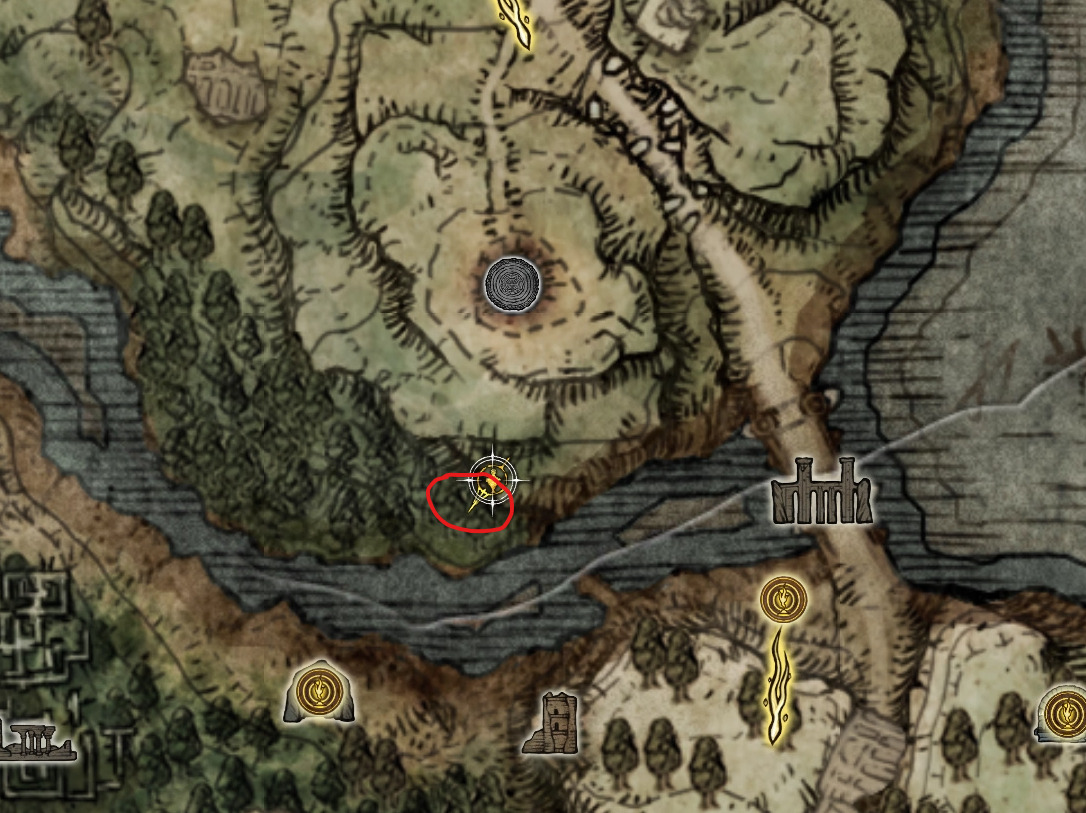
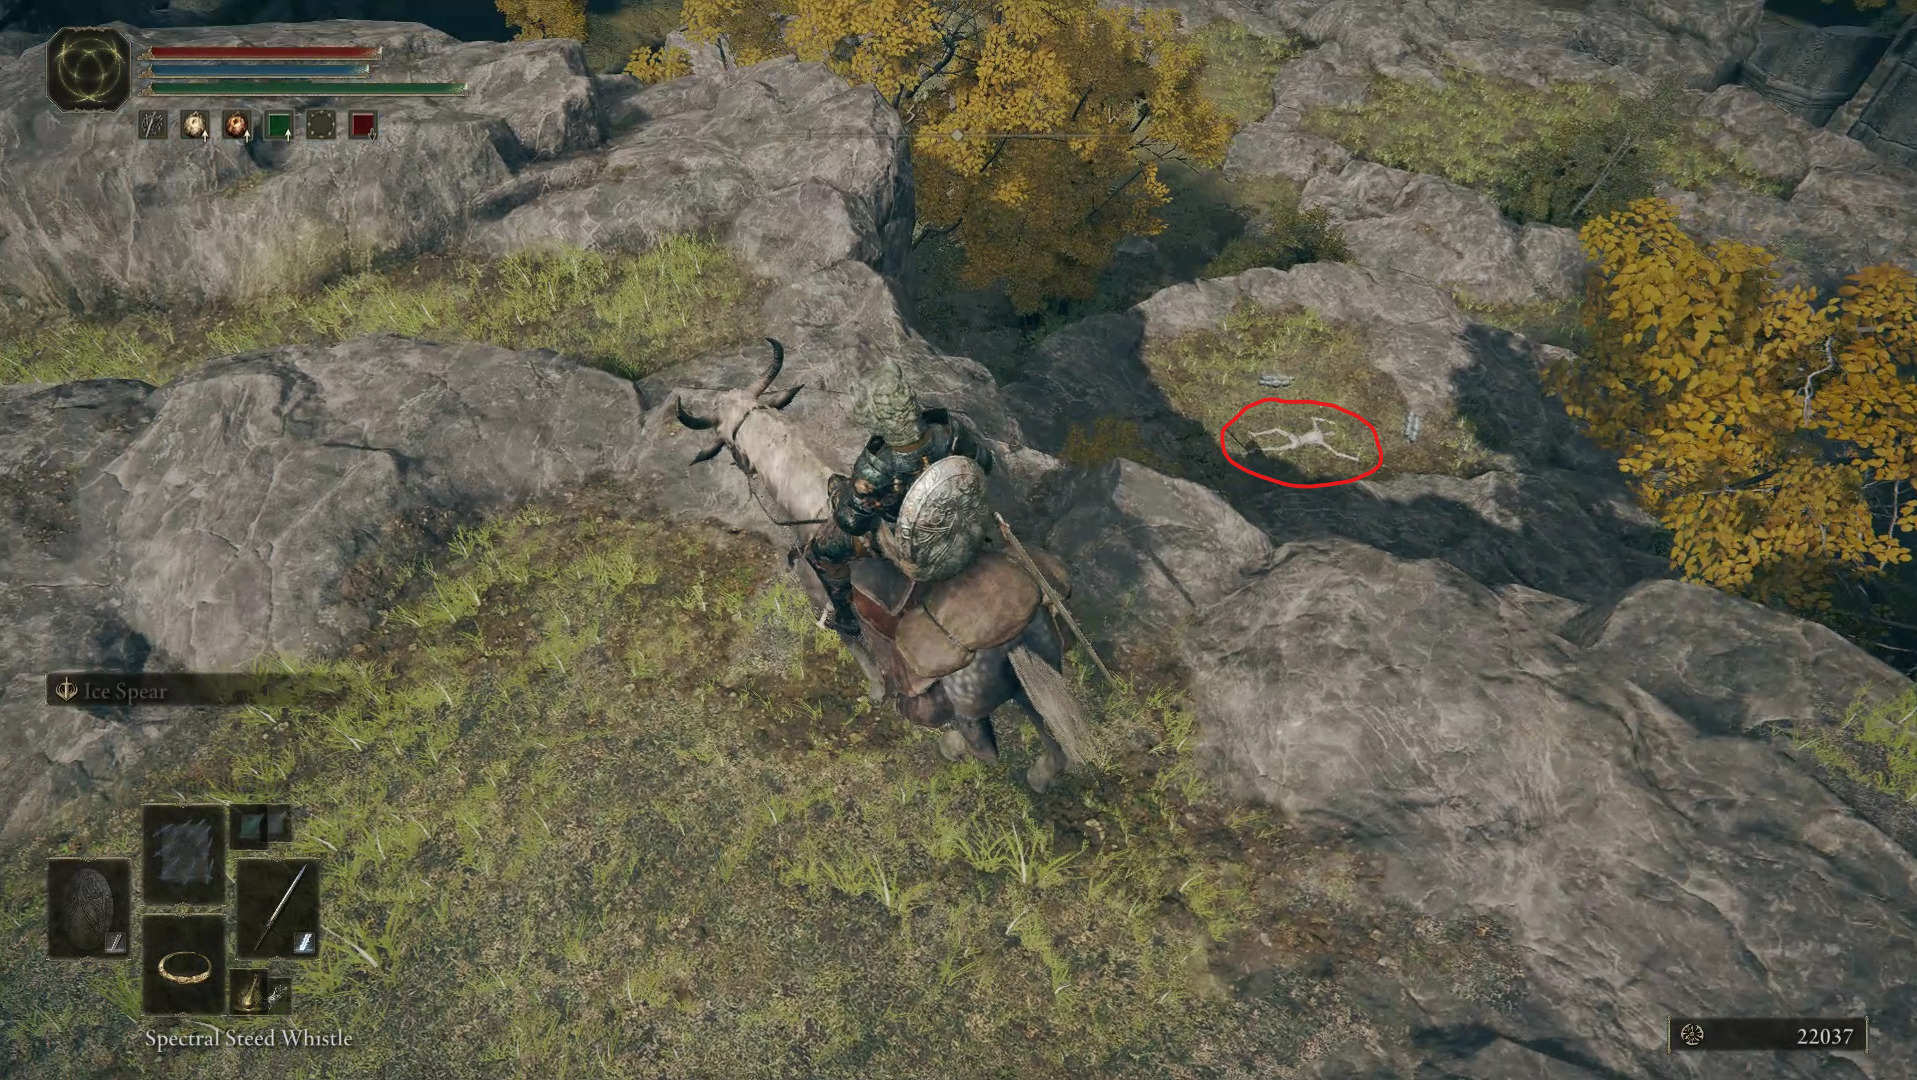
Once you’re out of the catacombs, use the Spiritspring Jump northward and then head southeast to find the Artist’s Shack. Grab the nearby item and the site of lost grace, and then inspect the Homing Instinct Painting inside the shack. Doing so will allow you to find the Incantation Scarab south of the lake (see here for details). Head west from the Artist’s Shack and jump on top of the rock formation to find a scarab with a Somber Smithing Stone [1] but be careful as killing it will cause it to explode.
Hop up the rocks to reach the scarab at the topThe scarab will explode when you kill it
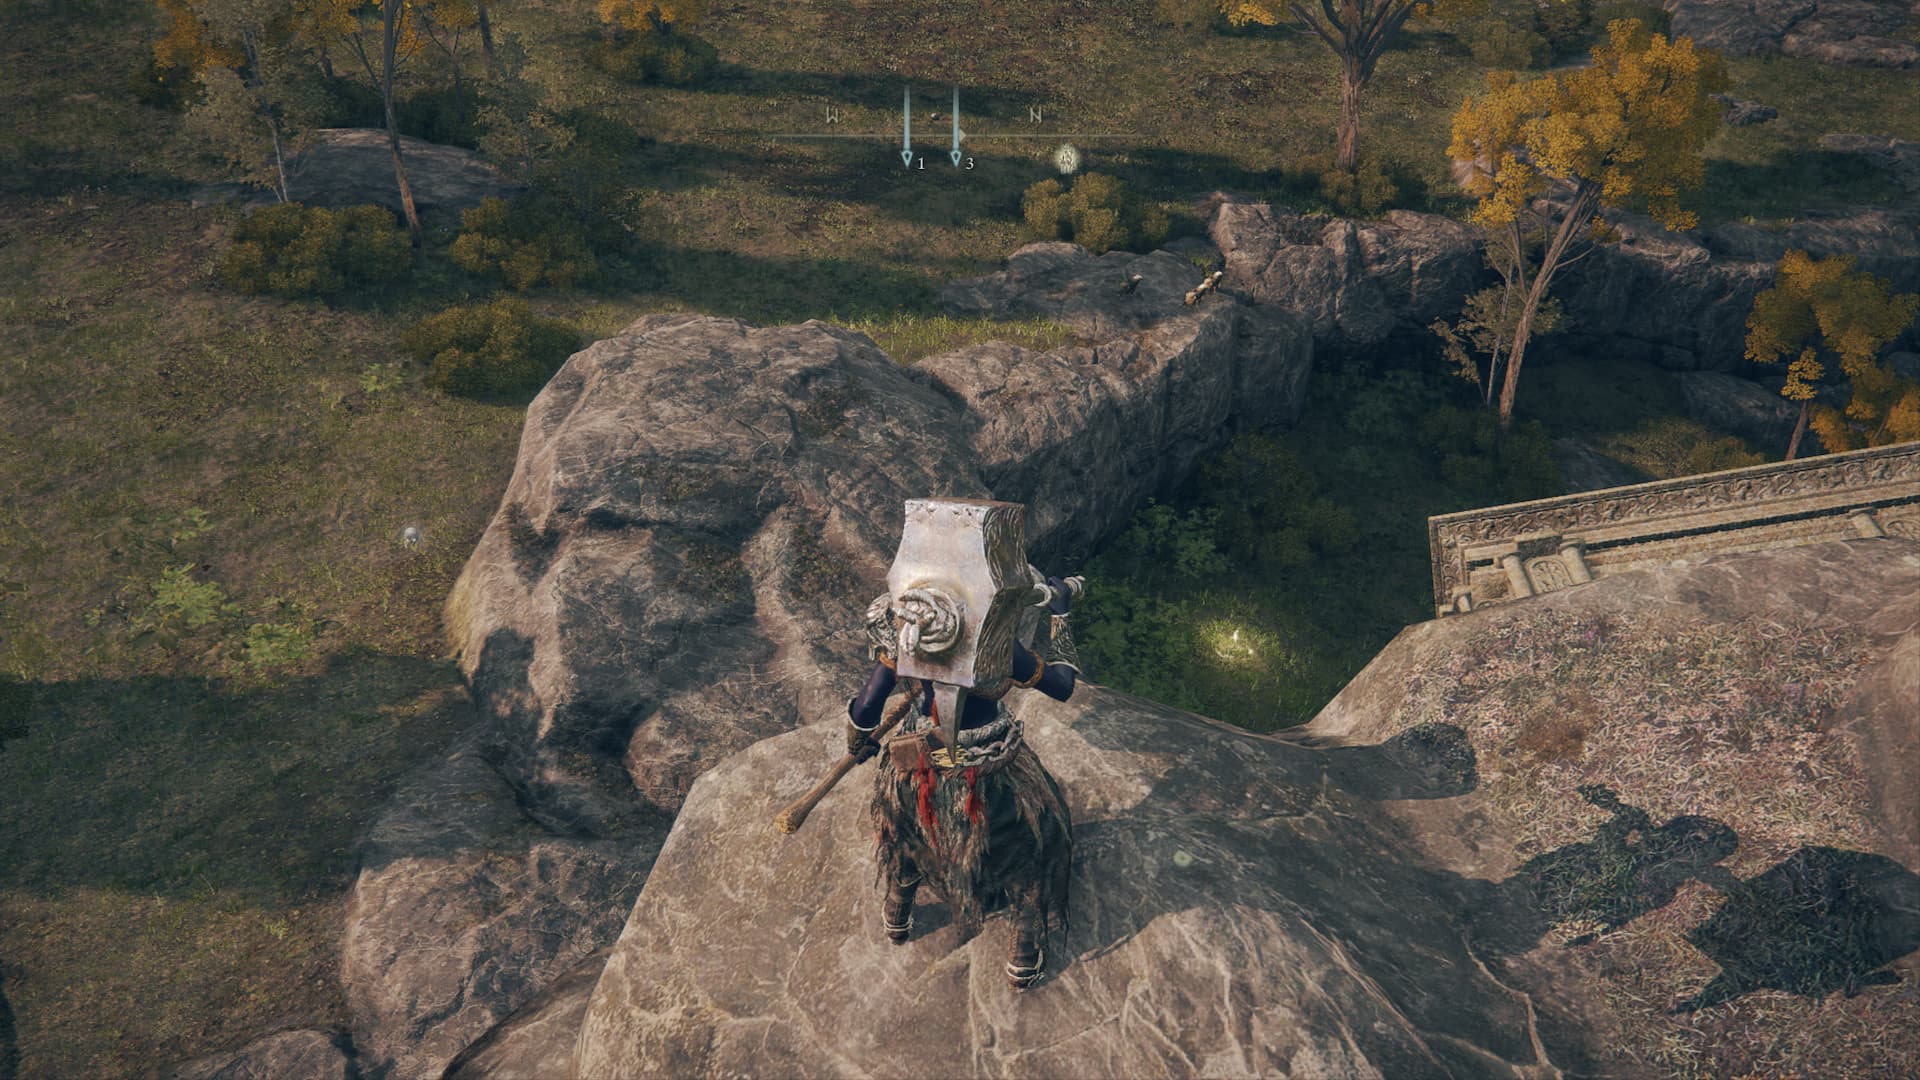
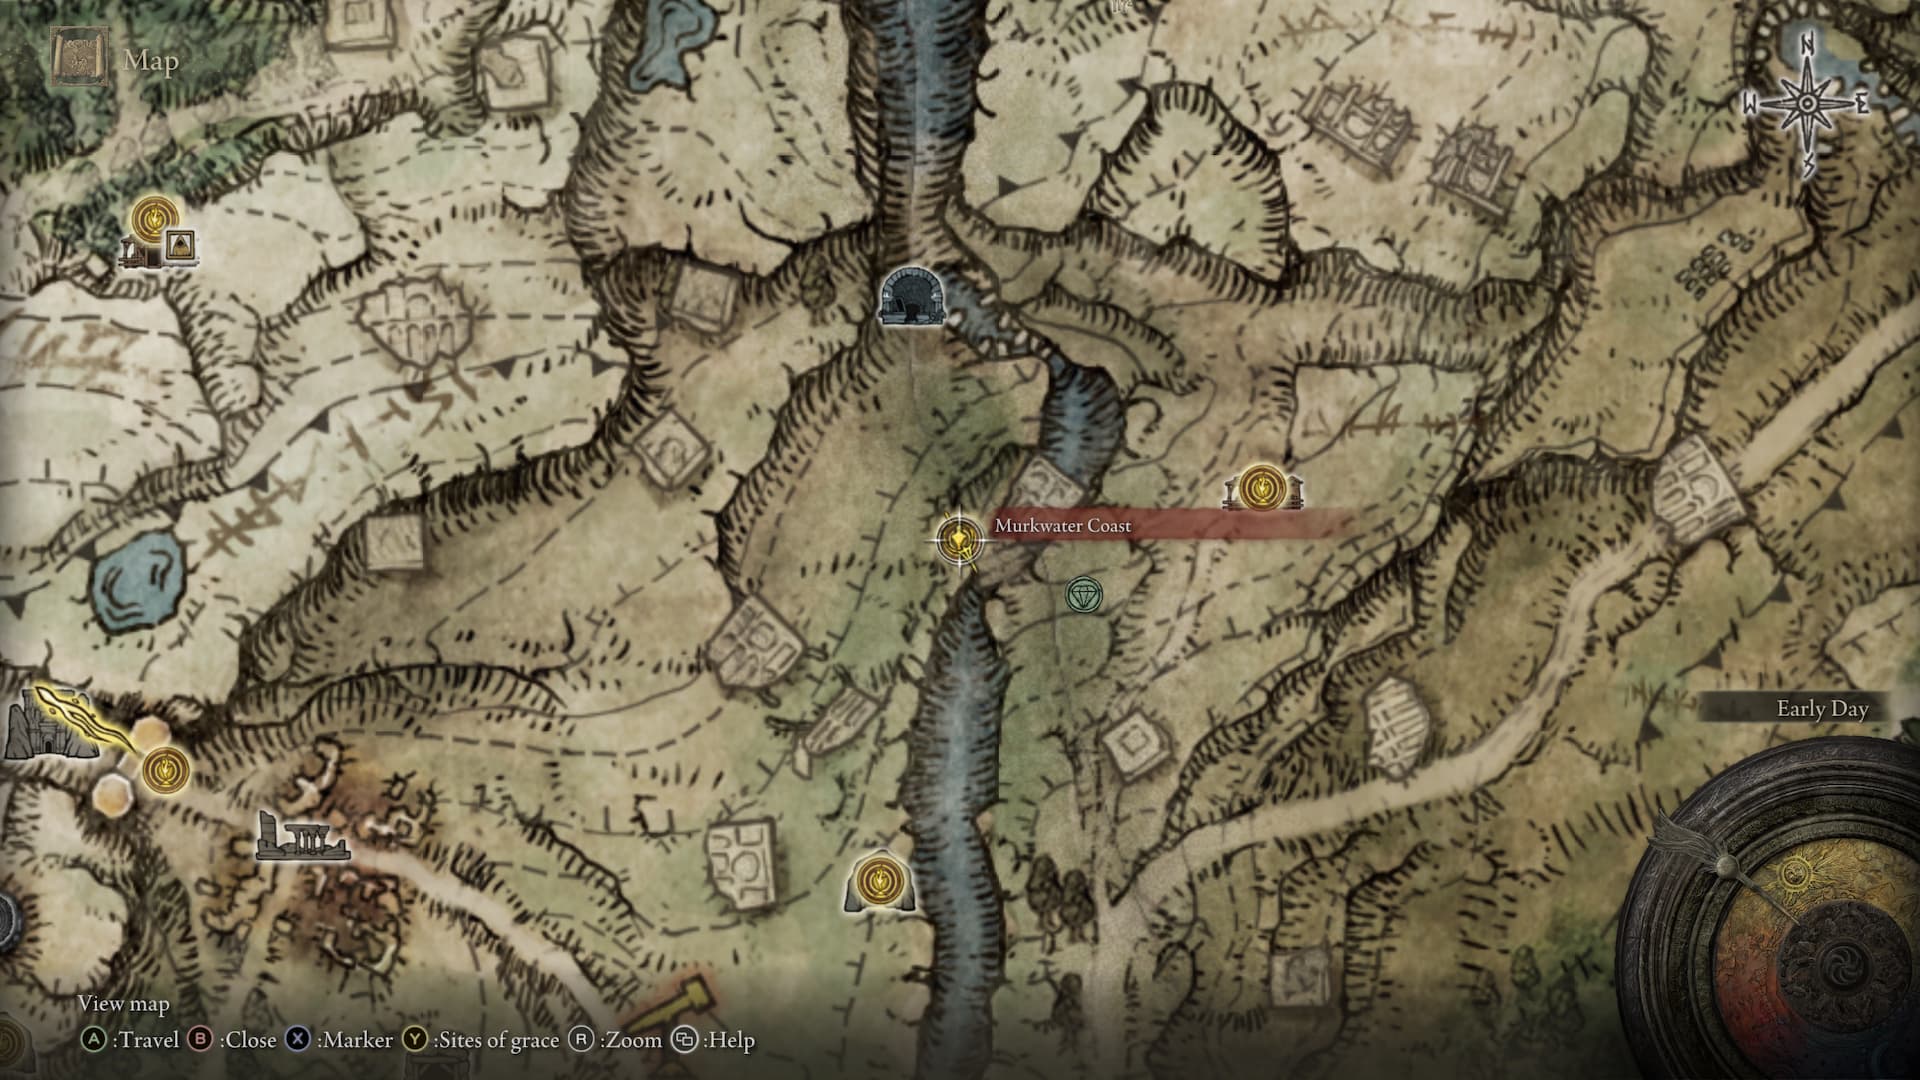
From this vantage point you can see a new site of grace by traveling west towards the edge of the cliff. When you reach the end, look right toward the ruined structure to see the Murkwater Coast site of grace. Jump down to activate it. When you’re ready, head south to find the road that leads back west to the Gatefront Ruins.
Hop down to grab the Murkwater Coast site of grace The emblem is the scarab and it located between the Artist’s Shack and the Murkwater Coast site of grace
The road from Gatefront Ruins that leads southeast, past the bridge, and to Waypoint Ruins, is where you can find a carriage being drawn by two giants. Ignore the giants for now, and focus your attention on the enemies guarding the carriage. Don’t hesitate to use your summons here to avoid getting overwhelmed, and try to deal with the mounted enemies first.
Note that the bridge you cross on the northern edge of the lake has a boss you can face — one of the Night’s Cavalry. he only appears at night, so if you want to find him, you can rest at a nearby site of grace and then go fight him. If you defeat him, you’ll get 2400 runes and the Ash of War: Repeating Thrust.
Once the only thing left is the giants pulling the carriage, attack a giant’s leg and quickly roll out of the way as an angry stomp will follow. This will stop the carriage, which will allow you to open the chest in the back containing the Greataxe. Once you’re done looting, continue heading southeast to Waypoint Ruins.
At the center of these ruins, you can find the remains of a small square building, with a set of stairs leading underground. By going down the stairs, you will reach the MadPumpkin Head boss fight.
In the room behind the boss, Sorcery users will gain access to Sorceress Sellen, who will offer a good selection of sorceries — she is also the person you can bring scrolls you find, allowing her to teach you additional spells.
Go back up the stairs, and leave the Waypoint Ruins by following the road back to the Agheel Lake North site of lost grace. On the other side of the bridge you will find a rolling enemy that drops an Ash of War when slain, and to the right side of the road you should notice a talking bush trying to get your attention.
Once you find the talking bush, you will have to roll into it to reveal Boc the Seamster, a demi-human that has been transformed into a bush against his will. By exhausting the dialogue with him, he will mention the Coastal Cave, and you will be able to find him at its site of lost grace. Travel to the Coastal Cave site of lost grace, and interact with Boc the Seamster nearby to give him the Sewing Needle, which you acquired earlier by defeating the Demi-Human Chiefboss. Make sure to exhaust all of his dialogue before moving on.
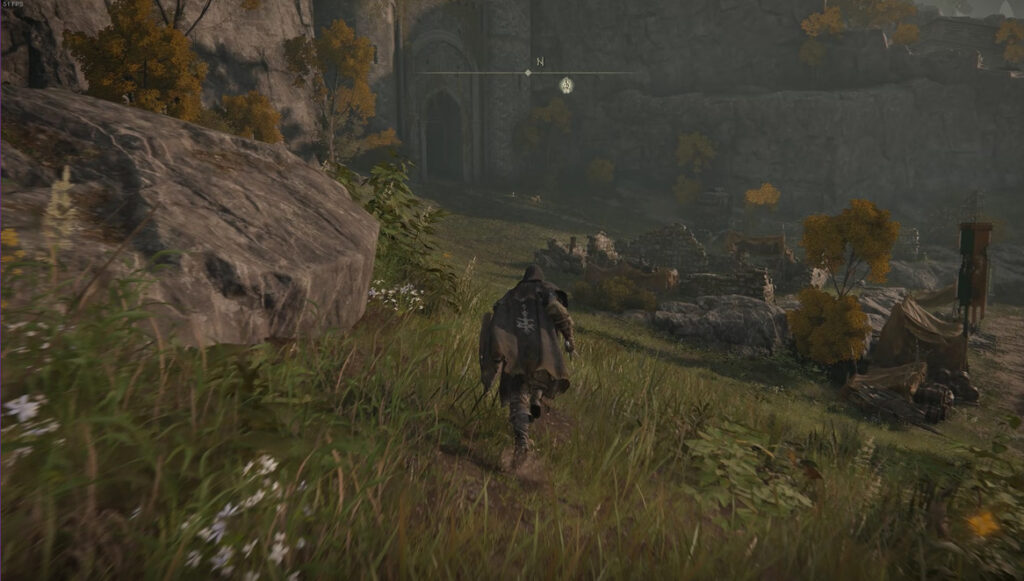
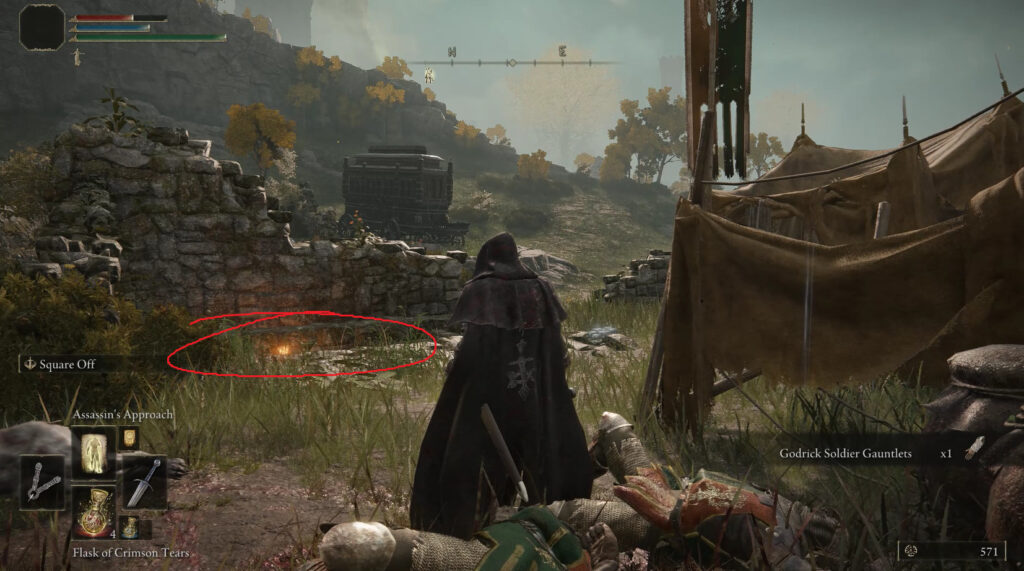
Further north there’s an enemy camp between two broken tower pieces — here you can find the Armorer’s Cookbook [1] on a corpse. It’s on the right side of the camp (if you enter from the south). If you plan on just riding through and grabbing the loot, be careful — the enemies here are very good at dismounting you.
Location of the Armorer’s Cookbook [1]
Northern Limgrave
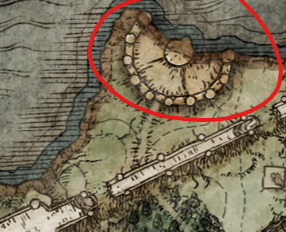
Now teleport to the Agheel Lake North site of grace, then follow the road east over the bridge, then take a left to head north when the road forks. You’ll soon come to an arch that stretches over the road. Go off the road to the right and make your way up onto the arch. There you’ll meet Kenneth Haight, who wants you to clear out his fort. Say yes to him and exhaust his dialog, then look north — you should see a graveyard just across the small gap. There you’ll find the Fevor’s Cookbook [1] as well as the usual assortment of Golden Runes.
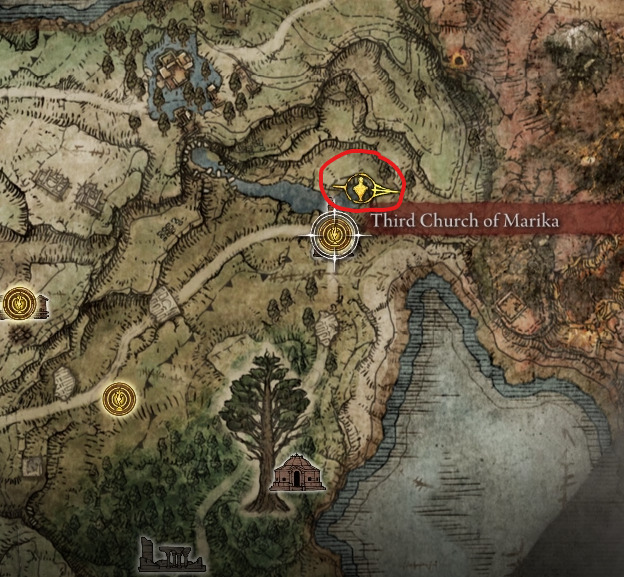
Head back past Kenneth and down to the road below him, then continue north along the road. You’ll run into a giant — he doesn’t drop anything good, so feel free to go around him. You’ll soon reach the Third Church of Marika — head into the ruins to activate the site of lost grace, grab the Flask of Wondrous Physick, and the Crimson Crystal Tear, as well as a Sacred Tear. The flask is an item that can be equipped with various tear items while resting at any site of grace — the first tear you get allows the flask to heal half of your HP, so it’s a good idea to make your mix now (and put the flask somewhere in your tool slots or pouch).
The Church of Marika
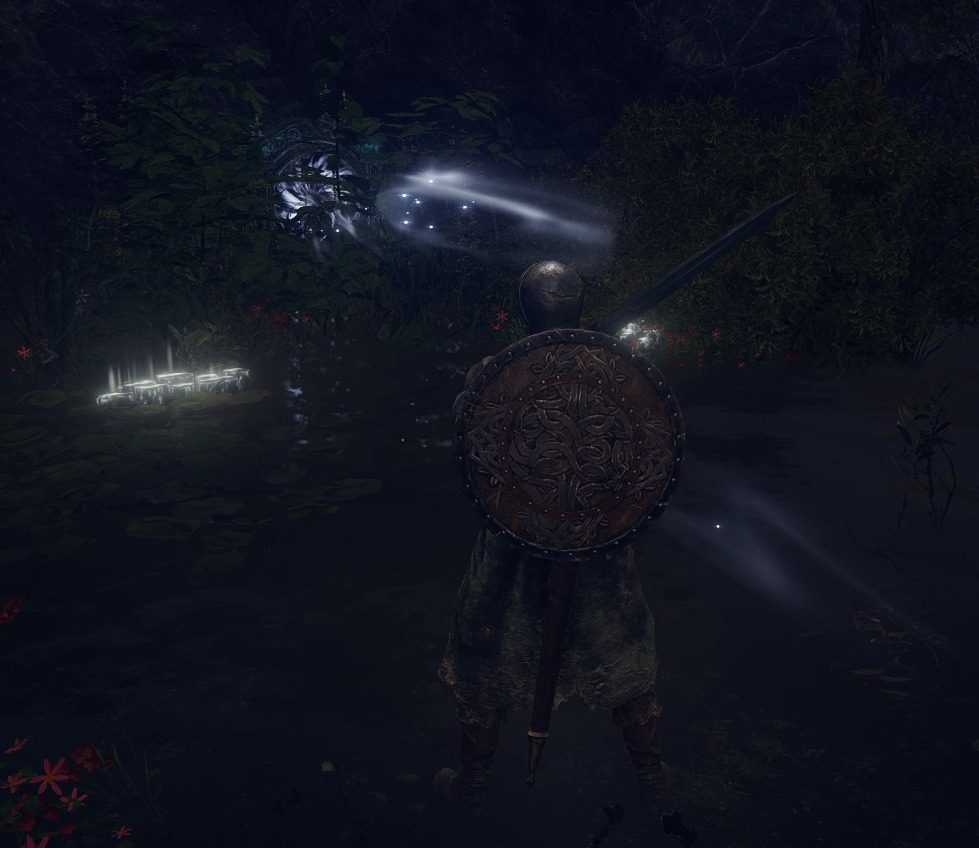
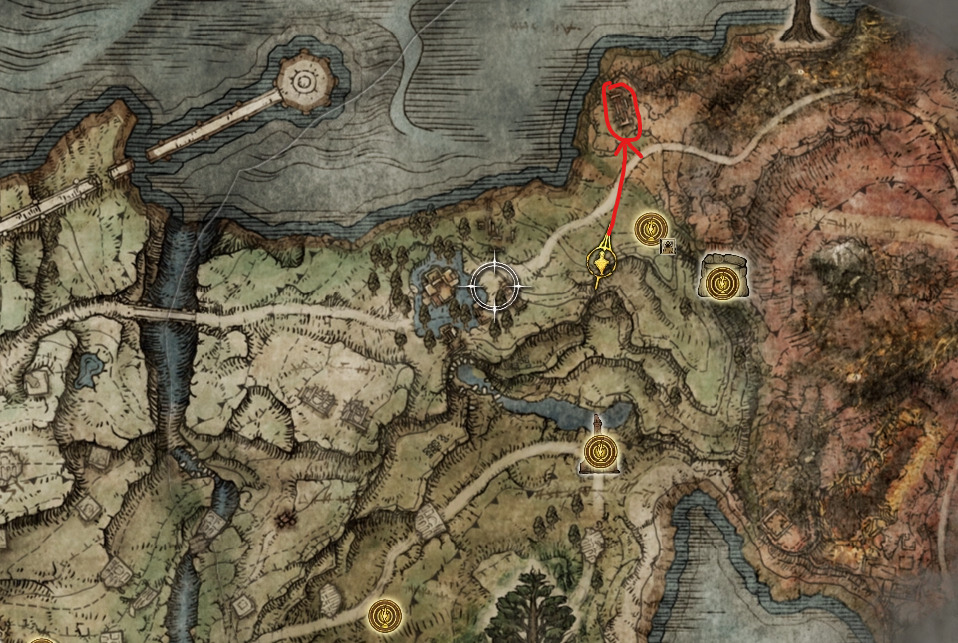
From the Third Church of Marika site of grace, head north-northeast to the nearby river to find a small portal hidden behind some bushes.
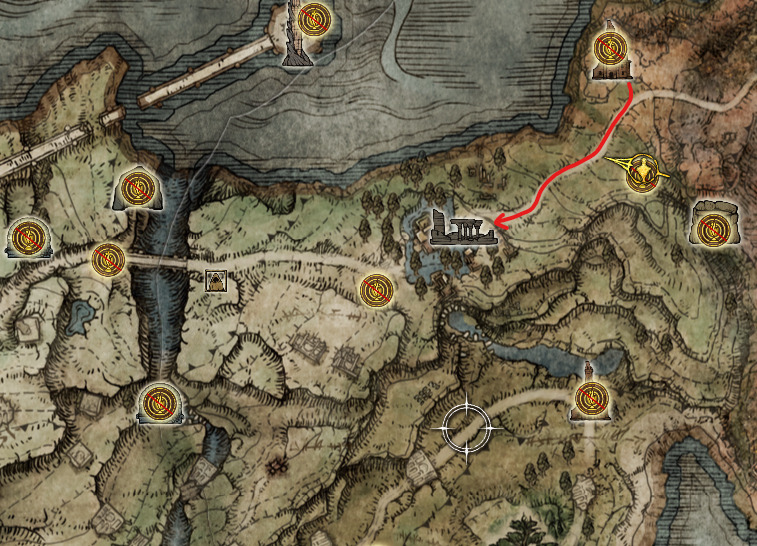
Interacting with this portal will send you to the Bestial Sanctum, where you can bring Deathroot to the NPC there in exchange for various rewards. For now, just grab the site of grace, and then teleport back to the Third Church of Marika site of grace.
NOTE: You will soon have another interaction with Melina when you rest at a site of grace (although perhaps not your very next one — we’re still trying to figure out the timing). She’ll offer to take you to Roundtable Hold, which will be the main hub for the rest of the game, and has several helpful NPCs such as a blacksmith that will allow you to upgrade your weapons. Accept her offer, exhaust the dialogue with all of the NPCs, and explore the whole place once you get a chance to go there.
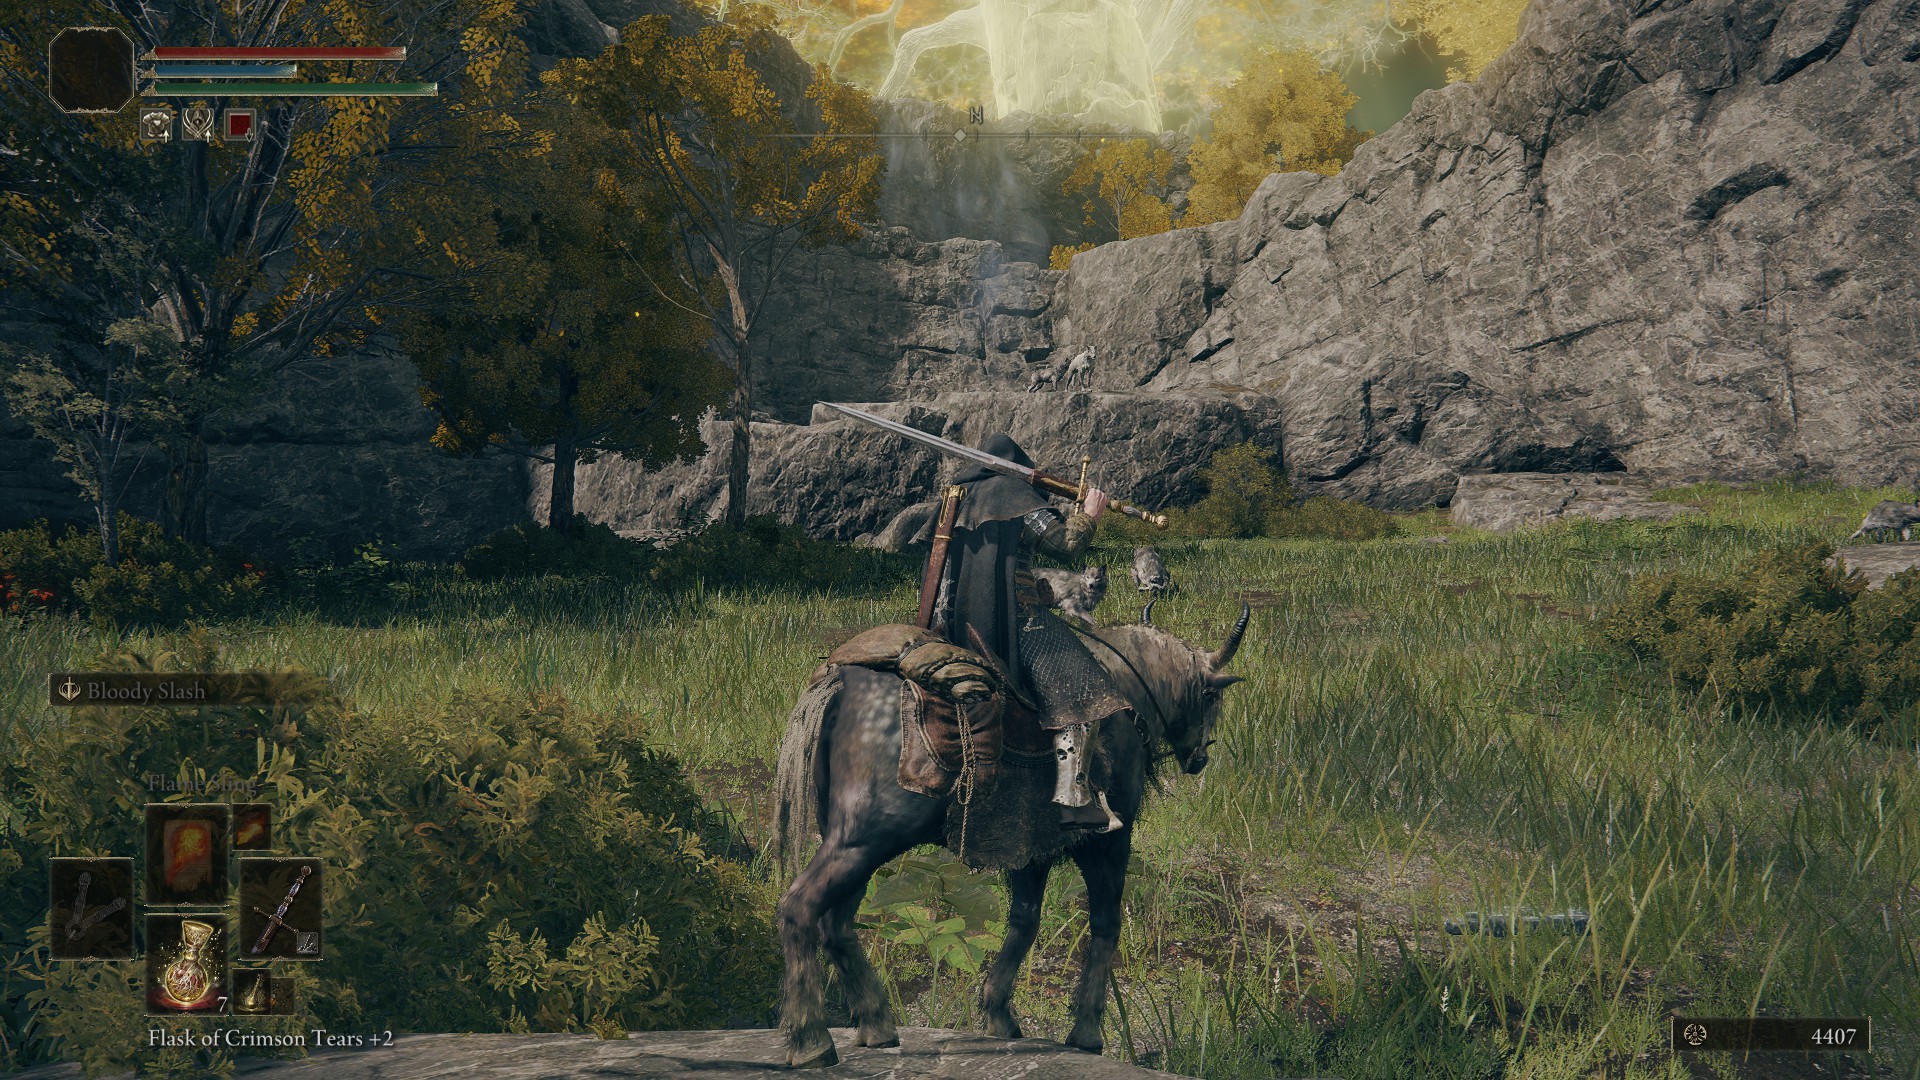
Leave the church from the western archway, then head north across the river towards the broken wooden fences. Follow the path between them up the hill (heading northeast) and you’ll quickly see a loot beetle — smack its ball until it drops you the Ash of War: Sacred Blade. Now take the Spiritspring jump that was just to the left of the loot beetle to go north further up the cliff, then north again past the pack of wolves to the next spiritspring jump.
Use the Spiritspring to jump up north to the cliff, and you’ll land near another Spiritspring. Take that one north as well, and from there, continue heading north until you reach the Smoldering Church.
While inching closer to the church, you will be dismounted and will remain unable to call Torrent until you deal with the incoming invader: Anastasia, Tarnished-Eater. However, they will not be appearing straight away, which you should take advantage by running inside of the church and activating the Smoldering Church site of grace. This way, even if you end up dying to the invader, you will be able to respawn close by and try again until she dies. Defeating her will grant you the Sacred Scorpion Charm, and you’ll be able to grab Nomadic Warrior’s Cookbook [14] as well as Missionary’s Cookbook [3] on two corpses inside of the church.
East of the church is another zone, Caelid, which we’ll explore later during our playthrough. For now, head west and you’ll soon reach Summonwater Village, where an easy boss is going to give you some sweet loot.
Stay mounted as you enter the village — soon, a boss in a ghostly boat will spawn. Summons are available here, so bust out any Spirit Ashes you like, then focus on taking the guy in the boat down. He’ll spawn skeletons, but you can mostly ignore them unless they crowd around the boss in the boat. He has a few attacks, but they’re all slow and involve his boat slamming down, so just back way off when the boat starts to rise and you should be fine. Sometimes he’ll teleport to another part of the village and you’ll have to go find him; just keep in mind that he can only hang out in water, so don’t bother exploring any dry land. Once he’s defeated, you’ll receive a Deathroot and the Skeletal Militiaman Ashes.
The Deathroot can be brought to the NPC in the Bestial Sanctum we teleported to earlier in the guide for a reward — it’s the site of grace way to the northeast that’s probably on an unrevealed part of your map.
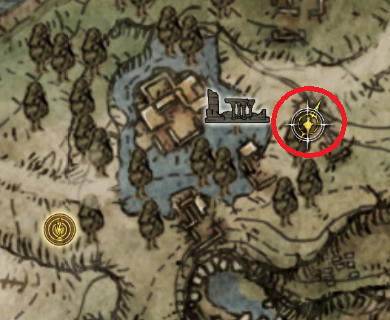
If you have a Stonesword Key, you can head to the eastern part of the ruins, where you’ll find two turtles in a ruined building. They’re hanging out near a Stonesword Imp — you can spend one and head down the stairs to find the Green Turtle Talisman.
The location of the Green Turtle talisman
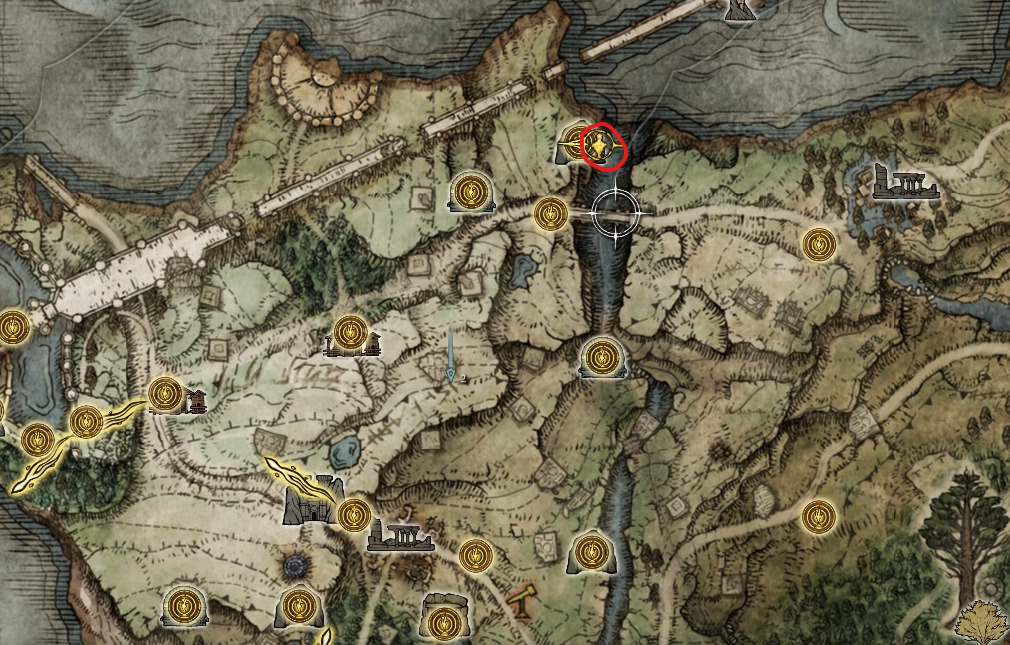
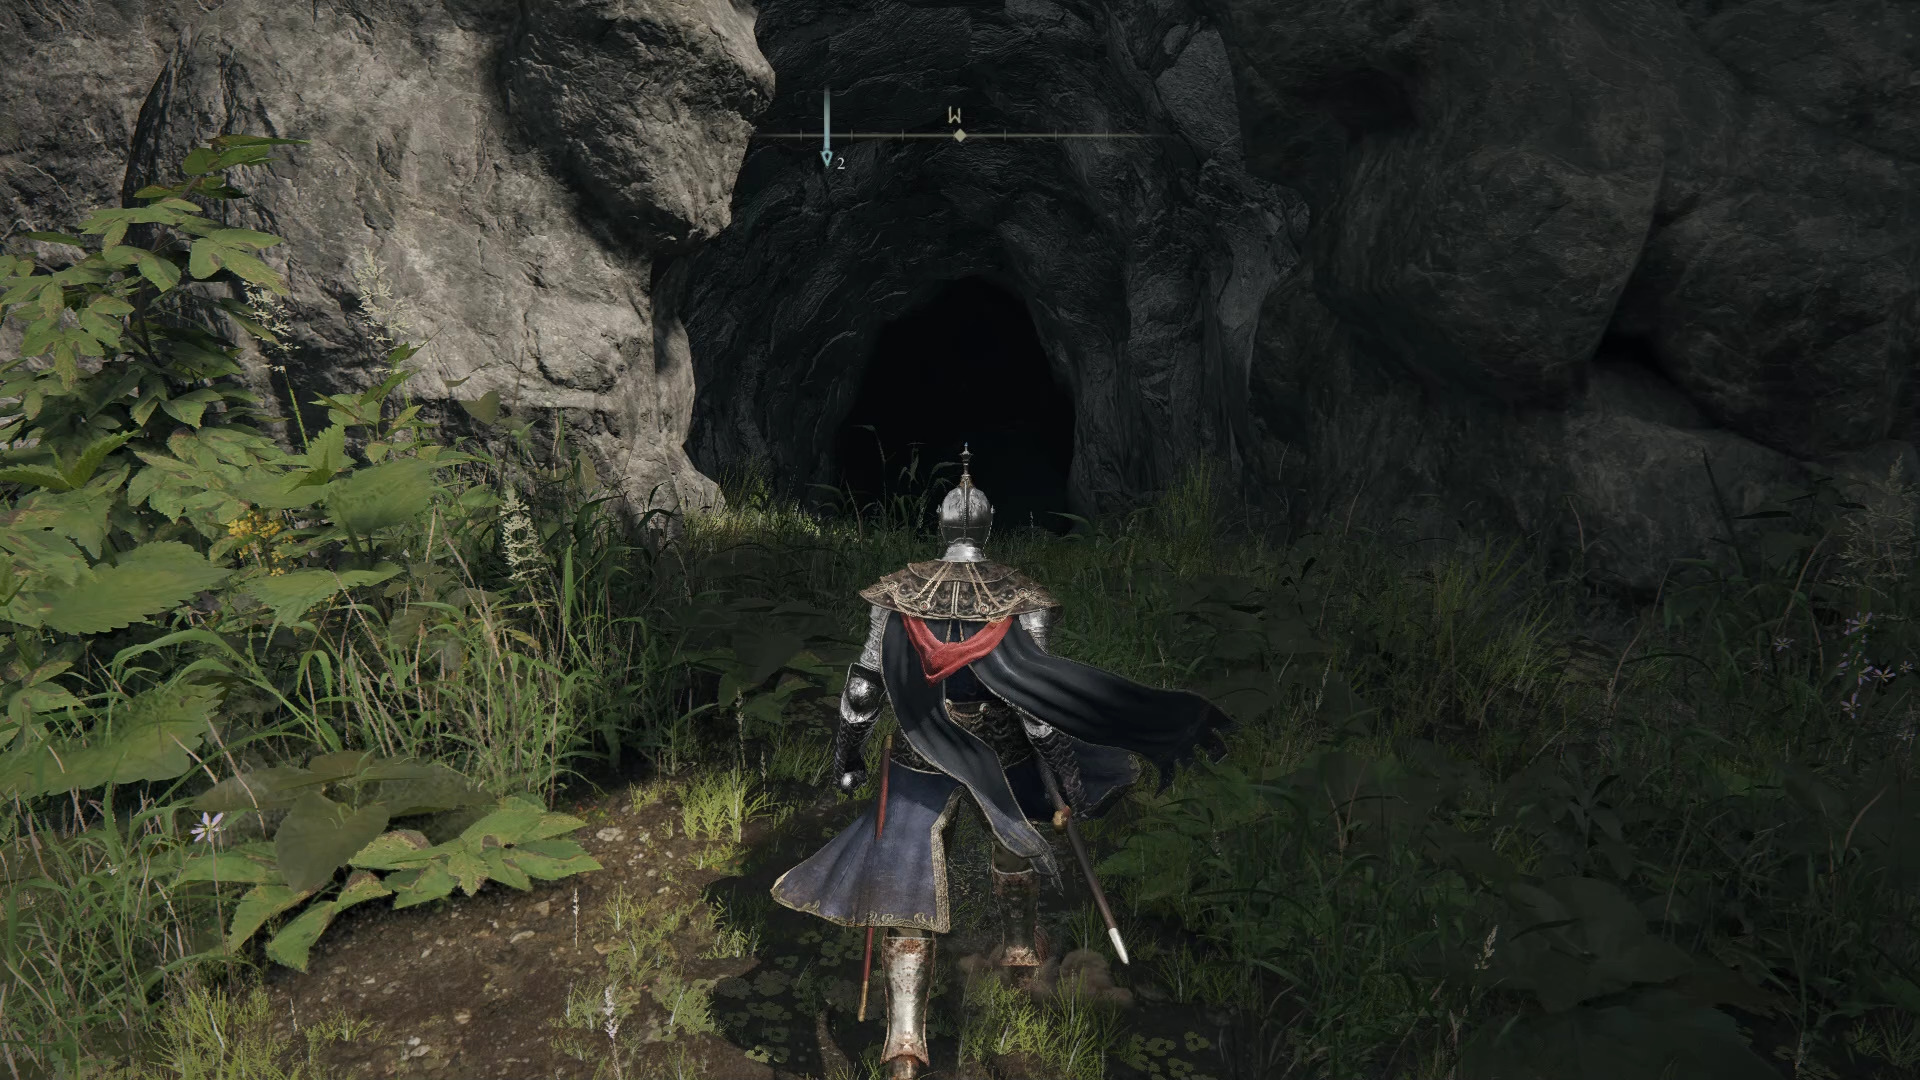
Leave the ruins heading west on the road and grab the Summonwater Village Outskirts site of grace — its to your left by the broken fence. Continue west on the road and you’ll soon see a campfire on your left. Stop here and see if you want anything the Nomadic Merchant is selling (he’s got the Nomadic Warrior’s Cookbook [3]), then continue west across the bridge — you can ride past this pumpkin-head enemy if you want — and grab the Saintsbridge site of grace. Now go back and look for a spirit spring south of the bridge. Make sure that you’re riding Torrent, and double jump towards the spirit spring to safely land at the bottom of the ravine. From there, start heading north until you find the entrance to another dungeon: the Highroad Cave.
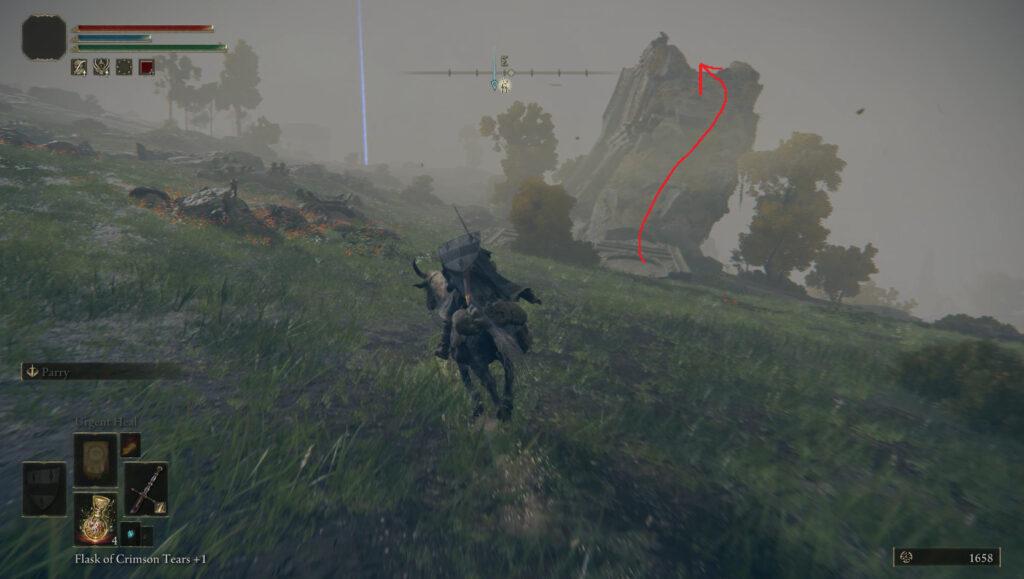
Coming out of the Highroad Cave dungeon, travel back to the Saintsbridge site of grace and you’ll hear someone calling for help — continue up the road until you find rocks on the left side that you can jump on:
The path from another angle
Continue forward (east) up the path and you’ll find a pot with arms stuck in the ground. Speak with him and he’ll ask you for help — agree to do so, then walk behind him and do a charged attack or two. He’ll pop out and give you the Triumphant Delight emote and some Exalted Flesh (don’t ask where he got it). Exhaust his dialog, then go back the way you came. Now continue forward a bit further, and look for a similar path, this time on the right side of the road:
Once you’re close to the enemy camp, look right……and find this path that leads up some rocks.
Once you’ve climbed up the rocks, you’ll find a wooden door on your left that leads to the Deathtouched Catacombs.
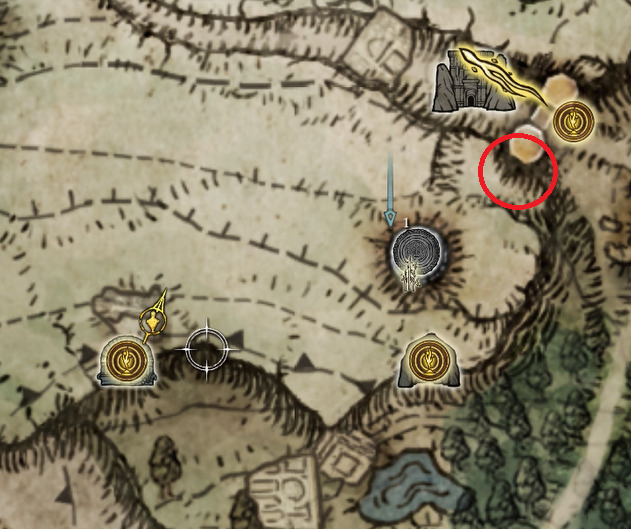
From the entrance of the Deathtouched Catacombs, ride north-northeast under the large (and broken) stone bridge, into an open field littered with fragments of giant skeletons:
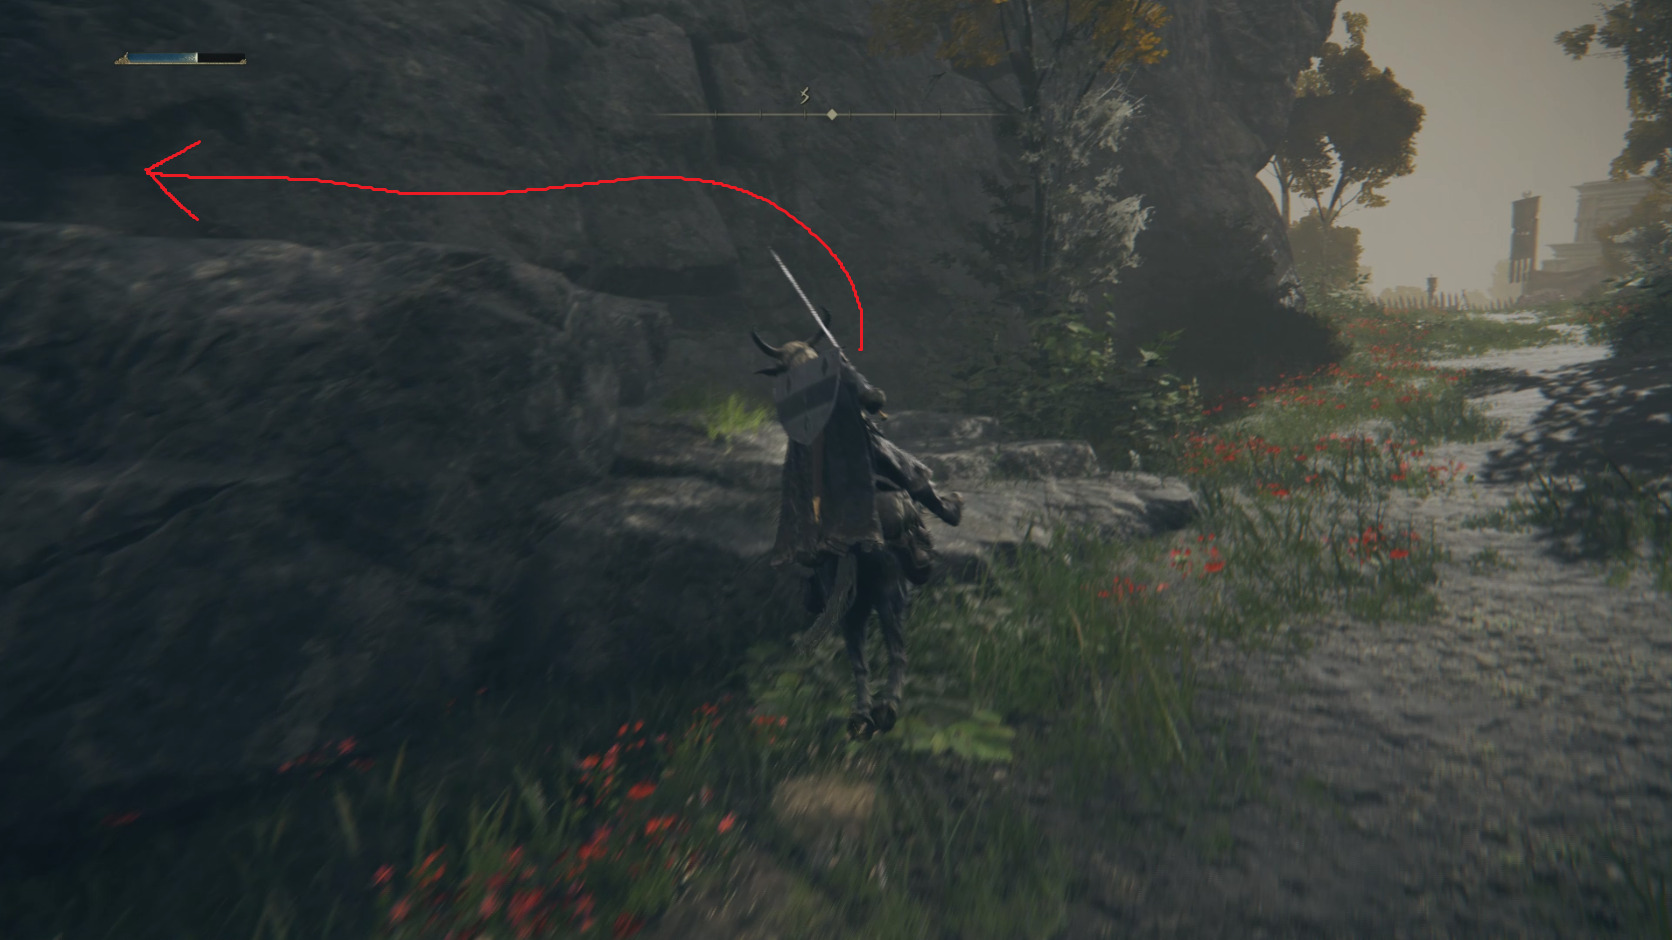
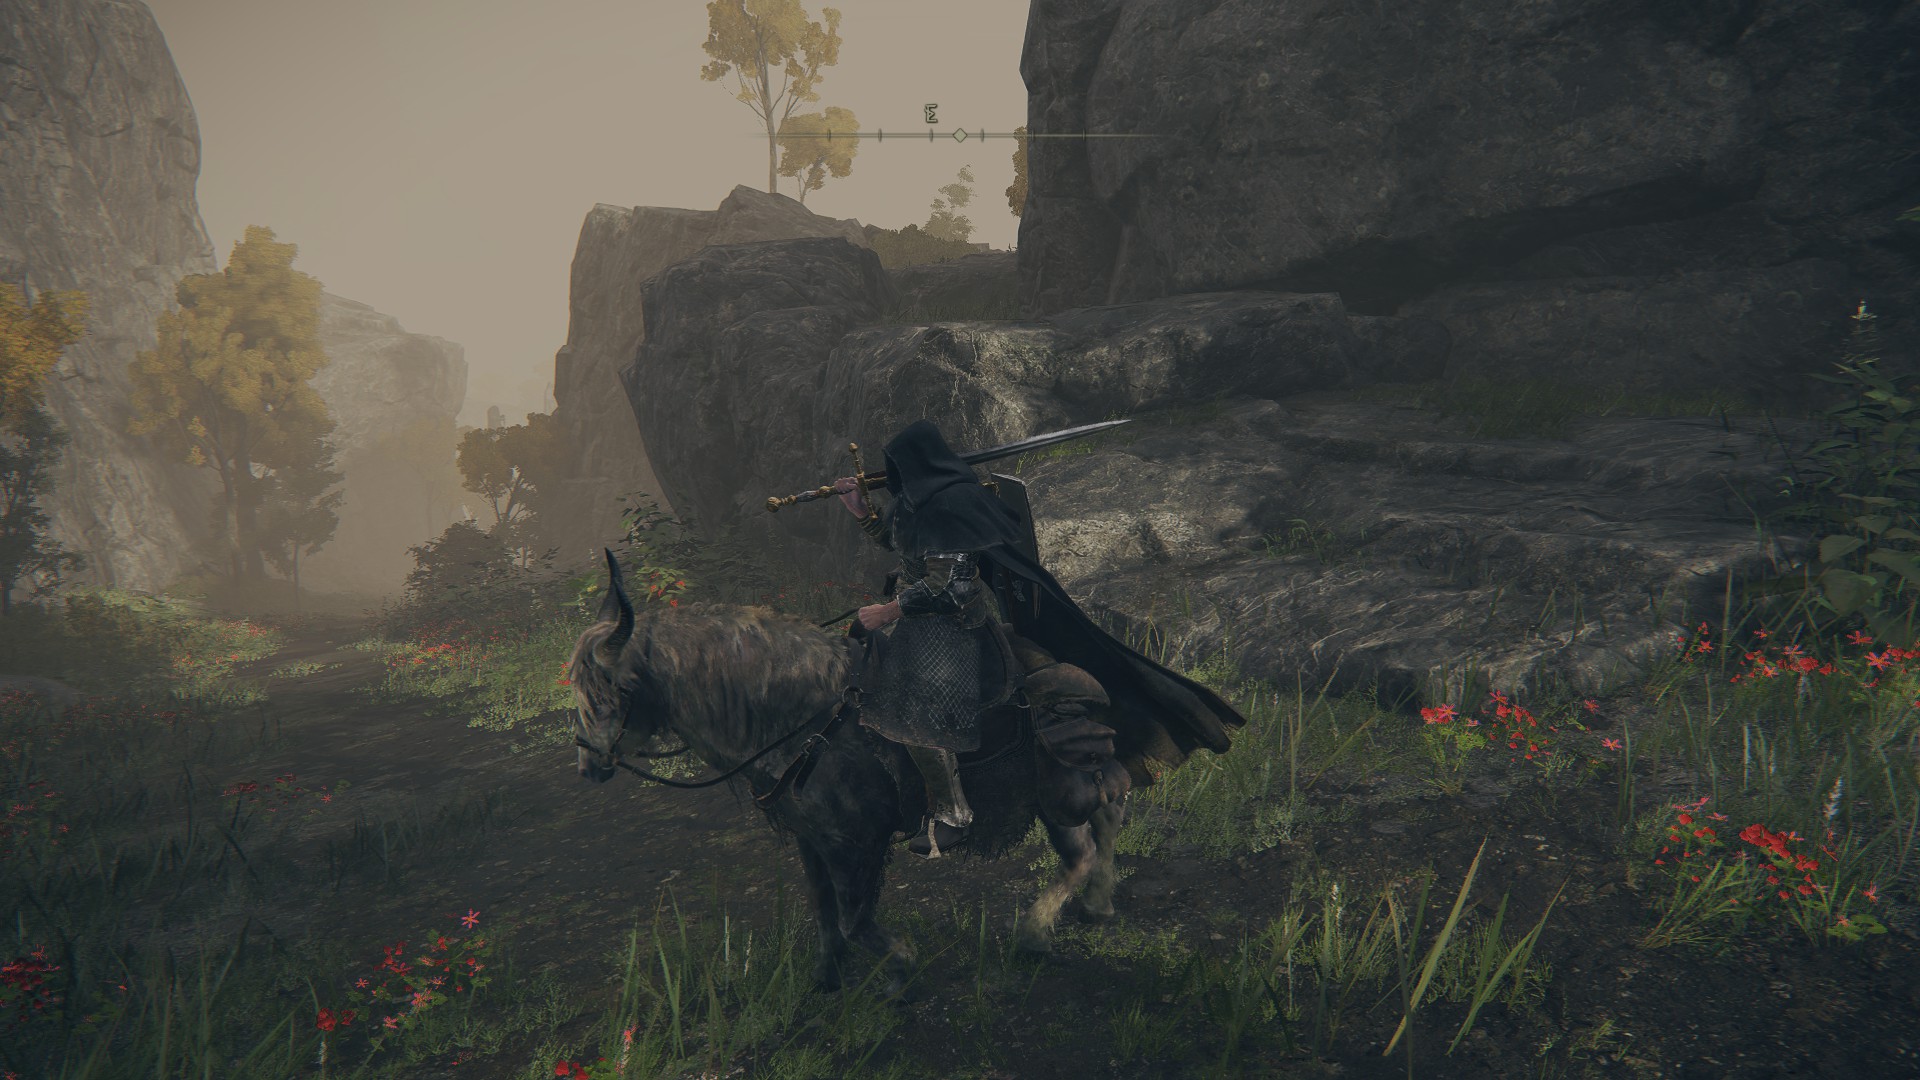
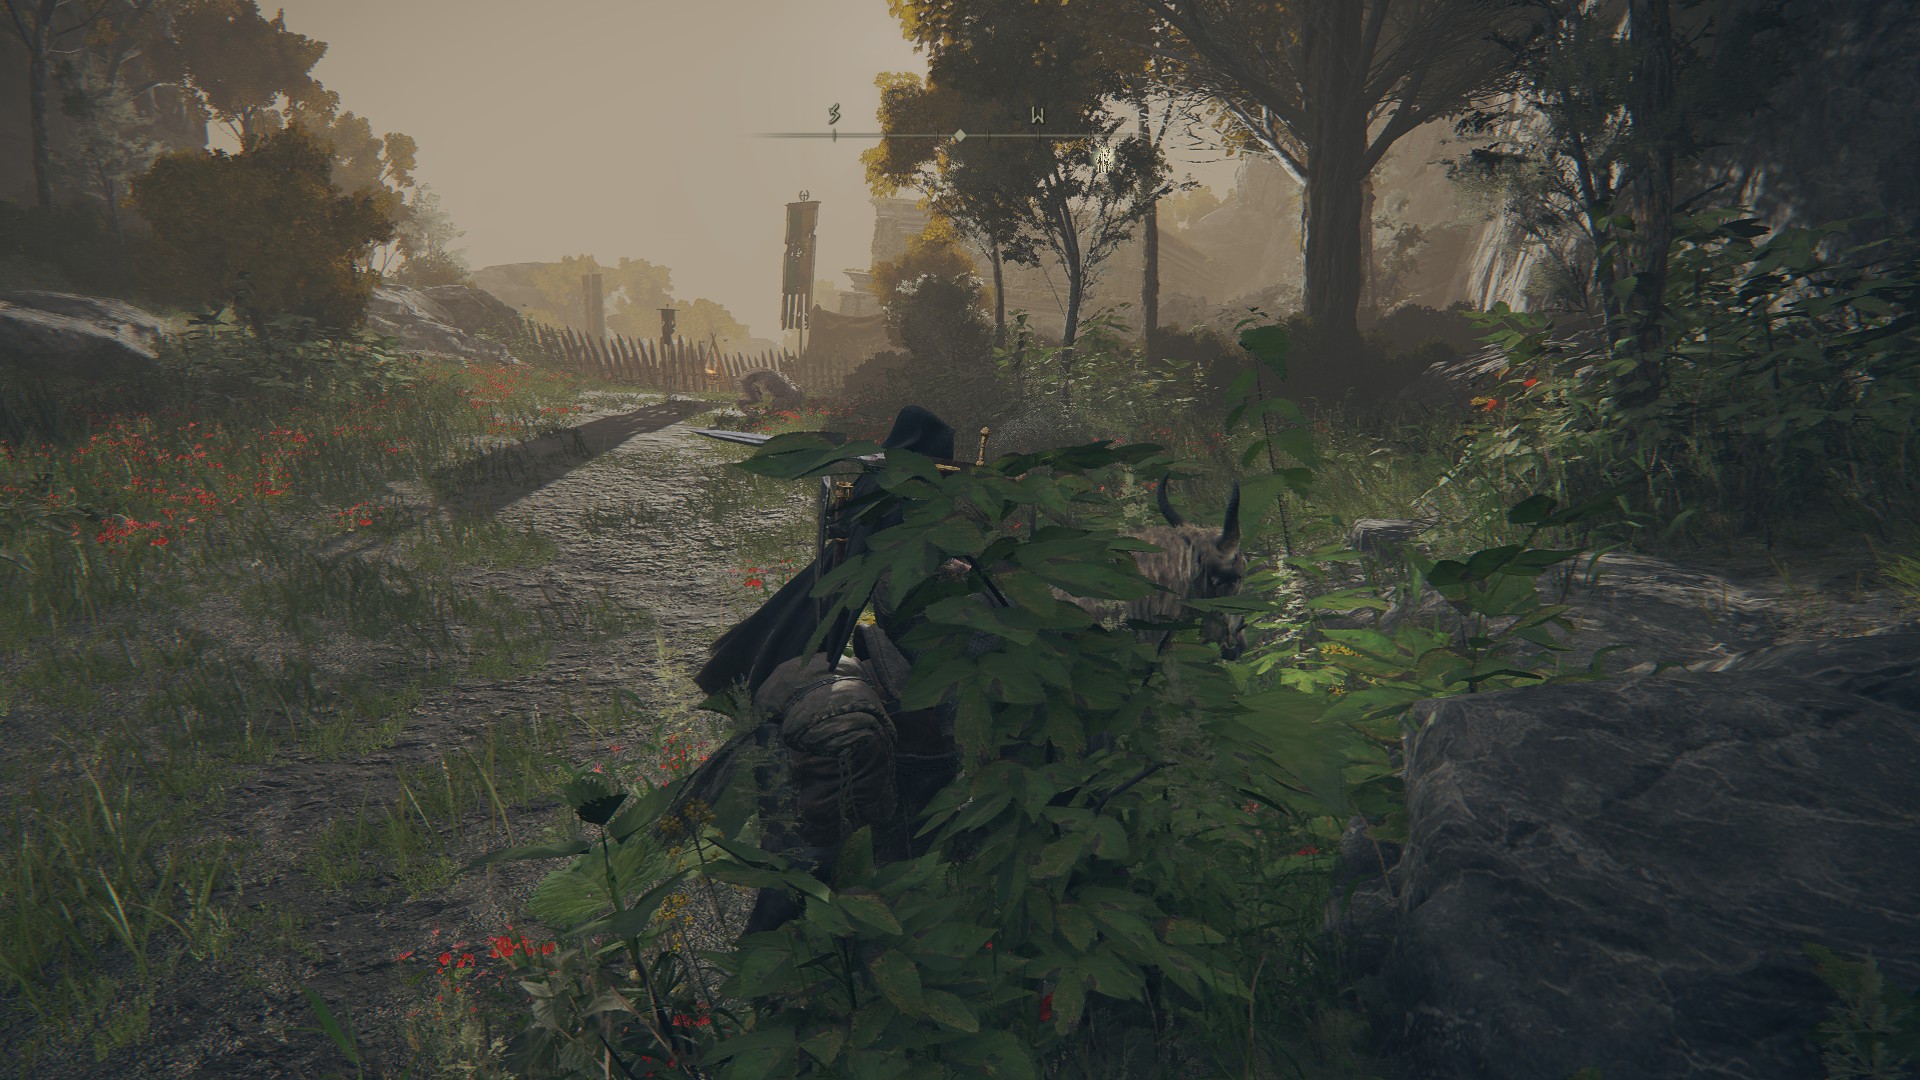
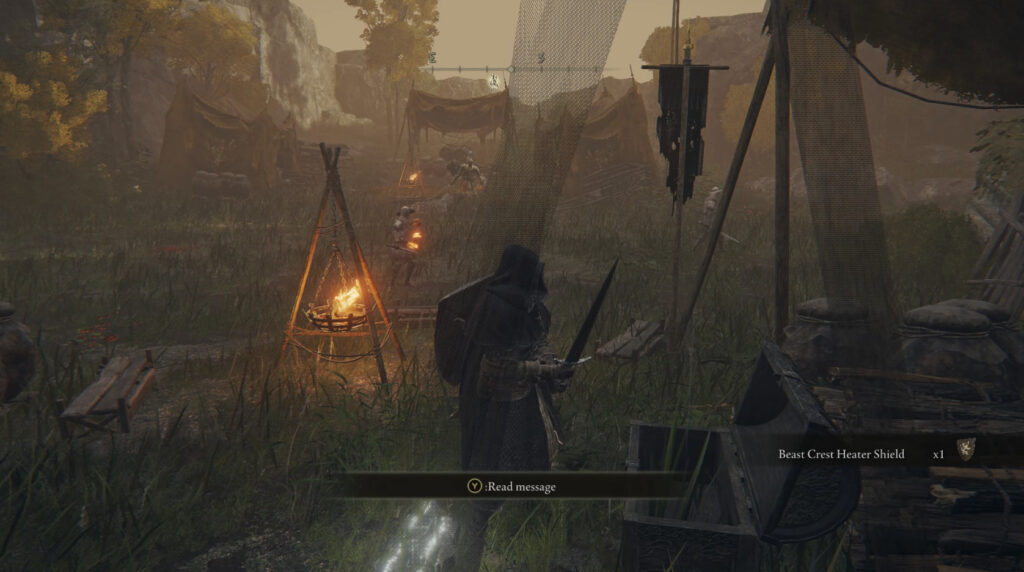
There’s a sleeping giant in the field, and in the middle of the rib cage of a long-dead giant you can find the Lance Talisman. Ride away from the waking giant back the way you came. If you want to grab some Exalted Flesh and the Beast Crest Heater Shield, you can get both in the camp that lies just west, up the road from the Deathtouched Catacombs. There are plentiful bushes, and it’s possible to sneak between the patrols to open the chest — you’ll be found as you’re looting it, but you can simply mount up and ride away, grabbing the item on the corpse to the south as you leave.
The chest with the shield is on the northern side of the camp
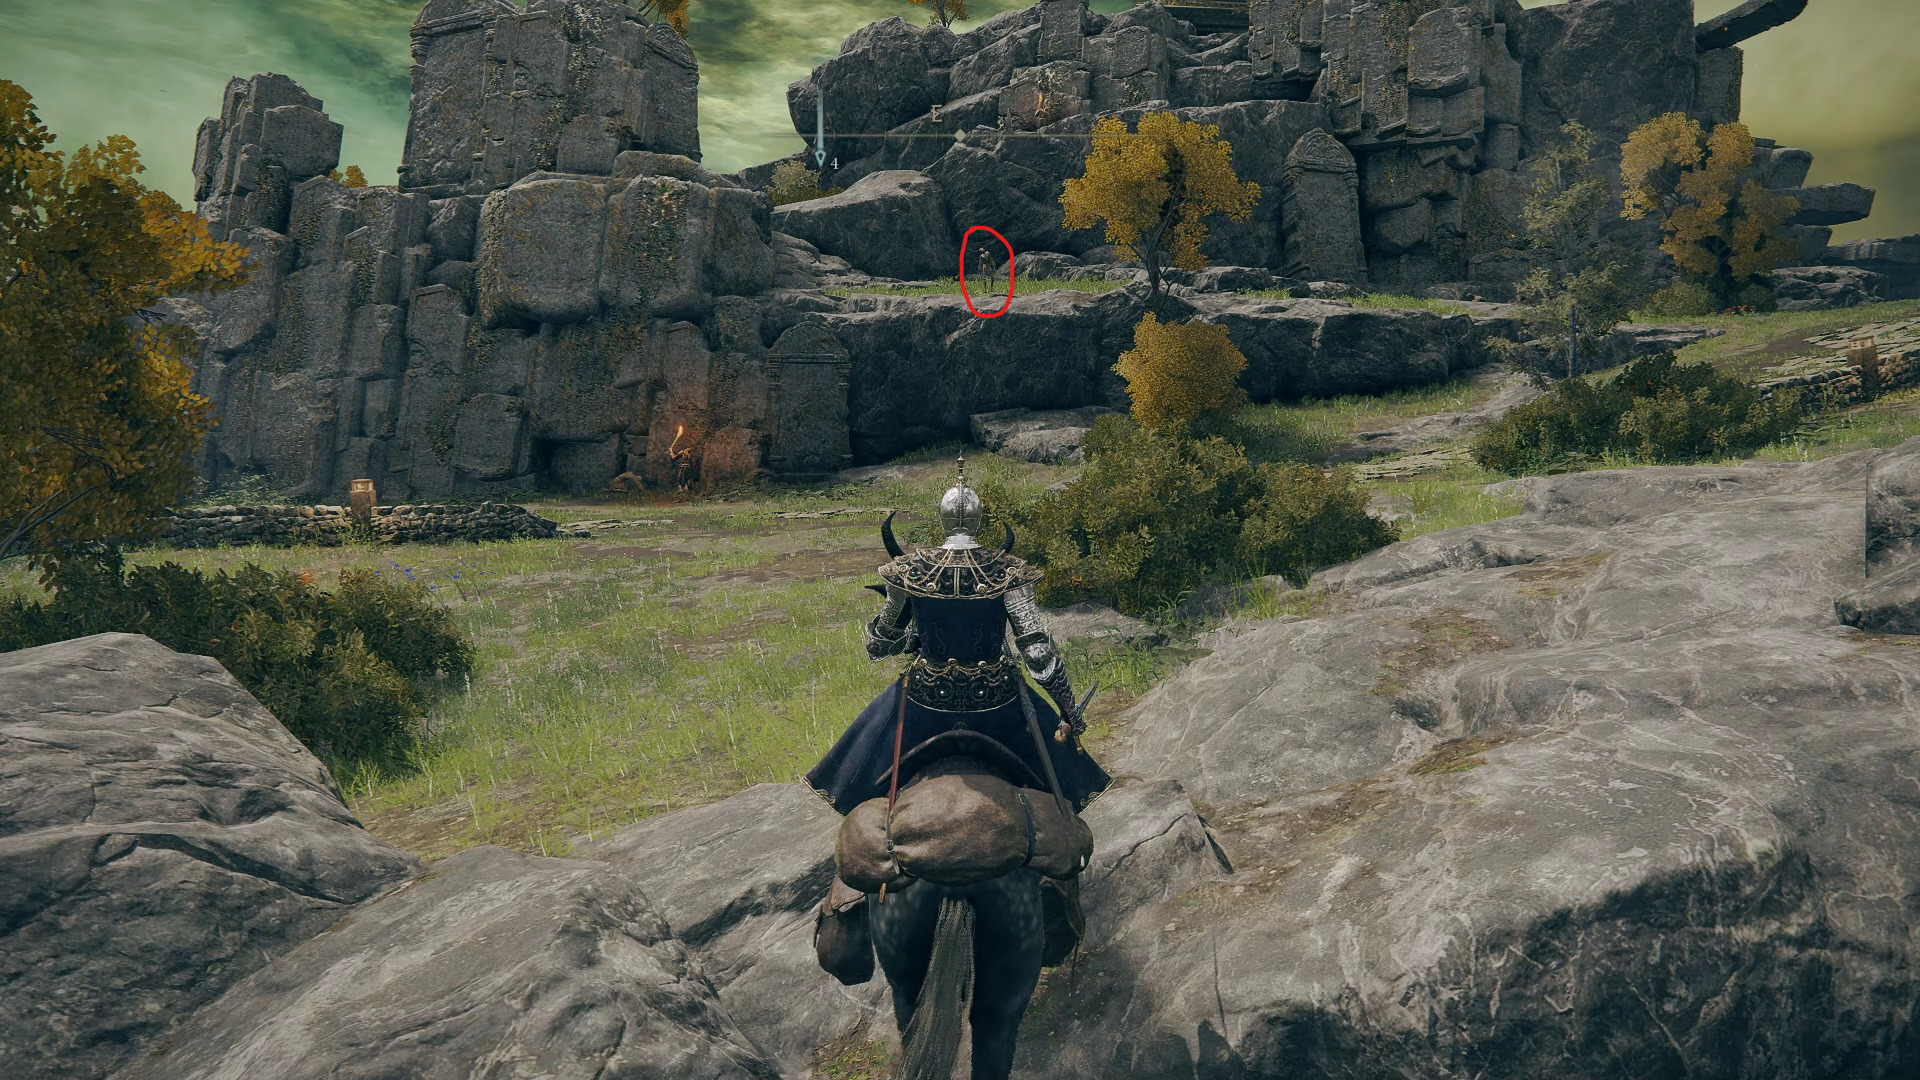
Lastly, on the hill north of the camp, you can find a patrolling knight (1) that drops the Ash of War: Golden Vow once defeated, a loot beetle dropping a Somber Smithing Stone [1] on top of the building next to the knight, and you’ll be able to jump on top of the roof of the structure inside of the camp to grab the Lance.
Next, head southwest to the path and turn left to go south — at the T-intersection, you’ll find the Warmaster’s Shack and its site of grace. Grab it and then go and speak with the NPC inside, Knight Bernahl.
Optionally, you can fight the Bell Bearing Hunter here. To get him to spawn, you’ll need to purchase something from Knight Bernahl in the shack, then teleport to a different site of grace, then teleport back and pass time until night — then the boss will spawn where Knight Bernahl was.
After defeating the Bell Bearing Hunter (or deciding to save that fight for later), there’s another night fight you can do. Once again, pass time until nightfall, and then head southeast to the nearby tower ruin chunk, where you can fight a Deathbird at night.
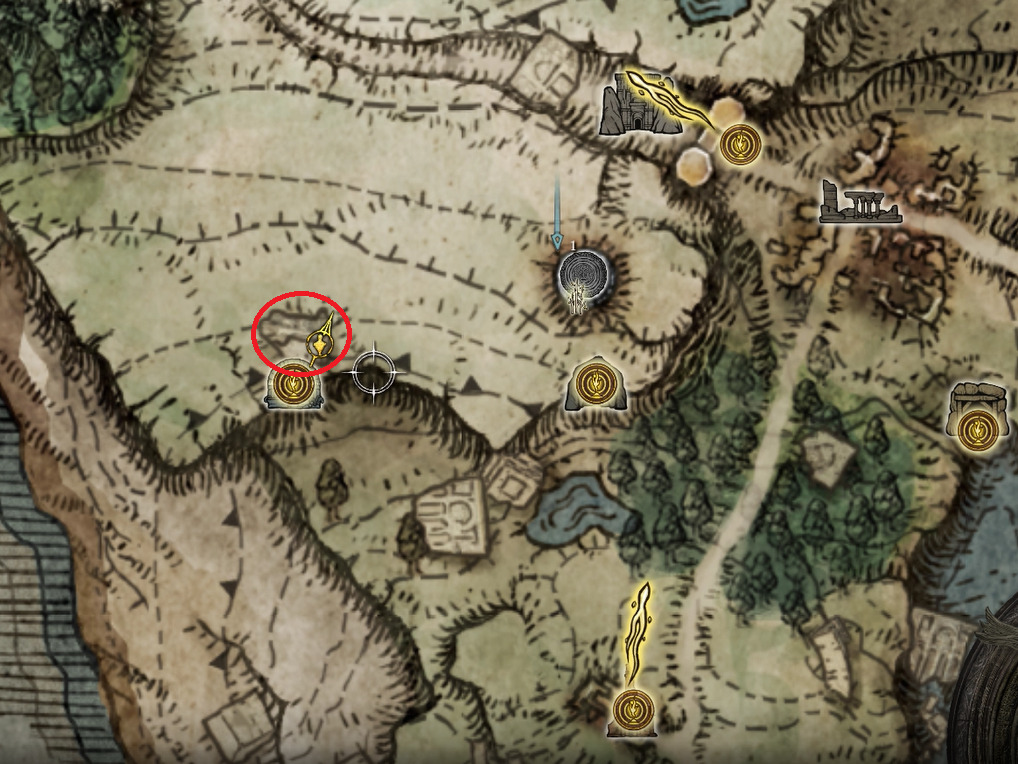
When you’re ready, teleport back to the Third Church of Marika. Once there, you can continue on the road that heads due south into the forest. You’ll soon reach another monument that has the second Map Fragment — grab it and then take the left-hand fork to head south to the Minor Erdtree. At its base just to your right you should find boththe Greenspill Crystal Tear and the Spiked Cracked Tear. Grab them and go southwest back to the road — there should be a rolling ball that contains the Ashes of War: Ground Slam in between you and the road.
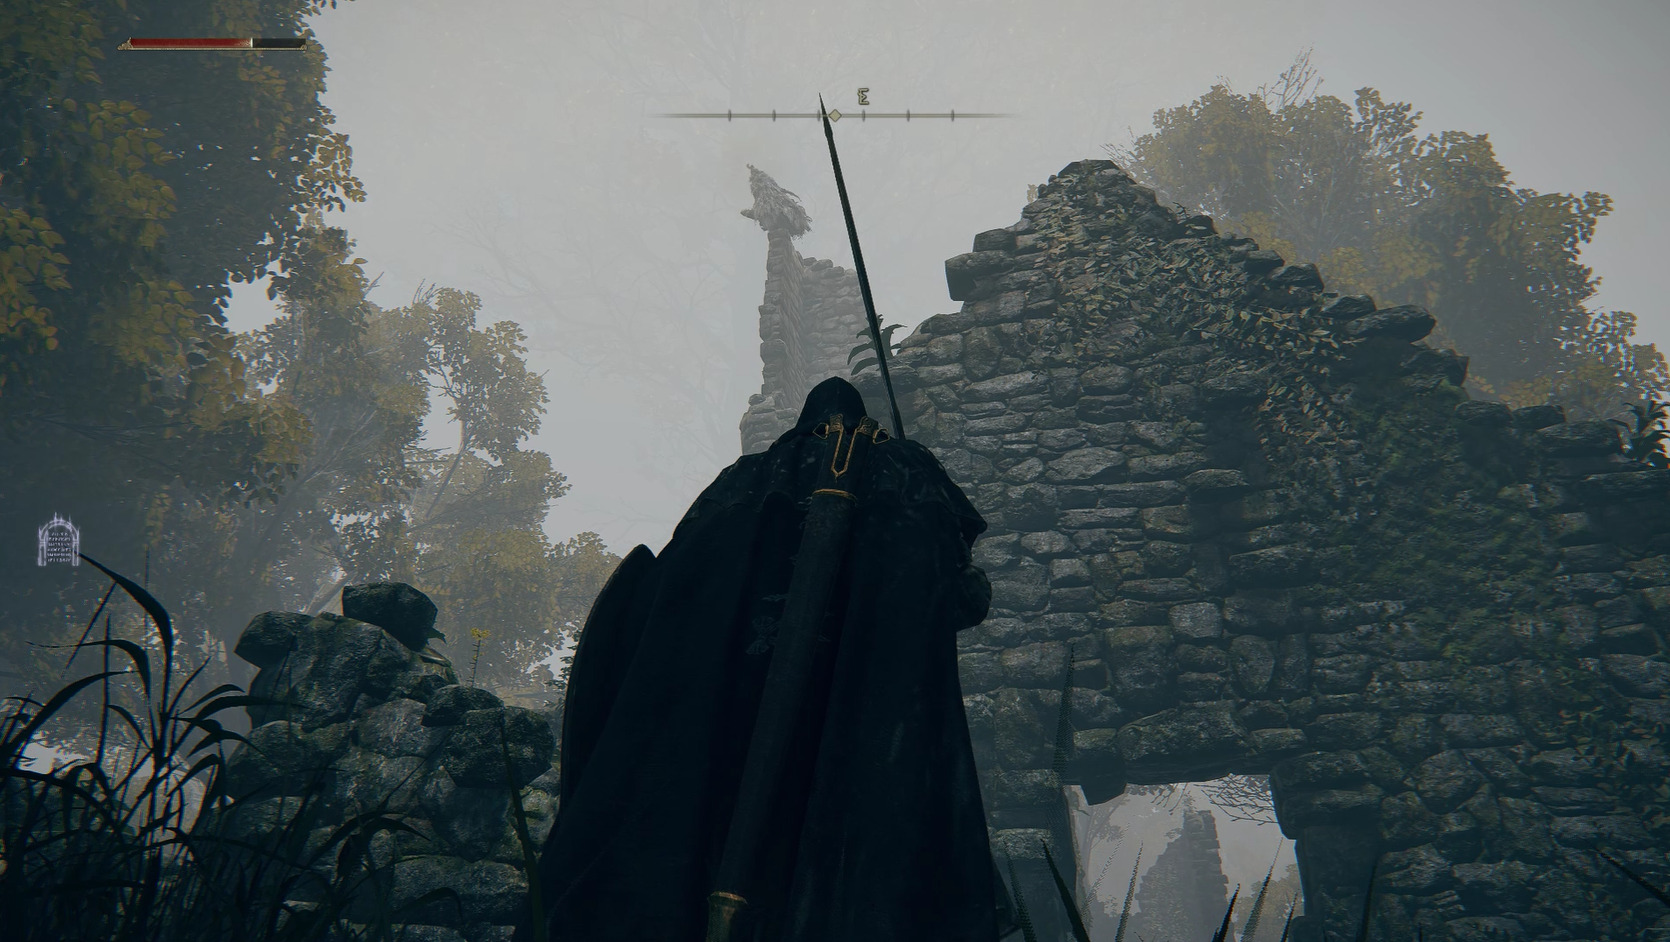
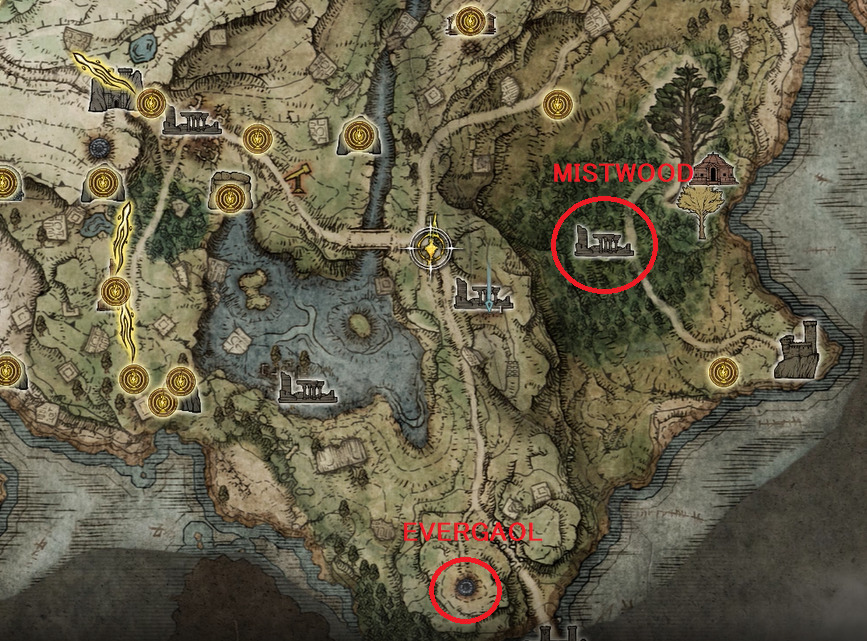
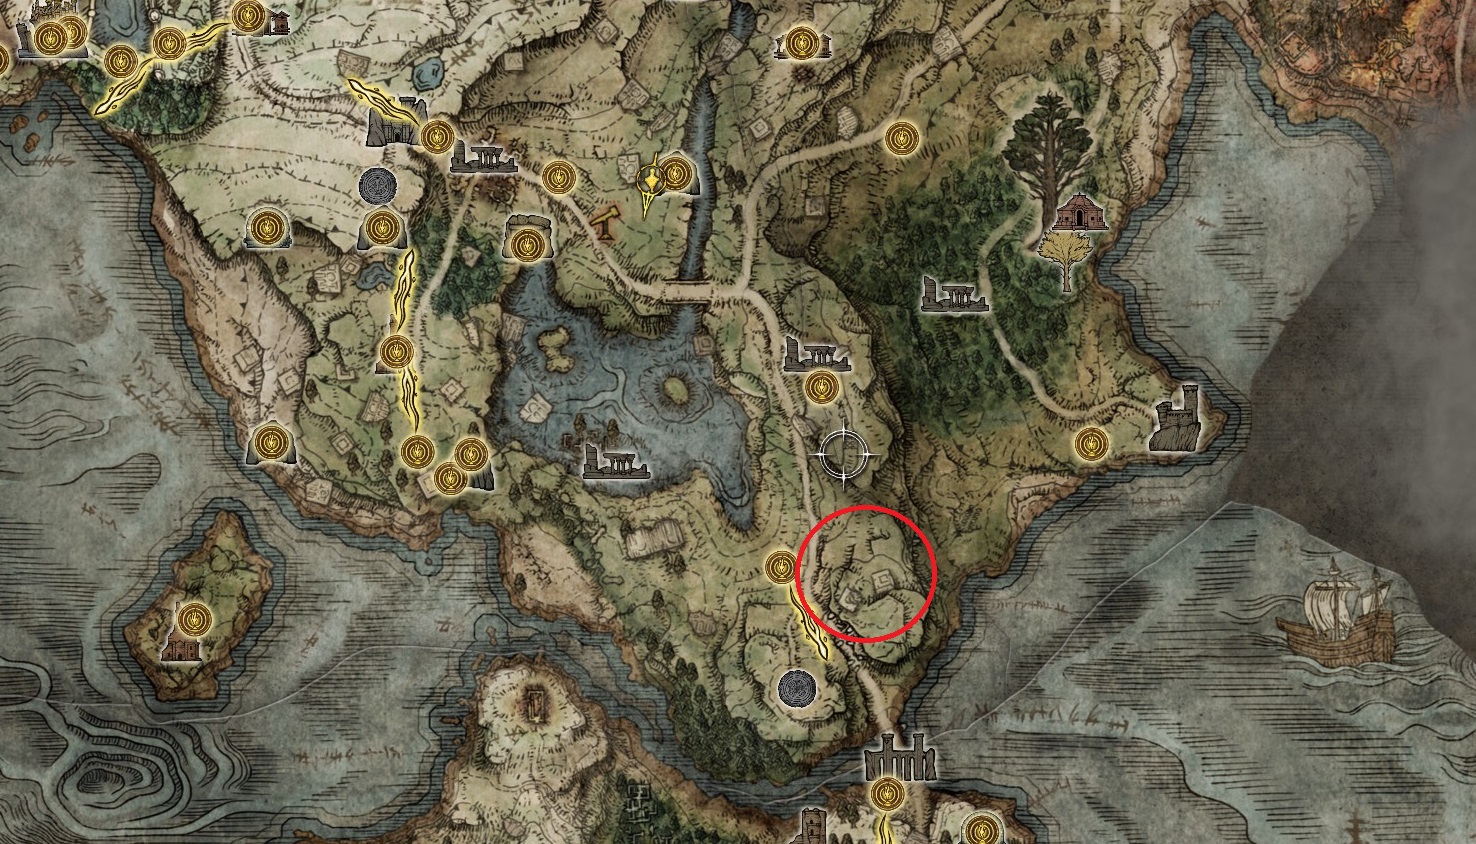
Continue south on the road and you should see the Mistwood Ruins, which lie just off the road on your right. Sneak around to avoid the huge slumbering bear, and collect all the items. You should also hear the howl of a wolf — that’s Blaidd up atop the ruins. We’ll come back for him later — for now, continue south on the road, and stay on it as it bears right.
You’ll eventually reach Fort Haight — before you enter, make sure you grab the site of lost grace that lies south of the road. Then head inside and clear the whole place out. The knight on the battlements can be tough, so make sure you’re healed up before you face him. Defeating him grants you the Ash of War: Bloody Slash. In the nearby tower, climb the ladder and loot the chest atop the tower to find the Dectus Medallion (Left).
Now teleport back to the Church of Marika, return to where you found Haight atop the arch (take the road southwest from the church) and speak to him, where he’ll reward you with an Erdsteel Dagger. Once you exhaust his dialog, teleport back to the fort again, fight through the enemies, and go up the stairs to speak with Haight again, making sure to exhaust his dialog.
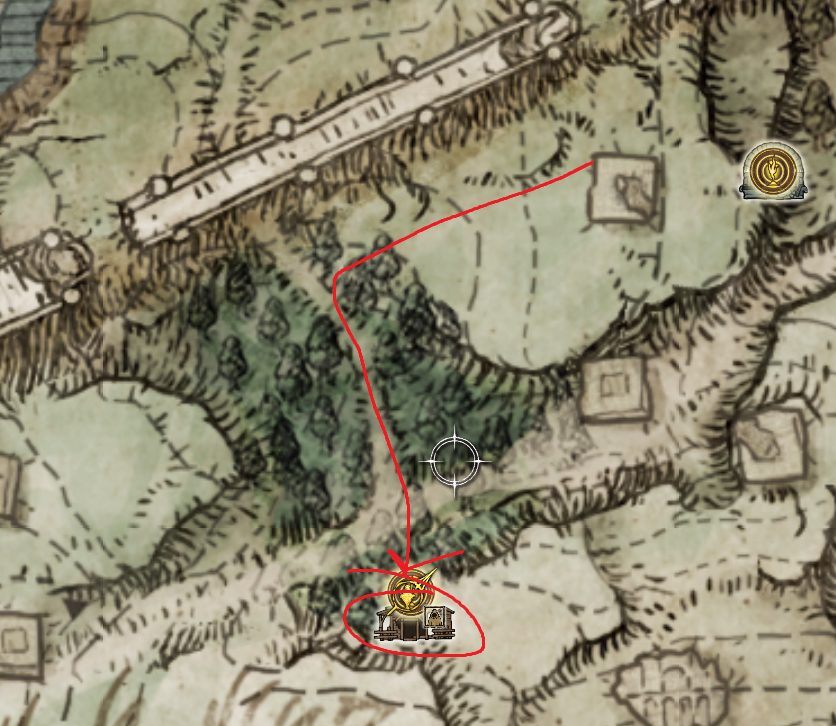
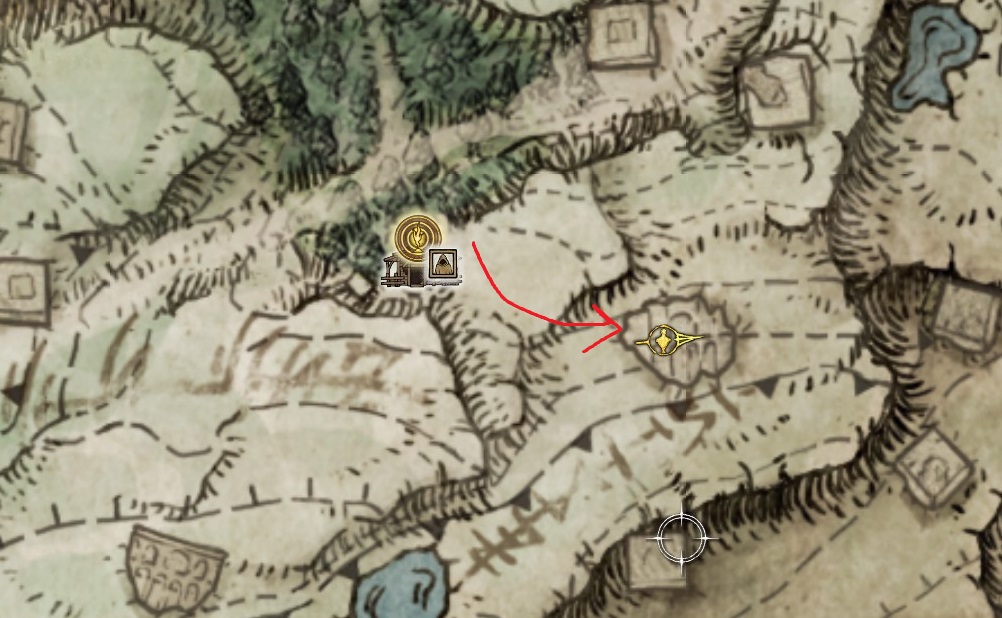
Now we’re going to work on Blaidd’s questline. To get him to come down, you’ll need to teleport back to the Church of Elleh and speak to Merchant Kalé again. Talk to him about the howling in MistwoodRuins, and he’ll teach you the Snap gesture. Now you can return to MistwoodRuins, stand beneath Blaidd, and snap. He’ll jump down — exhaust the dialog with him, and open the chest inside of the ruined tower to grab the Smithing Stone [2], before heading towards the nearby sleeping Lesser Runebear. Next to it, you’ll find a staircase leading down to a room underground, with a chest that contains the Axe Talisman. Ignore the bear and run down the stairs to grab the talisman, and stay underground until you can safely run out or travel out of these ruins. Now open your map and find the Evergaol. Head there and stand in the center of the shrine, then activate it. You’ll be teleported to the Evergaol — find Blaidd’s summon sign and use it, then run around the arena until the boss fight activates.
Once the boss fight is over, leave the Evergaol and exhaust Blaidd’s dialogue to advance his quest to the next step. From there, head southwest to find several demi-human enemies around a corpse that contains the Large Club.
Now either use the spiritspring to jump back up or travel back to the Agheel Lake South site of grace, and head north to find a loot beetle surrounded by several crabs in the lake. Grab the Ash of War: Unsheathe from the loot beetle — at this point you can go southeast and cross the road to find a Lesser Runebear disguised as a weaker enemy. Defeating the bear will grant you a Larval Tear that can be used to reallocate your stats later in the game. After defeating the Lesser Runebear, you can either explore the nearby camp containing some items, or just proceed west to the edge of the cliff.
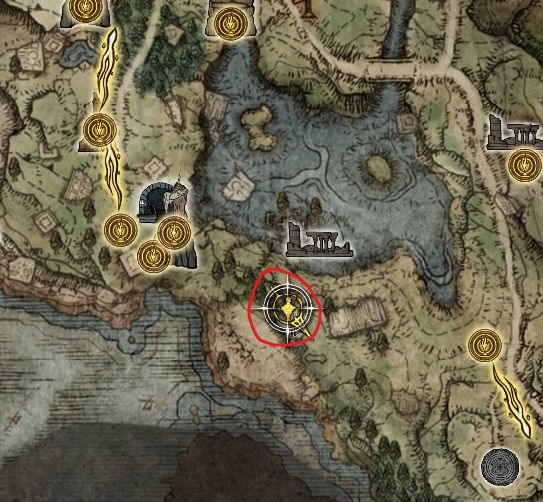
The camp contains the Great Epee and the Royal House Scroll — it’s best to kill the sorcerers on the high ground before taking on the rest of the camp (and the scroll sits on the eastern tower ruins high ground. You can also find a Starlight Shard on the southeastern edge of the cliffs here, in front of a stone quarter-sphere. With that done (or if you decide to skip it), go west and head to the spot on the cliffs indicated below. On the way, make sure you grab the Seaside Ruins site of grace just southeast of the spot indicated below.
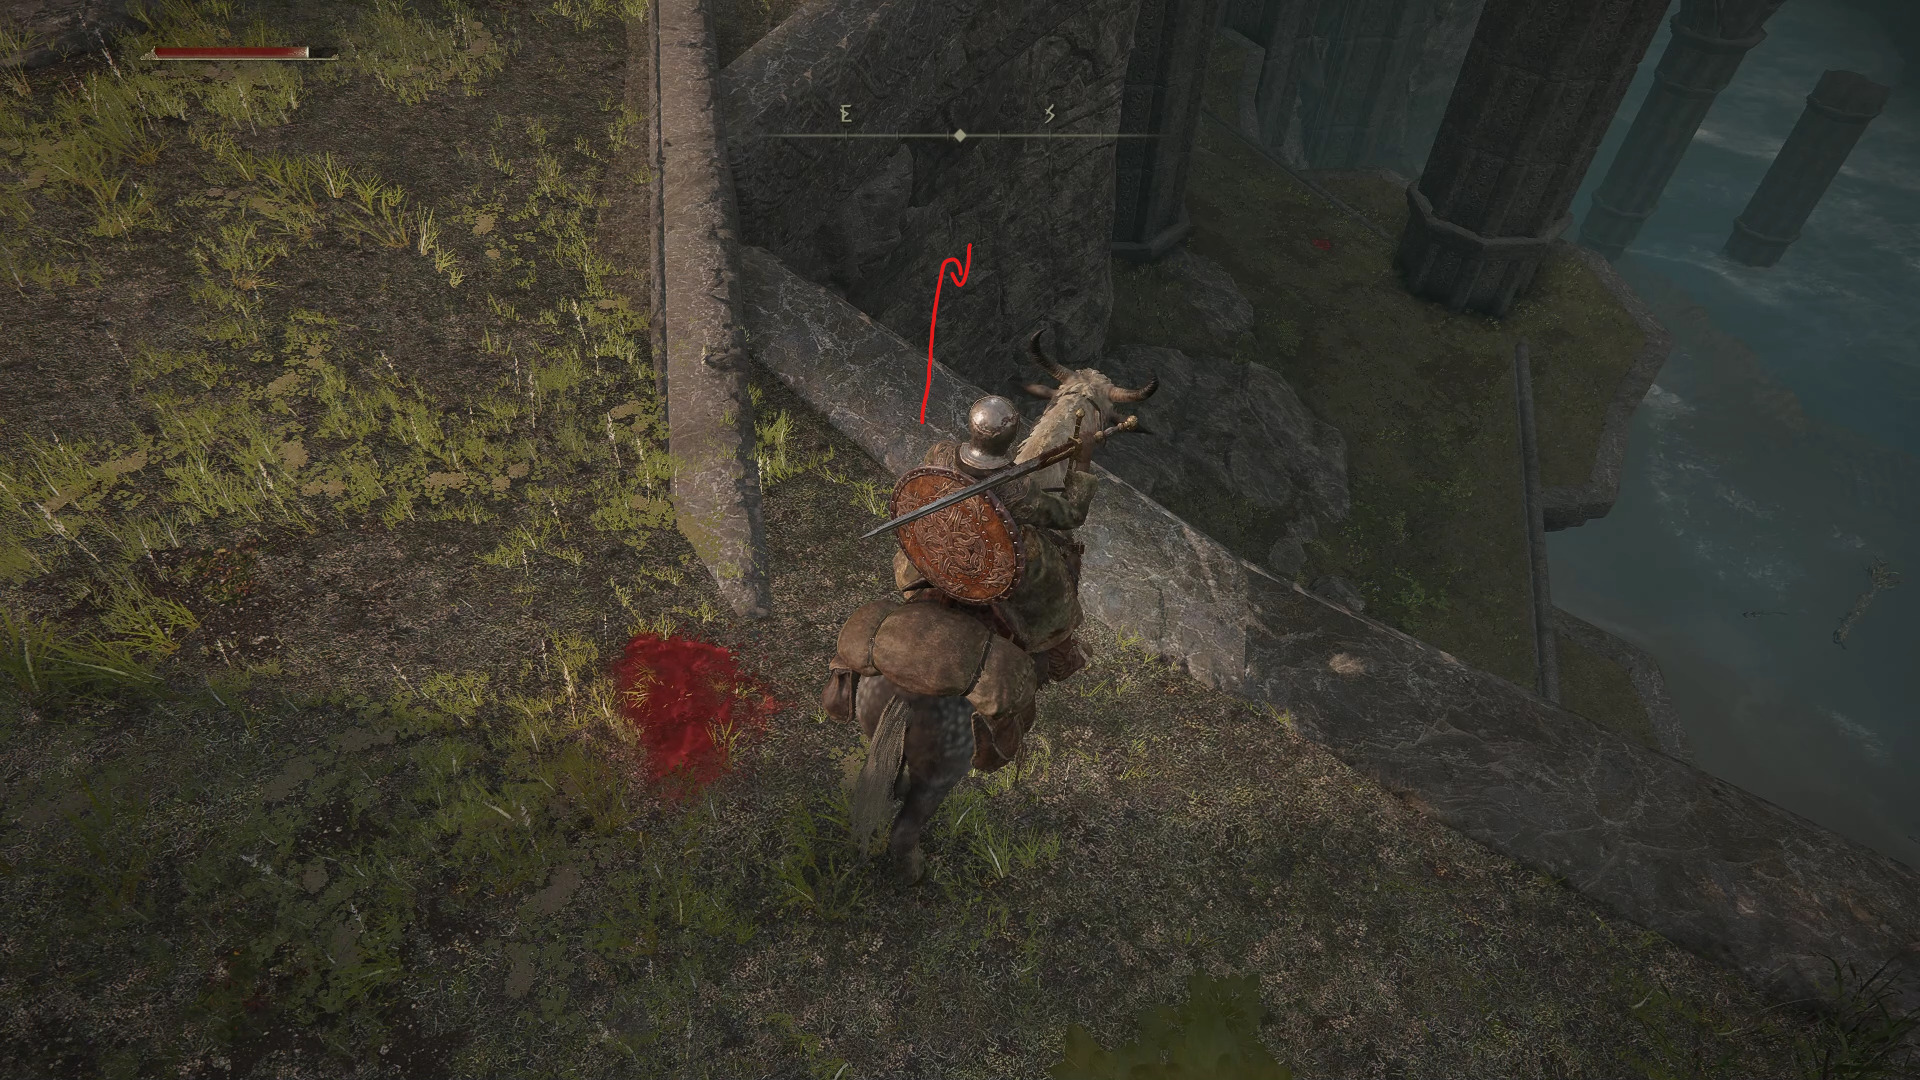
You will see a secluded beach that is only reachable by jumping down, which can prove tricky without following a specific path.
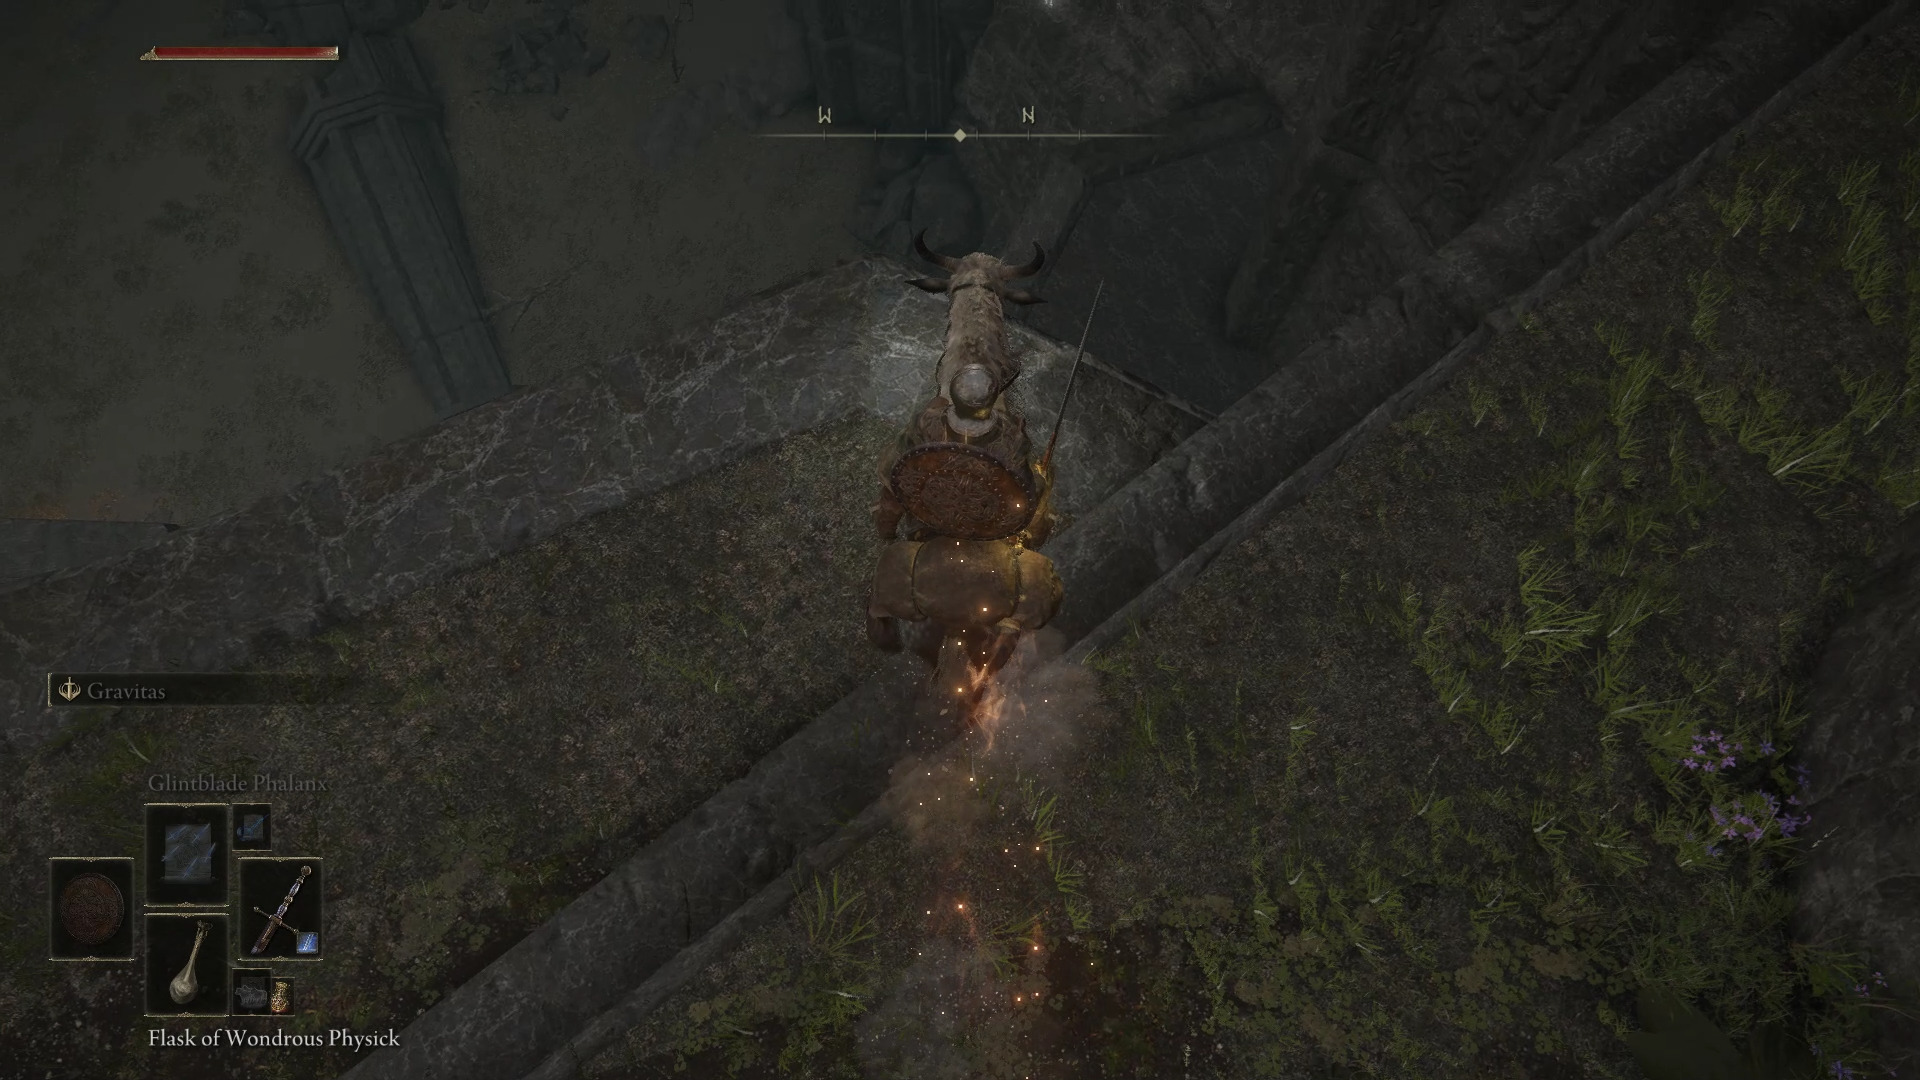
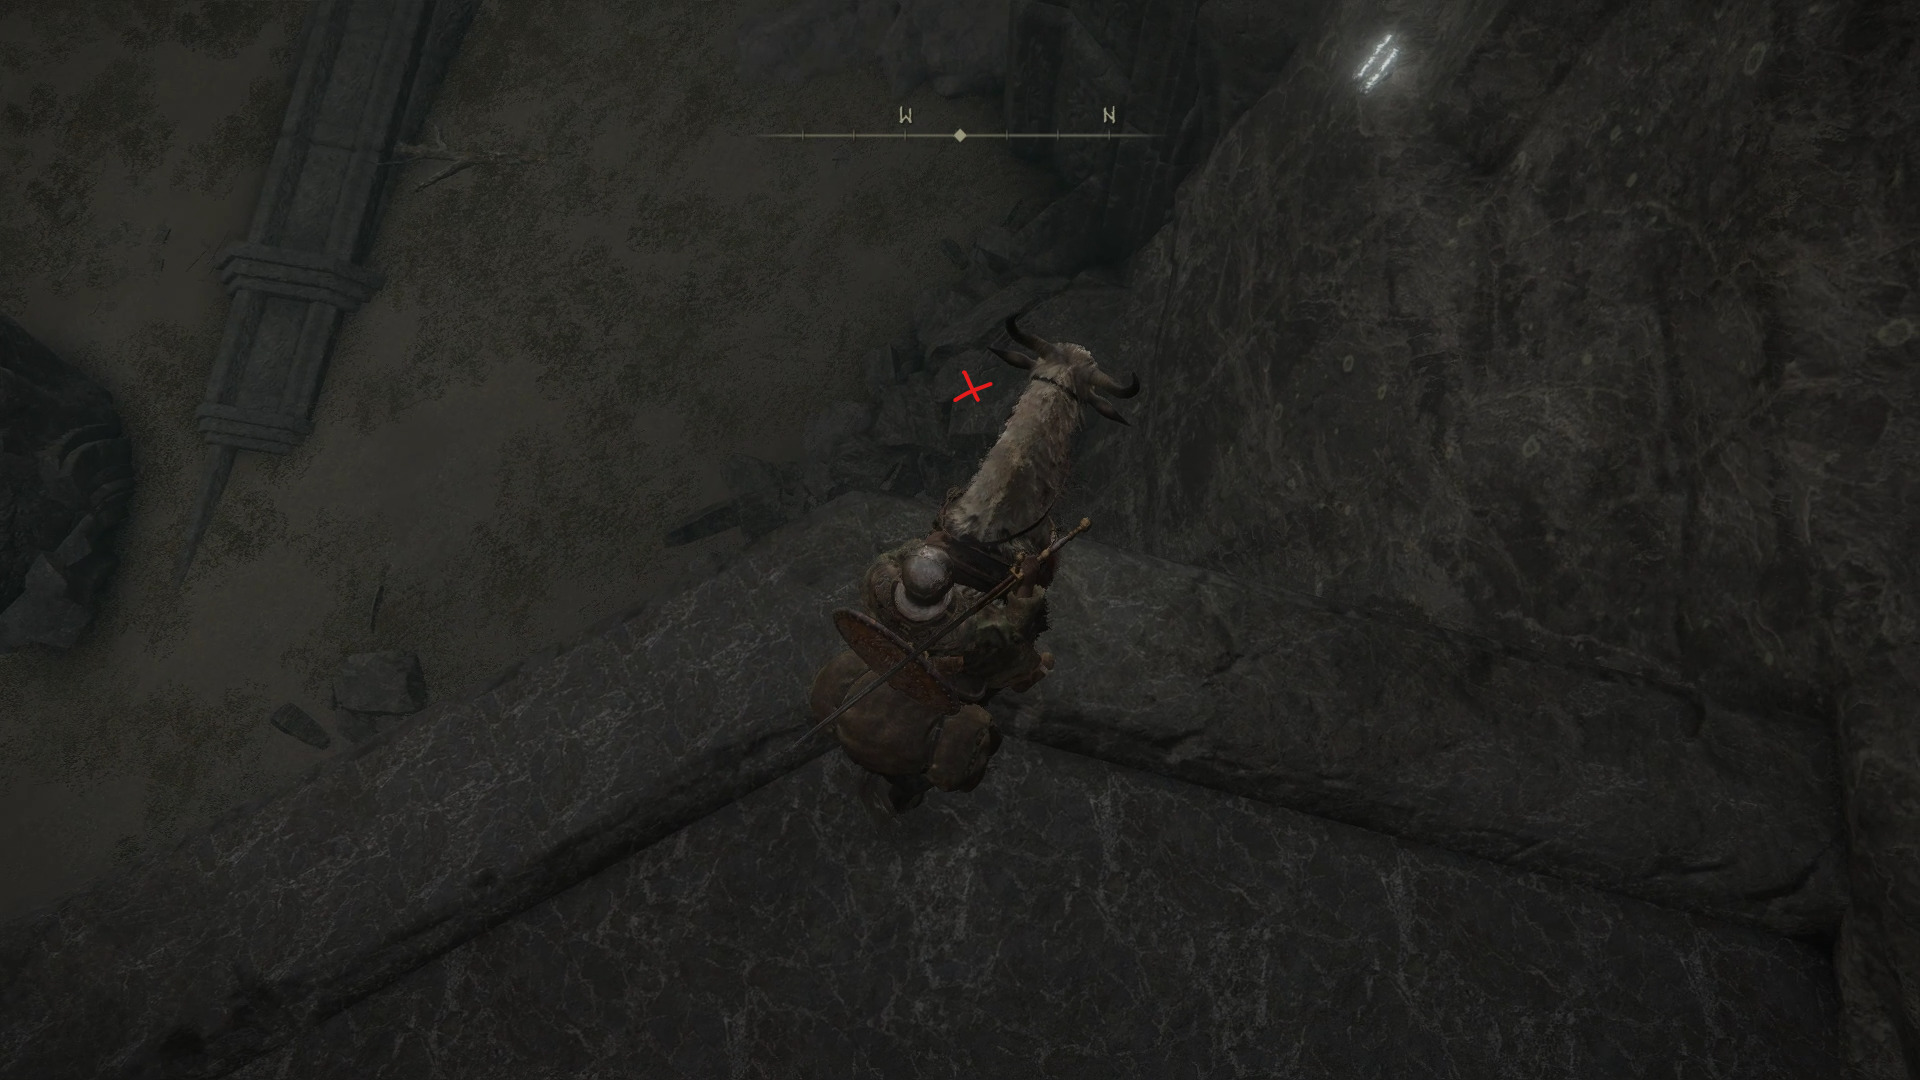
While jumping down, you will have to use your mount’s double-jump ability to both change directions when needed, and reduce the falling damage. With that in mind, follow this path to safely descend to the beach.
On this beach, you will find a campfire with an enemy that drops the Ash of War: Gravitas. Defeating him shouldn’t be much of a challenge, especially on horseback. Next, head north-northwest to find a cave that leads to a ledge above the starting area, which is where you will find the Haligdrake Talisman.
Stormgate
Now all that’s left to do is head to the Stormgate, which lies just west of the Gatefront site of grace — teleport there to continue. The Stormgate is guarded by several enemies, and a giant that will leap down to prevent you from going through. Here, you can either run through on horseback, or you can try to deal with these enemies. While the giant is difficult to deal with on his own, the enemies with the crossbows complicate this fight even further. There’s no real reason not to simply pres forward with your horse.
If for some reason you do want to fight, one way to deal with the giant is to go deep enough to get the giant to leap down, and then run back towards the entrance of the Stormgate. When the giant crosses the gate, you will be out of range of the crossbows, and it will become much easier to deal with him. Do not dismount to fight him, and instead run in for a couple hits before running out to avoid his attacks — or just throw spells from horseback.
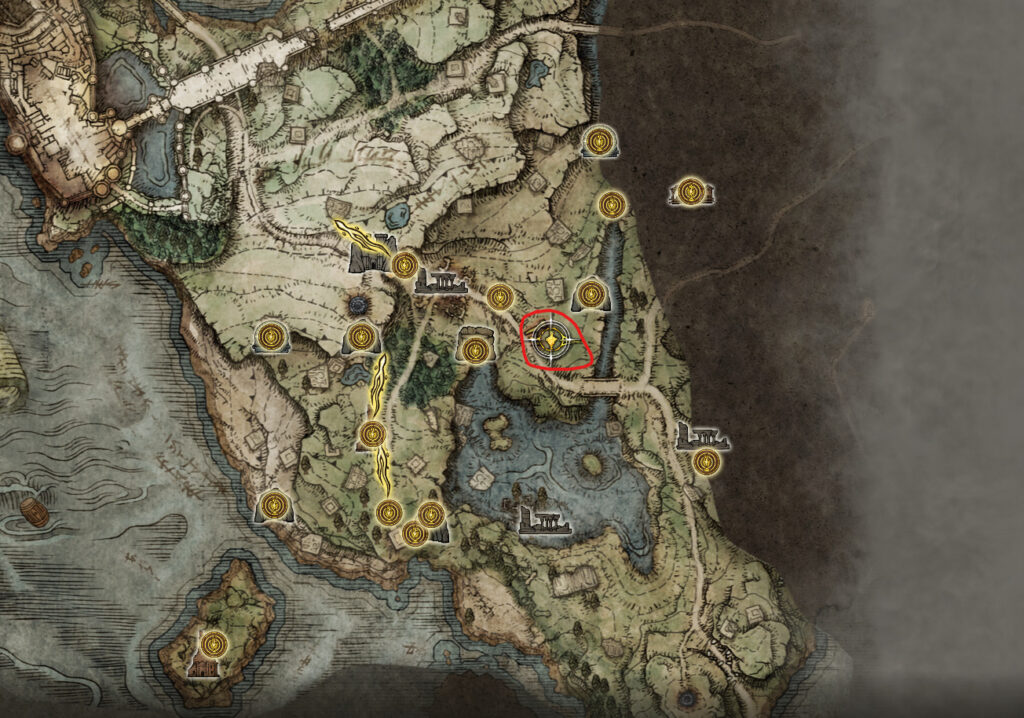
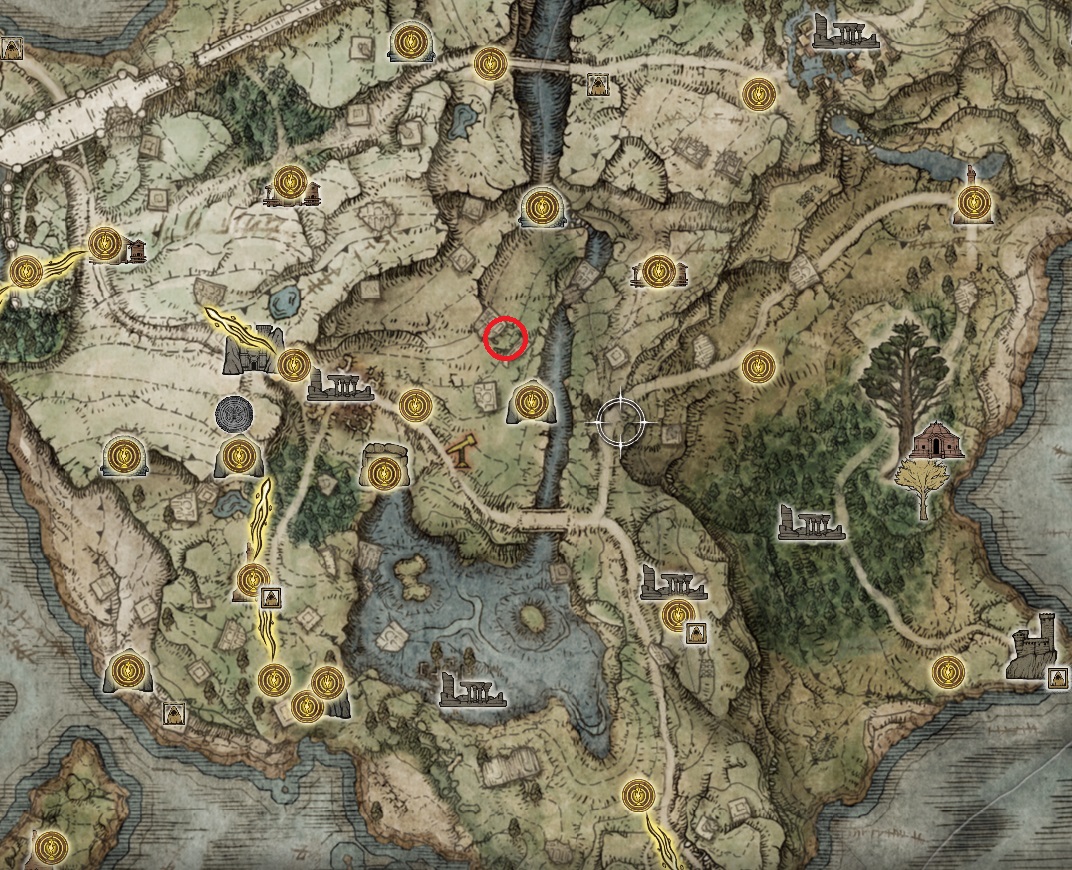
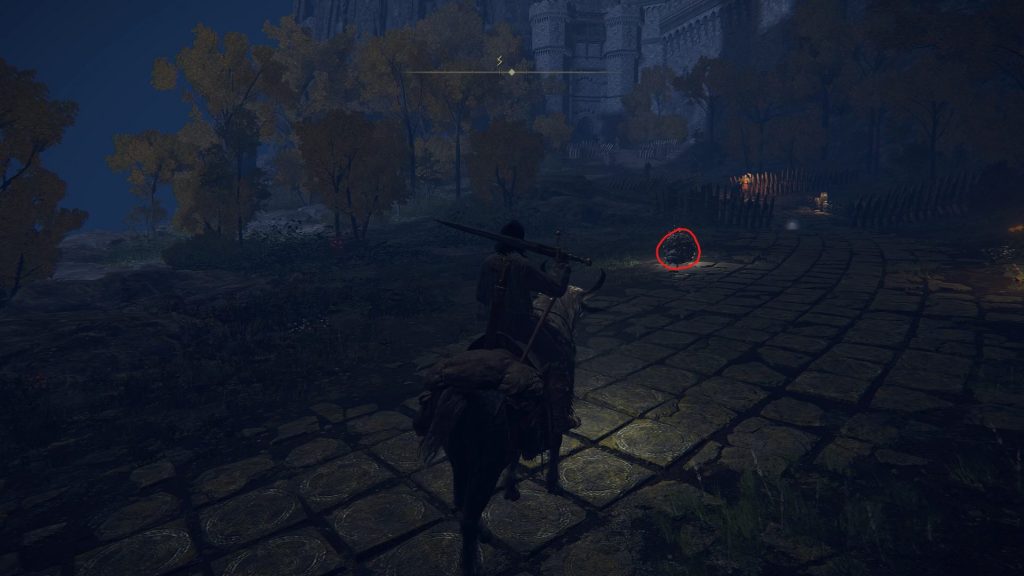
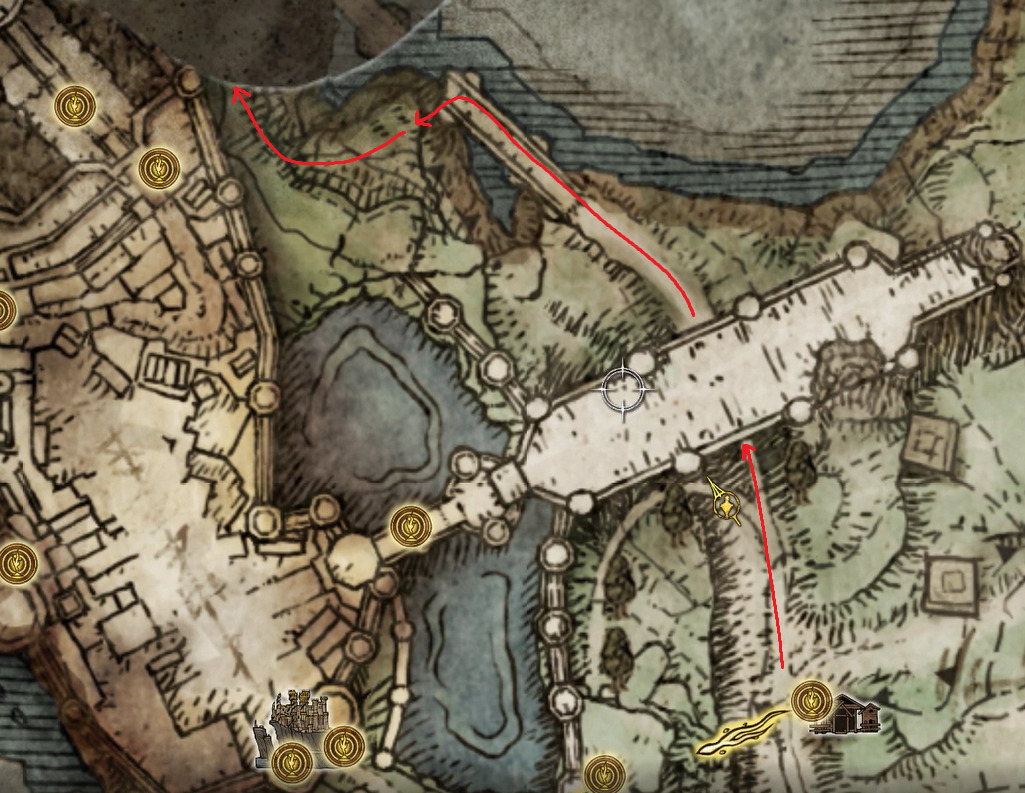
Continue north on the road — making sure you grab the Golden Seed on the right side of the road beneath the glowing gold tree — and find the shack on the right side of the road. Grab the Stormhill Shack site of lost grace and exhaust the dialog of the woman inside the shack — she’ll gift you the Spirit Jellyfish Ashes. Then mount up and head northeast — you should soon spot a giant. Ride past him and grab the Strength-Knot Crystal Tear from the stone bowl, then turn north and continue under the broken castle wall.
You’ll want to head to the small castle, which can be seen on the map:
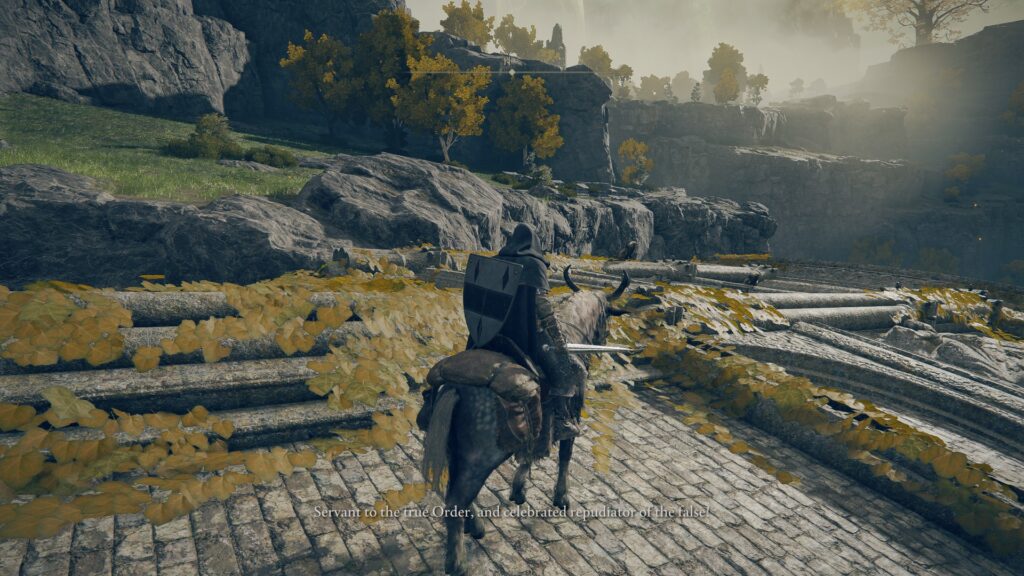
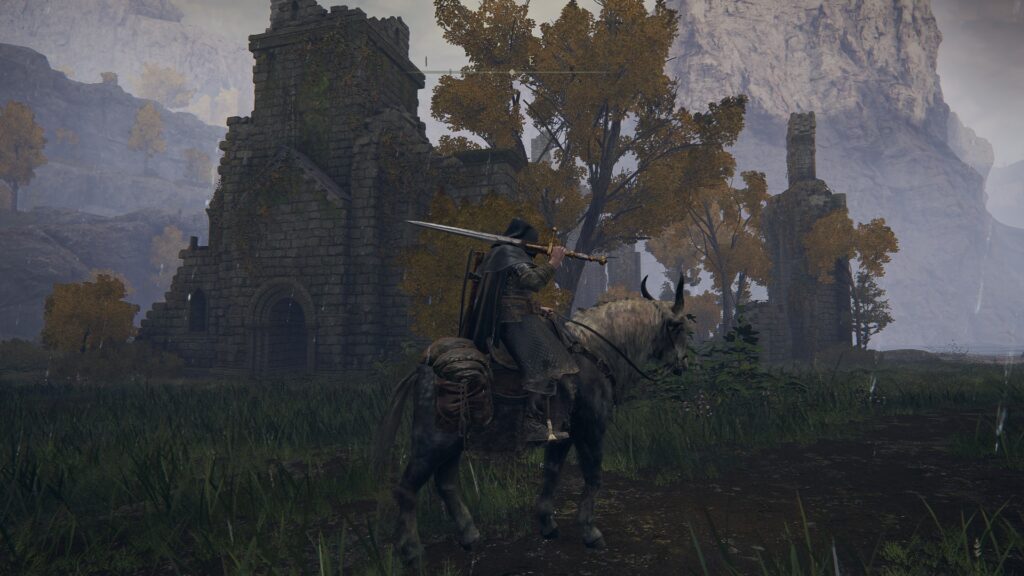
When you get close enough, you’ll be invaded by an Adversary NPC. He’s got strong, slow attacks, so roll out of their way and then counter-attack. When he’s defeated, continue towards the building and you’ll see a ghost next to an item. Pick up the Duelist’s Furled Finger and Small Red Effigy, then teleport back to the Stormhill Shack.
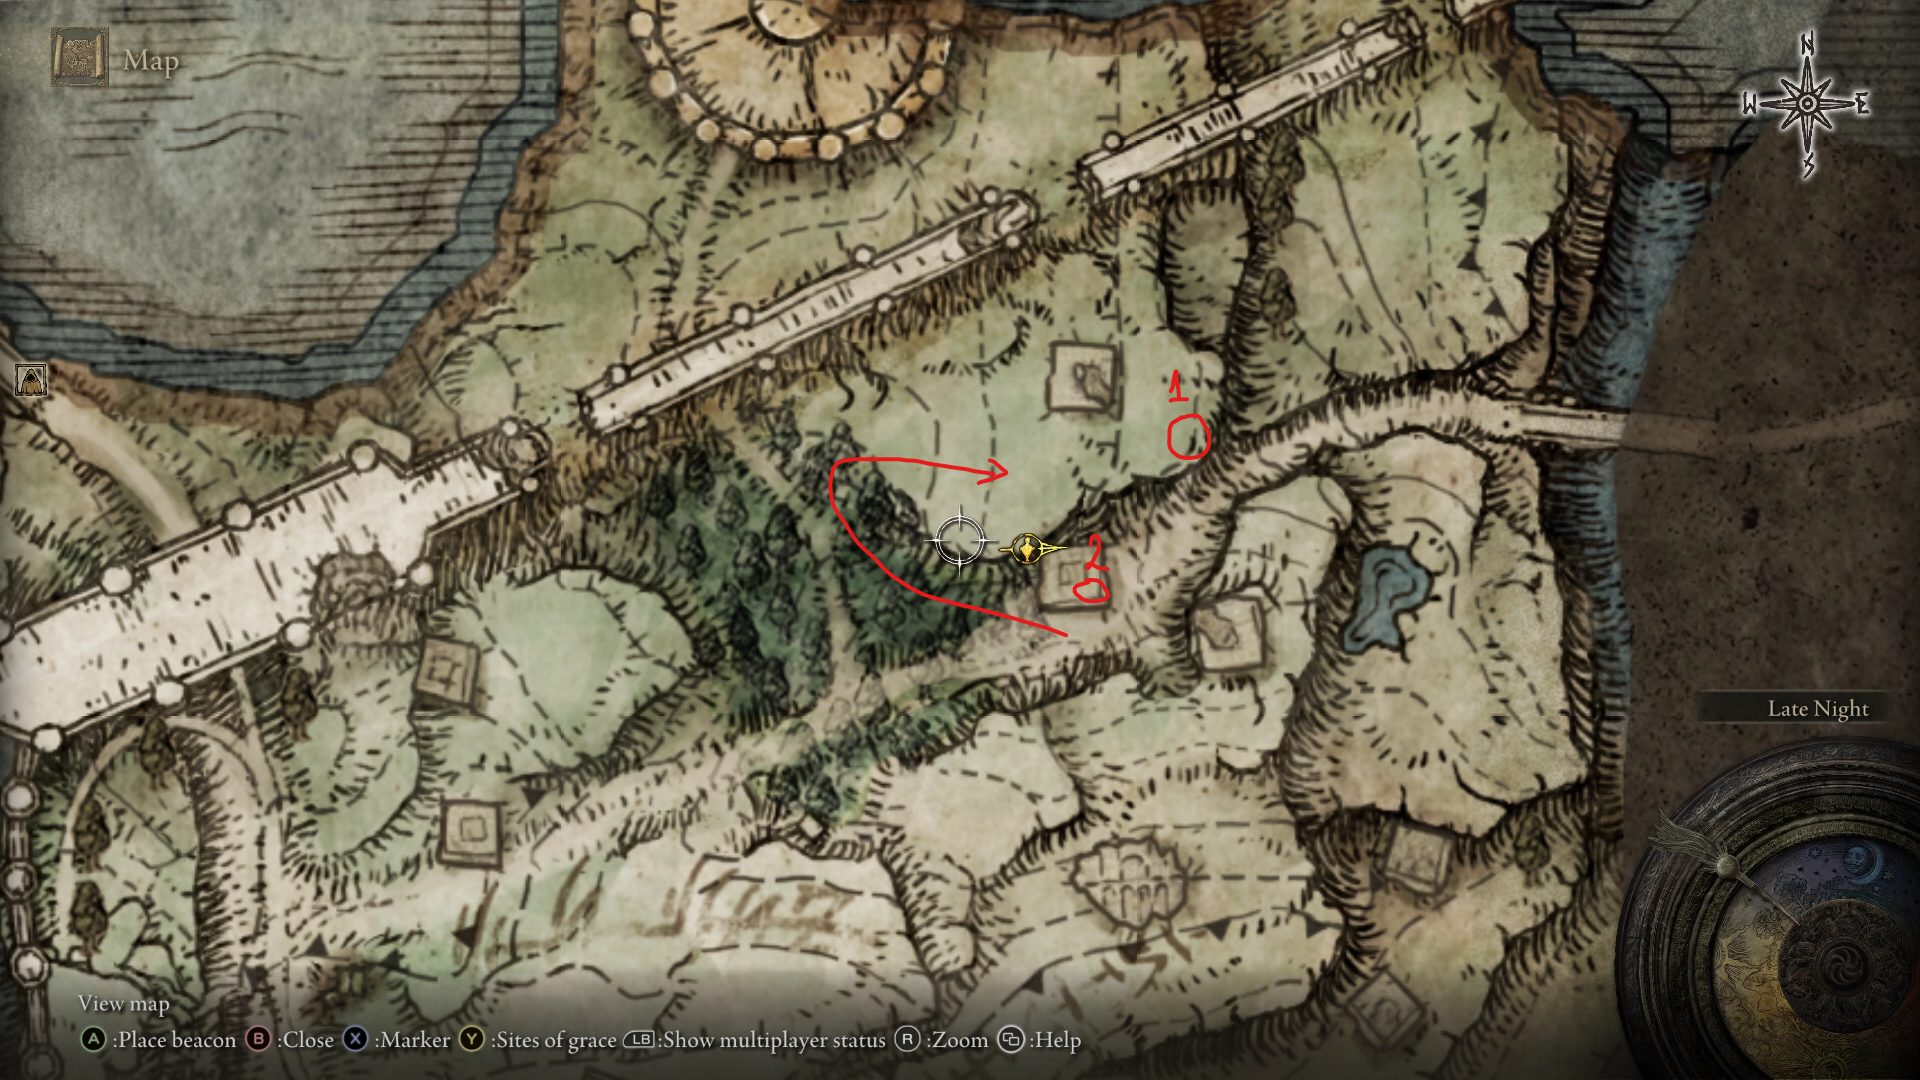
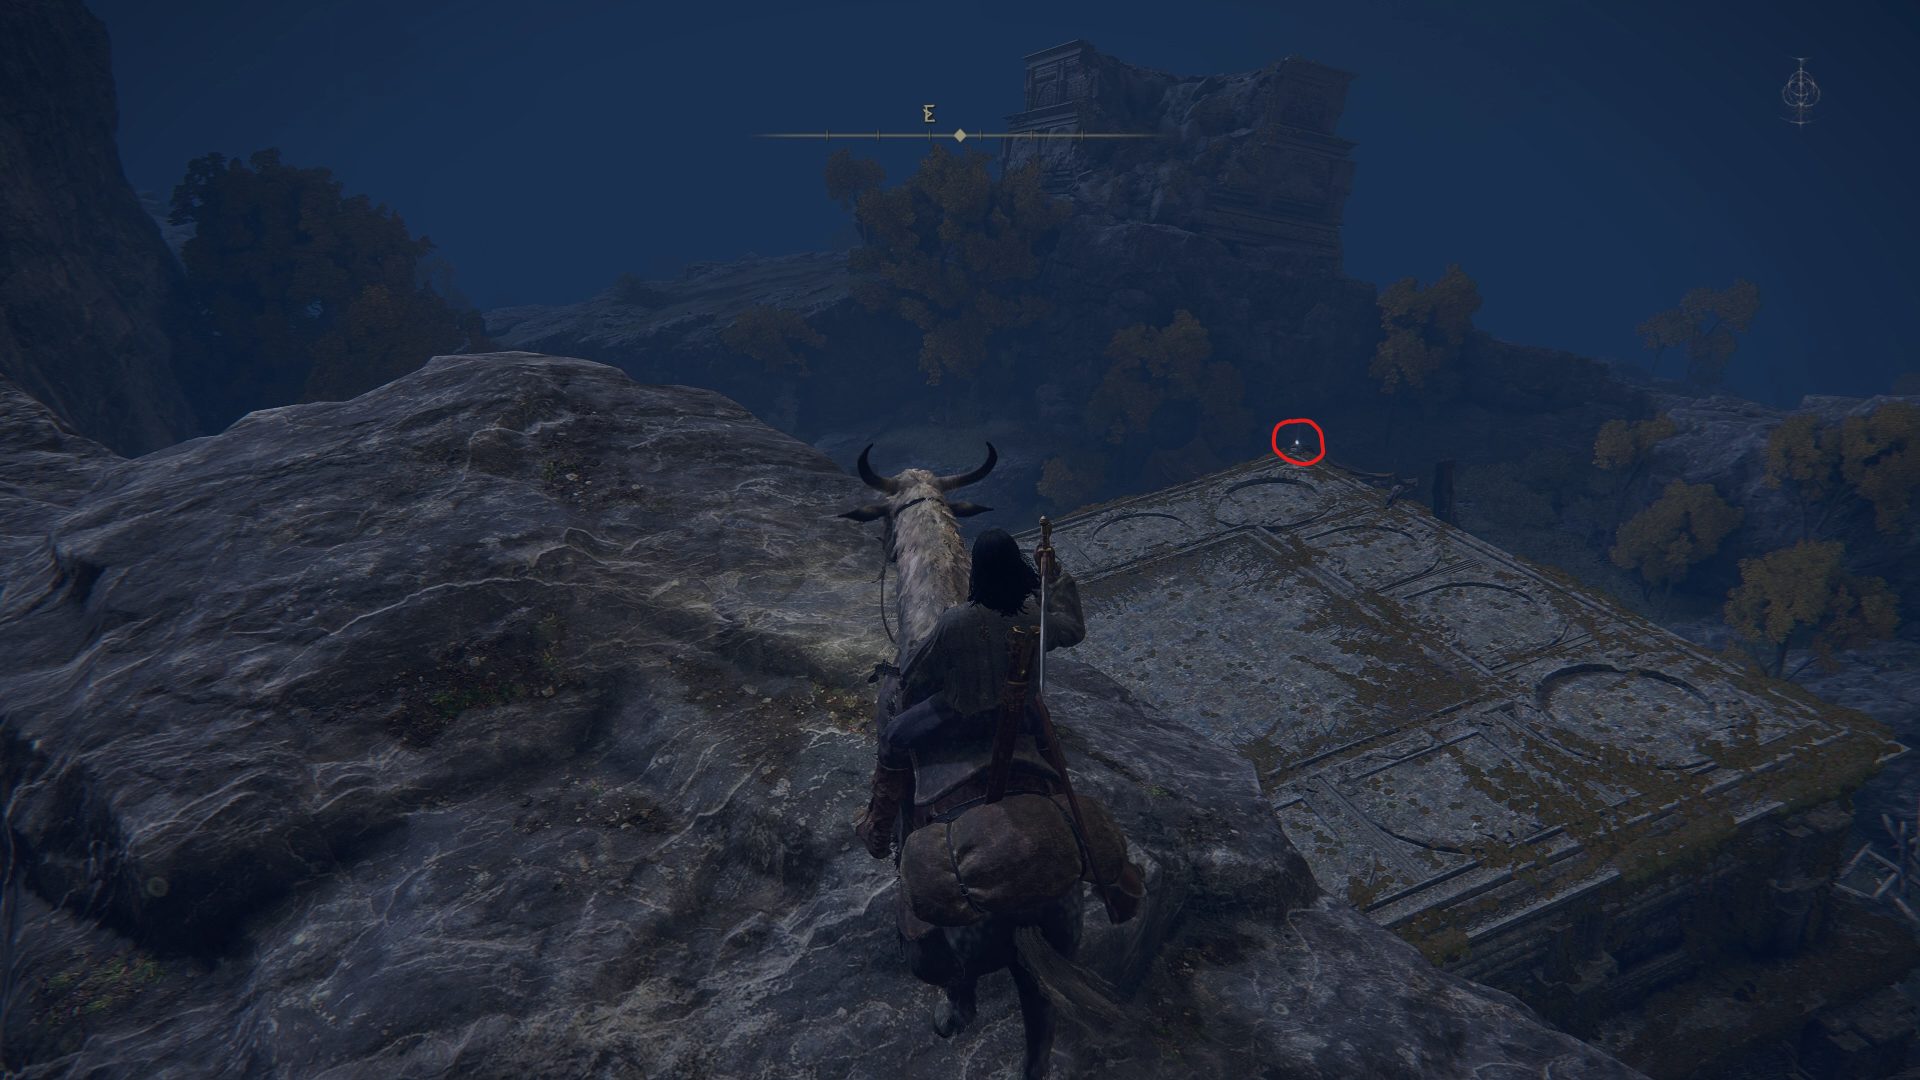
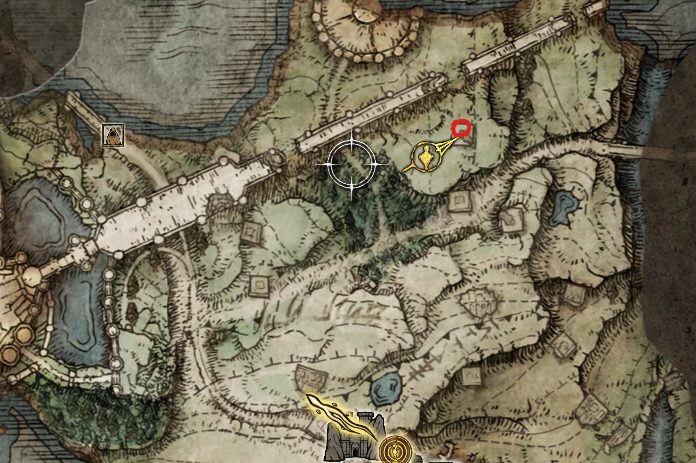
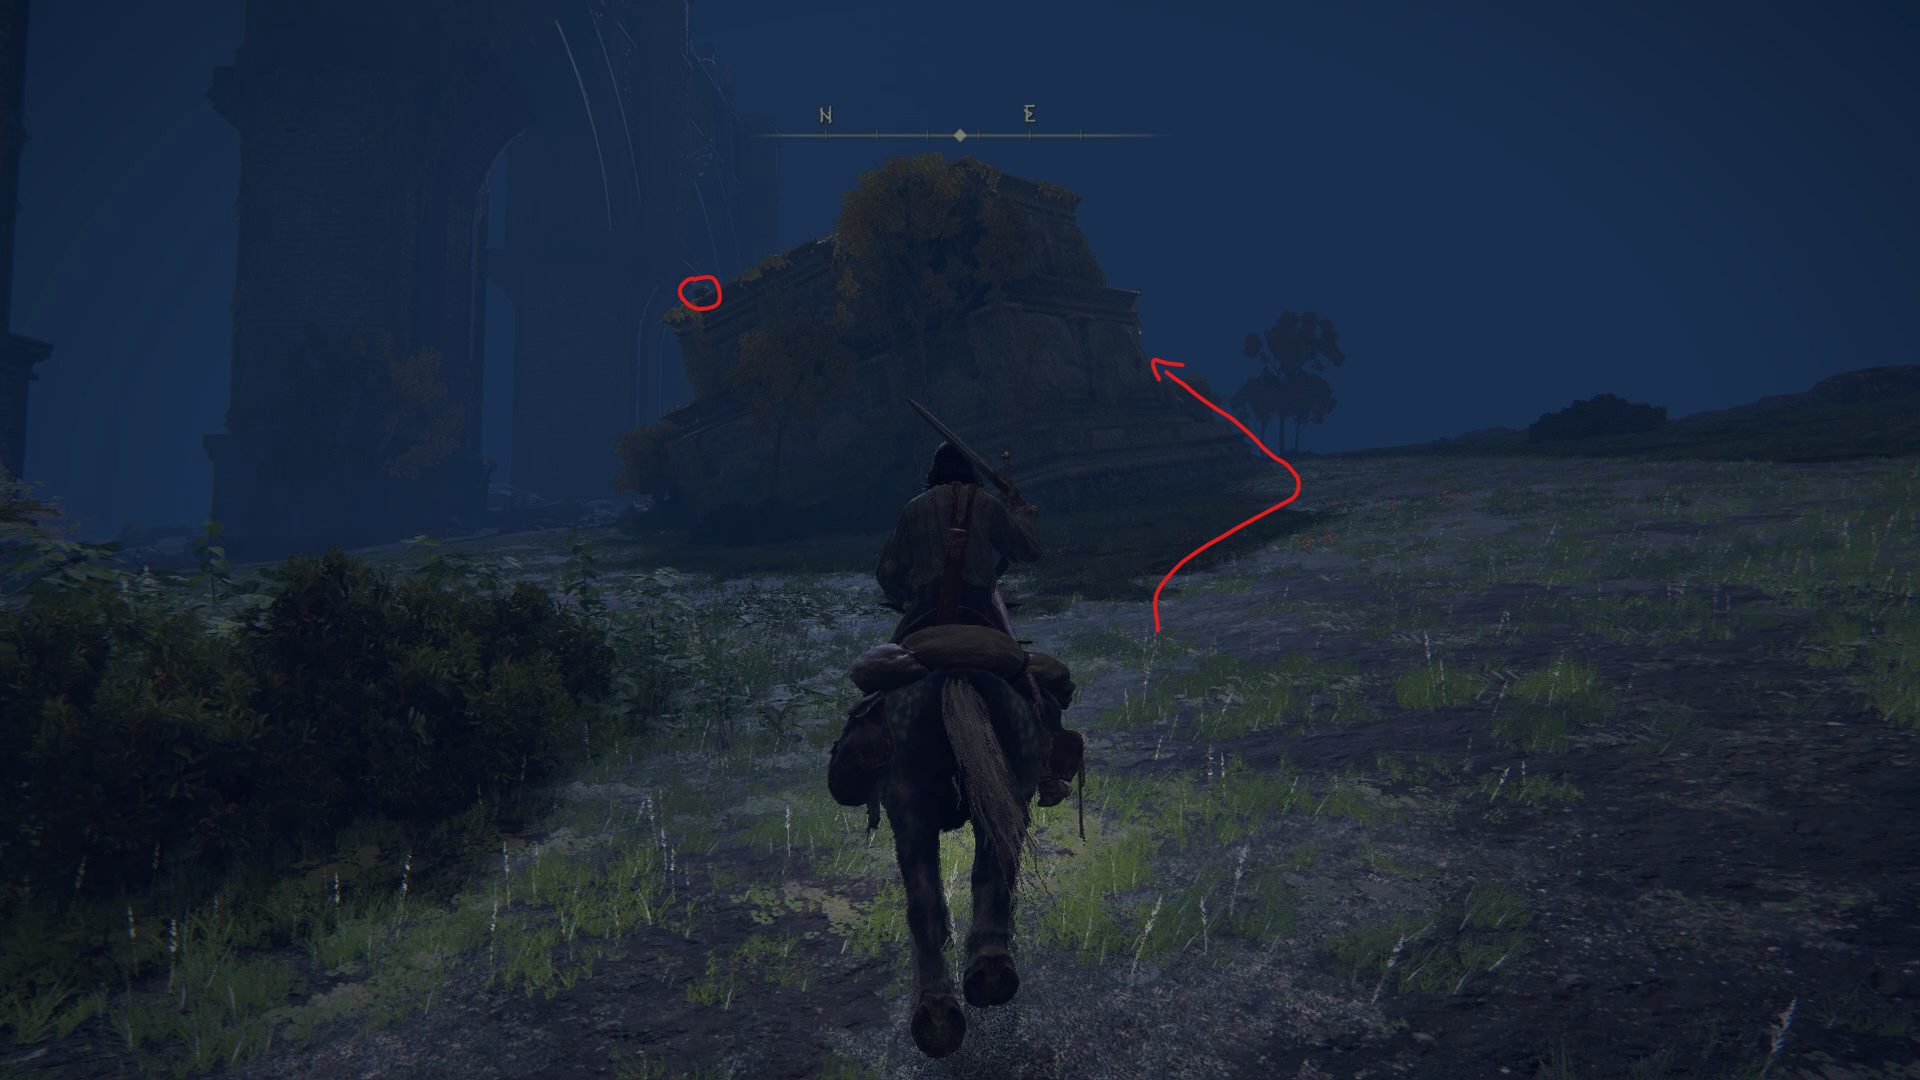
There’s a few pieces of loot we can collect now: The Arrow’s Reach Talisman is useful if you plan on using a bow, and there’s a gesture we can get now as well. If you want either of these things, open your map and find the grey blob just above the site of grace [1]. You’ll need to climb the ruined structure from the northern side [2] to grab the Crossed Legs gesture. Then open your map again and find the hole in the south side of the Stormgate on the map — there’s a fire-lit entrance to one of the upper levels of the gate there [3] — dispatch the handful of foes here and loot the chest to find the talisman. You’ll also pass the Stormhill Evergoal here (it’s the dark circle in between the two item locations), but it’s a very tough fight at this point in the game and is better left for later.
123
Teleport back to the shack again and continue up the road heading north. Stay north when the road curves west, and follow the dirt path to a bridge. Speak with the NPC there, Roderika. exhaust her dialog, and then go to the end of the bridge where you’ll find the Nomadic Cookbook [7]. Return to the road and take the other fork (heading west on the cobblestones). Follow the road until you reach the wooden fortifications in front of the castle, and kill the loot beetle to get the Ash of War: Wild Strikes.
Here you’ll have to ride through some defenses — juke side to side and veer left around the enemies to avoid getting killed by the ballista. Enter the tunnels and grab the site of lost grace, as you’re about to face another boss: Margit the Fell Omen.
Having defeated Margit, grab the site of lost grace. The way north leads to the first Legacy Dungeon:Stormveil Castle.
Where to Go After Margit and Limgrave
Rather than going to Stormveil Castle, we recommend completing the Weeping Peninsula first. It’s a great way to level up, and you’ll grab lots of useful items.
How to Skip Margit and Stormveil Castle
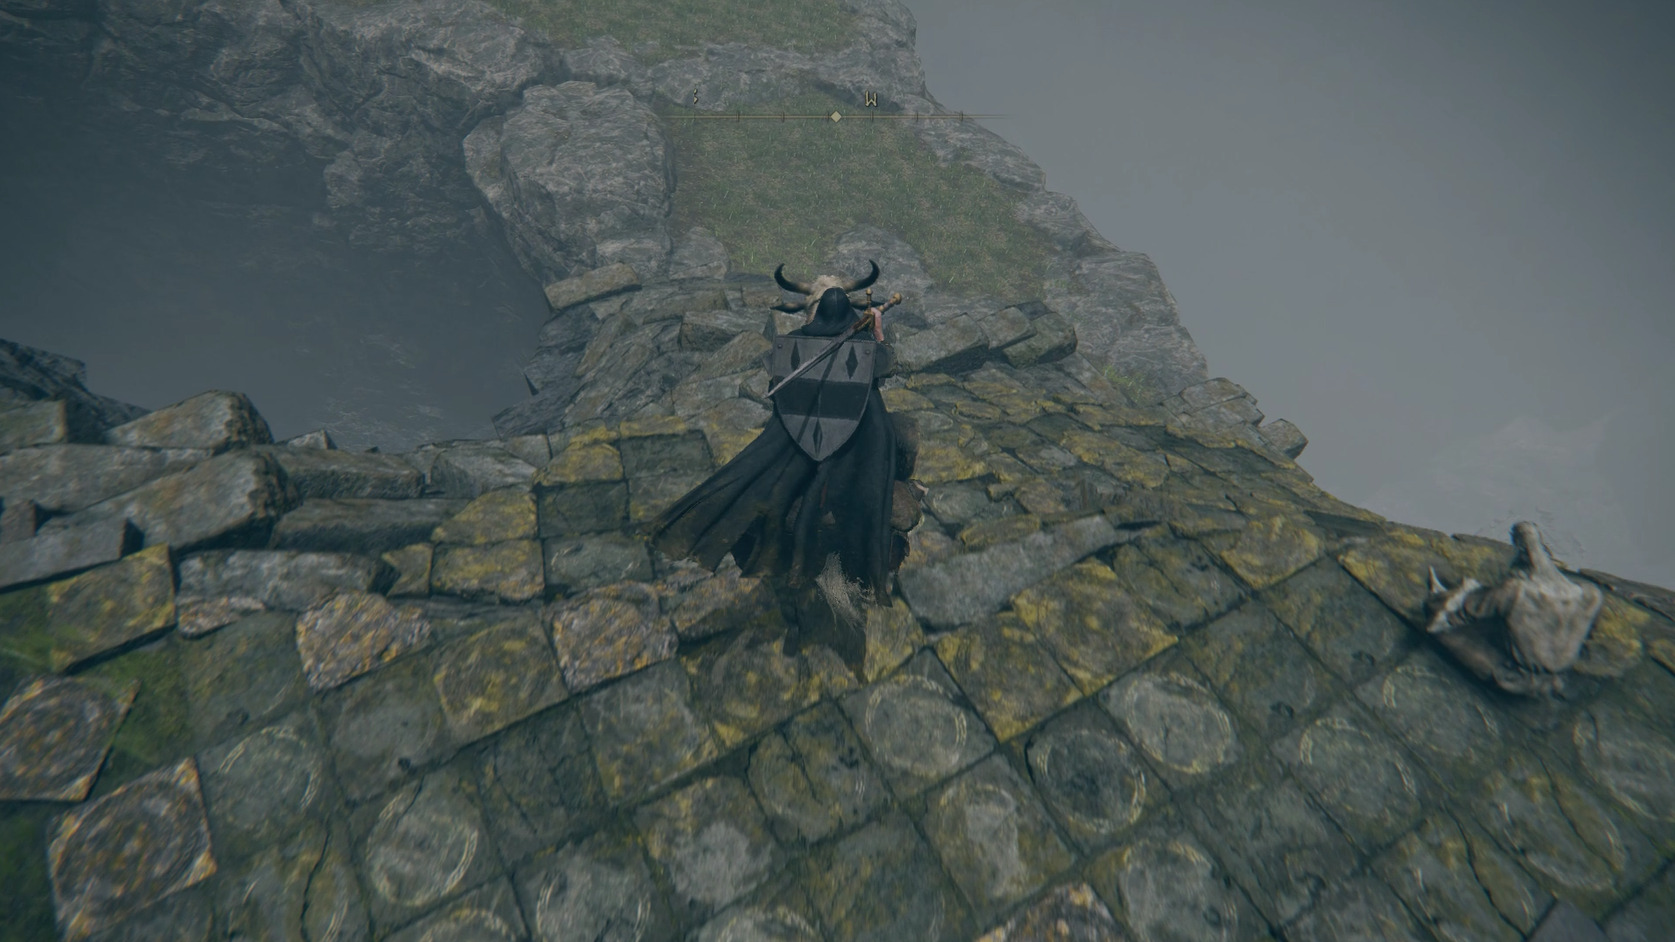
If you’re struggling with the boss or the next section, or if you want reach Liurnia of the Lakes early, there’s a simple path to follow that allows you to do so. Teleport to the Stormhill Shack site of grace, then ride north on the road. When the road curves left, continue north on the dirt road and go under the bridge, then continue out onto the broken bridge. At the end of the bridge, turn left and drop down onto the grass and stones below. Continue south until you reach the cliff, then turn right and follow the narrow grassy path northwest. You’ll encounter a few packs of wolves, but you can easily outrun them on horseback. After riding for a minute or so, you’ll find yourself in Liurnia of the Lakes — a site of grace should be nearby to the west.
The route from Stormhill Shack to the path The drop from the bridge to the path
Video game fan since TMNT: The Manhattan Project, I'm always on the lookout for games that could top Outer Wilds or Disco Elysium, or for new songs to listen to.
Loved this guide on my last run, the best around imo. Literally the only thing I think missing from Limgrave is that if you go west from the Artist’s Shack grace, jump up the rocks on your left & you should see a beetle which drops a Somber Smithing Stone (1) & then explodes! Looking over the cliff edge you can see (& jump down to) the Murkwater Coast grace, which also isn’t mentioned. Looking forward to the expansion!
lesskarr
2 years ago
this has been one of the best and most usefull guides i have found so far for this game keep up the fantastic work also 2 things one will you be covering eventually the various endings and the questlines to get to the endings? also as for lingrave there are couple areas not mentioned in this guide that i ended up coming across namely Murkwater Coast Highroad Cave Agheel Lake South
Seaside Ruins
ik this game is massive and easy to miss things so wanted to point this out so that this guide section could be more fully complete
regardless loving this guide keep up the amazing work
Thanks lesskarr, it’s pretty tough to find everything so your help is much appreciated! We’ll definitely add Highroad Cave in when we can, and I’m also seeing the spot we missed in Agheel Lake South (where you get the Large Club) — any chance you could give me a hint about Murkwater coast as far as what we should add to the guide?
As for the quests and endings, the short answer is yes, eventually. However, it will probably be a little while until we get there, as I honestly haven’t had much time to progress through the game with all the guide/database work we’ve been doing 😀
as for murkwater coast and other places i mentioned i found out about them by coming across them and also from when i was consulting another guide before i ended up finding this one https://www.neoseeker.com/elden-ring/walkthrough/Agheel_Lake
Thank you very much Jayce, I truly love hearing that these guides are helpful — it makes me feel like the time we spend on them is worth it!
Frank
2 years ago
I really enjoy reading this guide because I know what to do next.
I think a lot of people will agree that they don’t know where to go and what to next in such a huge and empty world! I even put the game away for one time. With this guide I tried to pick it up again and can enjoy it.
Hi Brian, sorry for the delay on Mt. Gelmir — both myself and the other Elden Ring writer have IRL obligations this week (and part of the next), but we’re going to work twice as hard the following week to try and catch up!
Last edited 2 years ago by DanielD
ChrisJ
2 years ago
There are two references to “Scavenger’s Shack” in the walkthrough which I believe should be “Stormhill Shack” to match your map.
You’re absolutely correct, thanks Chris! I think that was a relic from when we’d used network test data to build this walkthrough.
LittleBird2292
2 years ago
loving the guide so far!! One thing I noticed – when you’re going after the Ash of War Gravitas, there’s a lost grace called Seaside that’s just south of your mark on the map pictured here. A bit south of the grace, look over there edge to find a spiritjump that’ll get you safely to the bottom.
There’s also an air current you can jump off the cliff into and ride it all the way down to the Gravitas beach to avoid having to do the difficult jumping down ledges part, it’s just a bit more to the south from the jumps.
Adam
2 years ago
Ayo the teleporter sent me to the bestial sanctum, did they change that?
Thanks for reporting that Adam, based on your experience it sure seems that way — I’ll edit the guide accordingly. You’ll probably just need to keep adventuring and resting at sites of grace — Melina should show up at a site of grace soon and offer to take you to Roundtable Hold.
That’s awesome to hear Adam! Elden Ring can be overwhelming as heck, especially if you’re new to the FromSoft formula. They’re my favorite games, and it’s been such a pleasure to help other people enjoy them.
Matt
2 years ago
the sacred blade Ash of war comes from a knight near the area you said it is at, not the “loot beetle”
No worries! We did seem to be missing the location for the Ash of War: Golden Vow as well as the nearby Lance, which we may not have noticed without your help. Thanks for the feedback!
You guys are making like, the most high quality walkthrough I have found, like, this outranks fextra which is pretty shit to begin with. but if you are looking for stuff you might be missing I would suggest fextra, and somehow incorporate it into this walkthrough
And the mistwood ruins aren’t mentioned besides Blaidd’s quest
Edgar
2 years ago
Hello, It seems you are missing the Highroad Cave from the Limgrave area. It’s all the way to the North, close to the Divine Tower.If you go by the Saintsbridge Site of Grace, it’s under that bridge in the water a little to the north on the left side cliff. There’s a Guardian Golem “boss” in there. It drops the blue dancer charm.
Thank you very much Edgar! We’d published the guide for the cave, but neglected to put it in the Limgrave guide.
kurban61
2 years ago
hey thanks for this super helpfull guide its just perfect.but i have a small wish if possible can u include divine towers of all areas to unlock the great runes and some of the dungeons are not included in the main walkthroughes like Siofra River but instead under the dungeons link if i have not look for the moon witch quest line i would not know it… thanks again
Thanks for the feedback Kurban! We’ll work on getting the divine towers in each walkthrough section, and we’ll try to find a good place to link the Siofra River guide as well.
Brent
2 years ago
Hey! I love you walkthrough it is hamdsdown thee best. But it is cut a bit short. Just food for thought here. Can you look into adding NPC questlines somewhere. Honestly the main ones are Varris and Ranni IMO. But even the spirit turning girl I had to Google elsewhere how ro complete. You brought me through stormviel with her but then I didn’t know what to do really. I’m not making insults here or throwing shade. You have an evenly detailed and easly followed guide. But it seems after the huge detail in limgrave we kind of have to find the dungeons and side quests In Lurinia forward. I know this game has a novel of things to follow. But just the main stuff I would like to see more of. Not just how to simply beat the game. Again maybe missing certain key links somewhere and you have it all covered but if not please consider it
Hi Brent, thanks for the feedback. We completely agree with you, and are actively working on the NPC entries and their related quests. We’ve had to balance getting the walkthroughs done with adding enough detail, and so we decided (since lots of other websites have the quests) to prioritize finishing the first chunk of walkthroughs before we added NPC quests.
Frank
2 years ago
I could only enjoy Elden Ring with the help of the guide. There are others guides out there but this one is the true guide that can help. Great job!! (How long will it take to complete all the content?)
Appreciate that, Frank. If I had to estimate optimistically, I’d say another month — we’re probably about 2/3 done with the walkthroughs, and it took us 2 months to get this far.
Matt
2 years ago
I think you guys missed the Deathbird to the north east of the lake just north of storm gate
Thanks Matt, you’re right! Nice catch — I’ll get that in the guide.
Malavesh
2 years ago
I recently completed using this Limgrave guide as I started my second playthrough and noticed a couple of issues I thought I’d mention. First off, the Mistwood Ruins near where you call out to Blaidd aren’t covered (another commenter mentioned this, I think). Killing the bear at this location reveals a stairway underneath with an Axe Talisman. There are a few other loot items around the area as well.
The bigger issue I found is following this guide as currently written likely messed up my Alexander the Jar questline. Apparently there has been a long-standing bug they haven’t fixed yet that will cause issues with the Alexander quest if you meet him at rear Gael Tunnel entrance first. The intended first encounter with him is above the Saintsbridge Site of Grace where he’s stuck. Until they patch this, doing it out of order causes his quest progression to get permanently stuck after the Radahn fight. Hopefully they patch this soon, but I thought I’d mention it. I’m probably hosed on that quest this time through, as a search of the net shows this bug is pretty prevalent and repeatable when doing it in the order presented here. I hope I’m wrong when I get that far (or they finally fix this before then).
Shoot, I’m sorry about that! I’ll update the guide ASAP to warn people not to talk with Alexander (I’m assuming you spoke with him?). Also, thank you very much for the reminder about Mistwood  🙠 It’s been tough trying to update the old guides while also keeping up with publishing new ones, and sometimes stuff slips through the cracks.
Yes, I did speak with him at the rear Gael Tunnel entrance. He now won’t show up for me at all in the spot near Saintsbridge. That’s what got me to start researching this and how I found out about the bug. I had no issues on my first playthrough, as I met him at Saintsbridge first. Not your guys’ fault. They really need to patch this. Most of the NPC quests allow some flexibility if explorers do things a bit out of order. Not for this one. I think you could just remove the Gael Tunnel part entirely here. You’ll find that normally as you are leaving that dungeon, and I don’t think going out of the way to grab it here helps much.
Again, no worries at all. I know it takes a lot of work putting these together in as much detail as you guys do. They’re wonderful guides! I’ll try to point out any other issues I come across as I go through again. 🙂
I didnt speak with Alexander in gael tunnel, but even seeing him there meant that he wasn’t located near the bridge. Hopefully that means the bug has been fixed? But I did miss out on dialogue with him so far (and the emote, and the exhalted flesh). Not sure if his full questline will be affected though.
Thanks for reporting that, and sorry to hear it… hopefully it’s not quest-breaking. Either way, I’ll modify the guide to have people avoid Alexander in this location.
Also, if you don’t mind updating us, it’d be helpful if you can let us know what happens with the quest!
Gilheri
2 years ago
Hello kind guide makers
The guide is wonderful. There are a few things missed but that doesn’t take away from the effort put into this guide. I would like to mention the things I found not mentioned in this guide.
There is a grace point near the secluded beach on top from where you start jumping down (seaside ruins)
Also there is a starlight shard towards the south-east of agheel lake south grace point. Cheers and thank you for all the hard work.
Thank you very much Gilheri! We really appreciate when people help us add stuff we missed 🙂
Vibrioidplague
1 year ago
Hi, not sure if anyone has said this yet, but on the island with the church of dragon communion farther down from the loot beetle there is a corpse with with a smithing stone 2 just down the cliff from where the beetle starts out
Hi Forkinator, it’s pretty close! However, our guide doesn’t worry about achievements, and it’s possible more NPC secrets were discovered since we last updated this guide. It should, at a minimum, take you to every corner of the map though. Glad it’s been helpful so far in any case 🙂
Hey David. I really appreciate your response and I sincerely thank you for this guide. I was curious why there’s no mention of the glintstone key required to get into raya Lucaria? I just finished East liurnia and the next guide is raya Lucaria academy but nowhere does it mention the key. What did I miss?
I forgot to mention that at the end of East liurnia walkthrough, it should link to either central or west liurnia since most people will be doing east liurnia first.
People should not have the academy key if following the guide from top to bottom, Just a thought.
I really enjoy following guides and being directed (as this guide has done up until this point).
Thanks for the feedback Forkinator, you’re right that we’re missing a note telling people to continue on to the next tab. The Glintstone Key is mentioned in the Central Liurnia tab, which is on the same page as the rest of the Liurnia guide.


Loved this guide on my last run, the best around imo. Literally the only thing I think missing from Limgrave is that if you go west from the Artist’s Shack grace, jump up the rocks on your left & you should see a beetle which drops a Somber Smithing Stone (1) & then explodes! Looking over the cliff edge you can see (& jump down to) the Murkwater Coast grace, which also isn’t mentioned. Looking forward to the expansion!
this has been one of the best and most usefull guides i have found so far for this game keep up the fantastic work also 2 things one will you be covering eventually the various endings and the questlines to get to the endings? also as for lingrave there are couple areas not mentioned in this guide that i ended up coming across namely Murkwater Coast Highroad Cave Agheel Lake South
Seaside Ruins
ik this game is massive and easy to miss things so wanted to point this out so that this guide section could be more fully complete
regardless loving this guide keep up the amazing work
Thanks lesskarr, it’s pretty tough to find everything so your help is much appreciated! We’ll definitely add Highroad Cave in when we can, and I’m also seeing the spot we missed in Agheel Lake South (where you get the Large Club) — any chance you could give me a hint about Murkwater coast as far as what we should add to the guide?
As for the quests and endings, the short answer is yes, eventually. However, it will probably be a little while until we get there, as I honestly haven’t had much time to progress through the game with all the guide/database work we’ve been doing 😀
i understand no rush just was being curious 🙂
as for murkwater coast and other places i mentioned i found out about them by coming across them and also from when i was consulting another guide before i ended up finding this one https://www.neoseeker.com/elden-ring/walkthrough/Agheel_Lake
Awesome, thanks!
no problem glad to help
I just had to comment here and say what a fantastic guide this is. Thank you so much for taking the time to create it
Thank you very much Jayce, I truly love hearing that these guides are helpful — it makes me feel like the time we spend on them is worth it!
I really enjoy reading this guide because I know what to do next.
I think a lot of people will agree that they don’t know where to go and what to next in such a huge and empty world! I even put the game away for one time. With this guide I tried to pick it up again and can enjoy it.
We need Mt. Gelmir stat! 💪ðŸ¼ðŸ™ðŸ¼
Hi Brian, sorry for the delay on Mt. Gelmir — both myself and the other Elden Ring writer have IRL obligations this week (and part of the next), but we’re going to work twice as hard the following week to try and catch up!
There are two references to “Scavenger’s Shack” in the walkthrough which I believe should be “Stormhill Shack” to match your map.
You’re absolutely correct, thanks Chris! I think that was a relic from when we’d used network test data to build this walkthrough.
loving the guide so far!! One thing I noticed – when you’re going after the Ash of War Gravitas, there’s a lost grace called Seaside that’s just south of your mark on the map pictured here. A bit south of the grace, look over there edge to find a spiritjump that’ll get you safely to the bottom.
Nice find!
There’s also an air current you can jump off the cliff into and ride it all the way down to the Gravitas beach to avoid having to do the difficult jumping down ledges part, it’s just a bit more to the south from the jumps.
Ayo the teleporter sent me to the bestial sanctum, did they change that?
Thanks for reporting that Adam, based on your experience it sure seems that way — I’ll edit the guide accordingly. You’ll probably just need to keep adventuring and resting at sites of grace — Melina should show up at a site of grace soon and offer to take you to Roundtable Hold.
Hey this has been an outstanding guide and made the game accessible to me. Thank you so much for your hard work on it.
That’s awesome to hear Adam! Elden Ring can be overwhelming as heck, especially if you’re new to the FromSoft formula. They’re my favorite games, and it’s been such a pleasure to help other people enjoy them.
the sacred blade Ash of war comes from a knight near the area you said it is at, not the “loot beetle”
Nevermind, i was thinking of golden vow, sorry
No worries! We did seem to be missing the location for the Ash of War: Golden Vow as well as the nearby Lance, which we may not have noticed without your help. Thanks for the feedback!
yeah, that’s what i was thinkin of.
You guys are making like, the most high quality walkthrough I have found, like, this outranks fextra which is pretty shit to begin with. but if you are looking for stuff you might be missing I would suggest fextra, and somehow incorporate it into this walkthrough
like the notebook on the broken bridge leading to liurnia
AND there is a “loot beetle” next to the knight who drops the golden vow ash of war that you forgot as well :p
Thanks for the heads-up!
You also forgot the wild strikes ash of war before the margit fight.
And the mistwood ruins aren’t mentioned besides Blaidd’s quest
Hello, It seems you are missing the Highroad Cave from the Limgrave area. It’s all the way to the North, close to the Divine Tower.If you go by the Saintsbridge Site of Grace, it’s under that bridge in the water a little to the north on the left side cliff. There’s a Guardian Golem “boss” in there. It drops the blue dancer charm.
Thank you very much Edgar! We’d published the guide for the cave, but neglected to put it in the Limgrave guide.
Thanks for the feedback Kurban! We’ll work on getting the divine towers in each walkthrough section, and we’ll try to find a good place to link the Siofra River guide as well.
Hey! I love you walkthrough it is hamdsdown thee best. But it is cut a bit short. Just food for thought here. Can you look into adding NPC questlines somewhere. Honestly the main ones are Varris and Ranni IMO. But even the spirit turning girl I had to Google elsewhere how ro complete. You brought me through stormviel with her but then I didn’t know what to do really. I’m not making insults here or throwing shade. You have an evenly detailed and easly followed guide. But it seems after the huge detail in limgrave we kind of have to find the dungeons and side quests In Lurinia forward. I know this game has a novel of things to follow. But just the main stuff I would like to see more of. Not just how to simply beat the game. Again maybe missing certain key links somewhere and you have it all covered but if not please consider it
Hi Brent, thanks for the feedback. We completely agree with you, and are actively working on the NPC entries and their related quests. We’ve had to balance getting the walkthroughs done with adding enough detail, and so we decided (since lots of other websites have the quests) to prioritize finishing the first chunk of walkthroughs before we added NPC quests.
I could only enjoy Elden Ring with the help of the guide. There are others guides out there but this one is the true guide that can help. Great job!! (How long will it take to complete all the content?)
Appreciate that, Frank. If I had to estimate optimistically, I’d say another month — we’re probably about 2/3 done with the walkthroughs, and it took us 2 months to get this far.
I think you guys missed the Deathbird to the north east of the lake just north of storm gate
Or southeast of the war master’s shack
Thanks Matt, you’re right! Nice catch — I’ll get that in the guide.
I recently completed using this Limgrave guide as I started my second playthrough and noticed a couple of issues I thought I’d mention. First off, the Mistwood Ruins near where you call out to Blaidd aren’t covered (another commenter mentioned this, I think). Killing the bear at this location reveals a stairway underneath with an Axe Talisman. There are a few other loot items around the area as well.
The bigger issue I found is following this guide as currently written likely messed up my Alexander the Jar questline. Apparently there has been a long-standing bug they haven’t fixed yet that will cause issues with the Alexander quest if you meet him at rear Gael Tunnel entrance first. The intended first encounter with him is above the Saintsbridge Site of Grace where he’s stuck. Until they patch this, doing it out of order causes his quest progression to get permanently stuck after the Radahn fight. Hopefully they patch this soon, but I thought I’d mention it. I’m probably hosed on that quest this time through, as a search of the net shows this bug is pretty prevalent and repeatable when doing it in the order presented here. I hope I’m wrong when I get that far (or they finally fix this before then).
Shoot, I’m sorry about that! I’ll update the guide ASAP to warn people not to talk with Alexander (I’m assuming you spoke with him?). Also, thank you very much for the reminder about Mistwood  🙠 It’s been tough trying to update the old guides while also keeping up with publishing new ones, and sometimes stuff slips through the cracks.
Yes, I did speak with him at the rear Gael Tunnel entrance. He now won’t show up for me at all in the spot near Saintsbridge. That’s what got me to start researching this and how I found out about the bug. I had no issues on my first playthrough, as I met him at Saintsbridge first. Not your guys’ fault. They really need to patch this. Most of the NPC quests allow some flexibility if explorers do things a bit out of order. Not for this one. I think you could just remove the Gael Tunnel part entirely here. You’ll find that normally as you are leaving that dungeon, and I don’t think going out of the way to grab it here helps much.
Again, no worries at all. I know it takes a lot of work putting these together in as much detail as you guys do. They’re wonderful guides! I’ll try to point out any other issues I come across as I go through again. 🙂
Thanks Malavesh, really appreciate all the help finding issues!
Hi there,
Thank you for this guide!
I didnt speak with Alexander in gael tunnel, but even seeing him there meant that he wasn’t located near the bridge. Hopefully that means the bug has been fixed? But I did miss out on dialogue with him so far (and the emote, and the exhalted flesh). Not sure if his full questline will be affected though.
Thanks again!
Thanks for reporting that, and sorry to hear it… hopefully it’s not quest-breaking. Either way, I’ll modify the guide to have people avoid Alexander in this location.
Also, if you don’t mind updating us, it’d be helpful if you can let us know what happens with the quest!
Hello kind guide makers
The guide is wonderful. There are a few things missed but that doesn’t take away from the effort put into this guide. I would like to mention the things I found not mentioned in this guide.
There is a grace point near the secluded beach on top from where you start jumping down (seaside ruins)
Also there is a starlight shard towards the south-east of agheel lake south grace point. Cheers and thank you for all the hard work.
Thank you very much Gilheri! We really appreciate when people help us add stuff we missed 🙂
Hi, not sure if anyone has said this yet, but on the island with the church of dragon communion farther down from the loot beetle there is a corpse with with a smithing stone 2 just down the cliff from where the beetle starts out
You never mention the storm foot catacombs? Why?
The Stormfoot Catacombs actually are mentioned, as the second dungeon to visit. They link to our walkthrough for the dungeon itself, found here:
https://eip.gg/elden-ring/guides/stormfoot-catacombs-dungeon-walkthrough/
Hey I was curious if this is a 100% guide? Thank you for making it I really appreciate it.
Hi Forkinator, it’s pretty close! However, our guide doesn’t worry about achievements, and it’s possible more NPC secrets were discovered since we last updated this guide. It should, at a minimum, take you to every corner of the map though. Glad it’s been helpful so far in any case 🙂
Hey David. I really appreciate your response and I sincerely thank you for this guide. I was curious why there’s no mention of the glintstone key required to get into raya Lucaria? I just finished East liurnia and the next guide is raya Lucaria academy but nowhere does it mention the key. What did I miss?
I forgot to mention that at the end of East liurnia walkthrough, it should link to either central or west liurnia since most people will be doing east liurnia first.
People should not have the academy key if following the guide from top to bottom, Just a thought.
I really enjoy following guides and being directed (as this guide has done up until this point).
Thanks for the feedback Forkinator, you’re right that we’re missing a note telling people to continue on to the next tab. The Glintstone Key is mentioned in the Central Liurnia tab, which is on the same page as the rest of the Liurnia guide.
Please know that I really appreciate this guide. Thank you so much.