Found east of Limgrave, Caelid is home to some tough enemies and some disgusting Rot. Unless you’re coming here for a specific item, it’s best to wait until you’ve reached at least level 60, or completed Liurnia of the Lakes, before coming to Caelid.
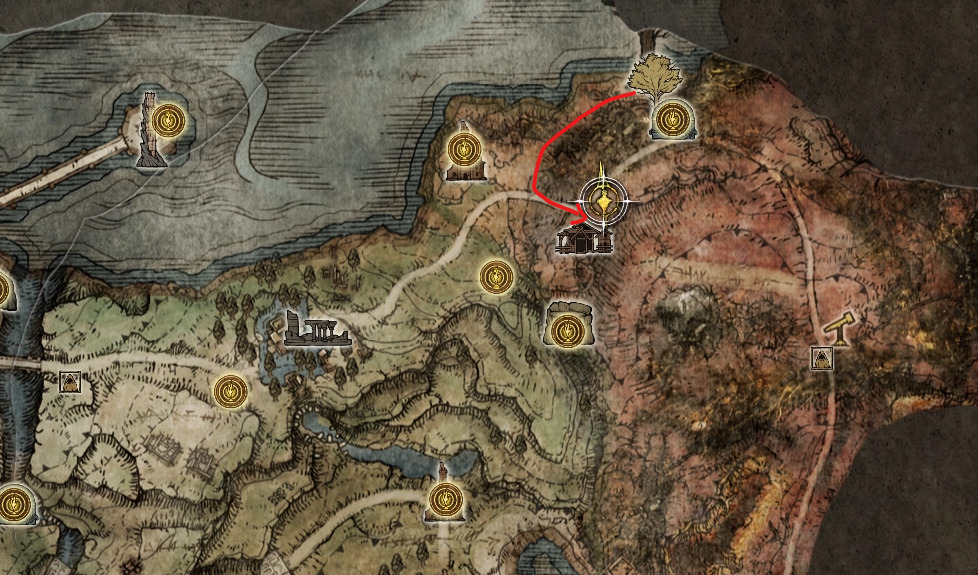
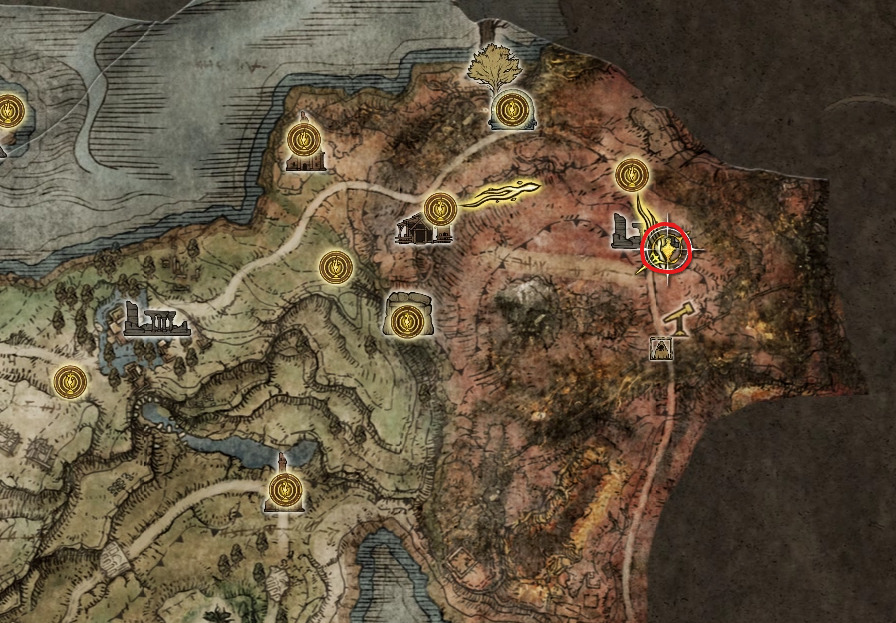
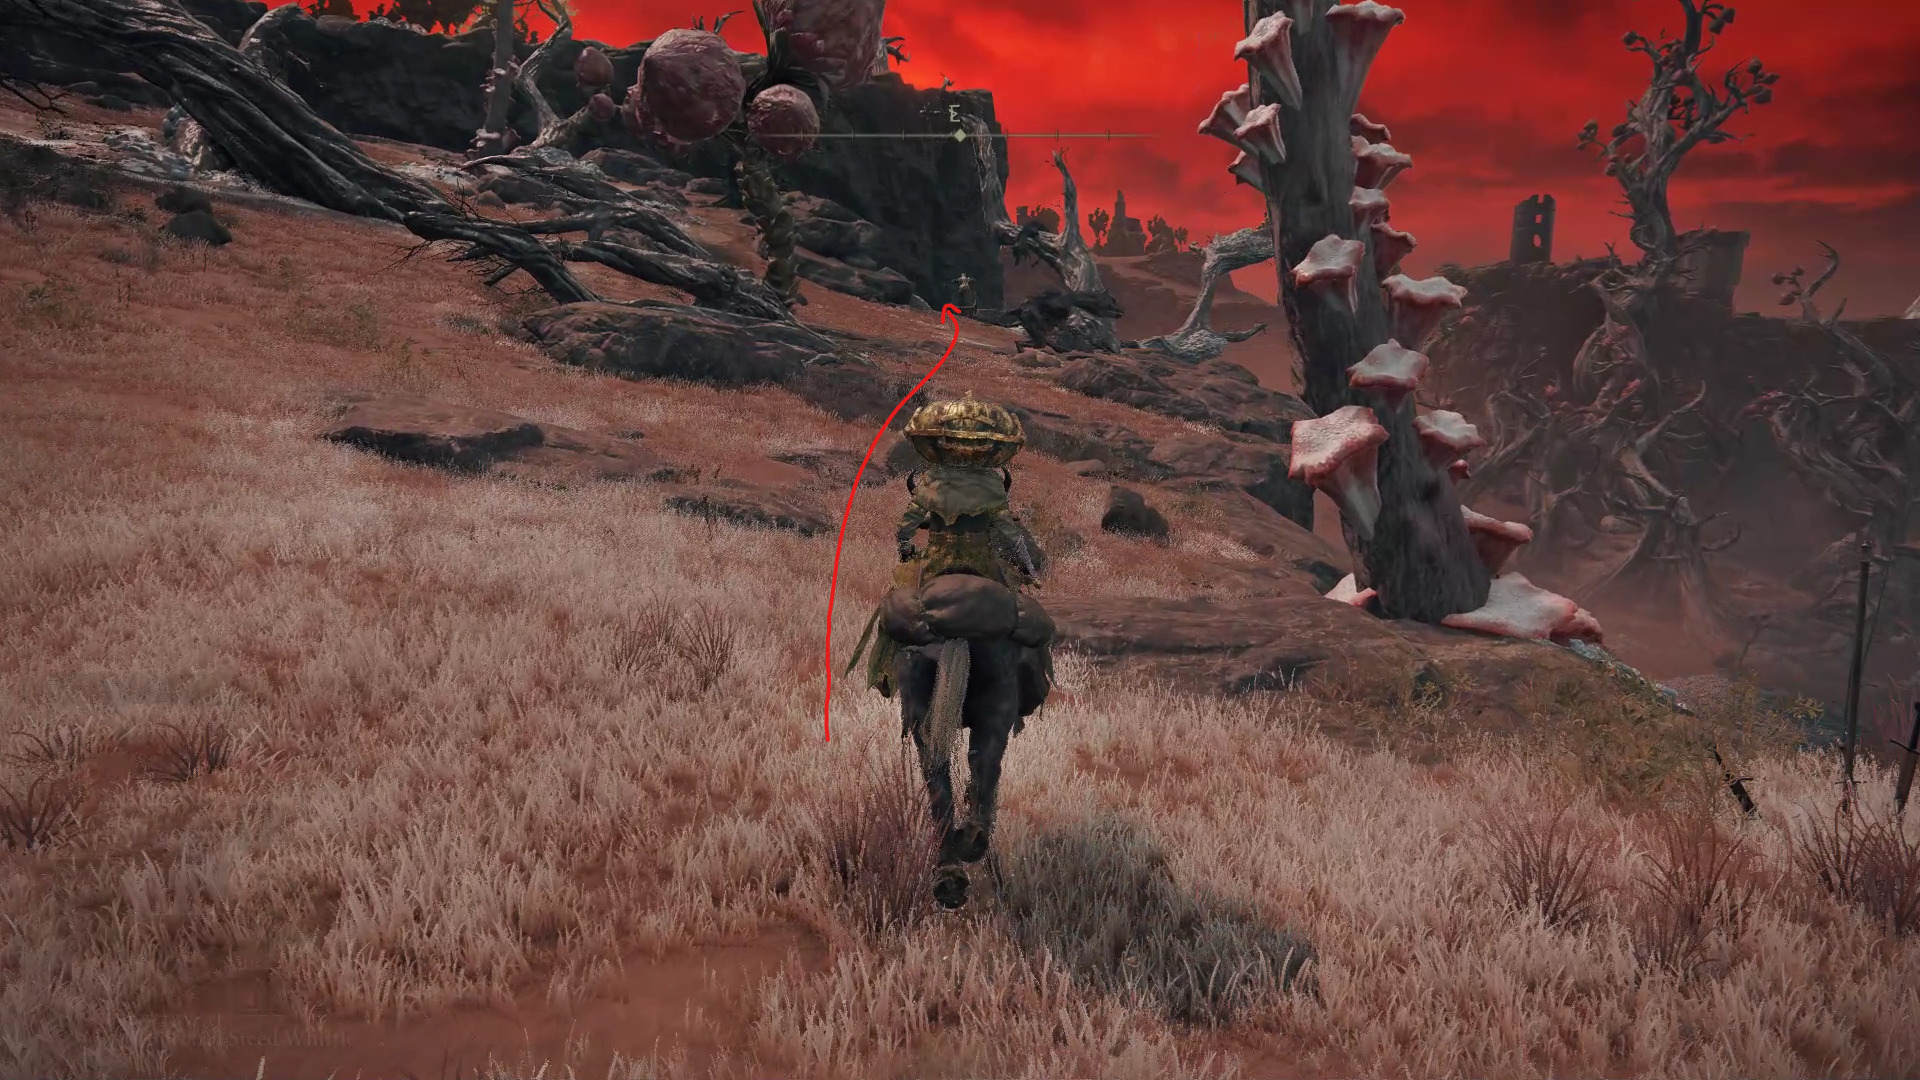
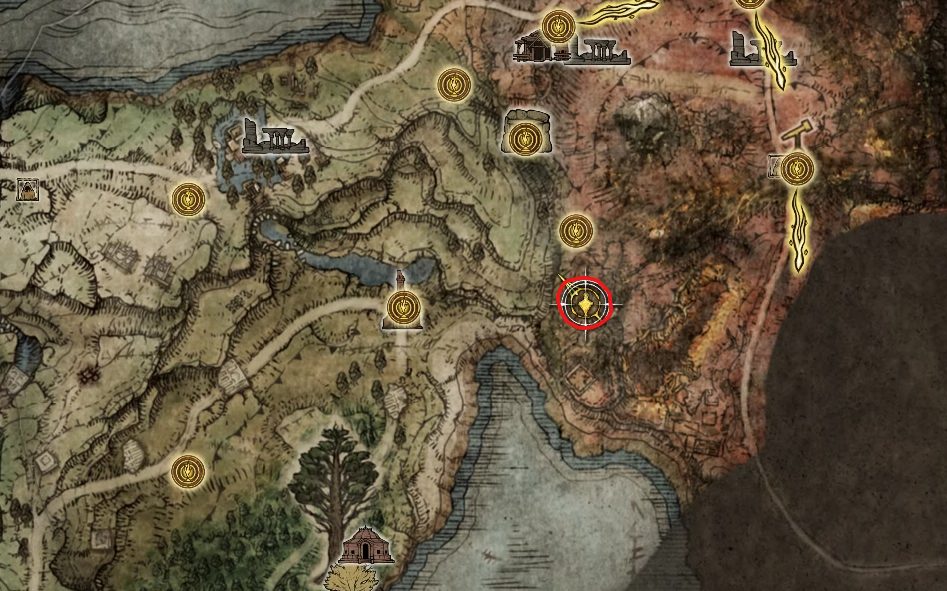
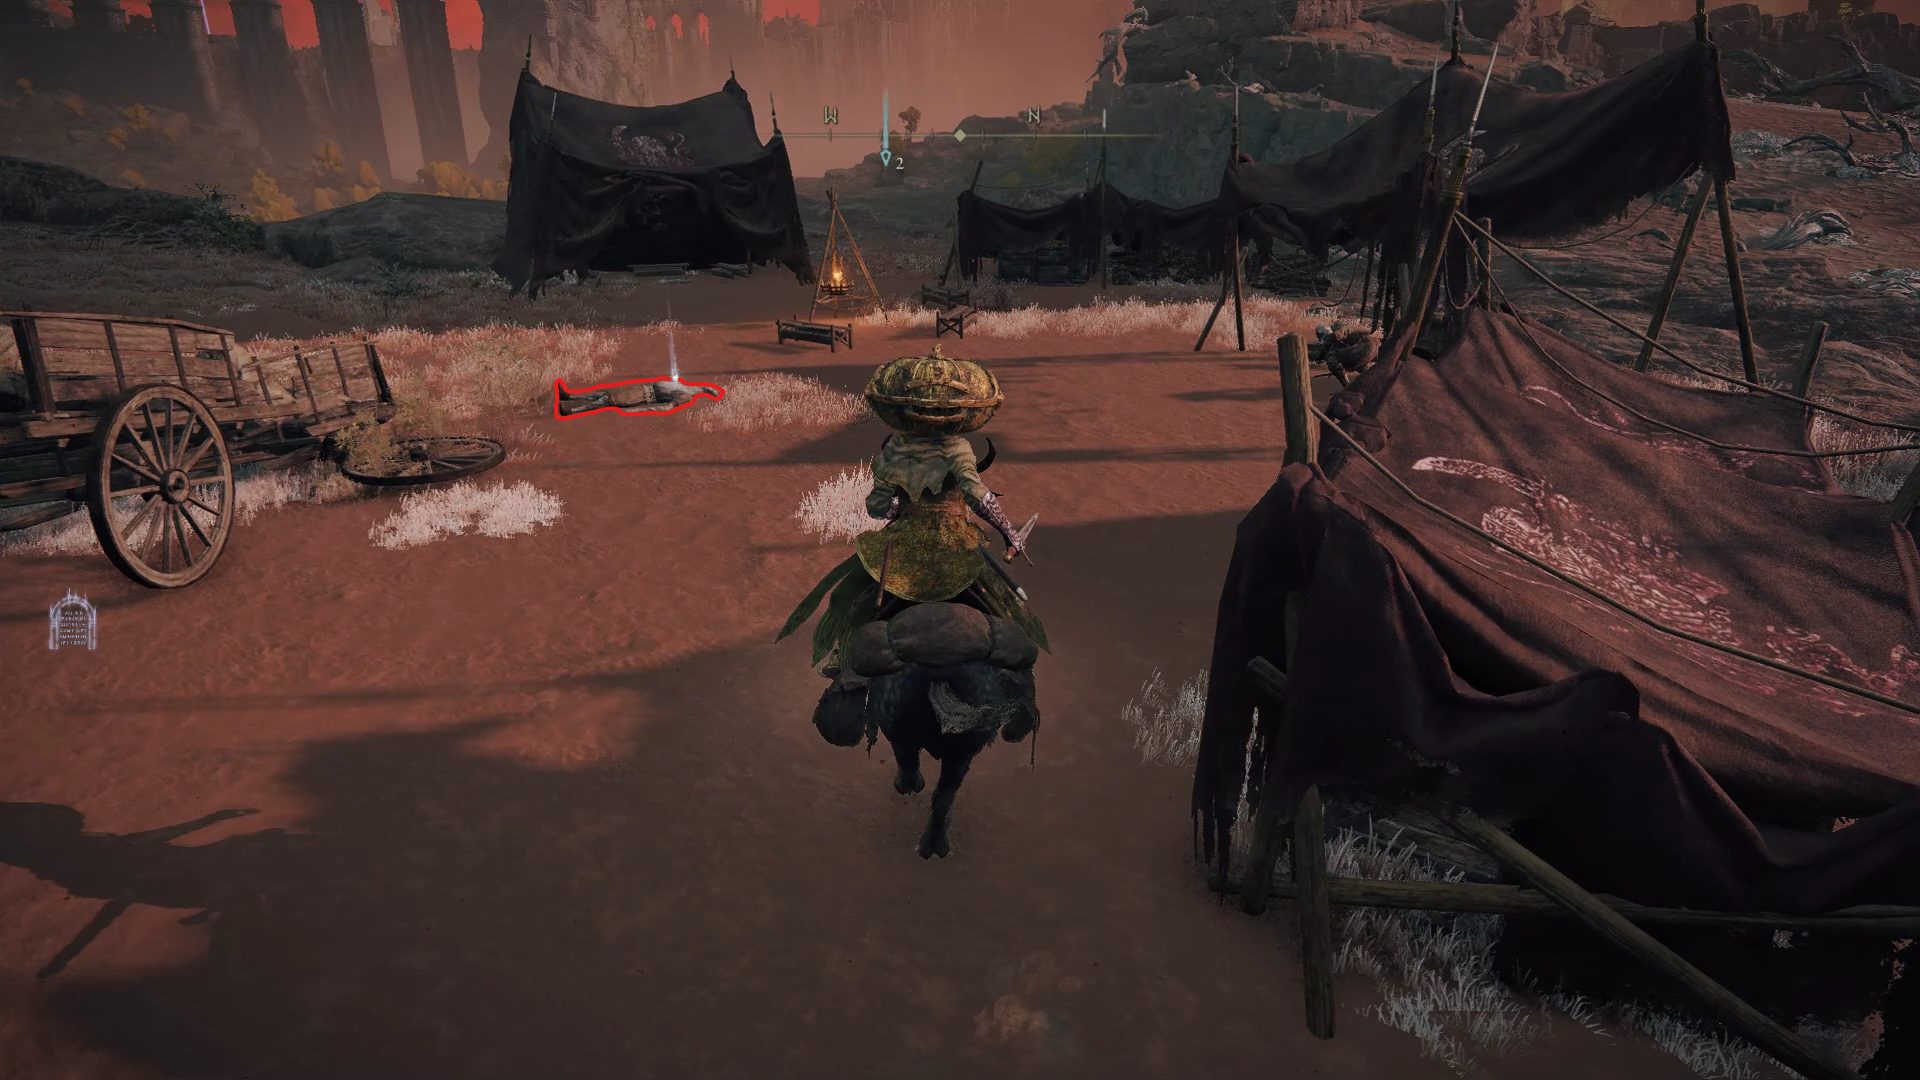
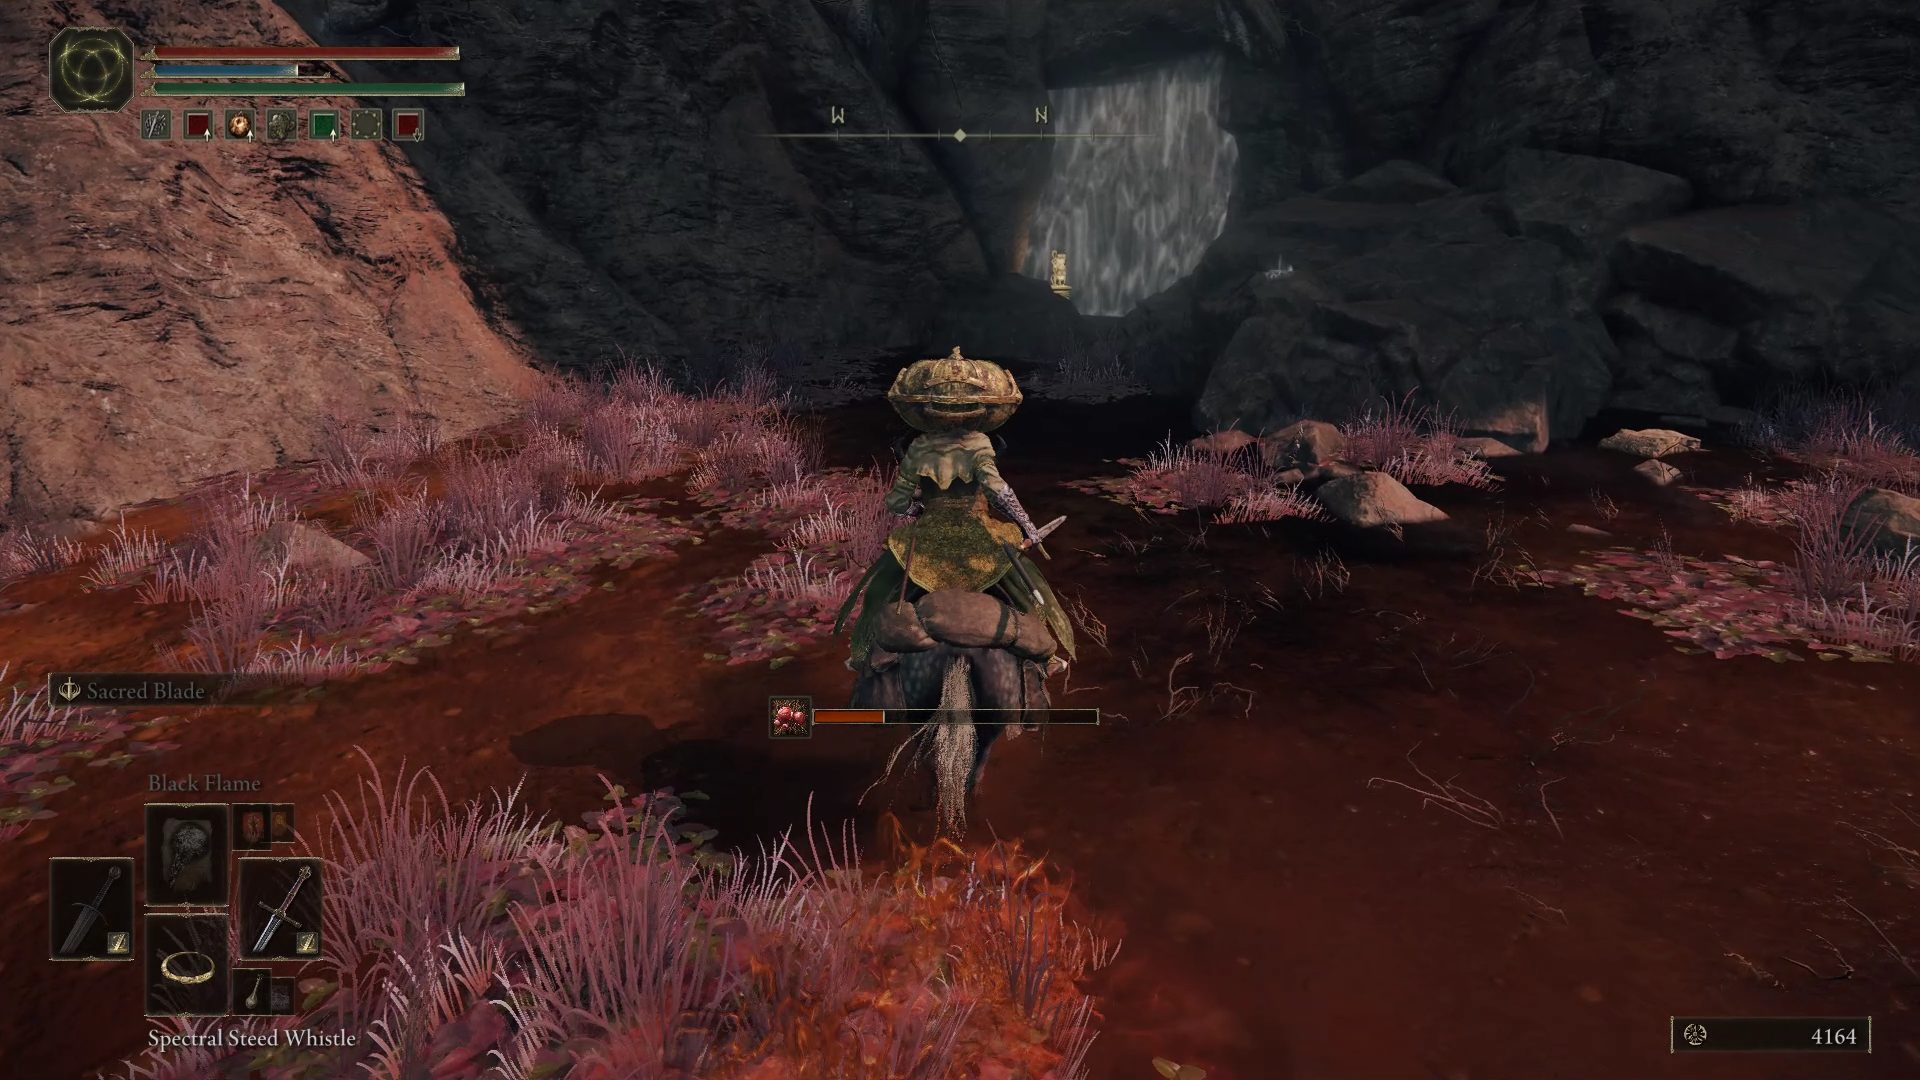
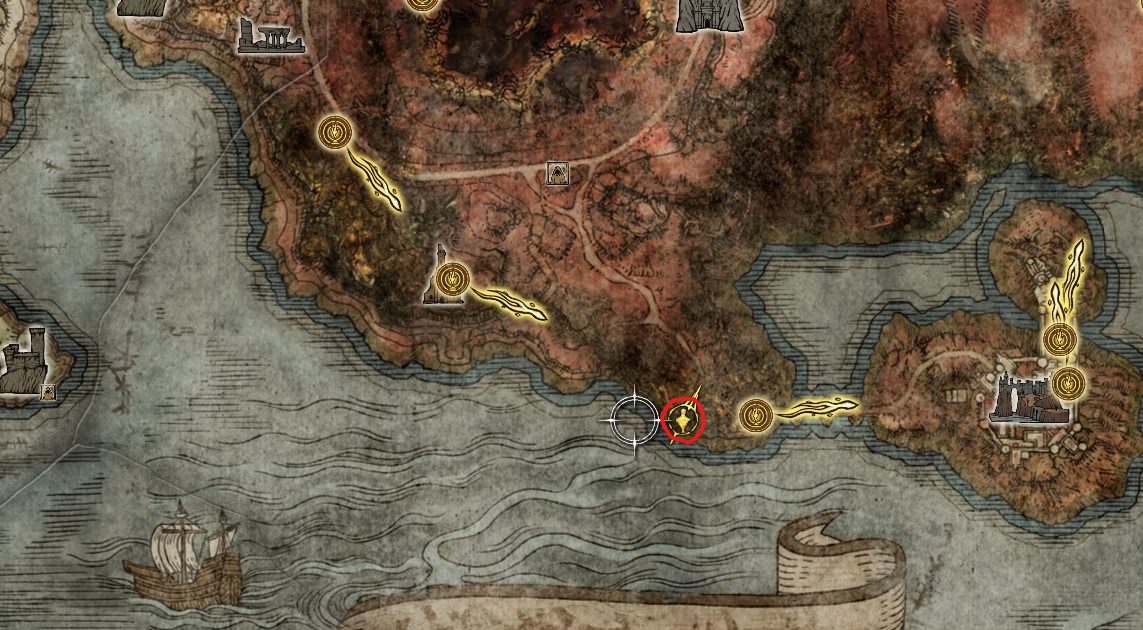
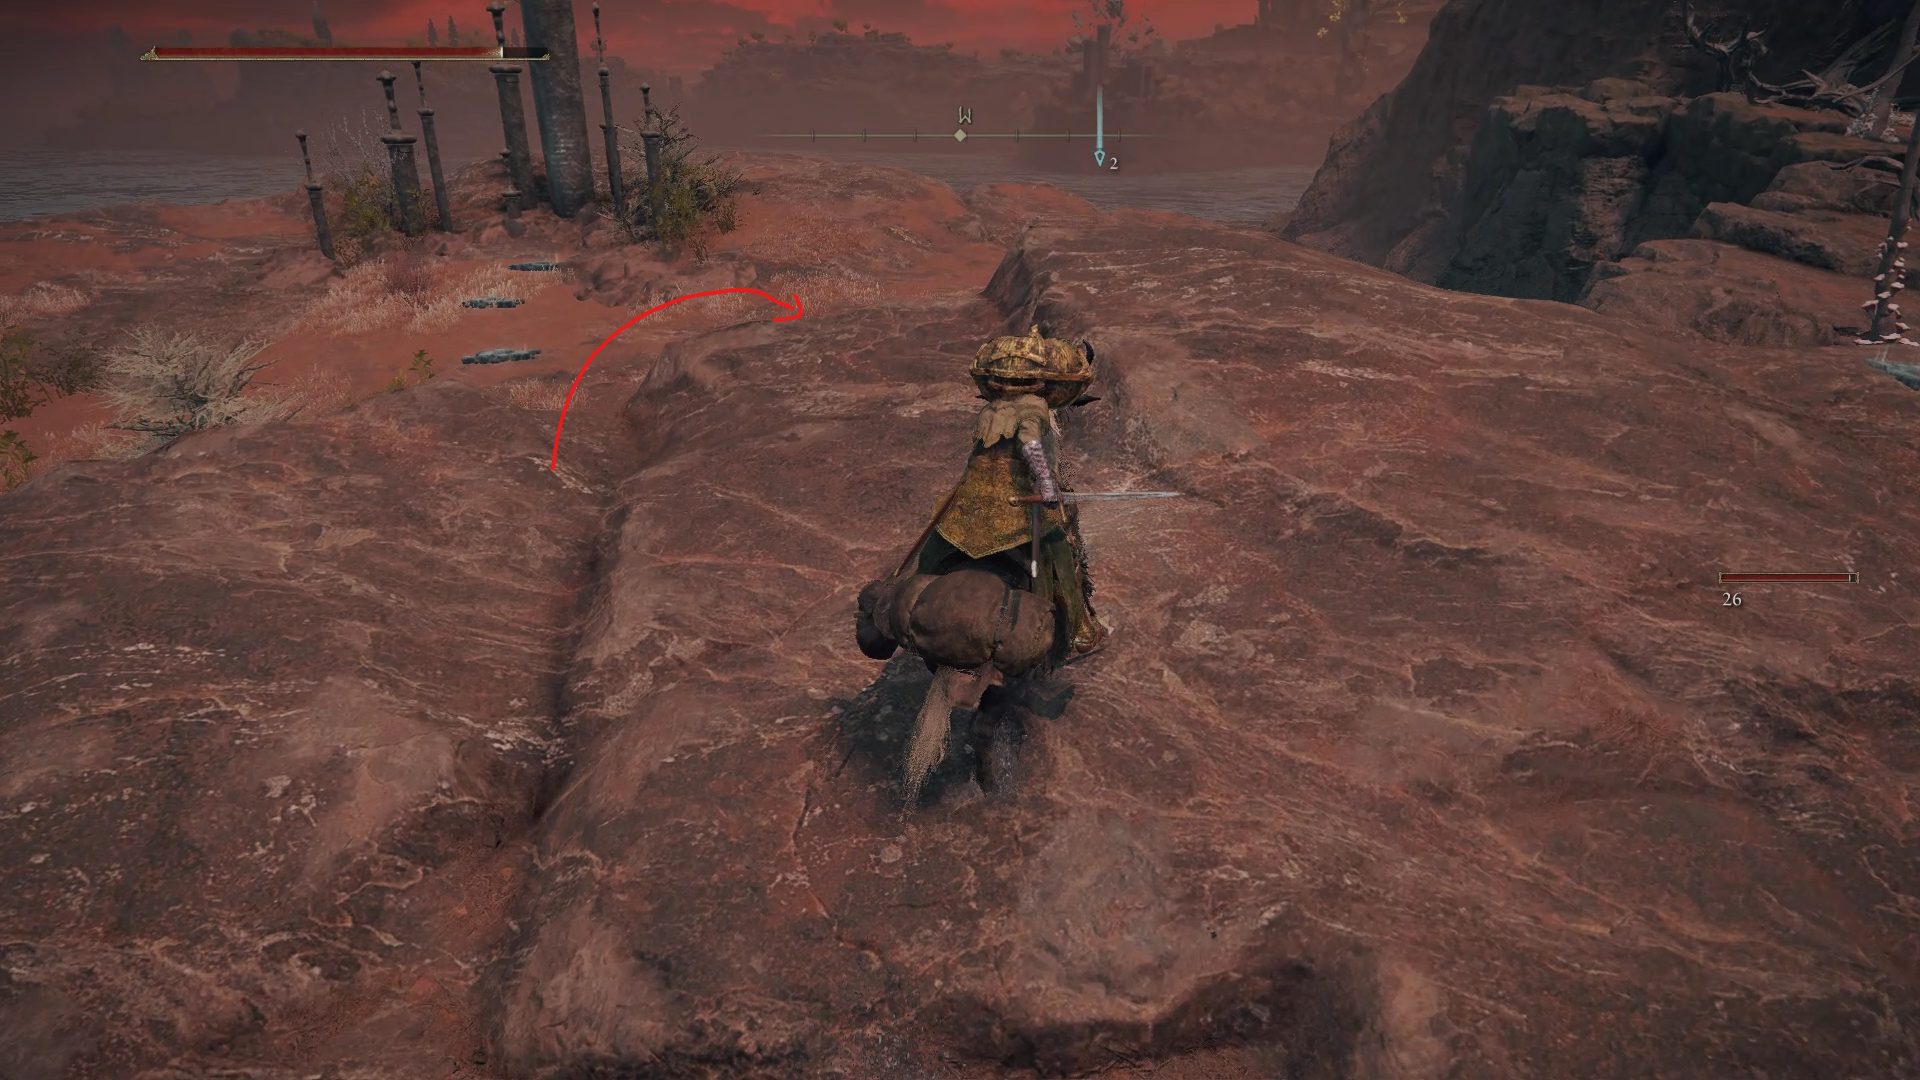
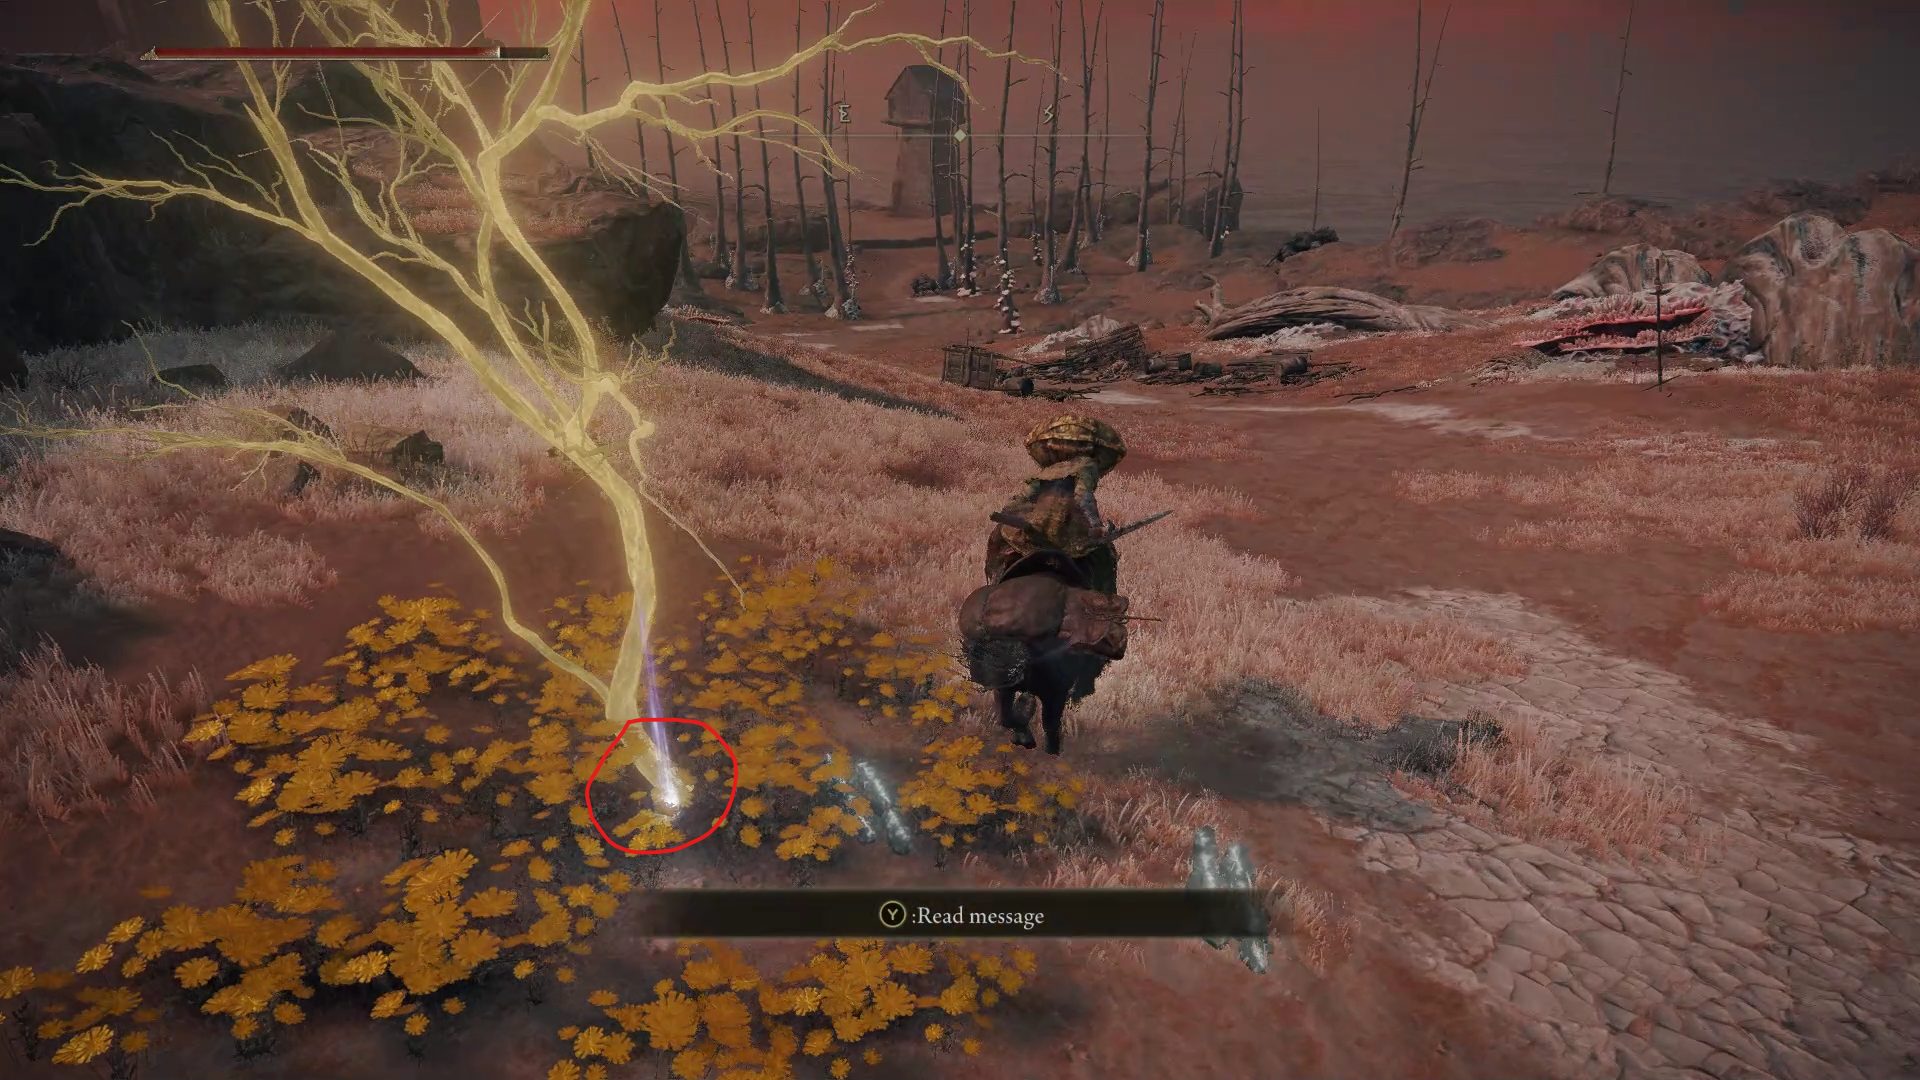
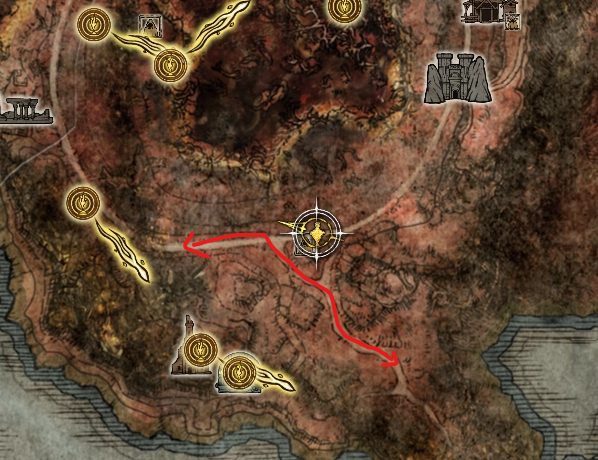
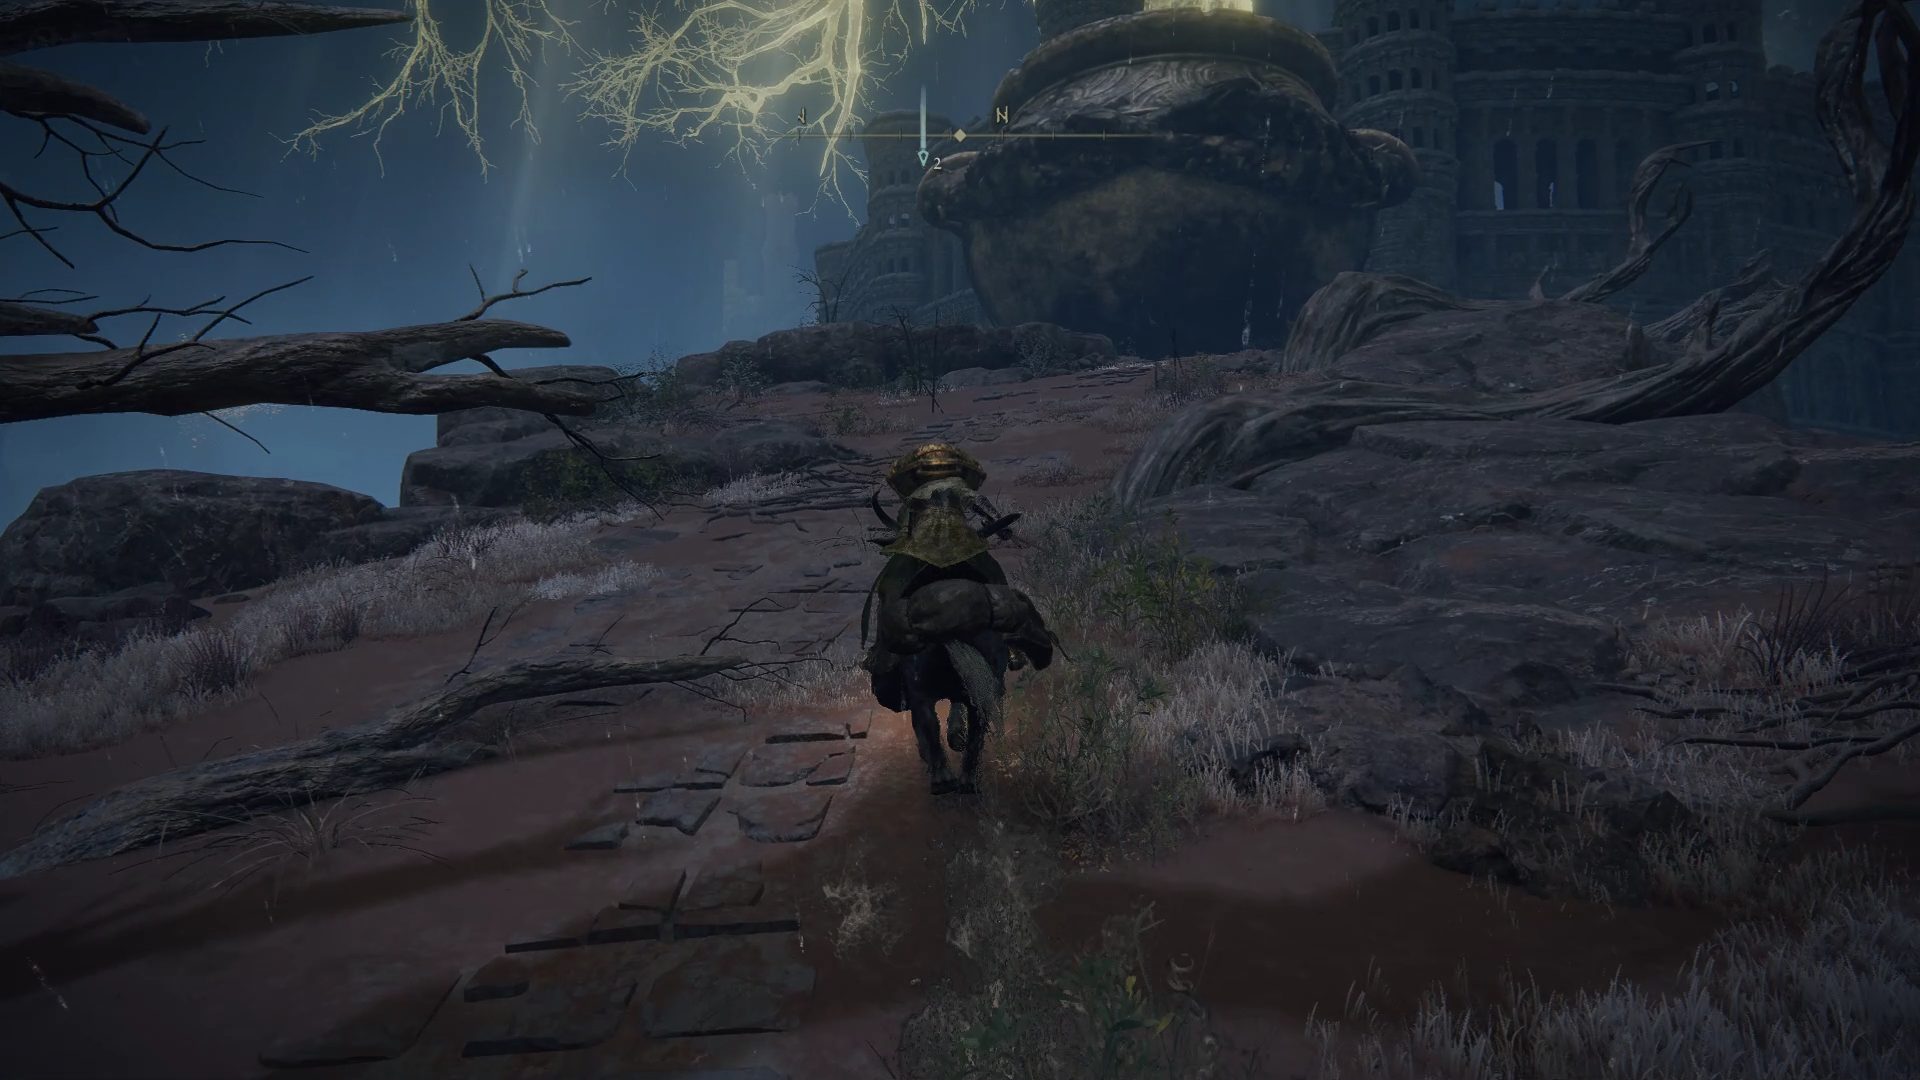
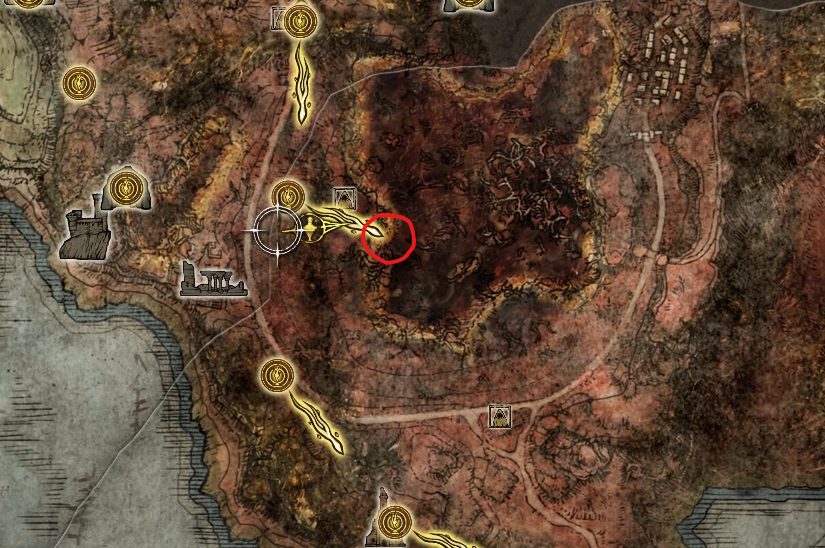
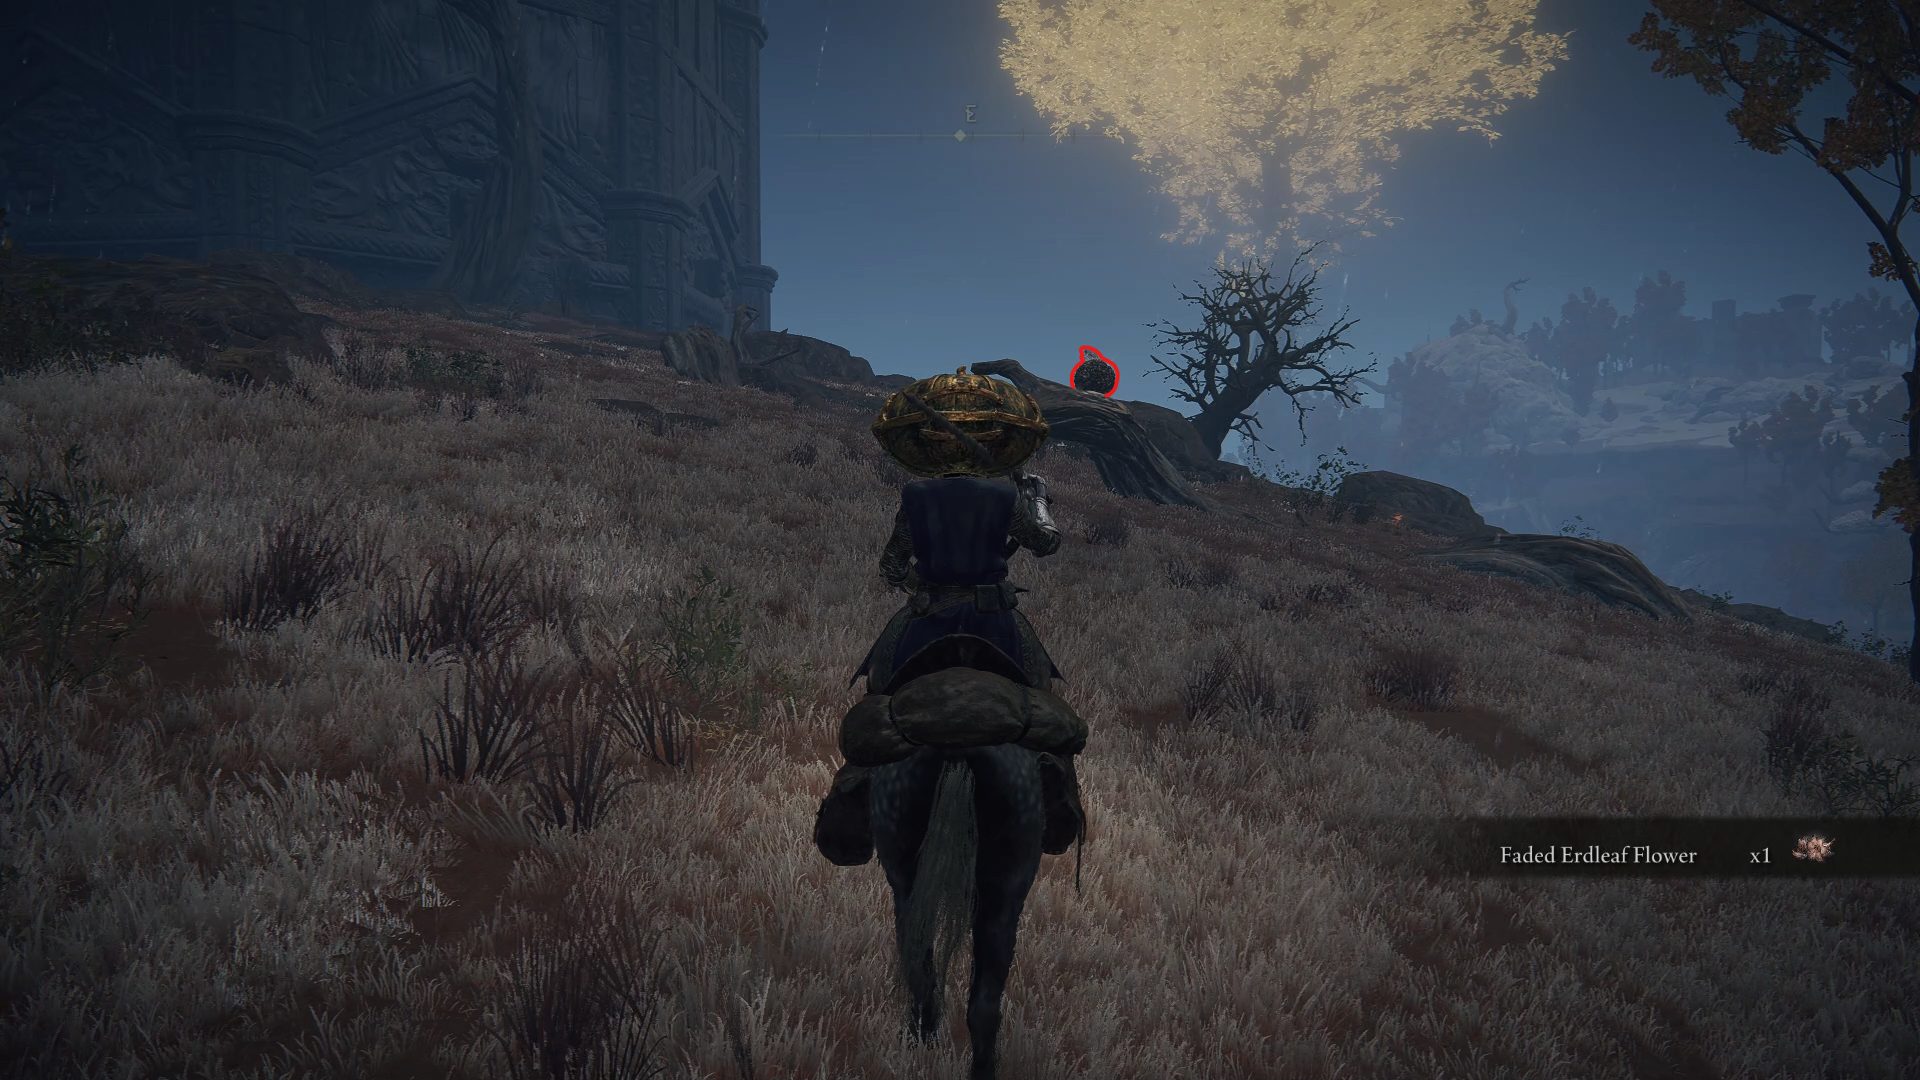
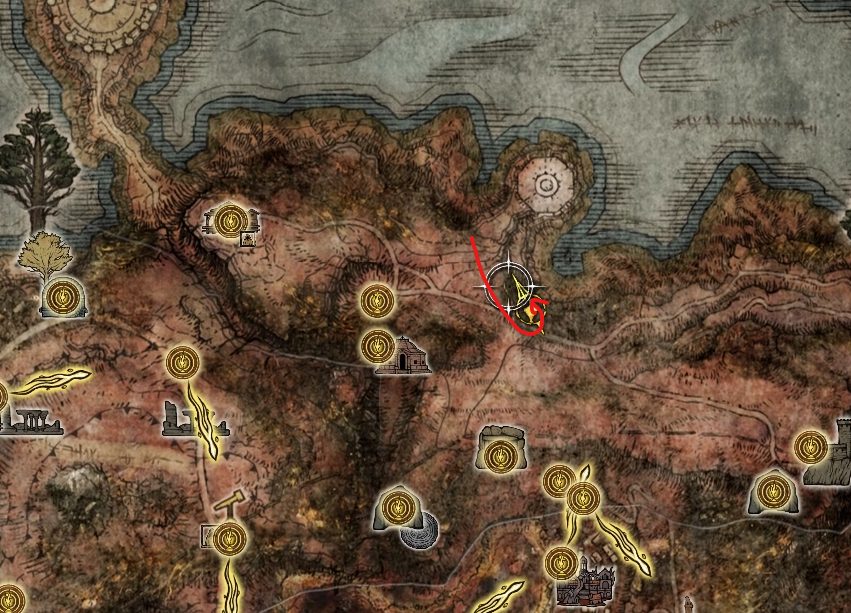
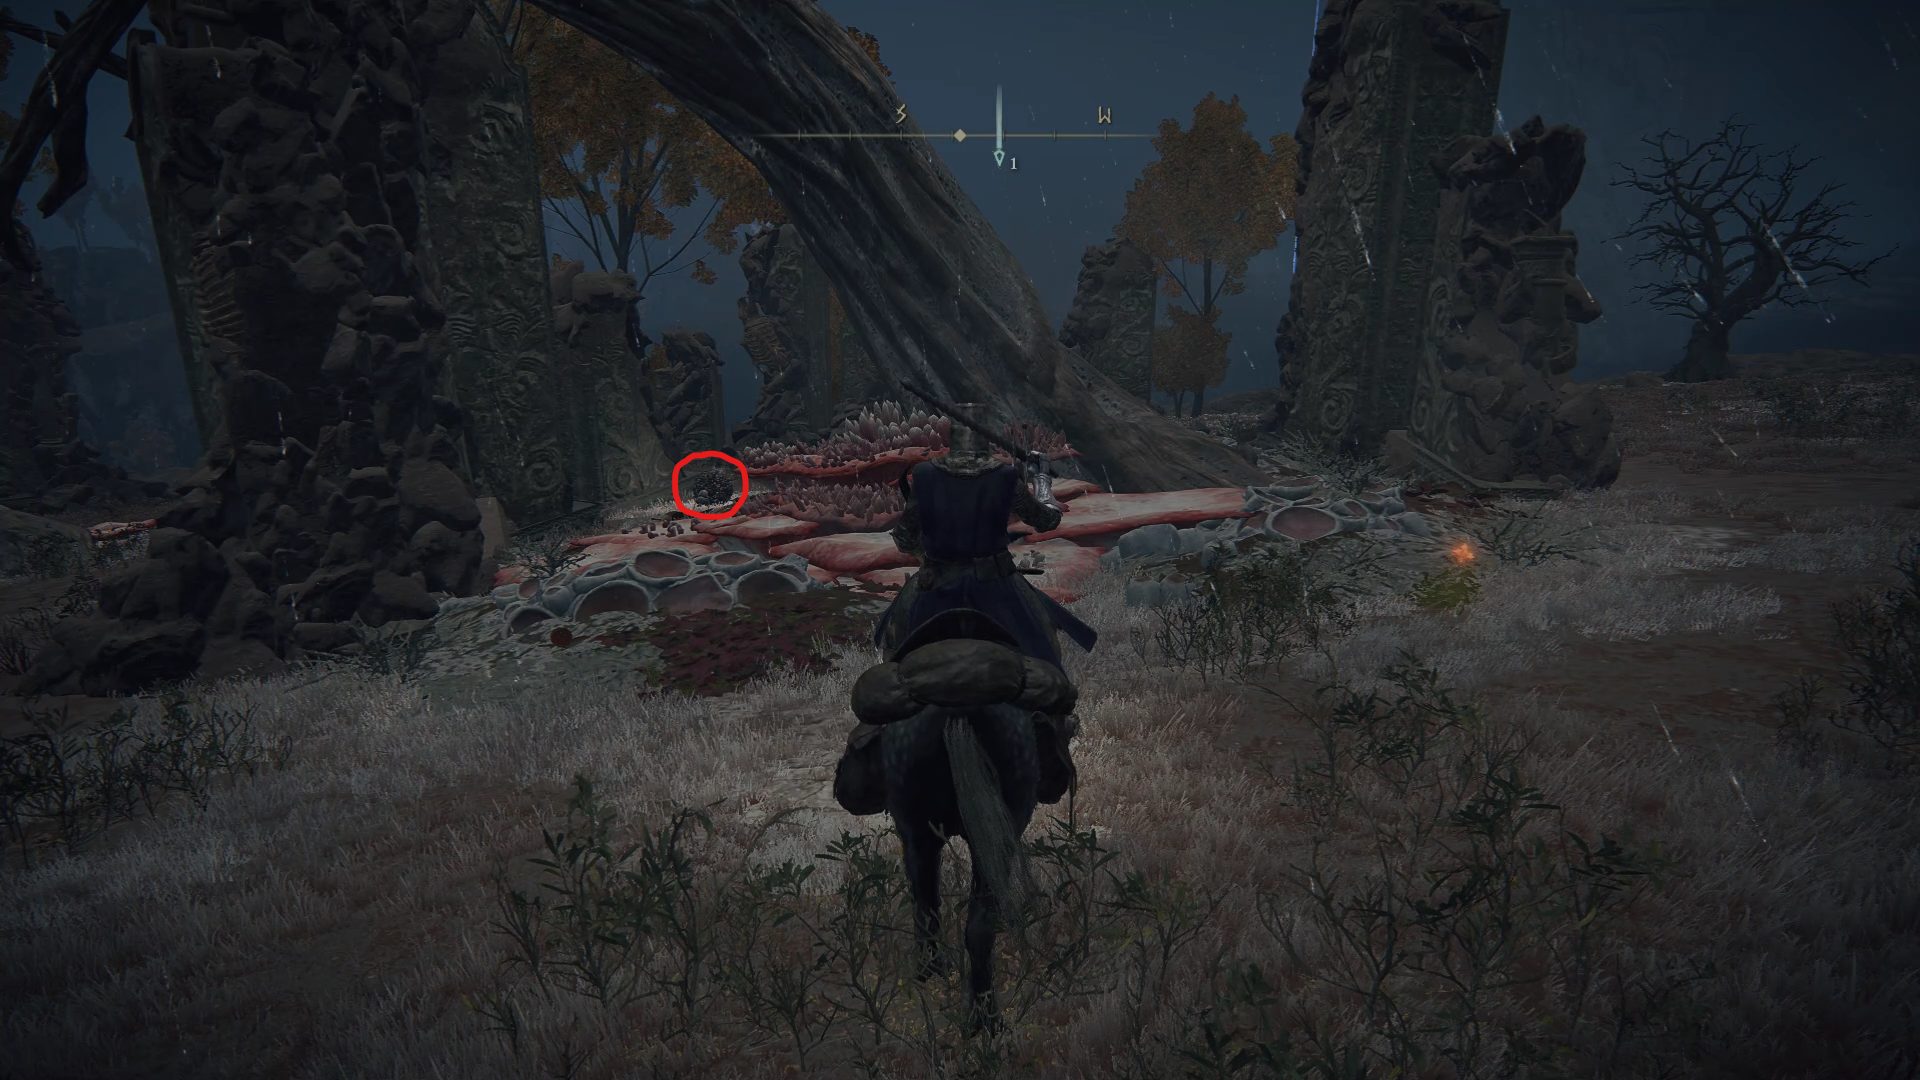
While you can get to Caelid in a few different ways, exploring from the Smouldering Church site of grace is the easiest way to make sure not to miss anything. As such, from the Smouldering Church site of grace, follow the road going east until you reach a broken-down cart with several sick-looking dogs. There you can find 2x Drawstring Lightning Grease. From there, instead of continuing east, we’ll be making a small detour to grab some quick but valuable loot. Go north east and follow the path down to the nearby Minor Erdtree.
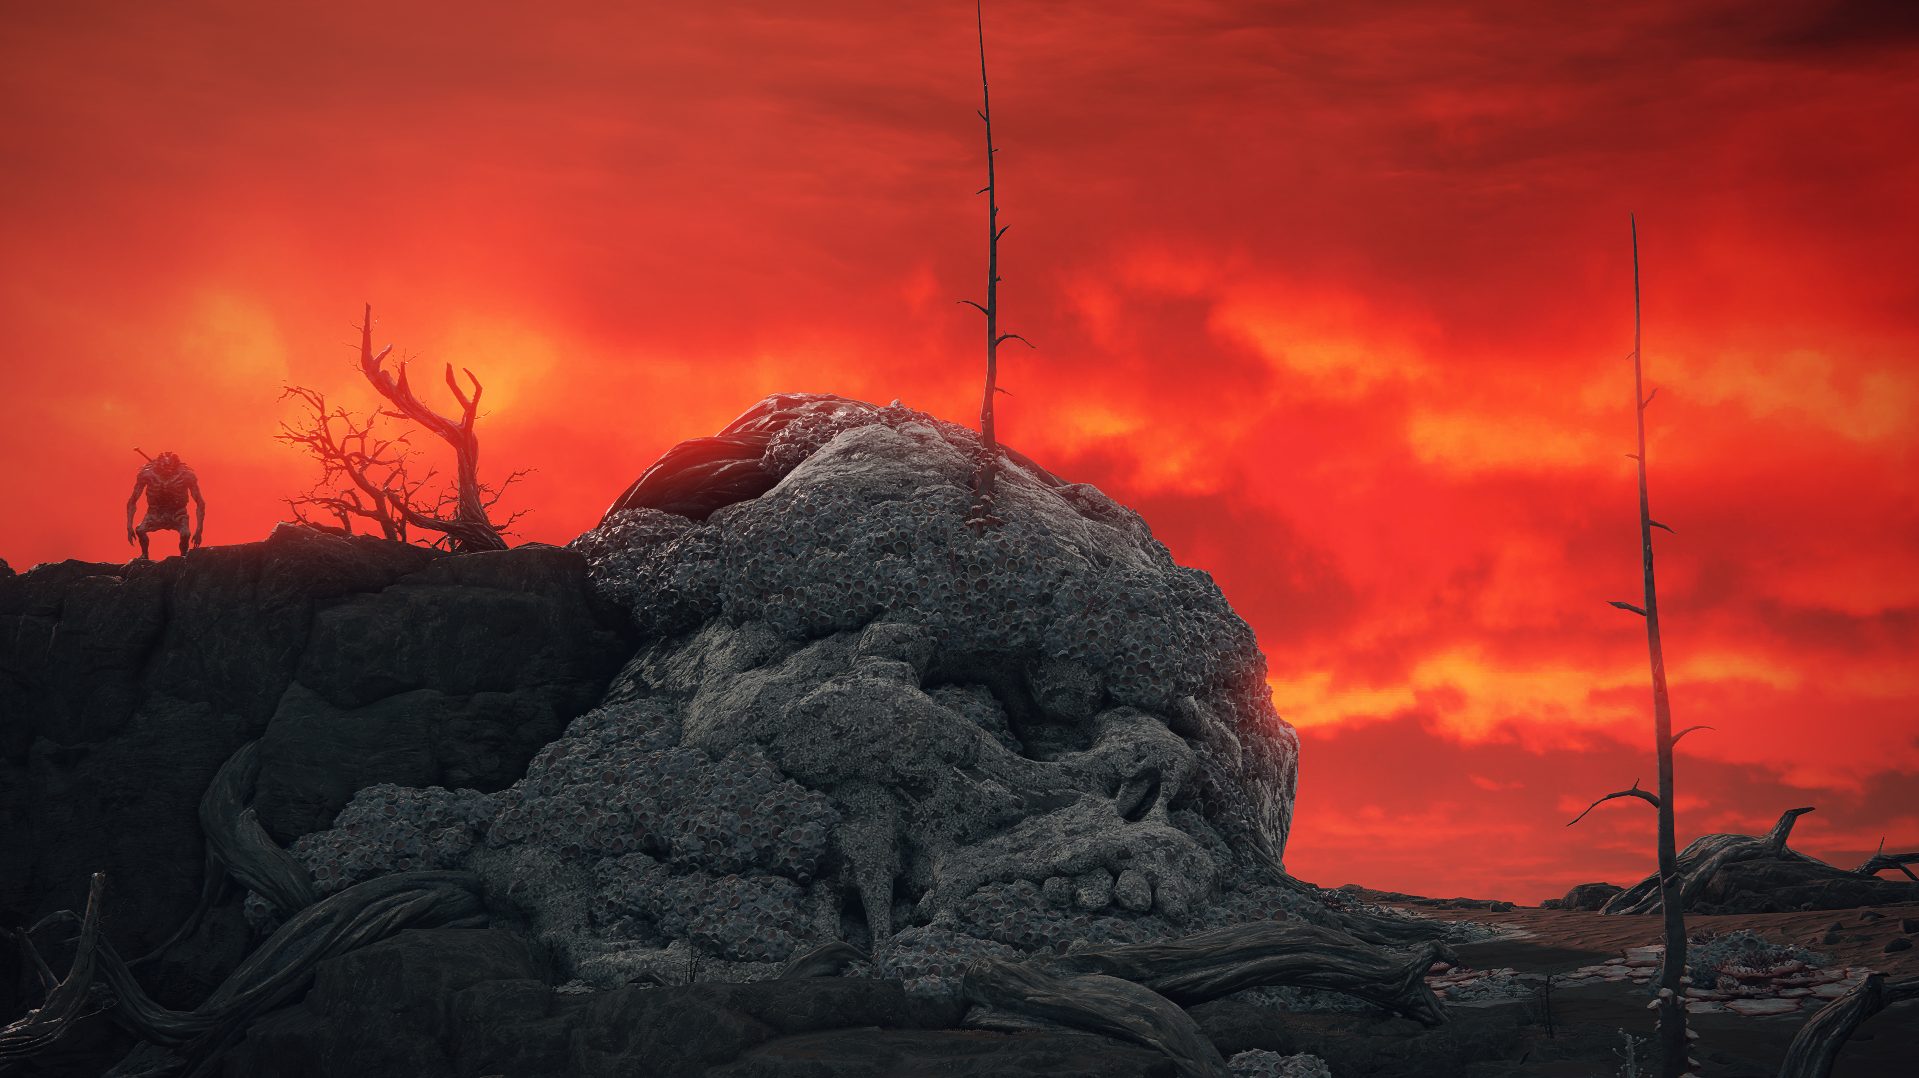
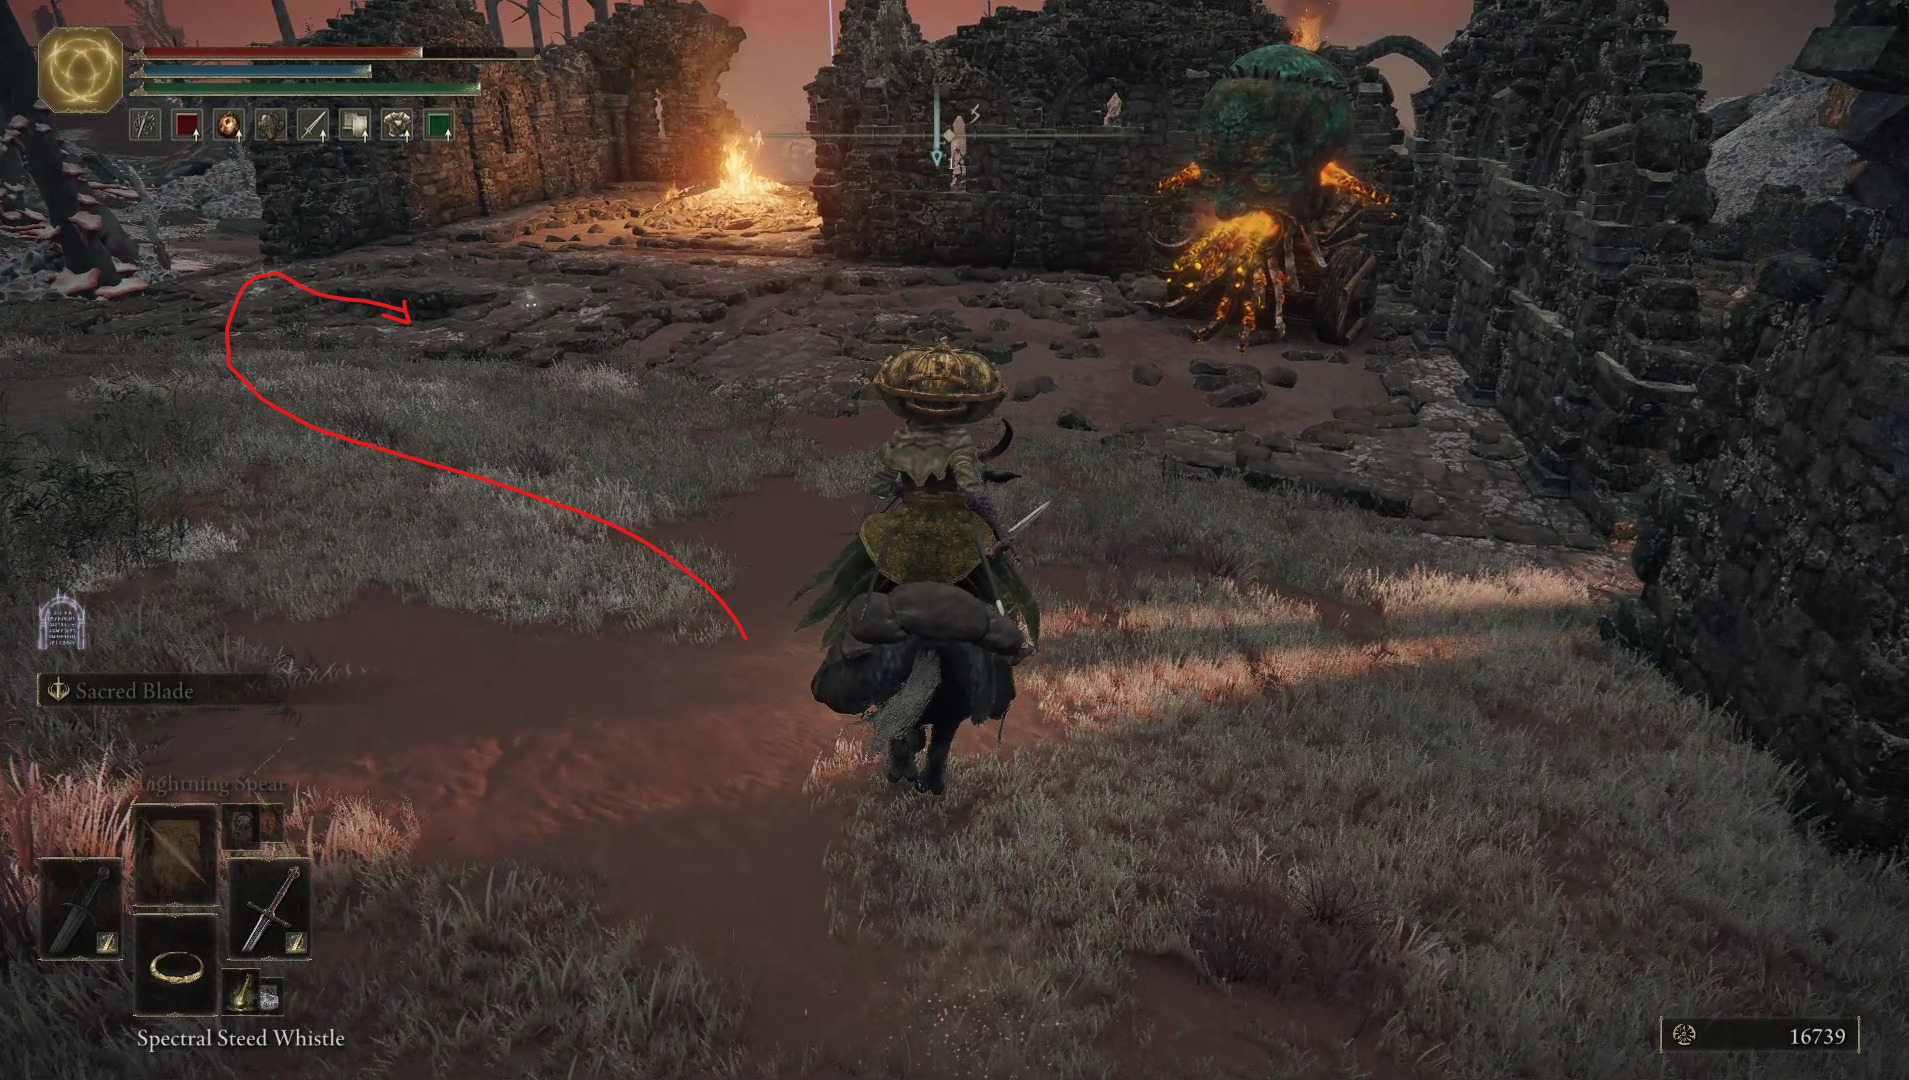
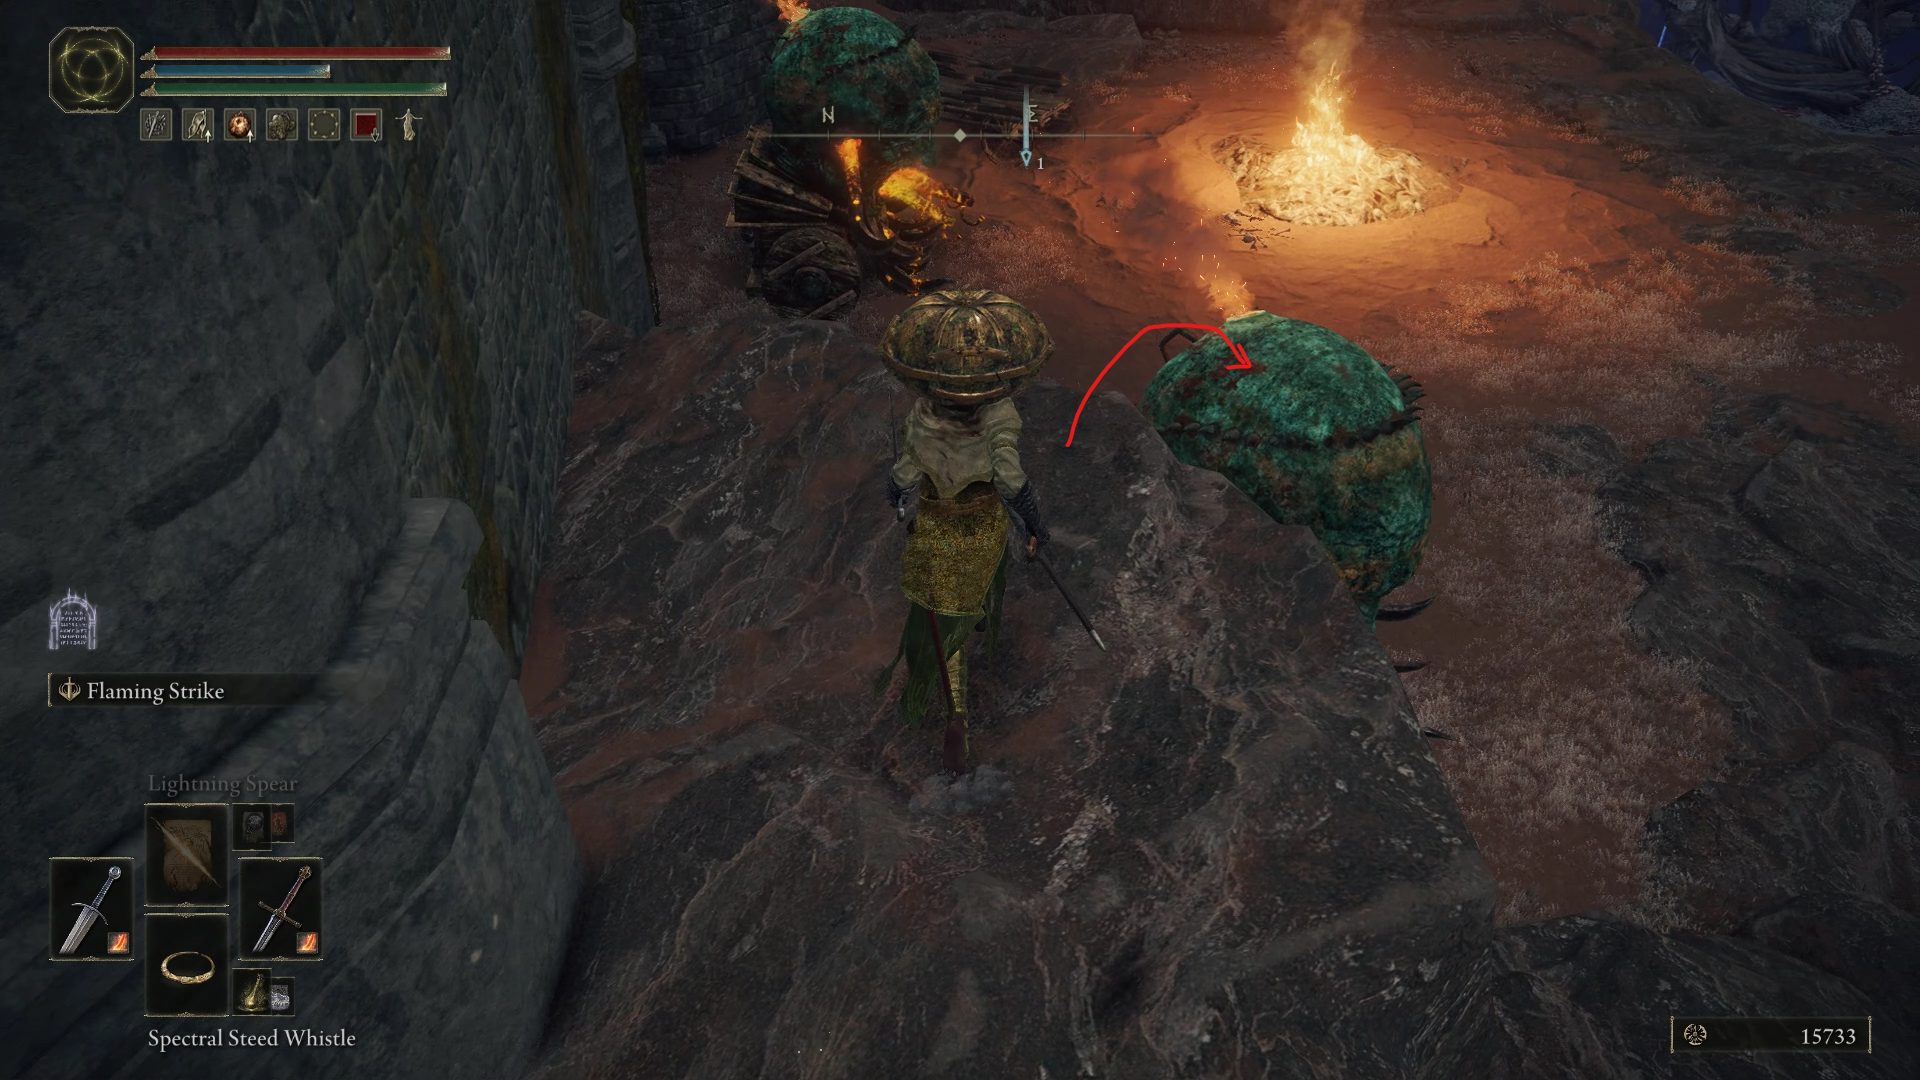
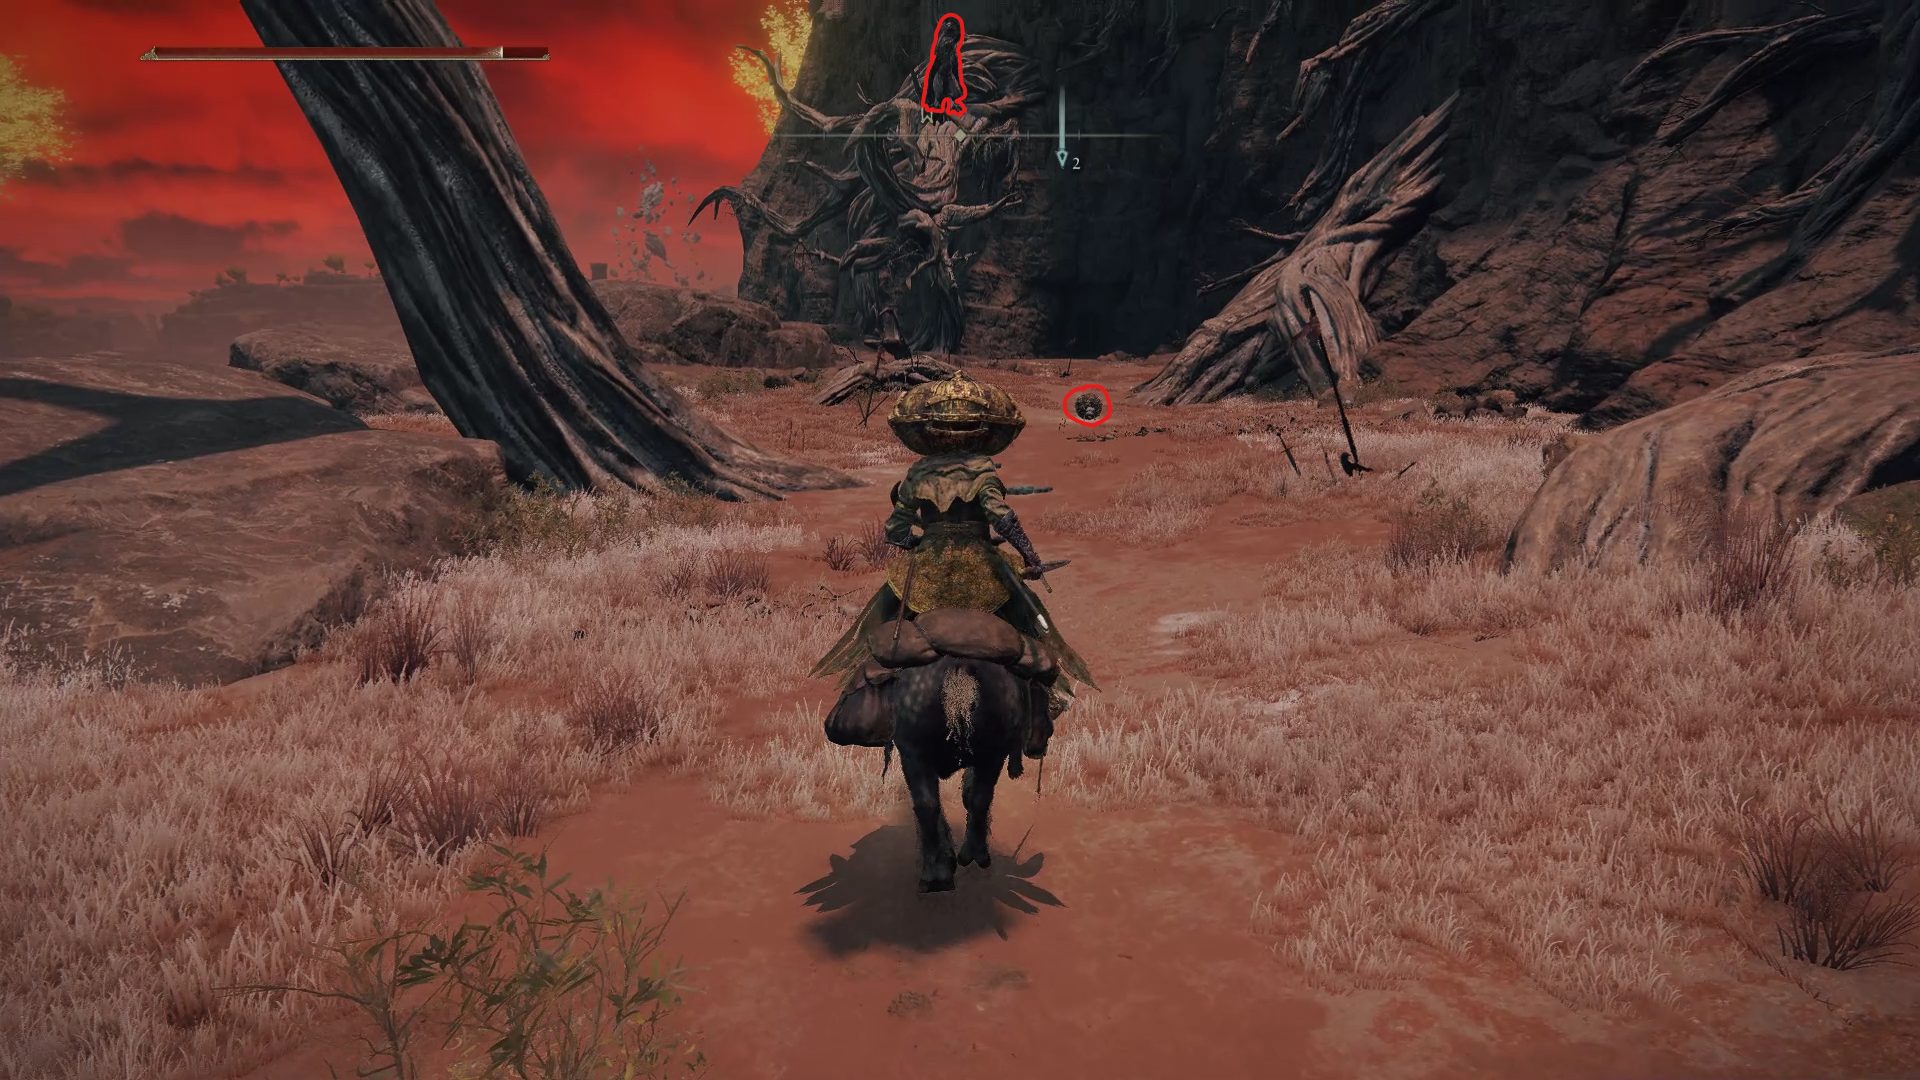
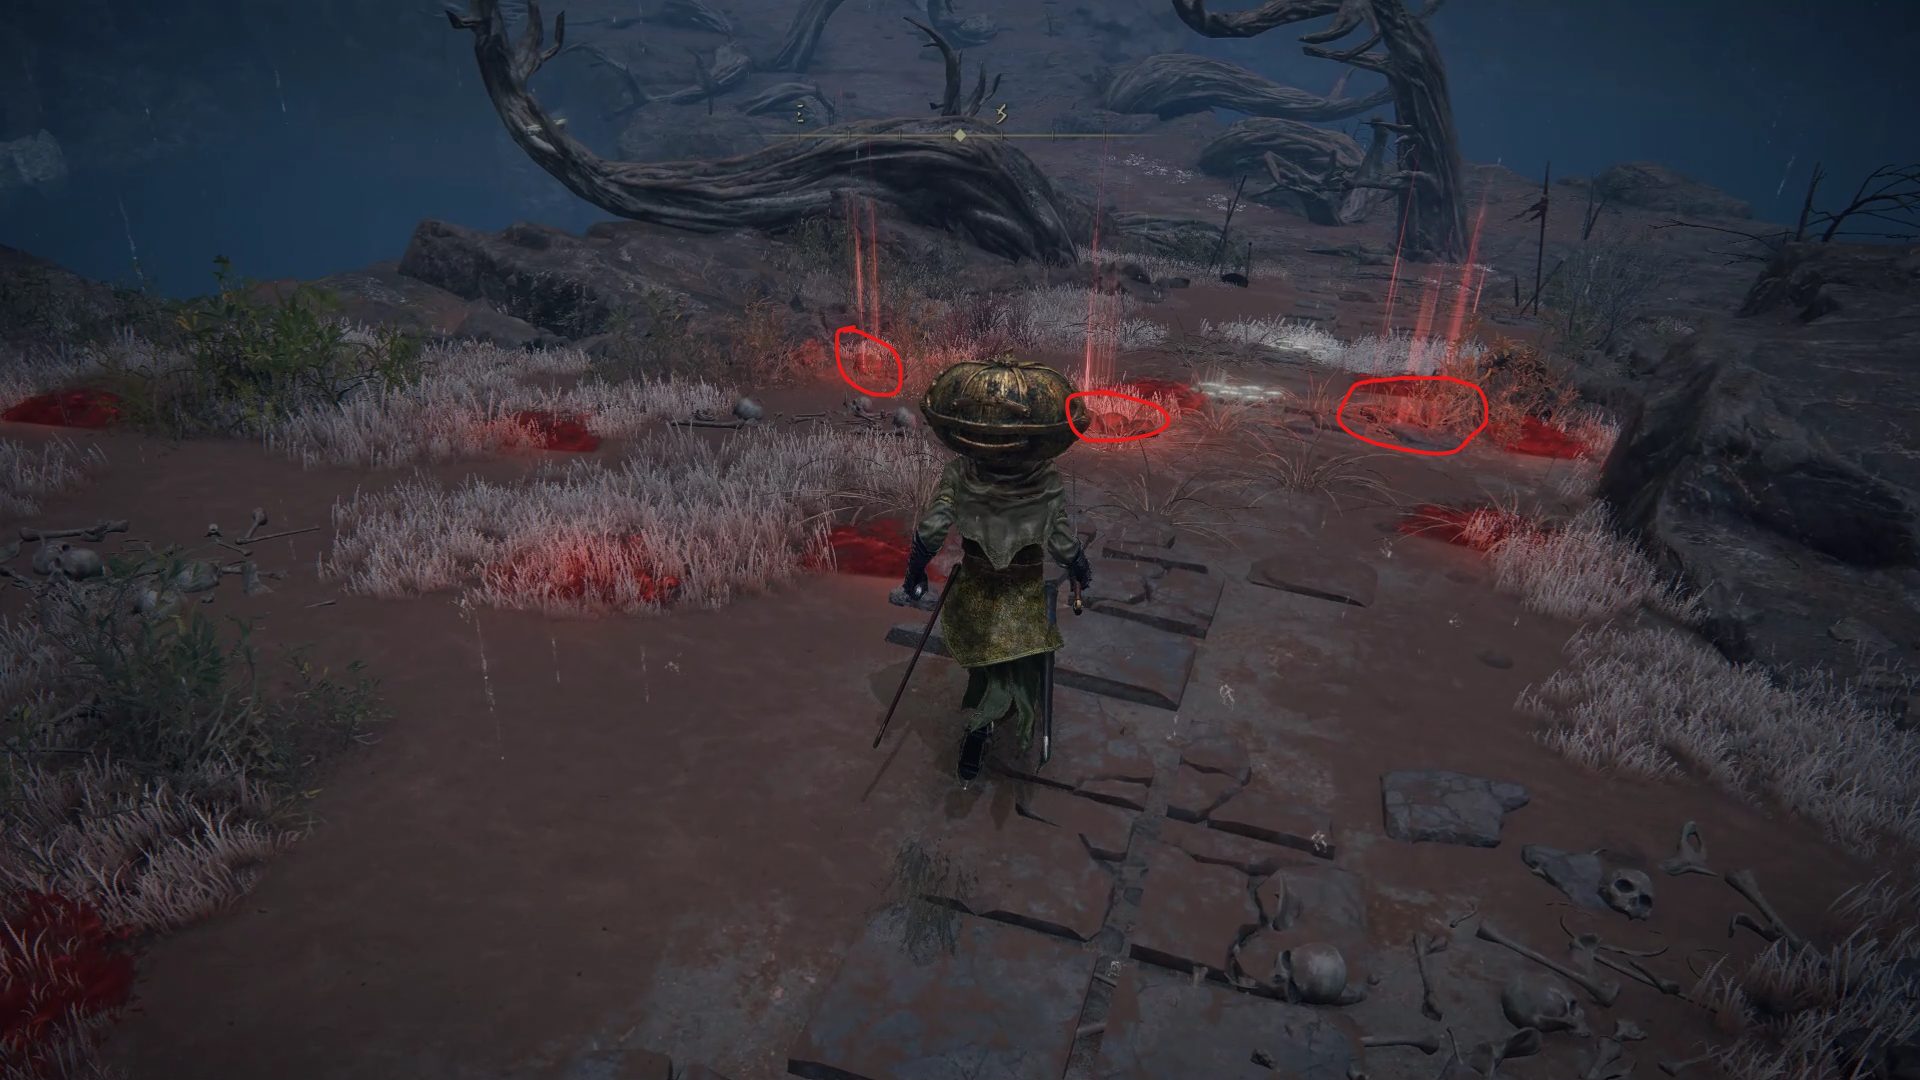
The Putrid Avatar next to it is very similar to the Erdtree Avatars that you encounter previously, with one difference: it inflicts rot. While the attack where the Avatars jump into the air before slamming their buttocks down on the ground was part of their weakest attacks, here it will also send a wave of Scarlet Rot your way. Scarlet Rot will be present throughout Caelid, so keep in mind that gear with higher Immunity will allow you to slow down the buildup, though it will not reduce the damage that you take from it. To remove it, Preserving Boluses will be your new best friends all throughout Caelid.
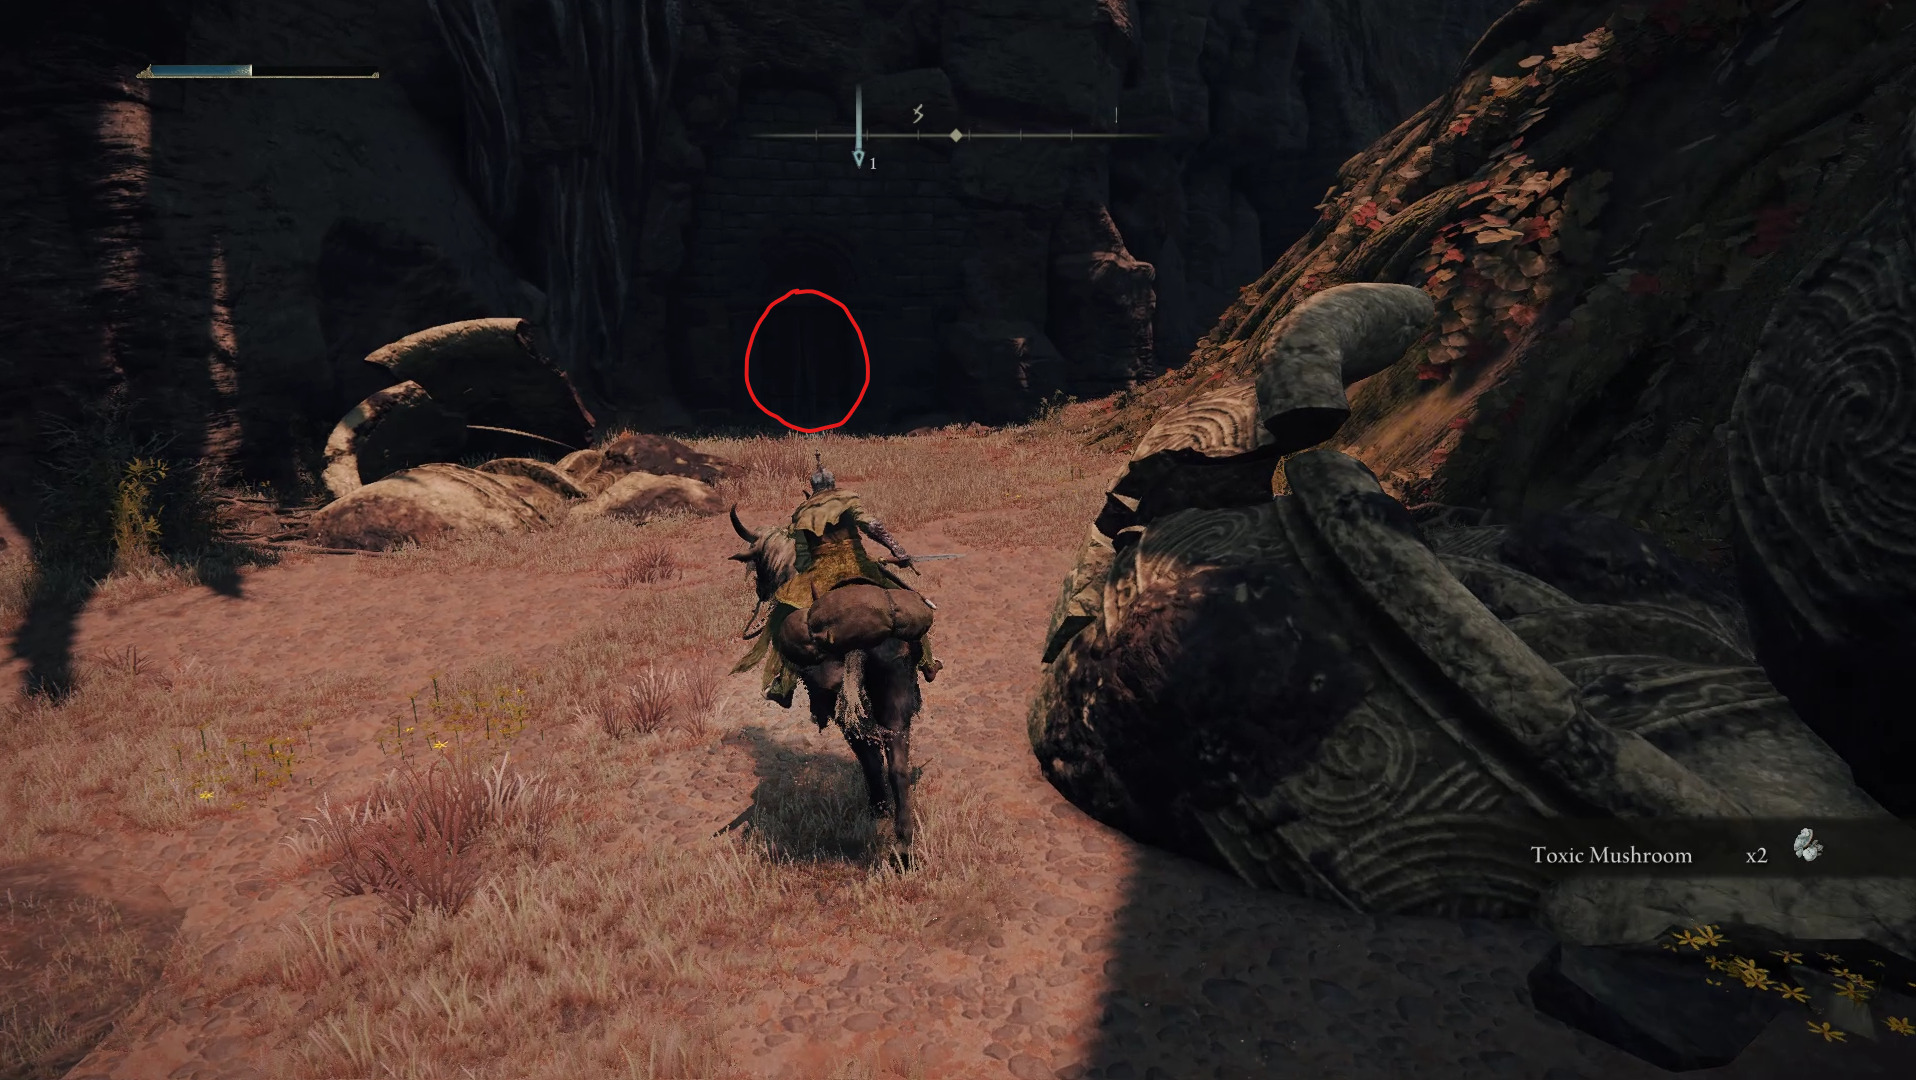
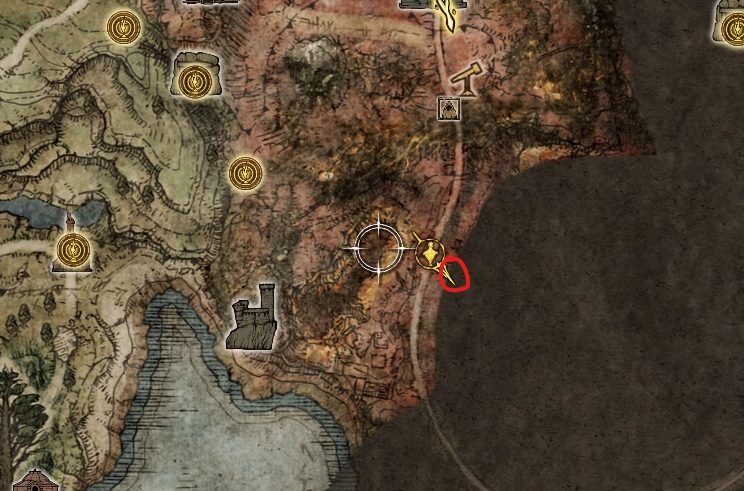
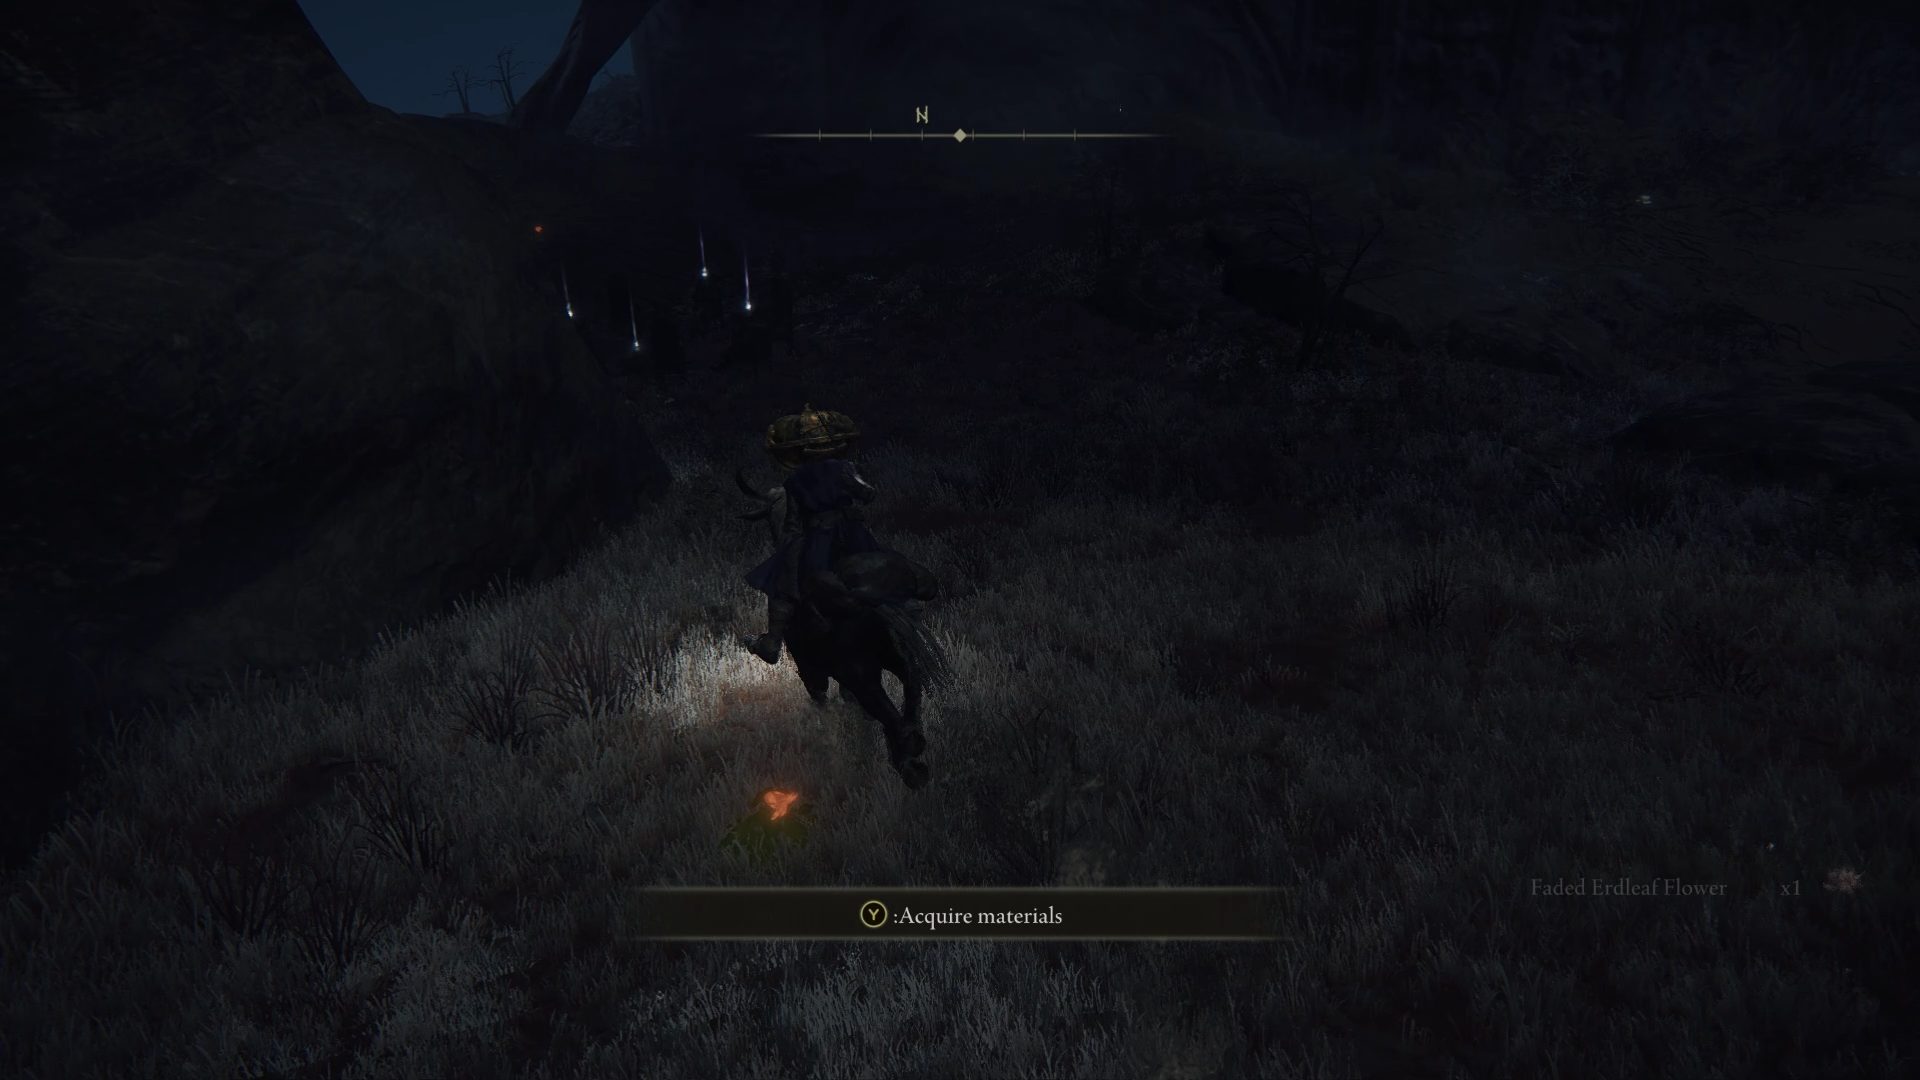
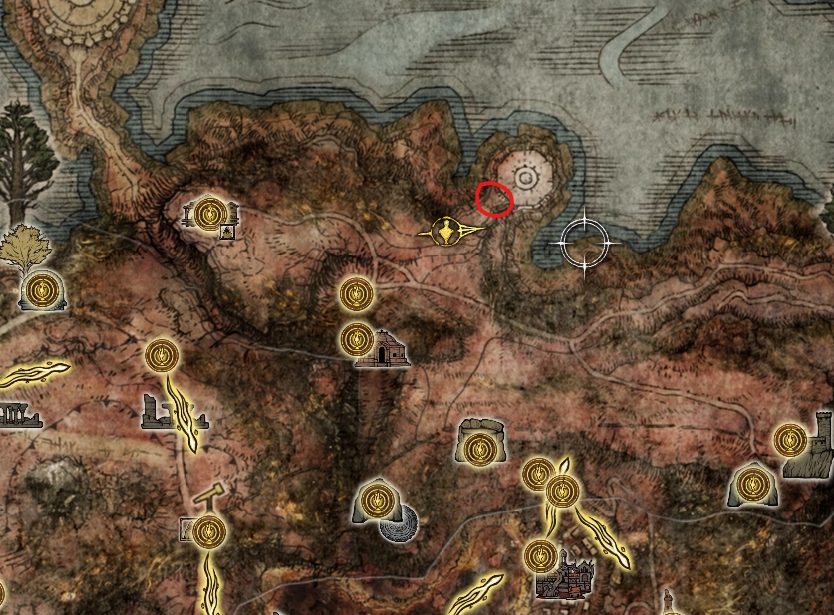
In that same area, there is still one thing we need to do before moving deeper into Caelid: the Minor Erdtree Catacombs dungeon. You can find its entrance south of the Minor Erdtree.
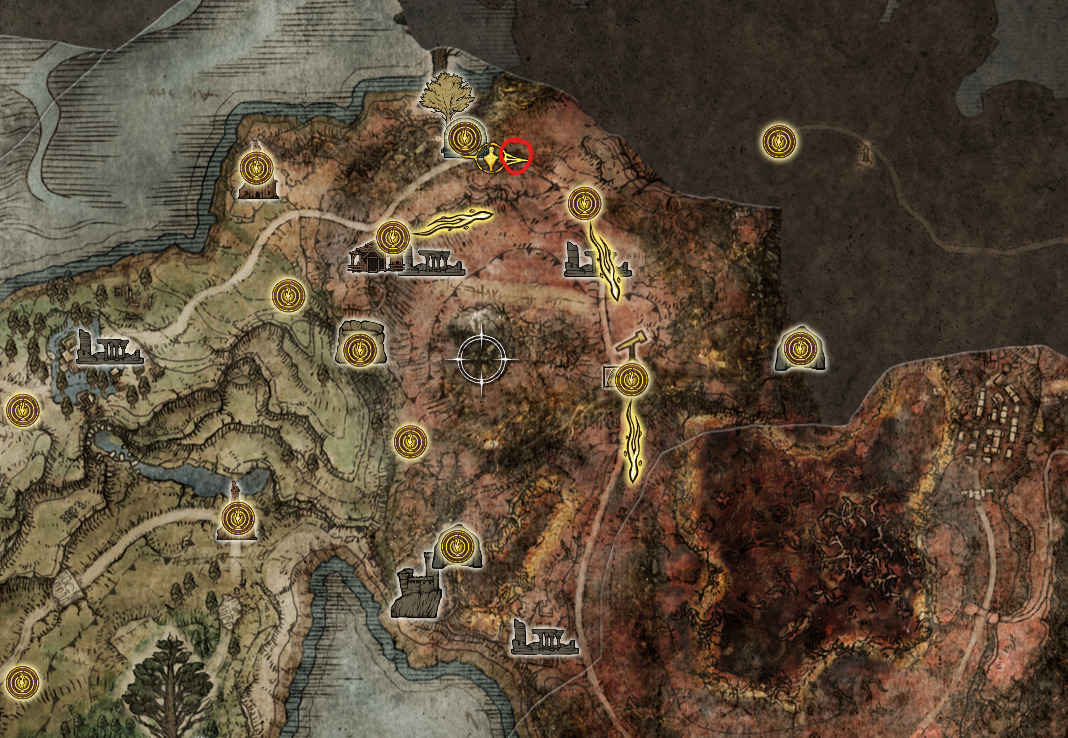
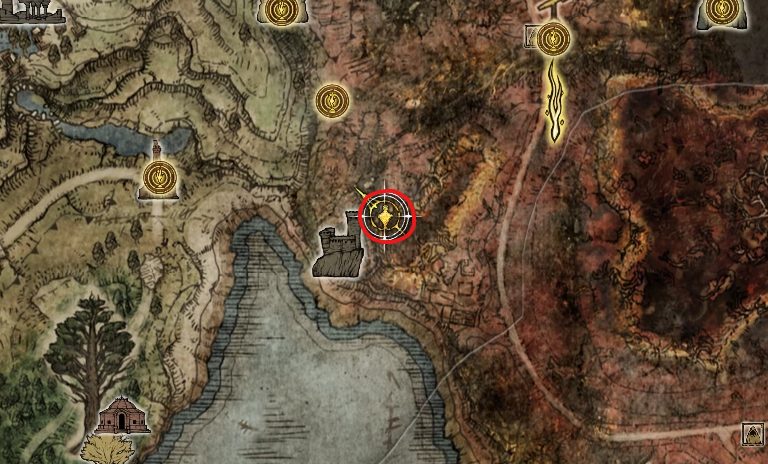
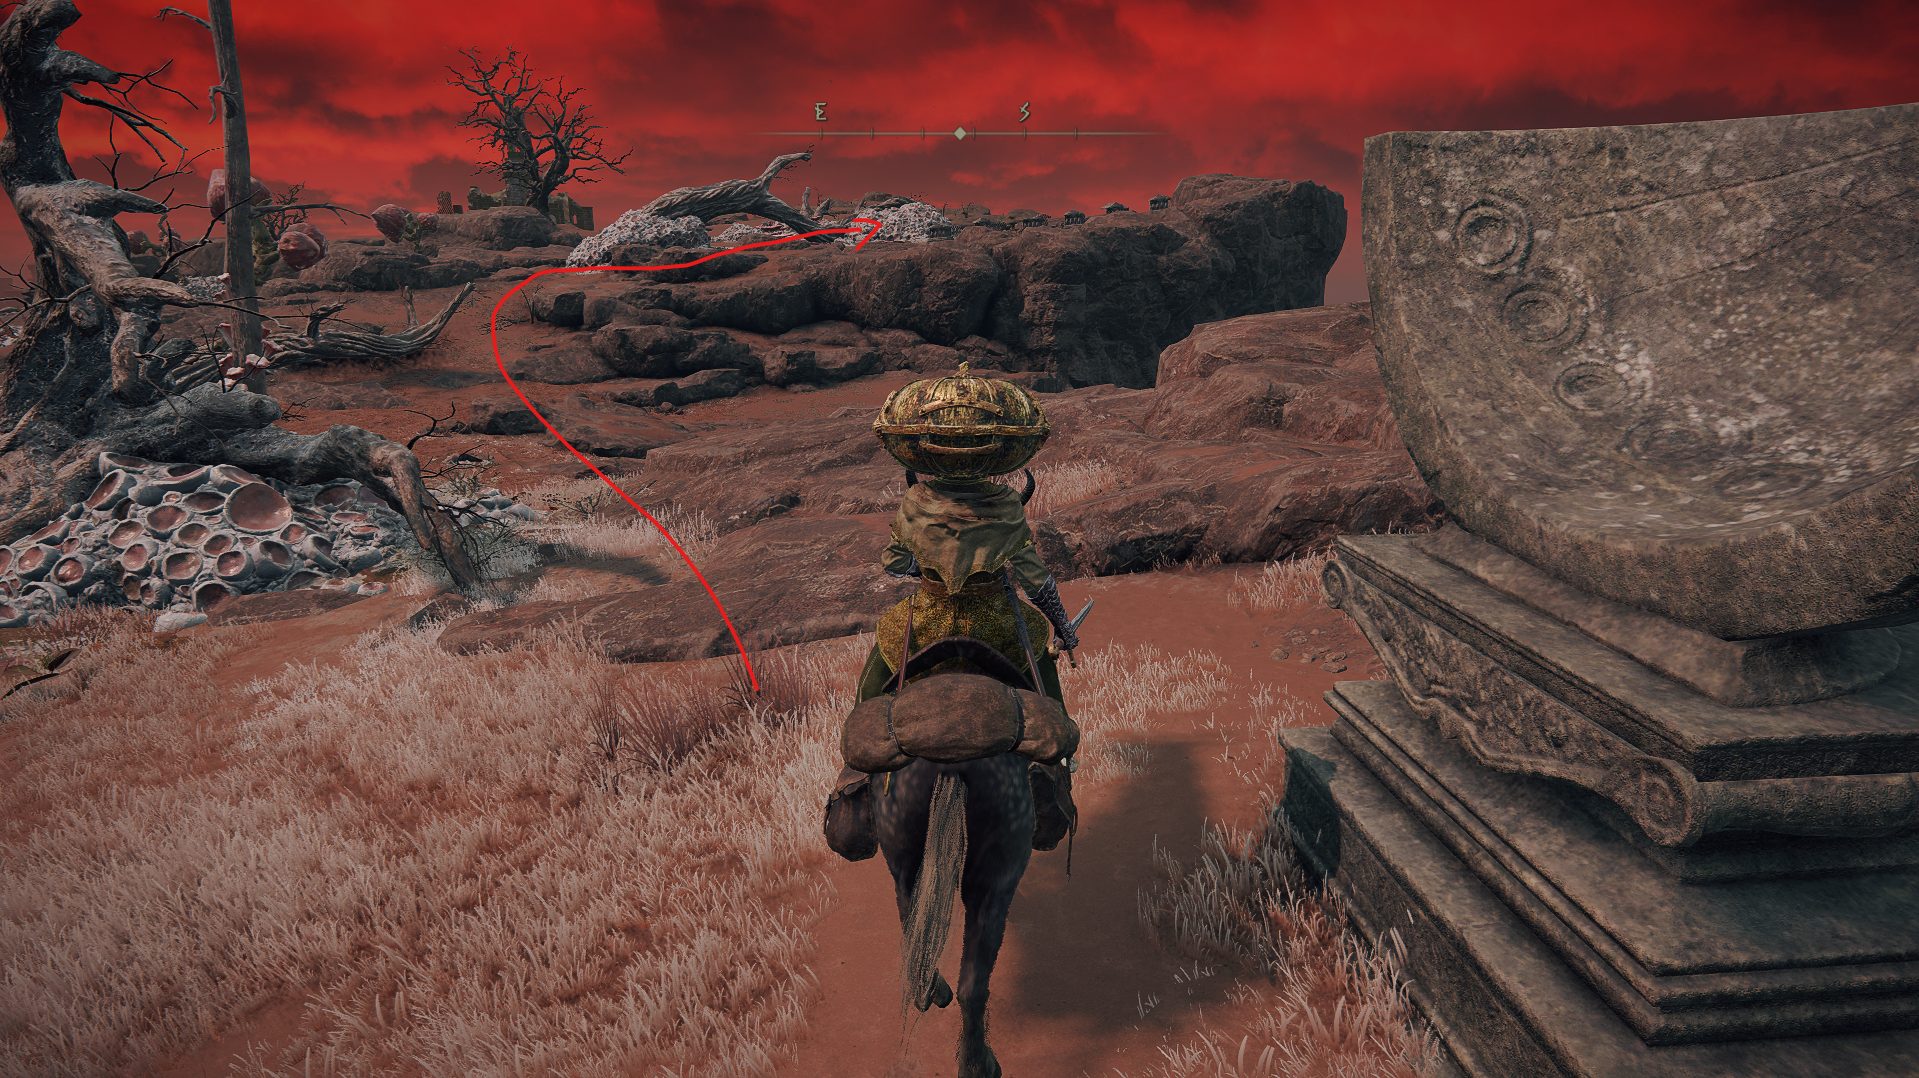
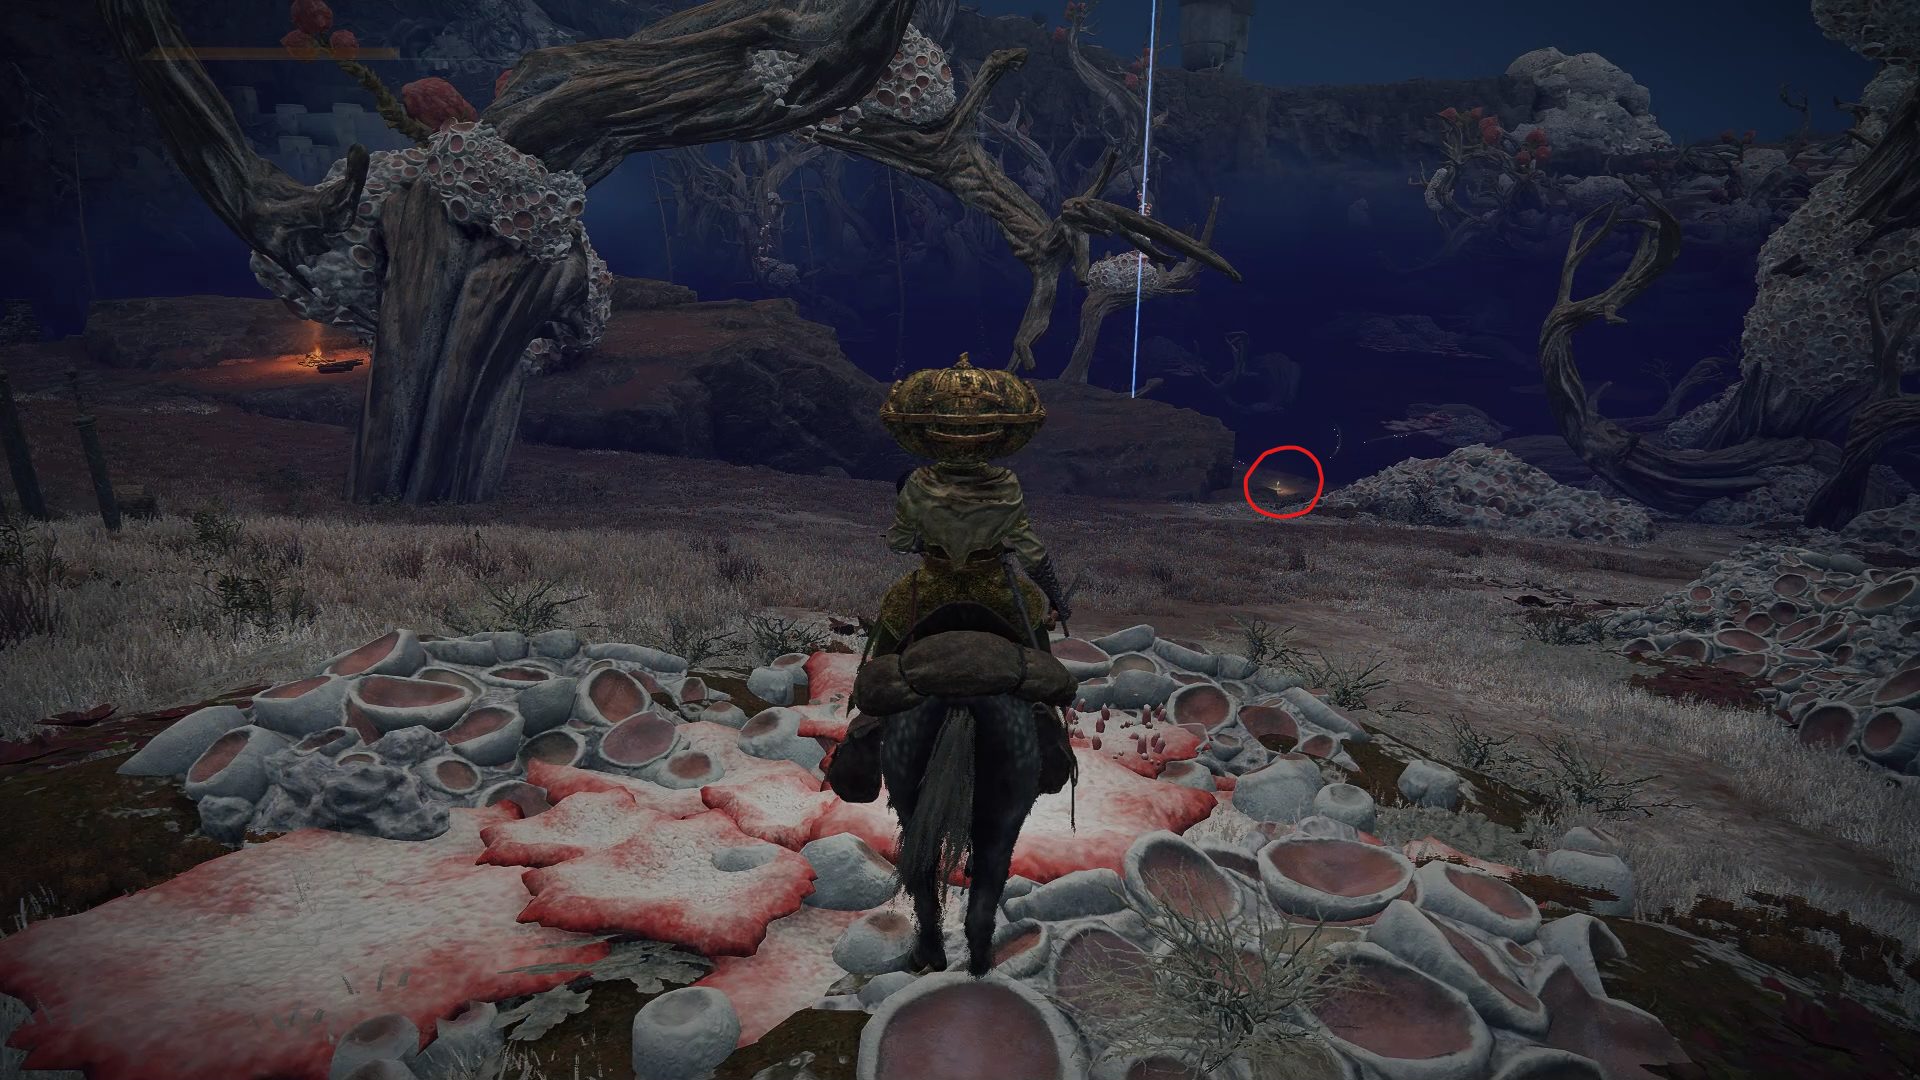
Now that you’re done with this secluded area, head back the way you came and head southeast to find a small village with the Rotview Balcony site of grace.
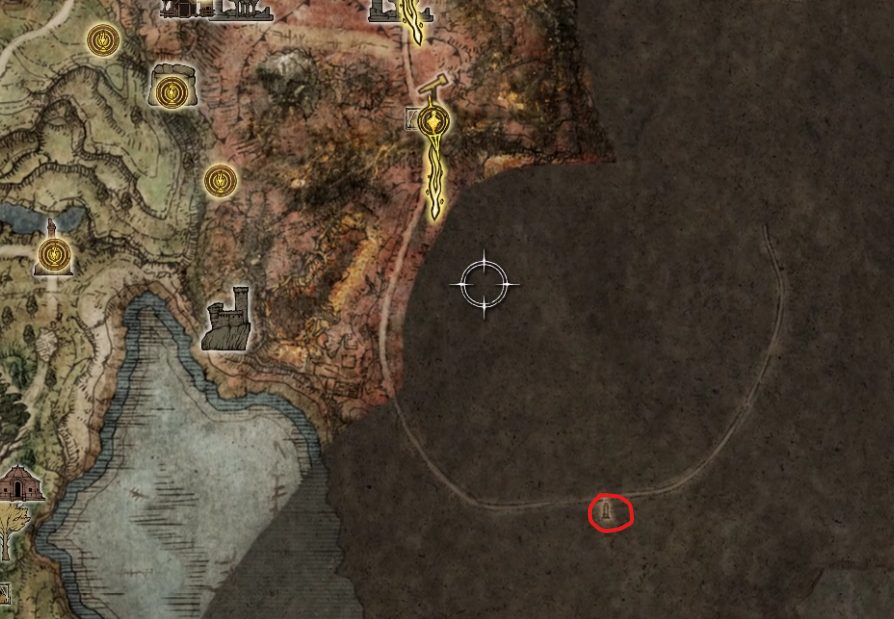
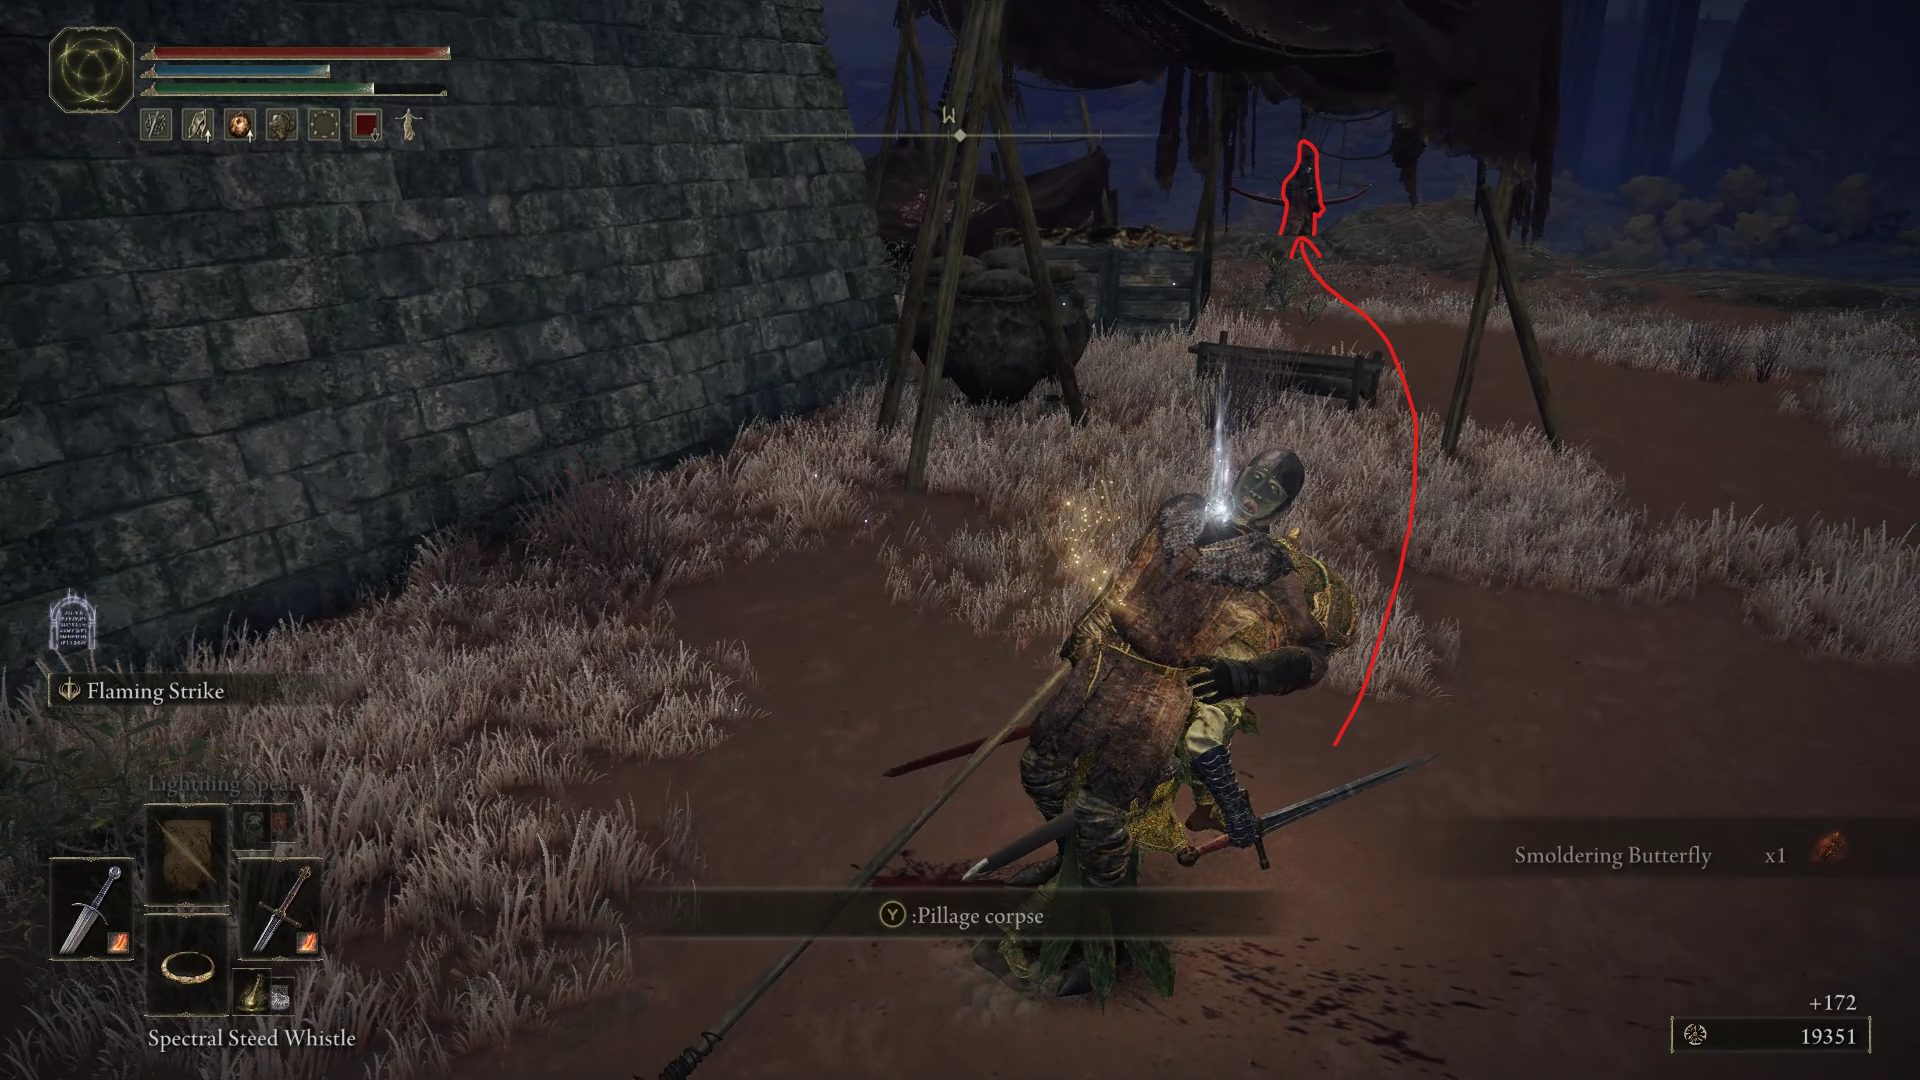
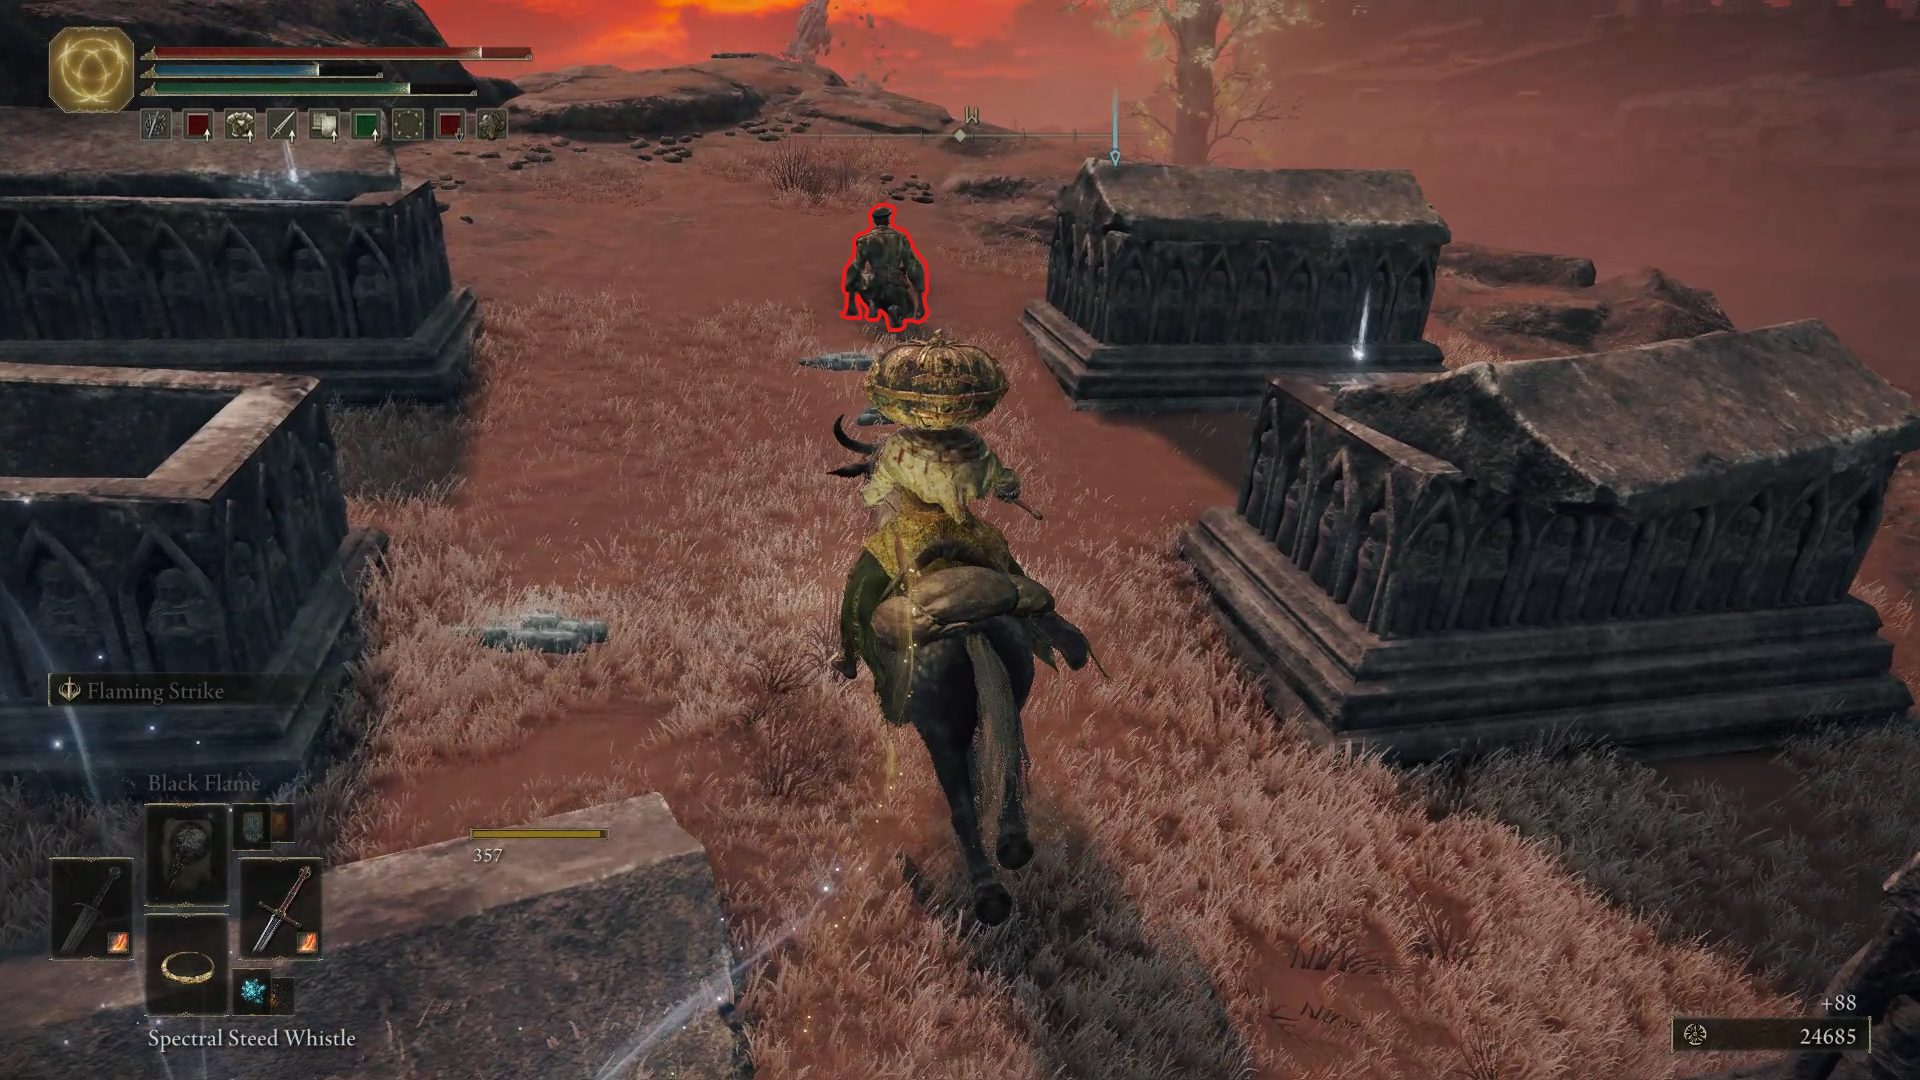
There are very few things to grab in this decrepit village: 2x Nascent Butterfly next to the site of grace, as well as 5x Preserving Boluses south of the site grace, and a Golden Rune [3] in another shack north of the site of grace. Once you’re done pillaging around the village, start heading south past the cemetery (the dead don’t need their Golden Runes) until you’re overlooking a small camp defended by a couple of soldiers. Right under you will be the entrance to another dungeon: Gael Tunnel.
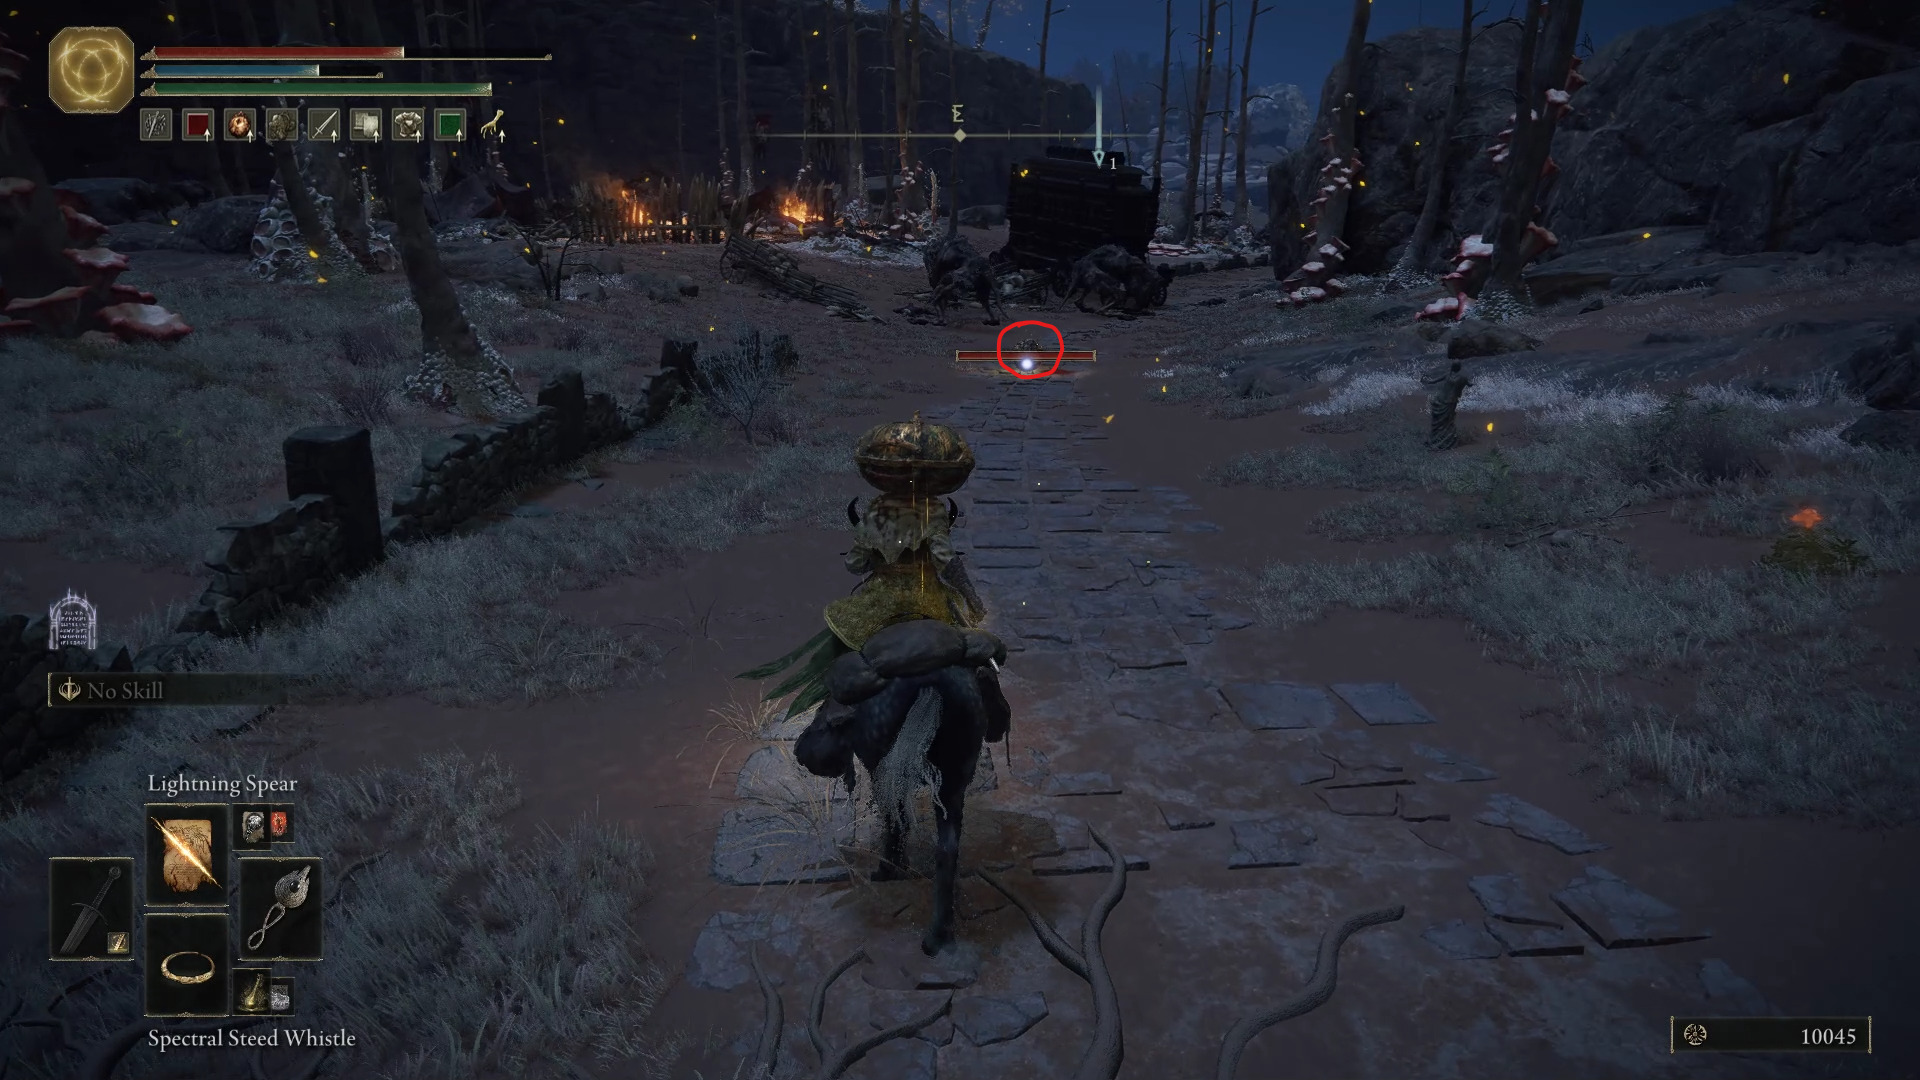
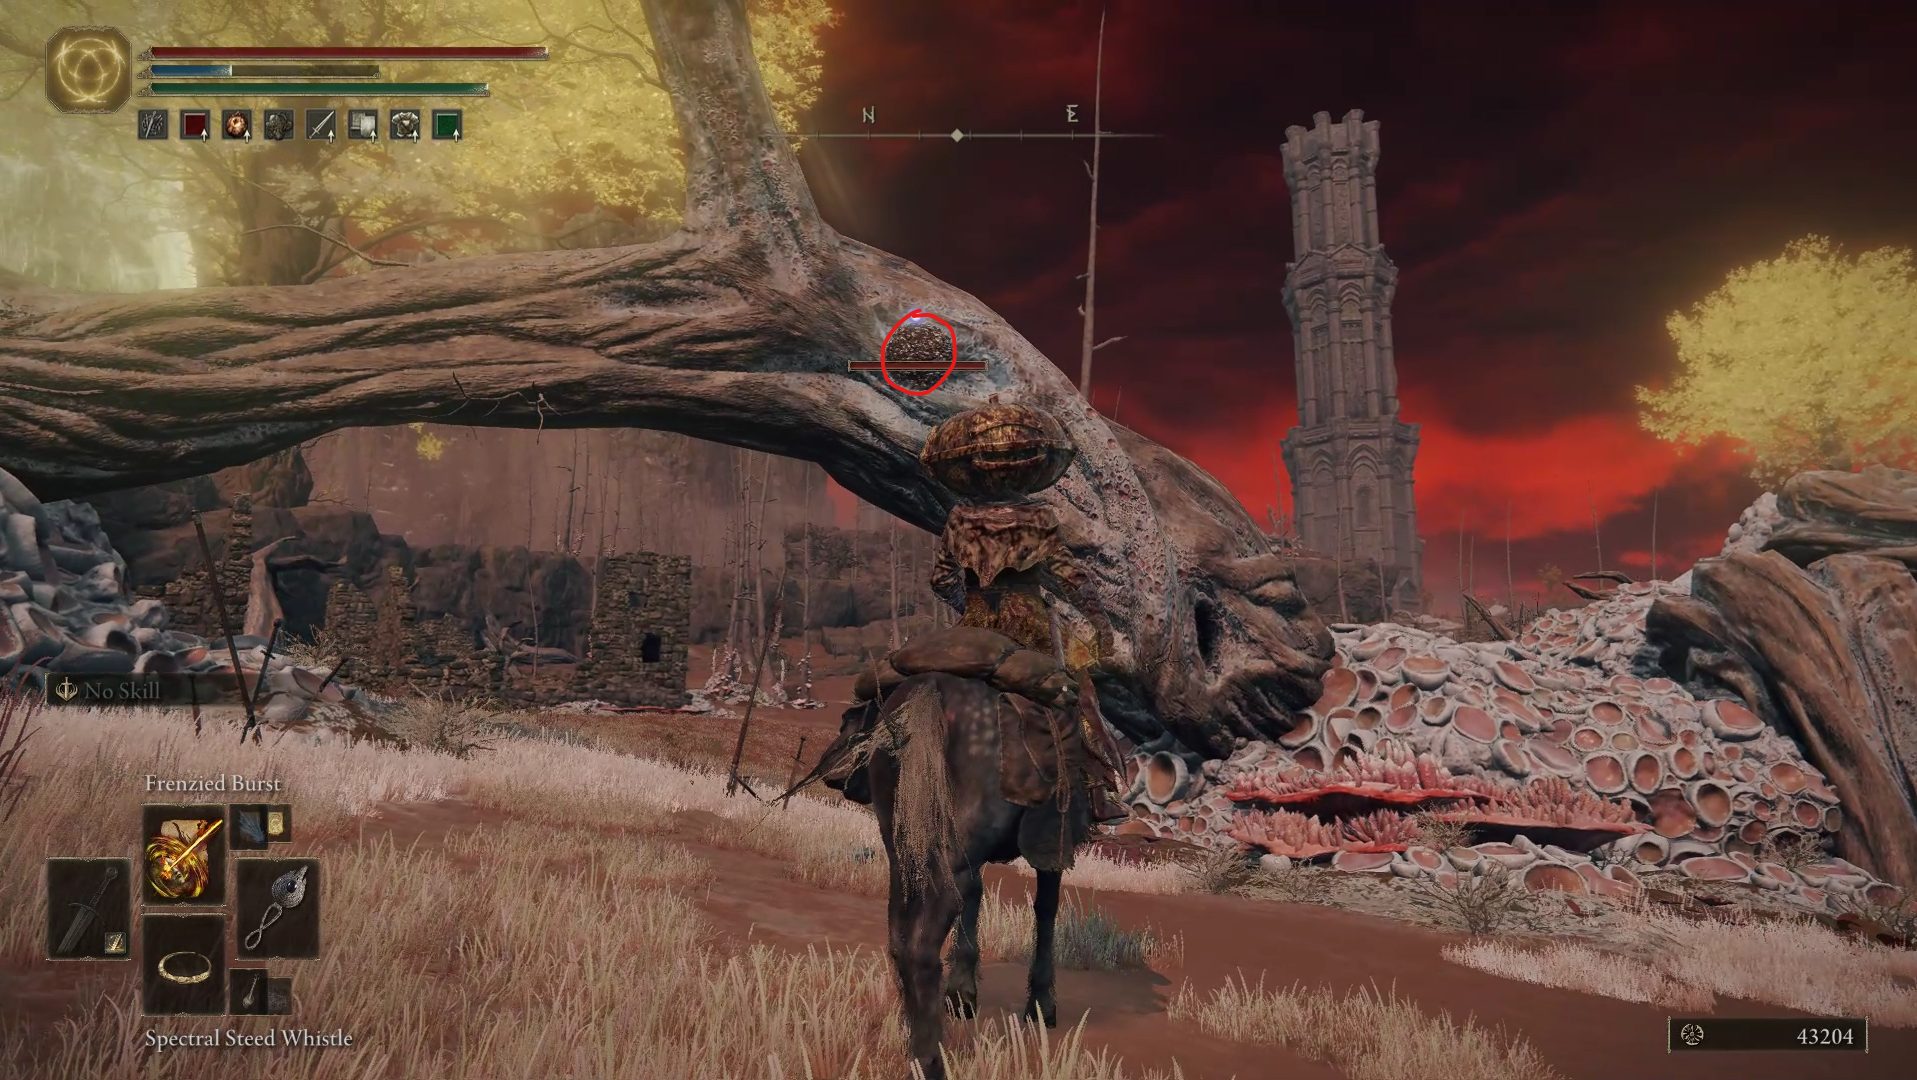
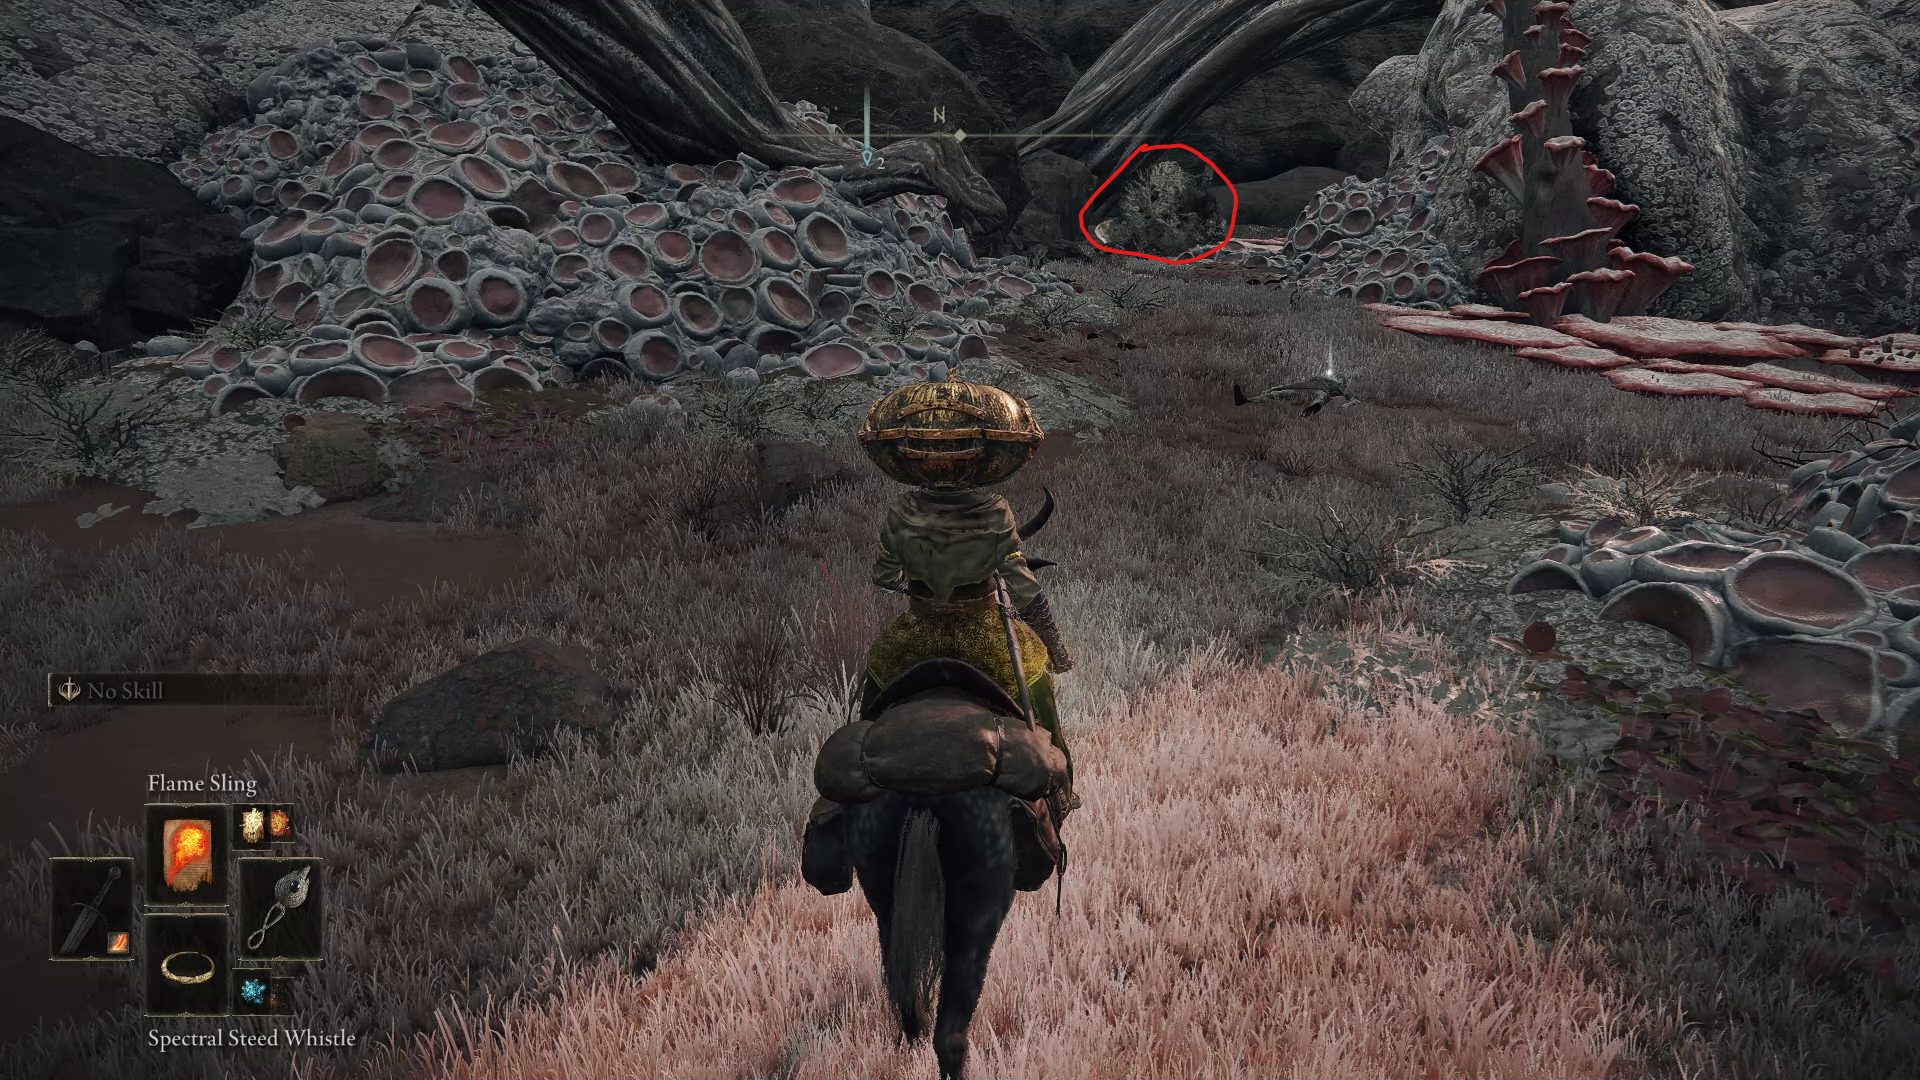
Now you should travel back to the Rotview Balcony site of grace, as we still have a few places to explore before heading further south. From there, follow the road going northeast until you reach a broken-down carriage with a couple huge dogs nearby. While the dogs are a threat, you should first turn your focus towards the loot beetle on the road.
If you have access to spells, you can kill the beetle from afar to avoid having to deal with the dogs at the same time. If you don’t, rush towards the loot beetle on horseback and kill it quickly before the dogs start attacking you, which will grant you the Whirl, O Flame! incantation. As for the dogs, while fighting two at once can be quite challenging, you can keep running away until they start losing interest and going back to where they originally were. Then you can attack one of the dogs which will allow you to kill them 1 by 1. The safest way to fight them is to wait for them to use an attack, which will give you a small window to run in and attack them before running away and waiting for another window of opportunity.
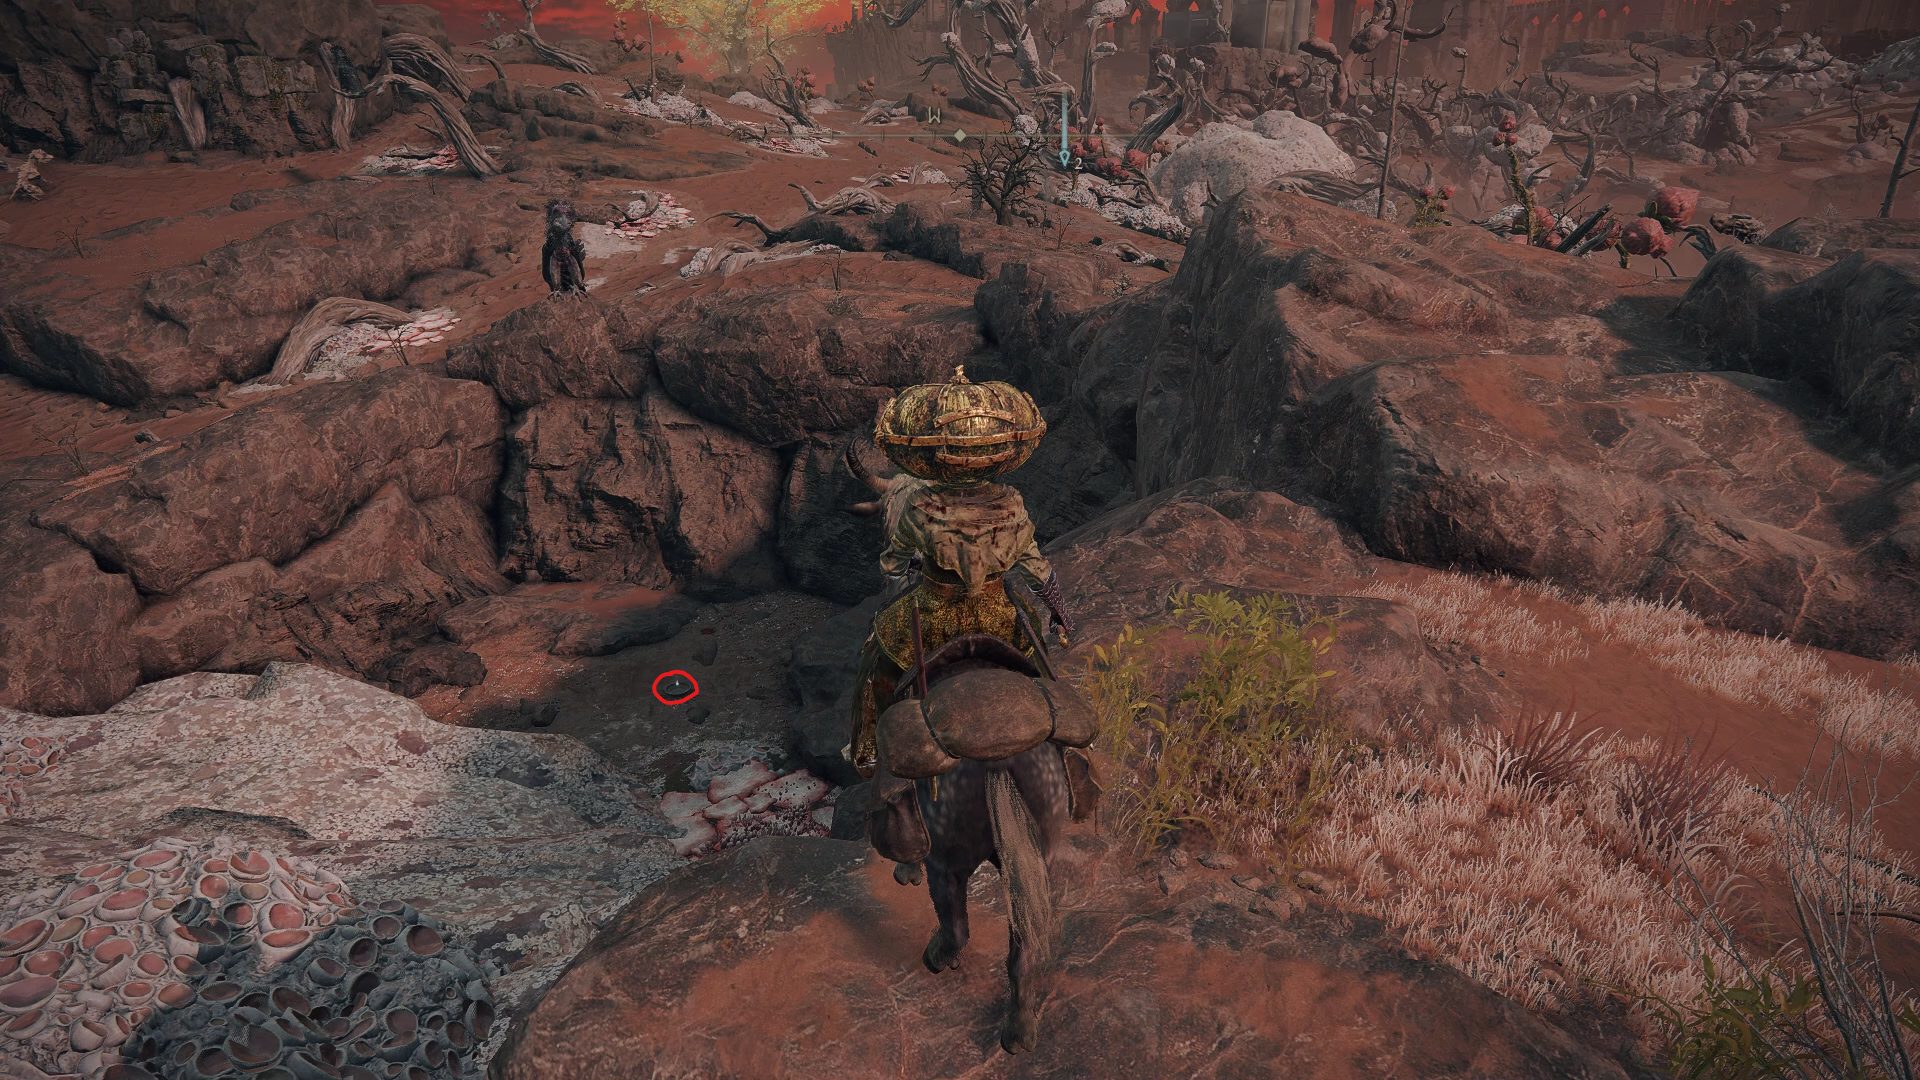
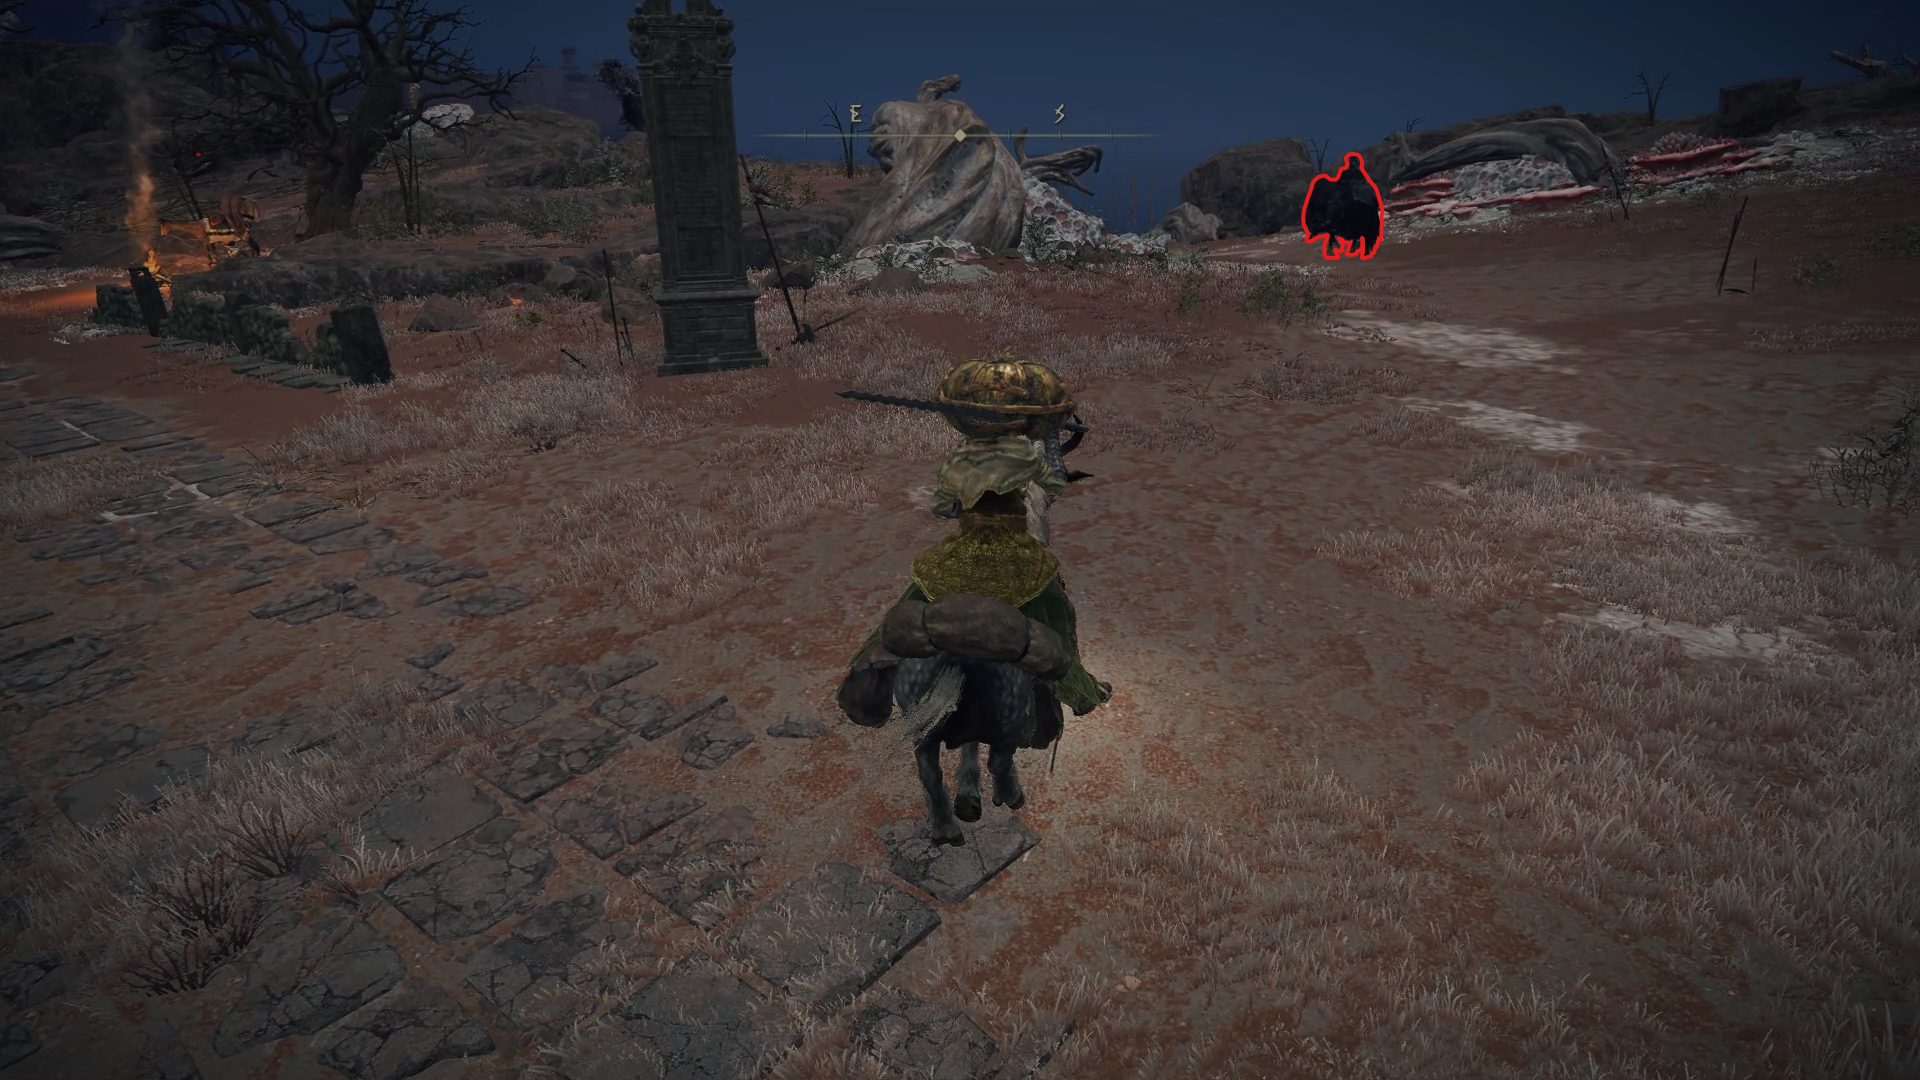
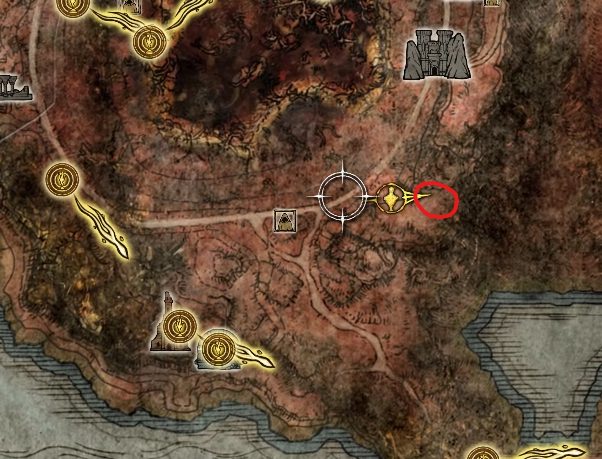
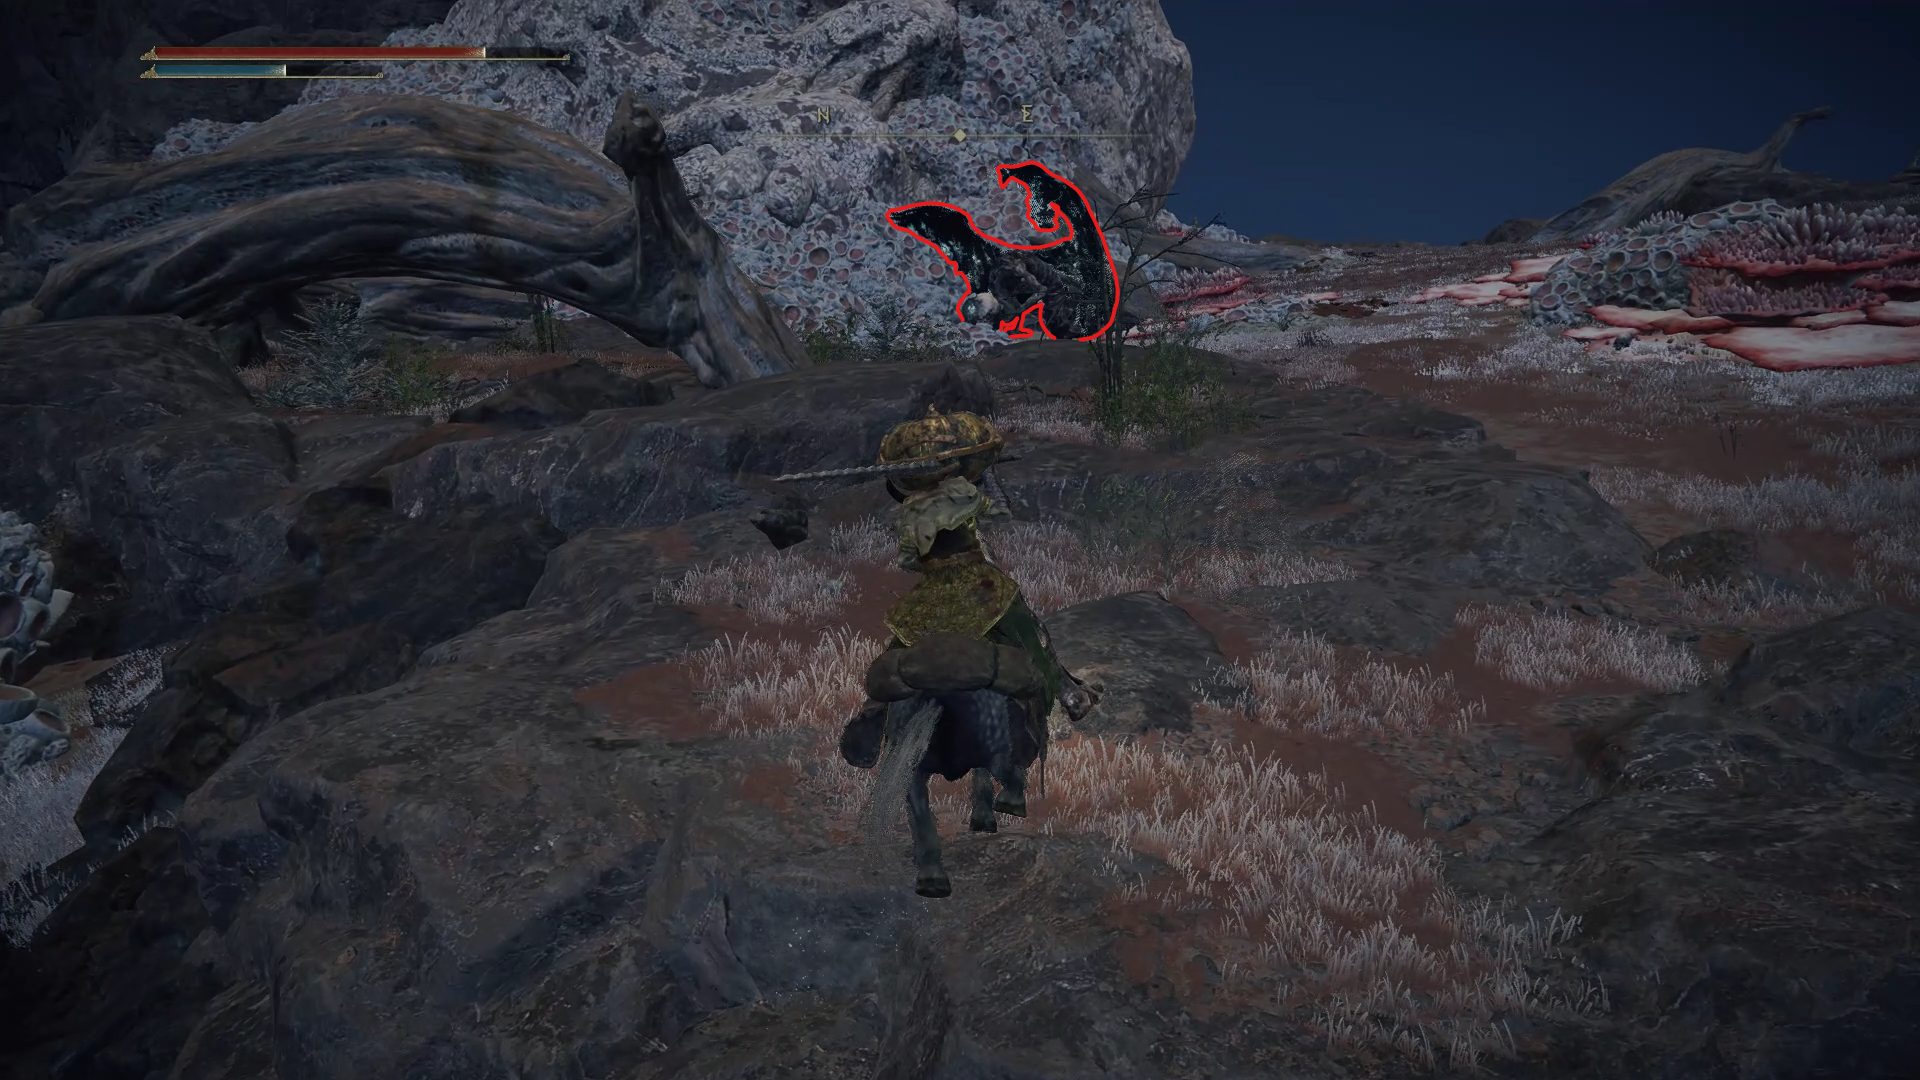
Once both dogs are dead, open the chest in the back of the carriage and grab the Greatsword. Northeast of this carriage, you can find the remnants of a small camp. Inside this camp you can grab 6x Explosive Bolt on a corpse, as well as a Rune Arc inside of a chest. Before grabbing those however, you’ll have to defeat a freakishly big crow. Contrary to the big dogs that you just encountered, sticking close to the crow and circling around while attacking is safer than running in and out.
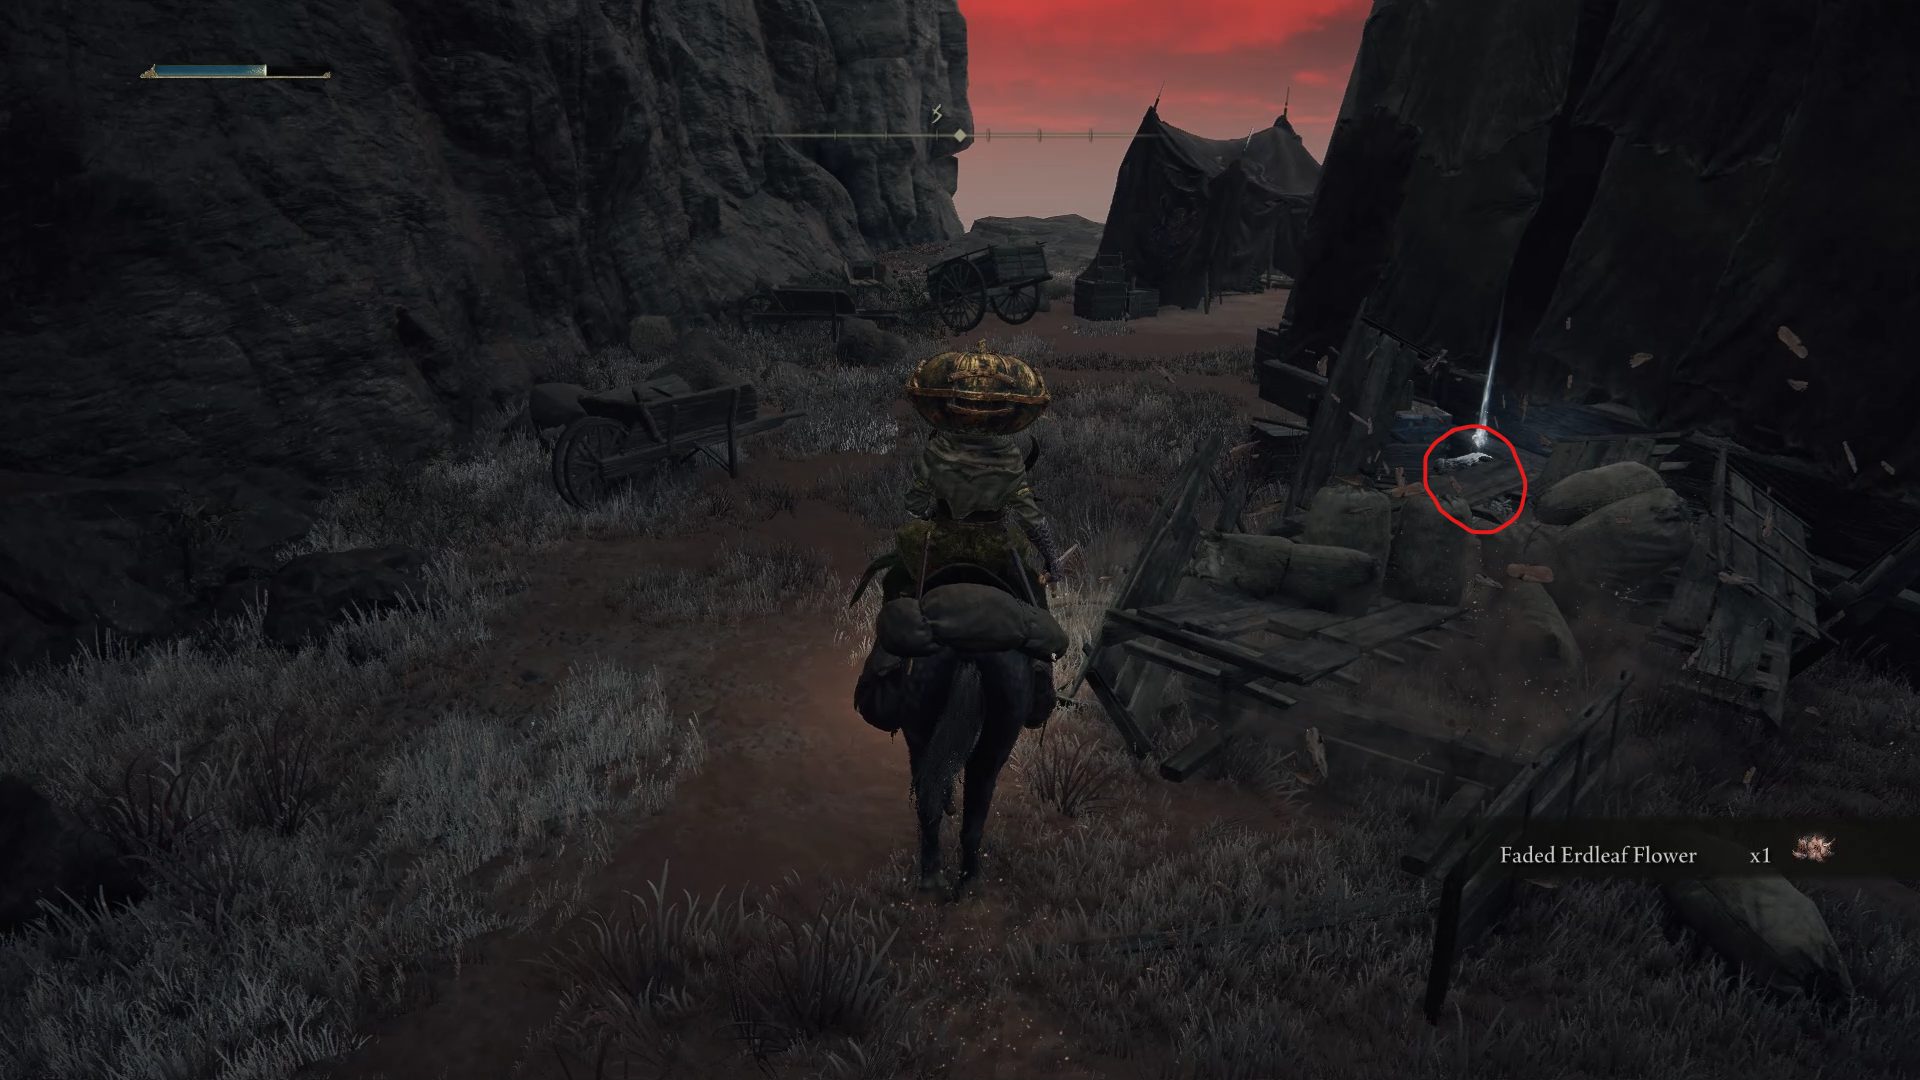
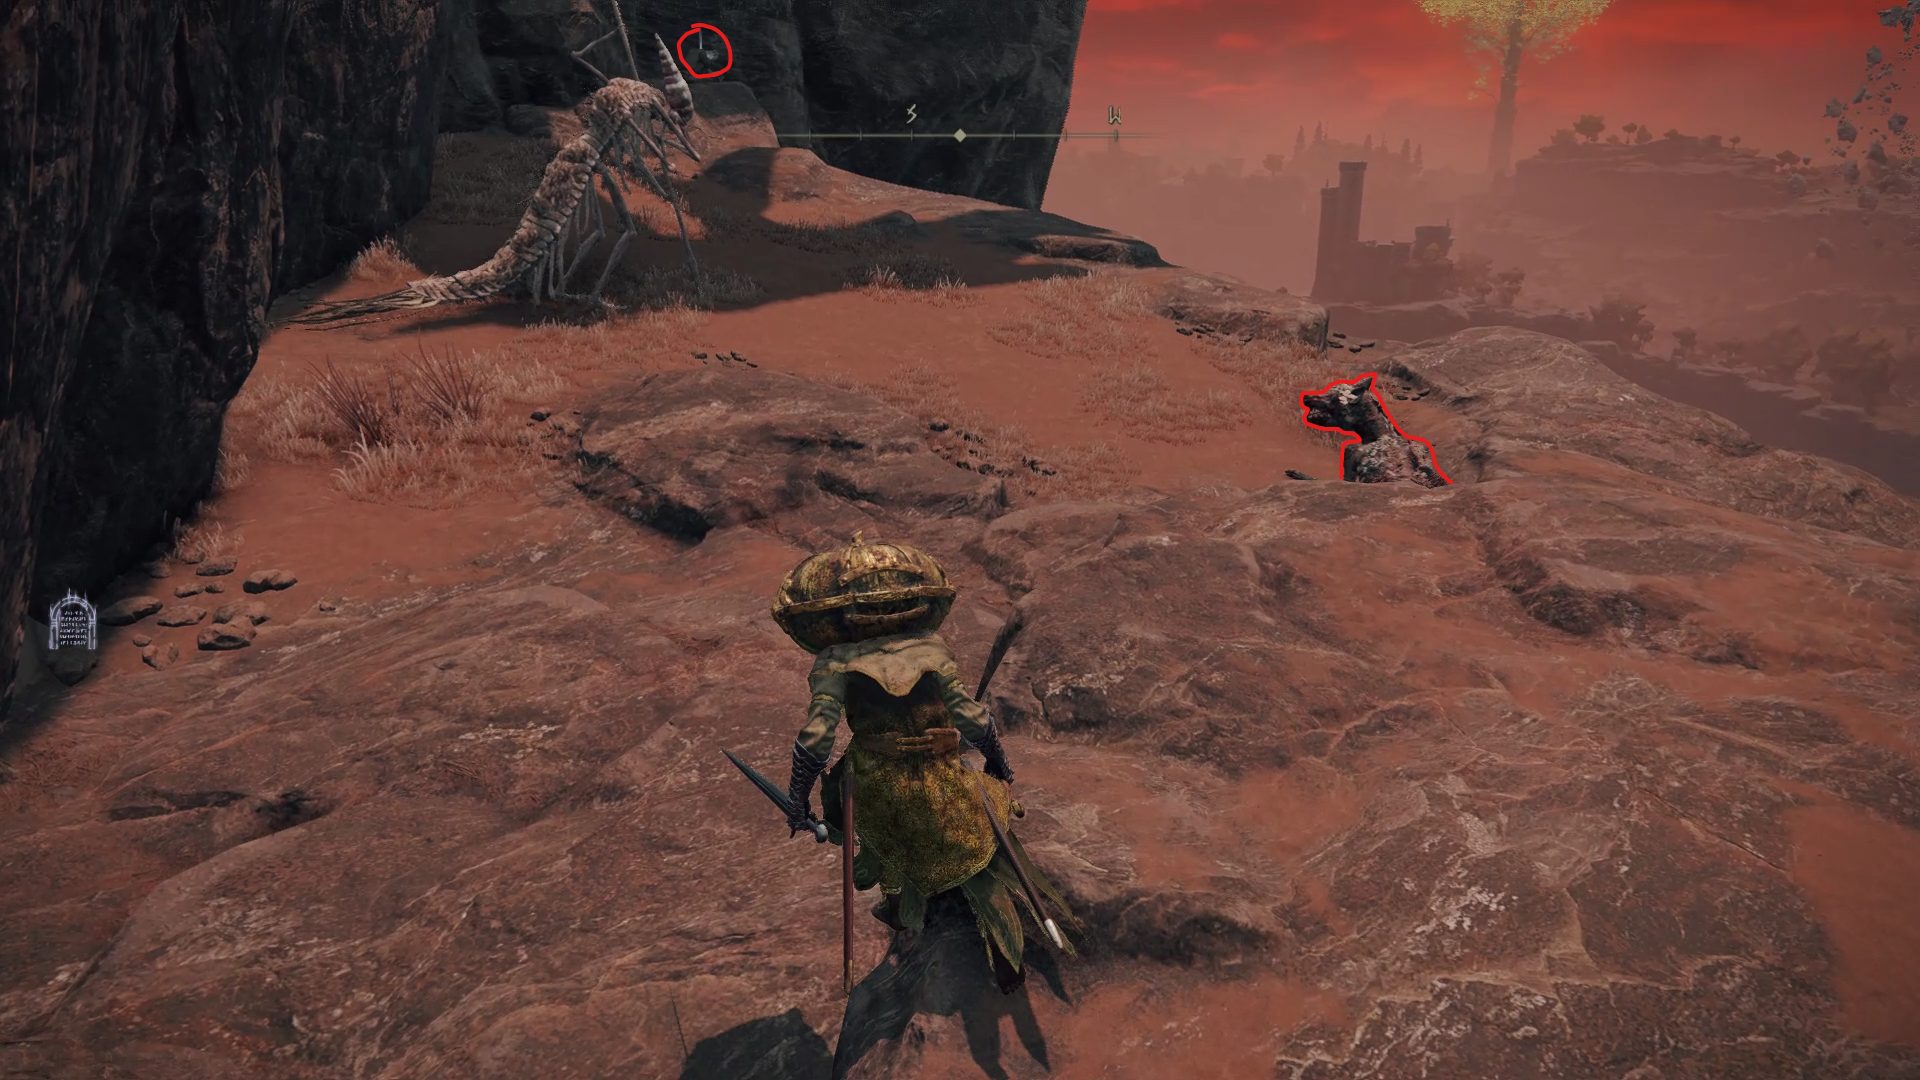
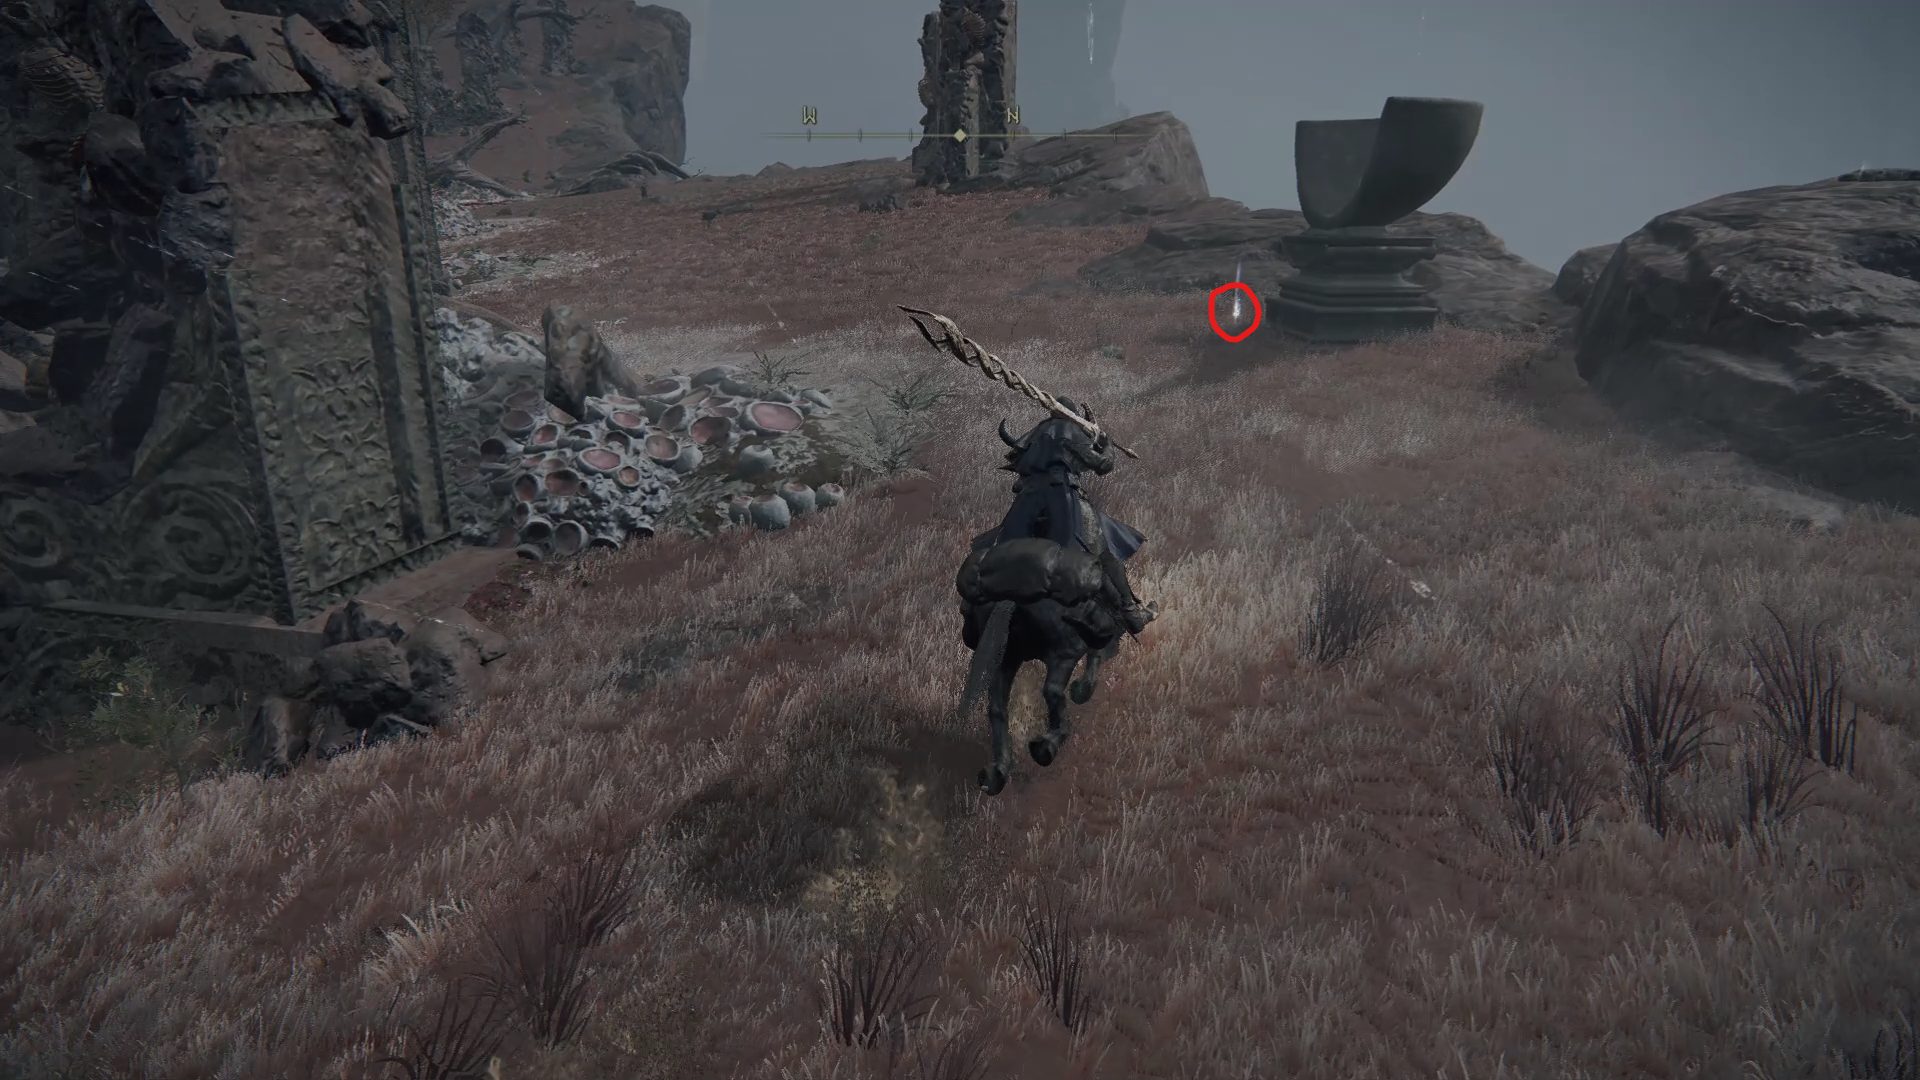
From this camp, go straight north to grab a Somber Smithing Stone [4] from a corpse that you can find in a chair at the edge of the nearby cliff.
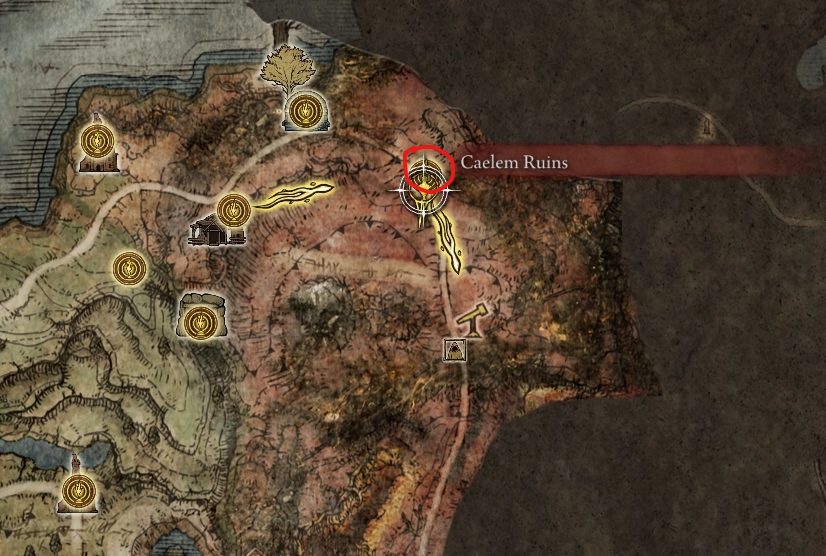
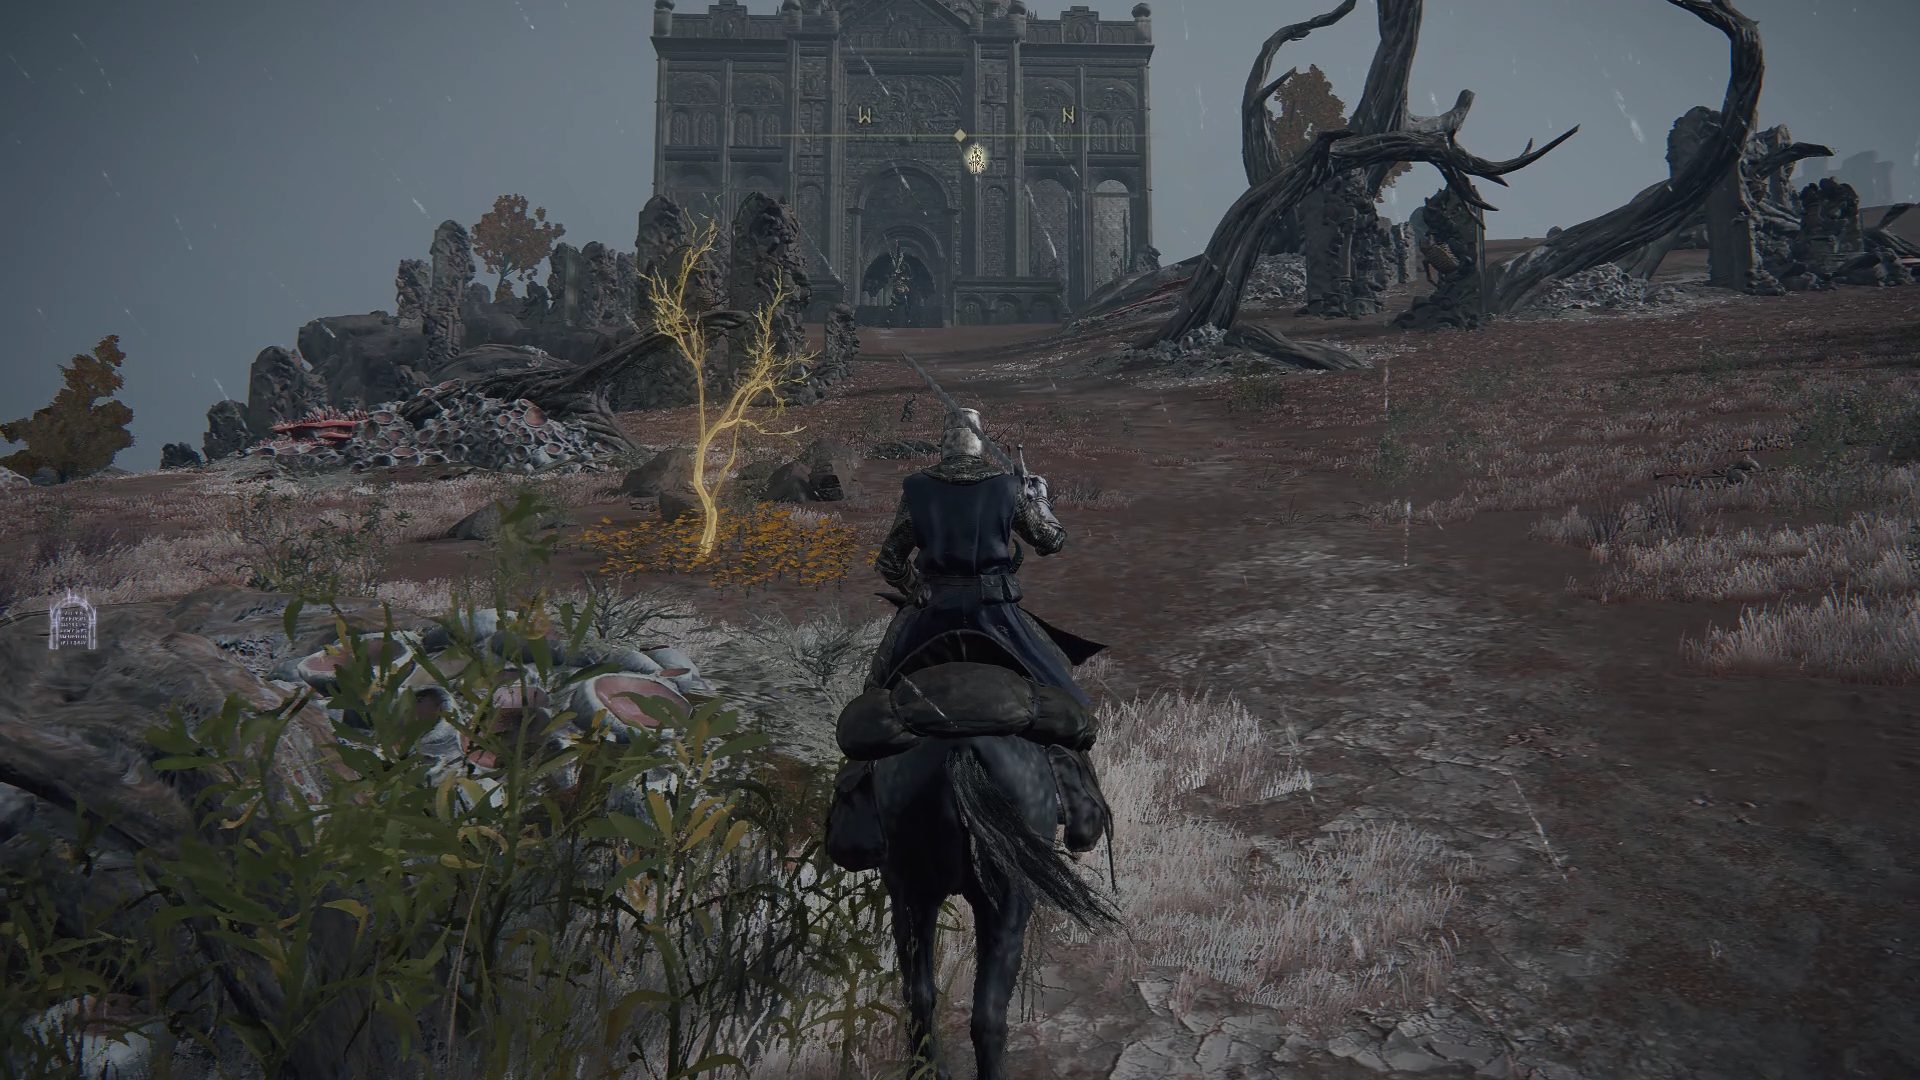
When you’re done disturbing the dead, get back on the road with the broken down carriage, and continue following it southeast until you find a site of grace by the side of the road: the Caelem Ruins site of grace.
Next to this site of grace are the Caelem Ruins, so we might as well take a moment to explore those before continuing our journey through Caelid. From the site of grace, go through the doorway southeast to grab the 3x Drawstring Fire Grease.
Once you make your way through this room however, you will be ambushed by several fiery ghouls. These enemies are so happy to see you that if you come close to them, they will explode after a short delay. Just run in and grab the Drawstring Fire Grease from the corpse before running out of the room. These enemies are very slow, so you can safely let them roam about.
As for the rest of these ruins, there is no interesting loot left to grab except for the Visage Shield that you can find past a boss room in the southeastern part of these ruins. While heading there, you will encounter a couple of Flame Chariots that can look somewhat intimidating. They have a pretty major flaw however: the driver is sticking out from the back of the chariot. If you’re sneaky, you can sneak up to the driver for a backstab that will deal significant damage. Other than that, you’ll have to ride around them to land a few hits on the driver whenever it’s safe, Additionally, a plunging attack will instantly defeat those chariots, however you won’t always be able to find yourself in a position to use one of those.
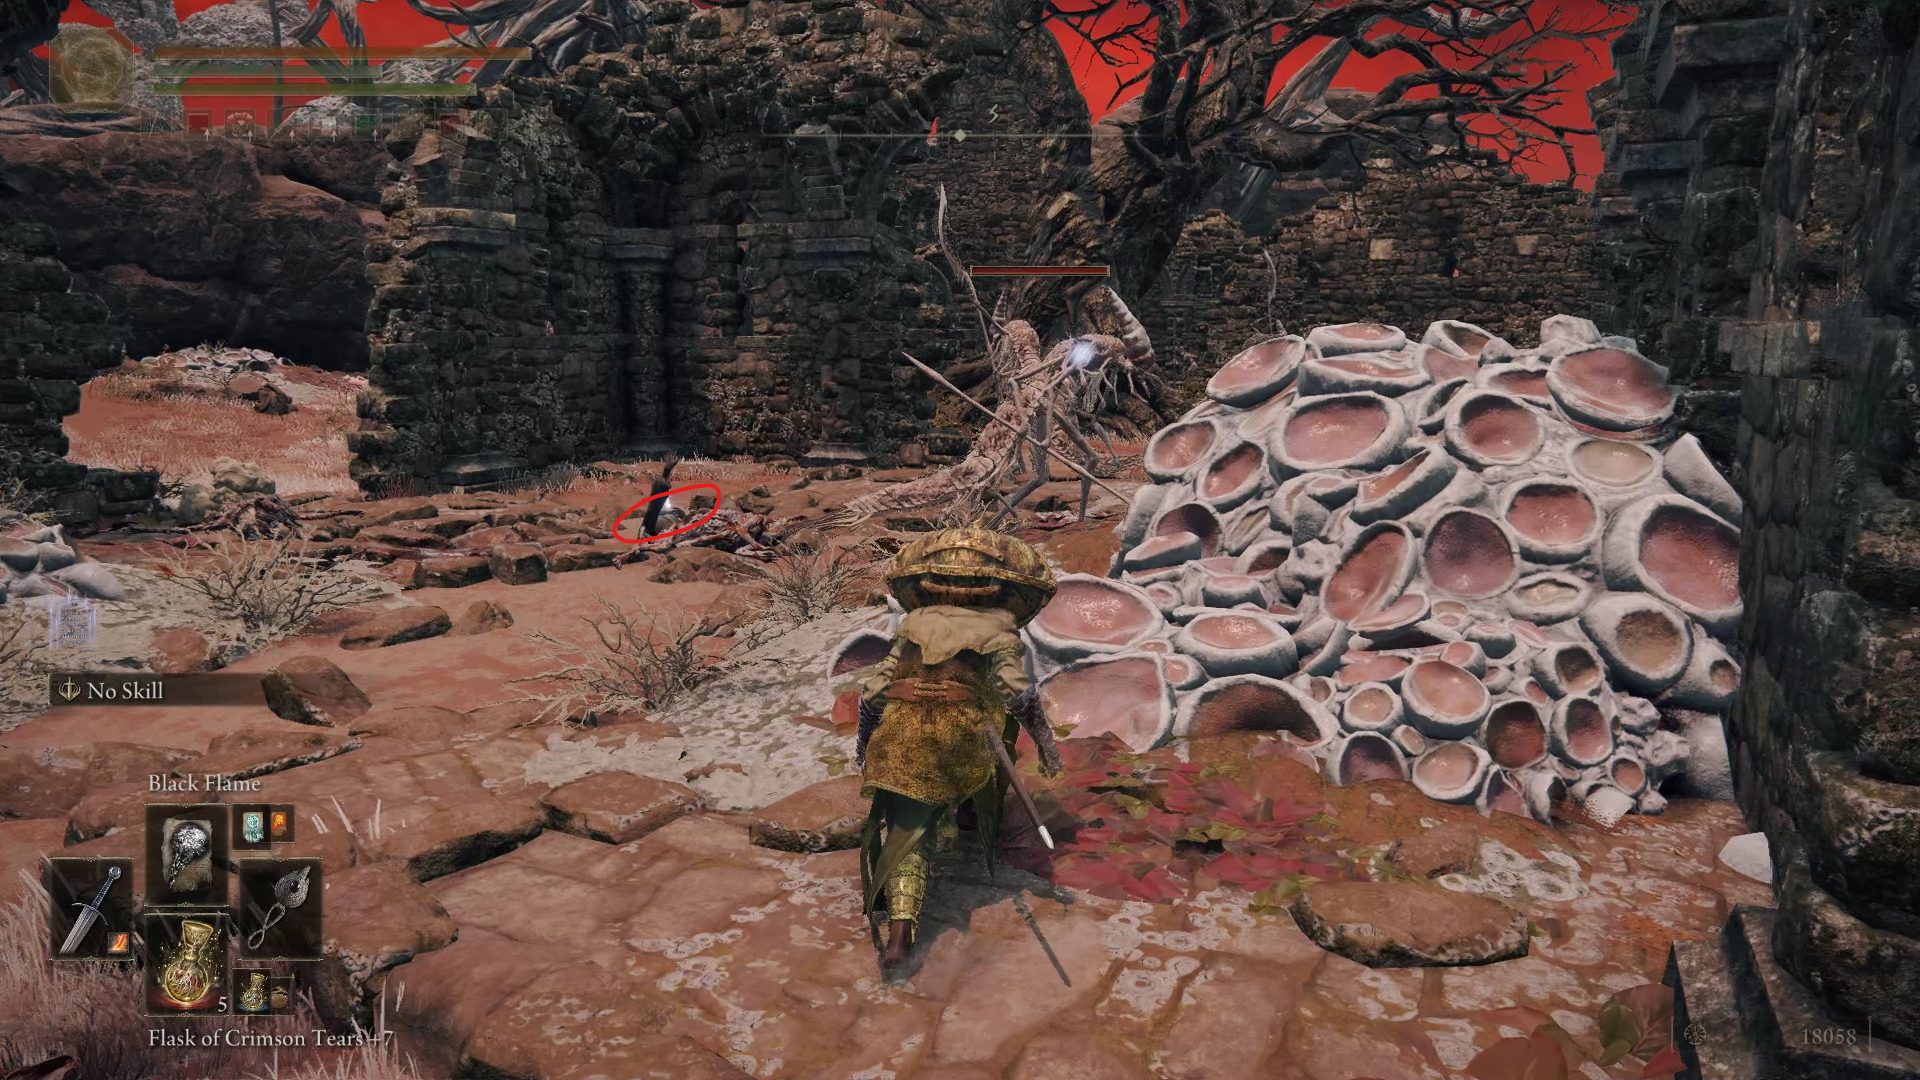
At the southeastern corner of Caelem Ruins, you’ll find a staircase leading down to the Mad Pumpkin Head Duo boss fight.
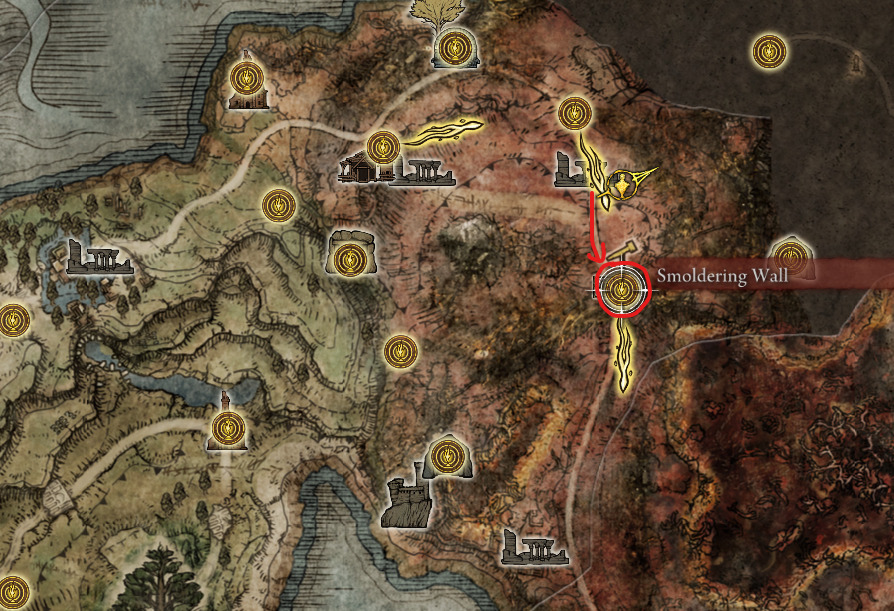
Going back up the stairs, you’ll see 3 dogs feasting on something (or someone). If you decide to kill them, you can get some leftovers: 3x Hefty Beast Bone. Whether fighting 3 very angry dogs to grab some bones is worthwhile is up to you. Either way, next you should get back on the road and continue heading south until you reach the Smoldering Wall site of grace.
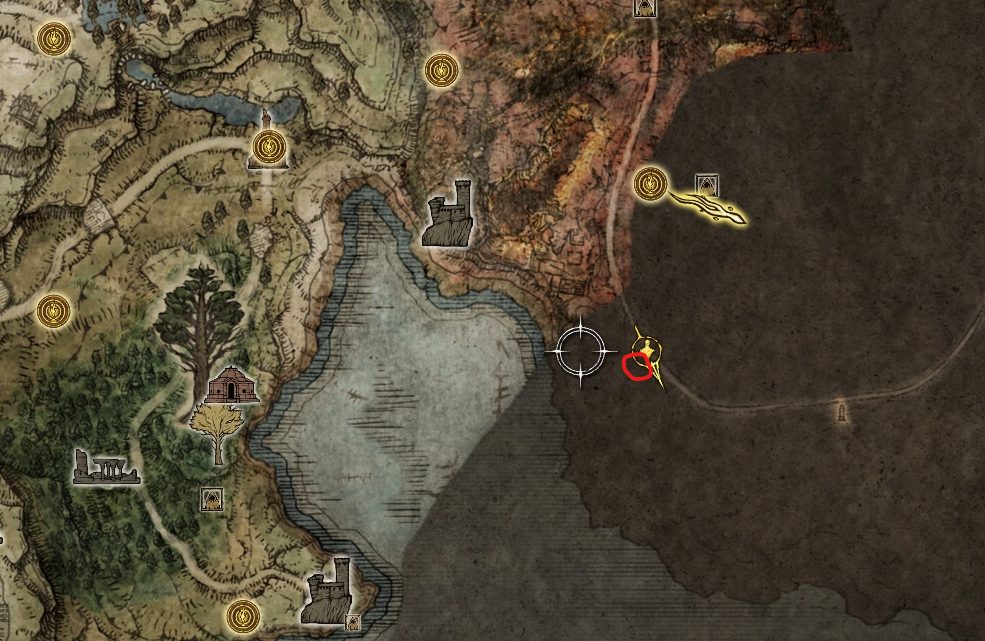
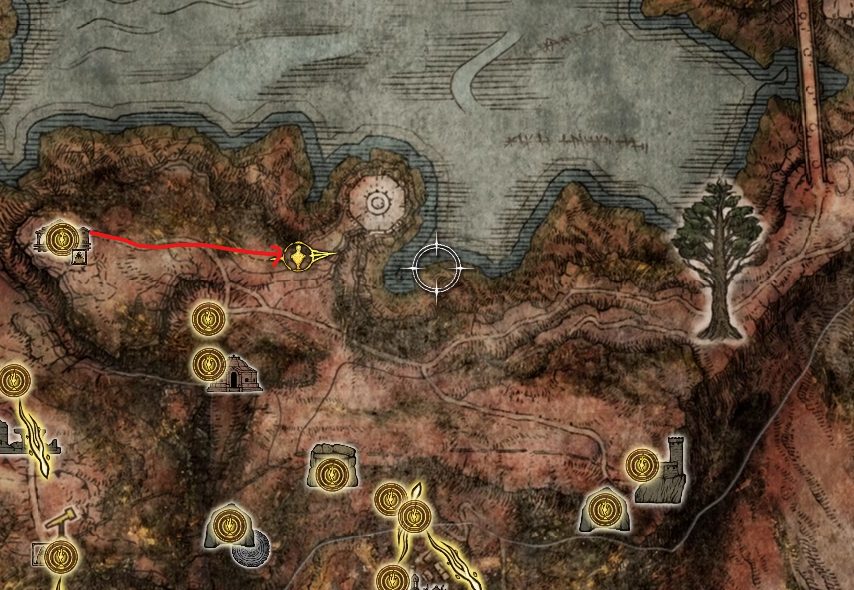
Grab the site of grace and start heading east from it. The place we’re heading to is guarded by an Iron Maiden enemy. Whether you decide to fight it for a few runes or not, she can serve as a landmark to find your way to the next dungeon. Right past her will be a couple of branches that you can walk across to reach the Abandoned Cave dungeon.
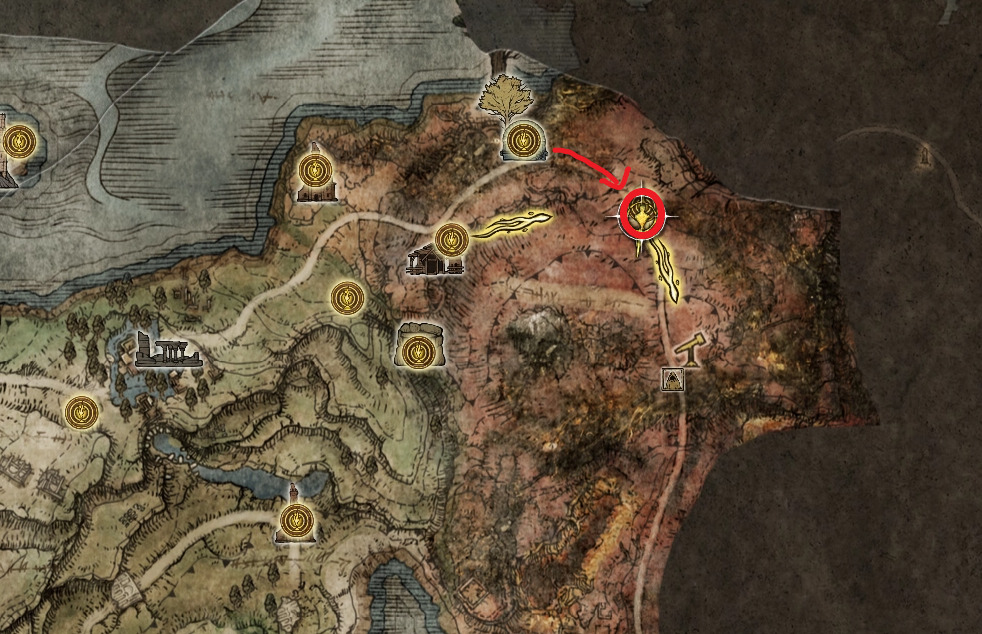
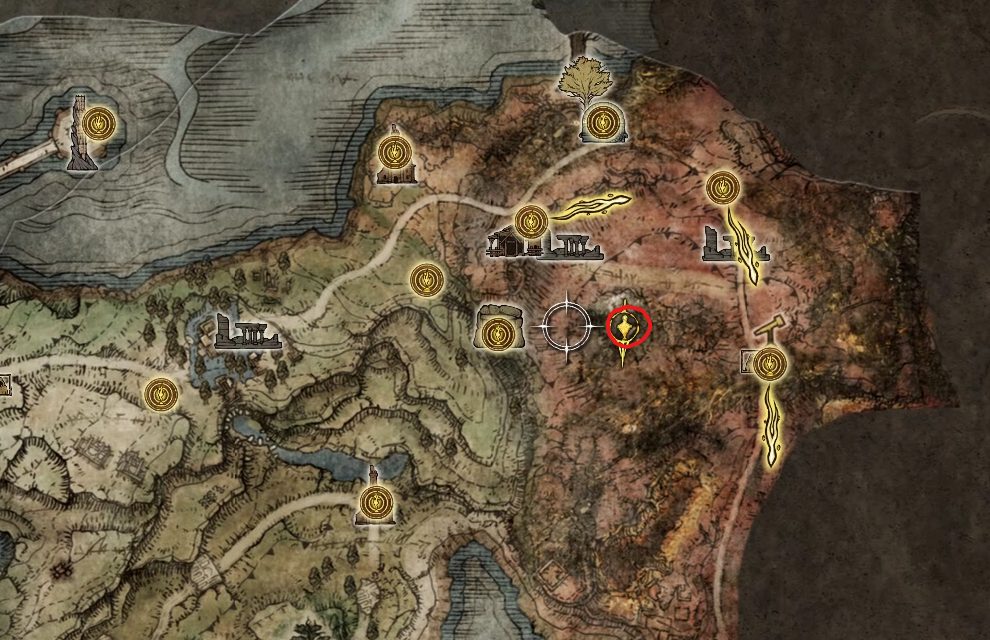
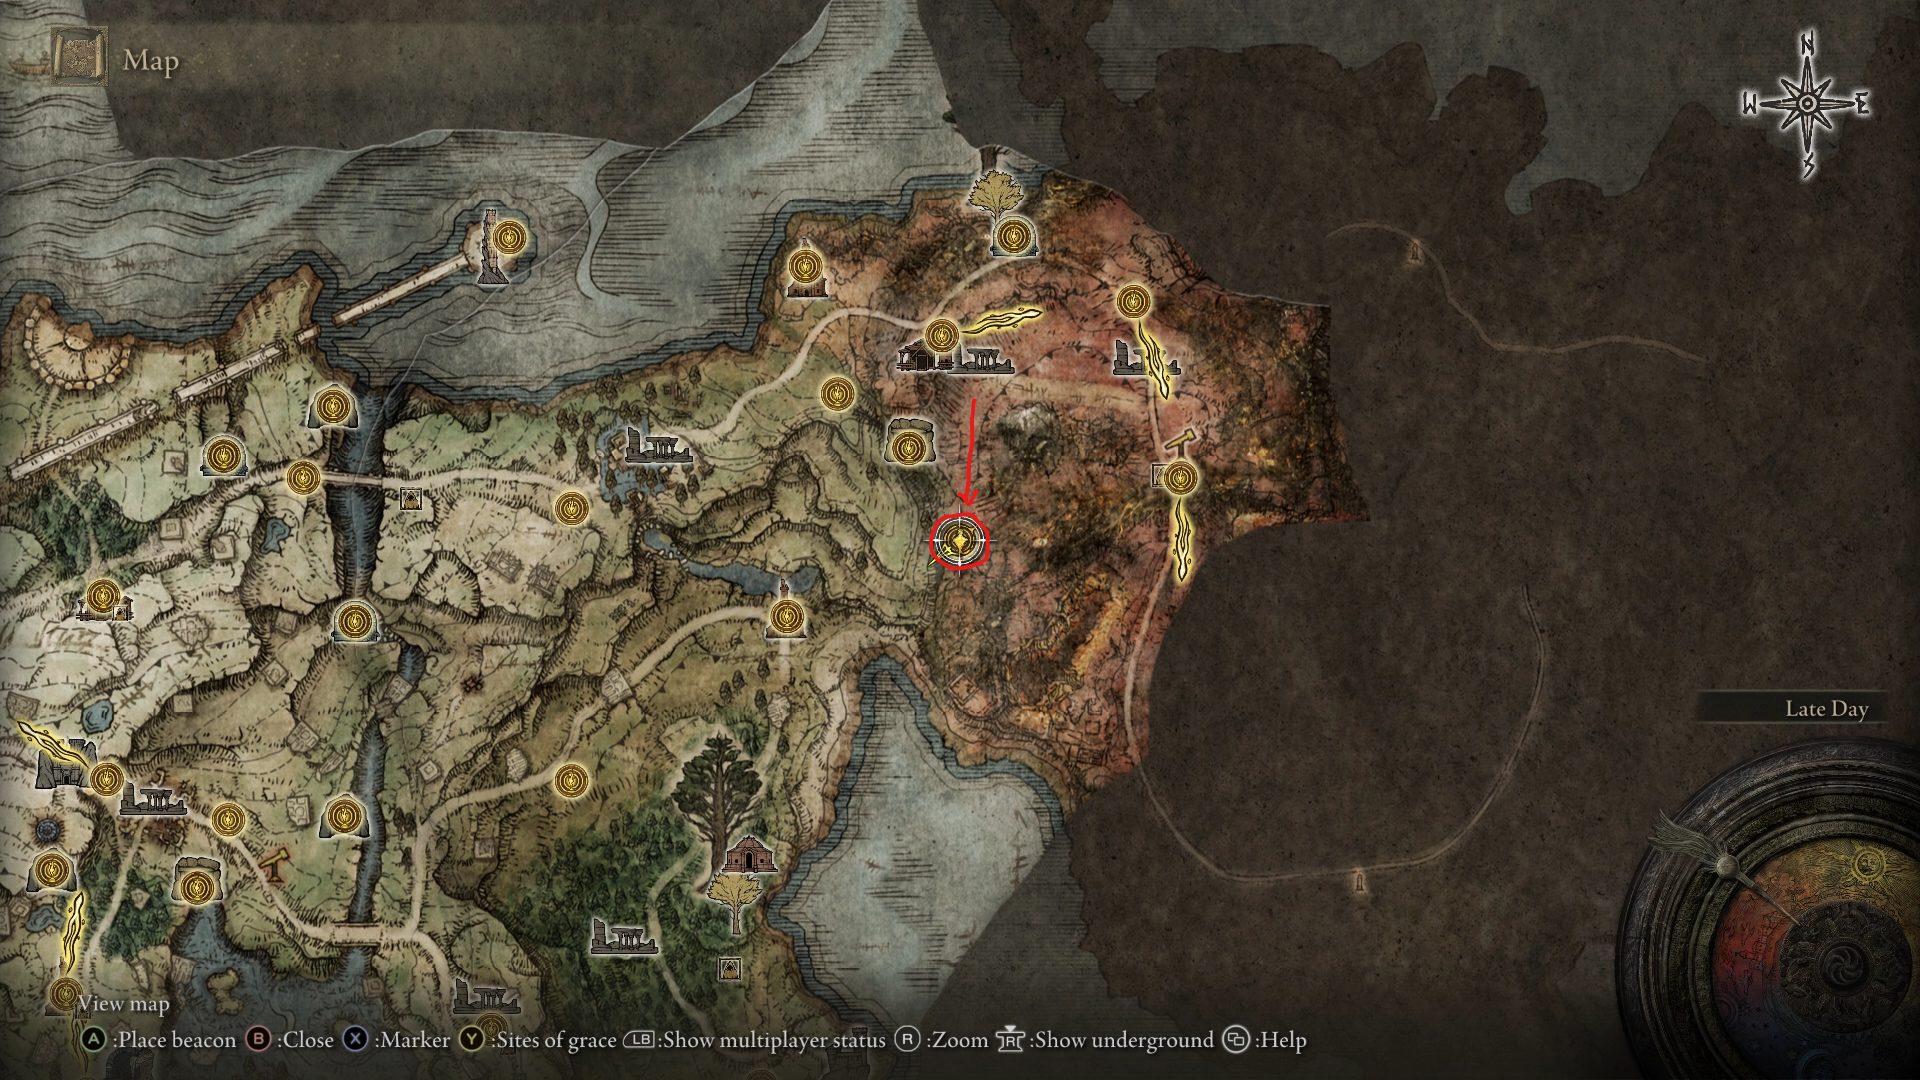
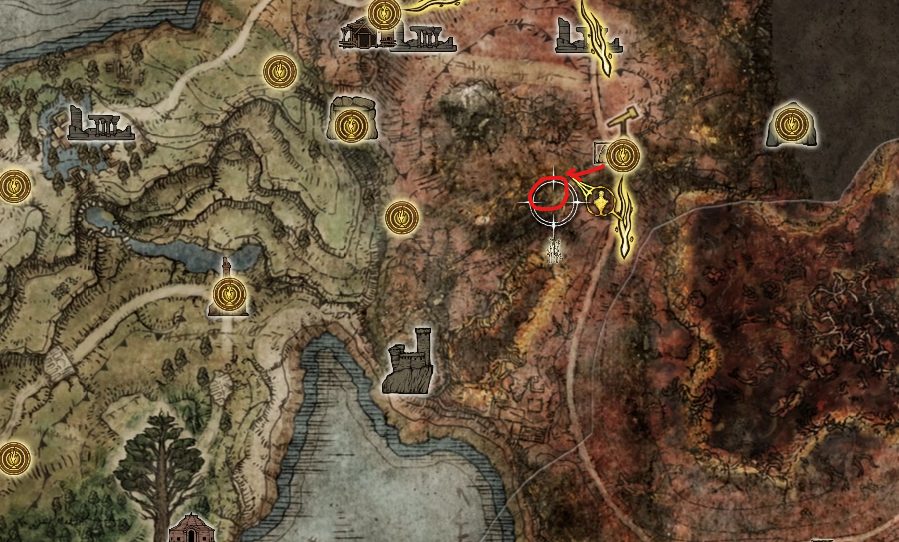
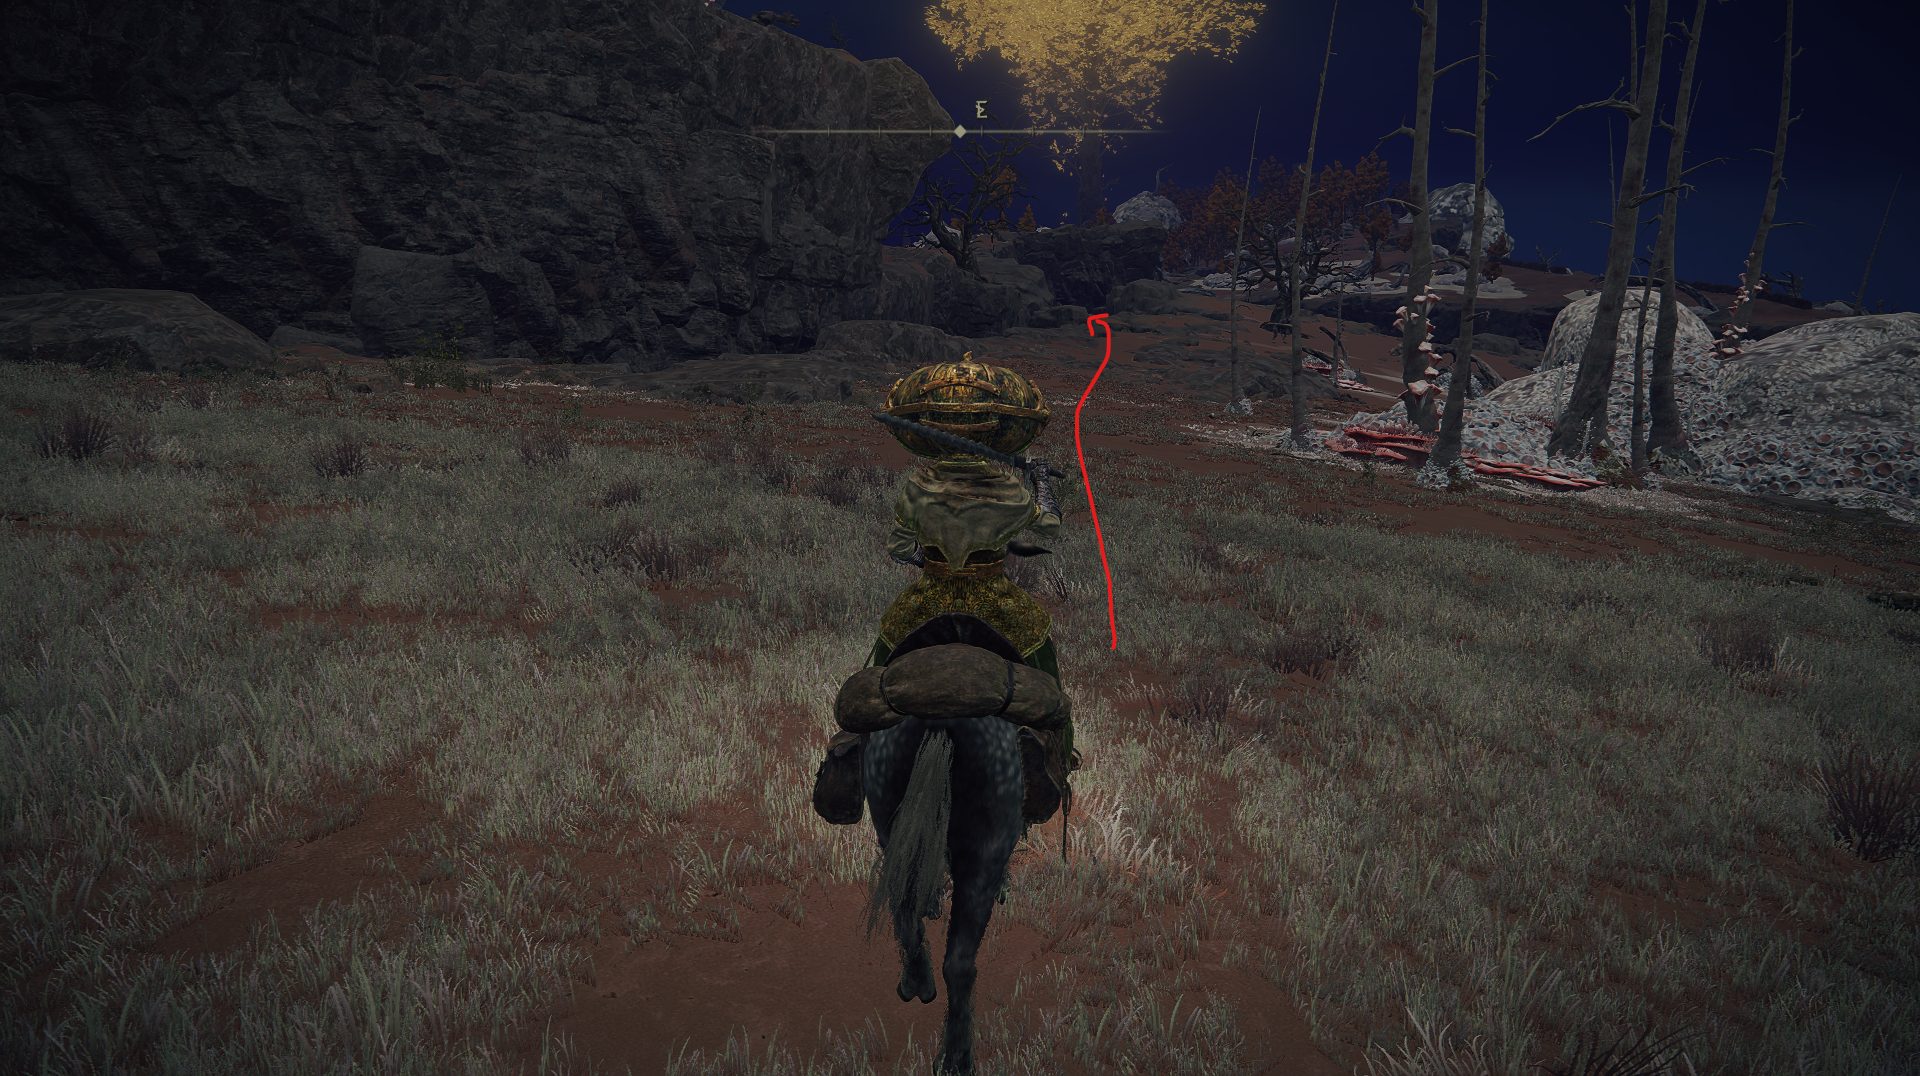
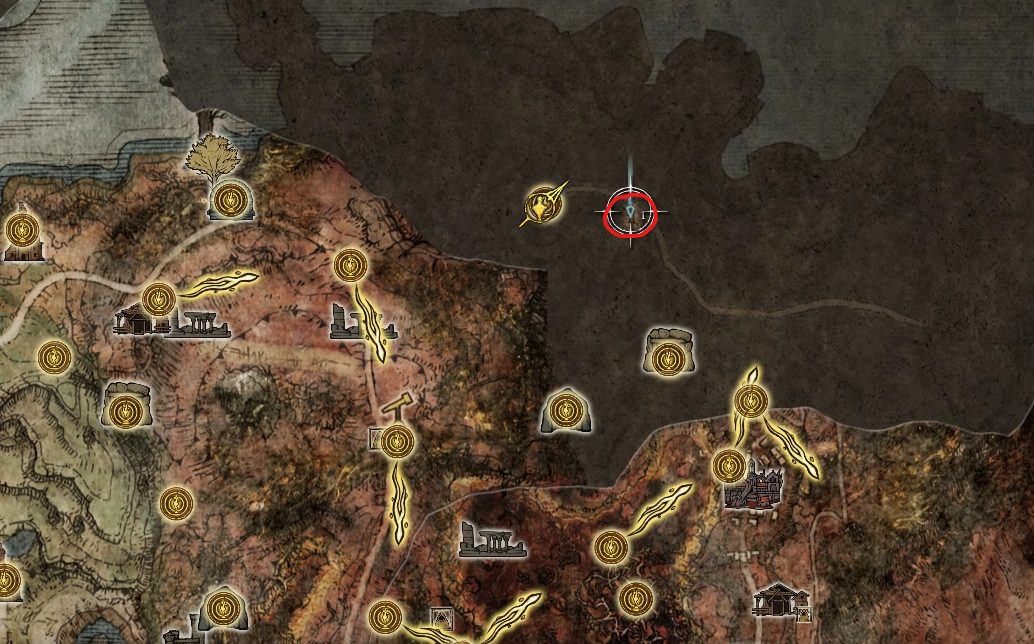
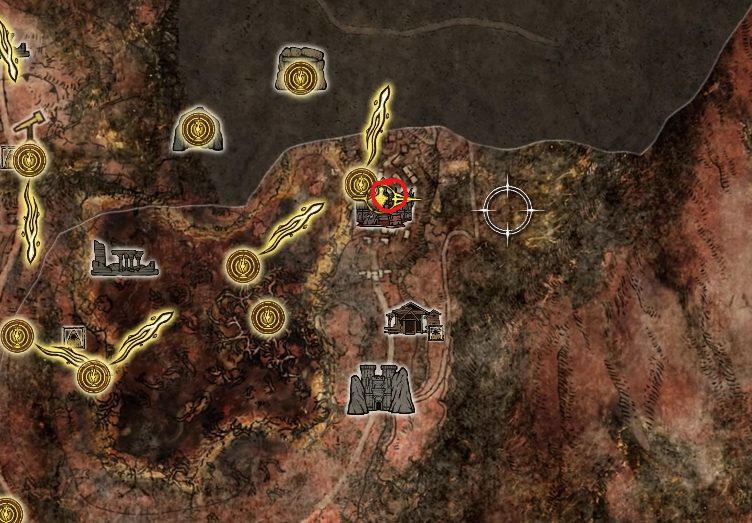
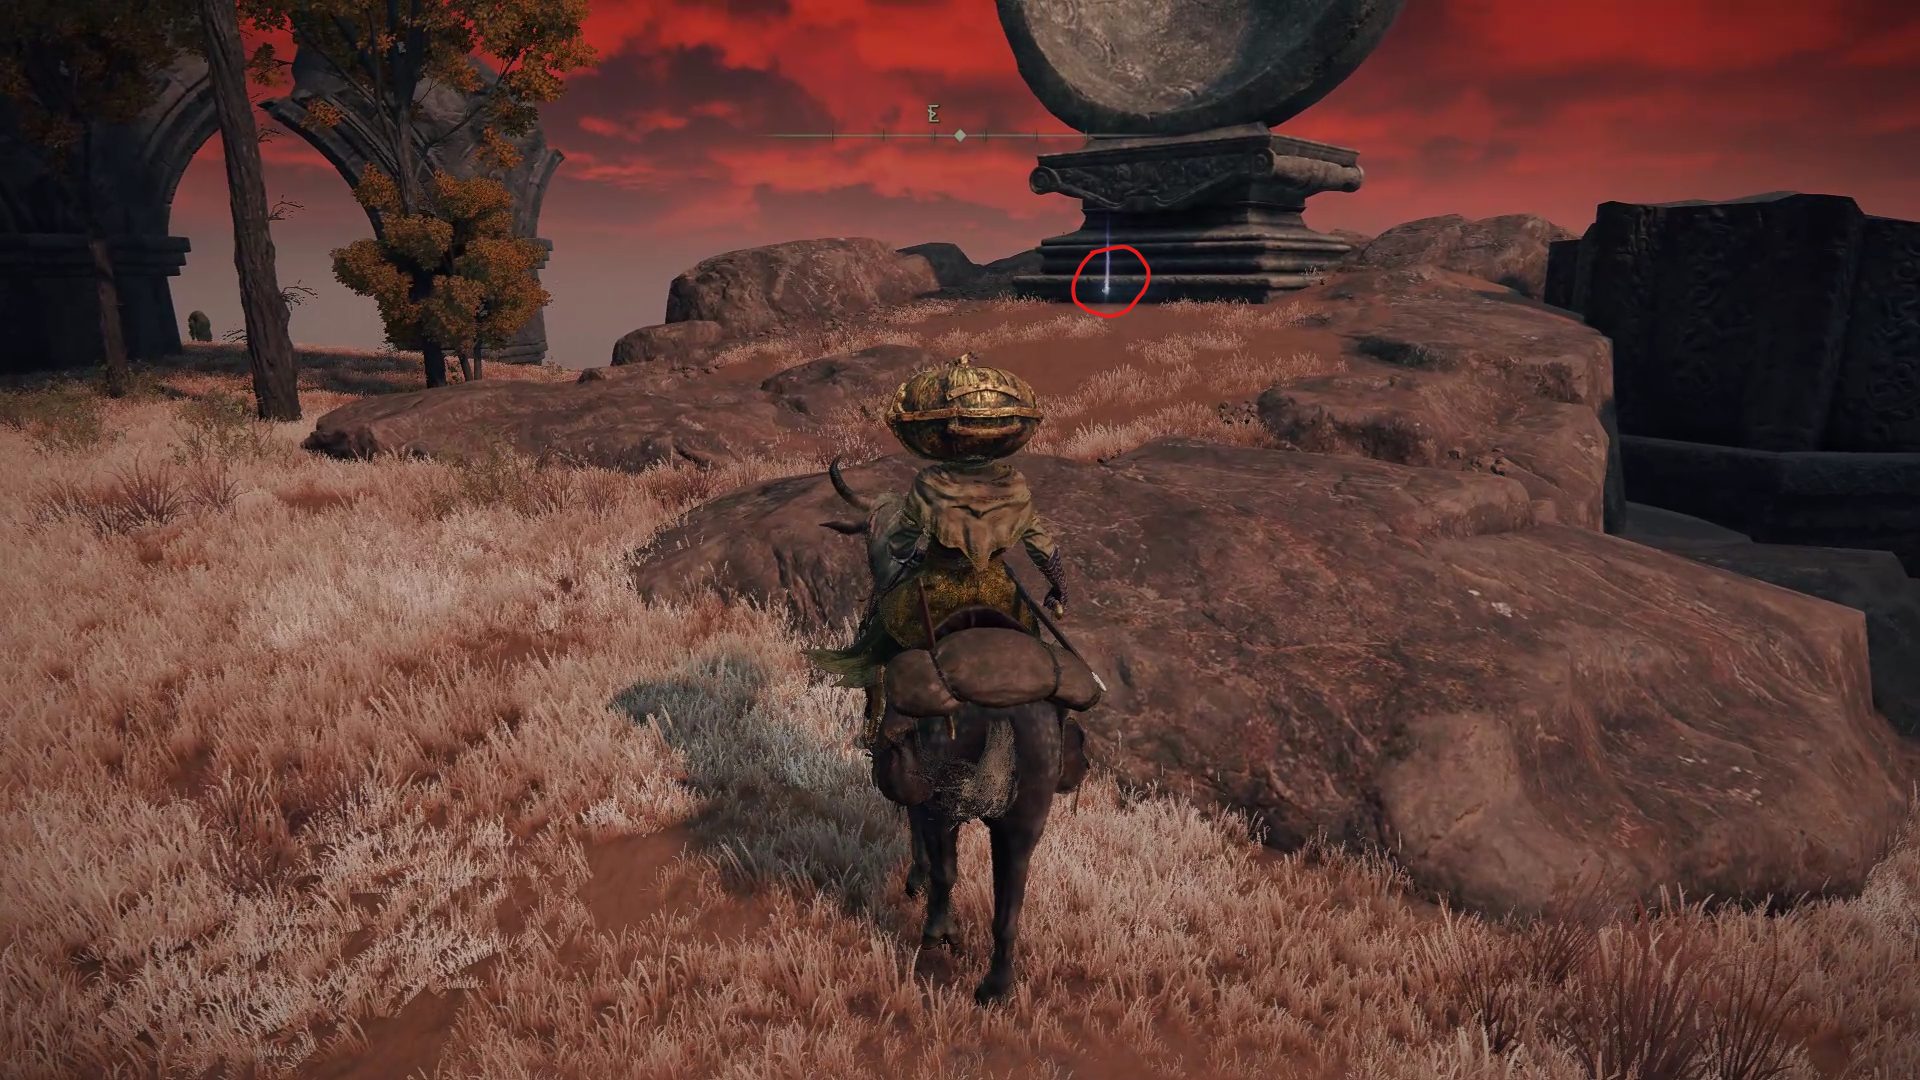
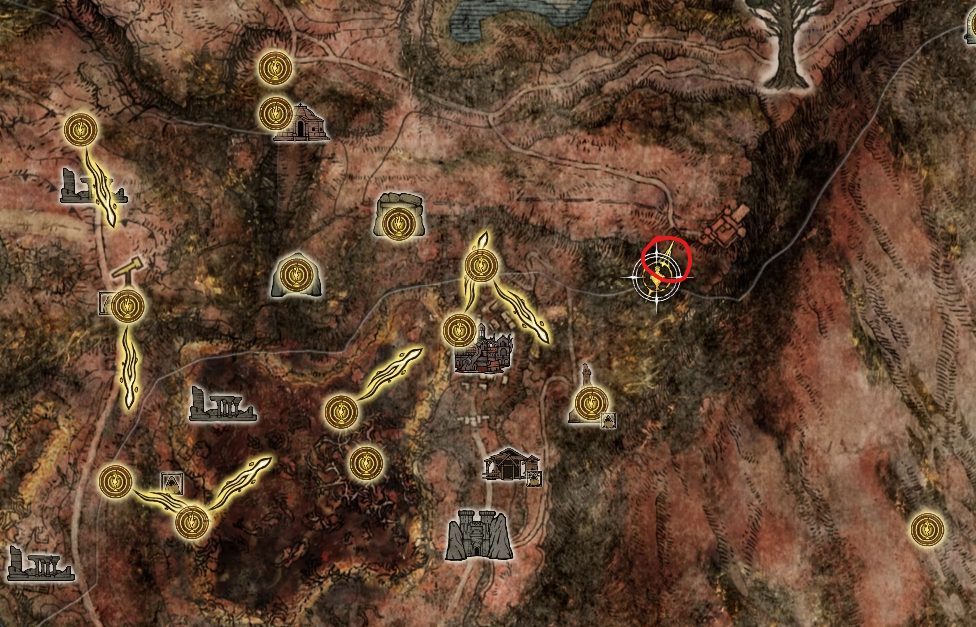
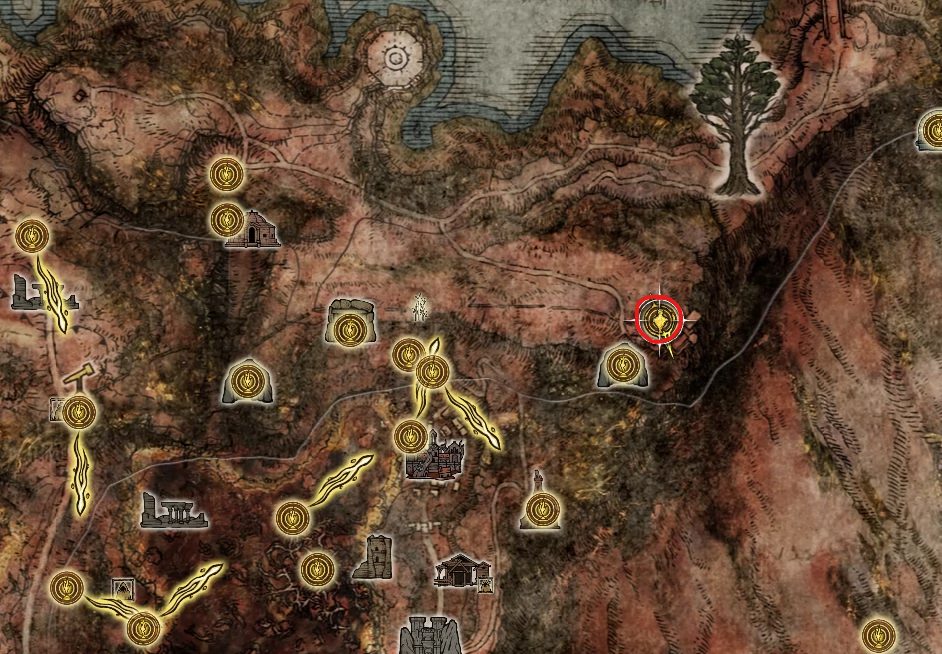
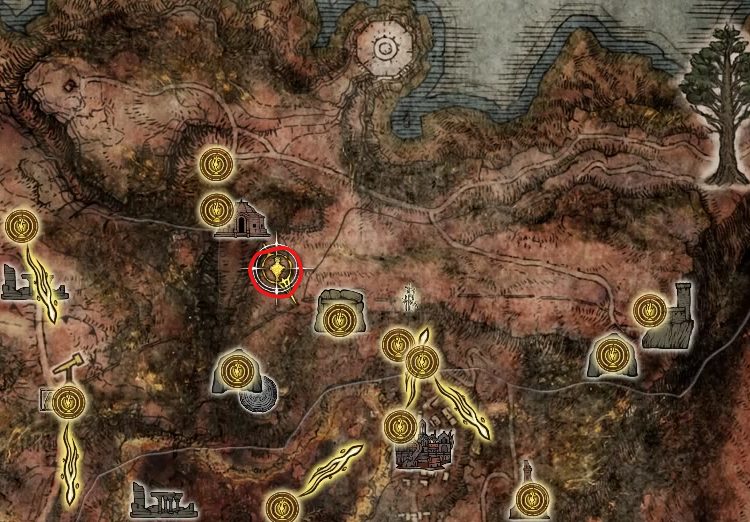
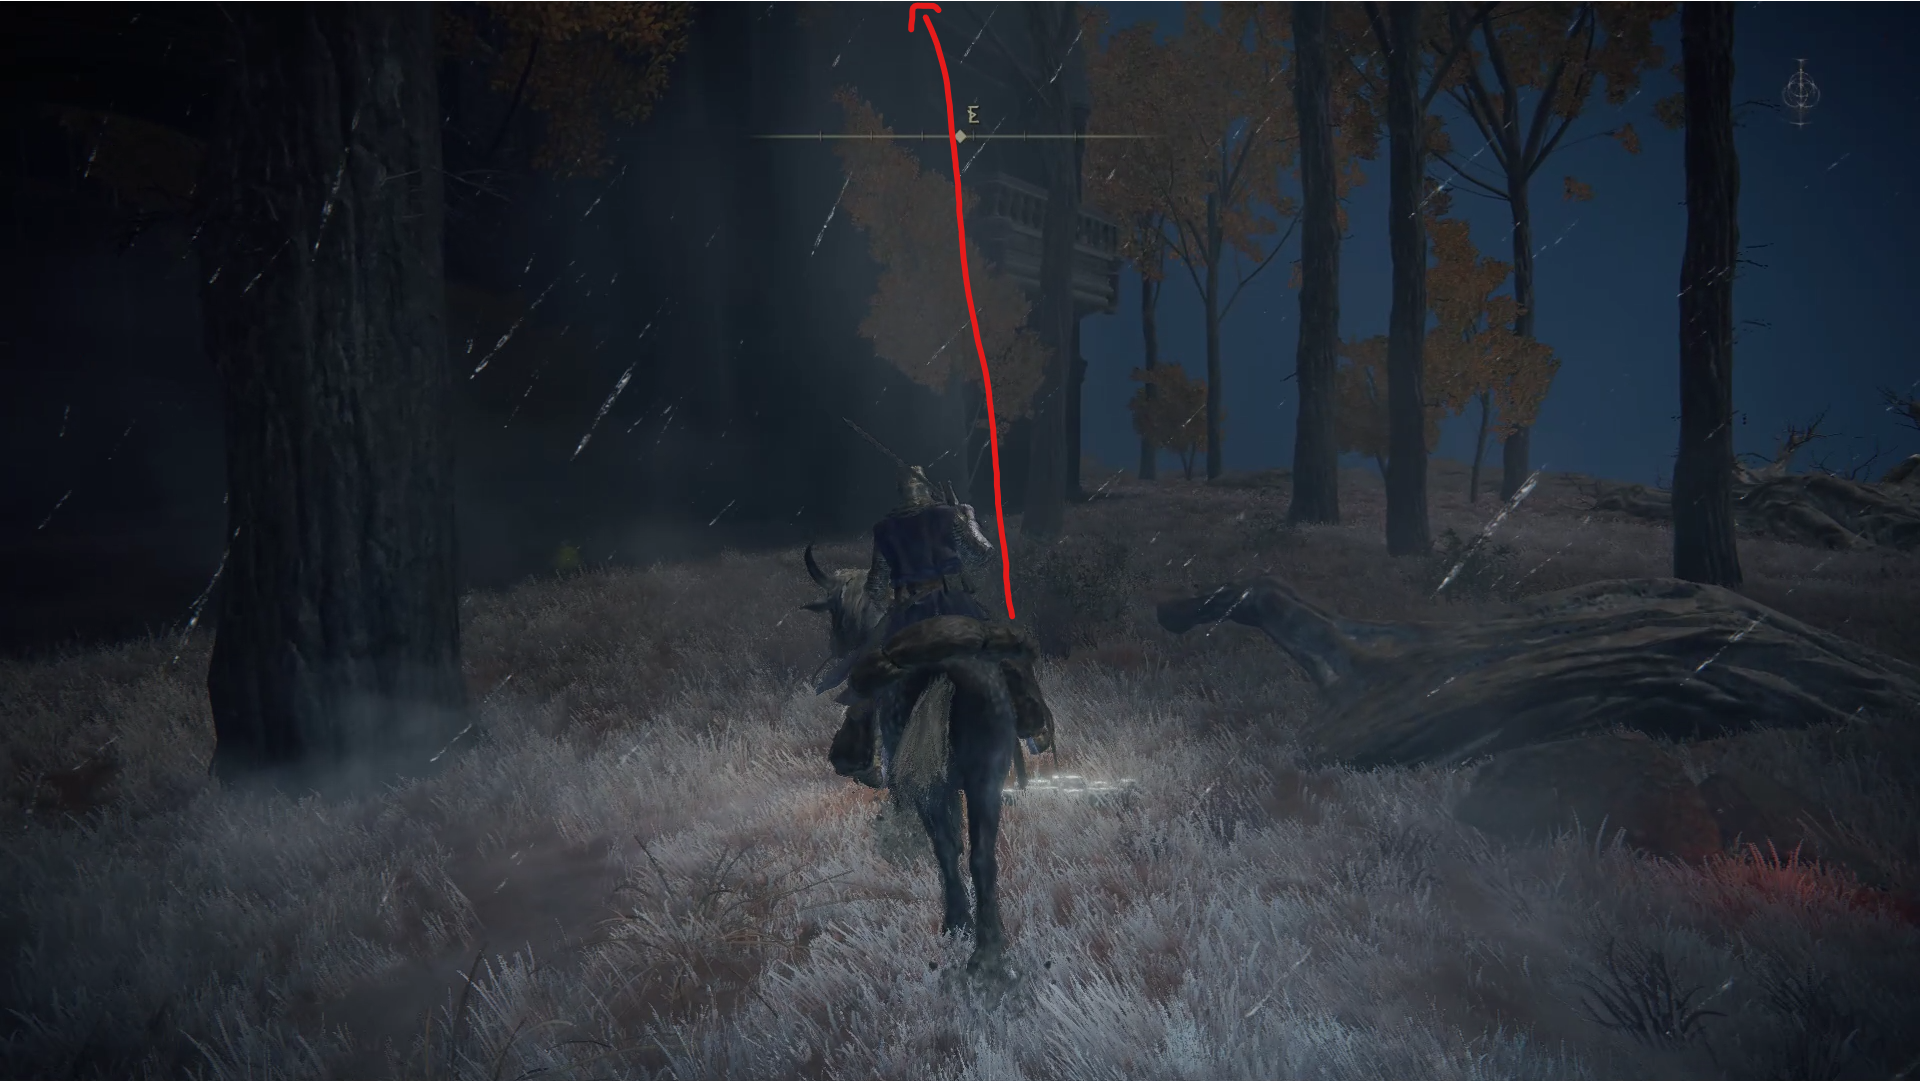
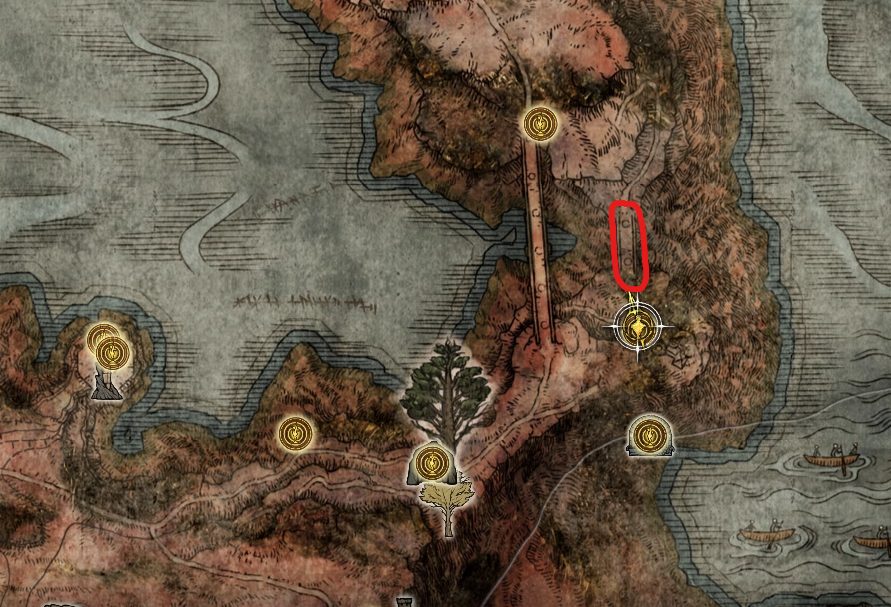
Travel back to the Smoldering Wall site of grace now as we’ll be grabbing the area’s map next. While it isn’t necessary to grab it, it will help you follow this walkthrough later on, so we might as well do it now. From the Smoldering Wall site of grace, you simply have to follow the road going south until you reach the familiar icon on the map that shows you where the area’s map is located.
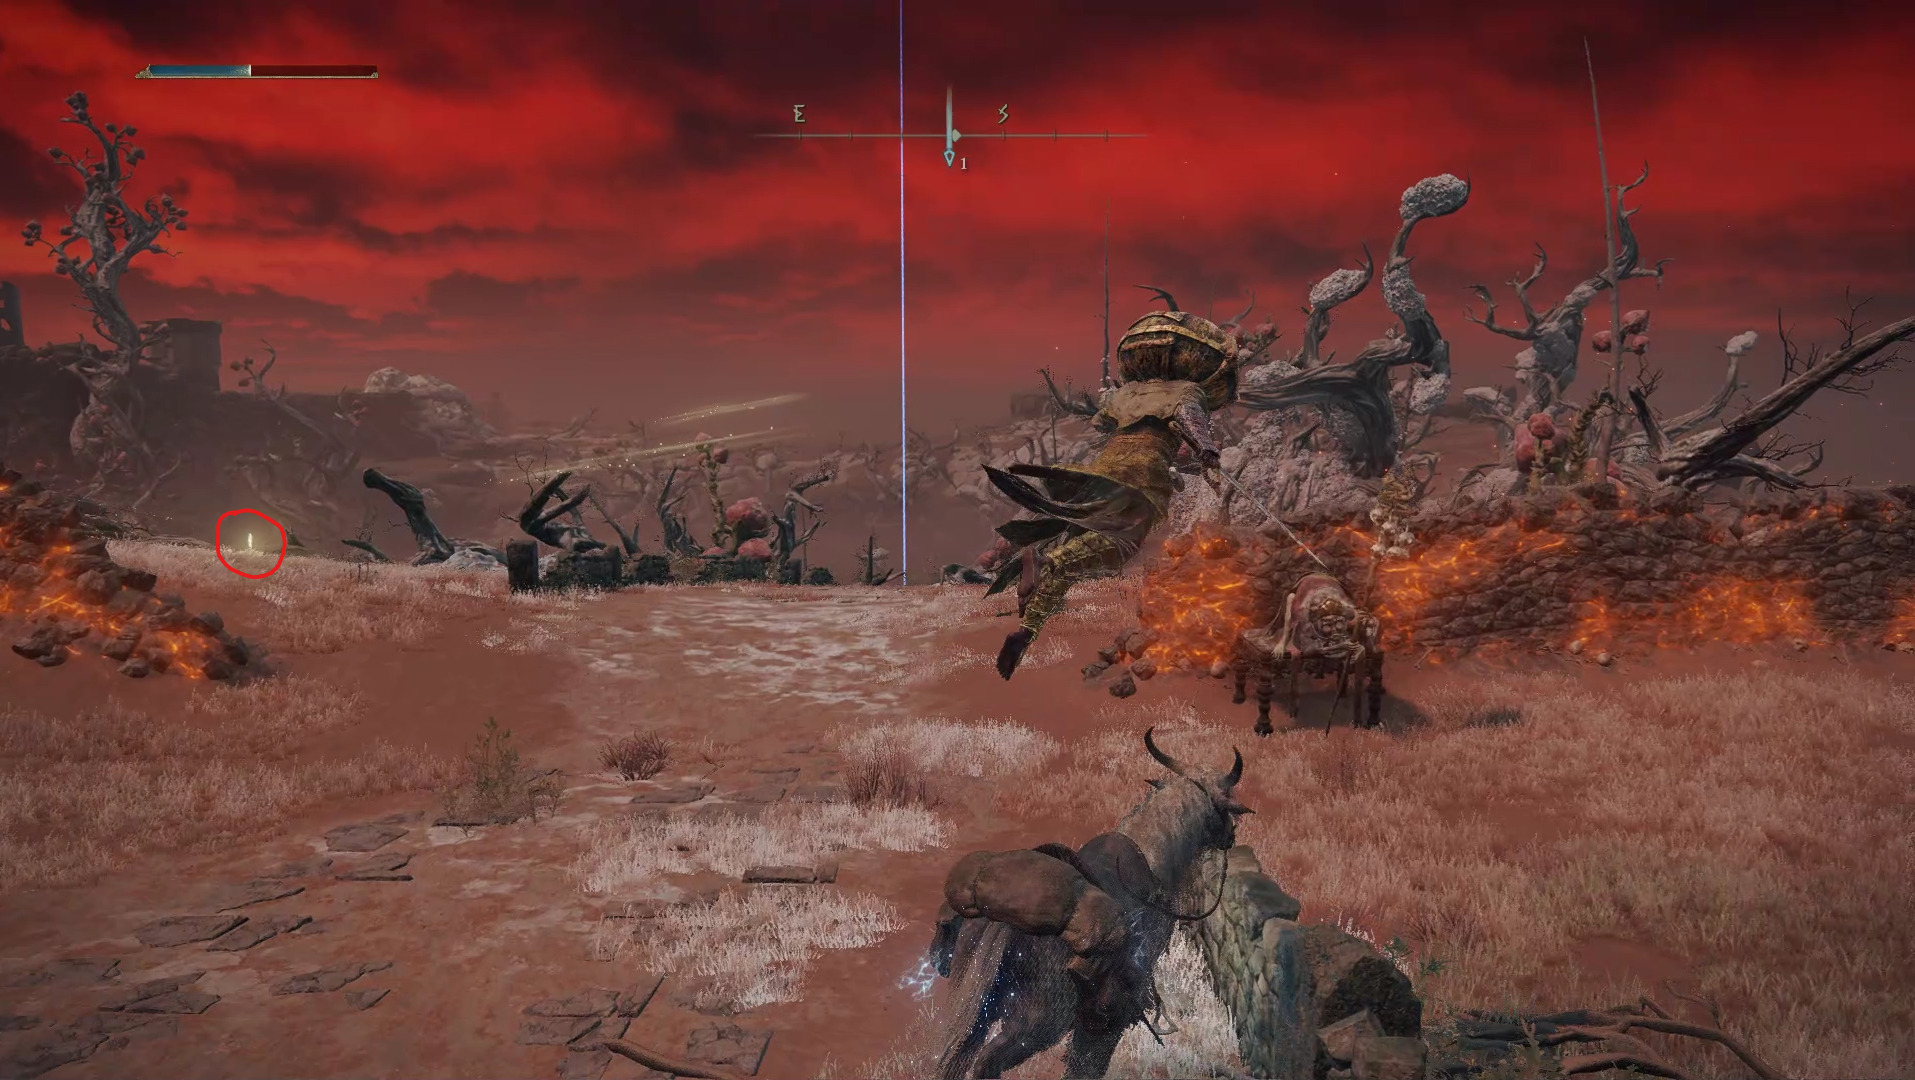
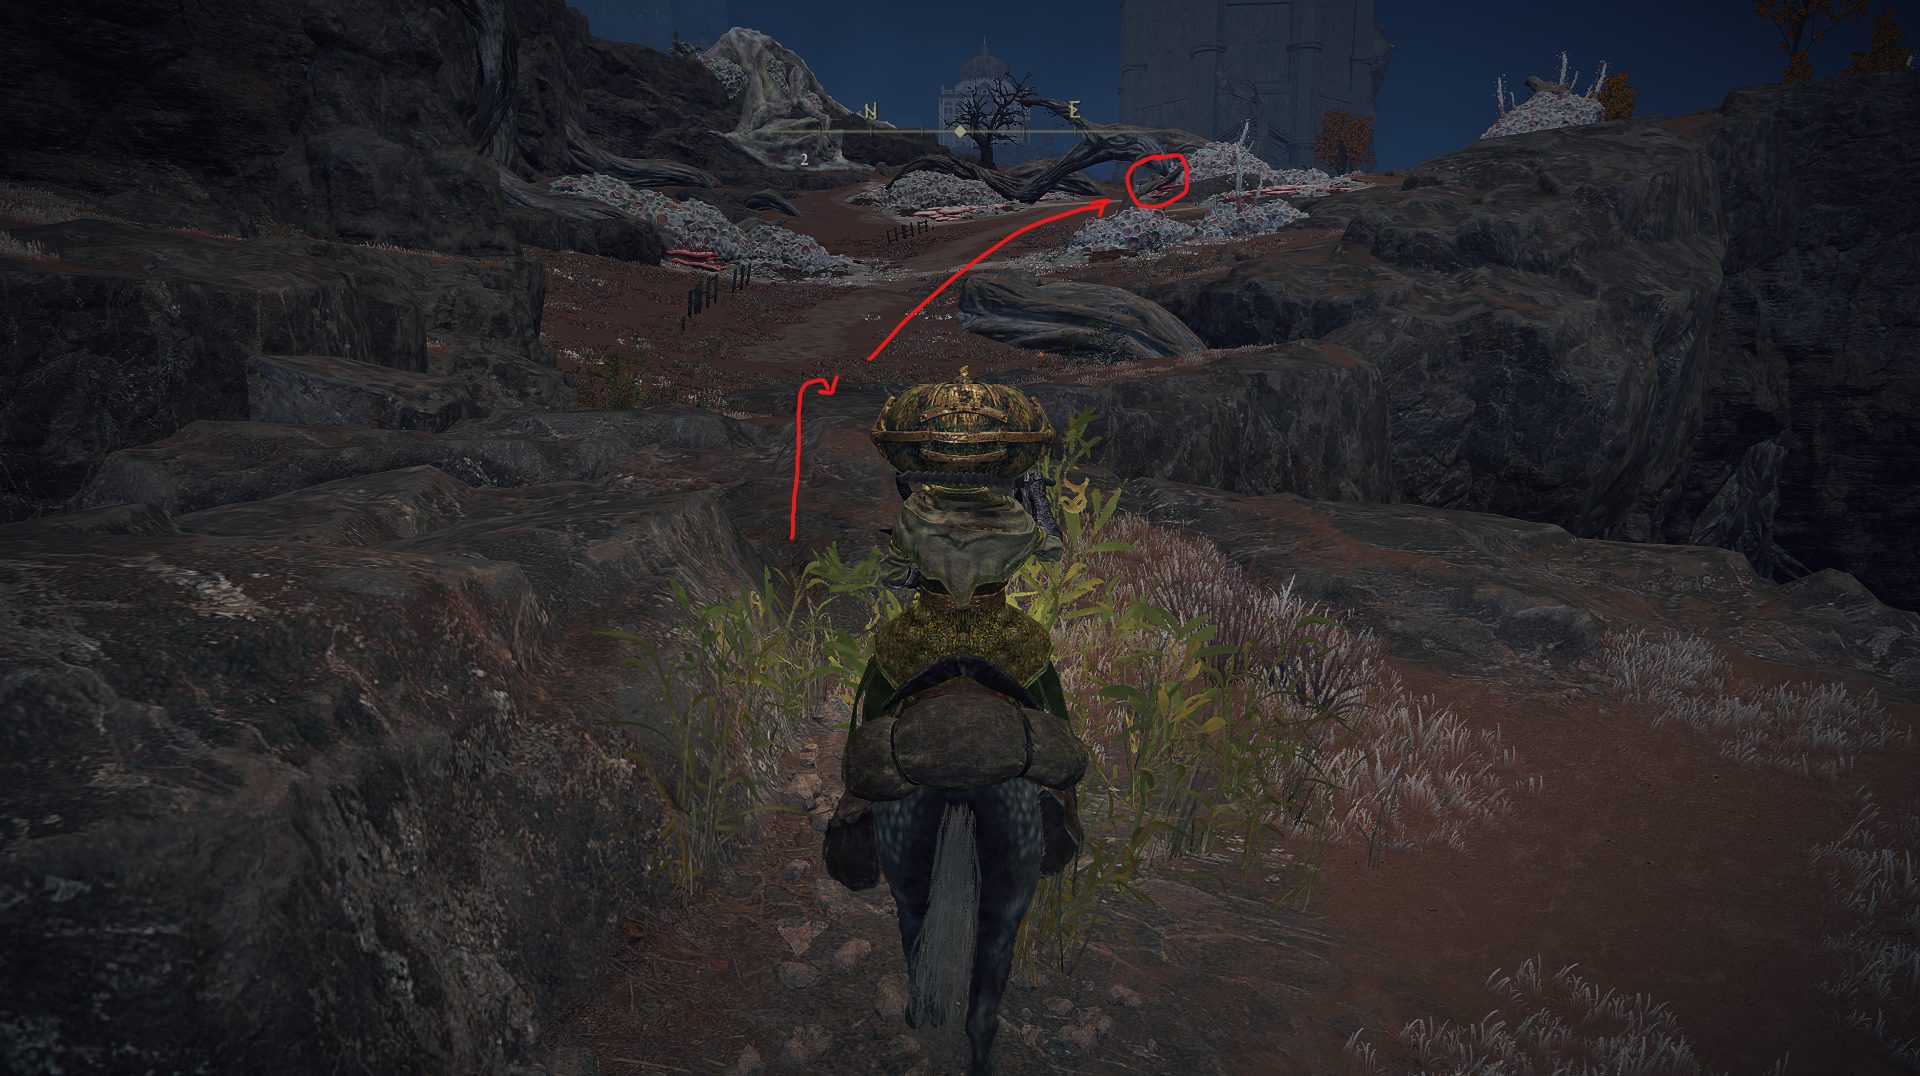
To make it easier for yourself, don’t hesitate to put down a waypoint as it’s a bit further than it may seem. Now continue following this road until you find a loot beetle on the eastern side of the road. On top of this beetle (A) dropping the Ash of War: Lifesteal Fist, there is also a site of grace (B) nearby that can be worth grabbing.
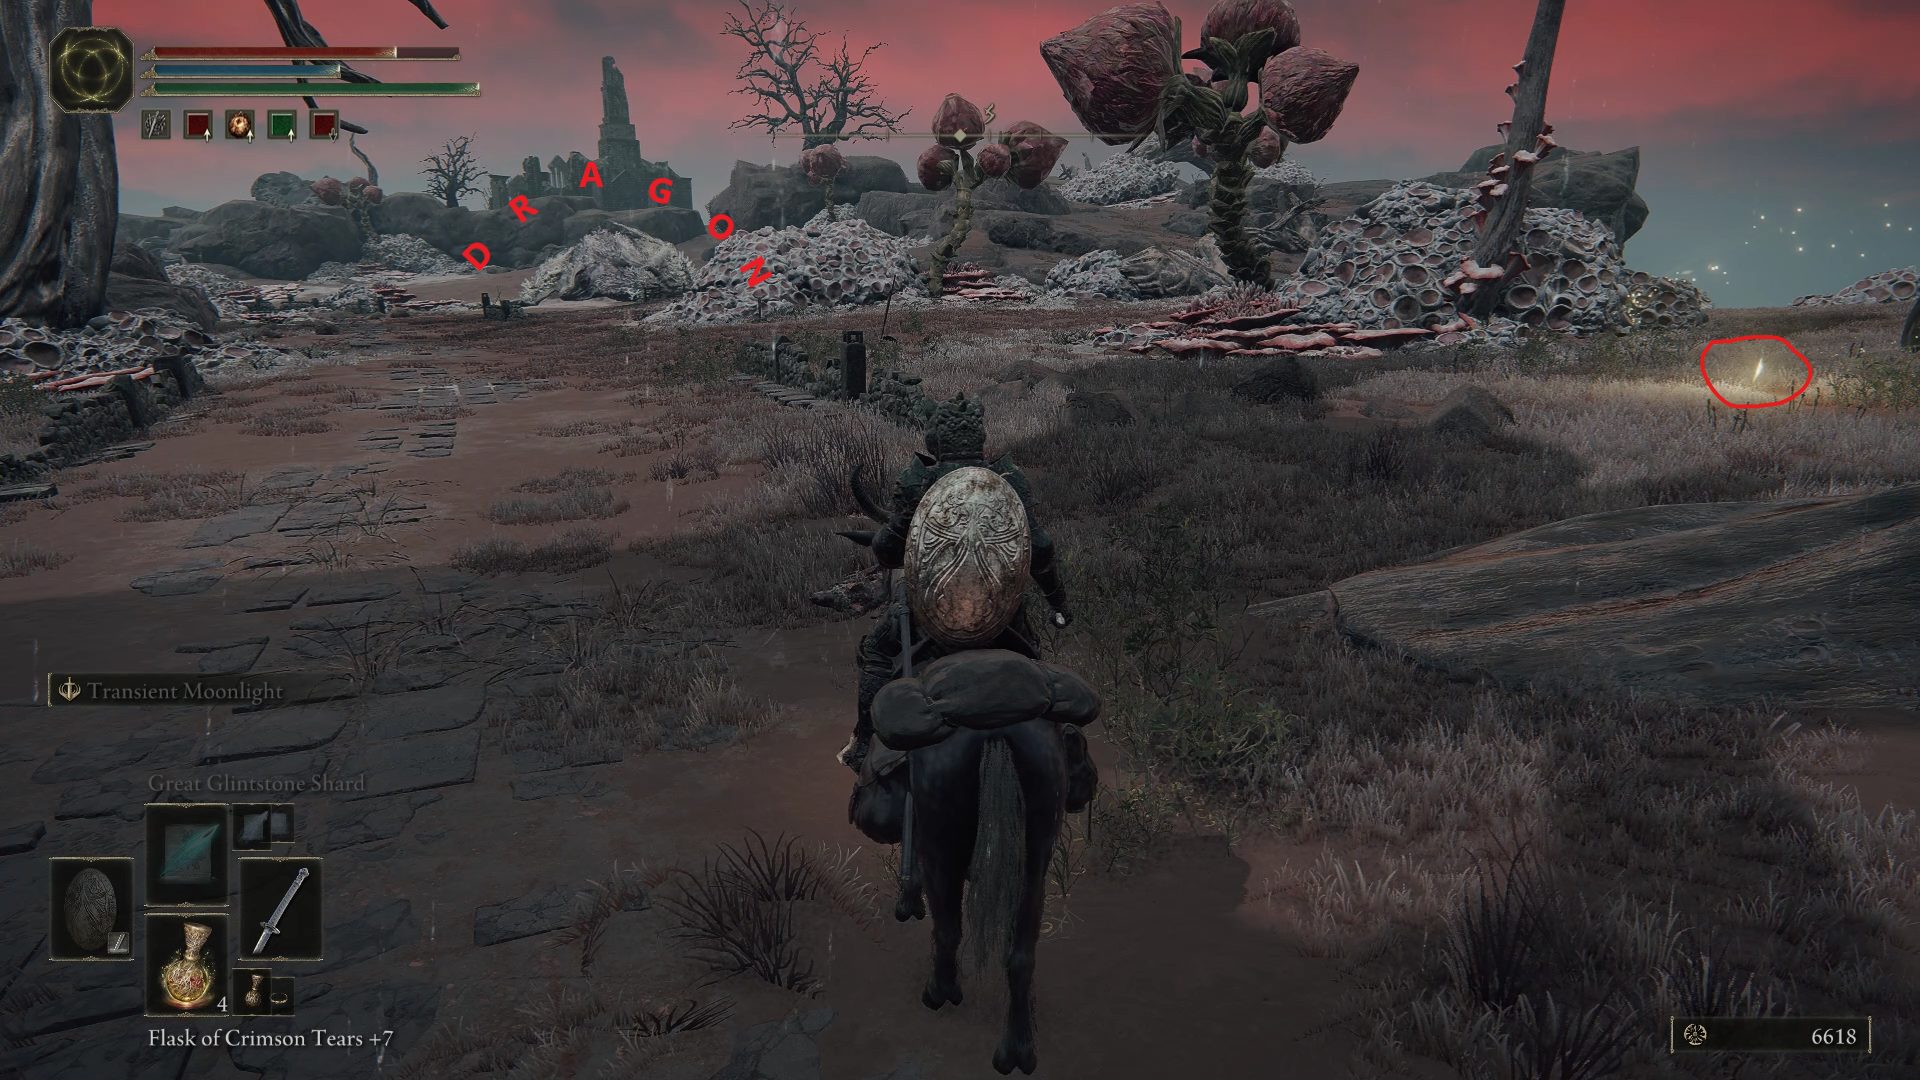
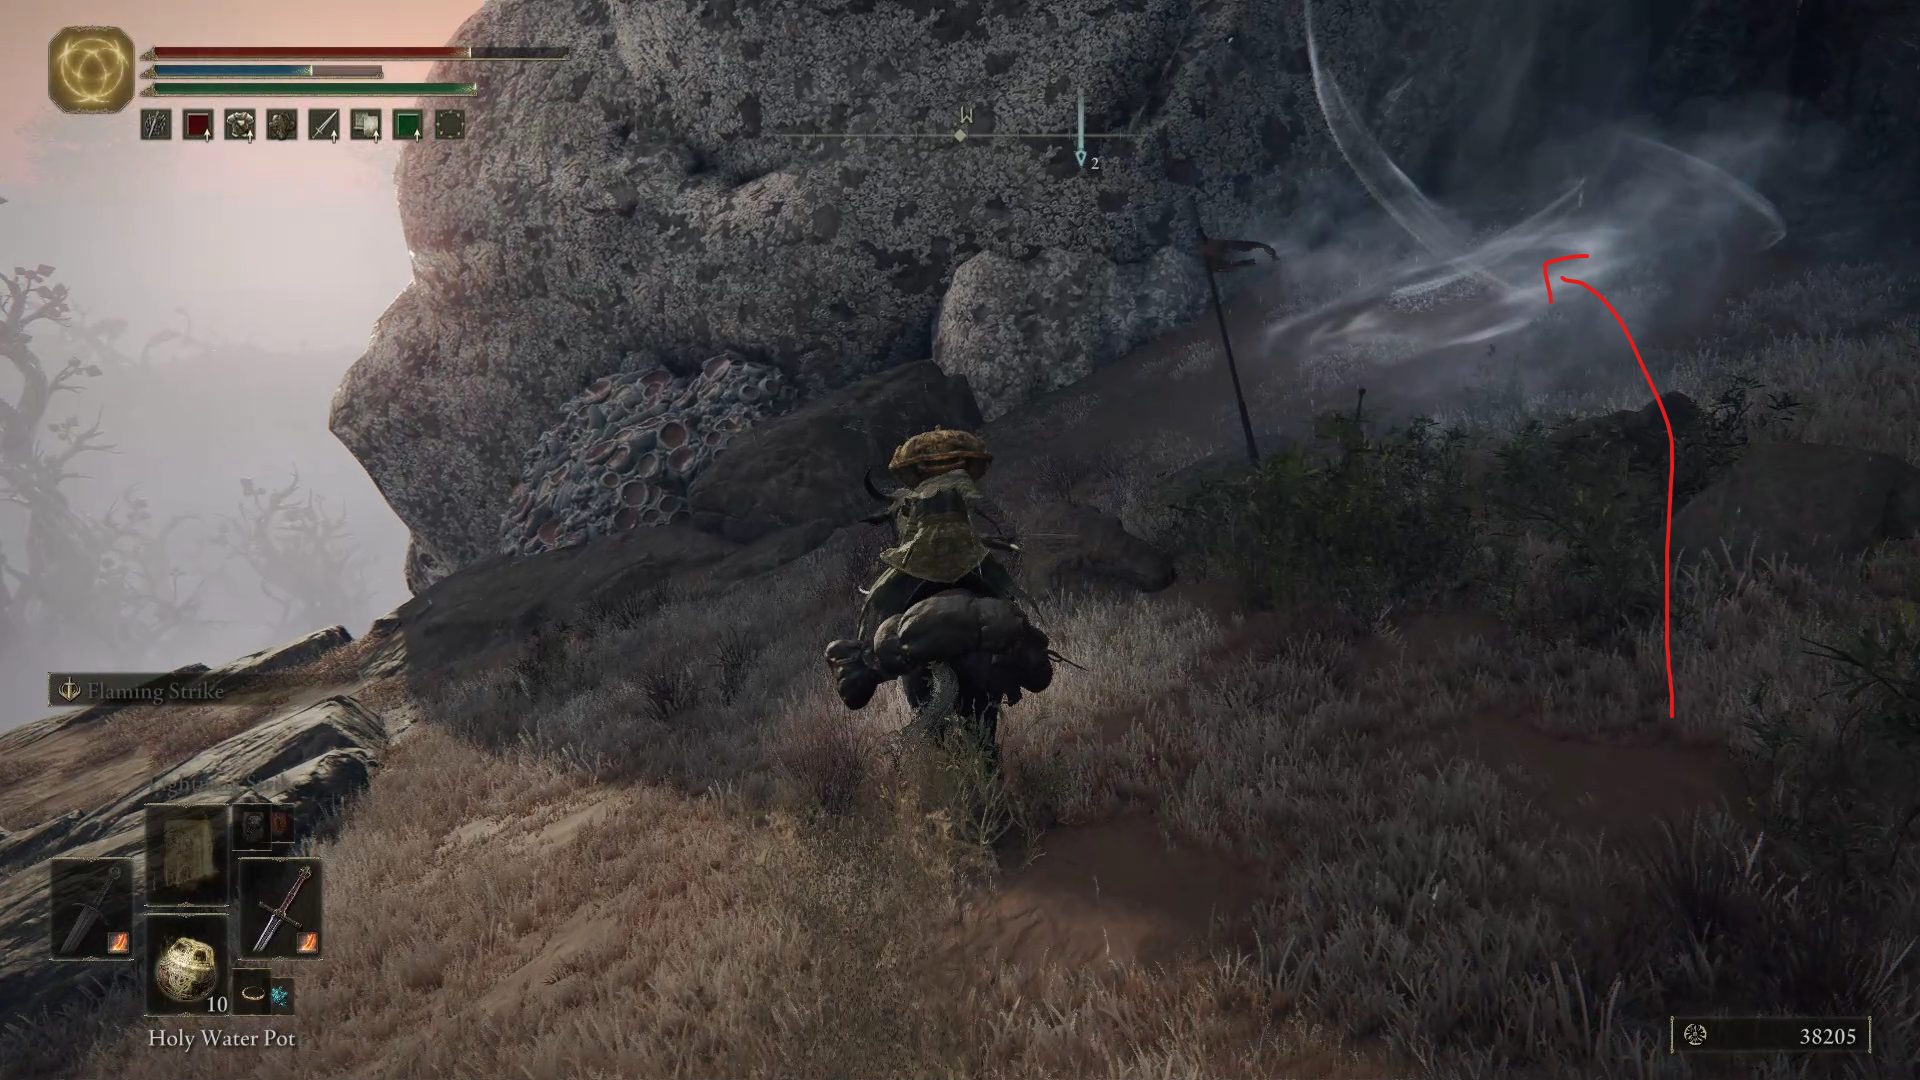
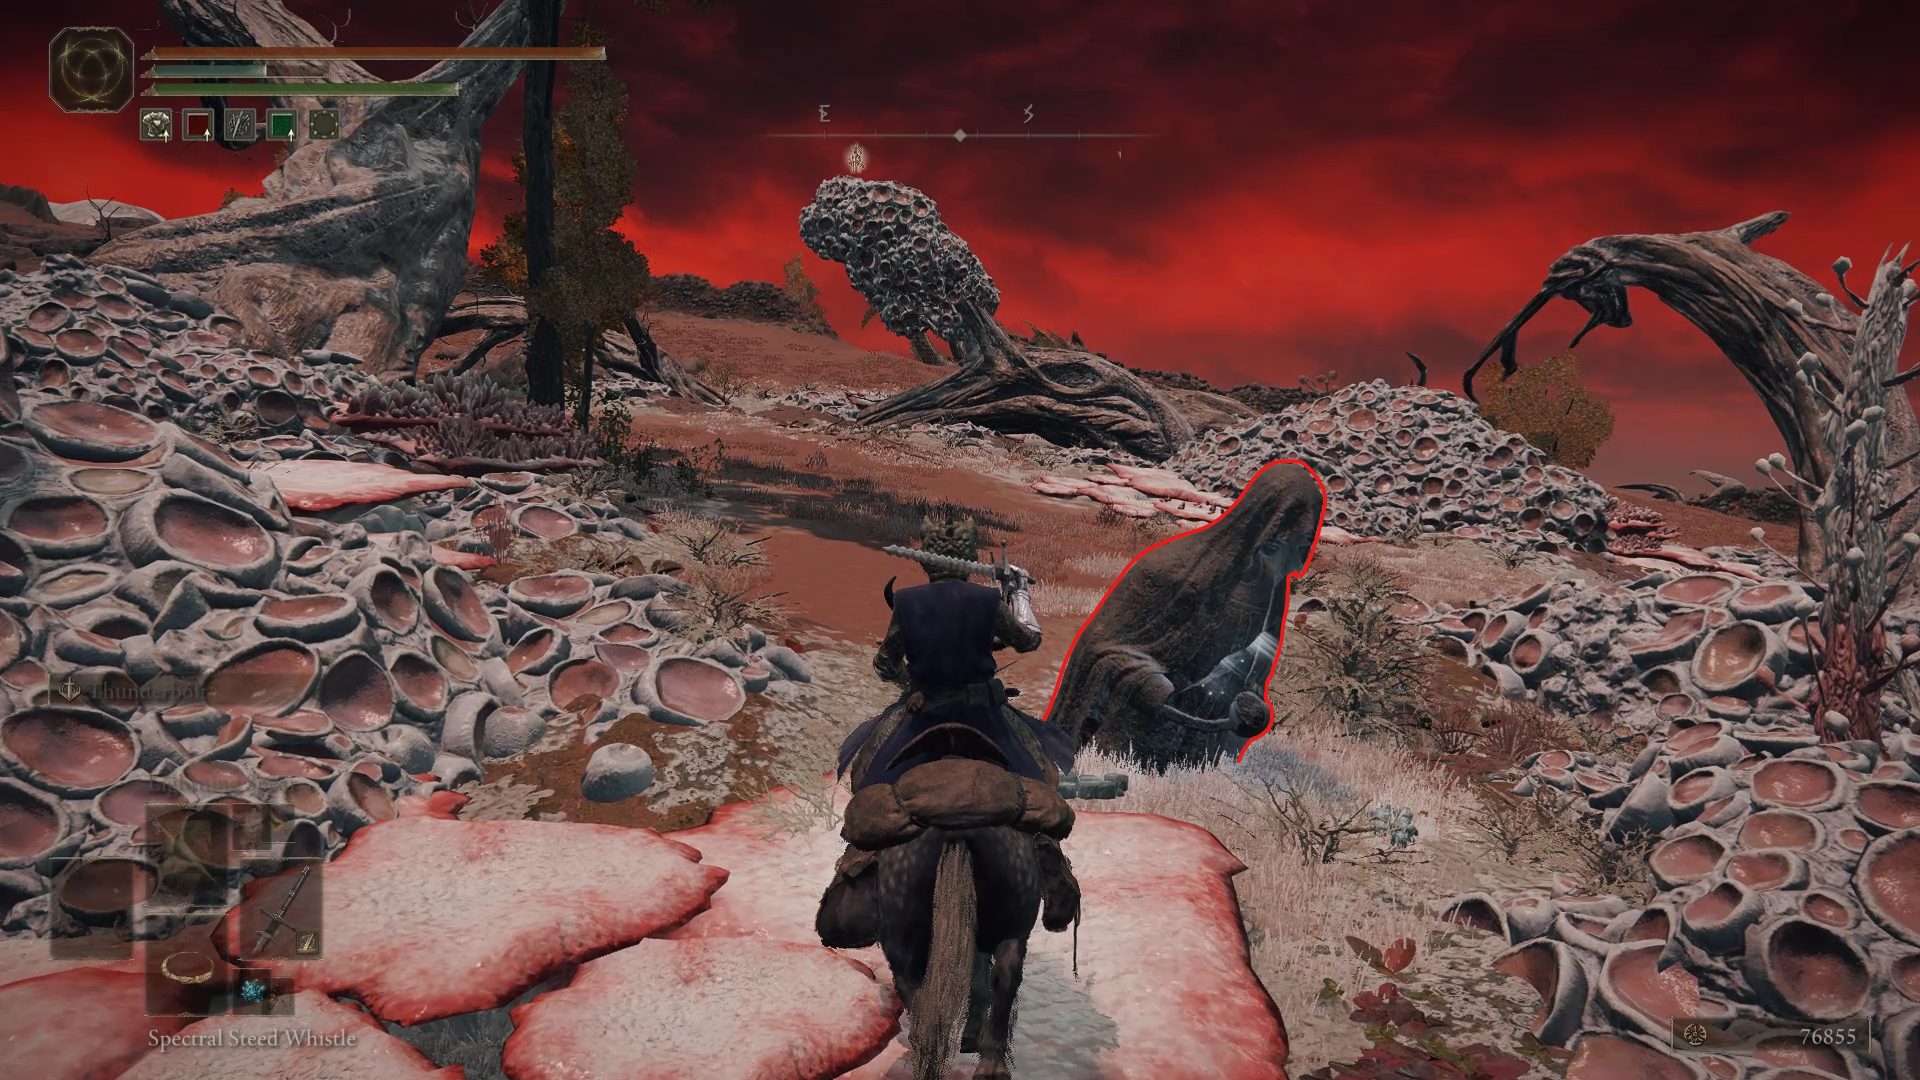
If you go further east from the site of grace, you can find a hungry merchant selling some Poisonbone Darts, Poisoned Stone Clumps and 3x Preserving Boluses. Once you’re done grabbing the site of grace and shopping, get back on the road and continue following it south until you reach another site of grace: Caelid Highway South. Right past it, what you could mistake for another one of Caelid‘s putrid white clumps is actually another dragon enemy: Decaying Ekzykes.
Once you’ve grabbed the site of grace, you can either fight the dragon or ignore it and proceed to Caelid‘s map’s location. If you do decide to fight the dragon, as with the other dragons, its moveset is very similar to his brethren except for a couple of variations. Ekzykes will sometimes breathe down at its own feet which will create a quickly spreading cloud of rot, and a few of his stomp attacks will also create small Scarlet Rot clouds. Whenever he breathes underneath himself, just create some distance until it’s safe to go back in. You can also equip items that have higher immunity, as it will make it easier to avoid getting infected with Scarlet Rot.
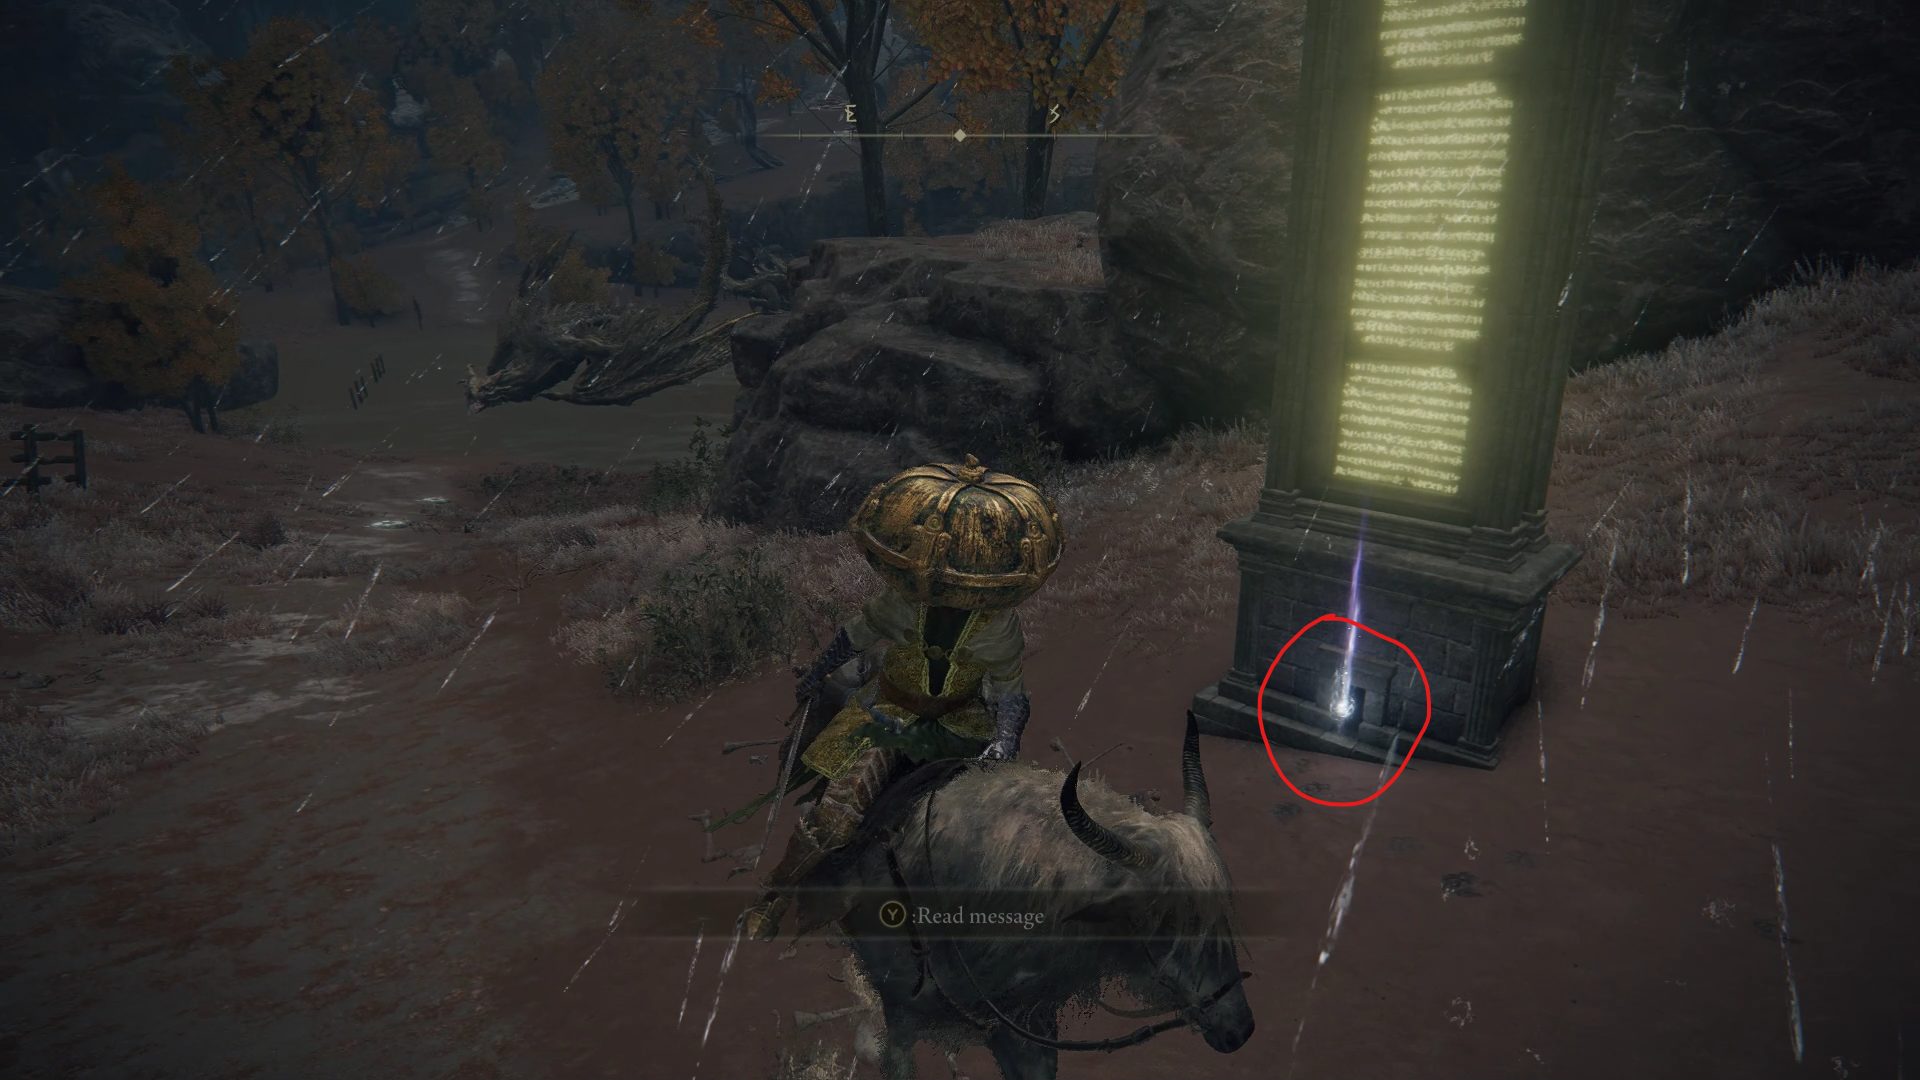
If you decide to fight Ekzykes, it will reward you with 38 000, a Dragon Heart, and it will unlock new draconic powers at the Cathedral of Dragon Communion. Either way, continue following the road until you reach the monument with the Map: Caelid. Before traveling back to the Smoldering Wall site of grace and continuing to explore Caelid, make sure to visit the nearby Nomadic Merchant if you want to grab some armor, Nomadic Warrior’s Cookbook [15], Flaming Bolts or a Stonesword Key.
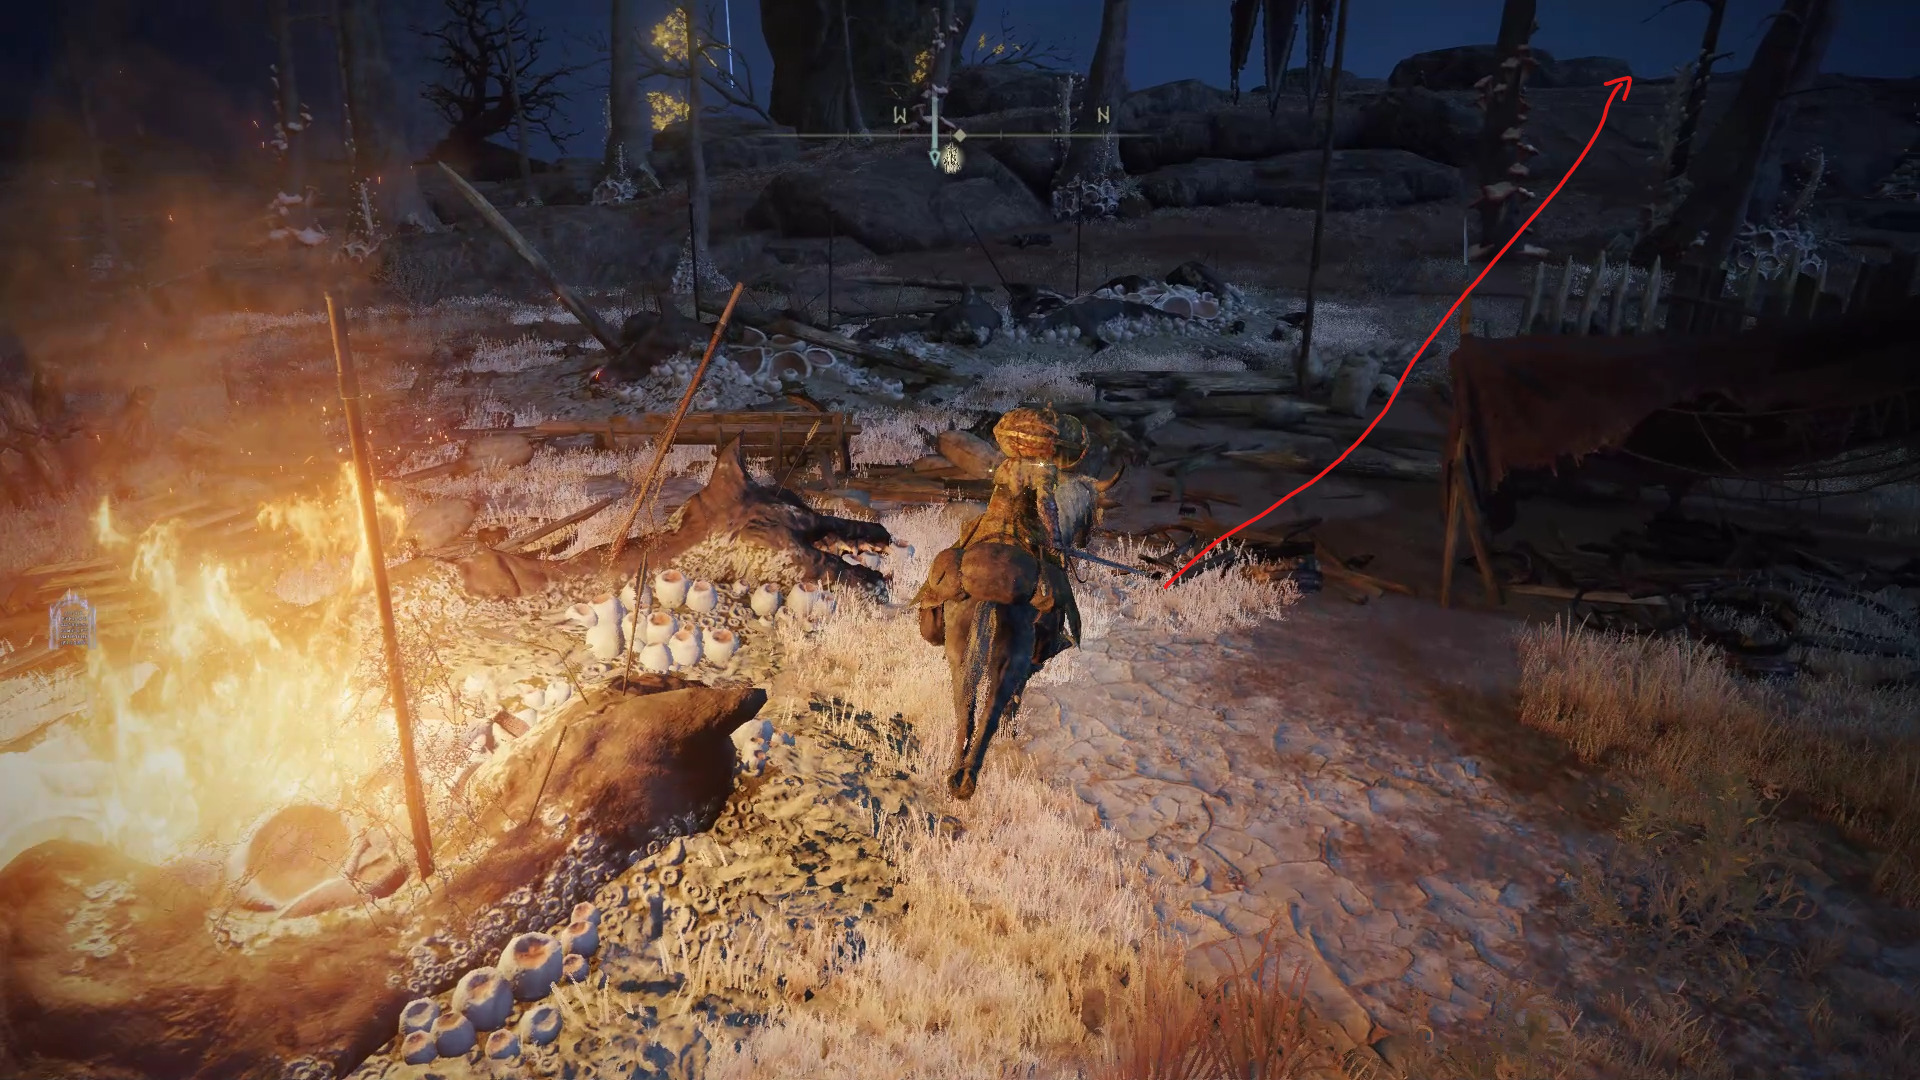
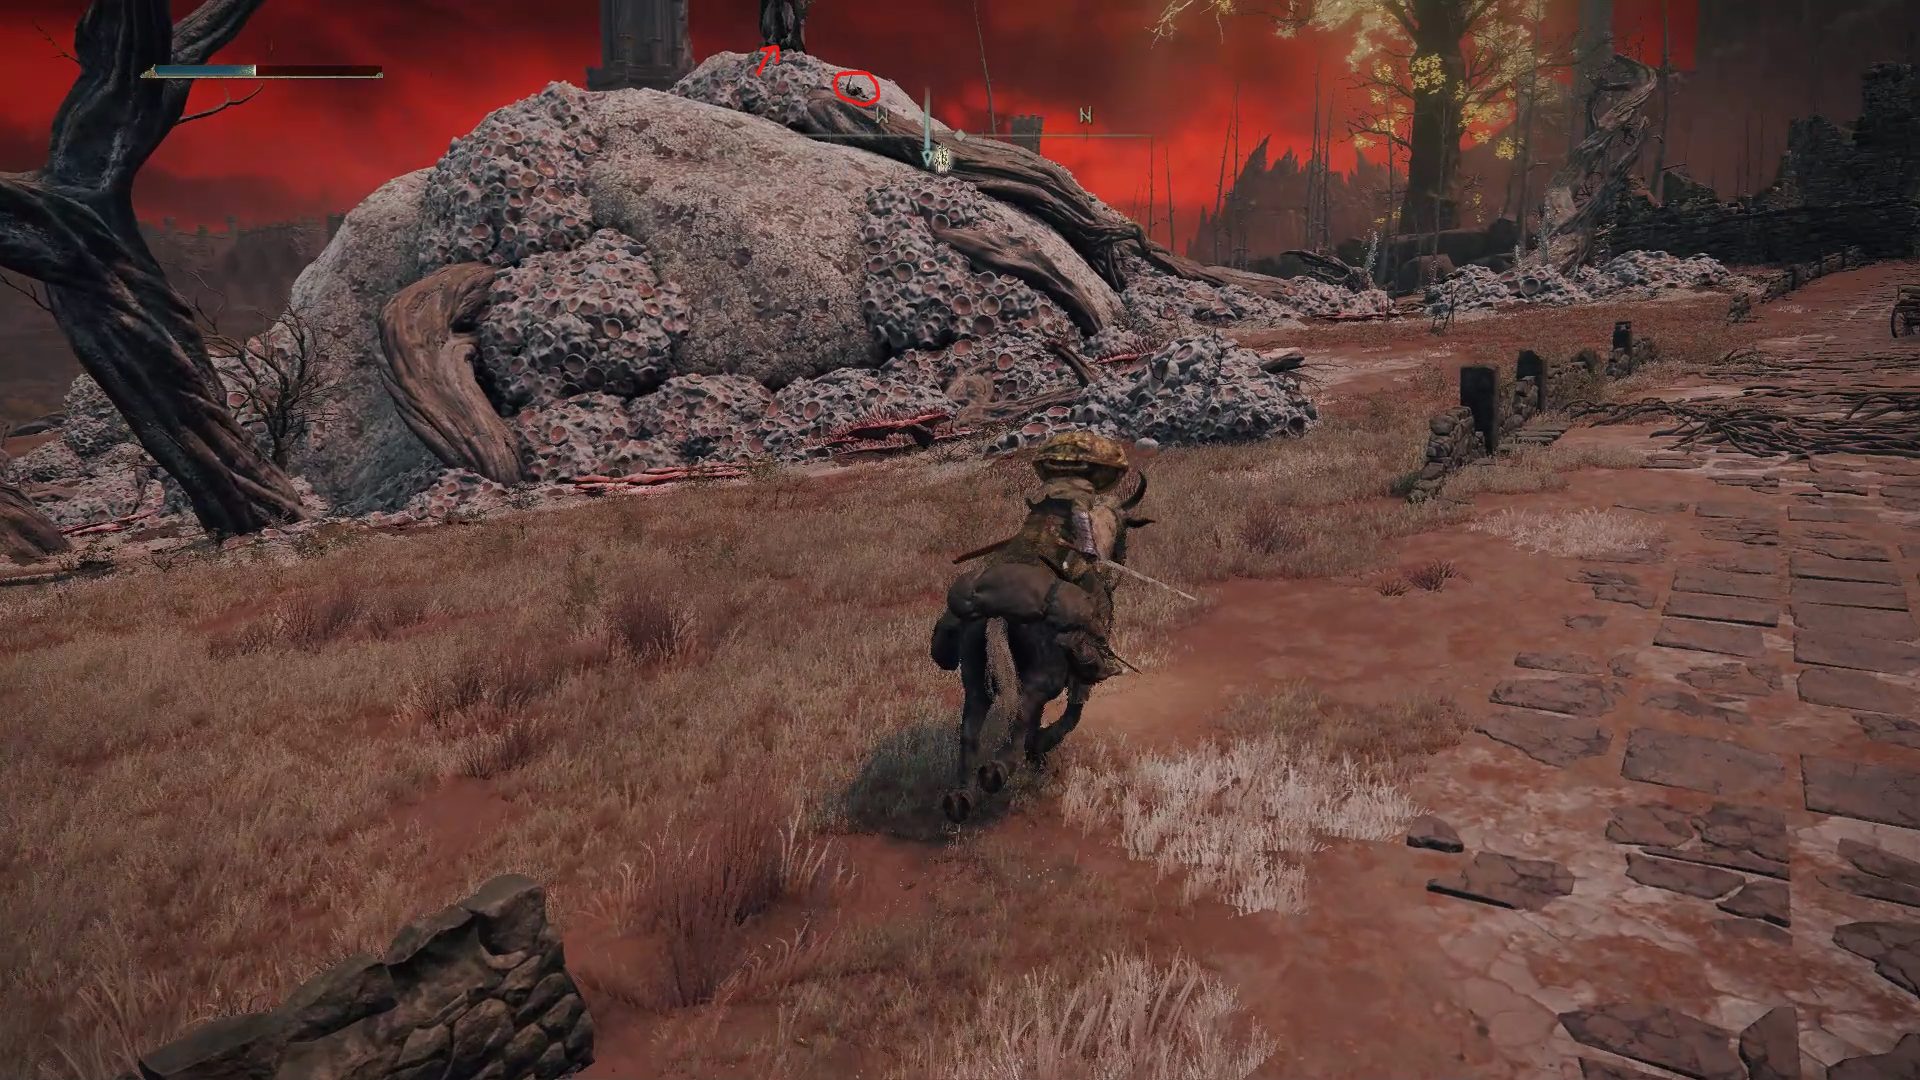
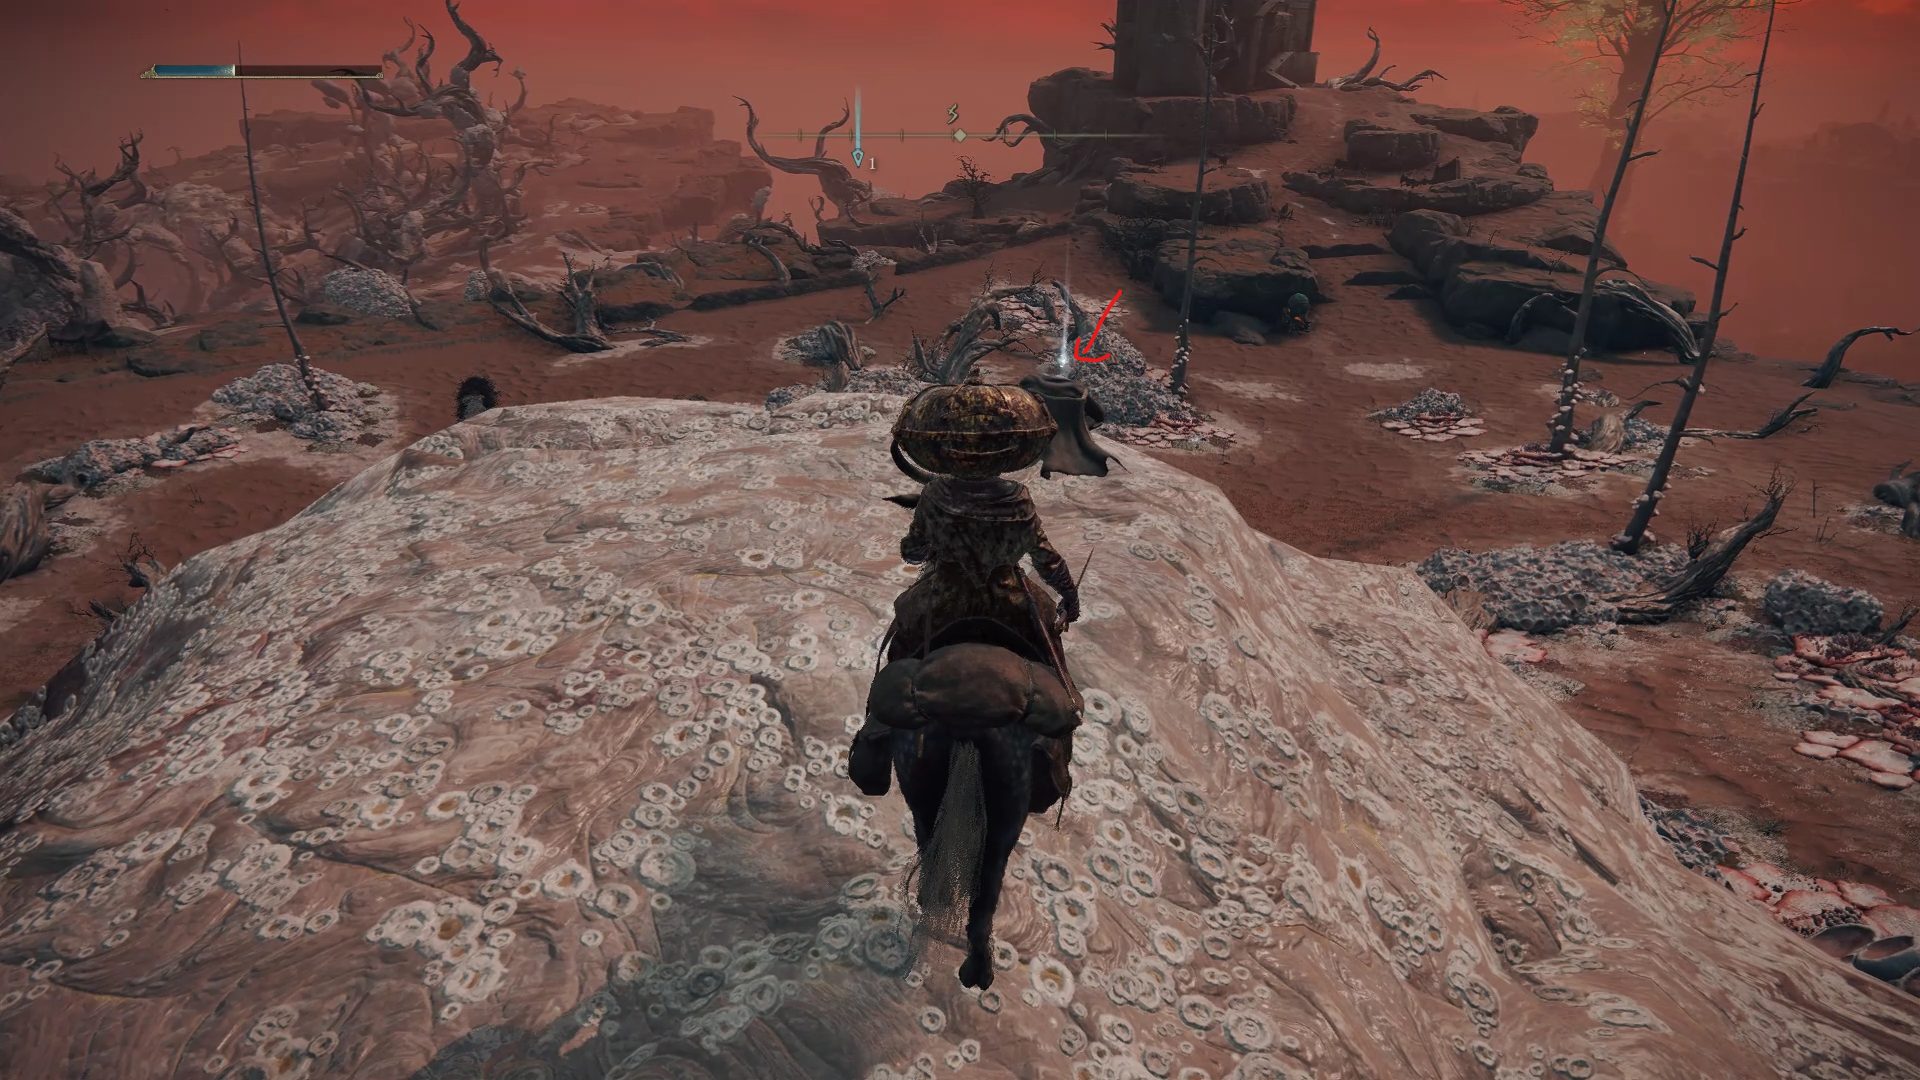
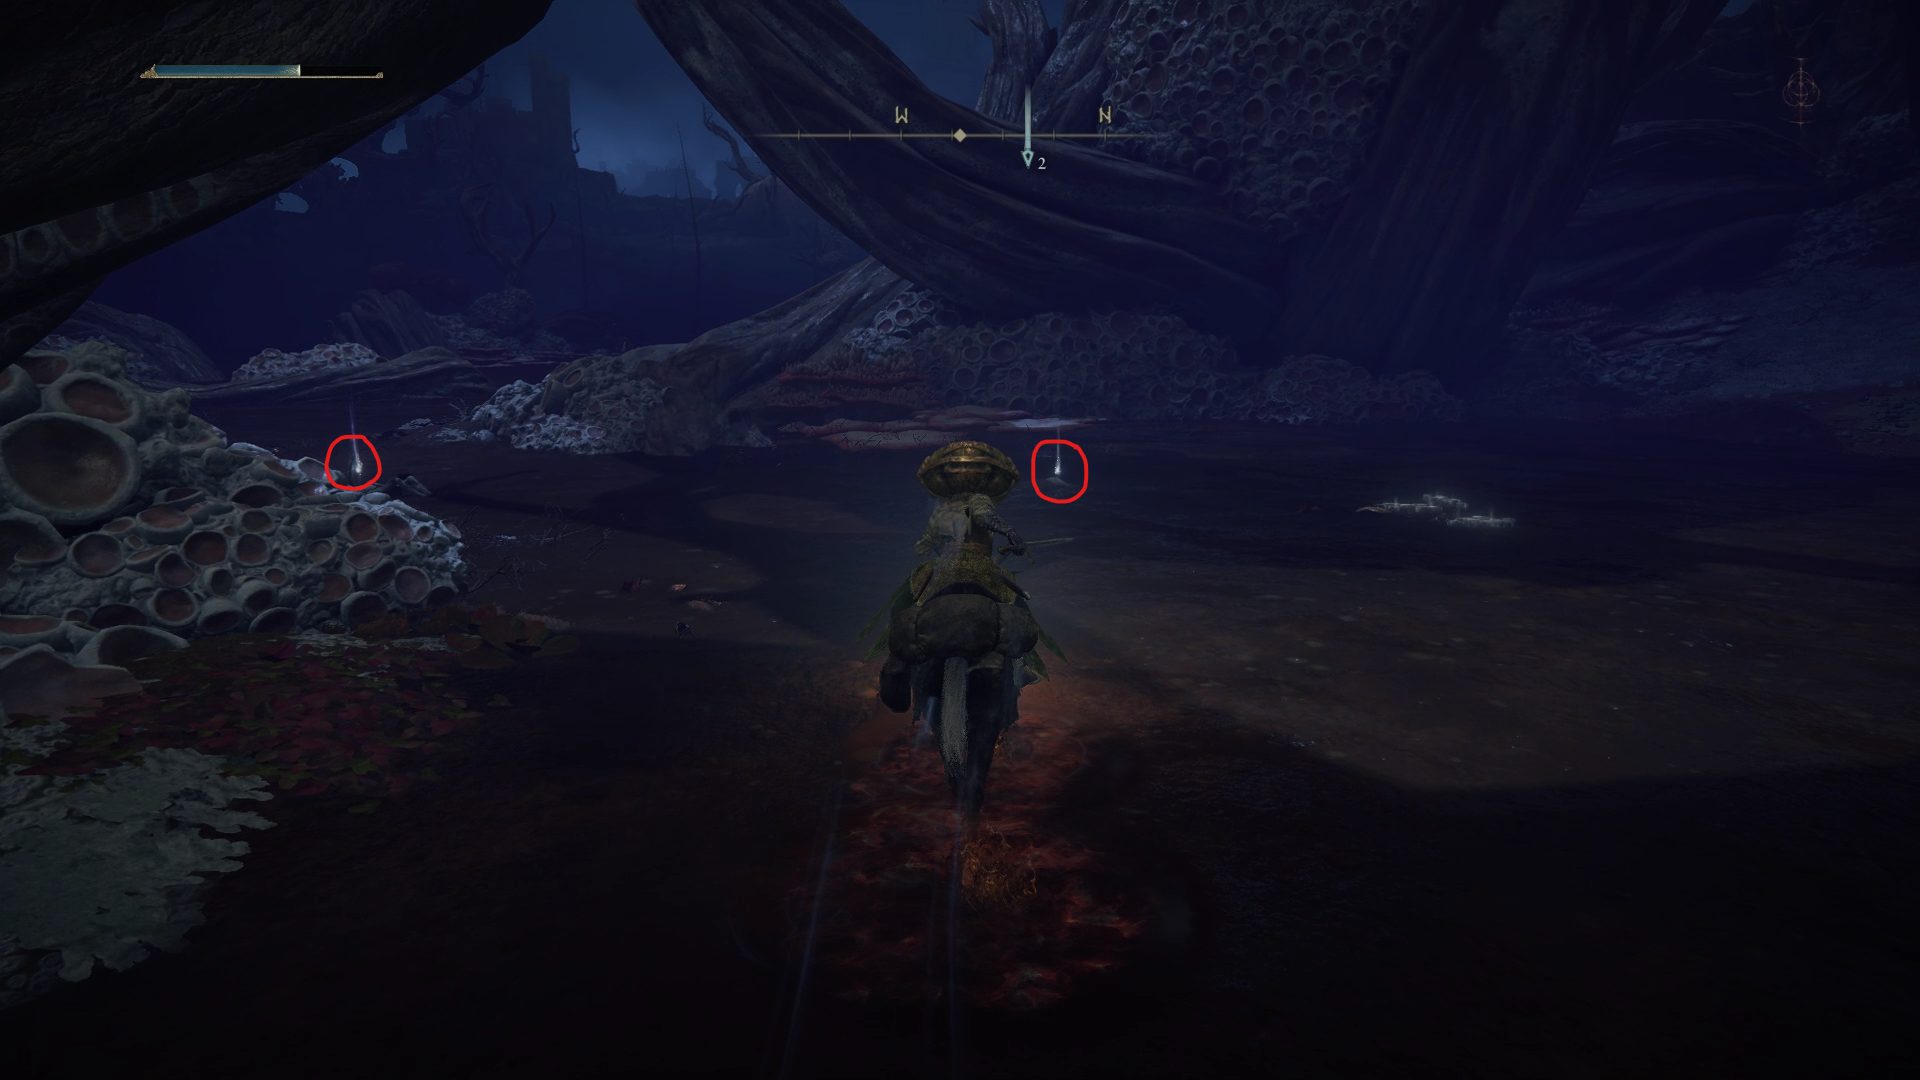
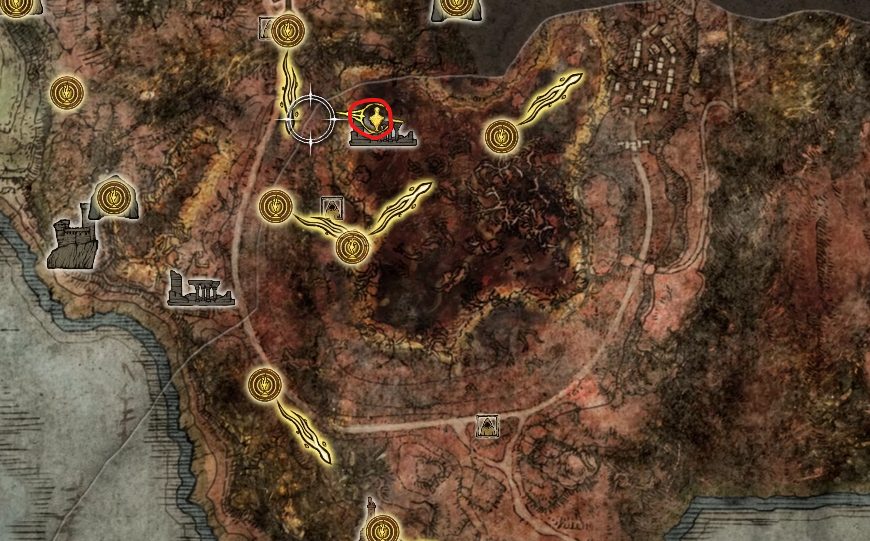
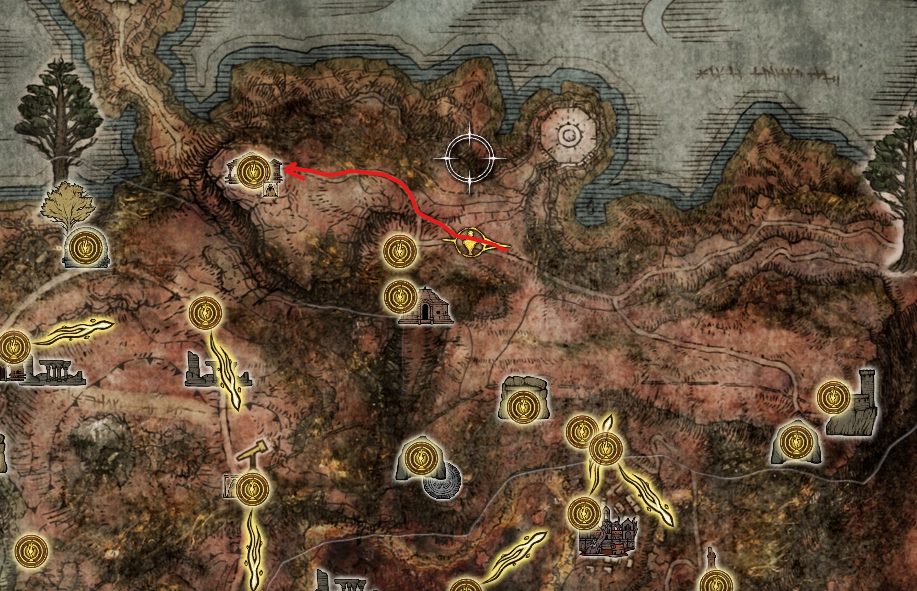
Now that we have a better view of the map, travel back to the Smoldering Wall site of grace and head northwest. On top of a white hill, you will find a corpse with a Golden Rune [9], guarded by a giant crow.
You can choose to fight the crow on flat terrain by getting close enough to grab its attention and running back, which could make this fight a bit easier. Once you’ve grabbed the rune, if you look west you’ll be able to see another hill, which is where you can find a Smithing Stone [5]. This hill is also home to giant crows, so approach carefully.
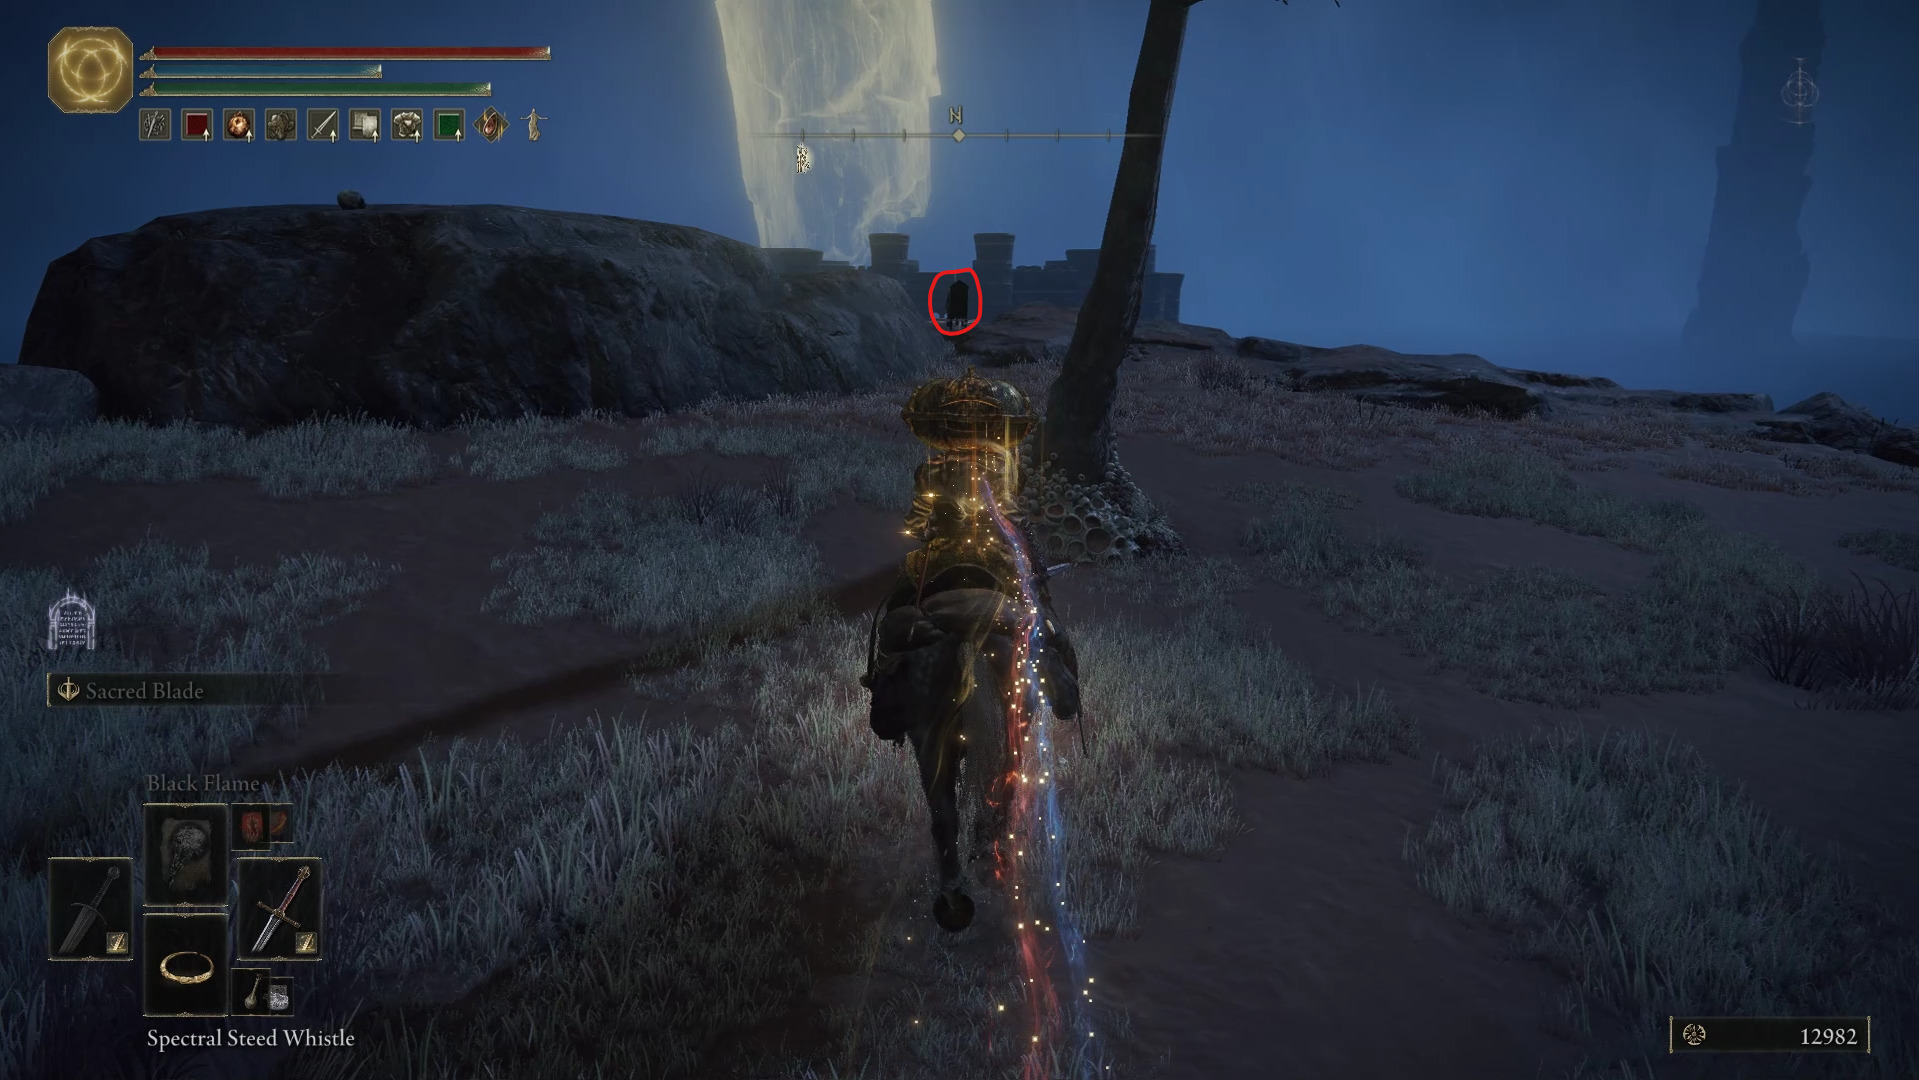
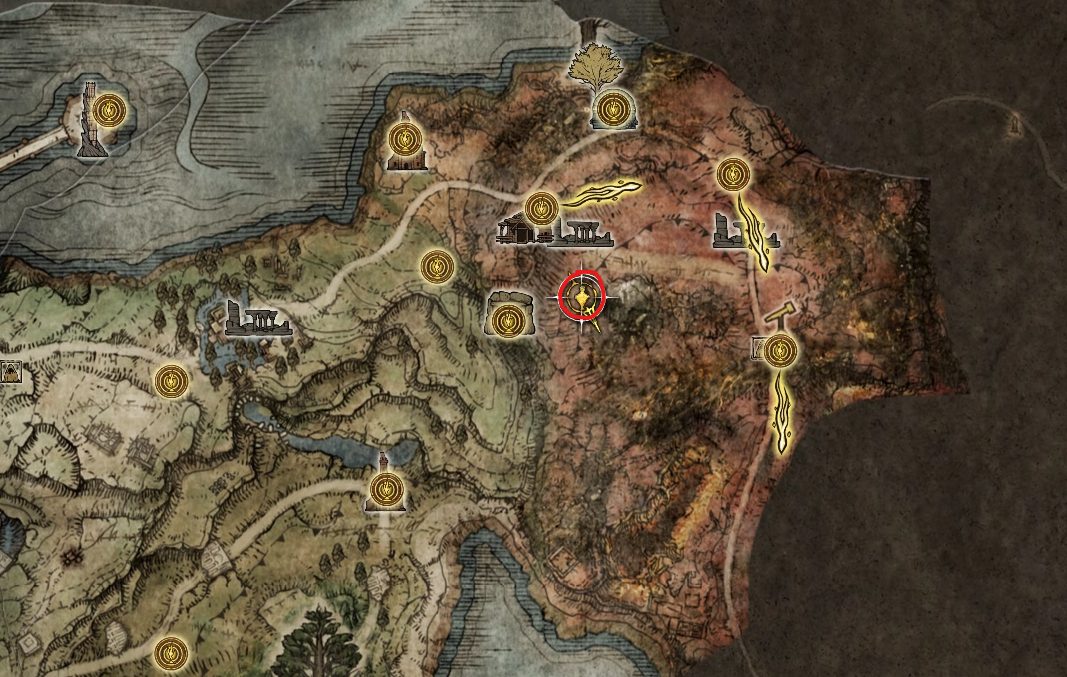
Northwest of this hill you should be able to see a small set of ruins: the Forsaken Ruins. That’s where we’ll be heading to next, and you guessed it, there are more giant crows to fight.
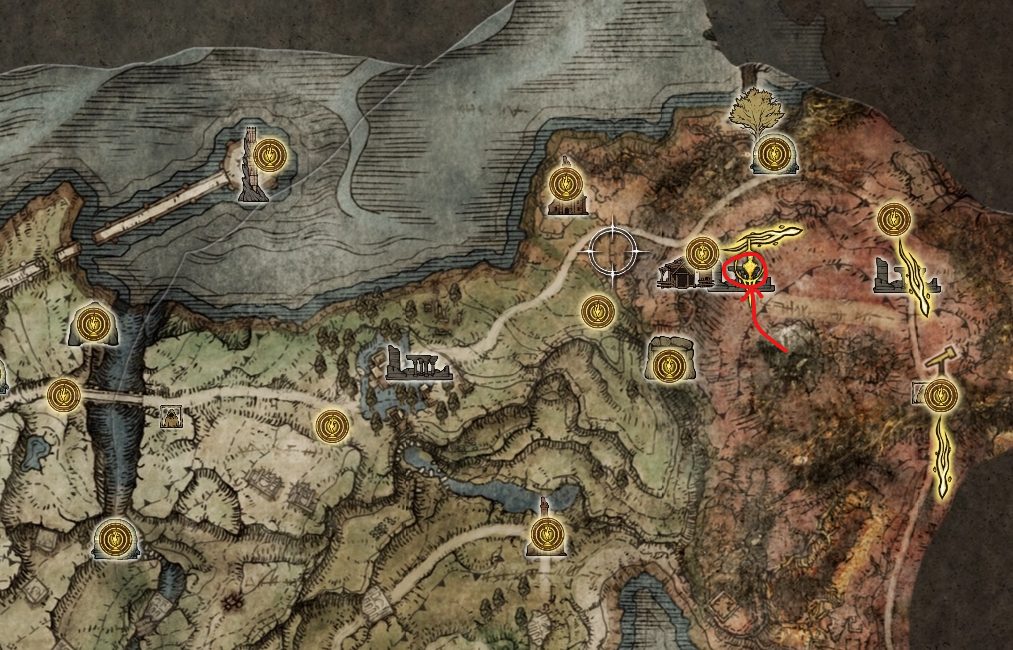
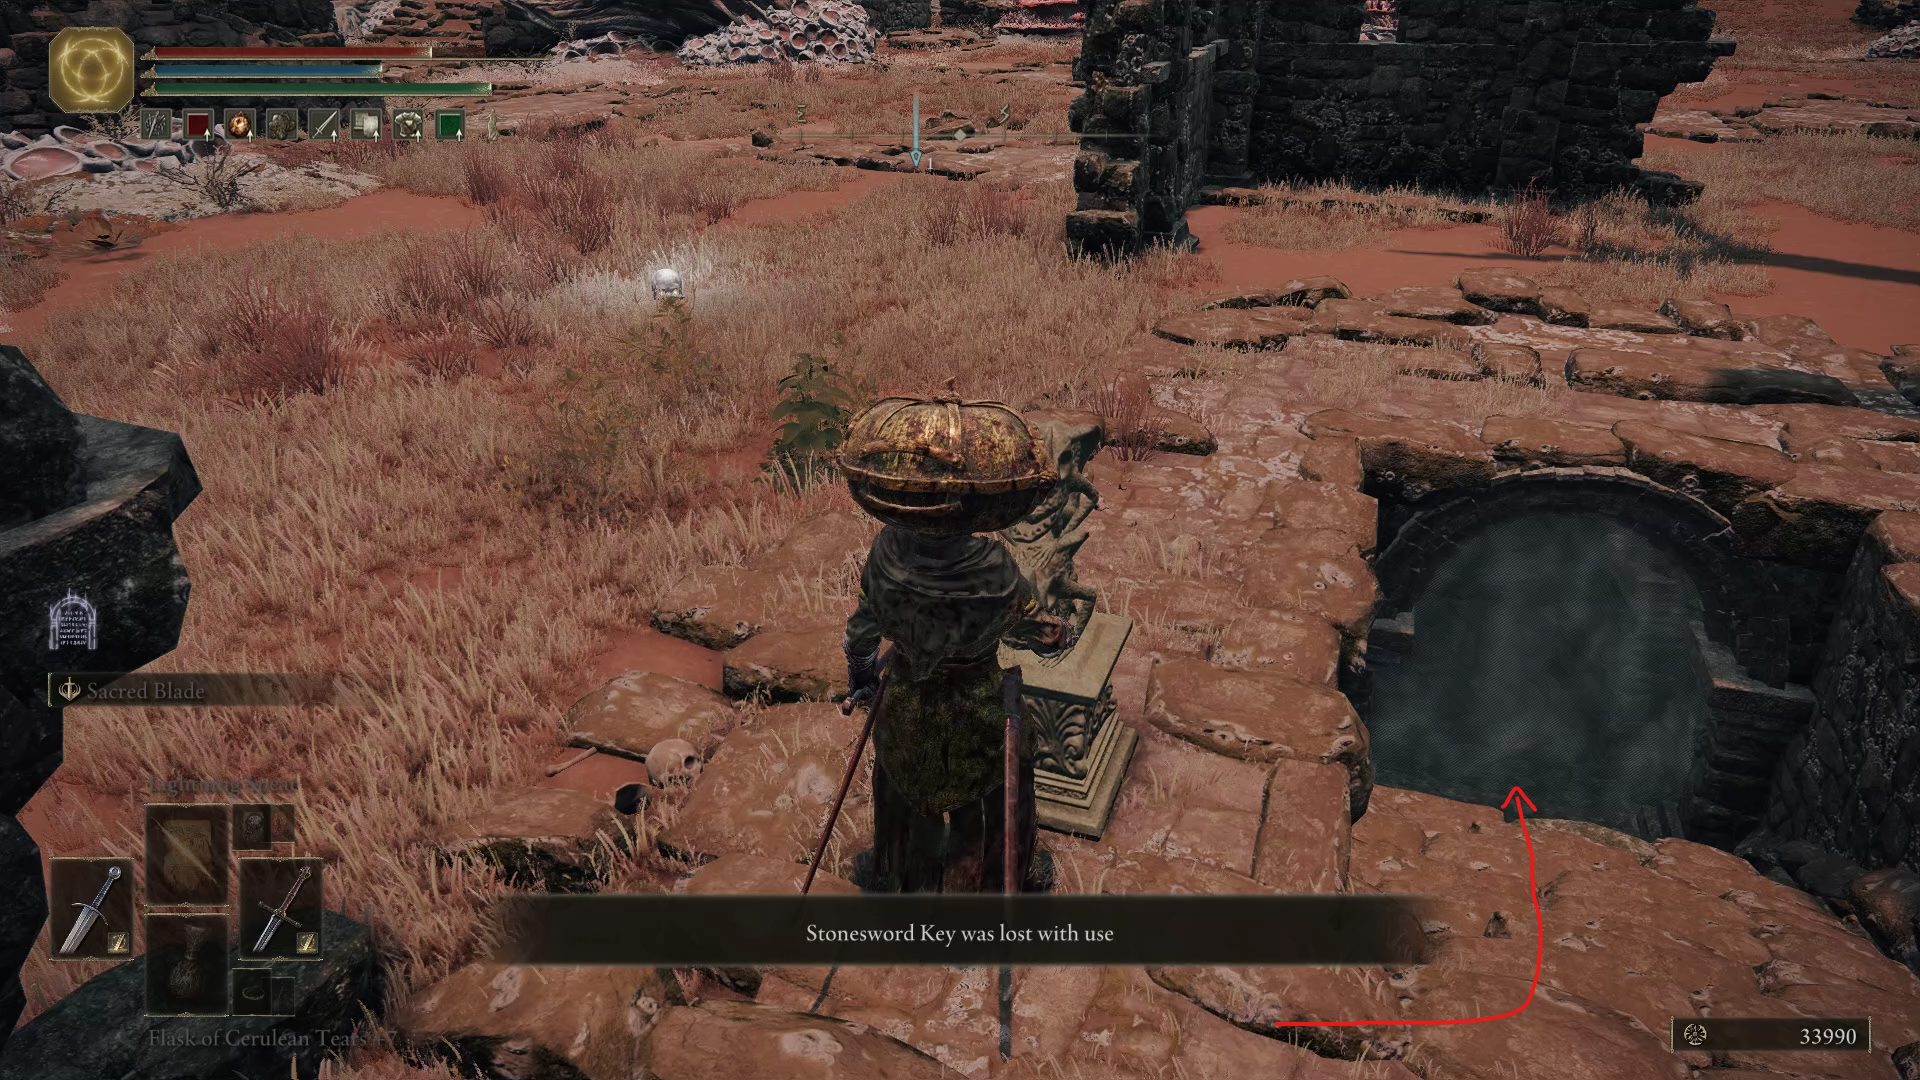
Several crows will be sitting on top of the ruins, so approach these ruins carefully to avoid fighting several at once. While it doesn’t sound like the most fun place to be, there are a couple of things that may be worth grabbing. On the northernmost edge of these ruins, you can find a room locked behind a fog gate. If you use 1x Stonesword Key at the nearby imp statue, it will open up the way to a chest underground, which contains the Sword of St. Trina. Additionally, in the center of these ruins you can find a Smithing Stone [4].
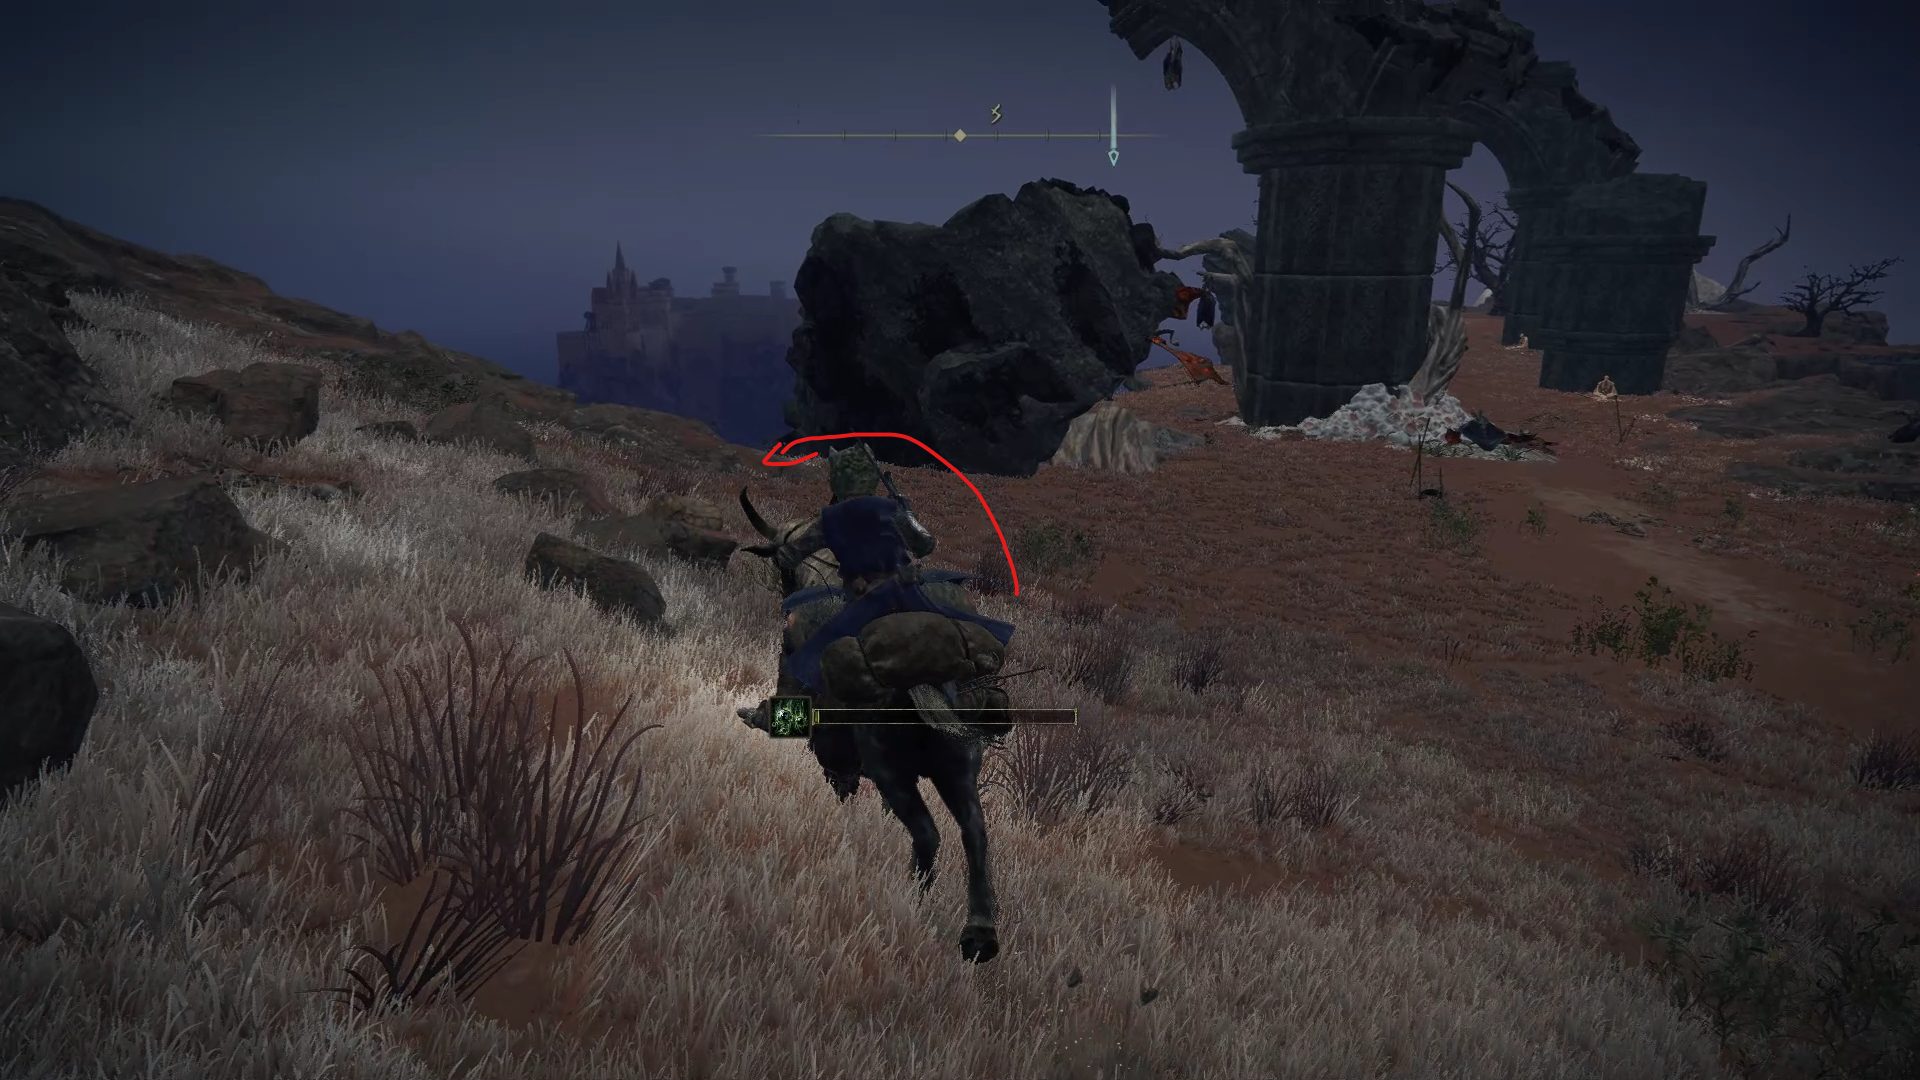
There isn’t much left in these ruins, so start heading south in the direction of the nearby castle. While leaving the Forsaken Ruins and heading south, you may hear the familiar chime of a loot beetle. You can find one hanging from the side of a branch, and defeating it will grant you a Somber Smithing Stone [4].
You can now continue heading south all the way to the next site of grace: Fort Gael North. While you may encounter some dogs along the way, instead of fighting them you can just run to the site of grace. Even if they end up killing you, activating the site of grace will allow you to respawn right next to your runes.
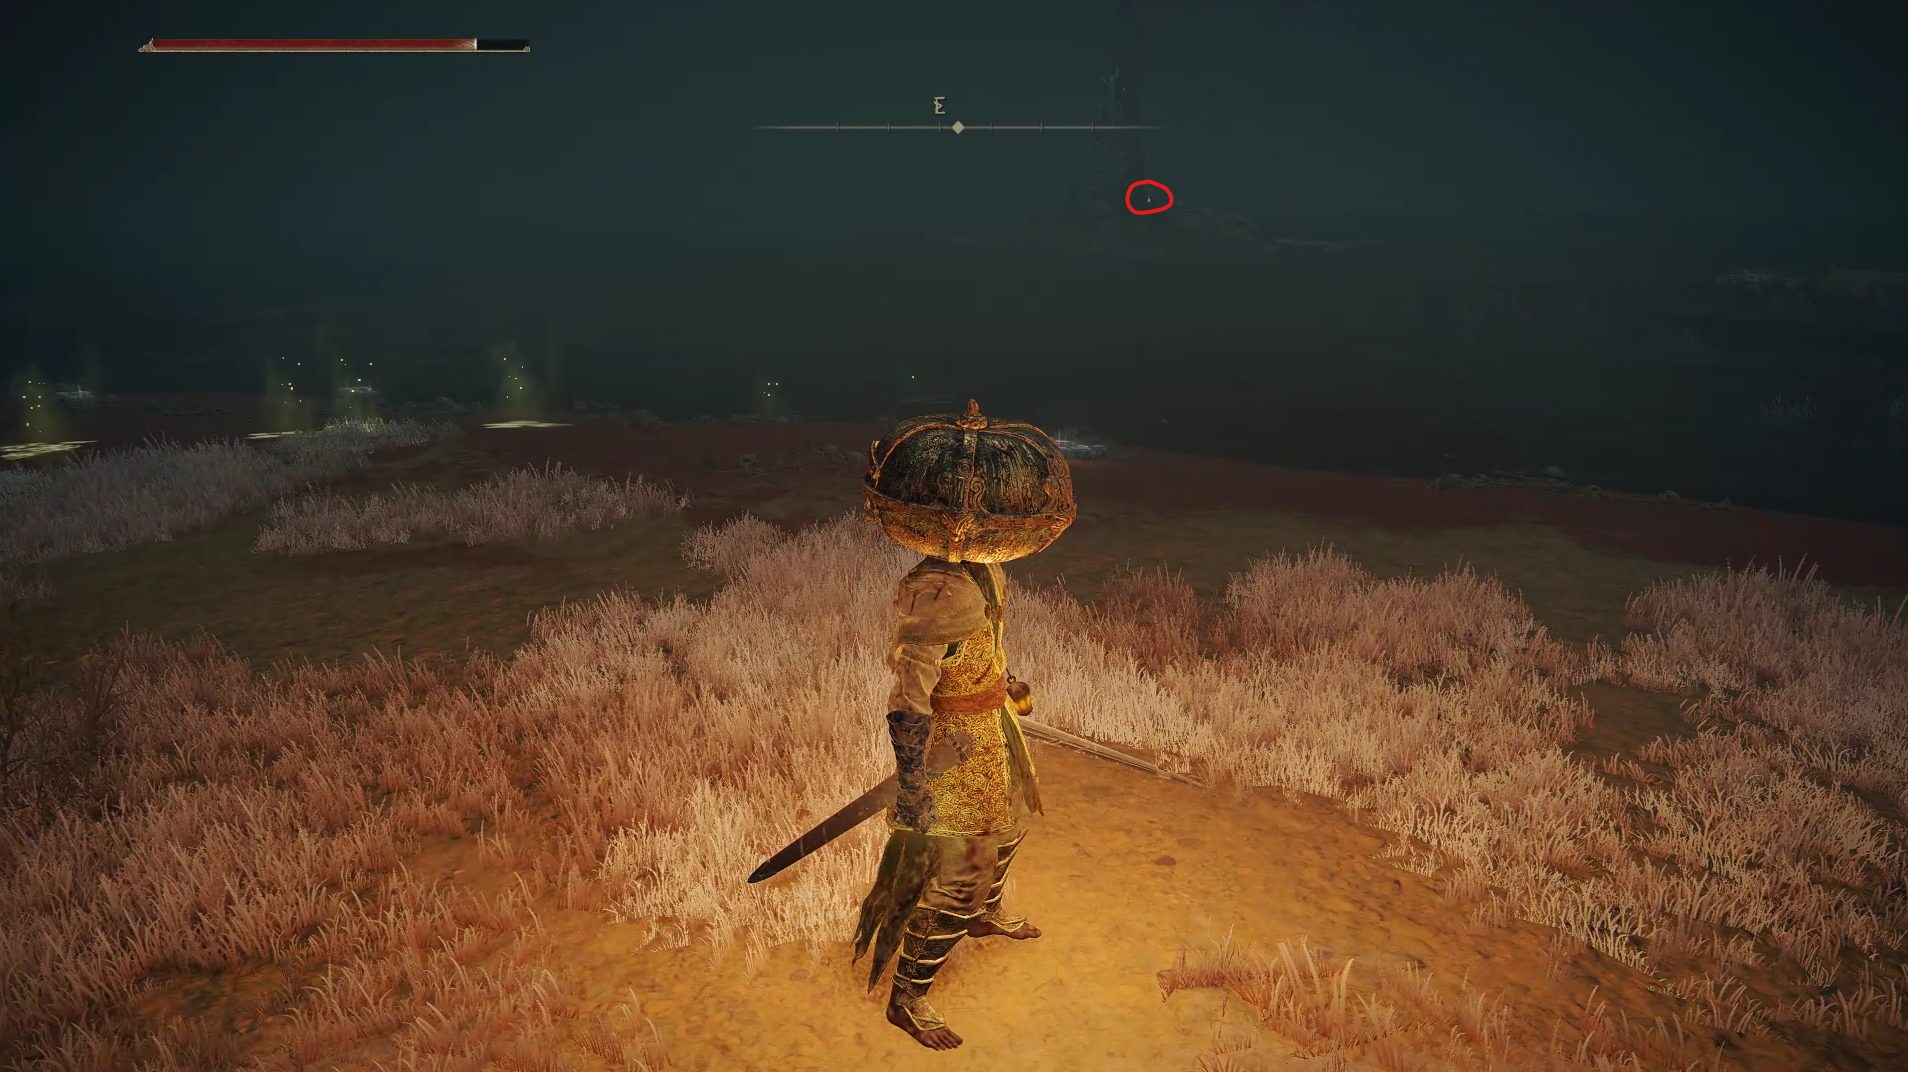
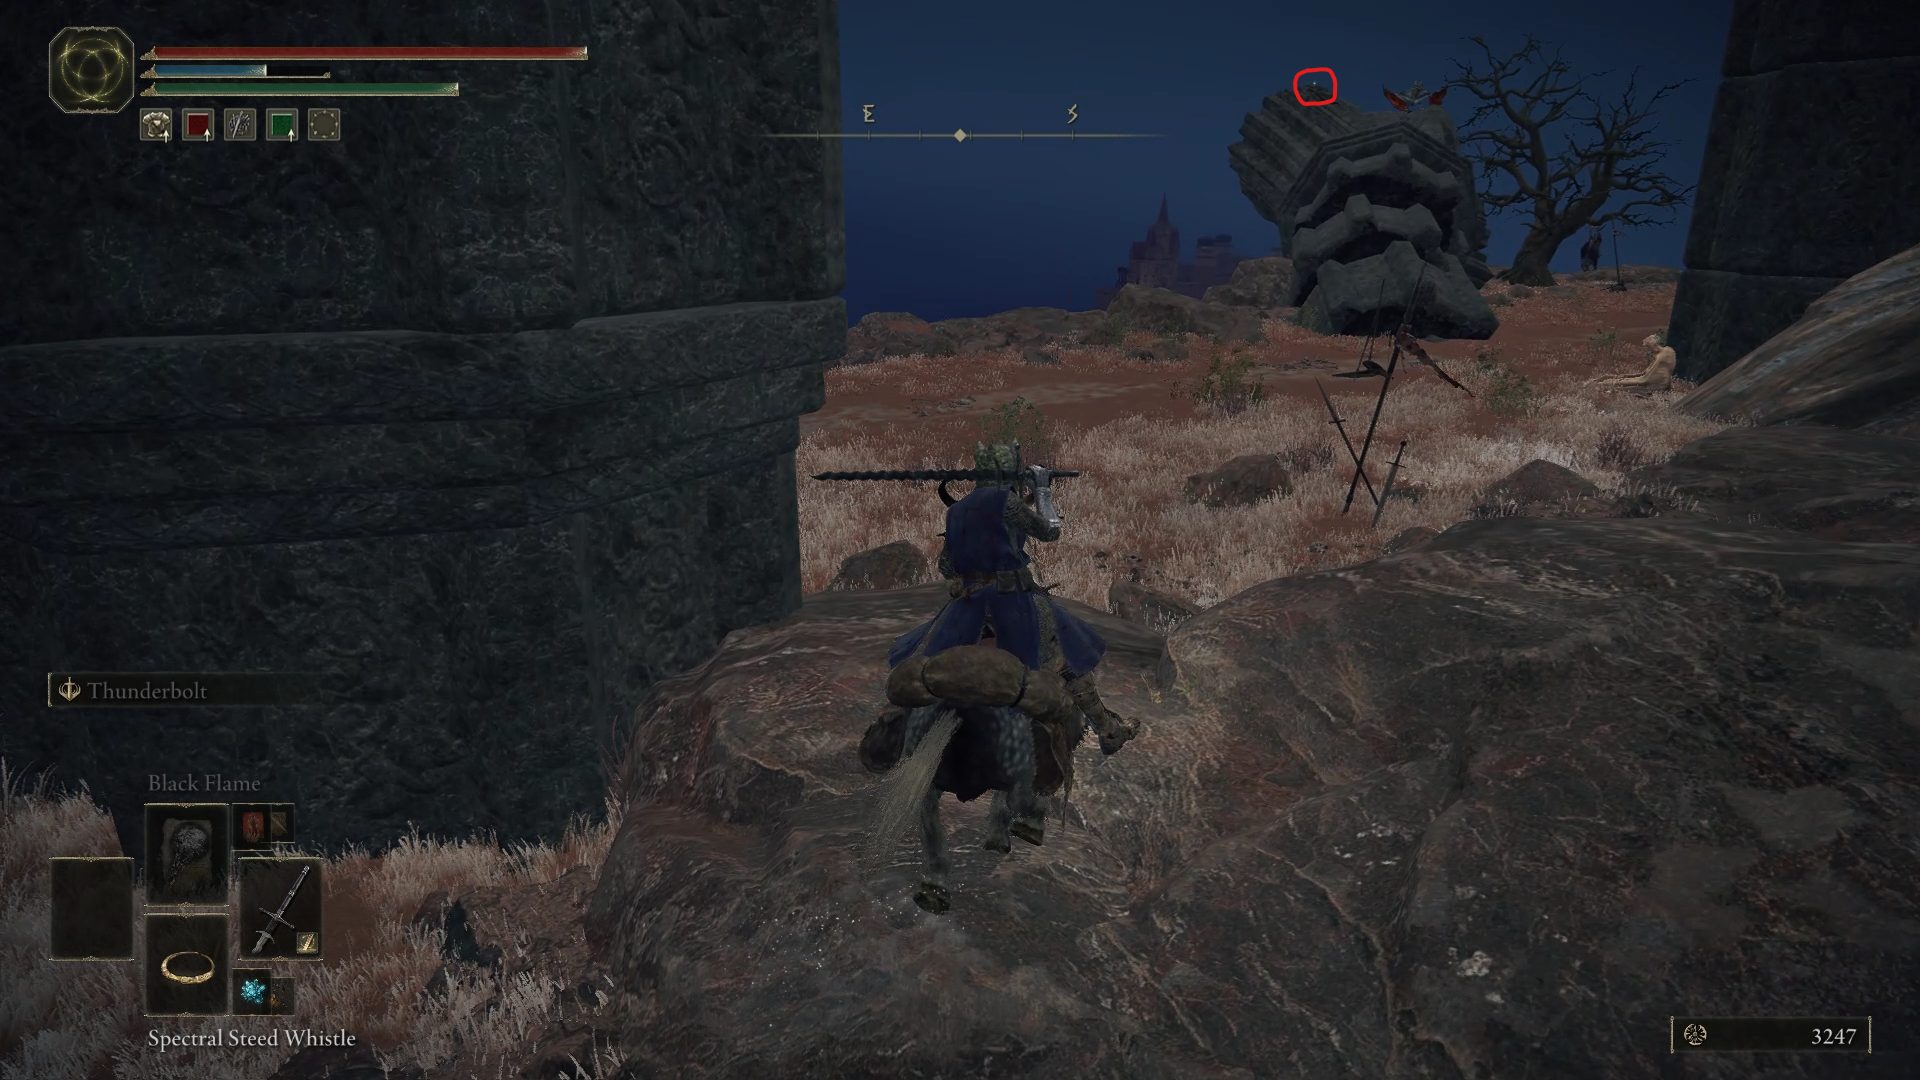
From this site of grace, if you look northeast you’ll notice another invisible loot beetle rolling around. Just like the one in Limgrave, you’ll have to hit it as it’s rolling by. If you’re patient, you can stay close to the site of grace and try attacking the beetle on its very predictable path.
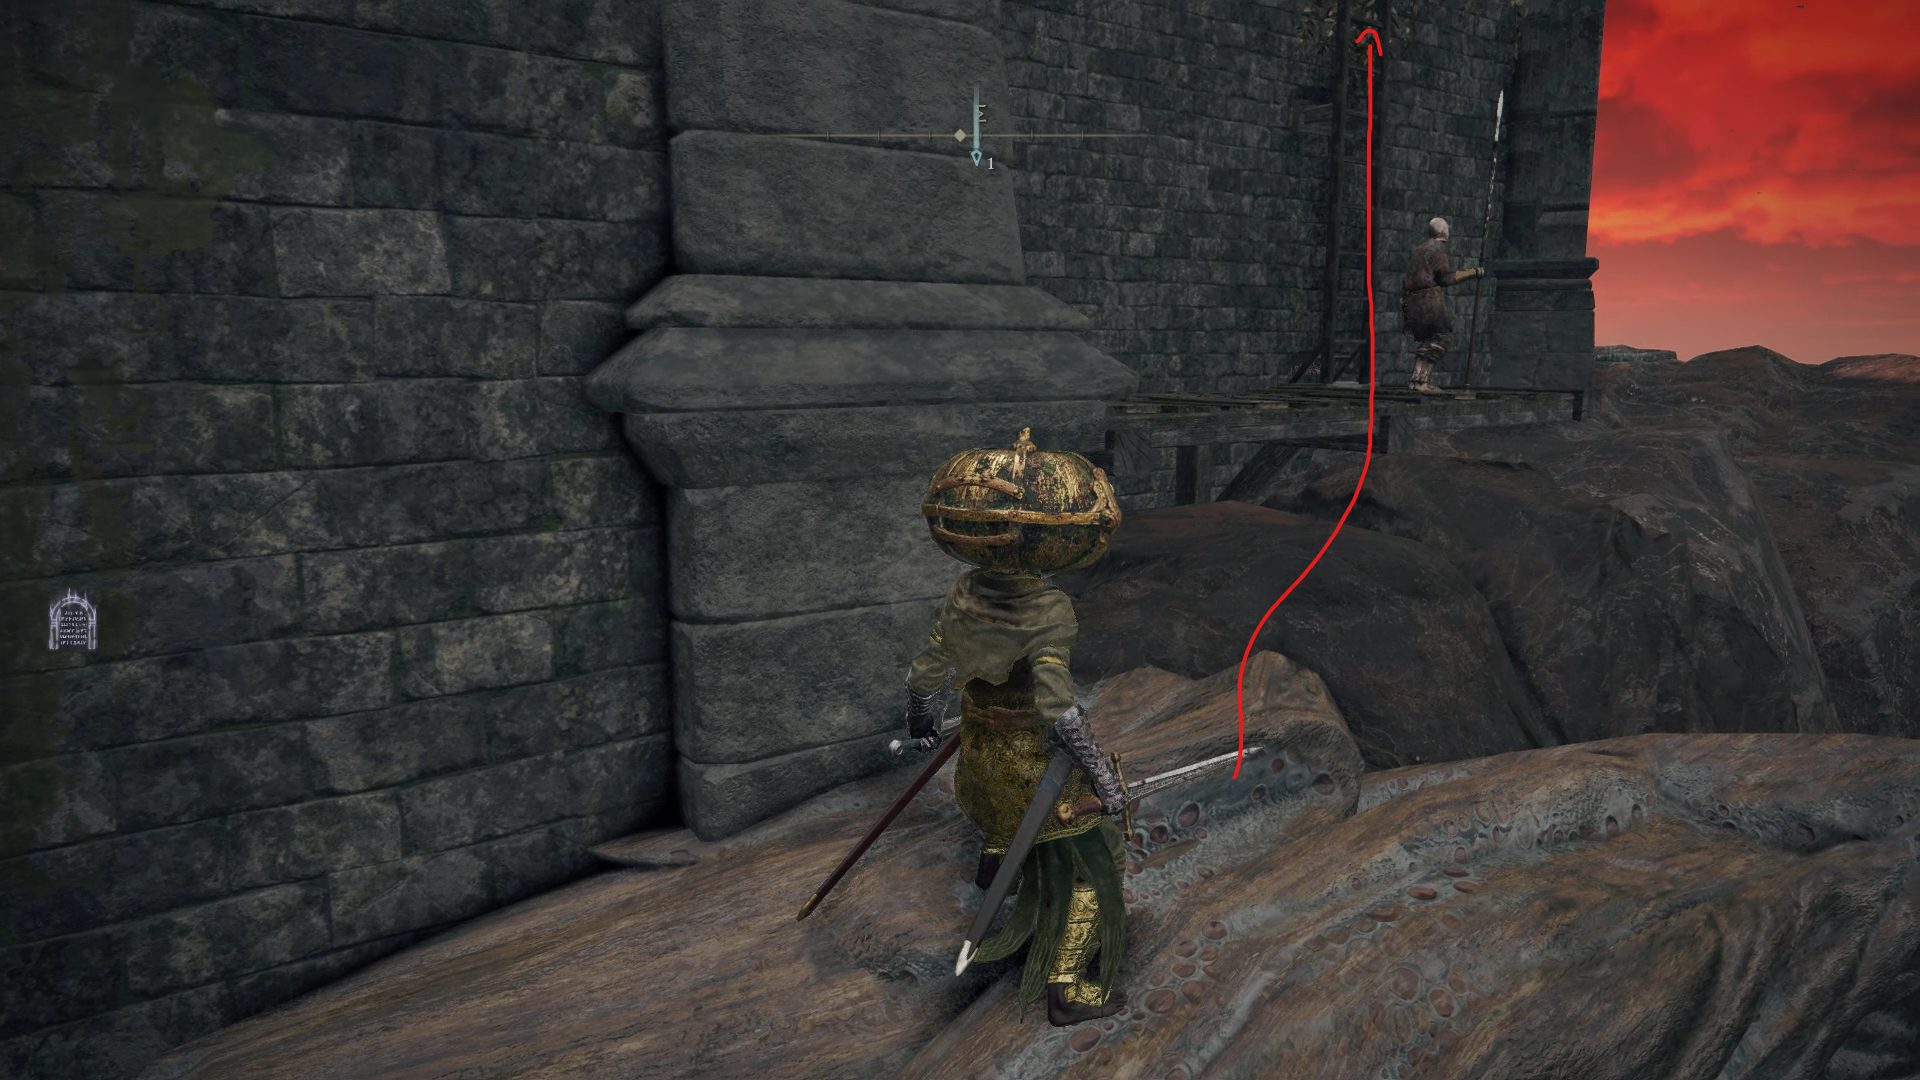
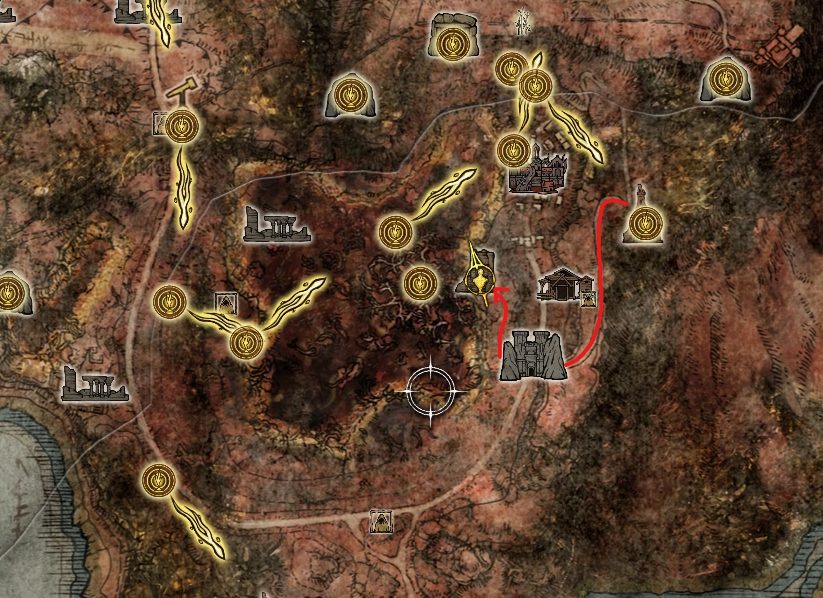
If you’re not and you rather ride around while trying to attack the invisible beetle, make sure to dispose of the wolves east of the site of grace as they might not appreciate you running next to them. Attack the loot beetle to get the Ash of War: Flame of the Redmanes, and go back towards the site of grace. Next to it, southwest, you can find a spot low enough for you to climb using your mount’s double jump ability, which will make it easier to approach the nearby castle. After climbing up, head towards Fort Gael by sticking close to the cliff. When you reach the fort, go up the stairs and past the doorway to find a small path leading to the side of the castle.
While it may feel like we skipped potential loot by running straight to the fort, going this way will allow you to flank a very annoying archer. In fact, while approaching the fort you may get noticed by them, which could result in a rain of purple arrows following you around. So for now, continue going around the castle and do not go up the ladder just yet. Instead, follow the path around the castle until you’re overlooking a secluded area with 2x Flame Chariots. While it may sound challenging to fight both of them at once, you will not have to as you’ll be able to defeat one of them before the fight even begins, by executing a plunging attack.
If you jump towards the top of a Flame Chariot and use a light attack, your character will execute a critical attack that will cause the Flame Chariot to explode. There, if the other one notices you, you should quickly mount up before fighting it as it will make it much easier to avoid its attacks. Additionally, if you’re lucky, the second Flame Chariot may not notice you as its friend explodes. If that happens, you should instead sneak up to its back and backstab the driver. Either way, continue attacking the driver in the back of the chariot to defeat it. While there will be several suicidal enemies trying to explode all over you, remaining mounted will make it easy to avoid them.
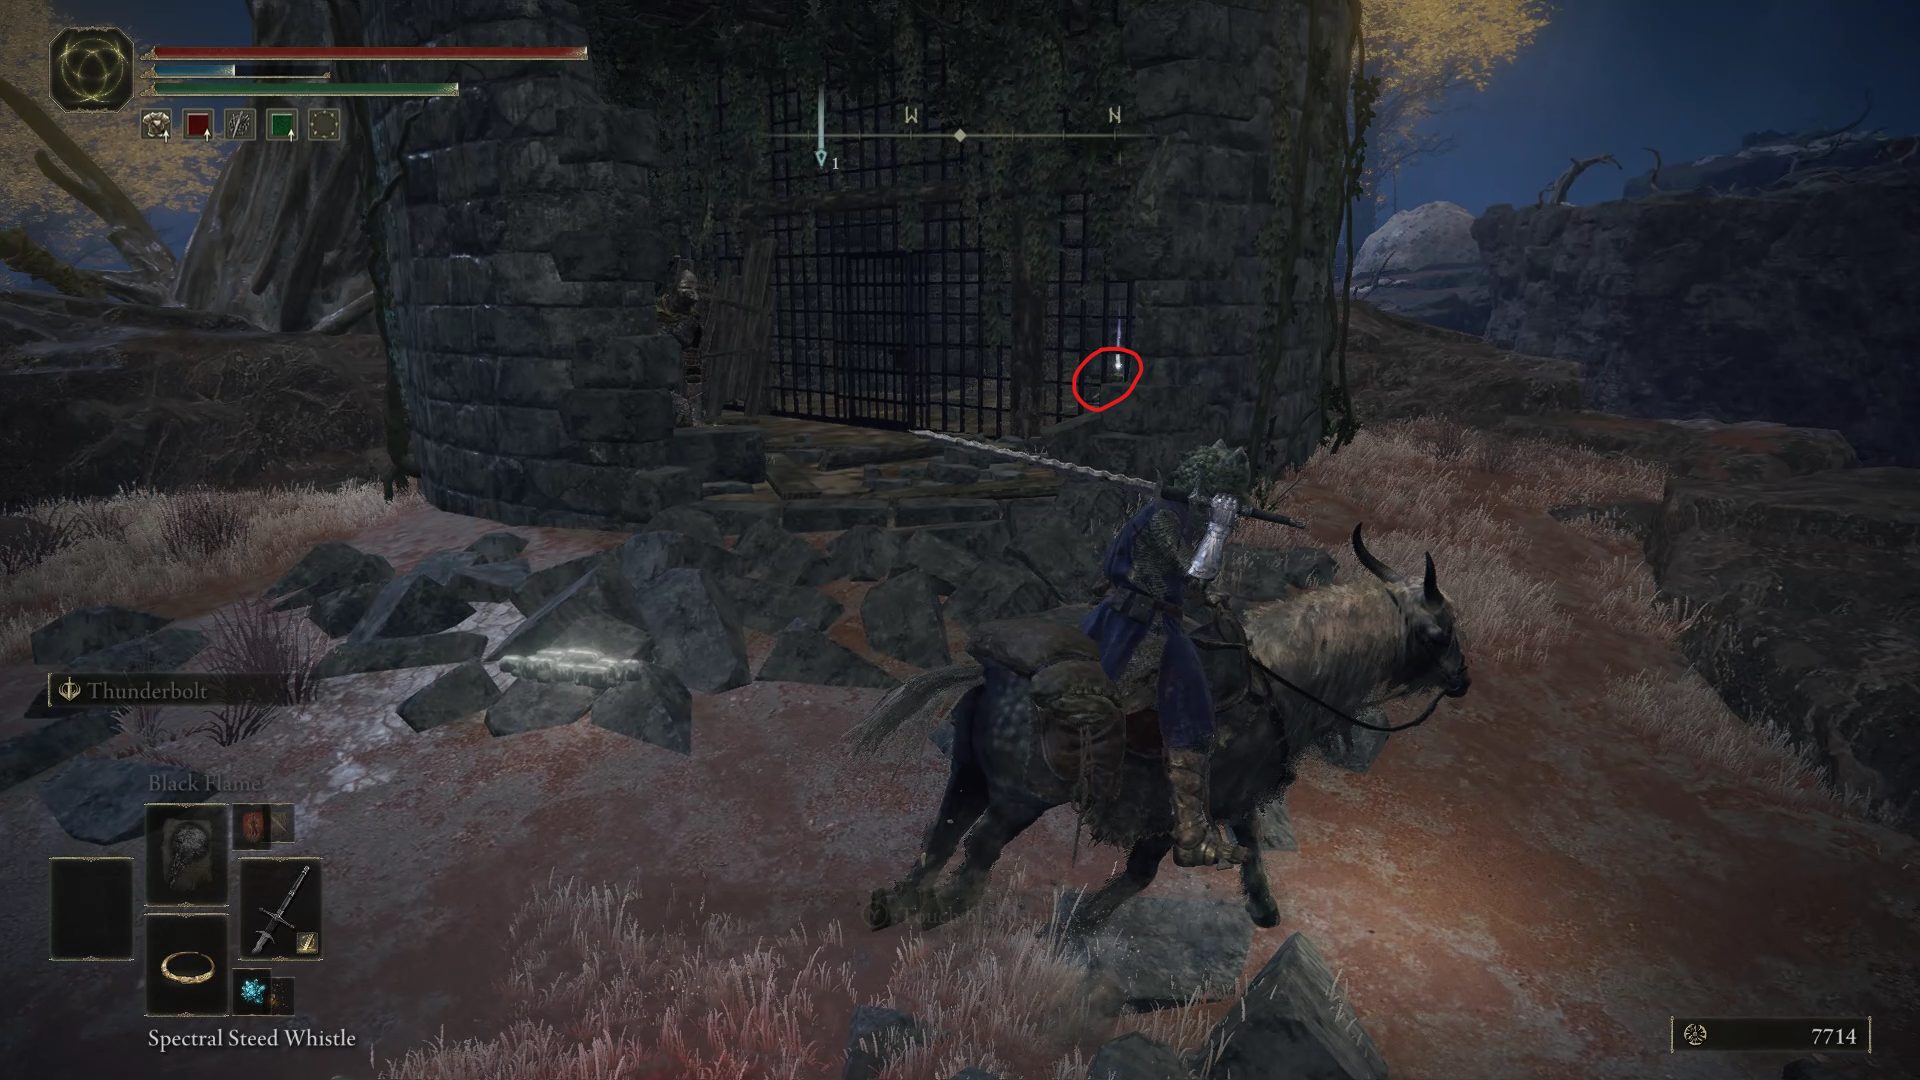
Once the enemies are defeated, grab the Flame, Grant Me Strength from the corpse next to the wall, and the 6x Smoldering Butterfly from another corpse laying next to the fire, before continuing to go around the fort. You will end up reaching the front of Fort Gael once again, however this time you’ll be in a much better position to deal with the pesky archer nearby.
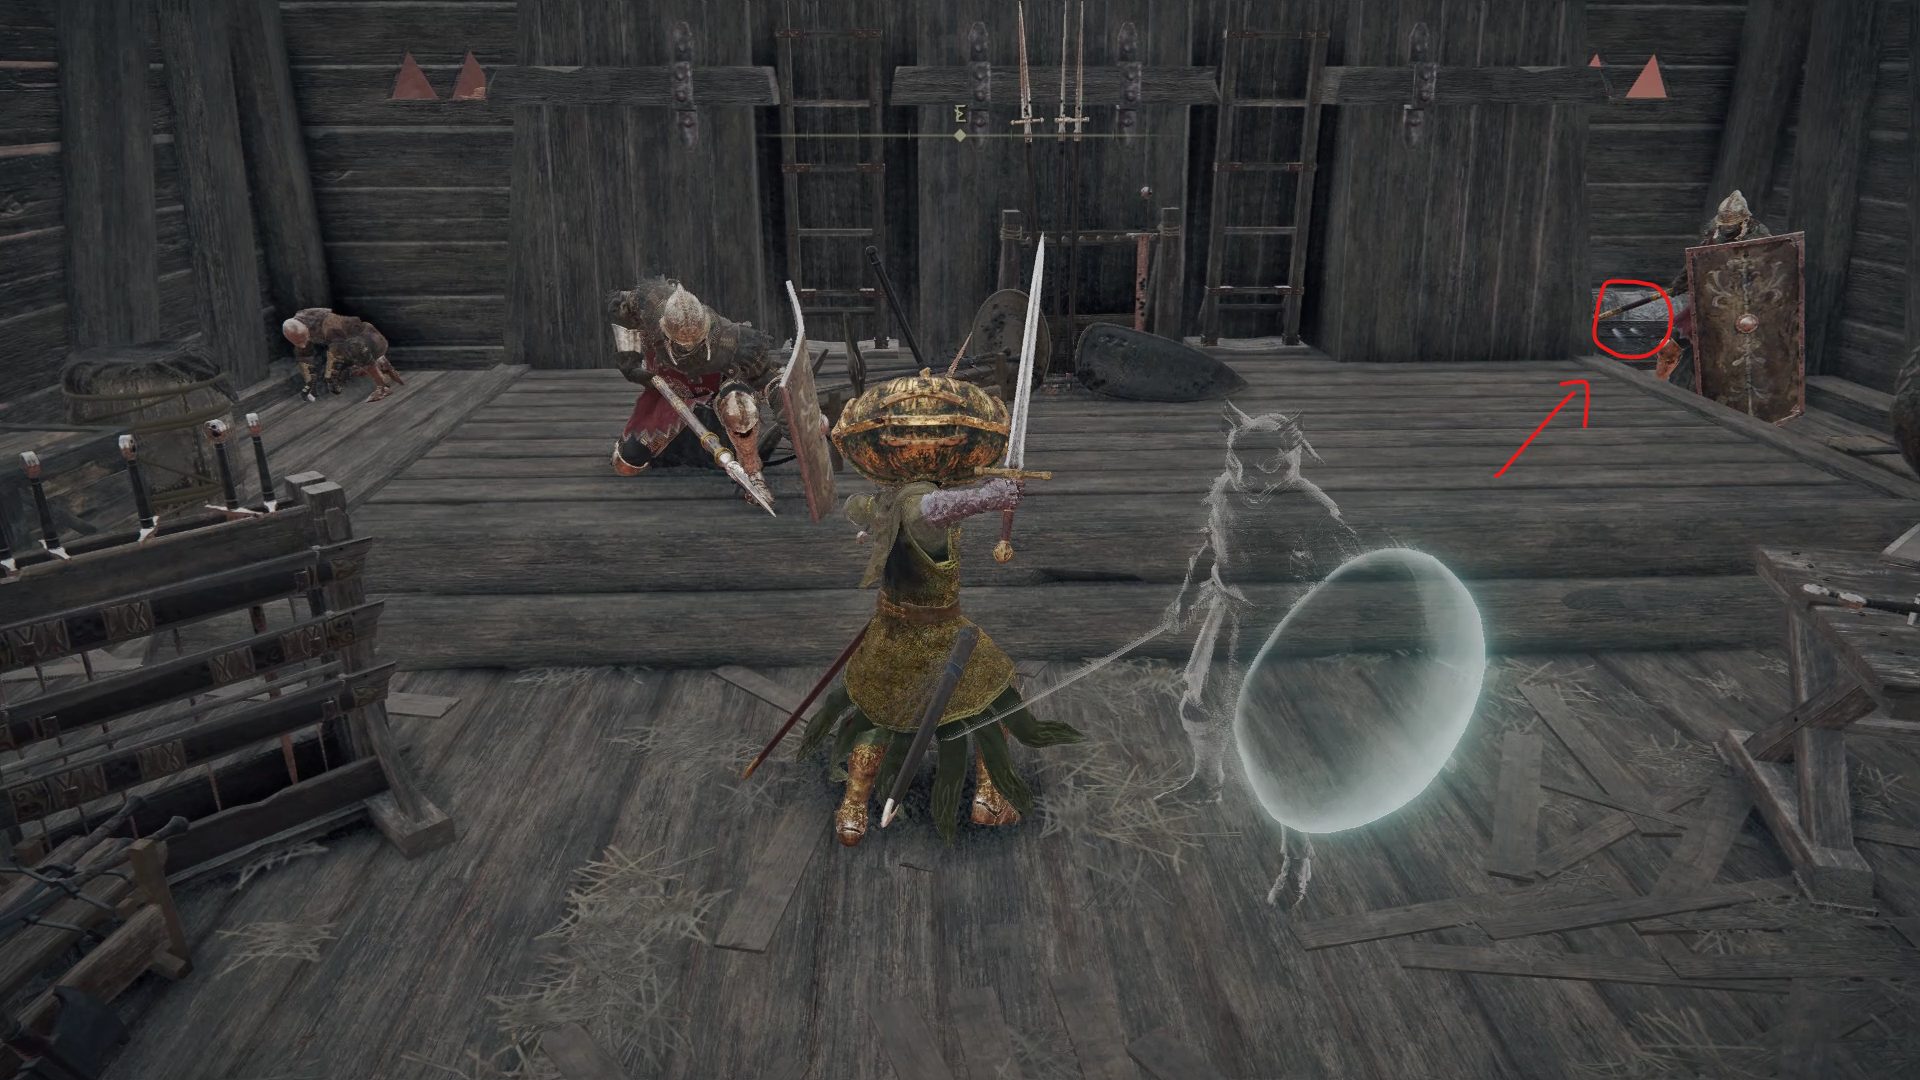
You’ll be able to backstab the archer or use your most powerful spells again them, which should make quick work of them. While its bow abilities may be new to you, the rest of its moveset is very similar to the other knights. The other enemies shouldn’t be much of a challenge, especially on horseback. Make sure to grab the 5x Explosive Greatbolt on a corpse in one of the camps before heading back to the ladder that you found earlier on the side of Fort Gael, and climbing it all the way up to enter the fort itself.
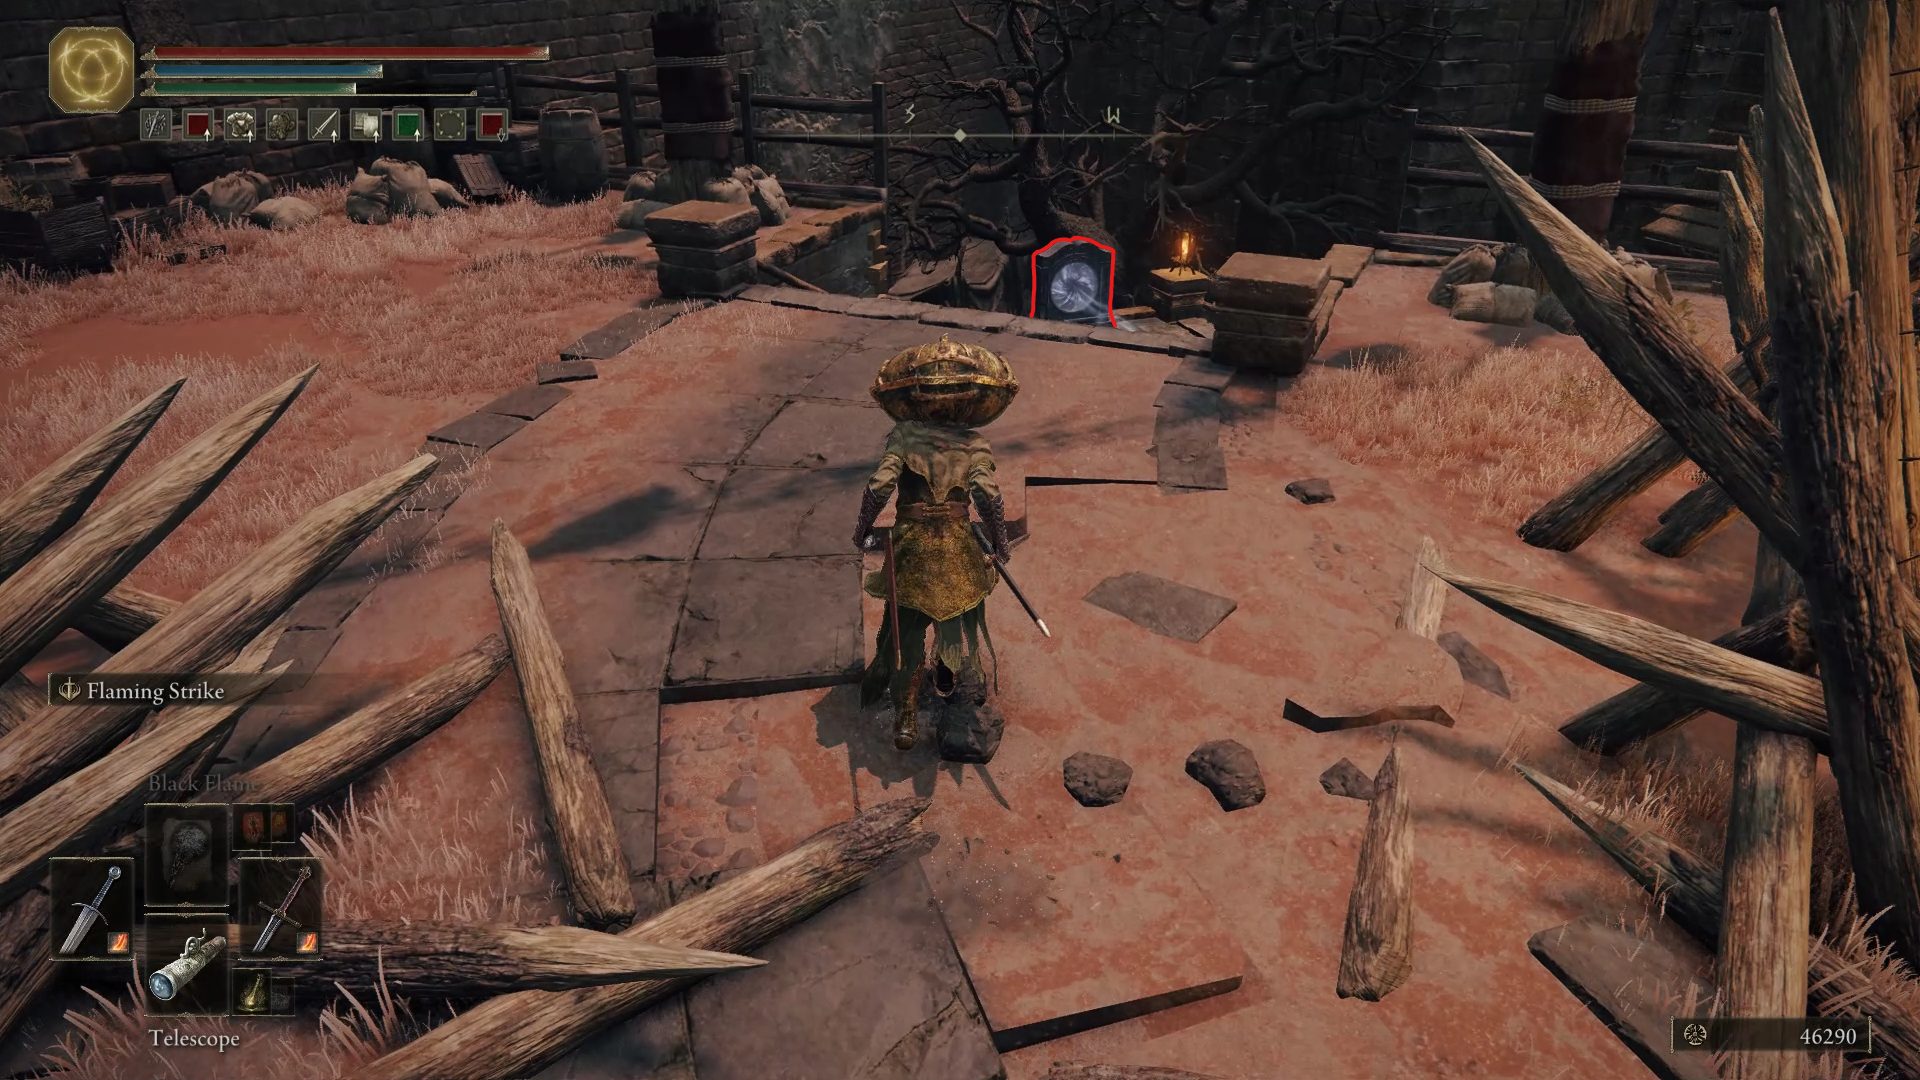
After taking the waygate at the end of the Fort Gael dungeon, you’ll find yourself right next to Redmane Castle. If you’ve been following Ranni‘s questline and have spoken to Blaidd in the Siofra River dungeon about going to Caelid to fight Starscourge Radahn, you’ll be able to safely explore the castle’s surroundings. Otherwise, both approaching the castle and fighting your way through it will be much more challenging, in which case we recommend going across the bridge to the west to grab another waygate, that will take you directly into the castle.
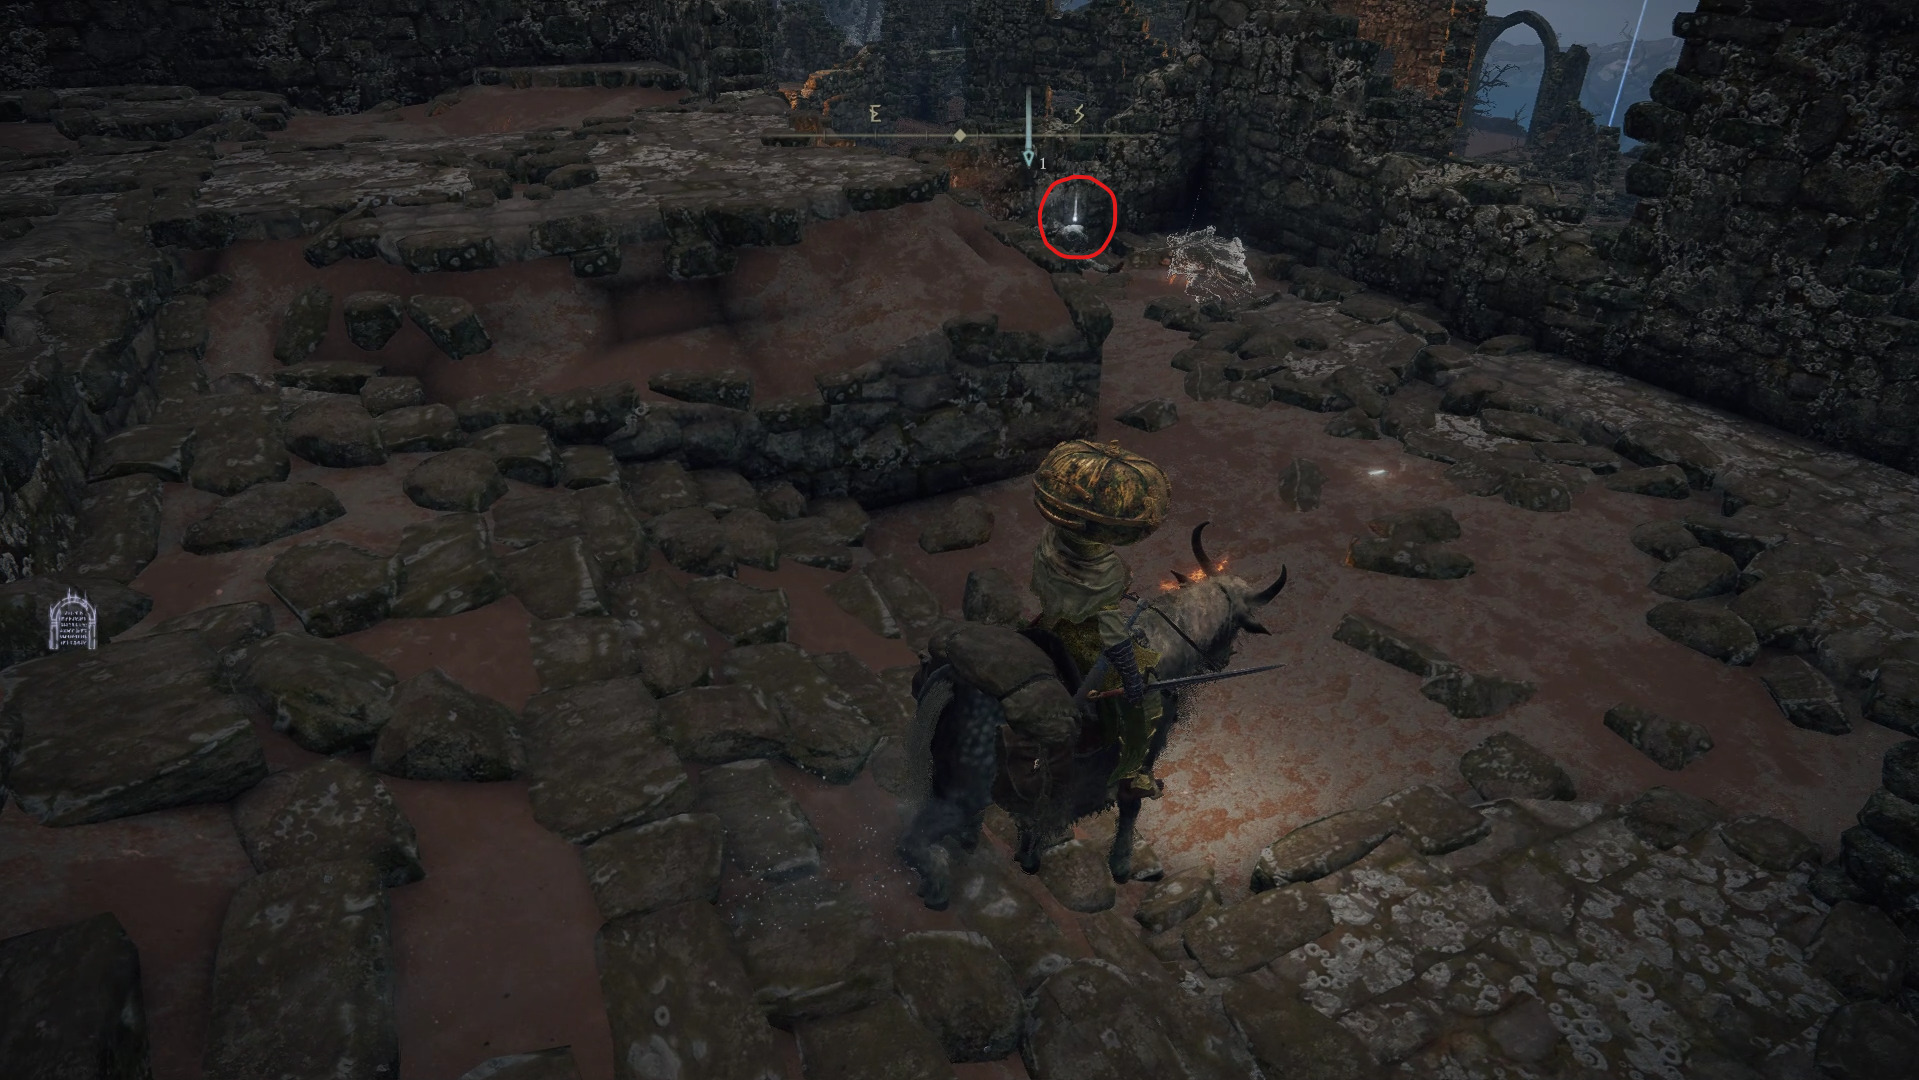
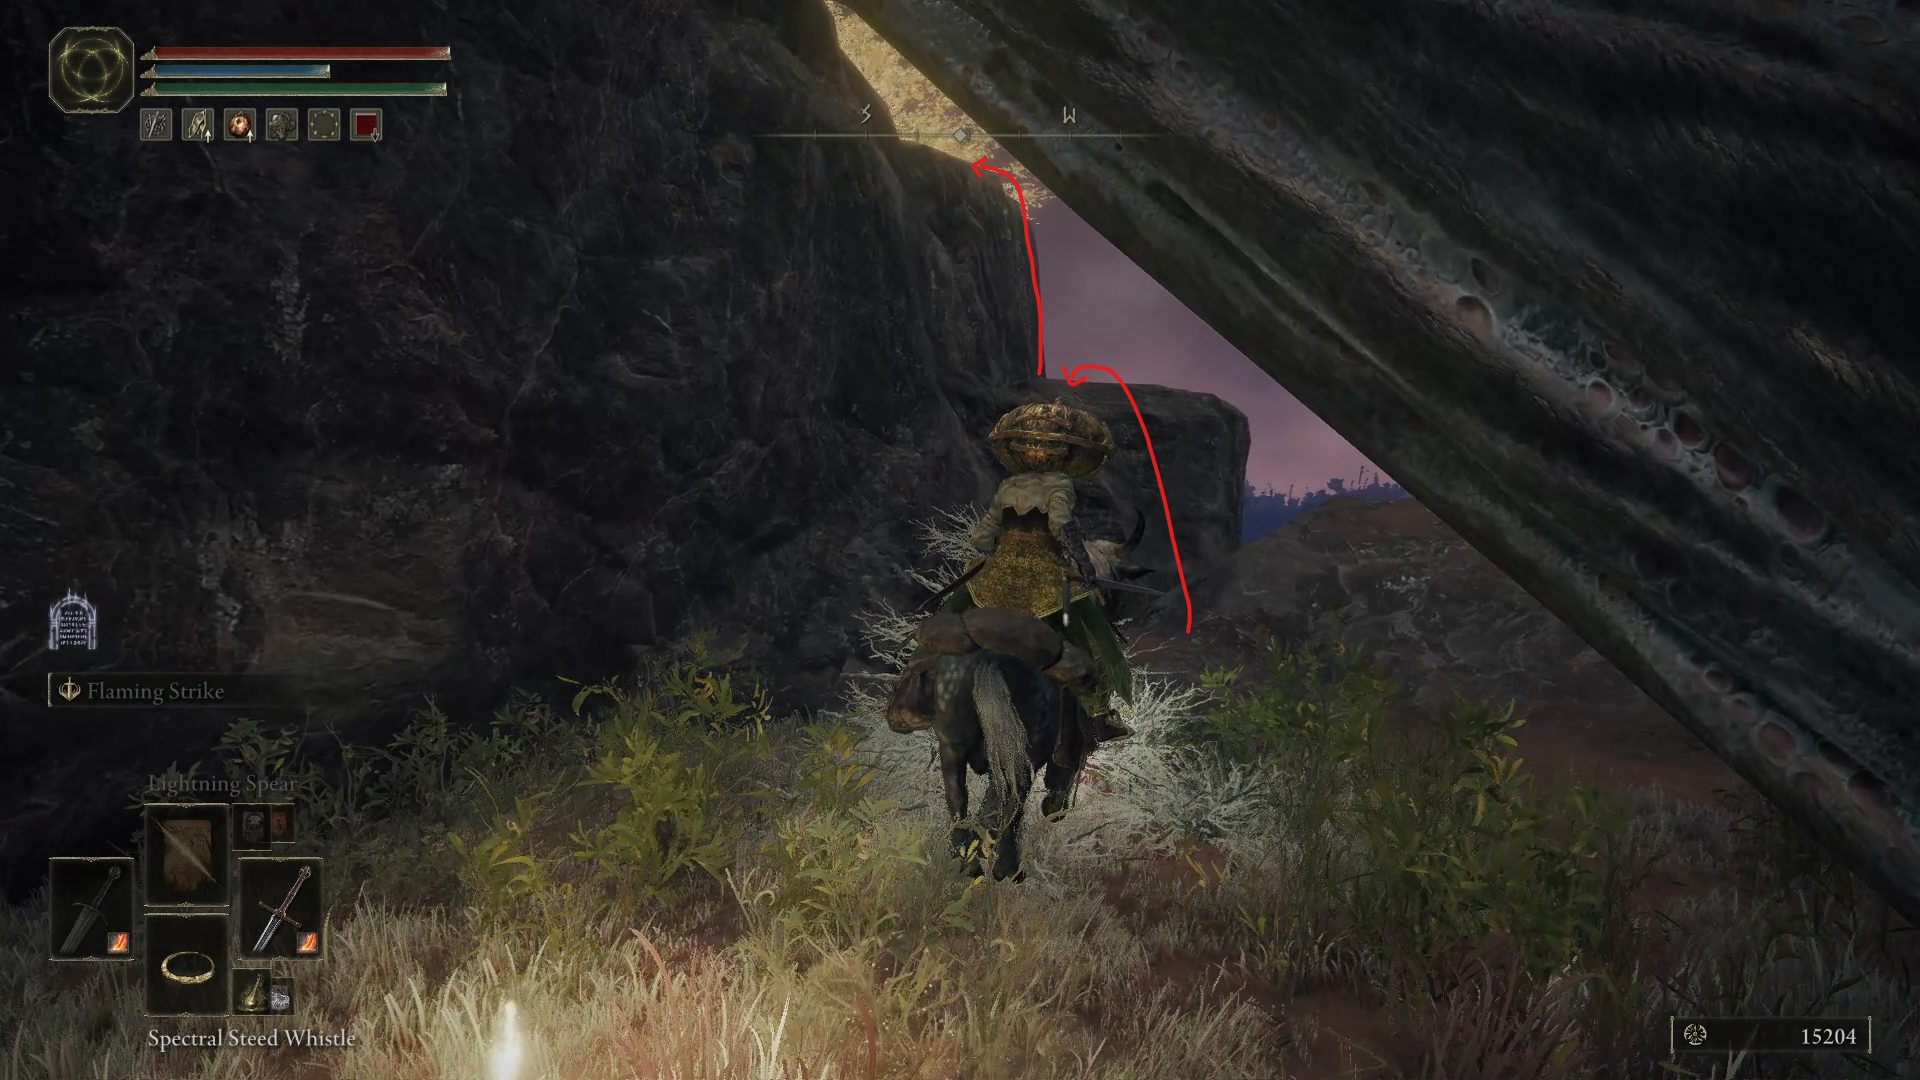
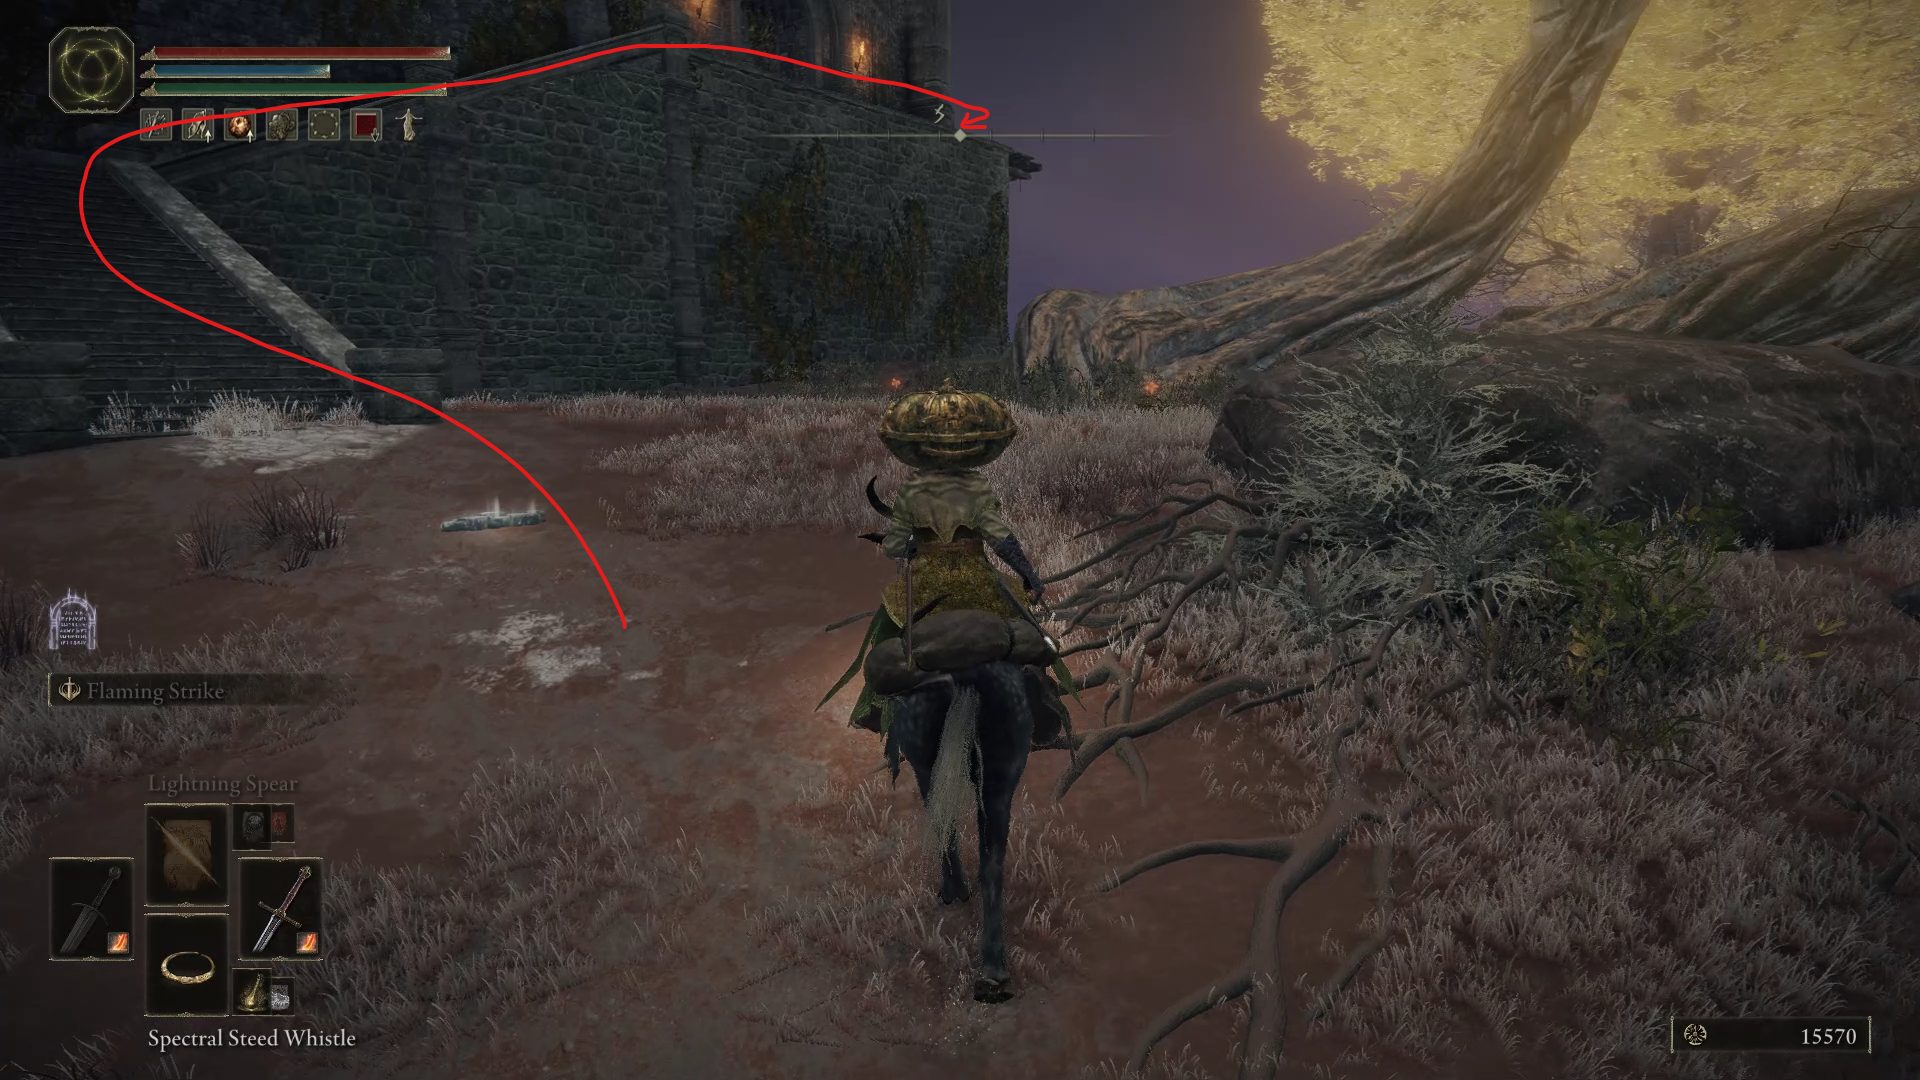
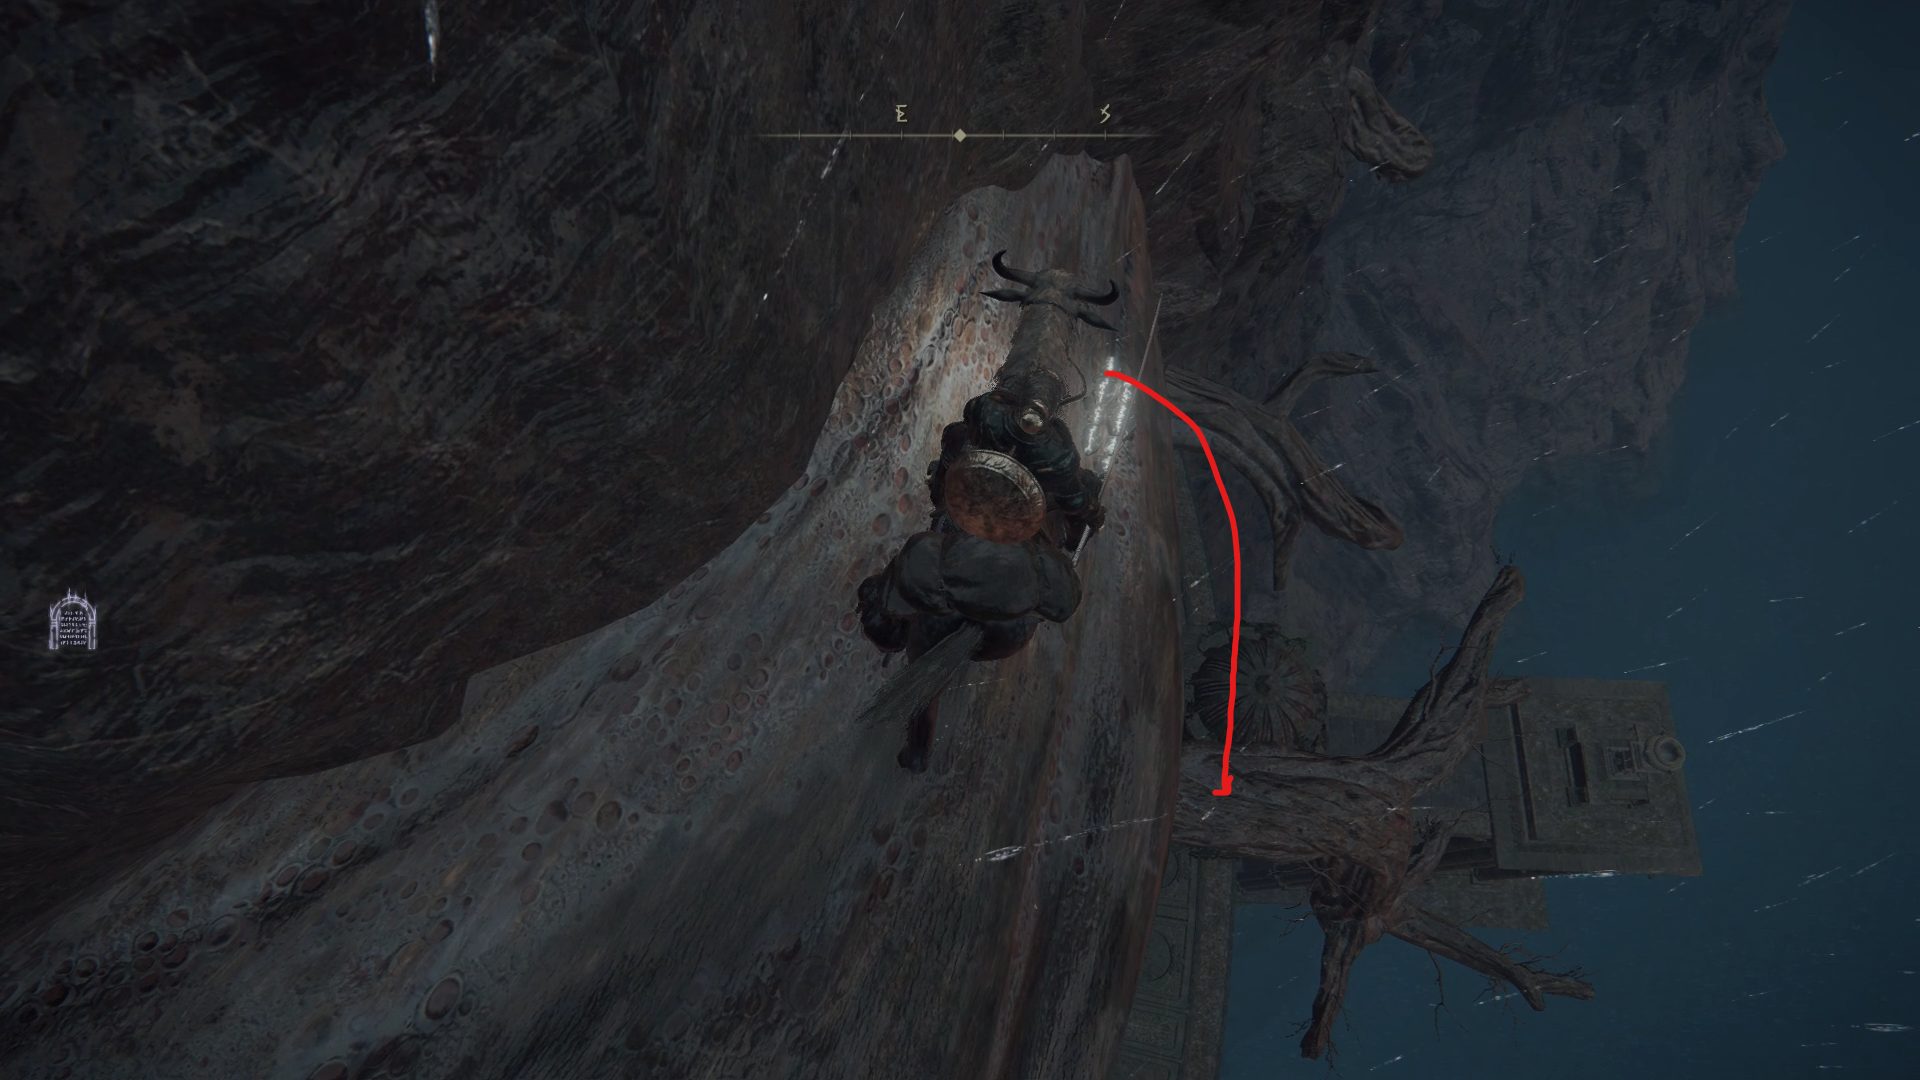
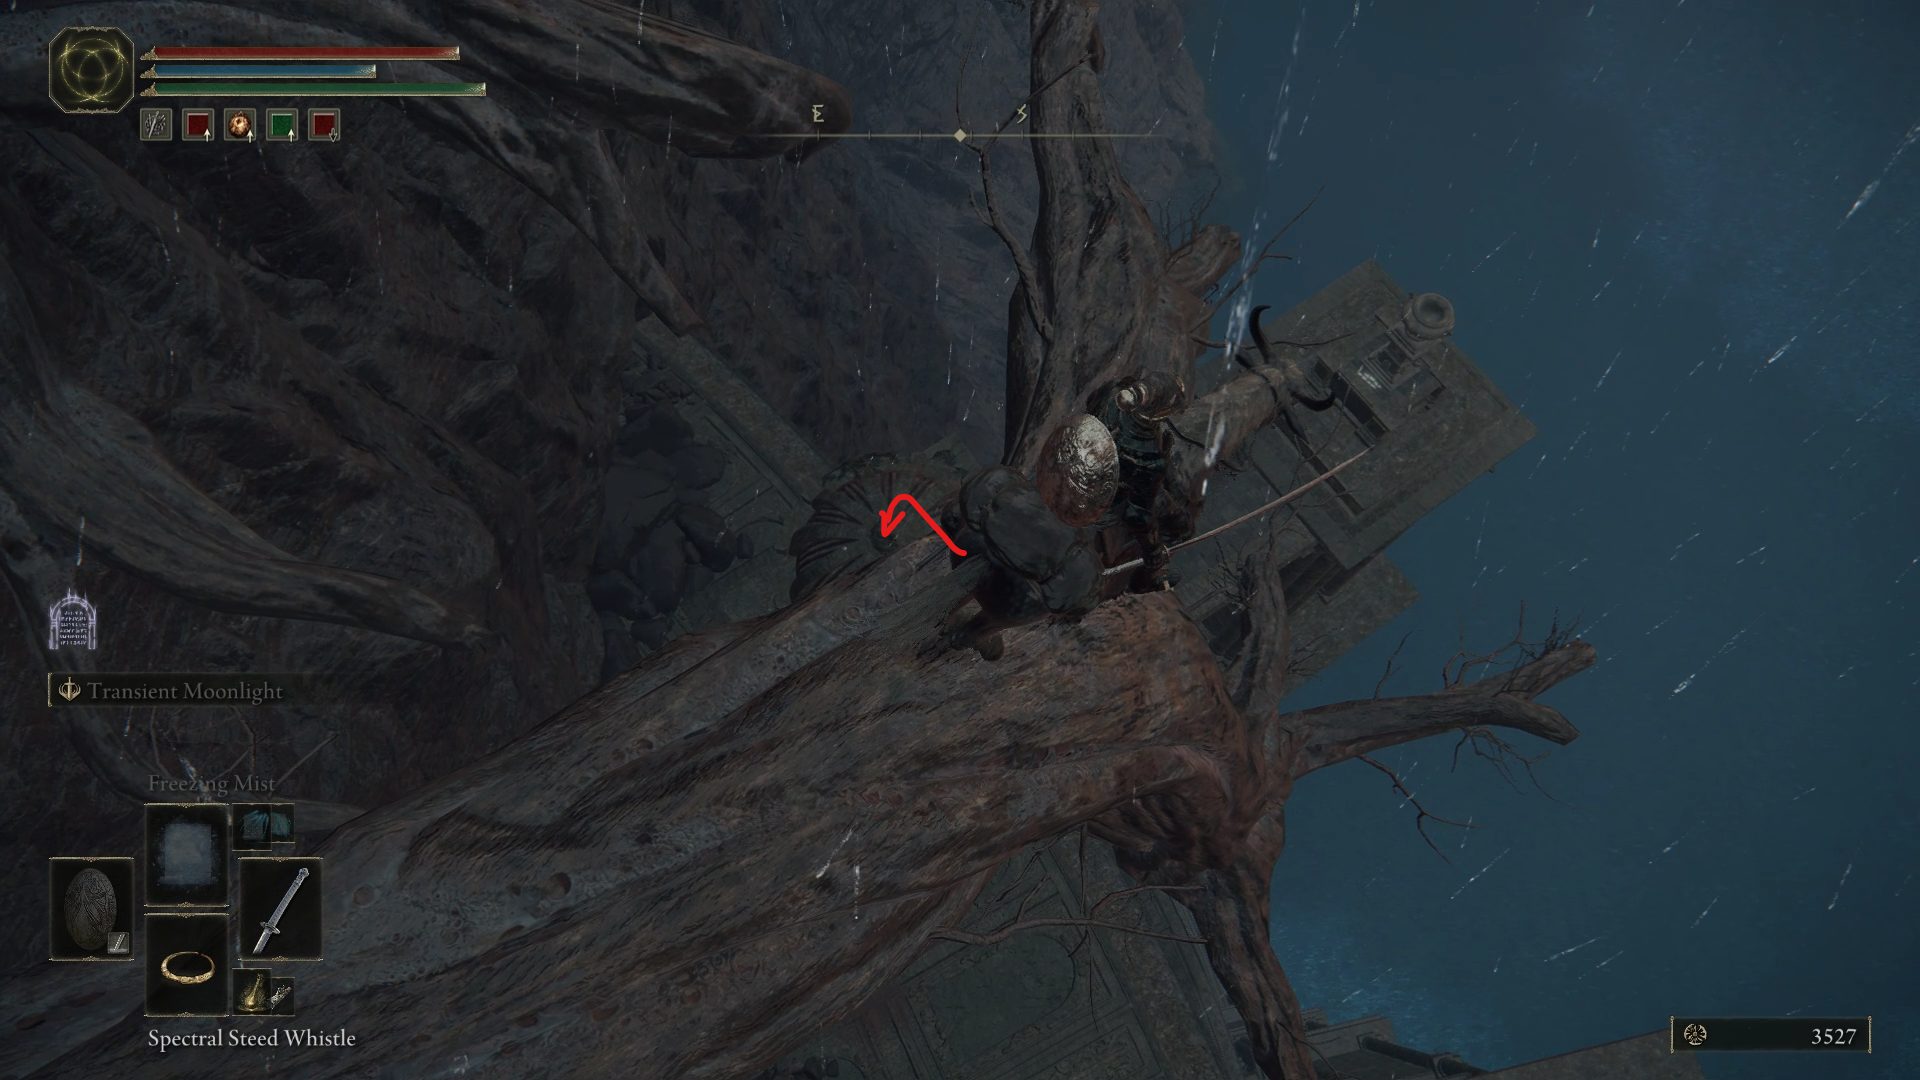
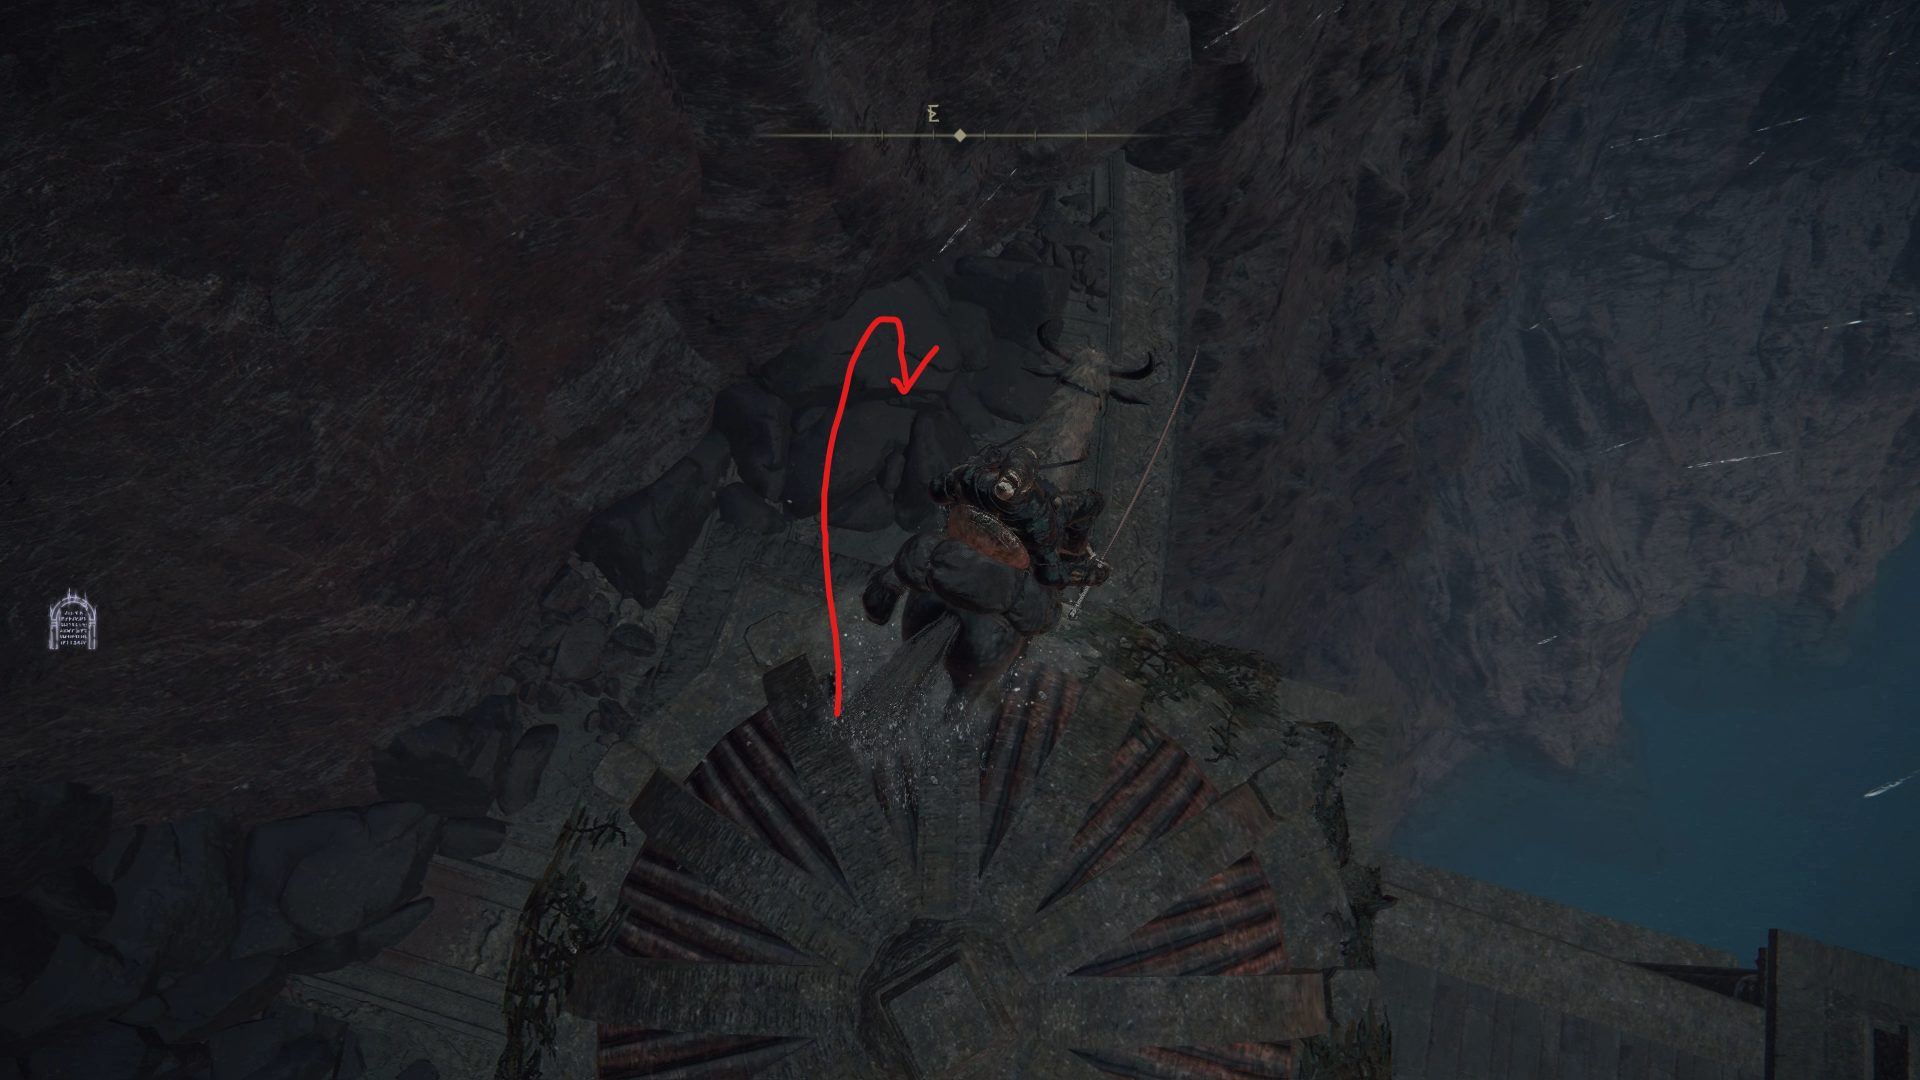
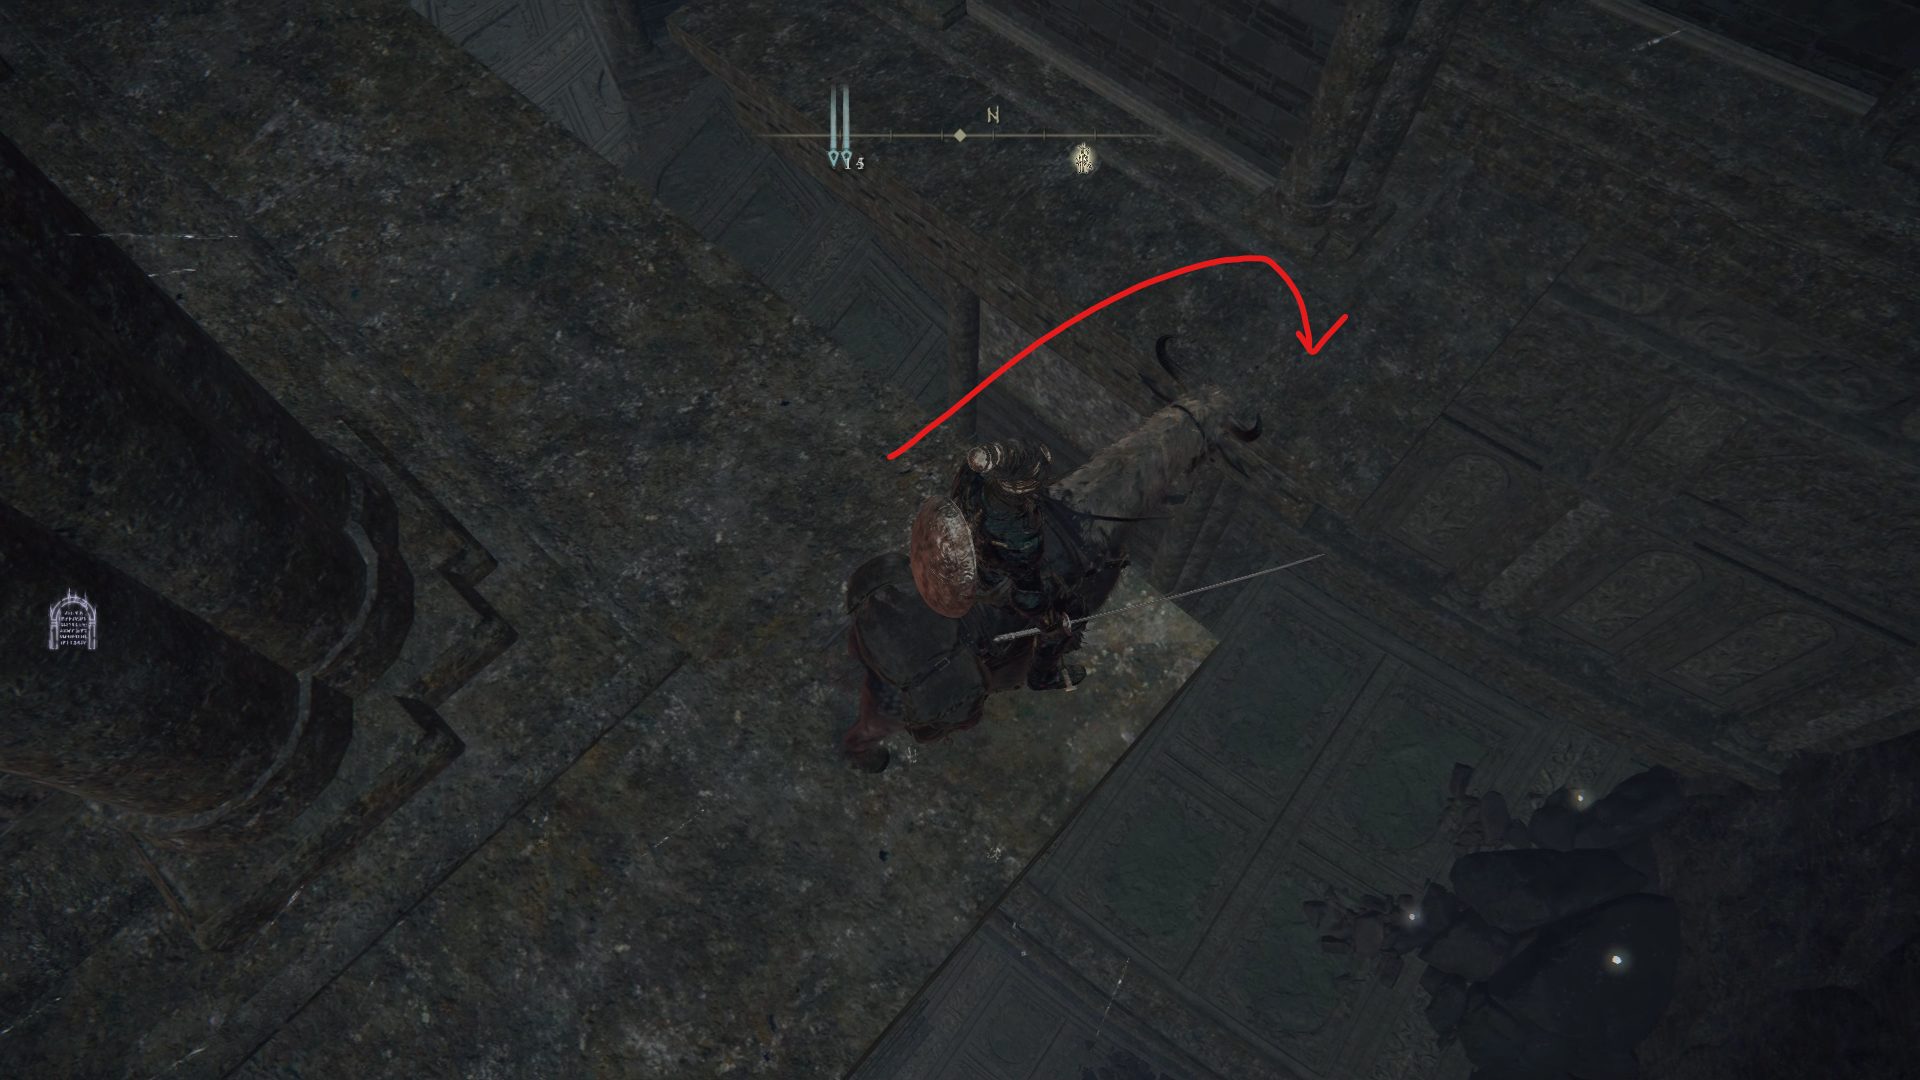
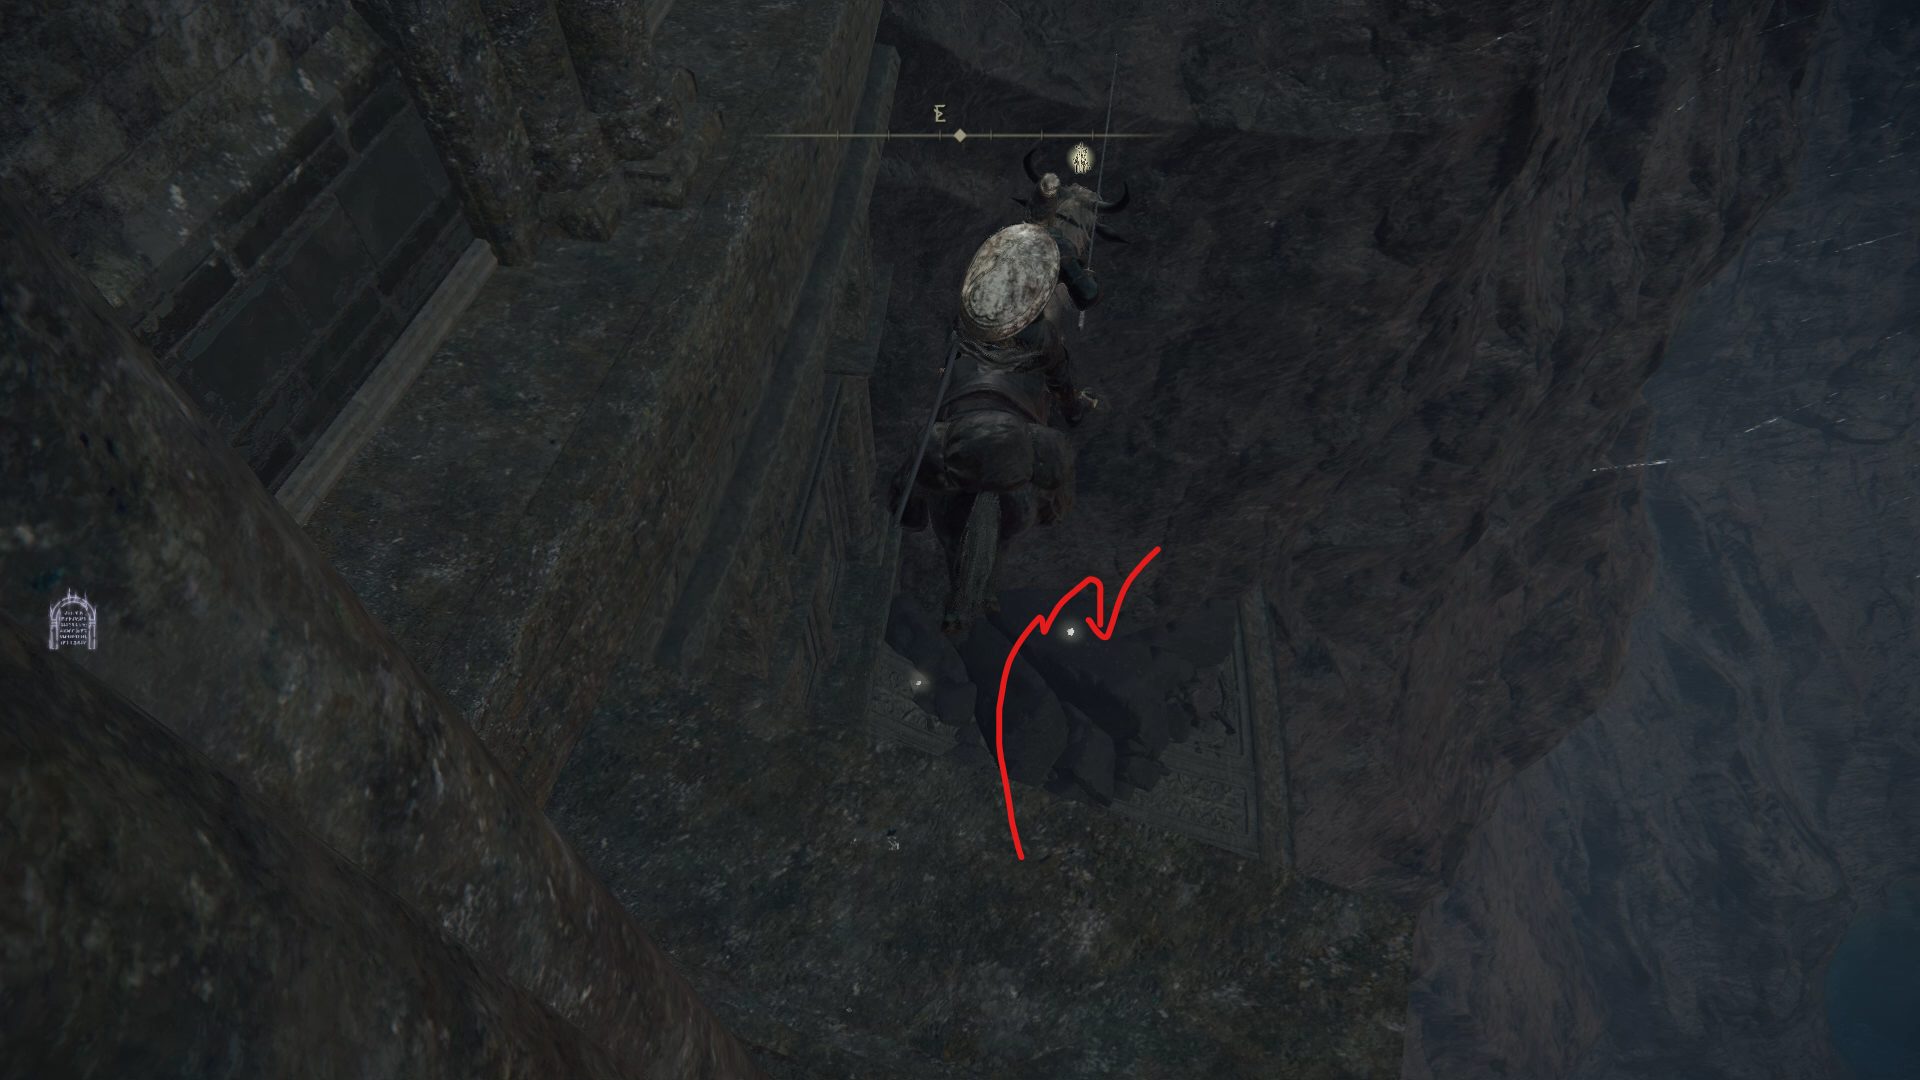
If you have been following Ranni‘s questline, start by going around the siege tower to the east and grabbing the Smithing Stone [3], before following the path to the castle’s main gate and going right to jump over to the siege tower’s upper level. There, go down the ladder to grab a Smithing Stone [6] before going back up to the way you entered this siege tower, and jumping over to the nearby cliff.
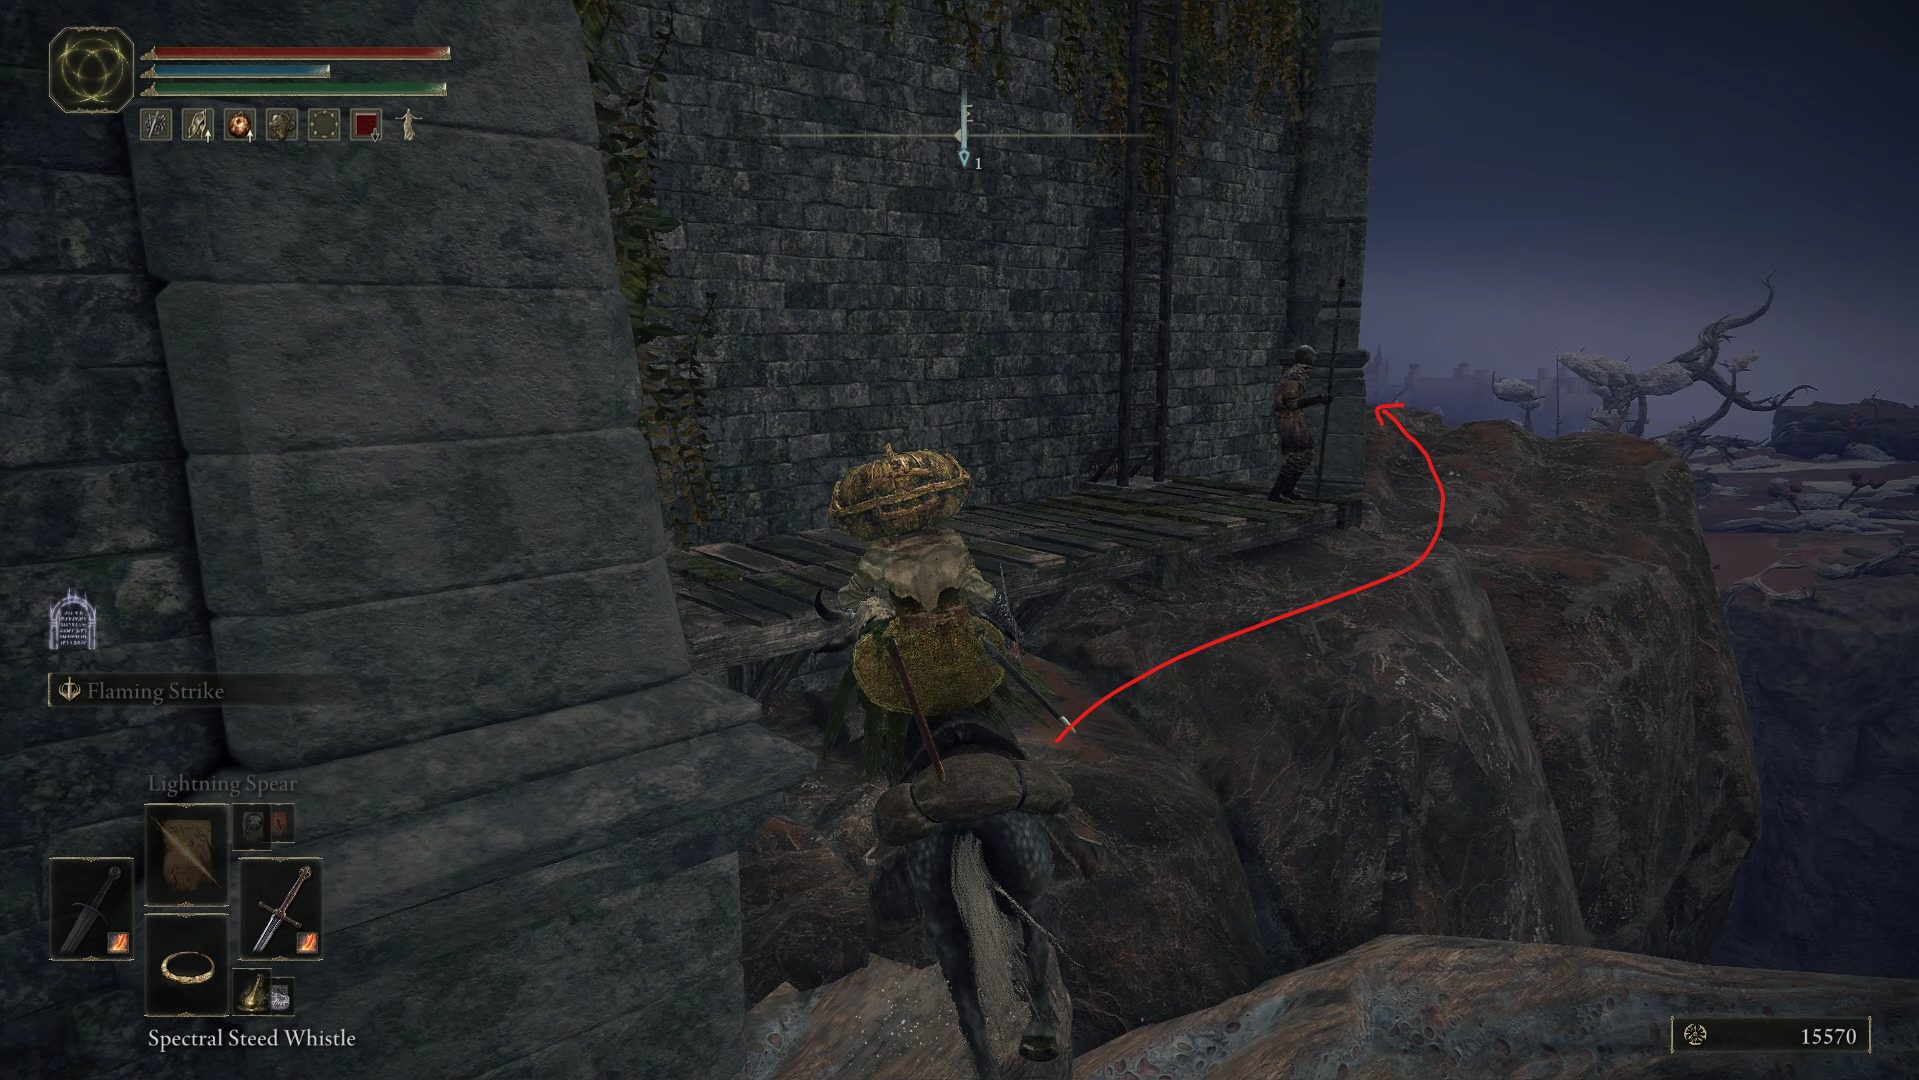
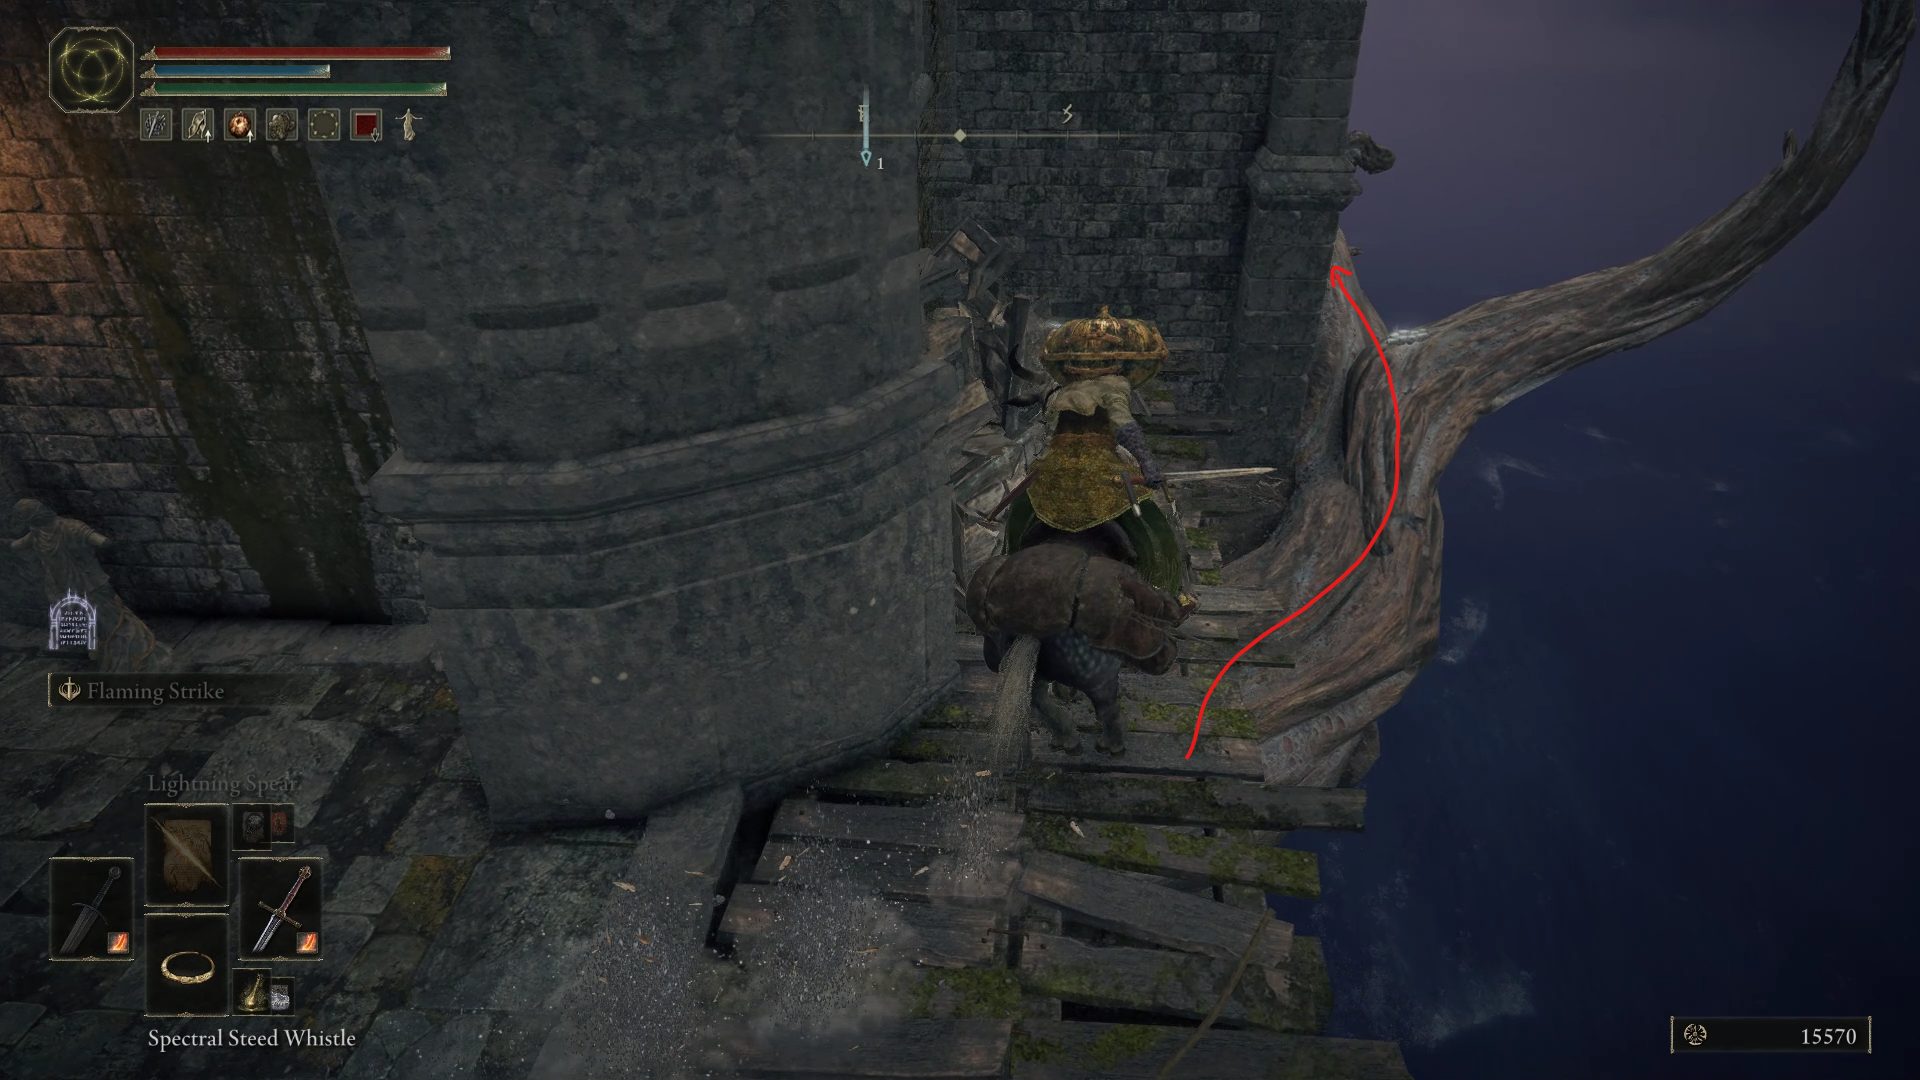
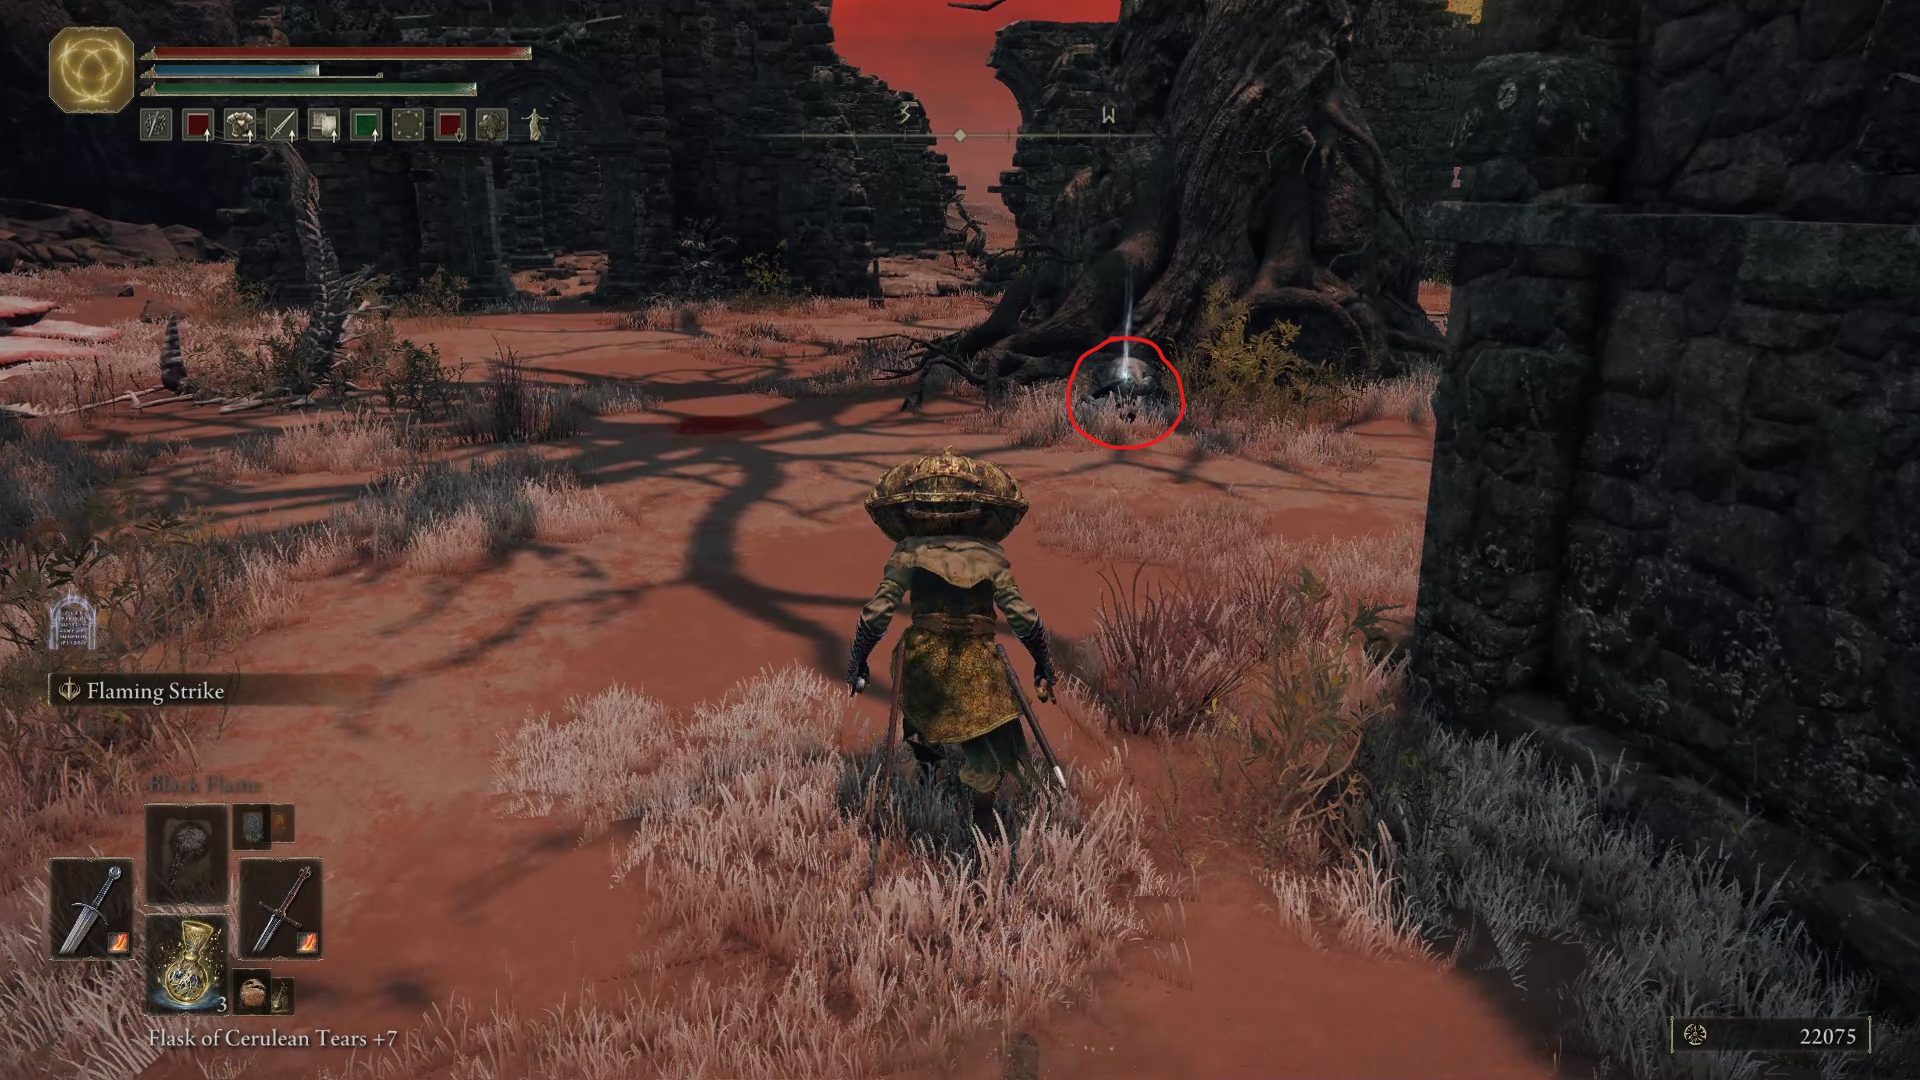
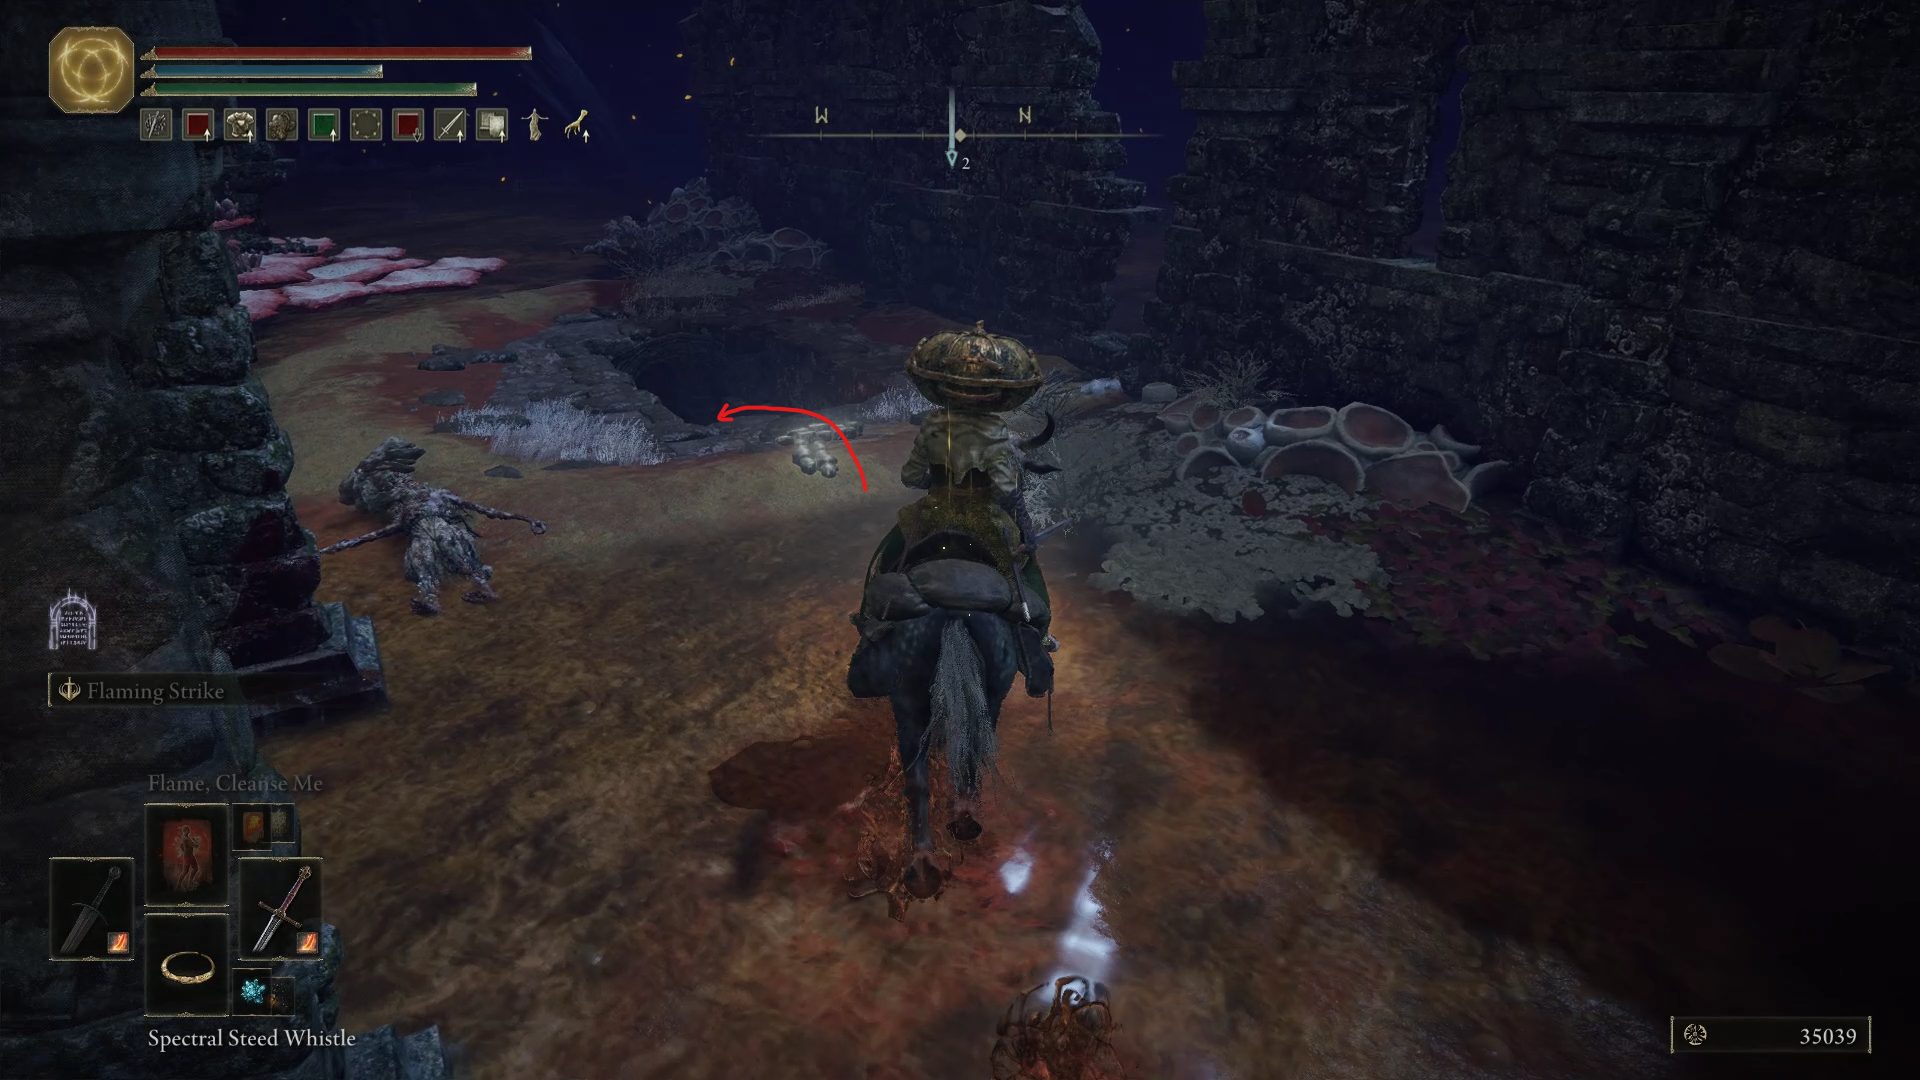
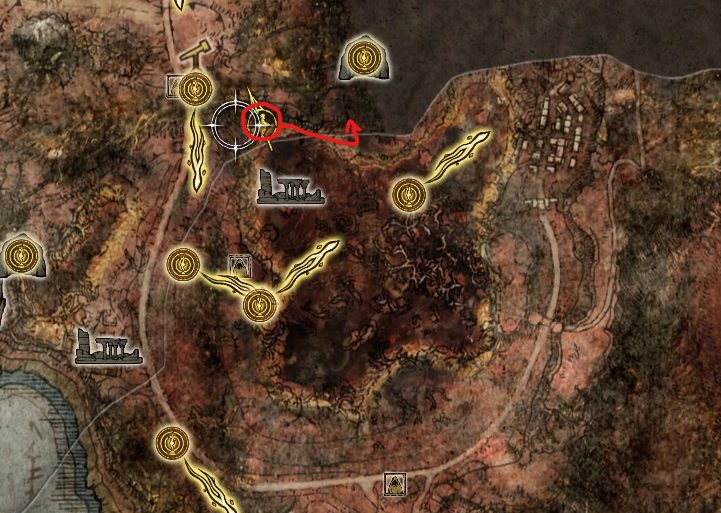
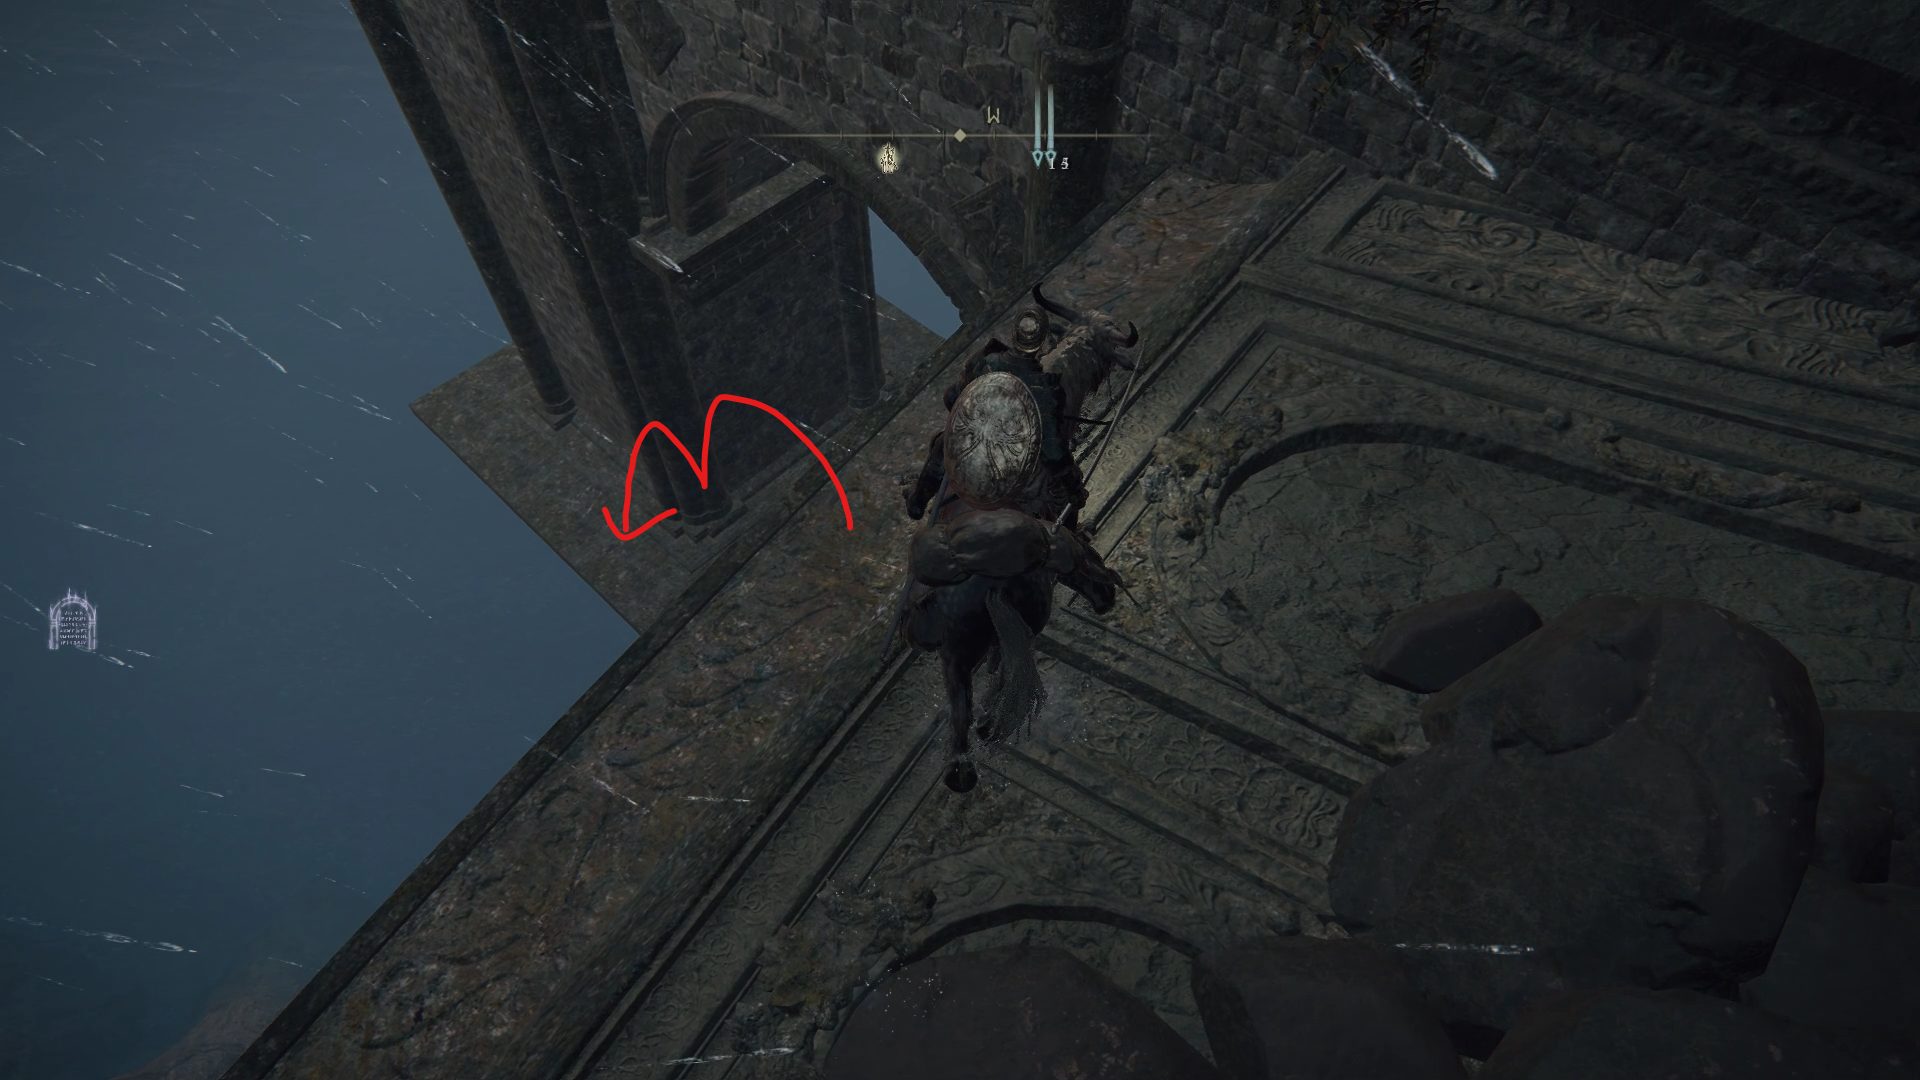
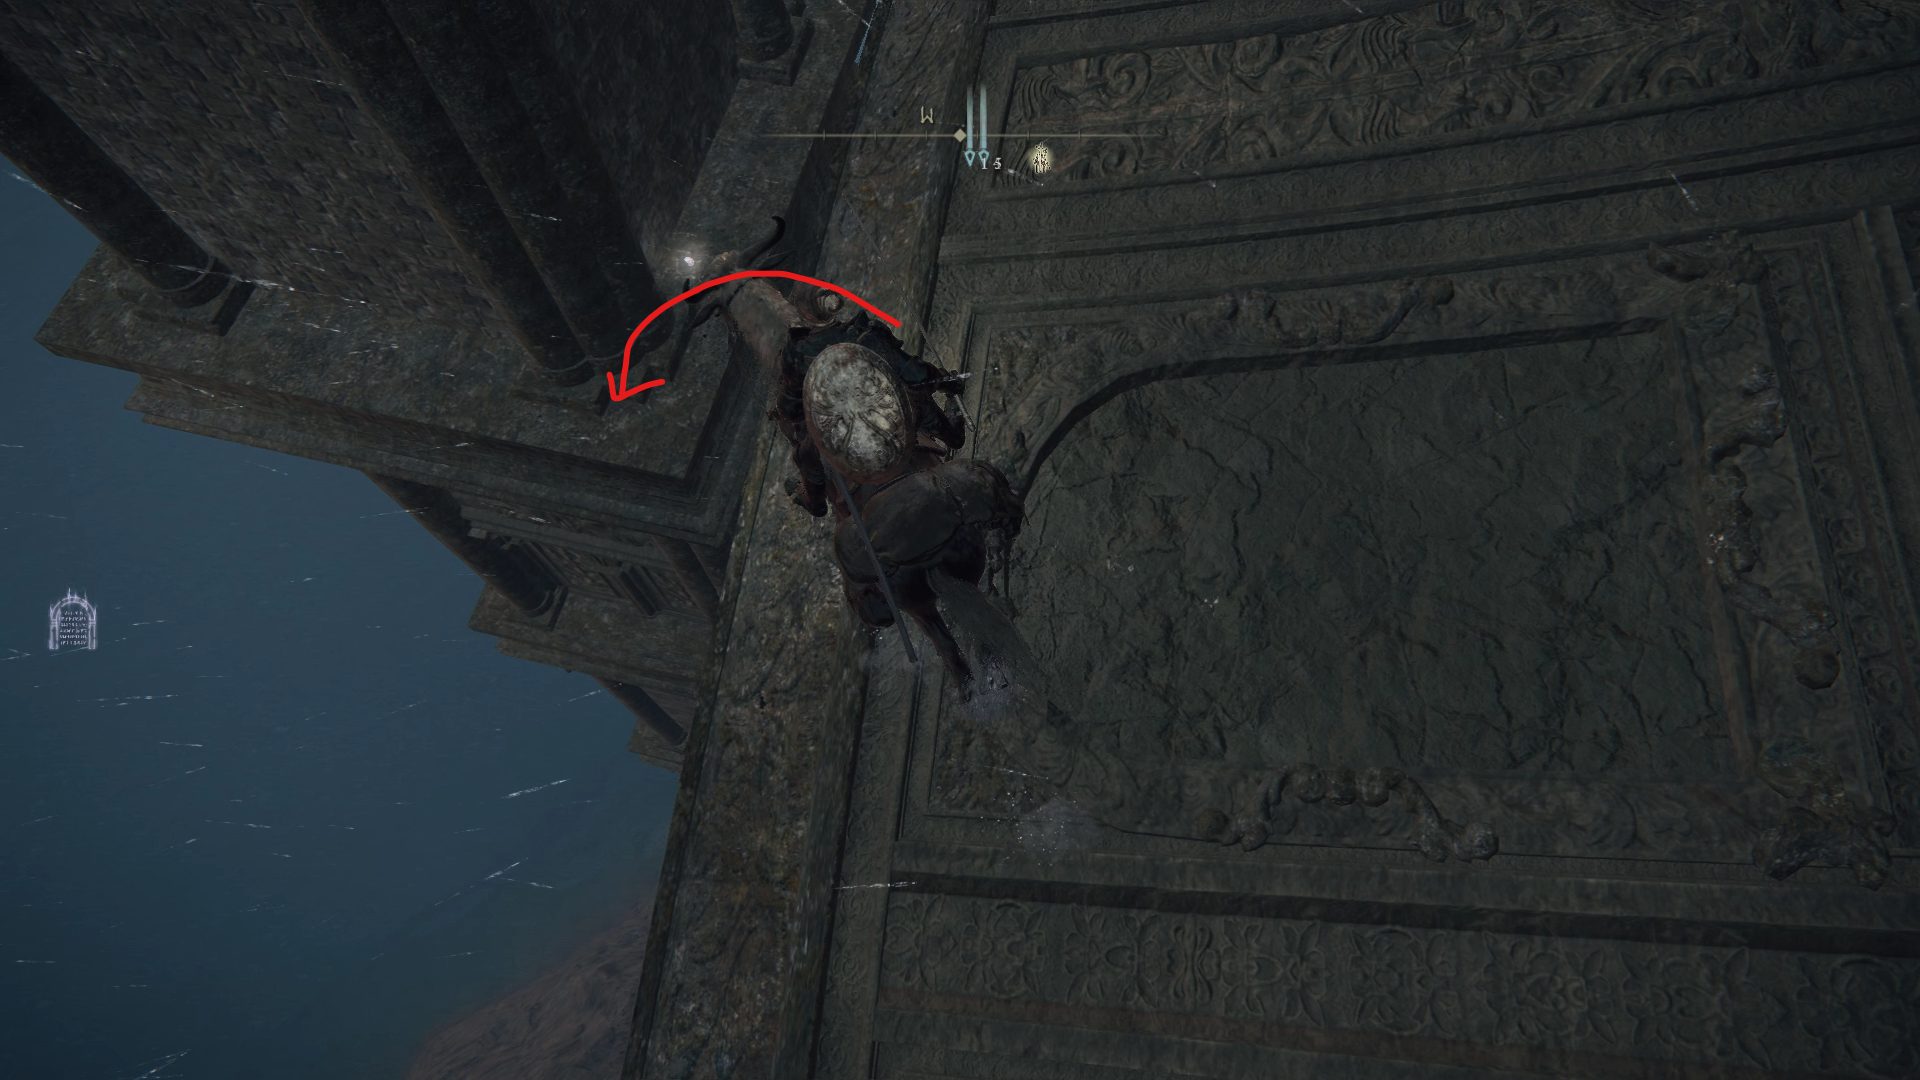
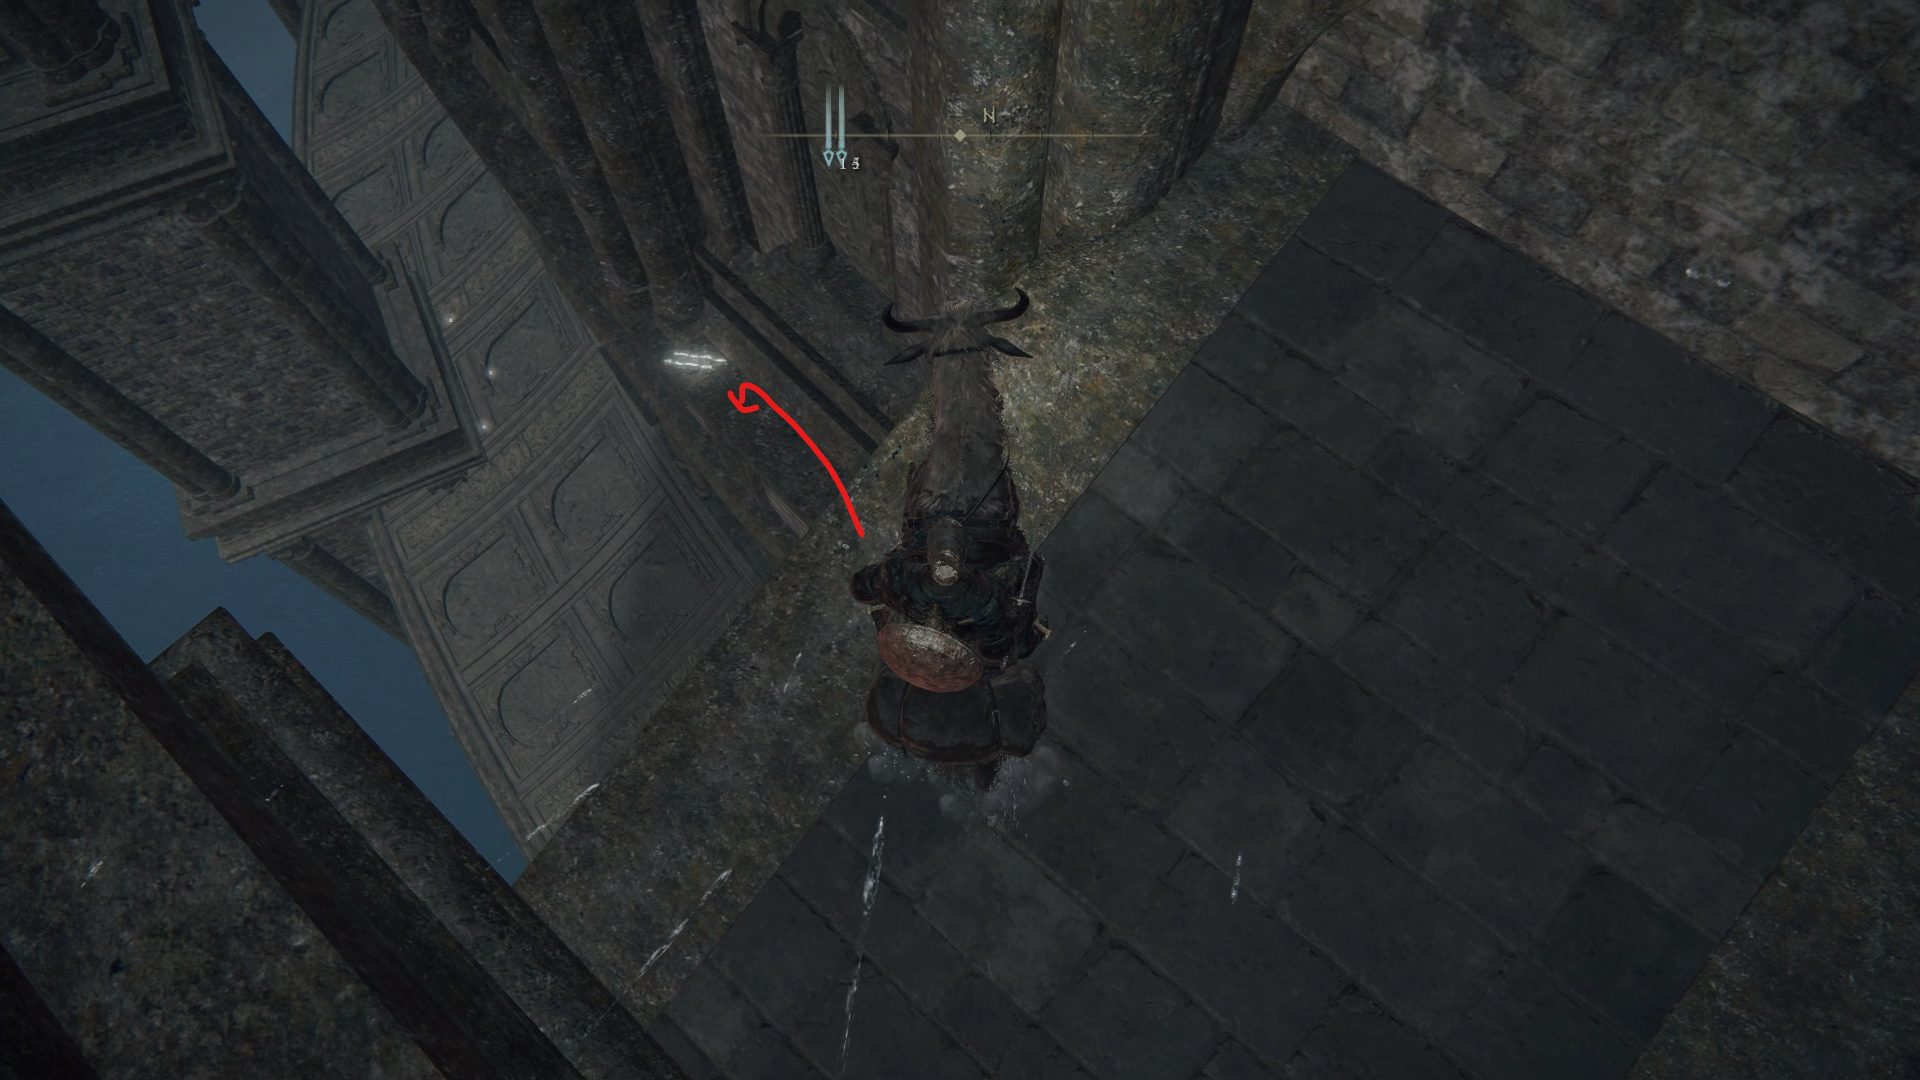
Keep following the path that goes along the castle walls, all while cutting your way through the bats that made these cliffs their home. The path will end upon reaching a secluded cemetery, and you’ll have to jump over to continue forward. In this cemetery, you’ll have to deal with 2 more bats as well as a harpy, and if you look to the left you’ll notice a loot beetle.
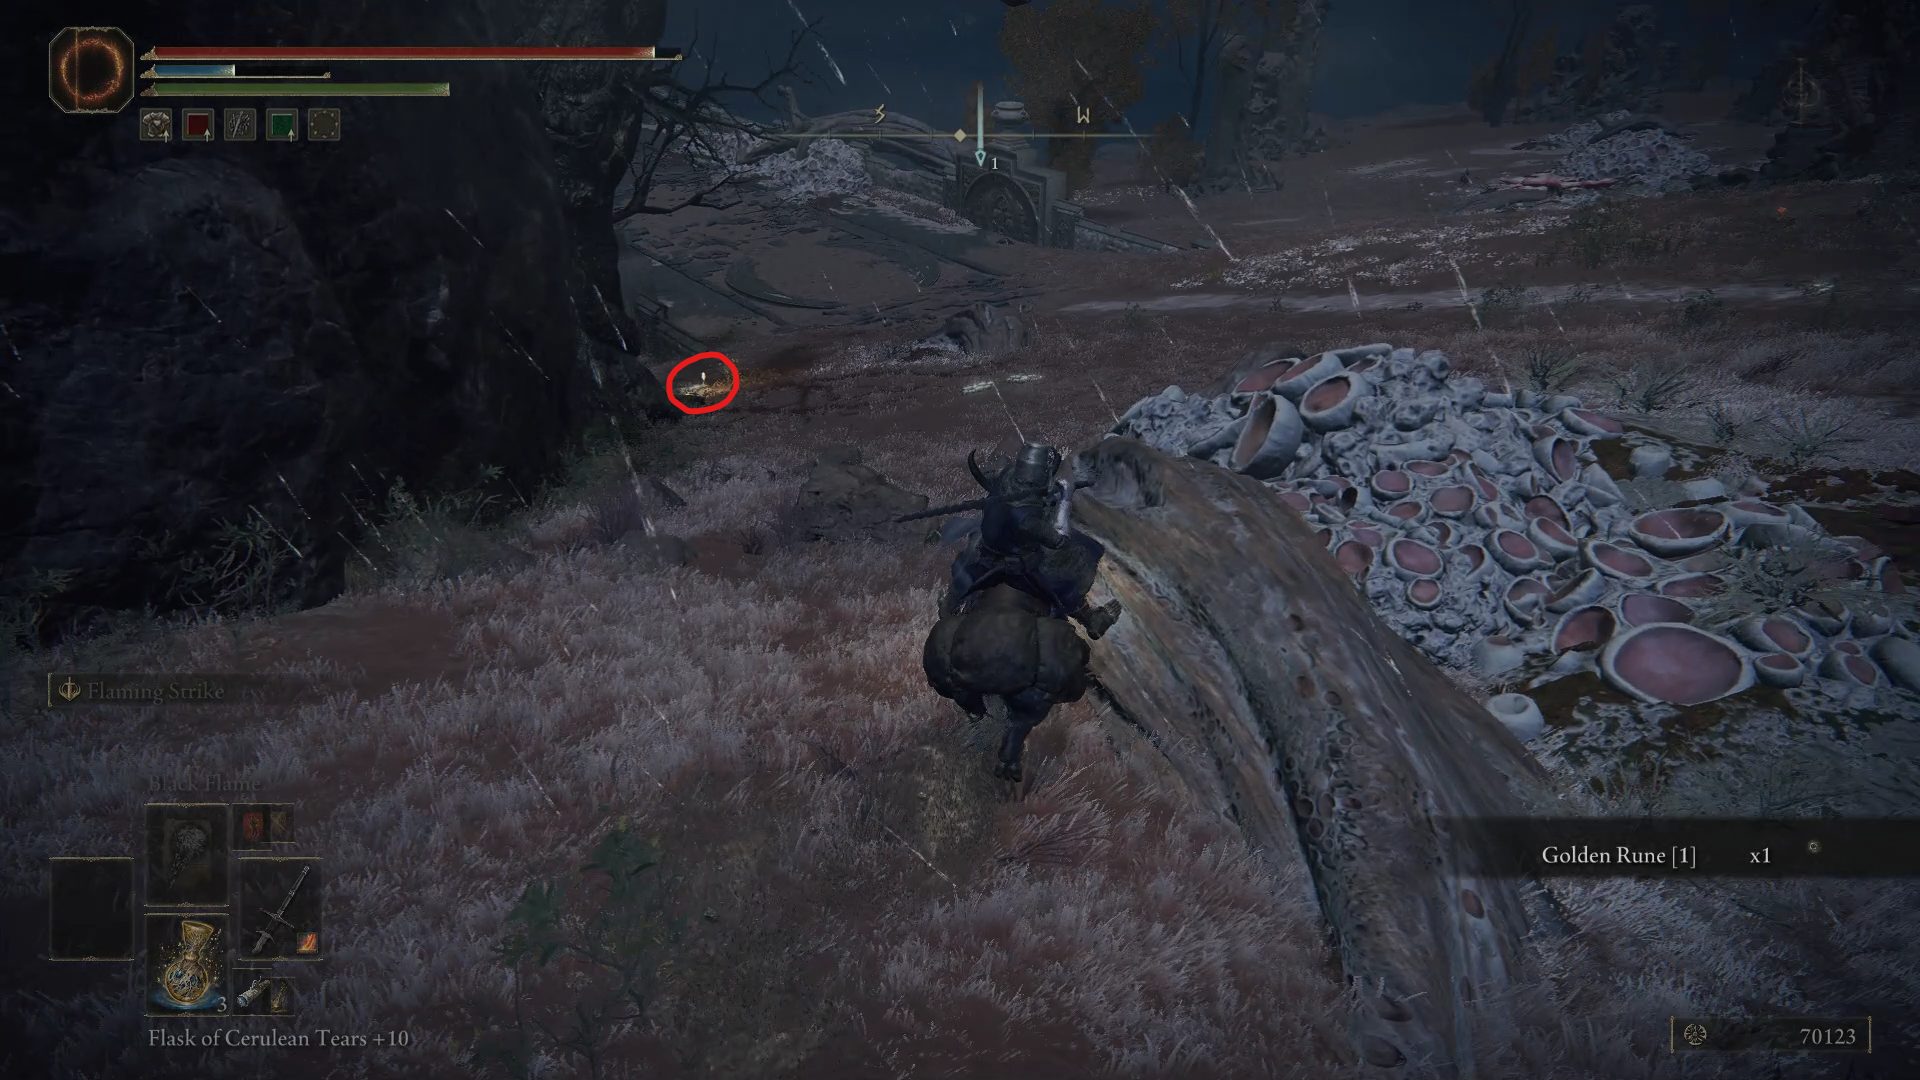
To avoid running around and accidentally scaring away the loot beetle, you can use ranged attacks to either grab the attention of one bat at a time, or if you’re a spell caster, you can murder them from afar instead. Remember to kill the loot beetle for its Ash of War: Flaming Strike and then go up the ladder next to the staircase to enter the Redmane Castle dungeon.
Continued in Part 2 — use the tabs above to continue reading the walkthrough!
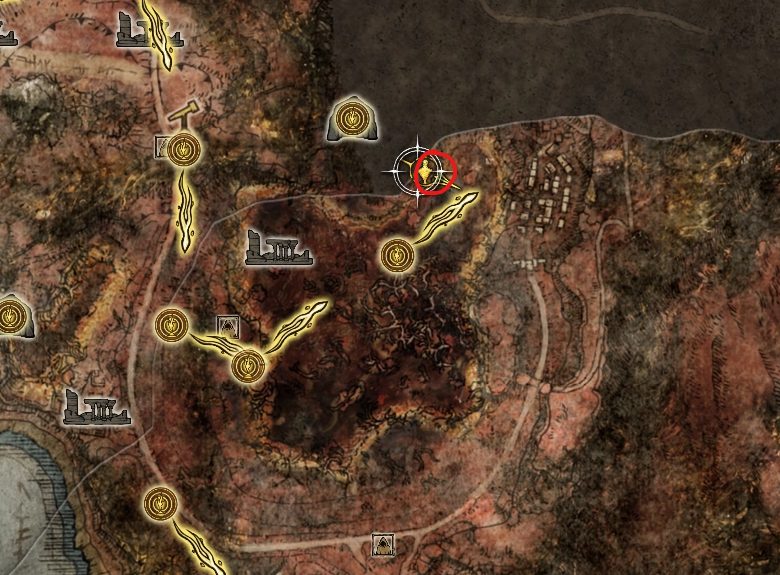
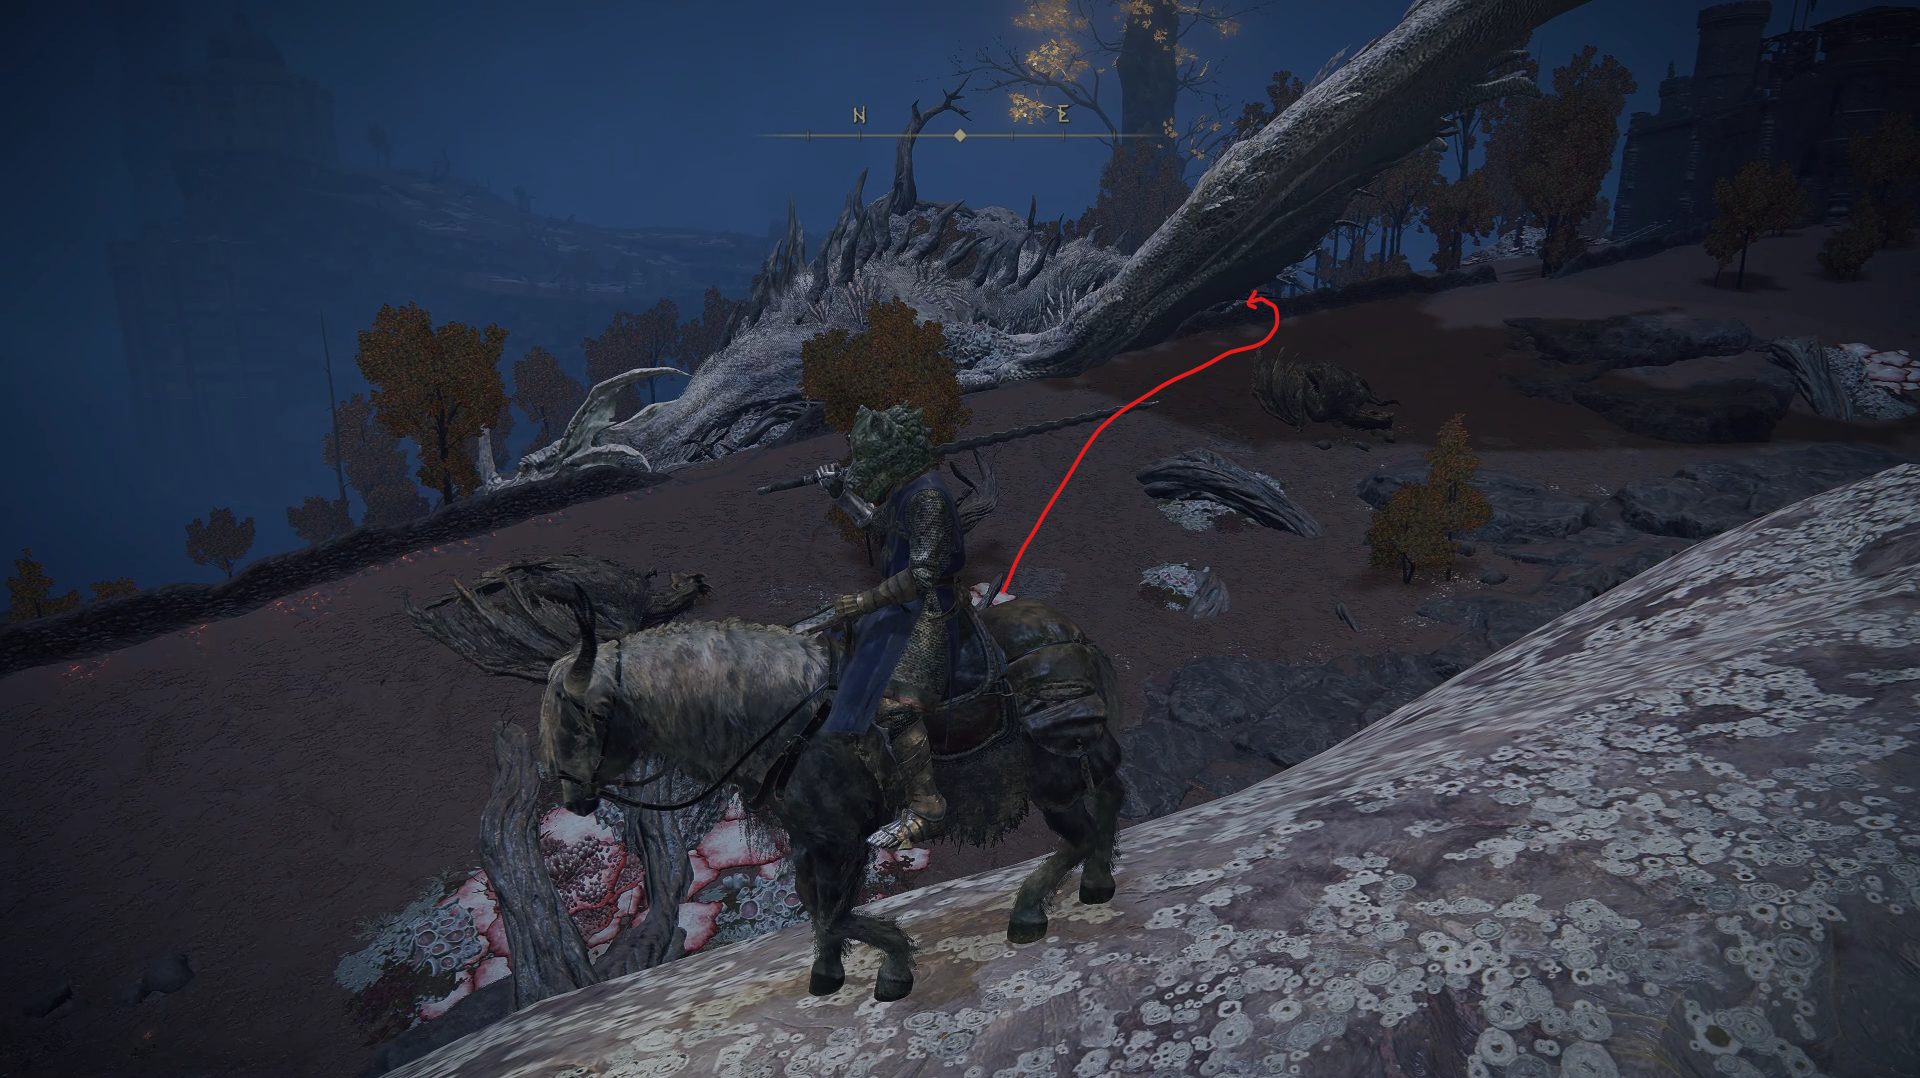
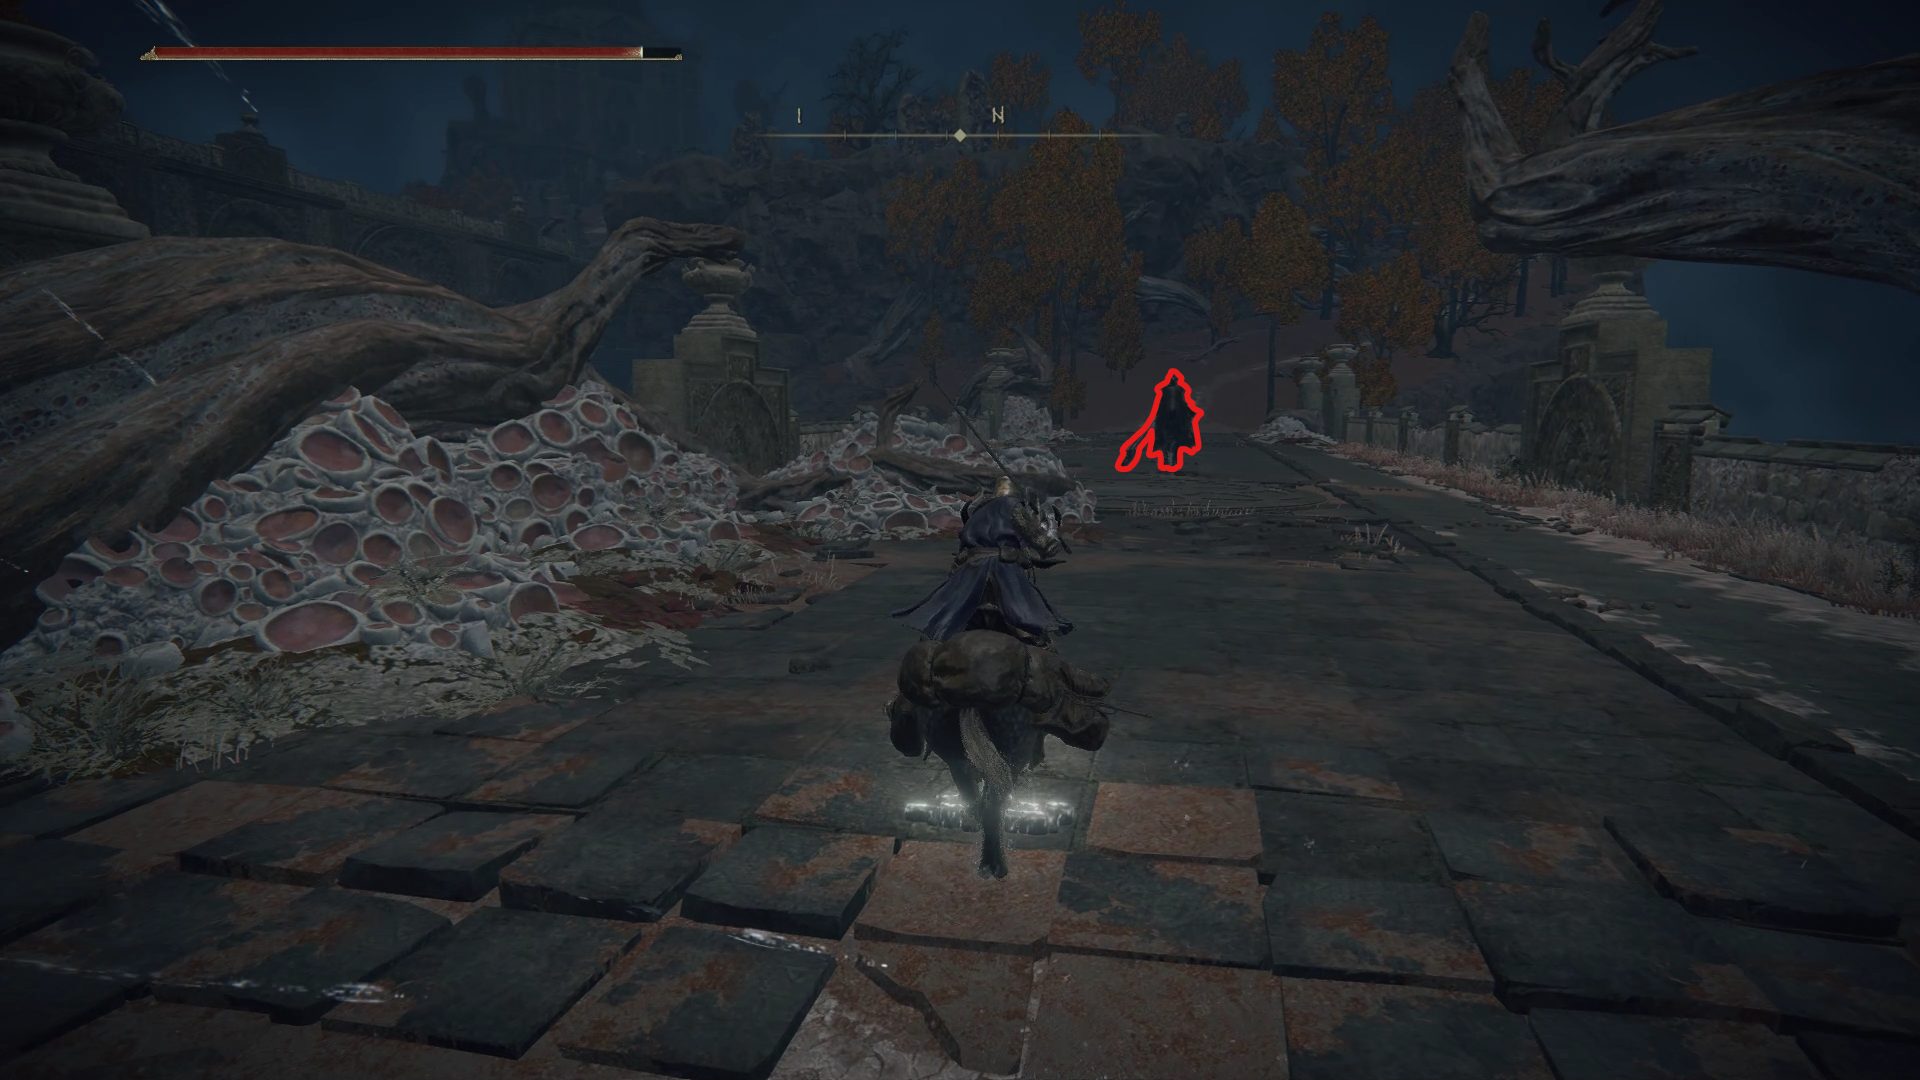
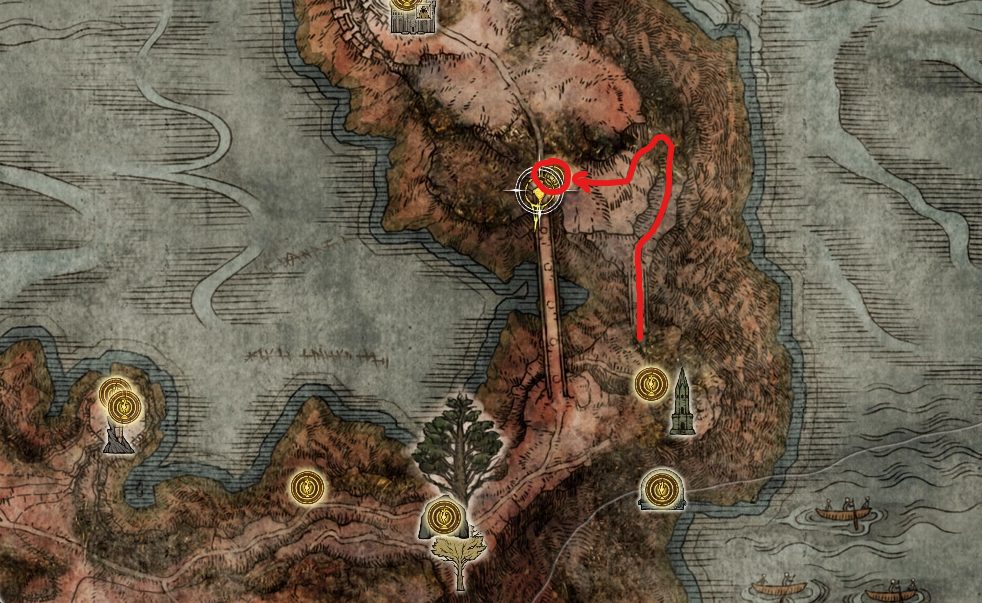
Having gone through Redmane Castle and defeated Starscourge Radahn, you now have access to his boss room. While there isn’t much loot to be found there, if you head north-northeast from the Starscourge Radahn site of grace you will find the entrance to another dungeon: War-Dead Catacombs. One thing to keep in mind is that this is far from being an easy dungeon, so don’t hesitate to come back later if you’re having trouble.
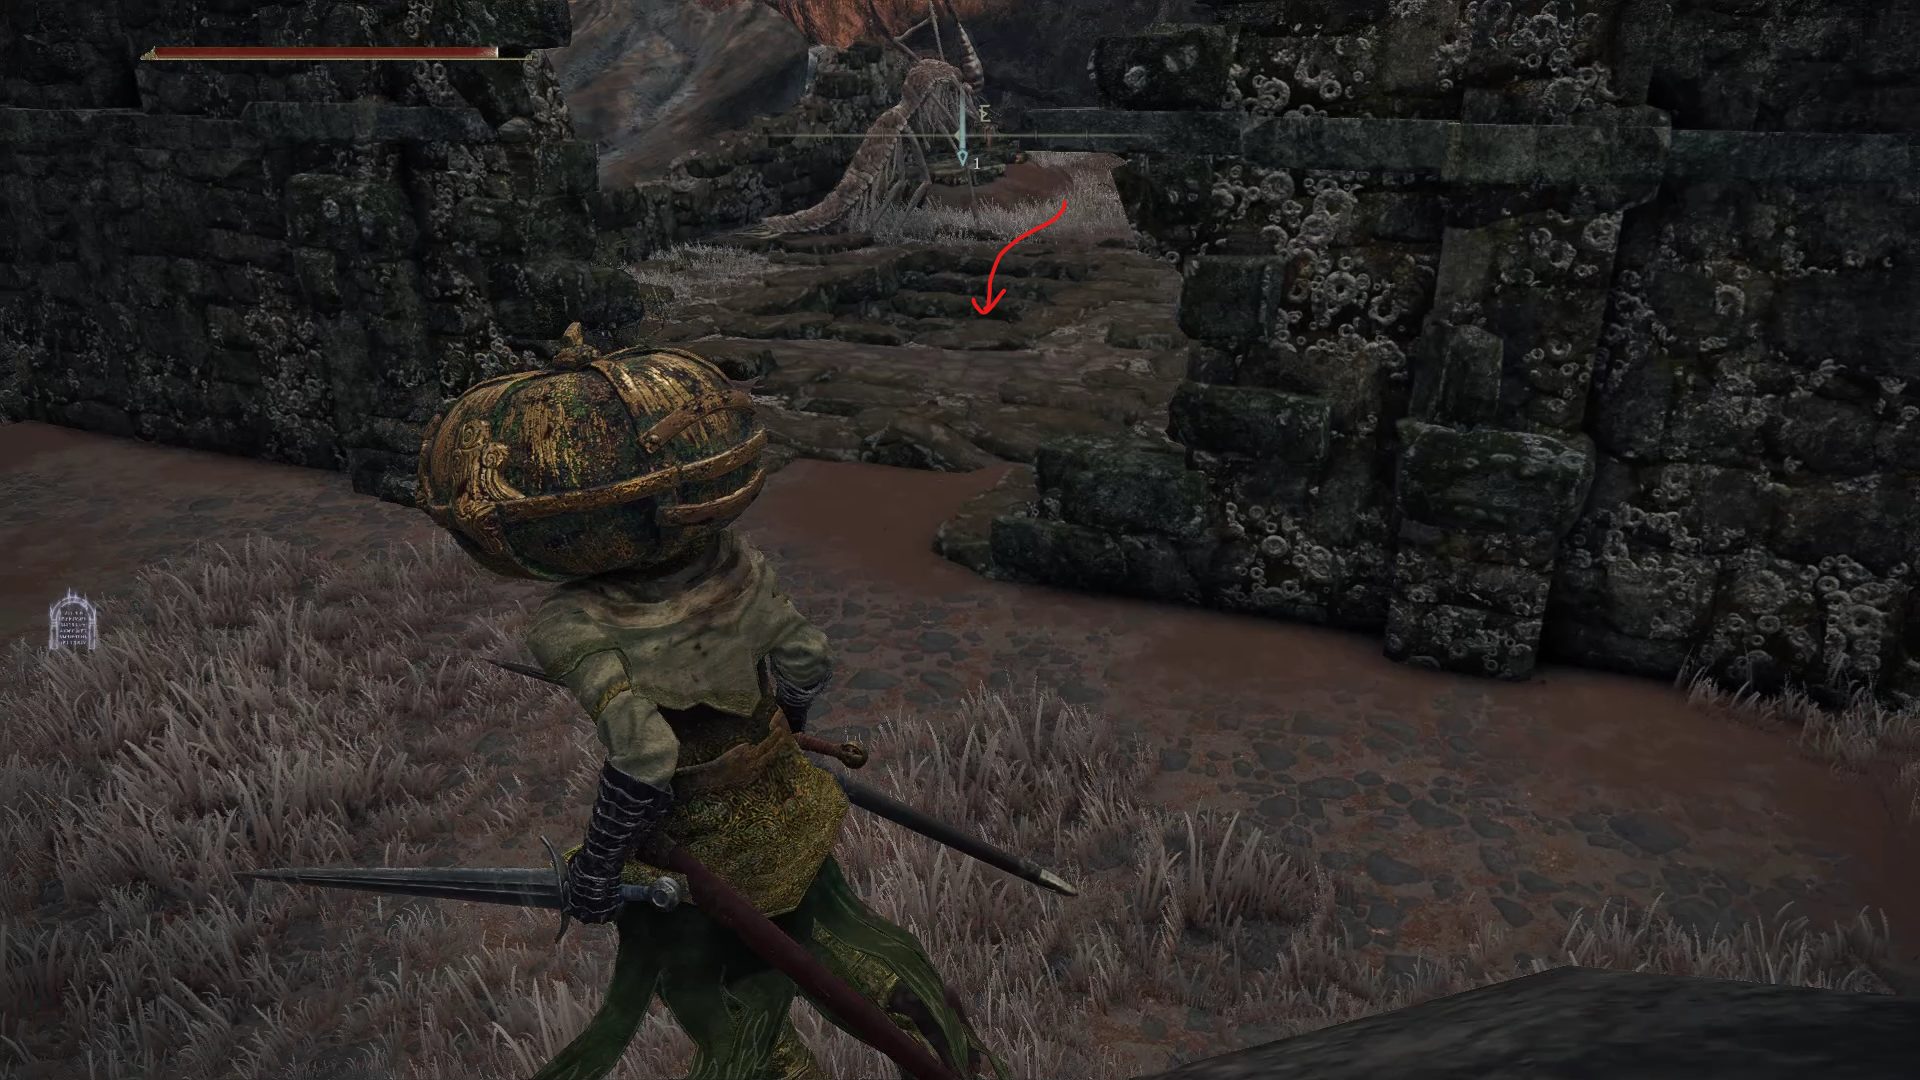
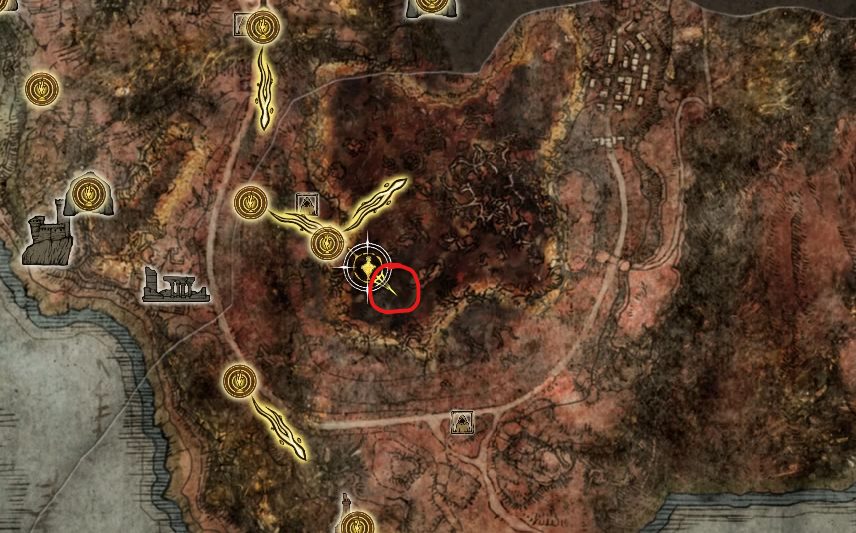
Coming out of the War-Dead Catacombs dungeon, travel to the Smoldering Wall site of grace and head west-southwest to a nearby camp.
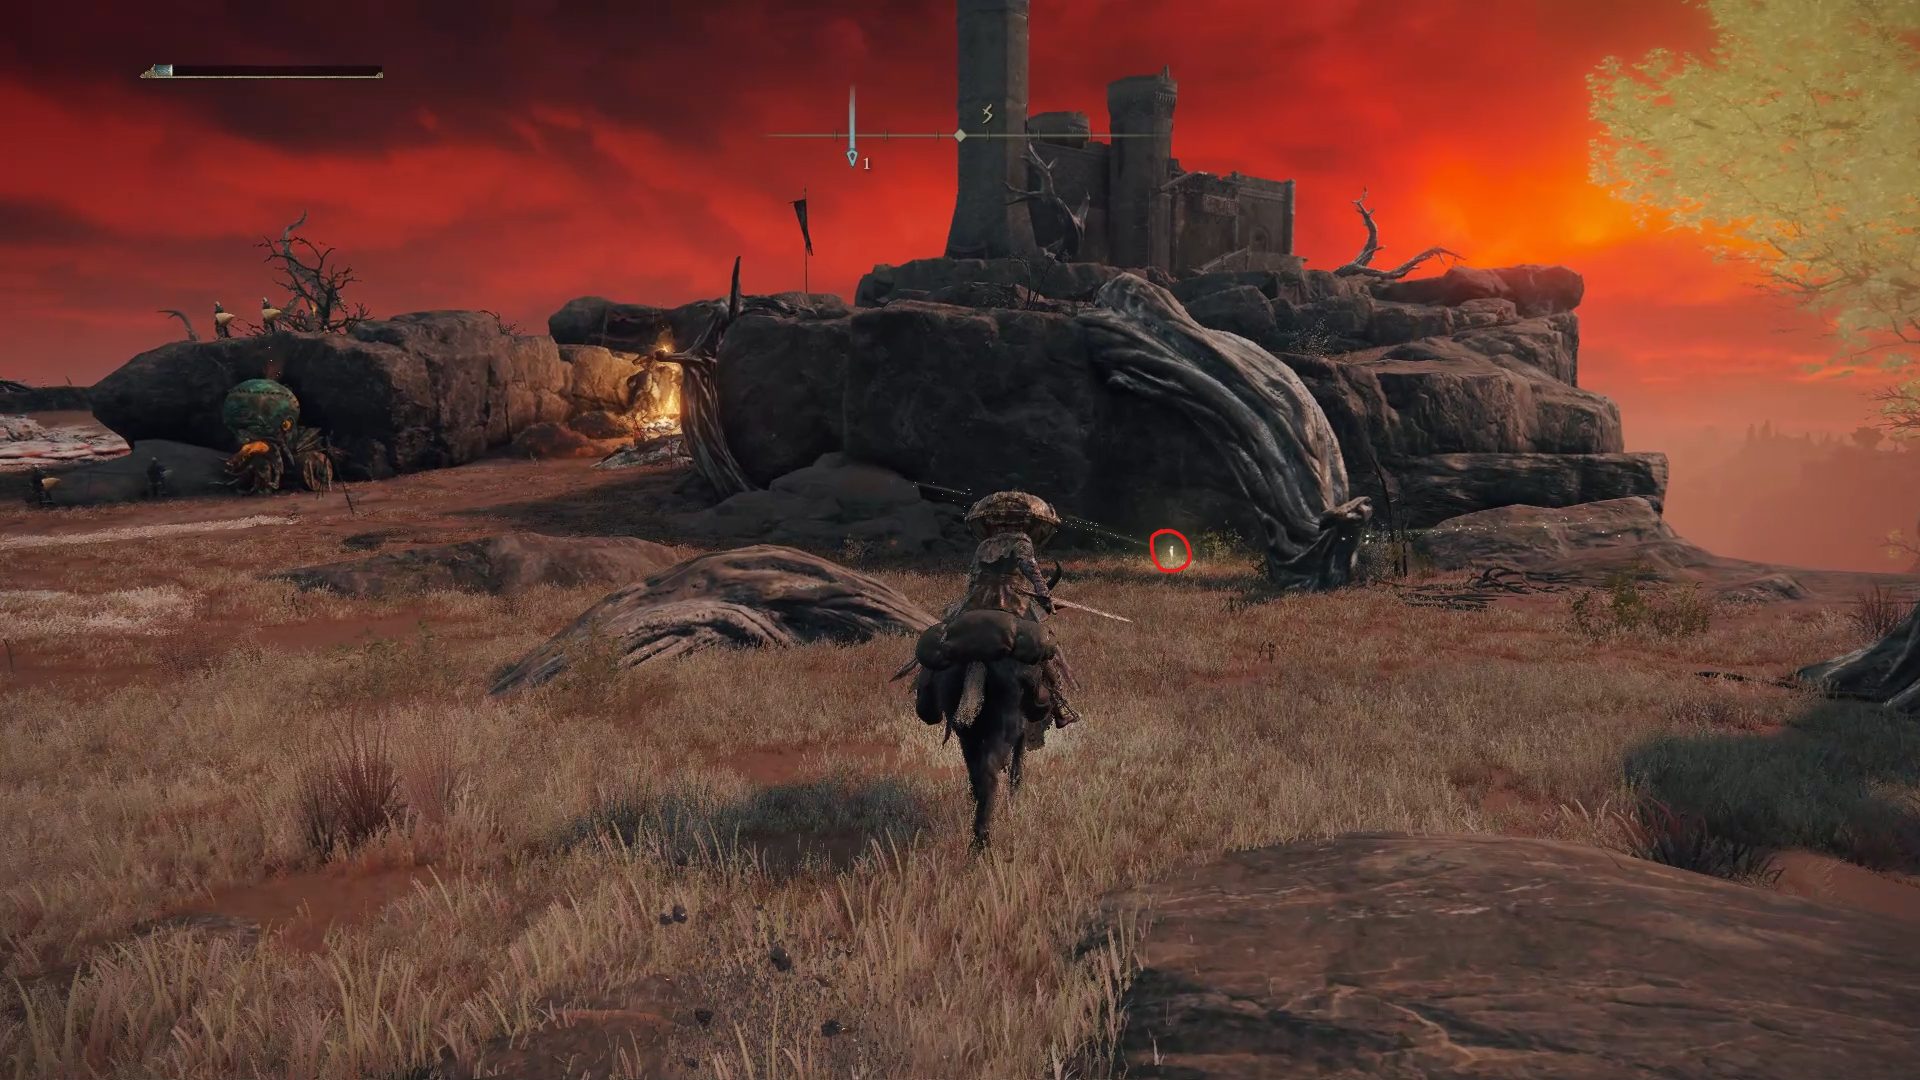
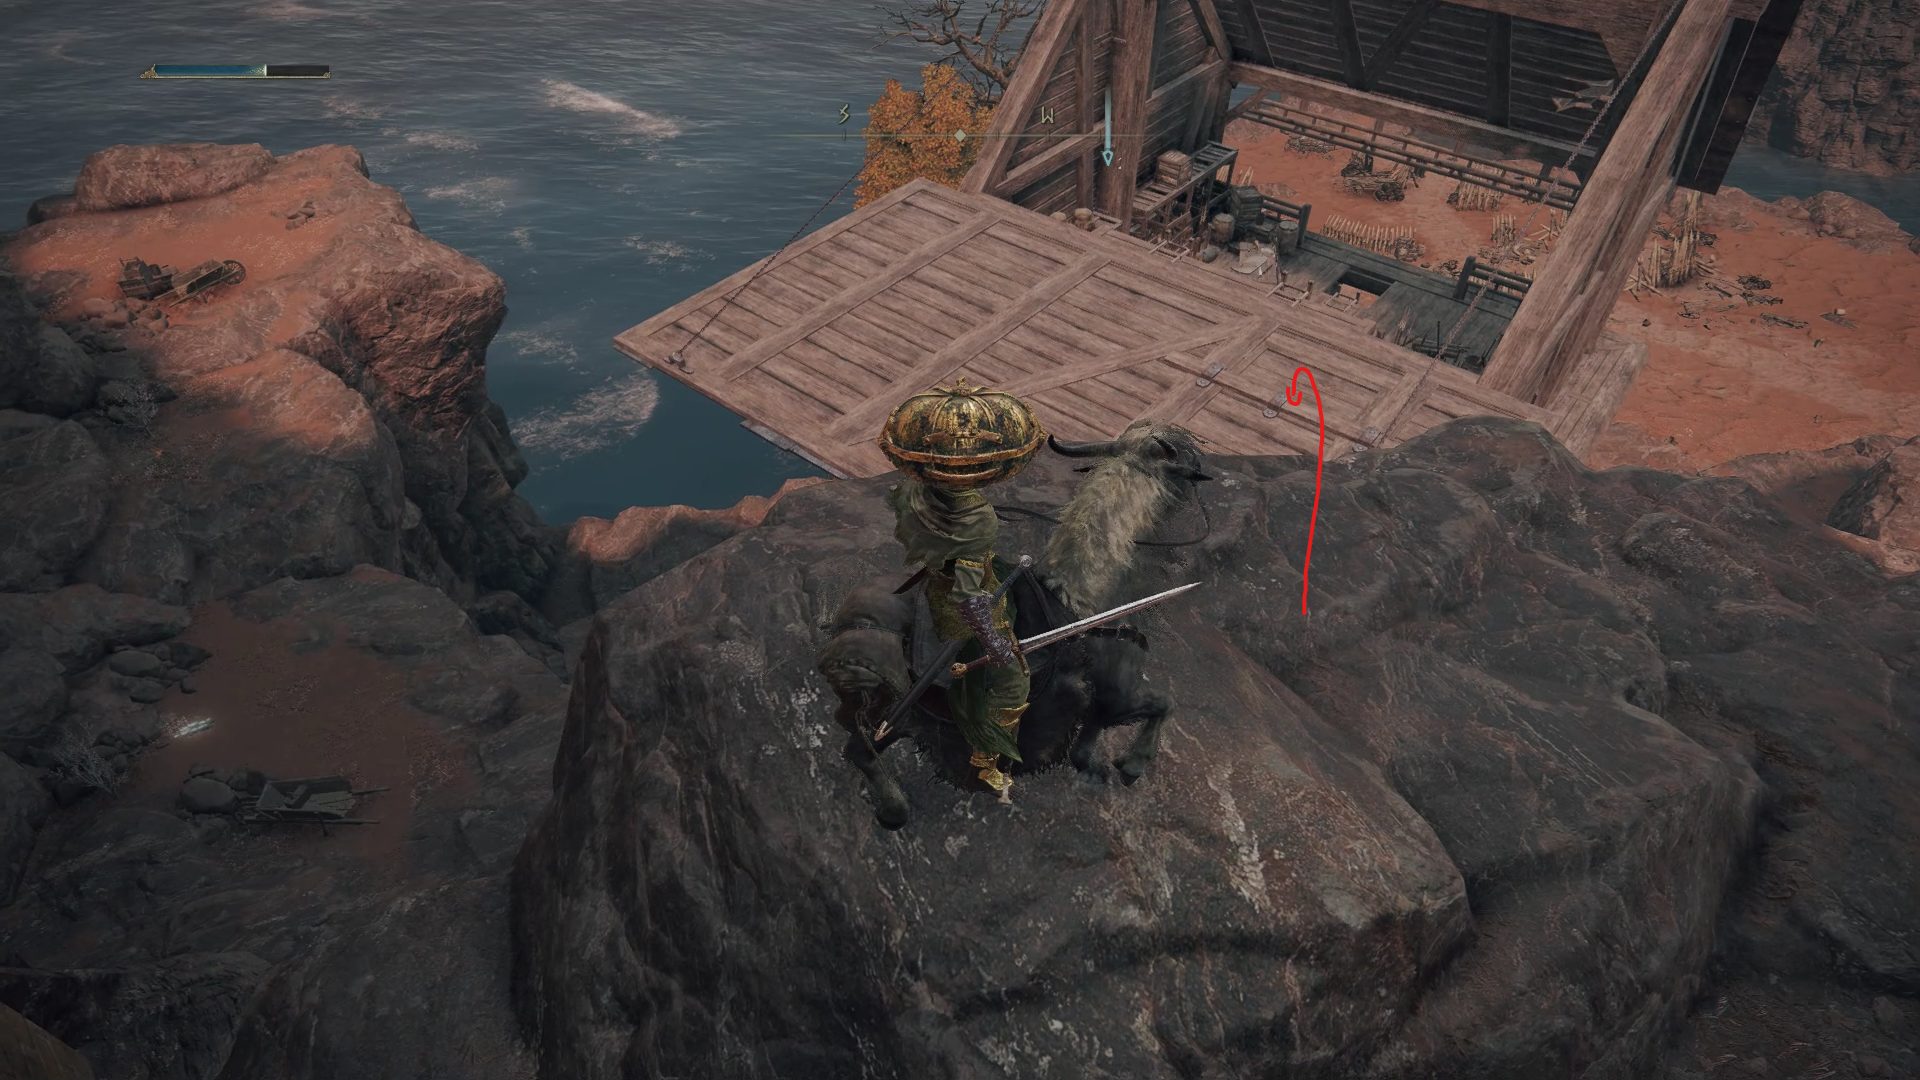
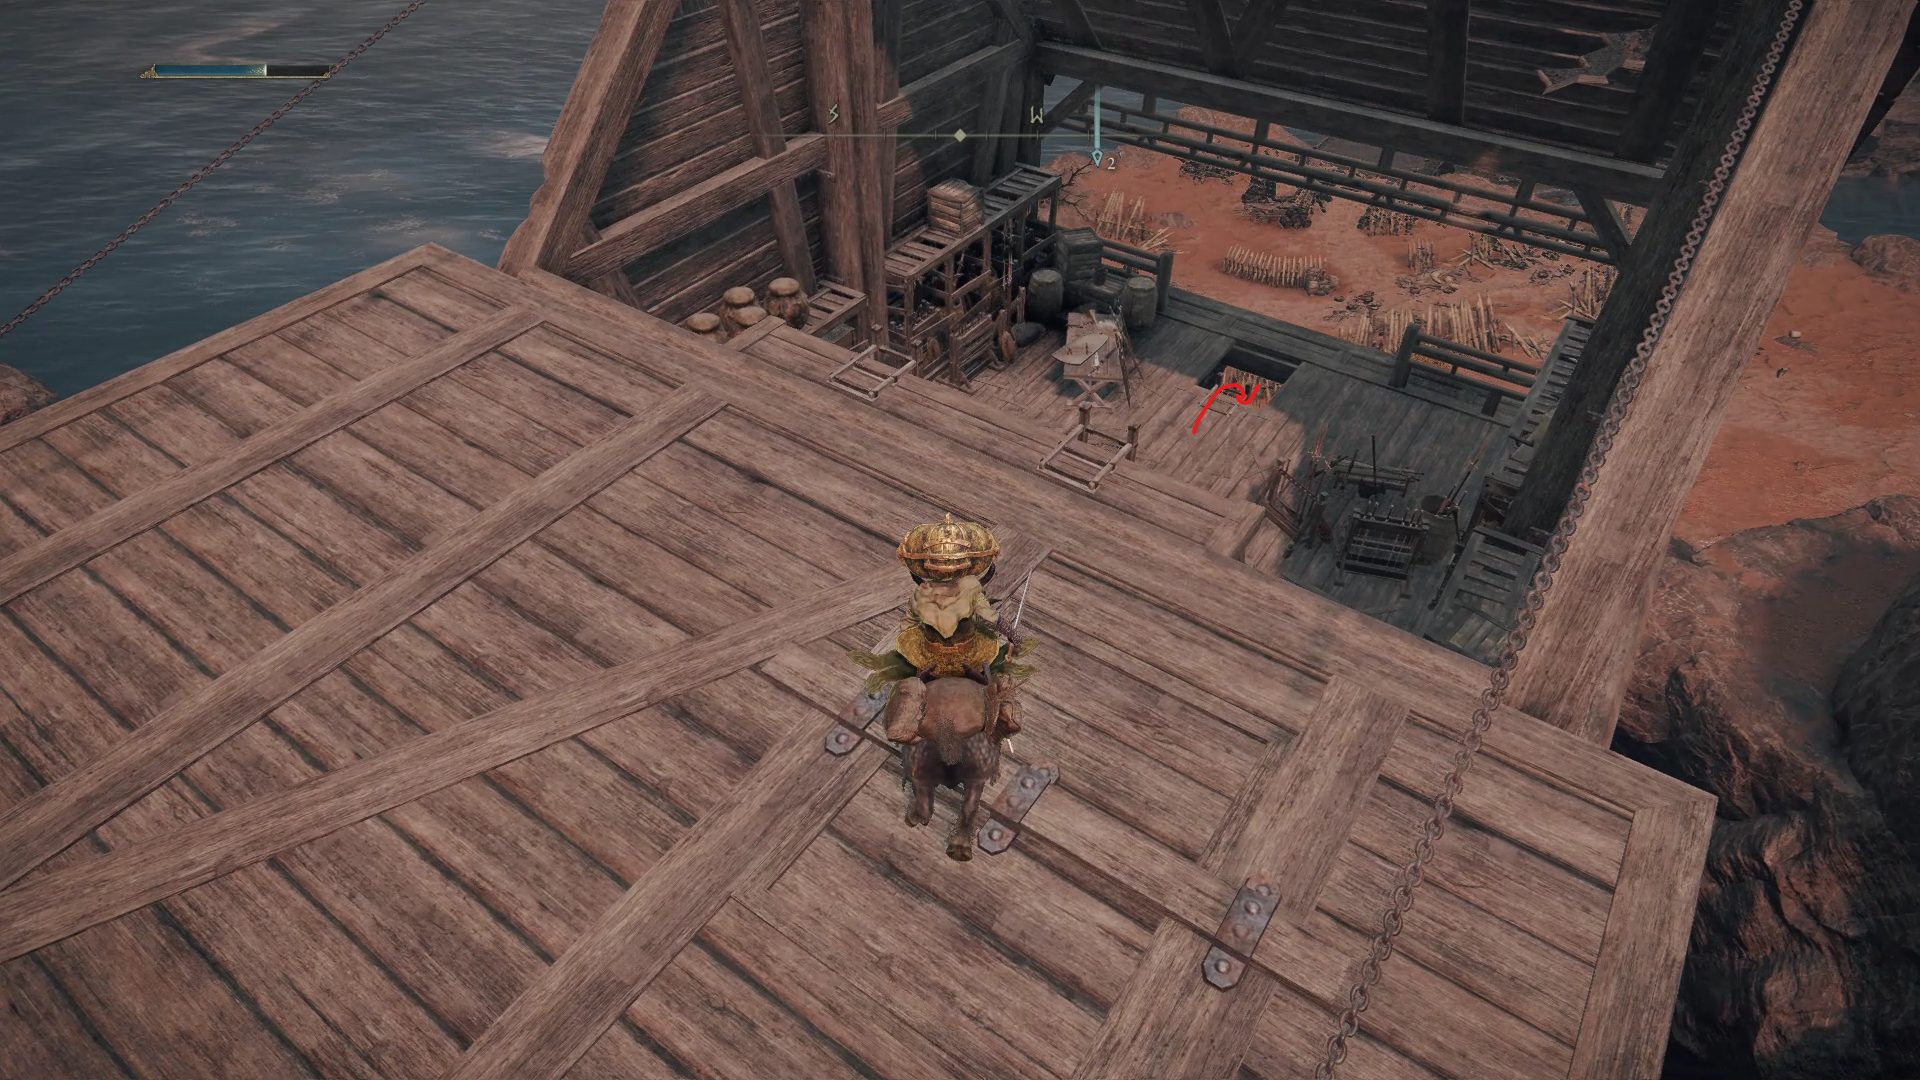
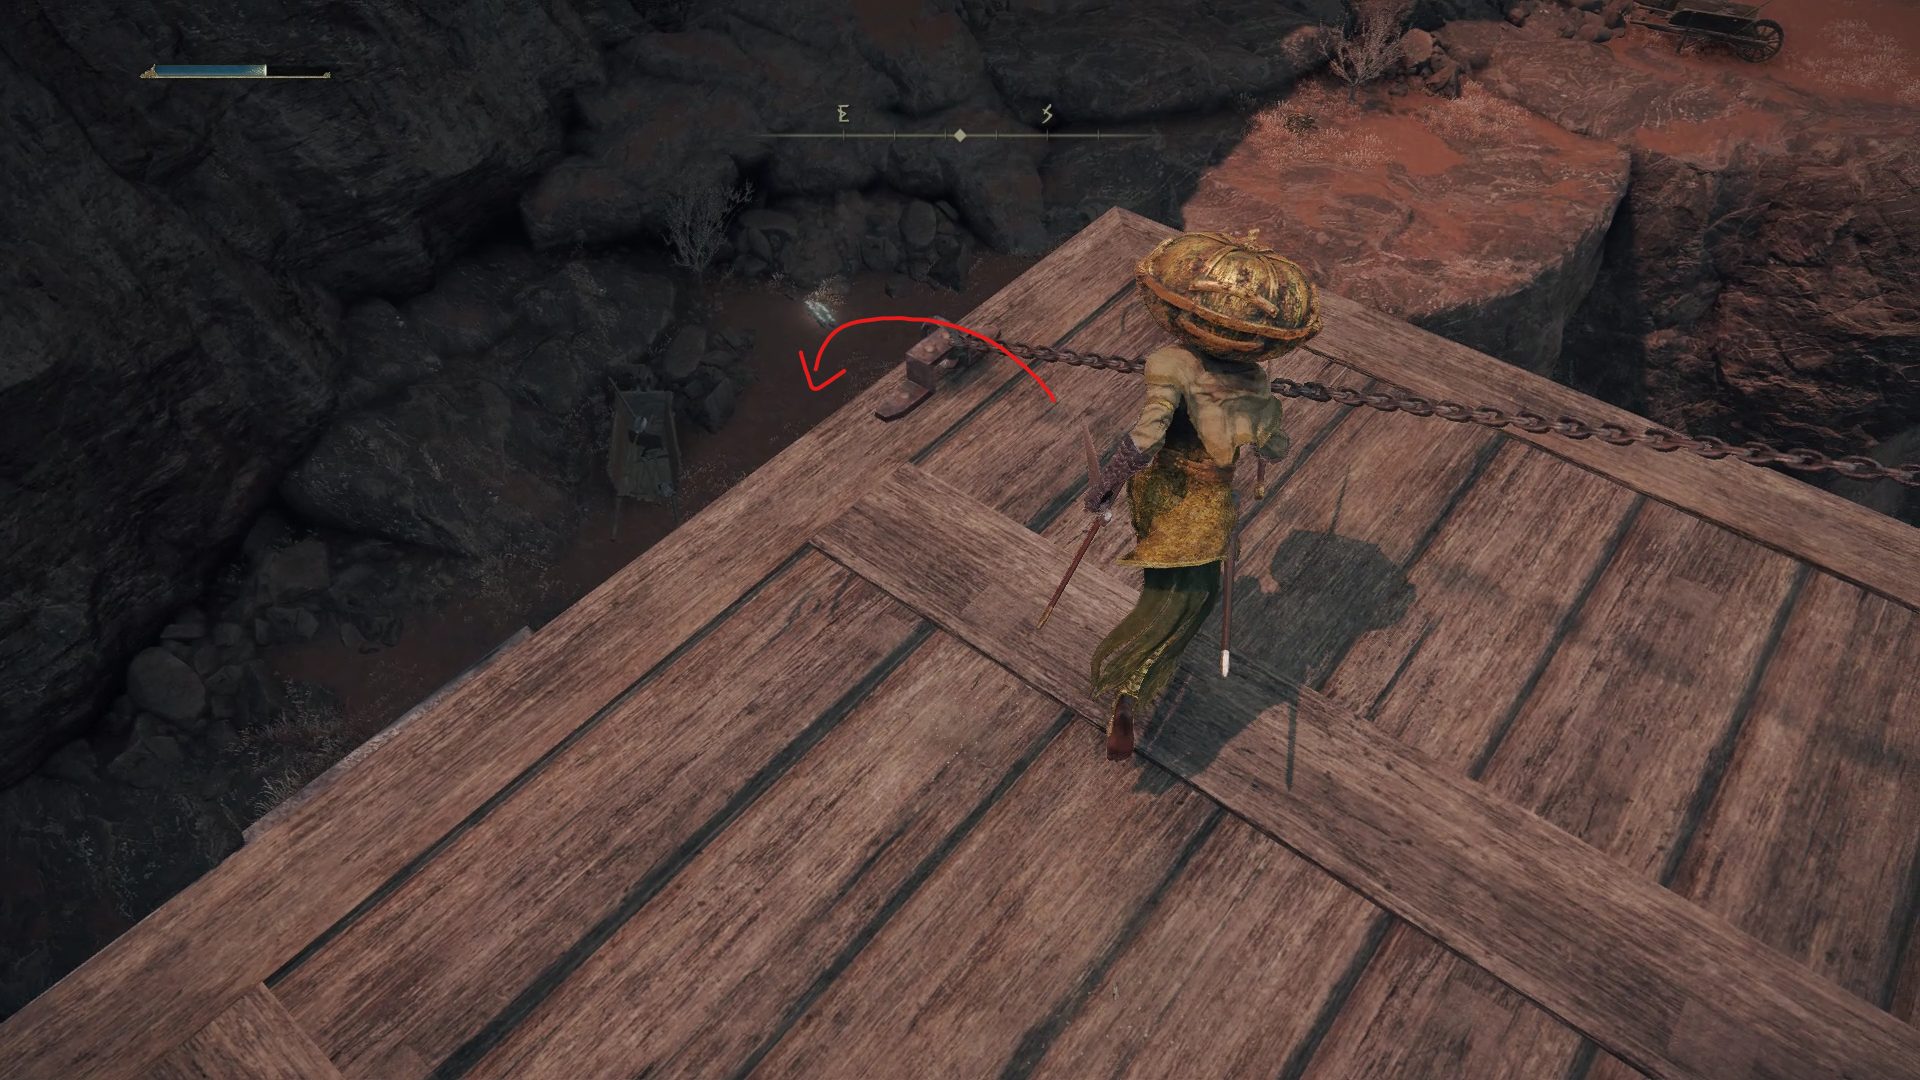
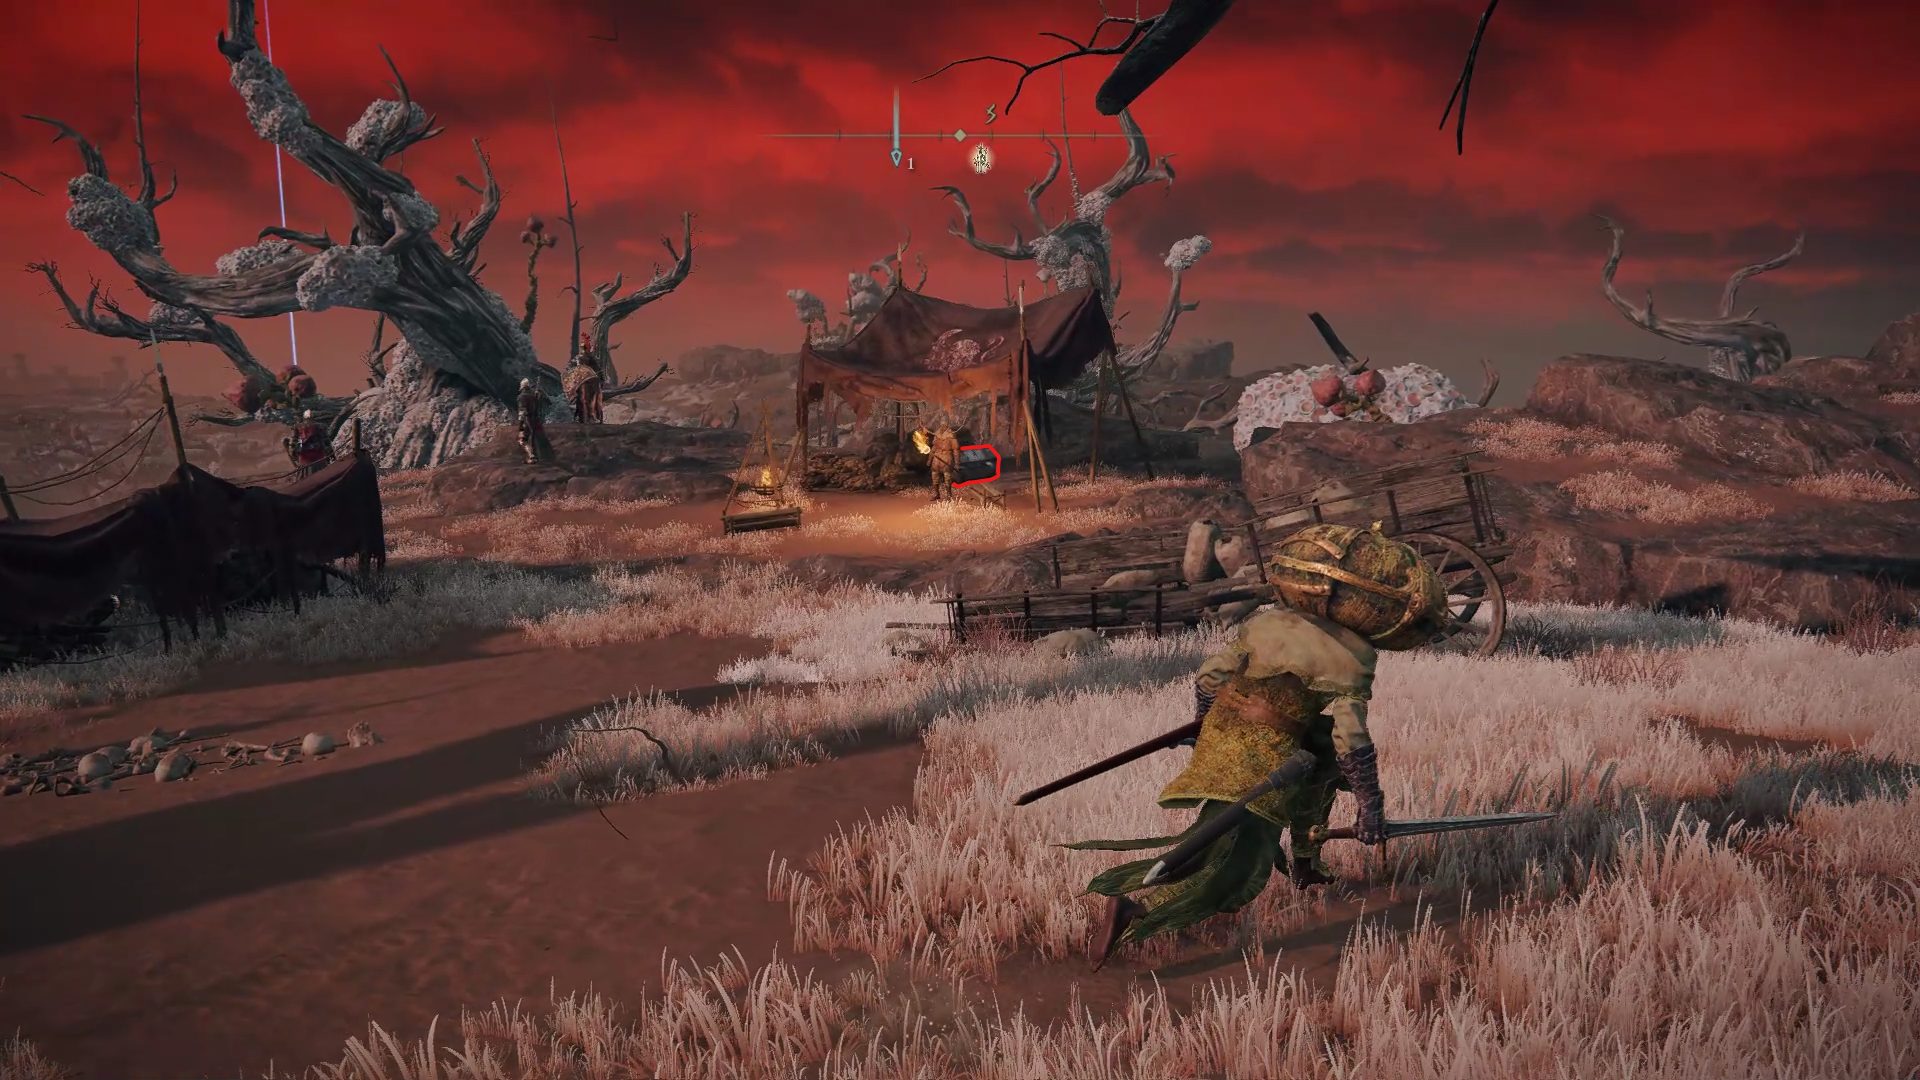
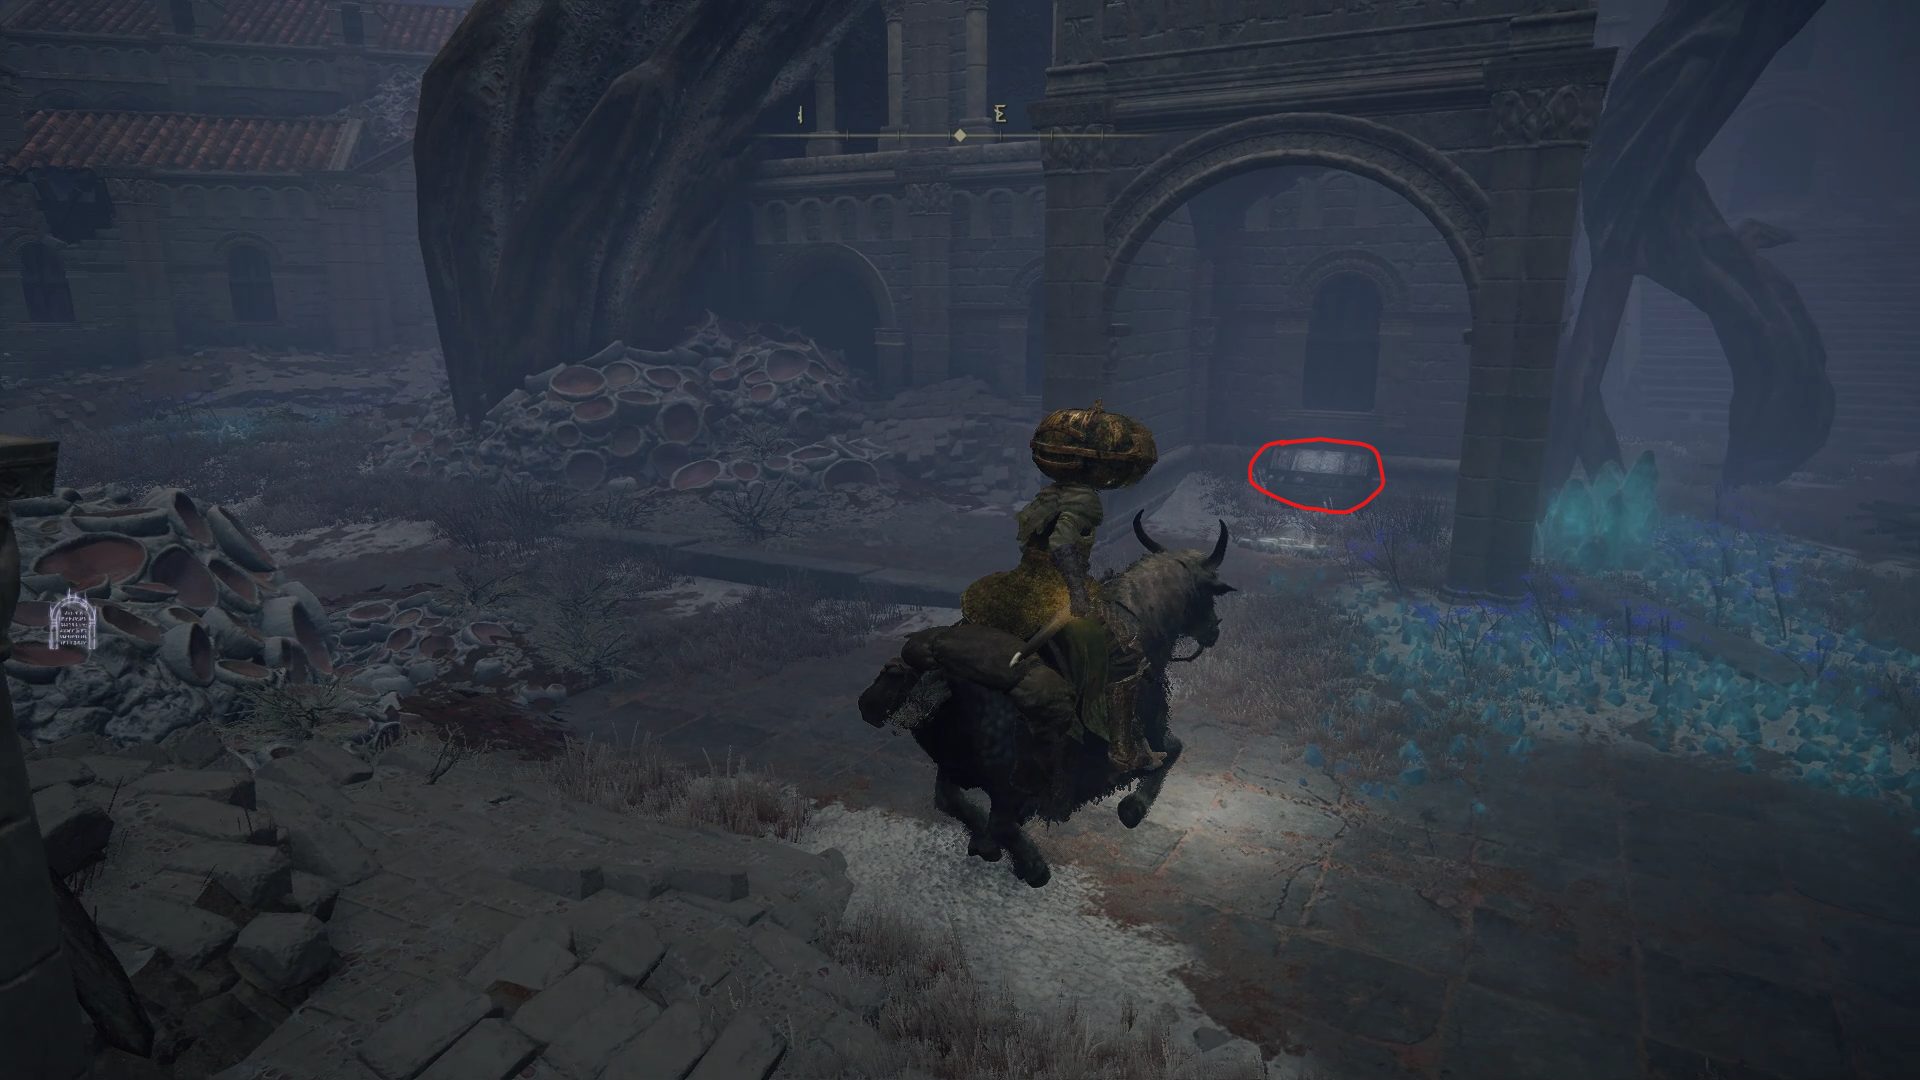
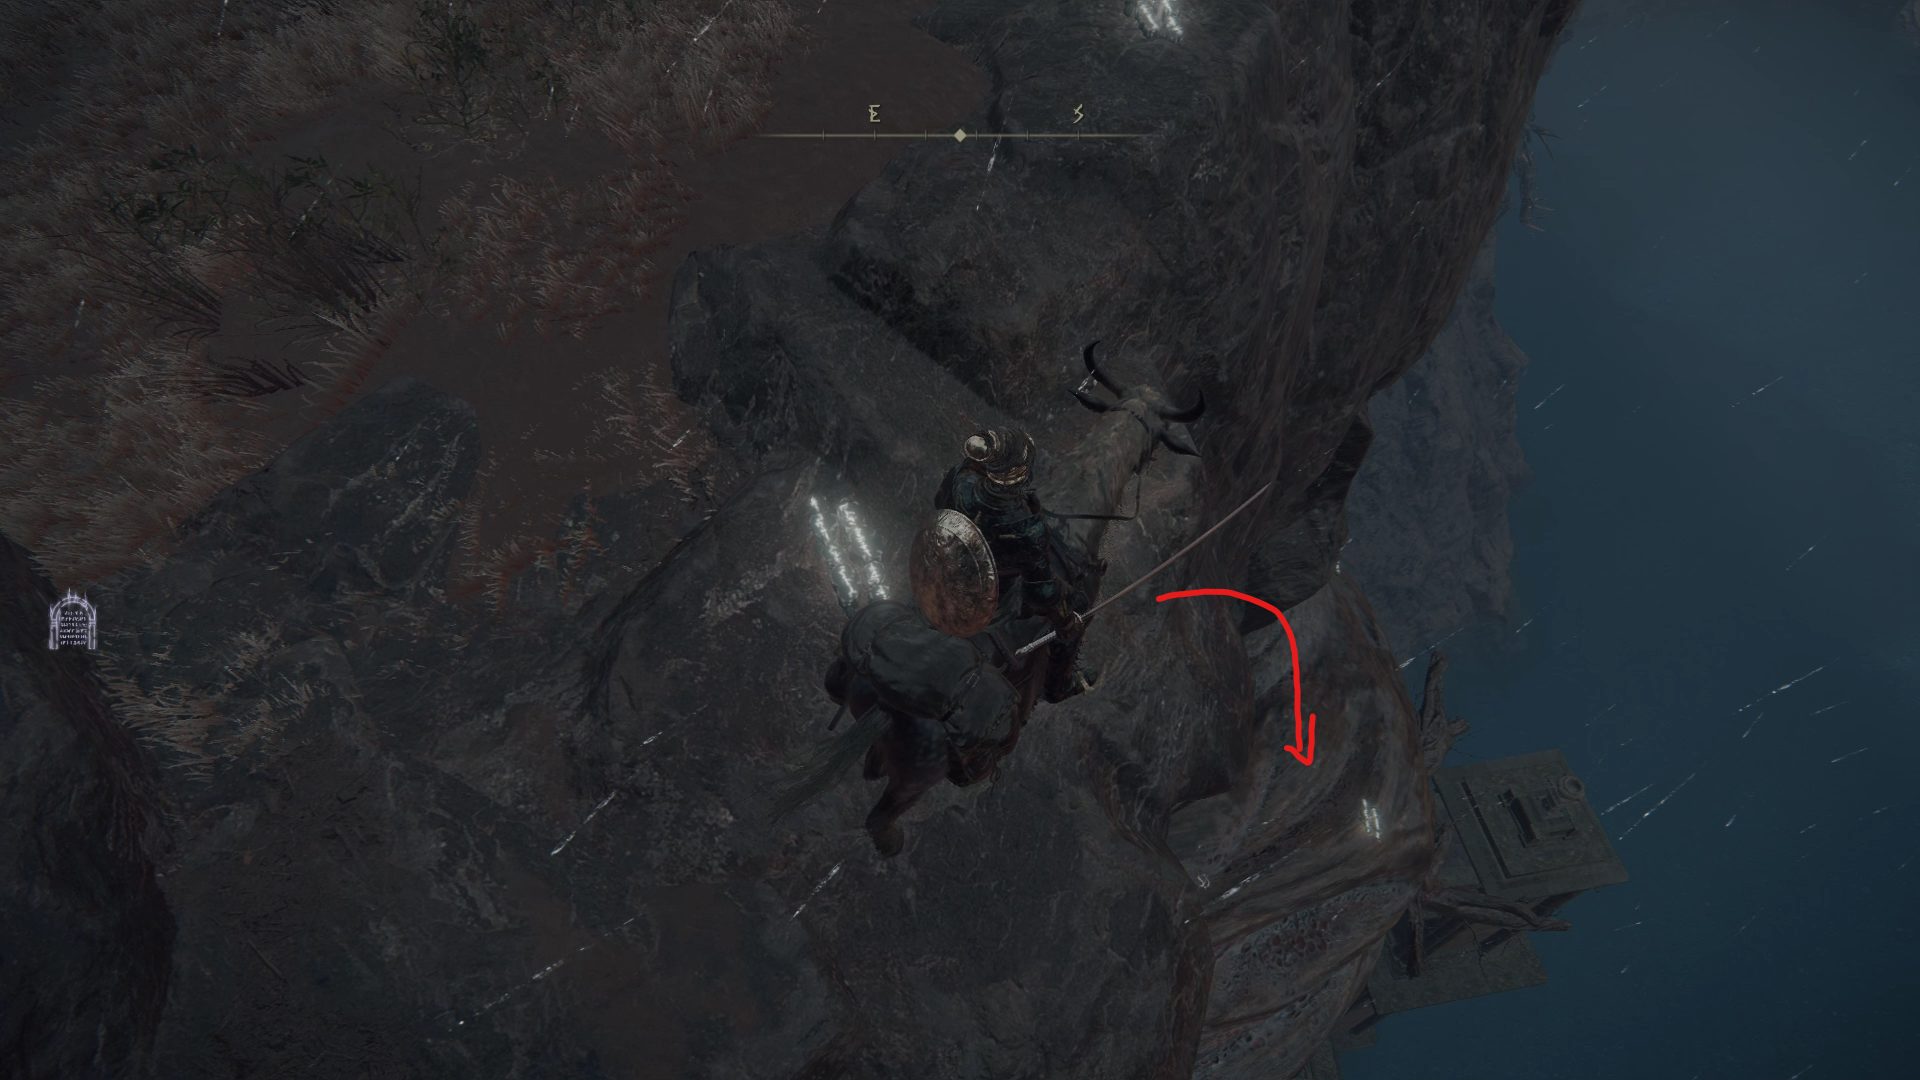
The well-defended chest found inside the camp contains 2x Slumbering Egg, so if you don’t care about these crafting materials, just ignore it and head south-southwest from the camp to the edge of the cliff. Underneath, you’ll see a Pumpkin Head enemy and some of his friends chilling around a putrid white clump, as well as a corpse resting in a chair on the bit of land overlooking them. Go around to safely descend to the corpse and loot the Somber Smithing Stone [4].
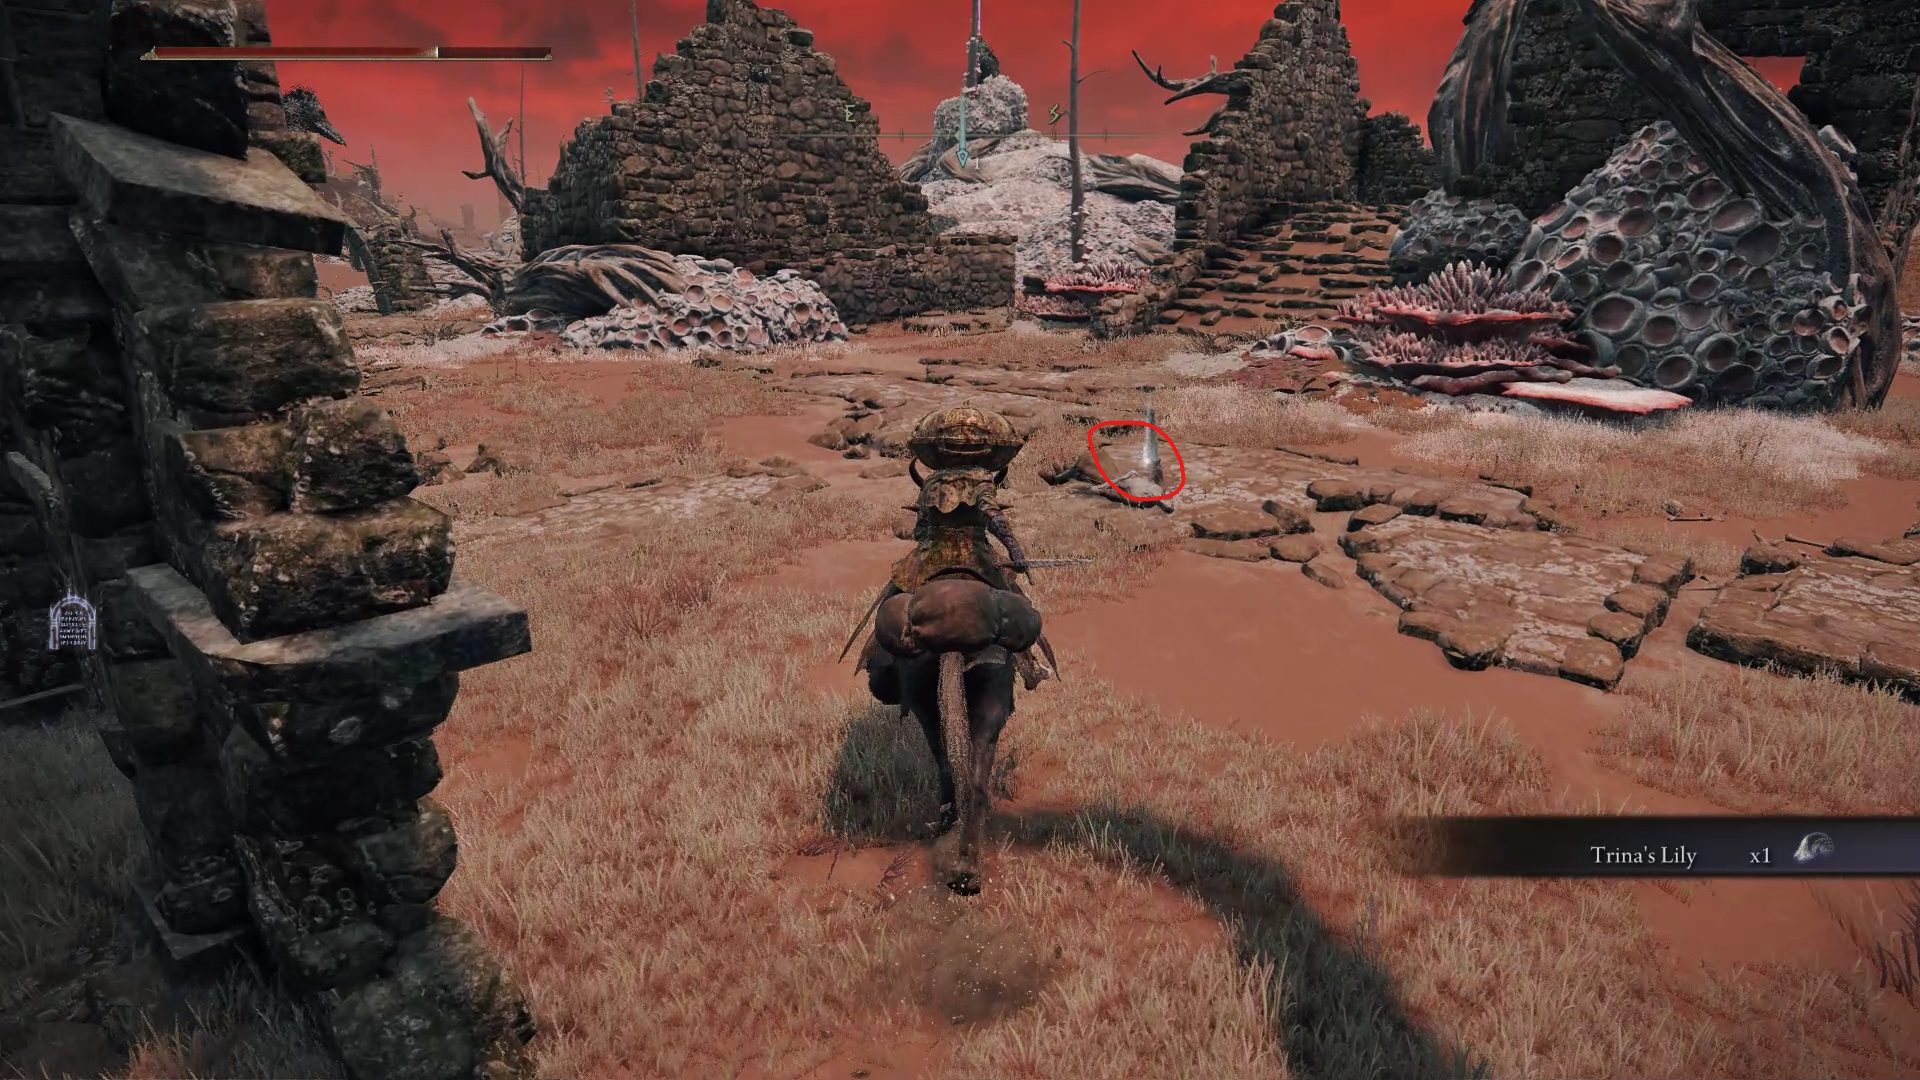
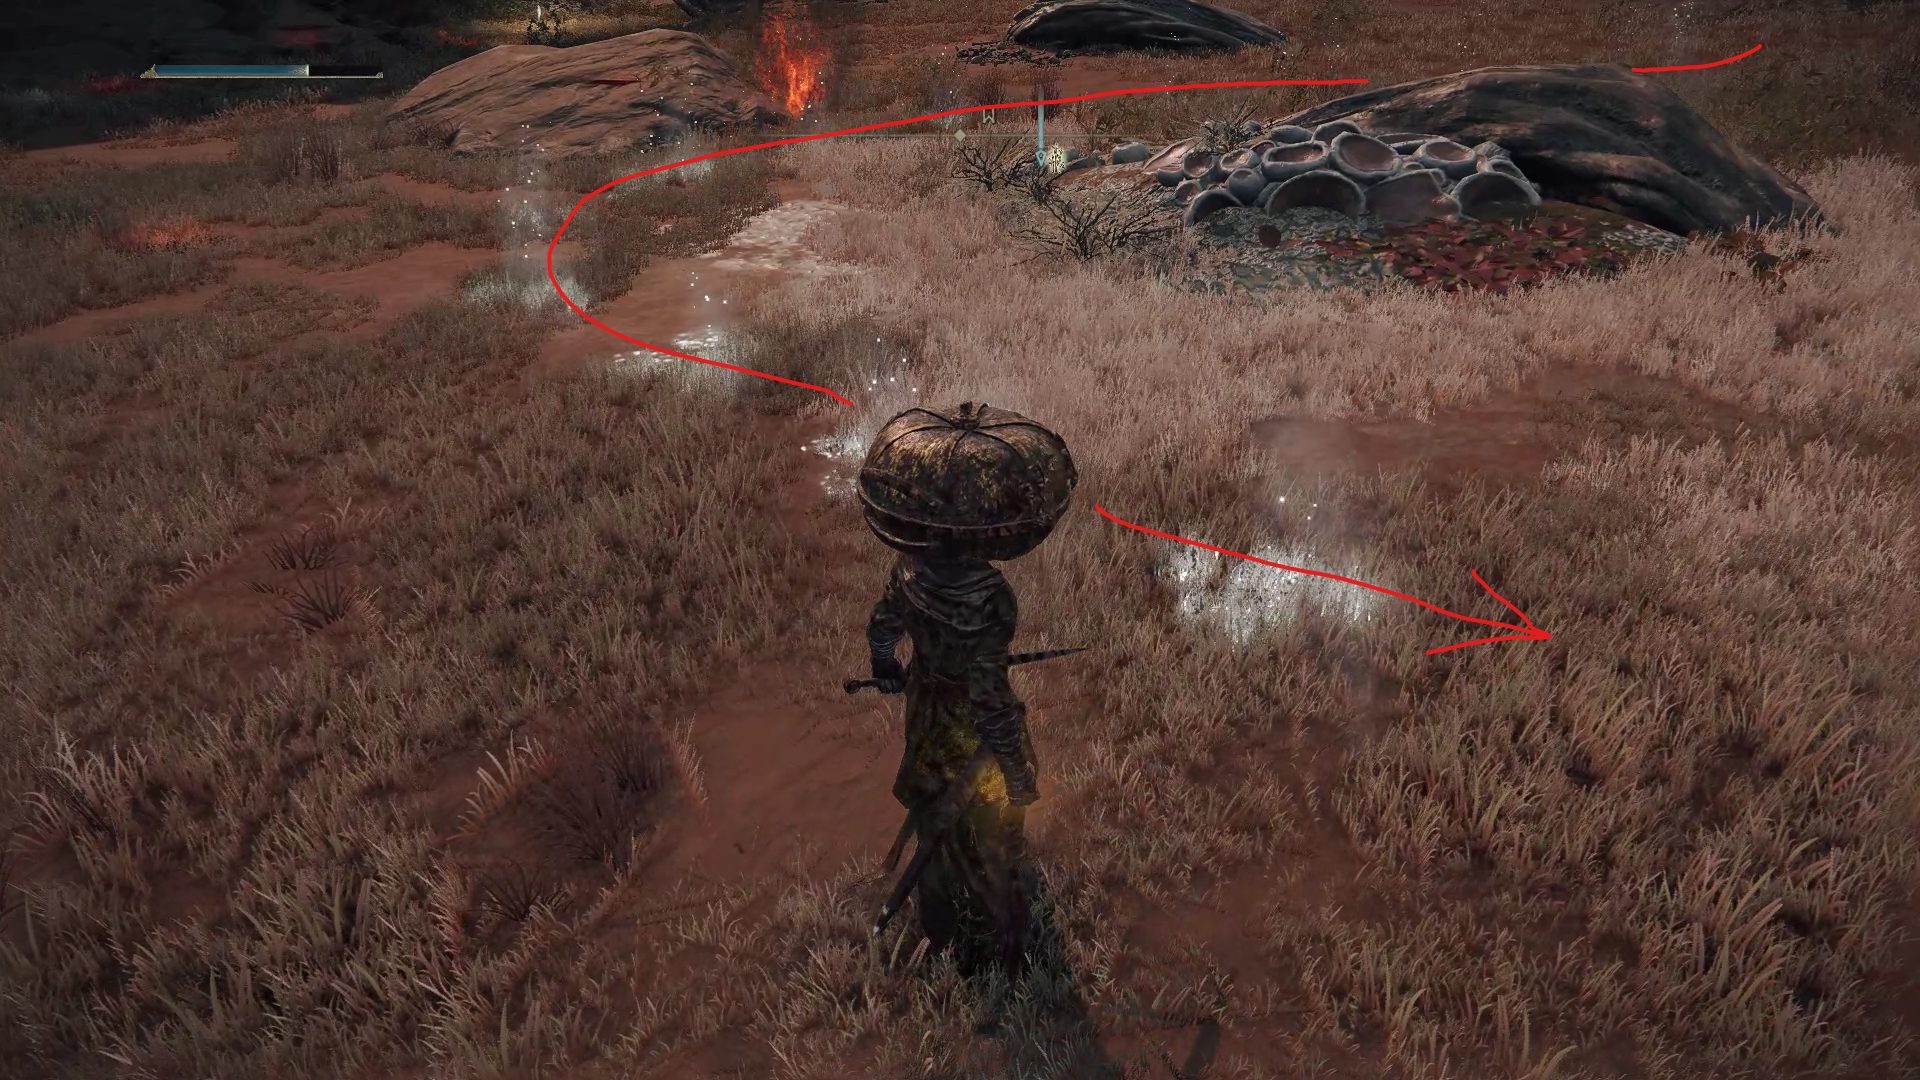
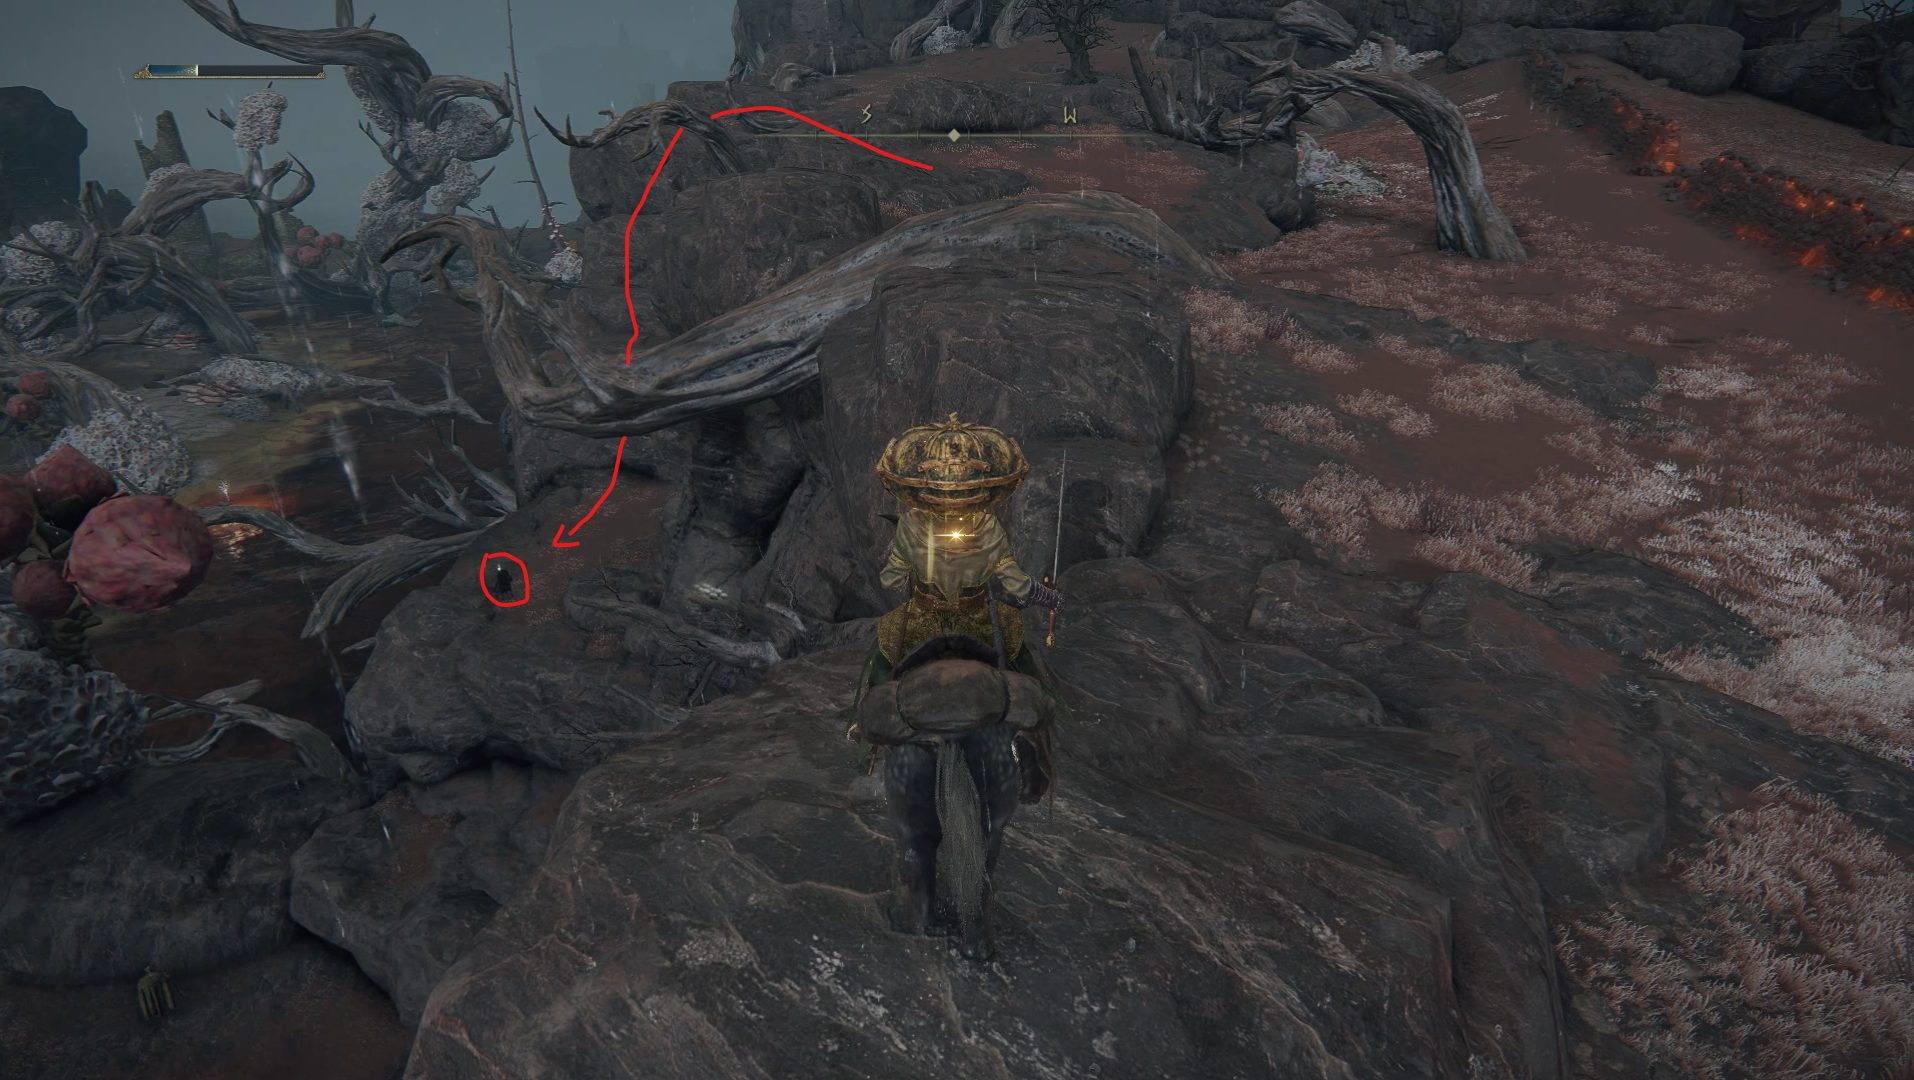
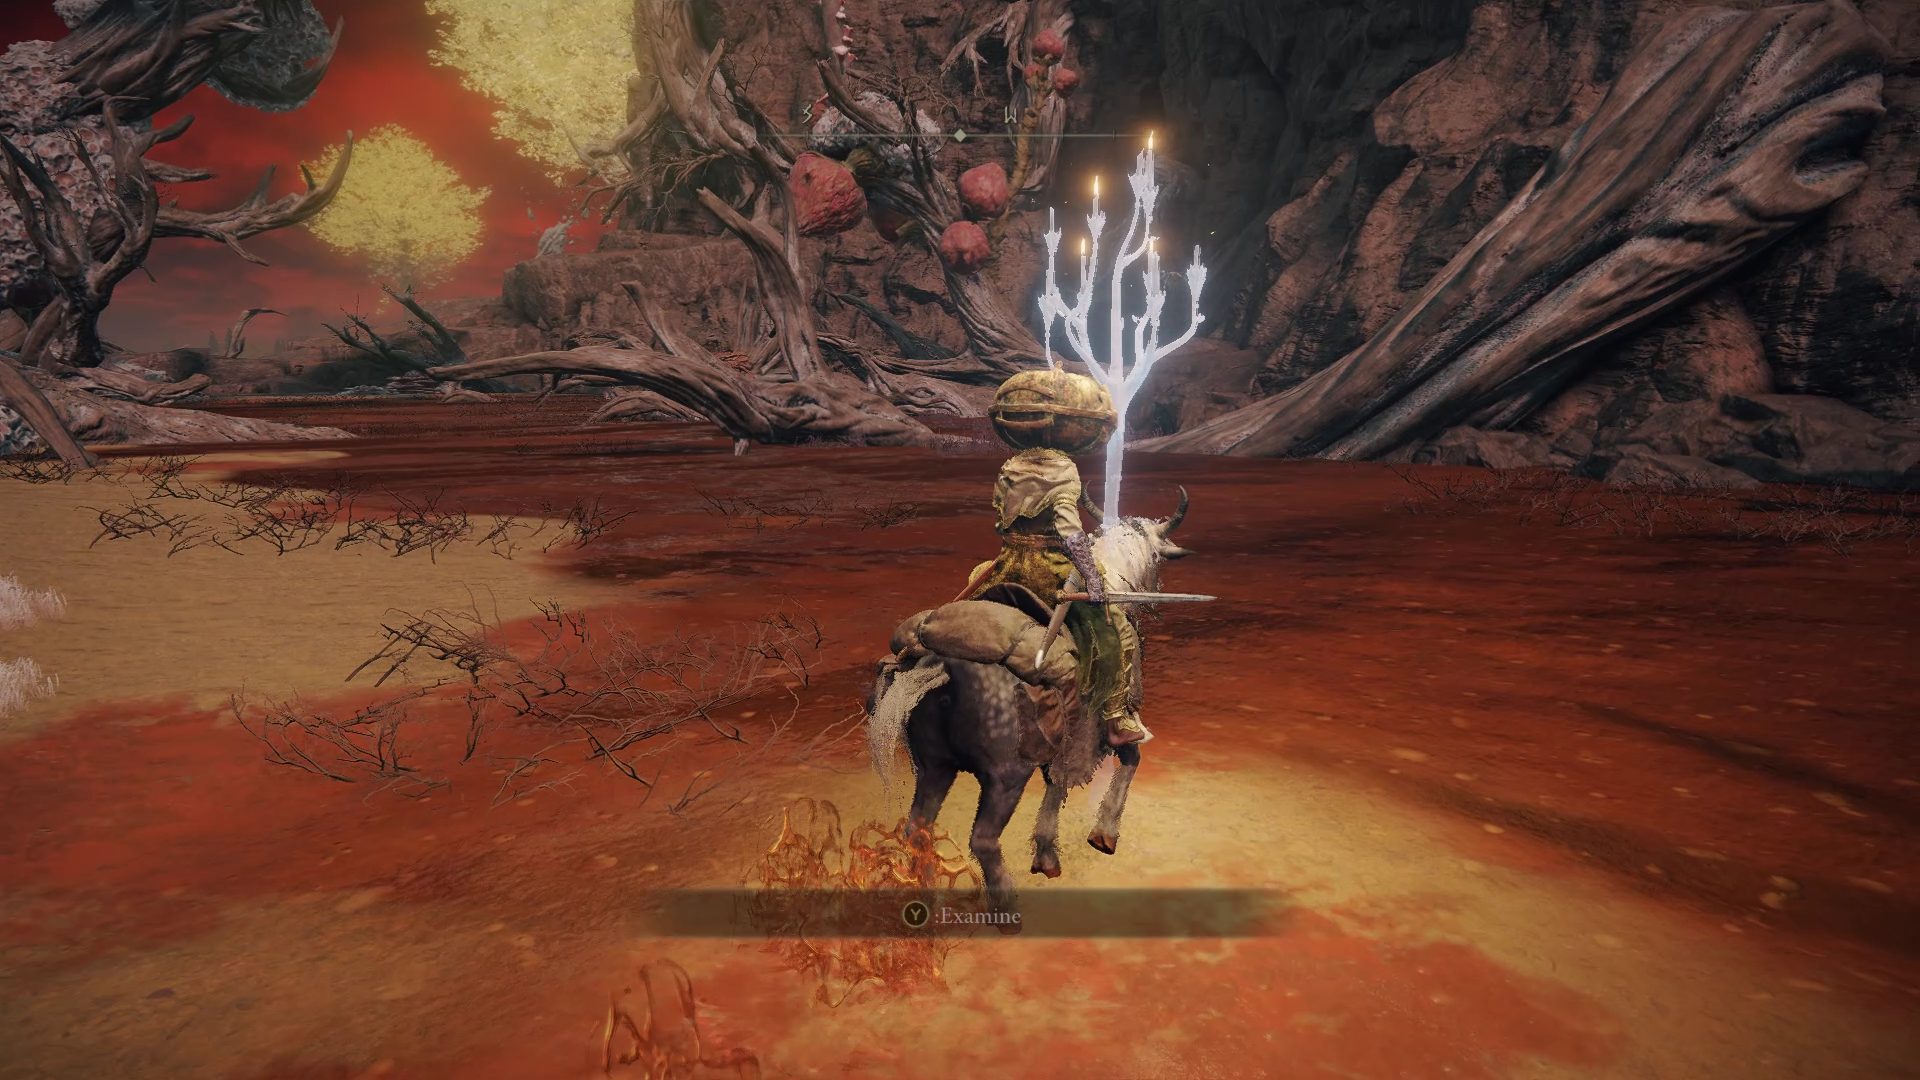
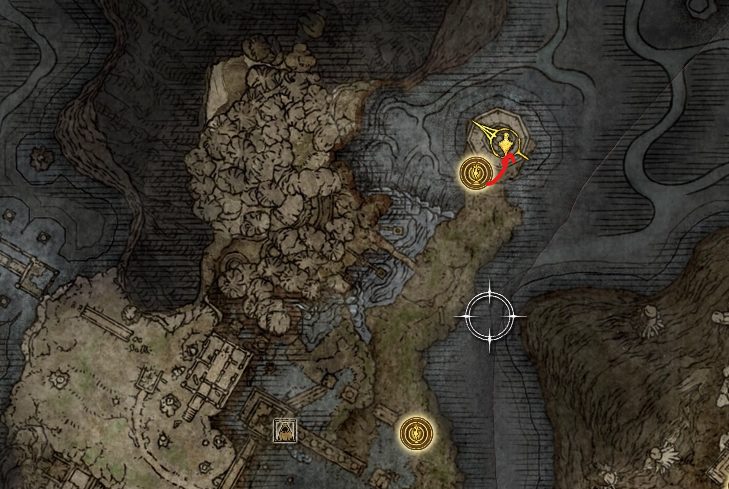
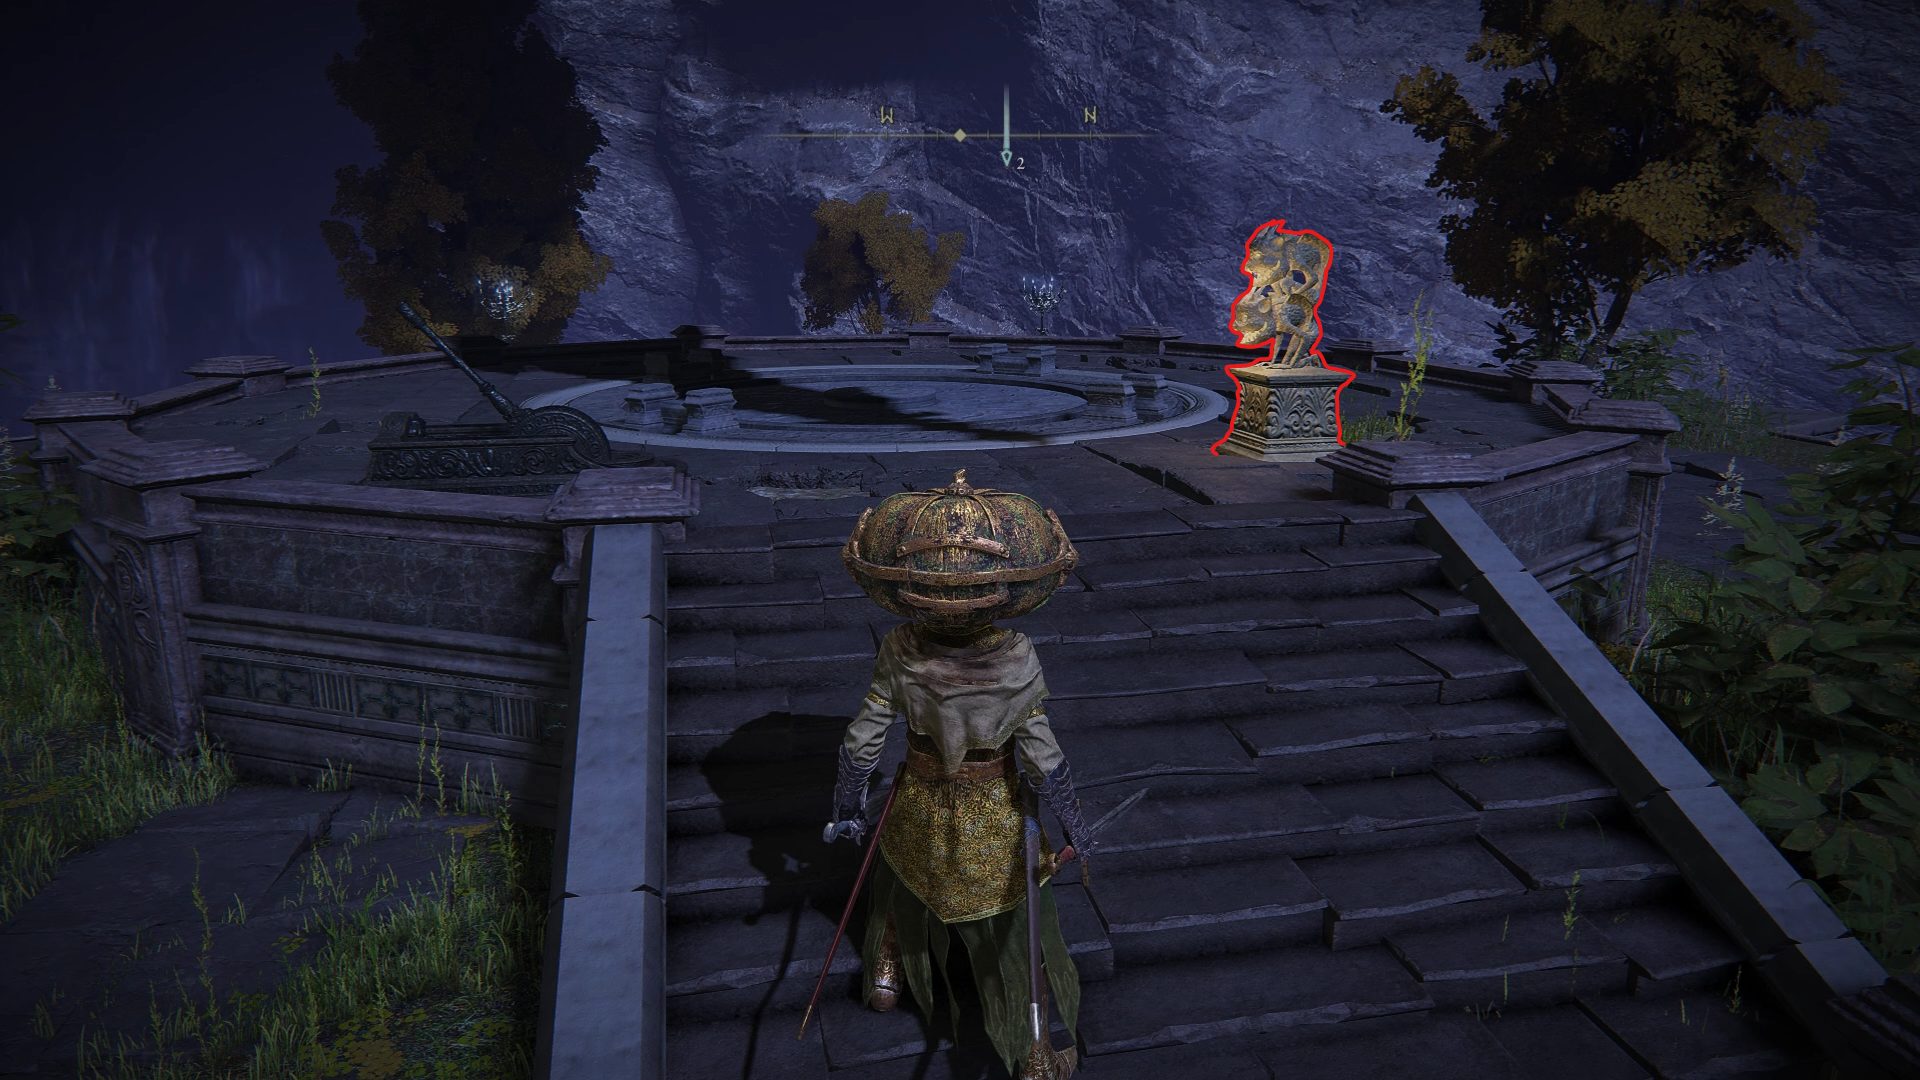
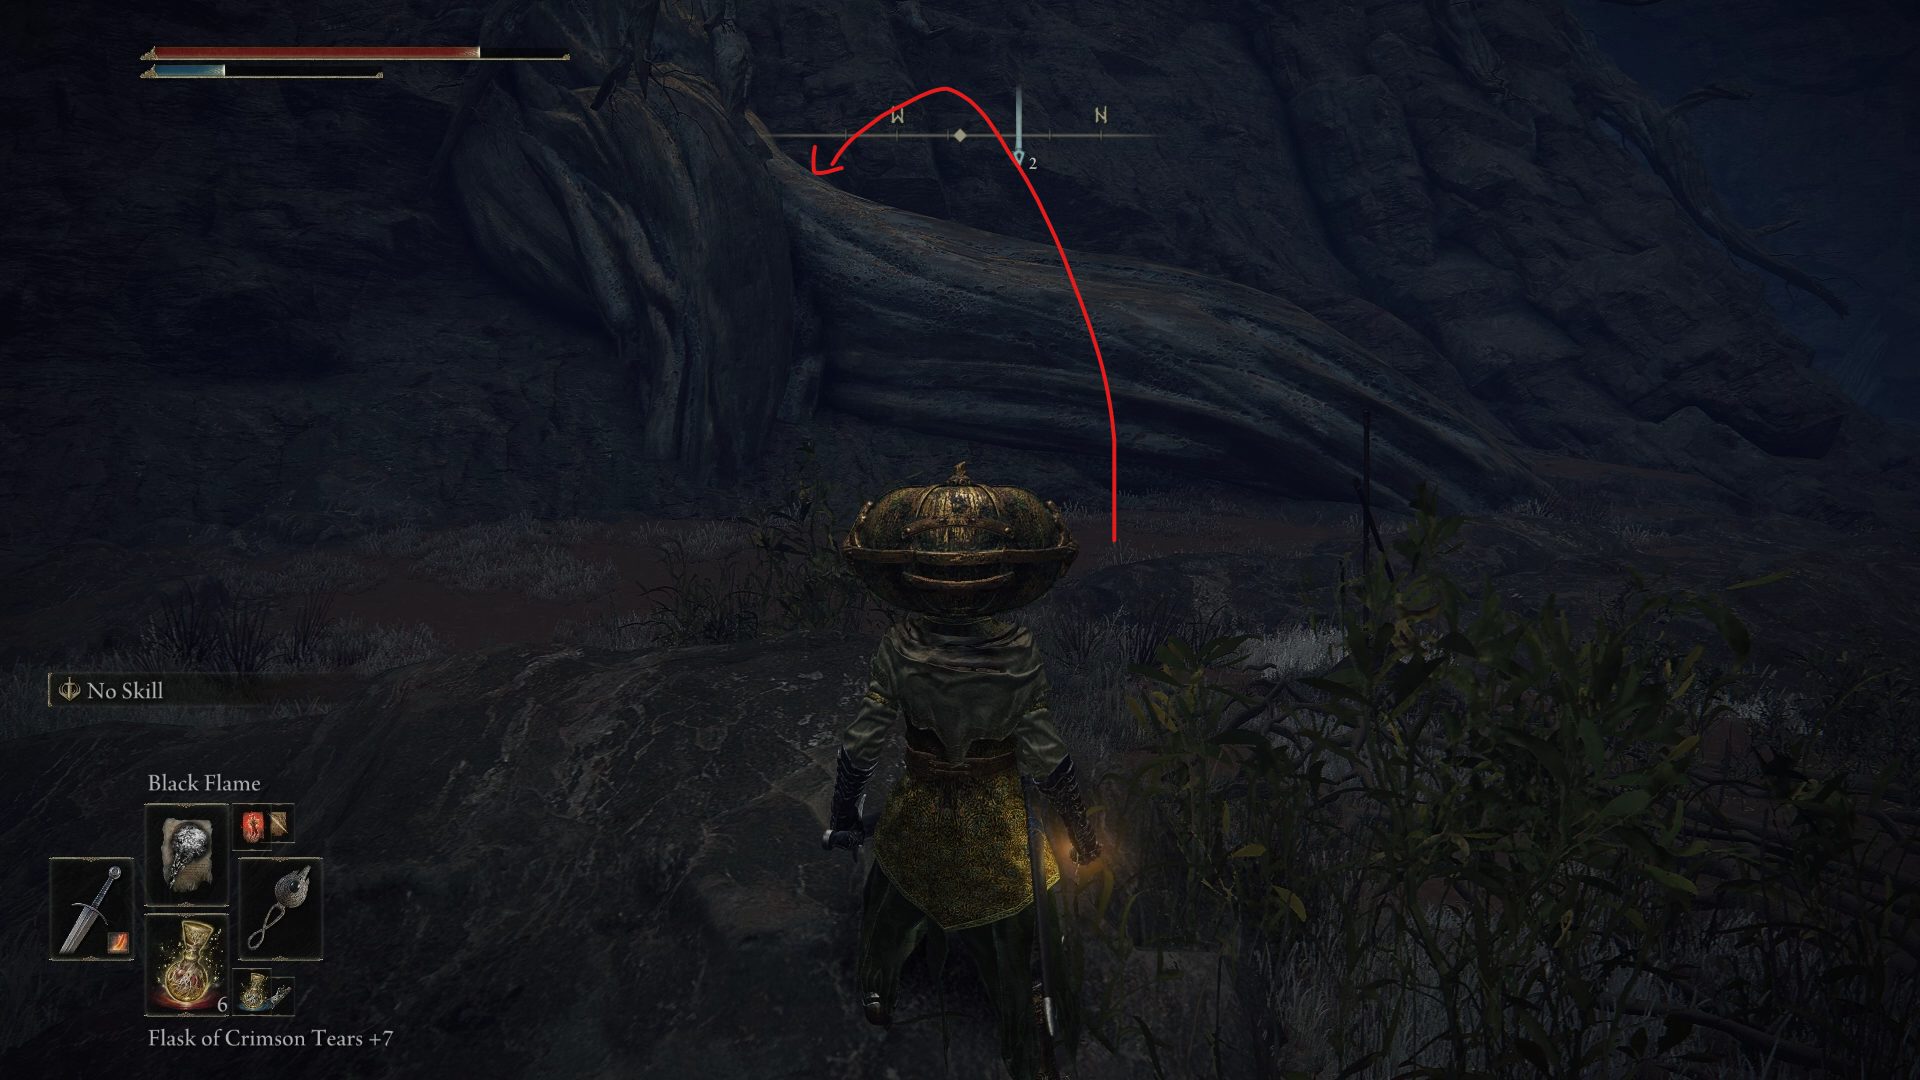
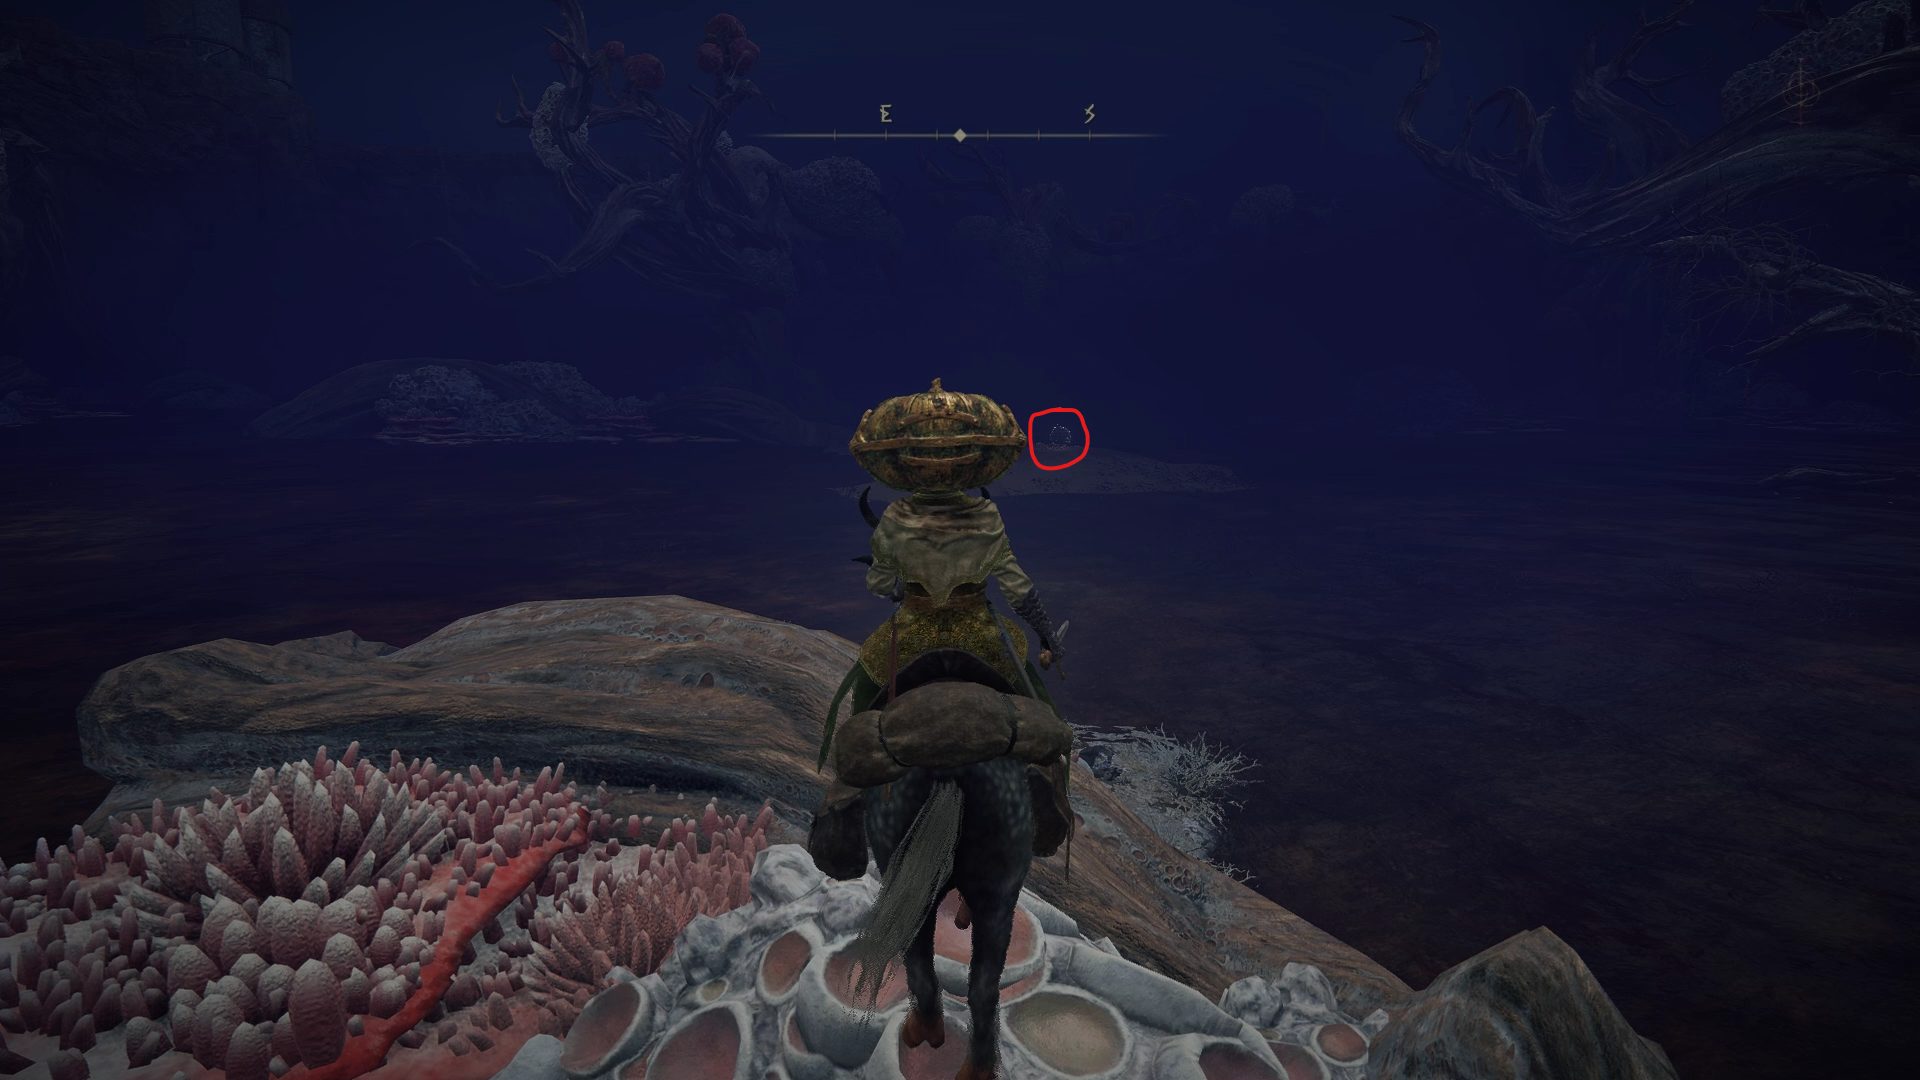
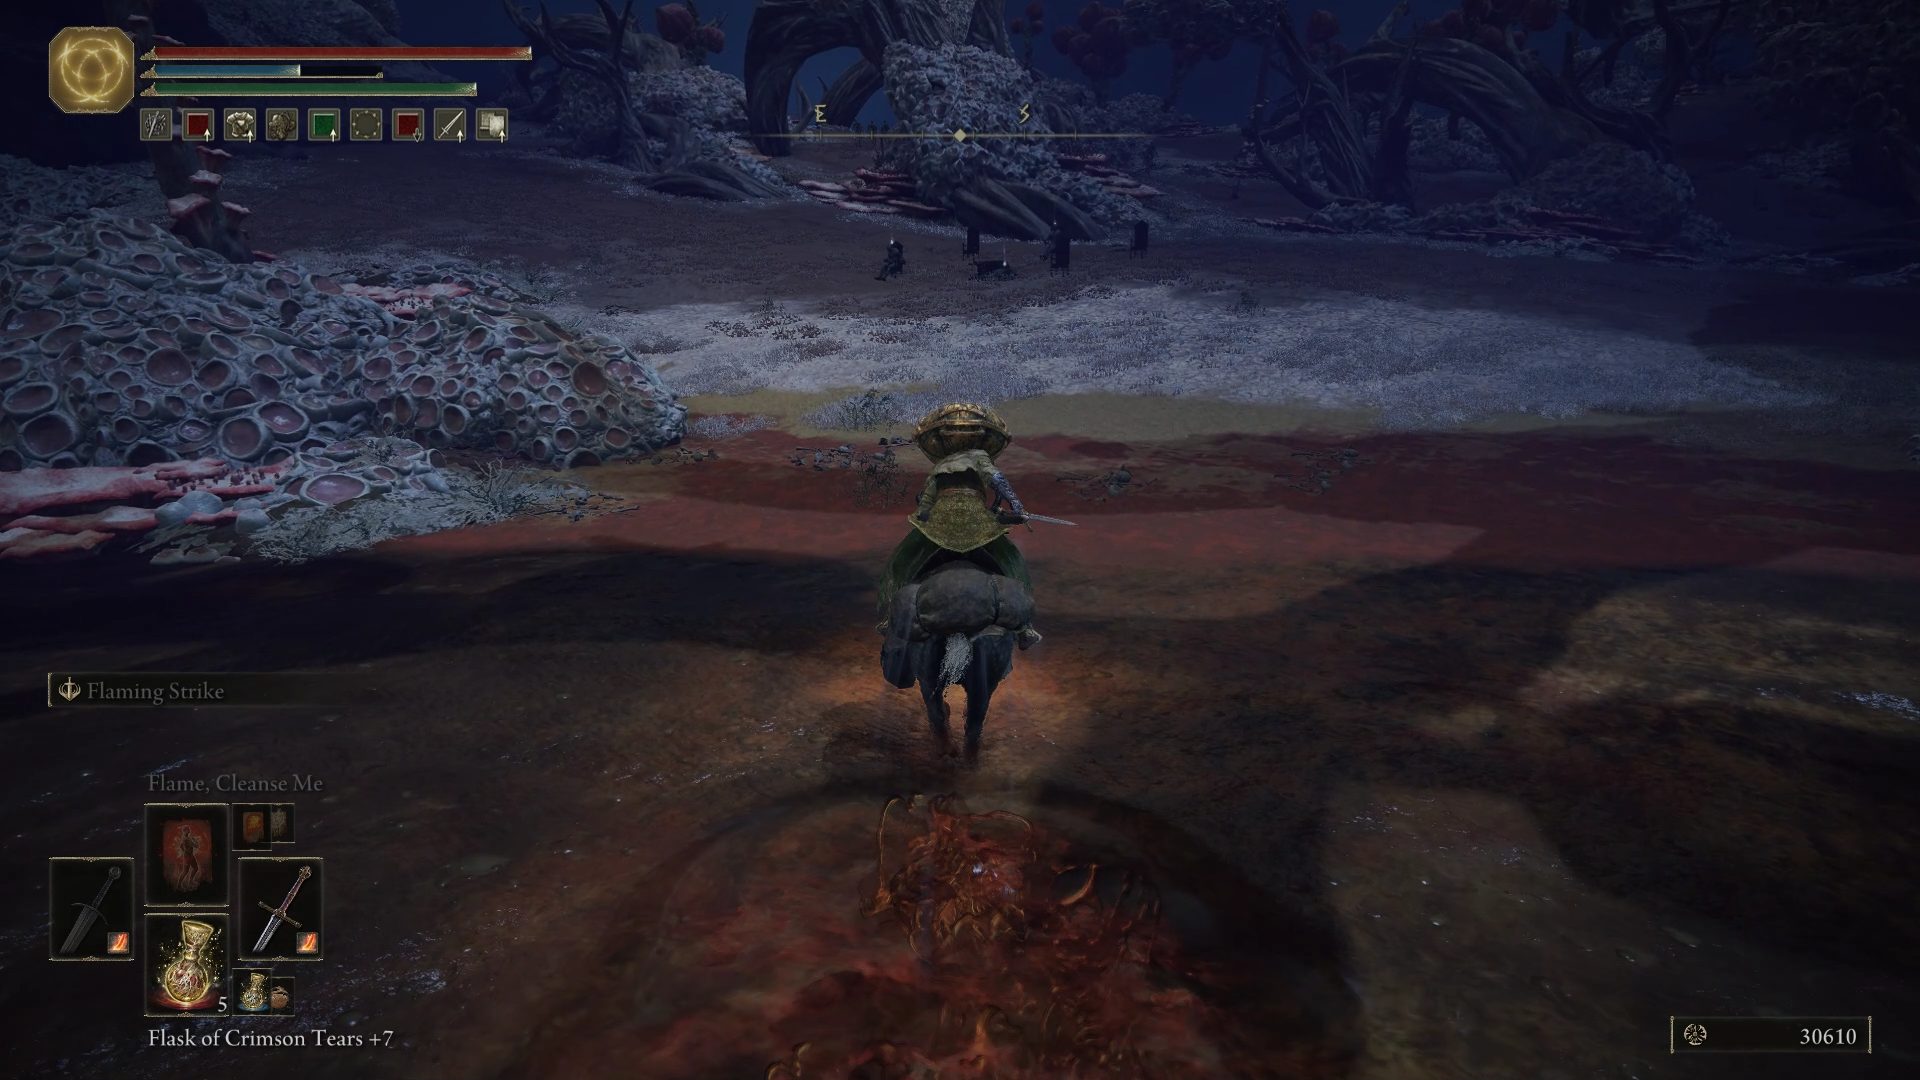
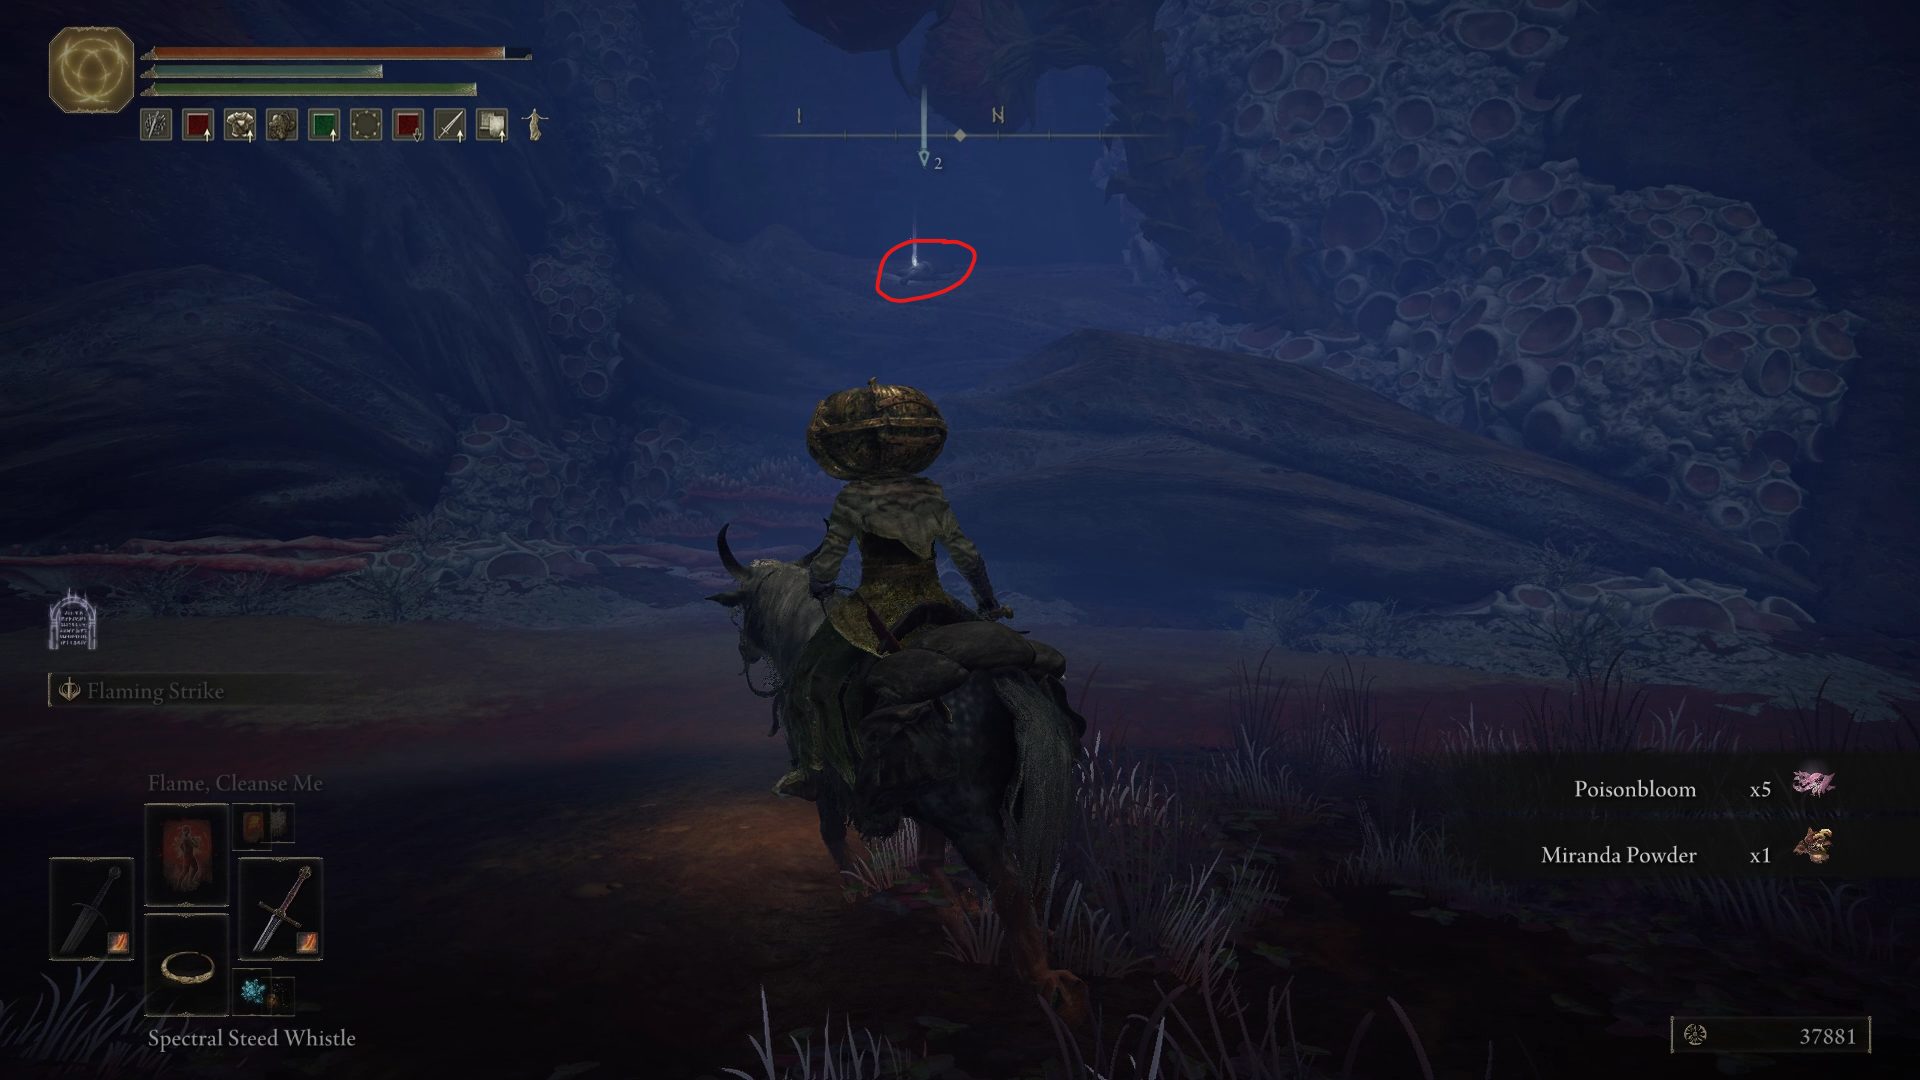
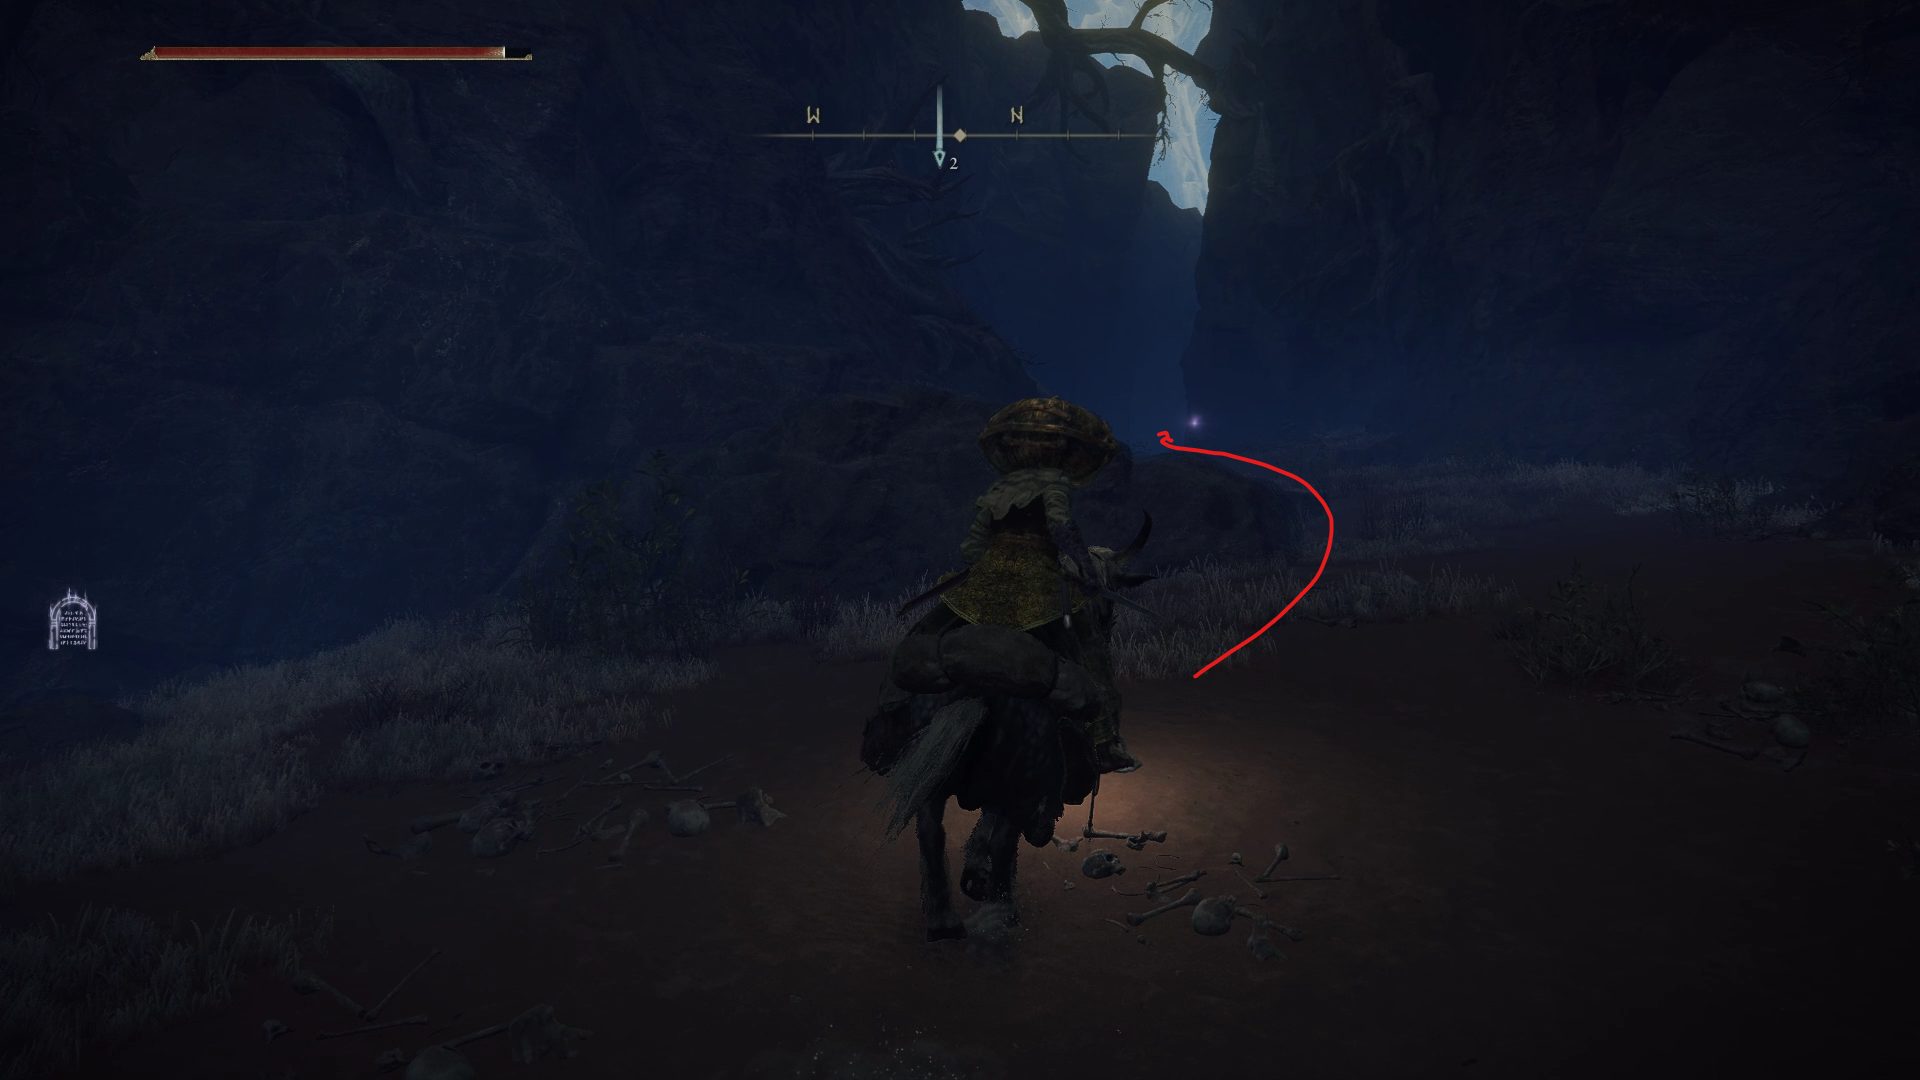
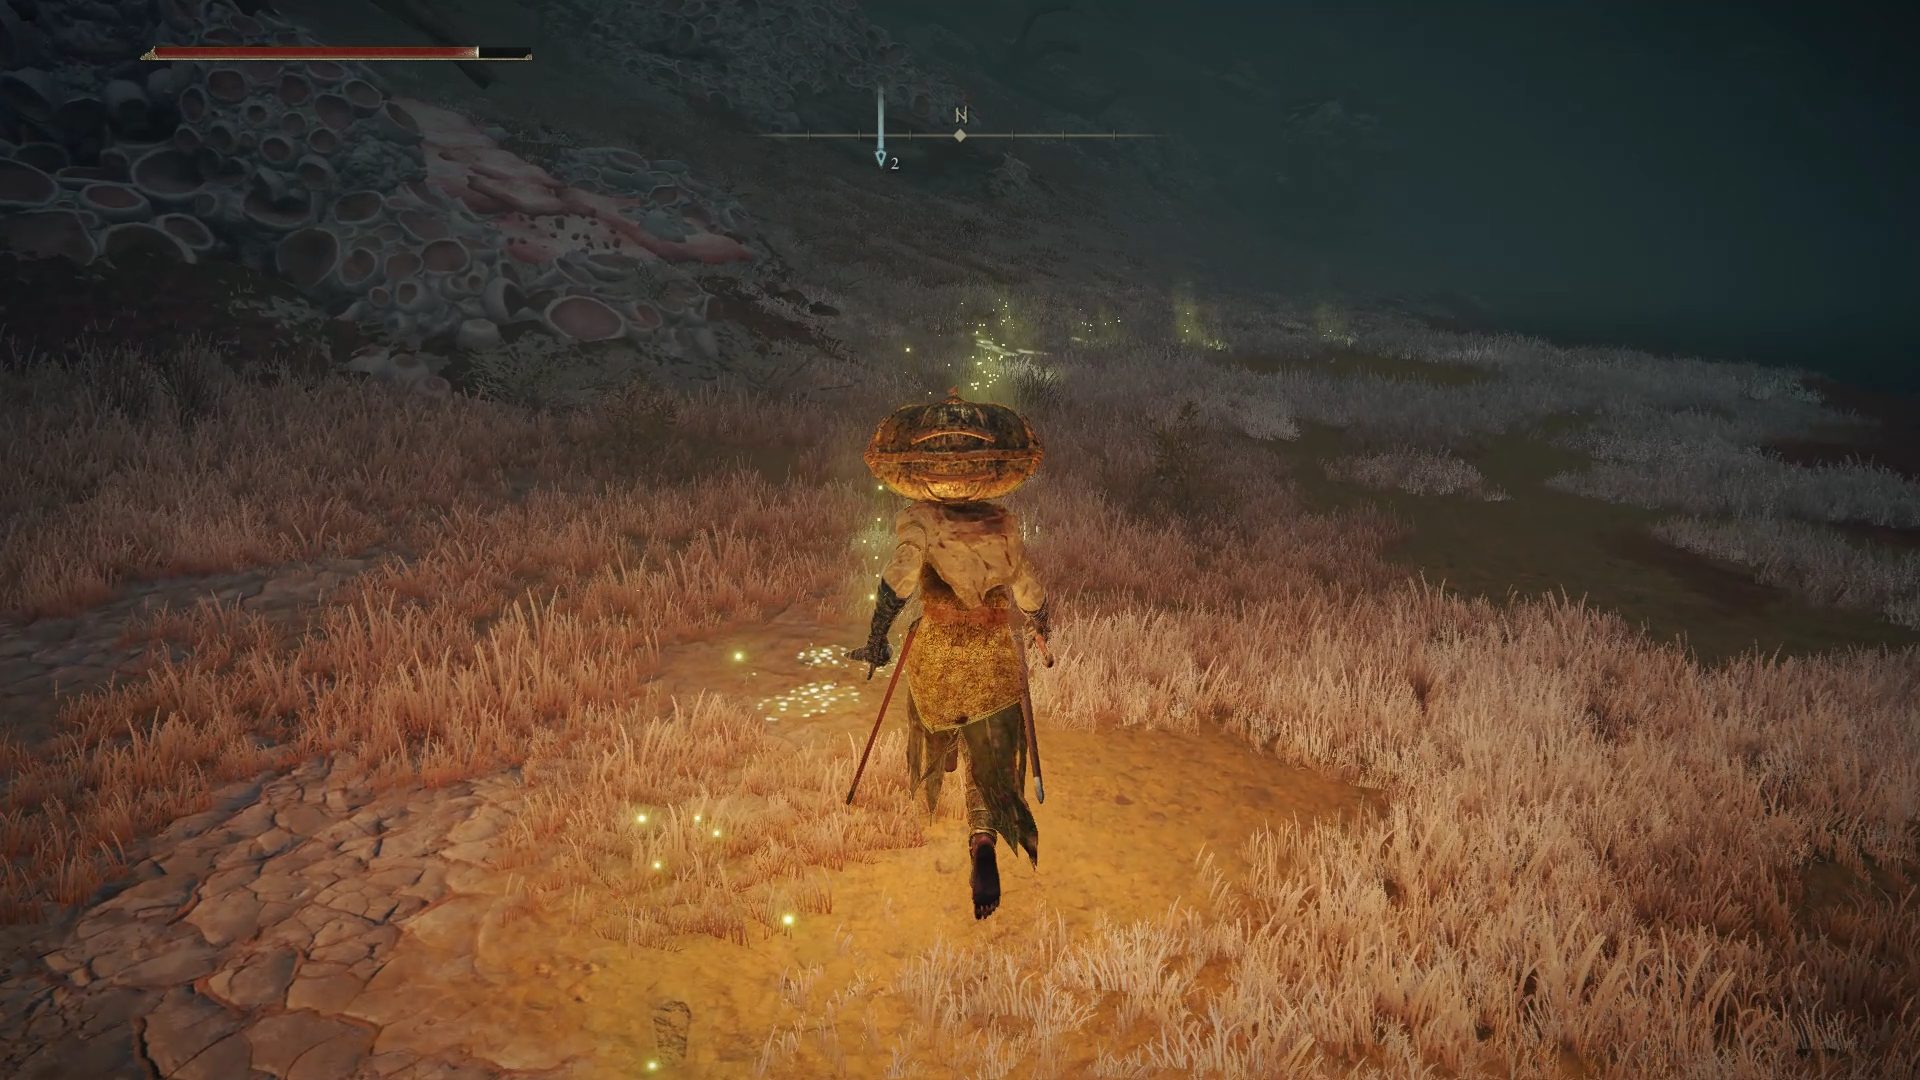
From there, if you decide to fight the group of enemies below, you can use ranged attacks to safely dispose of some or all of the enemies. There isn’t much to loot there however, except for 1x Miquella’s Lily growing next to the white clump. However if you go south of where those enemies are, you’ll notice a ghostly chandelier in the putrid lake below. Examining it will summon a ghost that will lead the way to a dungeon that can be accessed by using 2x Stonesword Key: Gaol Cave.
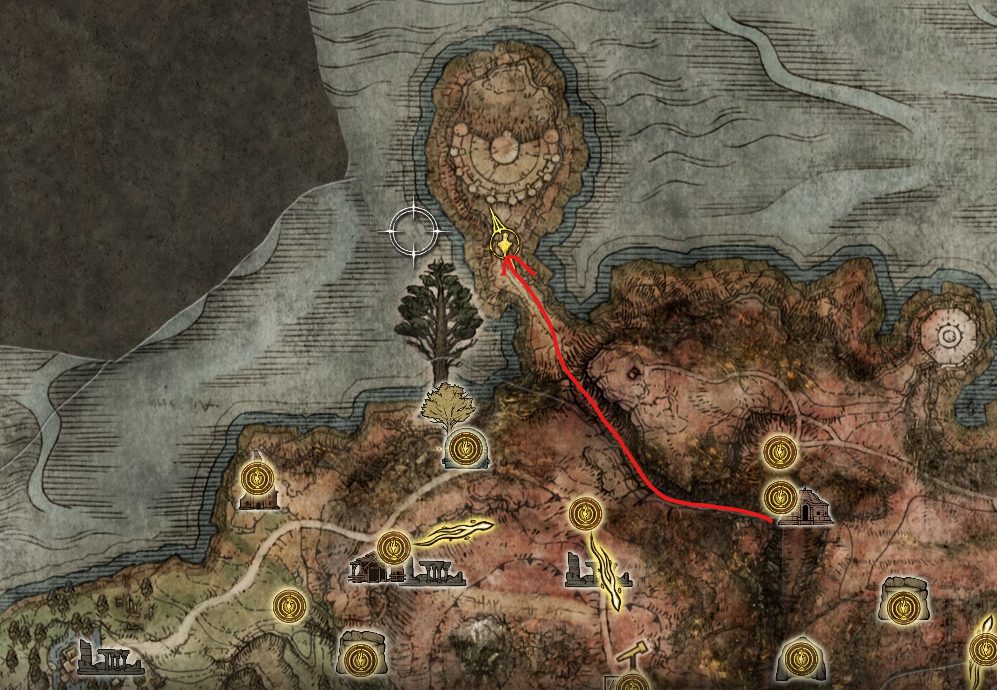
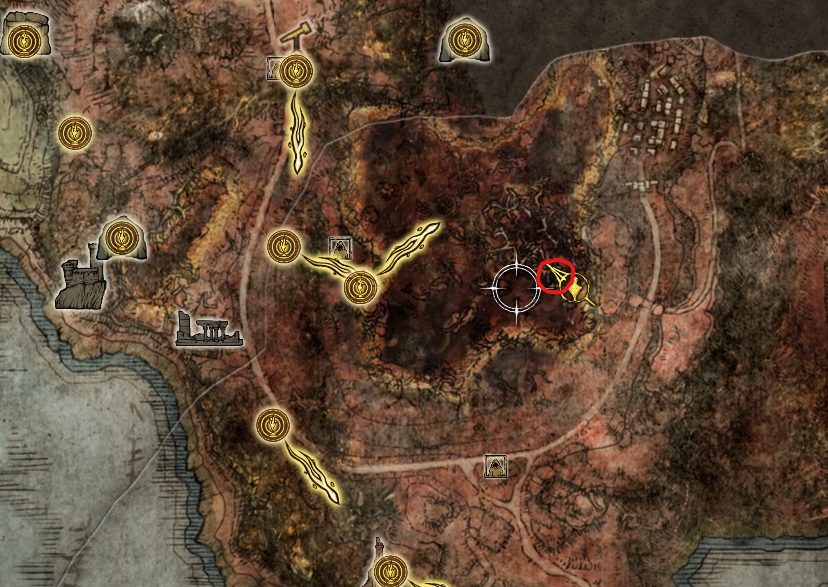
Coming out of the Gaol Cave dungeon, head south-southeast to the nearby ruins: Caelid Waypoint Ruins. By entering these ruins through the southeast, you should see a centipede-looking enemy guarding a staircase leading underground.
The room underground has several smaller centipedes and a humanoid enemy guarding the door to the Meteoric Ore Blade. They can overwhelm you really fast if you’re not careful, so just run in to grab their attention, and run back to the staircase to have them come one by one towards you. Once you’ve dealt with them, open the door in the back of the room and loot the chest to acquire the Meteoric Ore Blade. While these ruins are populated by some annoying enemies, except for the weapon that you just picked up the loot found here isn’t great. If you head to the tree found in the middle of the ruins, you can grab 3x Rot Grease on a corpse by the tree, 4x Poisonbloom south of the ruins, and 5x Great Dragonfly Head in the ruined remains of a building close to the tree.
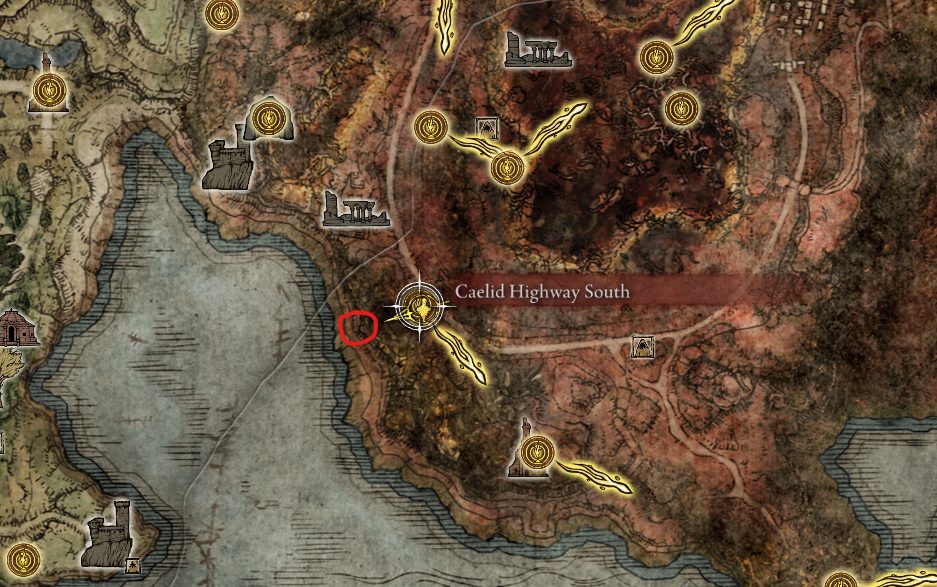
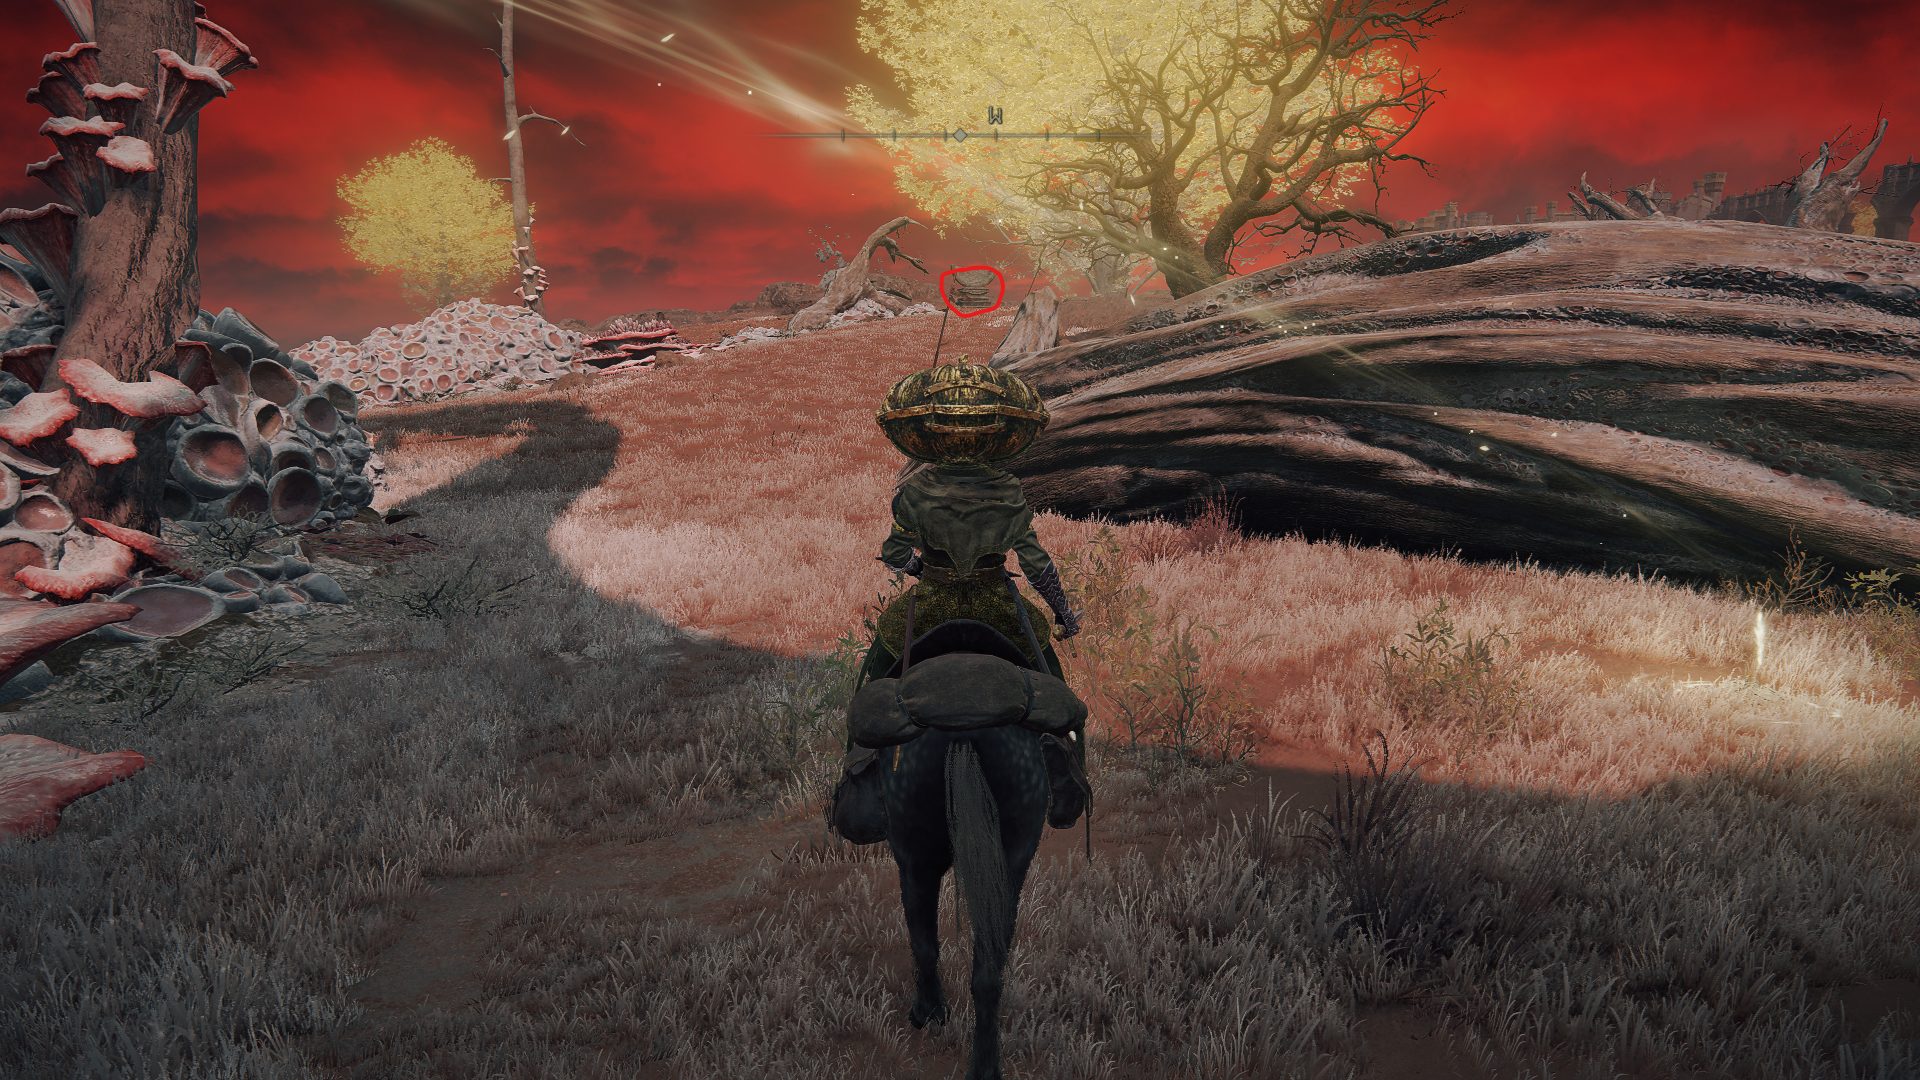
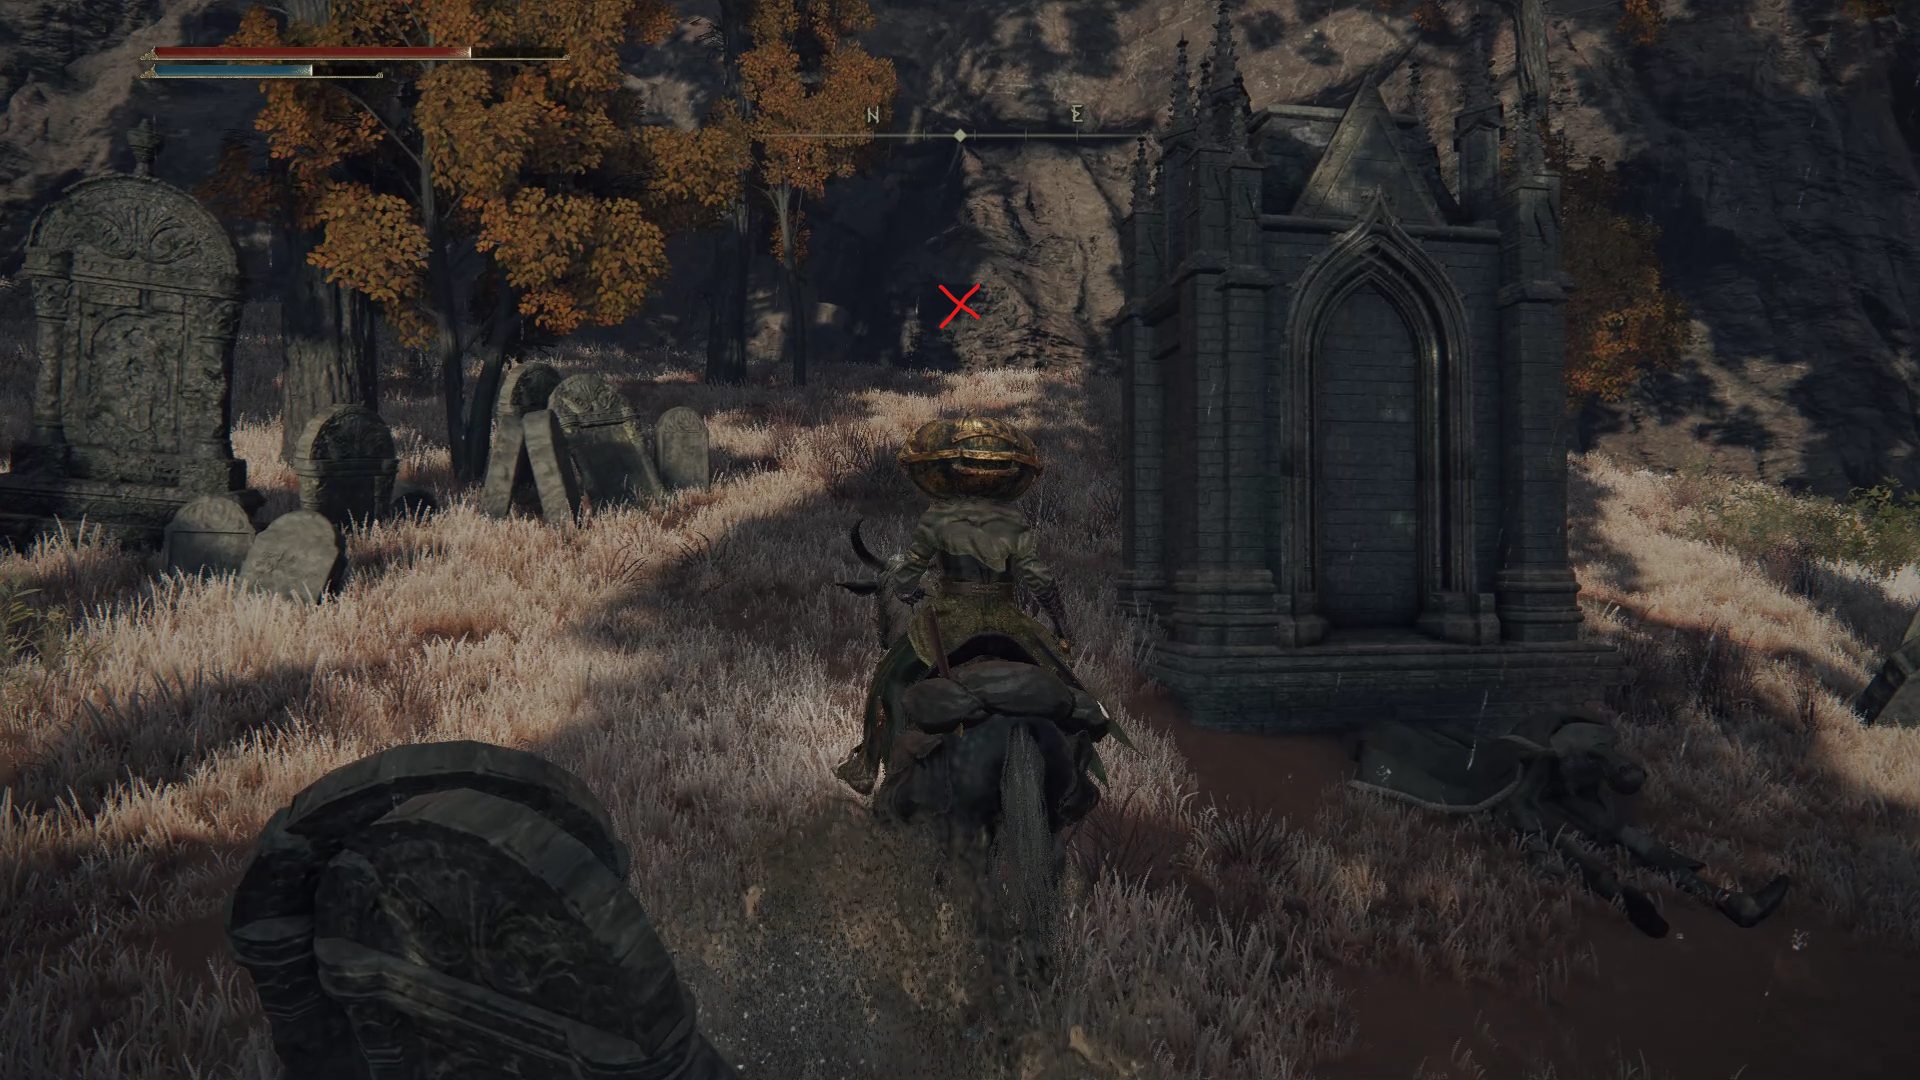
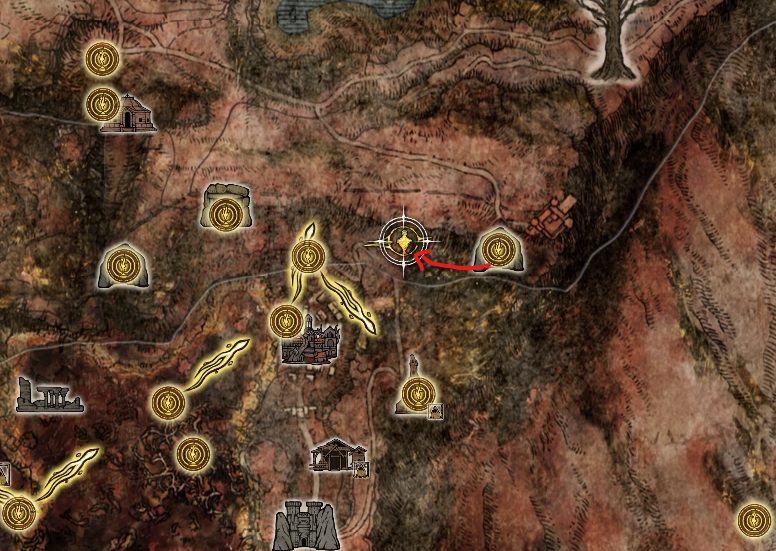
When you’re ready to leave the ruins, travel to the Caelid Highway South site of grace and head west to grab the Starlight Shards next to the small monument by the cliff, before going south-southeast to the nearby cemetery.
While you’re used to desecrating cemeteries and murdering weak undead enemies, one of these undead is not what they seem. Just like in Limgrave, when you attack this undead impostor their will reveal their true form, which in this case is a giant.
If you choose to fight the giant, defeating it will grant you a Larval Tear. Either way, make sure to grab the Golden Runes before heading east-southeast to the remains of a church. Grab the Cathedral of Dragon Communion site of grace inside, and the Ancient Dragon Apostle’s Cookbook [3] next to the dragon’s remains.
This being a cathedral, the nearby Altar of Dragon Communion offers a wider variety of incantations than its counterpart in Limgrave.
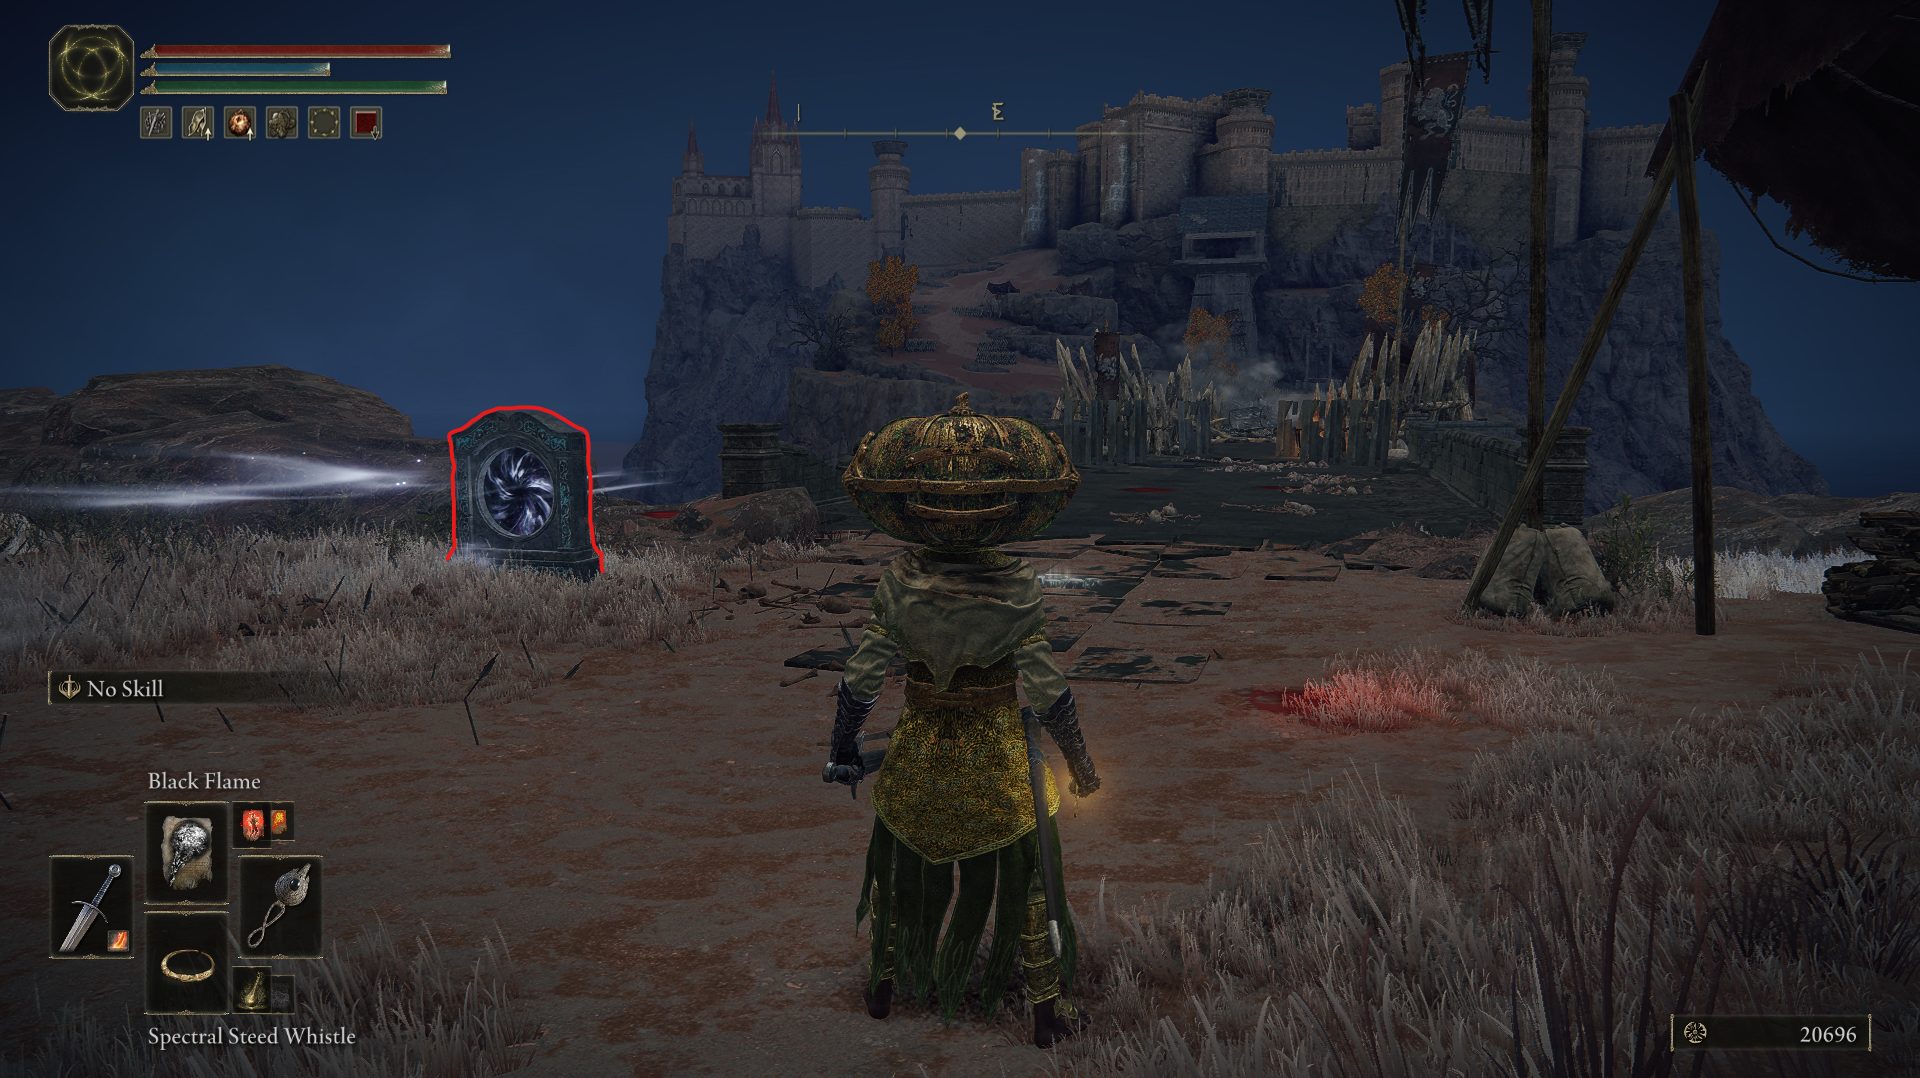
Now, we’ll be exploring further south, closer to Redmane Castle. If you have grabbed the Impassable Greatbridge site of grace next to the bridge leading to Redmane Castle, then travel there straightaway. Otherwise, travel to the Chamber Outside the Plaza site of grace in the Redmane Castle dungeon and head southwest, which is where you’ll find a waygate that leads to the Impassable Greatbridge site of grace.
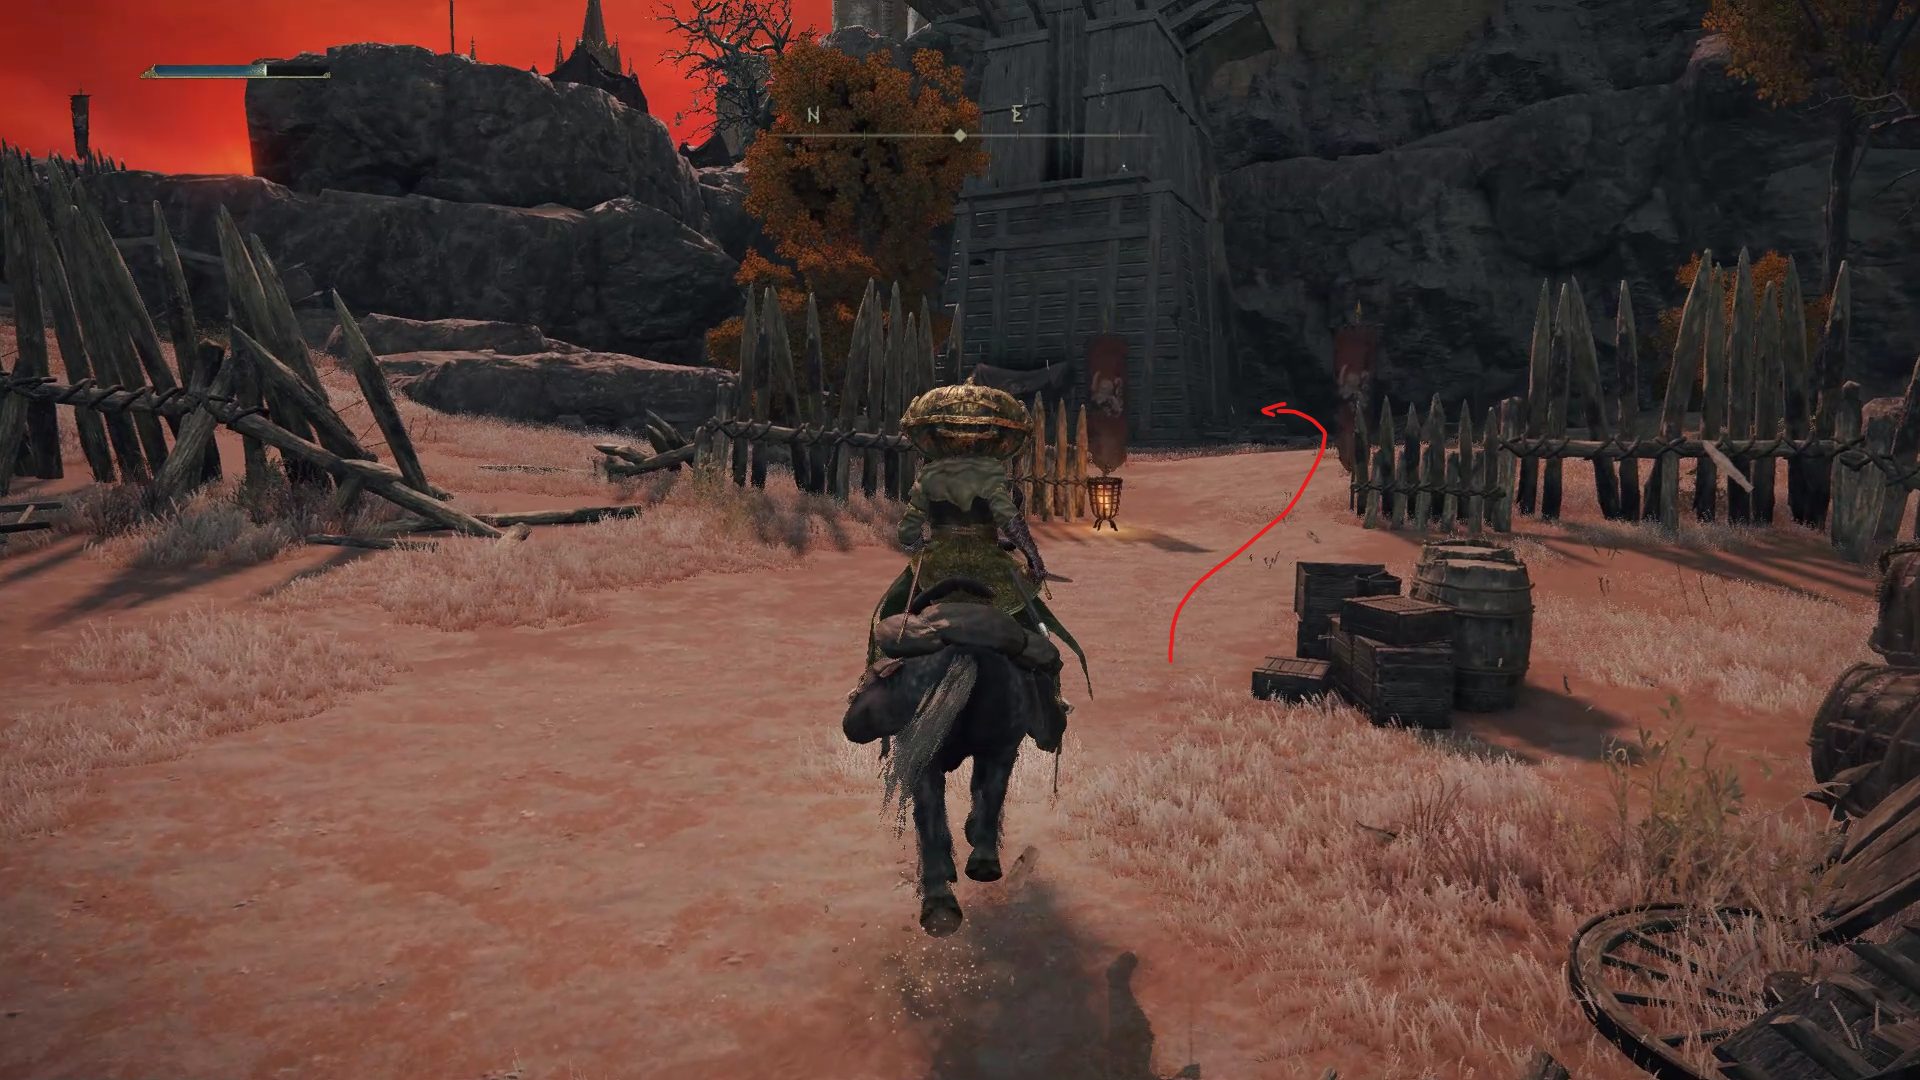
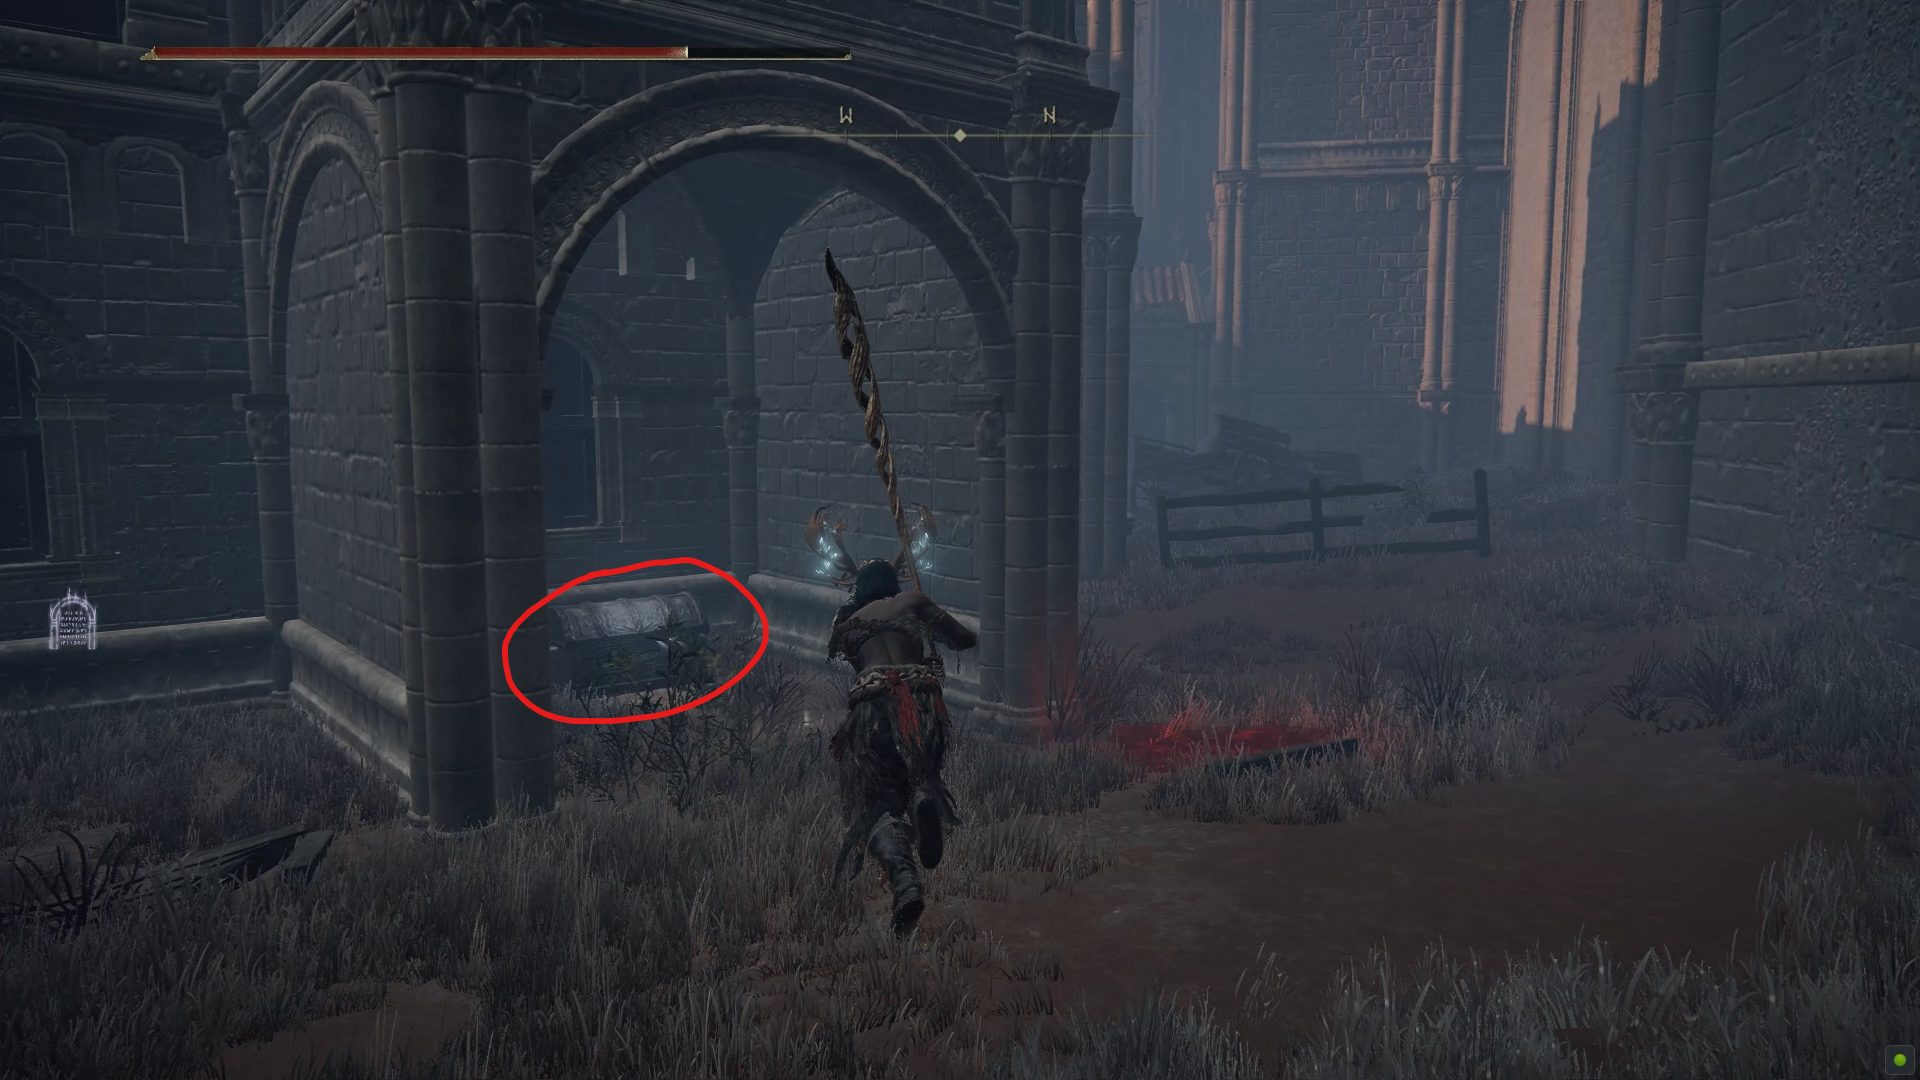
If you haven’t, activate the site of grace by the siege tower before climbing it, as the siege tower is well defended. After dealing with the soldiers defending the outside and the inside of the siege tower, make sure to loot the chest containing the Arrow’s Sting Talisman before climbing back down and riding west towards the sword memorial. Right next to the memorial, behind the nearby rock, you’ll find a loot beetle that once defeated, drops the Ash of War: Cragblade.
From there, continue going west-northwest and follow the path by the cliff. Following that path you will find another loot beetle, this time dropping a Somber Smithing Stone [4], but be careful as you chase it around as a crow is waiting to ambush you.
At the end of this path you will find another dungeon: Caelid Catacombs.
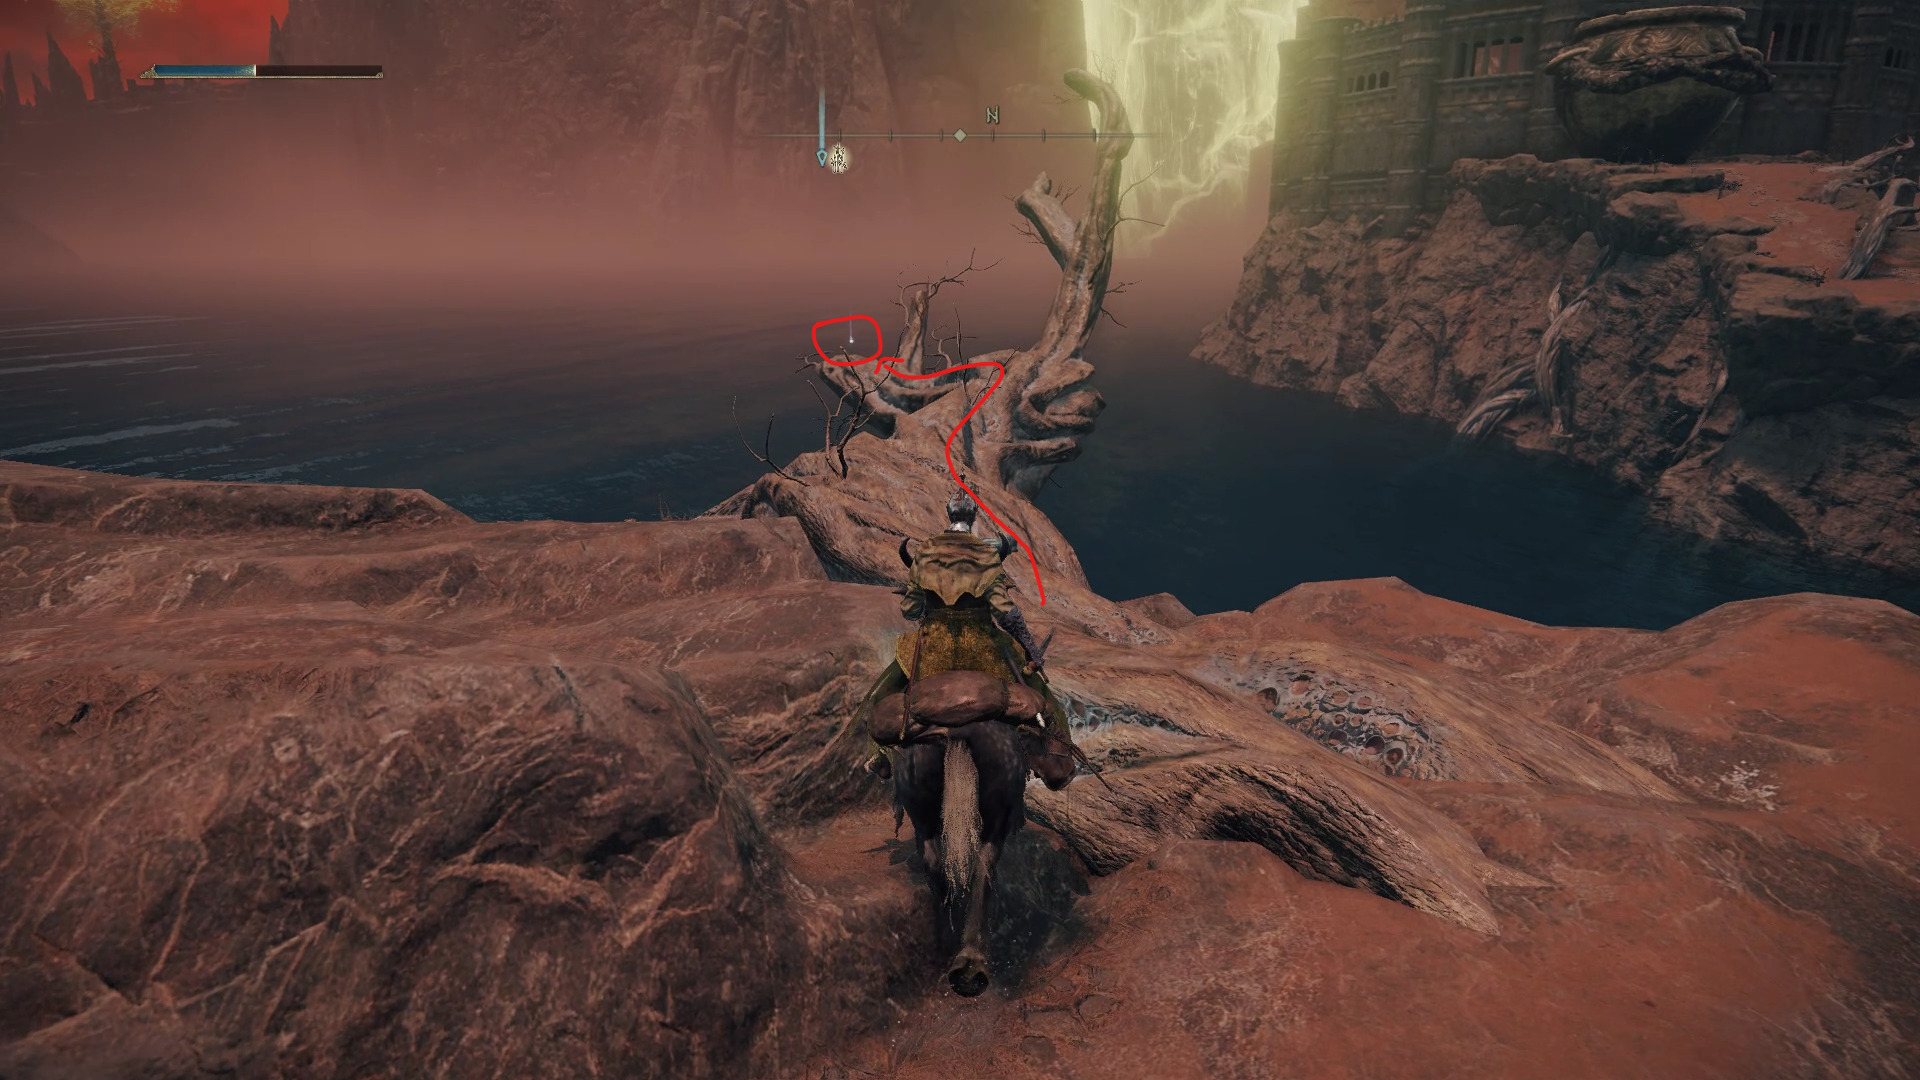
The Windy Crystal Tear can be found in a pit nearby. Make sure to deal with the 2 crows overlooking the pit before going for the loot, as it will allow you to avoid having to deal with both at the same time.
Nearby, there are also 2 optional bosses that only spawn at night. So if you want some more loot and aren’t afraid of getting your hands dirty, travel to the Caelid Highway South site of grace and use it to pass the time until nightfall. Then, head towards the crossroads east of the site of grace to find 2 bosses nearby.
The Night’s Cavalry boss patrolling nearby is very similar to the ones that you defeated previously and defeating him will reward you with the Ash of War: Poison Moth Flight and 8500.
The Death Rite Bird is just hanging out by himself next to the big white skull to the east of the crossroads. Don’t hesitate to craft some Holy Water Pots before the fight as it makes it much easier to get the loot from its dead avian hands. Defeating the Death Rite Bird will reward you with the Death’s Poker and 15000.
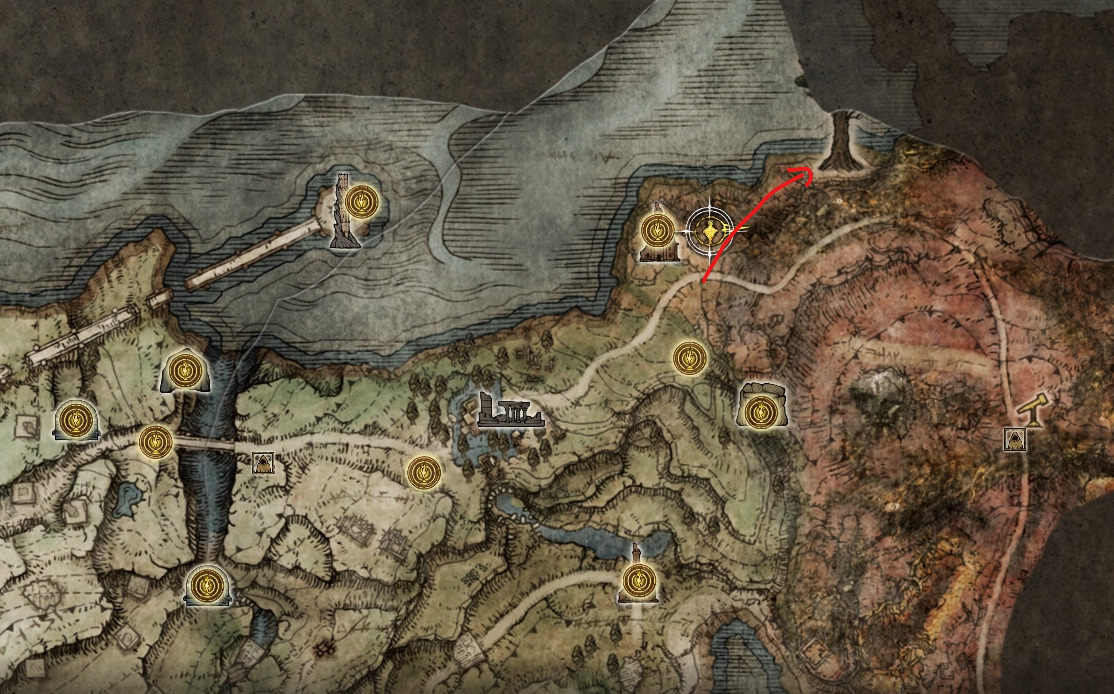
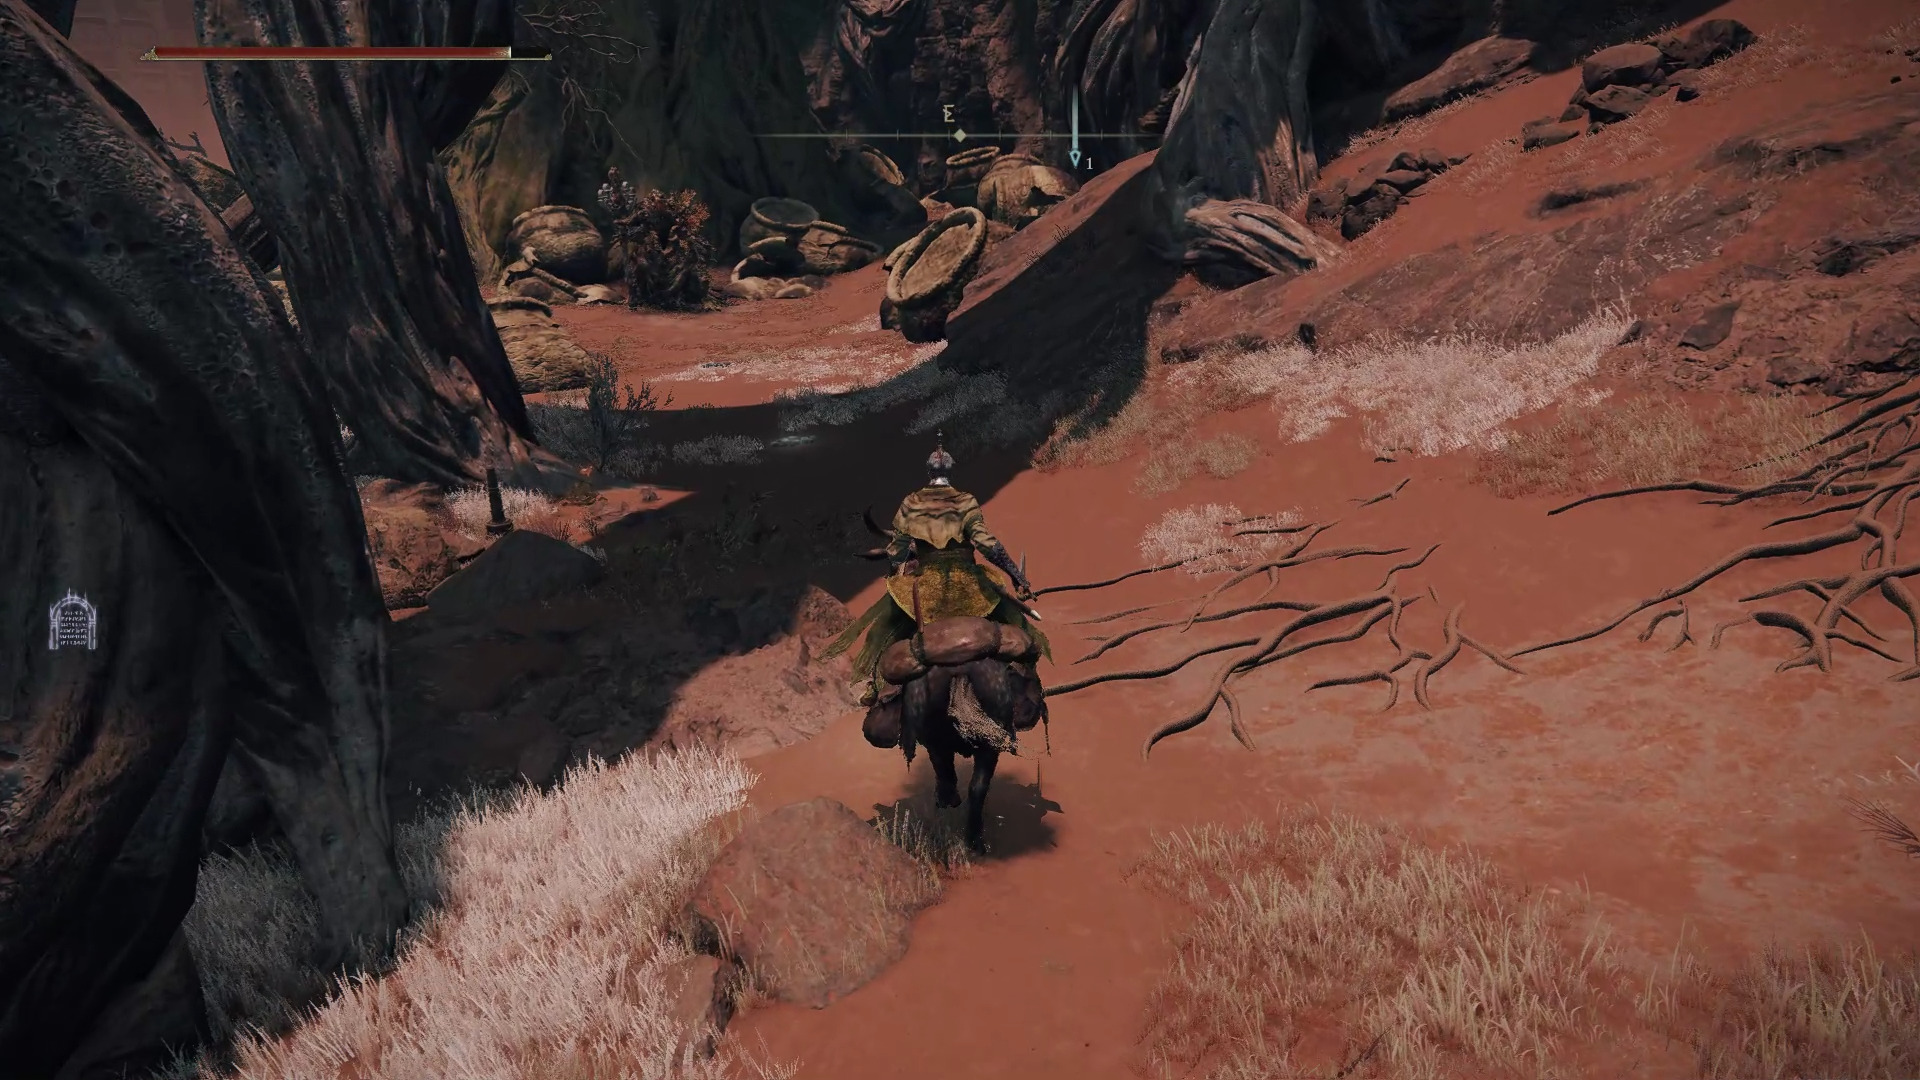
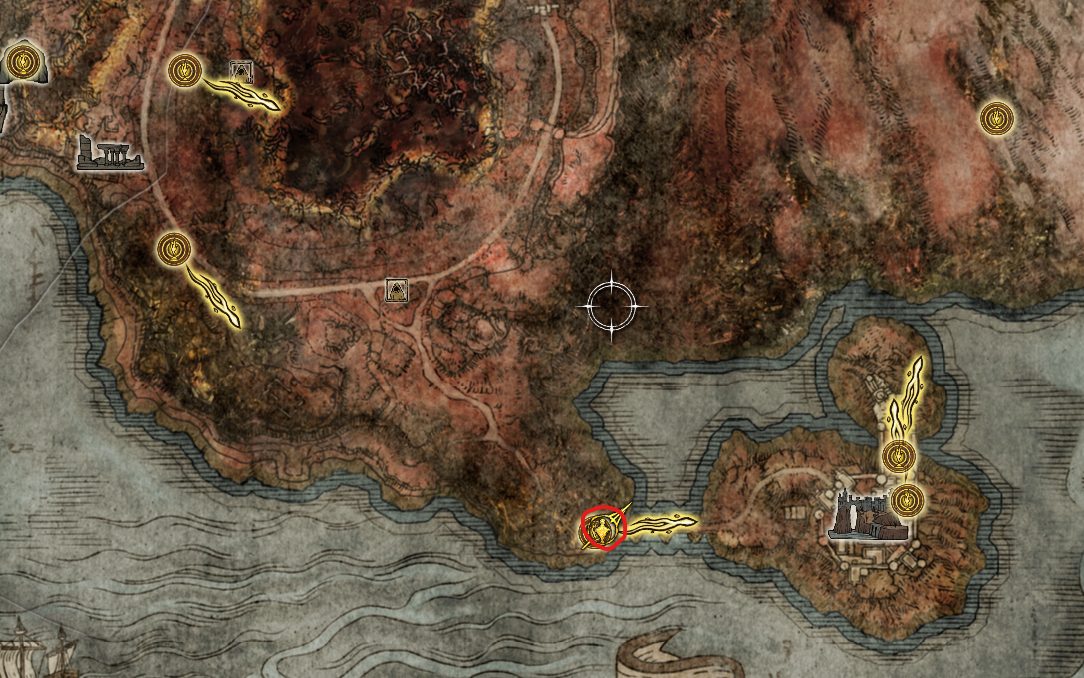
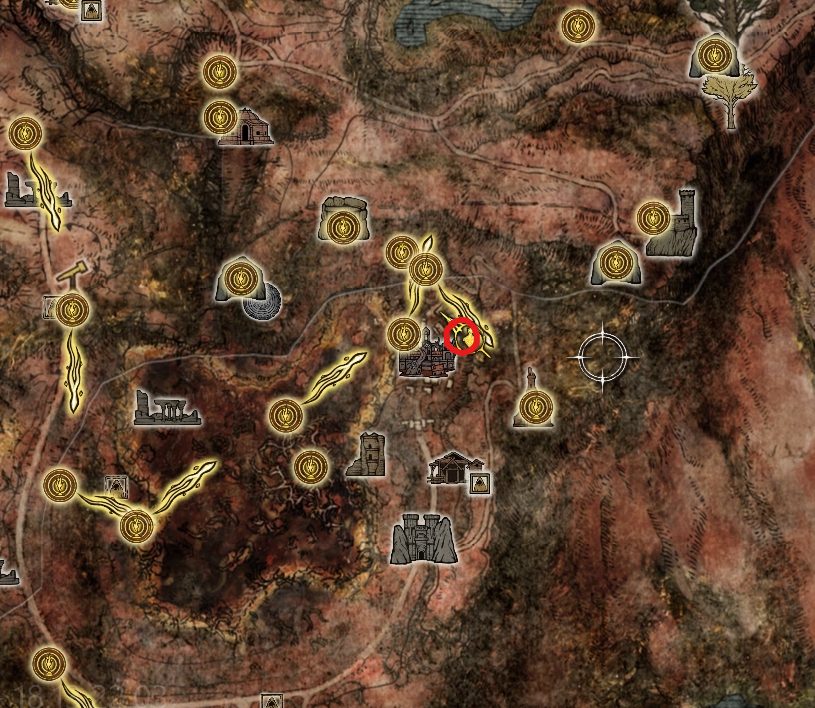
Before we continue to the swamp in the middle of Caelid, there is one more optional bit of loot that we can grab. Travel to the Caelem Ruins site of grace and head east towards the ravine. Jump over to the other side and follow the road until you find the Dragonbarrow West site of grace. From there, continue following the road east until you reach a monument with the Map: Dragonbarrow.
Now, go to the Siofra River dungeon in Limgrave, and travel to the Below the Well site of grace up north. Next to the site of grace, you’ll find a lift with an imp statue that requires 2x Stonesword Key. Unlocking and using this elevator will take you to an otherwise unreachable area of Caelid. Ride the elevator up and grab the Deep Siofra Well site of grace nearby.
From this site of grace, if you look south, you’ll see a rotten version of the runebear walking around. While you could deal with it as you would with any regular runebear enemy, if you have ranged attacks you can climb a branch nearby to make it unable to reach you with most of its melee attacks. It will still be able to use its one and only ranged attack, but it is easy to dodge roll, and much less threatening than its claws.
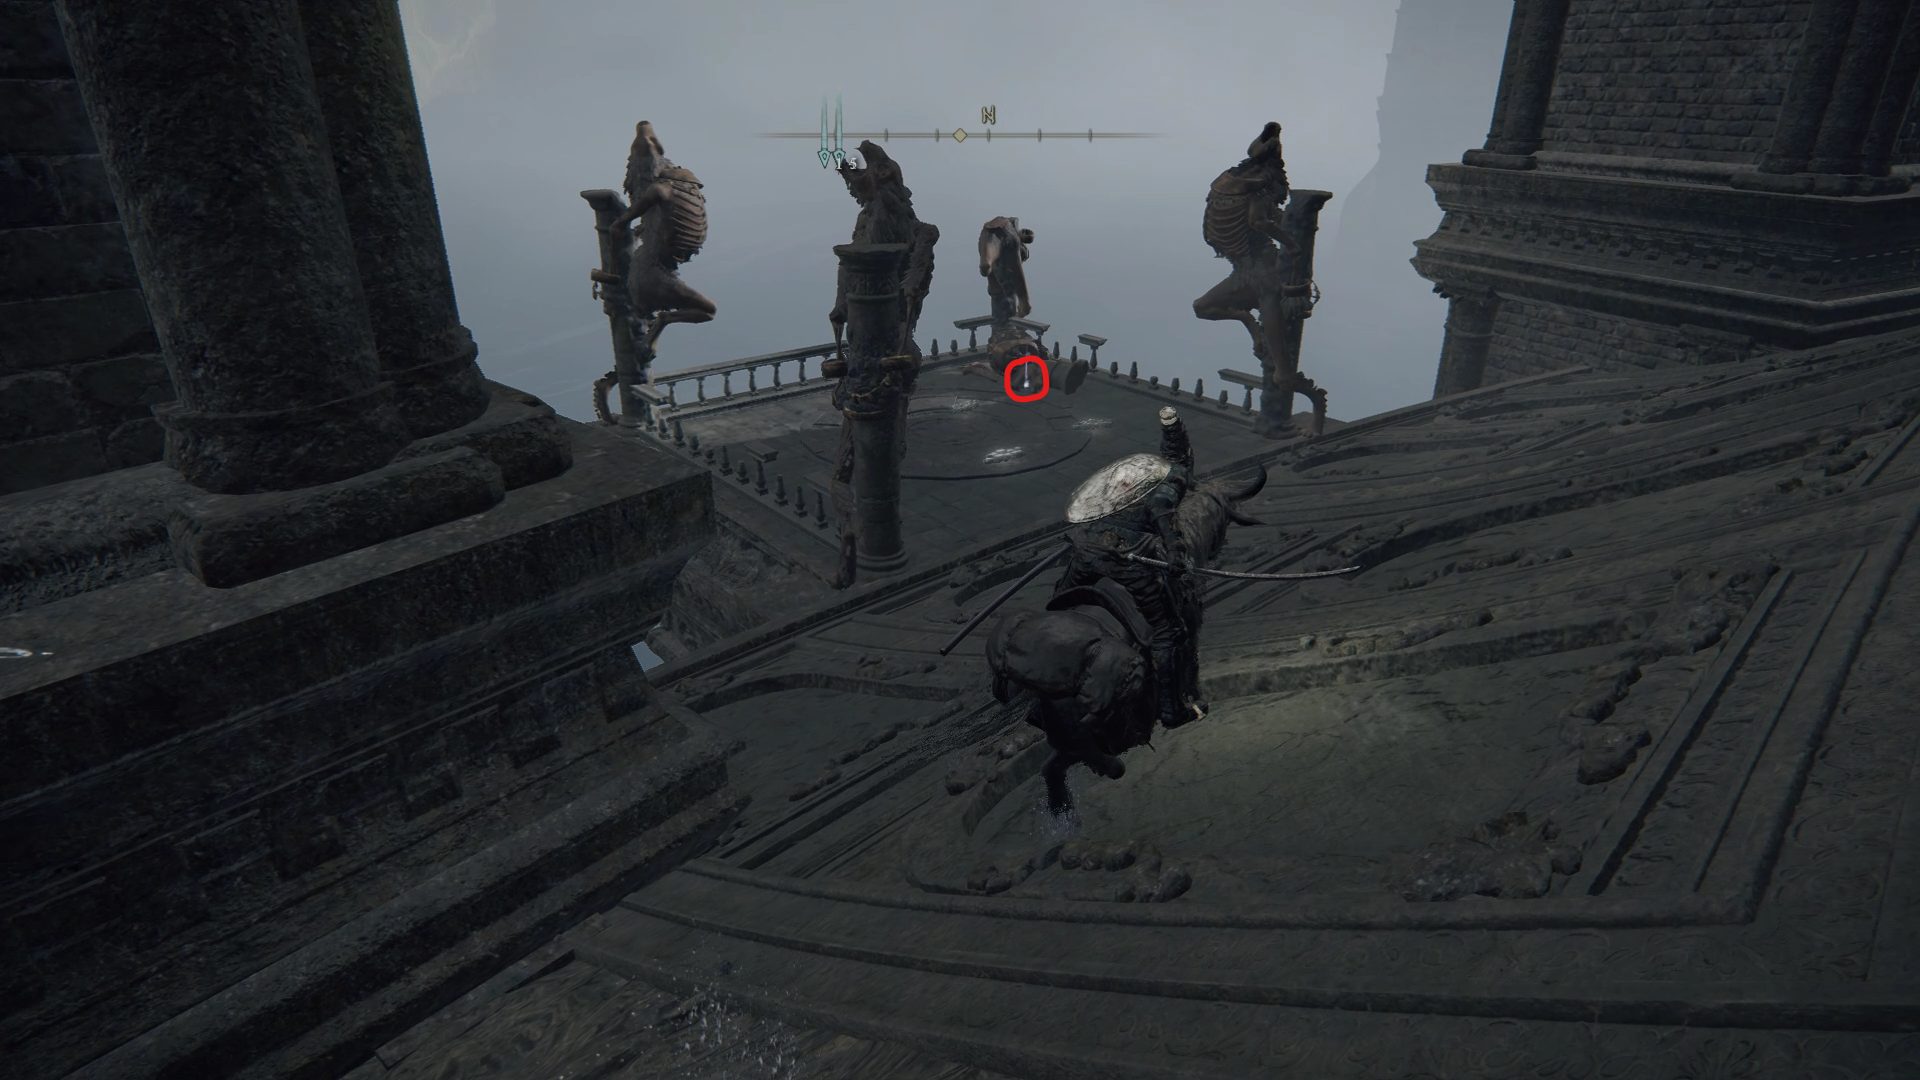
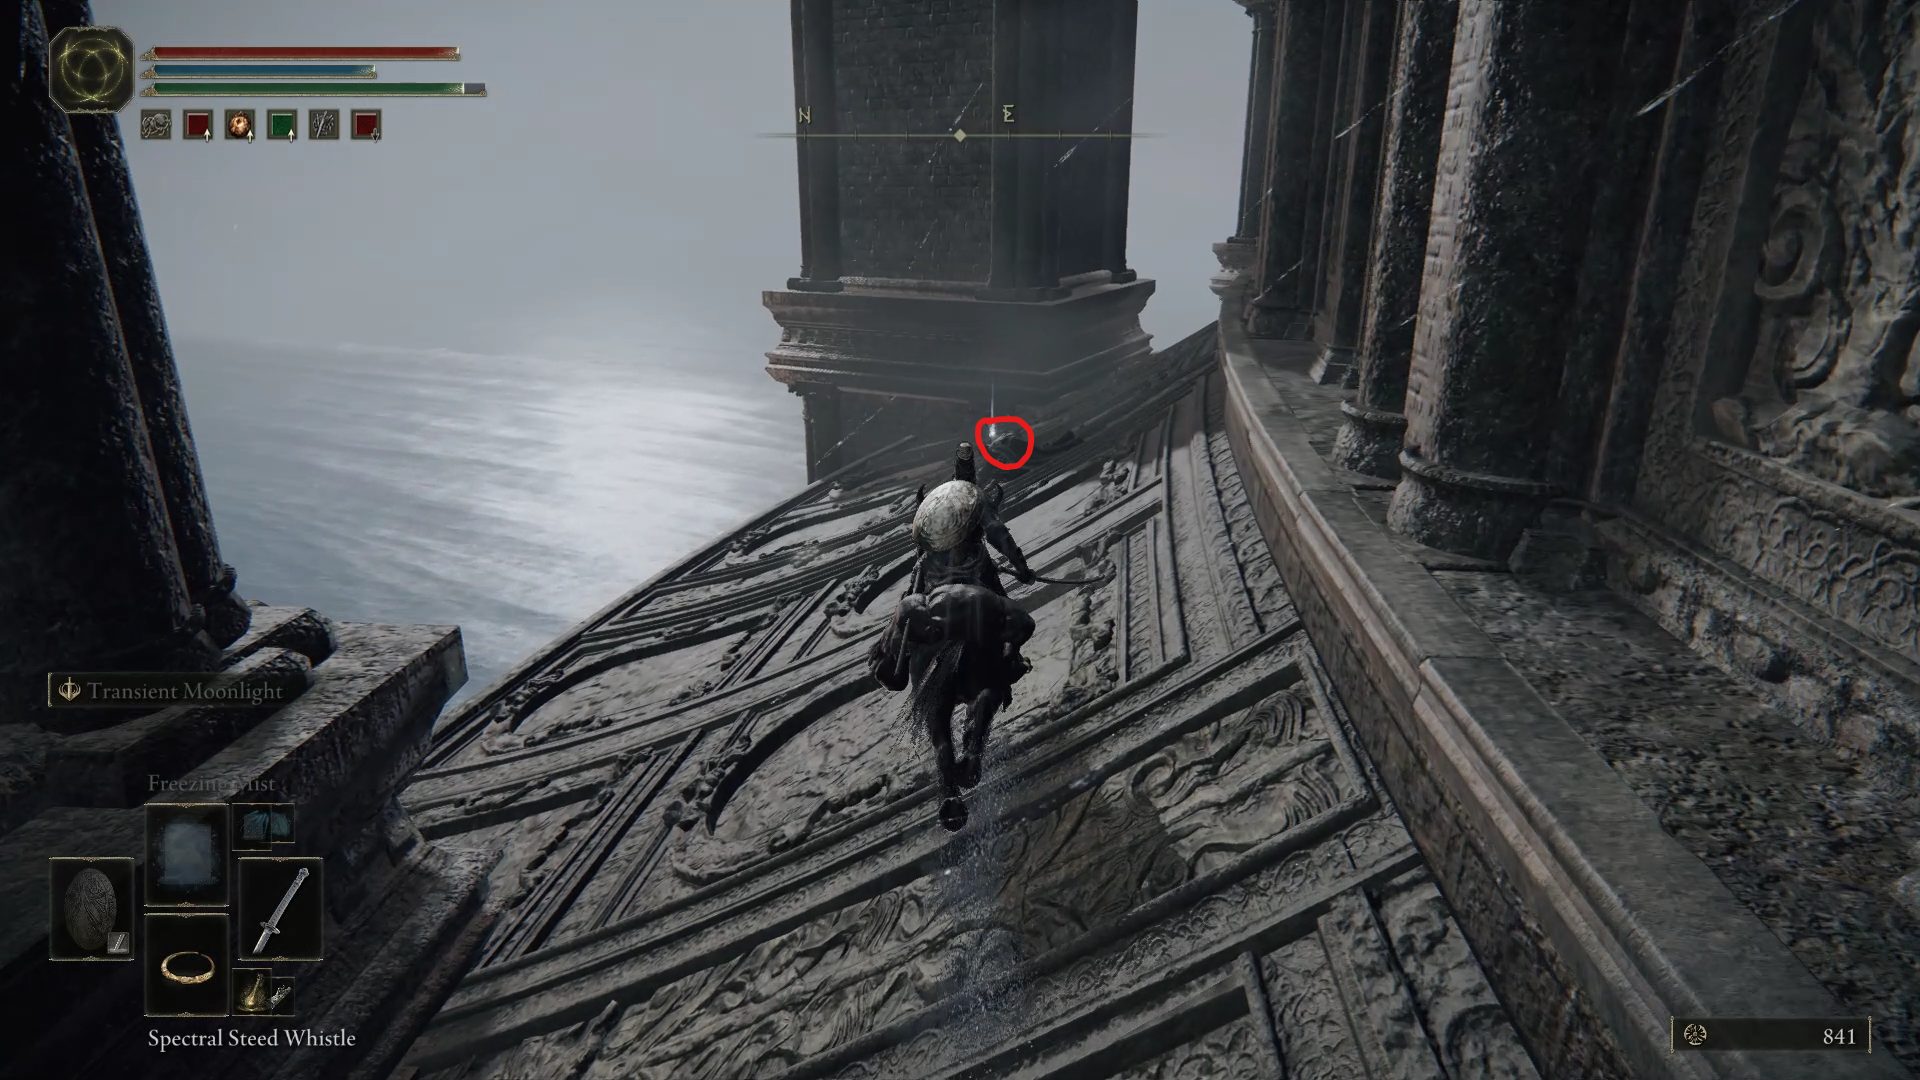
If you continue past where the bear was, you’ll be able to grab a Stonesword Key from a corpse sitting by the ledge. Be careful as you’re grabbing its belongings: you won’t be able to loot it while mounted, and the only way to loot it is to be really close to falling down off the ledge. Just walk slowly towards the corpse until you’re able to loot it.
Now go back towards the nearby site of grace and go west instead, through the narrow path. This path has several exploding enemies, none of which will be a threat if you just keep riding through them. At the end of it however, you’ll be greeted by two golem archers. While these ones have magical bows, defeating them isn’t much different from the ones you fought previously — take cover until they shoot, and ride up to them to attack their ankles. It’s not unlikely that when they fall and are supposed to be vulnerable to a critical attack by their chest, you won’t be able to execute one because they will be halfway through the ground. If that happens, just continue punishing their ankles. And while the second golem has ankle bracelets preventing you from inflicting higher damage, it only serves to delay the inevitable. Loot the corpse under the first golem to get the Spiked Palisade Shield, and deal with the second golem and its fortified ankles.
Now that you’ve made your way past the golems, you’ll see a massive jar north. Speaking to the jar will allow you to see the Great Jar‘s red summon signs, which will allow you to fight 3 Knights of the Great Jar. If you manage to defeat all 3 without dying, you’ll be able to speak to the Great Jar again to receive the Great-Jar’s Arsenal.
If you die while fighting these, you’ll be able to come back and try again as many times as needed. However, the Knights of the Great Jar will be different each time, so while it could get easier, you could also get more difficult opponents.
Now that we’re done picking up all the sweet loot, we can finally continue exploring Caelid. Navigate to Part 3 to continue following our walkthrough!
Travel to the Astray from Caelid Highway North site of grace and go east towards the Swamp of Aeonia. East-southeast, really close-by, grab another site of grace: Aeonia Swamp Shore.
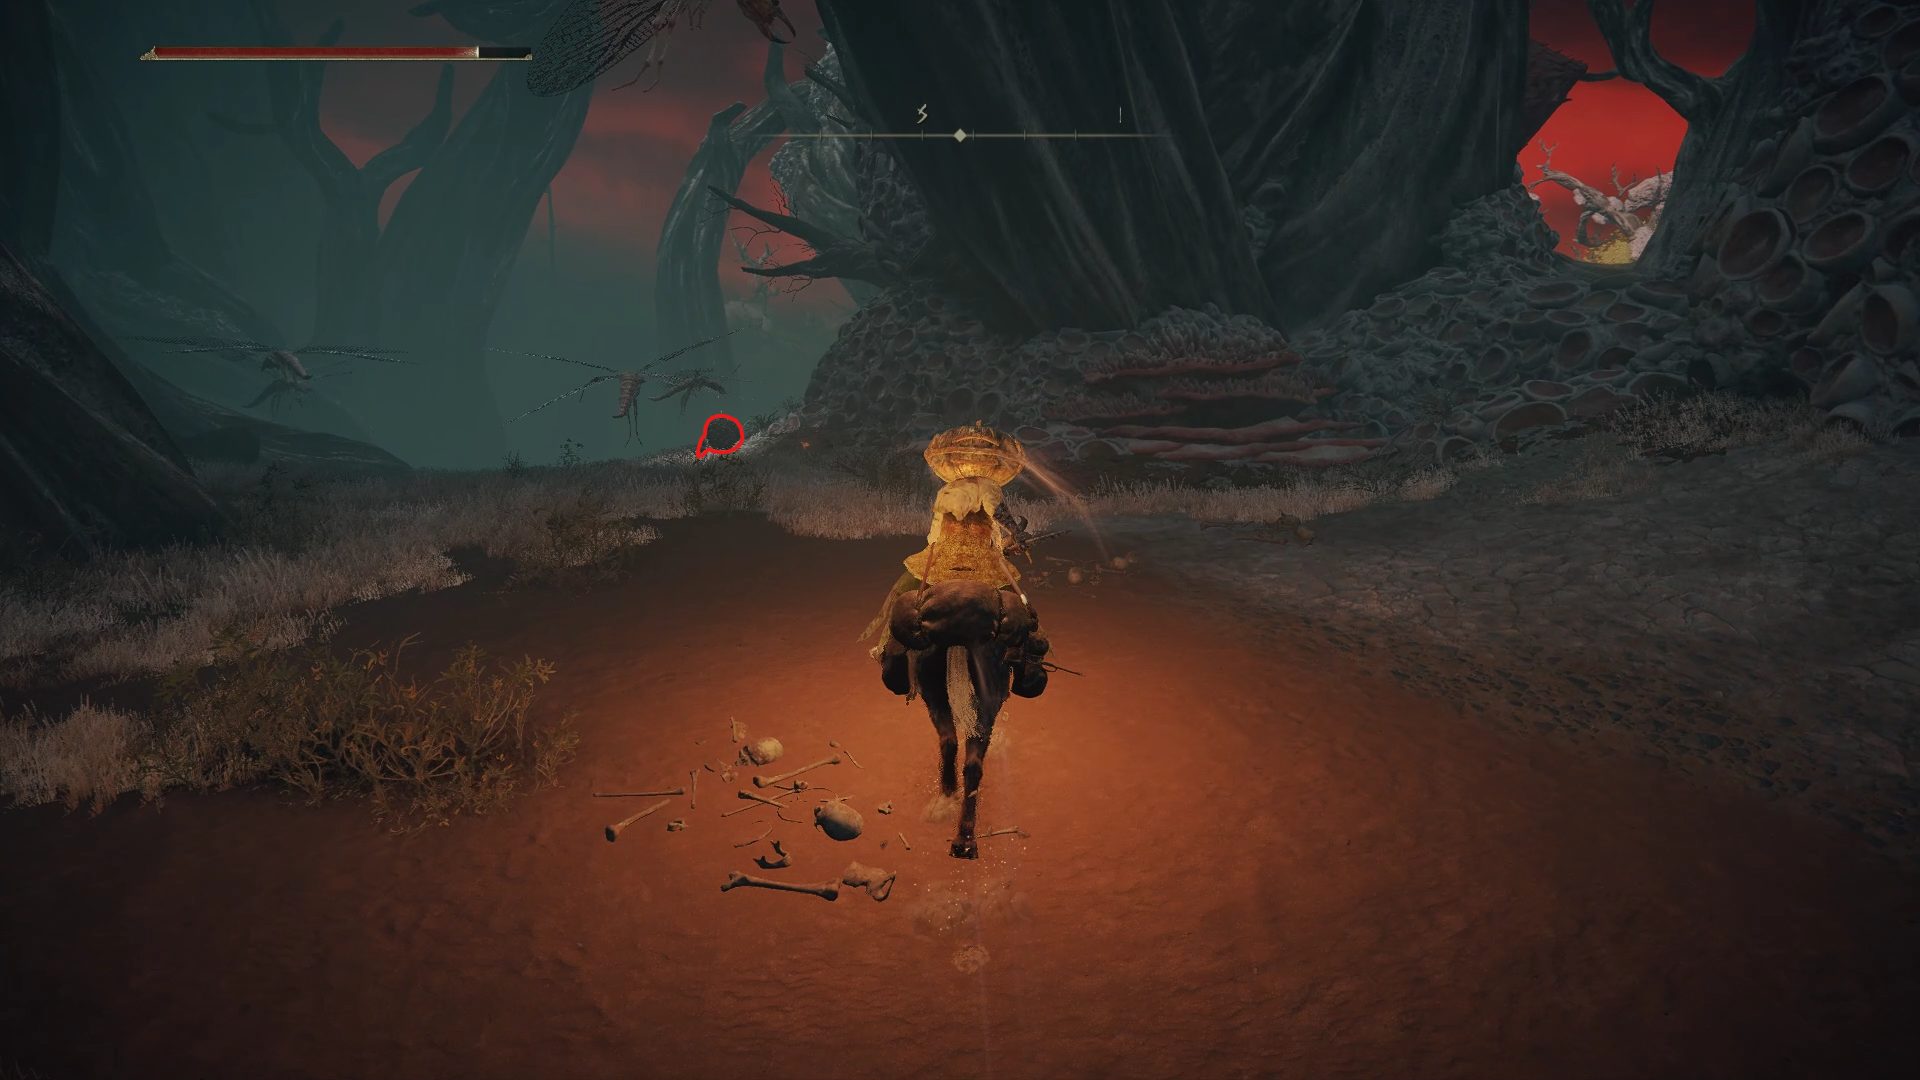
This whole area is filled with rotten swamp water but you don’t have to worry about that as long as you remain mounted. So call you trusty steed Torrent and head southeast to find a loot beetle with the Ash of War: Poisonous Mist.
This loot beetle is a teleporting one, so unless you use a ranged attack to kill it, you will have to chase it around in hopes of killing it before it manages to teleport away once again. However, while doing so, you will encounter one of this swamp’s residents: Cleanrot Knights. As you’re riding around the swamp, they will rise from their Scarlet Rot bath to try and kill you. Keep this in mind as you explore the swamp, as there are quite a few locations where those knights will show up.
From where the loot beetle was, ride east-southeast to find several corpses resting in some very fancy chairs.
While a knight will rise from the waters and you’ll have to deal with him, the Somber Smithing Stone [4] and the Aeonian Butterfly will be worth the effort. From there, start heading northwest toward the center of the swamp, before heading northeast towards the Inner Aeonia site of grace.
On your way there, you’ll encounter several Cleanrot Knights which can be quite challenging by themselves. However, when you approach the middle of the swamp, you’ll also be invaded by a red phantom: Milicent. With that in mind, make sure to defeat the knights that you encounter on your way, as dealing with the invader and the knights on top of being dismounted will be very challenging. When Milicent invades you, as with any other invasion, you’ll be forced to remain on foot until she is defeated. But since this is a swamp full of Scarlet Rot, dodging through its waters will quickly infect you. Before fighting her, find a spot out of the waters where you can safely dodge her attacks without being worried about taking a Scarlet Rot bath every time you roll. Defeating Milicentwill reward you with 5x Sacramental Bud, and Golden Runes[3], [5] and [10], so make sure to defeat her and grab the Inner Aeonia site of grace.
If you head west of this site of grace, you’ll end up reaching the Street of Sages Ruins. The first thing we’ll be looking for is a set of stairs going underground, which is where you will find the Rock Sling sorcery.
The last piece of loot we need to grab in these ruins is located in a ruined tower southwest of where you are. You’ll find a couple more flowers to kill inside of the tower, but also the Meteorite Staff and a Golden Rune [4].
Now that the ruins are fully looted, we can continue exploring the swamps. You’ll want to go north to grab the Sacramental Bud on top of a branch, before following the cliff while going east until you find a narrow path leading north.
Sacramental Bud
If you follow this path, you’ll end up in a small area filled with crystals and defended by a magical floating ball. Right next to it you can find a Somber Smithing Stone [5] and some Glintstone Fireflies. Once you grabbed those, leave this dead-end and continue following the cliff east until you find an invisible rolling loot beetle. Make sure to deal with the nearby enemies first, and defeat this beetle to get the Poison Armament incantation.
East-southeast from where the beetle was you should be able to see a tree with a visible piece of loot next to it. Ride up to the tree to grab the Rune Arc and then continue heading south to find another loot beetle nearby.
Rune Arc east-southeastLoot beetle location
This beetle is a regular one, and defeating it will grant you the Ash of War: Sacred Ring of Light. However, there are a few flying insects that will be much more annoying to deal with, though you can always run away and ignore them once you got your loot. No matter how you decide to deal with those, head back to the Inner Aeonia site of grace. South-southeast of there, in a secluded area, you’ll find the Commander O’Neil boss.
While it’s not a mandatory boss fight, defeating him will allow you to begin Milicent‘s questline.
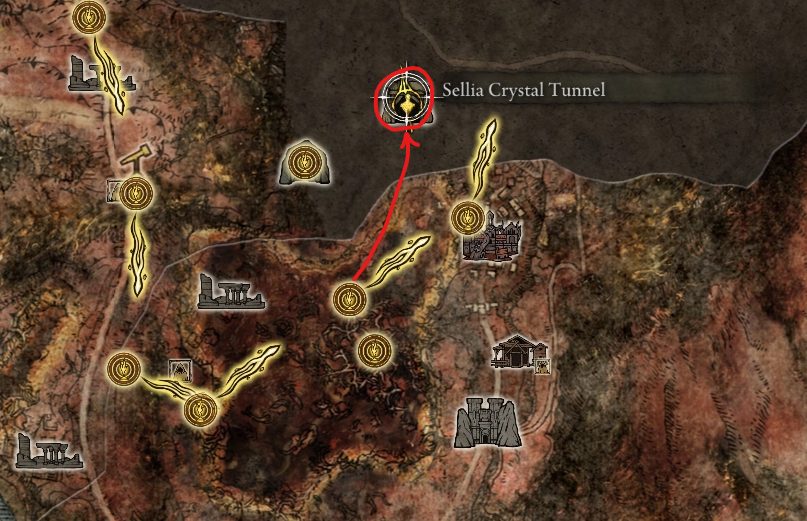
Now that we have the Unalloyed Gold Needle, we can almost start exploring the nearby town, but we need to do a tiny detour first. North-northeast of the Inner Aeonia site of grace, we can find another optional dungeon, which is worth exploring all the same: Sellia Crystal Tunnel.
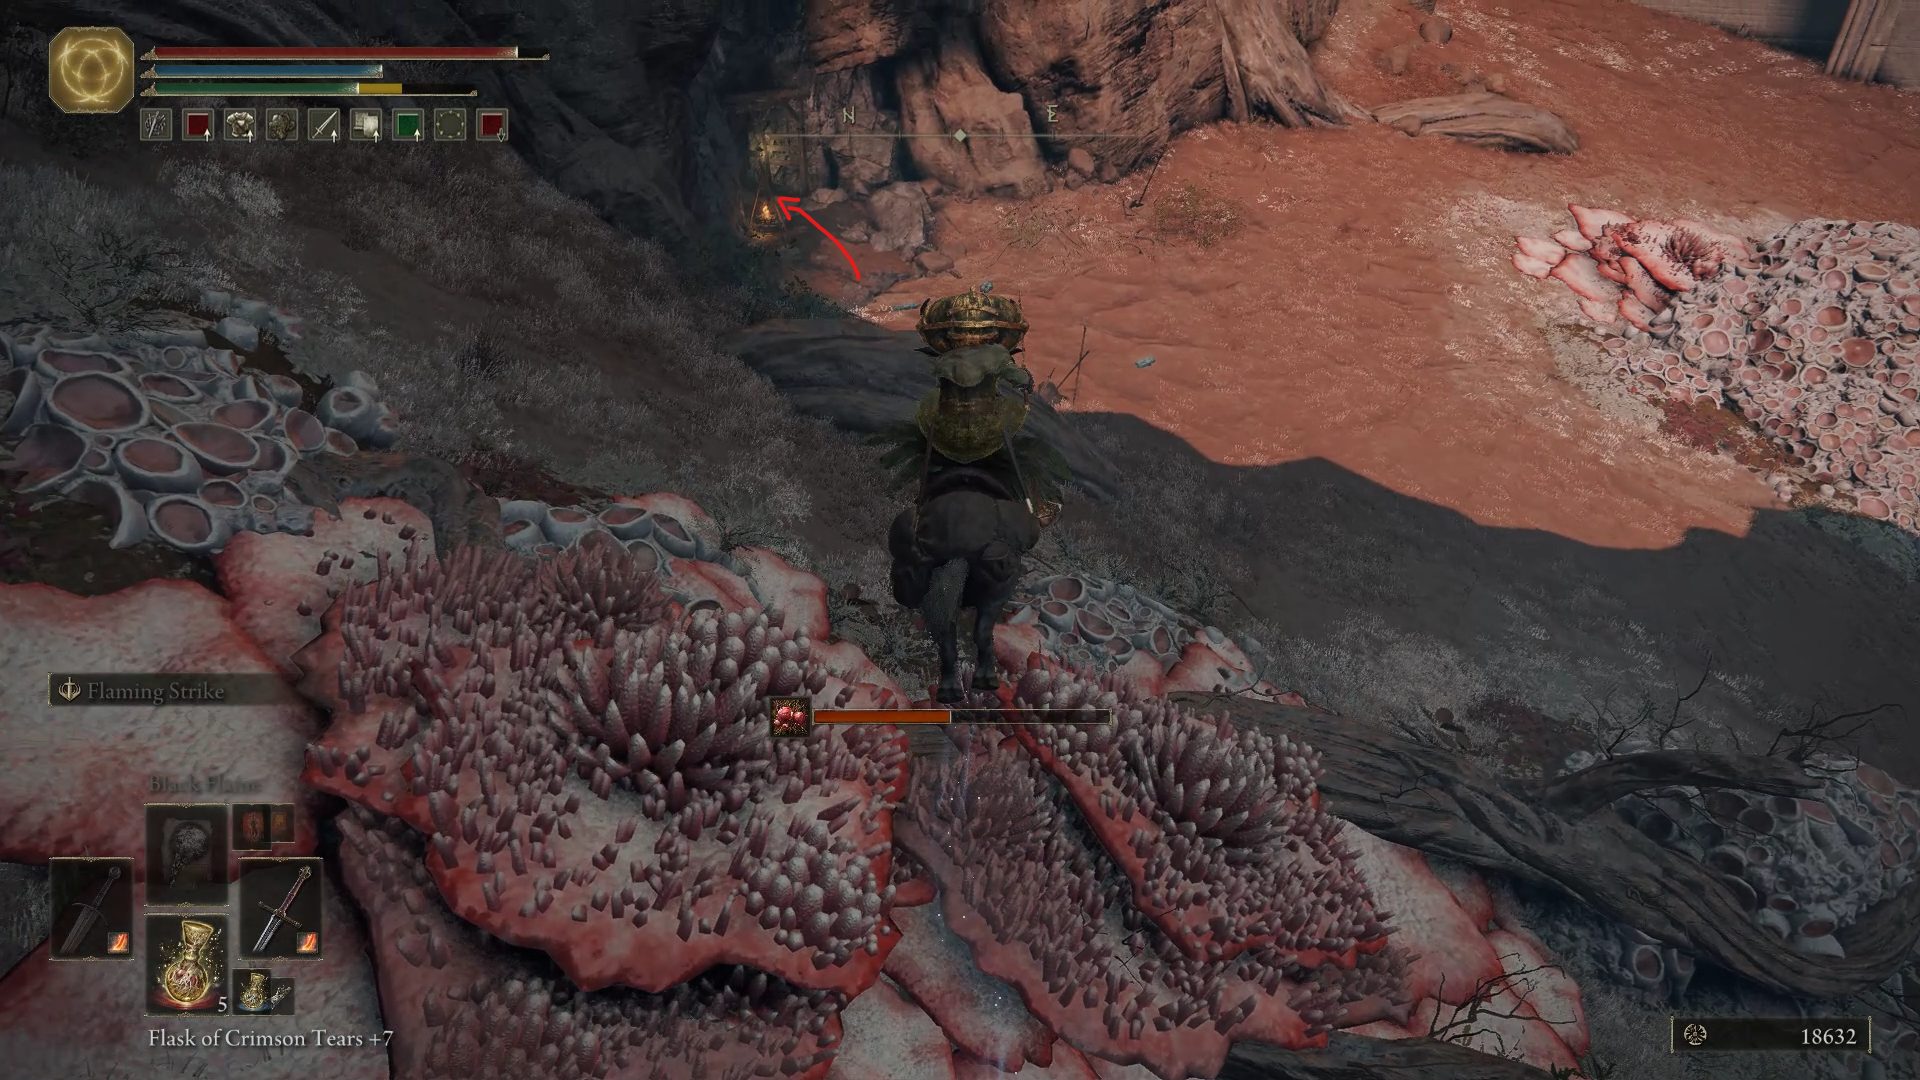
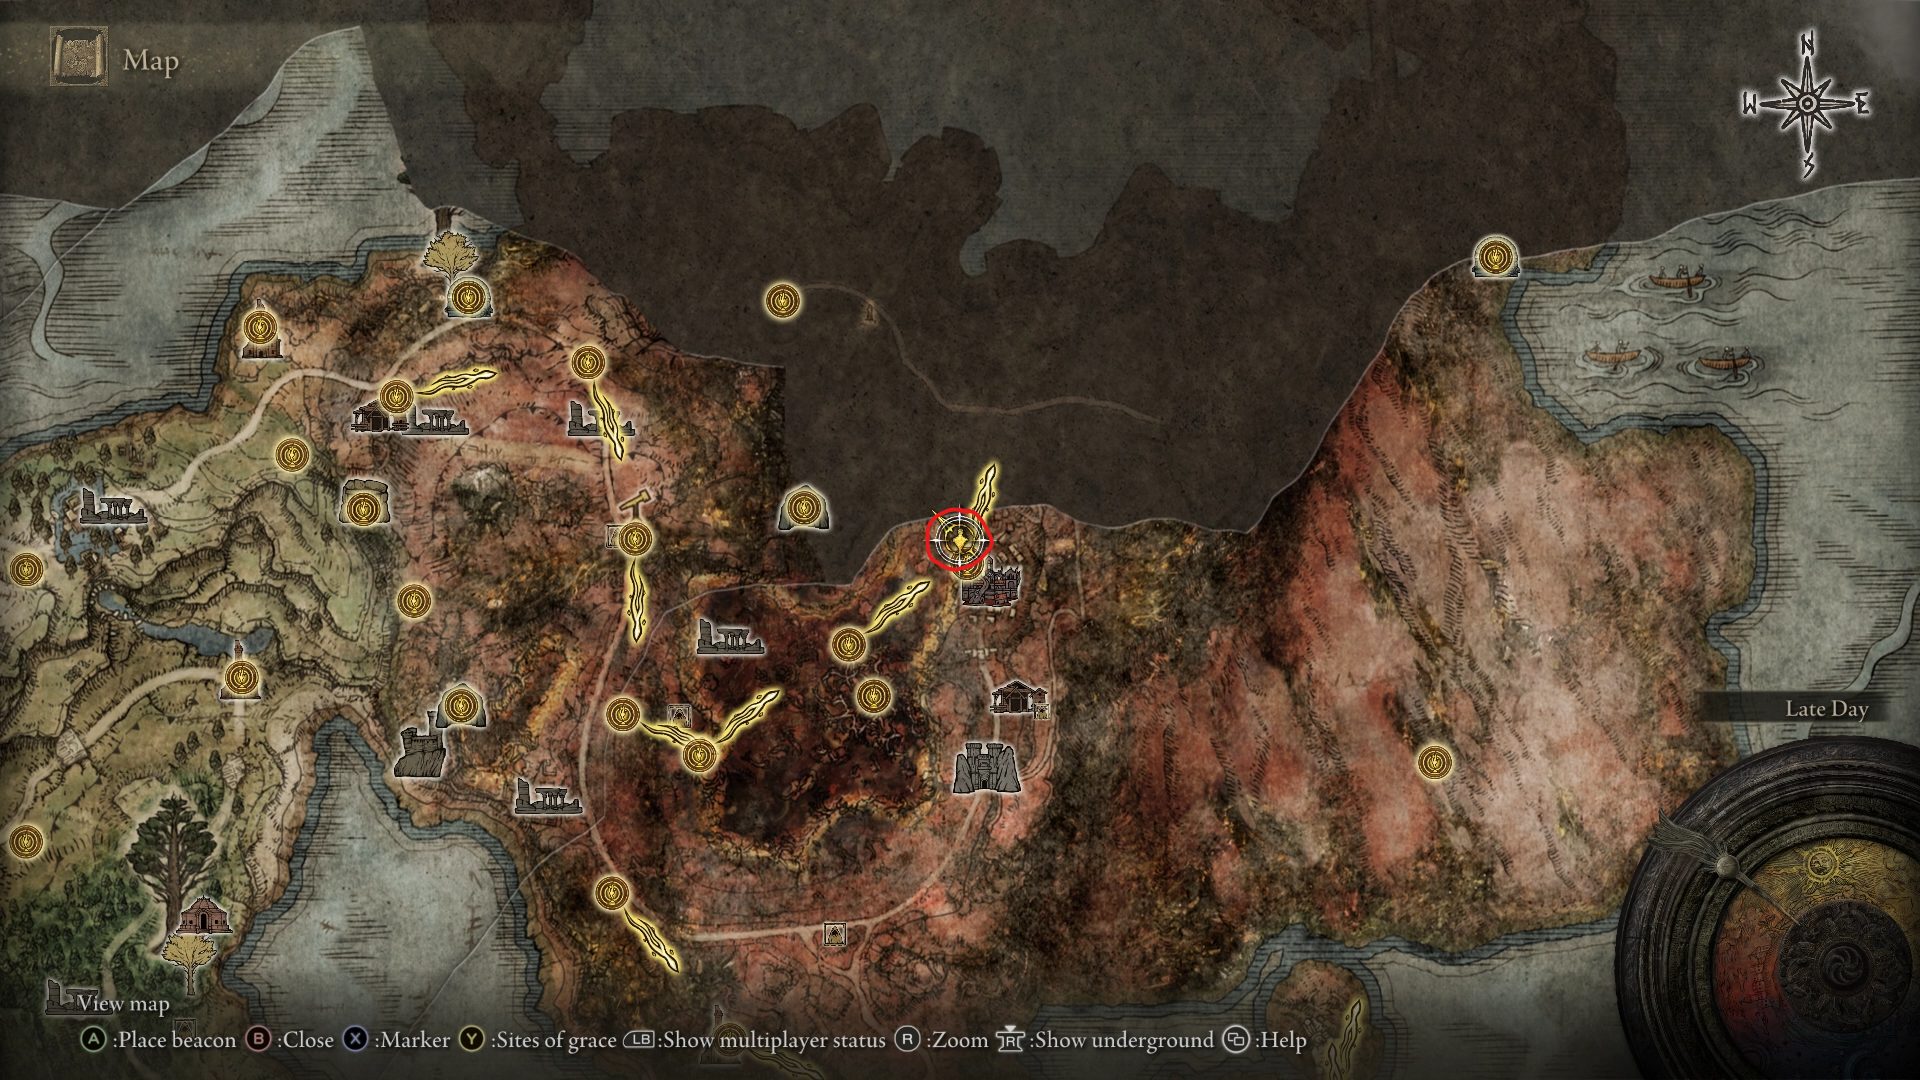
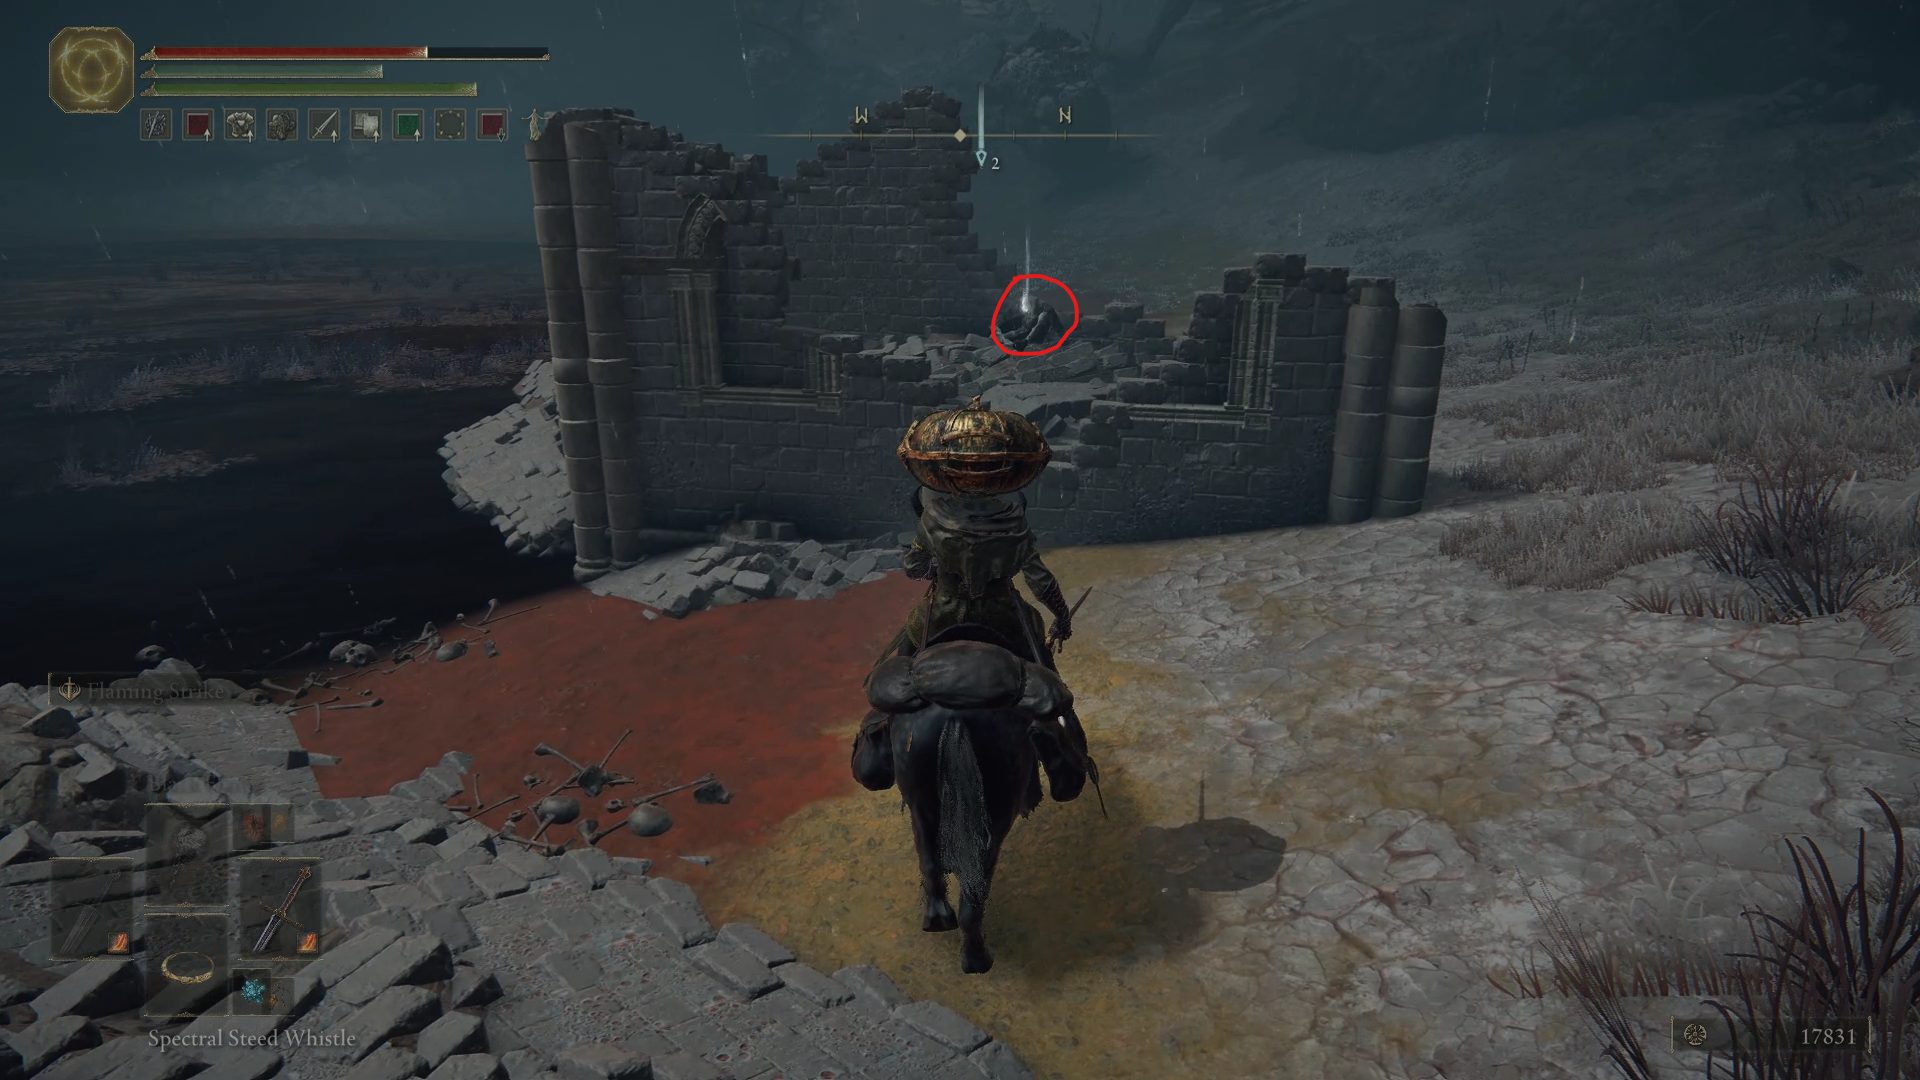
Coming out of this dungeon, start heading south-southeast. You can pretty much ignore the huge immobile enemies on your way there, but make sure to deal with the tall and small marionettes that you’ll encounter on your way to the ruins, as those can be quite deadly if left unchecked. In the ruins south-southeast, the first thing you want to grab are the Rotten Stray Ashes.
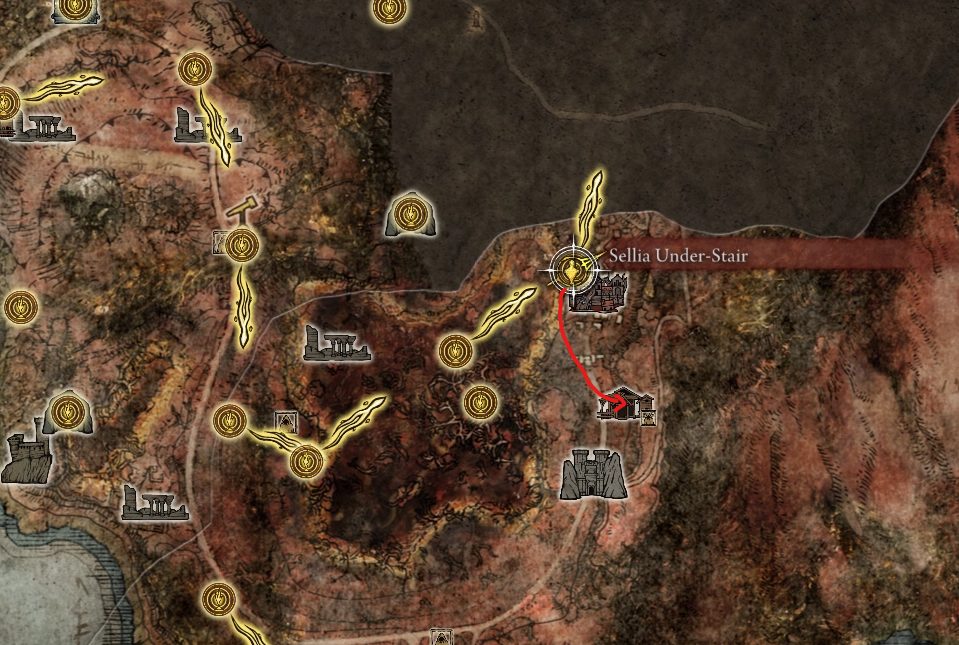
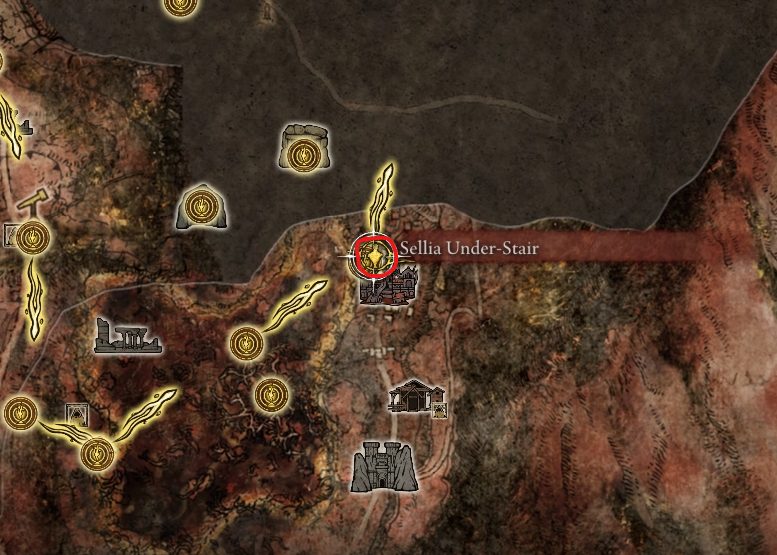
Just south of those ashes you should also grab the nearby Sellia Under-Stair site of grace. As you may have noticed, there is an entire town to the east, which we will explore after running a quick errand. From the Sellia Under-Stair site of grace, head south-southeast until you find Gowry’s Shack.
By speaking to Gowry in there, you’ll be able to begin Milicent‘s quest. Gowry will ask you to find and retrieve the Unalloyed Gold Needle in exchange for the nearby town’s secret. Luckily, we have already retrieved the needle, so keep speaking to Gowry until you exhaust his dialogue. Gowry will give you a note detailing Sellia, Town of Sorcery‘s secret, and will ask you to give him some time with the needle. You can either rest at a site of grace a couple of times or just quit to the main menu and load back in to give him some time, and at that point Gowry will ask you to give the needle to Milicent, past the nearby town.
The town’s secret is that in order to continue forward, you will have to “Light three flames atop the candle towers to break the seal”. What this means is that you will have to climb 3 towers to unlock the way forward.
These 3 towers unlock 3 different things: doors in the town, the gate to an optional boss, and the gate to a site of grace and the way forward. We’ll be unlocking all of the gates of course since our inventory is limitless, and so is our greed. You’ll just have to look out for the spectral wizards running around town, since they will only be visible if you’re close to them.
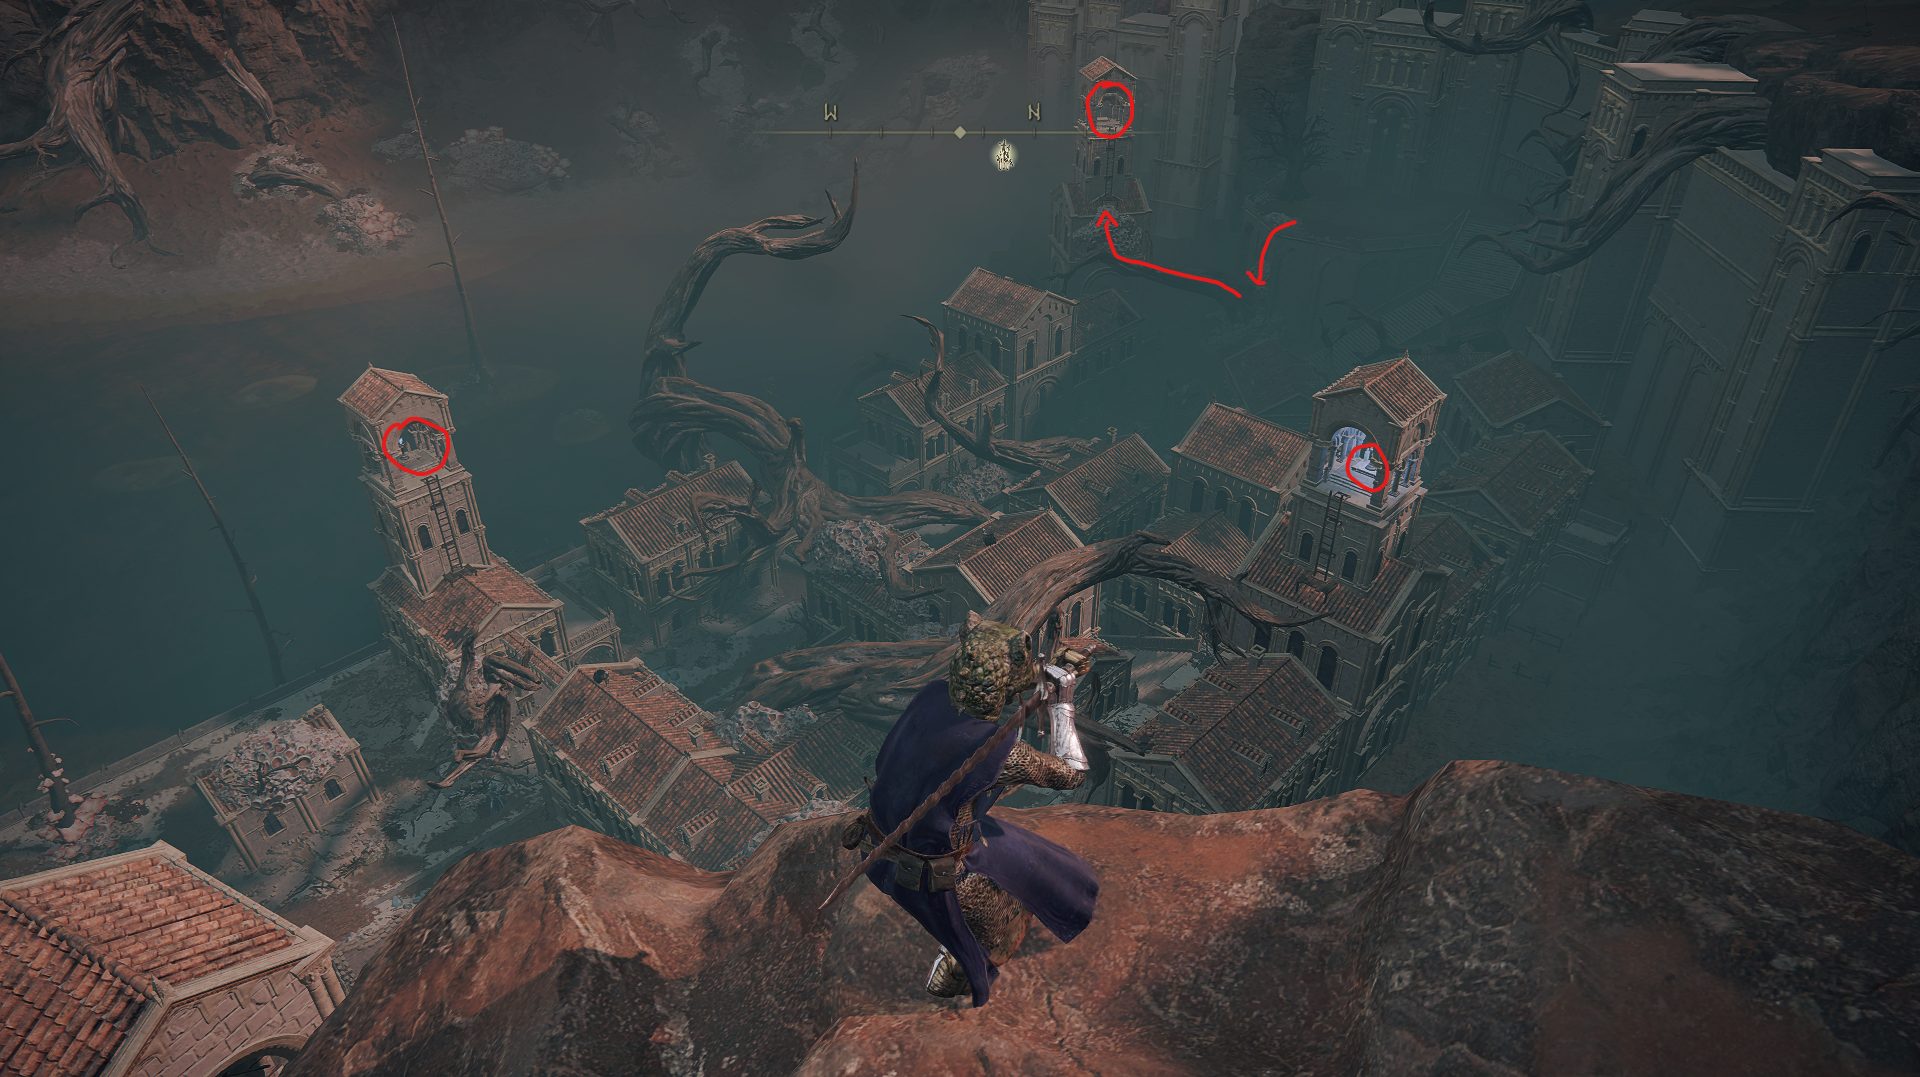
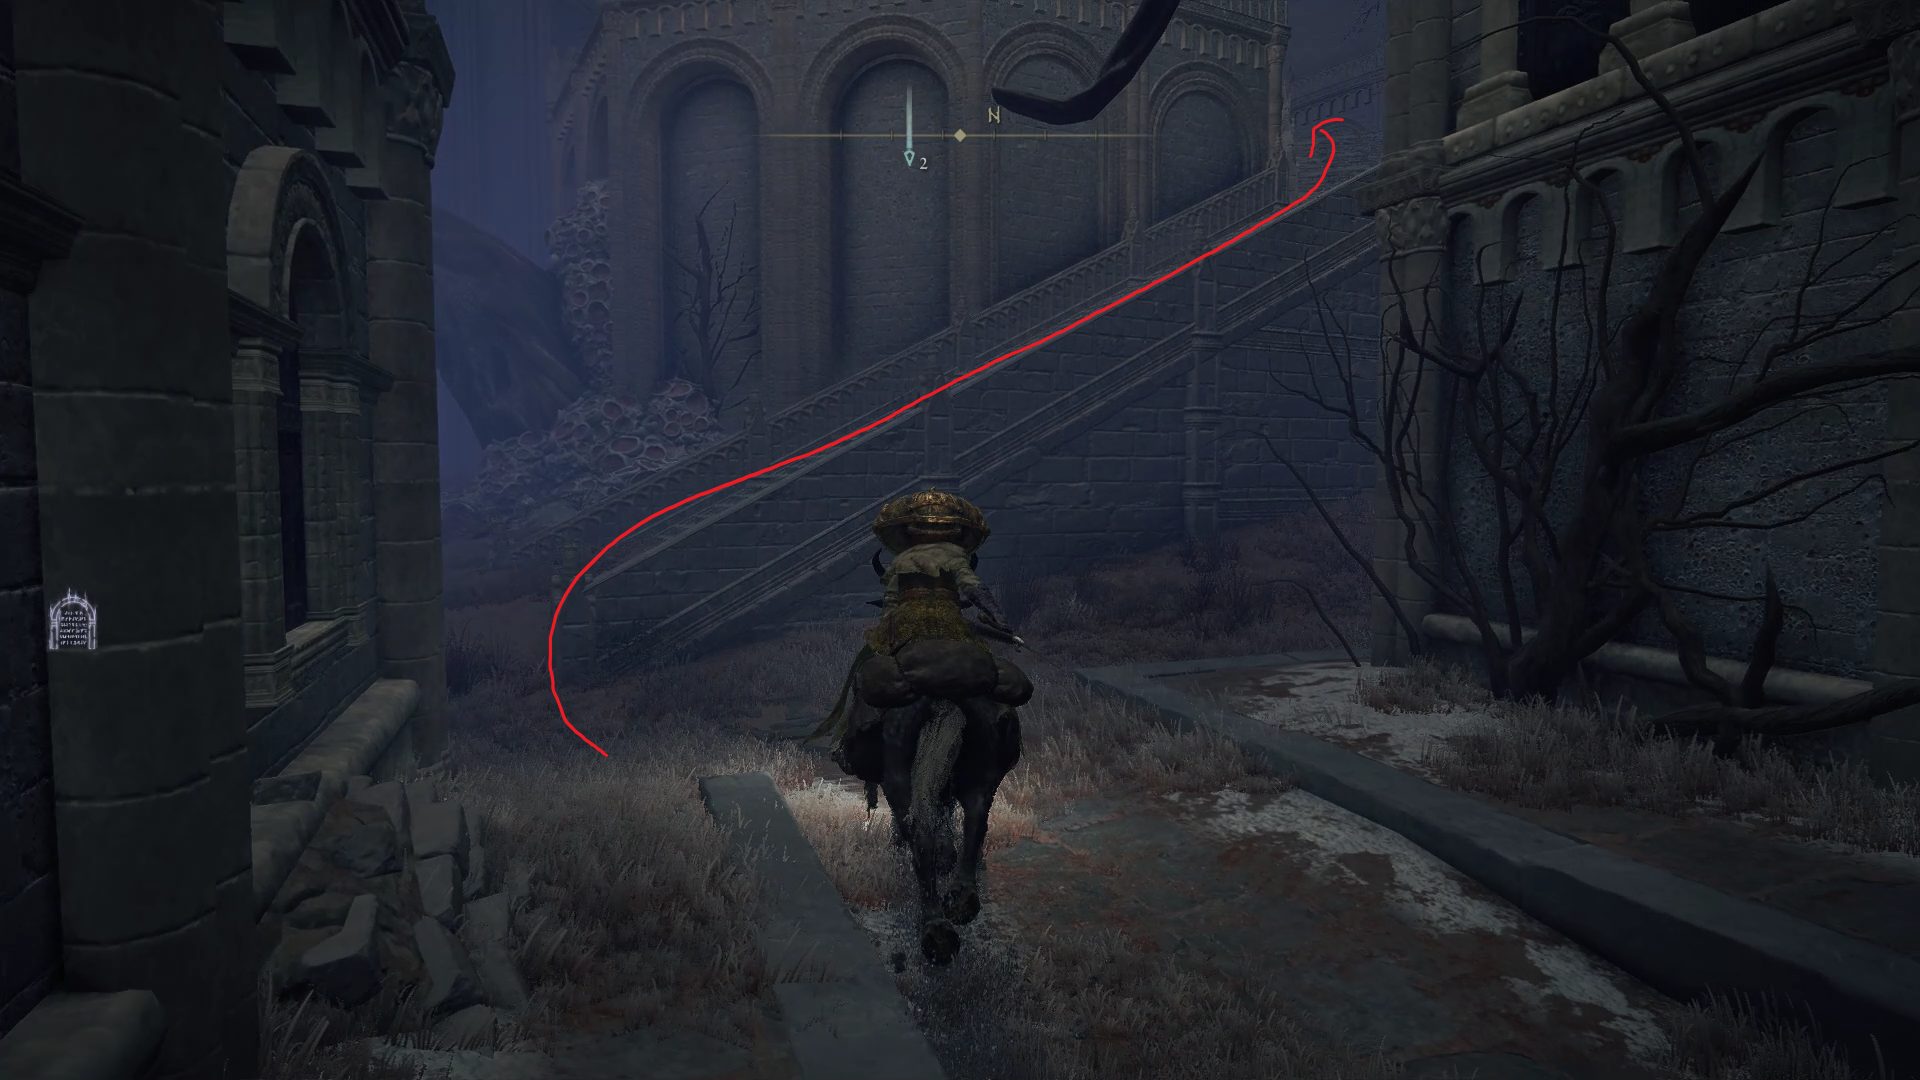
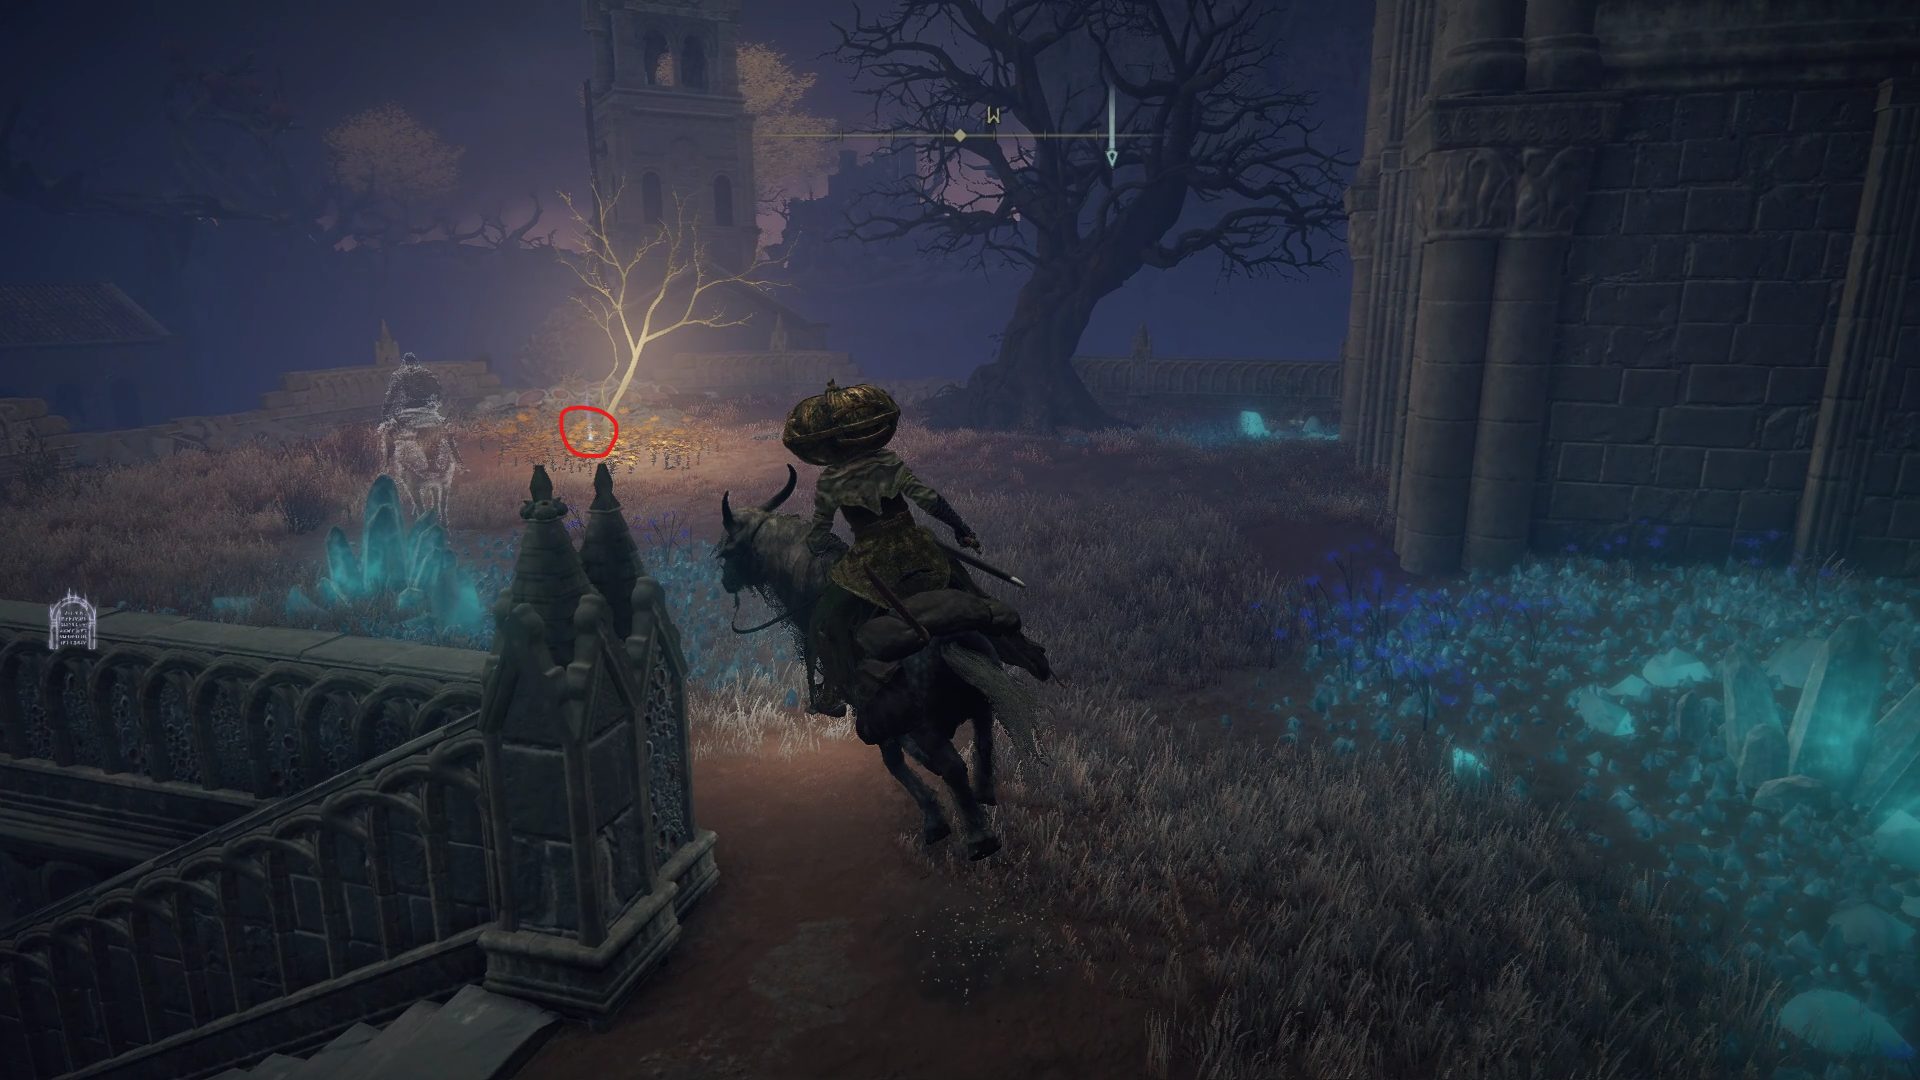
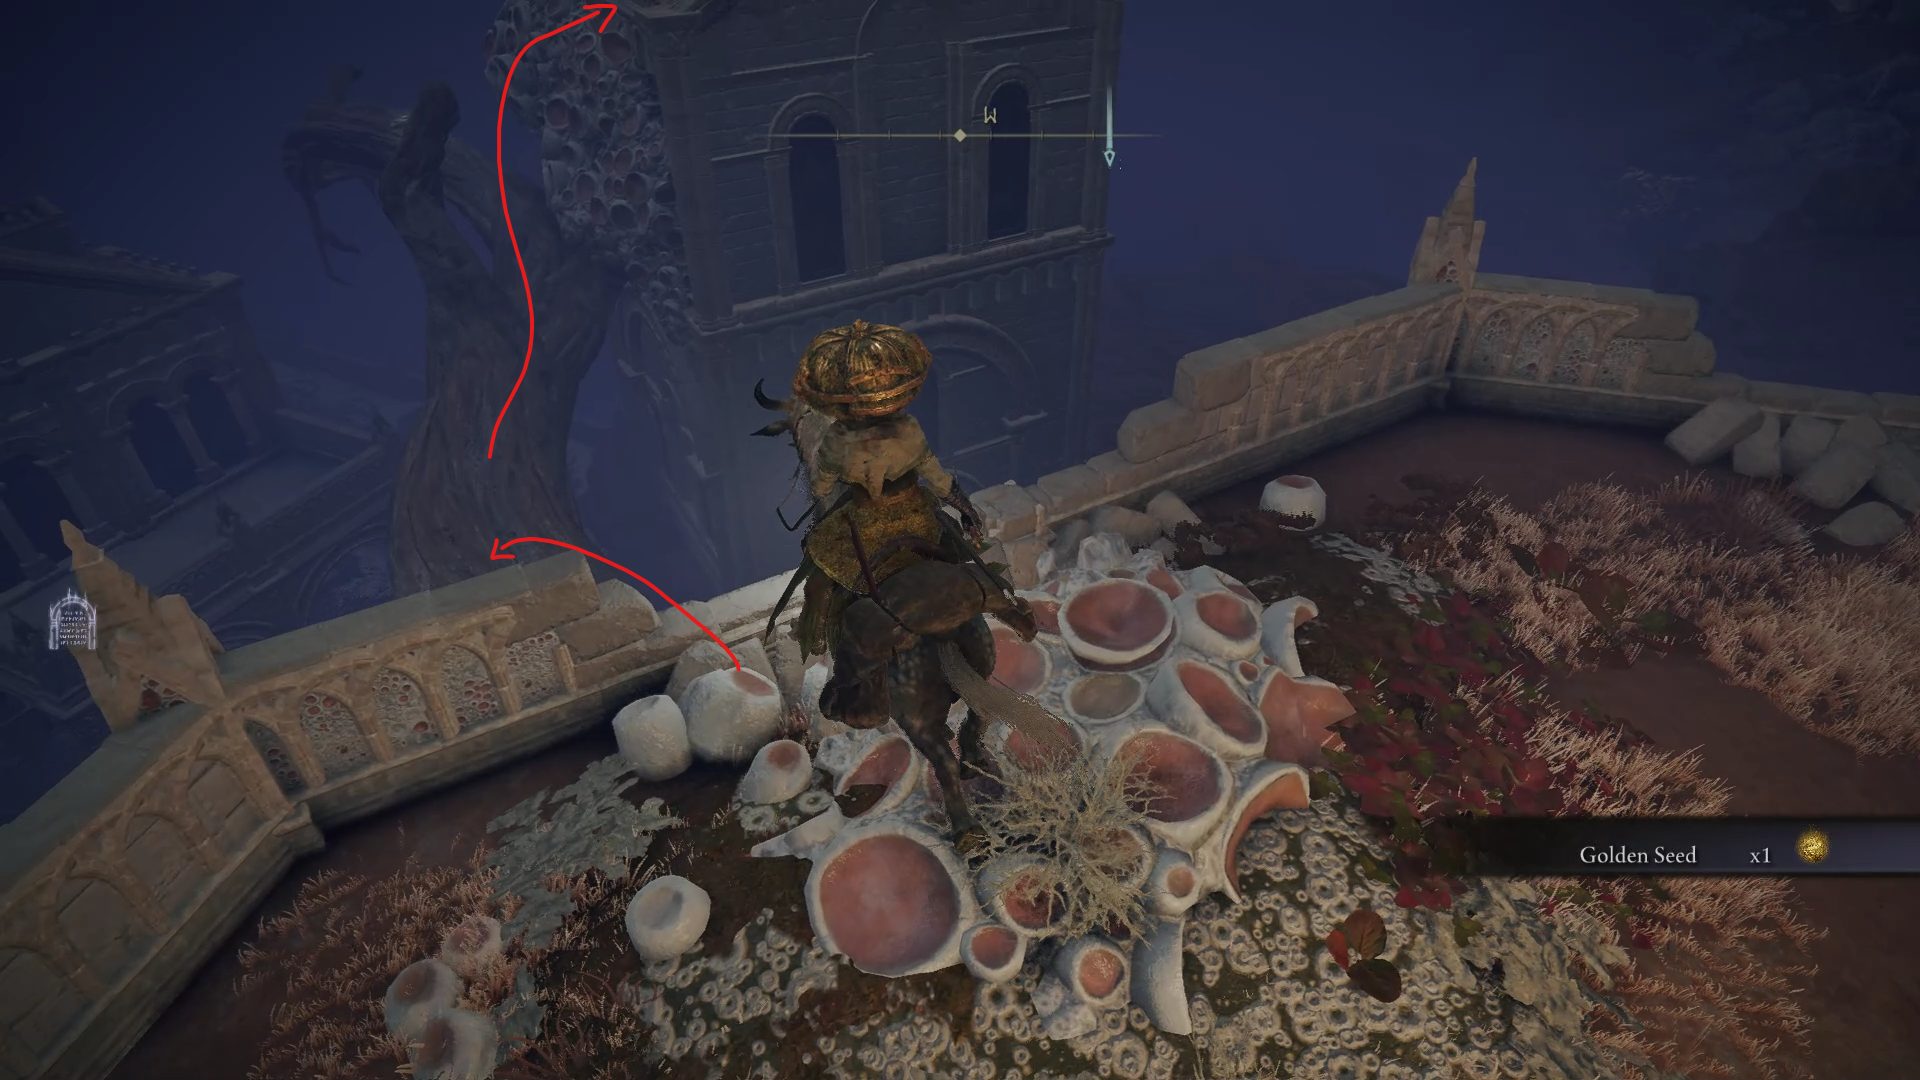
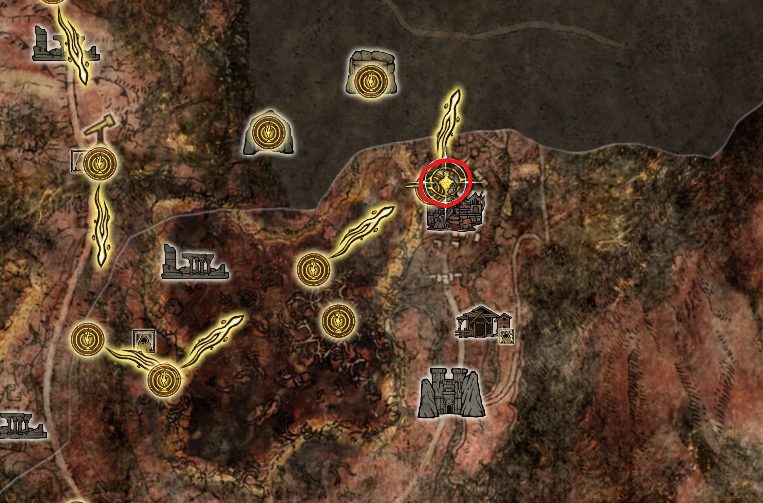
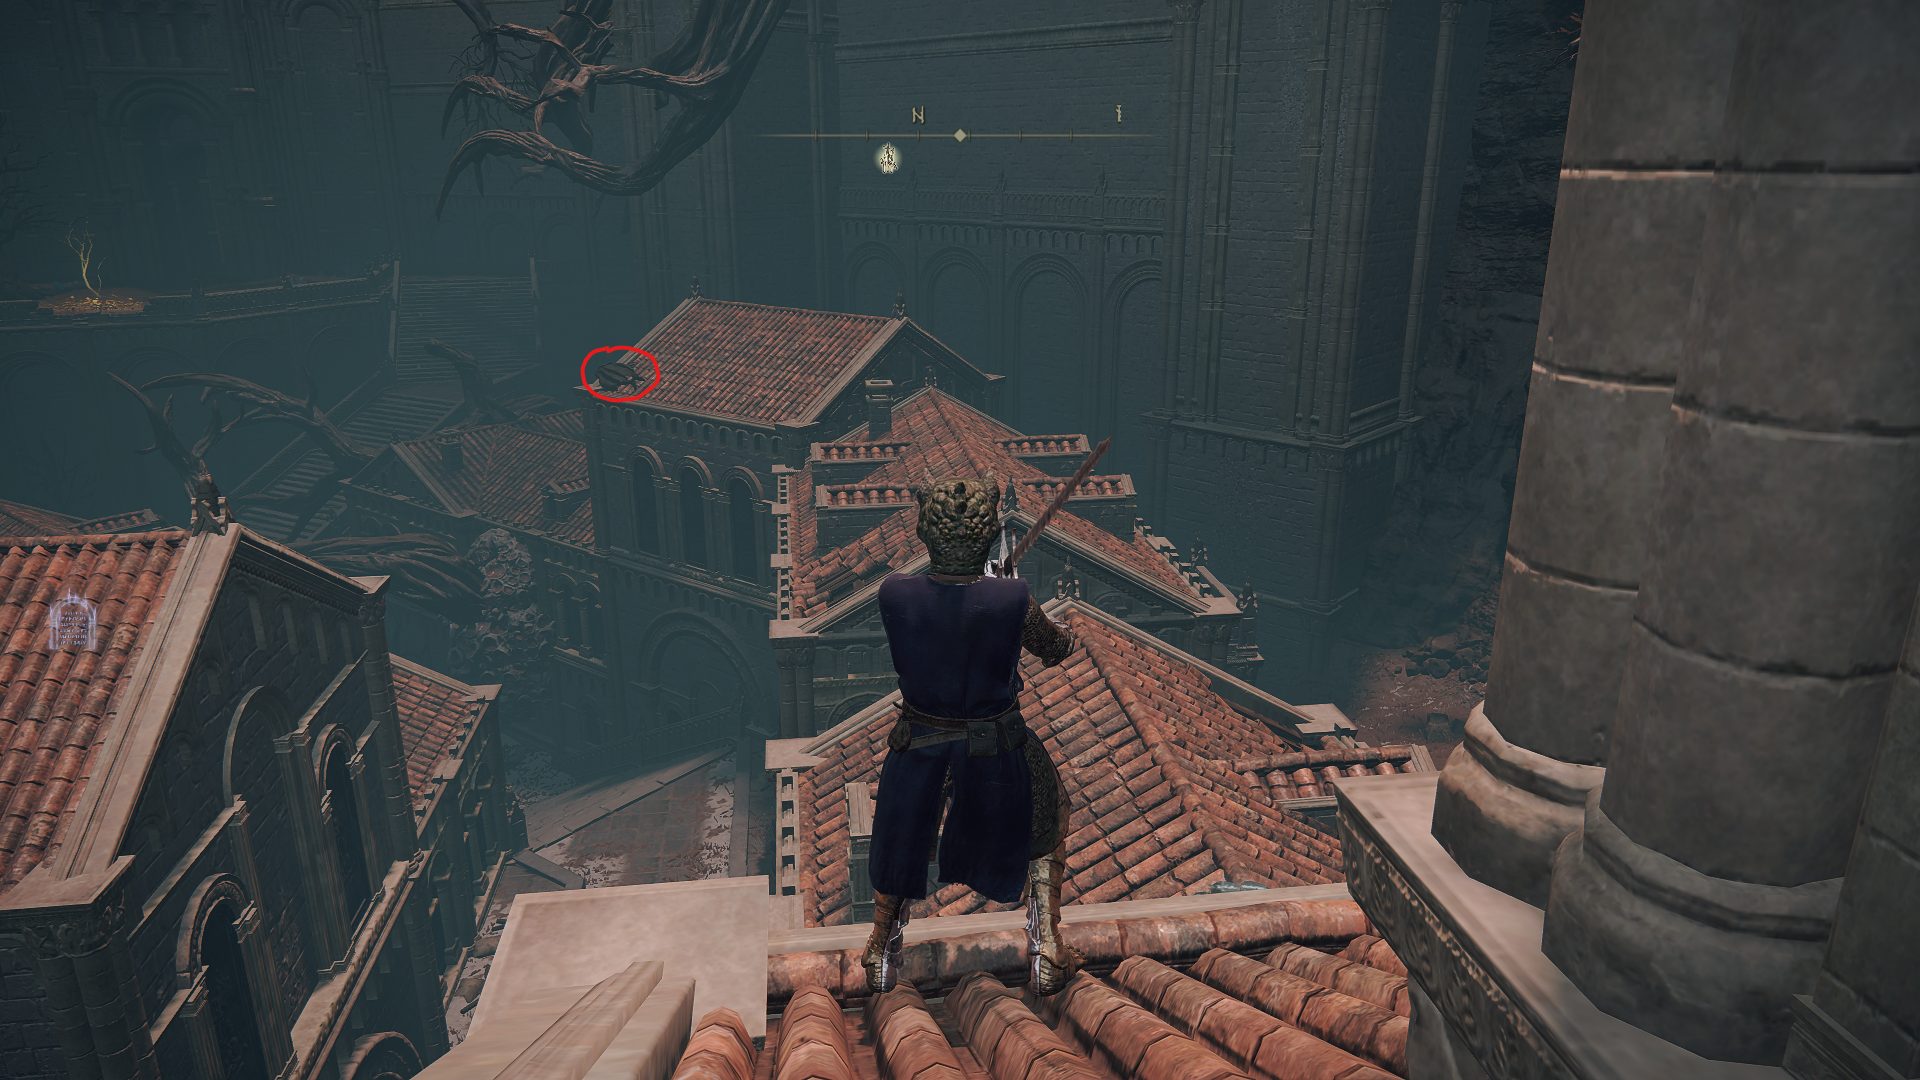
First, head all the way up the stairs found at the northern side of town, grab the Golden Seed from the illusory tree nearby and jump on top of the branch southwest of there to reach the first tower.
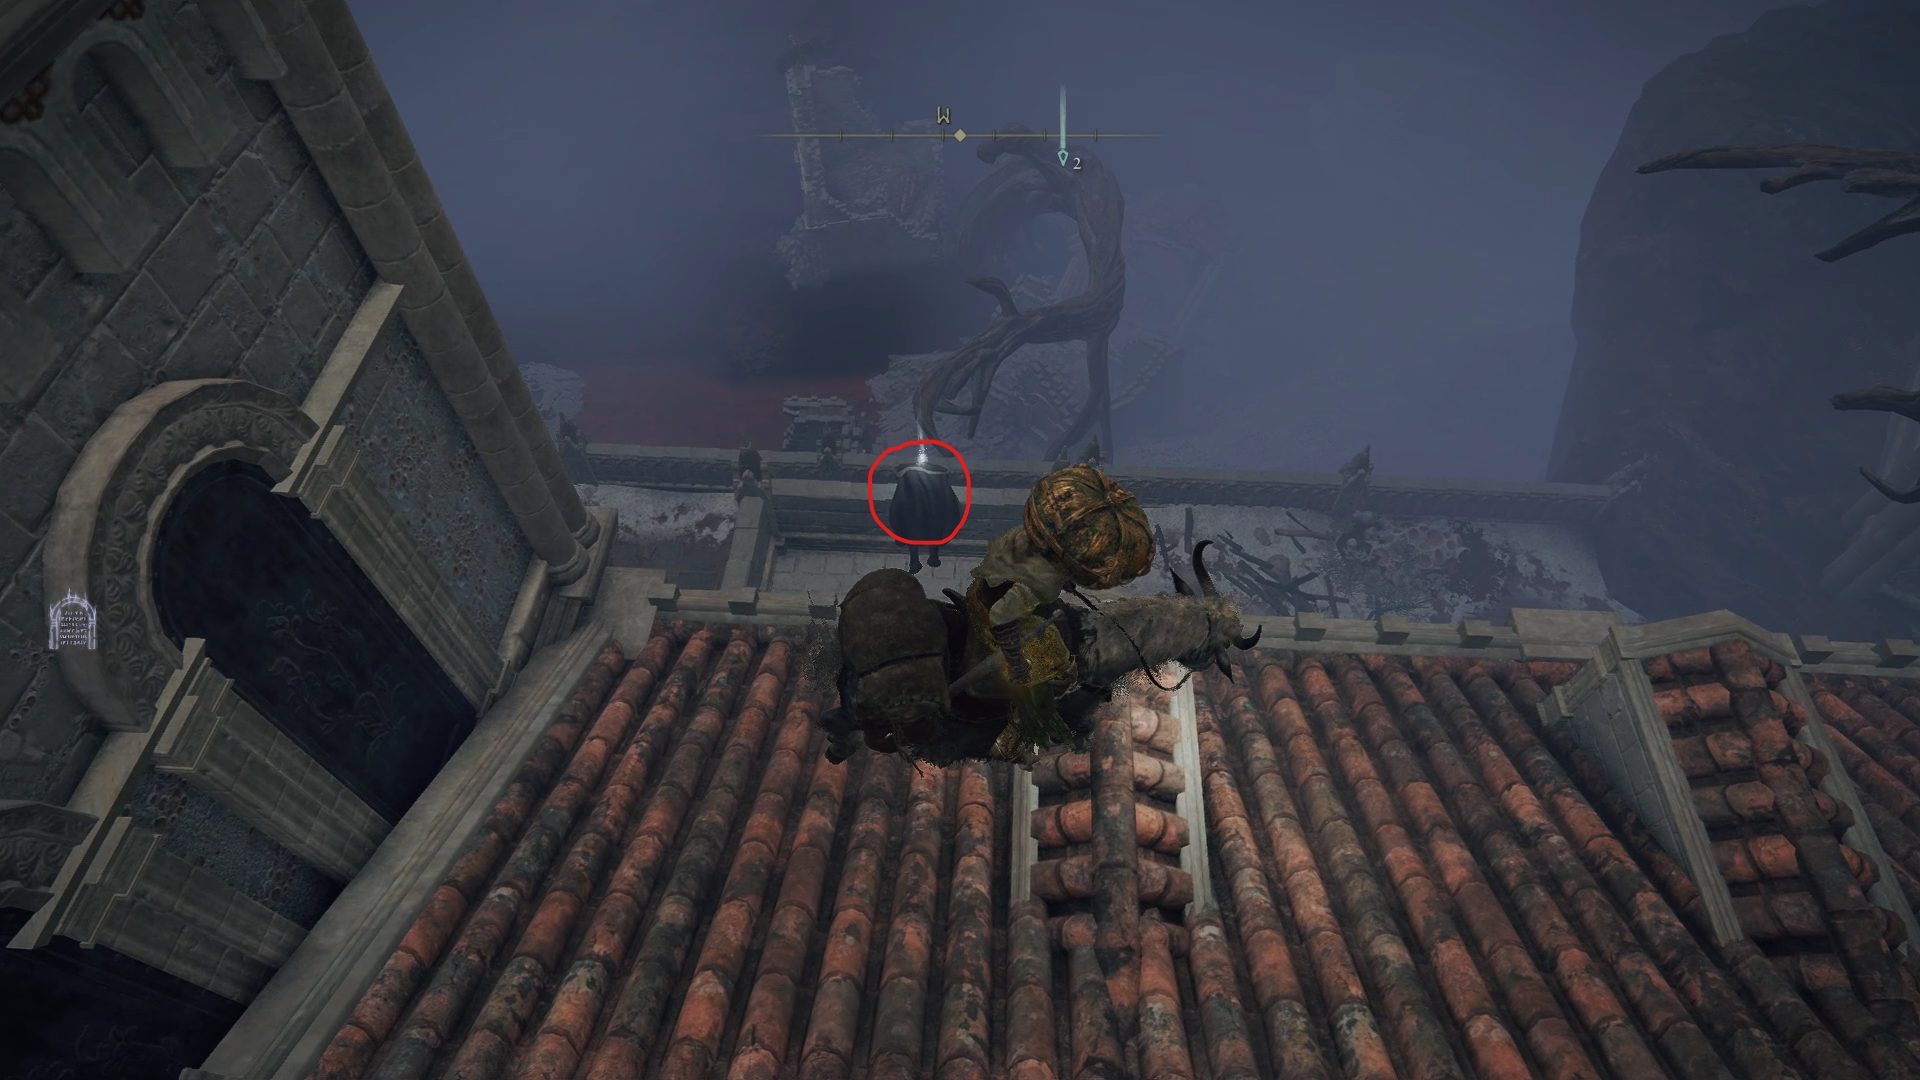
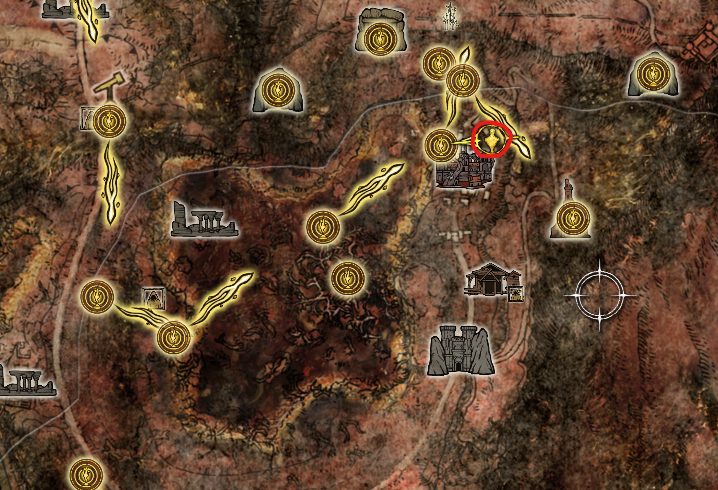
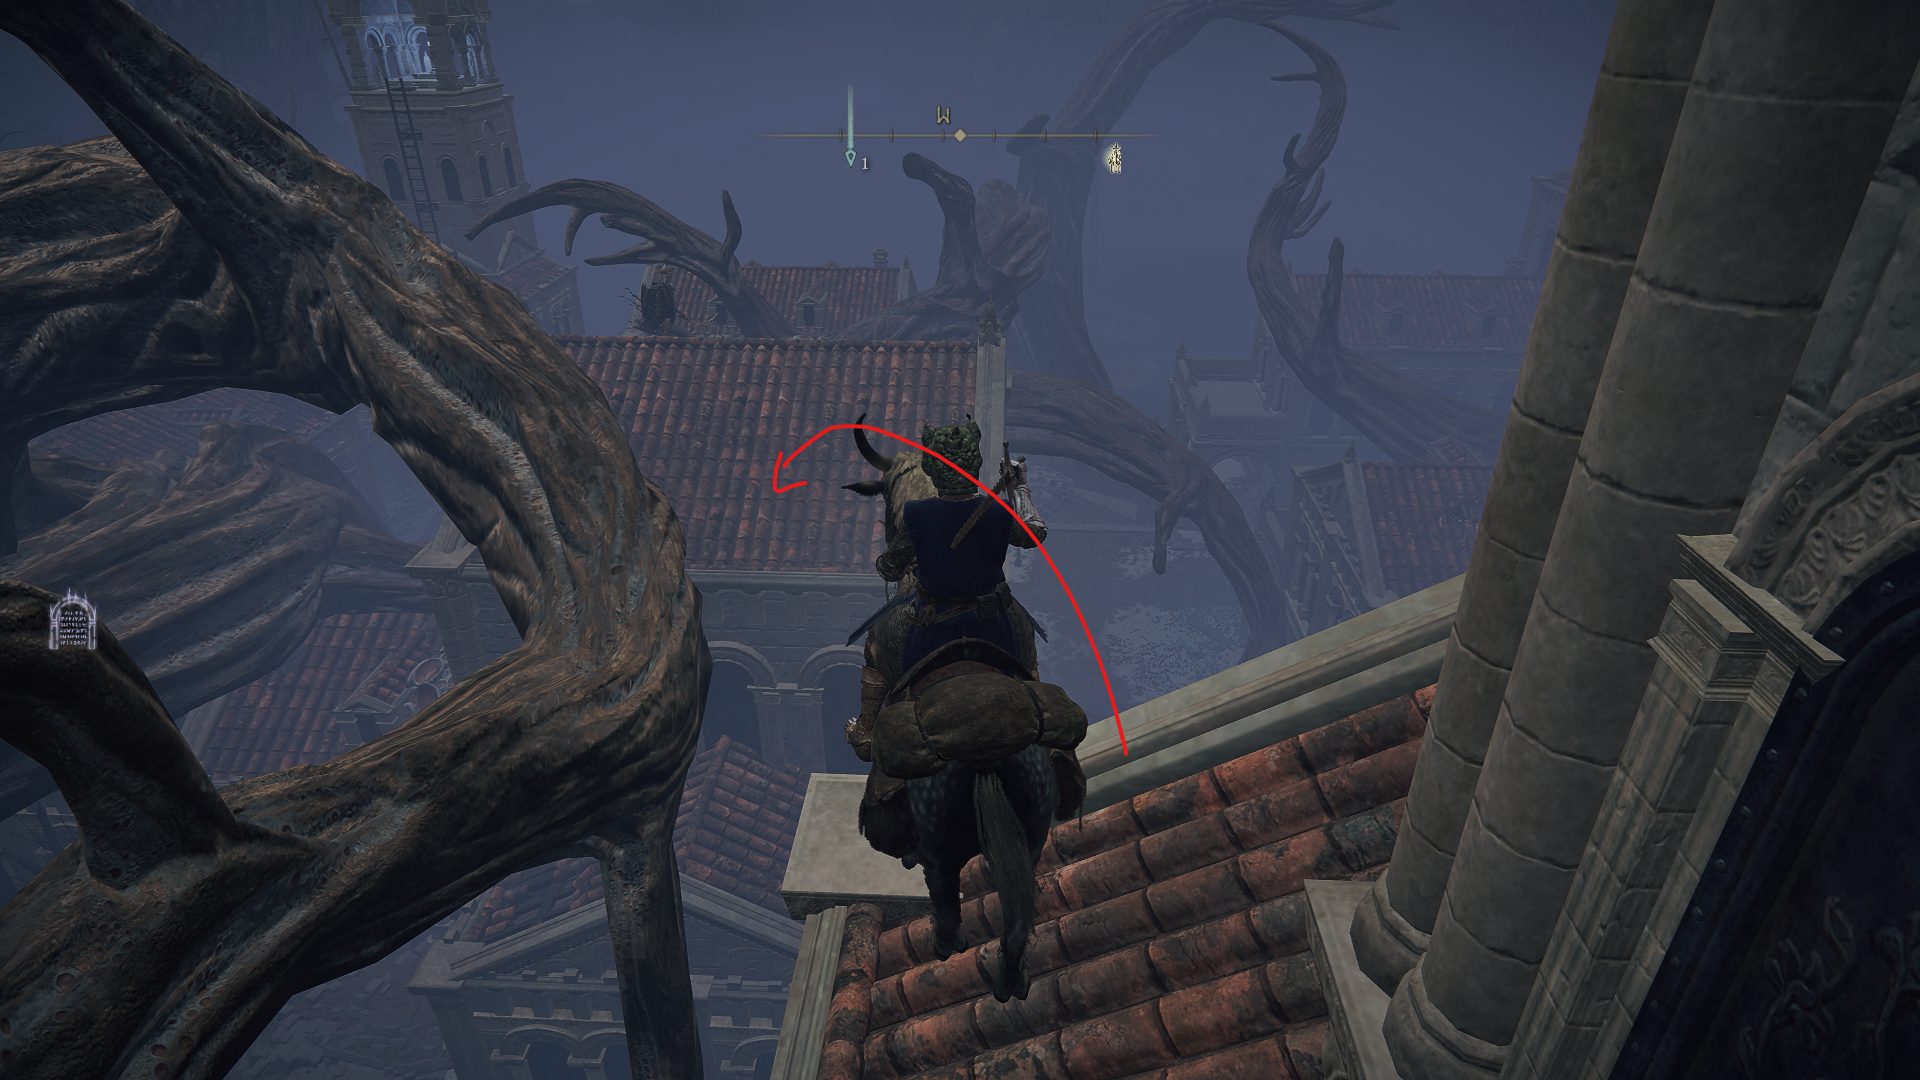
After activating this tower, continue navigating the rooftops by using Torrent’s double jump and head towards the next tower, which you can find on the eastern side of town. First, jump towards the rooftops south of where you are, and grab the Staff of Loss from the corpse hanging from the balcony below.
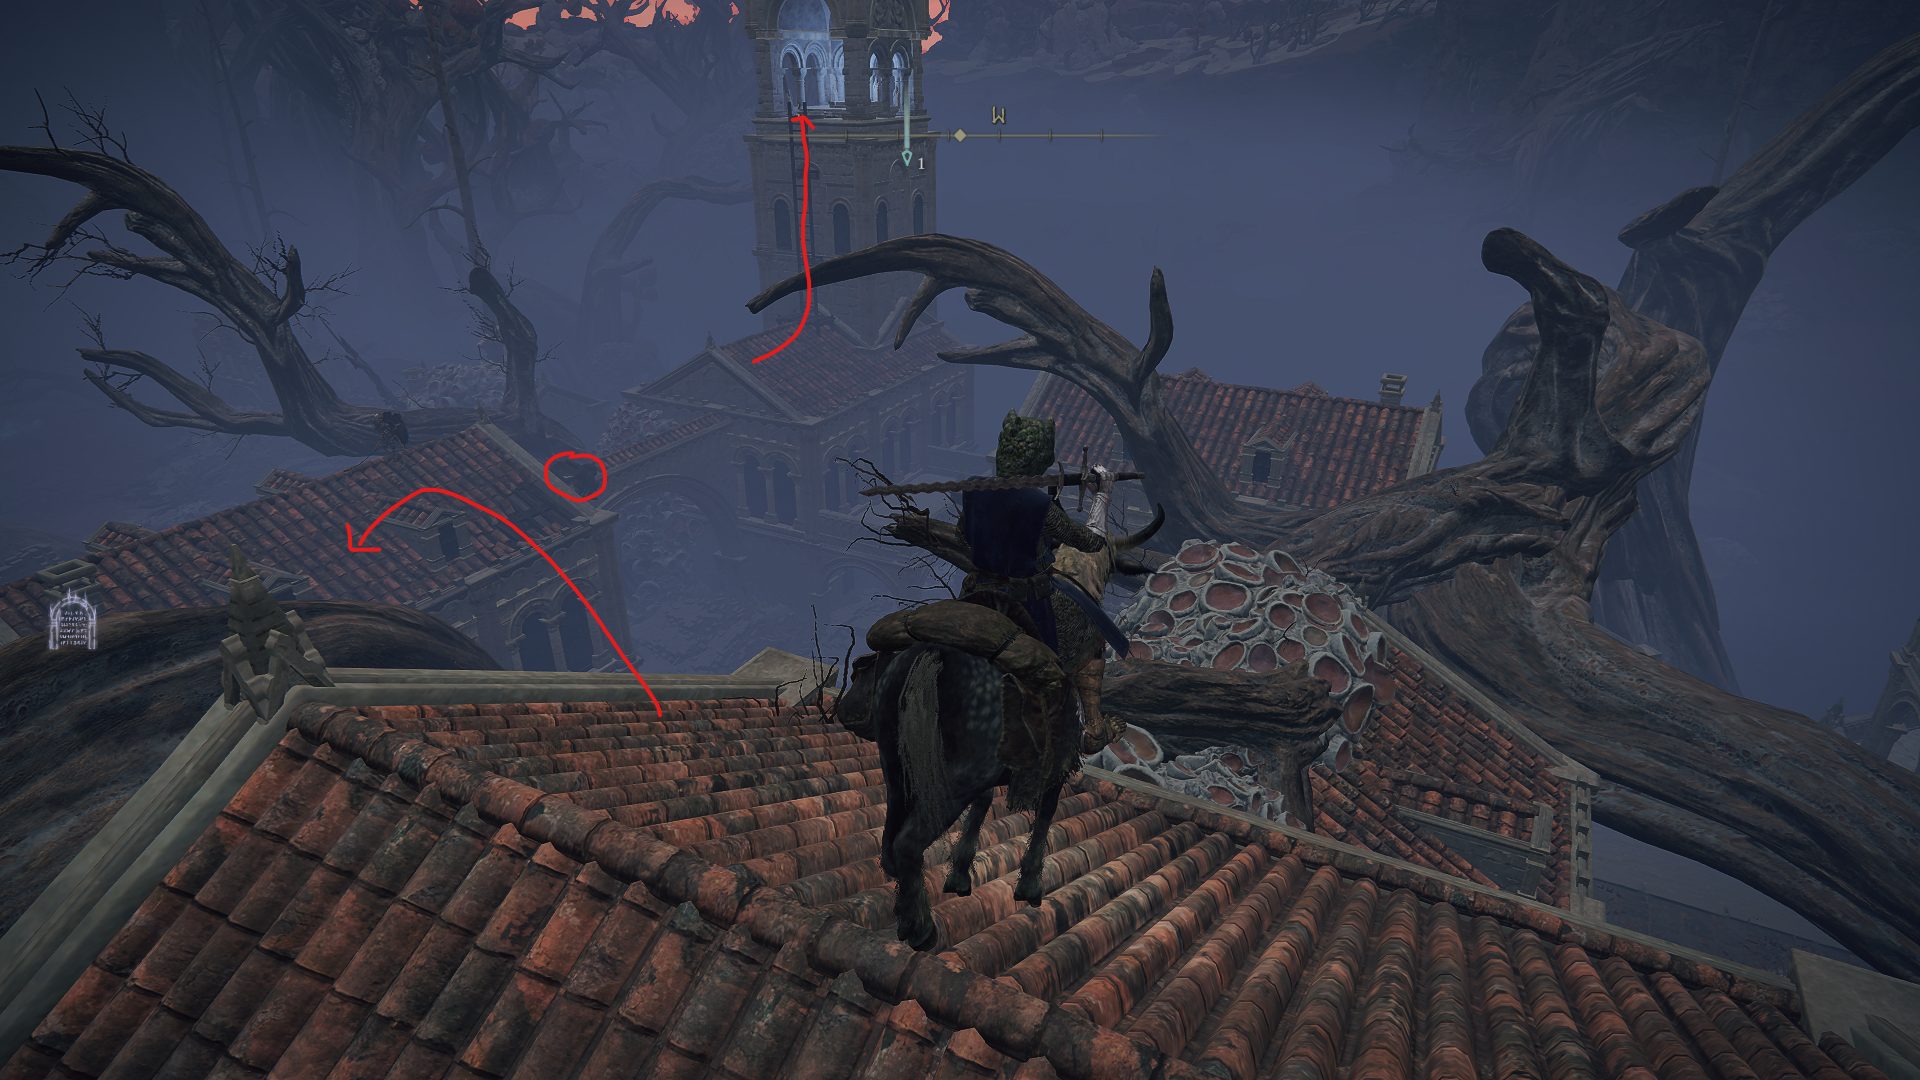
Now jump back up to the rooftop above you by either climbing up from the balcony’s ledge by double jumping with Torrent, or just retrace your steps the first tower. You will now have to do a bit of parkour to reach the next tower. Look southeast, and jump on top of the nearby branch to begin your journey across the rooftops until you reach the next tower.
Light up the fire at the top of the tower and go back down the ladder before heading north through the rooftops. By doing so, you can grab another piece of loot: the Cerulean Tear Scarab.
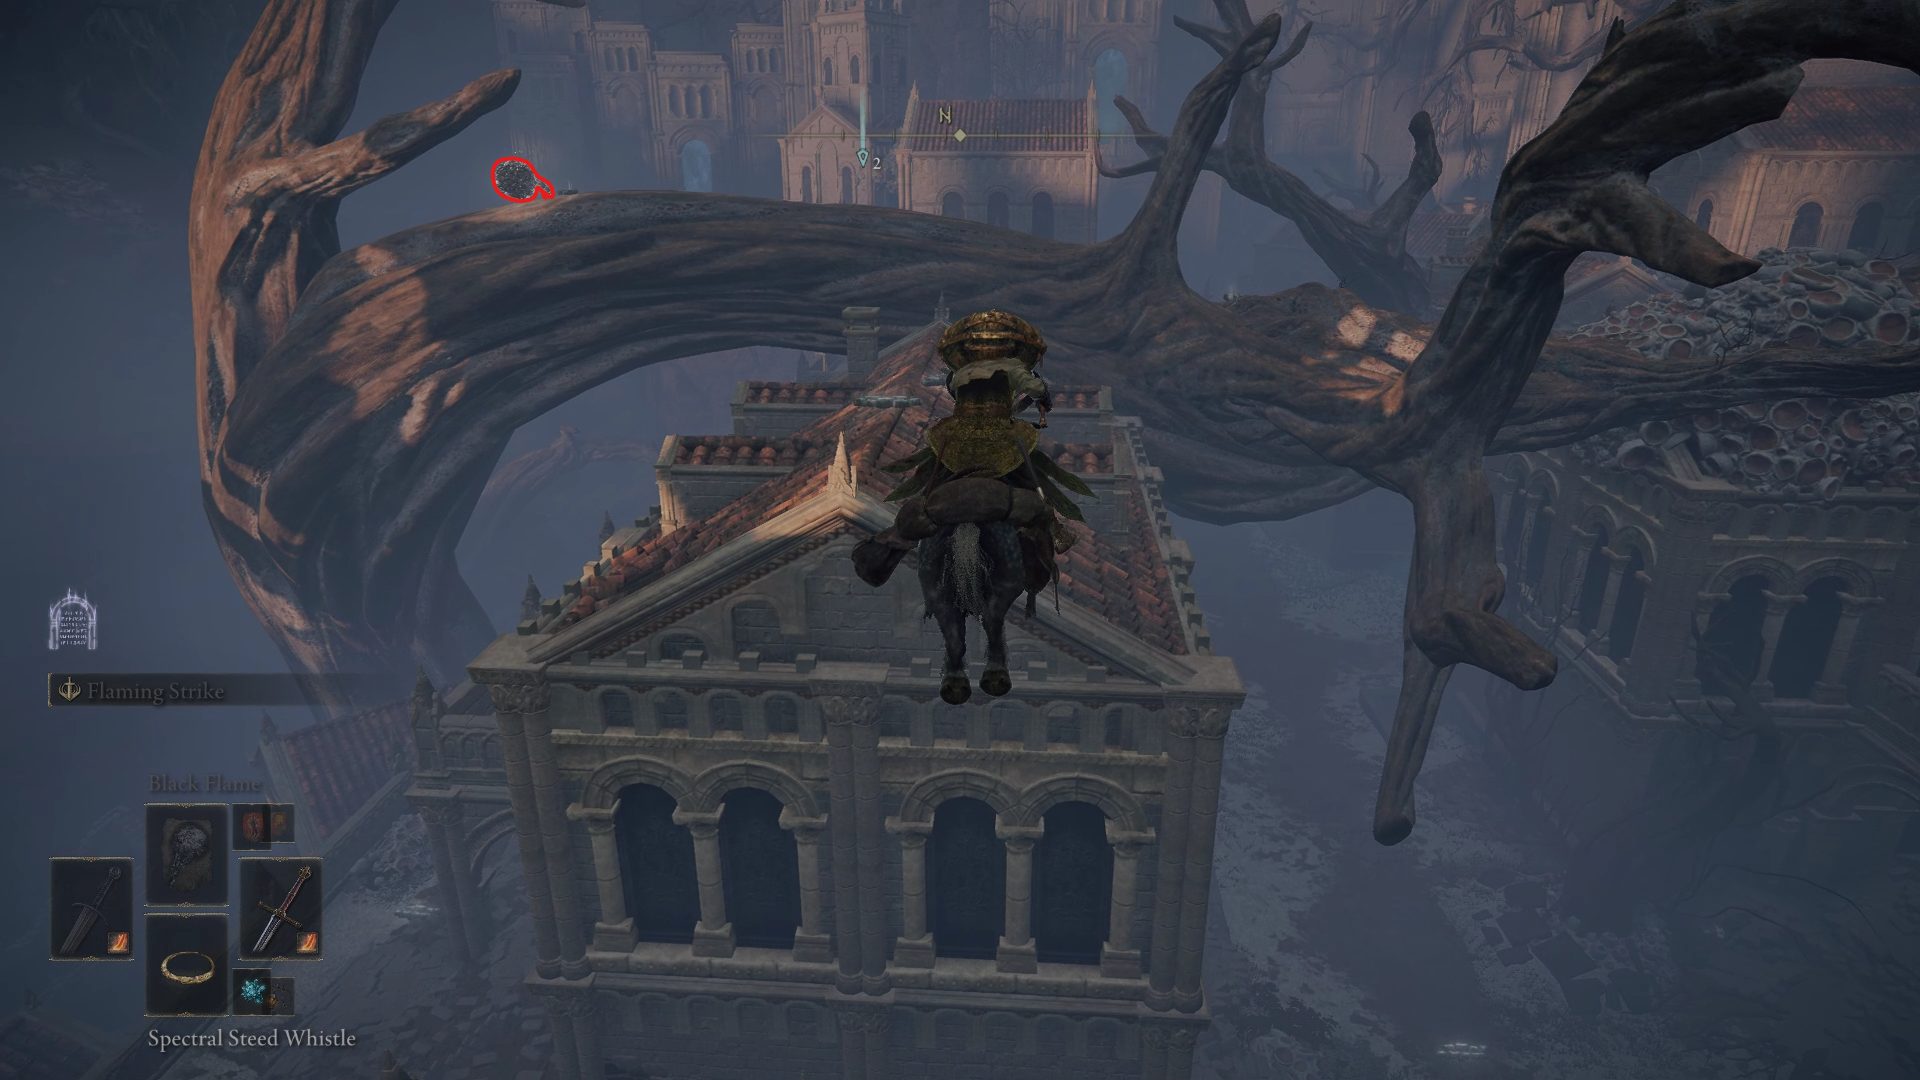
Now go back towards the second tower where you just lit up the flame, and jump over to the rooftop to the west. From there, look southwest and jump to another rooftop, from which you can reach the third and final tower. On your way there, make sure to grab the Stonesword Key from a nearby corpse: the dead don’t need keys, you do.
Now that the final tower has been taken care of, there is one last bit of loot that we need to grab from the rooftops. Look north, and you will see a teleporting loot beetle on top of a branch. Jump over to the roof next to it, and kill the beetle for the Ash of War: Double Slash. Remember that you can use a ranged attack on teleporting loot beetles to avoid having to chase them around endlessly.
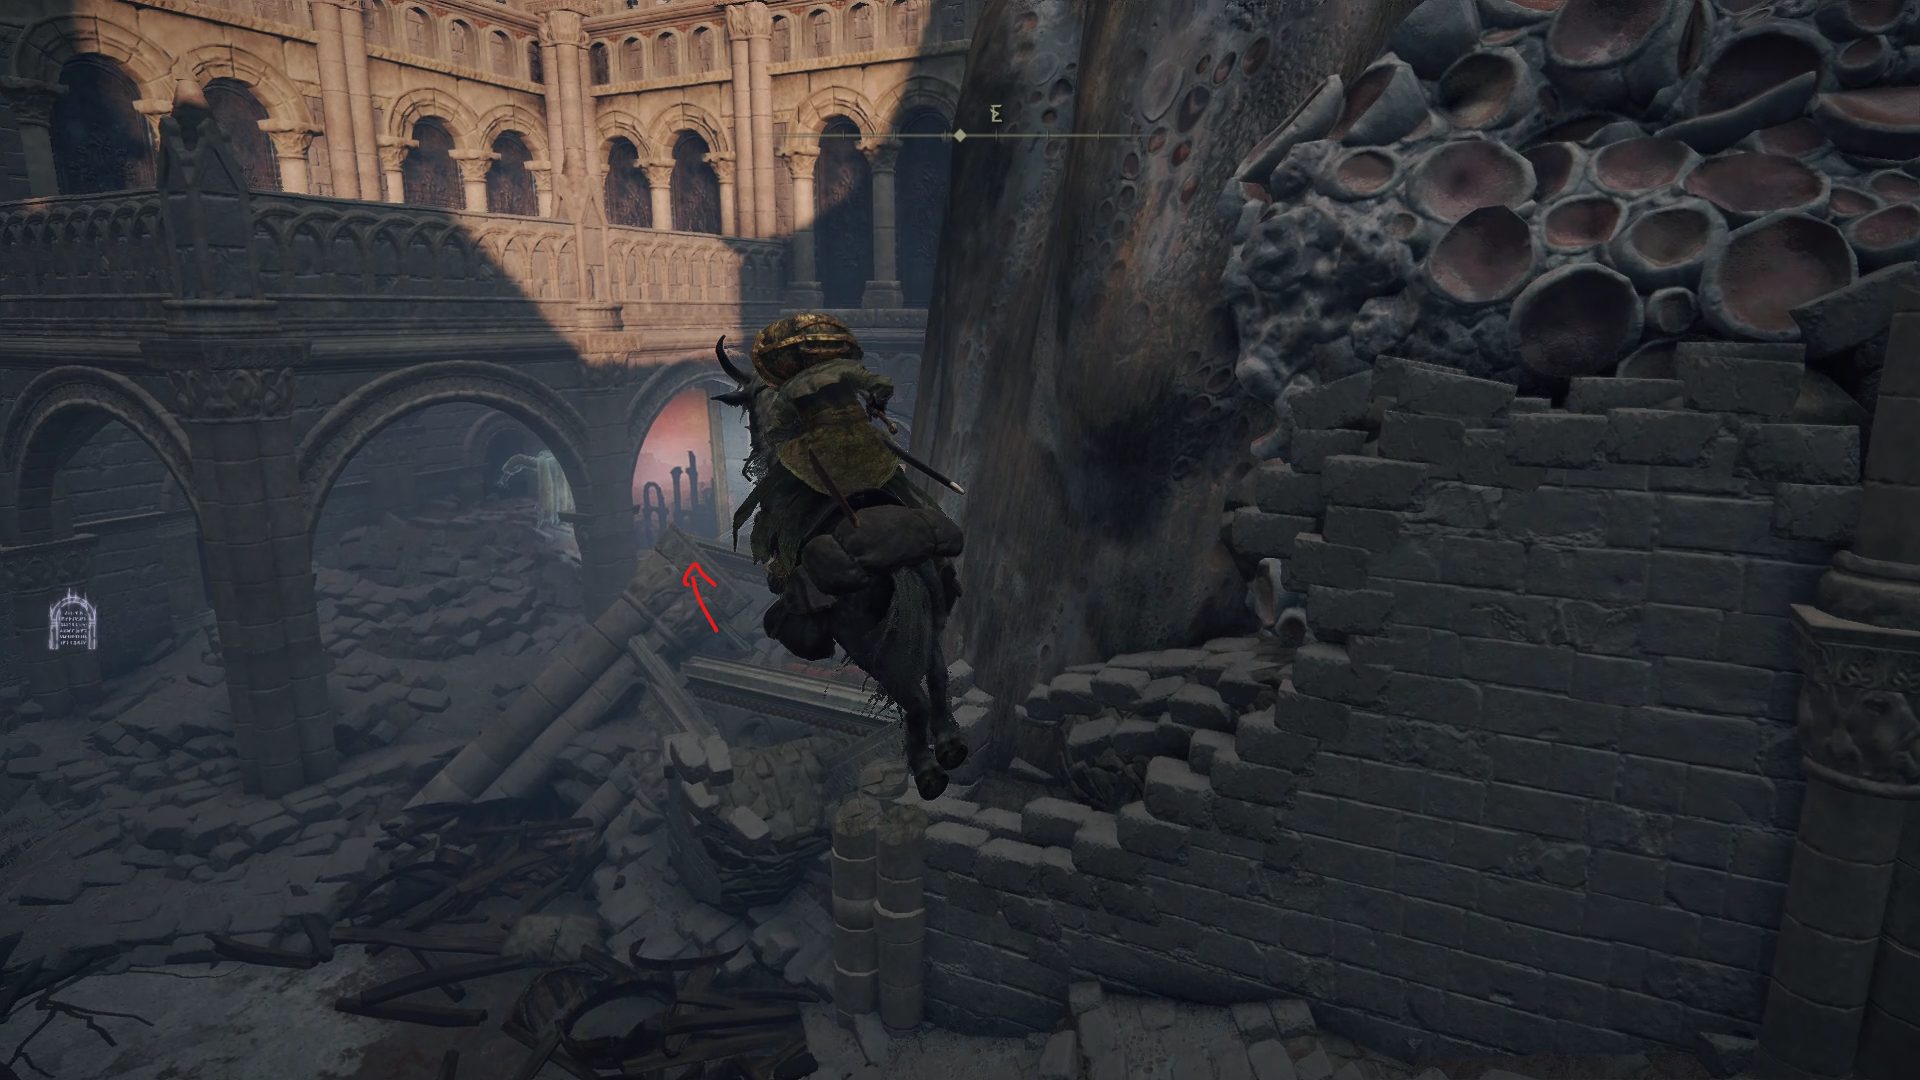
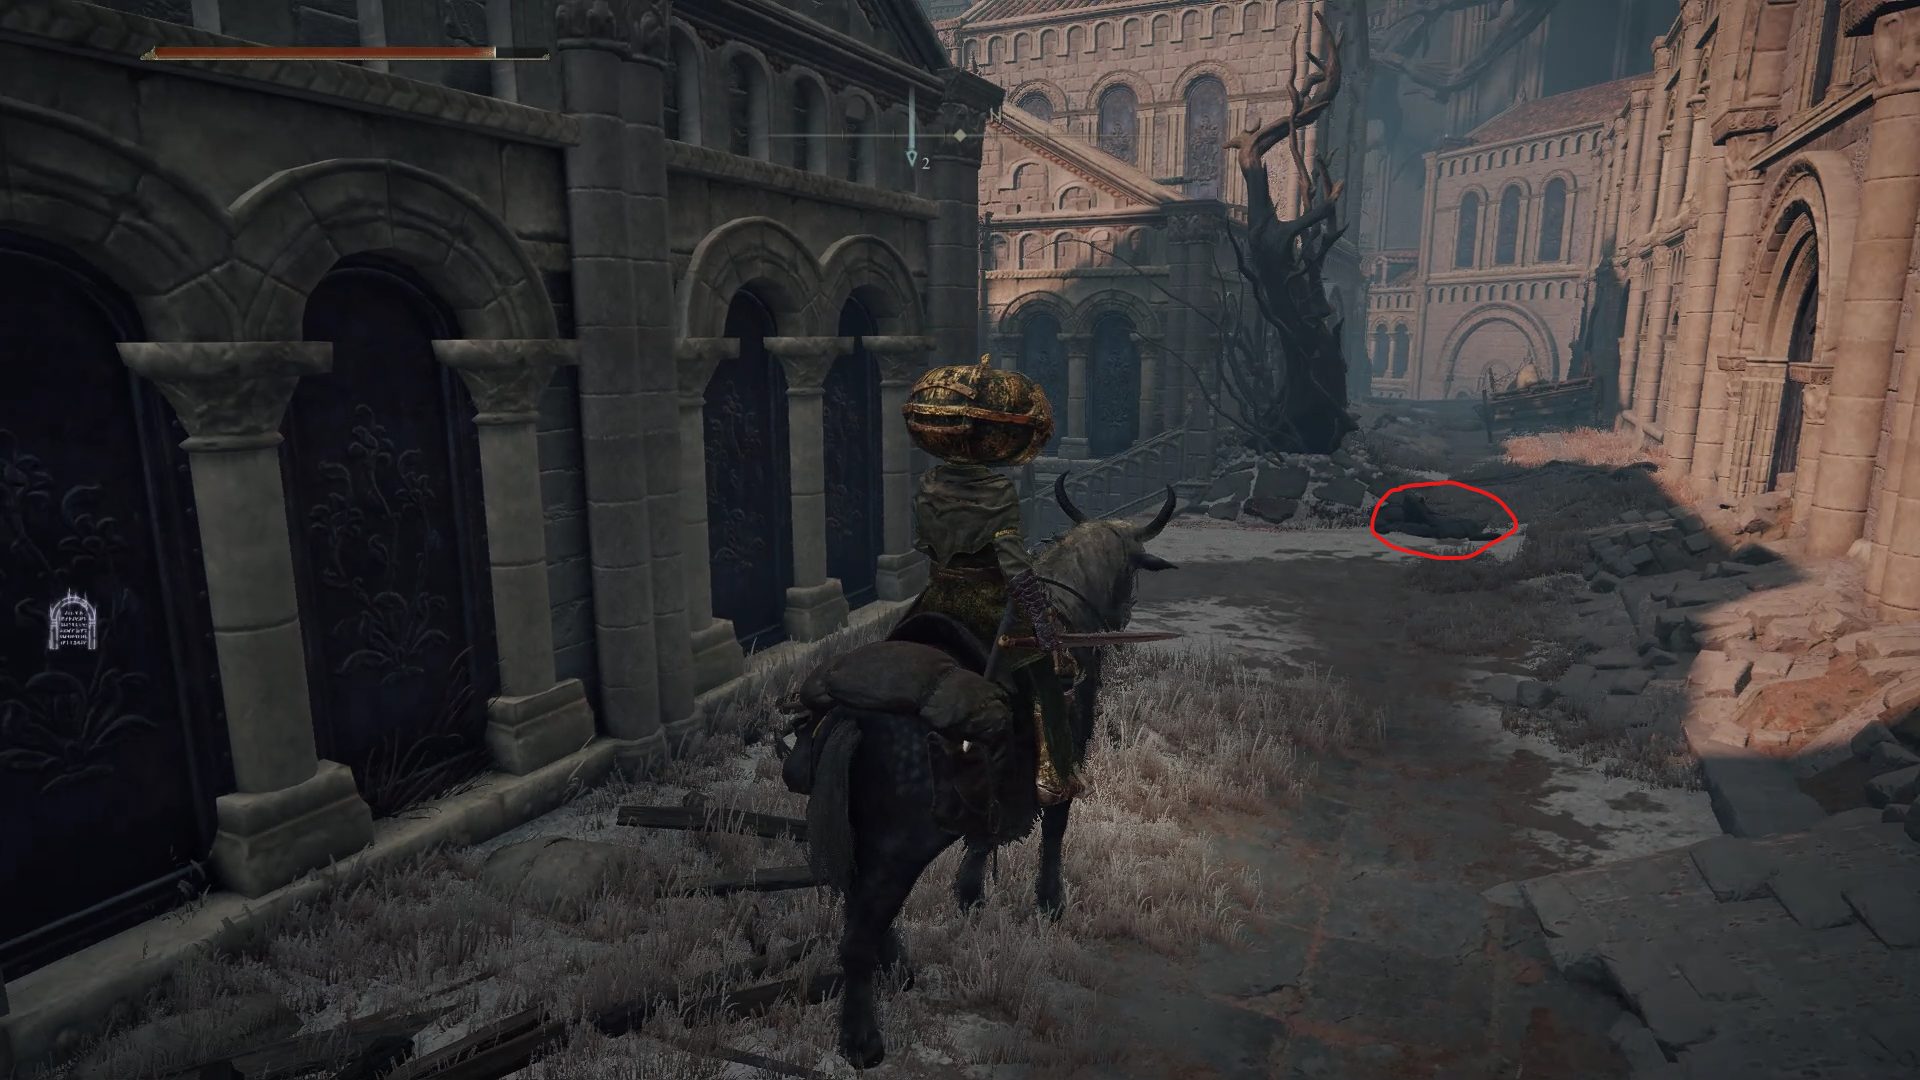
Once the loot beetle has been destroyed, we can start exploring the ground level of Sellia, Town of Sorcery. Luckily for us, there isn’t as much loot to grab on ground level. First, head southeast to grab the “Redmane” Painting and the 2x Poison Grease.
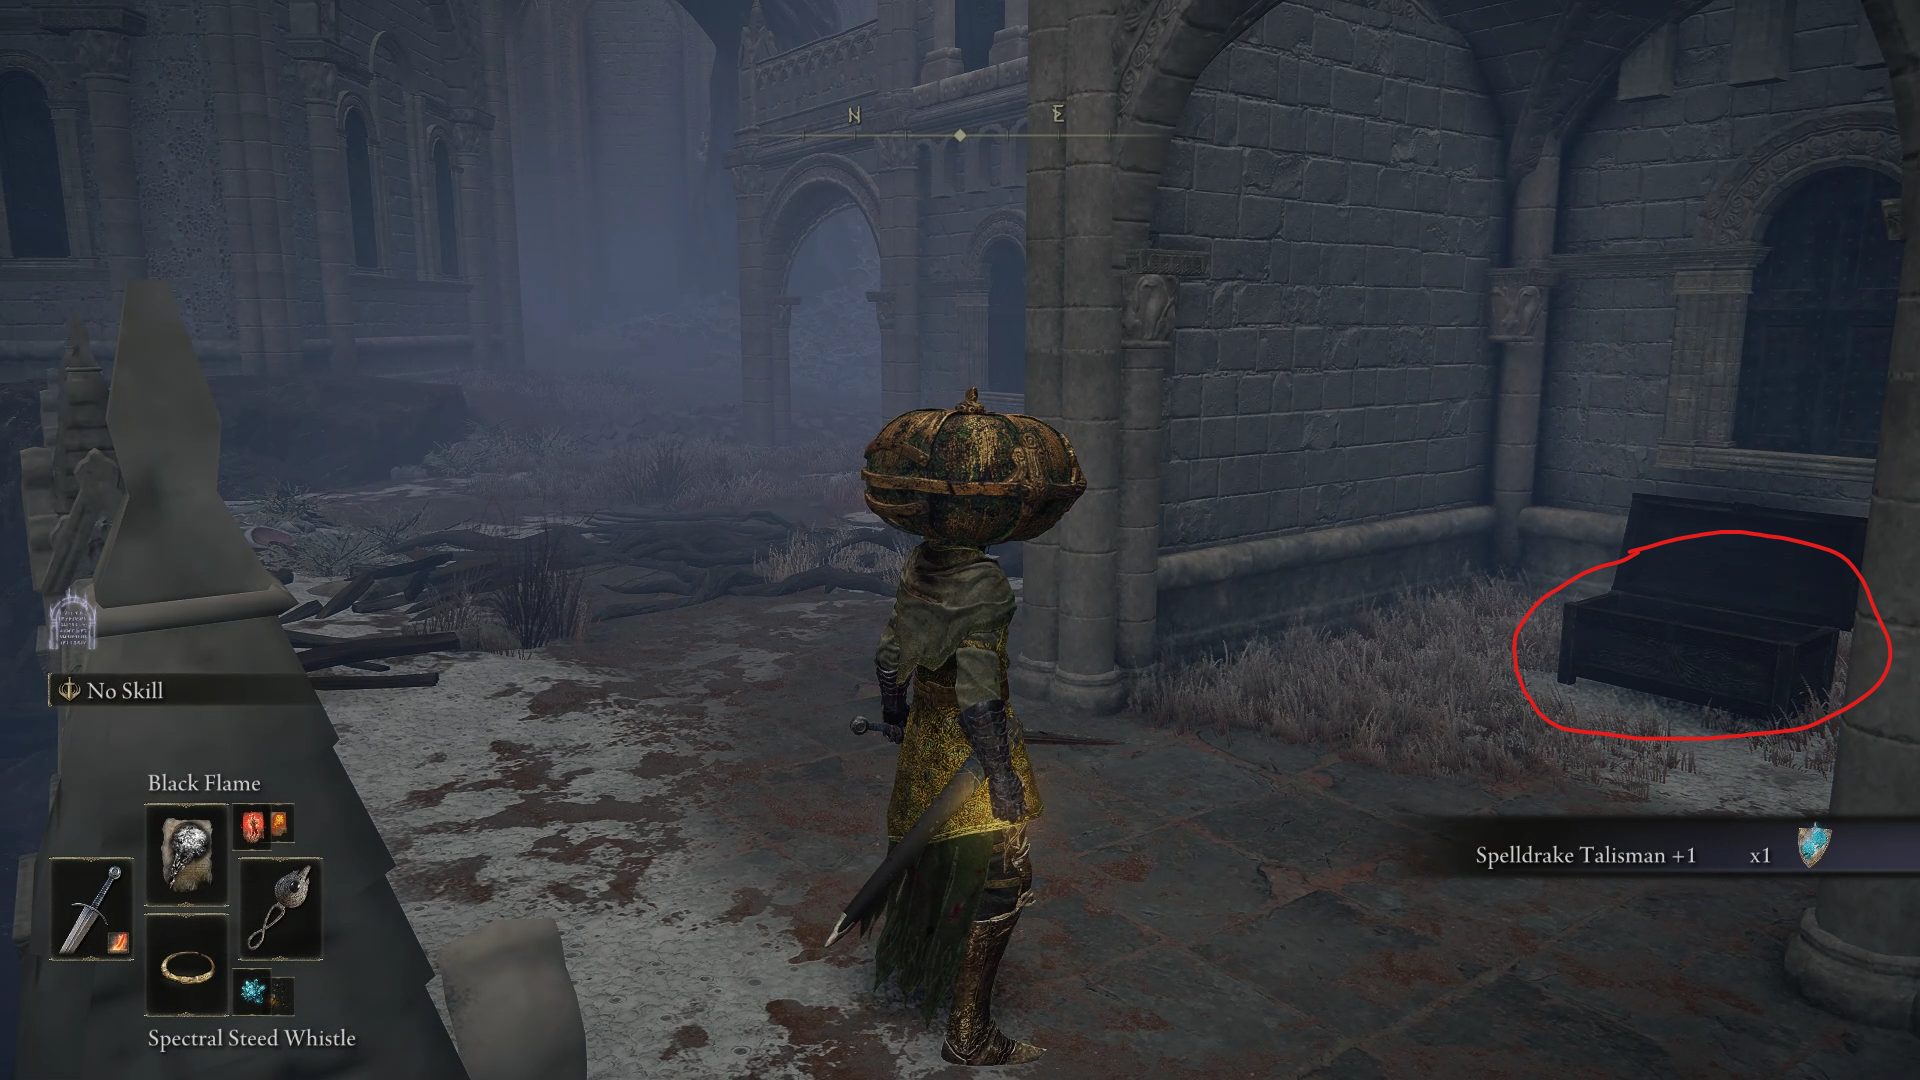
The last few things we need to grab were previously locked away behind magic seals that we removed by lighting the flames at the top of those towers. There are three chests to open, which contain the Spelldrake Talisman +1, the Night Comet sorcery, and an Imbued Sword Key.
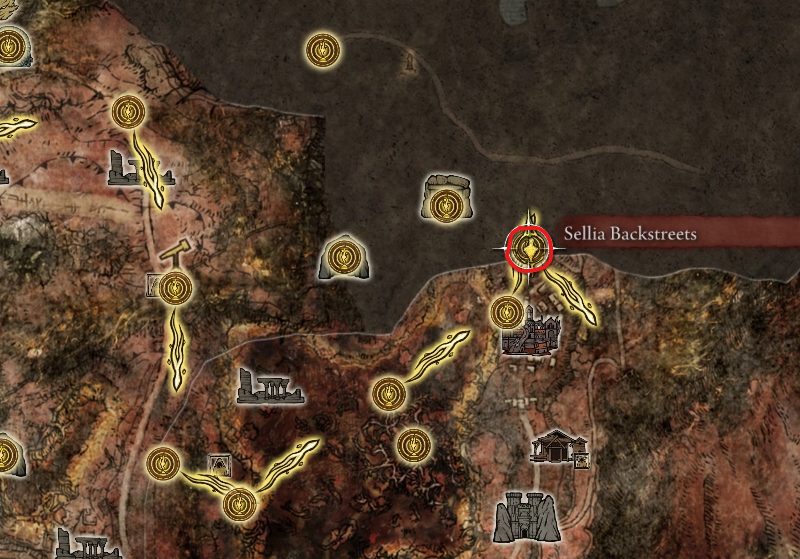
Travel to the Sellia Backstreets site of grace, and start following the path up the mountain. This path will be full of undead enemies, with some of them being quite challenging. With that in mind, you can either equip the Ash of War: Sacred Blade, or craft several Holy Water Pots and use them against the hooded skeletons. While the naked skeletons won’t be very challenging, the hooded ones have moire poise, HP and damage. So just continue going up, and throw pots in the hooded ones’ faces. On top of that, a magical boulder will appear to try and squish you, so keep that in mind while climbing up. Keep going all the way up until you reach a cemetery and see the Church of the Plague in the distance. There, make sure to enter through the hole in the wall found on its eastern side, as that will allow you to avoid dealing with the centipede enemies guarding the entrance.
Grab the Sacred Tear in front of the statue and speak to Milicent sitting by the wall inside of the church. Give her the needle and rest at the nearby Church of the Plague site of grace. After resting at the nearby site of grace, you’ll be able to speak Milicent once again and she will rerward you with the Prosthesis-Wearer Heirloom.
Now if you rest and go back to Gowry‘s shack, you’ll find Milicentthere instead of him. Exhaust her dialogue and reload the game by going to the main menu and loading your save. Finally, speak to Gowry and exhaust all of his dialogue, and he will reward you by offering to teach you Night Maiden’s Mist, Night Shard and Glintstone Stars.
Travel back to the Church of the Plague site of grace and take the road that goes south from the church. Following this road, you’ll encounter several harpies that drop a Golden Rune [9] the first time you kill them, though you can also just ignore them if you really dislike fighting those. Whether you decide to skip those or not, make sure to grab the 3x Drawstring Poison Grease by the eastern cliff, and the Golden Rune [5] on top of the collapsed pillar by the road.
Drawstring Poison GreaseGolden Rune [5]
Continue following the road until you reach the Sellia Gateway, and as you cross to the other side and pick up the loot lying around, be mindful of the fact that invisible sorcerers are waiting to ambush you. Once you’ve reached the other side of the gateway, head north-northwest to the Swamp LookoutTower. Inside, a Bloodhound Knight is guarding a cell with the Eternal Darkness sorcery. If you’re having trouble defeating him, try to remain on horseback and go in for an attack or two at the end of his attacks/attack chains. The attacks that end with a slam make him stay put for a longer time.
Now travel back to the Church of the Plague and grab the Starlight Shards by the monument found northeast of the church.
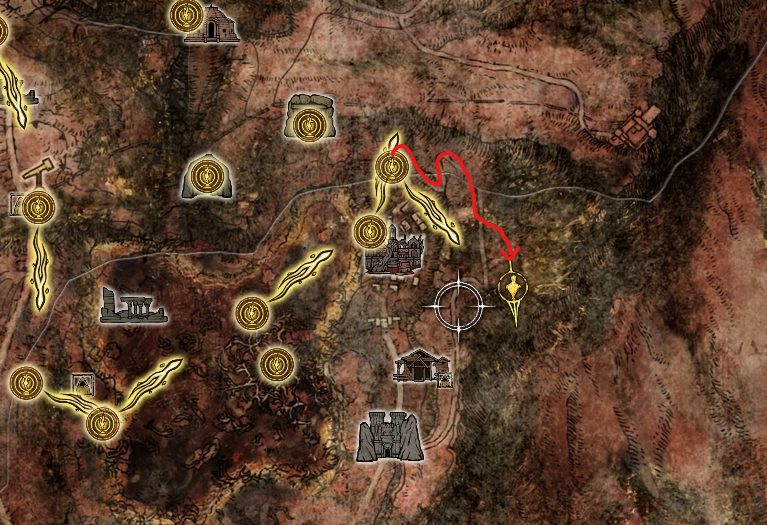
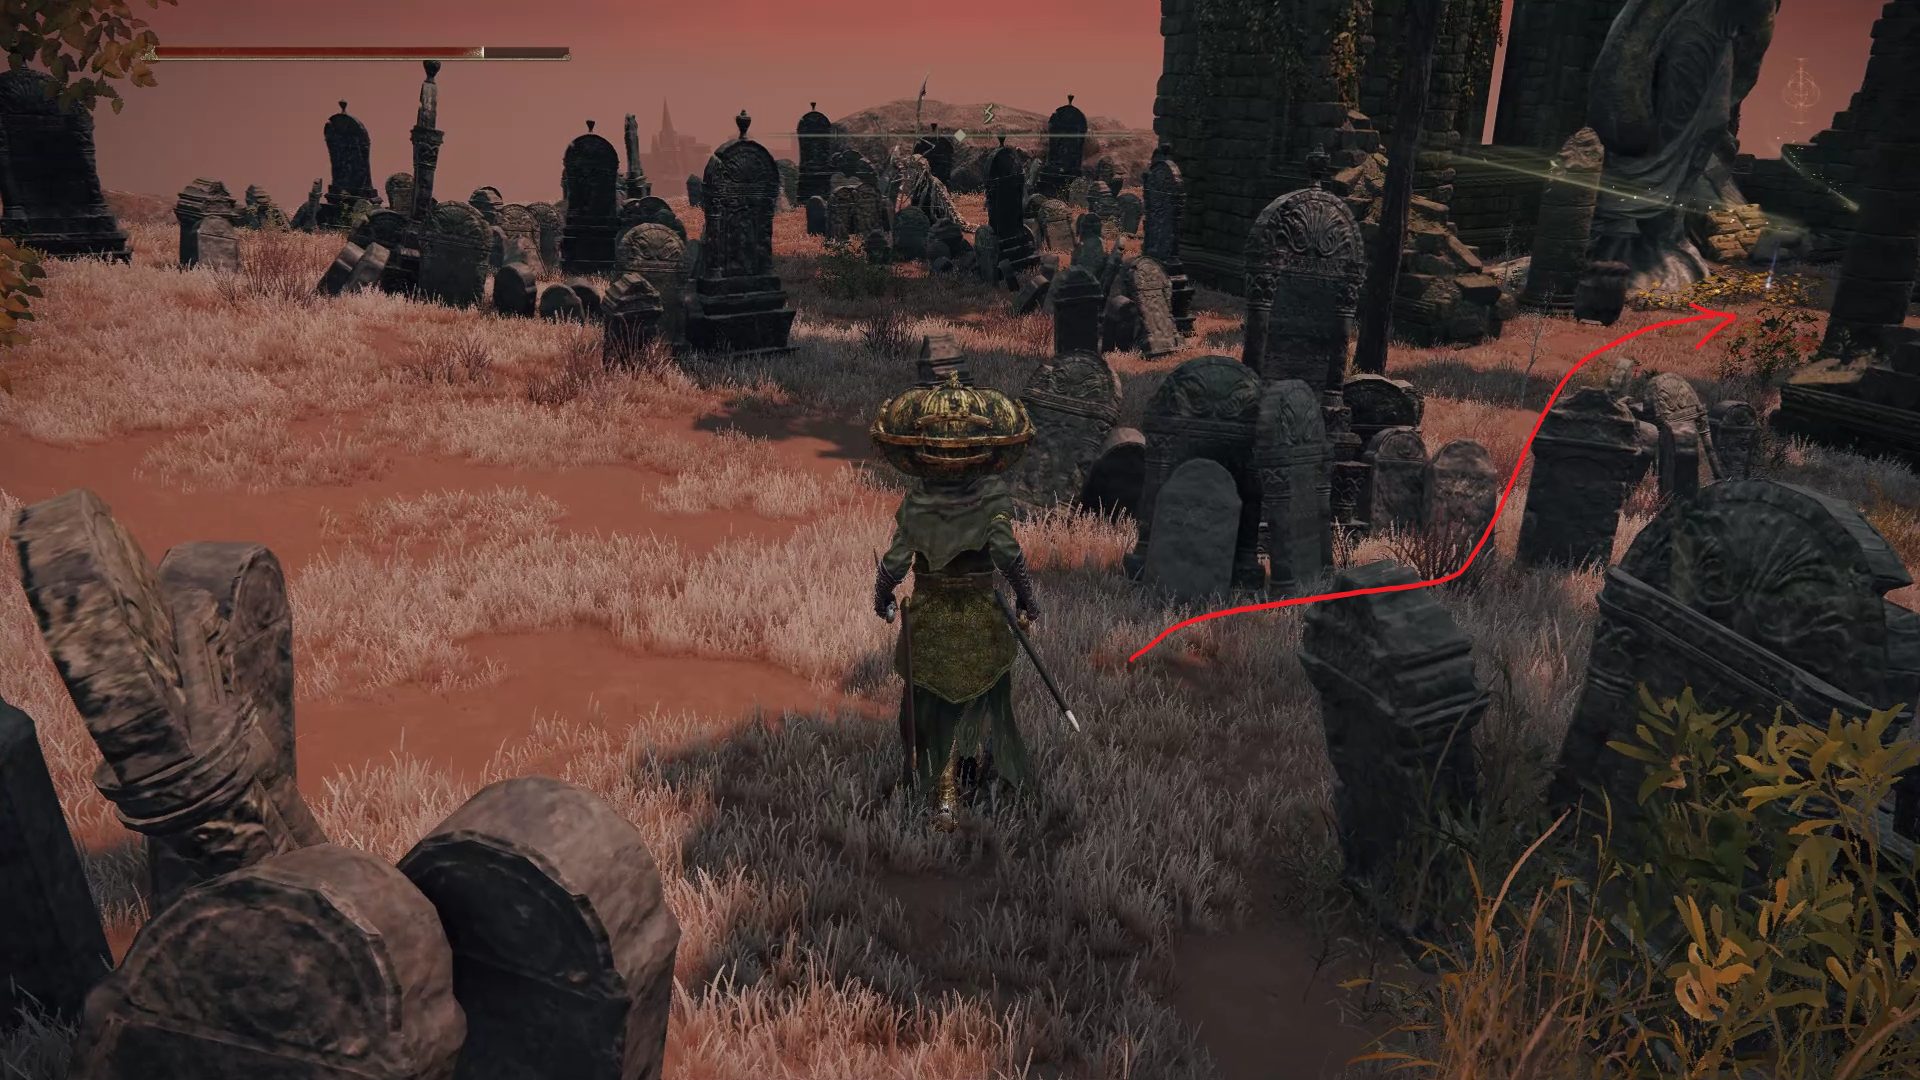
From there, go north-northeast past the cemetery, where you will be ambushed by several undead enemies. If you’re running out of Holy Water Pots, make sure to craft another batch as there will be quite a few undead popping out. At the end of this path, you will find a sorcerer standing next to a bigger tombstone. While defeating him won’t give you much and the loot he’s guarding is just 2x Beast Blood, right behind this tombstone you can find an illusory wall that leads to another dungeon: Sellia Hideaway.
Illusory Wall hiding the dungeon’s entrance
While this dungeon can be cleared now, part of it will remain locked until you progress Sorceress Sellen‘s questline, and the boss at the end can be particularly tough. With that in mind, we recommend waiting until Sellen‘s quest leads you here to avoid having to go through the dungeon twice.
All that’s left now is exploring the last section of Caelid: Greyoll’s Dragonbarrow. There is a noticeable increase in difficulty compared to the rest of Caelid, so don’t hesitate to come back later, after having explored the Siofra River dungeon and Nokron.
Navigate to the last tab to continue following our walkthrough!
The Dragonbarrow is noticeably more difficult than the rest of Caelid and is entirely optional, so don’t hesitate to come back after having gone through Siofra River and Nokron.
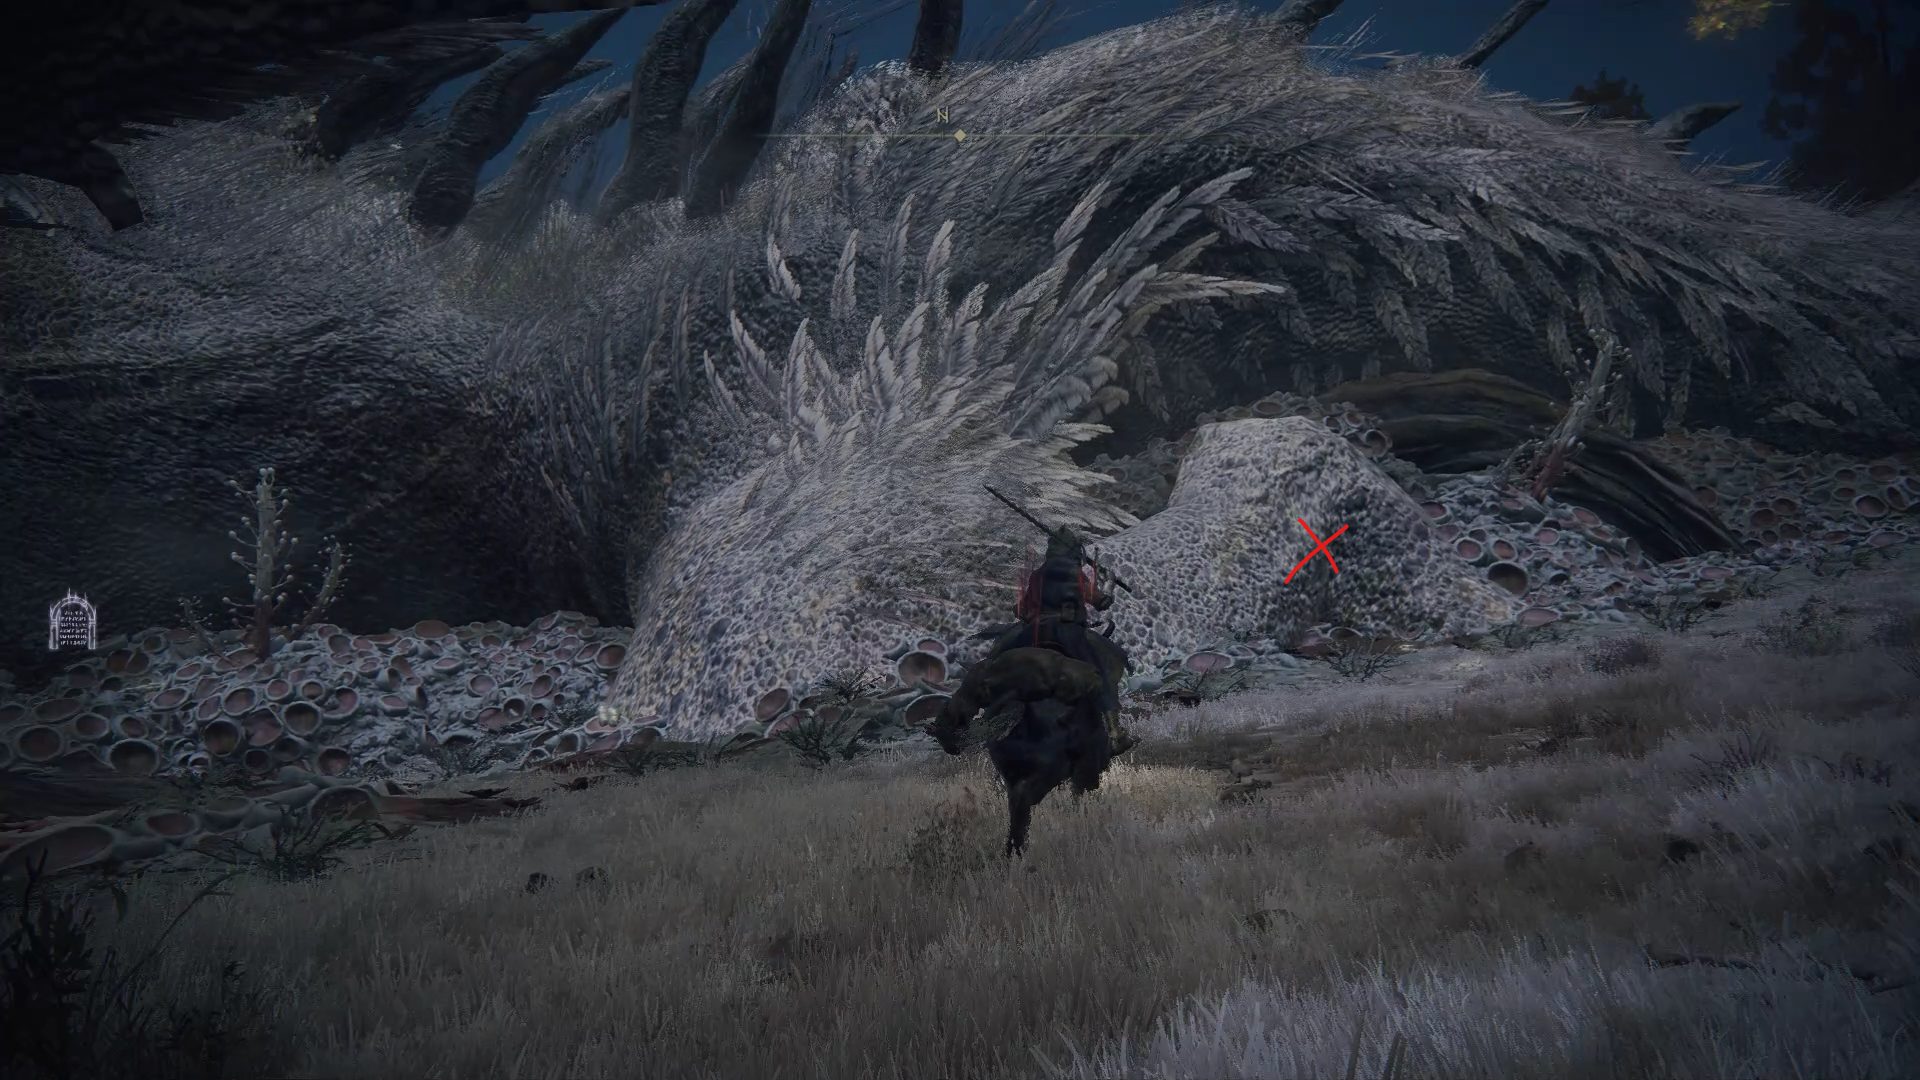
West of the Sellia Hideaway dungeon you can find a Spirit Spring that leads to Greyoll’s Dragonbarrow. As you take the Spirit Spring, make sure to jump west towards the white clump to climb on top of it. There, you can find several corpses that you can plunder for 2x Smithing Stone [7], a Smithing Stone [8] and a Stonesword Key.
Northeast of there you will see a massive dragon laying down, as well as several smaller ones around it. While these small dragons are slow and aren’t capable of breathing fire, they still have a decent amount of HP, and there are quite a few in this area. However, if you manage to kill the huge white one, the ones that are sleeping next to him will also die. Luckily, while this dragon is massive, it’s also immobile and can do nothing but scream for help. With that in mind, we’ll be heading to the dragon’s flank to find some peace and quiet as we slowly but surely murder him.
Try to avoid the small dragons on your way there as much as possible so that they don’t follow you around too much, and jump over the wall to find the dragon’s leg. While the small dragons will not be able to reach you for whatever reason, the problem will be the dragon’s huge health pool. Ideally, you want to equip a weapon that inflicts the Bleed status effect, since when it builds up it will inflict damage based on the target’s max HP. While this will greatly cut down on the time needed to kill the dragon, you can do it without resorting to bleed damage, although it will take much longer. Defeating this dragon gives you 50k runes + the runes of the surrounding dragons, 5x Dragon Hearts and a new draconic power will be available at the Cathedral of Dragon Communion. You can also choose to equip the Gold Scarab prior to killing the dragon, to increase the amount of runes received.
Now go southeast from where the dragon used to slumber and grab the Fort Faroth site of grace. As the name implies, this site of grace is close to Fort Faroth, which is what we’ll be exploring next.
Enter Fort Faroth and you will see a room filled with bats and harpies. Bats can be annoying on their own, and the harpies can send poison clouds your way, so the best way to go through this room is to either pull a bat or two back by using ranged attacks, or use spirit ashes to distract the enemies while you run past them and climb up the cladder. If you decide to fight them, don’t hesitate to run out of the fort to heal up/cure poison, or just keep running in for an attack and running back out until the bats forget about you.
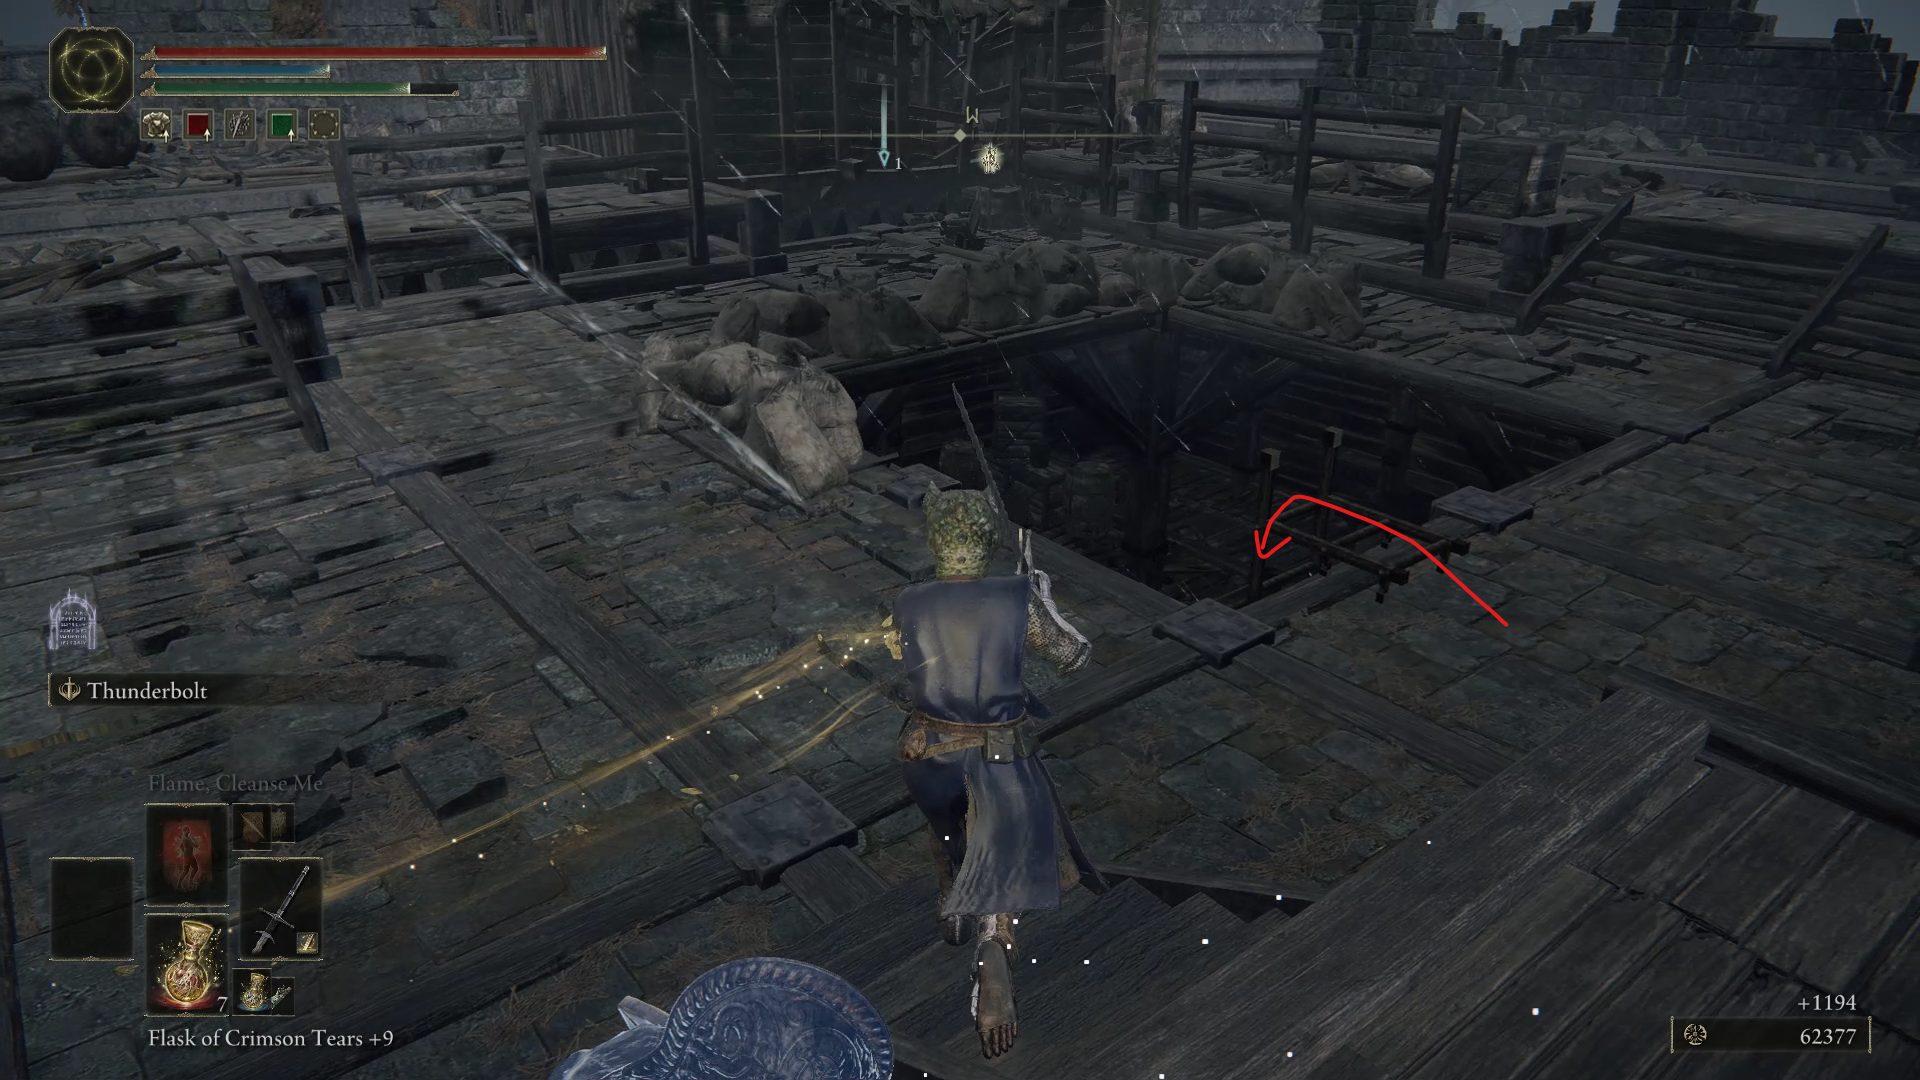
Once you go up the ladder, make sure to open the chest in front of you to get the Dectus Medallion (Right) and jump southwest to reach the fort’s upper level. While the path looks clear, several spectral soldiers will ambush you as you’re exploring this area, so keep that in mind. However, since this area has no loot, look for a ladder past the gallows that leads back inside of the fort. Grab the Golden Rune [12] from the corpse hanging from the wooden ledge, and jump south to get to an otherwise inaccessible area.
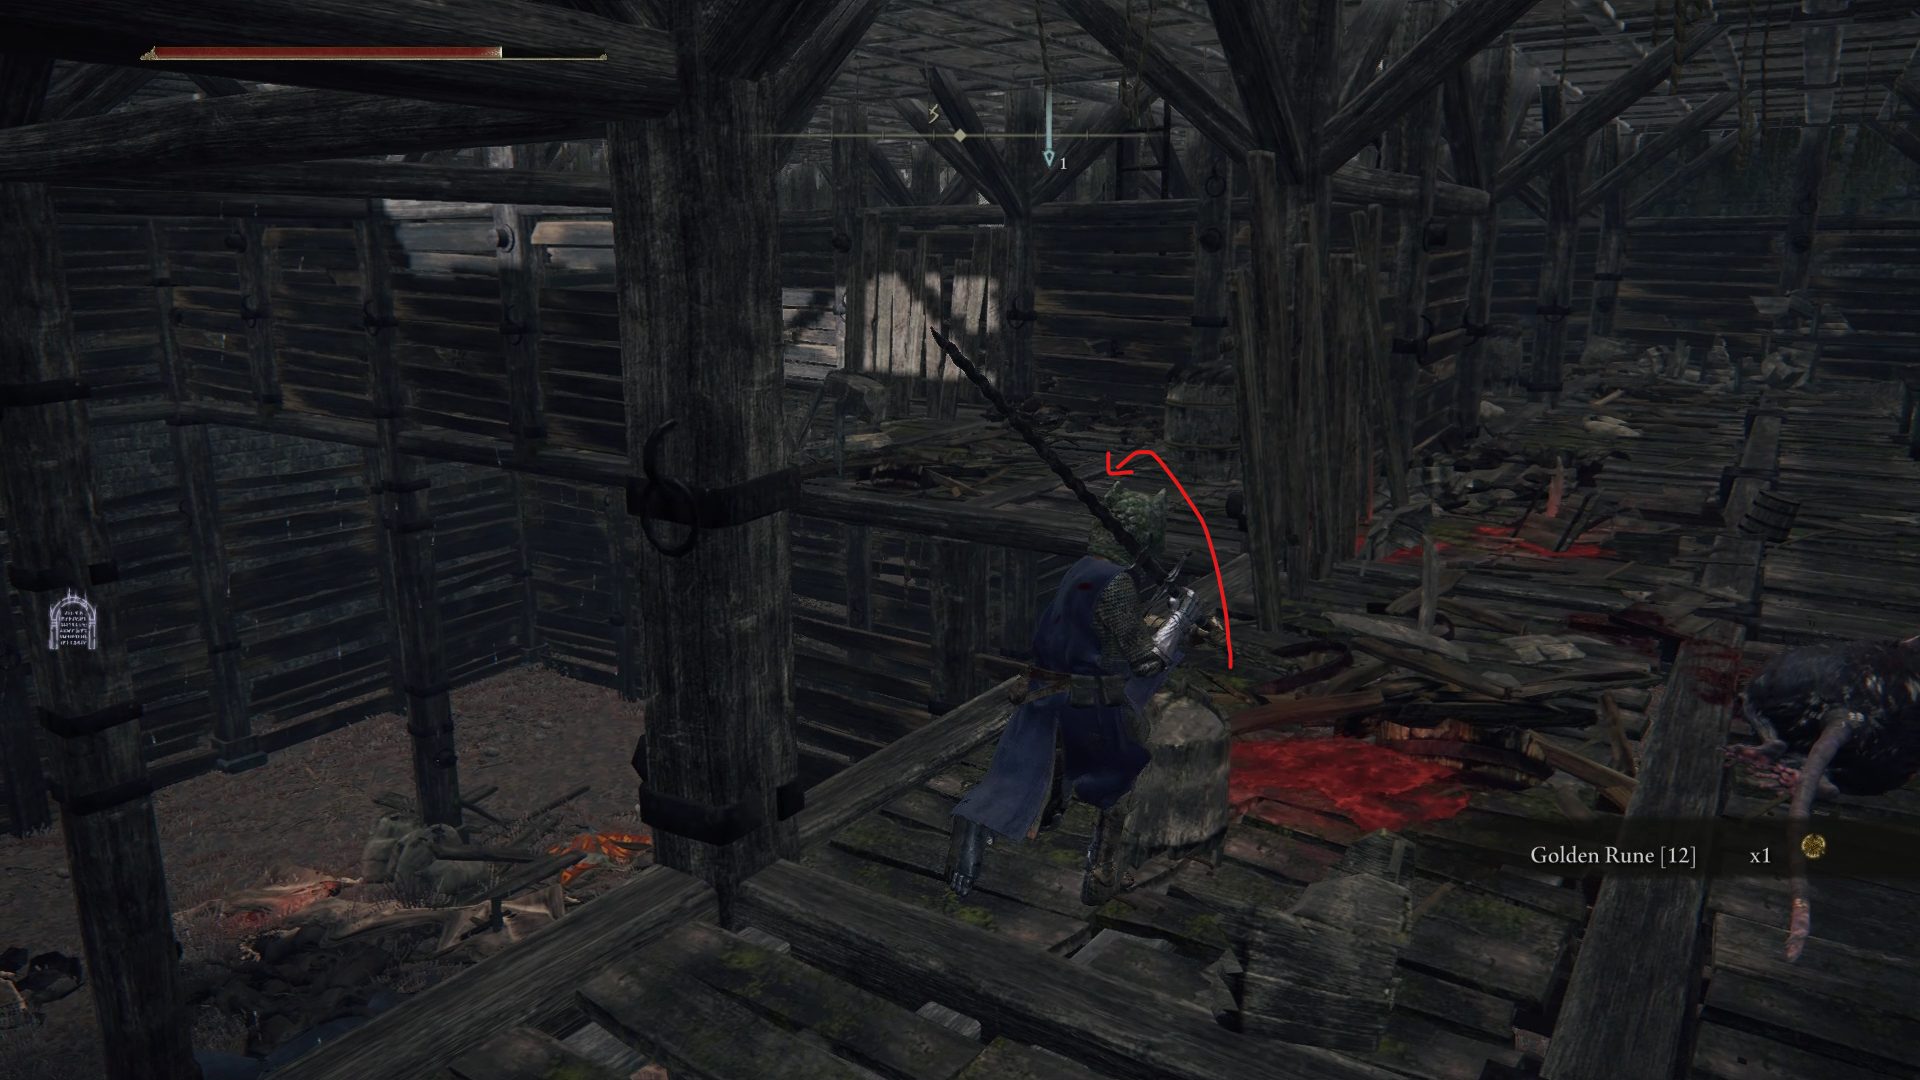
There, you’ll have to defeat a small and a huge rat while in a cramped area, which will be more than worth it once you go down another ladder and grab Radagon’s Soreseal.
We can now leave the fort and head towards the next location. Start riding west until you can make a turn south in the direction of the swamp below. There, you’ll be able to access the Sellia Evergaol and fight Battlemage Hugues.
Hugues is a boss version of the sorcerer enemy you fight next to Sellia Hideaway‘s entrance, and defeating him rewards you with Battlemage Hugues and 7800.
As you leave the Sellia Evergaol, start heading north until you find a cracked statue. To crack it open, you’ll have to drag a dragon from the nearby lake that you can find northeast of the statue. The dragon walking next to the statue will be enough to crack it open, and you’ll be able to grab 3x Smithing Stone [5].
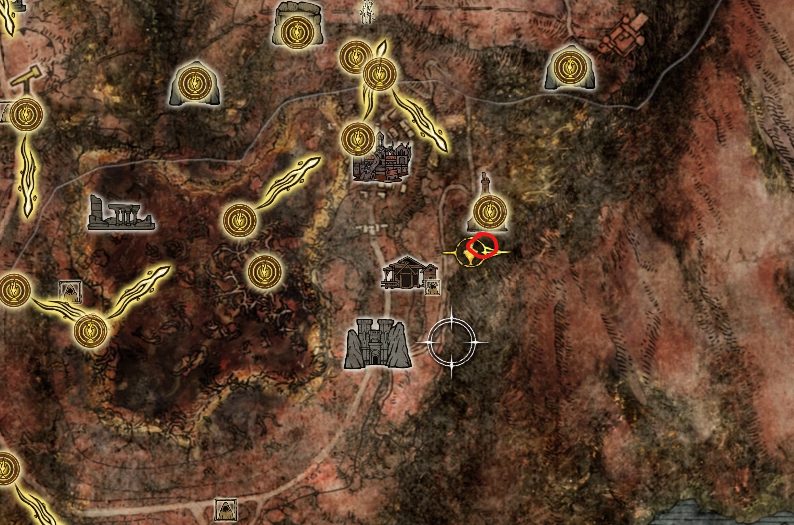
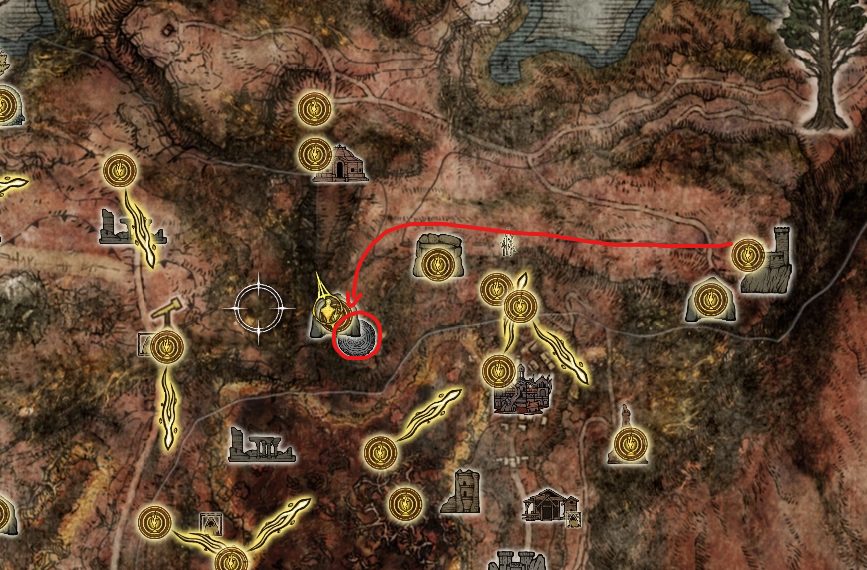
Now go back to the lake where the dragons were, grab the Golden Rune [5] and the Gravel Stone found in the lake and follow the road going northwest until you reach the Isolated Merchant’s Shack. There is no loot on the way to the shack, so don’t hesitate to ignore the huge dogs and run straight to the site of grace.
Rest at the nearby site of grace and pass the time until nightfall. Then, rest at the site of grace again and the Isolated Merchant will be gone, and moving to where the merchant was will begin the Bell Bearing Hunter encounter.
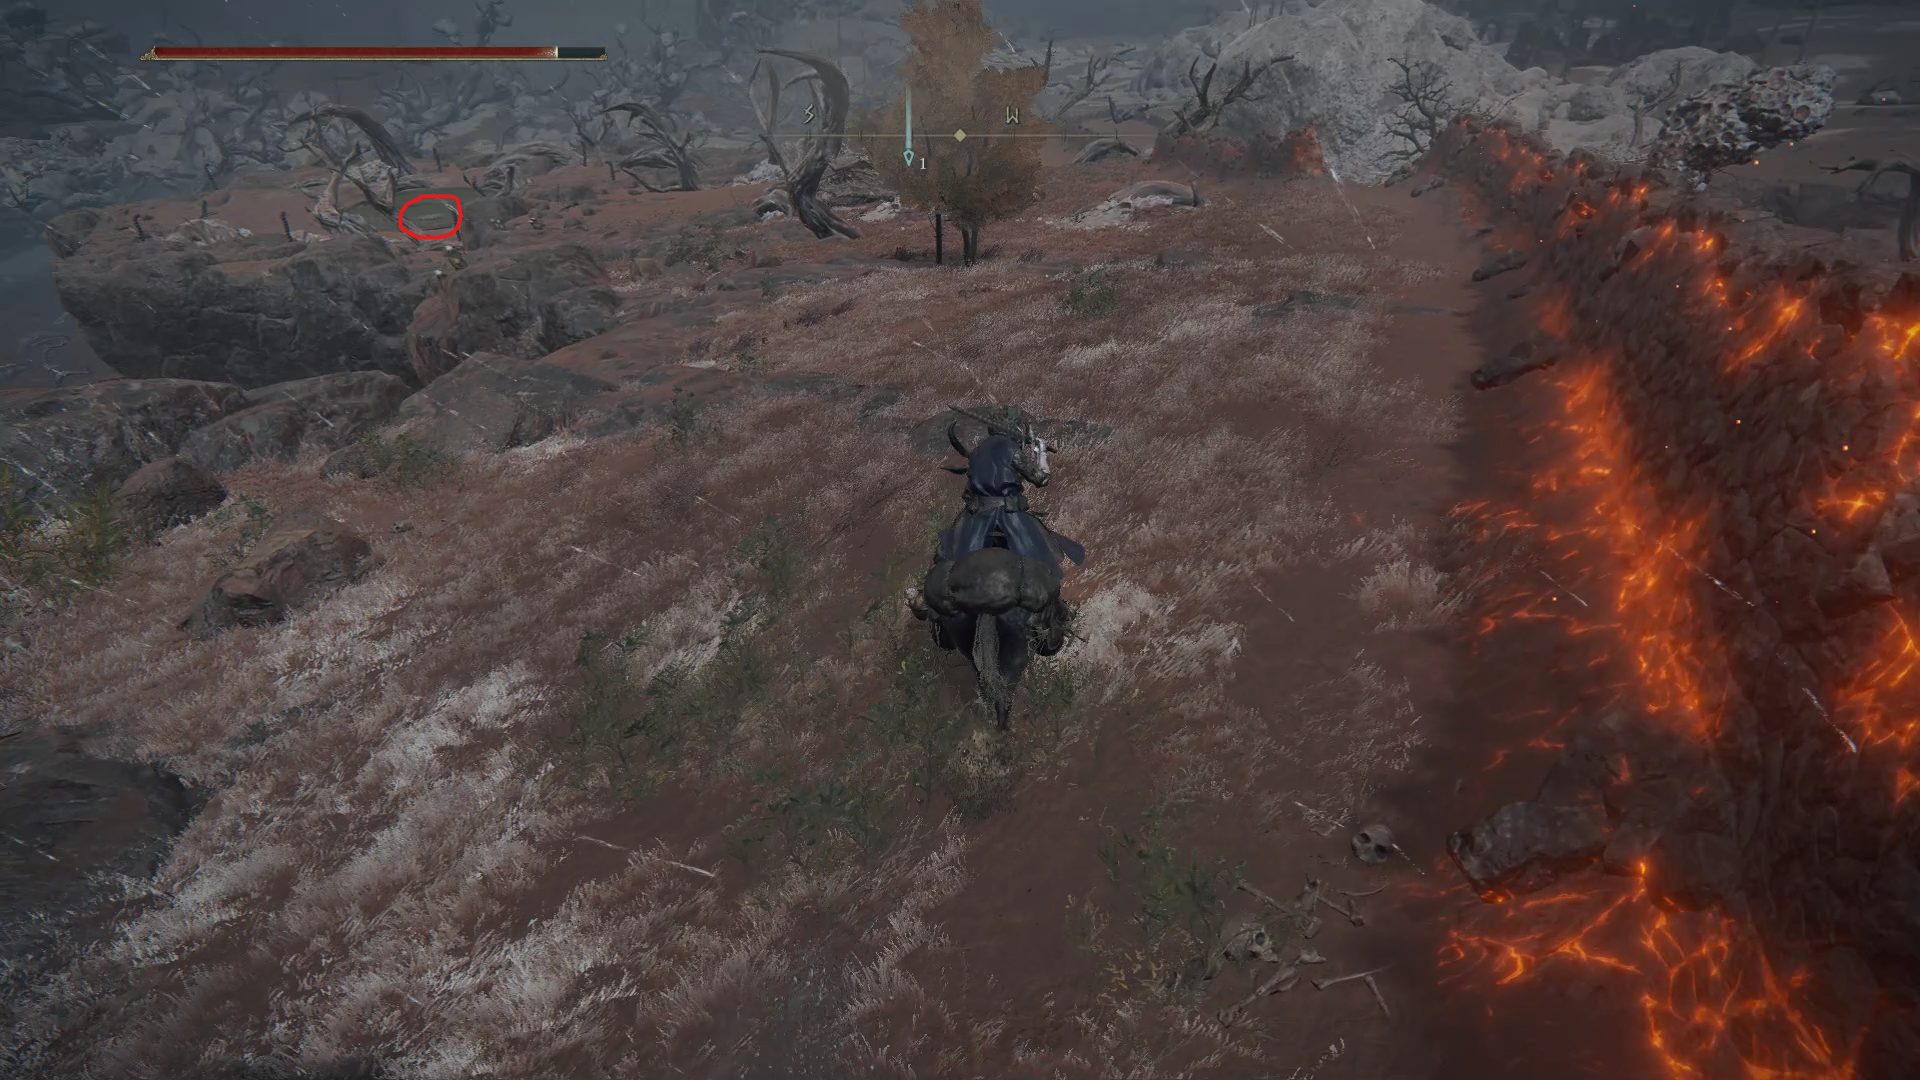
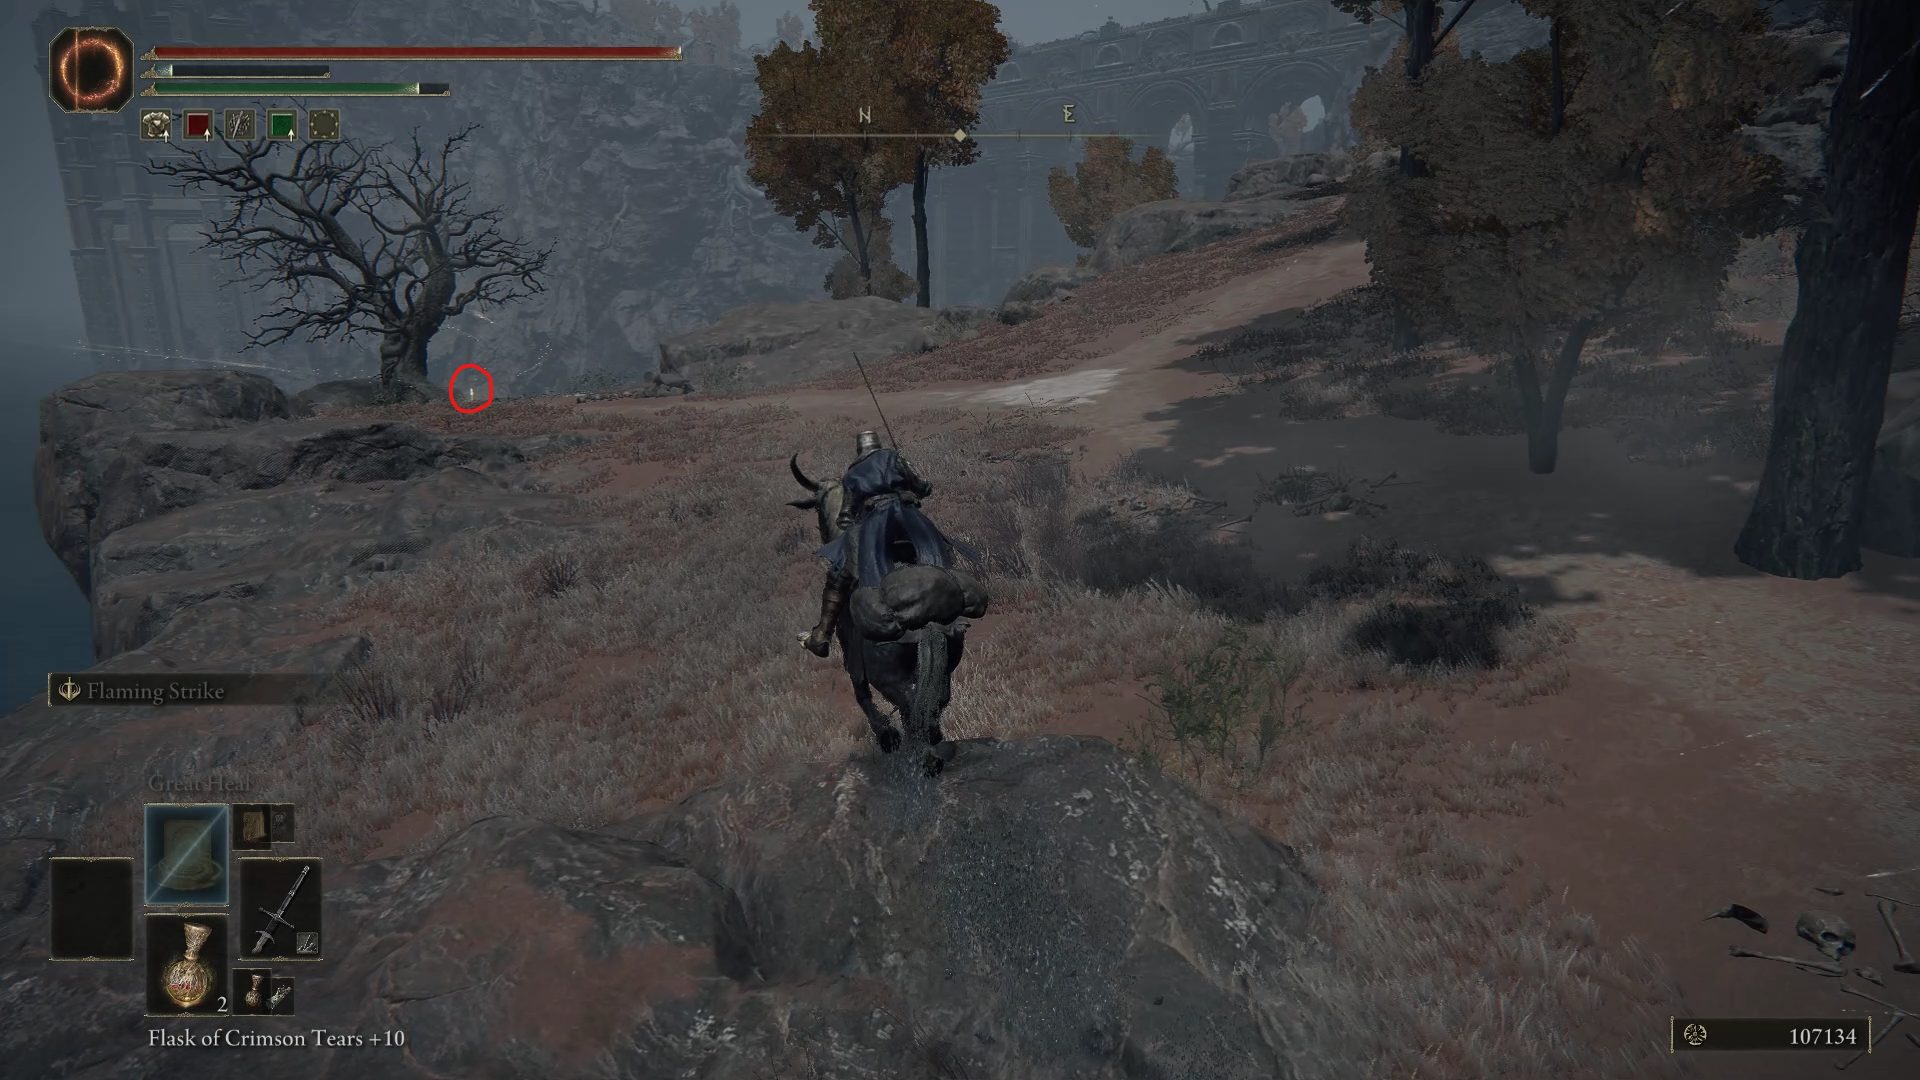
We can now start heading towards the Divine Tower of Caelid, which can be found east of the Isolated Merchant’s Shack. On your way there, kill the exploding loot beetle to get the Somber Smithing Stone [8].
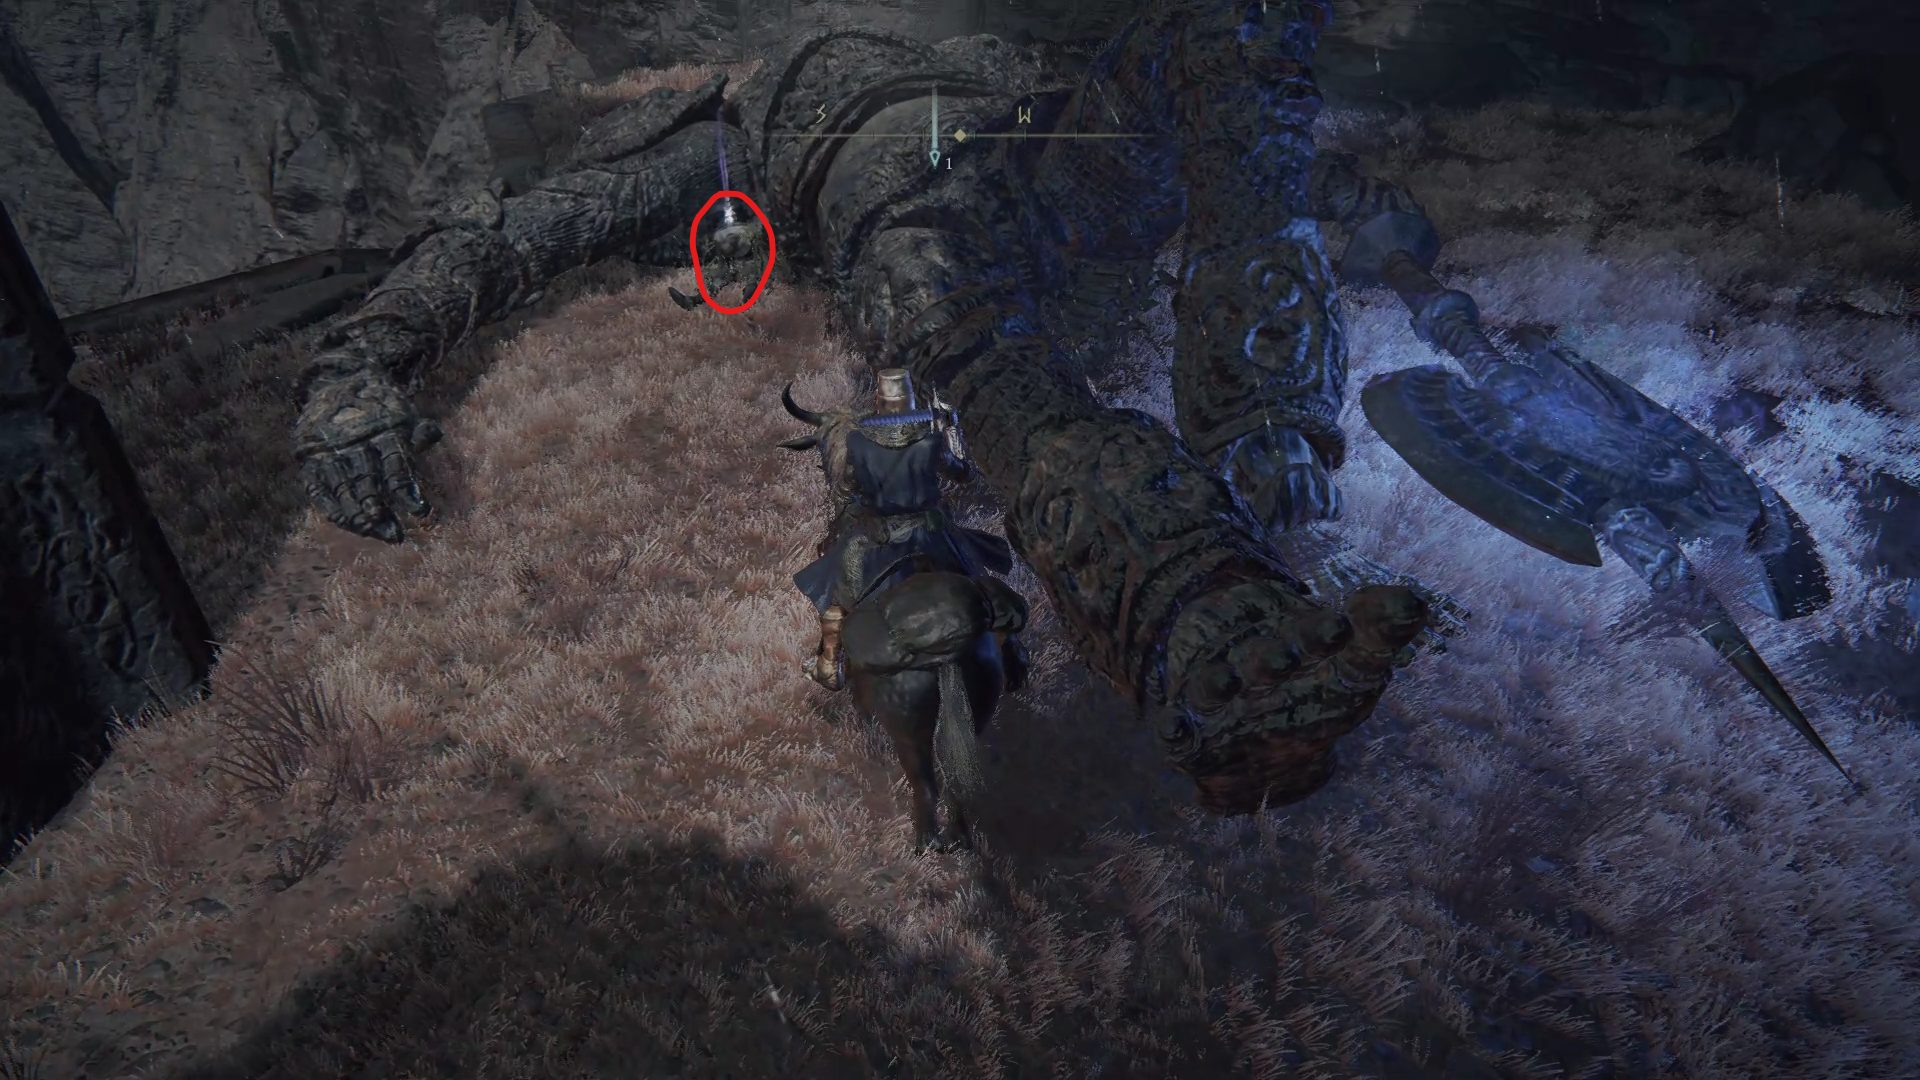
Instead of continuing towards the tower, go southeast to find a road leading down to the bottom of the divine tower. While you won’t be able to enter the tower there, looting the group of corpses sitting in chairs at the bottom of the tower will grant you a 1x Rune Arc, 1x Somber Smithing Stone [9], 1x Dragonwound Grease and 2x Arteria Leaf.
Now go back up where the loot beetle was and head northeast towards the tower. Here, you’ll be able to jump over to a branch and start exploring the Divine Tower of Caelid‘s exterior. Unlike the one in Limgrave, this tower not only allows you to restore a Great Rune, but also leads to an optional boss.
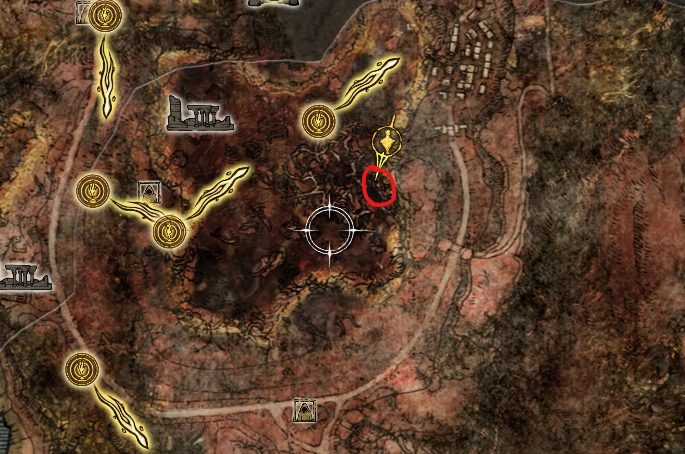
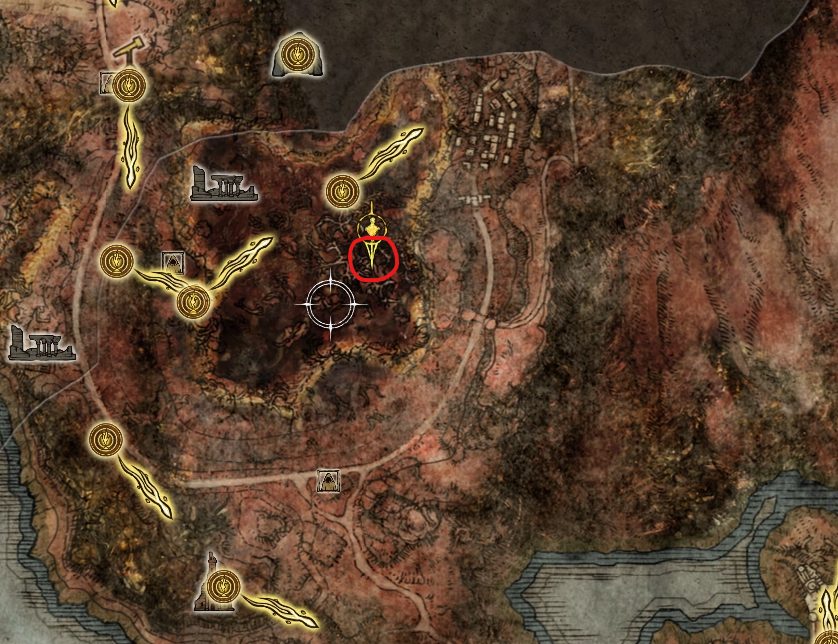
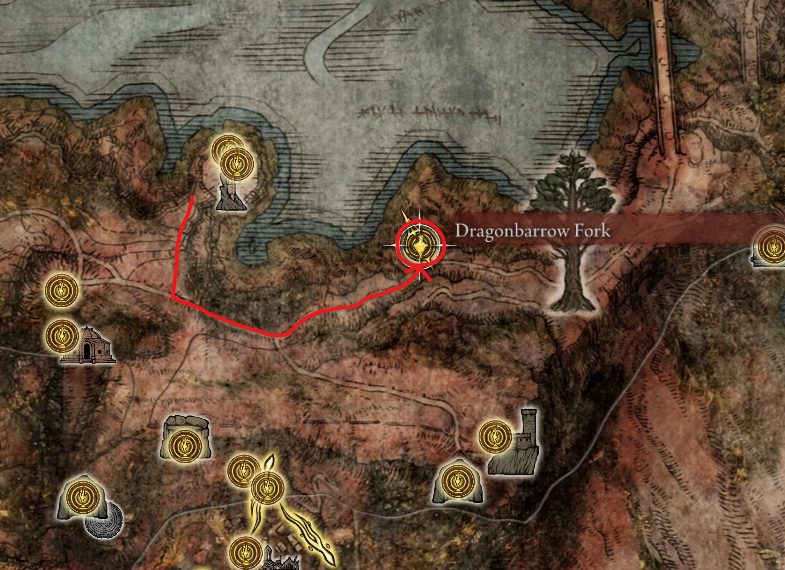
As you come out of the tower, go south until you reach the road and follow it east until the fork. From there, take the road going northeast all the way to the Dragonbarrow Fork site of grace and you will have 2 different paths: a path by the cliff, and another one going uphill. For now, we’ll be taking the path going uphill.
While going up, several enemies will be rising from the ground but you can ignore them for the most part. As you’re getting closer to the Minor Erdtree at the end of the path, make sure to kill the ones that are still following you so that they don’t get in the way of you fighting another Putrid Avatar. Just like the one at the start of Caelid, this Putrid Avatar is a variation of the Erdtree Avatar. The main difference between the two is that when the boss jumps up to slam the ground, you’ll have to run away to avoid the Scarlet Rot gushing out of the boss. Killing this boss will give you 91000, the Opaline Hardtear and the Stonebarb Cracked Tear.
If you picked up the Redmane Painting in Sellia, Town of Sorcery, there is a small bit of loot that we can quickly grab nearby. By going down the cliff to the southeast, you will be able to get a Rune Arc as well as the Ash of War: Rain of Arrows. While the Rune Arc is available to anyone, the Ash of War: Rain of Arrows can only be obtained if you looted the Redmane Painting in Sellia, Town of Sorcery. So if you haven’t already, go back there and grab the painting before continuing.
Now, you can either reach the bottom of the cliff by jumping down to several branches and platforms, or you can use the spirit spring to safely jump down in one go. While it may sound trickier to use the spirit spring, it’s actually much easier than platforming considering how easy it is to miss a jump and fall to your death. All you have to do here is use the spirit spring to jump east-southeast, and double jump while you’re starting to fall back down.
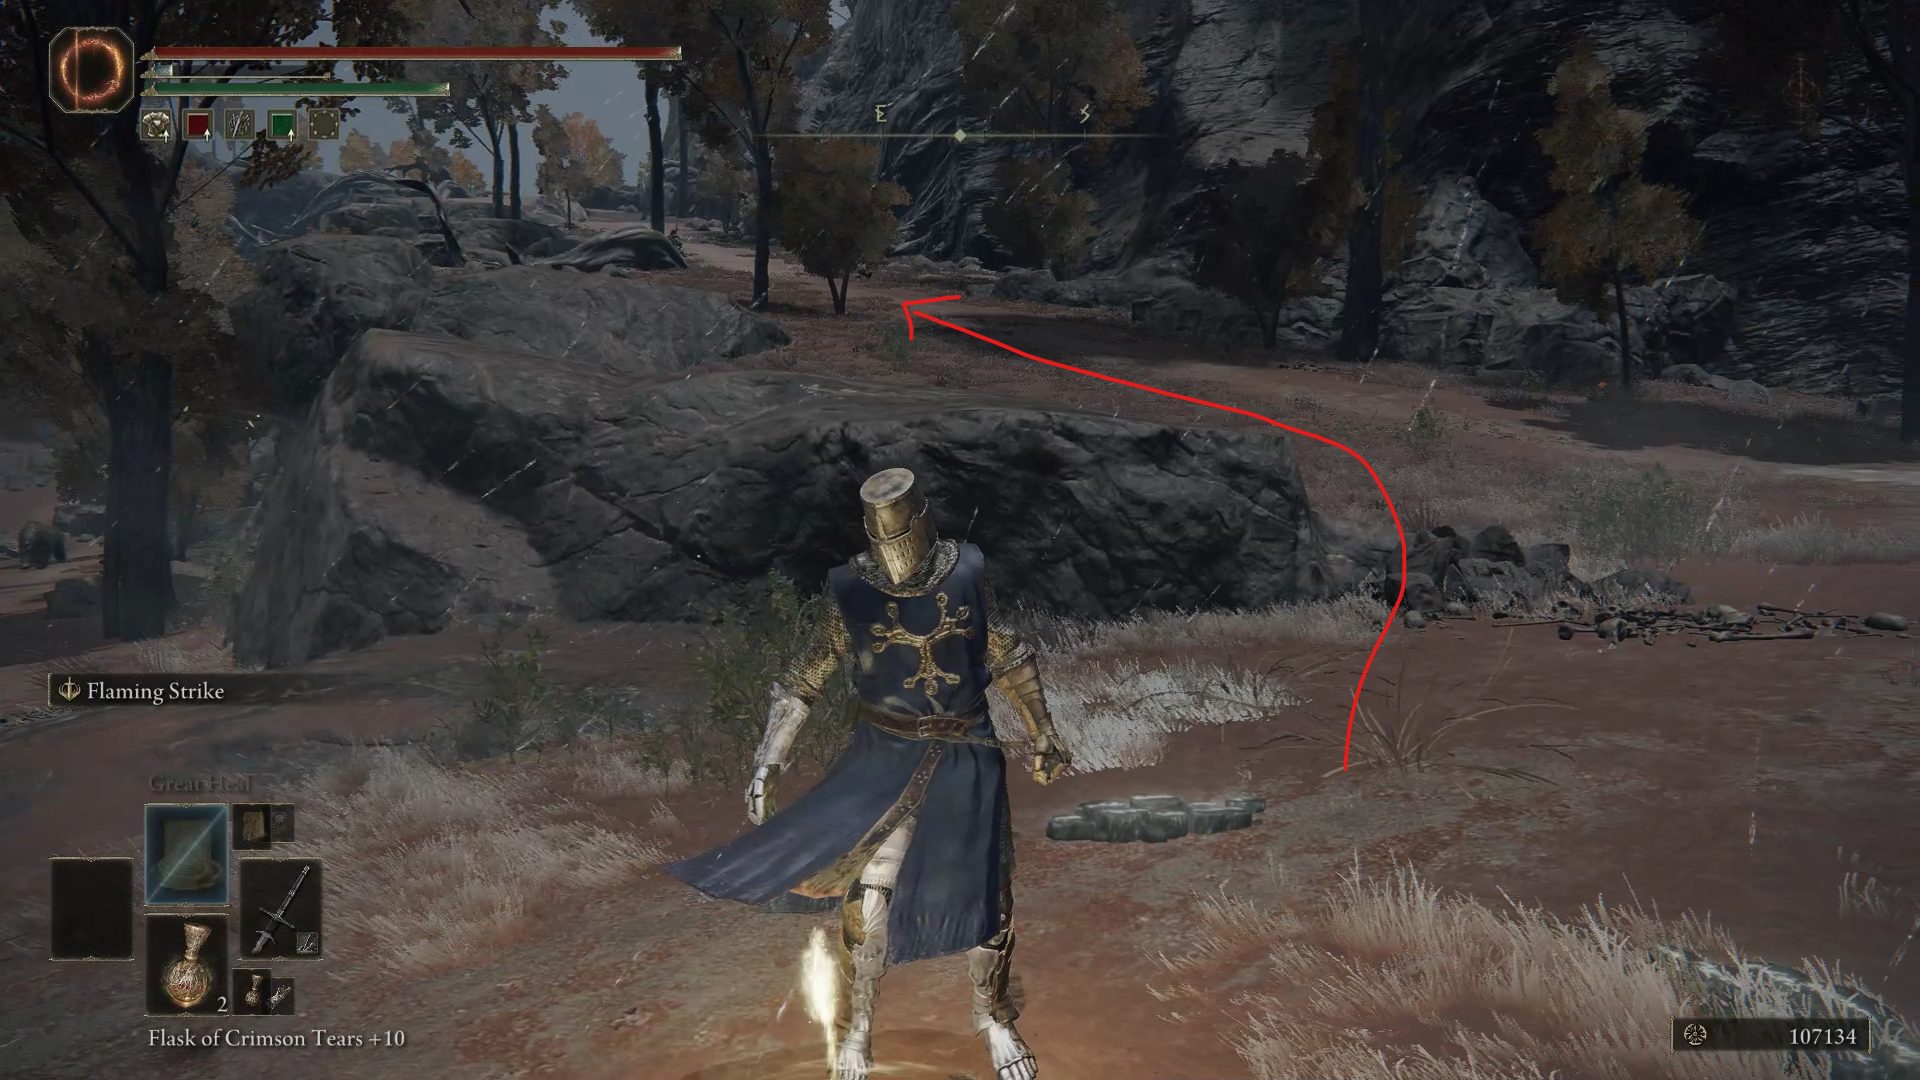
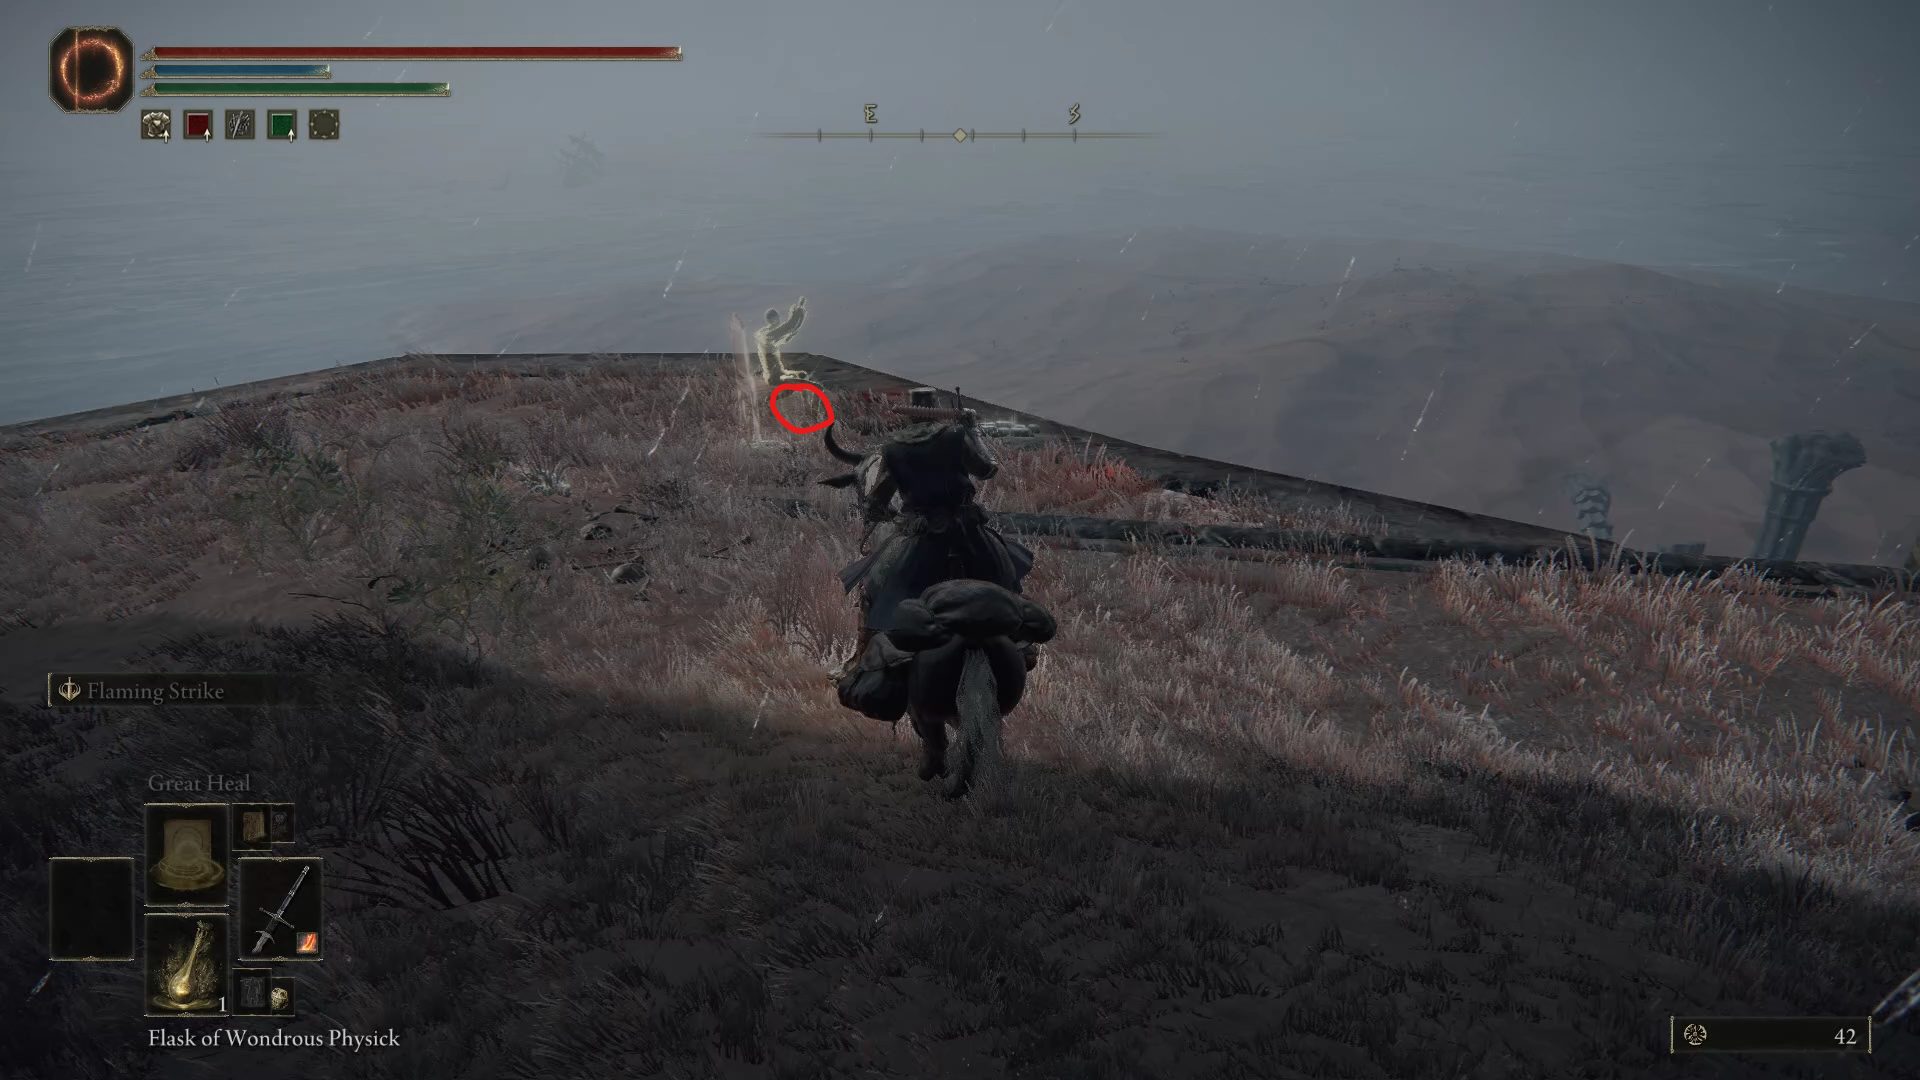
At the bottom, when you get close to the edge of this section you will see a golden phantom sitting in a chair. If you come close to it, it will vanish and leave the Ash of War: Rain of Arrows on the ground. And if you look southwest, you will see a golem laying down, with a corpse containing a Rune Arc by its armpit.
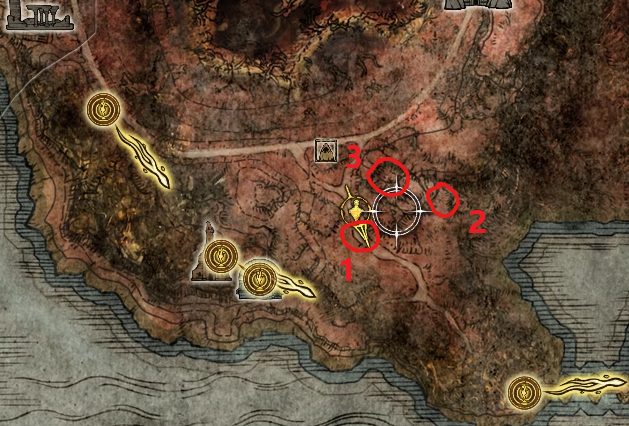
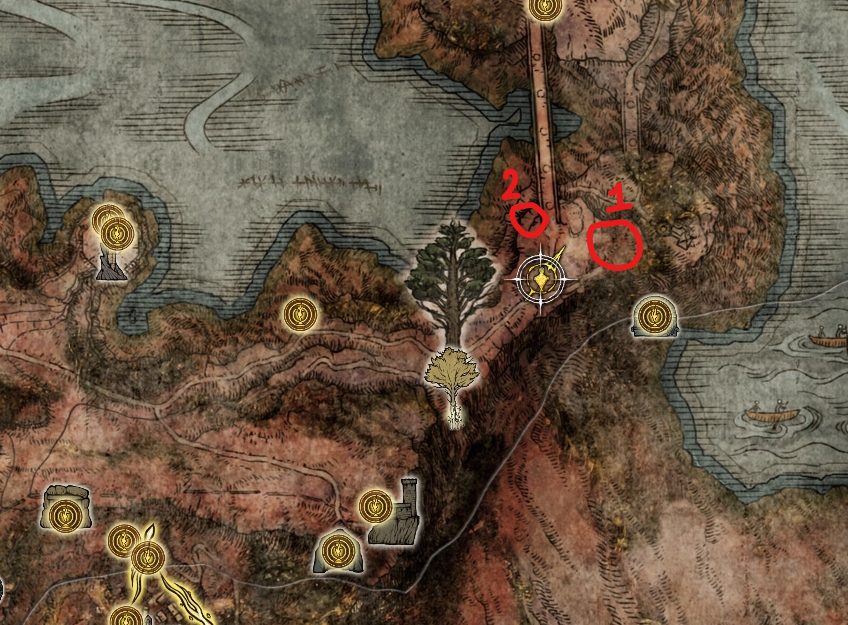
Fighting this golem is futile, as not only does it give very few runes and no unique loot, it also has a lot of HP and deals a lot of damage with its attacks. Instead, just travel back to the Dragonbarrow Fork site of grace. Go back to towards the Minor Erdtree and head northeast to a cemetery (1) that you can desecrate for a handful of Golden Runes. Then, go towards the bridge to the west and jump down to the left of the bridge to find a loot beetle with the Bestial Constitution incantation.
Way to the cemetery
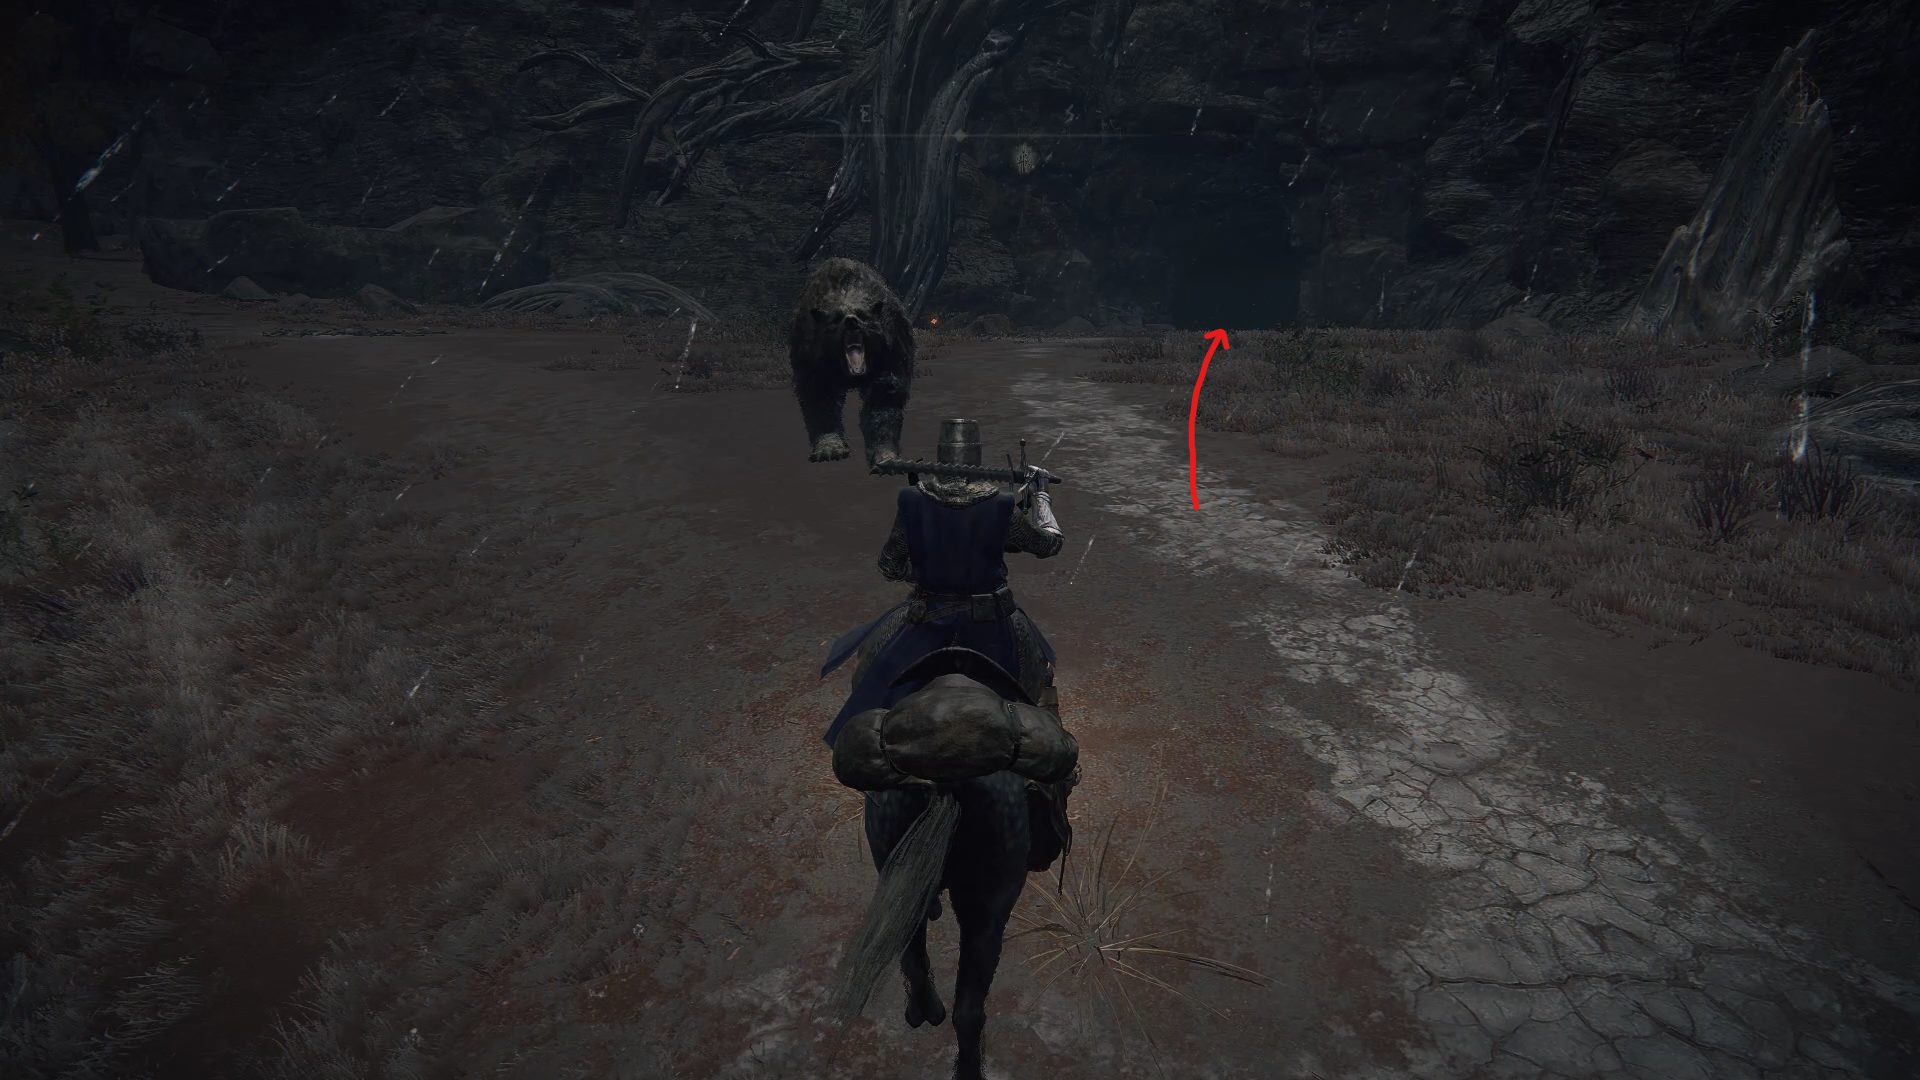
Now, instead of going past the bridge, go back to the Dragonbarrow Fork and instead of going uphill towards the Minor Erdtree, follow the path going east by the cliff. After making your way through a couple of bears you will reach Caelid‘s last dungeon: Dragonbarrow Cave.
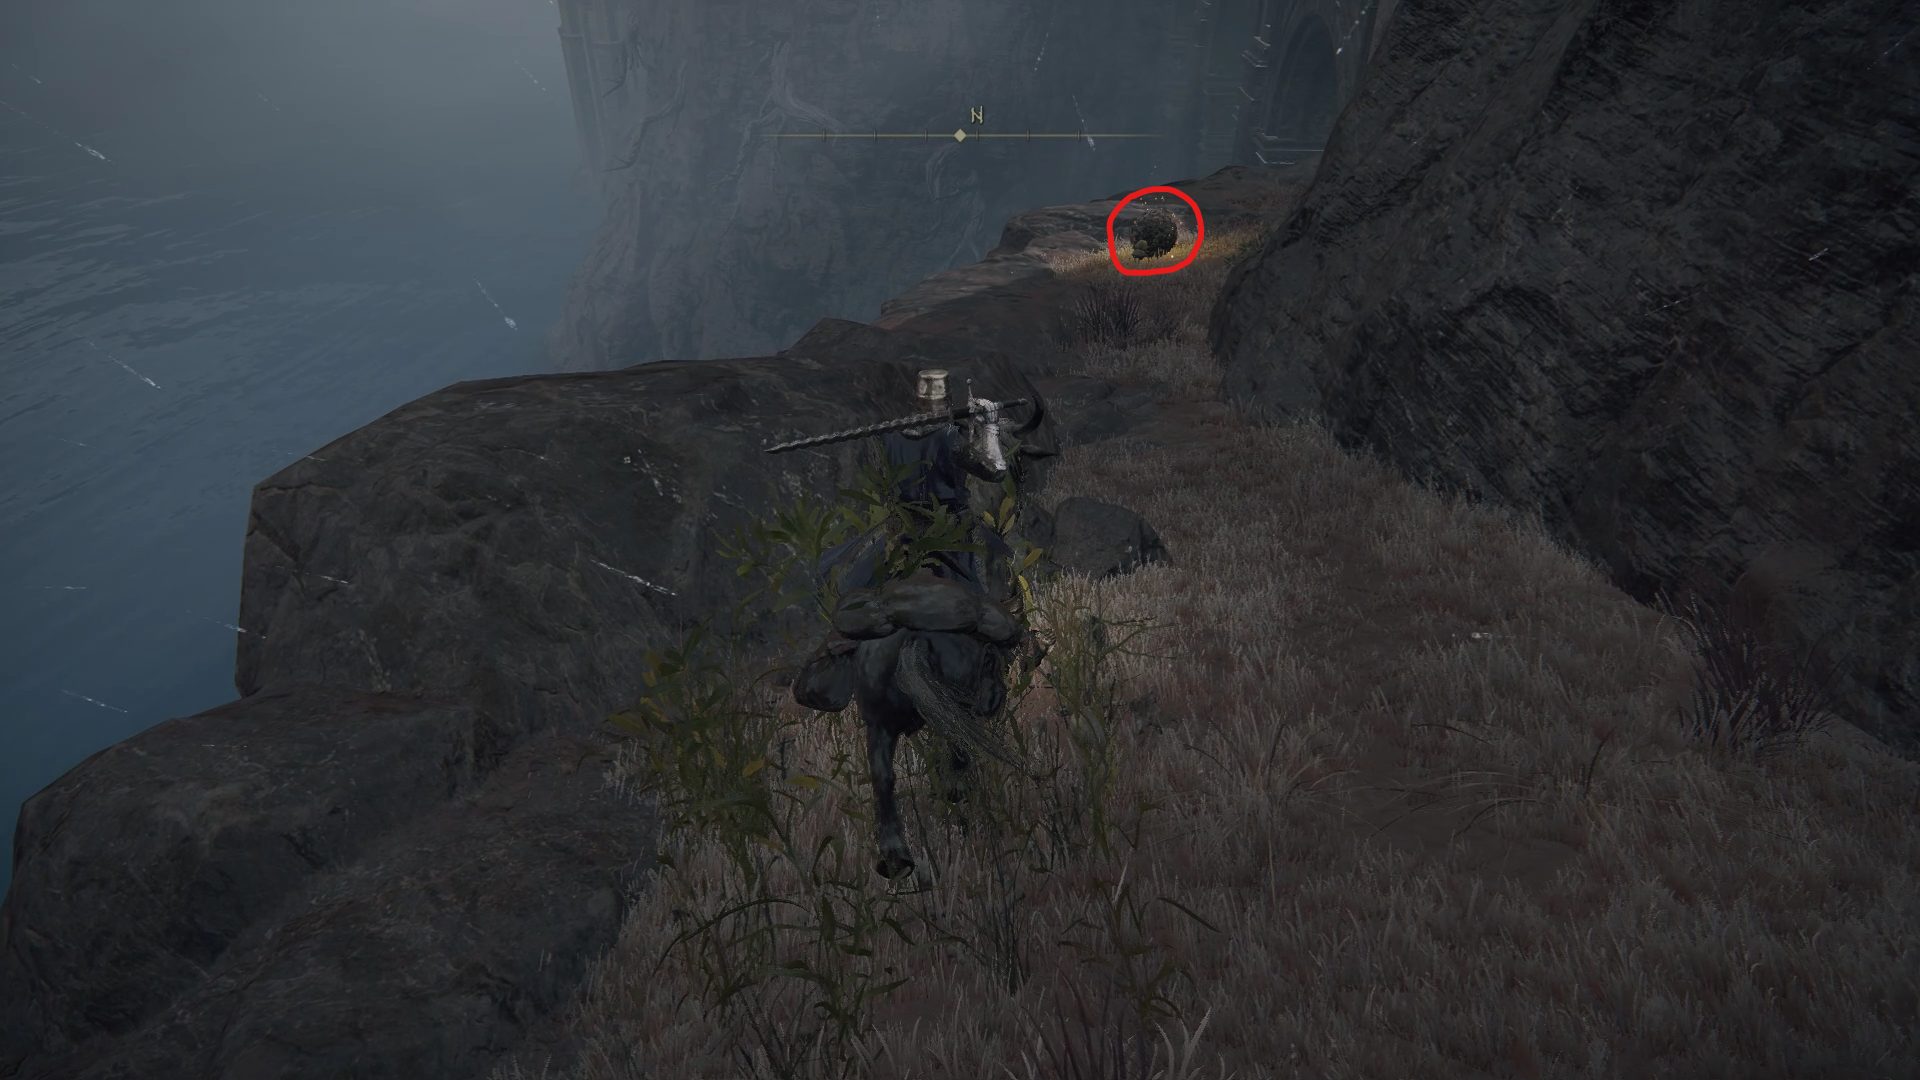
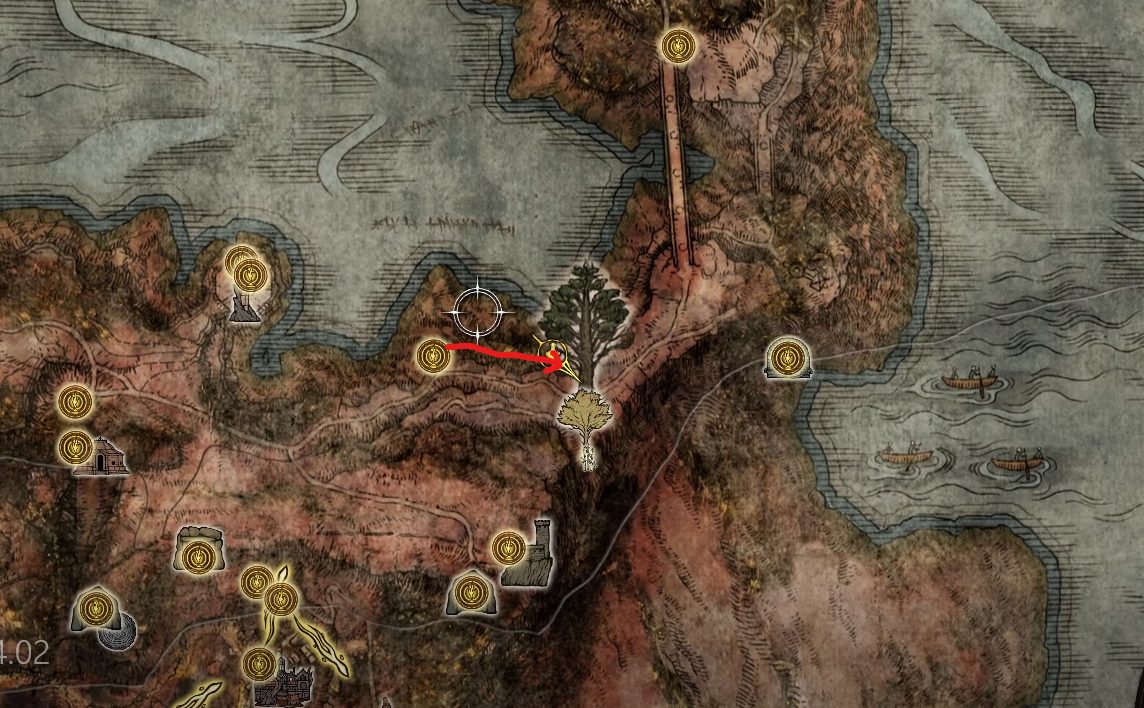
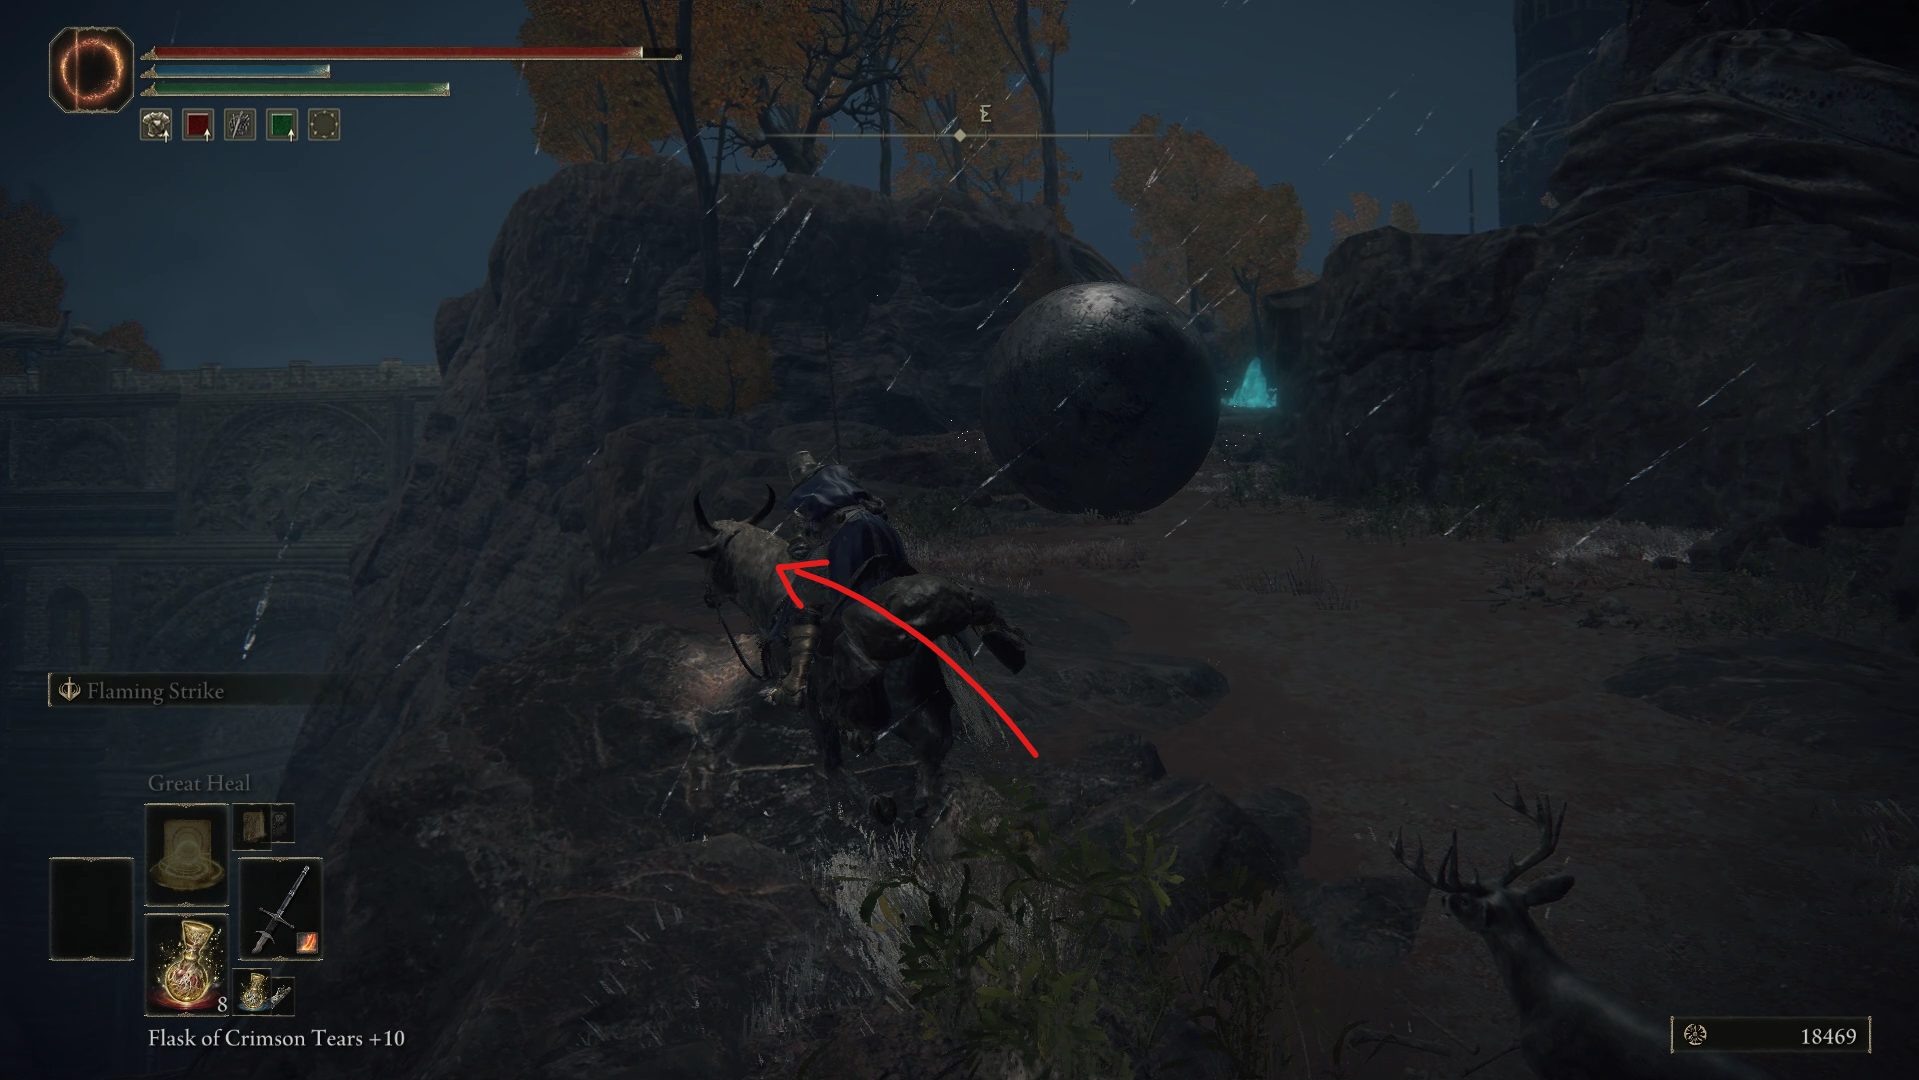
As you come out of the Dragonbarrow Cave, continue following the path going northeast. While the path is very straightforward all the way to Lenne’sRise, you will have to avoid 2 magic balls appearing out of nowhere, and rolling down to crush you. While the first one will be relatively easy to avoid, the second will be much more complicated to dodge, and you’ll have to do a sharp turn left to avoid getting crushed.
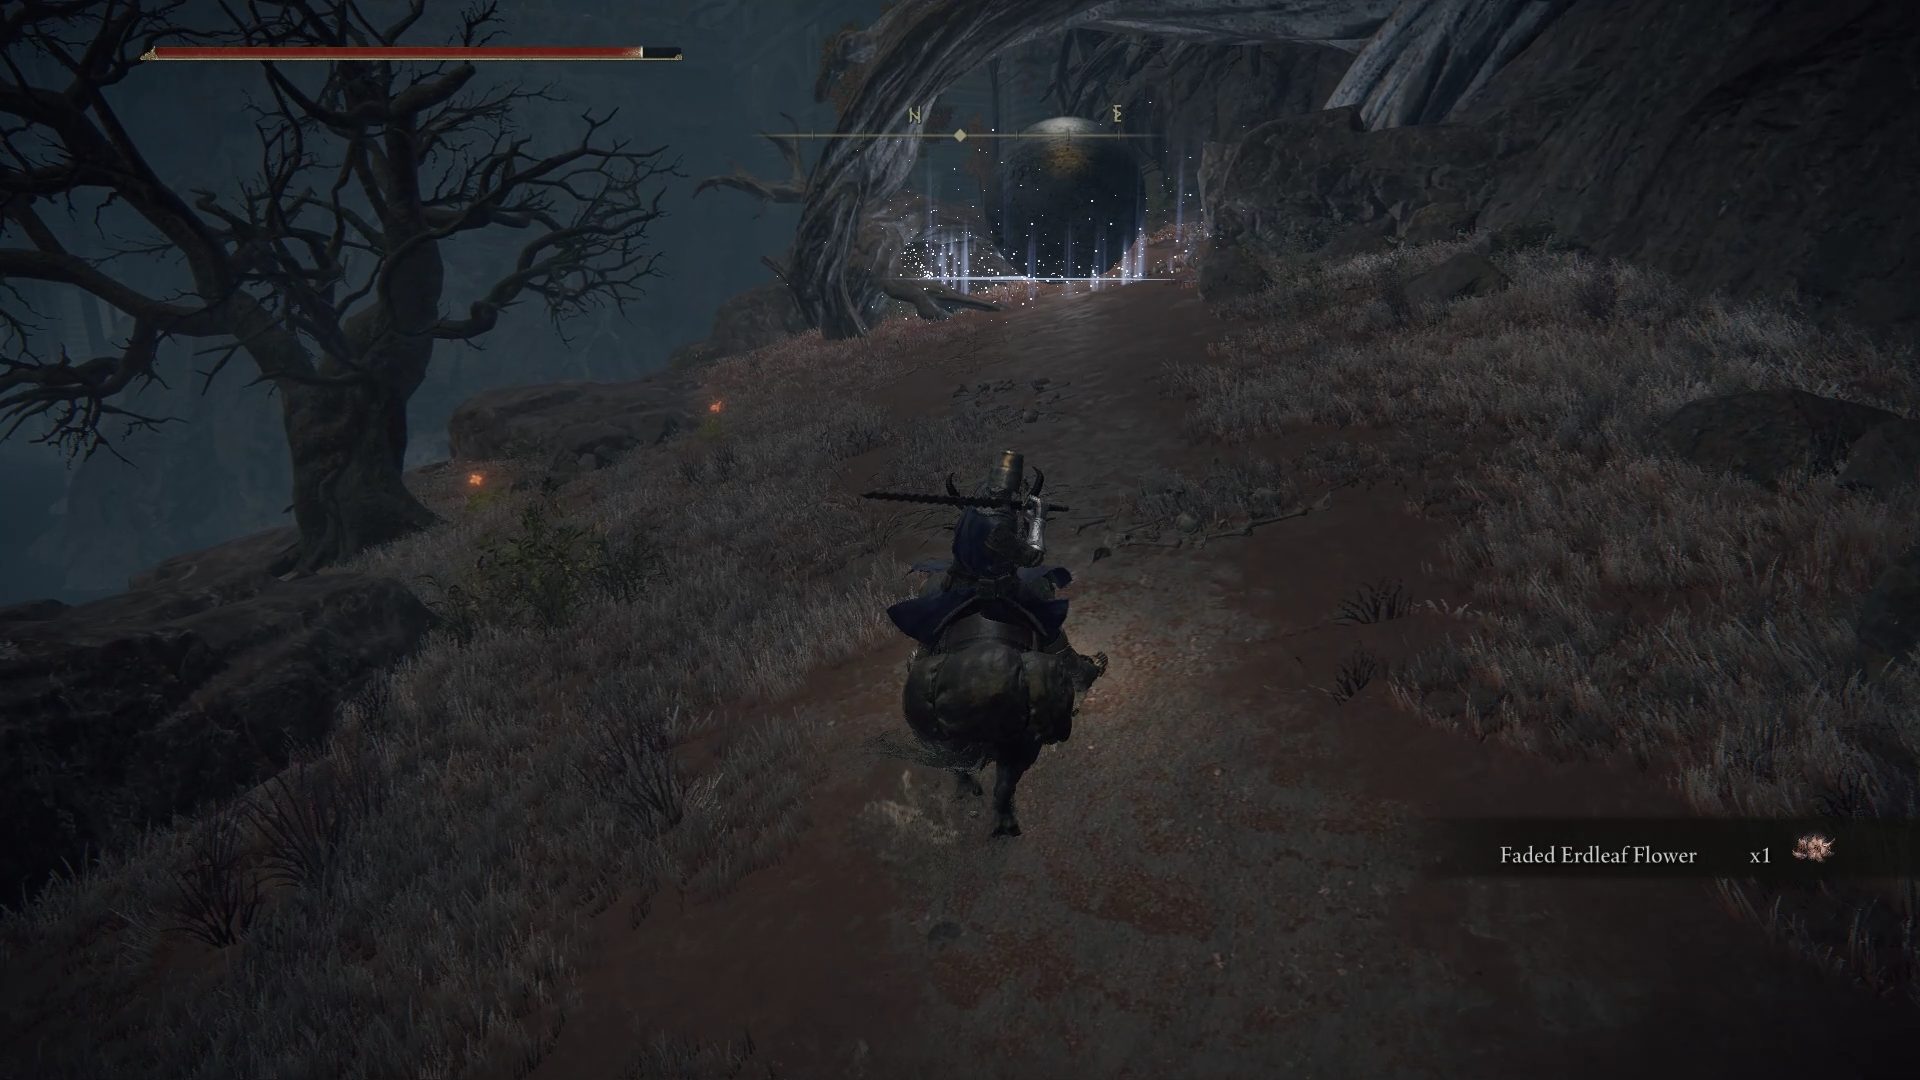
Once you make your way past these, grab the Lenne’s Rise site of grace and head to the spirit spring behind the building. By jumping east towards the building’s balcony, you’ll be able to enter the building by jumping up on the rooftop, and just walking down towards the balcony to slide down.
Once inside, go all the way up the tower to grab the Memory Stone and travel back to the nearby site of grace. Rest at the site of grace to pass the time until nightfall, and you’ll be able to fight another Night’s Cavalry boss patrolling the bridge north of the site of grace.
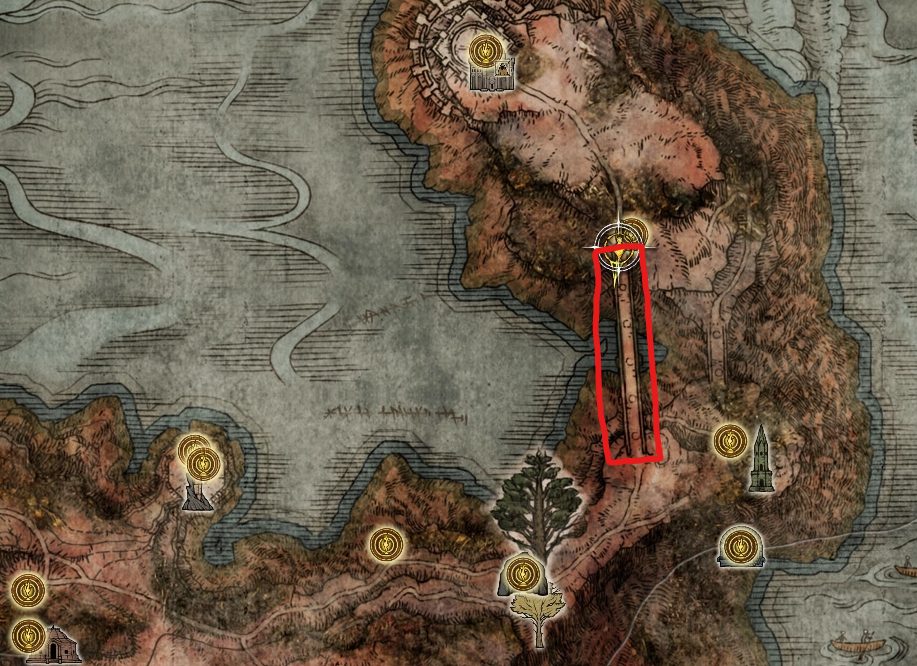
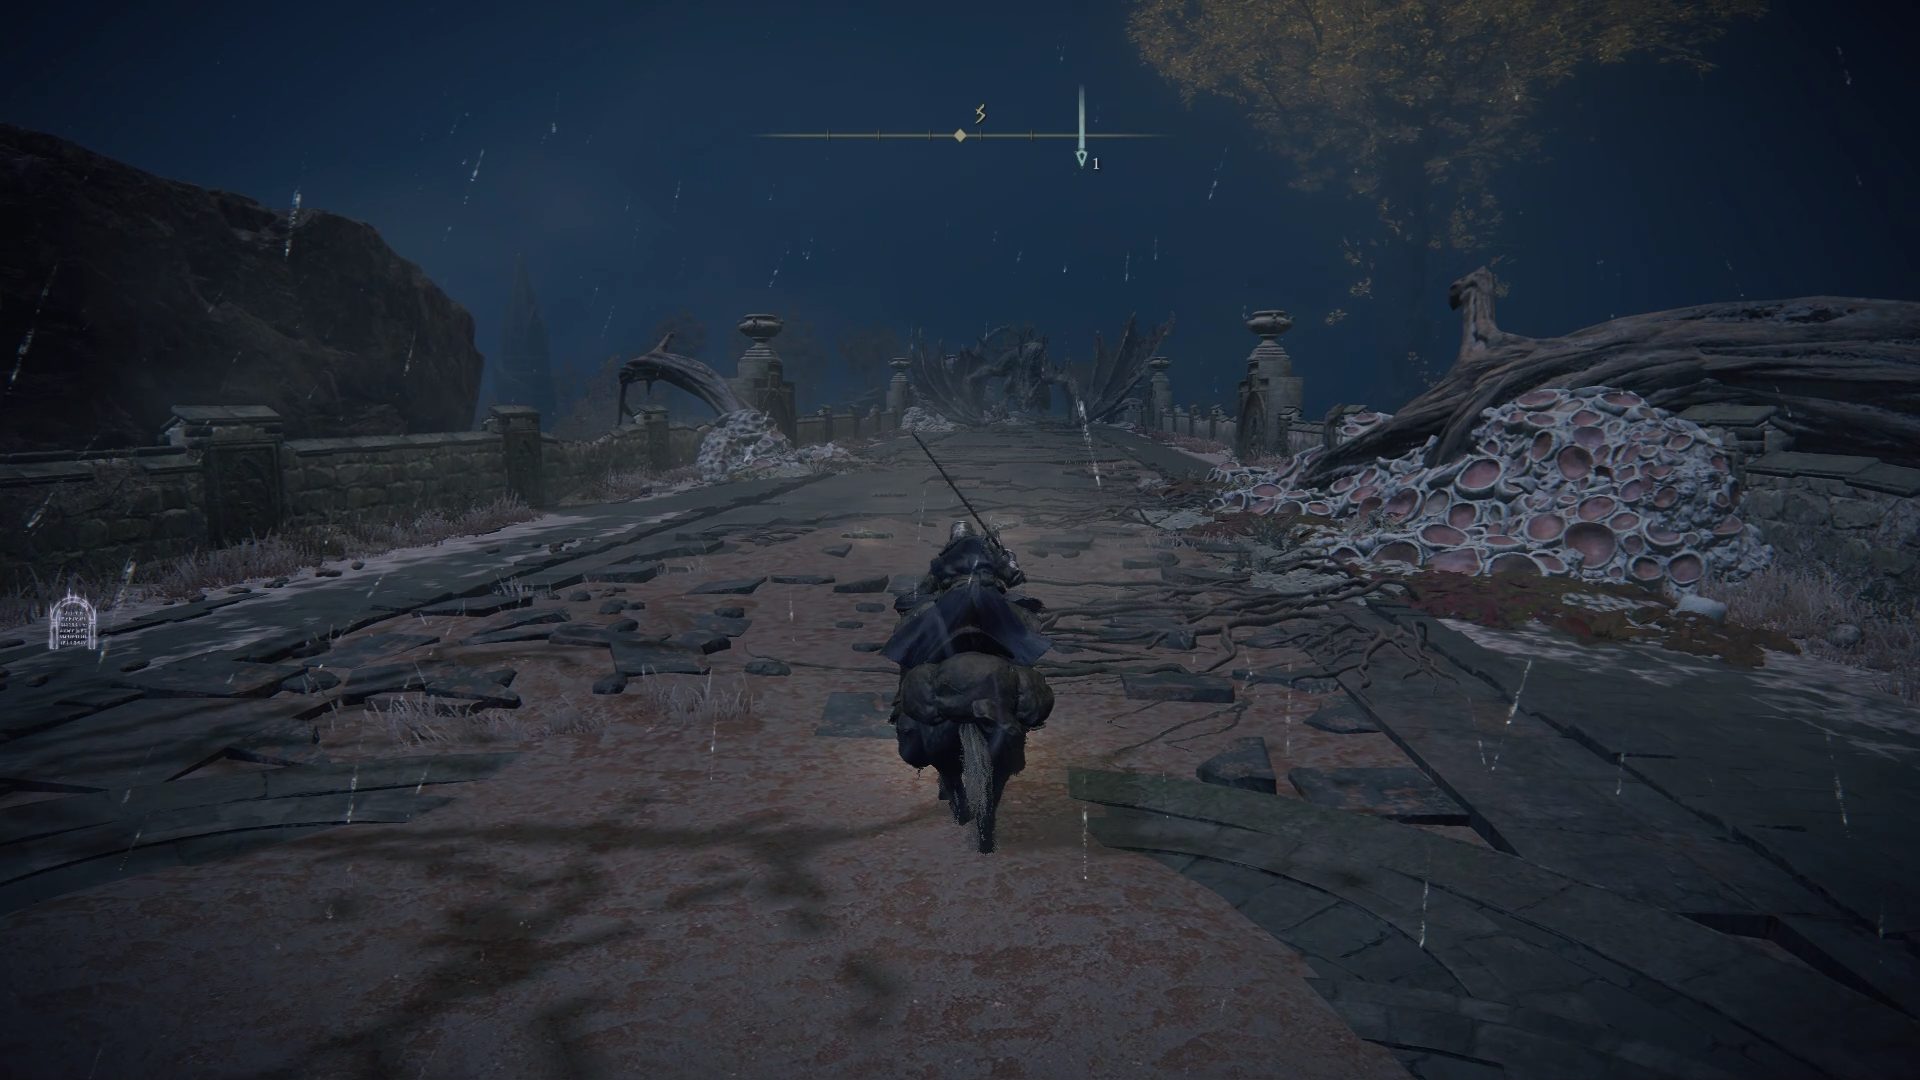
Defeat the Night’s Cavalry boss for 42000 and the Ash of War: Bloodhound’s Step, and continue north past this bridge to reach the last section of Caelid. As you cross the bridge, there will only be one way forward: a path going uphill, littered with poison traps and a bunch of Vulgar Militiamen waiting to ambush you. Since there is no loot to be found all the way until the next site of grace, if you stick close to the cliff to the right as you go up, you will be able to avoid most of the traps and enemies. Just follow the road all the way up, and then go southwest towards the other bridge to grab the Farum Greatbridge site of grace.
From this site of grace, go south to find the Flying Dragon Greyll patrolling the bridge.
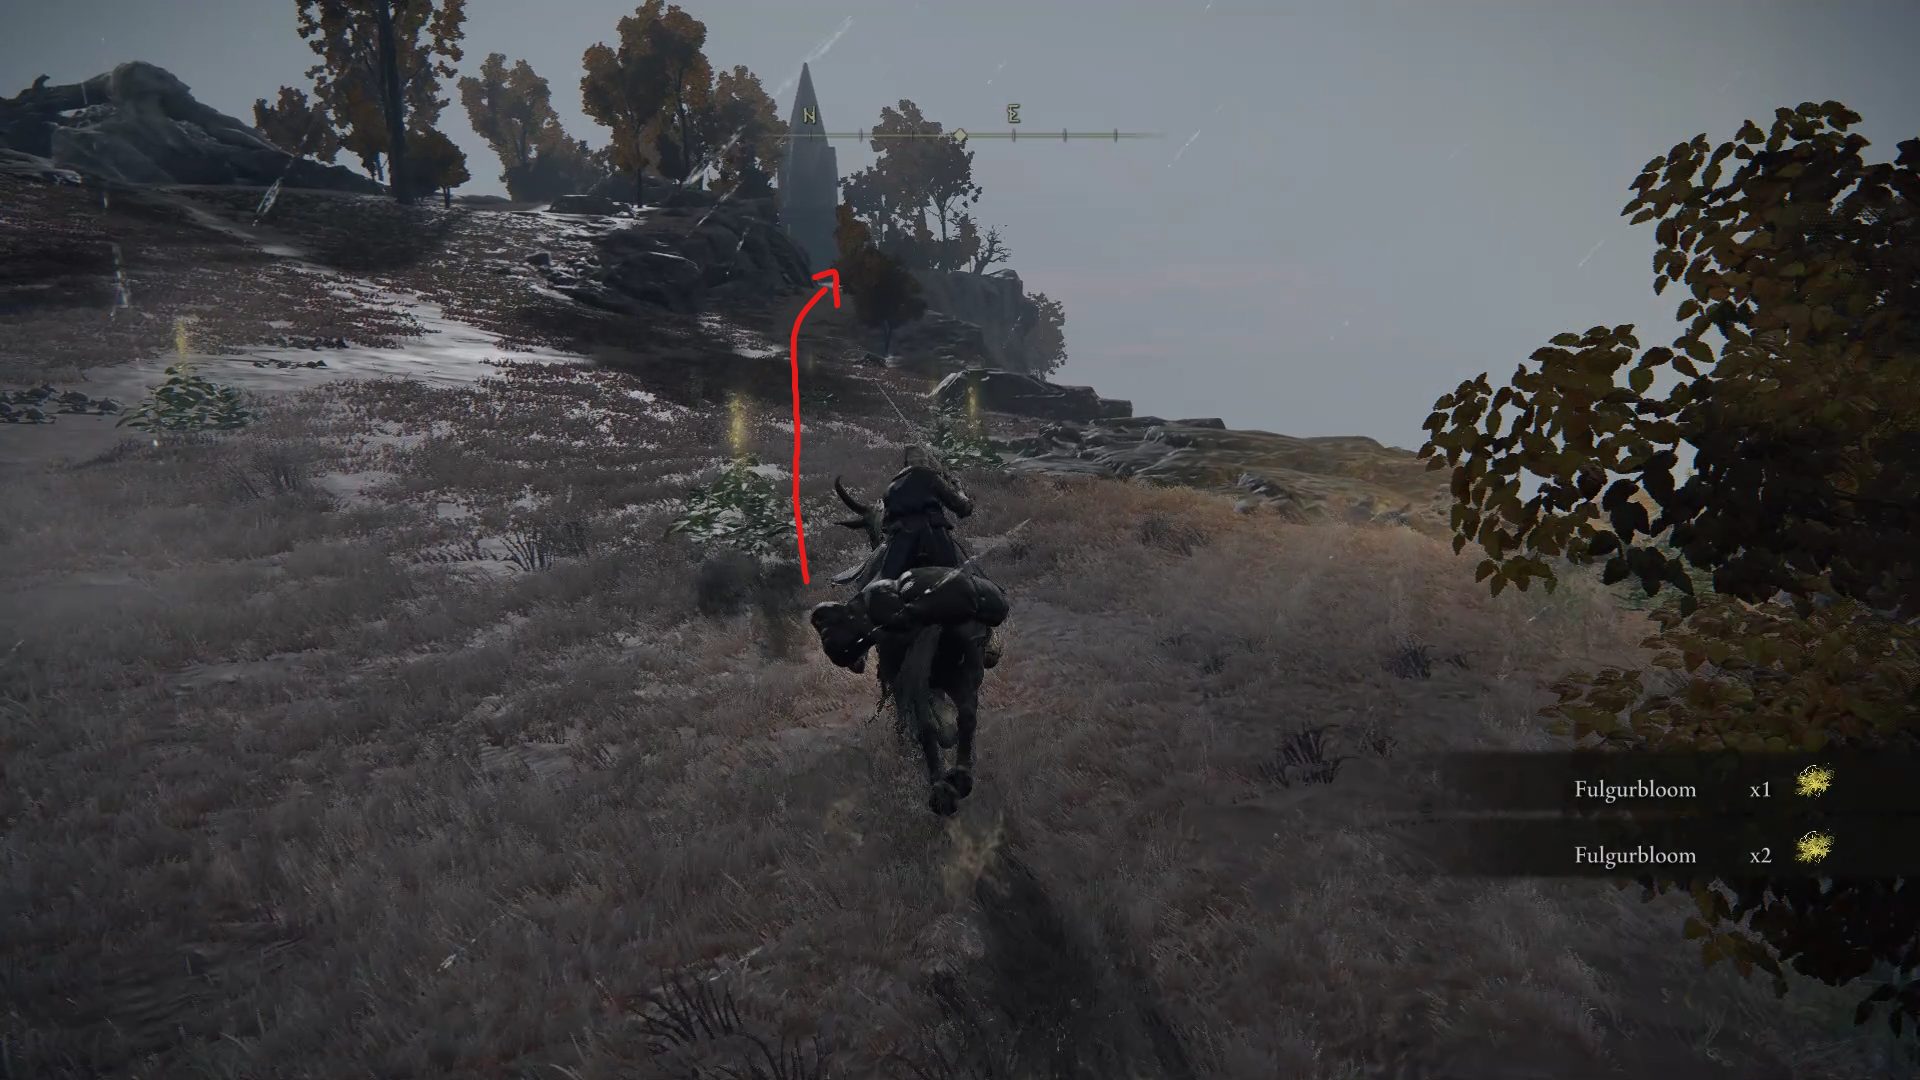
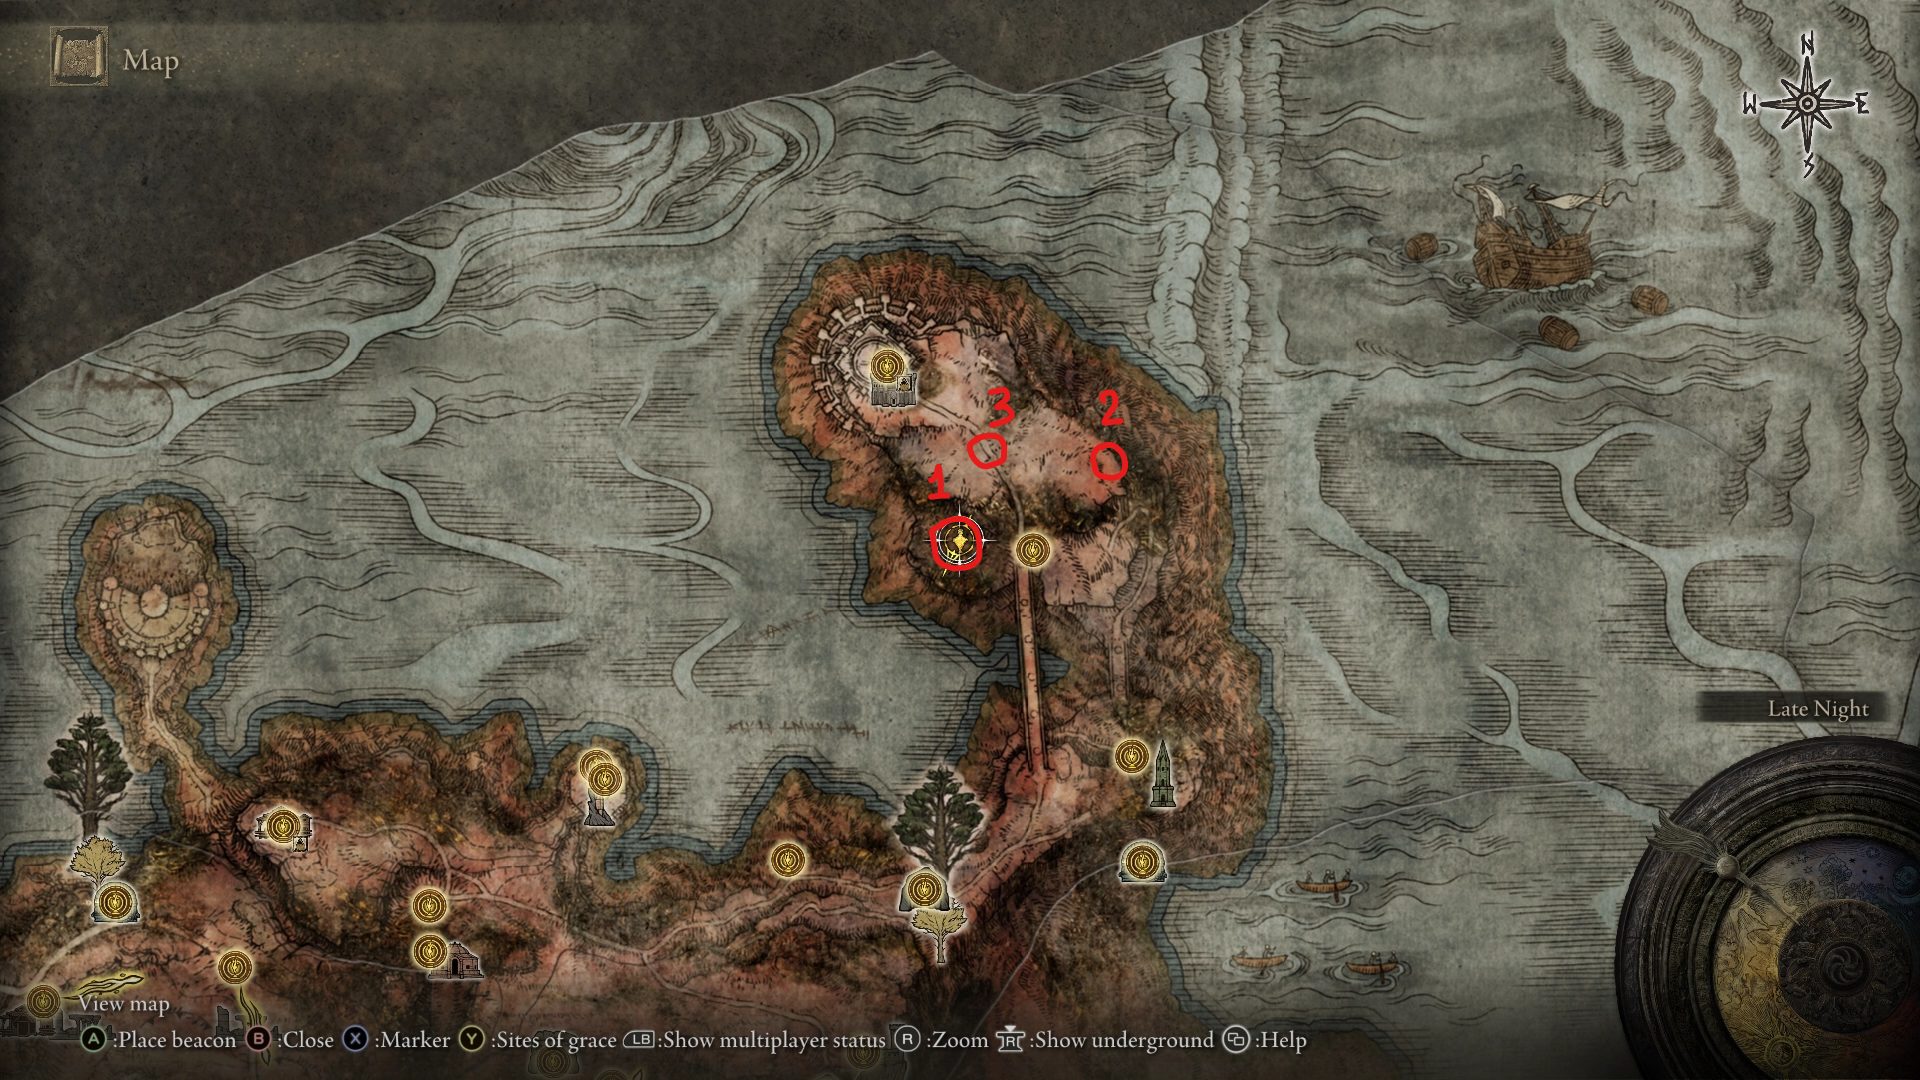
With the dragon defeated, there are only a few things left to grab in this area. If you head west of the Farum Greatbridge site of grace, you’ll be able to find a loot beetle with a (1)Somber Smithing Stone [9], while northeast of the site of grace, you can grab (2) 1x Starlight Shards. Lastly, if you follow the road north going towards the Bestial Sanctum, you’ll find an Illusory Tree by the road with (3) 1x Golden Seed.
(1) 1x Somber Smithing Stone [9](2) 1x Starlight Shards(3) 1x Golden Seed
Now, if you continue following the road all the way to the Bestial Sanctum, you’ll find another boss: the Black Blade Kindred.
Whether you fought or skipped this optional boss by going around the side, if you haven’t already, enter the Bestial Sanctum and grab the Bestial Sanctum site of grace. Now head back out and go west, and you will find a path leading down the cliff, which is where you can find the Cinquedea and the Dragoncrest Shield Talisman. However, this path is far from being safe, so make sure to spend your runes before starting your descent. Additionally, if you ever get in combat with a bat while climbing down, make sure to kill it as you could otherwise remain in combat, with no way to kill the bat or open your map to travel back to the surface.
Align yourself with the branch below and run forwardJust run towards the structure belowJump towards the rubble to avoid fall damageDouble jump to reach the ledgeDouble jump to reach the rubbleRun down towards the ledge
For the last part, you’ll have to carefully jump on top of a small ledge to avoid lethal fall damage.
Once you make your way down, if you go north you will find a small balcony with the Cinquedea, and the Dragoncrest Shield Talisman east of there.
If you skipped the War-Dead Catacombs dungeon earlier, this might be a good time to go back and explore it. Otherwise, with all of Dragonbarrow and Caelid explored, you can move on to the next part of our walkthrough: Nokron, Eternal City.
Video game fan since TMNT: The Manhattan Project, I'm always on the lookout for games that could top Outer Wilds or Disco Elysium, or for new songs to listen to.
Hey Ragedash, thanks for your patience! After some testing, it does seem that Caelid is the somewhat easier region — mobs and bosses both appear to have slightly less health than they do in Altus Peninsula. That being said, the two areas are relatively comparable in difficulty, so if you find one too tough/not to your liking, it’s definitely not a bad idea to see how you fare in the other area.
Tried both places this week end and it’s true Caelid mobs and bosses appears weaker but when you add the rot, the place can become hell really fast, it’s simple i lost all my runes twice to the rot while in Altus i didn’t die once. I still went for Caelid because quests send you there (ranni etc). So, yeah don’t hesitate to alternate or change destination if you struggle or have enough dying at the rot lol.
Soren
2 years ago
I enjoy your walk-throughs. Especially when you add in a sense of humor! Keep up the good work!
XcoldNfrostyX
2 years ago
Great guide as always. Just thought I would flag that in Sellia (Tower of Sorcery), once you have lit the braziers and cleared the seal. At the most NE point of town (before going up the stairs to the golden seed) you missed a chest with the final Imbued Sword!
Thanks for the heads up! Added it to the walkthrough.
Cidia
2 years ago
Ngl should mention how hard the knights of the great jar fight is and explain the cheese crouch strat for peeps interested cause man fuck that fight
Jocker
2 years ago
This is by far the best elden ring walkthrough I have seen…I been following it since before caelid when it finished at liurnia and I figured it out that caelid was the next step and since it took a while to figure out where to go next because this game gets really hard after liurnia I stared a new game with a wrench….I’m a completionist and following you I discovered a new mini boss in caelid, a new dungeon I completely miss and some really good runes in the map I completely miss I can’t wait until your done in the next upload of what you find because you’re teaching me where to look…I appreciate that pz don’t take long
Thanks for the kind words! Caelid’s walkthrough will get more frequent and significant updates during the next couple of days and going forward, hope you find it helpful!
Zman
2 years ago
Do grace lines stay on the map even after the quest is complete? I have been following your walkthoughs and still see some grace lines where I know I have completed the side quests. Thanks
It appears so yeah, the line leading to Castle Morne in the Weeping Peninsula never went away for me even after doing everything there was to do in there.
Mark
2 years ago
Are you close to finishing dragonburrow? This is the BEST guide
The routing for Dragonbarrow and Caelid is done! There are a few optional bosses and a dungeon that will get a walkthrough in the next few days, but other than that, this part of the walkthrough is finished. Thanks for the kind words!
Danii
2 years ago
Current glitch possibly. The dragon on the bridge got stuck beside the bridge and cliff where site of grace is and then just died with 75% health. 🤣
SREJ29
1 year ago
Loving the guide. Just want to point out that North West of the Isolated Merchant in Dragonbarrow is a tree with an Arteria Leaf at its base. South West of that tree is a loot beetle with Ash of War: Sky Shot. Also, the Harpies in Fort Froth, whilst a pain to kill, drop a Golden Rune (9) the first time you kill them. Looking forward to the expansion!
Larrymatt
2 years ago
Part 2 starts after you beat radahn, shouldn’t it start where we telephoned from fort Gael? I’m confused.
Part 2 starts after clearing the Redmane Castle dungeon, though I can see how the way it’s worded doesn’t reflect that well. Thanks for the feedback!
Lewis
2 years ago
Is mounting up really the best option for flame chariots? Your goal is to get behind them and hit the guy inside… horseback fighting is a little imprecise for that no?


![ancient dragon apostle's cookbook [3] location eldenring](https://eip.gg/wp-content/uploads/2022/04/ancient-dragon-apostles-cookbook-3-location-eldenring.jpg)


I am waiting for this to be finished so I can keep playing with this walkthrough! Love the work, any idea when the rest of this will be up?
Ditto!
We’ll have more updates to Caelid’s walkthrough this week, though it’s hard to say when it will be finished. Glad you’re enjoying our walkthrough!
I’ve been waiting for this and finally its here. So caelid instead of altus?
Hey Ragedash, thanks for your patience! After some testing, it does seem that Caelid is the somewhat easier region — mobs and bosses both appear to have slightly less health than they do in Altus Peninsula. That being said, the two areas are relatively comparable in difficulty, so if you find one too tough/not to your liking, it’s definitely not a bad idea to see how you fare in the other area.
Tried both places this week end and it’s true Caelid mobs and bosses appears weaker but when you add the rot, the place can become hell really fast, it’s simple i lost all my runes twice to the rot while in Altus i didn’t die once. I still went for Caelid because quests send you there (ranni etc). So, yeah don’t hesitate to alternate or change destination if you struggle or have enough dying at the rot lol.
I enjoy your walk-throughs. Especially when you add in a sense of humor! Keep up the good work!
Great guide as always. Just thought I would flag that in Sellia (Tower of Sorcery), once you have lit the braziers and cleared the seal. At the most NE point of town (before going up the stairs to the golden seed) you missed a chest with the final Imbued Sword!
Thanks for the heads up! Added it to the walkthrough.
Ngl should mention how hard the knights of the great jar fight is and explain the cheese crouch strat for peeps interested cause man fuck that fight
This is by far the best elden ring walkthrough I have seen…I been following it since before caelid when it finished at liurnia and I figured it out that caelid was the next step and since it took a while to figure out where to go next because this game gets really hard after liurnia I stared a new game with a wrench….I’m a completionist and following you I discovered a new mini boss in caelid, a new dungeon I completely miss and some really good runes in the map I completely miss I can’t wait until your done in the next upload of what you find because you’re teaching me where to look…I appreciate that pz don’t take long
Thanks for the kind words! Caelid’s walkthrough will get more frequent and significant updates during the next couple of days and going forward, hope you find it helpful!
Do grace lines stay on the map even after the quest is complete? I have been following your walkthoughs and still see some grace lines where I know I have completed the side quests. Thanks
It appears so yeah, the line leading to Castle Morne in the Weeping Peninsula never went away for me even after doing everything there was to do in there.
Are you close to finishing dragonburrow? This is the BEST guide
The routing for Dragonbarrow and Caelid is done! There are a few optional bosses and a dungeon that will get a walkthrough in the next few days, but other than that, this part of the walkthrough is finished. Thanks for the kind words!
Current glitch possibly. The dragon on the bridge got stuck beside the bridge and cliff where site of grace is and then just died with 75% health. 🤣
Loving the guide. Just want to point out that North West of the Isolated Merchant in Dragonbarrow is a tree with an Arteria Leaf at its base. South West of that tree is a loot beetle with Ash of War: Sky Shot. Also, the Harpies in Fort Froth, whilst a pain to kill, drop a Golden Rune (9) the first time you kill them. Looking forward to the expansion!
Part 2 starts after you beat radahn, shouldn’t it start where we telephoned from fort Gael? I’m confused.
Part 2 starts after clearing the Redmane Castle dungeon, though I can see how the way it’s worded doesn’t reflect that well. Thanks for the feedback!
Is mounting up really the best option for flame chariots? Your goal is to get behind them and hit the guy inside… horseback fighting is a little imprecise for that no?
Being mounted seemed like the safest option if you manage to hit the driver, though both work.
In Dragonbarrow, instead of fighting the massive white dragon you can kill all the small dragons and he will die.
Is Fort Faroth covered in this? I think it should be in the Caelid section but I missed it.
It is covered in this guide, you can find it in the Dragonbarrow tab  🙂 
Thanks
Awesome walkthrough!!! Can you please do walkthroughs with the Dark souls games?