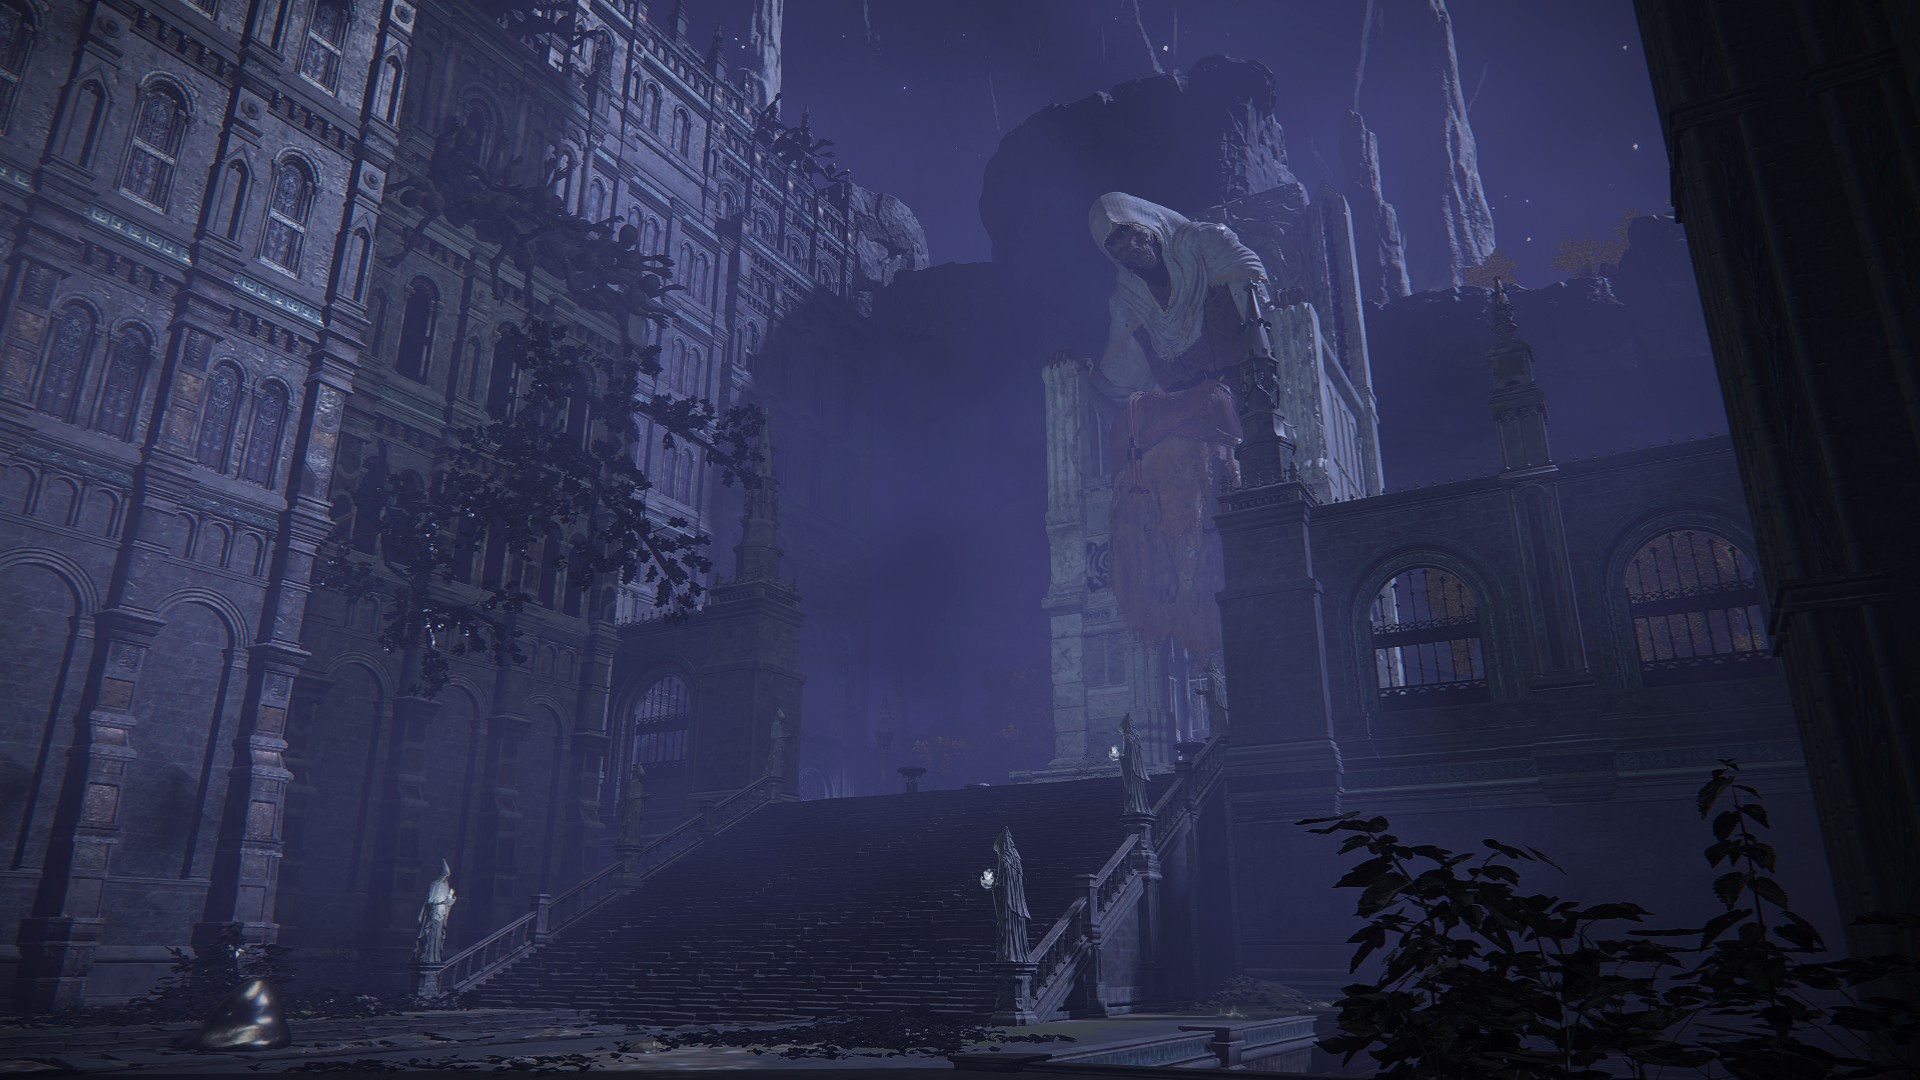
An ancient city punished for high treason against the Greater Will, Nokron is found underground, and sits above the Siofra River. The enemies here range from pathetically weak troglodytes to crucible knights, and the loot they guard is valuable. Additionally, this area is crucial to Ranni the Witch’s questline, and lets you access an area that’s part of unlocking Fia’s ending. This is also a good place to collect crafting materials you won’t find aboveground — the guide won’t specifically mention them, but you should be picking them up as you go.
You won’t be able to access Nokron until you defeat Starscourge Radahn in Caelid. Once Radahn is dead, a meteorite will strike eastern Limgrave, just south of Mistwood. Actually entering Nokron will be covered below, in the first tab of the walkthrough.
Walkthrough for Nokron, Ancestral Woods, Siofra Aqueduct, Night’s Sacred Ground
Note: the first version of the Ancestral Woods walkthrough was missing a brazier — this has been updated. Our apologies!
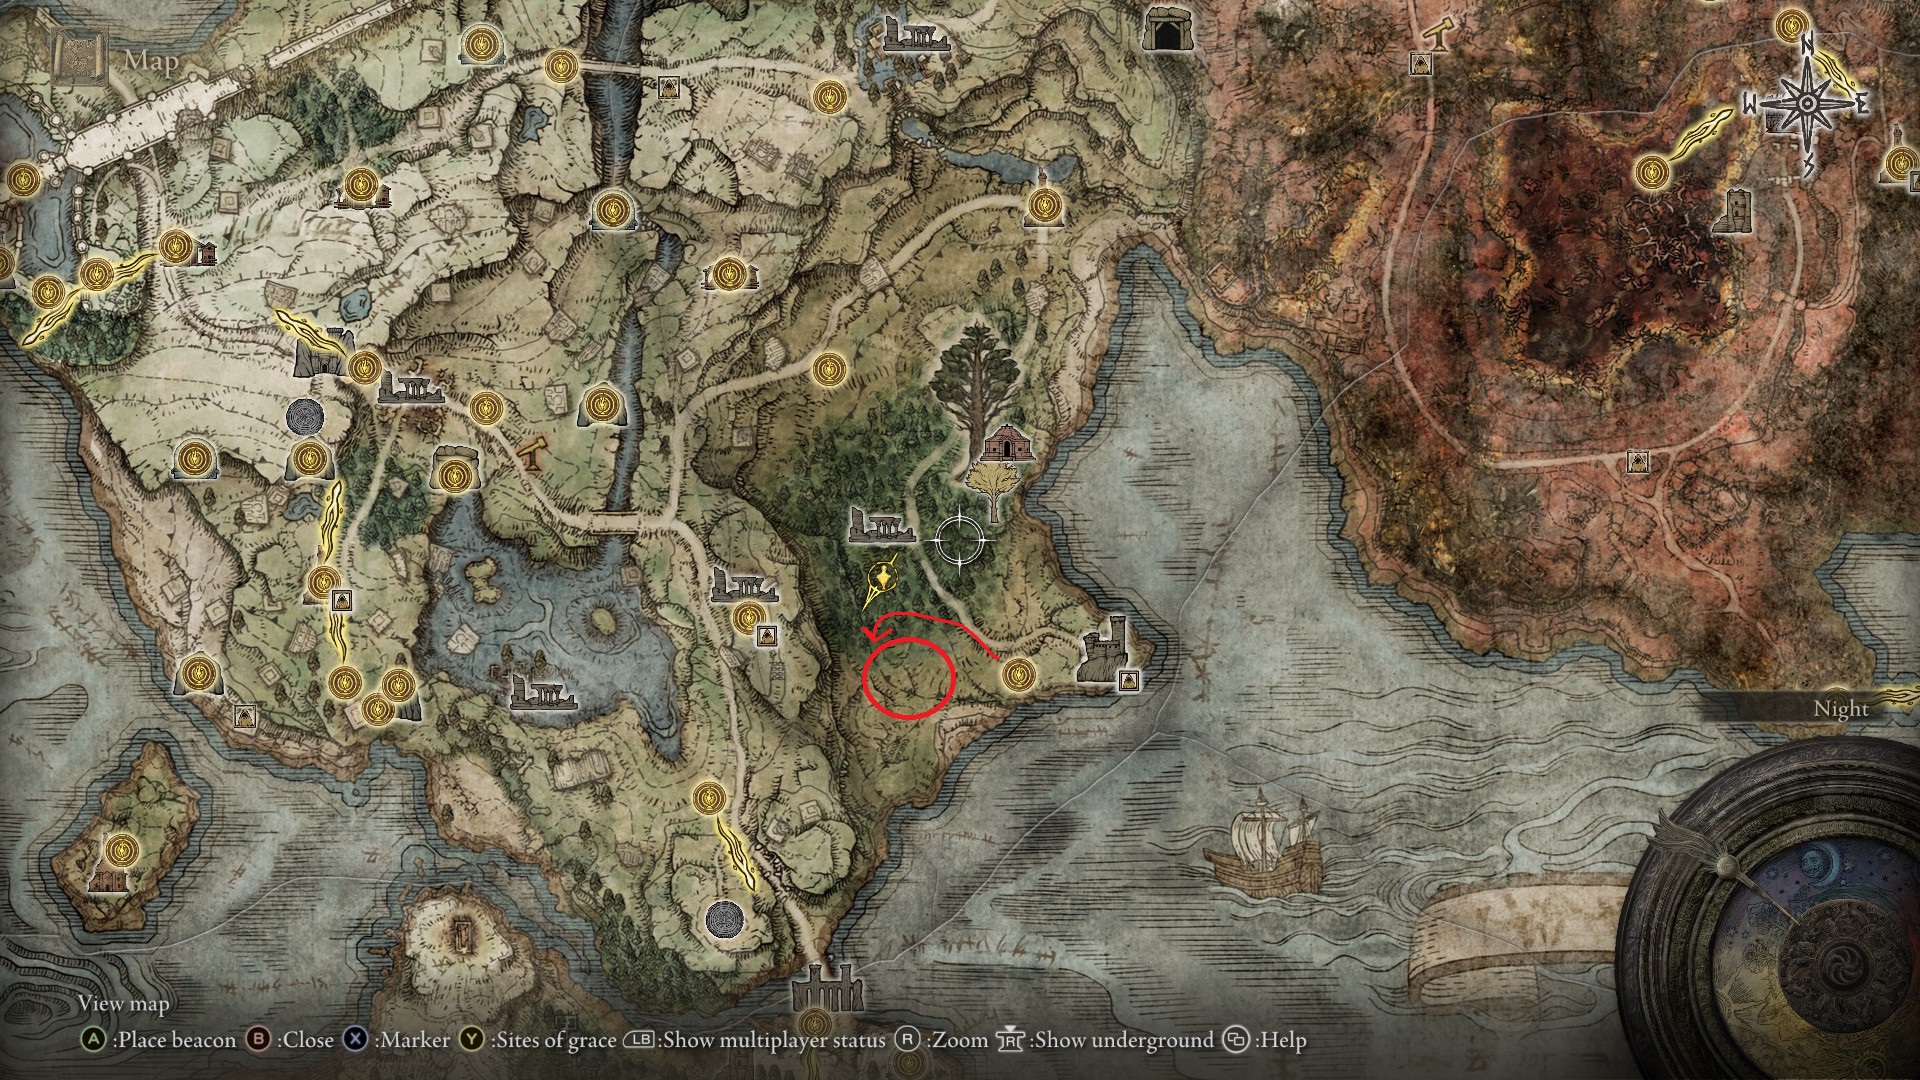
You’ll start your journey to the Eternal City by teleporting to the Fort Haight site of grace — if you don’t have this, the next closest site of grace is Mistwood Outskirts. The crater is west of Fort Haight, and you’ll want to enter it from the north.
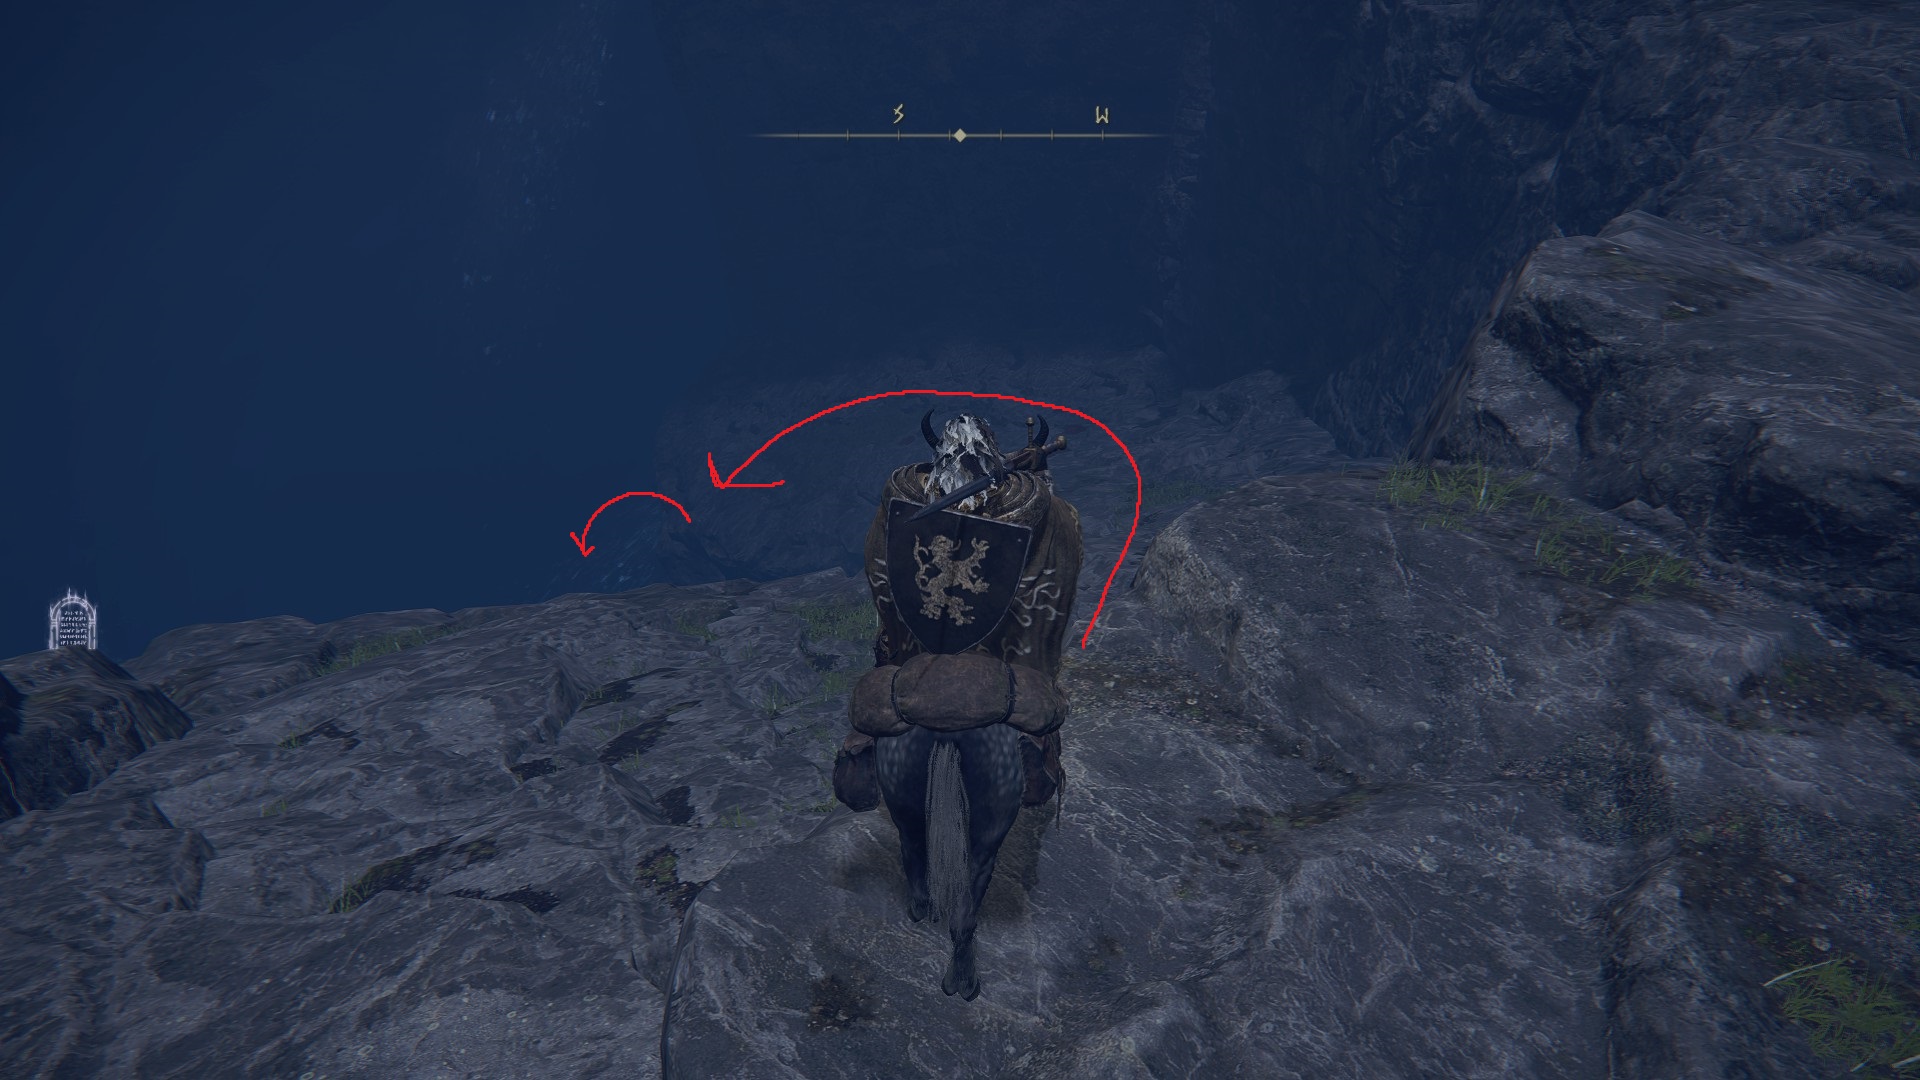
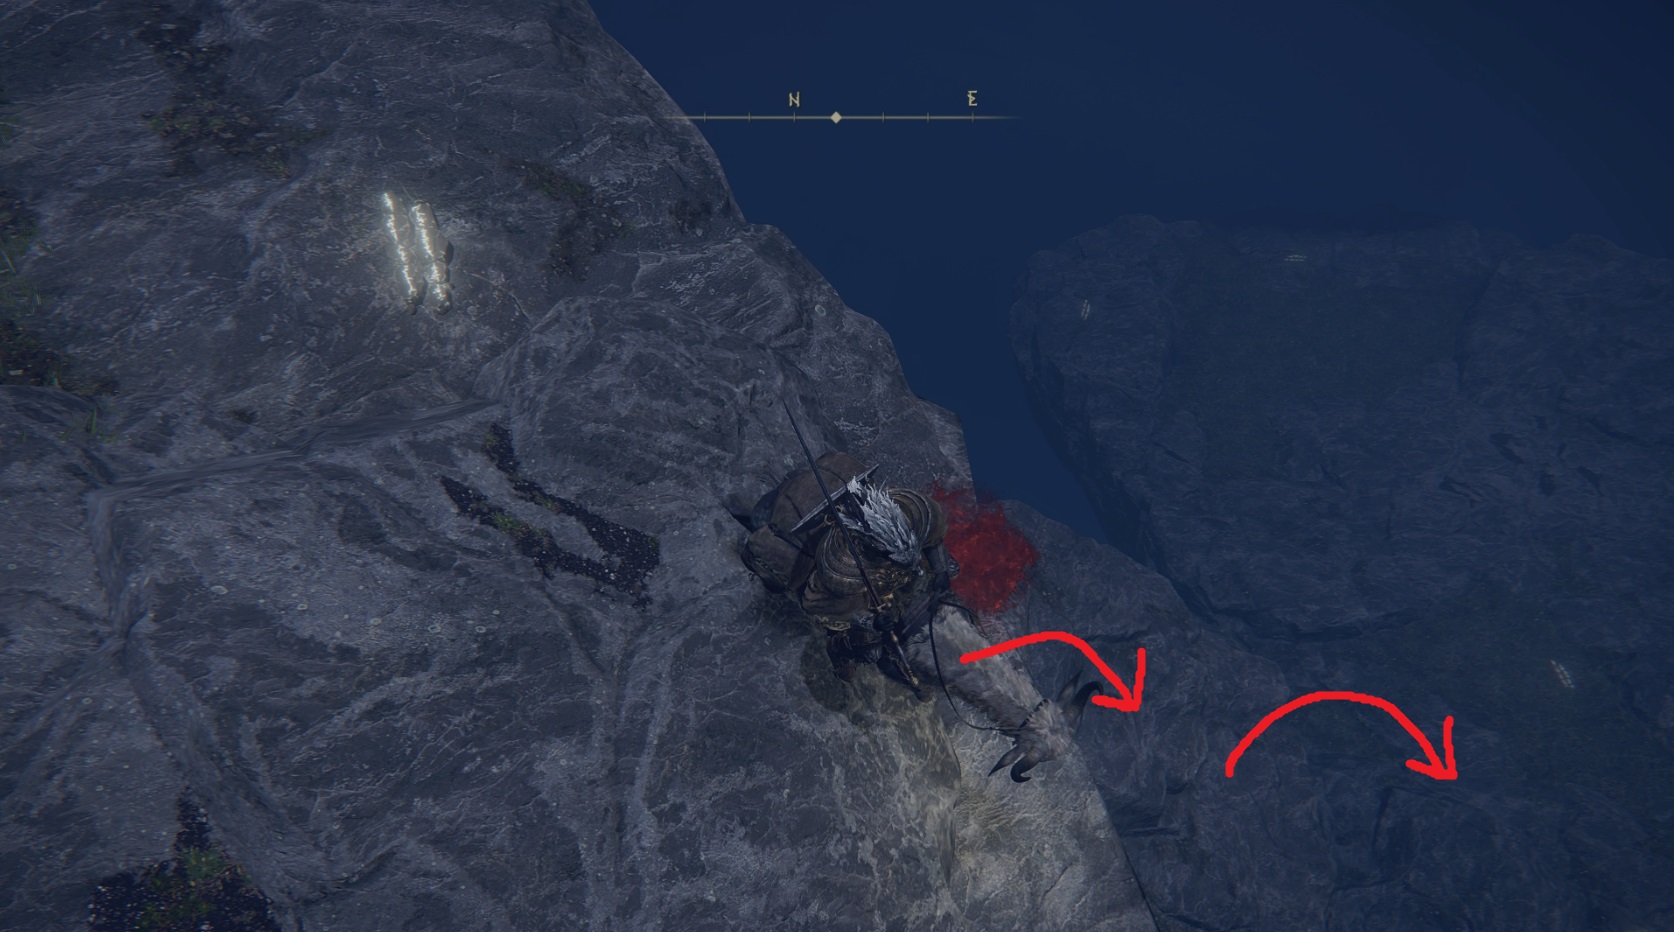
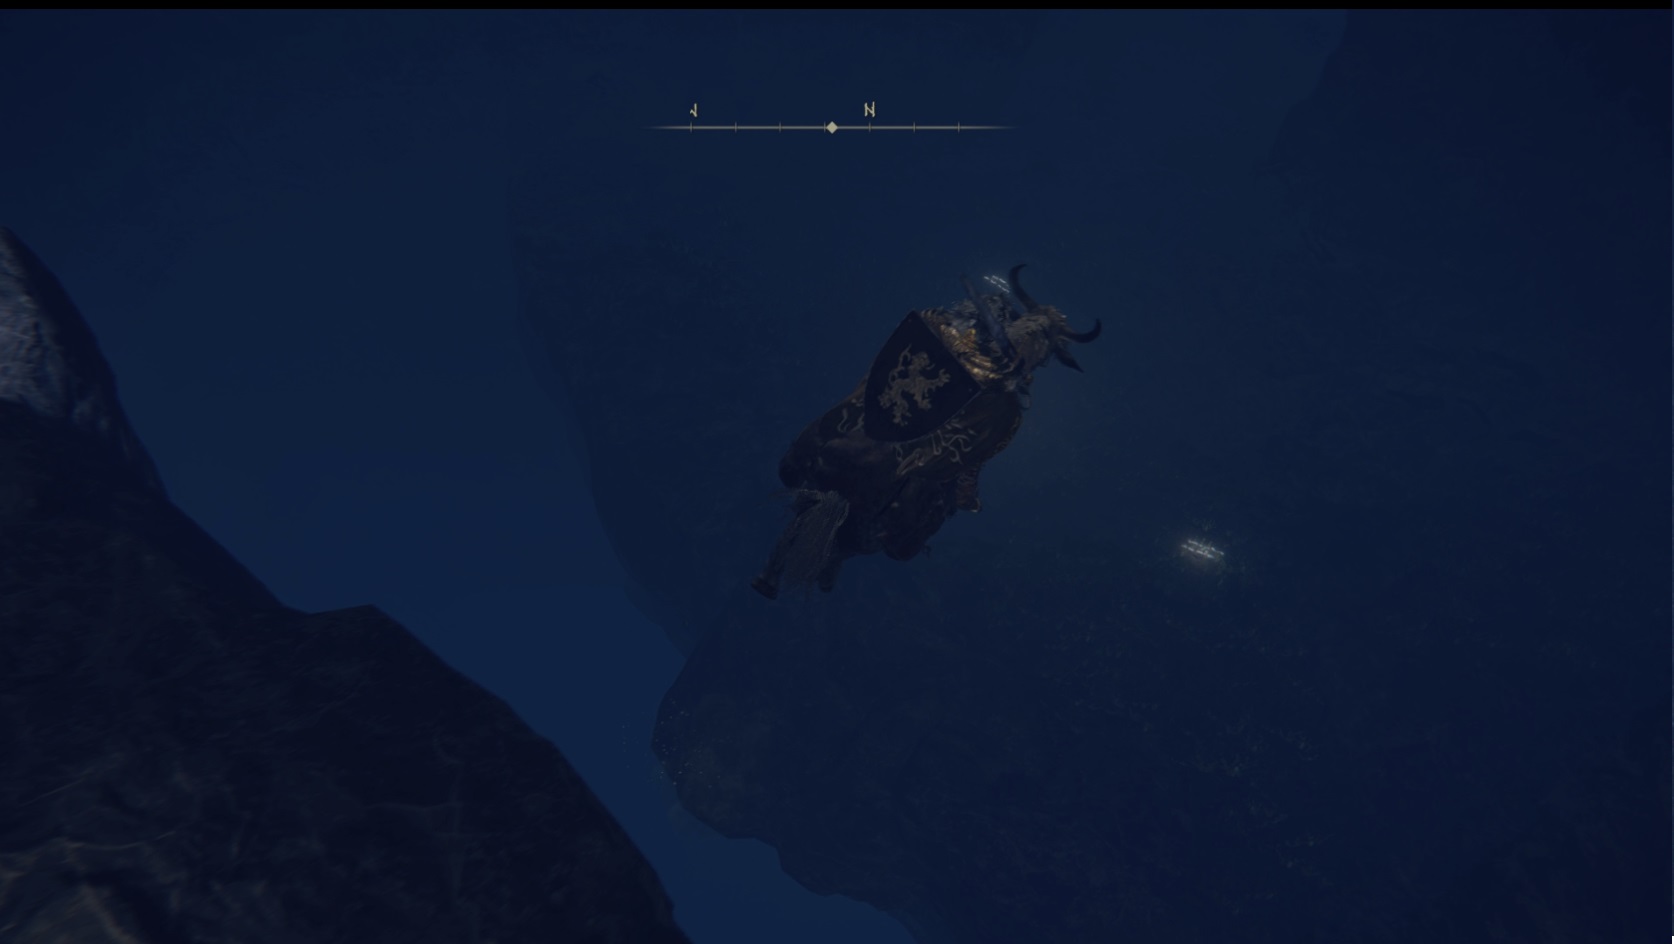
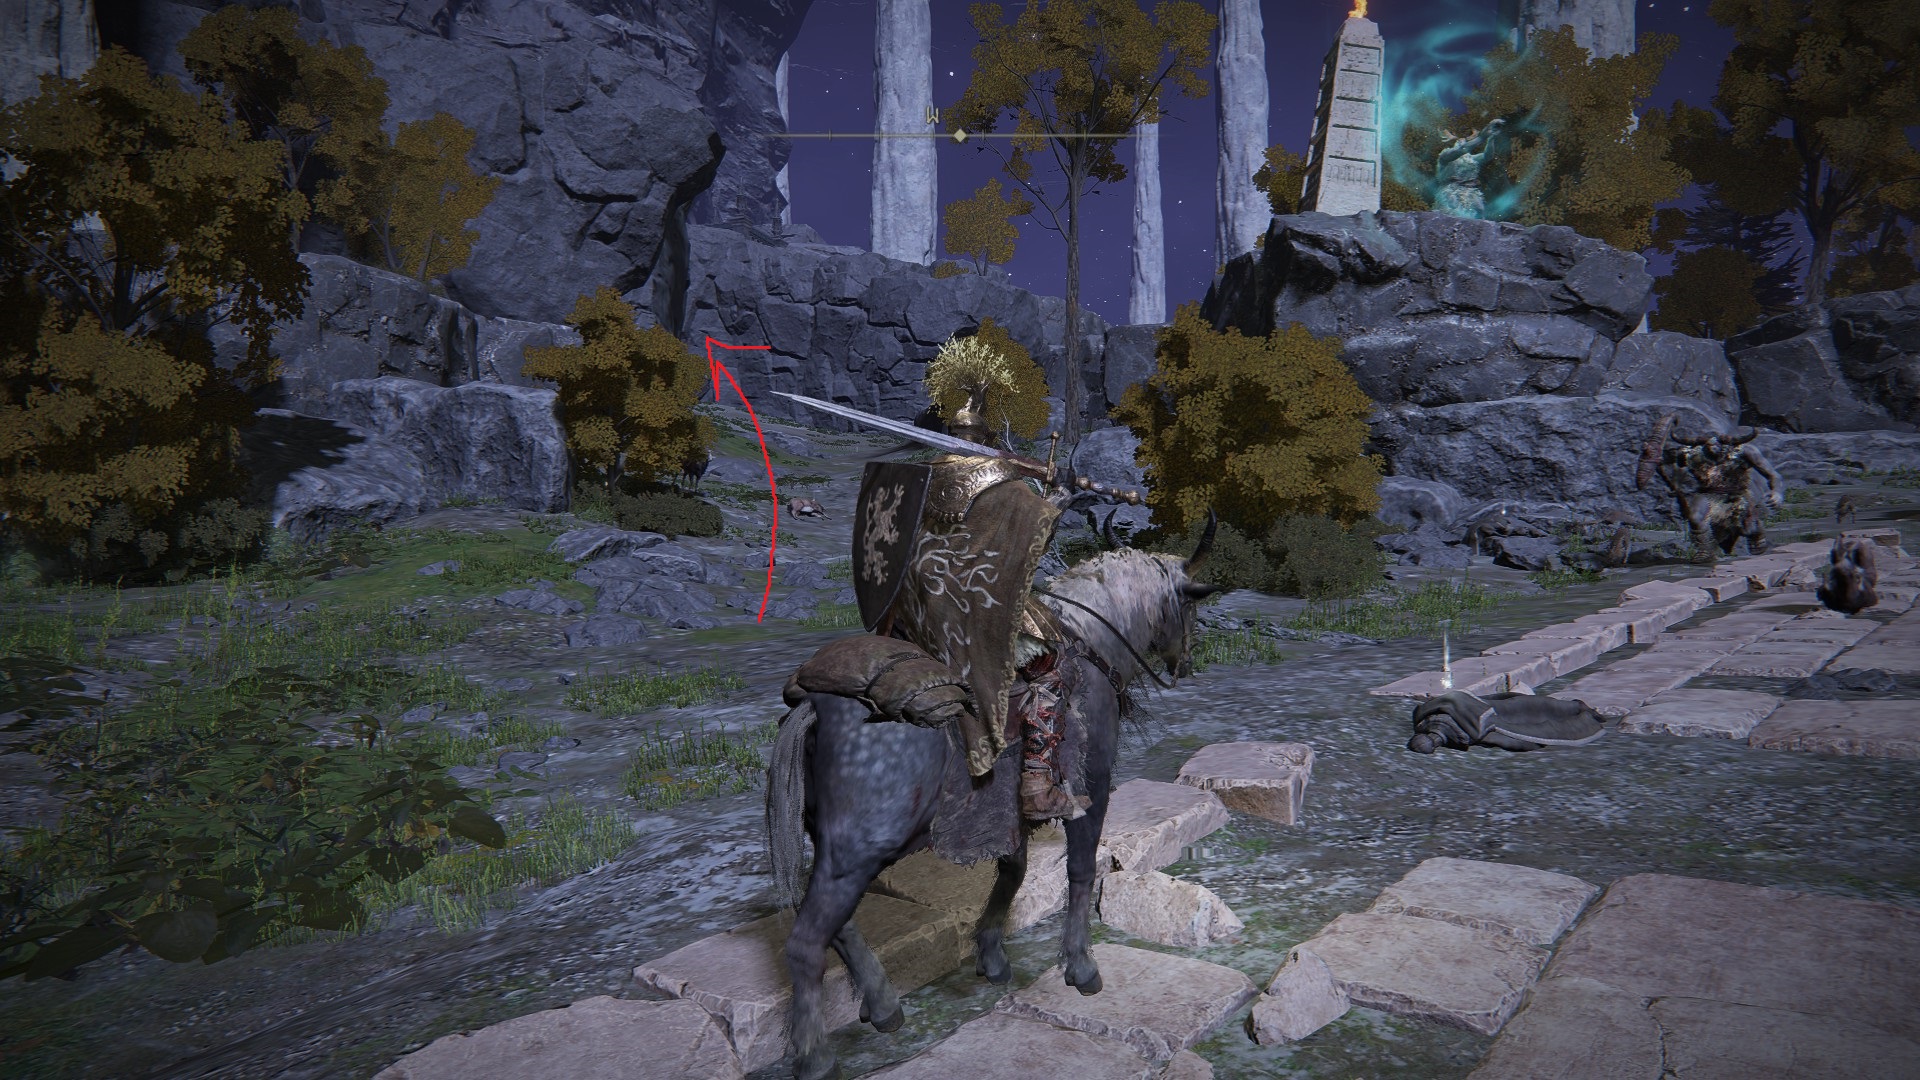
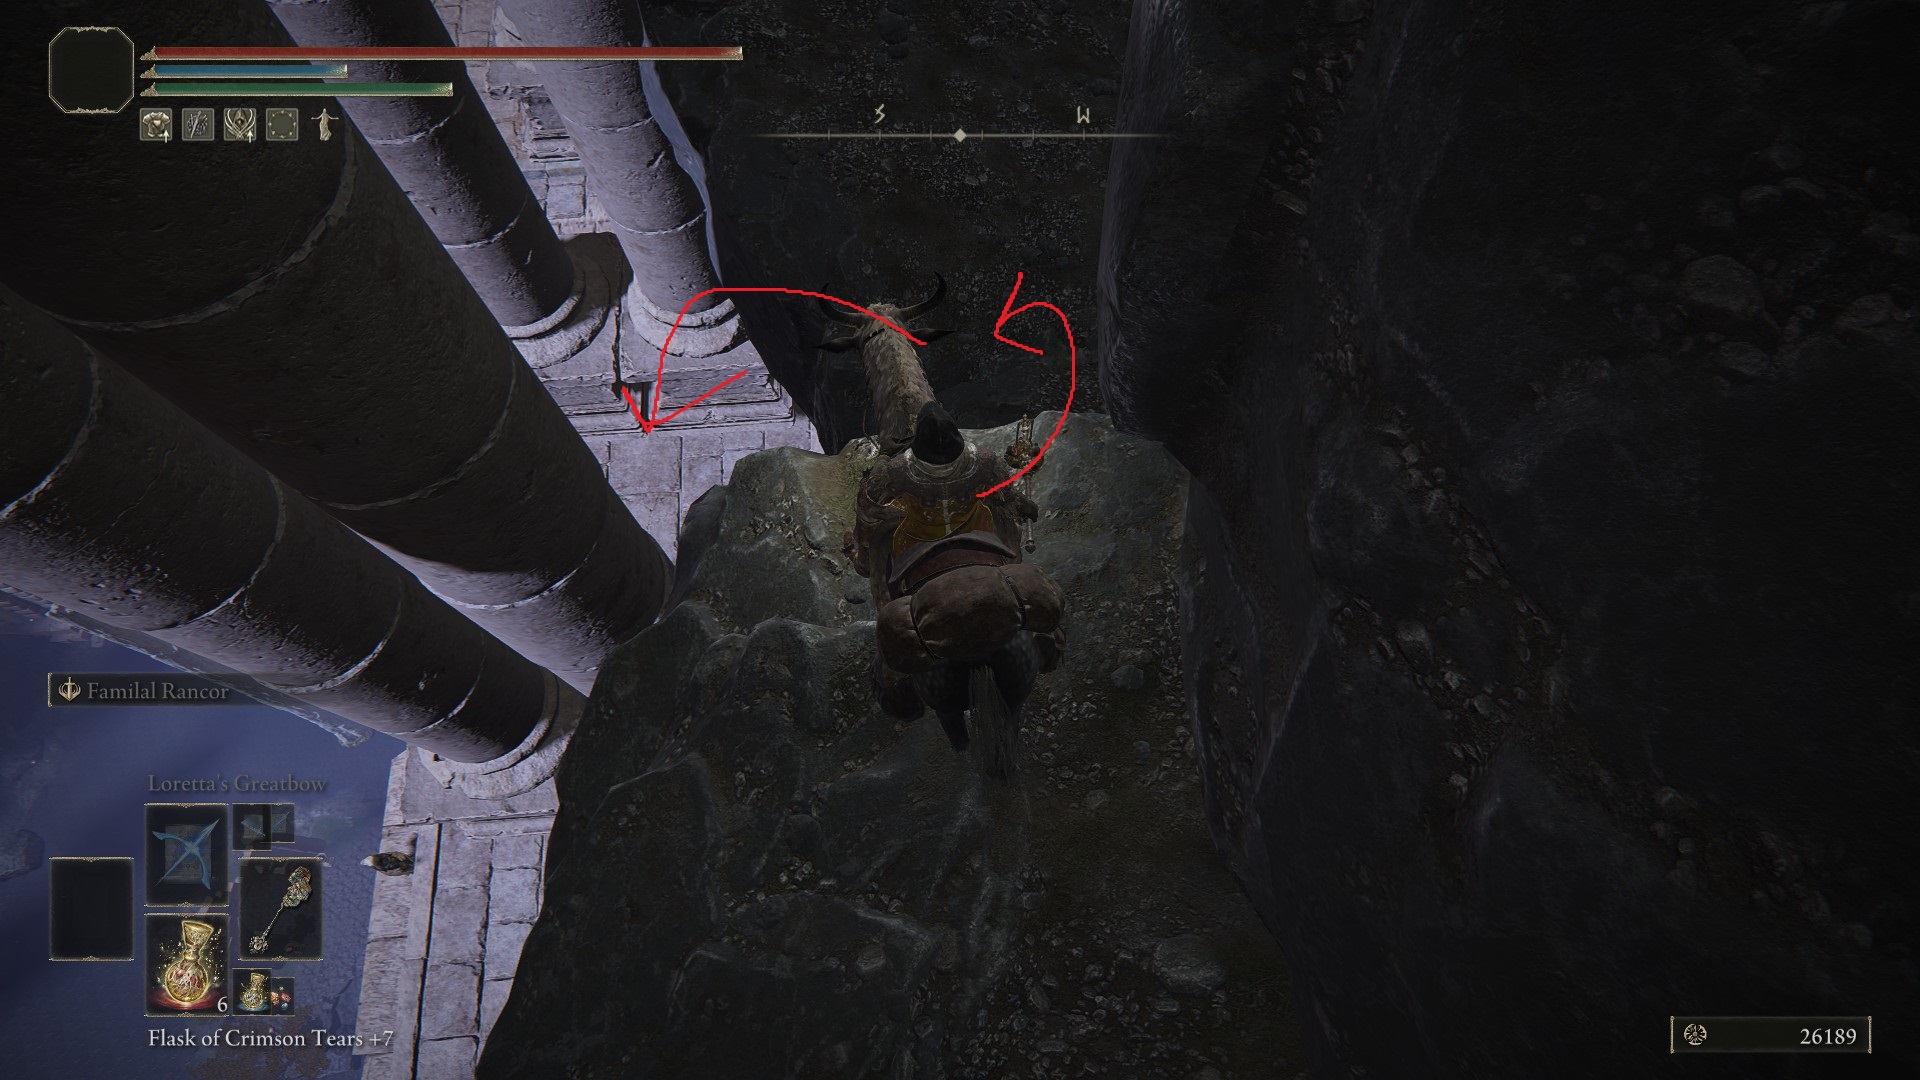
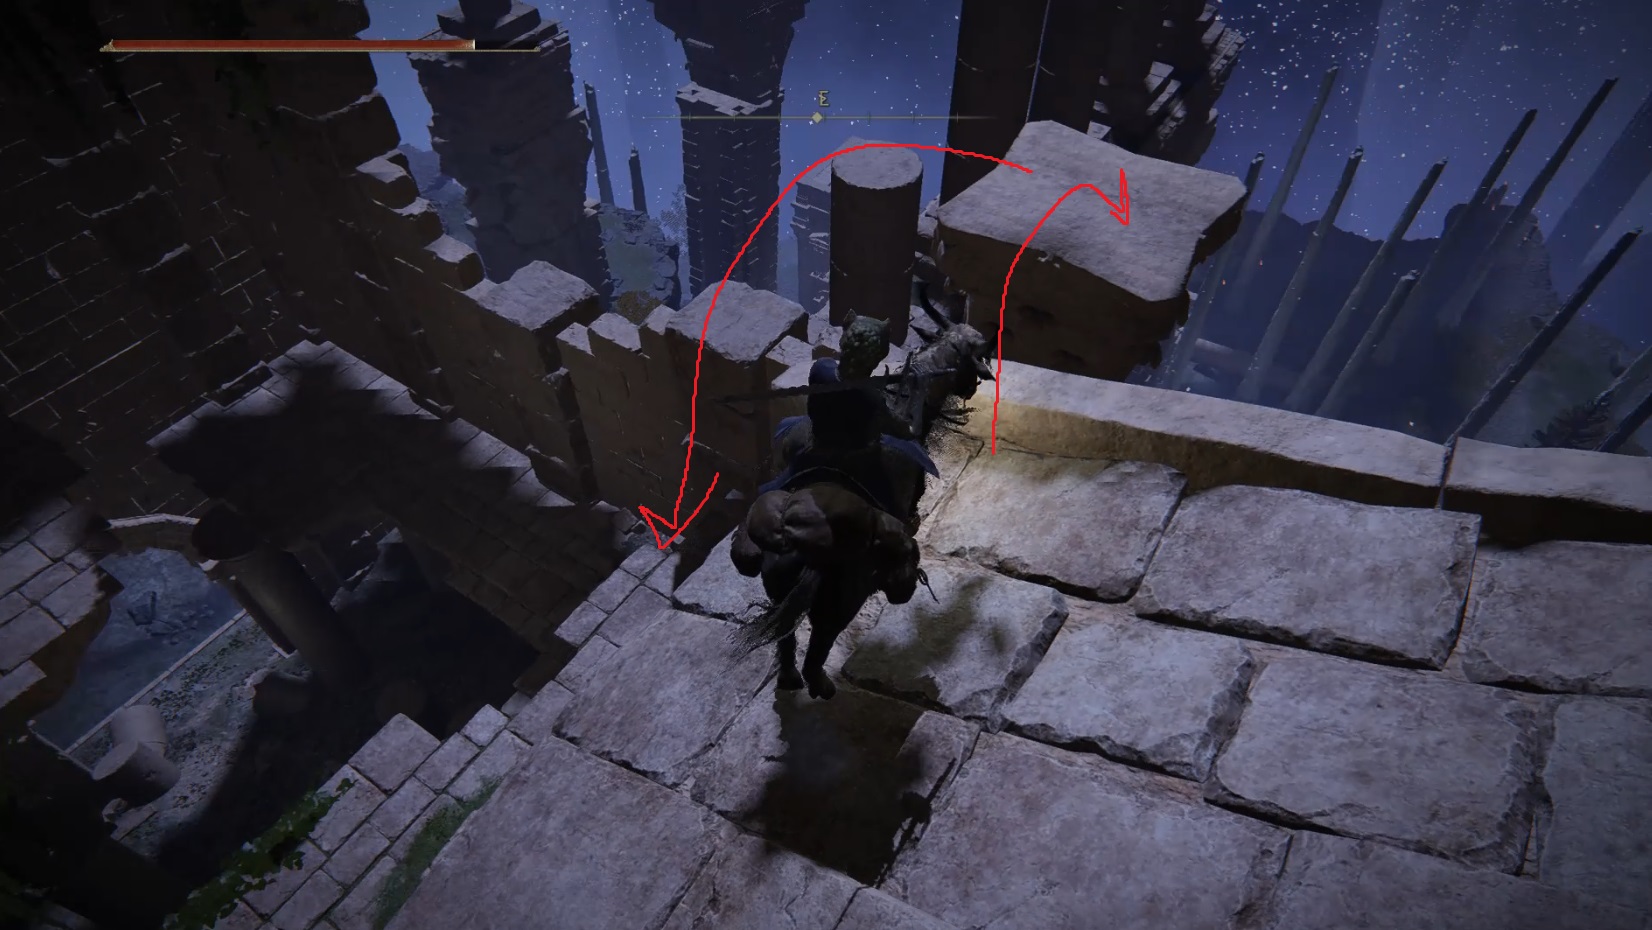
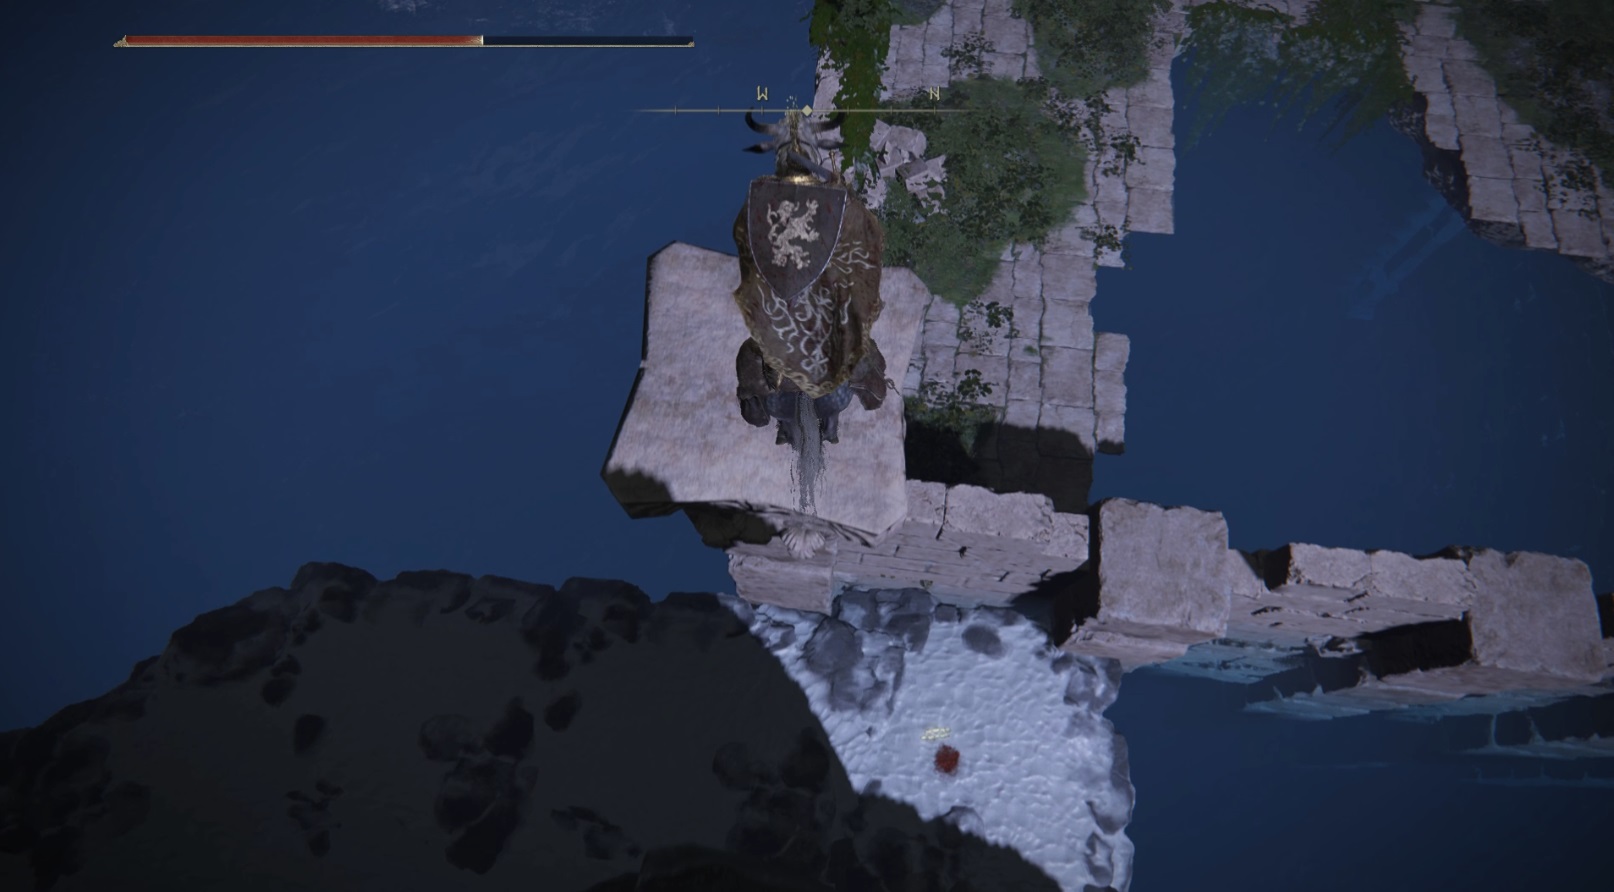
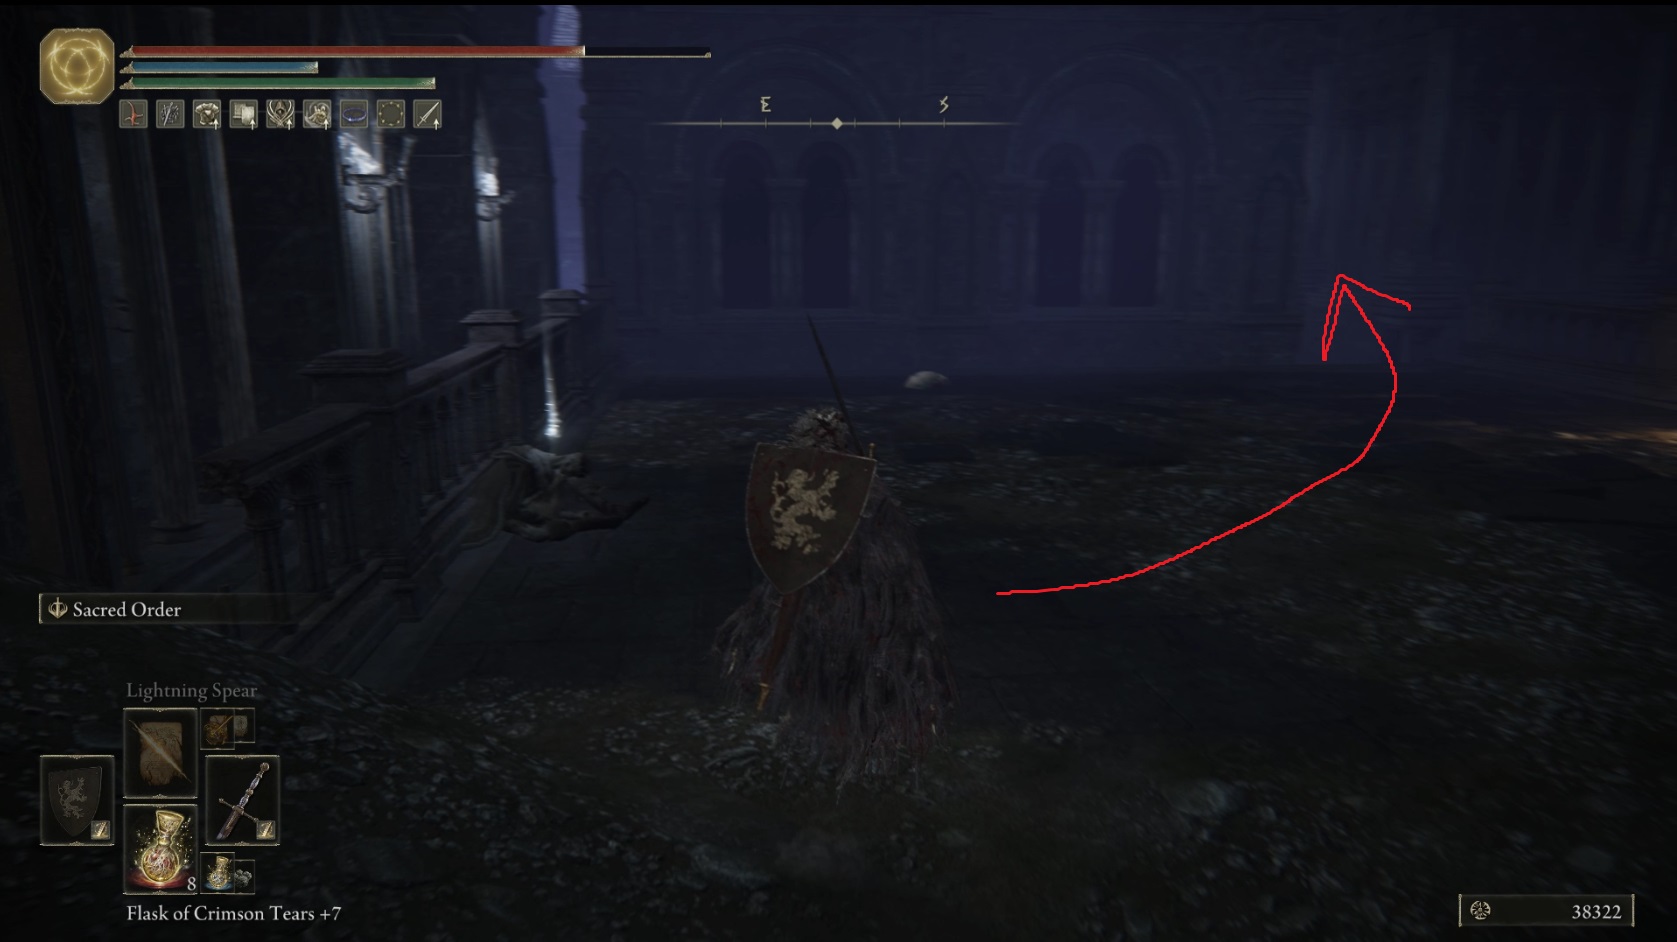
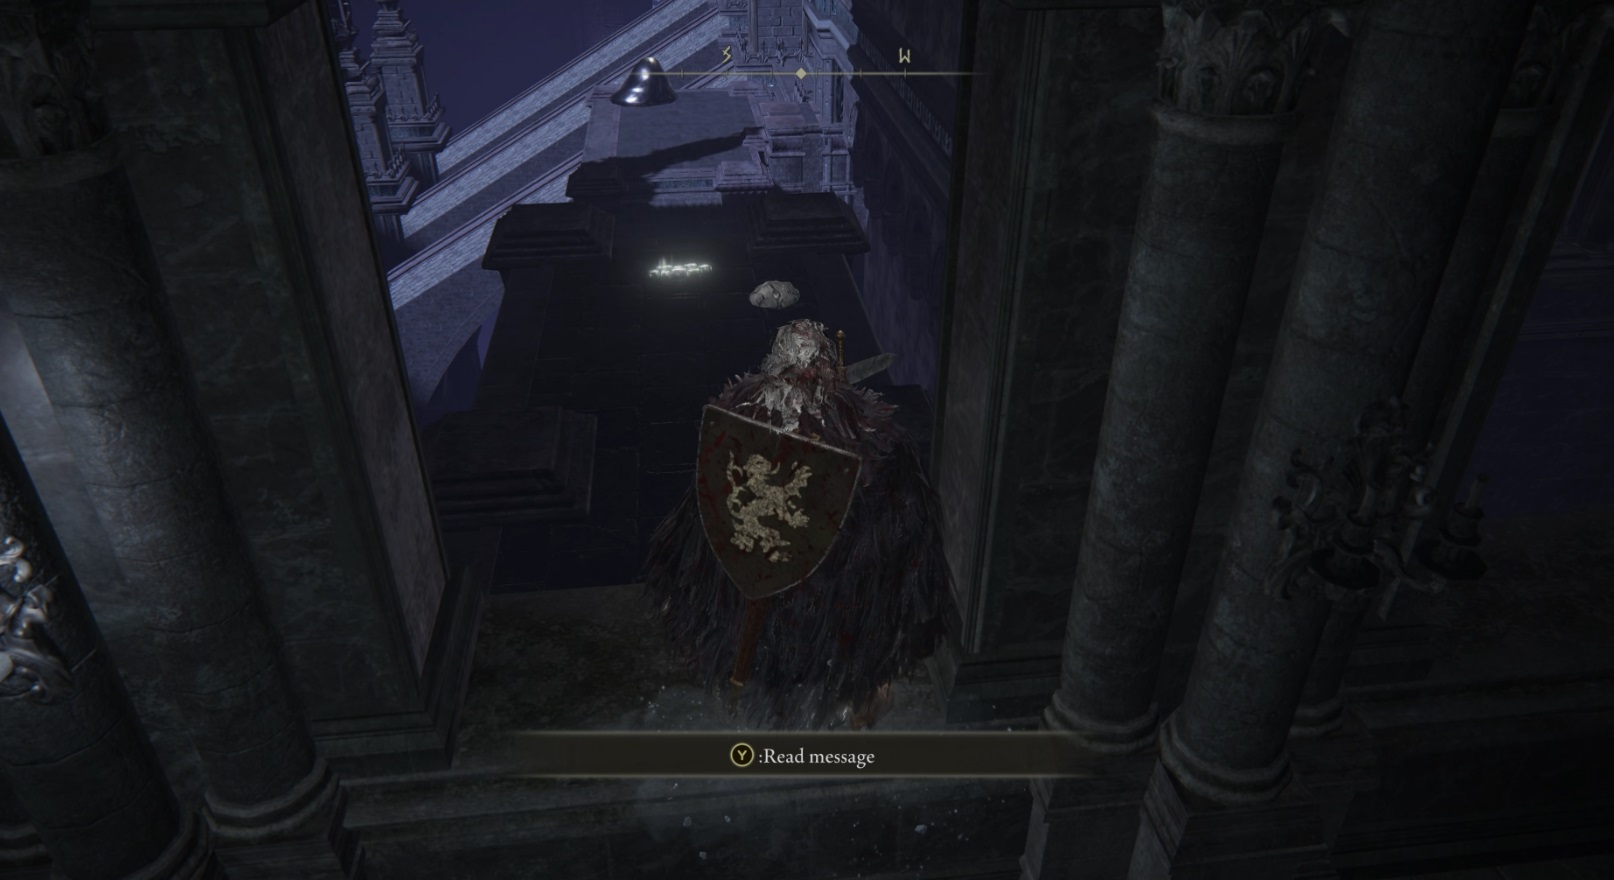
Follow the road west until it turns north — at this point, leave the road and head south towards the crater. You should see a message from Blaidd telling you to go on ahead — if you see this, you’re heading the correct direction. You’ll need to work your way around the crater counter-clockwise from Blaidd’s message [1], and then drop down twice heading east [2]. Then turn left and go north to the edge of the platform you’re on — one more drop to the rocks below you to the north [3], and you’ll be able to enter a tunnel that takes you out of the crater and into Nokron.
12
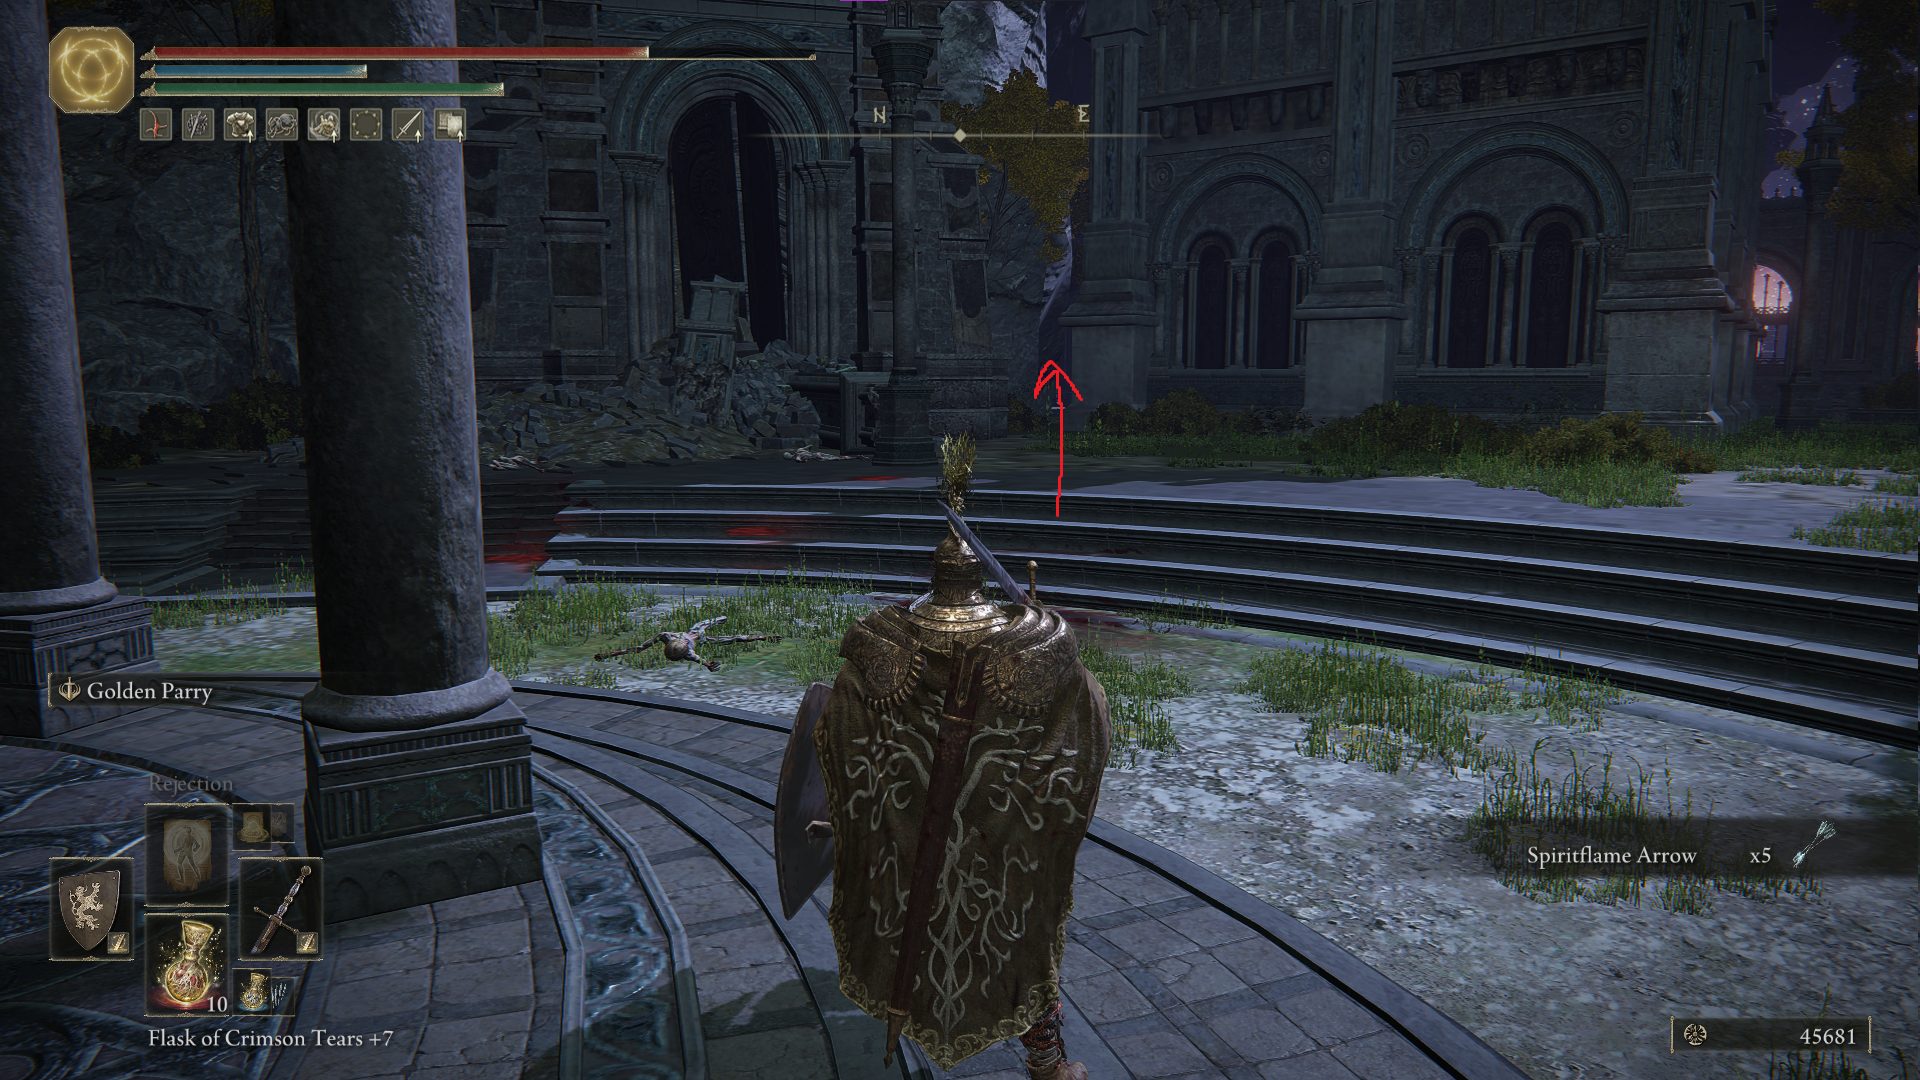
Continue north and you’ll enter a ruined building. Go straight and drop down to the next floor, then look to the northeast — at the edge of a broken piece of floor is a corpse with an item. Grab it and then drop down further west, next to the fallen pillar. A corpse hanging off the edge of the floor nearby has x2 Soporific Grease, so snag it before you leave the room via the northern doorway.
You’ll find yourself on a rooftop. Head right (east) and then drop down to the lower roof to the north. From there, continue north by dropping onto the very narrow roof below you, and follow it until you have to jump onto a square stone support pillar that comes up through the roof. Jump up onto the pillar and then look southeast at the nearby pillar — you’ll need to jump to the ledge that rings the pillar. Since you need to get a running start and room is limited, you’ll have to use a technique where you run in a circle while holding sprint, then jumping once you’ve gotten up to max speed:
EIP writer Spannah showing off his jumping skills
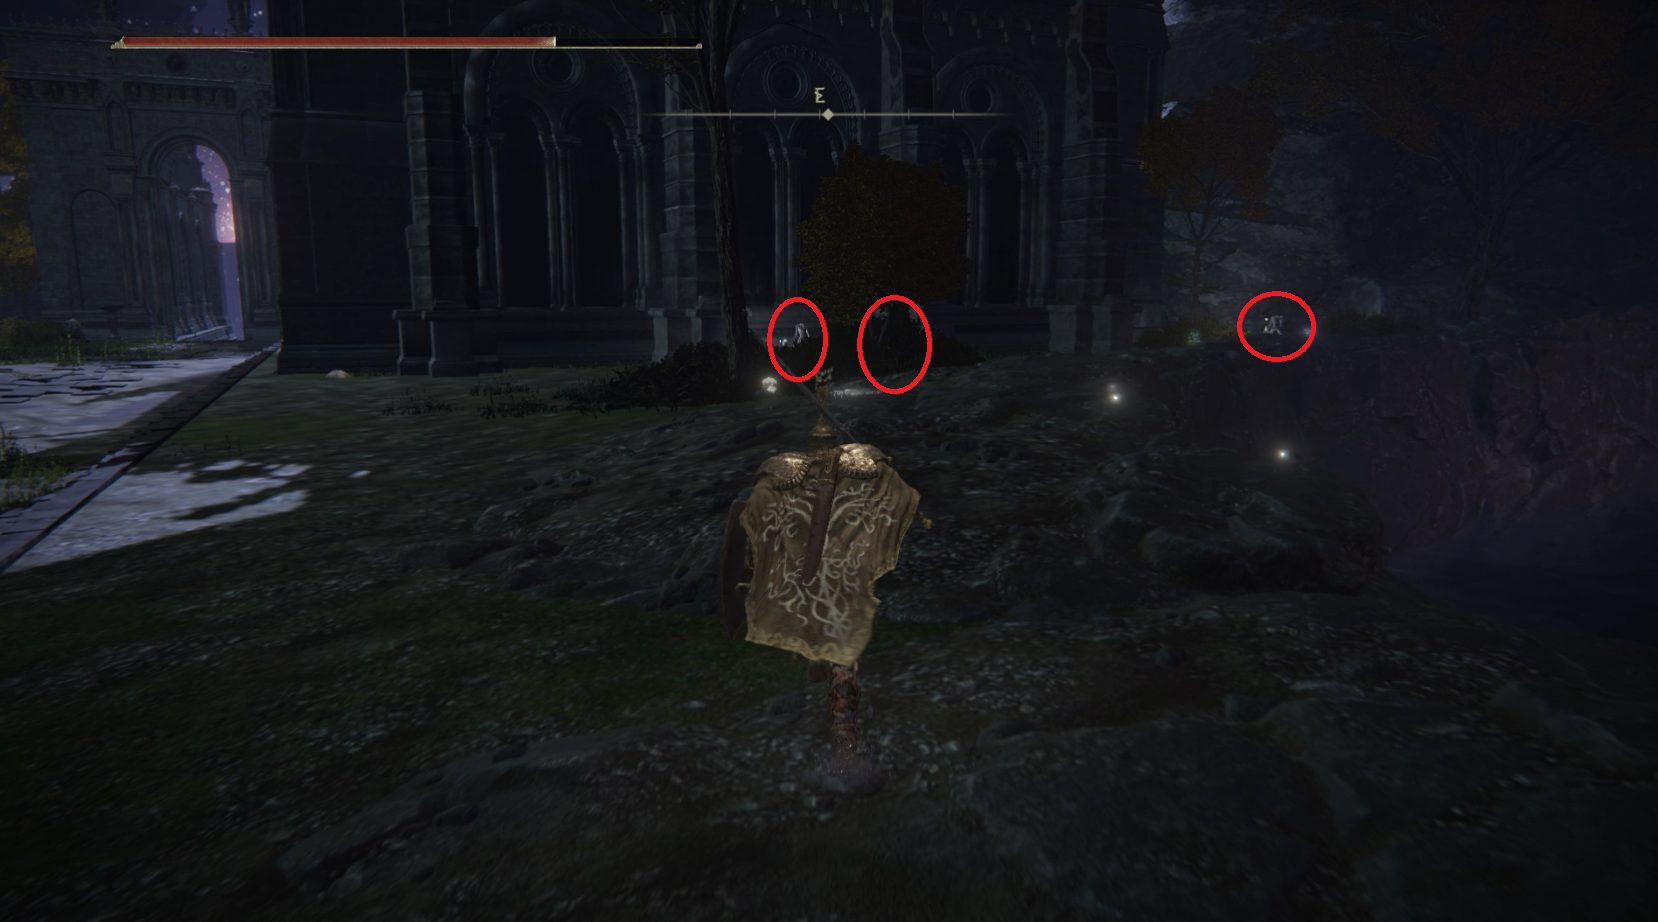
Continue around the ledge and then jump up onto the skinny roof segment that’s attached to the pillar. Run up it and jump off the end of it to reach the roof of the building to the east, where you’ll find the Ghostflame Torch. Go further east to the edge of the roof and look over the edge — you should see a line of three silver tears (the weird inky black blob enemies). Take them out from above if you can, then jump down near them and grab the Rune Arc from the corpse slumped against the nearby wall.
Head north — watch out for the silver tear just ahead — and take your first left to find a corpse with x10 Burred Bolt (and another silver tear waiting in ambush around the corner to the left). Then go northeast, take out the silver tear there, and make your way down onto the sideways building. You can drop onto the roof, but you’ll need to jump to the sideways building.
I wonder what it would feel like to put your hand in a silver tear…
Take out the nearby enemies and then turn right to head south and collect the Golden Rune [6] from the corpse there. Then go back north and make your way up the building, killing silver tears as you go. At the “top” of the building is a corpse with x3 Nascent Butterfly — from there you can jump northwest onto the nearby roof. Follow the roof north, and when it ends, drop down to the ledge below. Keep going north on the ledge until it ends, where you can turn left and jump through a window.
You’ll be able to pick up a Furlcalling Finger Remedy from a corpse inside, then go to the southern corner of the room to grab a Smithing Stone [5] (you’ll need to go a bit west first to make your way onto the higher ground). Then go to the western wall and turn right, and walk north. Look down over the nearby edge — you should see a broken pillar, which is where you want to try and land. Once you’re on the low ground, you can get a Golden Rune [6] from a corpse to the southeast, and then head north across the room, grabbing the Clarifying White Cured Meat from the corpse in the center of the room.
A few enemies wait for you on the far side of the room, including a ranged foe, so be quick once they spot you — you can sneak to close the gap without them noticing you. Don’t miss the Ghost Glovewort [3], then go through the doorway to continue north down the stairs, where you’ll finally find the Nokron, Eternal City site of grace.
From the site of grace, go east to head outside. Straight ahead, lying on the steps of the gazebo, is a corpse with the Ghost-Glovewort Picker’s Bell Bearing [1], along with a nearby enemy. There are a couple more melee foes nearby, plus two archers further to the north. Once again, you can sneak to avoid fighting all the enemies here at once — you can even grab the item by the gazebo without any of them noticing. Next, head through the gap between the buildings beyond the gazebo:
You’ll first encounter an archer enemy (assuming you didn’t aggro him earlier), then a shield-wielder with his back turned to you. On your right where the shield-guy is sits a corpse with a Somber Smithing Stone [4], and just past the enemy is a Nascent Butterfly. Now go back towards the gazebo, and continue past it heading southwest. You’ll hit the water (don’t fall in), at which point you can turn right and follow the edge of the rocks going northwest. You’ll meet another greatshield soldier, and beyond him a corpse with a Smithing Stone [3].
Turn around and follow the coast again, this time going southeast. You’ll see a couple of enemies ahead, but there is also one hiding behind the tree that’s in your path:
In the far corner near the right-hand enemy are a couple Ghost Gloveworts — grab them and then turn around to head north along the side of the building. Once you reach the front of the building, turn right and head inside. At the other end are two enemies that you can sneak up on — dispatch them and snag the Larval Tear from the corpse they’re chilling nearby. Head through the doorway to the northeast, but watch out for the two enemies that will ambush you from the right as soon as you step outside. It’s best to aggro them and then pull them inside so the third foe doesn’t stab you in the back once he also aggros.
Continue east into a graveyard with graves on either side. First, head to the right (southern) section — there are two enemies here, both with their backs to you. Slay them and pick up what they were guarding (or maybe just inspecting?): the Greatshield Soldier Ashes and a Smithing Stone [5]. Then cross to the northern part of the graveyard and do the same thing — this side doesn’t have any items, but does have a couple of Ghost Gloveworts and some crafting materials.
Head west and take a right at the corner, and you should see a greatshield soldier — take him down and then turn right to go down the stairs that lead east.
Continue down the stairs as they turn right — you’ll see a corpse with a Golden Rune [7] just past the bottom of the stairs. The Nox Swordstress that comes up the stairs further southeast is a tough foe, and she has a silver tear as backup — if you want, you can avoid her by heading south (to the right of the stairs she’s coming up) and dropping down through where the wall is broken. In the gazebo on the lower section, there’s another corpse with a Larval Tear, but watch out for the three silver tears that will drop from the gazebo’s ceiling. On the cliff to the east, find another Golden Rune [7] on another dead fella, then head east down the rocks towards the golden fog gate.
Turn around before you enter the boss fog — there’s a corpse with a Rune Arc tucked up against the rocks. Then once you’re ready, head through the fog to face the Mimic Tear boss fight. This fight should be straightforward: it’s a mirror of you, with your exact HP, damage, etc — but presumably with far less Elden Ring skills! Summons are available, and it’s easy to get backstabs off while the mimic tear focuses on your spirits.
If you want to cheese this boss, you can unequip your weapons (and even your armor) and then reequip it once the silver tear starts to transform; this will leave the boss with nothing to attack you with besides its fists. The first time you face the boss, you’ll have to wait until you’ve walked a bit into the room and the silver mist appears around the boss, but in subsequent attempts to boss seems to start mimicking you immediately, so you can start reequipping once you go through the fog.
The Mimic Tear will drop the Silver Tear Mask and x2 Larval Tear when you defeat it. Grab the Mimic Tear site of grace that’s now in the boss arena, and rest before moving on.
This walkthrough continues in the next tab, Ancestral Woods!
From the Mimic Tear site of grace, head northeast up the stairs and out onto the bridge. You can ride Torrent in this area, so you can hop on your horse to speed things up as you continue northeast. On the bridge, there is a loot beetle hiding behind the first set of bushes on the right that drops a Somber Smithing Stone [5]. You’ll pass a lit brazier — just past it on the left side of the bridge is a corpse with a Golden Rune [4]. Now continue on the bridge until you reach a covered area where you can turn right to go onto the remains of another bridge. Head to the end of the broken bridge and turn left — a corpse with x8 Dwelling Arrow lies against a brazier.
Go back to the covered spot and turn right to continue northeast, then take a left where the bridge has collapsed. Head down (grabbing the Nascent Butterfly from the corpse on the log) and follow the road for just a bit — once you see a shaman chanting on a small hill, head off the road and go left past her. Keep the rocks on your left and continue around the corner to find the Ancestral Woods site of grace. (Note that if you just want to do Ranni’s quest, you can skip the rest of this tab and the next one, and go directly to the Night’s Sacred Ground tab).
Now we’re going to head back the way we came in order to grab some items, but we’ll light a few of the braziers (that let us face the boss here) as we go. From the Ancestral Woods site of grace, head back the way you came (go northeast) and ride up to the shaman lady that stands behind the brazier. Kill her — there may be two ancestral followers (the vikings) nearby, so take them out as well, then light the brazier. Drop down from where the shaman was and loot the two corpses here for x5 Gold Tinged Excrement and a Fireproof Dried Liver, grab the nearby Ghost Glovewort [4], then take the road heading southeast.
You’ll come across a couple more ancestral followers and their adorable flock of deer, plus another brazier to light on the right side of the road. From the brazier, head northeast towards the large tree trunk — jump up on the rocks and go around the left side of the tree to find a corpse with a Smithing Stone [5]. Then head east around the tree to find another brazier. From that brazier, head south, where you’ll be able to drop down to a lower path. From there, jump off to the right (east) to land in between the support pillars below.
Go to the eastern side of the platform and then head south-southwest — you should find a corpse with a Smithing Stone [5] on a platform that extends out to the east. Then go back the way you came (northeast) and continue to the edge of the platform, then drop down into the top story of the building below. You’ll either need to equip the Longtail Cat Talisman, or else double-jump on Torrent to the pillar to the right, to avoid taking fall damage (although if you have a reasonable amount of HP you probably won’t die).
Drop down onto the next floor, then from there onto one of the pillars, then once more onto the ground floor. At the bottom, you’ll find the Clarifying Horn Charm +1. In the western and southeastern corners of the room are a Smithing Stone [2] and a Celestial Dew, so collect both before leaving via the doorway to the north.
Turn right and then head southeast out onto the platform that supports the broken columns to find a Smithing Stone [5] — it’s on a corpse that sits against one of the pillars, facing the direction you’re coming from — then teleport back to the Ancestral Woods site of grace we grabbed earlier. From the site of grace, head west-northwest, hugging the wall on your left. You’ll pass an oddly empty alcove, then just past a rock, a corpse in a puddle of water holds a Somber Smithing Stone [5].
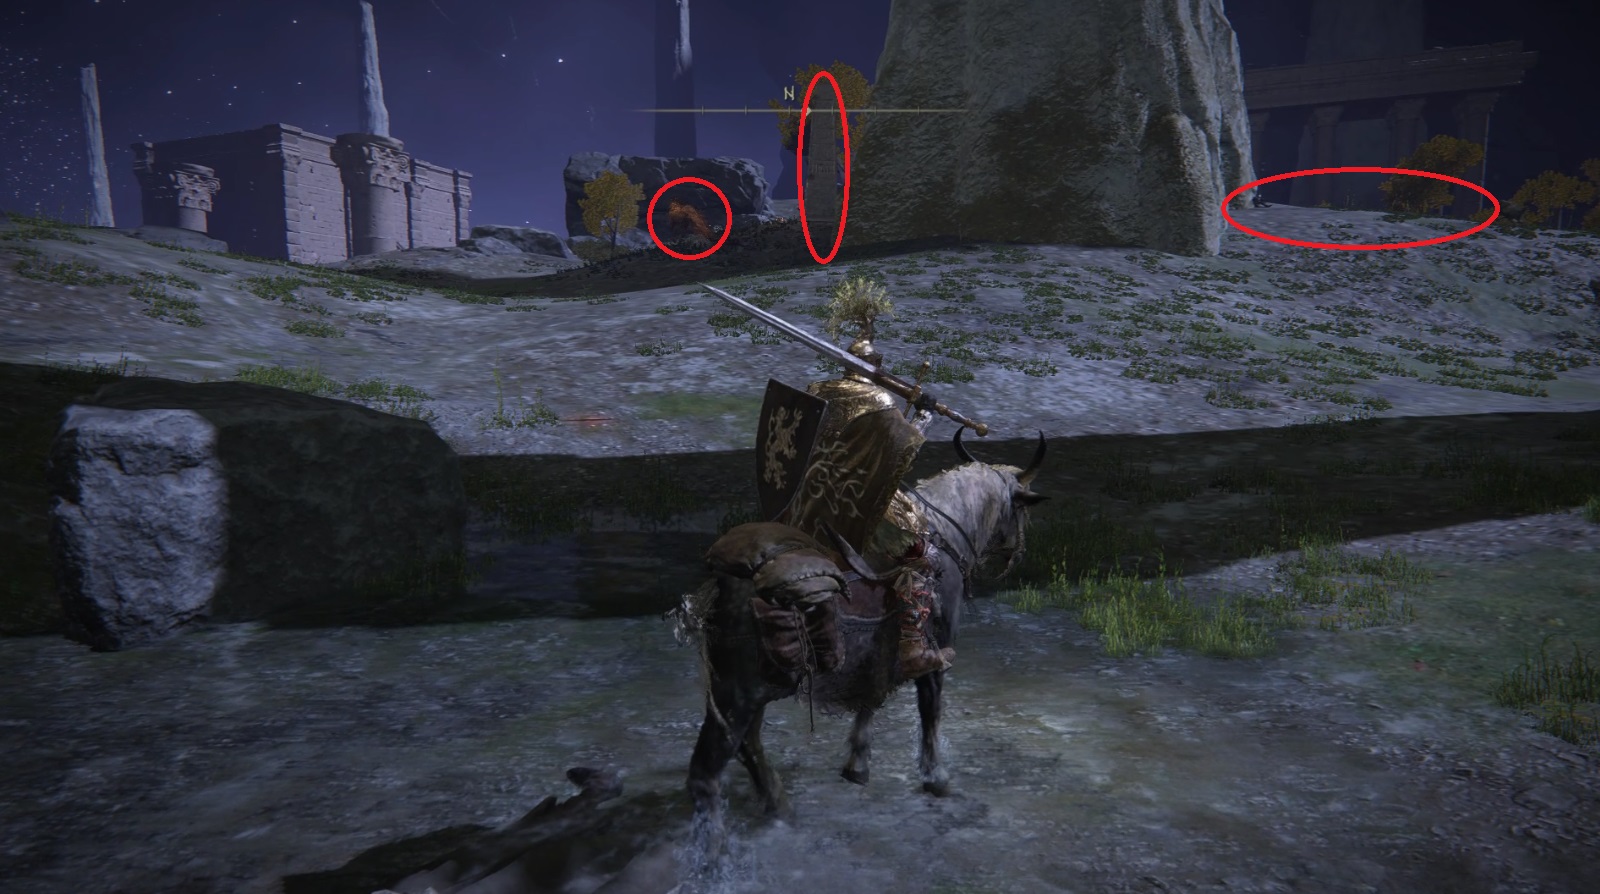
Now look to the north, where you’ll see what appears to be the base of a large tree. To the left of the tree is another brazier you need to light, and to the right of the tree are three corpses (one rests against it, the other two are on the ground nearby). You will also likely see a Red Wolf like the one found in Raya Lucaria. This is a copypasted boss, and doesn’t drop anything but a few runes, so it’s best to just avoid it — if you aggro it, ride far away and then come back. (There are also a number of wolves in this area to make fighting the red wolf even more annoying, which is another good erason not to bother.)
From left to right: The enemy to avoid, the brazier to light, the three corpses to loot
Light the brazier and loot all three corpses (you should find x3 Beast Blood, x1 Beast Blood, and a Smithing Stone [4]), then head north past the tree and through the gap in the rocks. Continue northeast and you’ll see another brazier — this one is guarded by a couple of shamans and their rat friends. There is also a loot beetle with the Ash of War: Enchanted Shot hanging out in the shadow of a rock. Torrent makes dealing with these enemies easy, and you can light the brazier once they’re all dead.
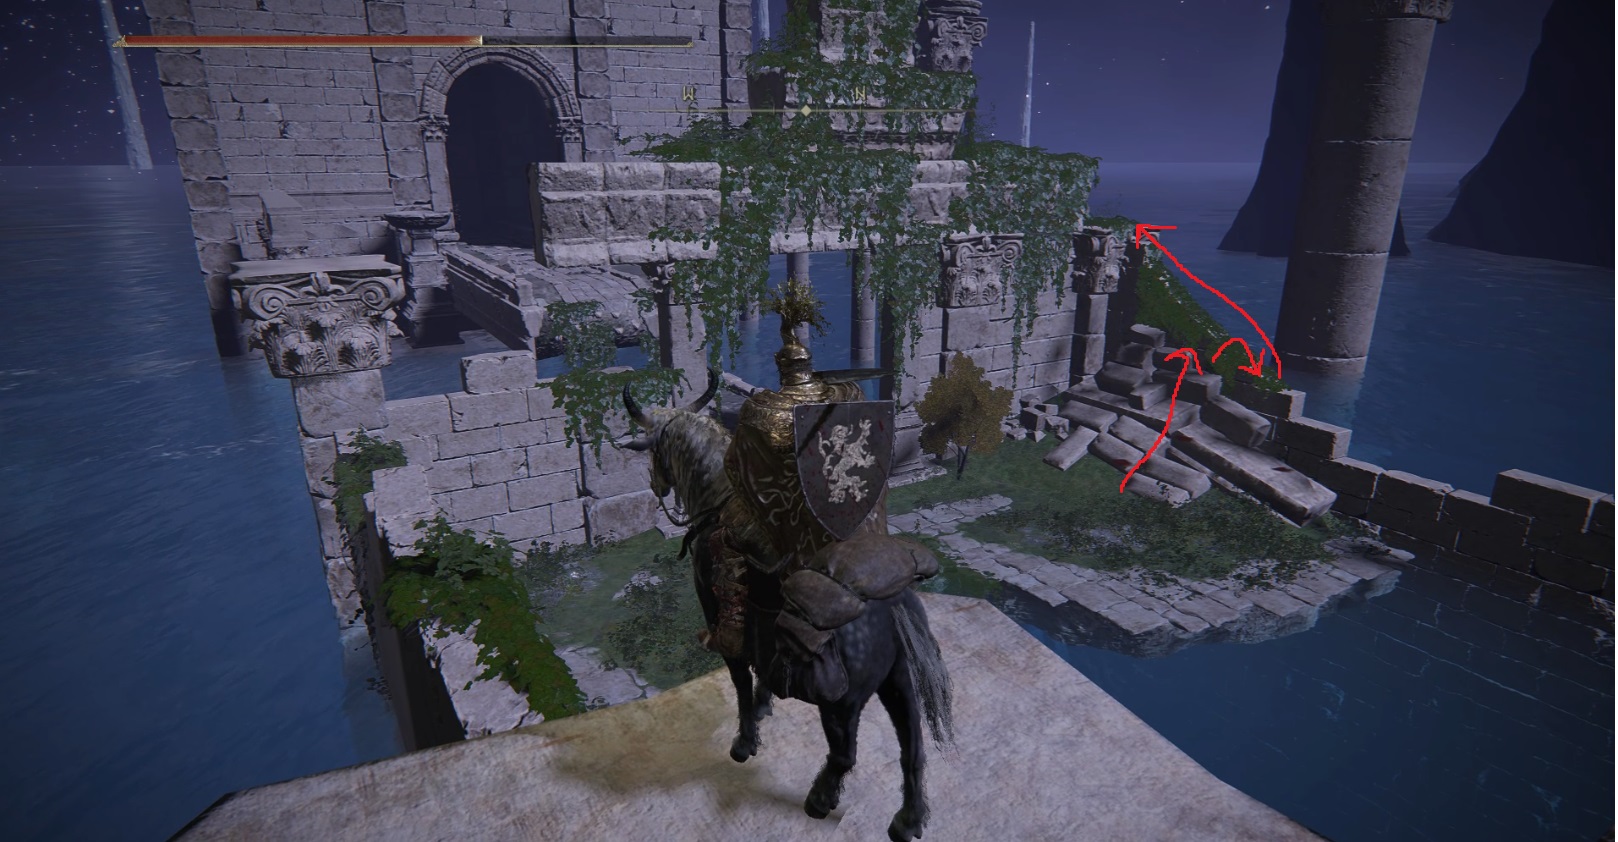
To the west of the brazier, there is a bit of the rock ledge that sticks out over the water [1] — you can jump from it onto the pillar below [2]. Then hop down (making sure you land on the stones and not in the water) and grab the Golden Rune [12] from the corpse that sits on the left side of the archway. Don’t miss the Ghost Glovewort [5] that’s down here as well! Then, make your way up the nearby pile of stones, and jump onto the vine-covered stone that slants diagonally — you’ll need to jump to a lower part in order to make it [4]. Don’t do this on Torrent — it makes the jumps easier but also makes it easier to fall into the water and die.
1234
Once safely on the diagonal stones, head up them and jump up onto the pillar. Continue west-northwest up onto the long stone beam. Walk slowly and find the first gap, then go back, get a running start, and leap it. Continue until the beam ends, then jump west-northwest onto the ledge there. You can follow the ledge to the nearby unlit brazier — jump into the brazier, then from there down onto the bridge below. Then head inside the building and kill the shaman who guards the Ancestral Infant’s Head, which is in the chest at the far end of the building. The shaman isn’t a tough fight 1v1, but don’t stand near the edge of the bridge, as she can knock you off into the water.
Teleport back to the Ancestral Woods site of grace, and ride north-northeast, to where the road ends at another brazier and the corpse of an ancestor. Kill the enemies here (shaman first since she buffs the other mobs) and then light the final brazier. If you followed the guide and lit all of the braziers, you should get a message that reads “Power gathers somewhere in horned remains”.
From the brazier, you can ride due east to find the Hallowhorn Grounds — at the northeastern end of this area are some Ancestral Remains (the big ol’ dead deer) — interact with them to teleport to the RegalAncestor Spirit boss fight.
After defeating the Regal Ancestor, you can interact with the white wisp in the center of the boss arena to be transported back to the Hallowhorn Grounds, or teleport back to the Ancestral Woods site of grace.
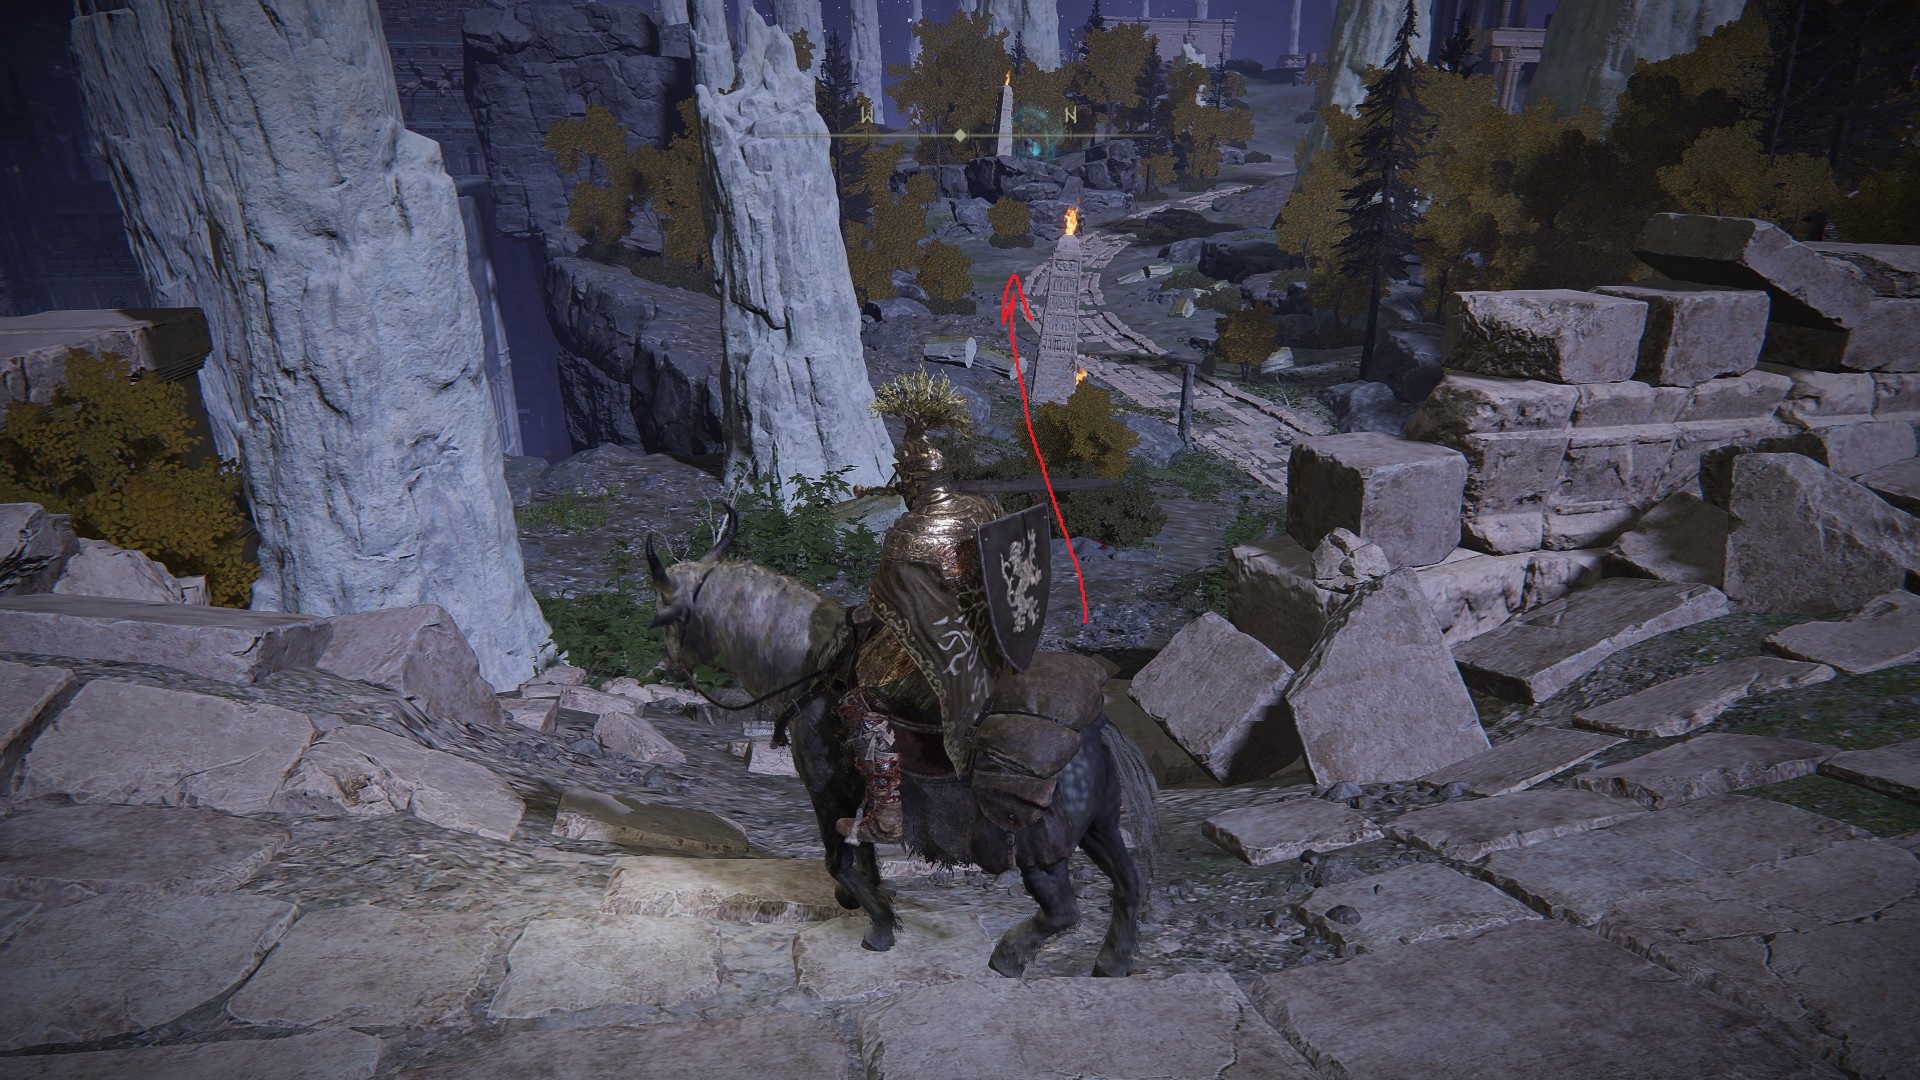
Ride northwest from the Hallowhorn Grounds, (or north-northeast from the Ancestral Woods site of grace) to where the second set of Ancestral Remains sits in front of a brazier. Go northeast past the brazier and up the hill — look to your left and you should see a corpse to the west, (it’s only got x3 Hefty Beast Bone, so don’t stress over it if you can’t find them). Continue up the hill and you should see a few jellyfish chillin’ and glowin’.
Near the first jellyfriend, turn right to head southeast and look for a rocky path that goes around the nearby tree trunk. Follow it up and jump onto the stone beam that stretches out over the Ancestral Remains. Go straight up onto the beam and follow it to its end, where you’ll be able to reach a corpse with the Mottled Necklace +1.
Grab the necklace, then go back to the path you came up and continue northeast to the jellies at the edge of the cliff. Look down over the edge and you should see a ledge that you can drop to. Turn right (south) and get the Stonesword Key, then head northwest and follow the path downward, past a few more jellies (there’s x2 Silver Tear Husk on a corpse to the left of the second jelly) and tap the Aqueduct-Facing Cliffs site of grace.
This walkthrough continues in the next tab, Siofra Aqueduct!
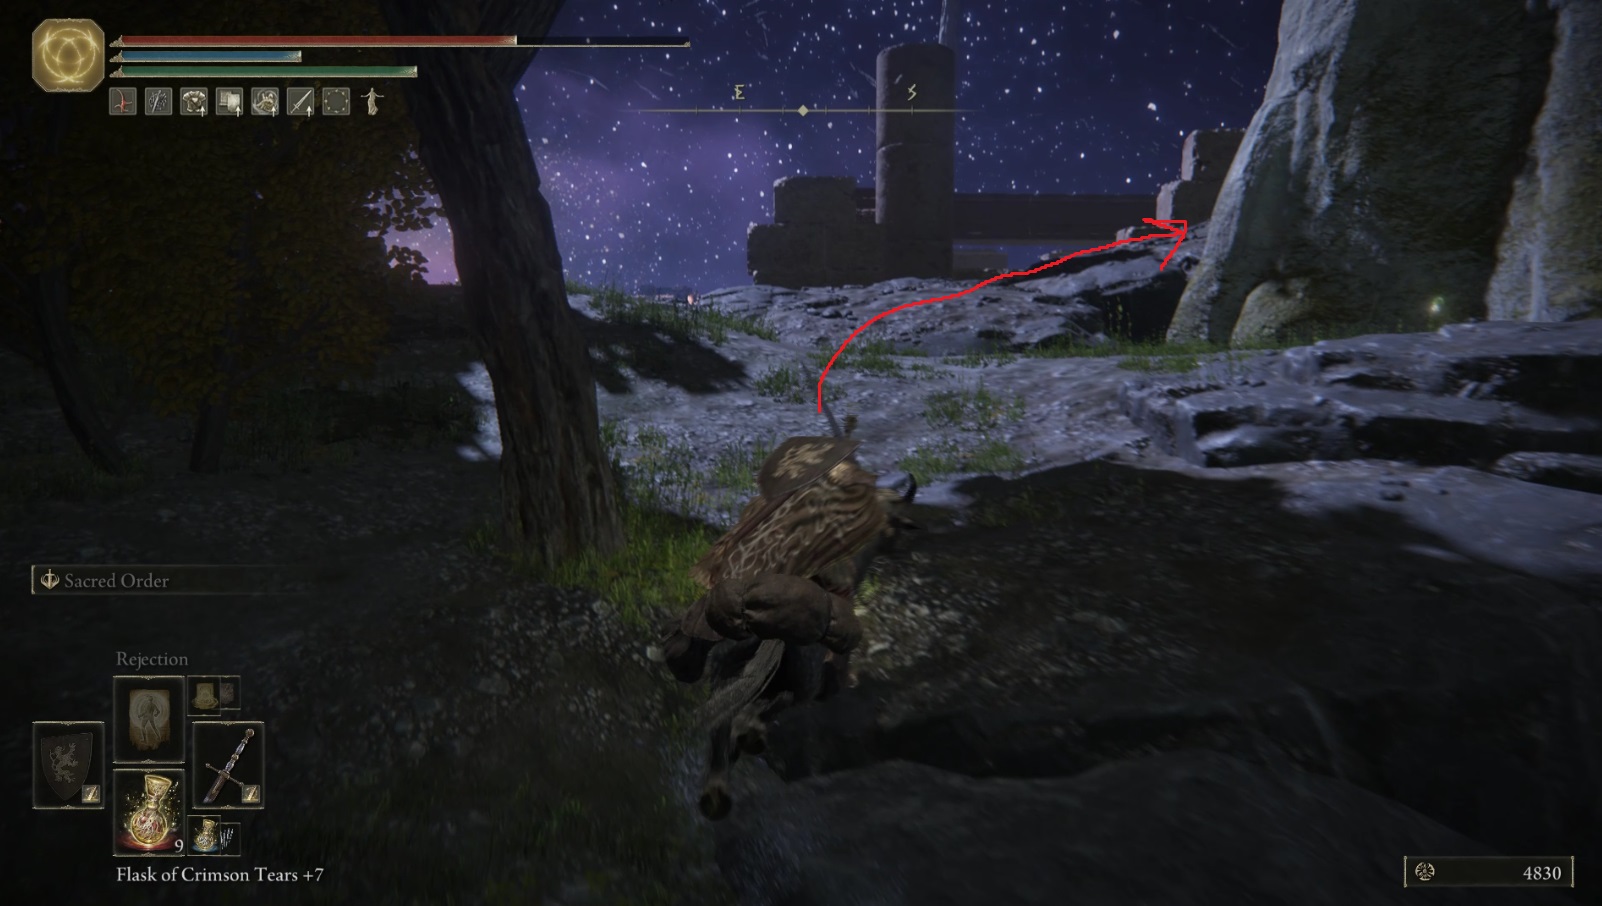
From the Aqueduct Facing Cliffs site of grace, head east-northeast through the cleft in the rock, and continue following the path until it ends. Look to your right and check out the crucible knight that patrols the bridge. There are a couple of Golden Centipedes and the Missionary’s Cookbook [5] in the structure to the west, but the knight is in the way. You can sneak past him, fight him melee, or throw spells at him from where you are now.
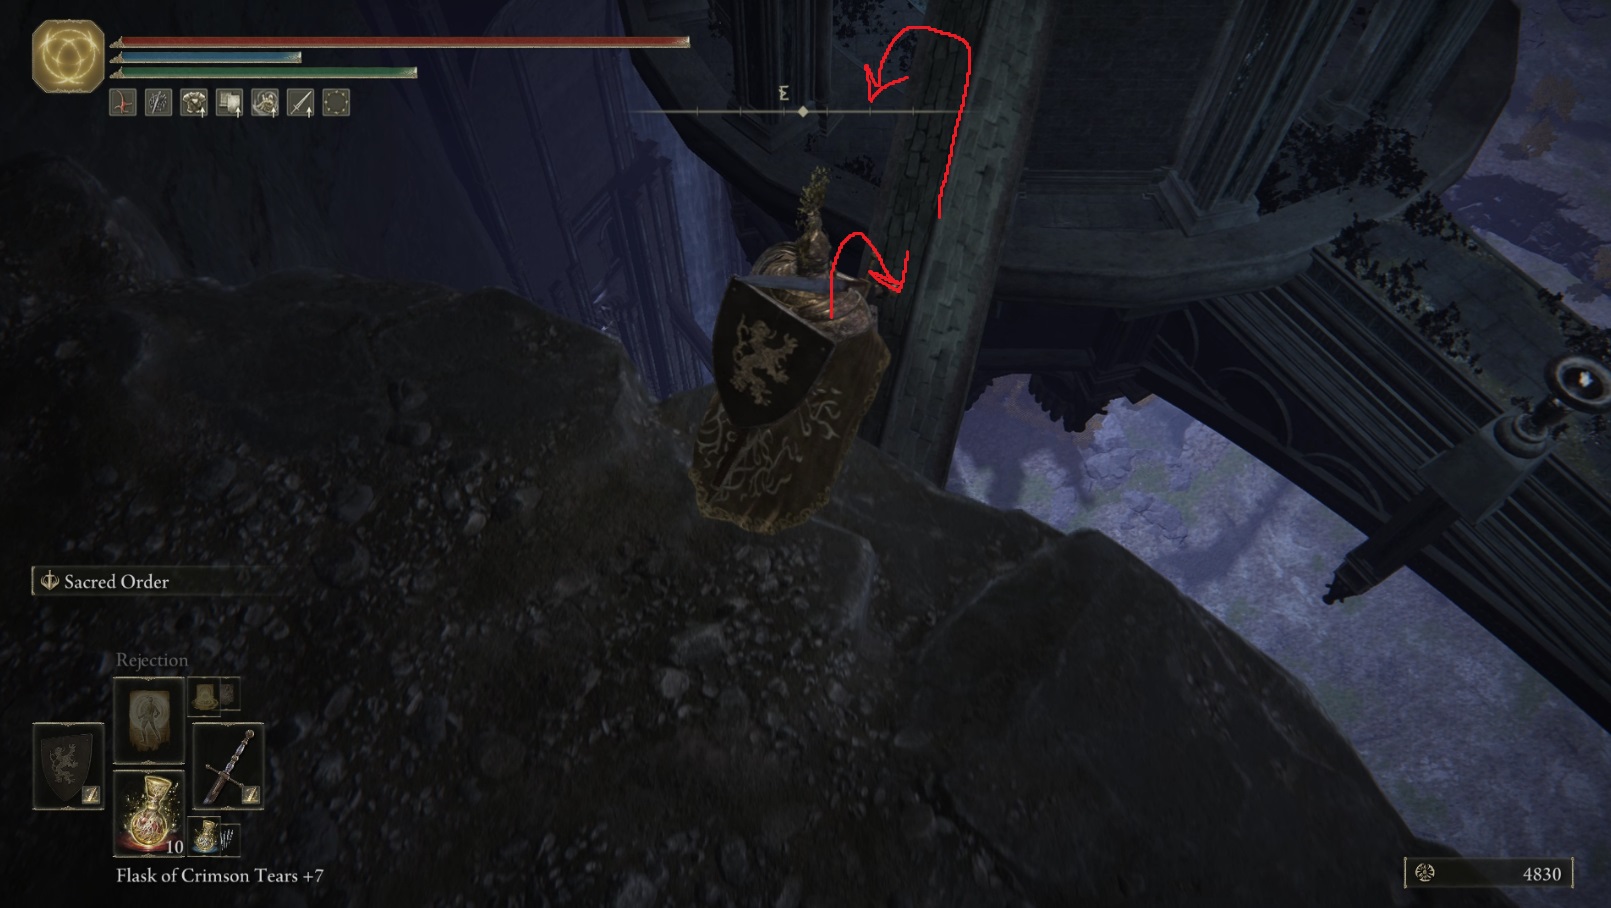
When you’re ready, jump down onto the narrow buttress. Follow it all the way up, then drop down to the left into the structure.
If you’re going to sneak past the knight, hide near where you landed, and wait for him to walk into the room you’re in. Then follow the outside ledge onto the bridge and crouch-sprint across to grab the items. You can then use this exact same technique once he comes back and enters the room with the items.
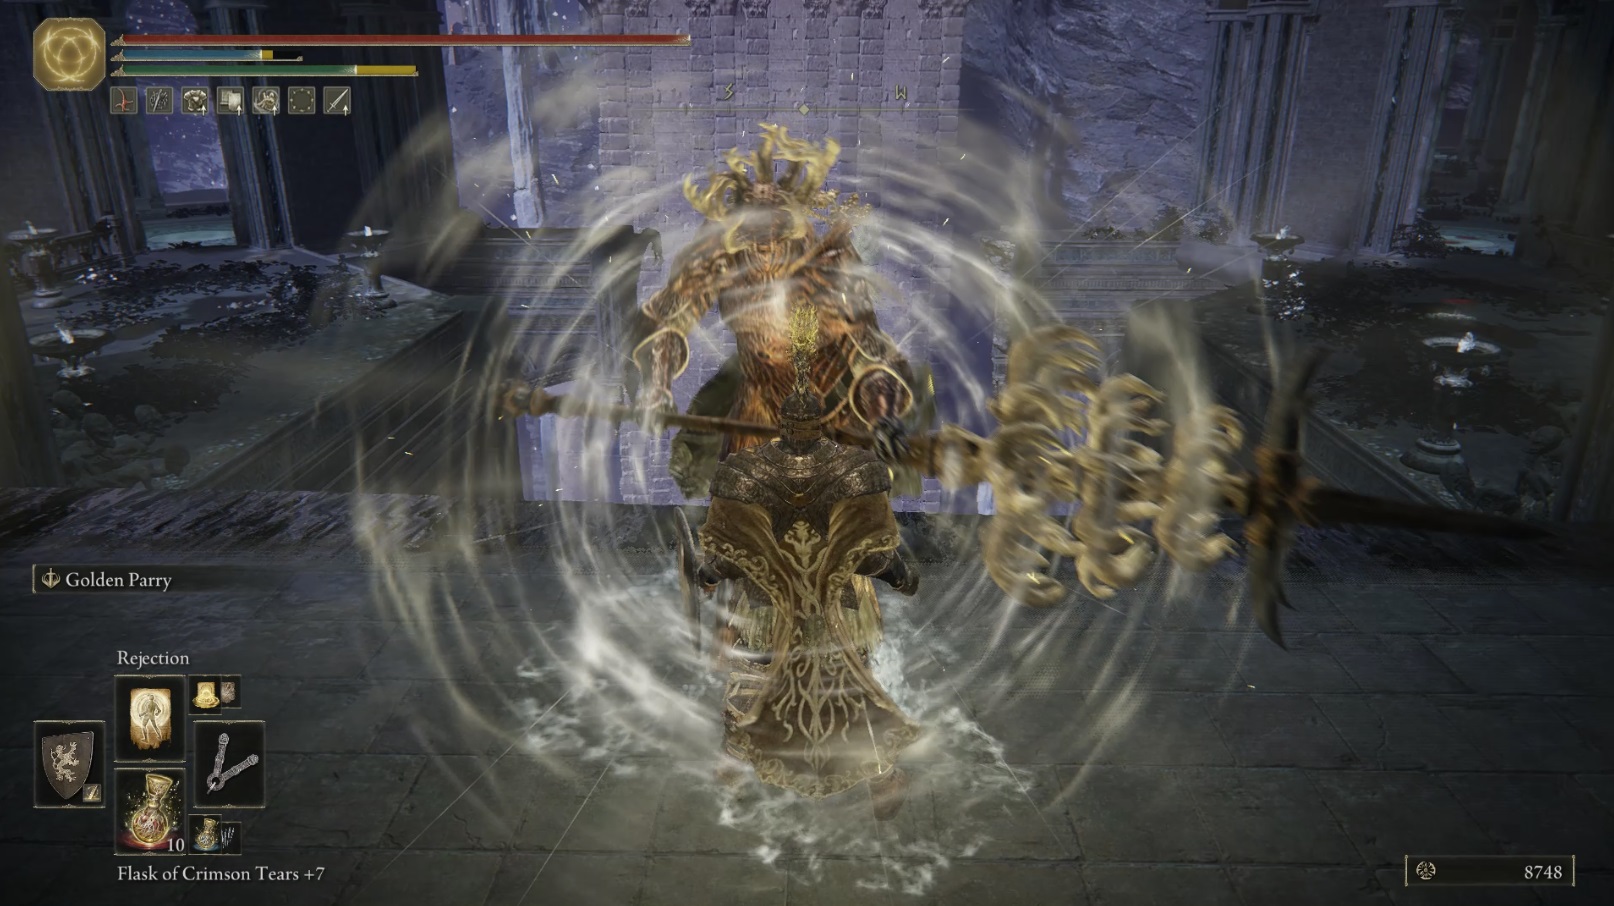
However, this knight drops the Crucible Hornshield, so if you want it, you gotta kill him. You can try to fight him on the bridge and use Rejection (or other weapons/spells that can push enemies) to knock him off the edge, although you run the risk of falling off yourself while fighting him on the bridge.
Whatever you decide, you’ll next head east-northeast up the stairs — look at the waterfall to see your next crucible knight target — and then continue up the next set of stairs to the northeast. The room here is empty, so go through the doors on the right. Directly across from you are another set of doors, which we’ll go through after dealing with the knight.
As with the other knight, fighting this guy is optional — you can sneak up and grab the Smithing Stone [5] on the corpse to his left — but he drops a Somber Smithing Stone [6] on death. Also like the last knight, he can be knocked off of the edge (it’s actually easier since he starts facing it), although it takes a few casts of Rejection to get him off the edge, and you’ll have to cast, roll towards him, and cast it twice more.
This is SPARTAA!
Go through the doors that face the doors you just came out of, and you’ll enter a room with a handful of relatively weak foes. One patrols and the other two are scavenging to your left as you enter, so you can sneak up on the patrolling one before killing the other two. Then go southwest, down the stairs and outside, and continue into the stone gazebo ahead. In the center of the gazebo is a loot beetle that drops Order Healing, and nearby is a Golden Centipede. From the center of the gazebo, go northwest to find a corpse hanging that holds a Golden Rune [13]. Additionally, there is a Golden Rune [7] on the outer ledge of the gazebo’s southern side.
Return to the area with the waterfall (that had the spear-wielding crucible knight), and head down the hall (going north). There’s a corpse in front of the waterfall with a Golden Rune [6] — grab it and turn left, where you can enter a room with a few enemies hanging out. Pick up the Rune Arc, then the Golden Centipede on the other side of the room. Exit the room and turn left to go behind the waterfall, where five enemies wait — three will be in front of you as you pass through the water, one will be on your right in the corner, and another will be in the far left corner. Take ’em all out and grab the Smithing Stone [4] from one corner, and Golden Centipede in the opposite corner.
Leave the room and turn left to go east out onto the balcony, where you can find a Golden Centipede by turning right. You should also see an NPC sitting by the railing with his head in his hands. If you try to speak with him, and you have the Twinned Armor Set, you’ll be given the option to give it to him. If you do so, you’ll be able to summon him for assistance with the boss fight that’s just ahead (and you can eventually get it back, although it will take a while). Head up the stairs to the northwest and enter the large cavern to face the Valiant Gargoyle Duo.
Once the Valiant Gargoyles are defeated, head to the western end of the boss arena to find the site of grace. Northwest of the site of grace is a coffin — enter it to be transported to the Deeproot Depths. Tap the site of grace to the south, then teleport back to the Ancestral Woods — you can come back to Deeproot later, but we aren’t quite done with Nokron yet.
This walkthrough continues in the fourth tab, Night’s Sacred Ground!
From the Ancestral Woods site of grace, go southwest to the edge of the cliff, and then jump that direction onto the roof below. Continue southwest to the edge of the roof, then jump down onto the ledge across the small gap.
Turn right and follow the ledge west around the corner, and you’ll see a corpse on the balcony below. Jump onto the balcony and grab the Rejuvenating Boluses, then jump over the balcony’s railing to the southwest and down onto the ledge below. Continue southwest, and at the edge of the ledge, turn around and go up the stairs to find a Rune Arc at the top.
Go back down the stairs — at the southwestern edge of the platform, look down and you’ll see a circular roof. Jump onto it, then jump once more further southwest onto the next building. You’ll see a silver tear enemy, but it will transform into a human when you approach (it will sometimes transform while you’re jumping the gap, so watch out for that). Don’t let it draw you too far southwest — there is another silver tear mimic on the low ground. This one transforms into a human wielding a mace, and can do serious damage if you let it unleash its full light attack combo on you. Try to stay near where you jumped and finish off the crossbow mimic quickly, as the other mimic often aggros and comes to double team you otherwise.
After dealing with both mimics, turn left to look southeast, where you’ll see a corpse with a Golden Rune [7]. Then head to the southern corner of the area you’re in and continue southeast onto the ledge there.
Follow the ledge and you’ll come to the top of a damaged stone arch that leads southeast over the road. Before you cross it, keep following the ledge around the building to find a Nascent Butterfly. Then go back and cross the stone archway — you’ll have to jump to get up the last bit, after which you’ll reach a set of windows. Drop down into the building, then head up the nearby stairs and grab the Black Whetblade from the corpse in front of the large altar. Go behind the altar and look southeast, where you’ll see a stonesword imp statue and fog gate.
Beyond the fog is a Nox Swordstress with her back turned, and a chest with the Mimic Tear Ashes. (These have been nerfed from their formerly OP state, but can still be quite useful.) From the Mimic Tear chest, turn around and you’ll see a corpse with a Smithing Stone [3] to the left of the doorway. Then go back into the hallway and look left — you’ll see an open window that you can go through to drop onto a ledge.
Head to the end of the first ledge and then jump further southwest to the next one, where a silver tear waits to stab you. Dissipate that freak of magic and then jump up onto the roof to the northwest. There’s a window to jump through just a bit further northwest, but first go to the southwestern end of the roof and turn right to find a Nascent Butterfly. Then head through the window and drop down to find a corpse draped over a stone beam — he holds the Nox Flowing Hammer.
If you’re confident in your running skills, consider running directly to the site of grace rather than killing the enemies in the next paragraph. Make sure you know where the doorway out of the building is before doing this. Go out the doorway, turn right and go down the stairs, then find the site of grace to the left. Then fight the enemies once you’ve activated the site of grace — this will save you a long run back if you die.
Now you’ll need to drop down to the ground floor. There are three enemies down there — the large ball below the beam, and two Nox Swordstresses. If you have ranged options, use them on the visible Swordstress before dropping down (the other one is hiding around the corner to the west). The ball will slowly roll towards you, but damaging it will stop it from rolling. Once you’ve dealt with the foes here, make sure you pick up the Larval Tear that the ball drops, and then out of the doorway to the southwest.
Go down the stairs and turn left to find the Night’s Sacred Ground site of grace. Rest, then start heading northeast where you’ll see more silver tears. Summons are available here, and since there’s no boss coming up, there’s no reason not to use them. Most of the silver tears here aren’t mimics, but there are two human mimics amongst them, plus a giant at the far end of the area. Interestingly, while the Spear/Shield mimic always transforms, the one with a greatsword can be killed before it transforms.
Deal with the mimics on the left first. The one with the spear and shield can be a challenge, but you can circle around for a backstab — using your own shield and guard countering is also an effective tactic. Pick up the Celestial Dew from the corpse and continue northeast, killing the other mimics and grabbing the two Golden Rune [7] from the corpses in the road — make sure you take out the Greatsword mimic immediately so it doesn’t transform. The final mimic, closest to the stairs, will transform into a giant if you get too close, so go wide around it and it’ll stay where it is.
You can drop off of the left side of the staircase to find a Nascent Butterfly, but you may end up meeting the giant if you do so. (Note that if the mimic does transform, the giant can’t fit into the tomb up the stairs that holds the items so you can run in there to hide from it.) Climbing the first set of stairs will see you in front of a small tomb with another set of stairs, and a waygate to the left of the stairs. Enter the tomb and open the chest to acquire the Fingerslayer Blade and a Great Ghost Glovewort.
That wraps up our time in Nokron, but if you want to continue Ranni’s quest, our next stop is theCarian Study Hall & Divine Tower of Liurnia (after grabbing the key from Ranni).
Note that this is an OK time to go to Deeproot Depths — though it’s a challenging area, and you may want to wait until you’ve got a few more levels.
Unabashed FromSoftware fanboy still learning to take his time with games (and everything else, really). The time he doesn't spend on games is spent on music, books, or occasionally going outside.
In the Siofra Aqueduct section, there’s a golden rune (7) on the exterior platform of the gazebo where the spear-wielding Crucible Knight is (the second one you encounter). It’s hidden from view by a wall, so you have to go outside and walk around the narrow ledge outside the gazebo to find the corpse holding it.
For the Ghost Glovewort found just prior to the Nokron City site of grace (after jumping down where the frost archers are), it’s a Ghost Glovewort [3] not [5] as listed. I needed a [5] and so was disappointed!
Thanks so much, and as commented elsewhere – terrific guide! The best.
Also, for other reluctant jumpers: might be worth noting that the more difficult jump as you’re moving along the narrow roof section (soon after descending into the great crater, and just before first encounter with silver tear blob enemies) is only required if you want a particular item (ghostflame torch). Otherwise, just proceed further down where there is a second narrow section and then an easy jump onto the adjacent land mass with buildings. All the other items listed are reachable save the torch which is a level above on the roof. Something to forgo, or perhaps come back for later and try (when runes aren’t at risk to be lost!)
Last edited 1 year ago by Chris W.
Chris W.
1 year ago
Also a Ghost Glovewort [4] right by the two corpses and related items, on the road below the first shaman encountered directly from Ancestral Woods Site of Grace (following your play through route). Thanks for the great guide!
Nice catch Chris, thank you (and thanks for your kind words!)
Chris W.
1 year ago
There is a Ghost Glovewort 5 that could be added to your walkthrough (fairly coveted item, particularly as this may be earlier in a playthrough). It’s found in the lower section of rocky ruins in water, down from the Ancestral Woods site of grace. You list the Golden Rune 12, and there are some other plants/flowers, but the Ghost Glovewort 5 is there as well. And this would be just before the section in your guide where you include a caution (written in blue) to not use Torrent when beginning to jump up and onto the wall of the ruins as it is easy to fall into the surrounding water on the other side.
Is there any way to activate the site of grace before collecting the items on the rooftops with all the tricky jumps? I just lost 50,000 runes messing around with that stupid spin jump. I should have known better, I thought the game would put me closer to where I died for some reason. So can I hit the point of grace first and go back and pick up those items after?
Bummer about the runes, Lee — as far as I know, there’s no way to get back up from the site of grace by backtracking (otherwise I agree, it would make sense to go and get the site of grace before attempting the jump). If you want to try for the Ghostflame Torch after grabbing the Nokron, Eternal City site of grace, you’ll have to teleport back to the Fort Haight site of grace and make your way into Nokron again via the crater.
Just a quick tip I learned that probably everyone else already knows. When doing that jump, running in 3 or 4 circles and then jumping. On the PlayStation controller, while holding the run button (circle), push the jump button (x) at the same time to get the extra jump boost. I died like 8 times before I figured this out 🙂
Without plugging a control in, the best method I can give you is to either try pressing WASD in sequence until you build up speed, or else start from the very opposite end of the platform and attempt the jump — without a quicksave, this is obviously a risky choice. Assuming you’re willing to spend a bit of extra time, it’s advisable to actually continue to the next site of grace, and then teleport back to Fort Haight to attempt the jump (to avoid having to do the entire hike again if you decide it isn’t worth trying to make the jump).
Jason
4 months ago
Can you add in deeproot depths walkthrough to the guide somewhere? I have been following this guide and I’m now at my gelmir and nowhere does it say that it’s a good time to visit the place. Only after valiant gargoyles is it mentioned, but it says you can come back later. Thank you so much. I hope I’m not annoying you with my comments. I just really enjoy the format of this guide and thought maybe you had forgotten to add deeproot depths in somewhere.
You are not annoying us with the comments Jason, in fact please keep them coming! Your QA has been very helpful. This was a huge project, so I’m sure plenty of little things got missed — and Deeproot Depths not being mentioned at the end of one of the walkthroughs is definitely one of those missing things 🙂


I really enjoy this walkthrough. It’s perfect!!
Thanks Leon!
In the Siofra Aqueduct section, there’s a golden rune (7) on the exterior platform of the gazebo where the spear-wielding Crucible Knight is (the second one you encounter). It’s hidden from view by a wall, so you have to go outside and walk around the narrow ledge outside the gazebo to find the corpse holding it.
Nice, thanks Malavesh!
For the Ghost Glovewort found just prior to the Nokron City site of grace (after jumping down where the frost archers are), it’s a Ghost Glovewort [3] not [5] as listed. I needed a [5] and so was disappointed!
Sorry about that Chris, I’ll fix the guide accordingly.
Thanks so much, and as commented elsewhere – terrific guide! The best.
Also, for other reluctant jumpers: might be worth noting that the more difficult jump as you’re moving along the narrow roof section (soon after descending into the great crater, and just before first encounter with silver tear blob enemies) is only required if you want a particular item (ghostflame torch). Otherwise, just proceed further down where there is a second narrow section and then an easy jump onto the adjacent land mass with buildings. All the other items listed are reachable save the torch which is a level above on the roof. Something to forgo, or perhaps come back for later and try (when runes aren’t at risk to be lost!)
Also a Ghost Glovewort [4] right by the two corpses and related items, on the road below the first shaman encountered directly from Ancestral Woods Site of Grace (following your play through route). Thanks for the great guide!
Nice catch Chris, thank you (and thanks for your kind words!)
There is a Ghost Glovewort 5 that could be added to your walkthrough (fairly coveted item, particularly as this may be earlier in a playthrough). It’s found in the lower section of rocky ruins in water, down from the Ancestral Woods site of grace. You list the Golden Rune 12, and there are some other plants/flowers, but the Ghost Glovewort 5 is there as well. And this would be just before the section in your guide where you include a caution (written in blue) to not use Torrent when beginning to jump up and onto the wall of the ruins as it is easy to fall into the surrounding water on the other side.
Thank you Chris for another nice catch!
This guide has been amazing….quick question is the first tab missing or just not completed yet?
Thanks!
Hi Mark, the first tab is “Nokron”, and covers entering the crater and reaching the Mimic Tear fight — is that tab not appearing for you?
Weirdly it was blocked by my pop up blocker.
Is there no walkthrough for Deeproot depths?
Is there any way to activate the site of grace before collecting the items on the rooftops with all the tricky jumps? I just lost 50,000 runes messing around with that stupid spin jump. I should have known better, I thought the game would put me closer to where I died for some reason. So can I hit the point of grace first and go back and pick up those items after?
Bummer about the runes, Lee — as far as I know, there’s no way to get back up from the site of grace by backtracking (otherwise I agree, it would make sense to go and get the site of grace before attempting the jump). If you want to try for the Ghostflame Torch after grabbing the Nokron, Eternal City site of grace, you’ll have to teleport back to the Fort Haight site of grace and make your way into Nokron again via the crater.
Just a quick tip I learned that probably everyone else already knows. When doing that jump, running in 3 or 4 circles and then jumping. On the PlayStation controller, while holding the run button (circle), push the jump button (x) at the same time to get the extra jump boost. I died like 8 times before I figured this out 🙂
Take your equips and just run jump normally. No need to spin jump.
For the insert joke here, I suggest “This is SPARTAA”
Solid caption, I’ll put it in!
Absolutely class walkthrough overall, reminds me of Stella’s Tombraider site which is very high praise.
Question – I’m playing on PC, how would I do the ‘running in a circle and jumping’ trick? Or is there an alternate path I can take from that spot?
Without plugging a control in, the best method I can give you is to either try pressing WASD in sequence until you build up speed, or else start from the very opposite end of the platform and attempt the jump — without a quicksave, this is obviously a risky choice. Assuming you’re willing to spend a bit of extra time, it’s advisable to actually continue to the next site of grace, and then teleport back to Fort Haight to attempt the jump (to avoid having to do the entire hike again if you decide it isn’t worth trying to make the jump).
Can you add in deeproot depths walkthrough to the guide somewhere? I have been following this guide and I’m now at my gelmir and nowhere does it say that it’s a good time to visit the place. Only after valiant gargoyles is it mentioned, but it says you can come back later. Thank you so much. I hope I’m not annoying you with my comments. I just really enjoy the format of this guide and thought maybe you had forgotten to add deeproot depths in somewhere.
You are not annoying us with the comments Jason, in fact please keep them coming! Your QA has been very helpful. This was a huge project, so I’m sure plenty of little things got missed — and Deeproot Depths not being mentioned at the end of one of the walkthroughs is definitely one of those missing things 🙂