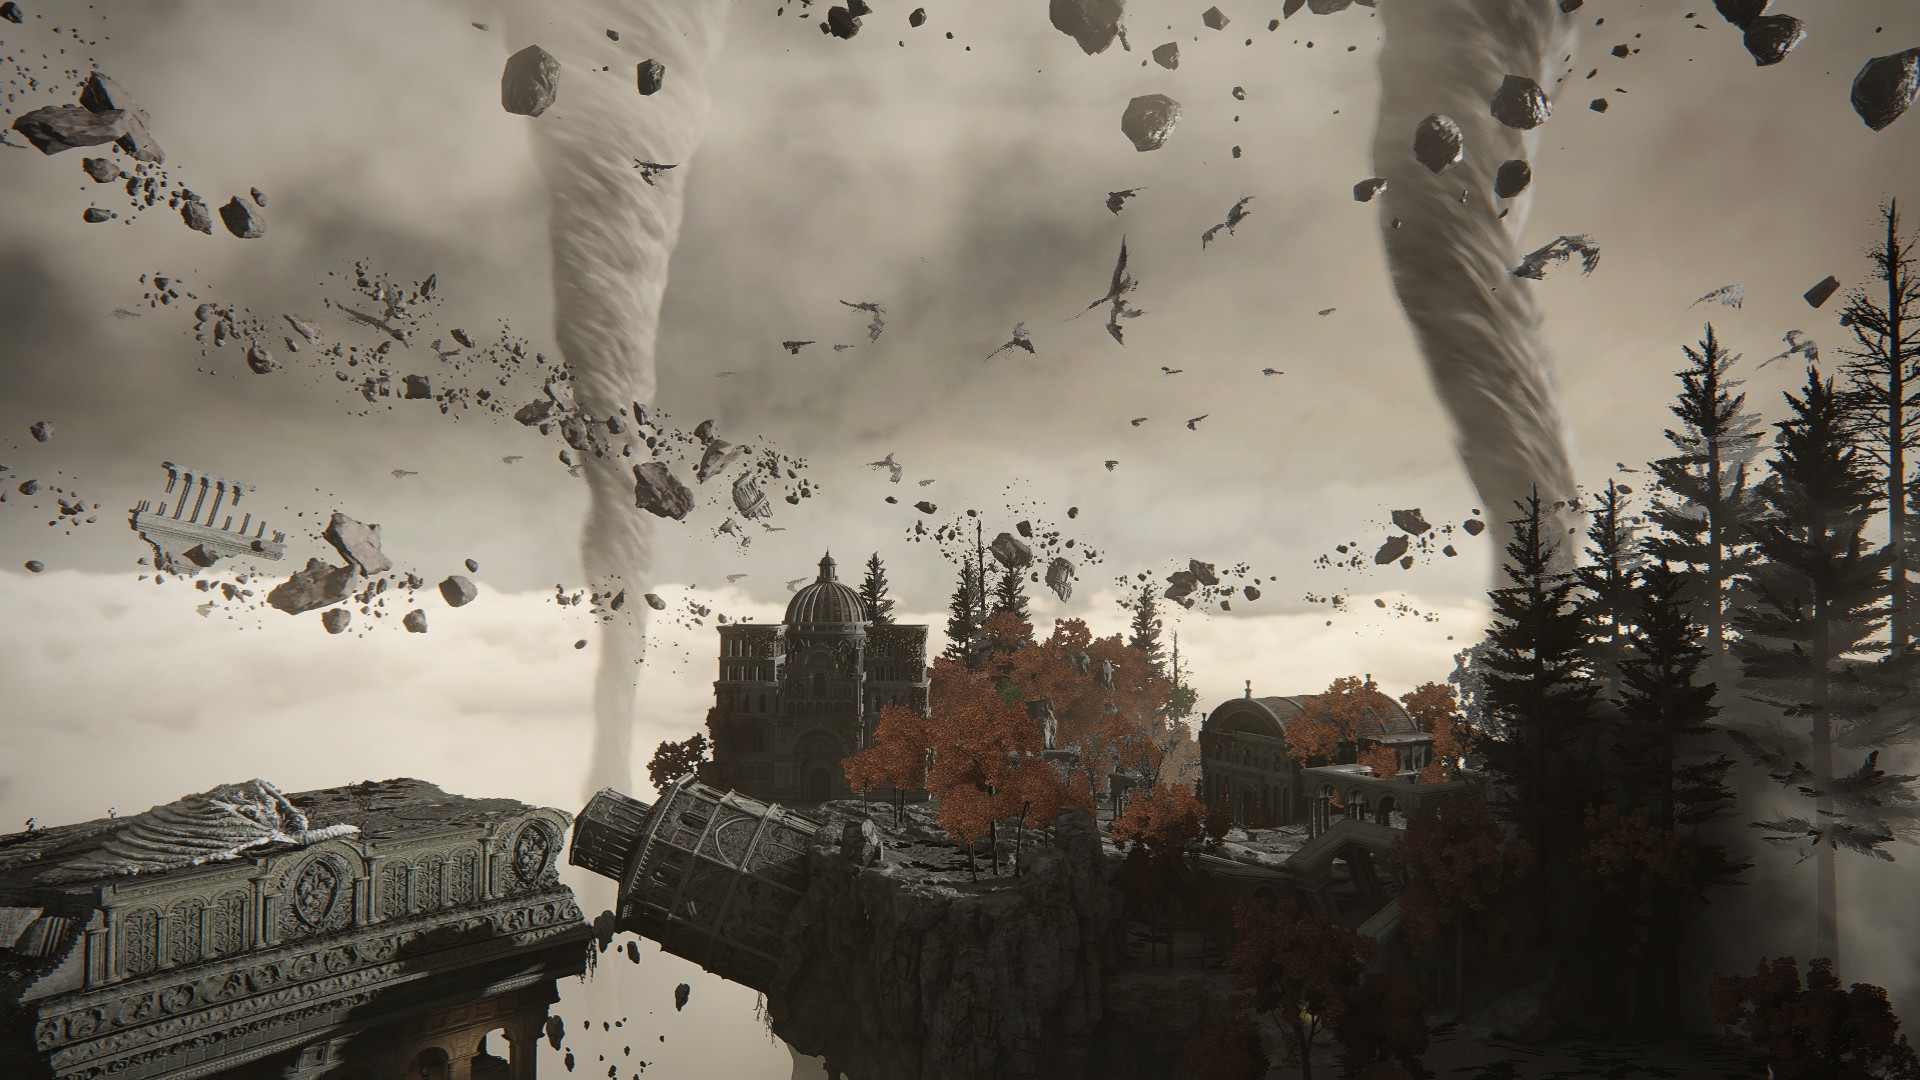
Ever wonder where all that fallen rubble all over the Lands Between came from? Or where that one beastman was from? Well, now you know. This is the final legacy dungeon of the game (although we’ll return to an altered Leyndell next), and includes some of its hardest boss fights.
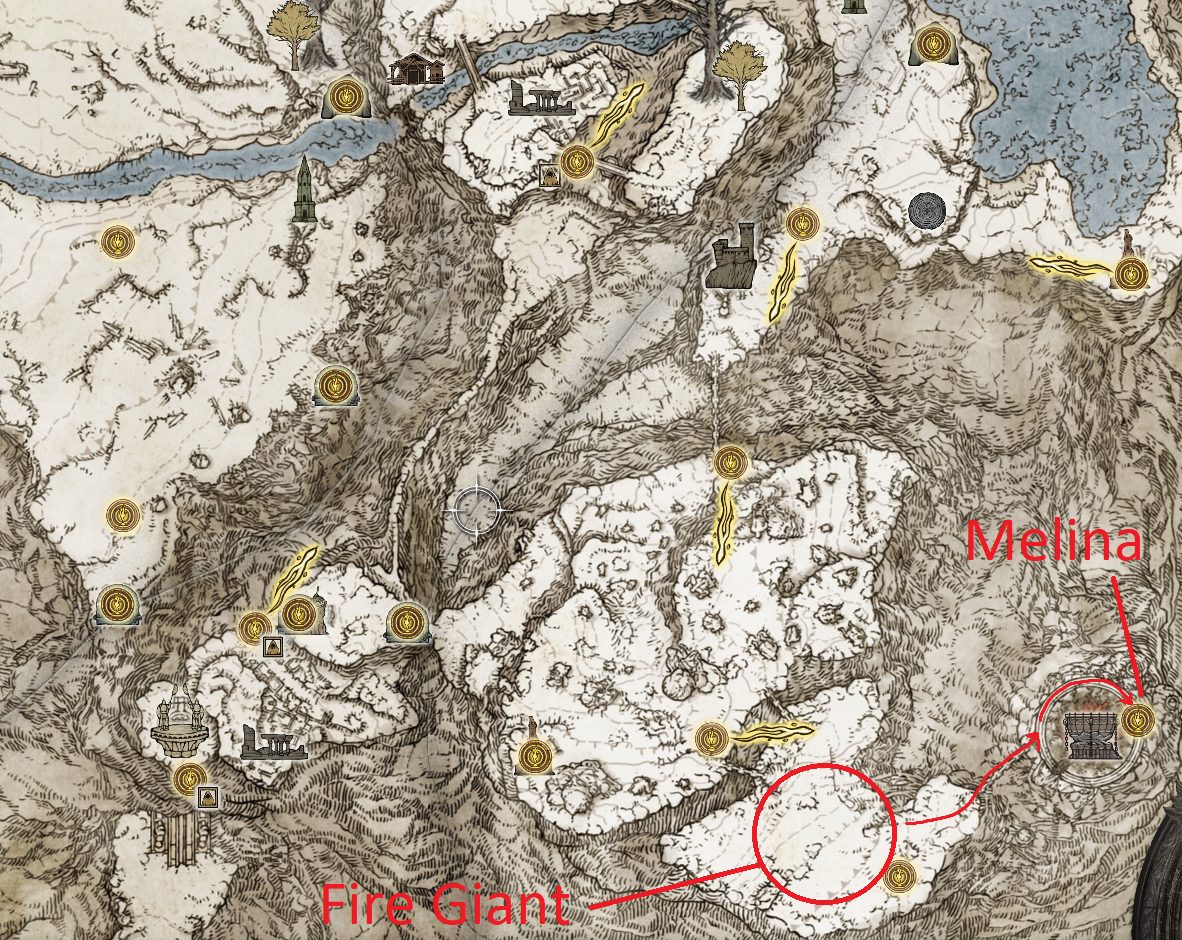
You can only reach Crumbling Farum Azula proper by being teleported there by Melina. Before she’ll do this, you’ll need to defeat the Fire Giant in the Mountaintops of the Giants, and then set the Erdtree on fire.
Walkthrough
This walkthrough is divided into sections — start with Beast Grave and use the tabs to navigate between sections.
After being transported to Farum Azula, you’ll be treated to a brief cutscene, and then find yourself on a crumbling bridge. Head northwest, and just before the bridge meets the wall you’ll find a Smithing Stone [8]. From there, turn right (northeast) and drop down through the broken section of rampart to the floating chunk of rubble below. Drop again to the next bit of rubble that’s below and to the north, picking up the Golden Rune [9] from the corpse there before dropping north a final time onto the balcony.
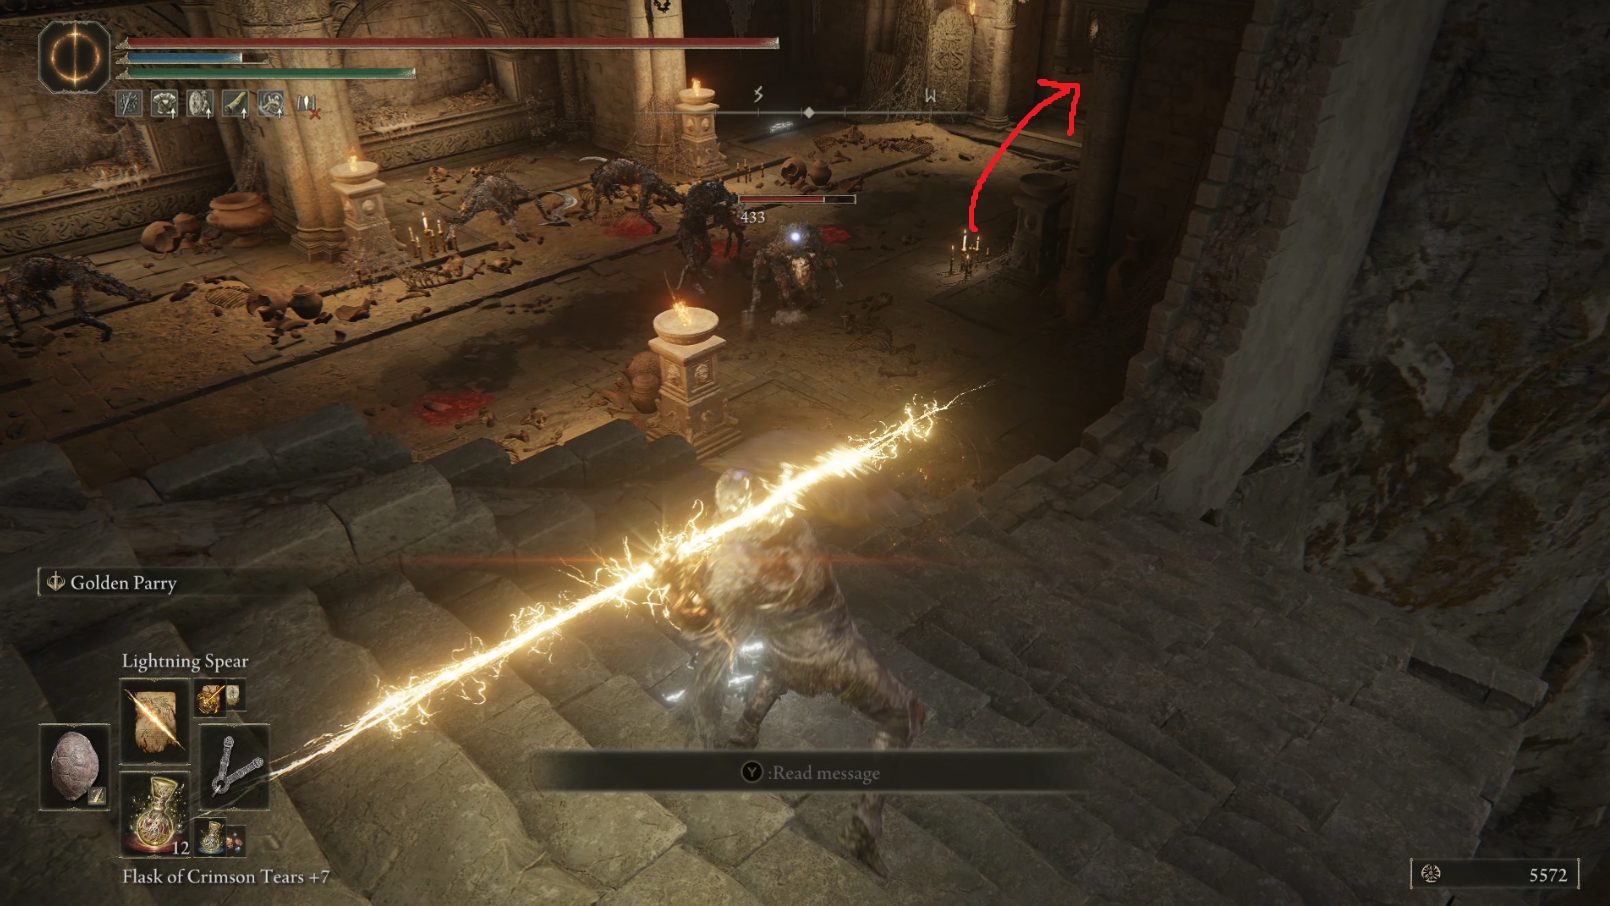
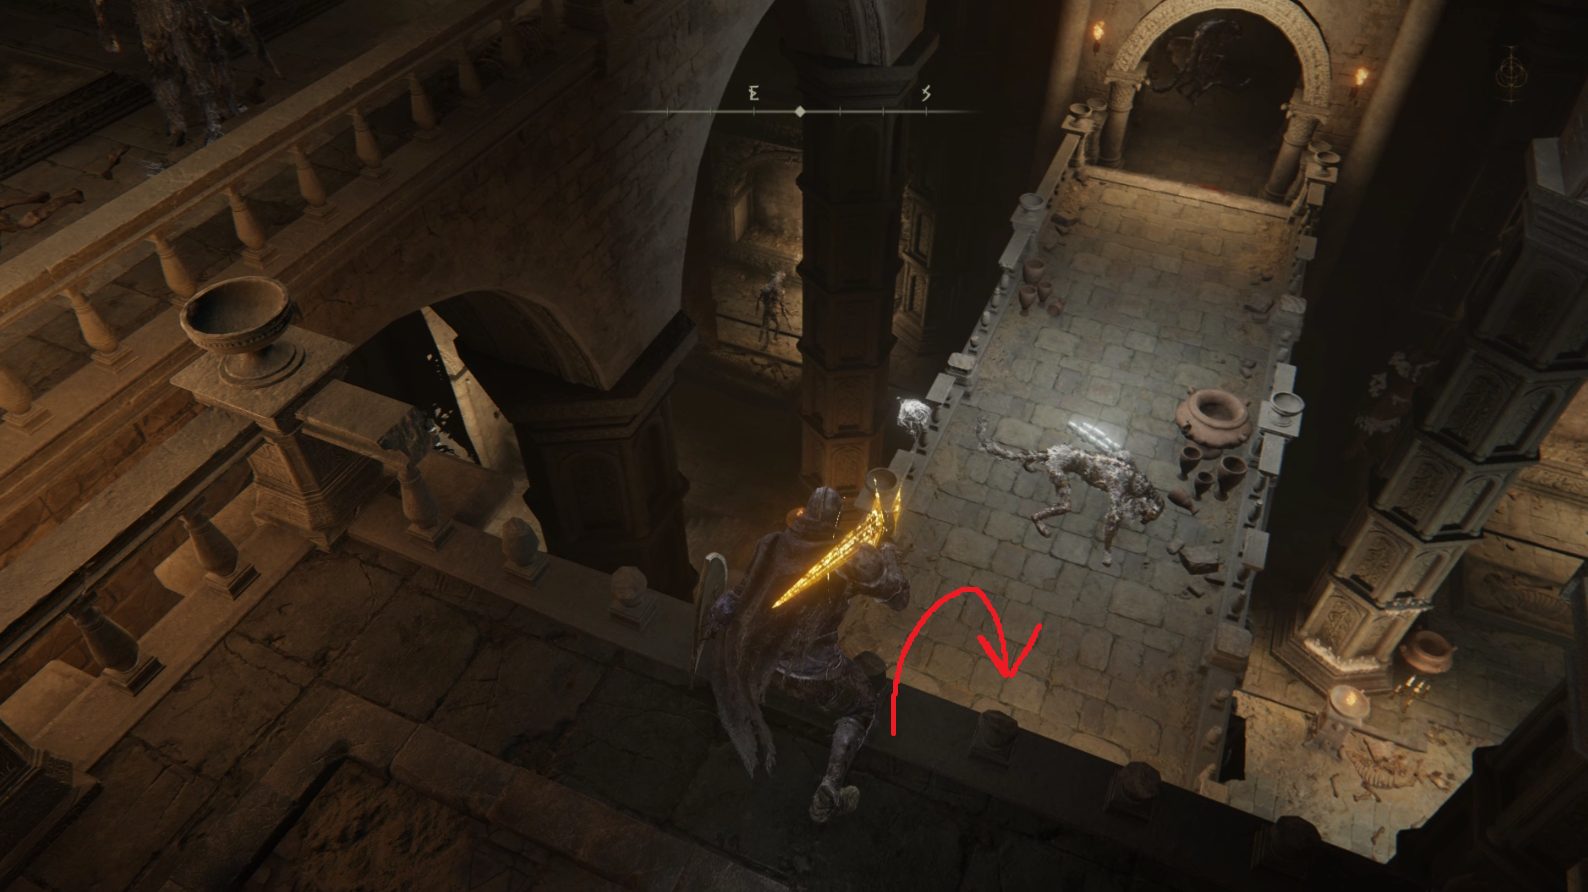
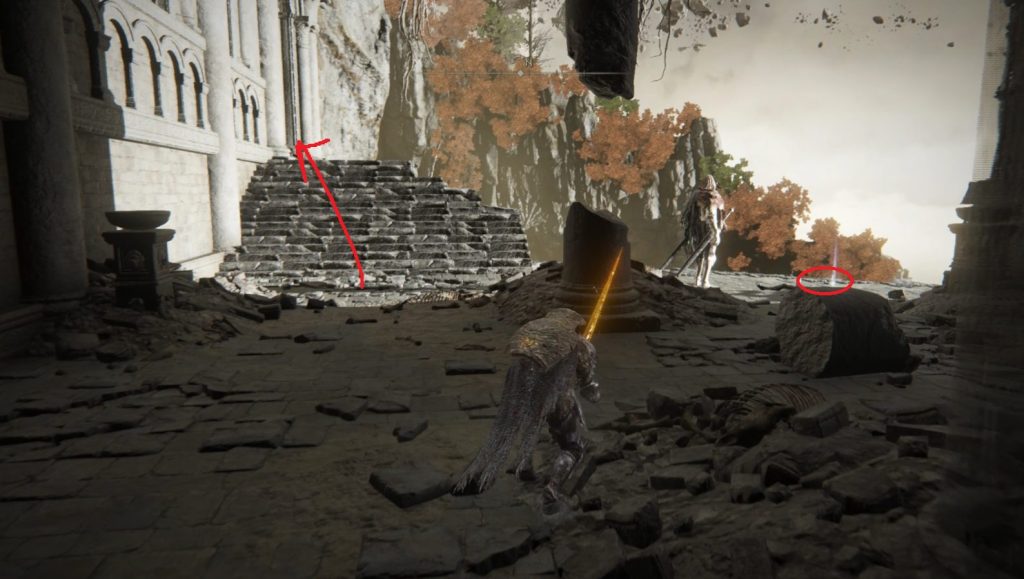
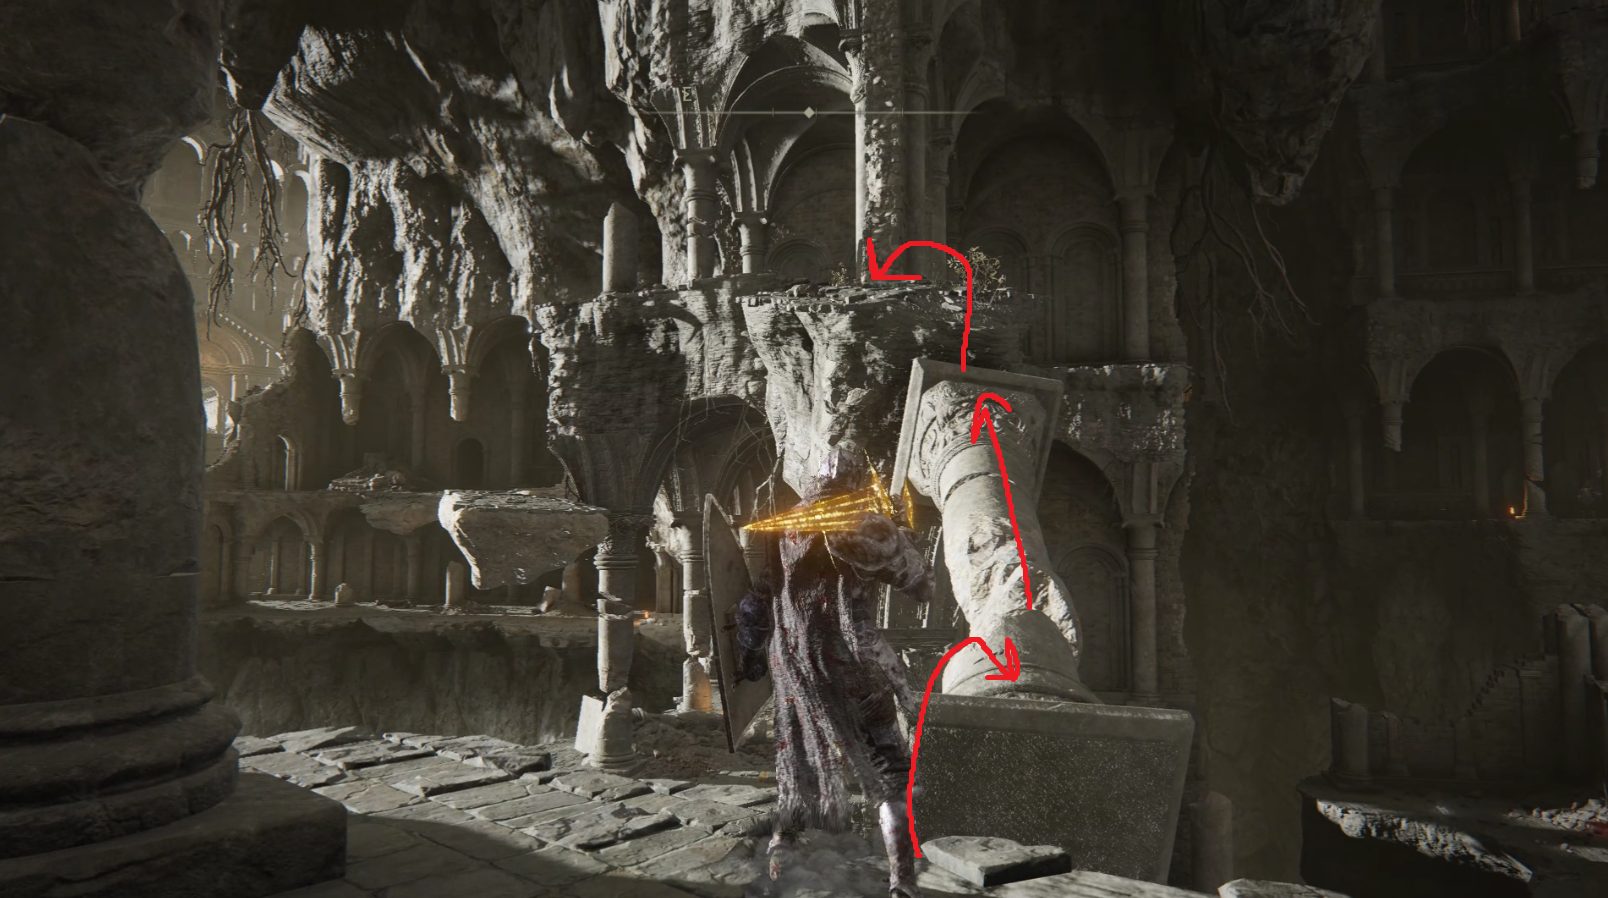
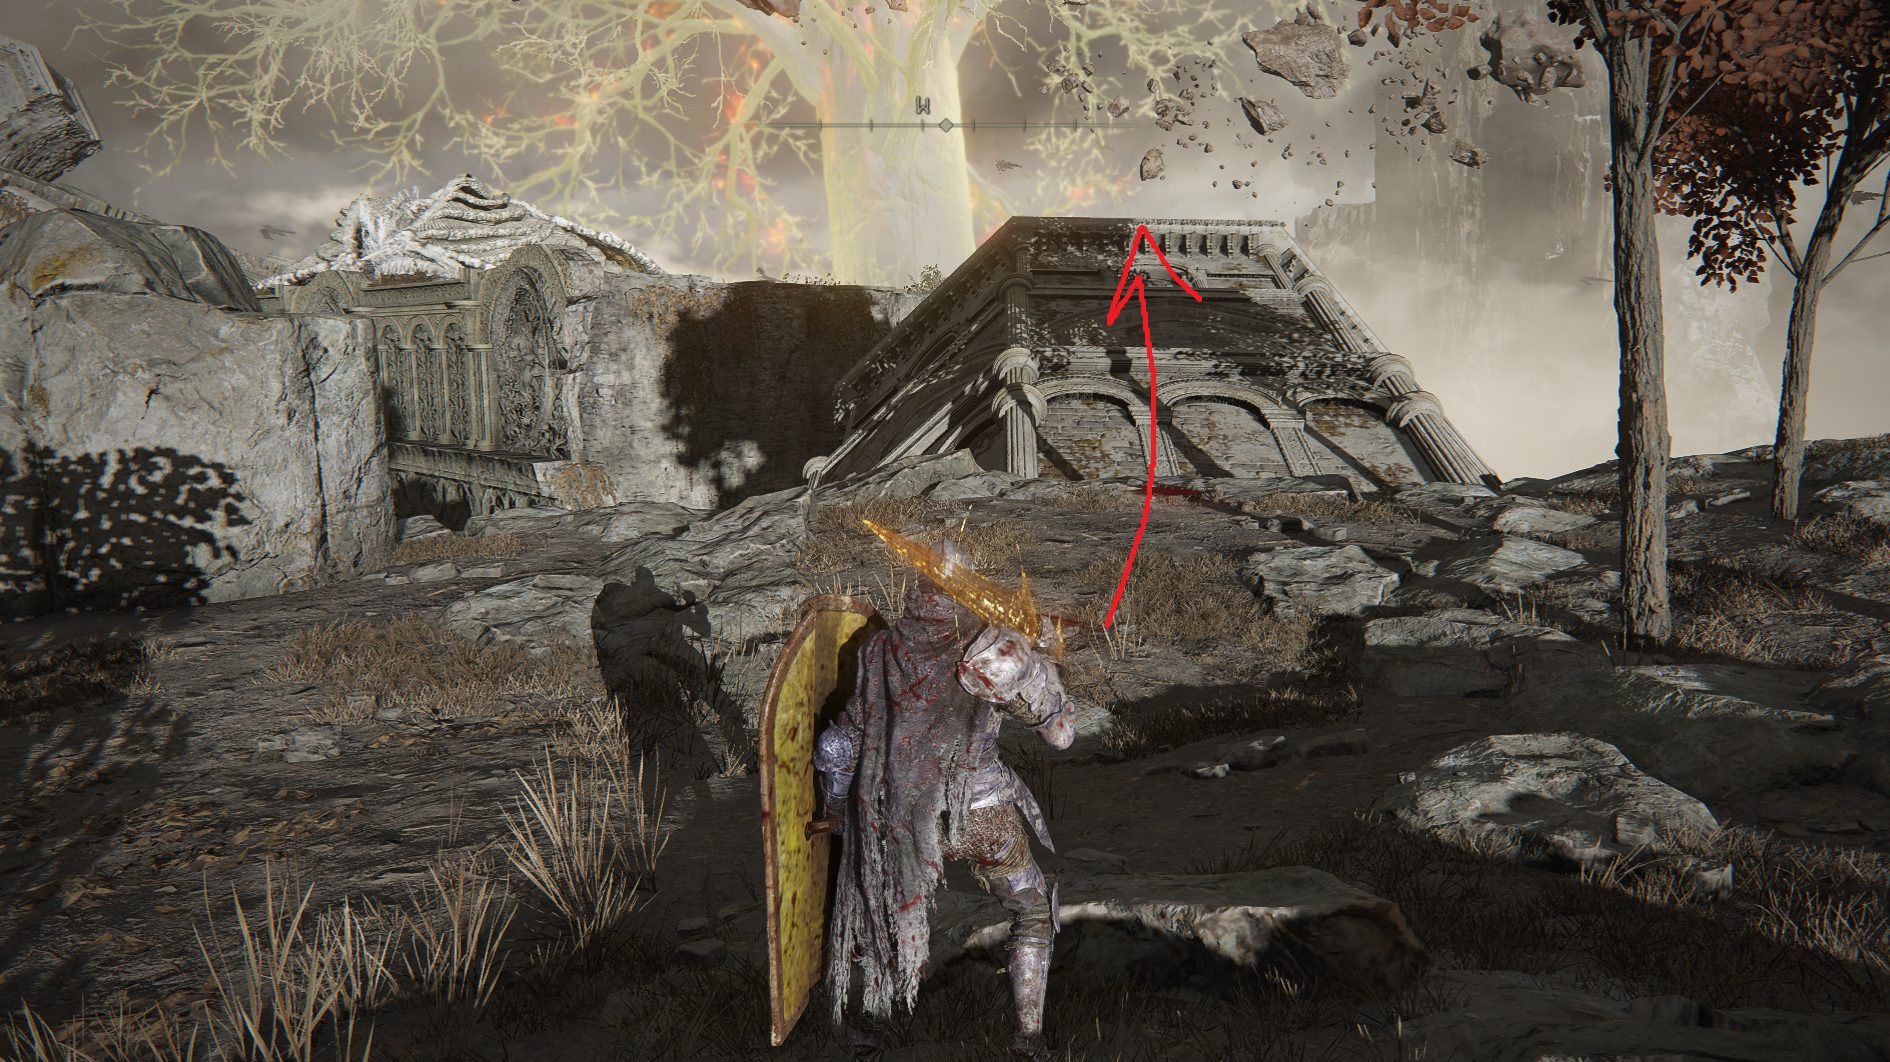
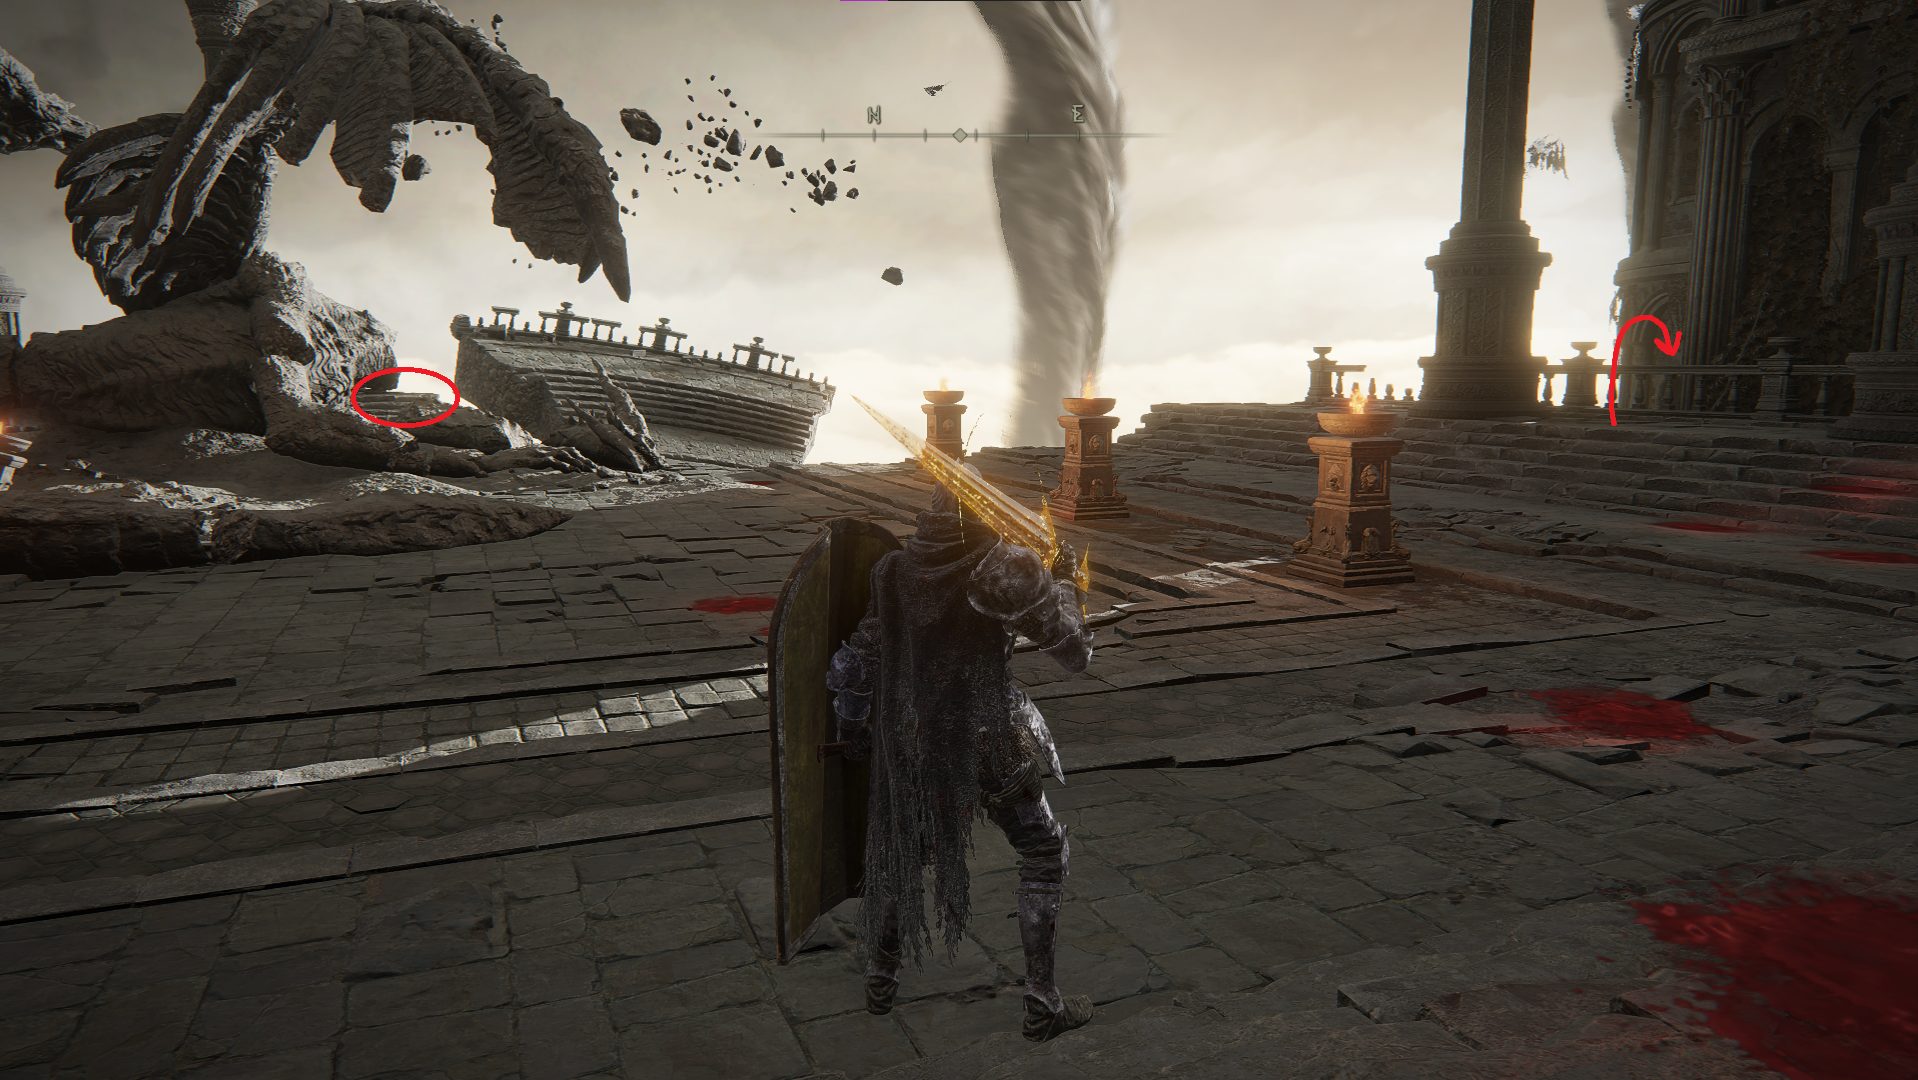
Head through the doorway, and continue through the small tunnel that leads back outside. Take a moment to enjoy the spectacle of the giant tornado, then go northwest down the stairs. On the landing, you’ll see numerous foes to the south and southeast — naturally, we don’t want to fight all of these at once. Instead, stay on the highground and use a projectile to pull the patrolling beastman up to you. Once he’s down, do the same thing with the one sleeping nearest the bottom of the stairs.
Alternatively, you can wake up the sleeping enemy without killing the patrolling one and fight a 1v2 for no reason, like I did. (Path into next room indicated by arrow)
Ranged characters can kill the rest of the enemies in the room from the high ground — otherwise, hop off the stairs to the low ground and sneak towards/kill the leftmost beastman. Greatsword/heavy weapon users can use charged heavy attacks on most beastman in this area to stagger them — this is easy to do against unaware enemies. Grab the x3 Old Fang from the corpse, and then you can sneak your way west-southwest to the doorway (killing the pair of beastmen that remain nets you some souls but isn’t necessary).
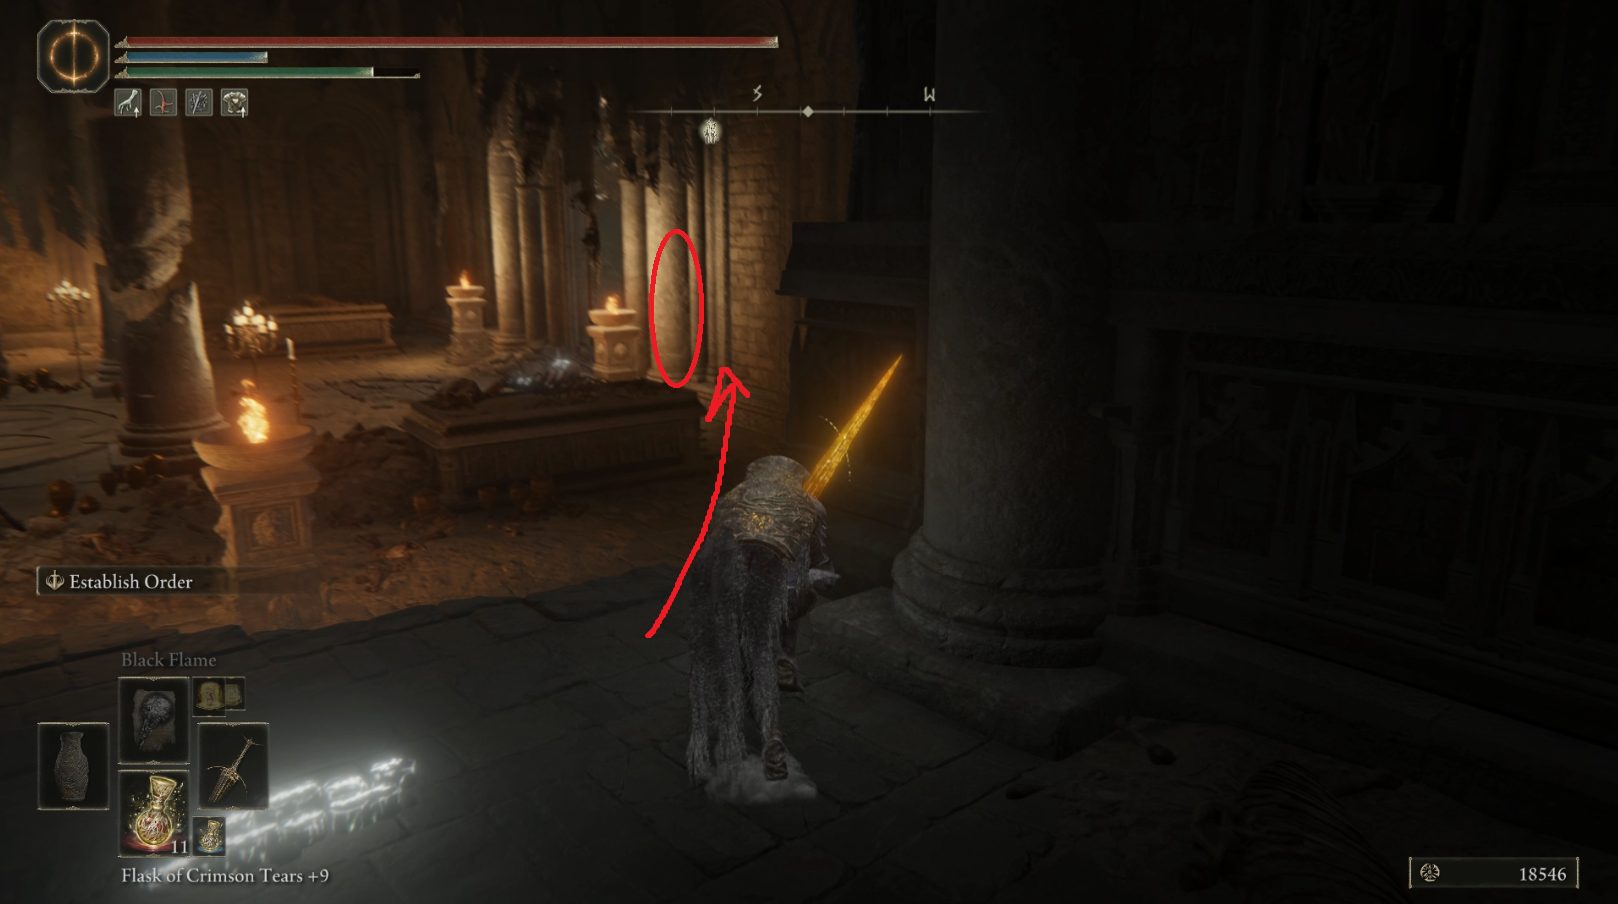
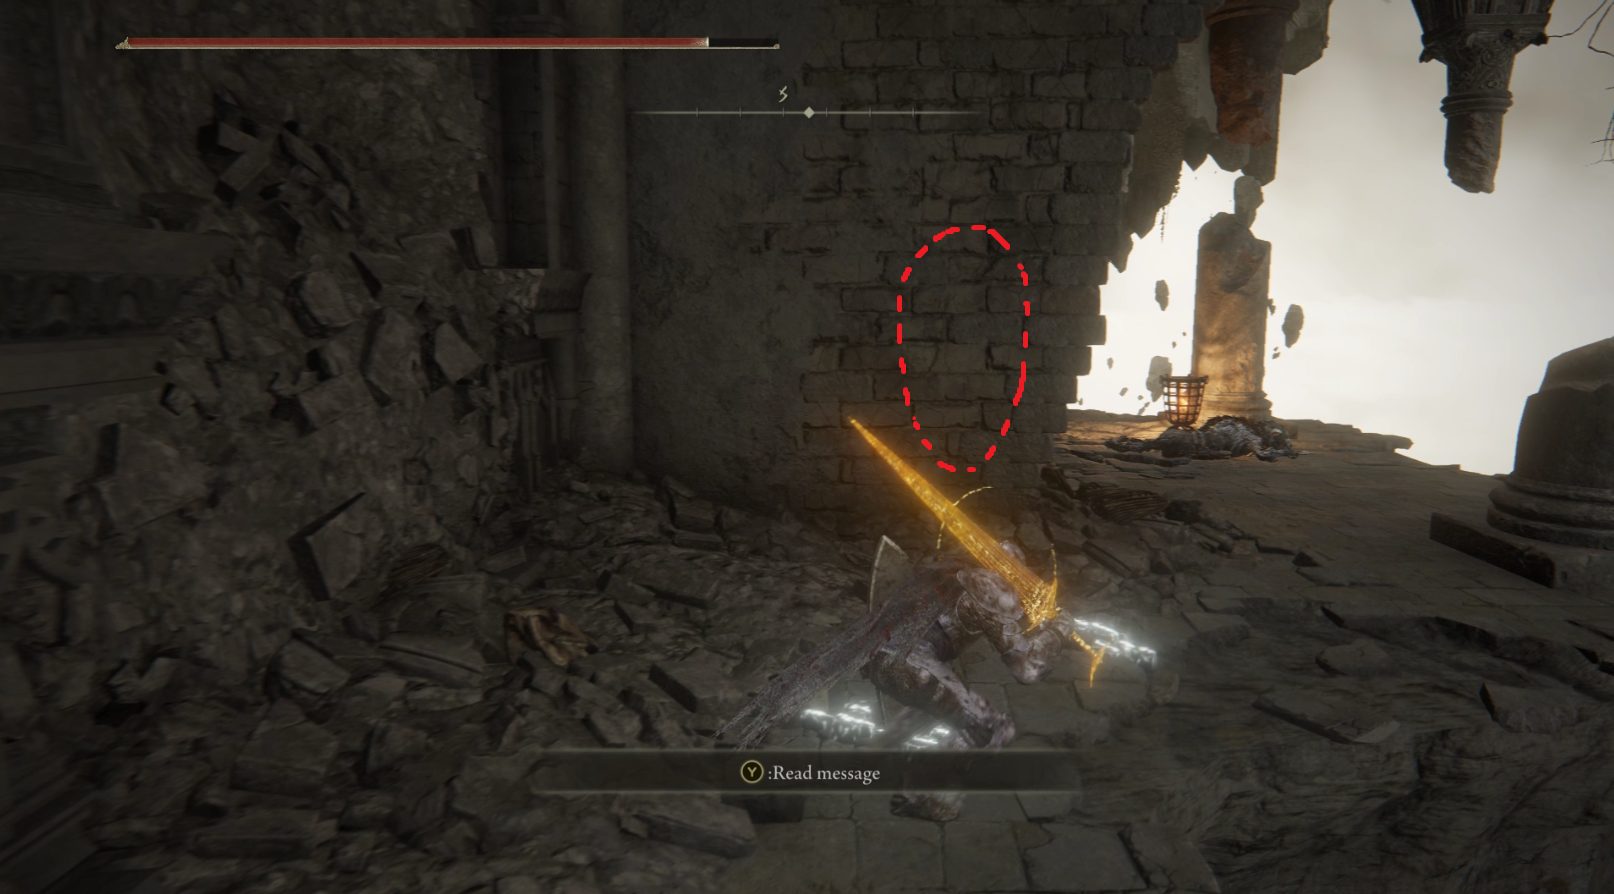
In the next room, there will be a beastman on your left (south-southeast) as soon as you enter the room. Once you backstab or otherwise attack this foe, a second beastman will approach from around the next corner on the left. With both beastmen dead, you can continue west across the room — on the right just before the doorway is a hole in the wall, and a nearby corpse has some Lightningproof Dried Liver. Then go through the doorway on the west-southwestern wall and take the first left to find the Crumbling Beast Grave site of grace.
From the site of grace, head north back out into the hallway, and turn left to continue west. Make your way down the stairs and head outside, then drop down to the west. Ahead of you you’ll see a Smithing Stone [6], so grab it and then decide whether you want to fight the dragon here now or not — you’ll earn an Ancient Dragon Smithing Stone and 32,400 for killing it. If you’d like to try, read the next paragraph, otherwise skip it — you can run past the dragon fairly easily.
This path covers all three items and ends inside near the site of grace
Fighting the dragon: Once you’re able to summon spirit ashes, go south to the wall and summon Latenna near it — this will prevent her from being pushed off the ledge by the dragon. If you don’t have Latenna upgraded, well, you should, ’cause she’s awesome, but go ahead and summon whatever spirit ash you prefer. The best way to fight this dragon is to stay under it and keep the camera unlocked so you can pay attention to the dragon’s upper body (this lets you see what move it’s doing next). Do your best to stand between its back legs — you’ll usually have to roll to avoid an attack, so roll towards his legs, and then you generally have time for an attack or two before the dragon turns or backs off and attacks again. Using your best physical+lightning resistance shield is also helpful, as holding block before rolling can save you from many attacks — the Dragonclaw Shield is particularly useful against this foe.
Beyond the Smithing Stone [6] further west is a corpse with a Smithing Stone [8]. Northwest of this corpse, on the edge of the “floor” you’re on, is some Dragonwound Grease. From there, you can go due west through the archways to find a Smithing Stone [8], and just northwest of that smithing stone is the Crumbling Beast Grave Depths site of grace.
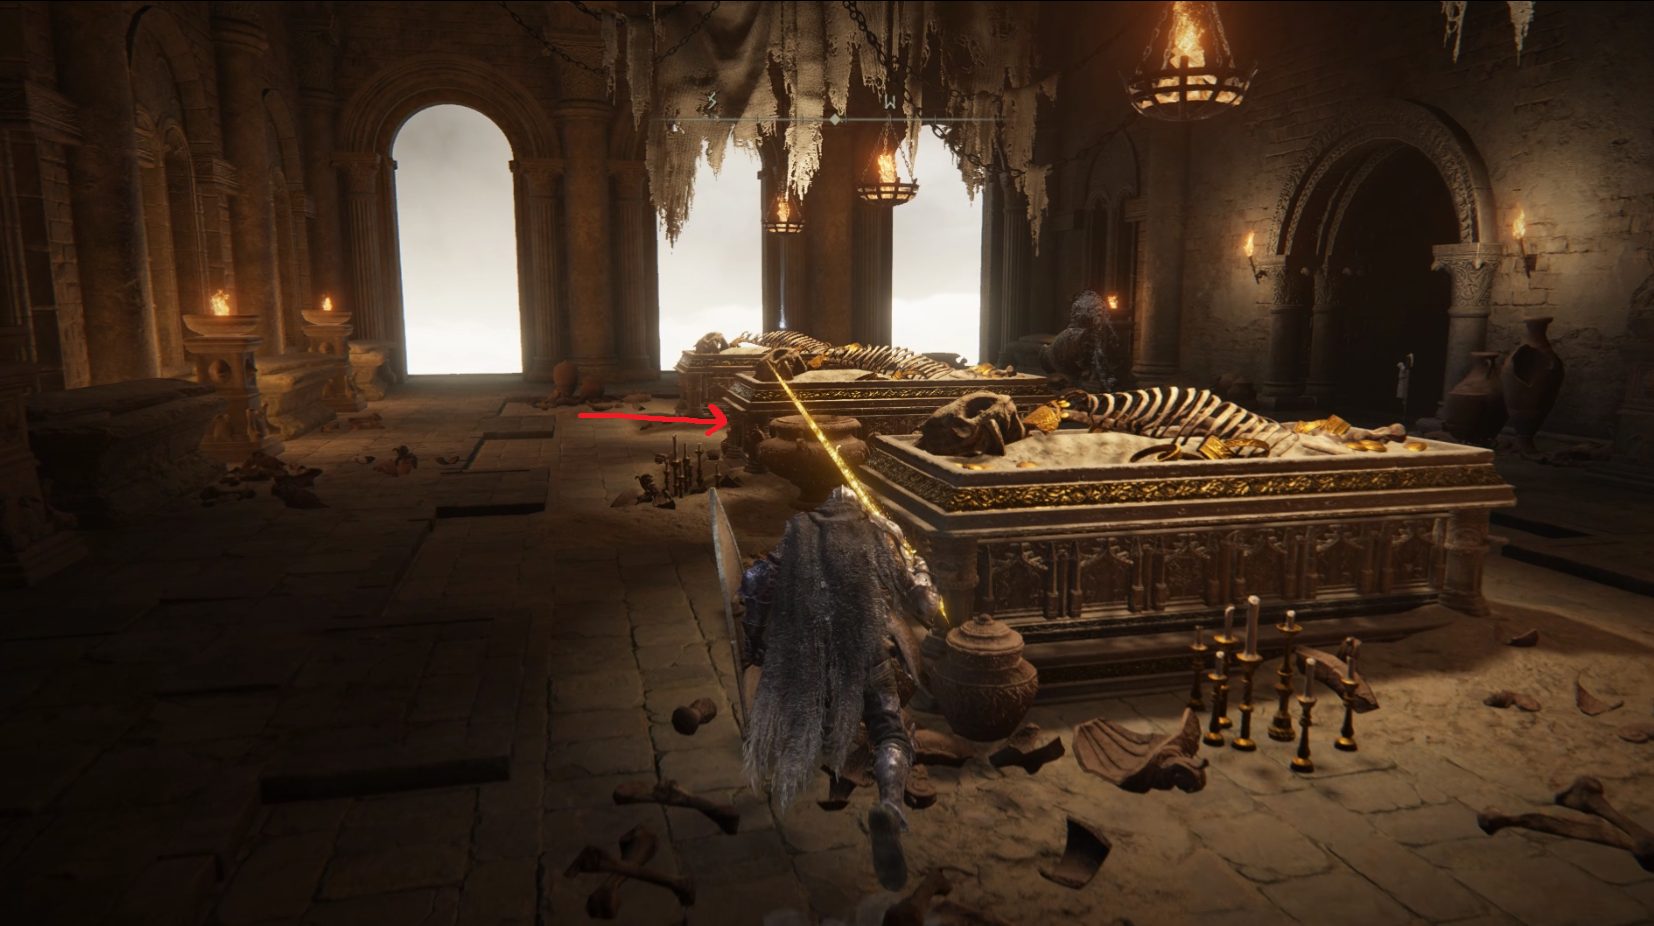
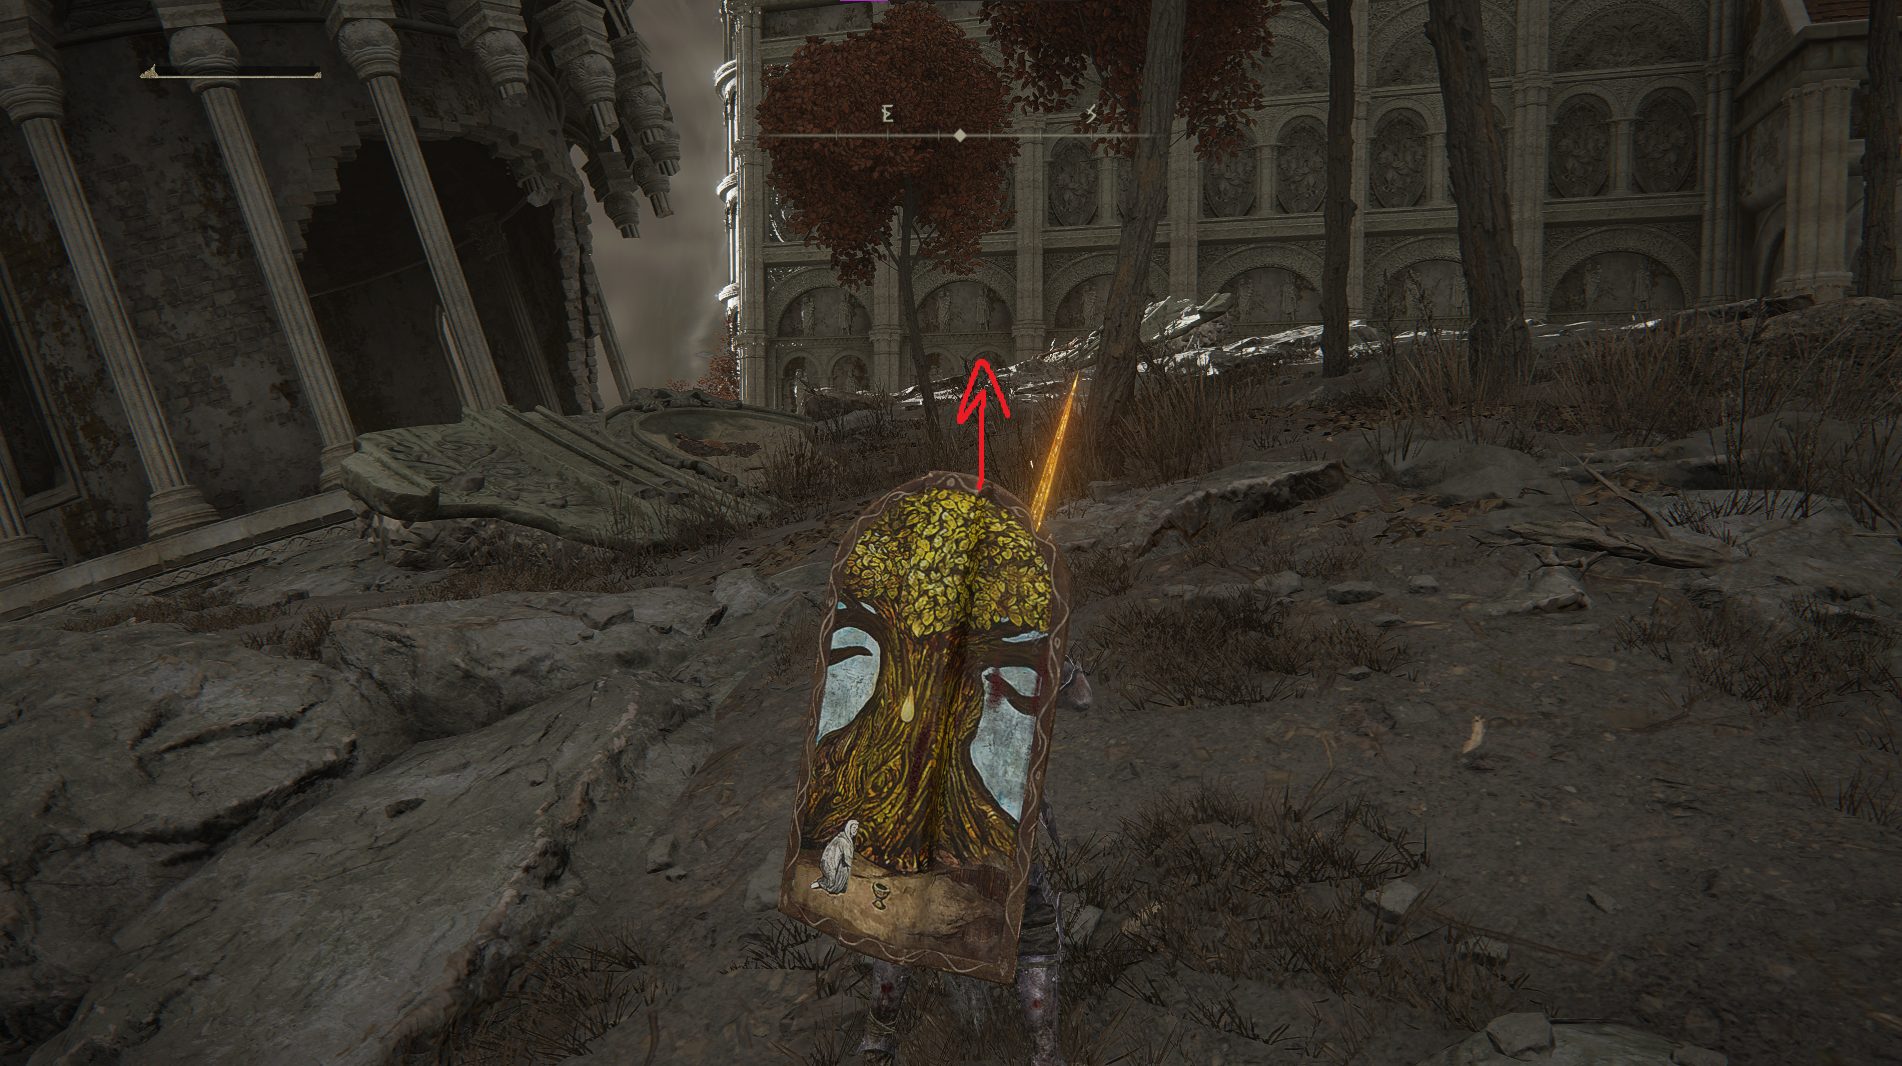
From the site of grace, go northwest through the doorway and start sneaking — a beastman patrols this room, and another is lying on the ground behind the coffin indicated below. Wait for the patrolling beastman to be far enough away from his friend and then kill the one lying down first. Once both are dead, grab the Smithing Stone [7] from the southwestern coffin and then go west to the ledge on the exterior of the building.
One of the two beastmen is hiding behind the coffin indicated
On the ledge, go northwest to the roof and jump up onto it. Continue northwest up the roof, and at the peak turn right (northeast) and jump back into the building. Inside, start sneaking and take a left (northwest) to head to the wall, being careful not to fall through one of the many holes/cracks in the floor. Then turn northeast and head forward to the x3 Gravel Stone on top of a coffin. Look east from the coffin — in the center of the room against a railing is a corpse with a Smithing Stone [6]. Grab it, making sure to keep an eye on the patrolling enemies that might be nearby. Then go back to the northwestern wall and continue northeast to where the three enemies are staring at a legendary item.
The enemy closest to the item is a spellcaster, so you might want to take him out first, since otherwise you’ll need to constantly be moving to avoid his lightning strikes. Kill all three enemies, and check and see if other enemies in the room are aggroing as well. Once no one’s trying to kill you, snatch up the Great Grave Glovewort from the wall and then head west to the opening in the floor — from here, you can drop down onto the bridge below (ideally killing the beastman down there with ranged attacks before doing so).
Once on the bridge, go southeast down the stairs and into the hallway. Before turning right (southwest), peek around the corner and see where the patrolling beastman is — you can sneak up on this guy once he turns his back to you. Continue southwest down the hallway and turn right (northwest) at the next intersection, where you’ll find x14 Lightning Greatbolt on a corpse on the stairs. Continue northwest up the stairs ahead — another beastman patrols the hallway at the top of the stairs, so be on the lookout for him. Keep going northwest through the doorway that leads outside, where a corpse hanging off of the ledge has a Golden Rune [12] for you.
Turn around and go southeast, back inside and down the stairs. Here (at the intersection of the three staircases) turn right (southwest) and head outside. Straight ahead down the stairs is an elevator, but first you should drop off of the western corner of the platform you’re on to find a Hero’s Rune [2]. Grab it, then continue to the southwestern side of the area and ride the elevator down. At the bottom, exit the elevator room and turn right to head north-northeast — ahead, you’ll see a circular platform of rock, reachable by jumping a number of times. On the northeastern edge of the platform is a Smithing Stone [8], but know that a dragon will land when you’re about halfway across the platform.
This dragon was never taught cool lightning skills, however, so it’s a fairly easy fight. Accordingly, it drops no loot besides the 21,600 runes it’s worth, so you may just want to jump back the way you came (southwest) rather than fight it. Make sure you get running starts when jumping back! Once you’re back on solid ground, go southwest and then follow the edge of the cliff as it curves east. You may want to stop here for a moment and equip the Prince of Death’s Cyst or Pustule, as you’re about to fight some wormface enemies that inflict Instant Death.
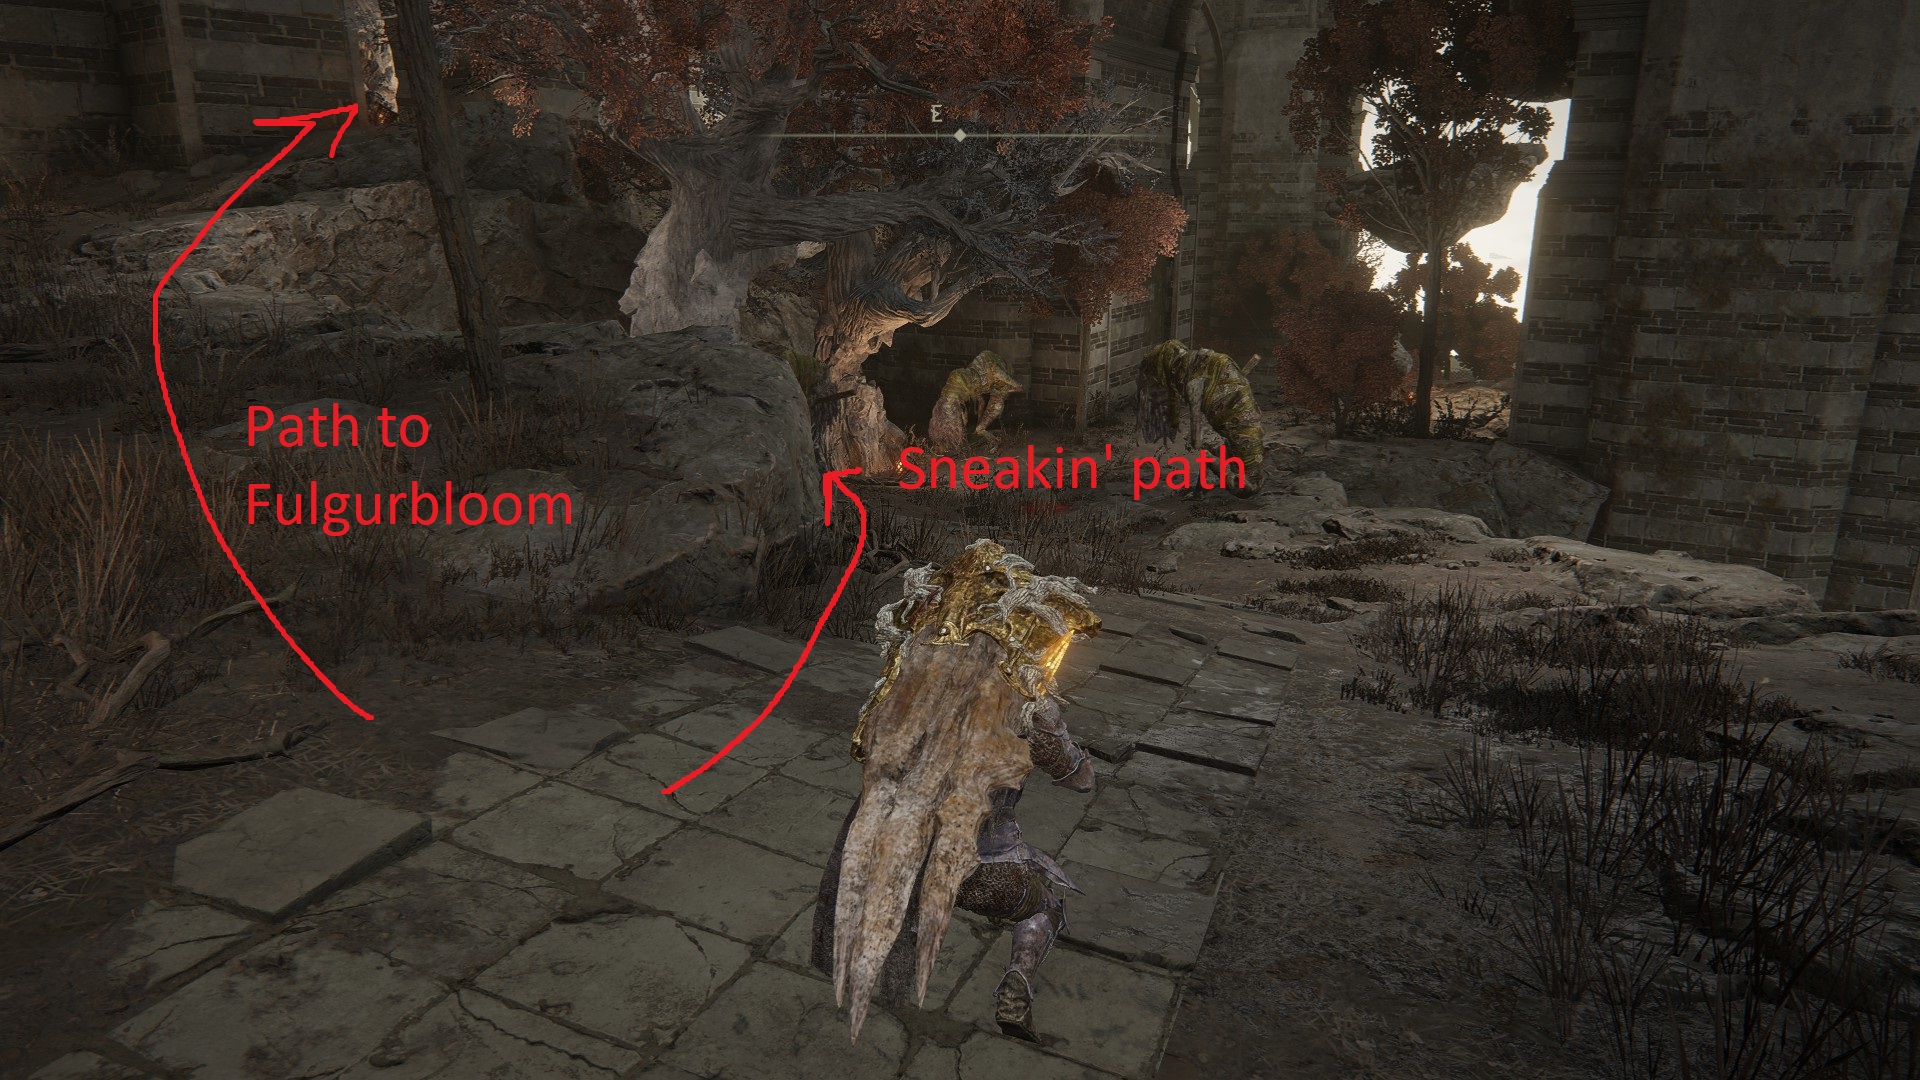
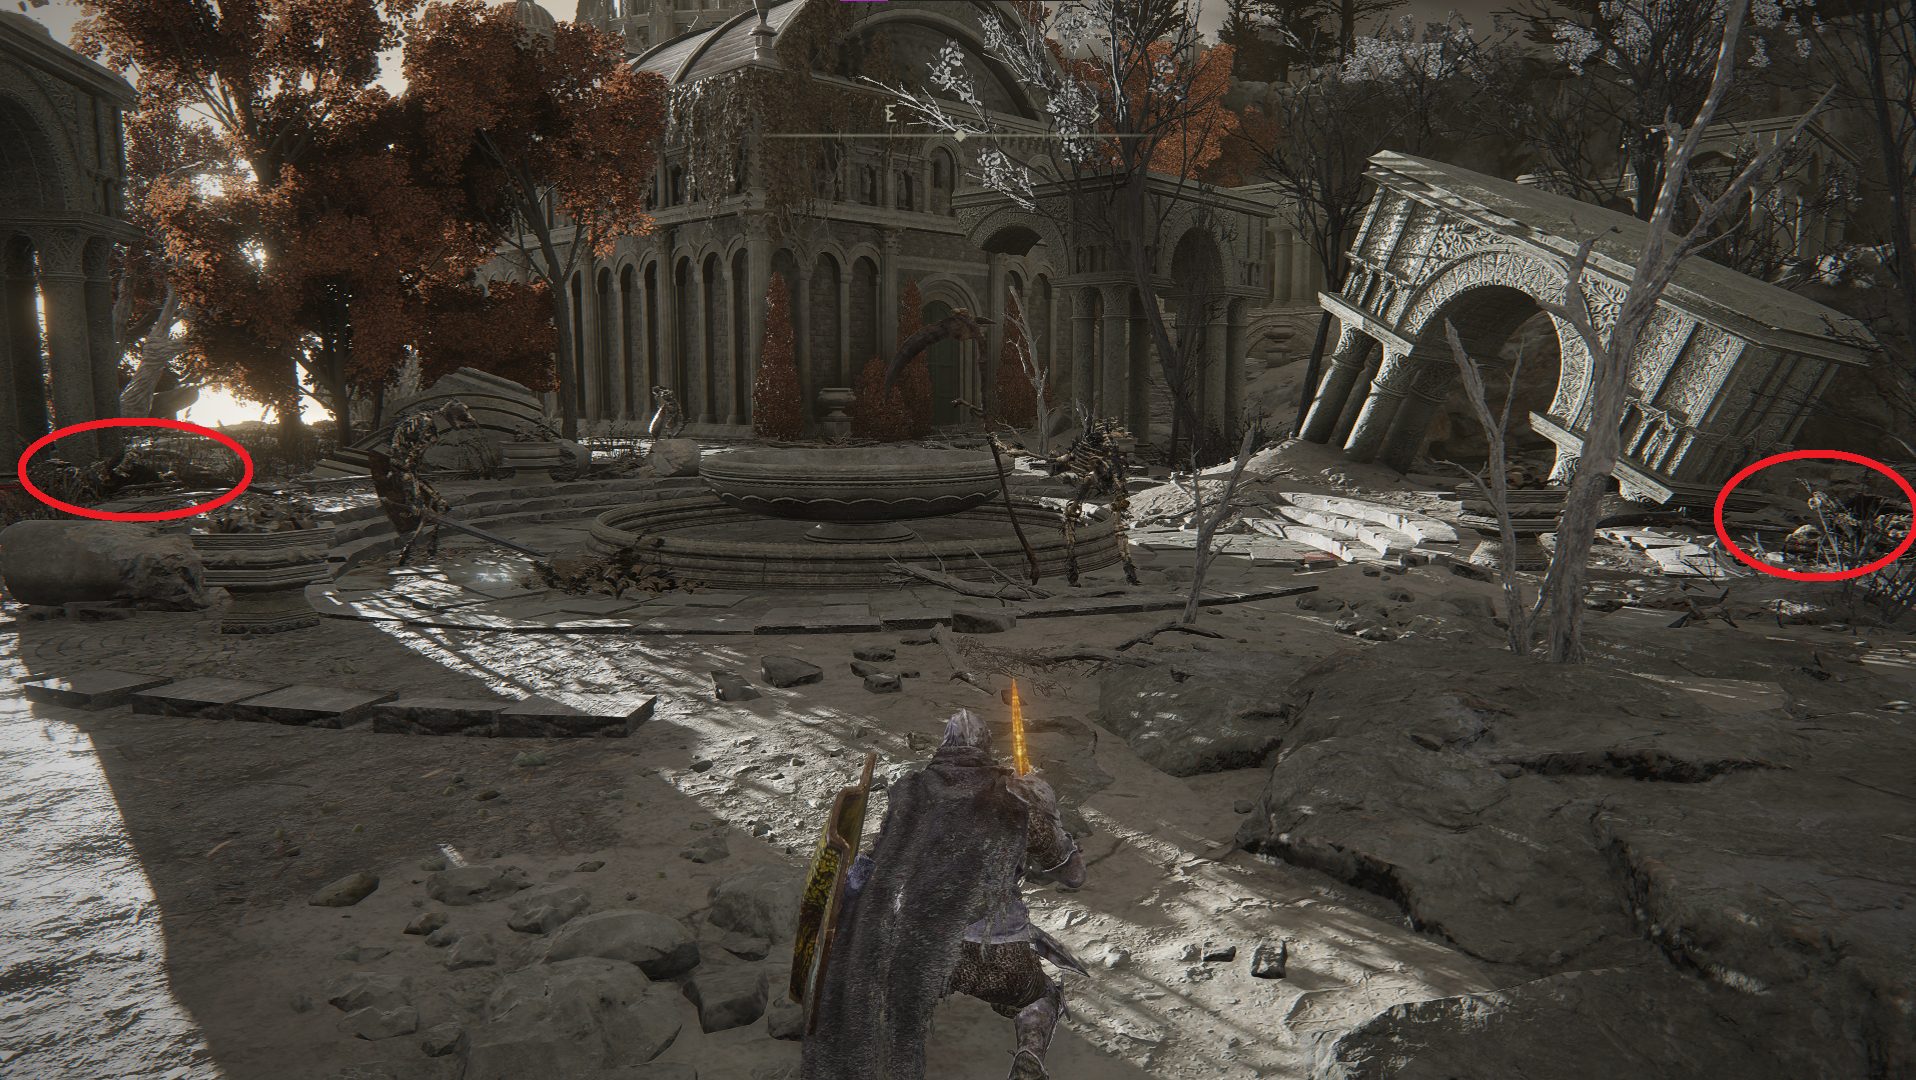
Once you reach a tree with a lantern beside it, you’ll need to watch out for the wormface to the north of the tree. Once he’s killed, you can choose to take the path that leads northeast towards the wall — if you follow it for a bit, you’ll find a corpse with x4 Fulgurbloom lying against a rock, with a wormface hiding behind the nearby tree. Then retrace your steps and look east from where the path splits. Ahead are three wormfaces, but fortunately you don’t need to fight them all at once. You can sneak behind the leftmost one and kill it, then take out the one further southeast that’s drooling on your Somber Smithing Stone [9] — the one up the path shouldn’t notice at all.
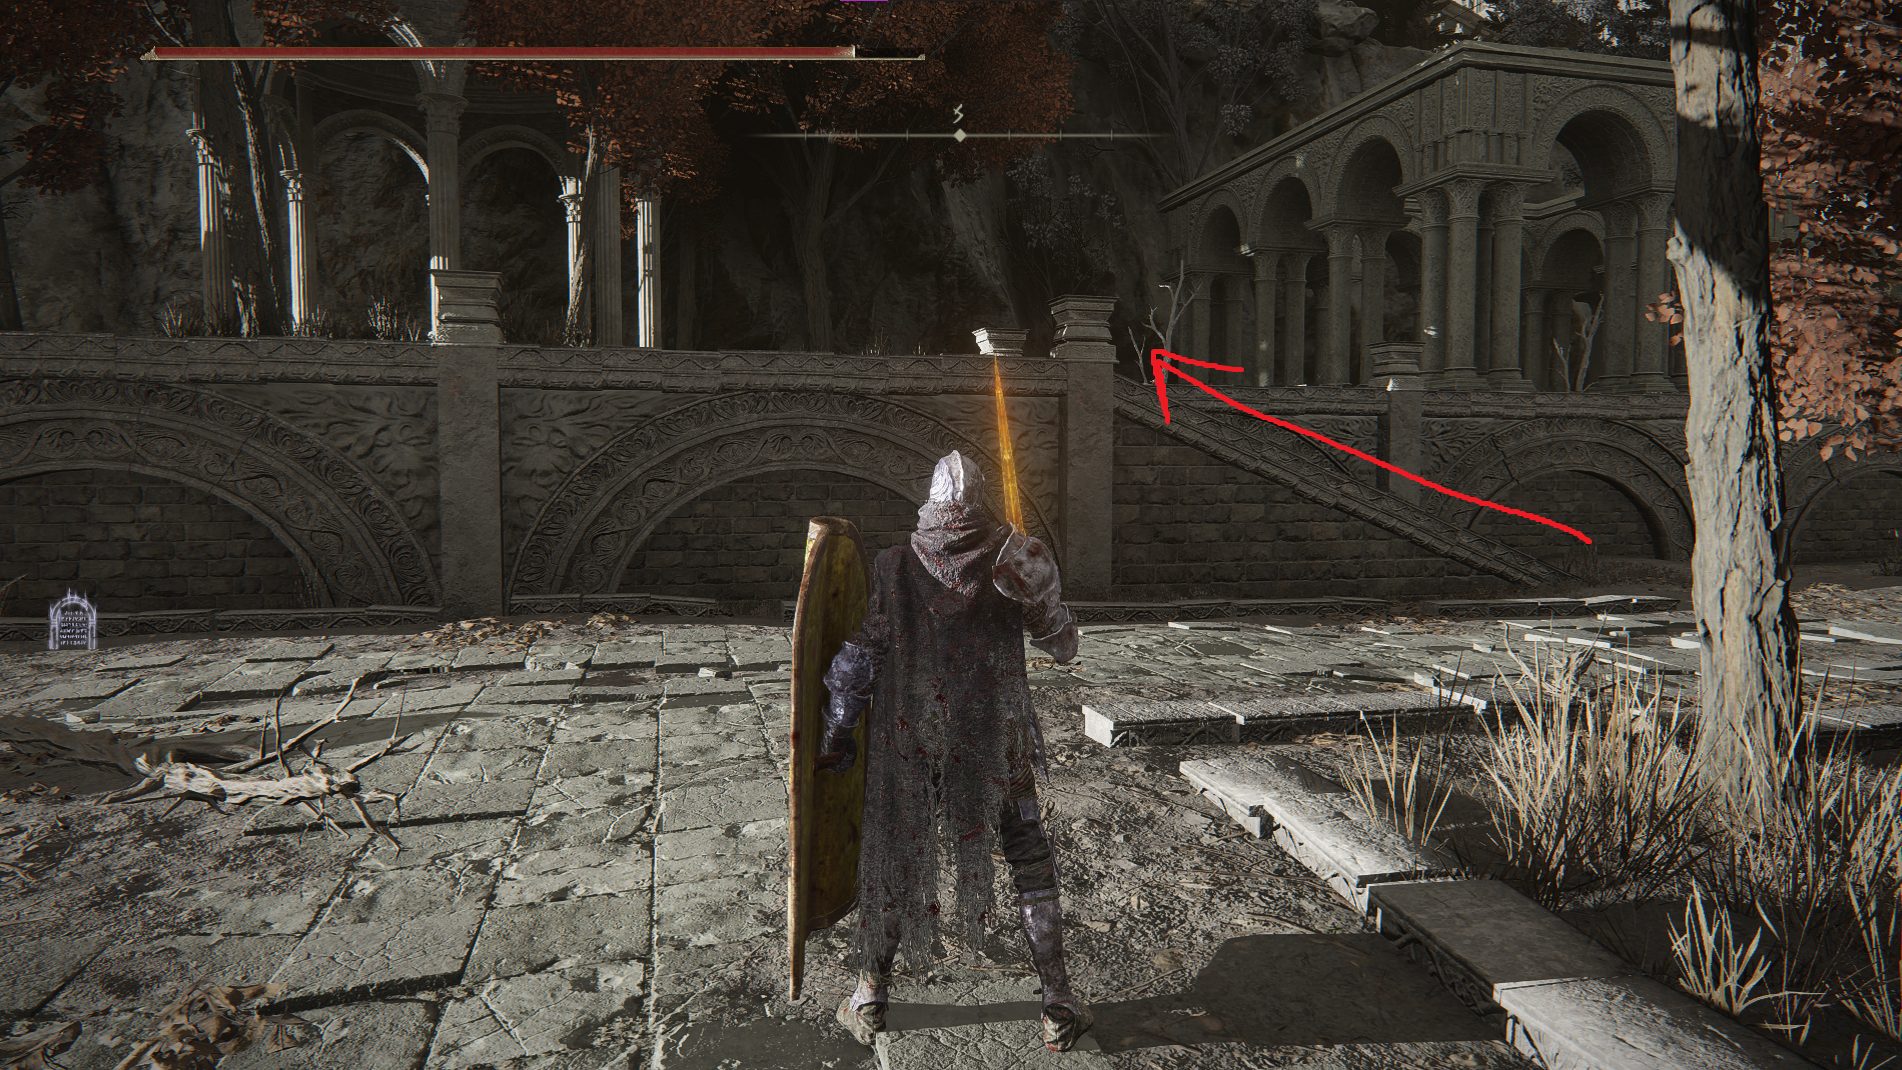
After grabbing your loot, make your way to the other side of the large stone support column by heading southeast and then turning left to continue northeast. You’ll see a wormface here — you can sneak up behind it and climb the ladder that’s on this side of the column. If you get too close and the wormface notices you, watch out for the dog that will come to support him. At the top of the ladder, sneak southwest to the end of the bridge and kill the wormface that guards the Smithing Stone [8].
Head east from the corpse to the gap in the guardrail — here, you can drop down to the east onto some floating platforms. Drop down four times to reach the area across the gap. Once on the ground, look to the south, where you’ll see three wormfaces (including a huge one) facing a gazebo. Sneak towards them to grab the Rejuvenating Boluses from the corpse in the water, staying as far away from the enemies as possible. Next, make your way to the Smithing Stone [8] on the eastern shore of the pond, then from there go to the gazebo, where you’ll find the Glovewort Picker’s Bell Bearing [3]. If the wormfaces notice you while sneaking, you can choose to run, or you can summon your strongest spirit ash to support you — or you can summon a spirit ash and then run.
From the gazebo, go northeast on the edge of the cliff until you find a place you can drop down to lower ground. Do so and continue following the cliff’s edge east until you find a wormface — this one guards x5 Gravel Stone, and once you’ve claimed it you can teleport back to the Crumbling Beast Grave Depths site of grace. From the site of grace, head northwest into the next room, then continue through the next room and through the doorway on the northwestern wall — you can hug the wall and sneak past the two beastmen here rather than fighting them if you like.
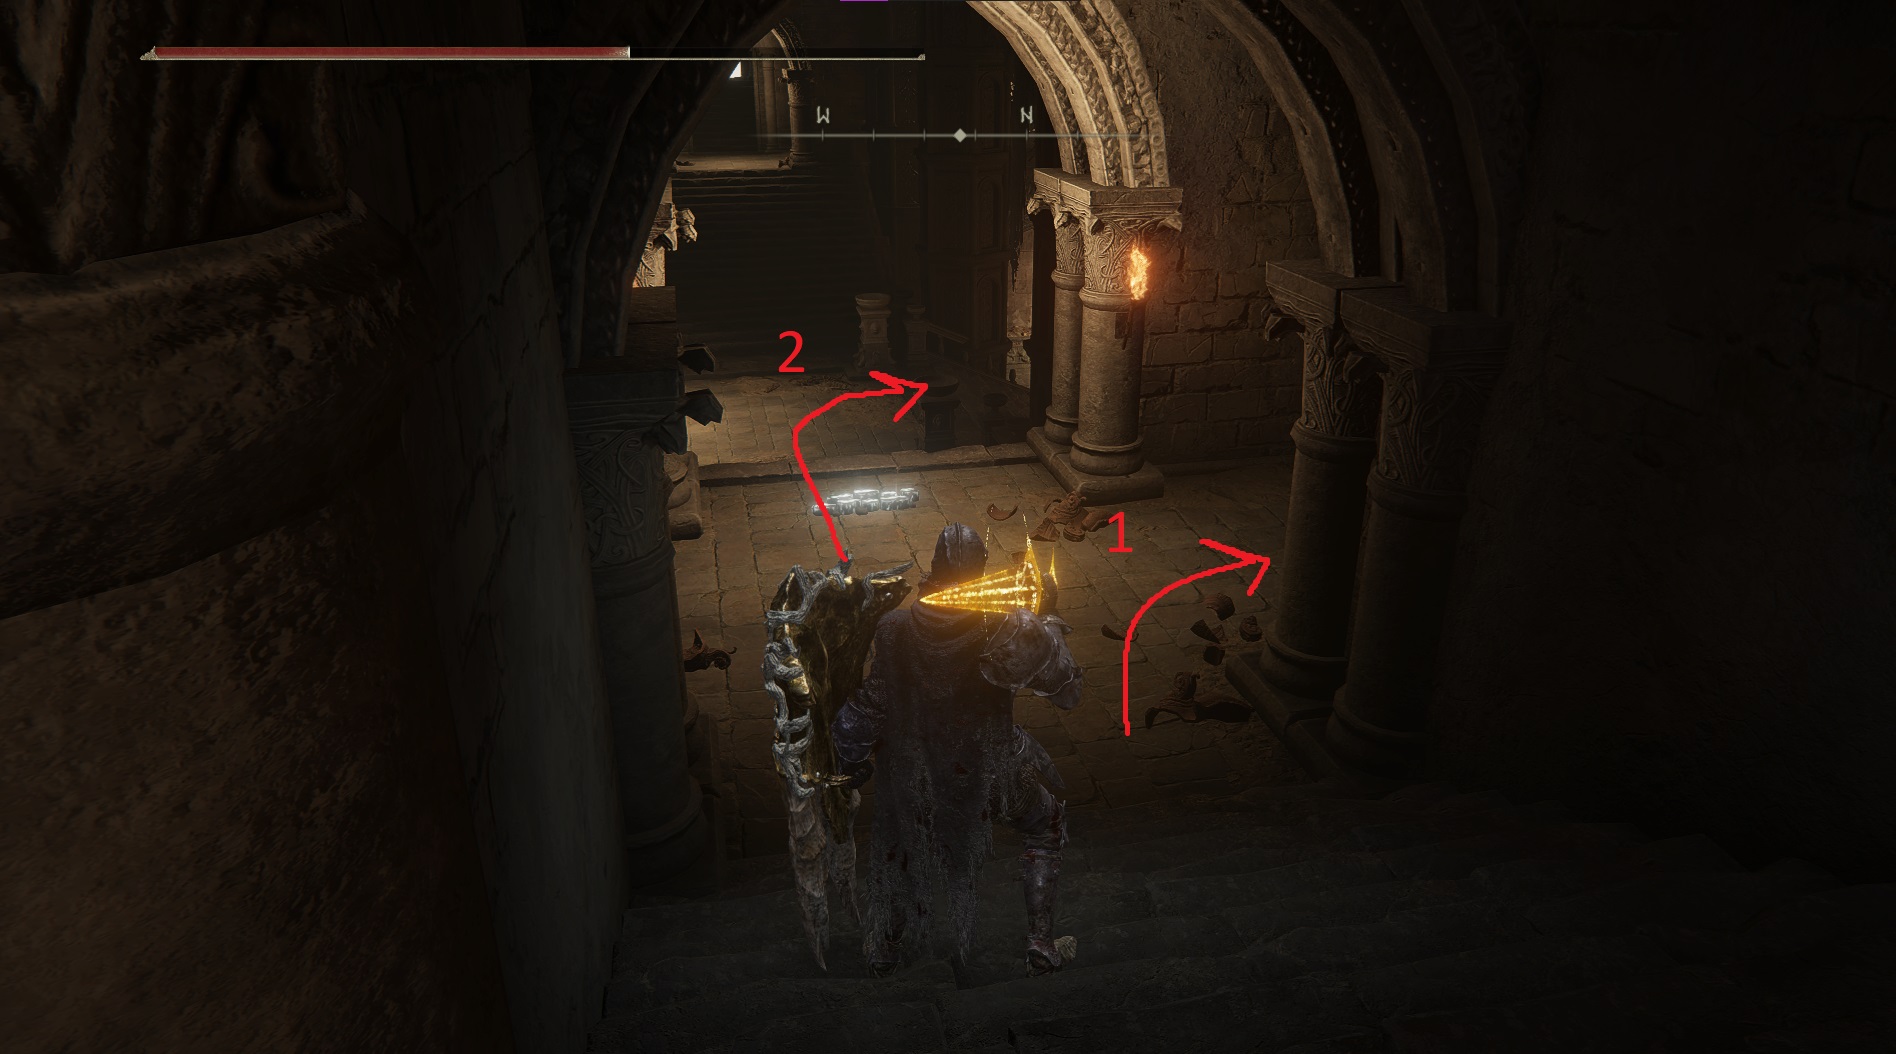
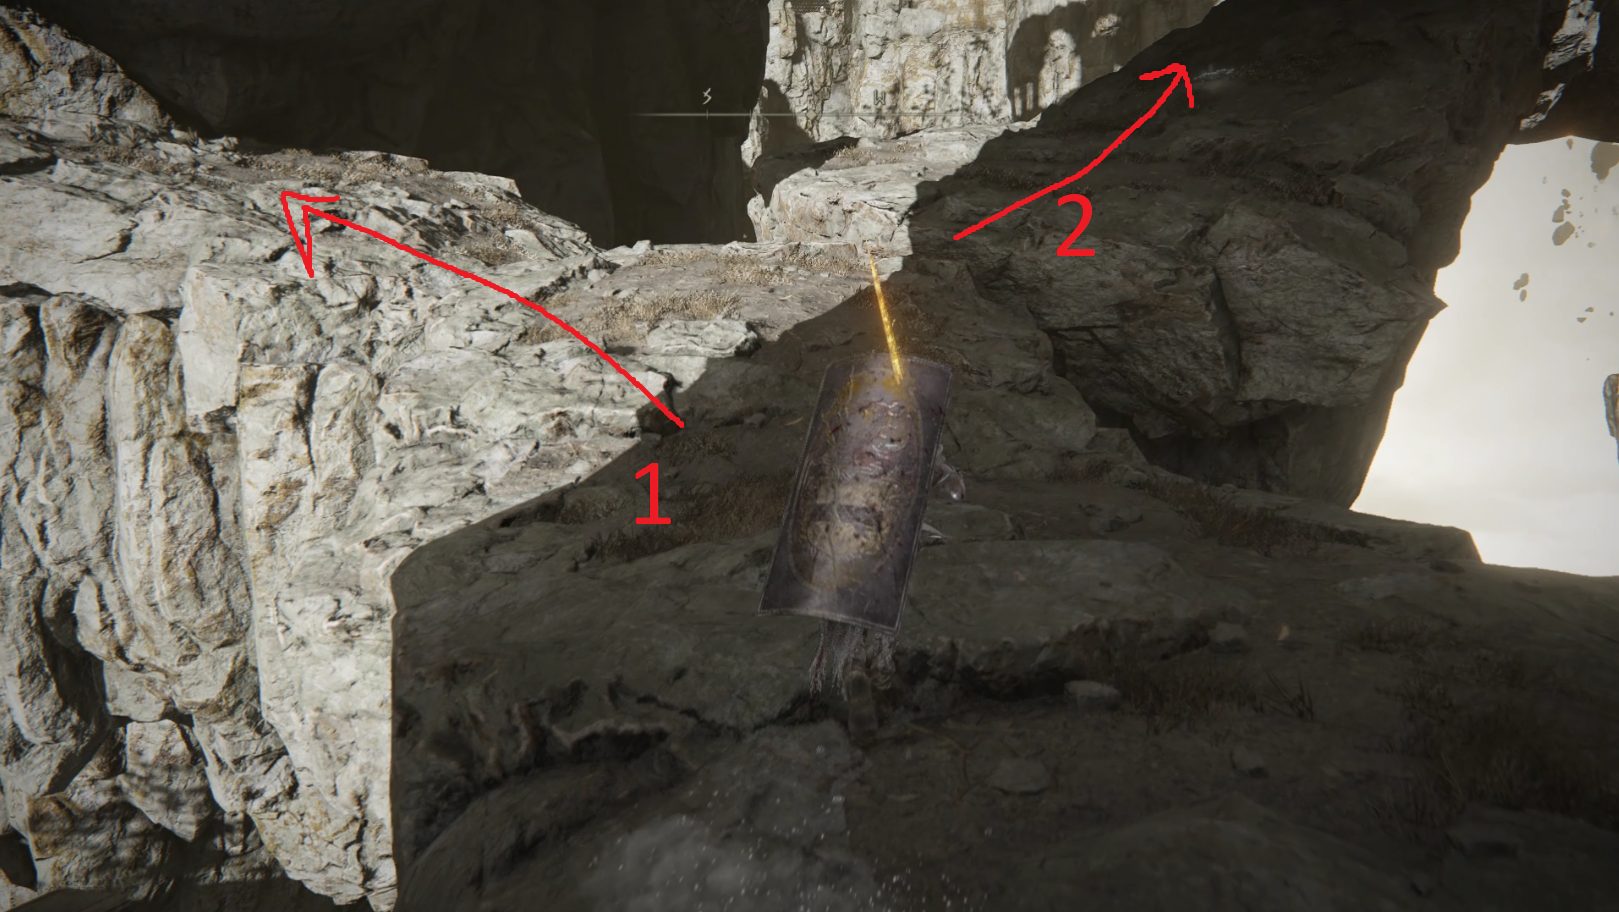
After going down the stairs, you’re going to eventually go down the next set of stairs and head through the main room, but first you should turn right (northeast) and kill the enemy in the hallway here (path 1). Otherwise, he may aggro as you clear the room below and attack you from behind. Once he’s dead, go back to the stairs and head down them, then turn right and go northeast down the central stairs (path 2).
You can choose to fight the enemies here, but you’ll come under fire from a mage on the floor above you, so you may also want to just grab the Ancient Dragon Prayerbook from the center of the room and then just continue northeast out the doorway on the other side of the room, then rest at the Tempest Facing Balcony site of grace to reset enemy aggro.
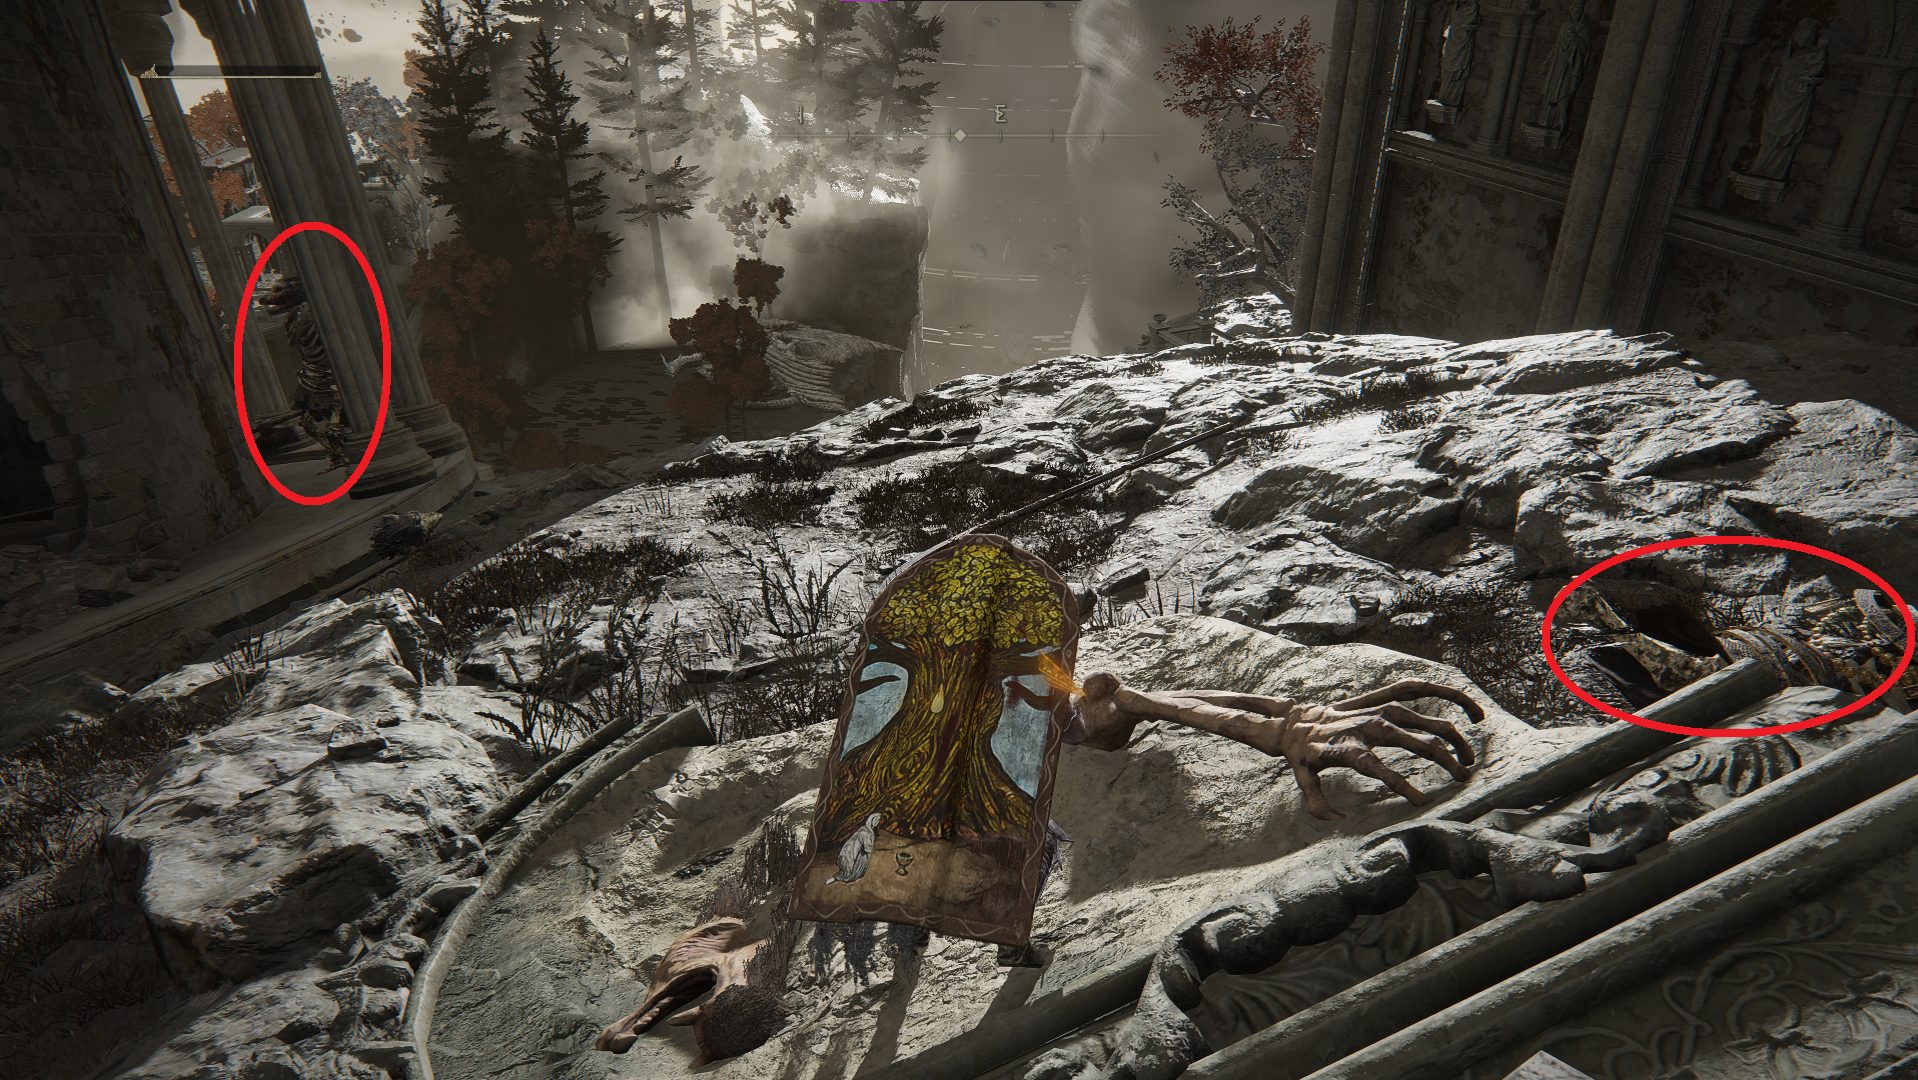
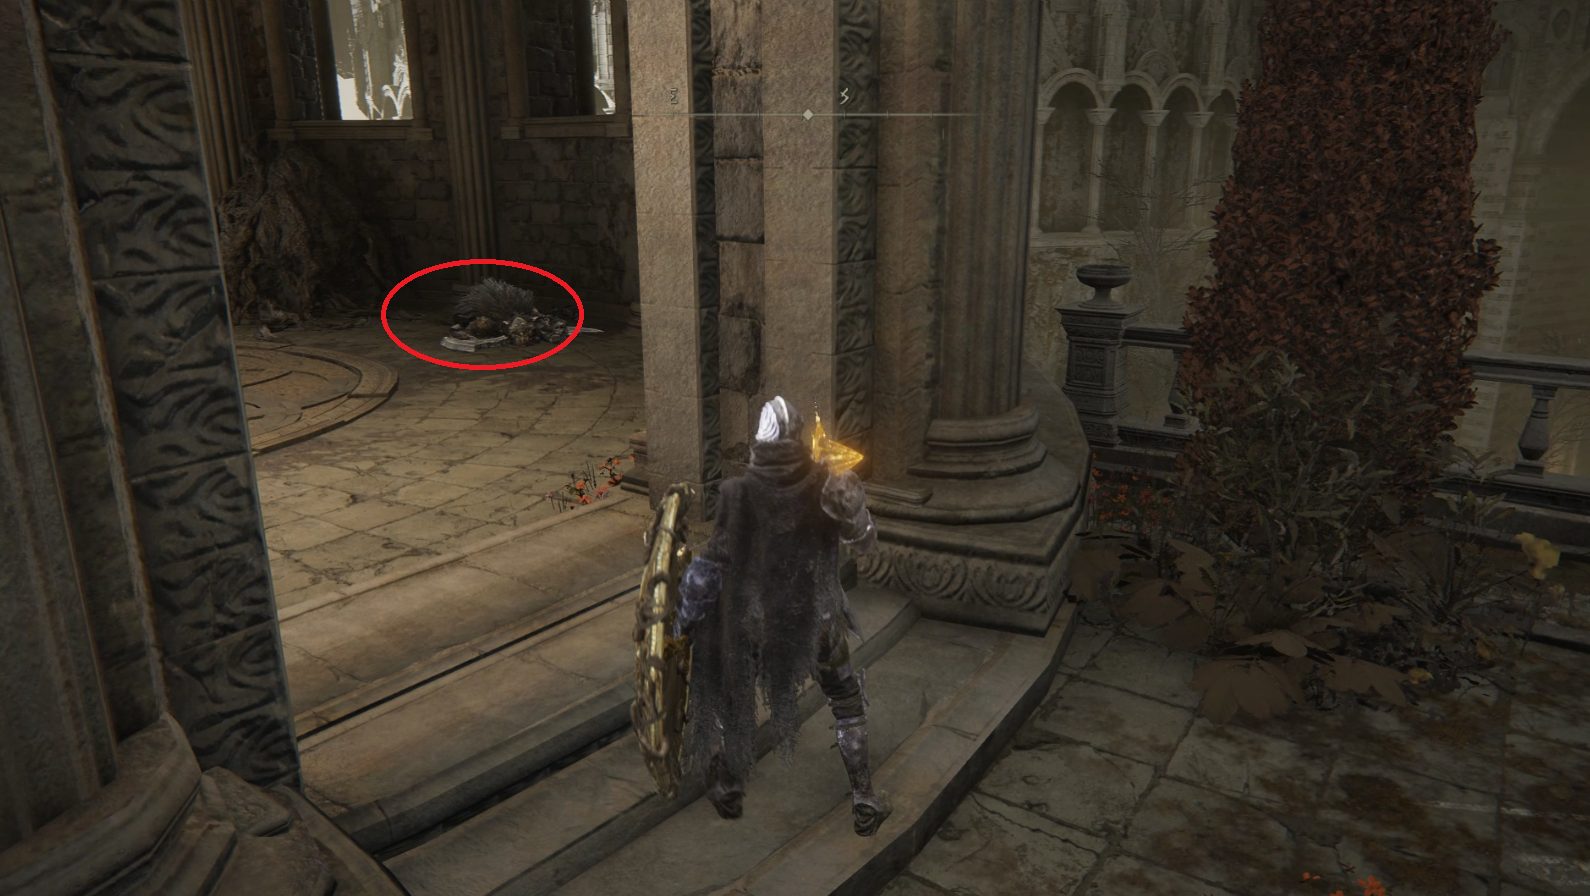
From the Tempest Facing Balcony site of grace, go north and grab the Somberstone Miner’s Bell Bearing [4] from the corpse on the edge of the cliff. Then head west past the summoning pool and drop down to the platform with a circular building (it looks like a long fall, but you won’t take damage). Next, you’ll need to jump to the platform to the north, where some skeleton beastmen await you. These are much easier to kill than their fleshy brethren, but you’ll need to make sure you don’t let them overwhelm you — use the broken chunk of rubble as cover from the ranged skeleton to the northwest as you kill the melee ones.
There is another ranged skeleton beastman further north, behind the rubble
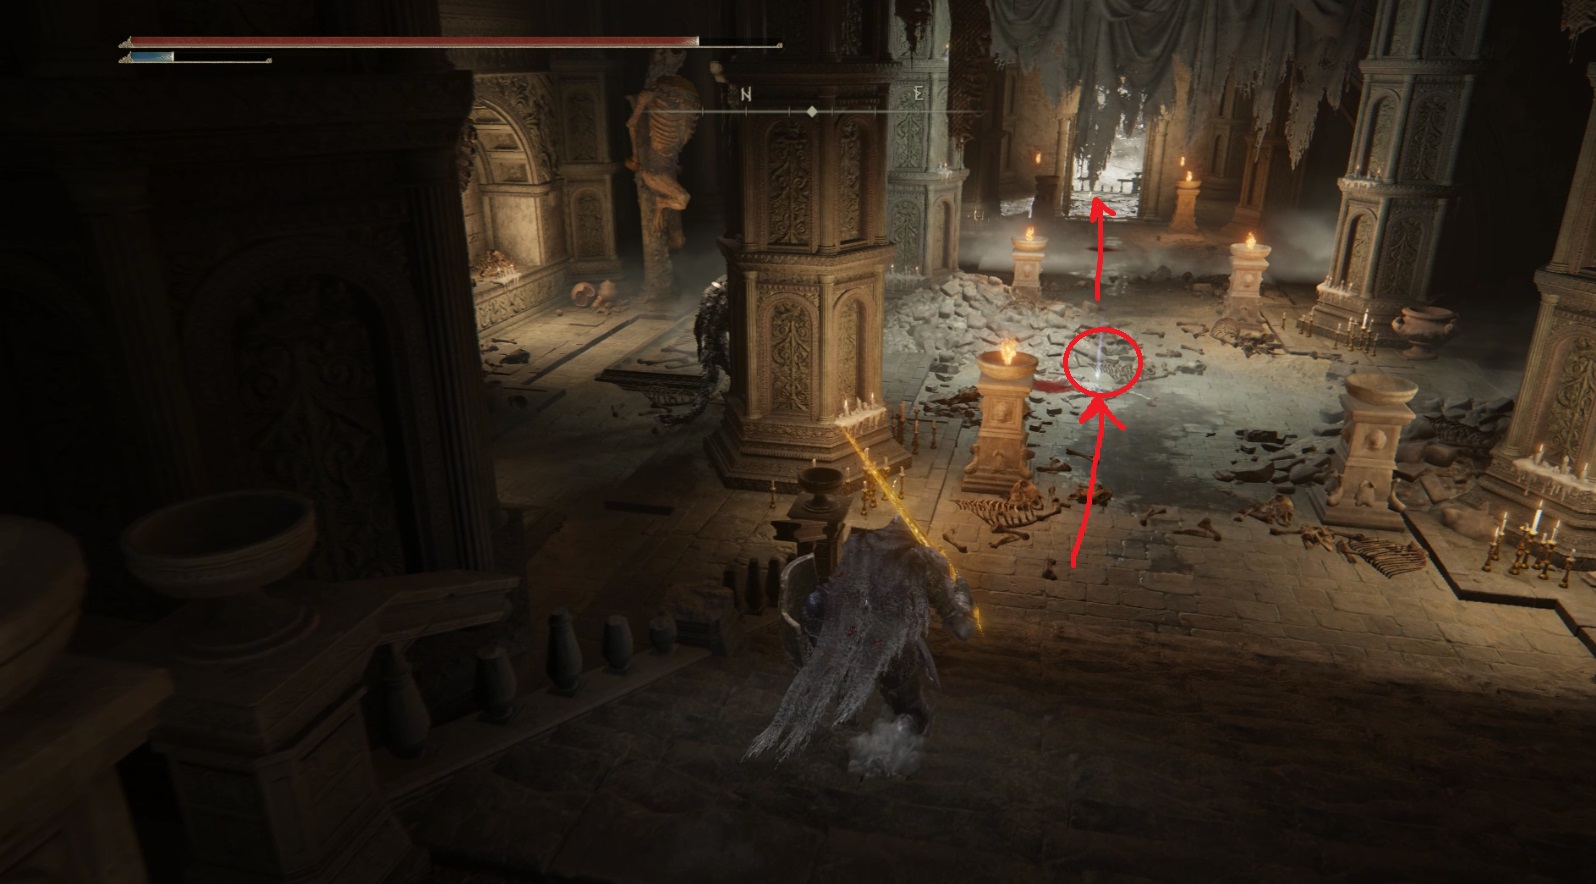
Once you’ve cleared the platform of enemies, jump to the Somber Smithing Stone [7] visible on the right of the image above (make sure you jump both ways from the near (south) side. Then head up to the columns on the west side of the platform — on the other side of one of the columns is a Golden Rune [9]. Continue north to the far side of the platform, where you’ll find a stone column that leads to a small floating fragment — at its tip is a corpse with x14 Golden Arrow. Grab them and continue following the columns north until they end and you can drop down onto the large platform below.
You’ll come under fire from an archer when you land, so keep moving as you collect the items here. First, run north to get under the roof, then turn right (northeast) and grab the x3 Gravel Stone from the corpse on the left-hand wall near the skeleton beastman (if the arrows aren’t chunking your health too bad, you can choose to fight this guy if you aren’t comfortable running past him). To the southeast, at the base of one of the crucified beastman, is a Somber Smithing Stone [9] — another enemy will approach from your right as you head towards this item. Once you’ve got it, you can go carefully to the east (there’s a hard-to-see gap), jump onto the small platform, and continue east to the Dragon Temple site of grace.
Don’t run too fast towards the site of grace
This walkthrough continues in the next tab, Dragon Temple!
From the Dragon Temple site of grace, walk west-southwest to the edge of the platform, and look down over the edge — there’s a staircase down there that you can jump to. Get yourself lined up, then back up, get a running start, and leap the gap. Go up the stairs and take the first right — just inside the doorway on the left is a large skelebeast (that’s what we’re going to call them from now on); these larger skeleton beastmen are difficult to stagger, but their attacks often miss if you stay close to them and their breath attack is a great opportunity to get an easy backstab. Defeat the skelebeast and then grab the Golden Rune [12] from the northeastern edge of the platform.
Head south back through the doorway and then go west-southwest. There’s a skelebeast waiting to ambush you in the next hallway on the right, so avoid its ambush, kill it, and then continue southwest up the stairs. You’ll find a corpse with a Golden Rune [10] hanging off the edge of the hallway’s end — grab it and go northeast back the way you came. Take your first left (northwest) into the dark hallway you were ambushed from, making your way up the stairs and out onto the balcony. Kill the skelebeast with its back to you, then go to the southwestern side of the balcony and jump down onto the column below.
Continue to the end of the column and then jump the small gap onto the rubble and then continue onto another balcony. On the southern side of this balcony is a ladder — climb it, and then kill the skelebeast archer you find at the top. To the northeast is a room with a coffin that’s got a Great Grave Glovewort on it, and hanging above the entrance to the room are three skelebeasts. You can hit them with ranged attacks, otherwise they’ll drop onto you after you pass under them while exiting the room. Once you’ve got the items and dealt with the enemies, you can teleport back to the Dragon Temple site of grace.
From the site of grace, head straight (east-northeast) into the doorway, then turn left to head north, and hop over the rubble — just ahead you’ll find a Golden Rune [11]. Turn around, start sneaking, and head south back into the hallway. Stay behind the rubble and sneak up it by hugging the left-hand wall. Wait for the knight that’s patrolling here to turn its back, then sneak-run up to him and get a backstab off. Once he’s defeated, grab the Smithing Stone [6] from the southern edge of the hallway, then go east-northeast down the stairs.
Start sneaking when you get to the bottom of the stairs, and wait inside the small room for a knight to pass. Ambush him, then head south-southeast down the hallway. At the stairs, don’t go down them but instead turn left (east-northeast) and make your way into the next hallway. There’s another patrolling knight here that you can sneak up on, but he’s got a long patrol route and you’ll have to wait a while if you want to ambush him. Once you’ve defeated him, continue down the hallway. It will turn left and you’ll go north-northwest down some stairs, where a knight is staring off into the distance next to a Stonesword Key — you can sneak up and get the item without aggroing the knight if you want.
Next, head up the stairs that lead northwest, and once again peek around the corner into the hallway — you can wait for this knight to turn around near you and ambush him, or you can Leroy Jenkins it. Continue south-southwest until the hallway ends; here, you can hug the left-hand wall and make your way to a corpse with x2 Dragonwound Grease. Grease grabbed, teleport back to the Dragon Temple site of grace.
Back at the site of grace, you’ll need to make the jump to the stairs below and to the southwest, just like before. This time, however, instead of going up the stairs, turn around when you land and drop down again to the northeast. Upon landing, sneak northeast around the corner, where you’ll be able to stealth behind a banished knight and pick up a Rune Arc. Head back to where you landed and this time go east-southeast through the large arched doorway that’s flanked by lit torches. Inside, go up the stairs and peek around the corner — there’s another knight that patrols here that you should try and ambush.
Continue south down the hallway and you’ll see a room with a knight and a bunch of coffins. Sneak your way to the doorway southwest of the small drop, and wait at the spot indicated below for a patrolling knight to go through the doorway. Once he does, backstab him or otherwise kill him quickly — if you can keep him near the doorway, the other knight won’t aggro.
Hide at the circled location to ambush the patrolling knight
Once the first knight is dead, you can sneak up on and dispatch the second one, and then grab the Azula Beastman Ashes from the coffin he was facing. Then head west, through the doorway the patrolling knight came through, and grab the Somber Smithing Stone [9] from the northwest side of the platform. Go back inside and make your way east-northeast into the hallway, making sure you don’t fall to your death when dropping down into the hall. Continue up the stairs and you’ll find the Dragon Temple Transept site of grace.
From the site of grace, head up the stairs to the north. Just to the right of the doorway, you can summon the NPC Recusant Bernahl if you’d like help with the boss fight — when you’re ready, continue into the room ahead to fight the Godskin Duo.
Once you’ve defeated the Godskin Duo, activate the Dragon Temple Altar site of grace and rest/spend your runes. Then, from the site of grace, sneak outside via the large doorway to the northwest. A knight on your left can be killed or ignored — straight ahead up the stairs is a corpse with a Golden Rune [12]. Grab it and then head back to the Dragon Temple Altar site of grace.
From the site of grace, go north-northwest through the doorway and down the stairs, then turn right (east) and head through the doorway. Go down the stairs here and then head west, where there’s a patrolling beastman and his lazy friend. The patrolling enemy will throw projectiles at you while his friend uses his lightning-enhanced melee weapon on you, so try to take out the patroller first. Then continue west towards the lit brazier — to the right of the brazier you’ll find stairs that lead west. Go down them and then turn right and continue north-northwest to head outside.
Here, you’ll see a dog straight ahead feasting on something. Sneak around it to the right and take it out, then pick up the Golden Rune [11] from the corpse hanging off the edge to the northwest.
Next, jump west through the closest window. You’ll land near a couple of dogs who probably won’t notice you, however the projectile-slinging beastman to the southwest probably did notice you. Kill the dogs quickly and then deal with the beastman, and then you can grab the x5 Old Fang from the corpse south of where the dogs were. Head to the northern end of the platform and drop down to the northwest onto the broken piece of platform below, and from there continue north onto the next structure.
Go north-northeast into the hallway and you’ll soon run into a tough beastman warrior. Defeat him and then continue north-northeast to the edge of the structure. Here, you’ll find a Smithing Stone [7] hidden behind a broken pillar. Grab it and then go west — at the corner, turn left to continue south. The path will narrow, and you’ll soon see a sleeping beastman by a brazier — there’s a beastman just on the other side of the wall here lying in wait.
Run forward and then roll backwards to avoid his attack, then take him out. Next, kill the sleeping beastman before he gets up, then grab the nearby x5 Lightning Grease. Now head north-northeast back the way you came, and when you reach the edge of the structure, turn around to head back towards the hallway, and then go up the stairs.
Start sneaking once the stairs start winding — at the top, a beastman will start patrolling in front of you, and you’ll be able to ambush him if you’re stealthy. Then go south, and you’ll be able to follow a path of rubble southeast by jumping to the pillar, then jumping up onto the higher ground. To the right will be a dog, and a beastman will be ahead of you. Rush the dog first and kill it, then deal with the beastman. Once both are dead, you can claim the Ancient Dragon Smithing Stone from the corpse on the eastern side of the platform.
Go northwest back the way you came (the precarious pillar path) and then take your first left to head west from the top of the stairs. On your left in the next area is a stonesword imp statue. Pay two Stonesword Keys to remove the fog wall, then enter and ride the elevator up. At the top, activate the Dragon Temple Lift site of grace. Rest if you need to, then head south out the doorway.
Continue southeast, and you’ll find a handful of skelebeasts hanging out by a basin with a legendary item in it. There are two large skelebeasts lying down on either side of the basin — you can sneak up to them and use jumping attacks to kill them before they can get up. Once you’ve cleared the sleepers, take out the other two enemeis and grab the Lord’s Rune from the basin. A patrolling enemy to the east may engage you while you do this, so keep an eye out.
Take out both sleeping warriors before attacking the other foes
Head east from the basin, kill the patrolling foe if you haven’t already, and continue down the stairs. At the bottom of the stairs, you’ll see another enemy facing a corpse with x2 Nascent Butterfly. Kill/loot, then go back up the stairs and take a left to head south-southeast. You’ll see another set of stairs ahead, but don’t go up them yet. There are two groups of skelebeasts that patrol here: a group of four regular-sized enemies, and then a group with one large one and one regular-sized one. You want to make sure you don’t engage both groups at once, so approach the stairs cautiously and make sure the groups are separated before you engage them. At the top of the stairs, you can summon spirit ashes, and it’s a good idea to do so before engaging either group.
Once you’ve killed both patrols, go east-northeast from the top of the stairs, and when you reach the corner of the building, you’ll see a tree ahead with a Golden Rune [12] at its base. Careful — when you get near the corpse, a few of the skelebeasts in the tree will drop down and attack you. From the tree, go northwest and you’ll find a corpse with a Smithing Stone [7]. Grab it and head back to the south, then go up the nearby stairs to get onto the high ground.
Note that there are skelebeasts in the trees here, but it seems very inconsistent when they decide to drop down. From the top of the stairs, head east-southeast to the edge of the cliff, where you’ll find a skelebeast with his back to you. Kill it and snag the Smithing Stone [8] from the corpse on the edge of the cliff. Then go west, and you’ll see an Illusory Tree with a Golden Seed — just before the tree is a corpse with a Rune Arc. Check out the skelebeast necromancer before killing it; it seems to be having a conversation with the tree! You can sneak behind him — if you choose to kill him, a couple more skelebeasts will come out of the ground and attack you.
From the tree, head southwest and drop down onto the low ground, and continue until you see a golden loot beetle. It drops the Golden Lightning Fortification incantation, but you’ll need to kill it quick, since he runs straight towards a dragon. This dragon doesn’t have any magic, so the only real danger is getting knocked off of the cliff. In the area the dragon guards is a corpse with a Smithing Stone [8], and defeating the dragon earns you 21,600 — it also drops x3 Gravel Stone.
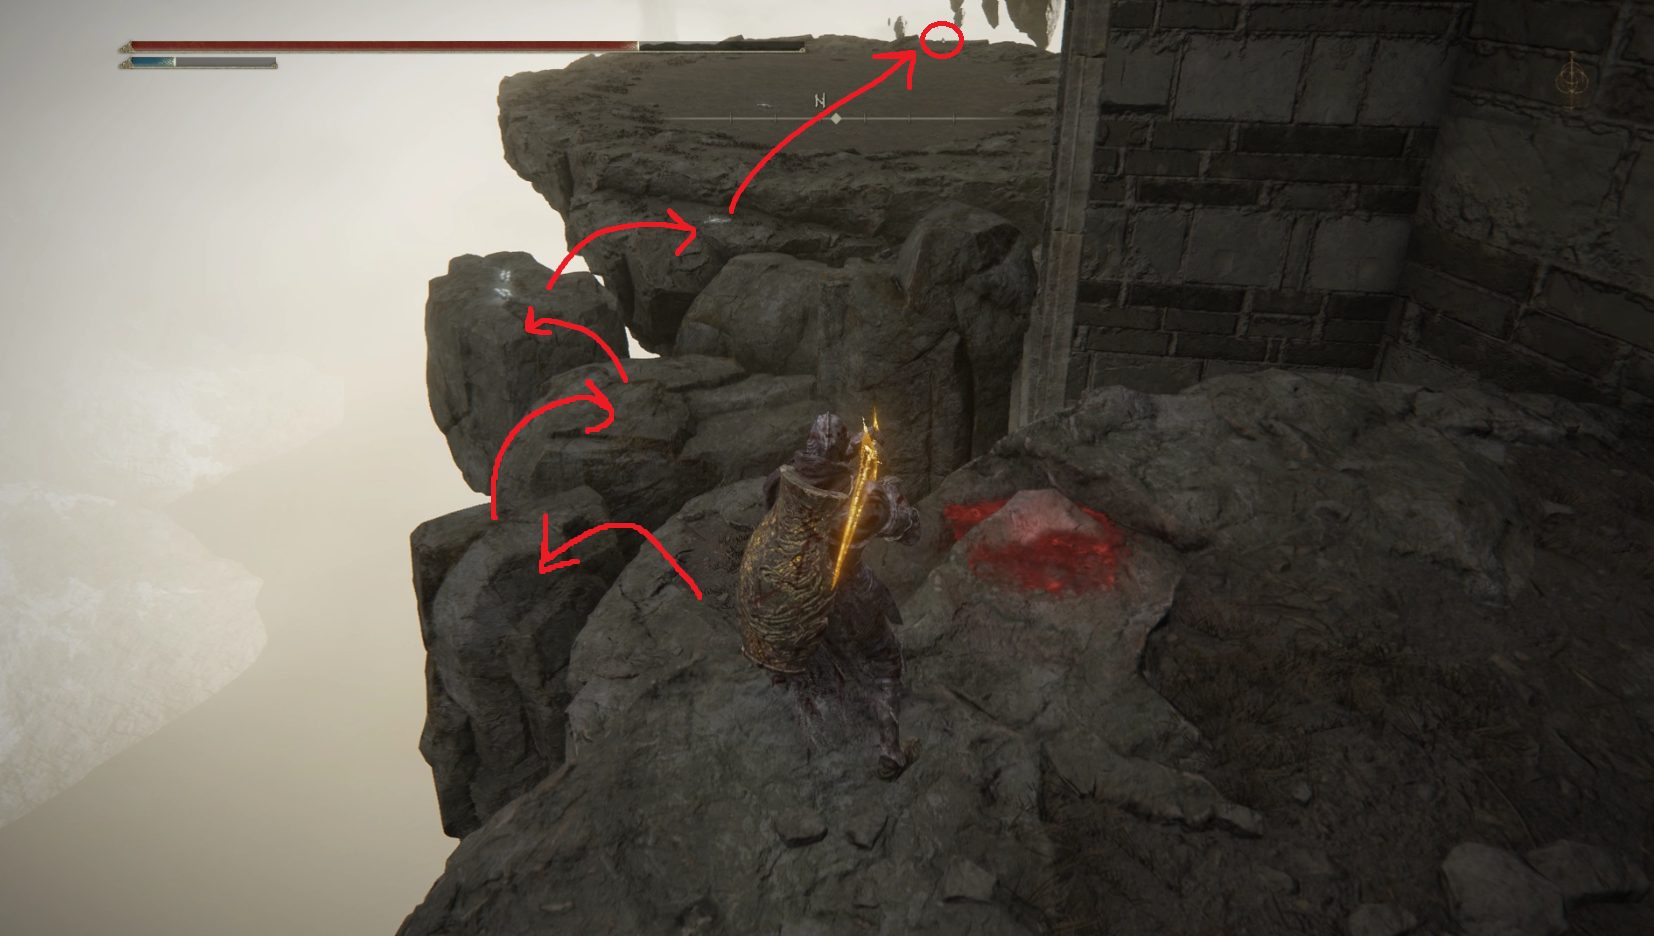
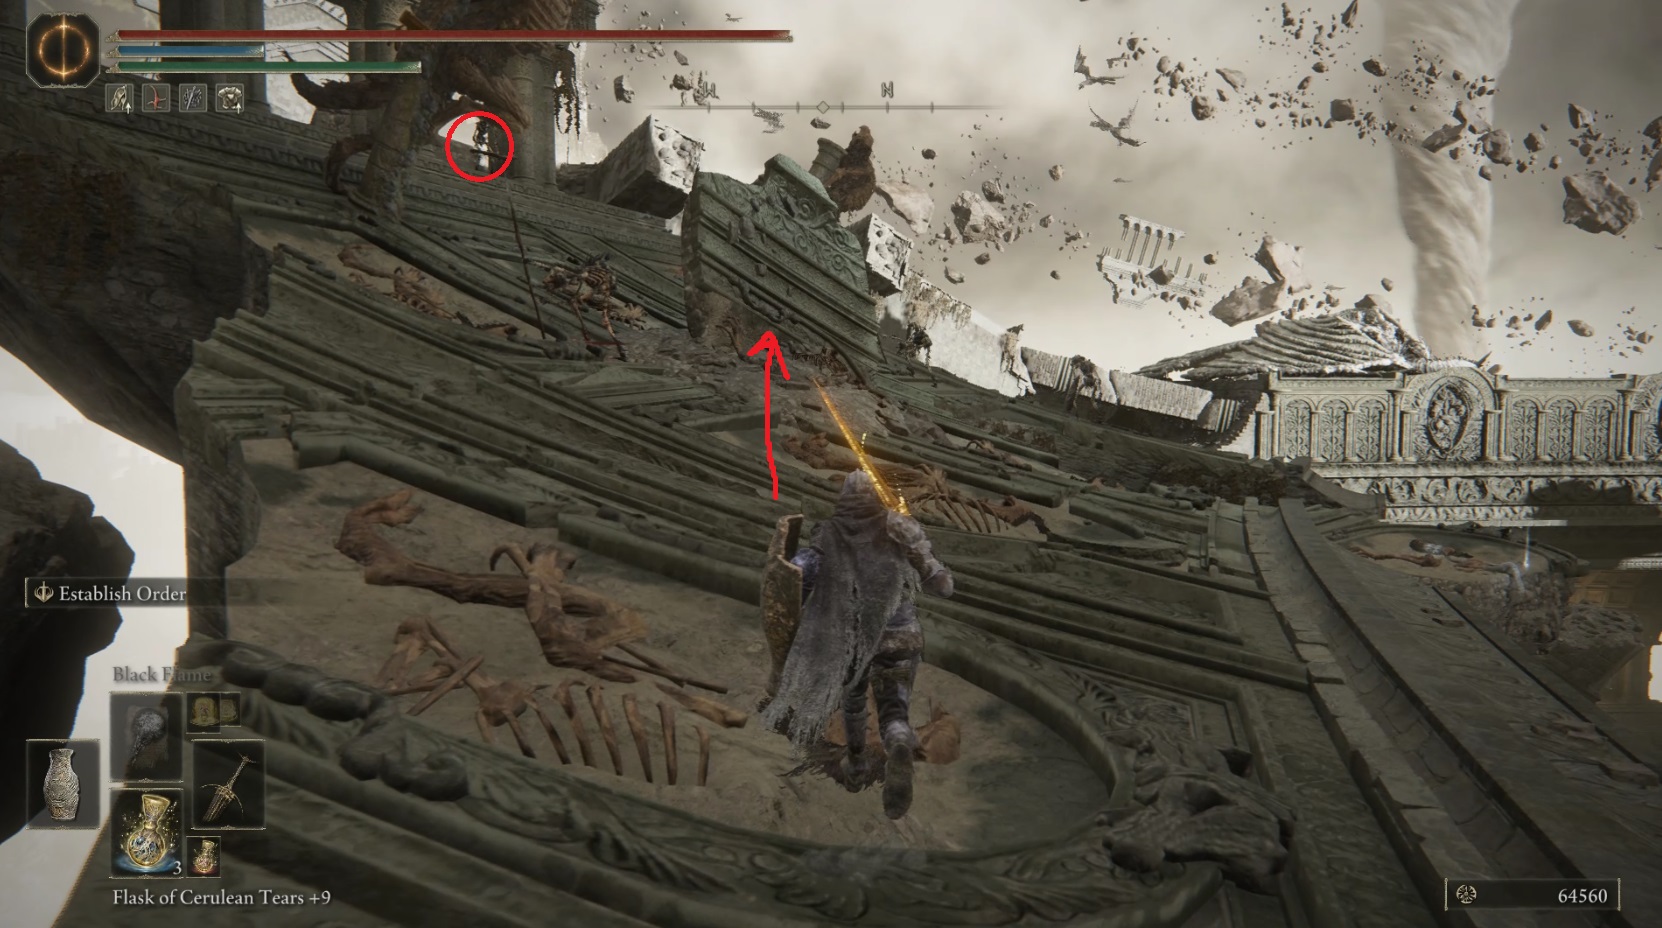
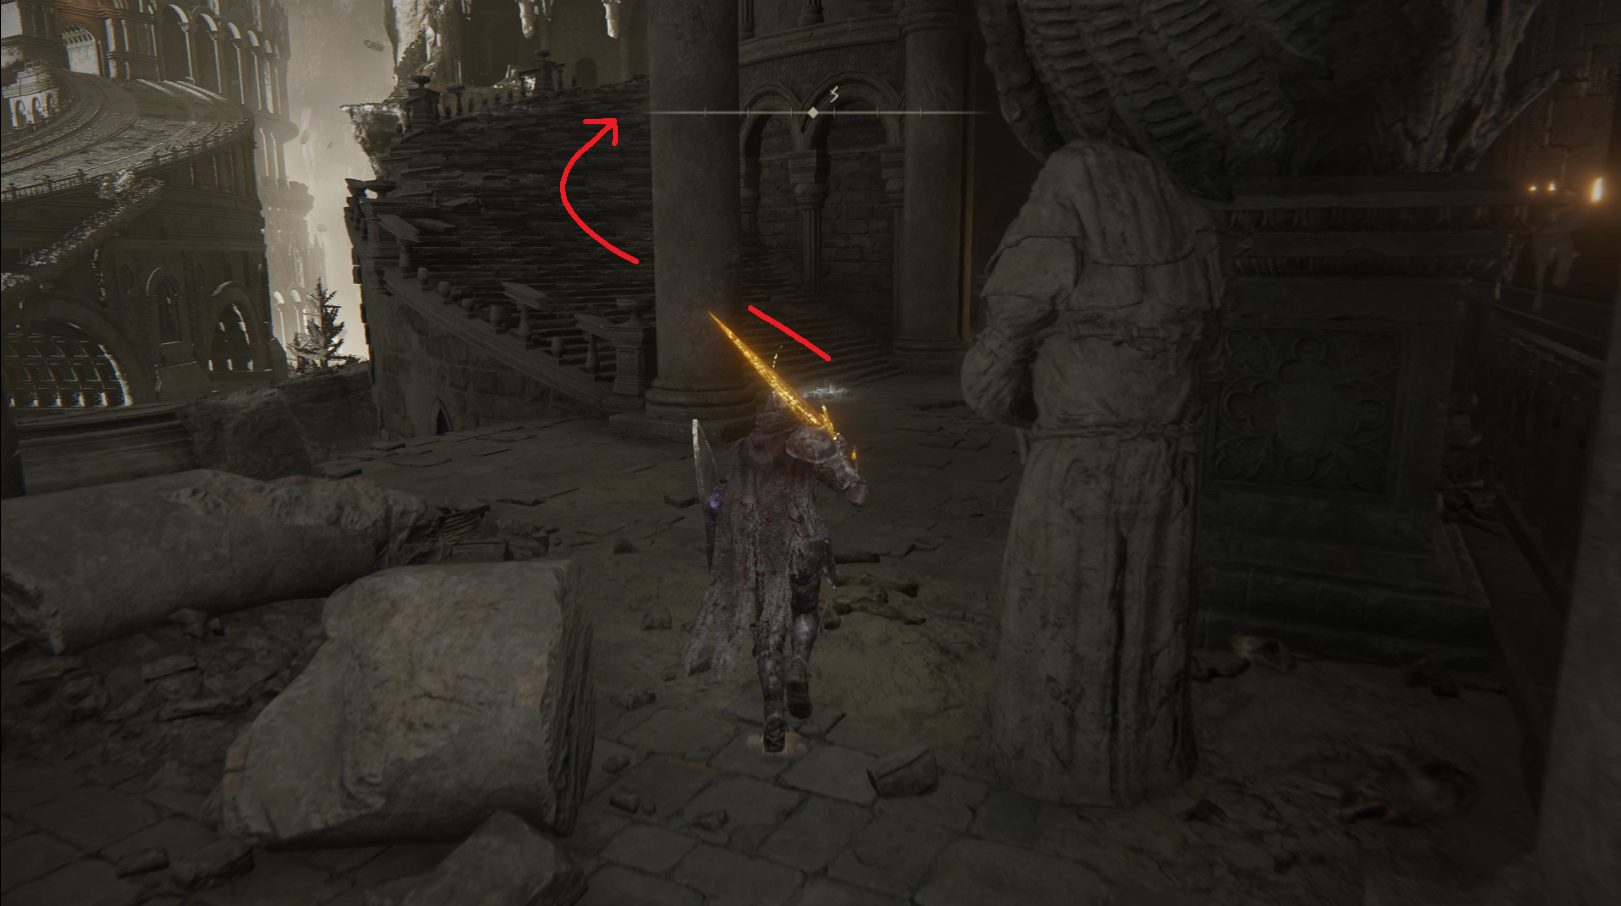
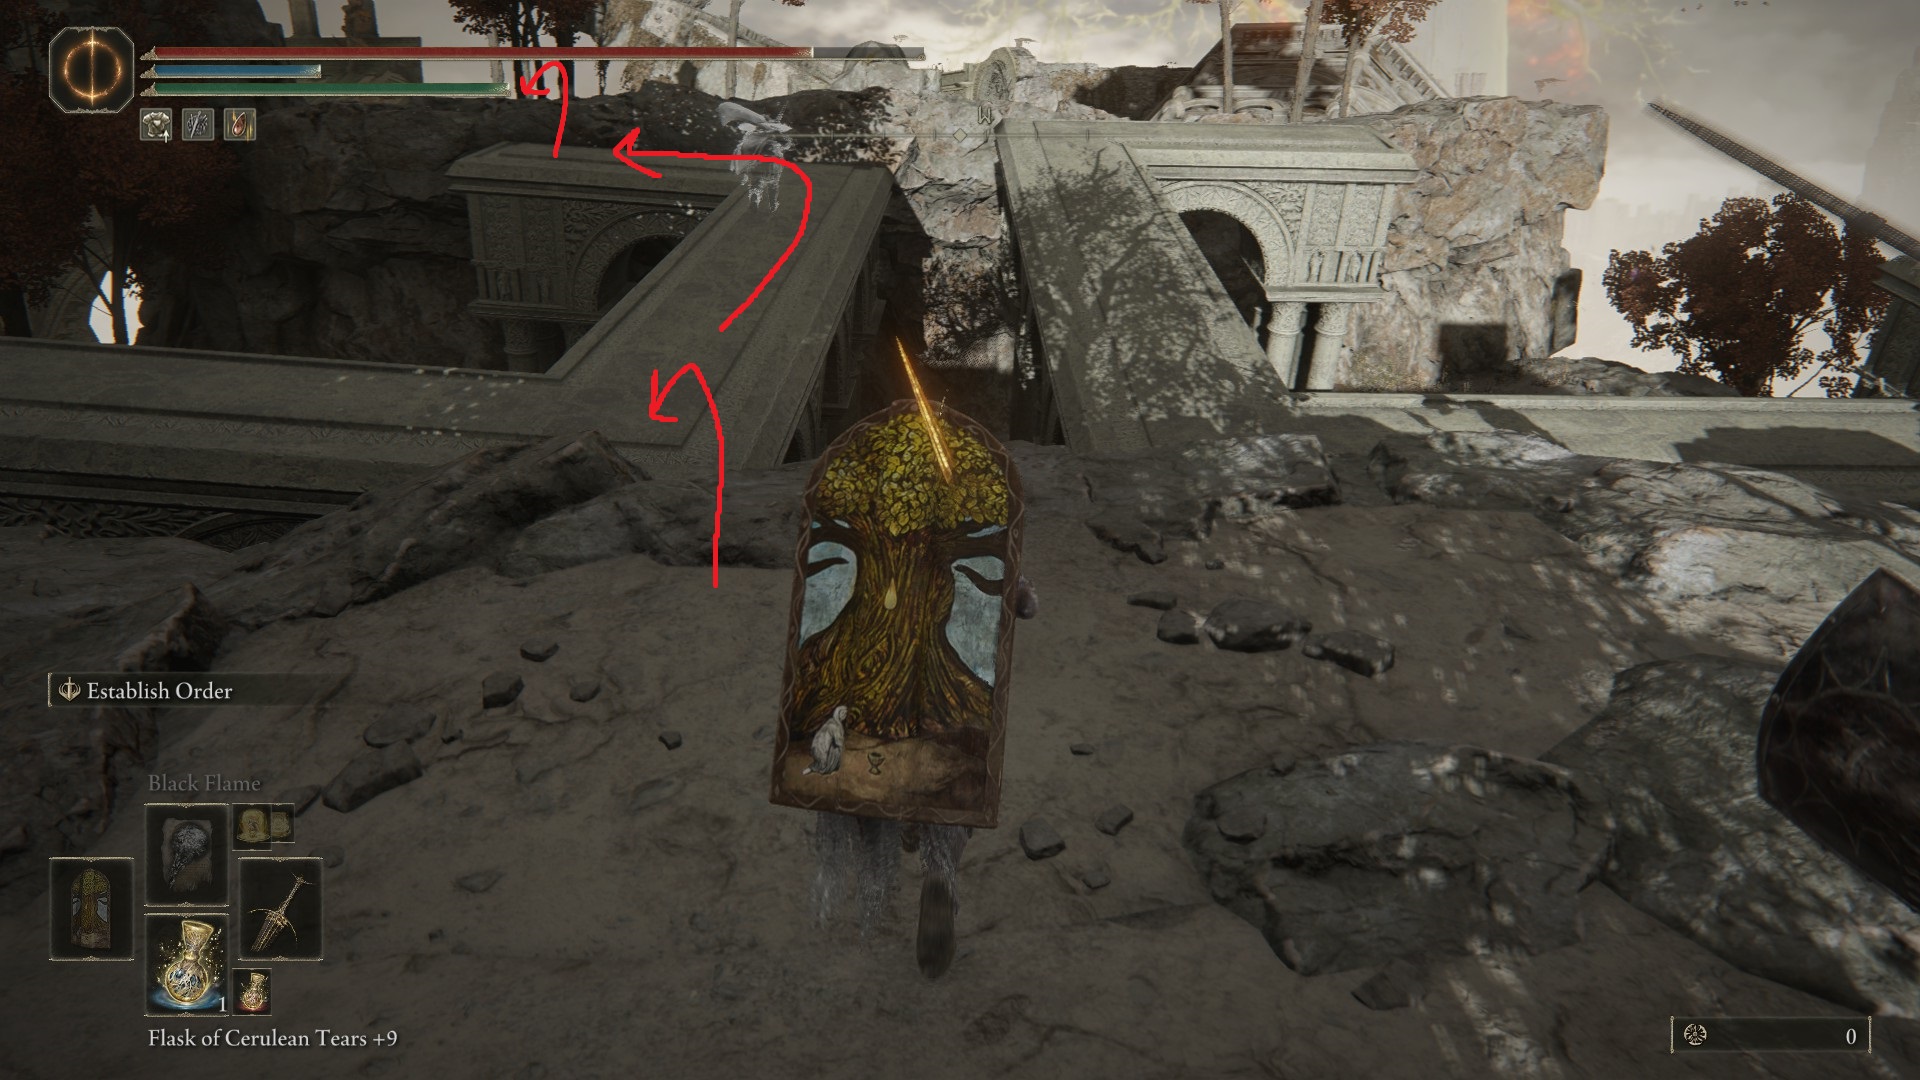
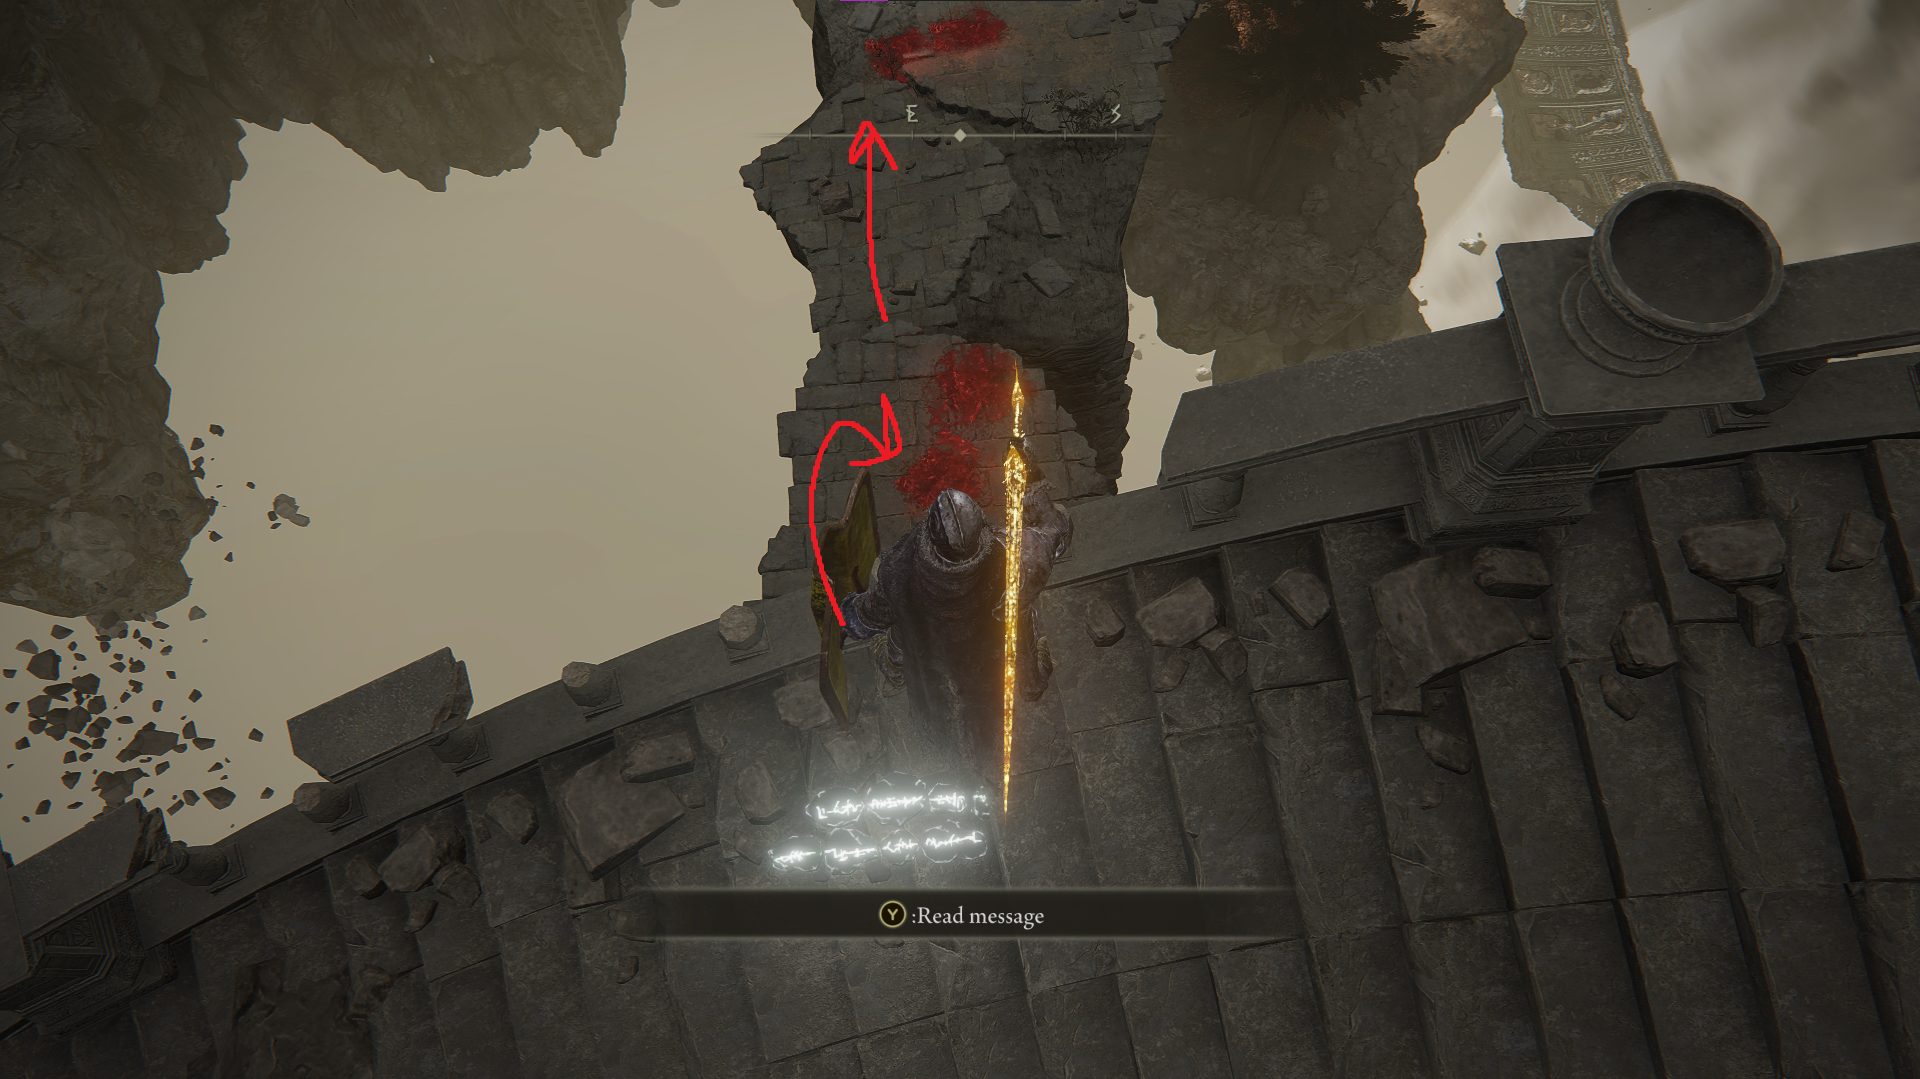
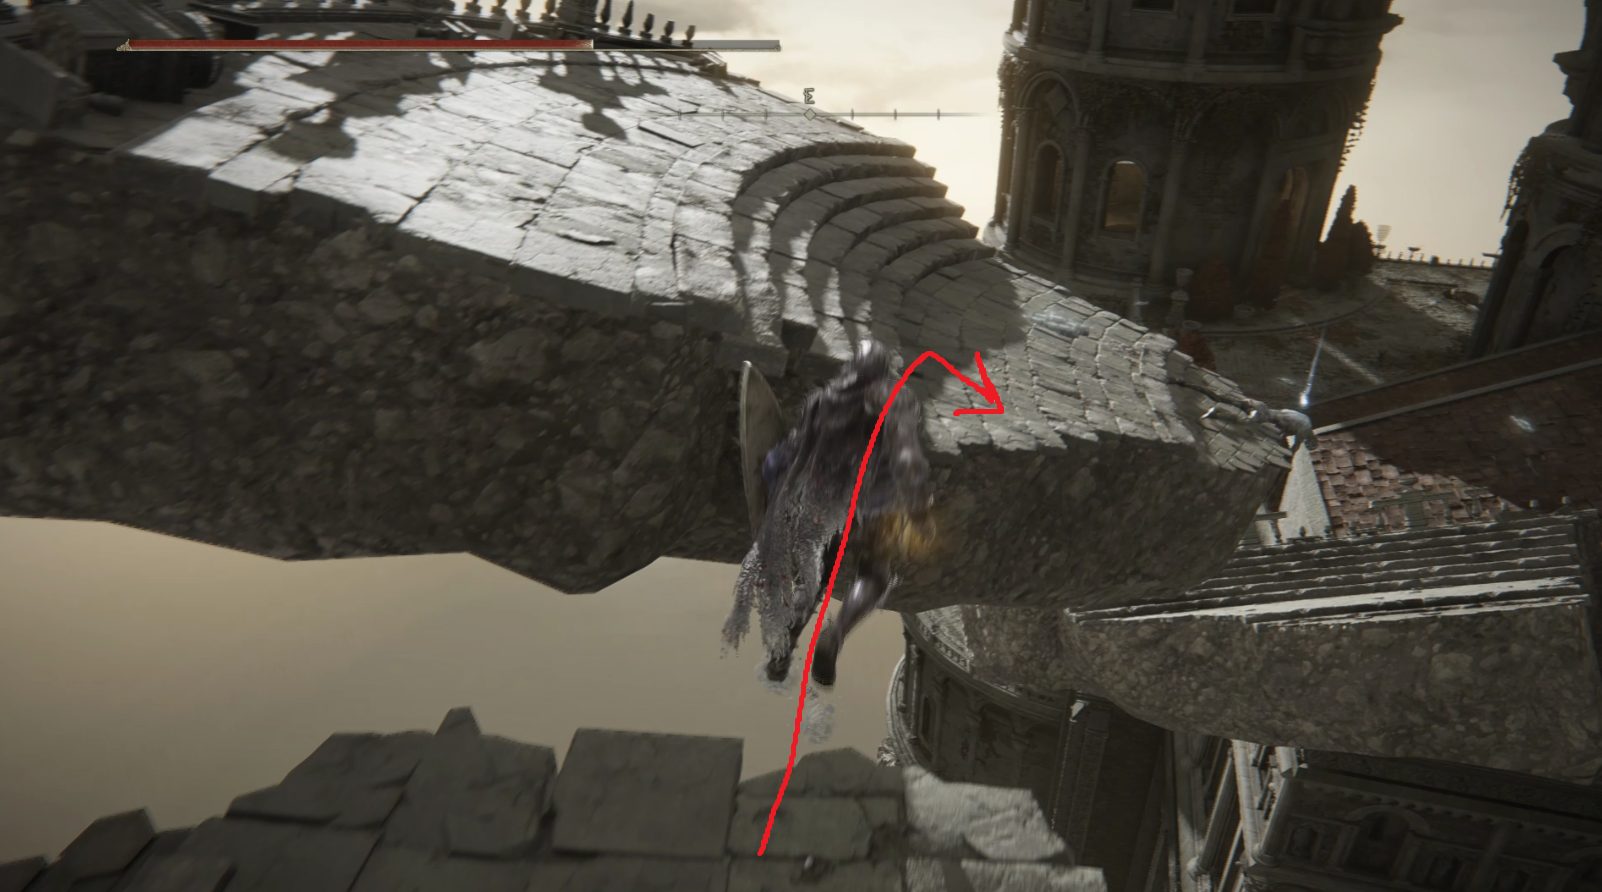
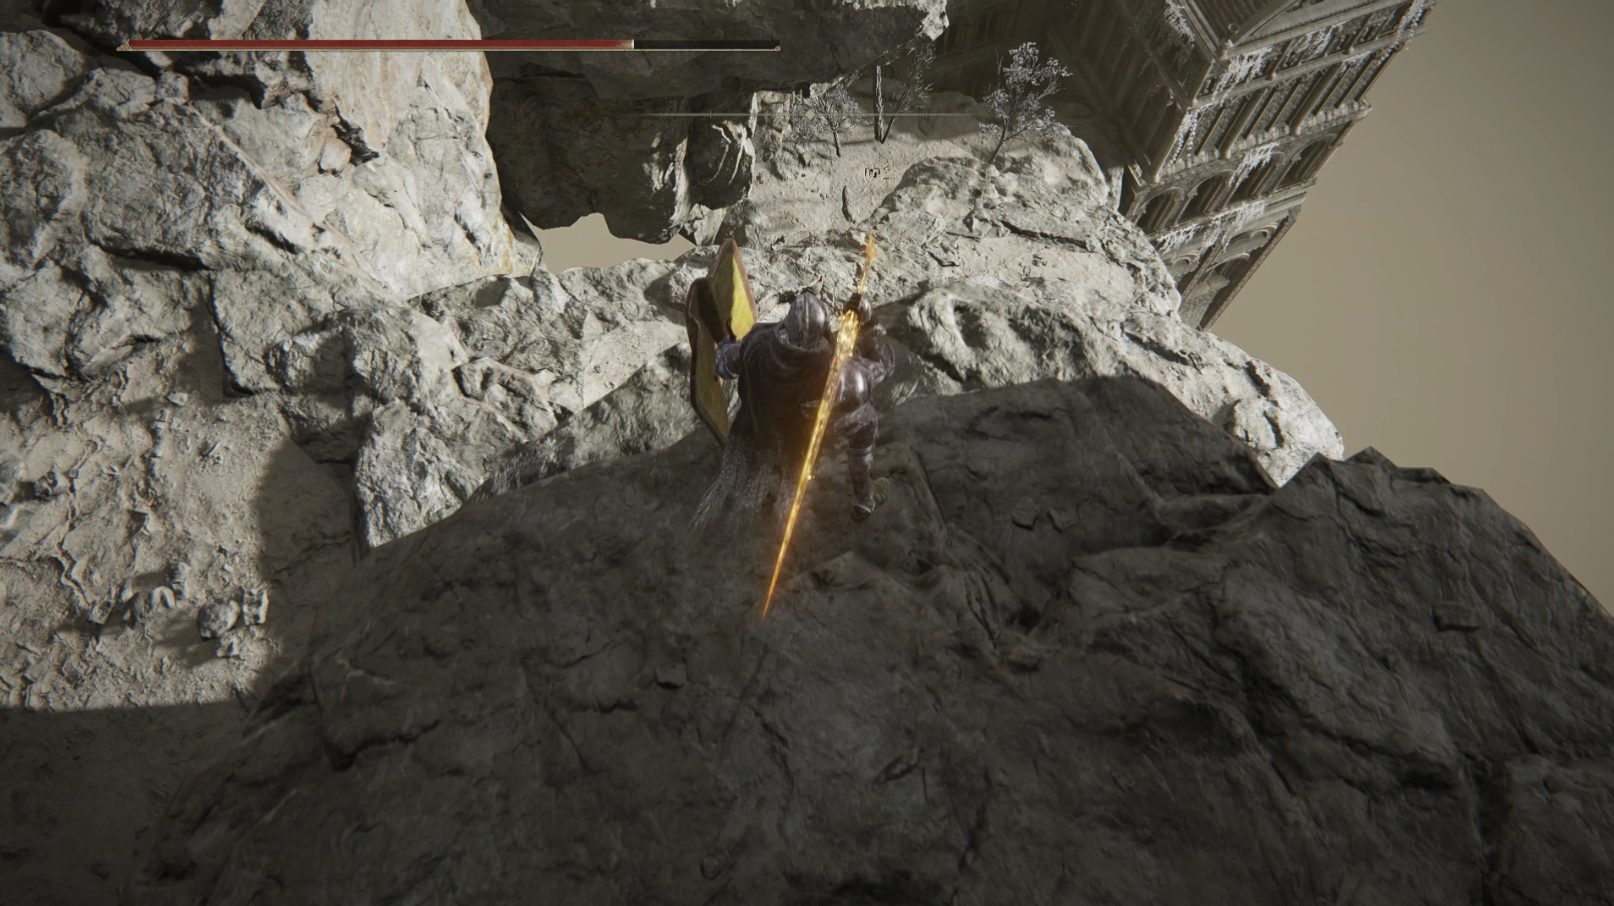
From the area with the dragon, head northeast, back up onto the higher ground with the tree. Then, face west and you should see some archways that you can jump onto, and from there onto higher ground to the west (1). Use the left-hand archway, since if you miss the jump you won’t fall into a hole and die. Then continue west onto the sideways building (2), drop off of the tip to the smaller segment, and jump west again onto the floating platform.
(1)(2)
Head southwest and jump up onto the platform with the sleeping dragon. There’s a Golden Rune [12] under the dragon that you can’t get without waking it up. If you want to, you can slay it, but doing so only nets you 14,400. If you do decide to wake it up, take advantage of its head being on the ground to get some good damage in on the dragon’s dome before it gets up.
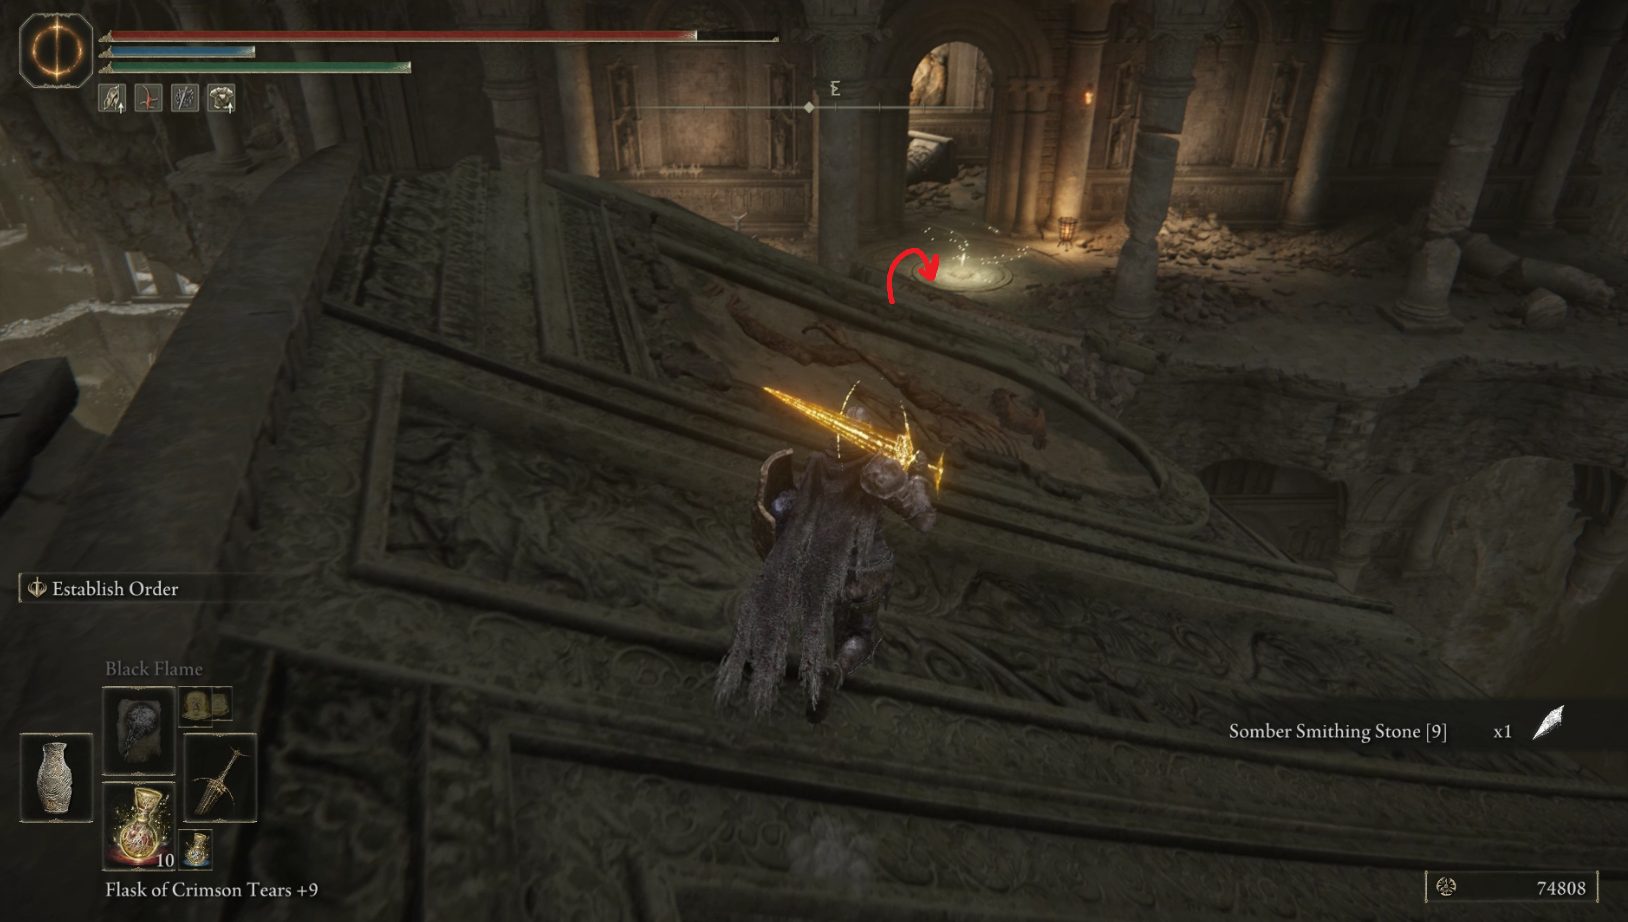
Past the dragon on the southwestern side of the platform is a column bridge you can follow southwest to the next platform. Head due southwest once on the other platform and you’ll find a corpse with a Smithing Stone [7]. From there, go due west and at the edge of the platform you’ll find another column you can walk out onto — this one leads south and upwards. Follow it to the floating balcony, and from there you can drop east-southeast onto another column bridge.
Continue on this column until you reach the next section of rocky ground, and then continue southeast until you’re past the tower. There are two enemies hiding here: one on the ground still in pieces, and one behind the tower. Kill the one on the ground, then take out the one hiding behind the tower. Once both foes are dead, you can go inside the tower and grab the Ancient Dragon Apostle’s Cookbook [4].
Leave the tower and turn right, then head to the northeastern edge of the cliff. From there, you can jump down to the platform below and grab the Somber Smithing Stone [8] from the corpse hanging off the edge by the broken column. Then go south a few steps from the corpse and look east, down over the edge of the platform. There’s a small floating platform you can drop to, and it’s got an item on it. First, inch your way off the edge of the platform you’re on, so that you fall onto the ledge below. From there, you can easily drop onto the platform and grab the Smithing Stone [8]. Once you’ve got it, teleport back to the Dragon Temple Lift site of grace.
This walkthrough continues in the next tab, Eastern Temple!
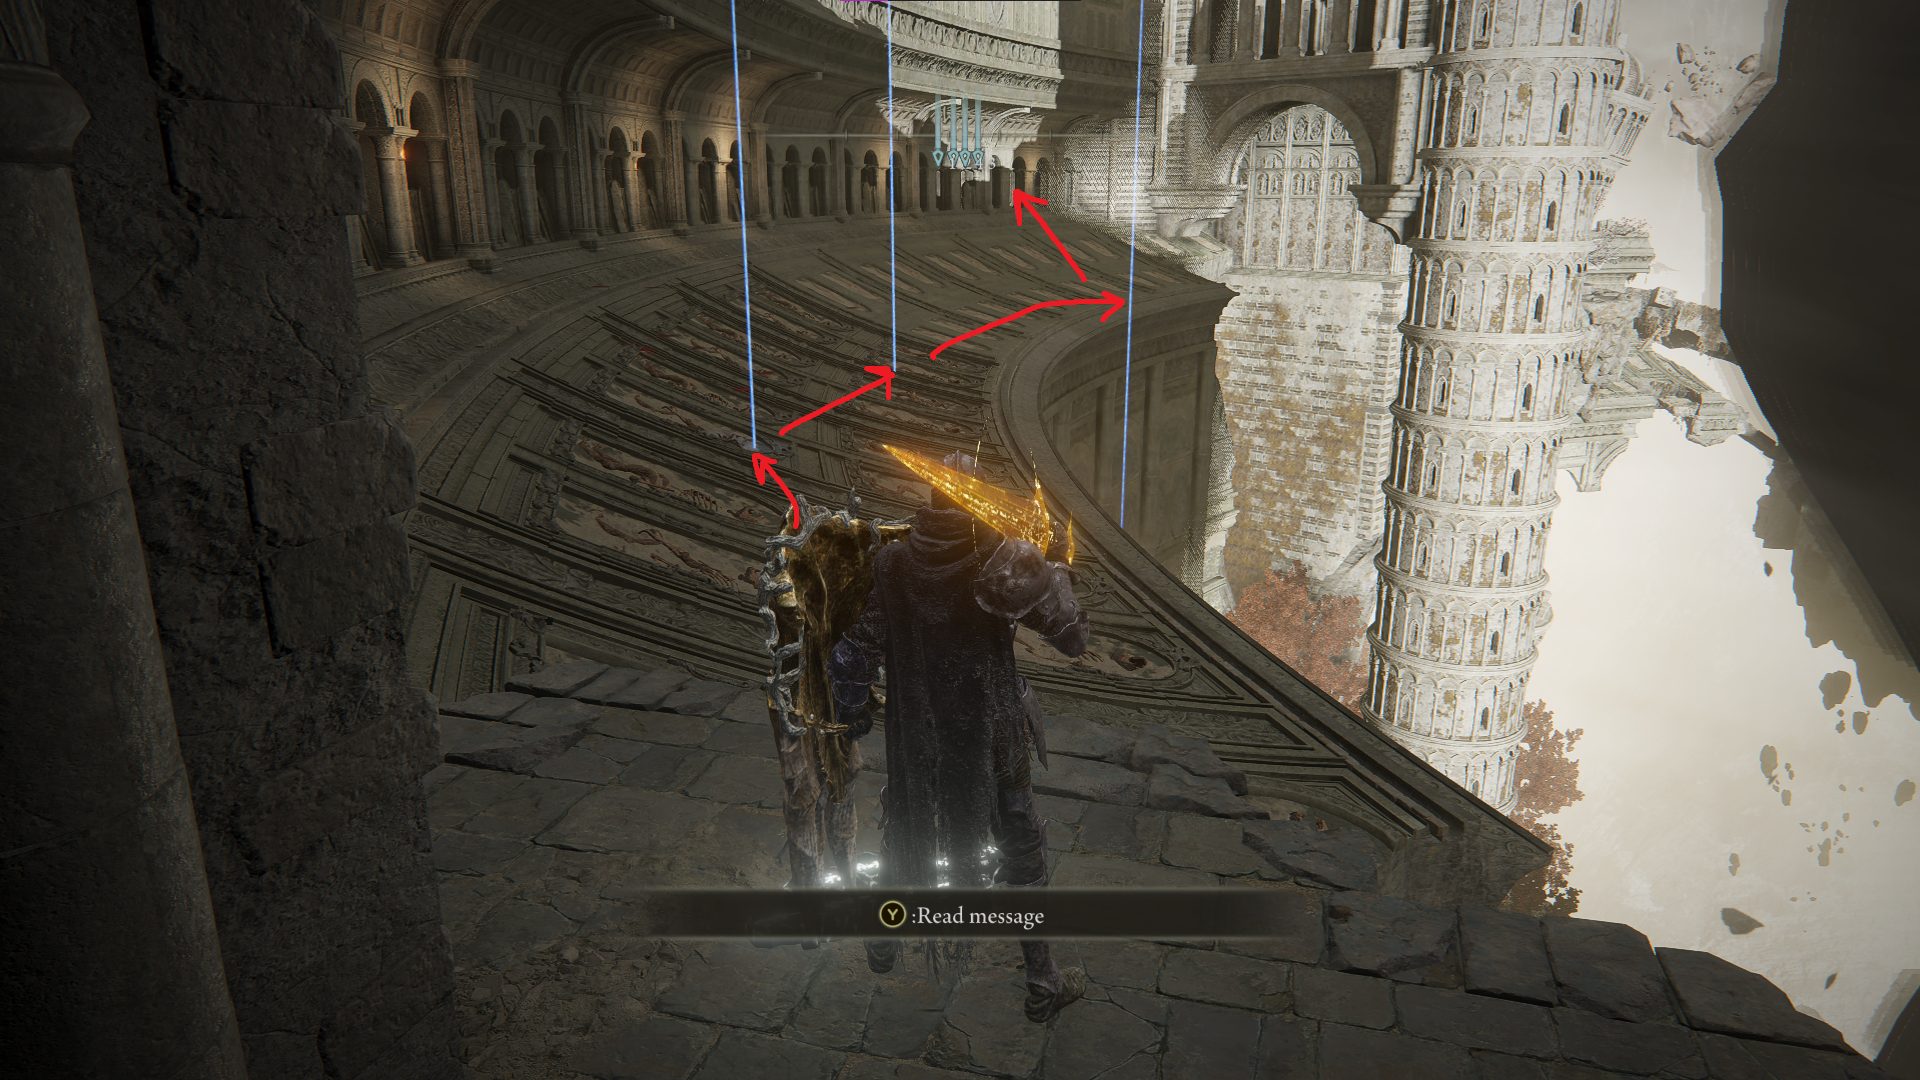
From the Dragon Temple Lift site of grace, turn around, go north onto the elevator, and ride it down. Walk out of the elevator room and turn right to head east towards the stairs. Don’t forget about the patrolling beastman here, and either sneak past or kill him before going down the stairs. Once you’re about halfway down the stairs, look east over the side of the staircase. From here, drop down to the path below and follow it forward, away from the stairs.
Continue onto the curved platform, and follow it until it ends. Drop east off of the end of it, onto a lower curved section. Turn around after dropping and look northwest, where you’ll see a tiny floating piece of rubble with a corpse on it. This corpse has the Dragoncrest Shield Talisman +2, but it’s a dangerous jump — if you already have the Dragoncrest Greatshield Talisman, you may not want to bother if you aren’t trying to catch collect ’em all. There is also a Golden Rune [12] on the southern tip of the platform that you should grab — with that done, you can go north-northeast into the doorway that’s across the narrow stone walkway.
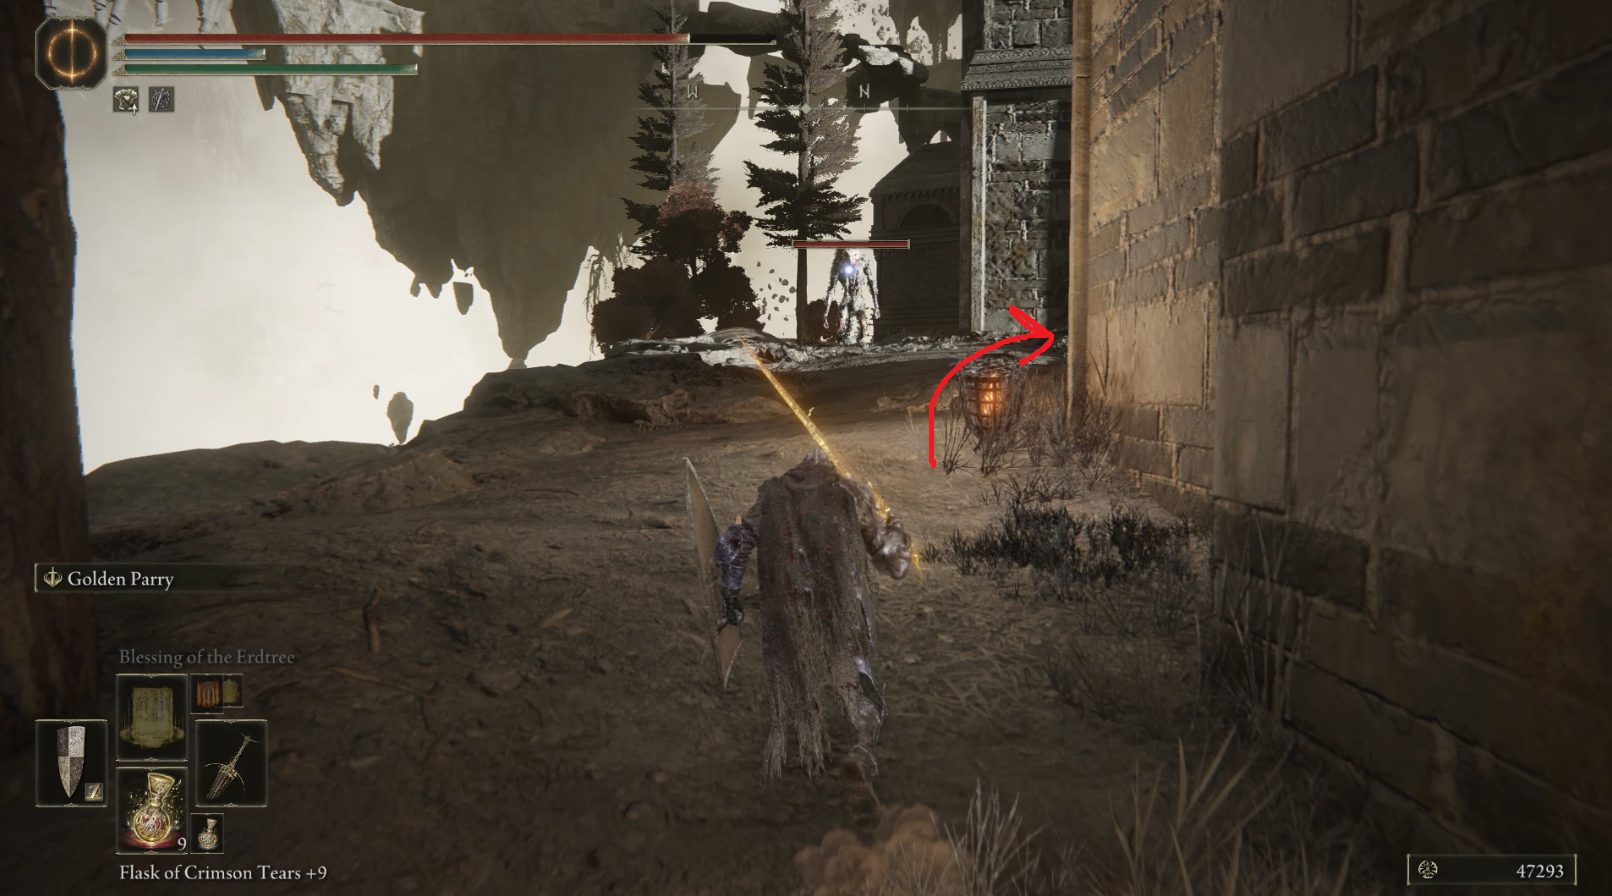
Start sneaking once you’re inside the structure, and take a right to head east. You’ll find a staircase patrolled by a dog — take it out and continue up the stairs. Once you near the top of the stairs, a shaman beastman to your left (west-northwest) will start firing lightning bolts at you, so run over and make him stop. Then head east-southeast to the other end of the second story, where a dog is feasting on a corpse’s Dappled Cured Meat. Kill the dog and take the meat for yourself, then drop down east, back down to the first floor. Walk west a few steps and you’ll be able to turn right and go down a hallway that leads north, back outside.
There’s a crucible knight out here that’s learned to breathe fire, but is otherwise identical to all the sword+shield crucible knights. Killing him only gets you 7360, so you may not want to bother if you hate fighting these guys. In addition to deciding whether or not you want to kill the knight, you also have to decide if you want to head straight to the site of grace (1), or risk dying on a tricky jump that nets you a Smithing Stone [8]. To reach the smithing stone, head behind the stone dragon and then jump to the platform to the east (2). If you choose to jump to the smithing stone, the subsequent jumps southeast to the Dragon Temple Rooftop site of grace aren’t too tricky.
(1) Where to jump from for the smithing stone is circled, while the arrow indicates the safe path to the grace(2)
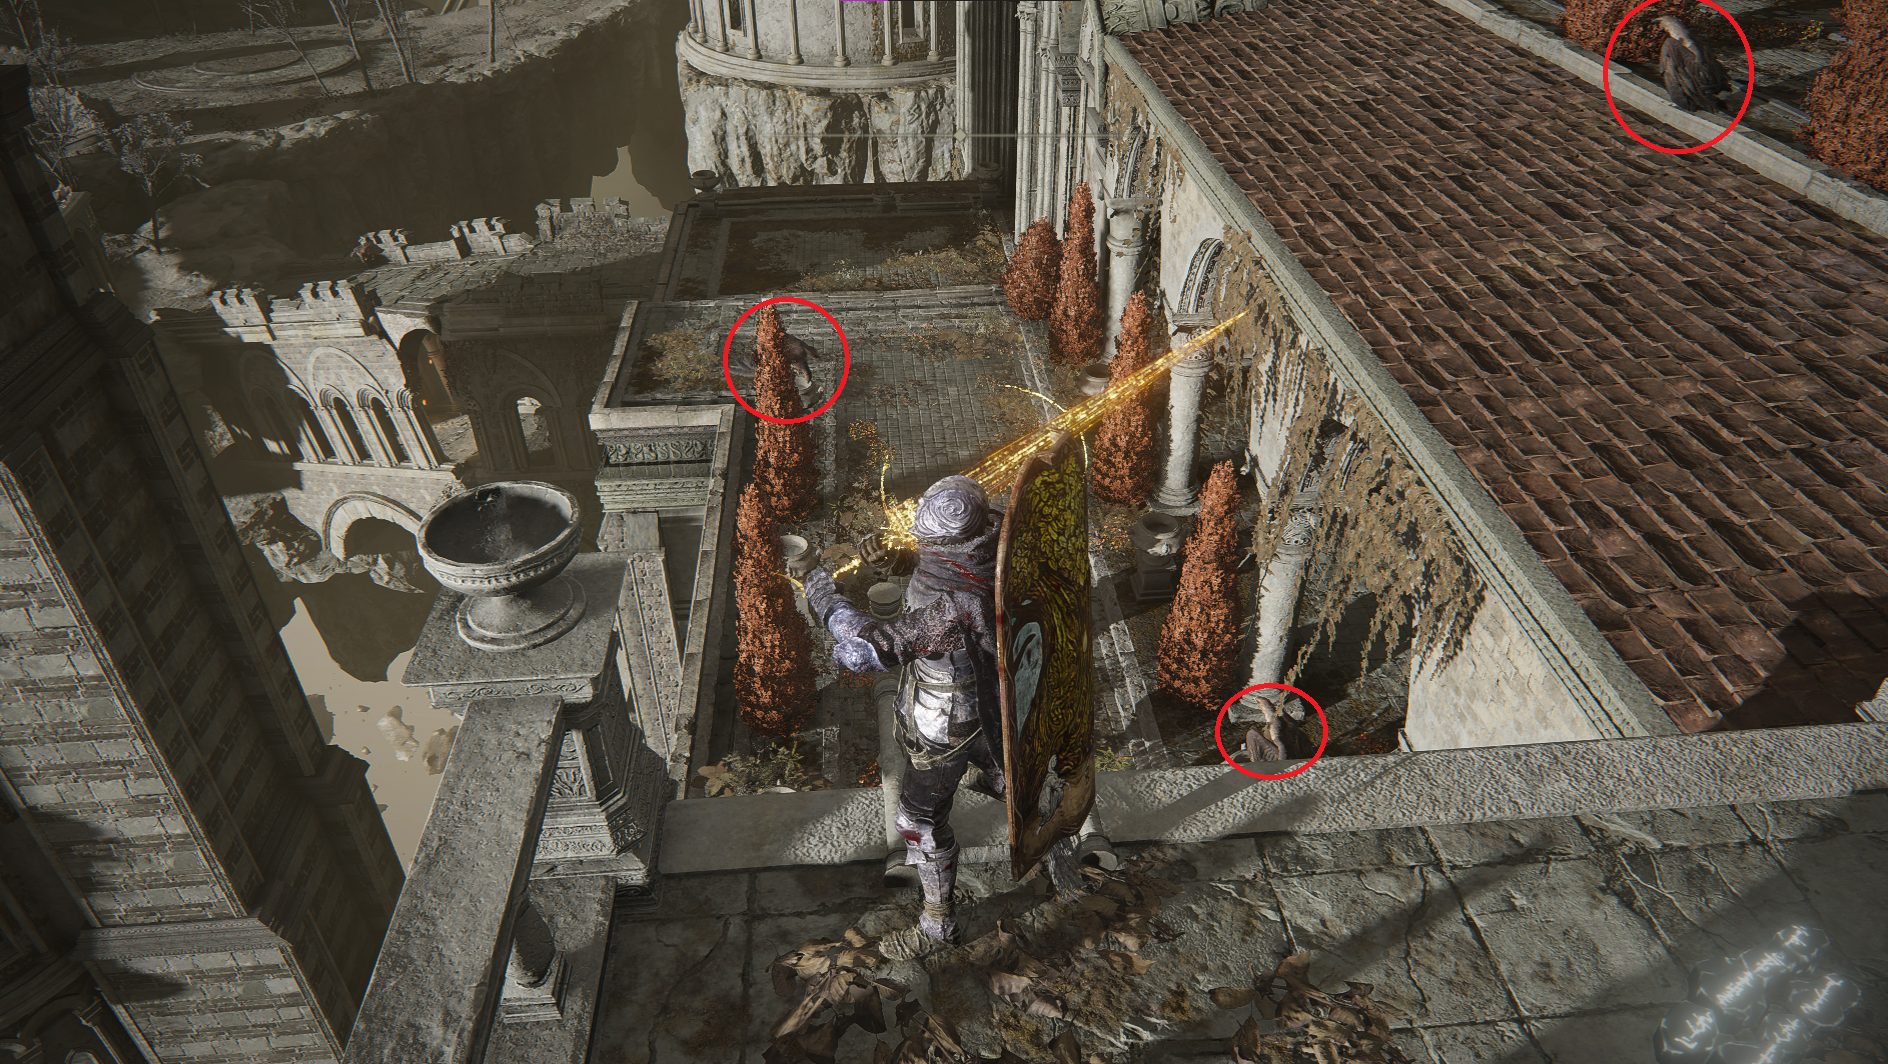
From the site of grace, drop down to the northeast, and stay on the roof until you’ve decided how to handle the enemies down below. Take a look at the tower to the east and you’ll see a bird in the doorway, and if you walk further down the roof, you can see another bird on the ground to the southeast. Consider killing at least one from range if possible, as otherwise you’ll have to fight them 1v2 (in which case it’s best to sneak around the left side of the area and try to kill the one in the doorway before the other one aggros.
Once both birds are dead, continue southeast and grab the Smithing Stone [6] from the corpse. Then, take a look at the area ahead — you have a good vantage point from here, and you’ll have to dodge lightning once you go any further (consider equipping Boltdrake and/or Pearldrake talismans now as well). If you’ve got the tools for it, you can kill two birds below you to the south-southwest — there’s one on either side of the path. There’s also a bird sitting on a platform higher up to the southwest that you should kill from here as well if possible.
When you’re ready, drop down southwest of the corpse and then sneak around behind the bird here (if it’s still alive). Take it out and then go to the southern edge of the platform and drop down to the lower ground. Quickly get under the platform you dropped from — if the birds down here are still alive, one will attack you now. Defeat it and then head towards the corpse to the north, at which point the second bird will attack you. Make it land forever, grab the x3 Arteria Leaf, and then get ready to run through some lightning.
Head out from under the platform and start running south. Go down the stairs and continue onto the roof — here, turn left and continue southeast across the ruined bridge. You’ll aggro some more birds here, but it’s best to keep moving. On the far sides of the bridge there are some columns — lightning won’t strike here, and the columns provide decent cover from the birds, so fight them here.
With all three birds cleared, you can go south to the dragon that’s causing all this dang lightning, and then kill it. You’ll have to jump up to get to the dragon — make sure you don’t fall into the cracks on either side of the jump up. This dragon has a number of lightning attacks, but fortunately it’s also got almost no HP, so it’s an easy kill. You’ll receive an Ancient Dragon Smithing Stone when it dies, and then you can grab the Golden Rune [12] and x8 Fulgurbloom from the two corpses on the large stone circles.
From the stone circles, go northeast and then north at the edge of the cliff. Continue north and jump up onto the roof, then look left and — if you can — kill the two birds on top of the arch ahead with ranged attacks. Then hop up onto the high ground and look left, where you’ll see a bird eating a corpse with a Smithing Stone [7]. Be careful — when you approach this bird, another will swoop down from hiding. Kill them both and pray that a third bird hiding above the illusory tree doesn’t aggro as well. Grab the nearby Golden Seed from the base of the illusory tree, watching out for the aforementioned bird, and then go to the southeastern end of the hill and drop off.
Go south and then up the path to the gazebo, where you’ll find a Somber Ancient Dragon Smithing Stone. Grab it and then go north and drop down to the ledge below the edge of the cliff.
It’s a long path down, but fortunately it’s pretty hard to fall off
Continue dropping down to the northeast until you’re on a balcony, at which point you can head through the doorway and inside. You’ll face a knight coming down the stairs here, so don’t let him surprise you. Once he’s defeated, go up the stairs and continue forward until you’re outside on another balcony. Here, a bird is pecking away at a corpse with a Golden Rune [12] — kill the bird and snag the runes for yourself.
There’s a ladder on the western wall here, but watch out — when you get close to the ladder, a knight can sometimes fall from above. Defeat this surprise challenger if he arrives and then climb the ladder. (If he didn’t fall on you, you’ll find him patrolling near the top of the ladder.) You’ll see an elevator straight ahead (west); that’s the way forward, but first you should go southeast and loot the chest there for the Dragon Towershield. Then go ahead and ride the elevator up, unless you want to fight the lonely knight staring out over the abyss.
Continue southwest off of the elevator and hop up onto the rocks. The path branches here — first go left (south) and pick up all four of the hard-to-spot Gravel Stone, and then continue west-northwest uphill.
You’ll enter a hallway, and up ahead a crucible knight is fighting some beastmen. You probably don’t want to participate in this fight — instead, run past the carnage (northwest), and at the end of the hallway is a small room with a ladder. Climb up and continue forward a bit to find a window with a bird and the Boltdrake Talisman +2. Kill the bird, grab the item, and then look south — recognize the area? Drop down from the window and head south, back to the stone circles where you fought the dragon.
From the stone circles, follow the paved path that leads southwest uphill. You’ll see a number of sleeping beastmen ahead, but you can ignore them if you like. Turn right when the paved path ends and continue on the narrow path northwest until you see a beastman shaman. There’s another beastman around the corner here who’s lying down, so run around the corner and kill that one first, then defeat the shaman.
From where the shaman started, you can go northeast to find a Somber Smithing Stone [7] on a corpse hanging over the edge. Once you’ve snagged it, go back southwest and turn right to continue northwest. You’ll see a gazebo that you can use as a bridge, and to the right of it on the far side is a beastman. Kill him from here if you can, then make your way across the gazebo to the other side.
Then go to the western edge of the cliff and look over the side, and you’ll see a ledge you can drop down to — don’t drop down yet though! If you drop here and continue following the floating platforms downwards, you’ll end up on a chunk of wall with a bunch of beastman corpses and one empty spot — walk into the empty spot and press the button to lie down, and you’ll be transported to the Dragonlord Placidusax boss arena. However, it’s better to continue to the site of grace and then backtrack here when you want to fight Placidusax.
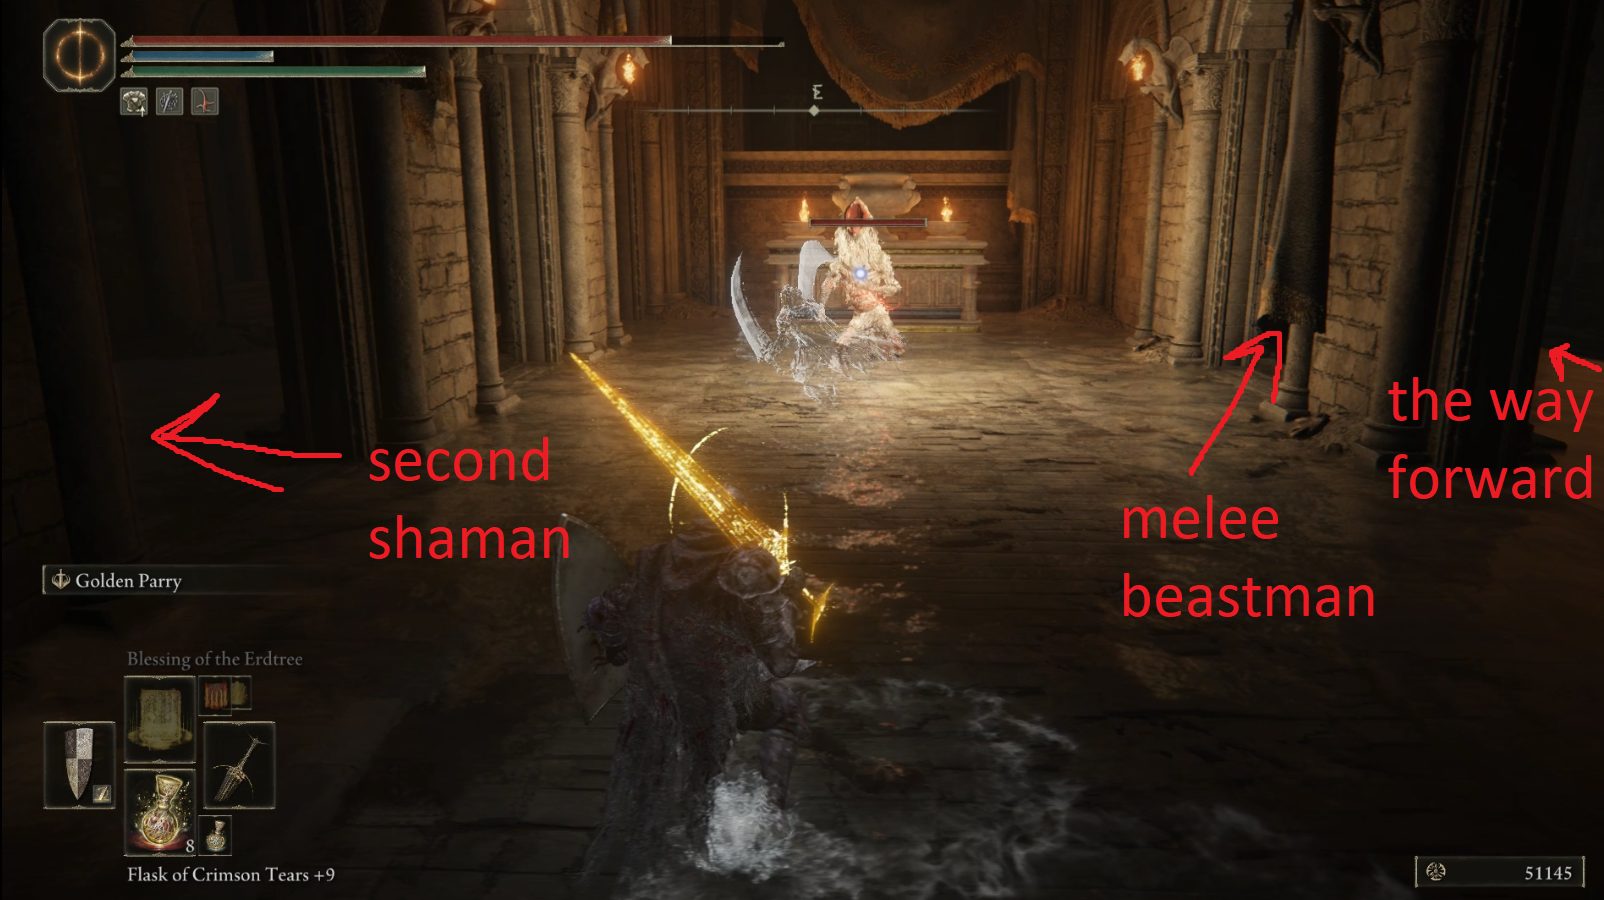
Next, head east through the doorway, where you’ll see a shaman standing over a corpse. He’ll hear you as you enter — kill him from range if possible. Otherwise, you can either rush in and kill him, or else run towards him and then run outside to bait the melee beastman hiding around the corner. Additionally, there’s a second shaman hiding on the left, so it’s best to pull the melee beastman outside if possible.
Once all three foes are defeated, you can claim the Somberstone Miner’s Bell Bearing [5] from the corpse, and then go to the southern side of the room. Turn left (east) and head up the stairs. In the next room, continue up the stairs and then go west up even more stairs and then ride the elevator up to the Beside the Great Bridge site of grace.
Activate the grace, then go up the stairs due west. Turn left on the balcony and head up another set of stairs to find yourself on the Great Bridge. Continuing southeast would take you to the boss(es), but there’s a bit more exploring to be done first. Run north to the end of the bridge, and hug the right guardrail to make your way into the building. Inside, continue north down the next set of stairs, and at the bottom turn right and go outside. Turn left and head north, where you’ll find a Somber Smithing Stone [8] amongst a bunch of sleeping beastman.
Then go back south, and continue to the ladder just past the doorway. Climb down and make your way east-southeast onto the bridge. If you’ve completed Volcano Manor, Recusant Bernahl should invade you here. Make sure you fight him on the bridge, as there are three enemies in the building at the other end of the bridge. (Also be careful not to accidentally hit any of the sleeping beastmen around you.) Bernahl will drop the Beast Champion Set and the Devourerer’s Scepter, plus the Blasphemous Claw (which will be useful in an upcoming boss fight).
Continue east-southeast across the bridge — in the structure ahead, three beastmen sleep — you can either kill them, or loot the chest and then run back to the ladder. If you decide to fight them, it’s best to take out the big guy on the right first.
Anyone else feel kinda bad killing sleeping foes?
Once you’ve claimed the Old Lord’s Talisman from the chest, teleport to the Dragon Temple Rooftop site of grace (unless you don’t care about the Drake Knight armor set, in which case you can teleport straight to Beside the Great Bridge). From the site of grace, head northeast and then east, dropping down from the rooftop to where the two pesky hawks are. Once they’re both dead, head southeast to the ladder and climb down it. At the bottom of the ladder, walk east to the corner of the platform, then jump down to the floating chunk of bricks to the north-northeast, and from there down onto the circular balcony below.
Once you land on the balcony, make your way forward, past the entrance to the structure. Follow the balcony until it ends, and you’ll find a chest with the Drake Knight Set. Grab it and then go back the way you came on the balcony, and this time head into the circular structure and activate the elevator. You’ll ride past where you killed the birds and keep going up — at the top, you’ll see a beastman guarding an item. Take down the beastman and loot the x5 Lightning Greatbolt, then teleport to the Beside the Great Bridge site of grace.
From the site of grace, head north and then up both sets of stairs again, and once on the bridge continue southeast uphill to face the Draconic Tree Sentinel, who drops 28,080 and the Malformed Dragon set upon death. If you don’t want to fight this tree sentinel, you can run past it and enter the fog gate to face Maliketh, the Black Blade. However, this can result in your spirit summons trying to attack the tree sentinel through the fog gate, so it isn’t advisable.
Once you’ve defeated the tree sentinel (or ran past him), you can pass through the gold fog wall to face Maliketh, the Black Blade. Note that defeating Maliketh changes the world state permanently, and will lock you out of completing Goldmask/Corhyn’s quest, as well as collecting some items in Leyndell, Royal Capital.
Unabashed FromSoftware fanboy still learning to take his time with games (and everything else, really). The time he doesn't spend on games is spent on music, books, or occasionally going outside.
Love the walkthroughs. Thanks for all the hard work.
Something i noticed on my playthrough in the dragon temple…
If youve advanced far enough in Alexanders side quest, the 2nd sleeping dragon you find after the golden seed tree(after you jump on the L archway to cross the chasm) isnt there and you can collect the 12 golden rune without fighting anything and then proceed to the smithing 7. Alexander tho will then ask if you want to fight him which will be the final part of his side quest.
Also the first dragon you see, you can aggro him and then run away. For me he despawned and i was able to loot the corpse with no dragon. Whether or not that was a bug or not i havent tested yet.
If you aggro the dragons from a spot they can’t harm you from they will despawn. That’s how I got through the lightning gauntlet.
Last edited 1 year ago by Shadowwolf
Alex S
10 months ago
1) Great Guide! Been using it since Limgrave. Without you the Elden Ring experience would be out of reach for me.
2) “Kill the dogs quickly and then deal with the beastman, and then you can grab the x5 Old Fang from the corpse south of where the dogs were.”
– there is also a heros rune (4 I think) hidden behind the western wall, reuqires a small jump.
Doug C
2 years ago
From the Dragon temple rooftop site of grace beat the 2 birds. You see that elevator on the left. In order to get to it there is a drop down next to the ladder that leads to down to the 2nd set of bird. This leads to the Drake armor set. There is a beat man on this area as well.
Thanks Doug, nice catch! I knew there had to be a way down there, but I totally forgot to look for it — kinda got distracted by all that lightning 😀
Aki
1 year ago
“If you do decide to wake it up, take advantage of its head being on the ground to get some good damage in on the dragon’s dome before it gets up.” Here I did not find any dragon, but only Alexander.
Before the DLC drops, yes, but probably not much before then.
Mr.blue
1 year ago
Aight, cool, cool, I like that you made a walk through but how about separating the part related to loot from the rest instead of taking 12 hours out of our lives for a level 6 or 7 smiting stone?


Love the walkthroughs. Thanks for all the hard work.
Something i noticed on my playthrough in the dragon temple…
If youve advanced far enough in Alexanders side quest, the 2nd sleeping dragon you find after the golden seed tree(after you jump on the L archway to cross the chasm) isnt there and you can collect the 12 golden rune without fighting anything and then proceed to the smithing 7. Alexander tho will then ask if you want to fight him which will be the final part of his side quest.
Also the first dragon you see, you can aggro him and then run away. For me he despawned and i was able to loot the corpse with no dragon. Whether or not that was a bug or not i havent tested yet.
Hope this helps 🙂
Thanks for your kind words Veoxess, and for sharing some info and tips!
If you aggro the dragons from a spot they can’t harm you from they will despawn. That’s how I got through the lightning gauntlet.
1) Great Guide! Been using it since Limgrave. Without you the Elden Ring experience would be out of reach for me.
2) “Kill the dogs quickly and then deal with the beastman, and then you can grab the x5 Old Fang from the corpse south of where the dogs were.”
– there is also a heros rune (4 I think) hidden behind the western wall, reuqires a small jump.
From the Dragon temple rooftop site of grace beat the 2 birds. You see that elevator on the left. In order to get to it there is a drop down next to the ladder that leads to down to the 2nd set of bird. This leads to the Drake armor set. There is a beat man on this area as well.
Thanks Doug, nice catch! I knew there had to be a way down there, but I totally forgot to look for it — kinda got distracted by all that lightning 😀
“If you do decide to wake it up, take advantage of its head being on the ground to get some good damage in on the dragon’s dome before it gets up.” Here I did not find any dragon, but only Alexander.
Hey will there be a guide for placidusax?
Before the DLC drops, yes, but probably not much before then.
Aight, cool, cool, I like that you made a walk through but how about separating the part related to loot from the rest instead of taking 12 hours out of our lives for a level 6 or 7 smiting stone?