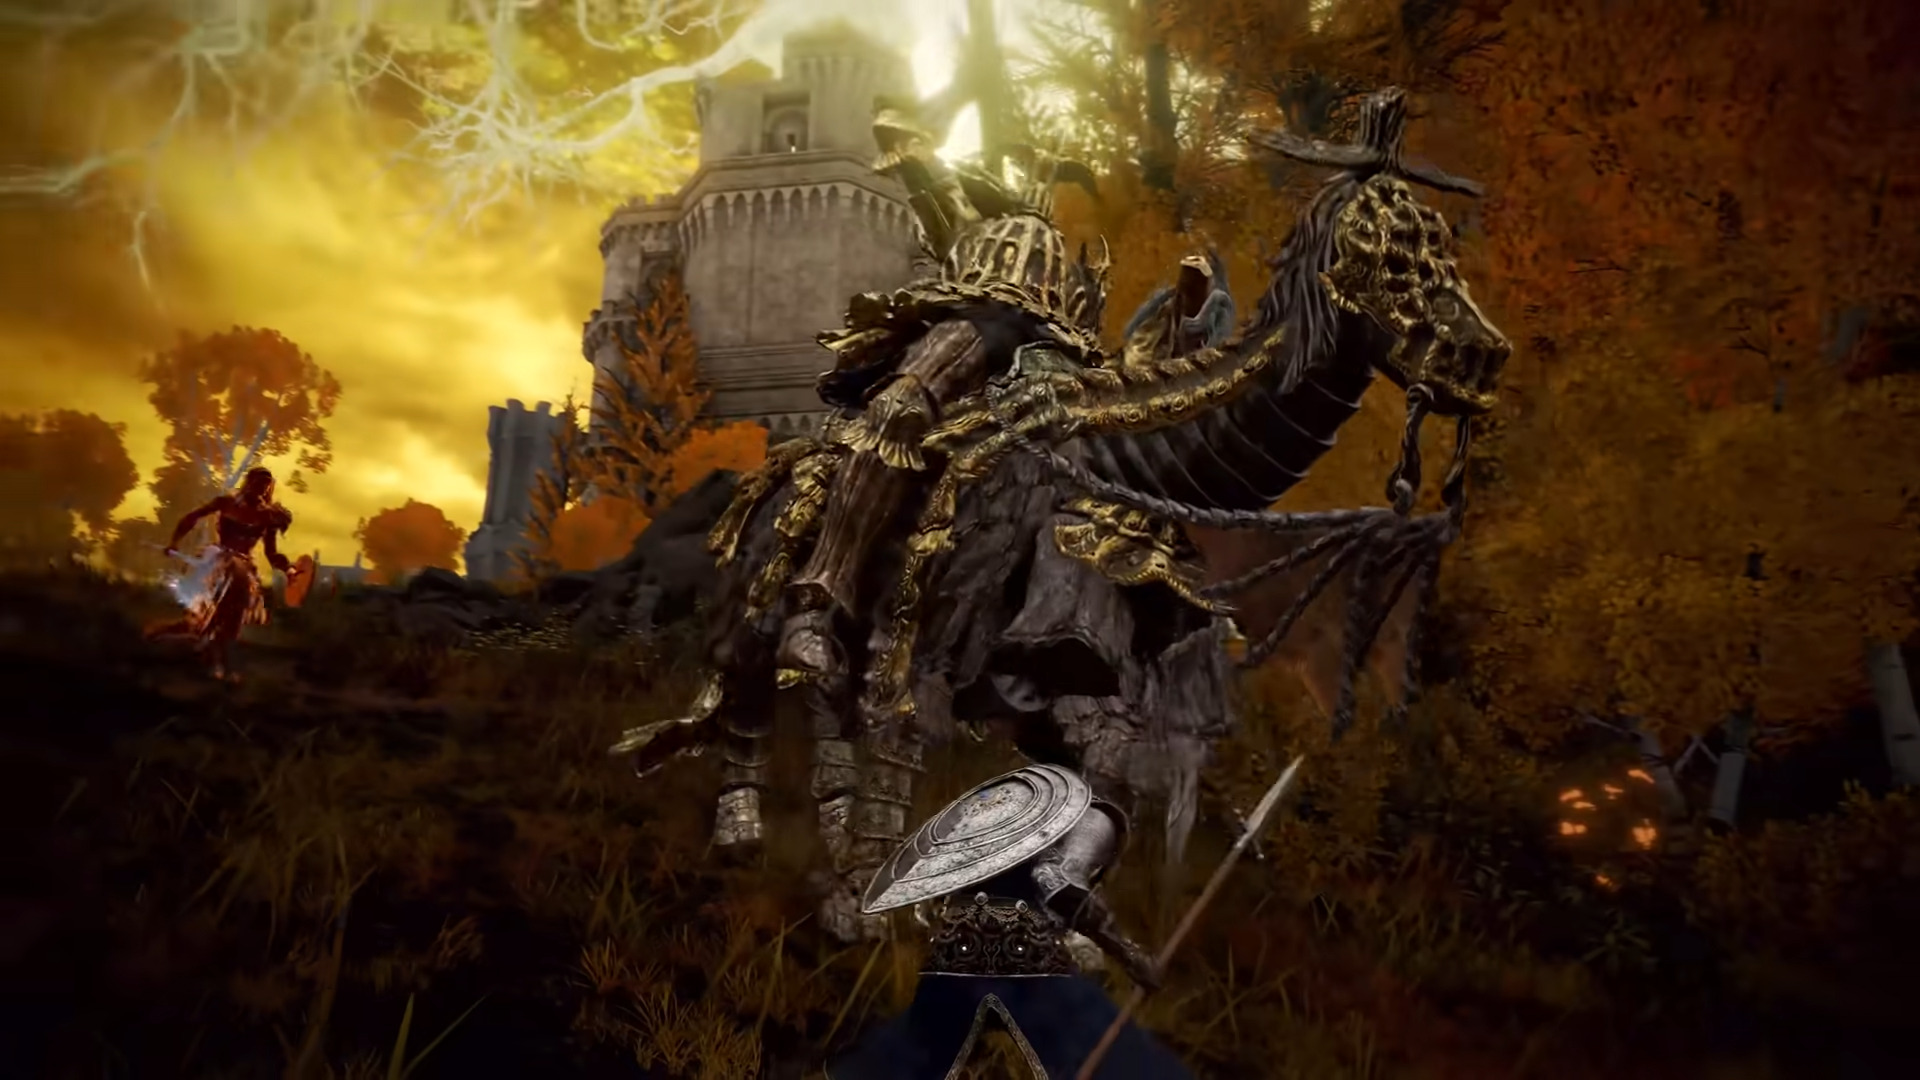
The Tree Sentinel is the first boss you will encounter during your playthrough, and it’s definitely not the easiest. While you can choose to fight him straight away, you can always decide to do this boss later on.
The nearby Church of Elleh has a site of lost grace, and a merchant that sells items such as  Lone Wolf Ashes, which can be helpful during the fight.
You will encounter two more Tree Sentinels in Shadow of the Erdtree, in the Hinterlands. The strategy to fight them is the same, though you will need to defeat both before being rewarded with Runes. Unlike the Tree Sentinel Duo in the Altus Plateau, however, one Sentinel will not respawn if you kill it and not the other.
- Rewards:
- Limgrave:
- Hinterlands Duo (Shadow of the Erdtree):
- 2x Blessing of Marika each
 120,000 after defeating both
- Summons Available: Yes
Horseback Strategy
Once you’ve got the Spectral Steed Whistle and your weapon is at least +2, you can try to take on the Tree Sentinel who roams the path in front of the Church of Elleh. The technique for this strategy is simple: make some distance between you and the boss, then ride directly at him, passing him on the left (his weapon side) and attacking as you pass.
If you tap the sprint button as you approach the boss, every attack he has should miss. The only exception to this is if he’s started an attack before you get close, in which case you should turn around and back off, then try to gallop at him again while he’s idle (with his horse just walking, or with them both charging towards you but not beginning an attack).
While it’s best to not face this boss until you’ve got Torrent and quite a few levels under your belt, you can fight him on foot the first time you see him if you really want to.
Melee Strategy
The key to dealing with this boss on foot is staying close to him, on his shield side. Attacks will be much easier to dodge, and you will avoid some more lethal ones such as the Sideways Shove. You will still have to dodge a fair amount of attacks, and especially area of effect ones, but this will be by far the safest way to defeat the boss. The best moment to punish the boss will be when he goes for a Hoof Strike, as you can just strafe around to his shield side and punish him with several attacks of your own.
Make sure to fight the boss in an open area, and remain patient throughout the fight. While you will have some openings, most of the time you will only get to attack the boss once before having to dodge or reposition.
The boss’s regular swings can be parried, which will leave it vulnerable to 2-3 hits. Additionally, you can opt to use jumping attacks and hold your weapon with both hands to inflict posture damage. Doing so, the boss will end up vulnerable for a moment, but you will not be able to critically strike him. Instead, use charged heavy attacks to inflict heavy damage to the boss.
Ranged Strategy
Unfortunately, casting spells against this particular boss might backfire, literally. While using spells that send projectiles towards the boss, he will raise his shield to reflect them back towards you as a more potent projectile that inflicts high damage.
One way to deal with that is by either using spells that aren’t projectiles, such as  Carian Piercer, or by distracting the boss with a summon. While the boss is distracted, unleash all of your spells on the boss, but be careful as the boss will fixate on the last enemy that damaged him. Meaning that if you’re spamming spells while your summon hasn’t had a chance to attack the boss in-between, you might still get spell reflected.
If your summons run out and you only have access to projectile based spells, you can either finish the boss off in melee following the Melee Strategy, or you can simply engage the boss at a later time, once you have acquired some better suited spells.
Moveset
- Weapon Swings: Most of this boss’s attacks will be fairly slow swings. Dodging through them shouldn’t be much of an issue, but they can also be parried, which will leave the boss vulnerable for a couple hits.
- Quick Turn Into Swing: Here, the boss will do a quick turn, which will be followed-up by a wide, backward swing. Keep an eye on the horse’s movements, and it should be easy to dodge roll.
- Hoof Strike: The horse will rear, before slamming its front hooves on the ground. To avoid being hit, just move around the boss while staying close to him.
- Rearing Into Shield Bash: The rearing will look similar to the Hoof Strike, but the horse will do a small jump, while the boss leans forward for a shield bash. Move around the boss or roll to the side to avoid it.
- Leap Into Shield Slam: The horse will do a high forward jump, before coming back down while the mounted boss slams the ground with his shield. Big area of effect attack, so make sure to roll to avoid splash damage.
- Forward Thrust: The horse will start rearing, before the boss thrusts his weapon forward. Not much of a threat if you’re close, so dodge roll sideways or forward if you’re close enough, to avoid it.
- Sideways Shove: If you’re standing on the boss’s weapon side, the horse will occasionally try to bump into you. Fast attack leaving you little time to react, and best avoided by not standing on that side of the boss.
- Sideways Shield Bash: Similar to the shove, the attack will be decently quick, however this one is telegraphed by the boss raising his shield above his head. Roll to the side towards the boss’s back to avoid it.
- Sideways Shield Slam: Variation of the shield bash, that instead ends in a massive shield slam dealing damage in a wide area. Make sure to dodge roll to avoid getting hit by the splash damage.