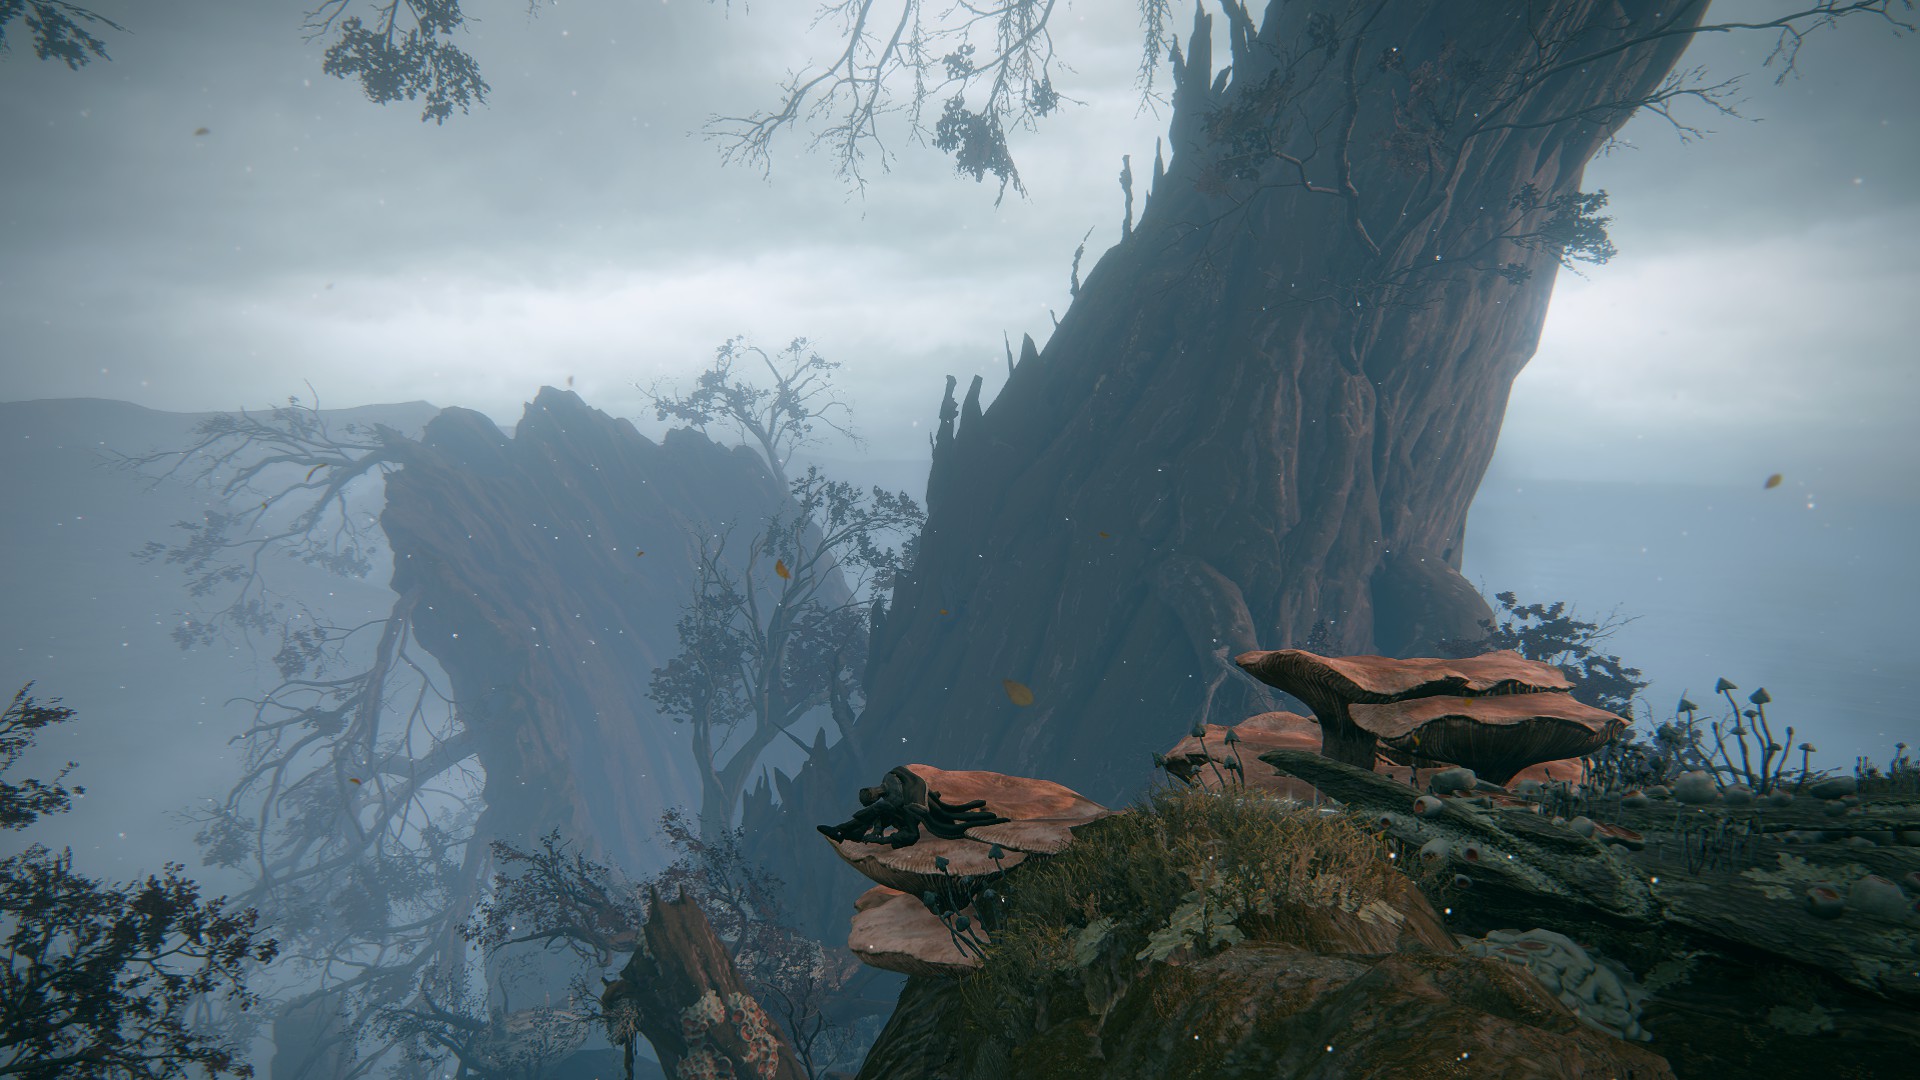
Miquella’s Haligtree is an optional area that leads to the Elphael, Brace of the Haligtree legacy dungeon. The Haligtree may have been majestic once, but when you find it, it’s clearly been decaying for some time. This is one of the more challenging areas of the game, both because the enemies here are tough and because you can fall off the tree in many places.
How to Get to Miquella’s Haligtree
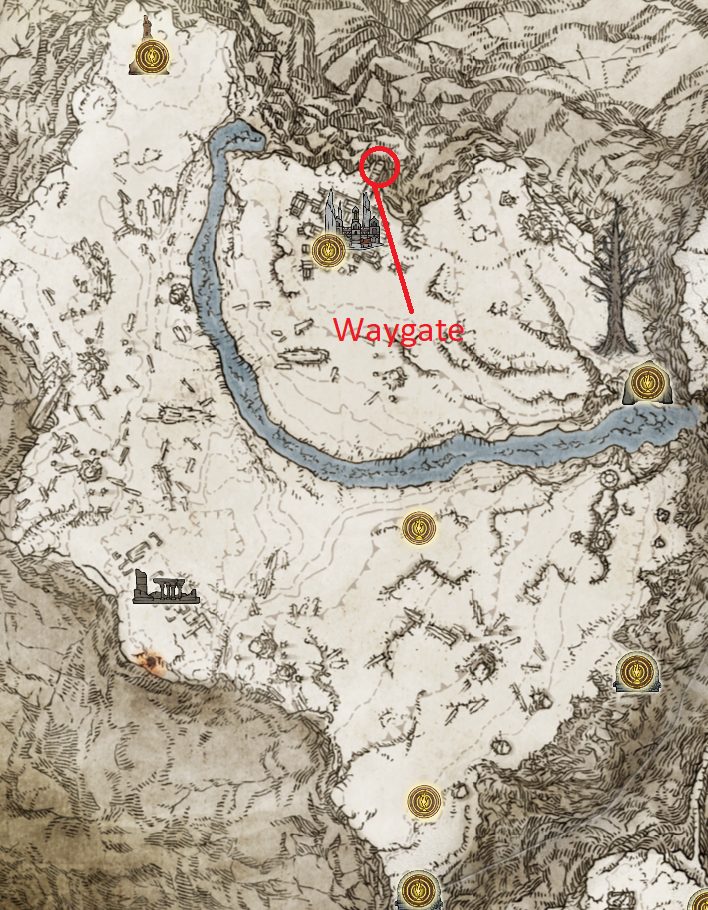
To reach the Haligtree, you’ll need to first make your way to the Consecrated Snowfield. Then, complete the evergaol puzzle in Ordina, Litugrical Town — doing so will unlock the seal blocking the waygate that leads to the Haligtree. For details, see the Northern Snowfield section of the Consecrated Snowfield walkthrough.
Walkthrough
This walkthrough is divided into two sections — start with the “Haligtree Canopy“, and use the tabs to navigate between sections.
Tips for fighting on the branches of the Haligtree: Because rolling can be so dangerous, using a shield is advisable. Additionally, ranged weapons can be very useful for clearing the area in front of you — if you find yourself getting frustrated as a melee character, consider respeccing so you can use whatever ranged incantations or sorceries you’ve collected — or a bow/crossbow — until you’ve made it out of this area. As long as you have at least two Larval Tears, you can respec, clear the tree, and then return to your original build. With ranged options, you can kill many enemies from safety before proceeding through their (former) zone of control.
A note on enemies and pathing: The route described below is designed to eliminate foes to make routing easier, however you may die and have them all respawn. The “easiest” thing to do is to follow the steps below again, but — given the challenges this area poses — it may take less time to simply run past the enemies and pick up the items.
After going through the waygate in Ordina, Liturgical Town, you’ll find yourself on a branch of the Haligtree — just ahead of you is the Haligtree Canopy site of grace. Make sure you activate it, and then go south, back up the branch you just walked down. At the very tip of the branch is a Stonesword Key — very carefully make your way forward until you can pick it up. Then walk back to the site of grace, and from there turn right to go east. Near the first of many oracle envoys, you’ll have to jump up onto a pink mushroom to proceed — do so, head forward to the branch junction, and then turn right (south).
You’ll be facing a patrolling envoy — kill it and then continue forward, turning right onto the branch that leads west-southwest. There is another patrolling envoy here, plus a second envoy further west that will aggro when you engage the first. Once both foes are down, you can pick up the x3 Sacramental Bud and then return to the branch junction.
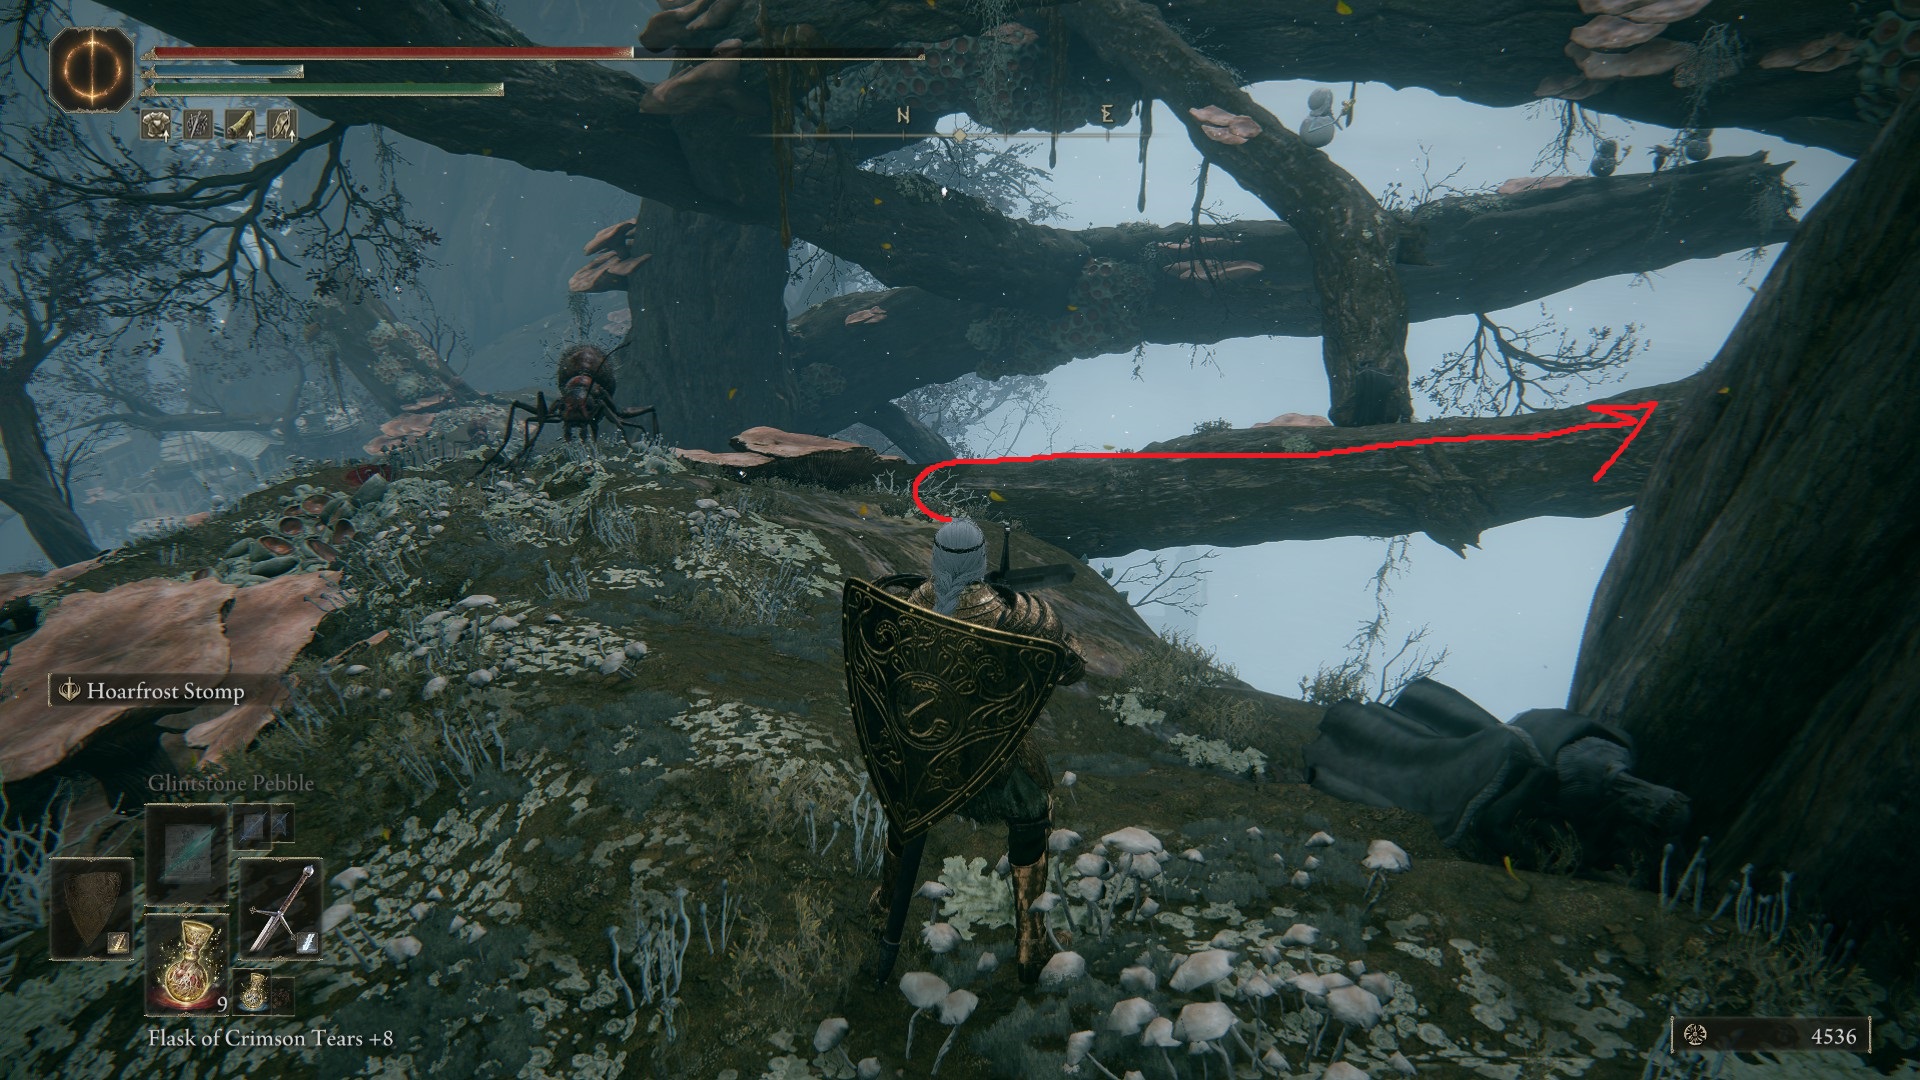
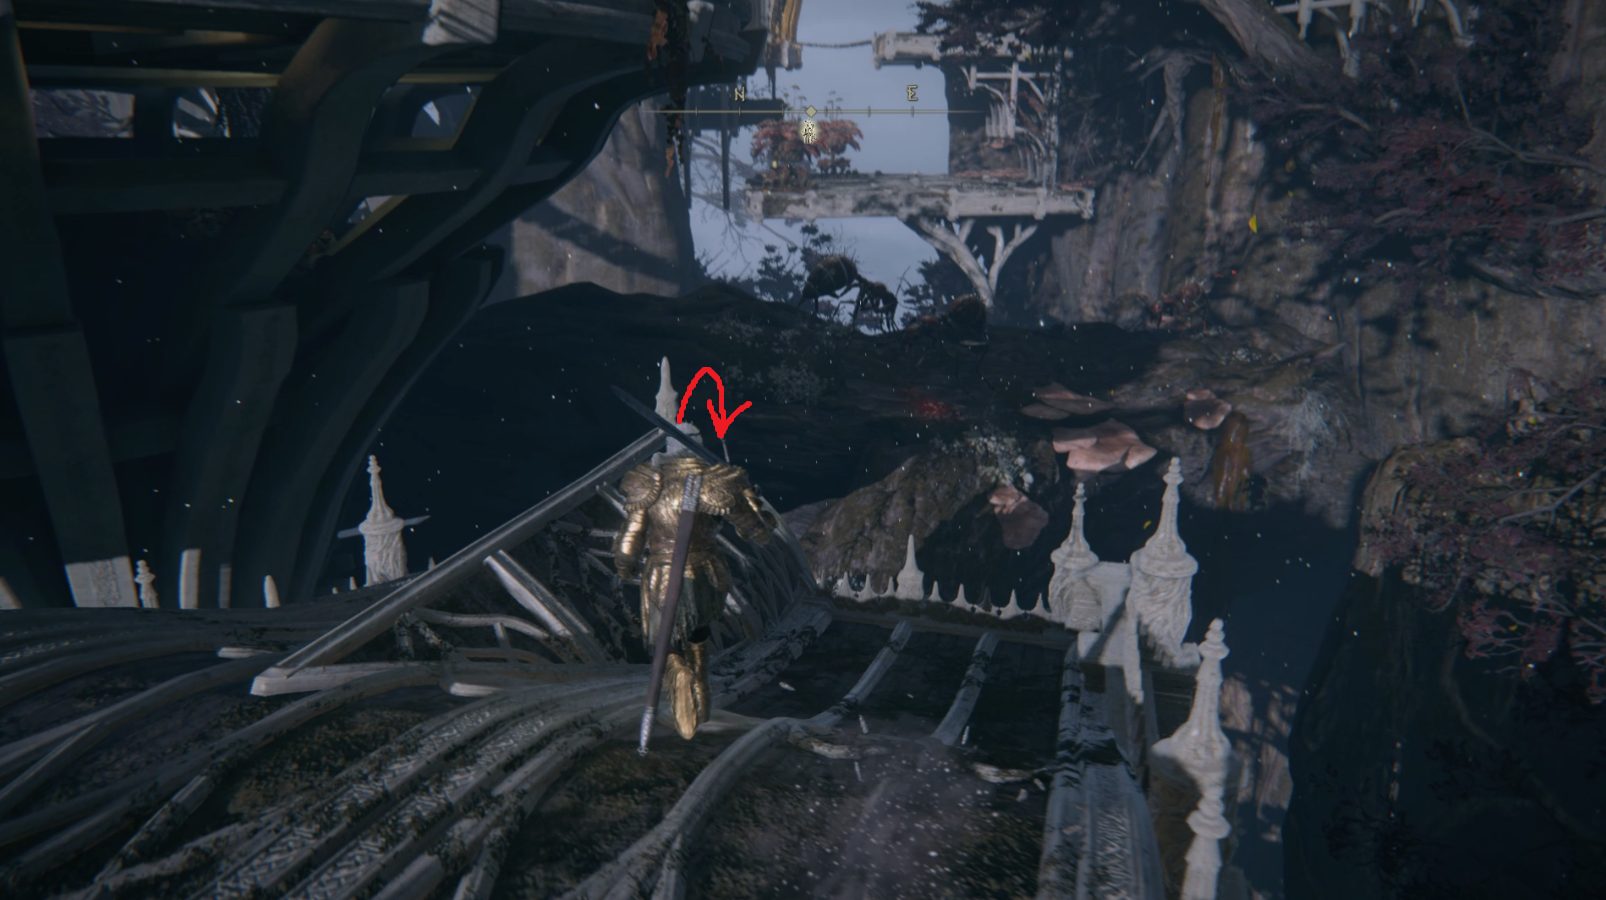
You can choose to ignore the envoys with their backs turned here, or kill them for easy runes. Either way, follow the branch northeast, and it will dead-end at some mushrooms. Look southeast over the edge of the branch just before the final mushrooms, and you’ll see where you need to drop down to.
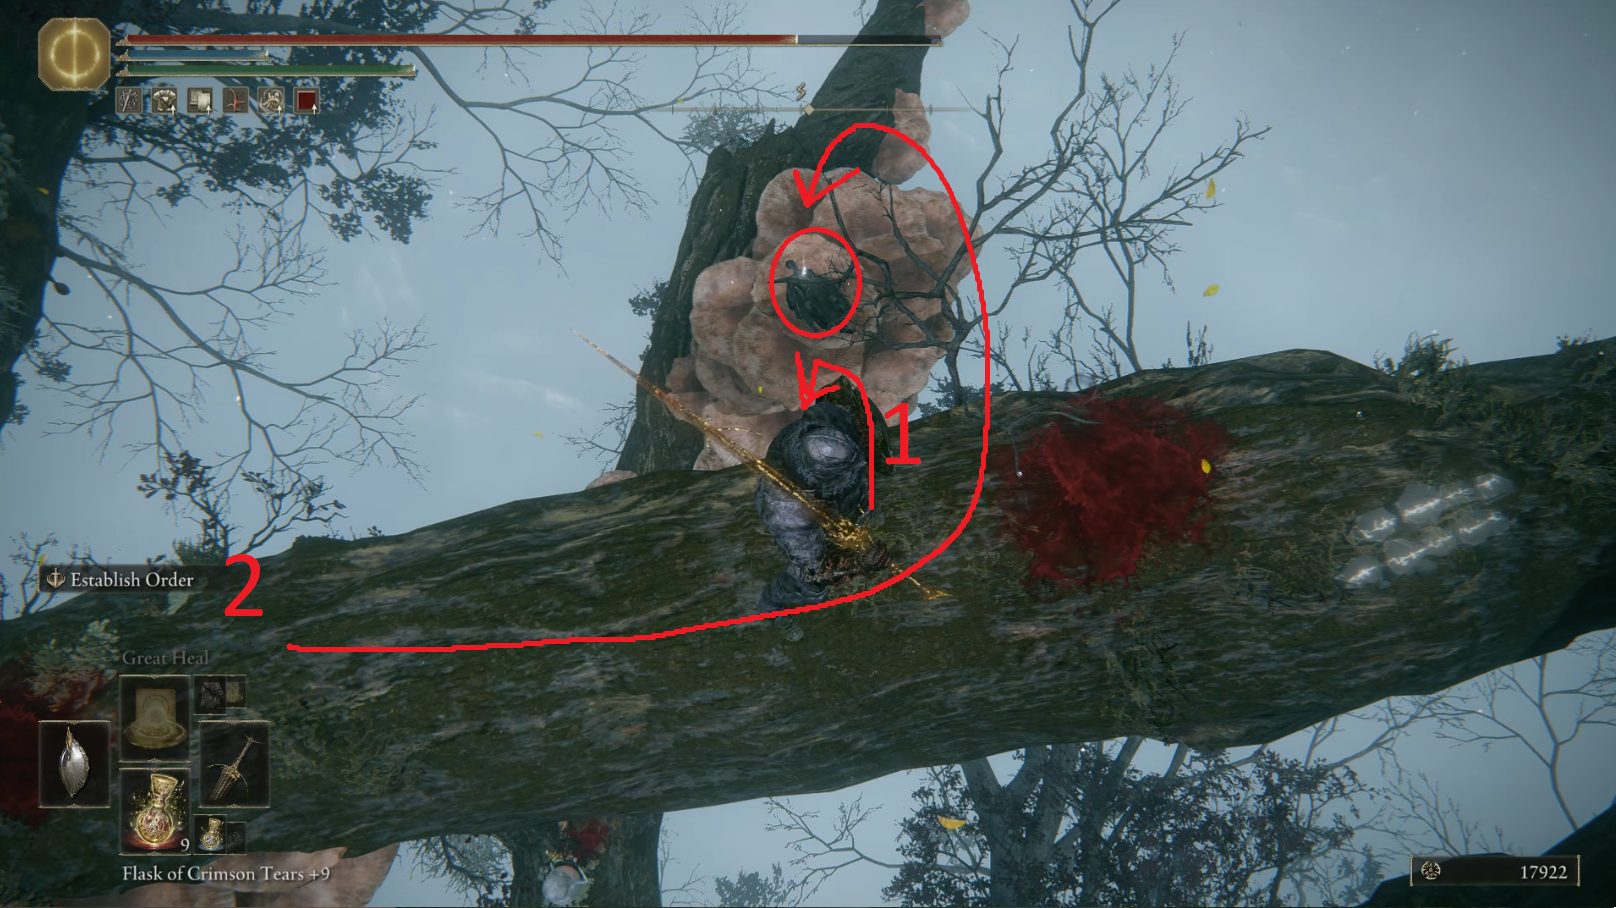
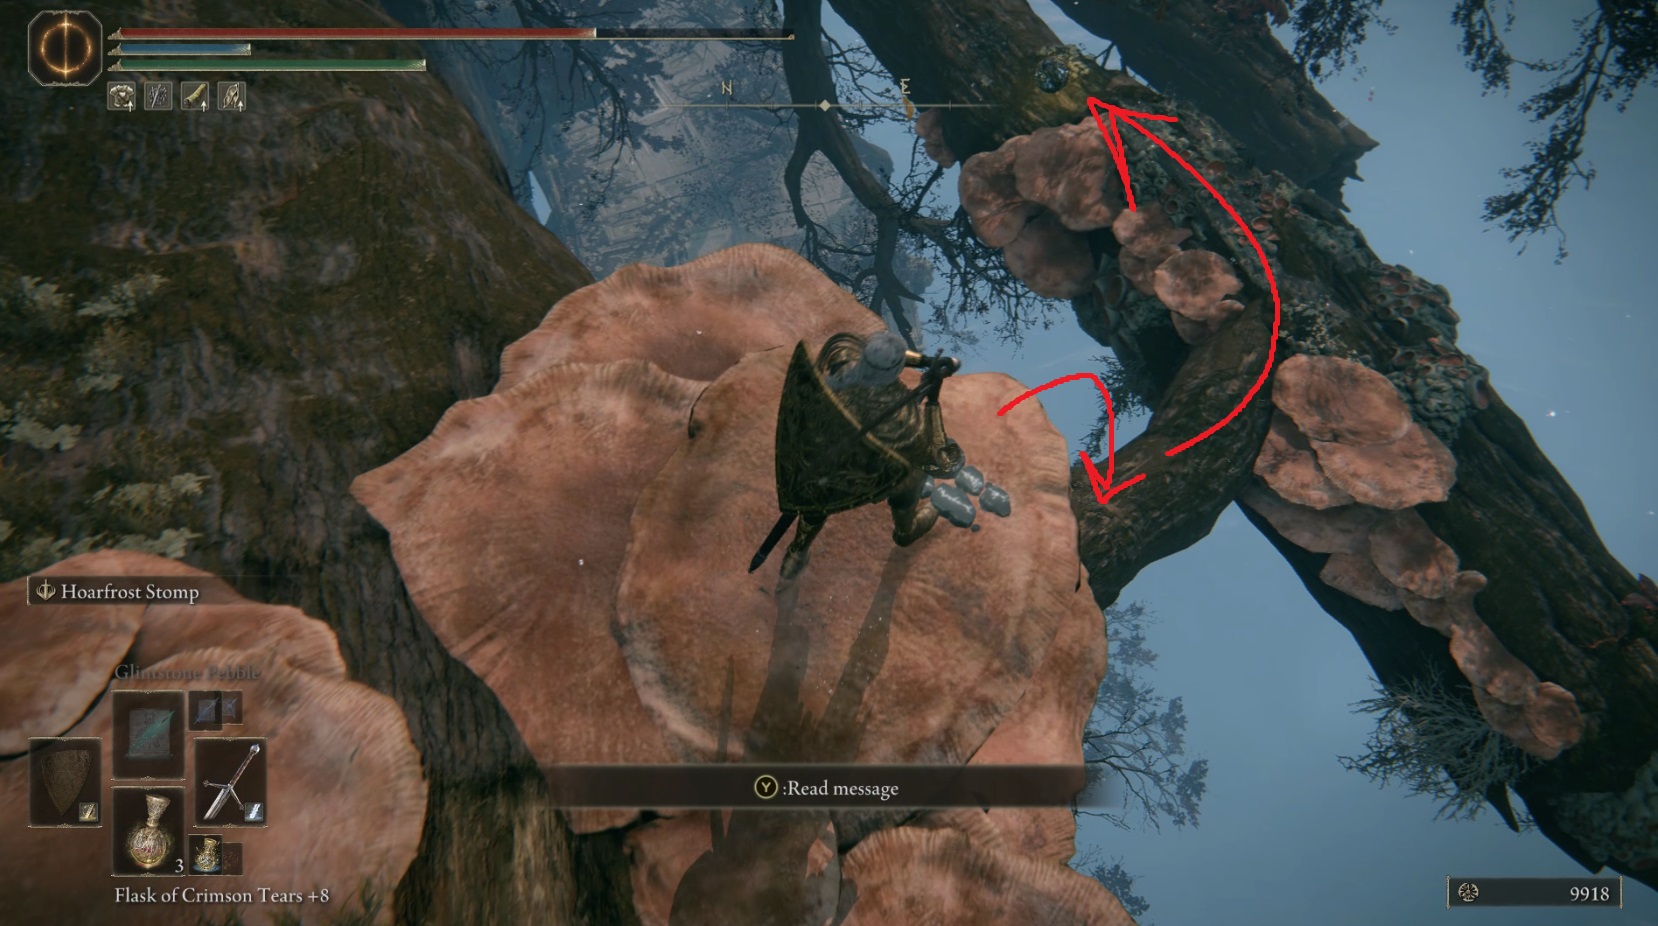
Upon landing, sneak east and kill the large envoy with its back to you, then loot the nearby corpse for its Golden Rune [10]. Then go back west, up the branch, to where you jumped down. Look over the edge to the south, and you’ll see a corpse on top of a clump of mushrooms.
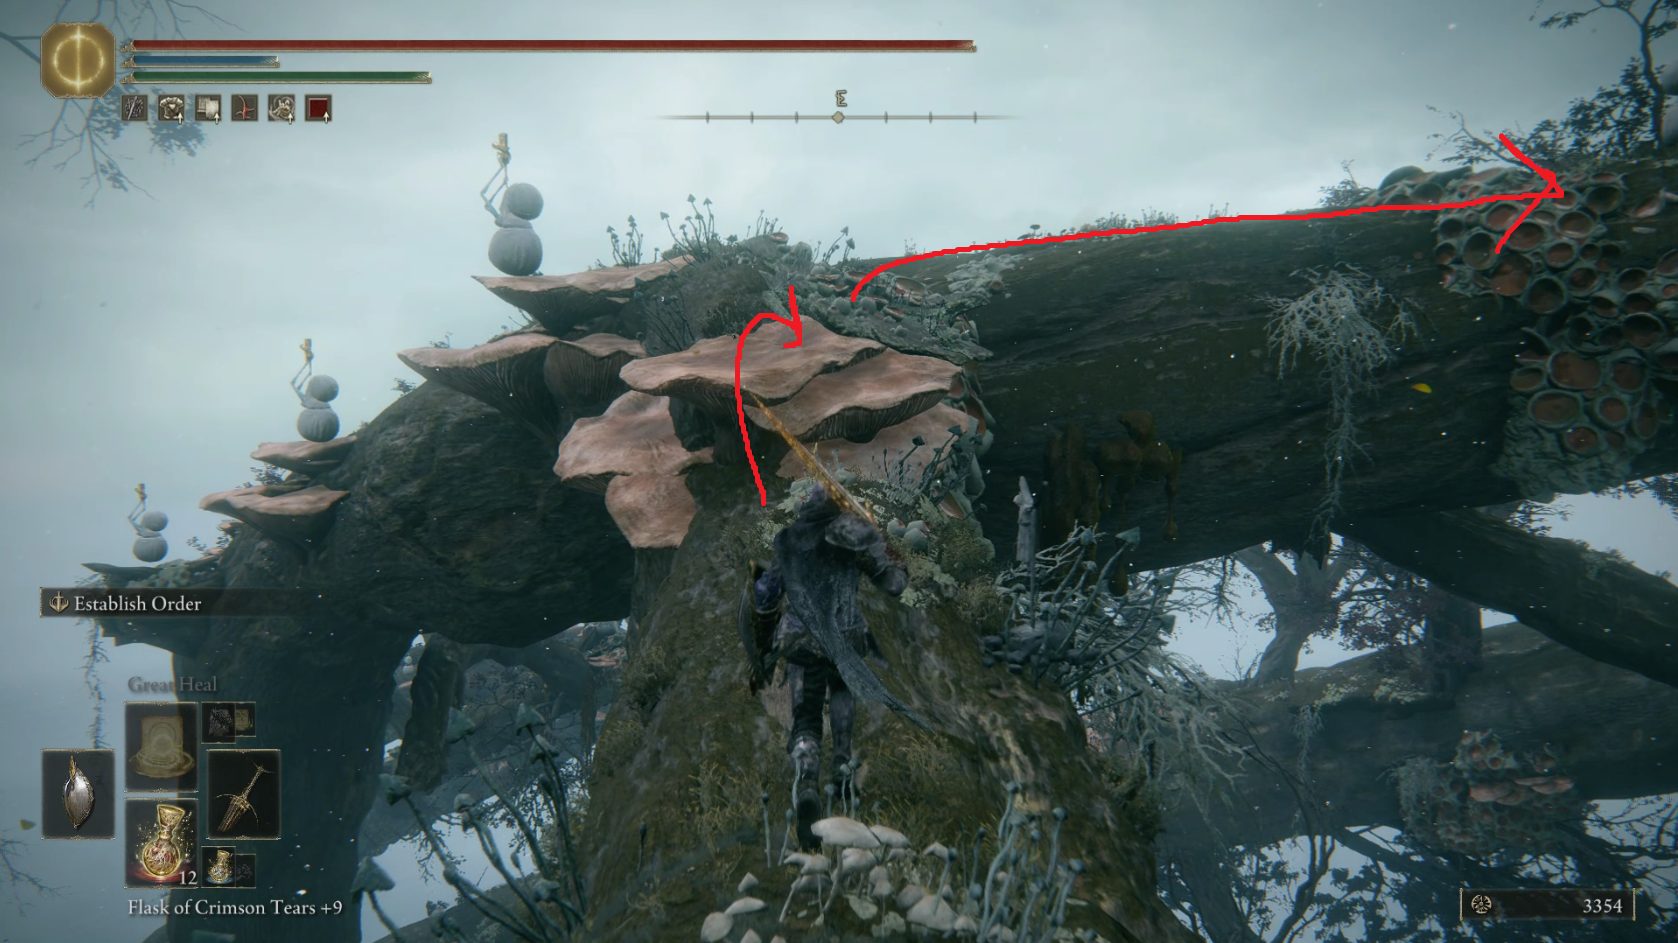
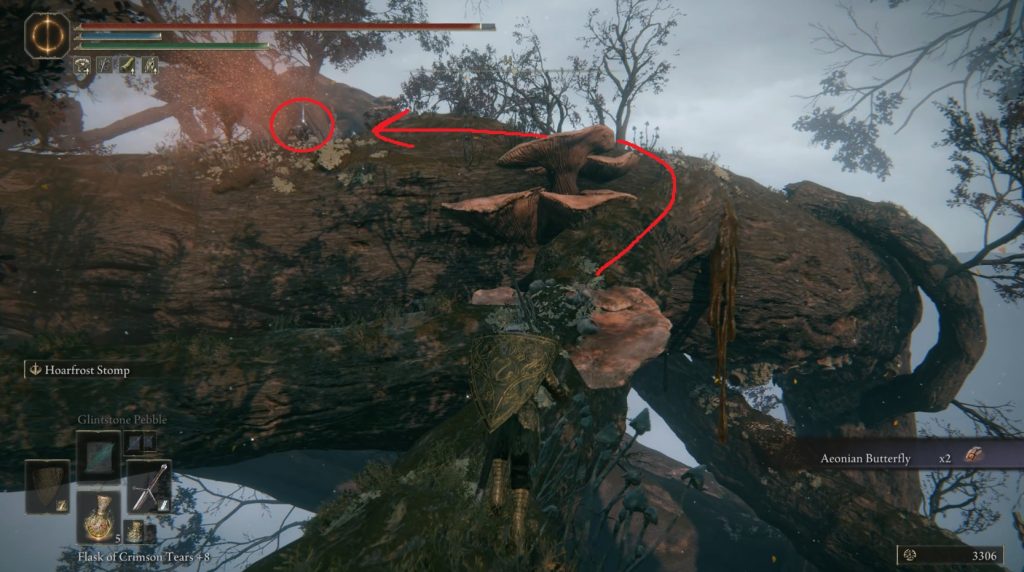
You have two choices here: The straightforward choice is to simply jump straight towards the mushrooms (Path 1 below) — this will let the envoys on the branch nearby target you easily, and you’ll take fall damage unless you equip the Longtail Cat Talisman. The more difficult (but also more rewarding) choice is to get a running start and then jump left (or right, it doesn’t matter) onto the mushroom with the corpse (Path 2). This avoids fall damage and puts you in a safer position, but you can easily screw this up and fall to your death.
You can also skip this jump and get the item from another angle, but this is the best path for clearing the canopy’s ants
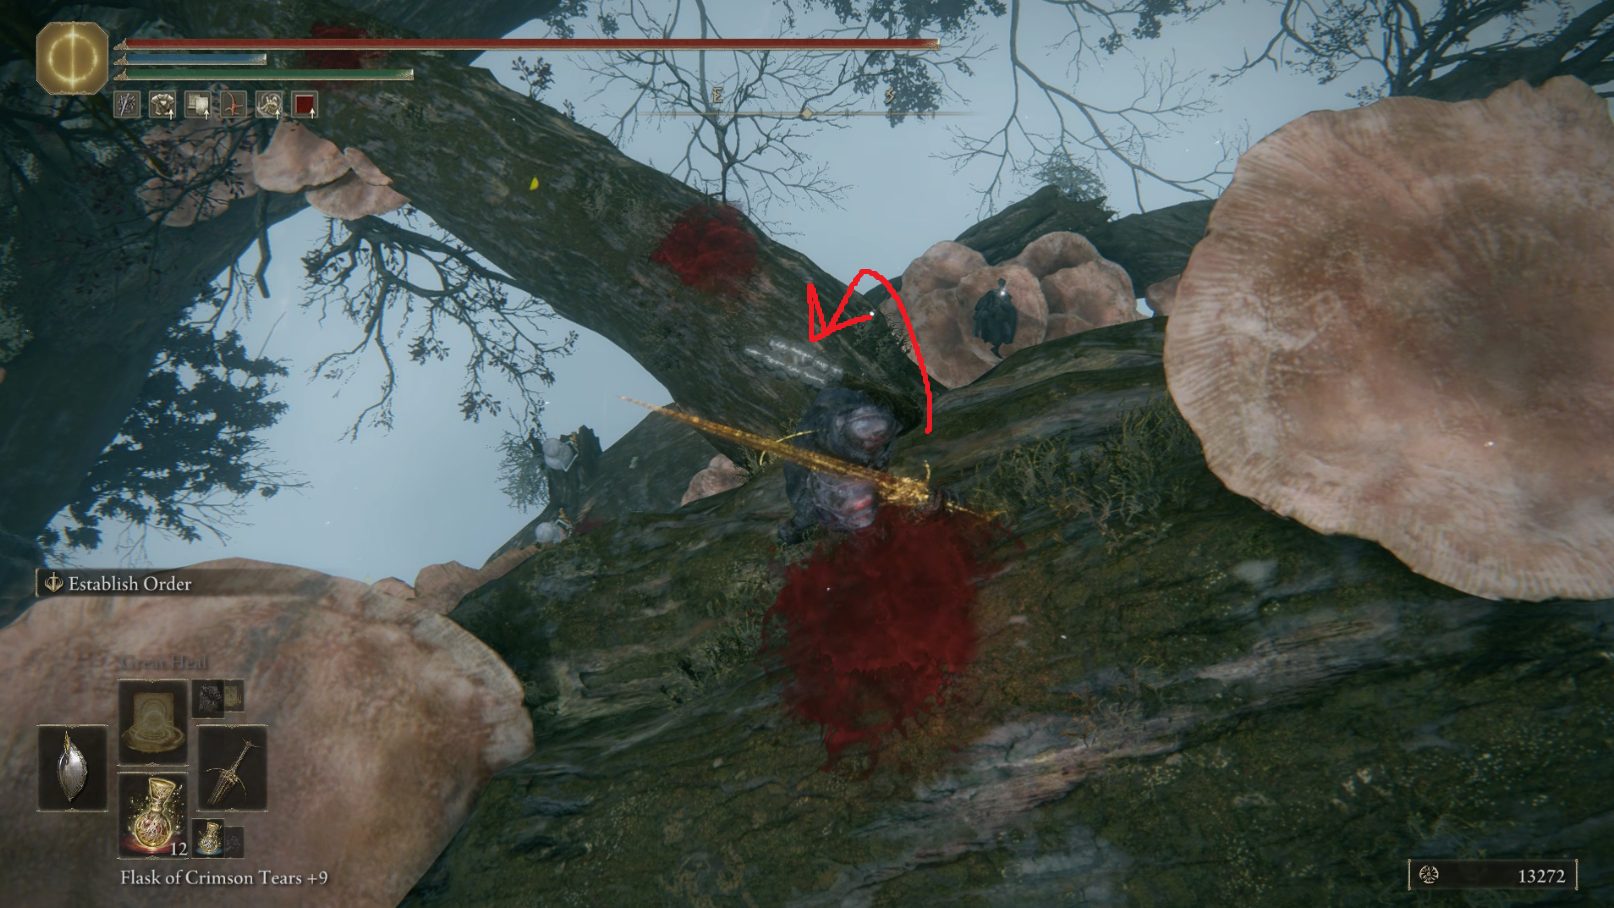
Whatever you choose, you’ll want to take cover on the far side of the mushroom clump and let the enemies come to you. Use the mushrooms for cover as you take them out, then jump up to the top to find Prattling Pate “My beloved”. Next, head north down the branch until you reach two envoys on the left who are both checking out… something in the sky. Backstab or otherwise remove them from this life, and then make your way forwards slowly (northeast) towards where the ants are marching.
The goal here is to get just one ant to come towards us so we can kill it away from its friends, so once one aggros, back up on your branch and lead it away from the central branch. Once you’ve killed three ants or four ants this way, you can head north to the nearby corpse and pick up the x4 Warming Stone it’s got for ya. Then turn around and face south, then head up the branch and take your first left onto the wide branch that leads east-southeast.
There is a large envoy that patrols on this branch, just beyond the next junction — if you’re patient, you can sneak up behind him for some bonus damage. After killing the large envoy, continue southeast on the branch to its end, where there are two smaller envoys and a rot flower. Clear these three foes out and then turn around to face northwest. Head back to the junction and take a left to go upwards to the southwest.
This next part is very difficult and you’ll come under some serious bubble attack, so make sure you’re full HP. Don’t stress if you die — you’re very, very close to the site of grace, and your runes will be a nice easy marker for where to head back to!After you pass under the branch above you, you’ll need to move very quickly, as three envoys will start firing at you. As you make your way west-southwest up the branch, you’ll pass a branch to your left — don’t take this turn, but instead stay on the branch you’re on. Just past this smaller branch, turn left and drop southward off the branch you’re on, down onto the large branch below you.
Since you killed at least three ants earlier, there should only be at most two ants left patrolling this large branch. You’ll still be under fire when you land, so move quickly — you’ll be at a fork in the branch, and you should start with path 1, which leads southwest.
You’ll find a corpse with a Dappled Cured Meat — just ahead is a patrolling large envoy. Sneak up and eliminate, then continue past it and kill the smaller envoy. Nearby on the left side of the branch is a broken branch with a corpse on it — snag the Smithing Stone [8] and then head back to the fork. This time, take path two, the one that leads south. On the left as you make your way up is a corpse with a Golden Rune [10], and at the end of the branch is a huge envoy.
Running past it is risky since it can knock you off of the branch — it’s safer to stand and fight it while facing south. Back off when it starts to attack, be patient, and attack once its melee attacks finish. If you back off far enough, it will shoot bubbles at you again, easily dodged by rolling forwards. At the very tip of the branch behind the envoy is the Envoy Crown, so make sure you grab it if weird fashion is your thing.
Now head back the way you came — just past the corpse on the right side of the branch, you’ll be able to take a right out onto a smaller branch. You’ll pass an item on your left, but don’t jump to it. We’ll get to it soon enough, I promise.
Follow the thin branch until it crosses over another branch and ends. Turn left (northeast) onto the next branch and follow it upwards. This is another tricky part, as you’ll come under fire from a few envoys. The branch you’re on will curve north, and you’ll find an enemy in your path. Take it out, and just past it turn right to head southeast to another envoy who’s shooting at you. Kill it, then turn around and go right (northeast) up the nearby branch to grab x2 Aeonian Butterfly from a corpse there.
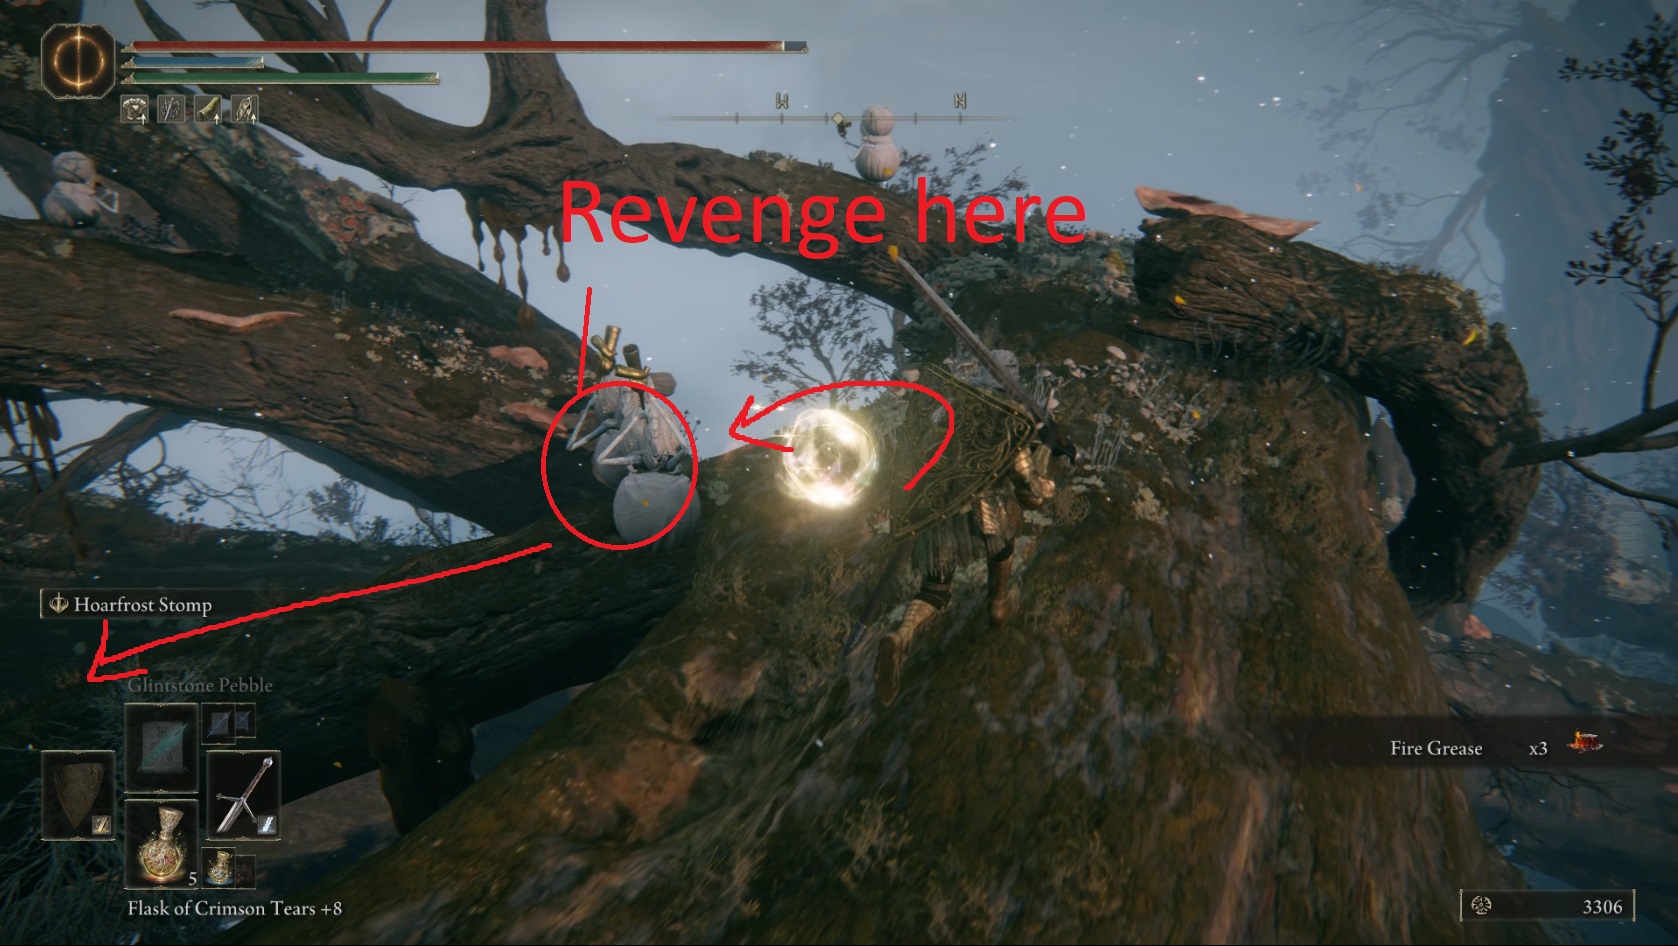
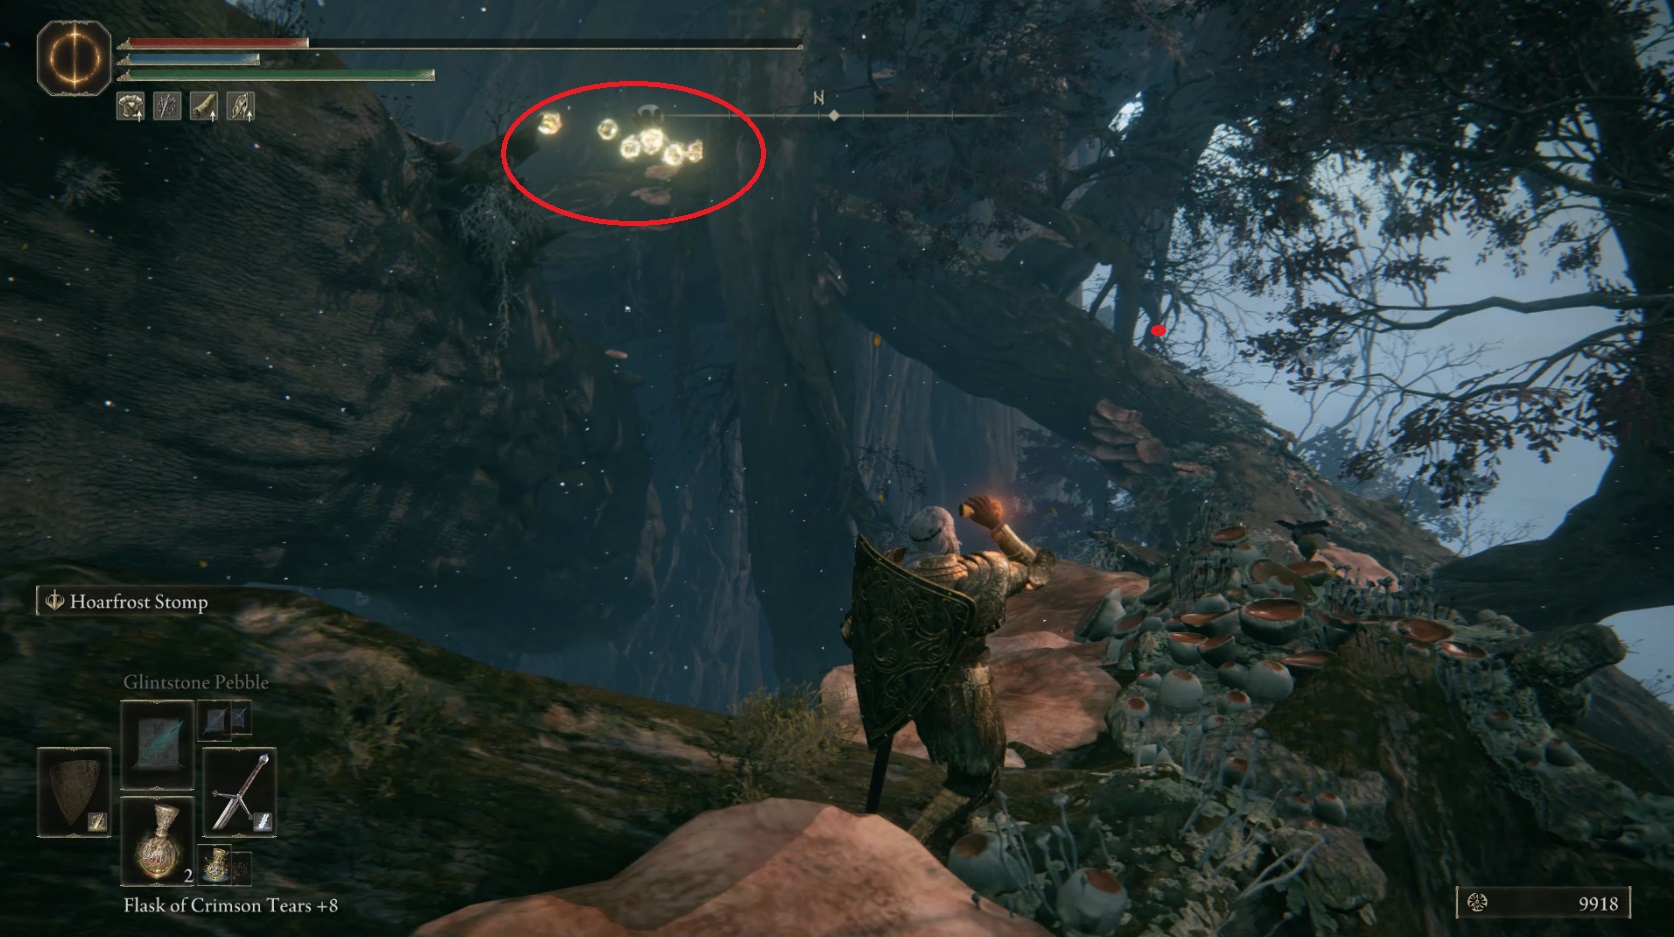
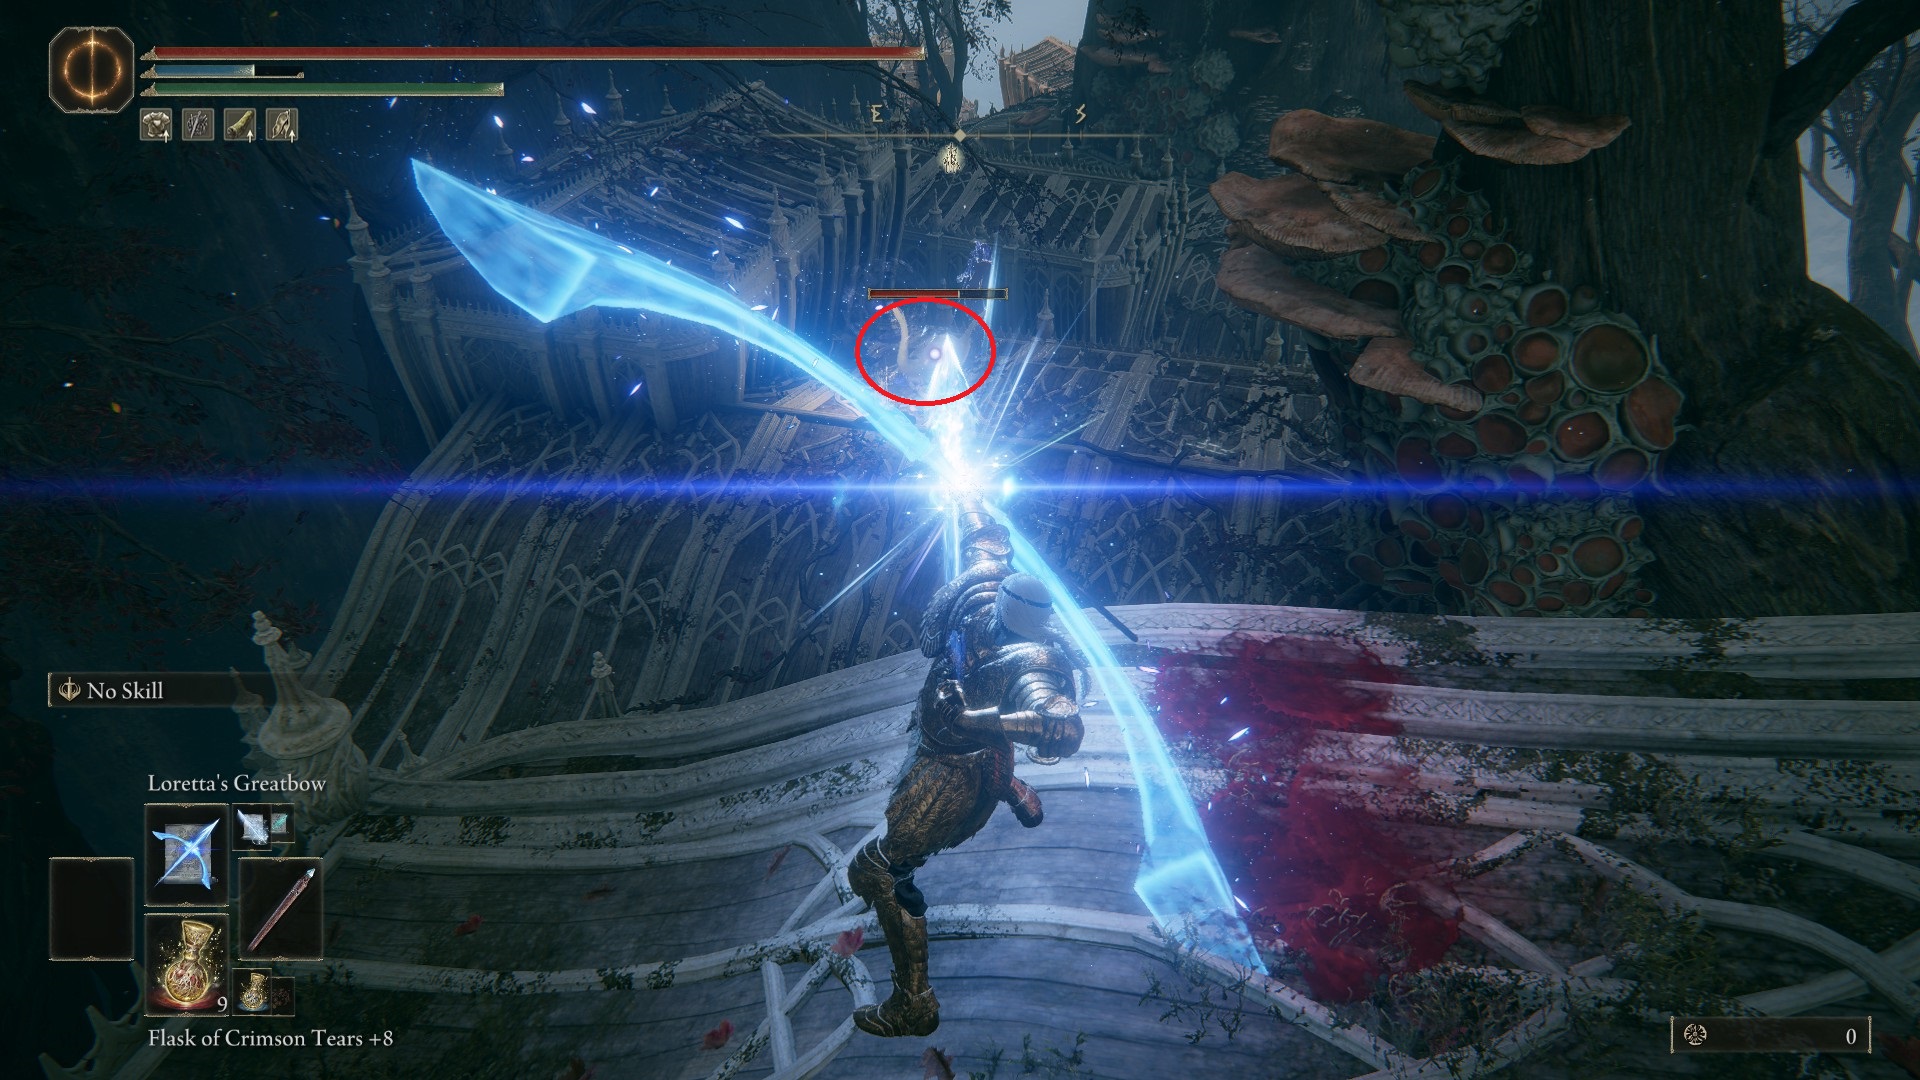
Now head west to the large junction of branches and turn left to face south — there’s x3 Fire Grease on a corpse defended by rot flowers. You can run in quickly, grab the item, and then head back to the junction and turn left (south), making your way onto the thin branch that leads to a Stonesword Key. There are sometimes three envoys on this branch (sometimes they’re on a branch further west — it depends on how you navigated). You may have to run off of the branch if the nearby large flower targets it with its ranged attack (floating white twinkling lights indicate this attack)
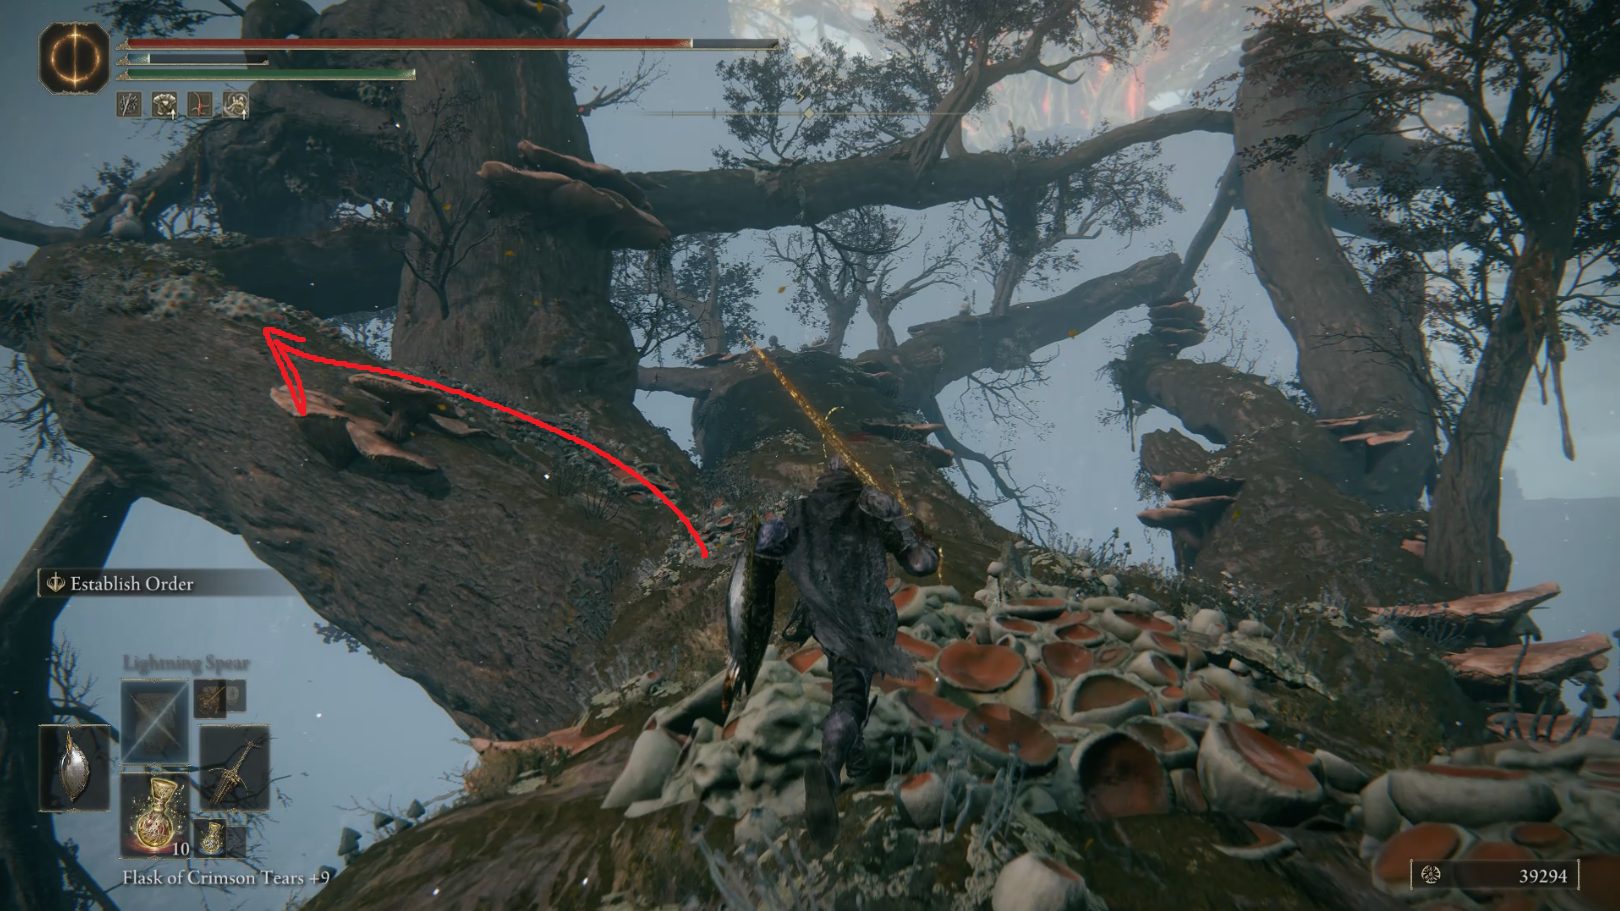
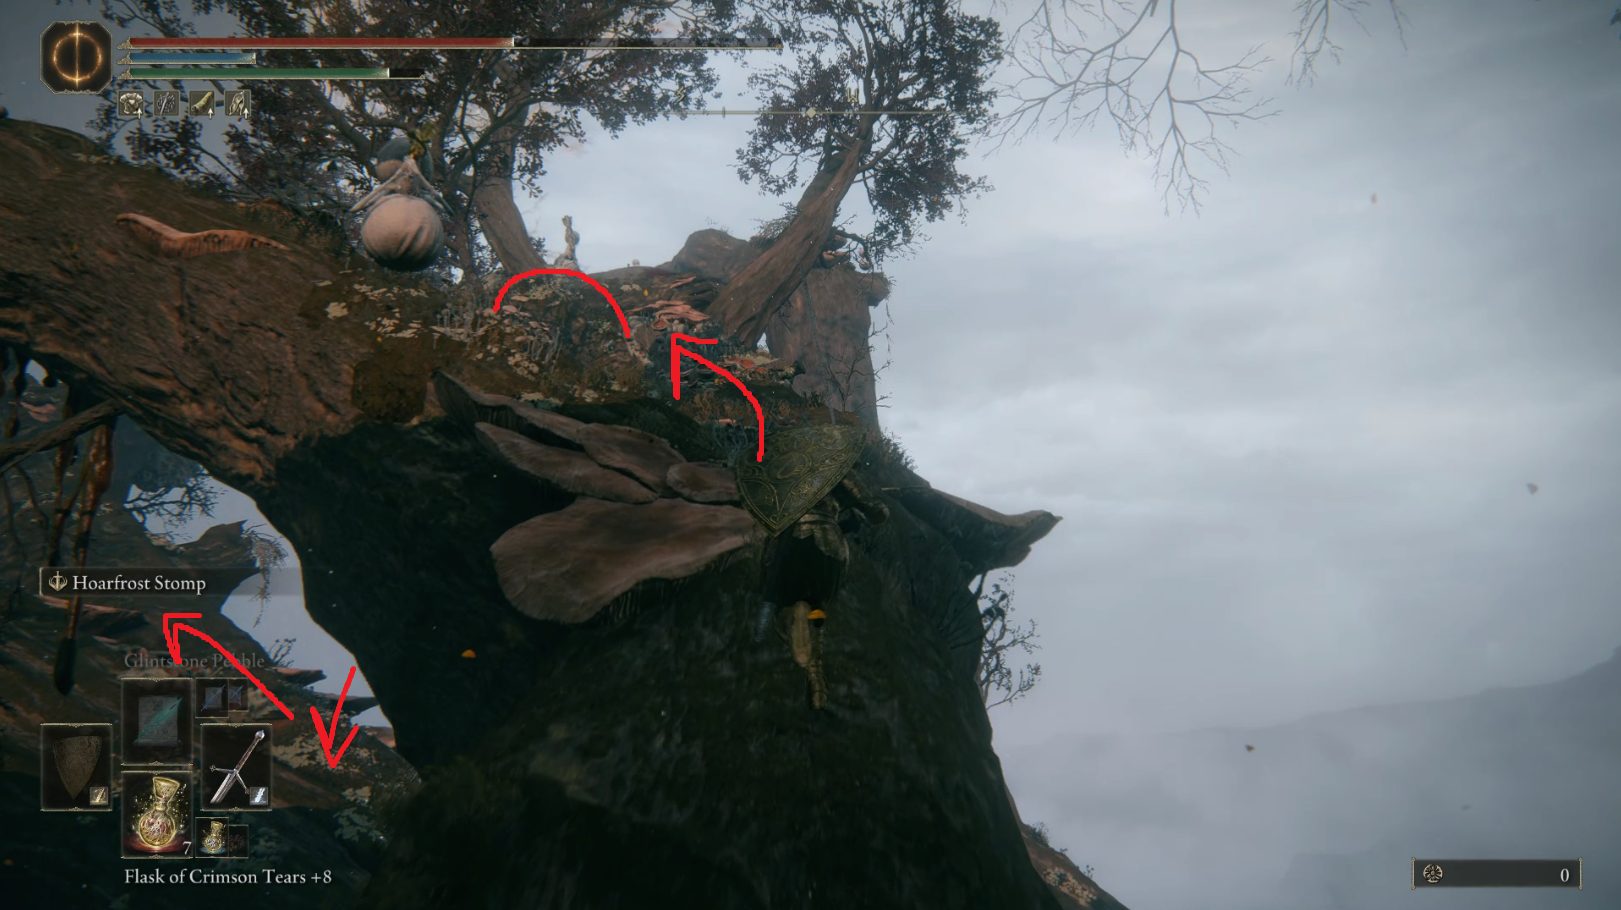
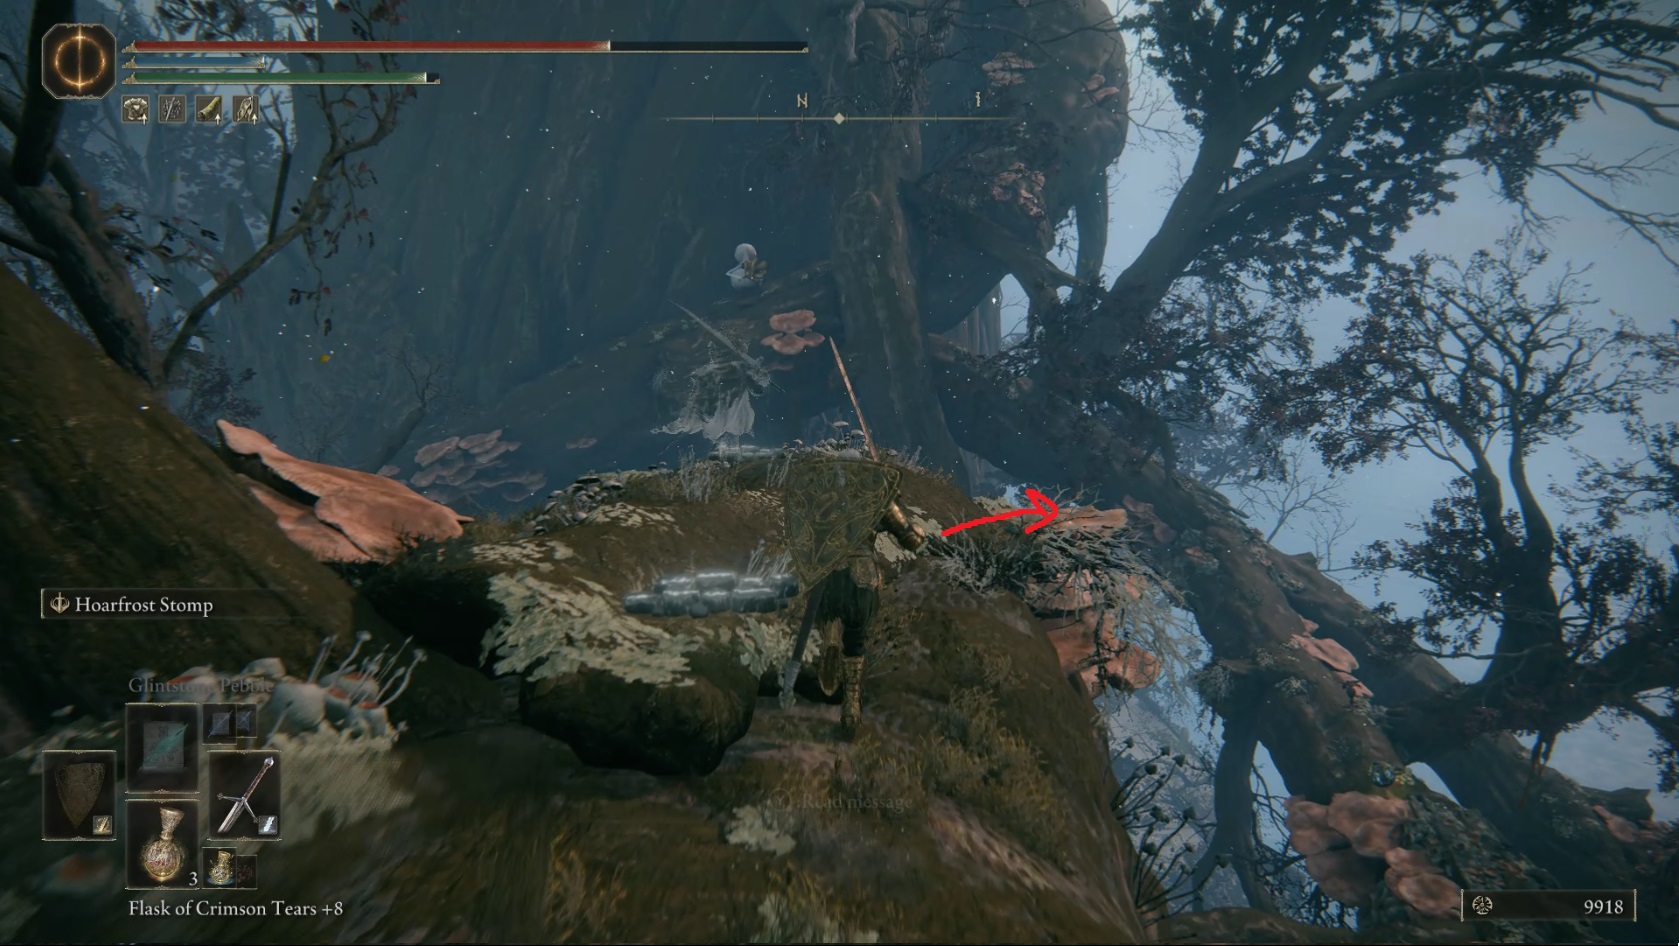
Head back to the junction and go northwest to the mushrooms, where there’s a corpse with some Preserving Boluses. Kill the nearby envoys, grab the item, and then look northwest over the edge of the mushrooms here the corpse is. You can drop down southwest onto the mushrooms below, and then drop southwest once more onto the main tree branch.
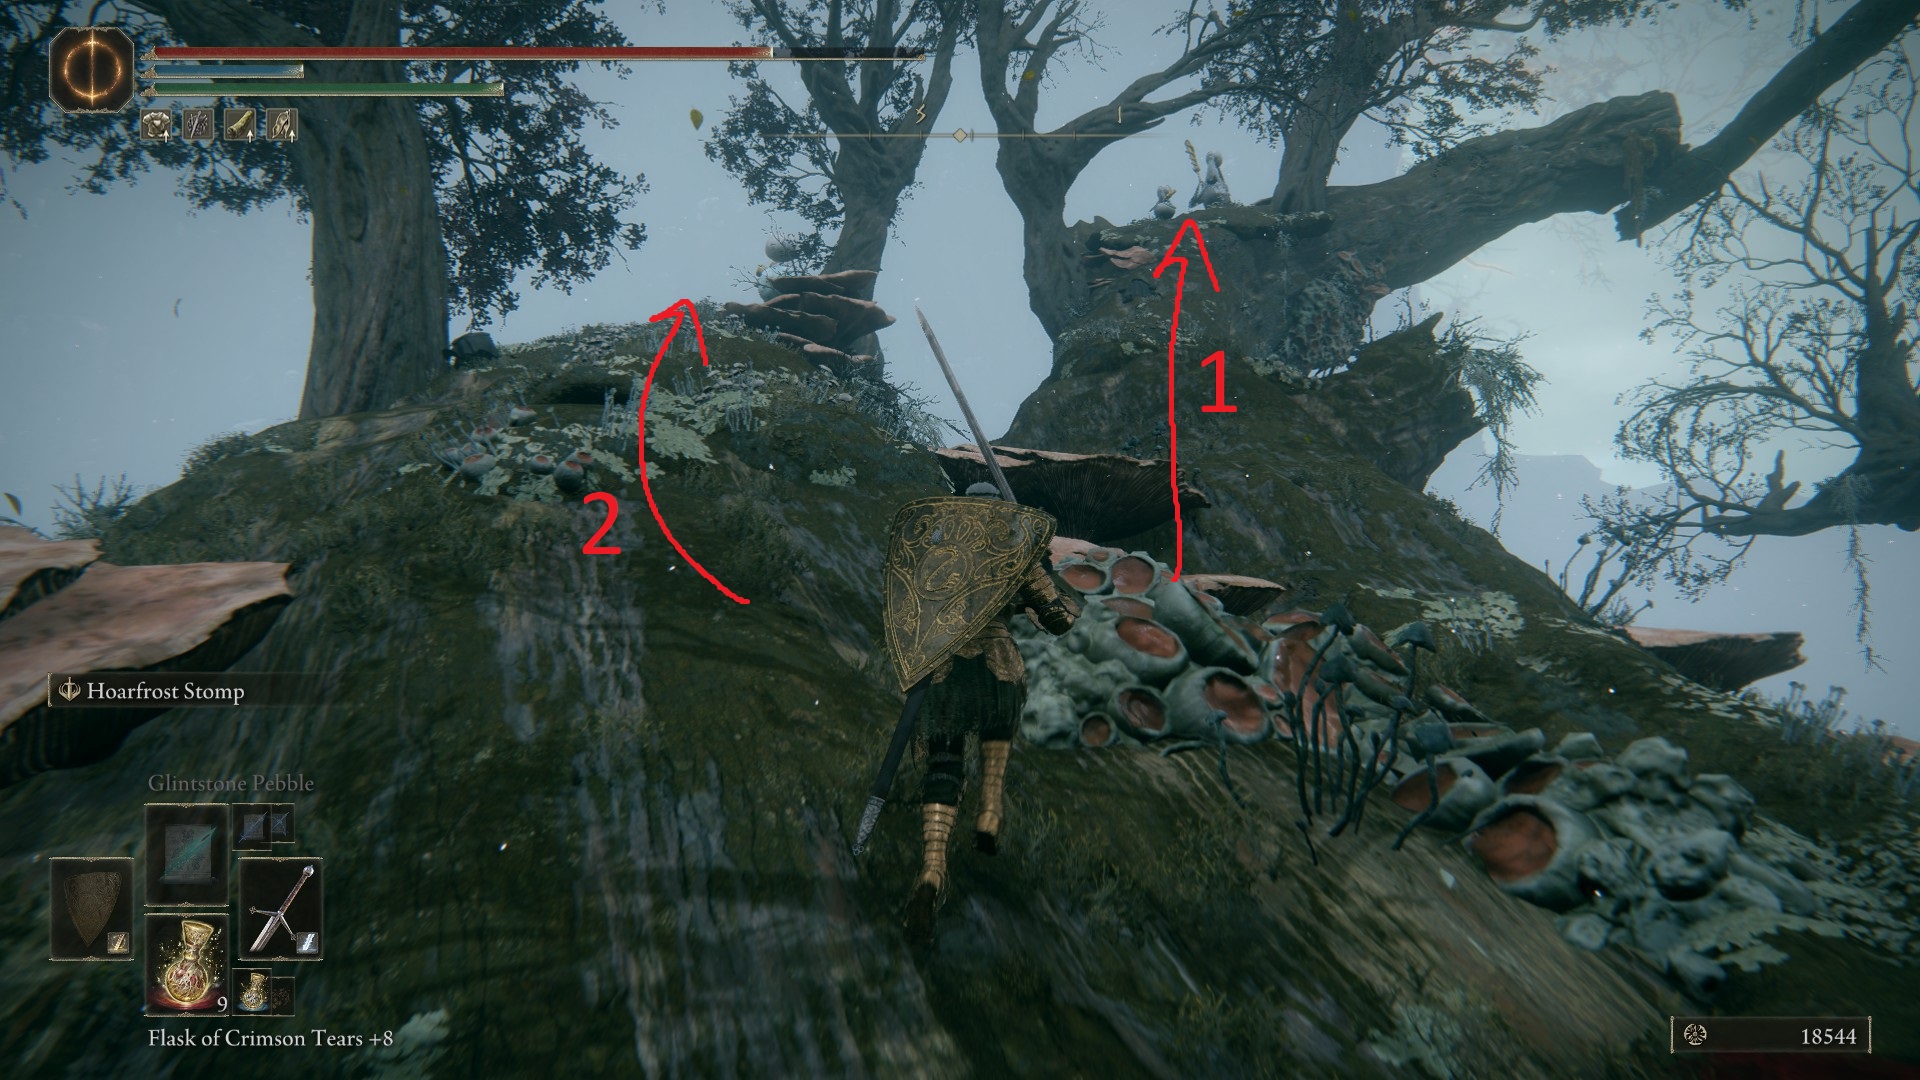
Continue north-northeast down the main branch — once you pass the branch sticking out vertically on the left, keep going a bit and look on the right side of the branch for a patch of mushrooms (1). Make your way out onto the mushrooms and drop down onto the branch that runs beneath them (2). Continue forward onto the larger branch, turn left, and then start running north-northeast. Starting when you near the mushrooms, keep an eye out for the bubbles that the huge envoy on the platform ahead is firing at you (3) — roll forwards when they get close to you and they’ll miss.
(1)(2)(3)
You’ll reach a junction where you can head on another branch, but it’s dangerous and all you’ll find is an Aeonian Butterfly, so it’s best to just continue northwest at the junction — do so quickly, as there’s a rot flower here. Grab the Golden Rune [13] from the corpse on your way up the branch, and then continue up onto the big branch where the huge envoy is. Again, be patient when you fight this foe.
Head east-northeast up the large branch — it will curve left, and where it meets the Haligtree there are three envoys (comically arranged by size). This is a very difficult fight, and you’re probably better off trying to run past them and grabbing the Oracle Envoy Ashes, which are just in past and to the right of the huge envoy. Run back down the branch, past where you fought the other huge envoy, and take a left onto the branch that leads up to a small platform — here you’ll find some Lost Ashes of War. Head back the way you came, onto the large branch, and then back to where you fought the large envoy — once there, drop down onto the large branch below.
Dropping back onto the main branch
There are a number of rot flowers here, but there is also a Numen’s Rune and x10 Flaming Bolt on corpses that are south of you, further up the large branch. Head up the branch and grab both items, then turn around and go back north through the rot flowers. The branch will end at the Haligtree trunk, and on the left side of the branch is a stone platform with a ladder. Take the ladder down, and then continue west-northwest down the stairs to find the Haligtree Town site of grace.
This walkthrough continues in tab 2 — Haligtree Town!
From the Haligtree Town site of grace, head northwest out the doorway and down the stairs. You’ll run into a winged misbegotten patrolling here. Take it out and then continue northwest down the next set of stairs, where two misbegotten are praying with their backs to you. You can sneak up and take them out, or you can just grab the Golden Rune [10] from the corpse — they won’t notice if you’re crouched.
If you spend long enough here, the first of many mushroom zombies (let’s call them shroombies) will drop down from the platform above, so don’t let it scare you. There’s a ladder on the northwestern corner of the platform you’re on — climb it to reach the upper platform. There are a bunch more shroombies up here, plus a single winged misbegotten. You can ignore all the enemies here (the shroombies can be avoided, and the misbegotten just keeps scratching at the ground) and pick up the x2 Rot Grease from the corpse.
Look southeast, and you’ll see another platform you can jump to. Do so, and start sneaking once you’re on the next platform, as there’s a misbegotten warrior here you can avoid if you so choose. Grab the Pearldrake Talisman +2 from the far end of the platform, and then you can go northwest, back to the gap you jumped, and simply drop down to the platform below. Continue north down the stairs, but watch out for the shroombie waiting to push you off the platform — it’s hiding just around the corner at the bottom of the stairs.
The ambush paths of the two lurking enemies
Sprinting or rolling will allow you to avoid being knocked off the platform, and you can then continue into the doorway. You’ll need to roll backwards after you get in front of the doorway to avoid being pushed off by the second ambusher — then head inside the building. In front of you on a corpse is a Smithing Stone [8], but around the corner on the right is a large misbegotten you should deal with first. Then grab the stone and sneak down the stairs and turn around — there’s a winged misbegotten hiding under the stairs. Kill it, and then check behind you to make sure the large misbegotten across the room hasn’t noticed you.
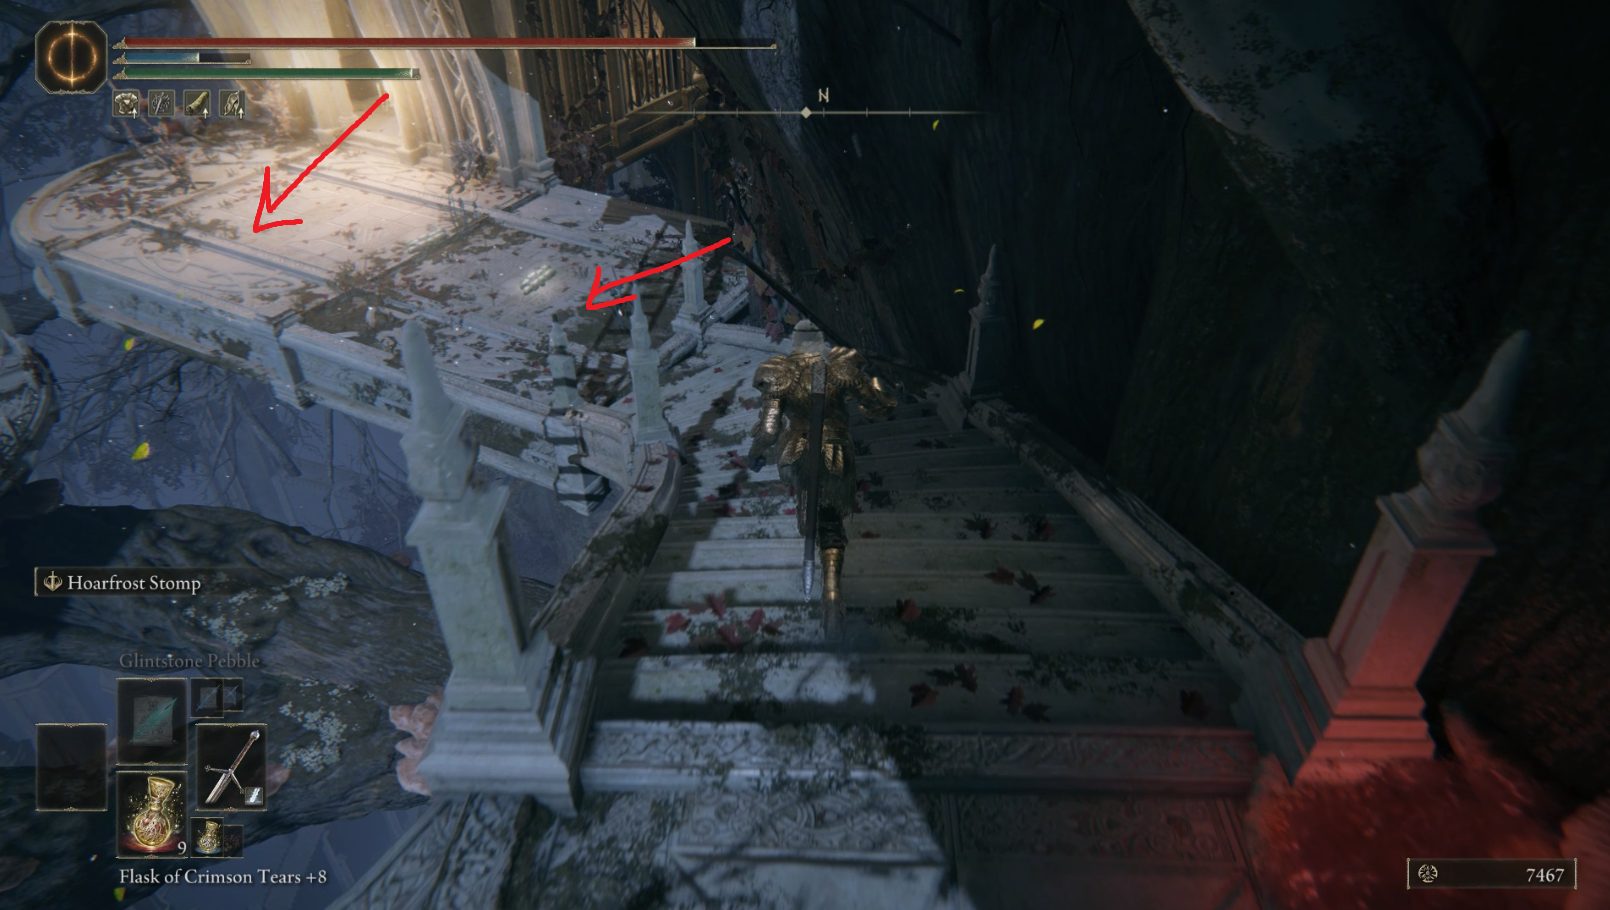
Assuming it’s still chilling, head through the doorway to the south-southwest and grab the Golden Rune [13], avoiding the shroombie out on the balcony as you do. Then go back inside and sneak north-northeast to the corpse near the enemy. You can kill him if you want, but he can’t chase you after you jump. Loot the x6 Hefty Beast Bone and then back up, get a running start, and jump north-northeast to the platform. When you land, turn left and go north-northwest across the bridge, snagging the x5 Fire Grease as you do so — don’t linger here, or the flowers below will hit you with their ranged attacks.
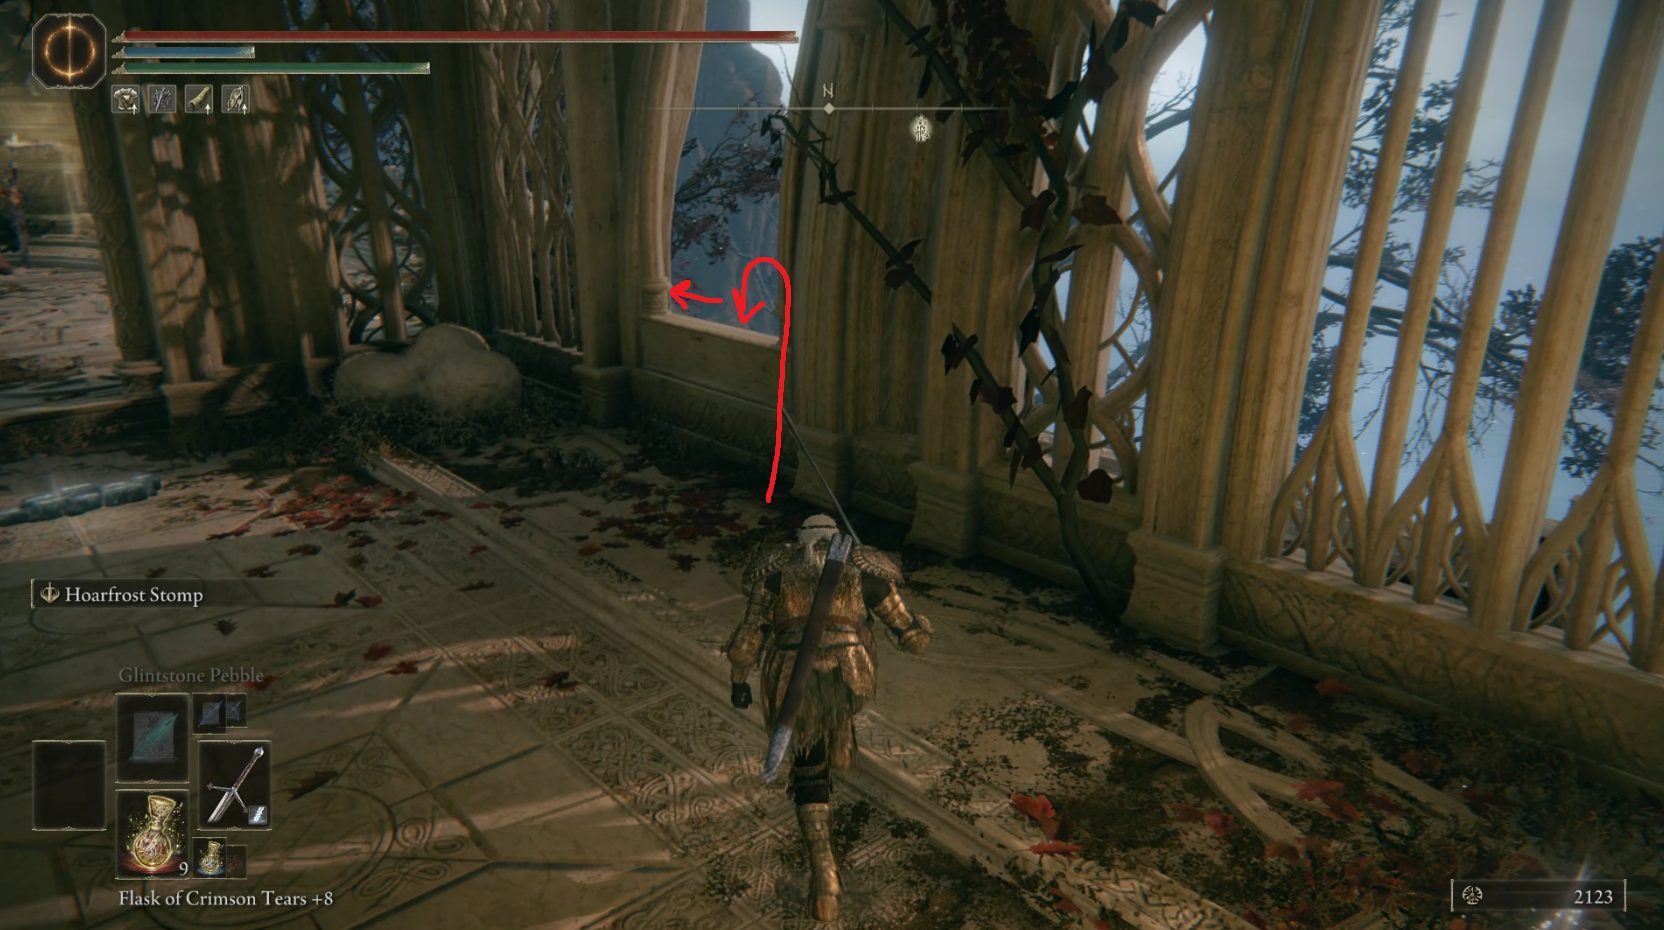
In the building, jump carefully out of the window and then sneak left to backstab the misbegotten who was planning on ambushing you. This shouldn’t aggro the other enemies, however the other misbegotten will notice you as you cross the pavilion, so you’ve got a couple of choices: you can fight the enemies here, or you can grab the Ancient Dragon Smithing Stone (it’s at the base of the statue the misbegotten warrior is facing) and then run southwest into the other building.
In the next building, you can turn left to go out onto a balcony with a Somber Smithing Stone [8] guarded by a misbegotten — there are also two shroombies waiting on the left of the balcony who will try to push you off. If you just ran past the enemies guarding the Ancient Dragon Smithing Stone, you’ll have to backtrack to the balcony. Either way, continuing southwest out of the building and across the wooden bridge will bring you to the Haligtree Town Plaza site of grace.
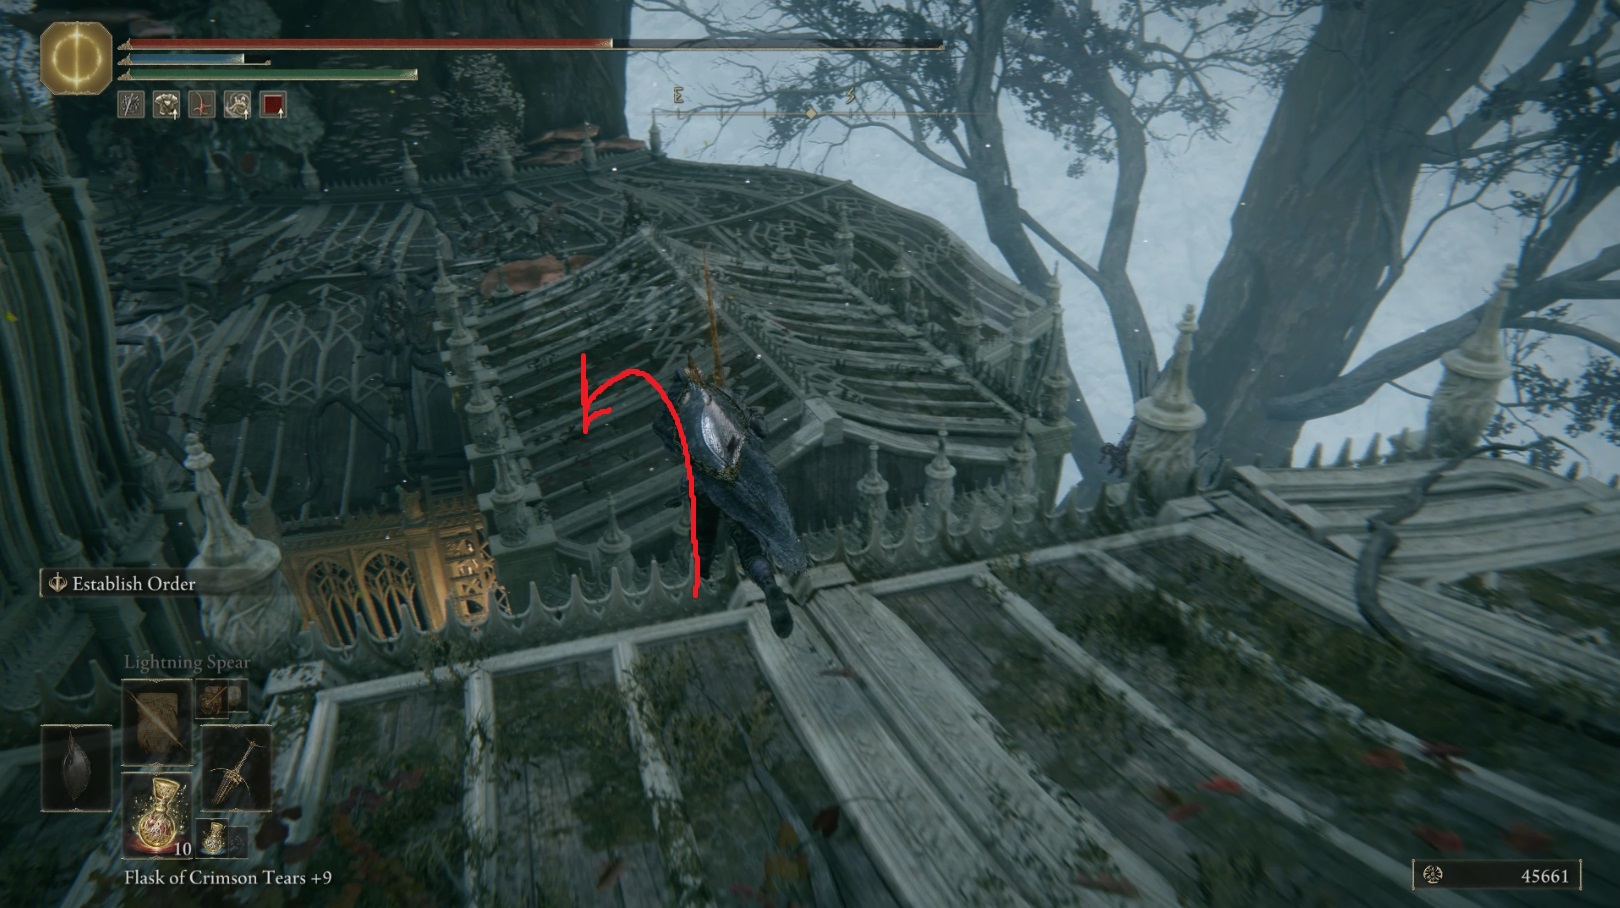
Make sure you grab the Golden Rune [12] from the corpse sitting against the statue, and then go south from the site of grace and do a running jump onto the nearby roof. Pick up the Smithing Stone [6] here, and then — if you’ve got a ranged build — you can kill a spiritcaller snail to the southeast from up here, which will save you some trouble later. Then turn around and head northeast to the other side of the roof, and drop carefully onto the branch below.
Continue forwards (northeast) and try to pull just one ant at a time onto the branch you’re on. Once you’ve cleared all three ants, you can grab the x4 Aeonian Butterfly from the corpse, plus an extra one further east up against the tree trunk. Then go back to the building you jumped off of and head inside, avoiding the shroombies as you loot the corpse’s Somber Smithing Stone [9]. Continue southeast out of the building and immediately turn right twice — against the western exterior wall of the building you’ll find a spiritcaller snail. Kill it before the crystalian it summons can leave the building, and then go east-southeast, where another spiritcalling snail is guarded by a crystalian (unless you killed it earlier from the rooftop, in which case it will be dead).
Don’t bother fighting the crystalian — if it still lives, just kill the snail ASAP. The crystalian by this second snail is the most dangerous, since it has a spell that can one-shot most builds; if you see the crystalian aiming its staff towards you and charging up a spell, you’ll need to hide around the corner behind you. Once you’ve killed the second snail, run southwest from its location, where a third snail is hiding just past the edge of the roof on a small balcony below. Once you kill this snail, all the crystalians will be gone, and you can pick up the Golden Rune [10] from the corpse by where the second snail was. Then head southeast and, with a running start, leap further southeast to the next set of rooftops.
Turn around and — with another running start — jump into the room to the northwest. Pick up the Golden Rune [12] from the corpse and then continue further into the building, where you’ll find a chest with the Viridian Amber Medallion +2. Head back to where you jumped into this building, and then do a running jump southeast. Continue past the shroombies to the ladder on the wall and climb up. At the top, go east-southeast and pick up the Smithing Stone [6] from the corpse, then go down the ladder on the eastern edge of the rooftop.
Optionally, you can head west into the doorway next the ladder — there are a few shroombies here, and if you take your first right you’ll be ambushed from the right by a winged misbegotten in a room with a Sacramental Bud. Back outside, head southeast into the doorway across from the ladder. Just ahead in this building you’ll encounter a misbegotten praying — sneak up and backstab it, then turn around and fight the other misbegotten that has likely aggroed.
NOTE: The next area involves fighting some pretty tough enemies. If you find yourself unable to defeat them, you can ignore them and just grab the items. Additionally, if you don’t want to have to deal with them at all, you can run out of the eastern doorway in the room with the two misbegotten, onto the bridge, and then jump left (northeast) onto the platform with the shortcut elevator.
Head to the southern side of the building and do a running jump out of the doorway onto the tree branch.
Grab the Aeonian Butterfly from the end of the branch, then go back a bit, get a running start, and leap from the tip of the branch to the balcony to the southeast. Sneak to the right, counter-clockwise on the balcony, and ambush the battlemage. You can’t backstab him, so just charge up your most powerful attack and unleash it on his unsuspecting back.
These guys hit hard with their spells — while it’s OK to trade melee blows with them, if you see a spell being charged up you’ll need to roll away or else dodge through it. Take advantage of the fact that you’re smarter than the battlemage, use the walls to avoid damage and only attack after the mage has whiffed an attack. Be especially careful of the Gavel of Haima attack, as it can be cast twice. Note that some of the spells have fairly large areas of effect, so they can often hit you through walls.
Once the first battlemage is dead, head into the building he was guarding to find a Hero’s Rune [4]. At this point, the second battlemage is probably making his way towards you via the bridge to the east, so deal with him next, again using the building for cover whenever possible.
There’s no shame in hiding from scary spells
Once the second battlemage is dead, pat yourself on the back, ’cause those guys are tough! Then go east across the wooden bridge, grab the Smithing Stone [7] from the end of the bridge on your left, and then in the building pick up the Smithing Stone [8]. Cross the wooden bridge that leads northwest, and ride it up.
Head straight off of the elevator to find yourself back at the Haligtree Town site of grace — this is the shortcut you’ll use if you die to the boss. You probably need to rest, so do so before getting back on the elevator and riding it back down. From the elevator, head southeast on the bridge, then turn left and cross the bridge that runs northeast. When you’re ready, you can head through the gateway to face Loretta, Knight of the Haligtree.
With Loretta defeated, you can activate the Haligtree Promenade site of grace and rest, then go north through the gateway. Continue forward to the tree trunk, and turn right to head northeast down the hard-to-spot stairs. They’ll wind around the tree and lead to a ladder, which you should head down. If you didn’t know, this is a great time to tell you that you can hold down + sprint to slide quickly down ladders.
At the bottom of the ladder, head southwest and continue around the corner. Ignore the doorway to the elevator for now, and continue up the stairs ahead. At the top of the tower, open the chest to find another Ancient Dragon Smithing Stone. Then you can head back down the stairs and turn left into the doorway. Ride the elevator down, and head north through the doorway to go outside and get your first view of Elphael, Brace of the Haligtree.
Turn left and go northwest across the bridge — on the right side of the middle of the bridge is a corpse with x3 Holy Grease. The doorway ahead is guarded by a Cleanrot Knight, but you should ignore her and run inside to activate the Prayer Room site of grace before you fight her.
This concludes our walkthrough of Miquella’s Haligtree! Use the buttons below to navigate back to the main walkthrough page or continue to the next section.
Unabashed FromSoftware fanboy still learning to take his time with games (and everything else, really). The time he doesn't spend on games is spent on music, books, or occasionally going outside.