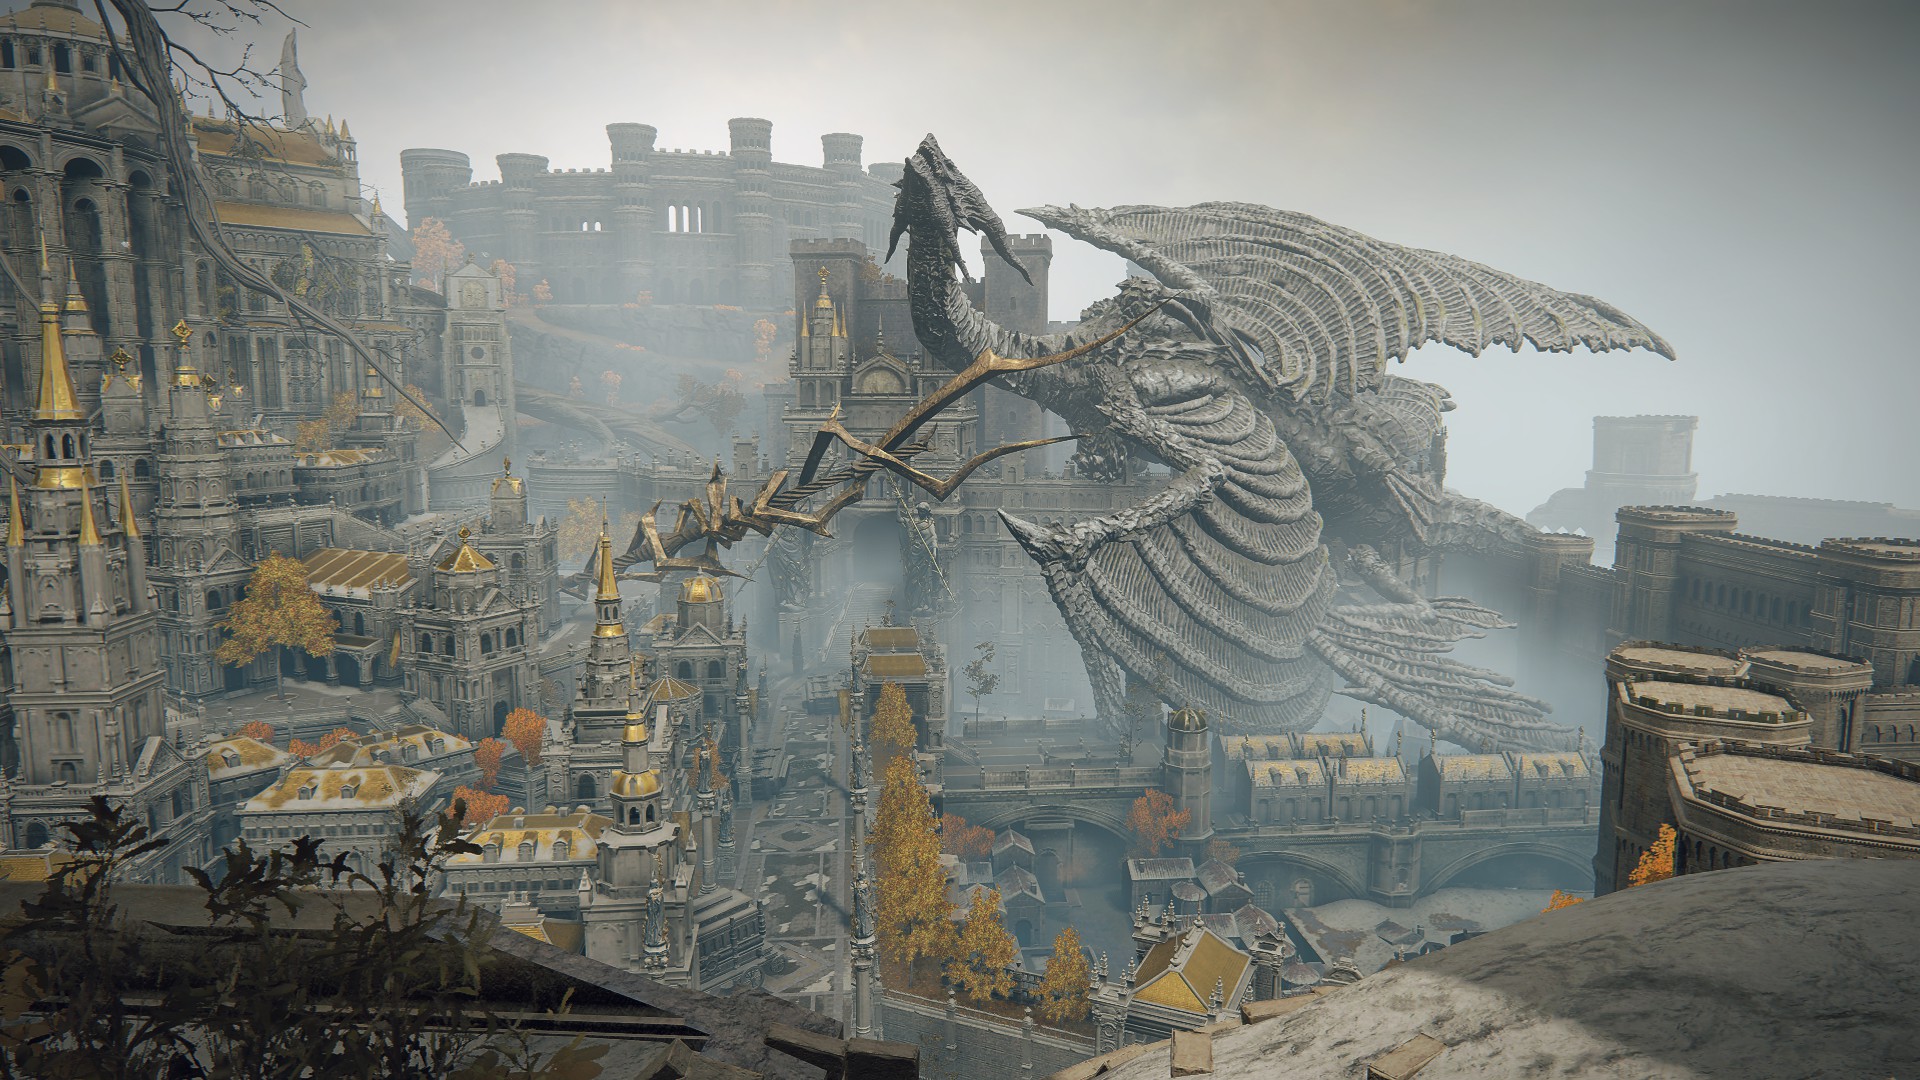
The royal capital sits on the eastern portion of the Altus Plateau, and is both the gateway to the endgame and the location of the Erdtree. The city itself is a maze of alleys and includes a lot of verticality, so it’s easy to get turned around. Much of this area is optional, but in this walkthrough we’ll do our best to guide you through the whole place! (You can also see how to go directly to the boss in the “Route Straight to Godfrey” section below).
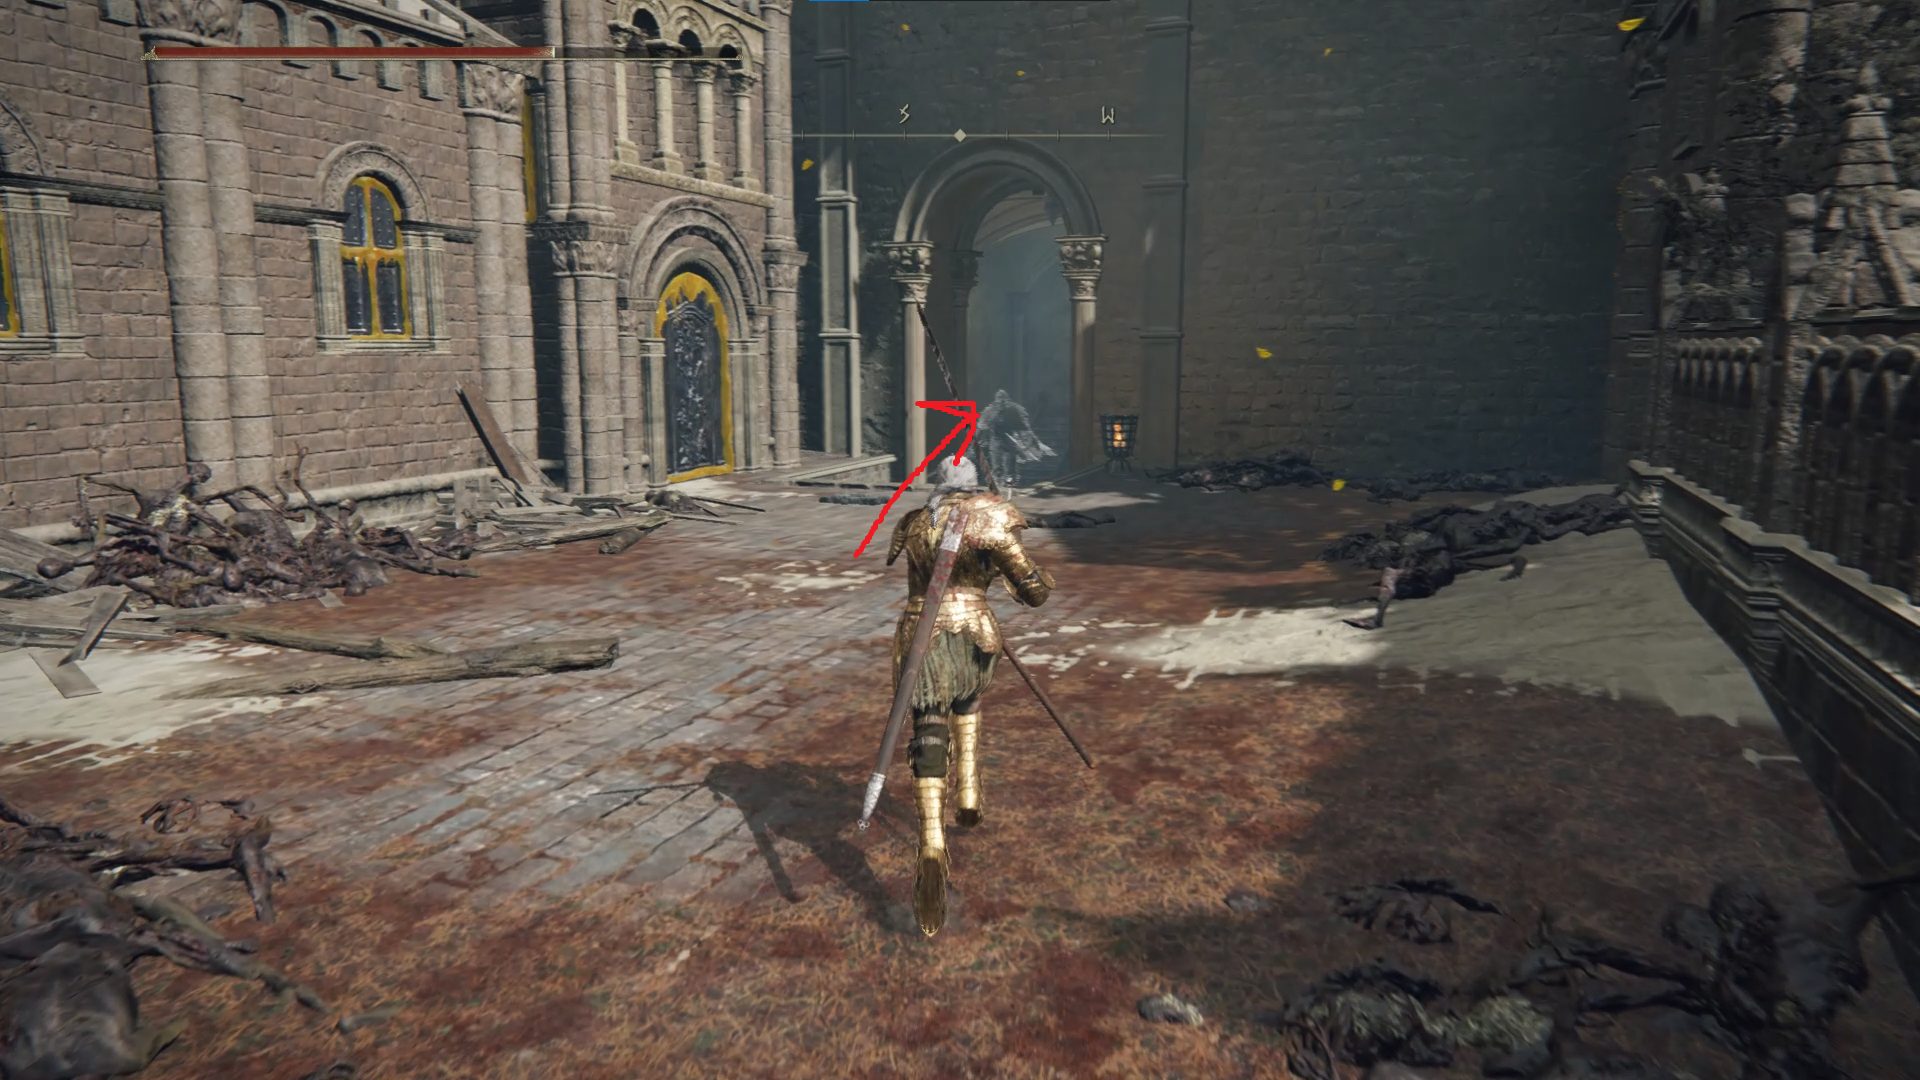
To reach the royal capital, you’ll need to first reach theAltus Plateau. From there, you’ll want to make your way through the Capital Outskirts and to the northeastern section of the inner wall. The Draconic Tree Sentinel guards the entrance to the city, so you’ll have to defeat this boss before you can continue into Leyndell. Note that you need two Great Runes to enter the capital — otherwise, you’ll find the way into the capital blocked by a seal. The easiest Great Runes to get are Godrick’s (in Stormveil Castle) and Rennala’s (in the Academy of Raya Lucaria)— naturally, you’ll need to kill these bosses to acquire their runes.
The shortest path to the Draconic Tree Sentinel from either of the two Altus entrances
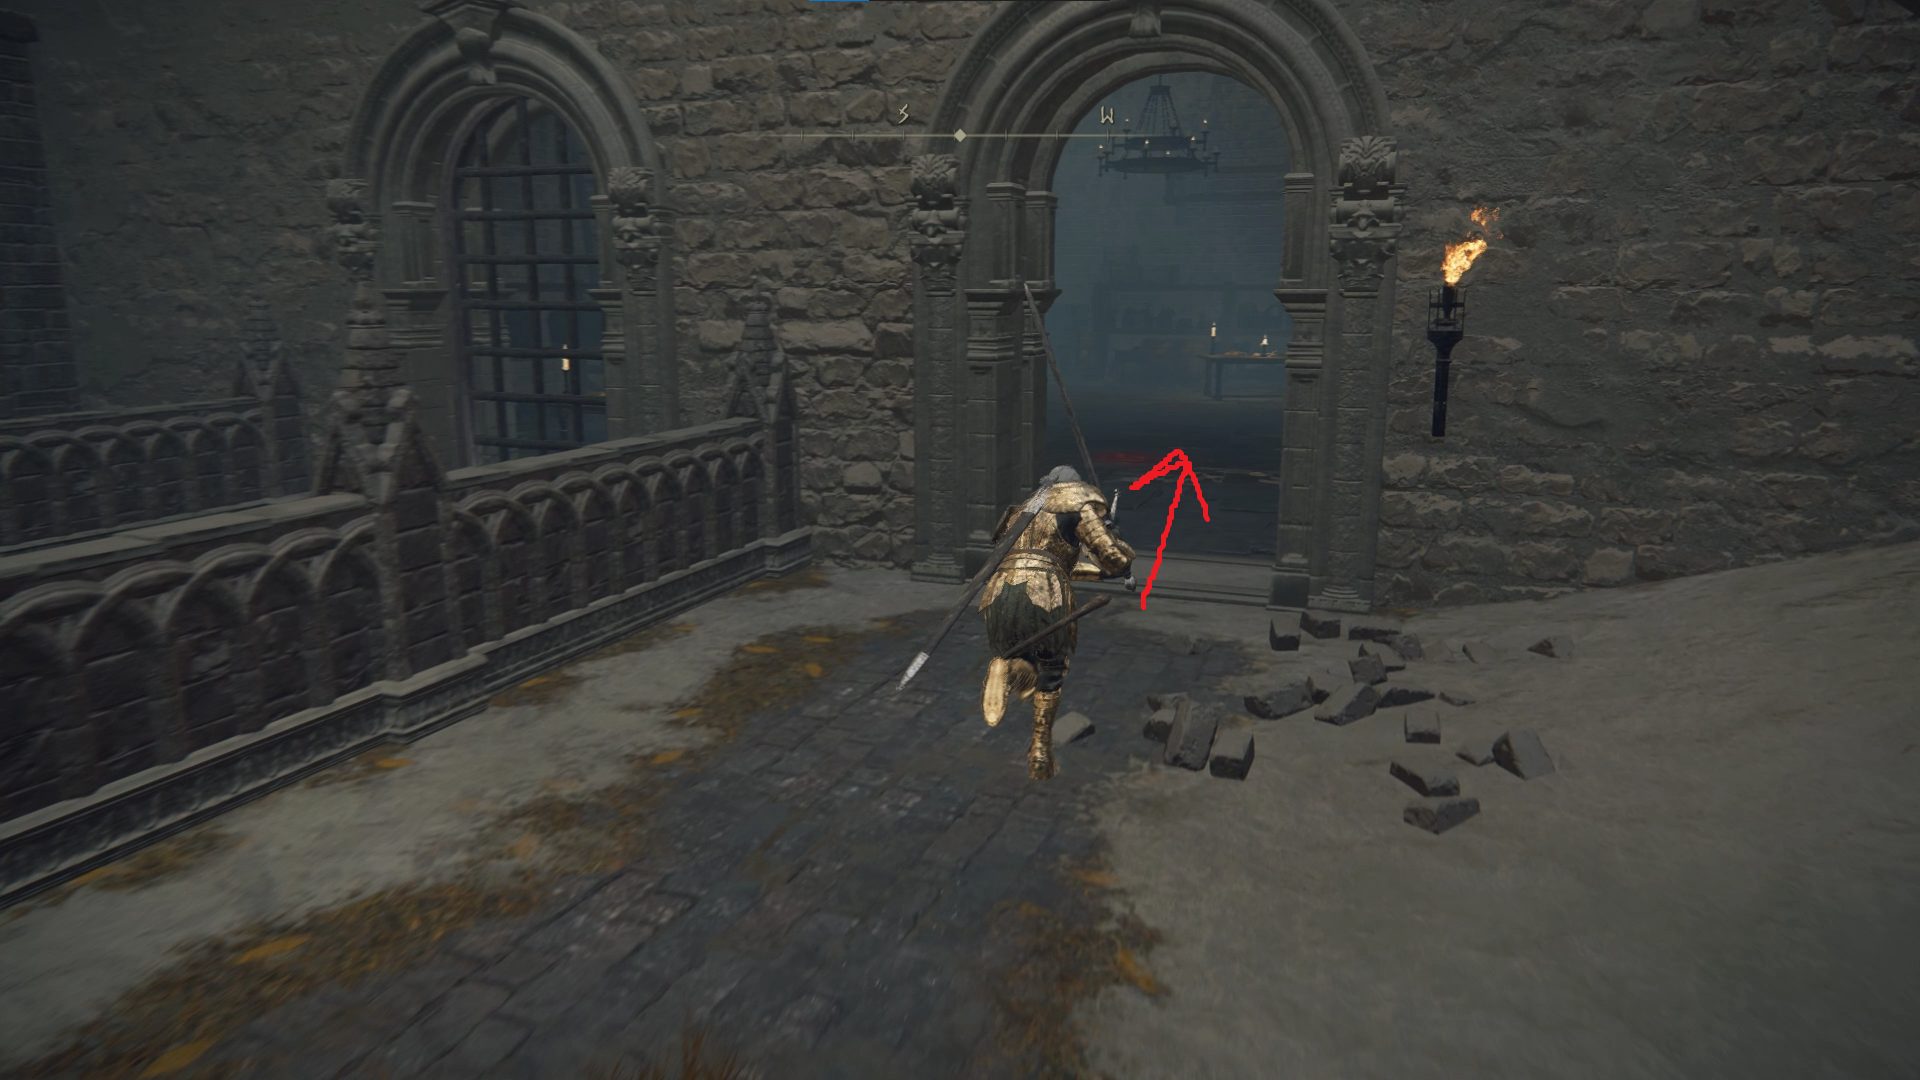
If you’re on NG+ or just something beyond your first playthrough, you may want to go directly to the boss rather than scouring Leyndell for loot. If that’s the case, here’s how to go directly to the boss from the East Capital Rampart site of grace.
Walkthrough
Because this area is so large, this walkthrough is split into different sections — use the tabs below to navigate!
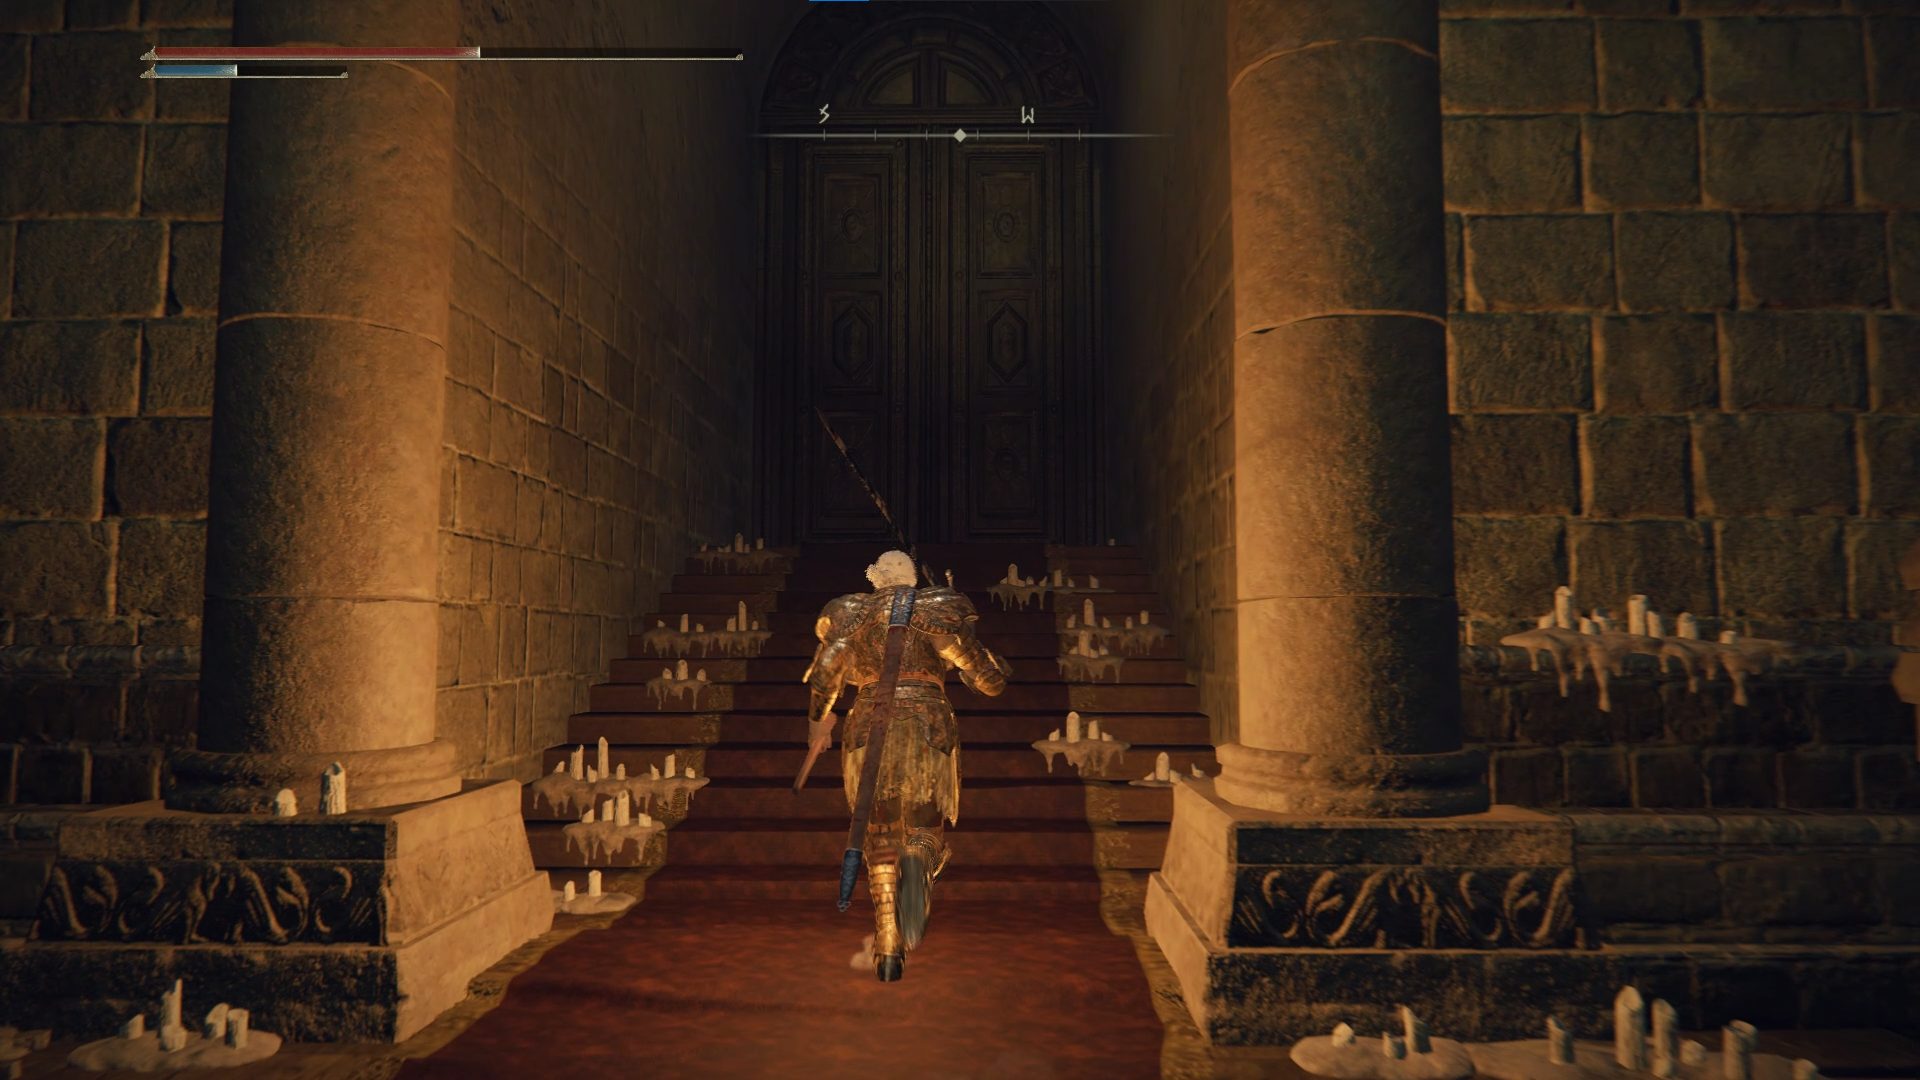
Once you’ve defeated the Draconic Tree Sentinel, you’ll be able to go through the doorway previously blocked by the fog gate and grab the Capital Rampart site of grace. From there, continue southwest across the rampart and into the doorway. Take a left and continue up the stairs, where you’ll find an elevator. Ride it up and continue southeast into the hallway, where you’ll find a corpse on your right with x3 Magic Grease.
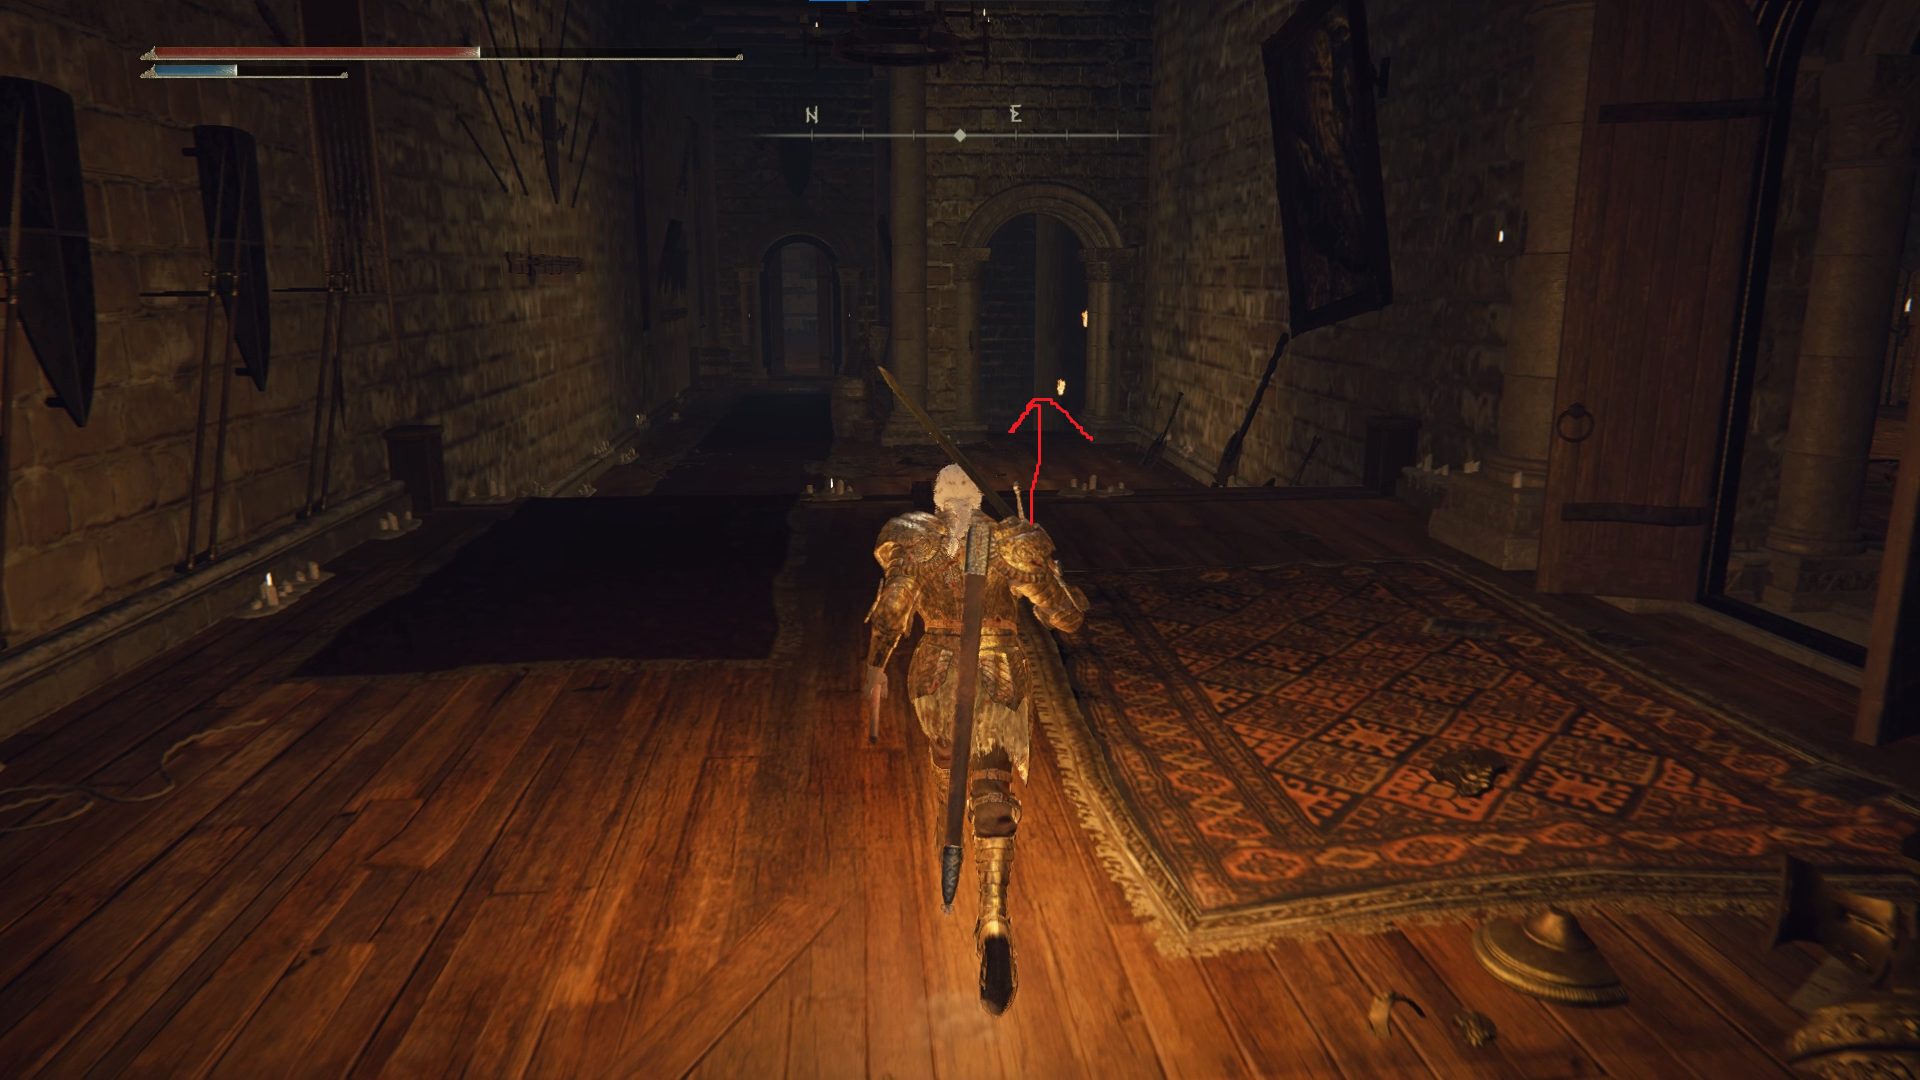
Continue east through an empty room and into the next one, where you can turn left to find a corpse on an altar with a Furlcalling Finger Remedy. Then go south and head outside, and continue south until you find yourself on a pile of sand (or ashes?) — at this point, turn right and head west inside the building, where you’ll find the East Capital Rampart site of grace.
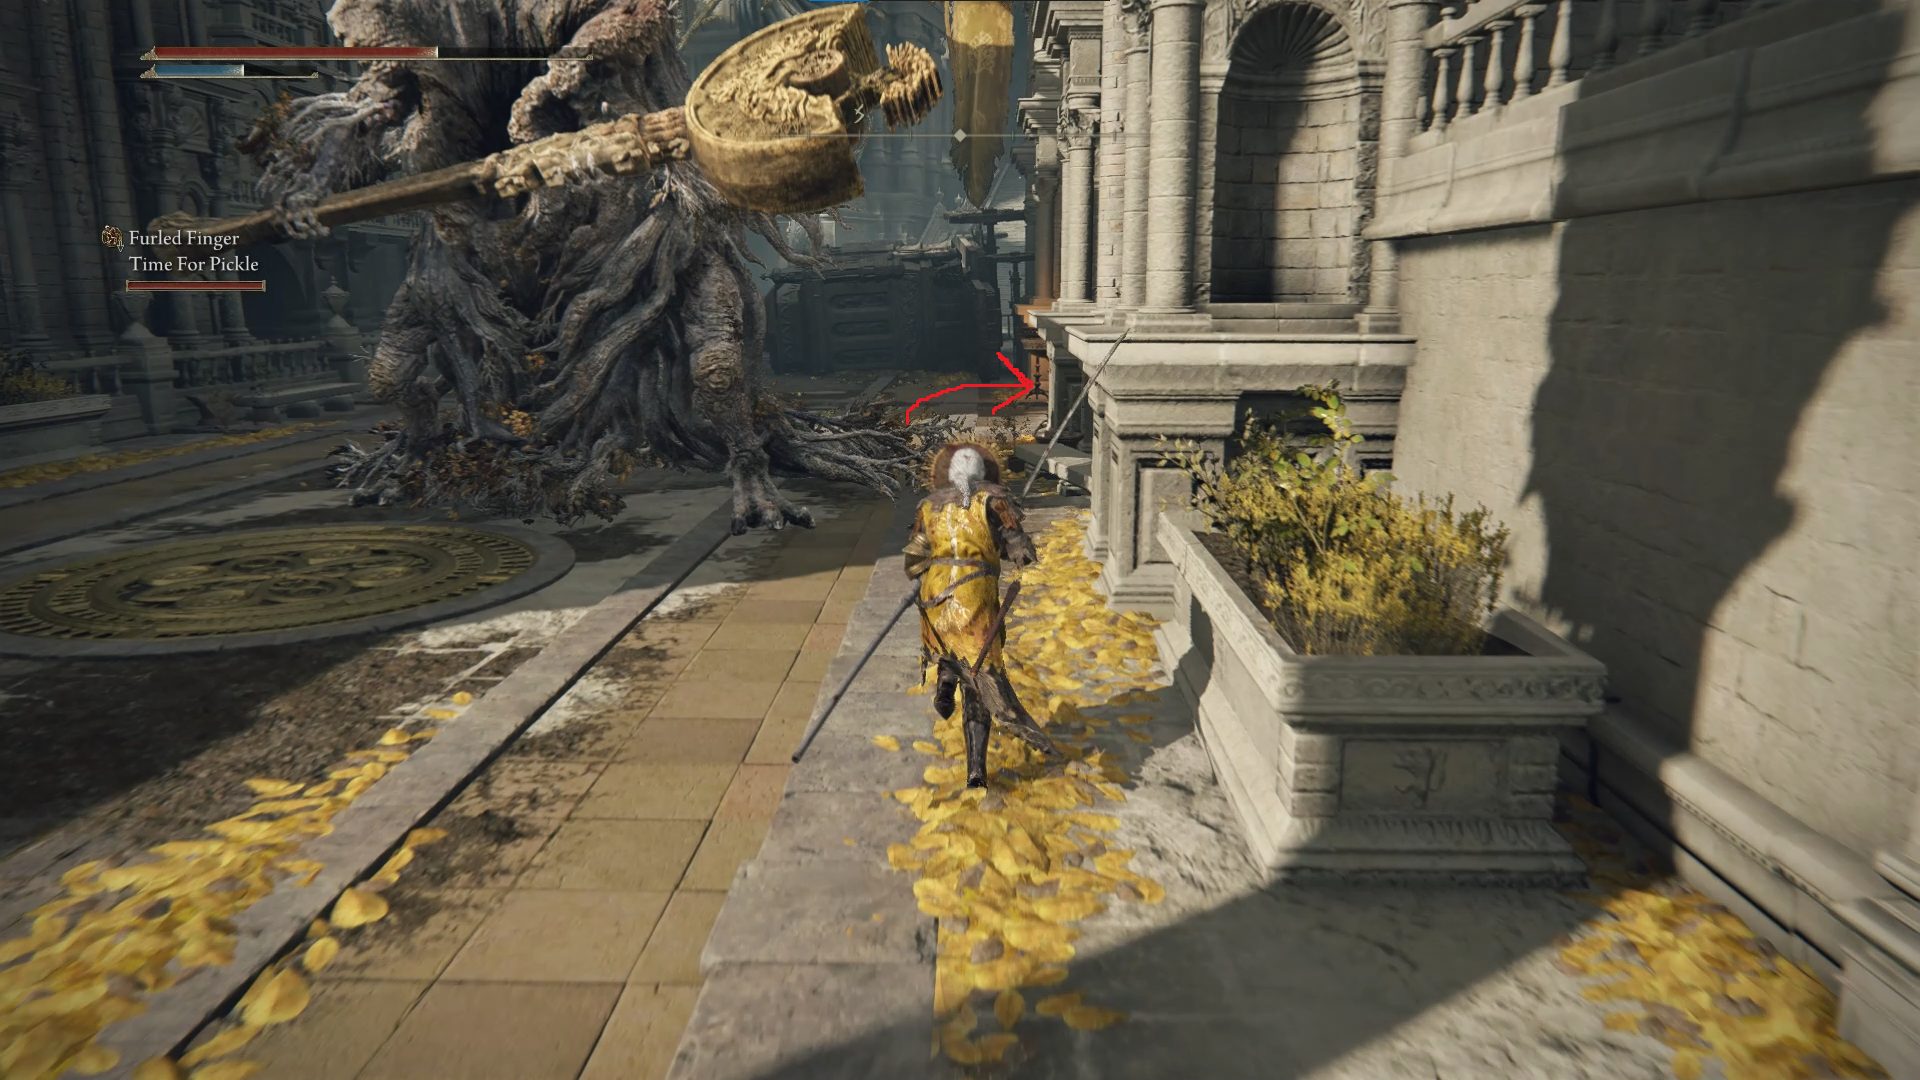
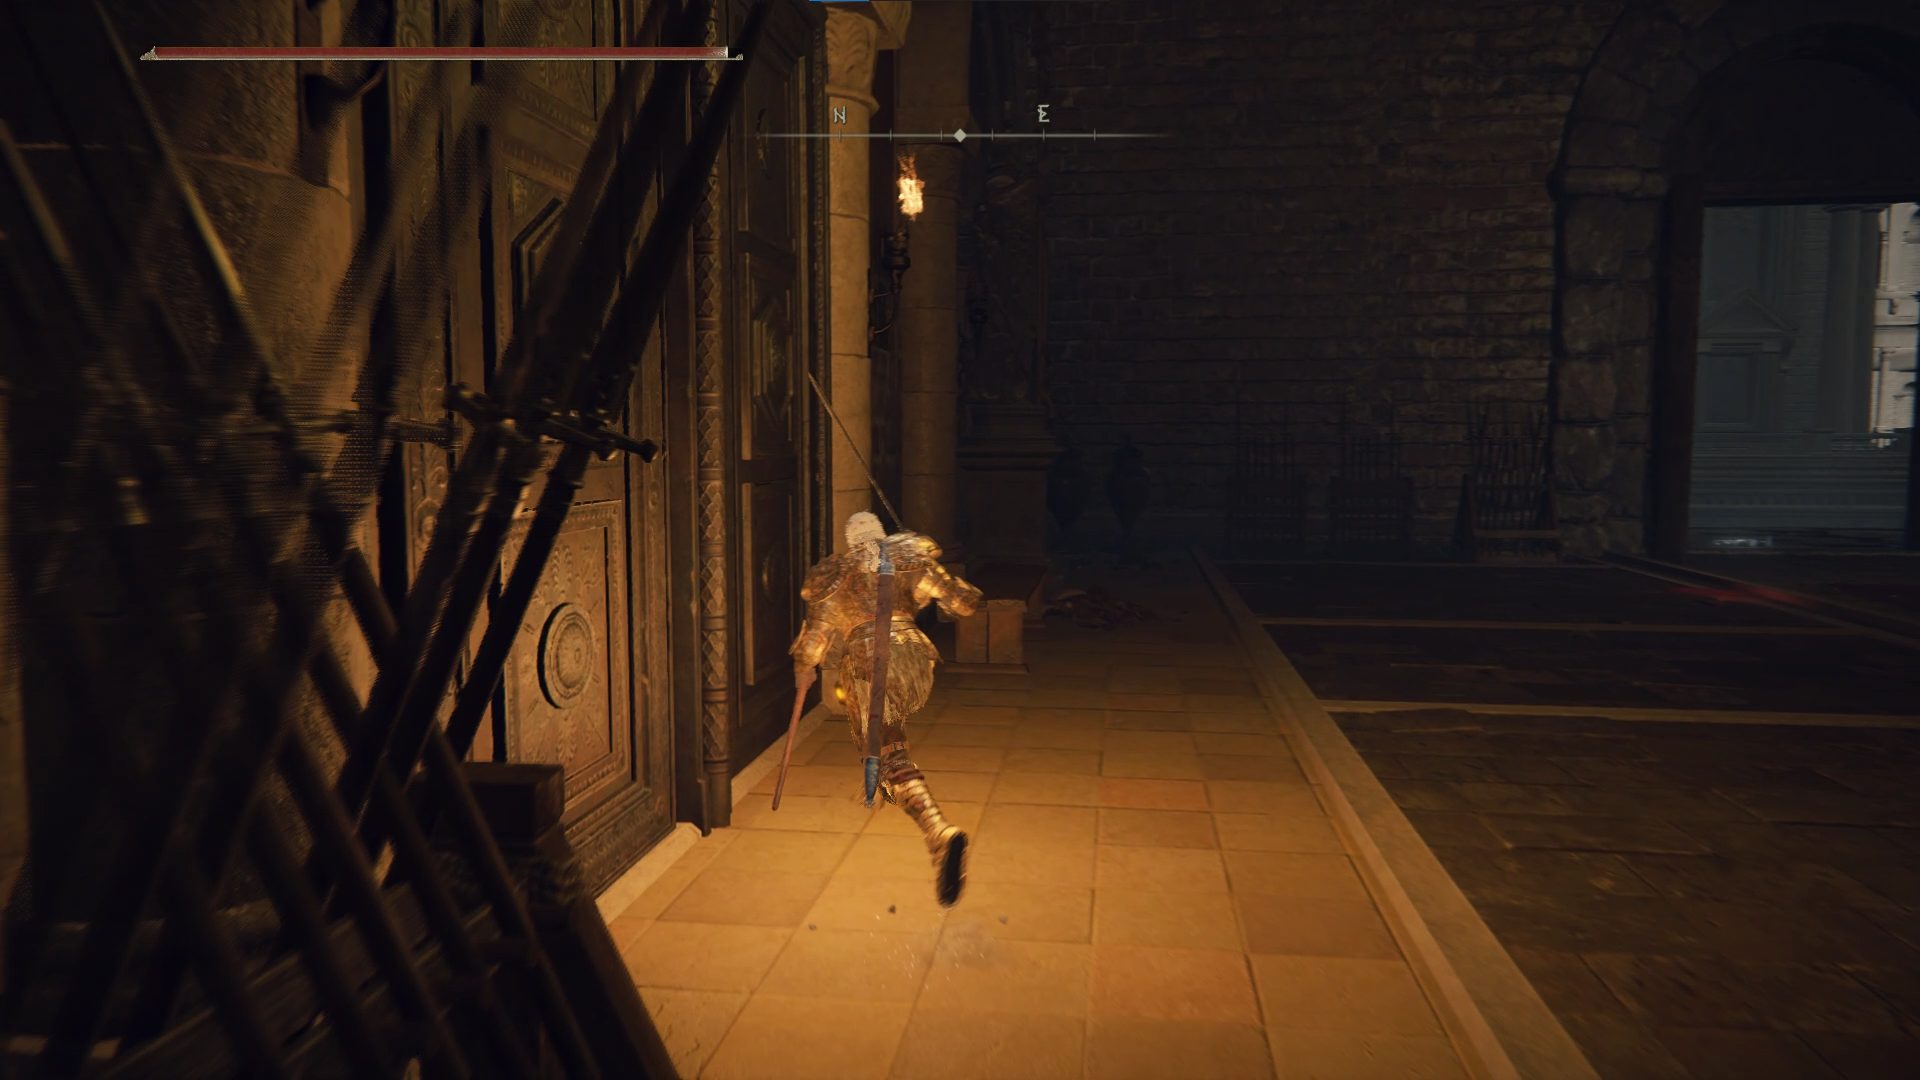
From the site of grace, exit the room via the western doorway and go down the stairs, where you’ll be treated to a panoramic view of the royal capital. Turn right (northwest) and note the door there — it’s locked, but we’ll open up that shortcut later in the guide. For now, turn around and continue southeast along the ramparts.
The strange enemies here are called Oracle Envoys, and they have a tricky ranged bubble attack (a bubble will form near you and then, if it attaches to you, explode and damage you). They also have a slow and fairly weak melee attack. It’s easy to run by them when doing a run back post-death, but during your first time through the area it’s best to clear them as you go.
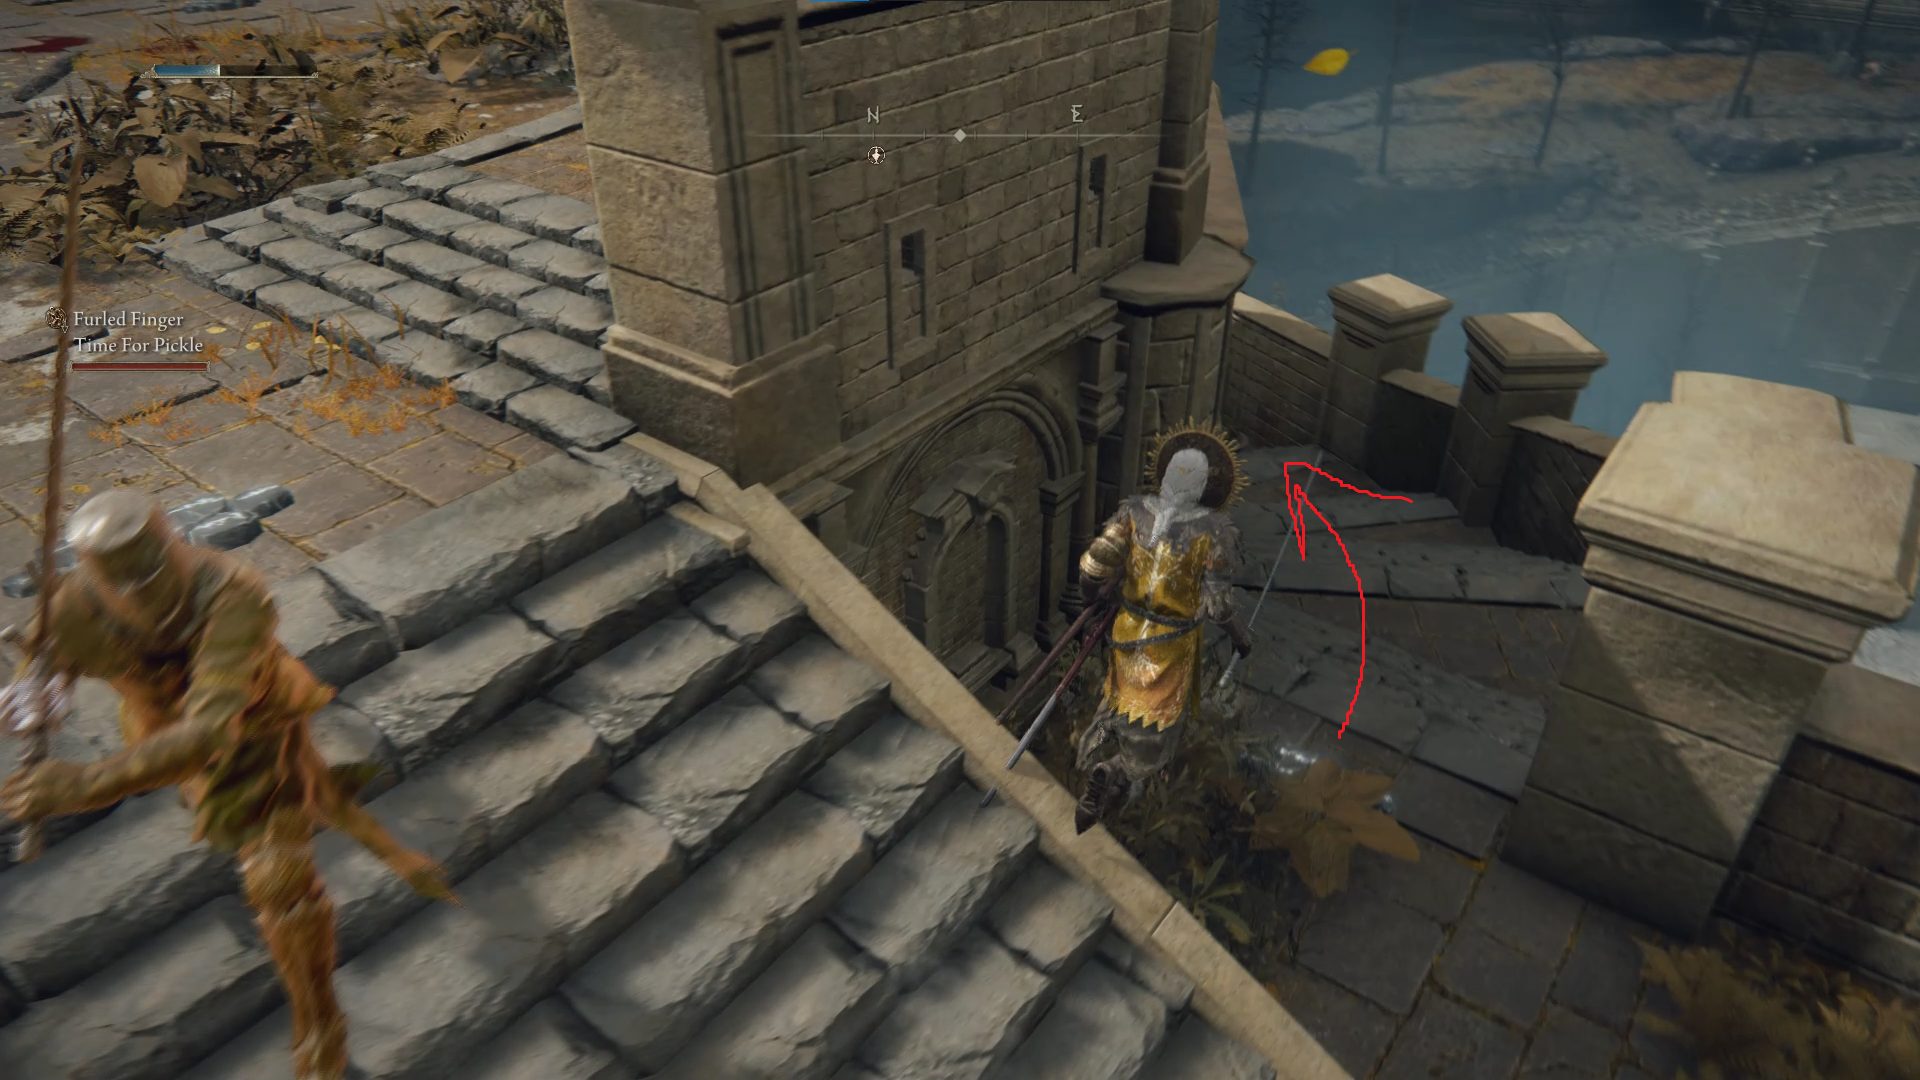
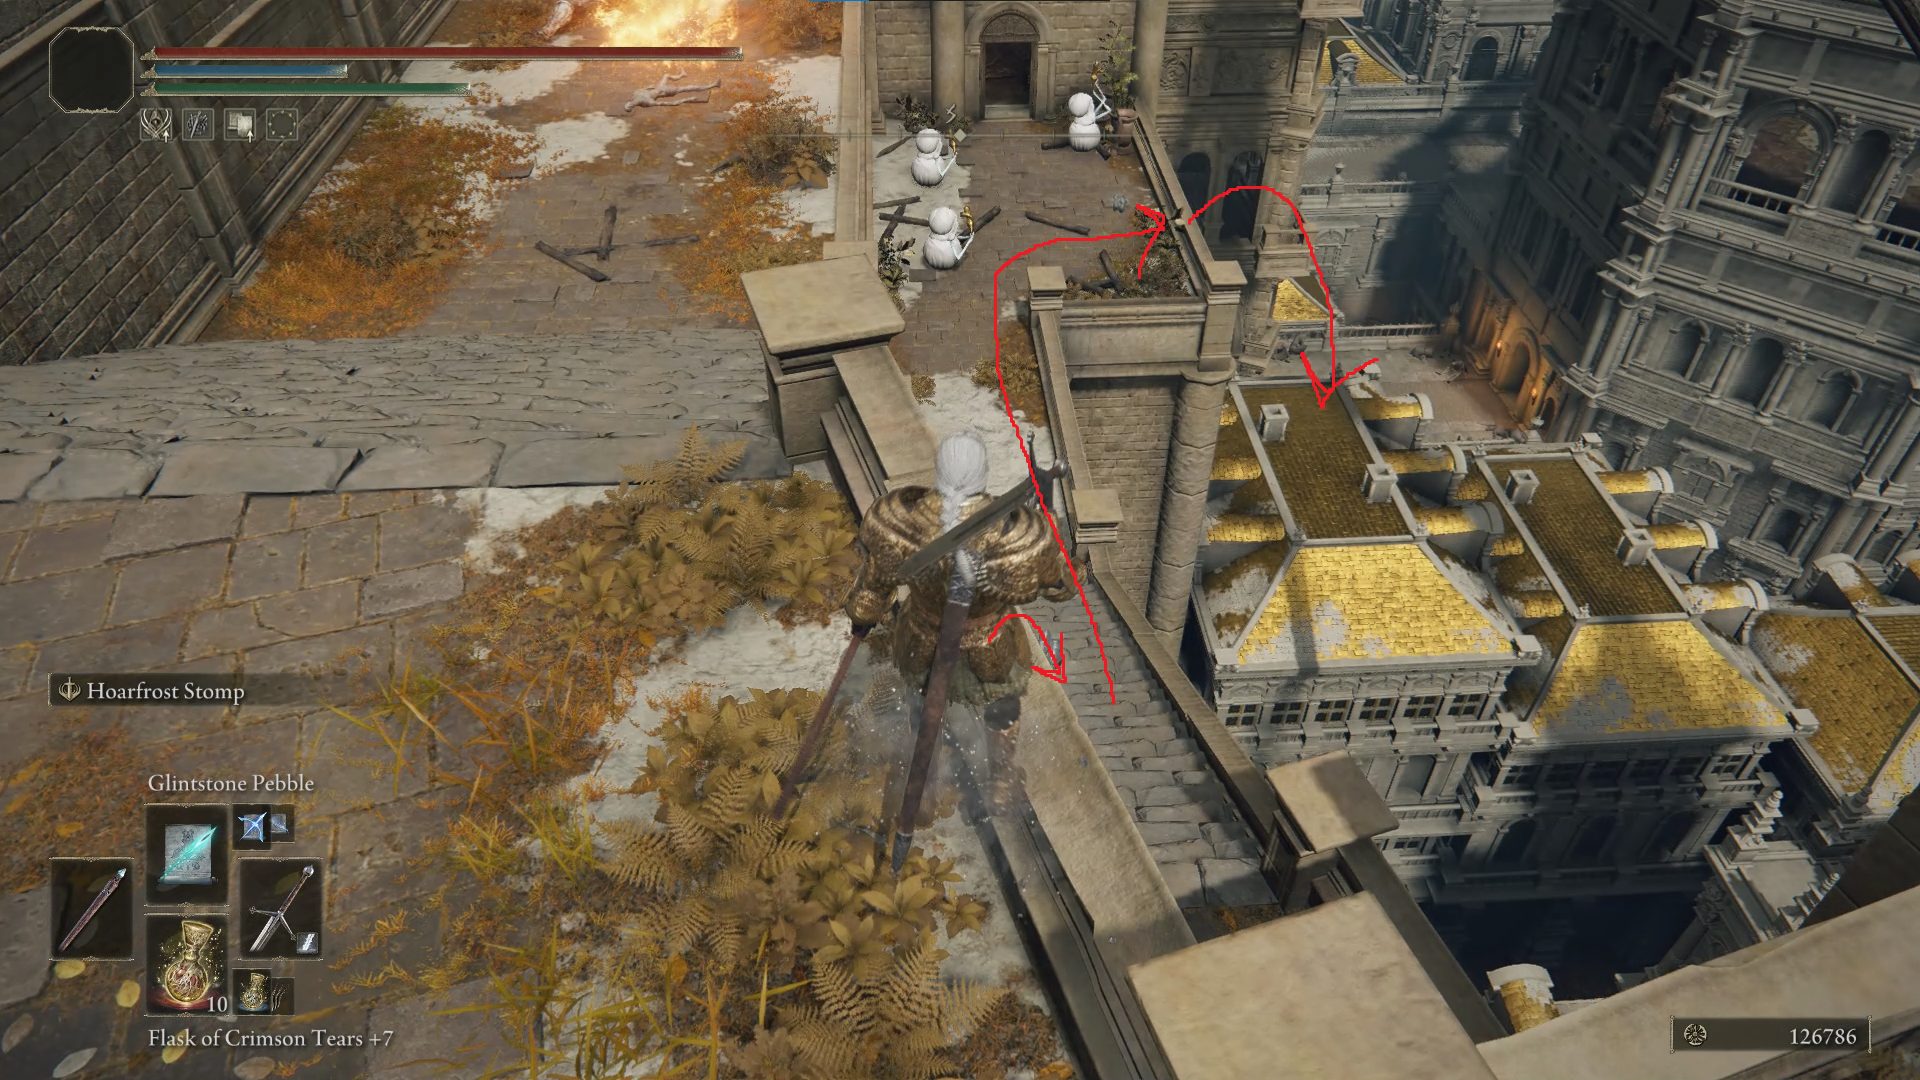
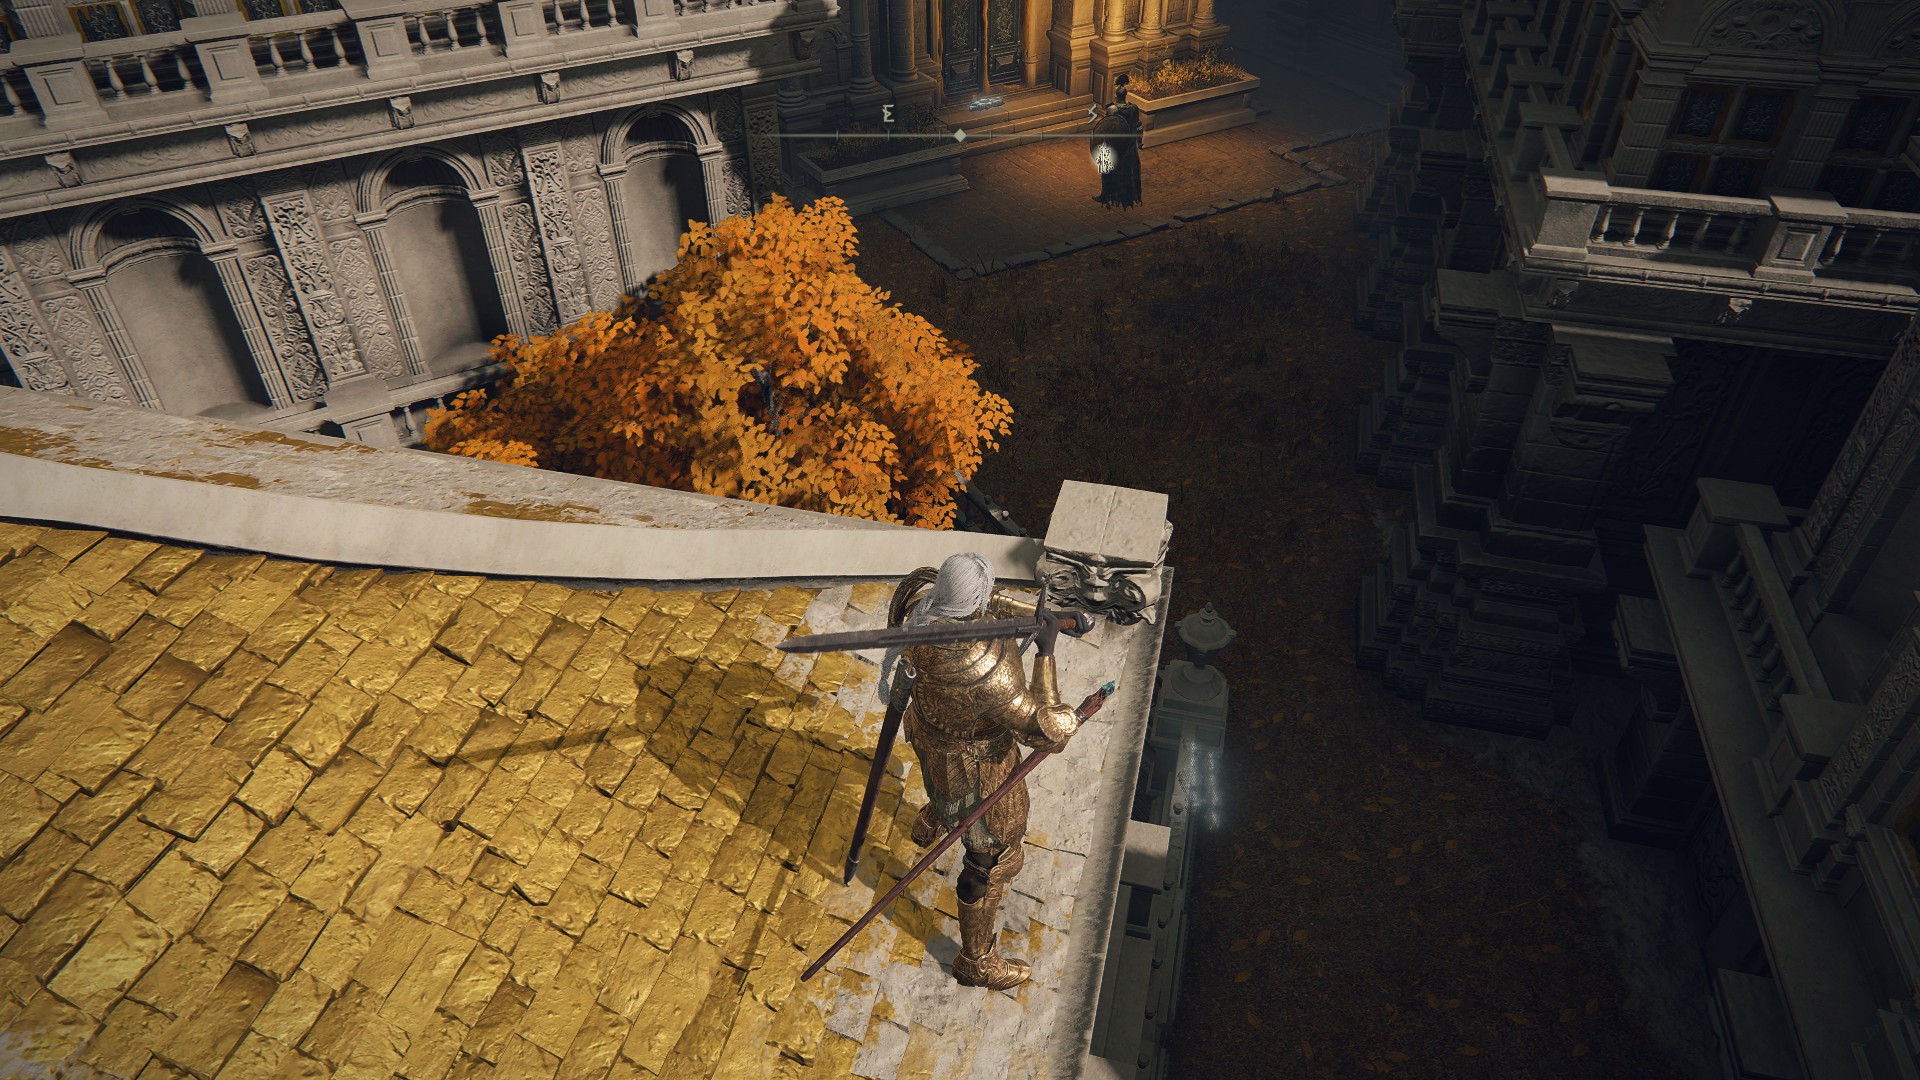
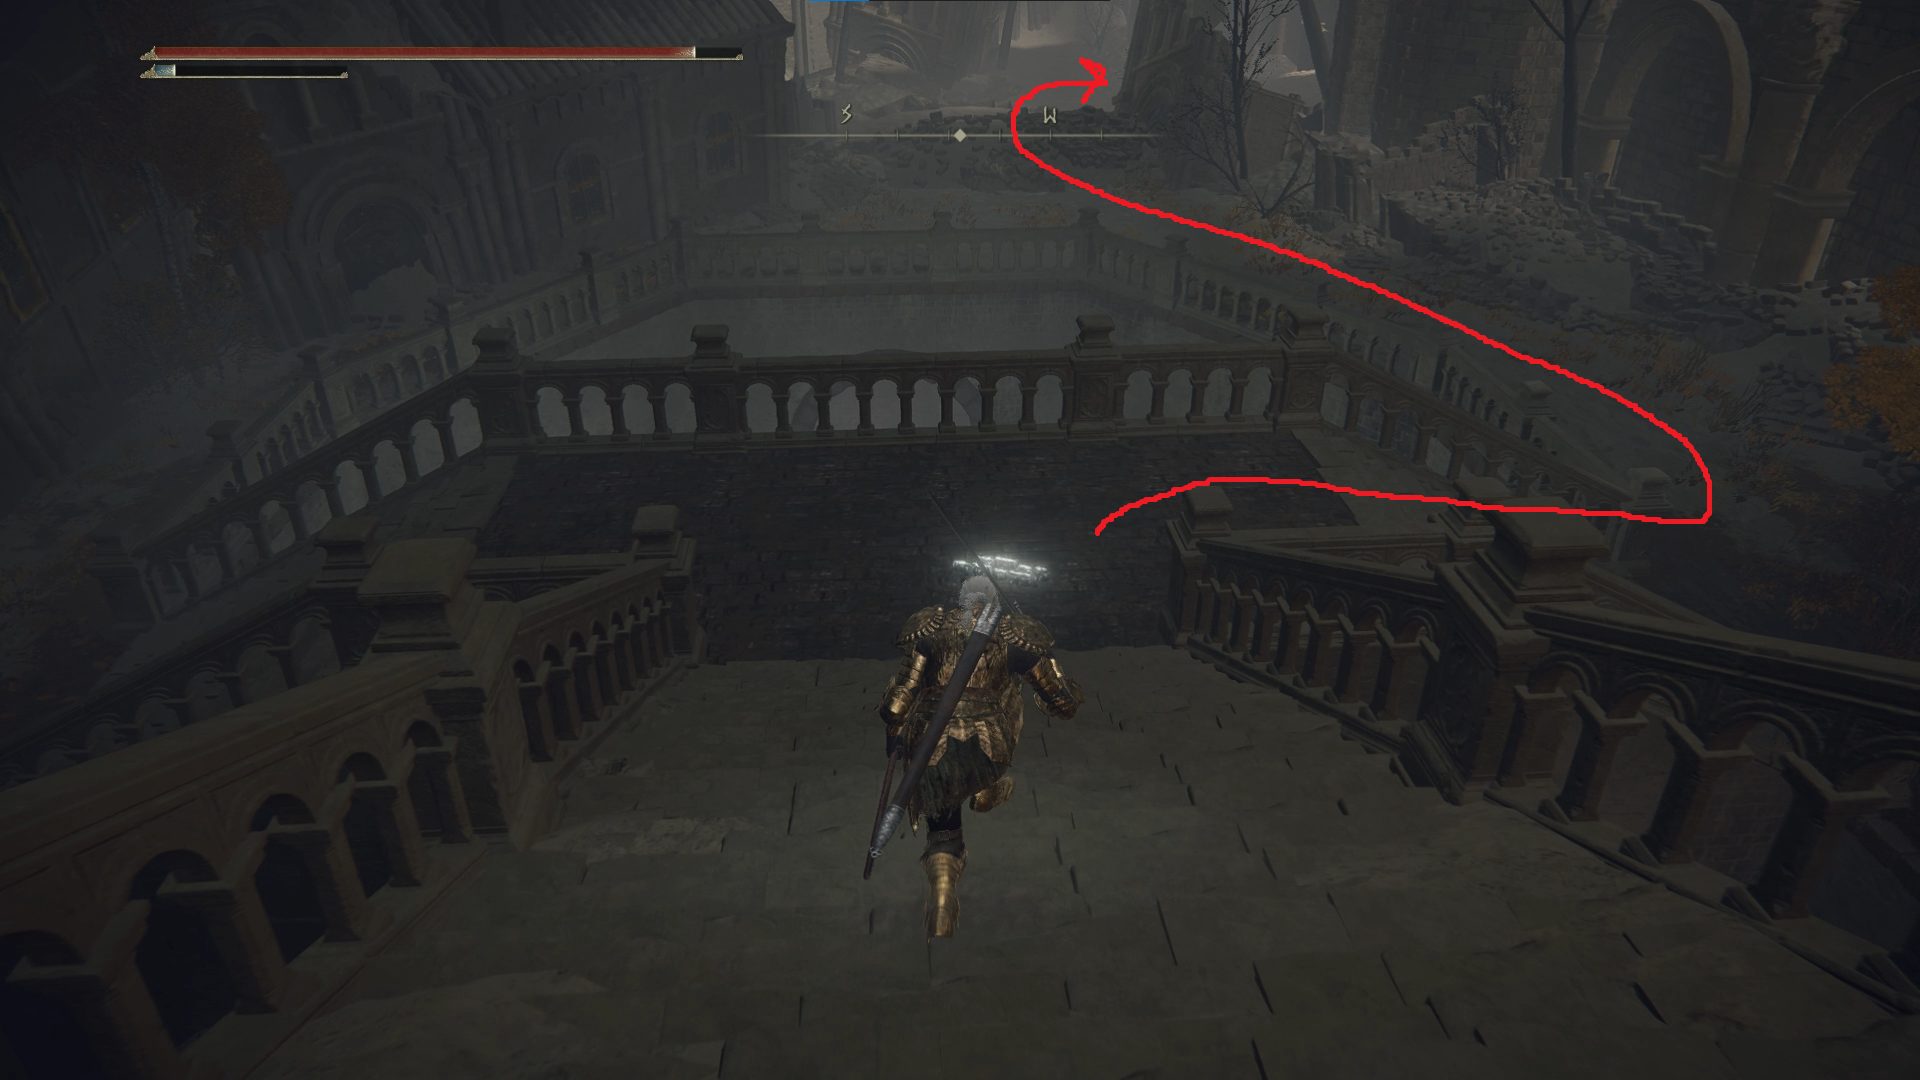
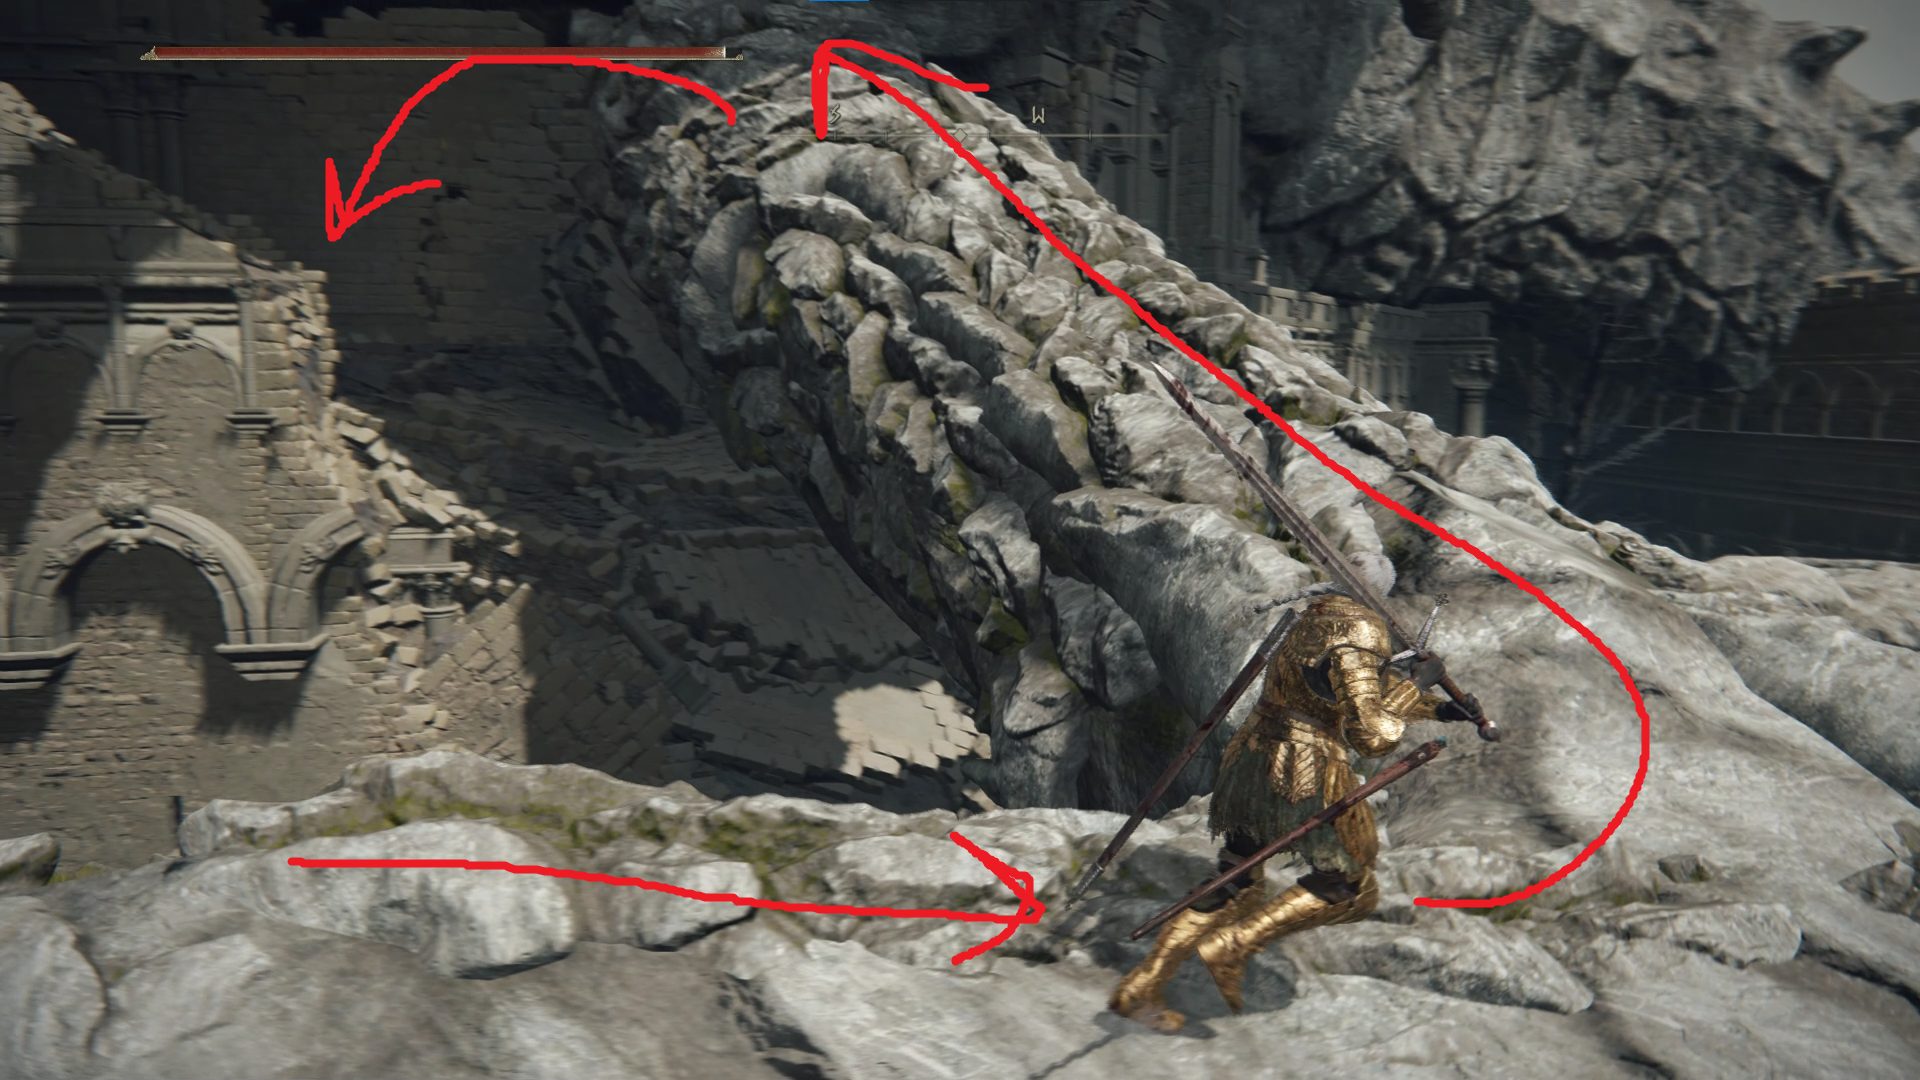
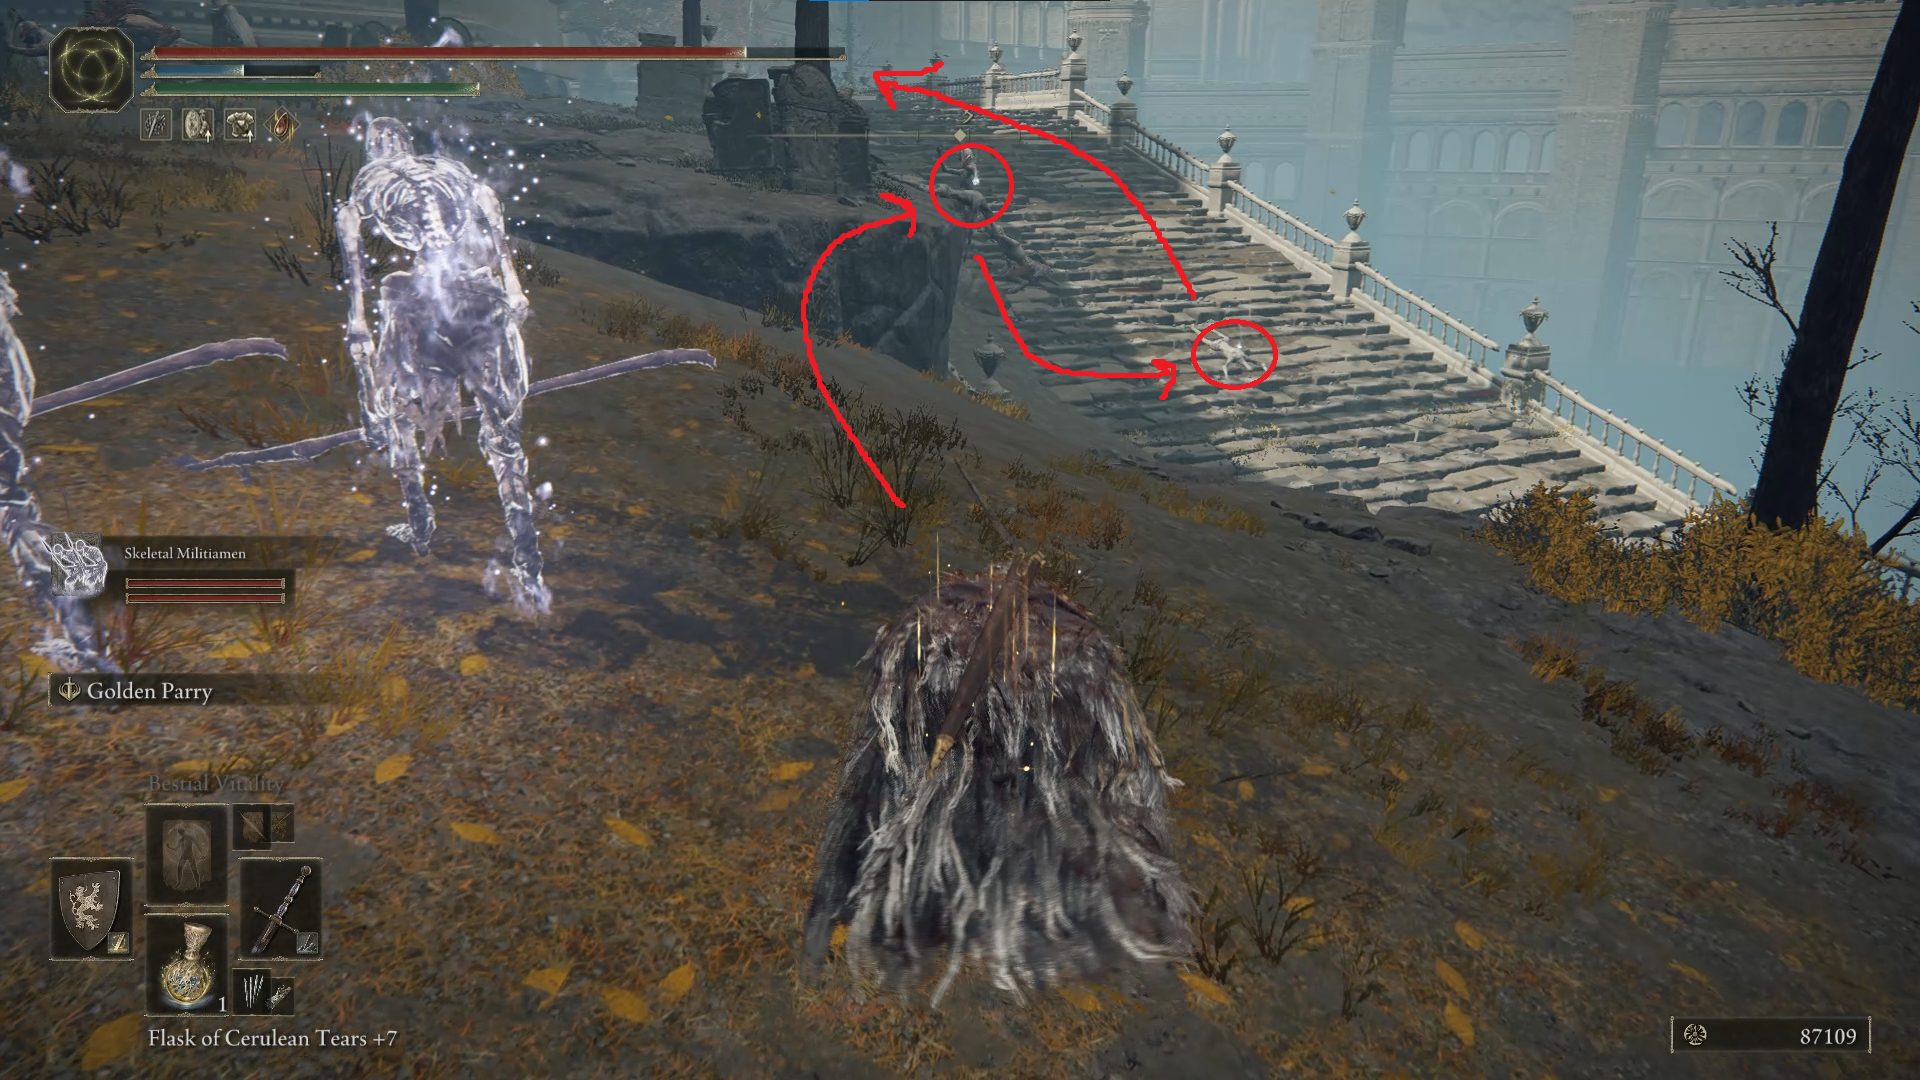
Head down the first two sets of stairs, killing the Oracle Envoys as you make your way along the rampart. When you reach a set of stairs that lead up onto a platform, head up them and then deal with the large envoy on the platform. It’s got a more powerful melee attack than its smaller cousins, but can be circle-strafed and dealt with fairly easily. Grab the Golden Rune [10] from the corpse slumped on the eastern side of the platform, then go to the top of the stairs that lead south-southeast and jump off of them heading east:
Continue down the stairs there and into the room below the platform. In the northwest corner of the room, behind the large metal brazier, is a page enemy — the corpse in the nearby chair holds a Smithing Stone [4]. Head out the western hallway and turn left on the balcony there, then continue south. You’ll go down some stairs and find three envoys — take them out and head through the doorway.
There are stairs on your left, but before you head up them, go behind the folding screen on the far side of the bottom of the staircase to find x10 Cave Moss. Then go up the stairs, where you’ll meet another page. At the top of the stairs, turn right and go out of the doorway to the north — you’ll find yourself behind a disfigured gargoyle, who you can safely kill from this angle (it can’t turn around). Once it’s dead, grab the Golden Rune [7] it was facing, and then head back inside and go back down the stairs. Head straight (west) from the bottom of the stairs and out the doorway to find an elevator.
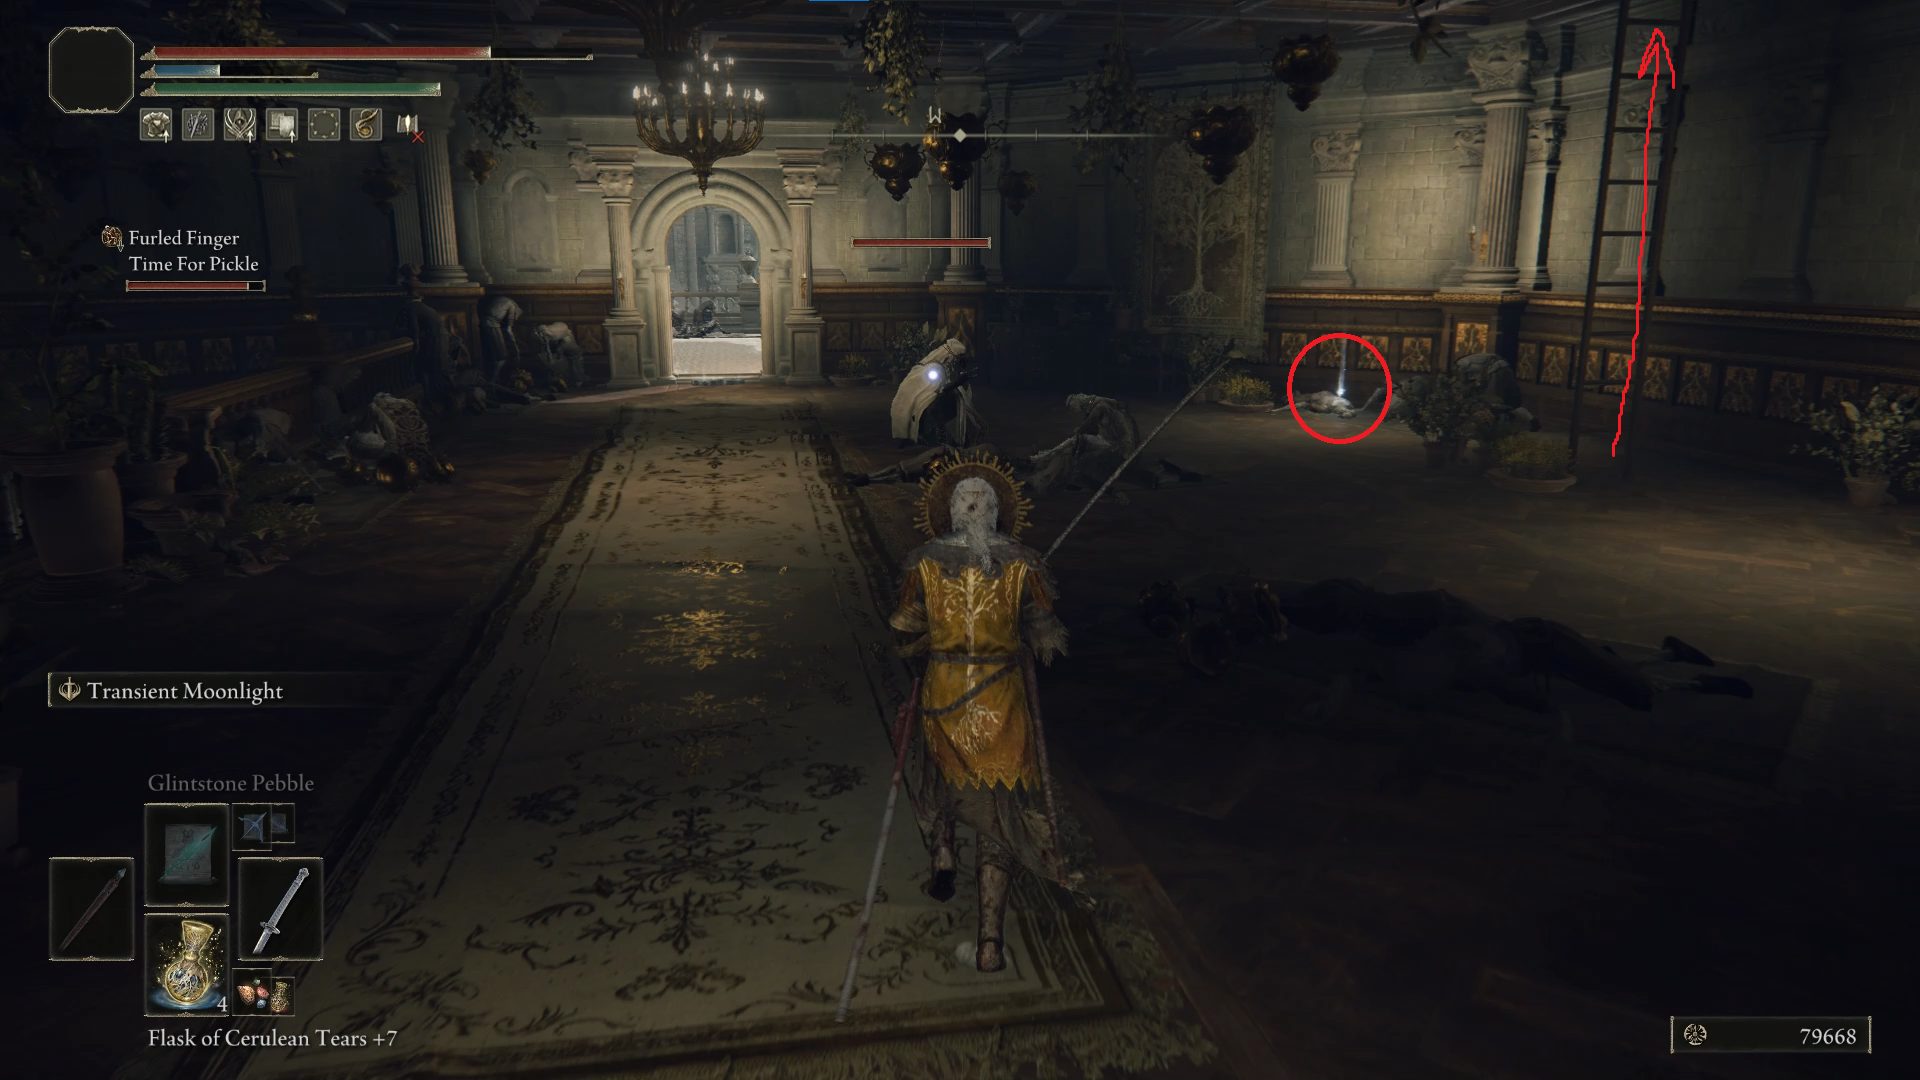
Ride it down, and then use target lock on the bridge to find the living amongst the bodies slumped all around. (There are sleeping commoner enemies like this throughout the capital — some will get up when you pass them, while some will remain where they are. They’re worth killing no matter what, since they drop a respectable 315.) Then continue west into the building, where a perfumer sits ministrating a commoner. Take out the perfumer first, and once both enemies are dead, grab the Preserving Boluses in the northwest corner of the room. Nearby is a ladder — climb it and then cross the room to the stairs.
The preserving boluses and nearby ladder
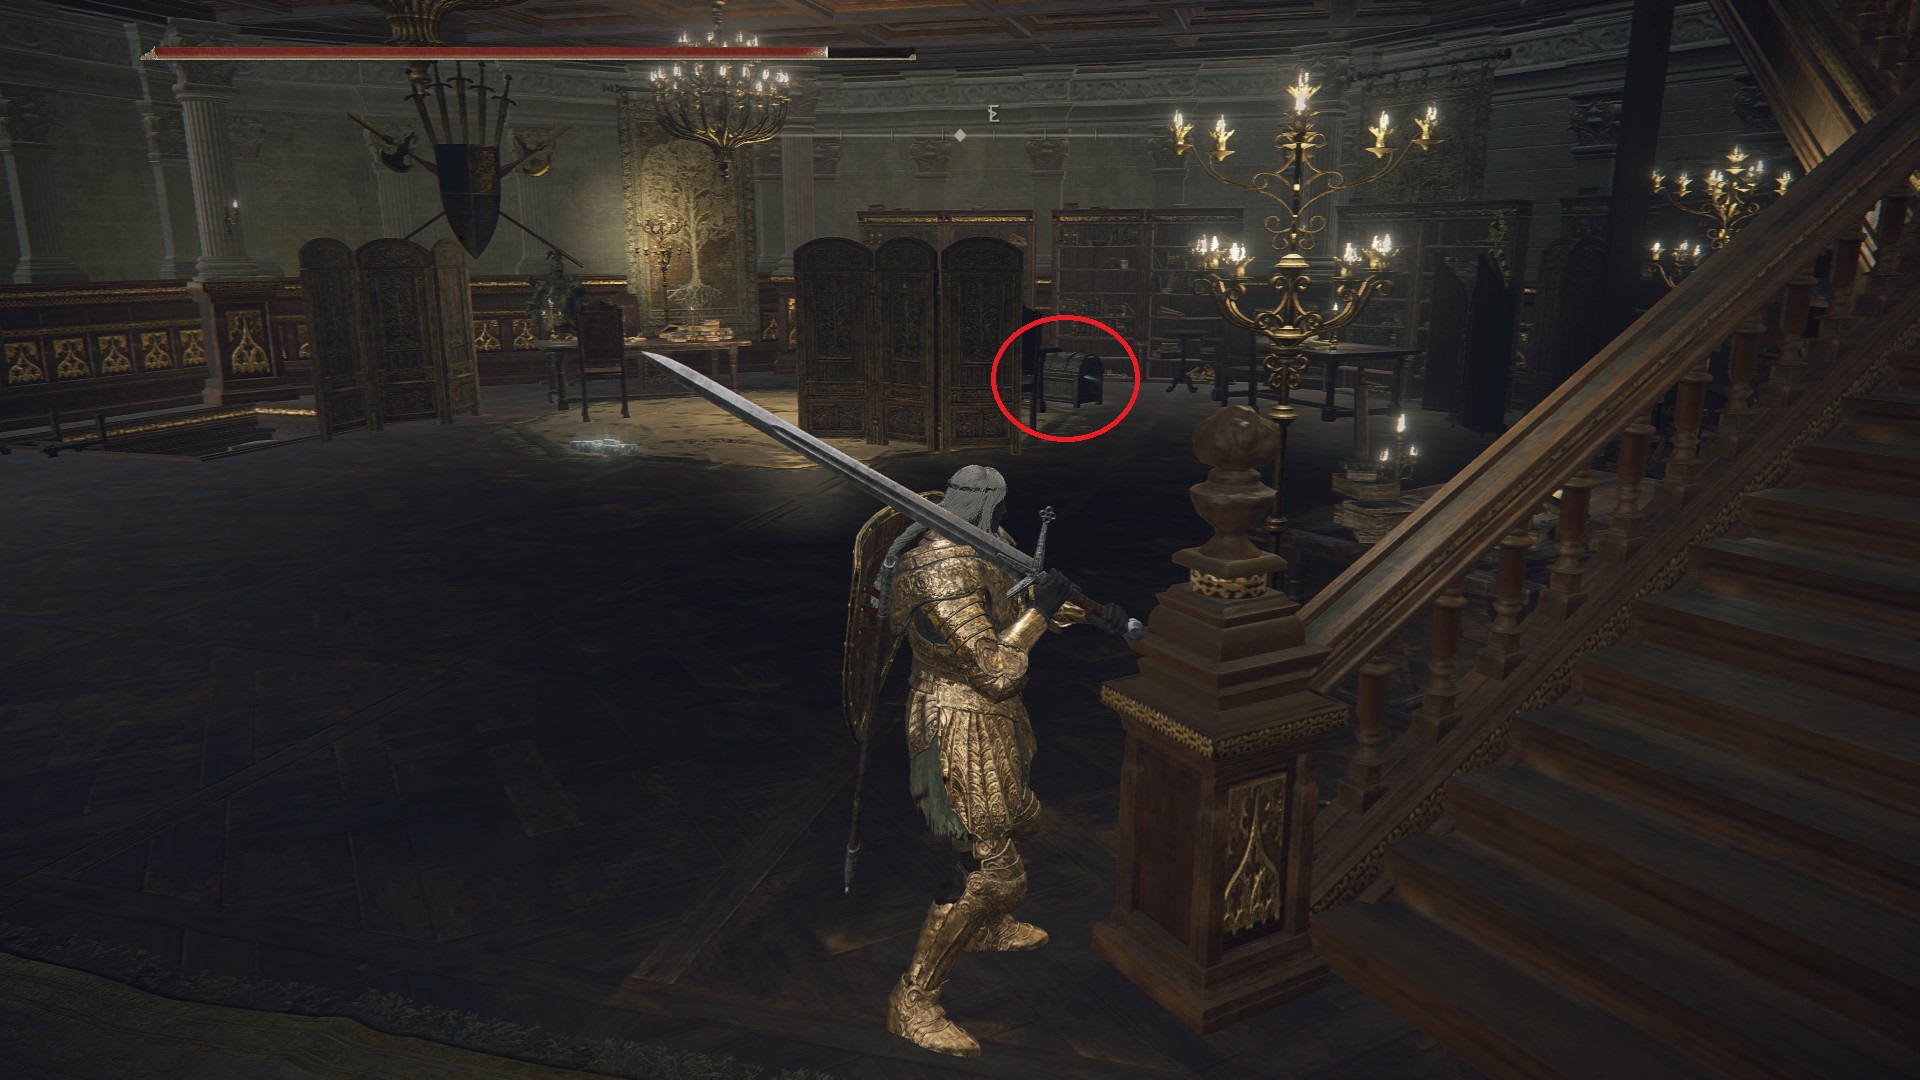
Look to the east from the foot of the stairs and you’ll be able to spot a sneaky chest with a Perfume Bottle inside.
Grab it and then go up the stairs where you’ll find a corpse in a chair with a Seedbed Curse (this item is part of the Dung Eater‘s questline).
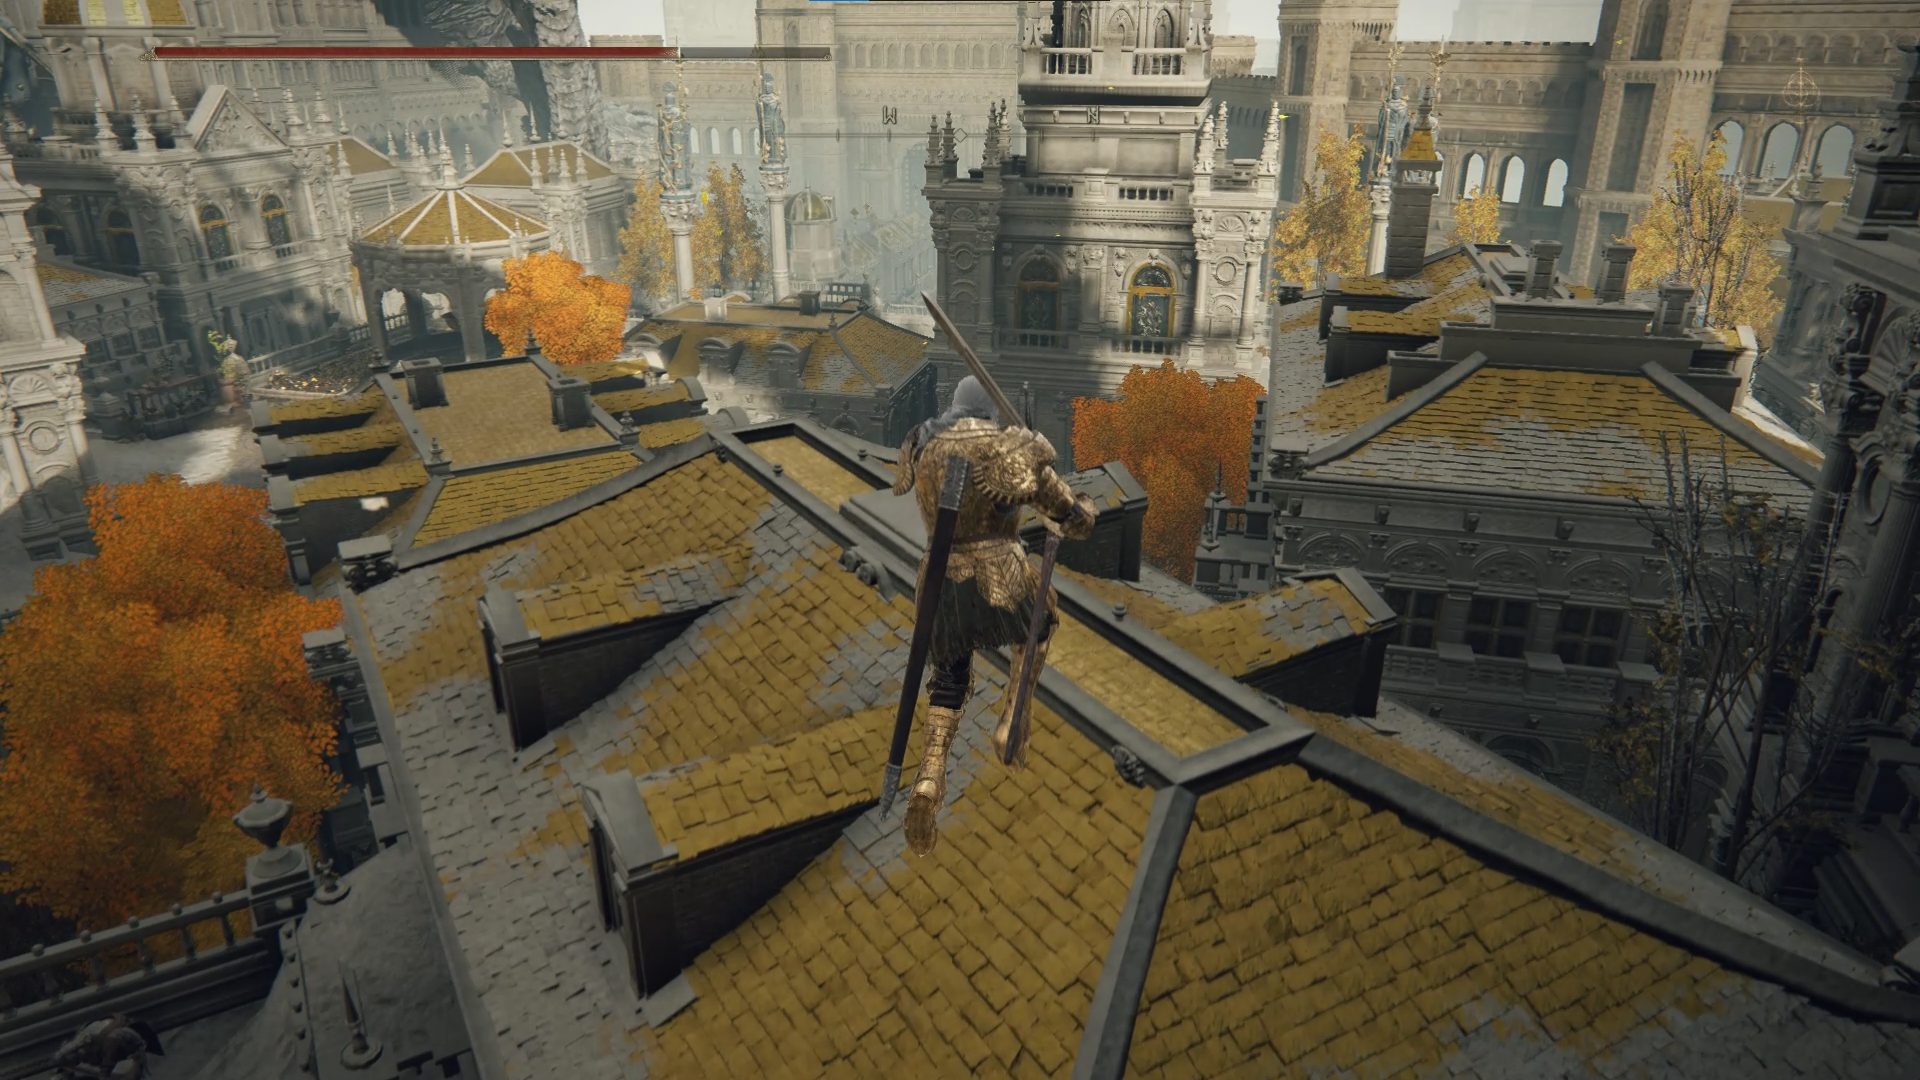
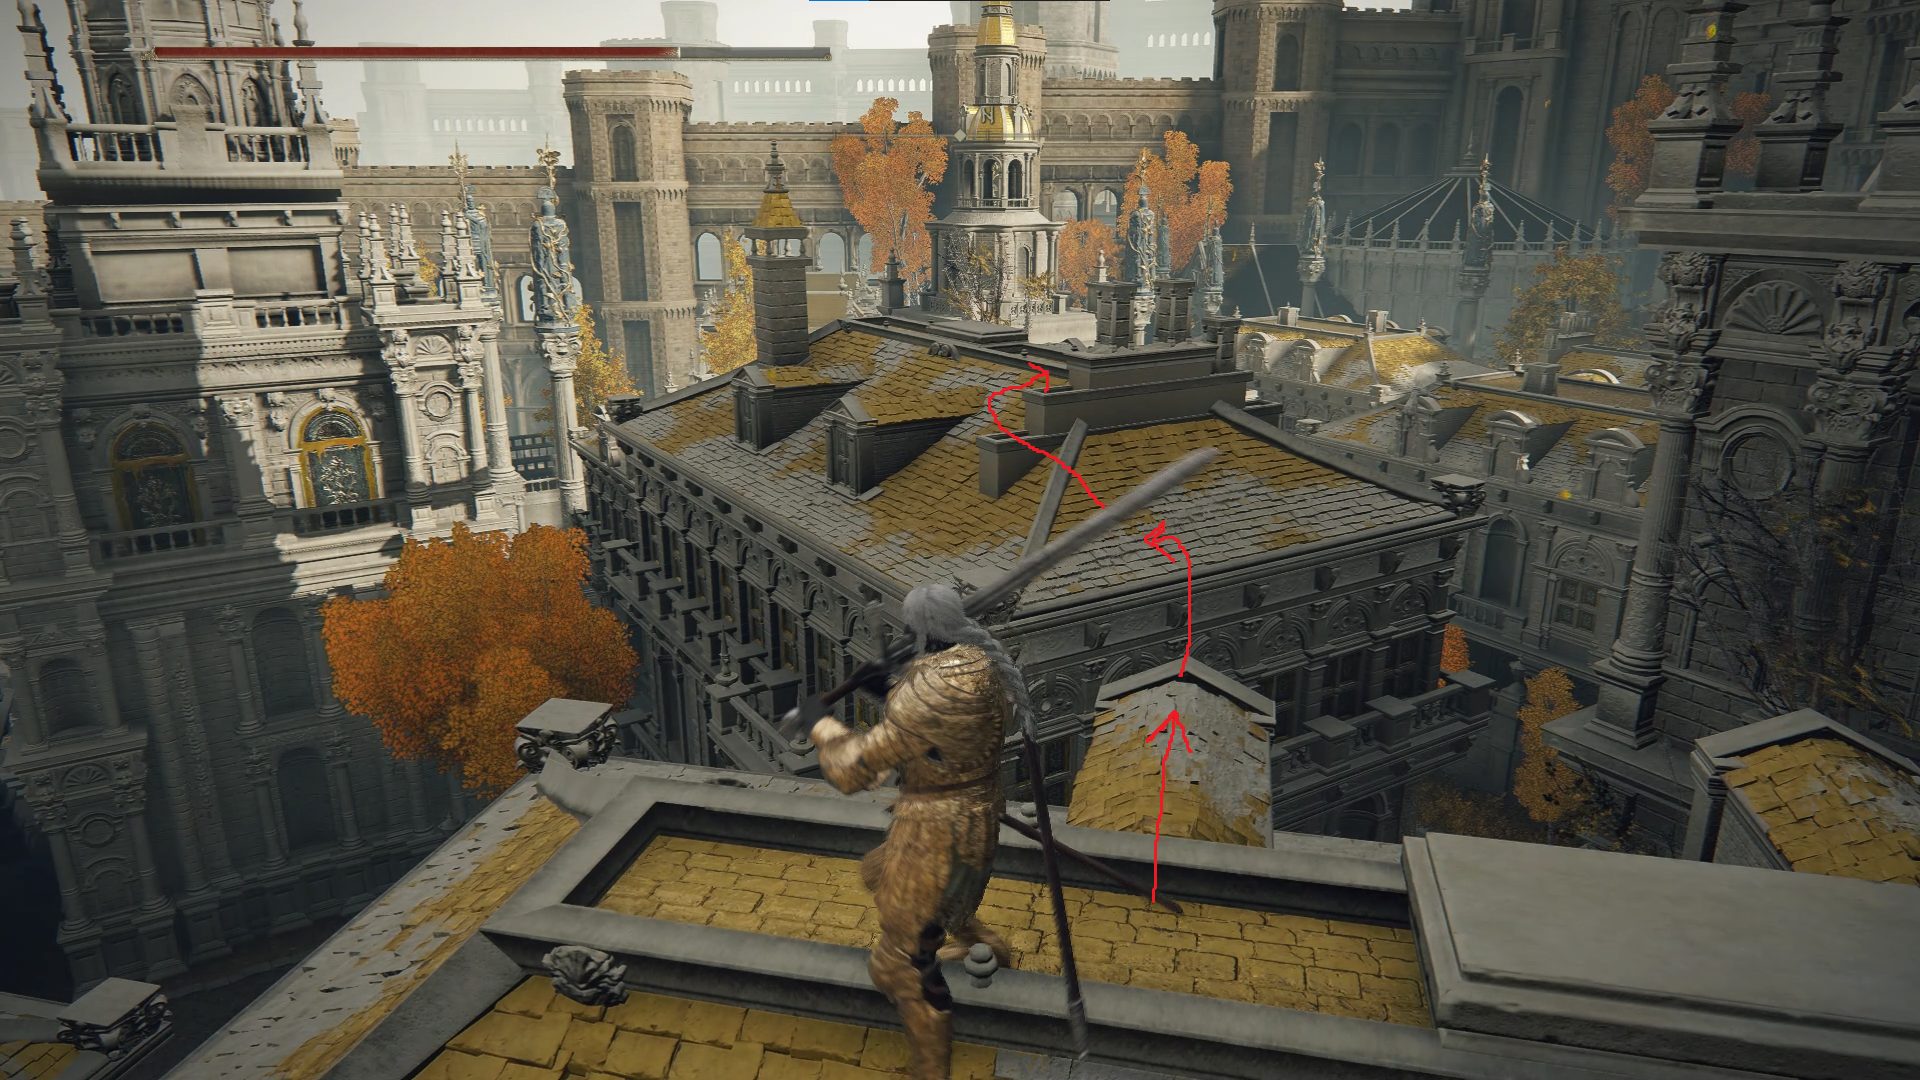
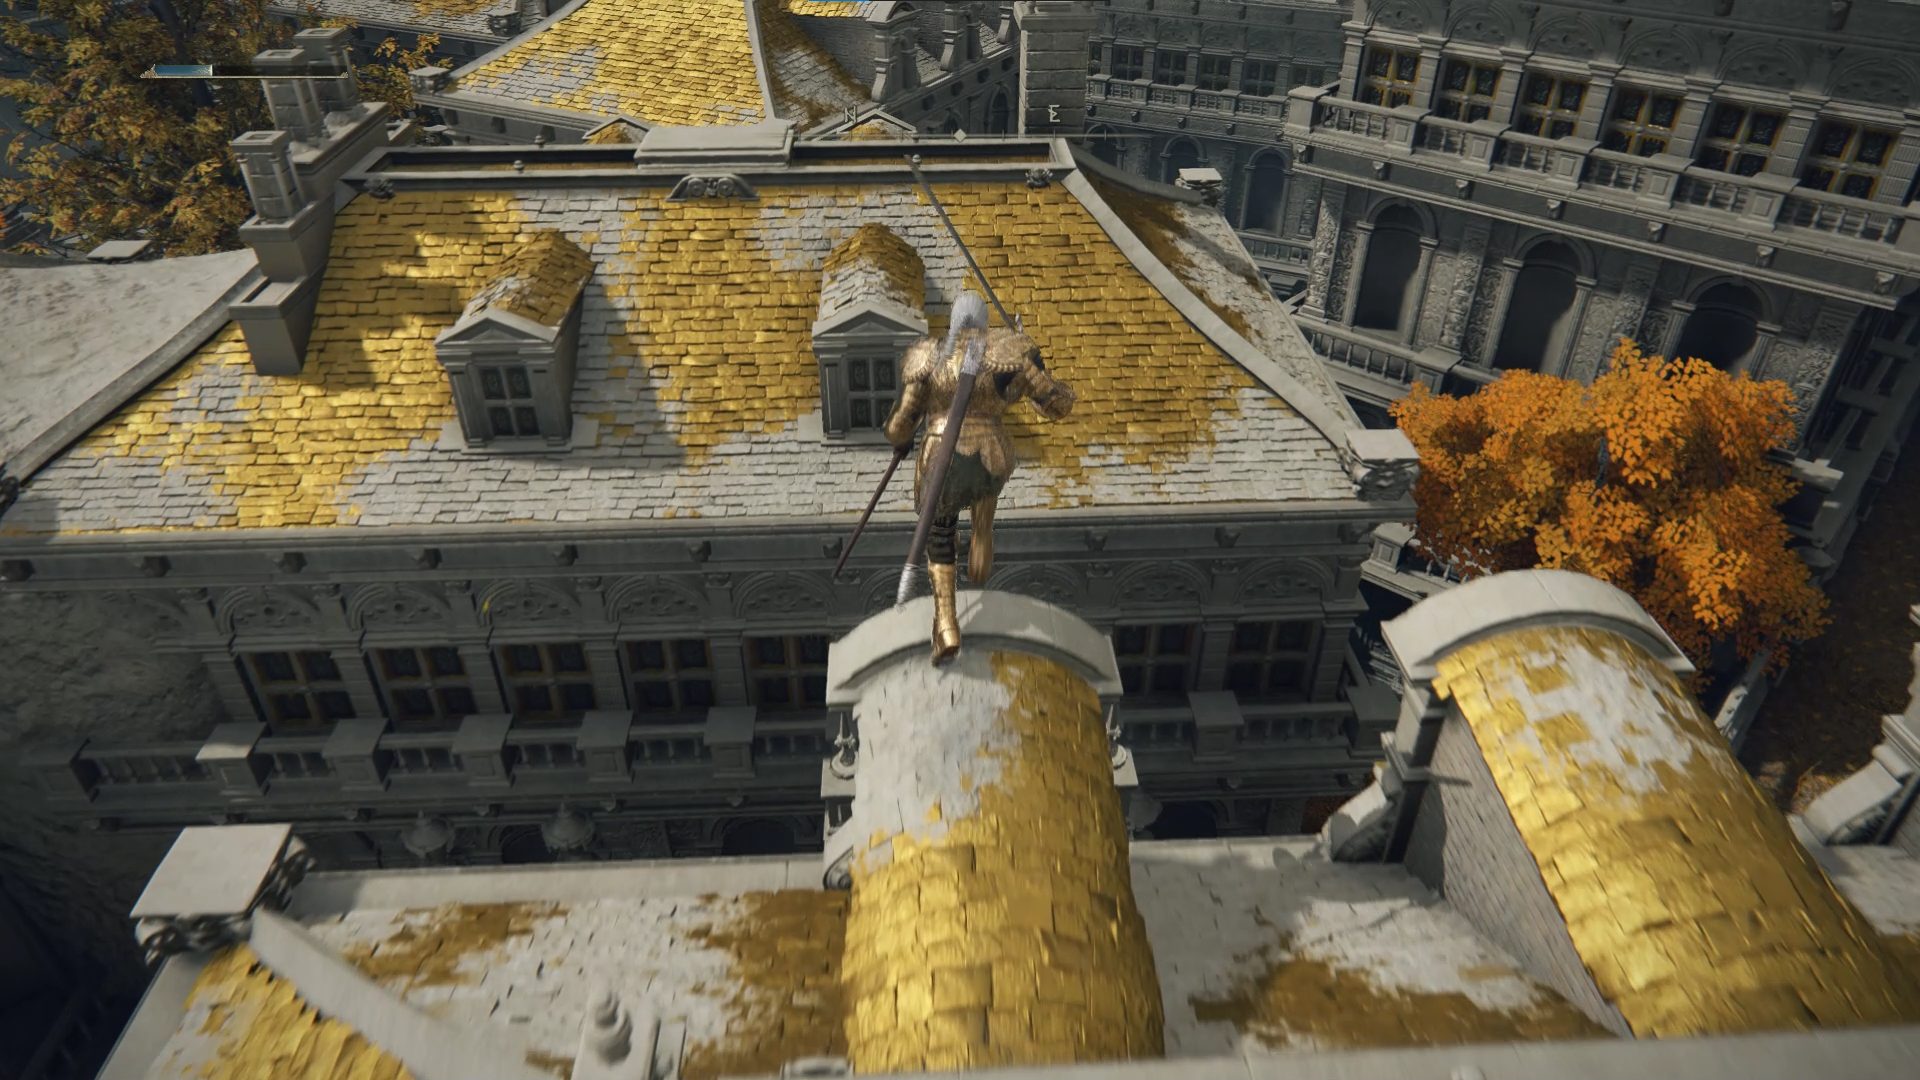
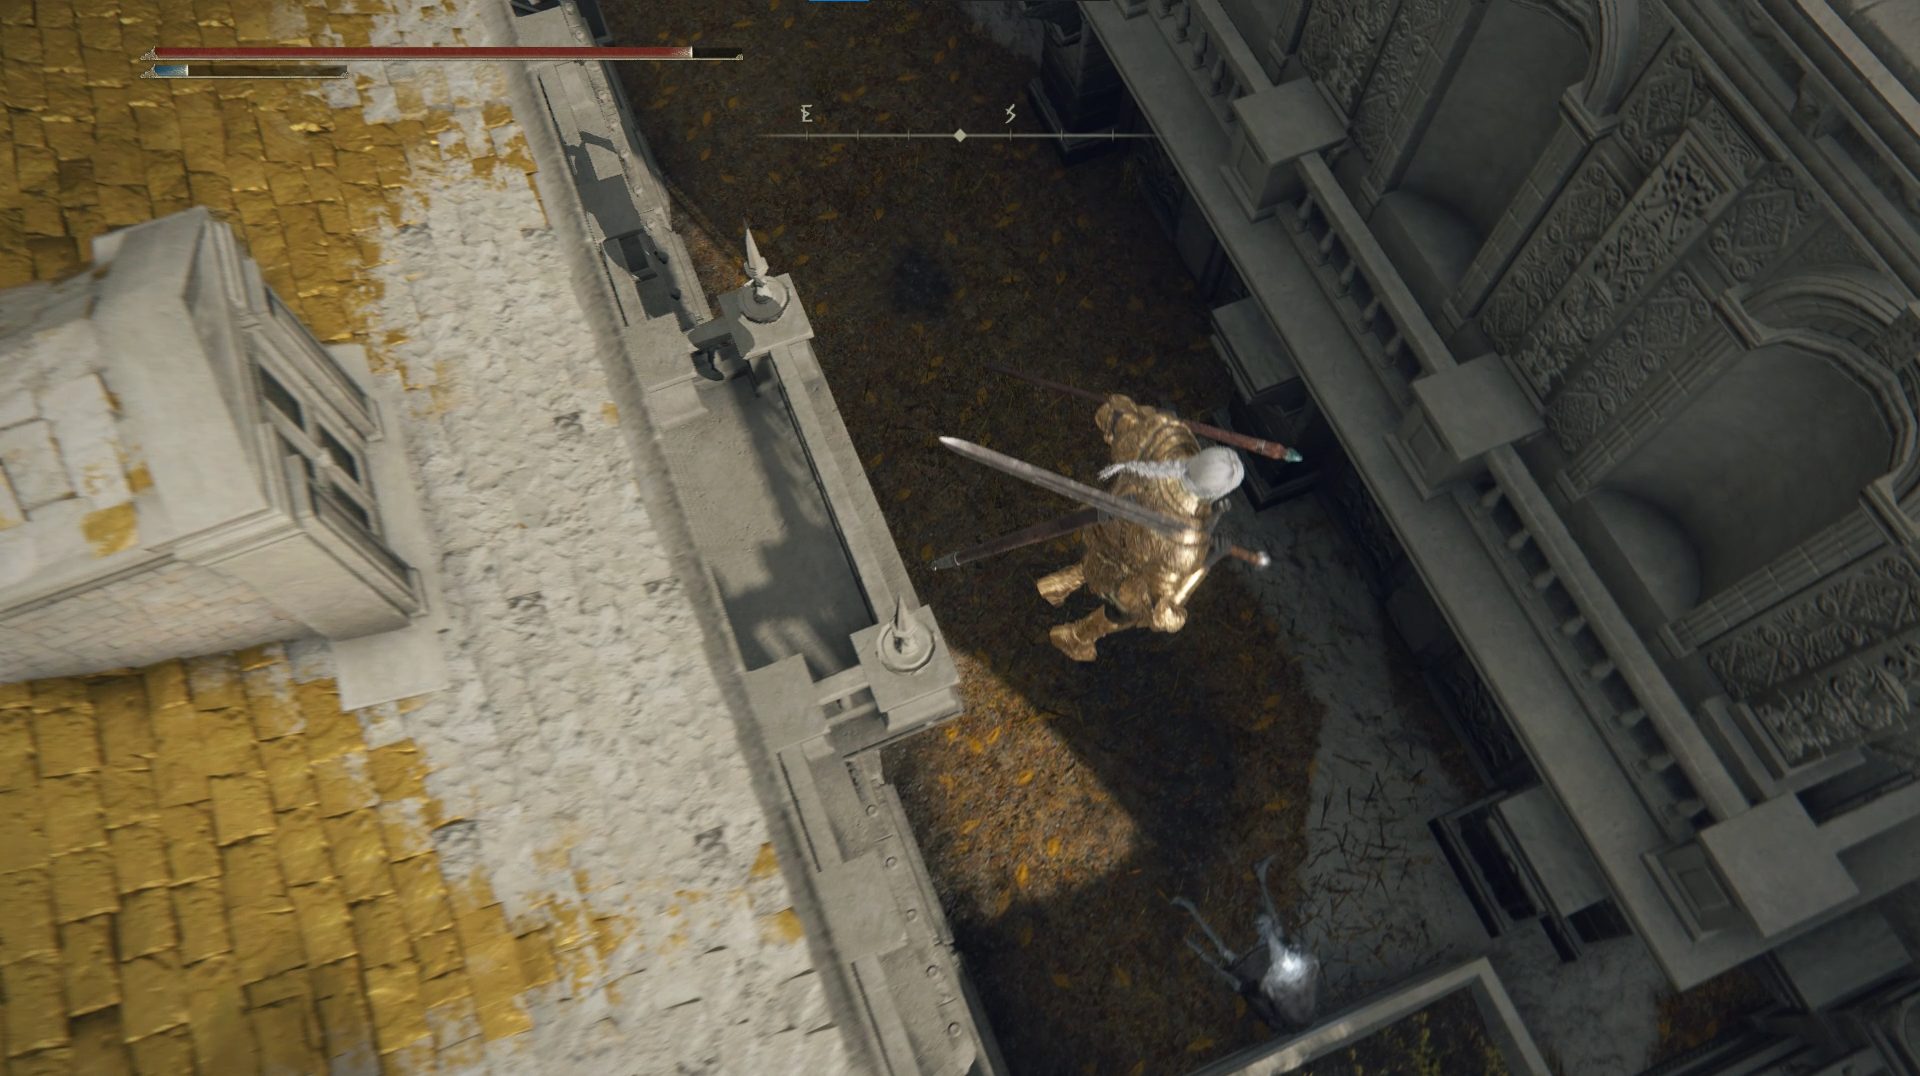
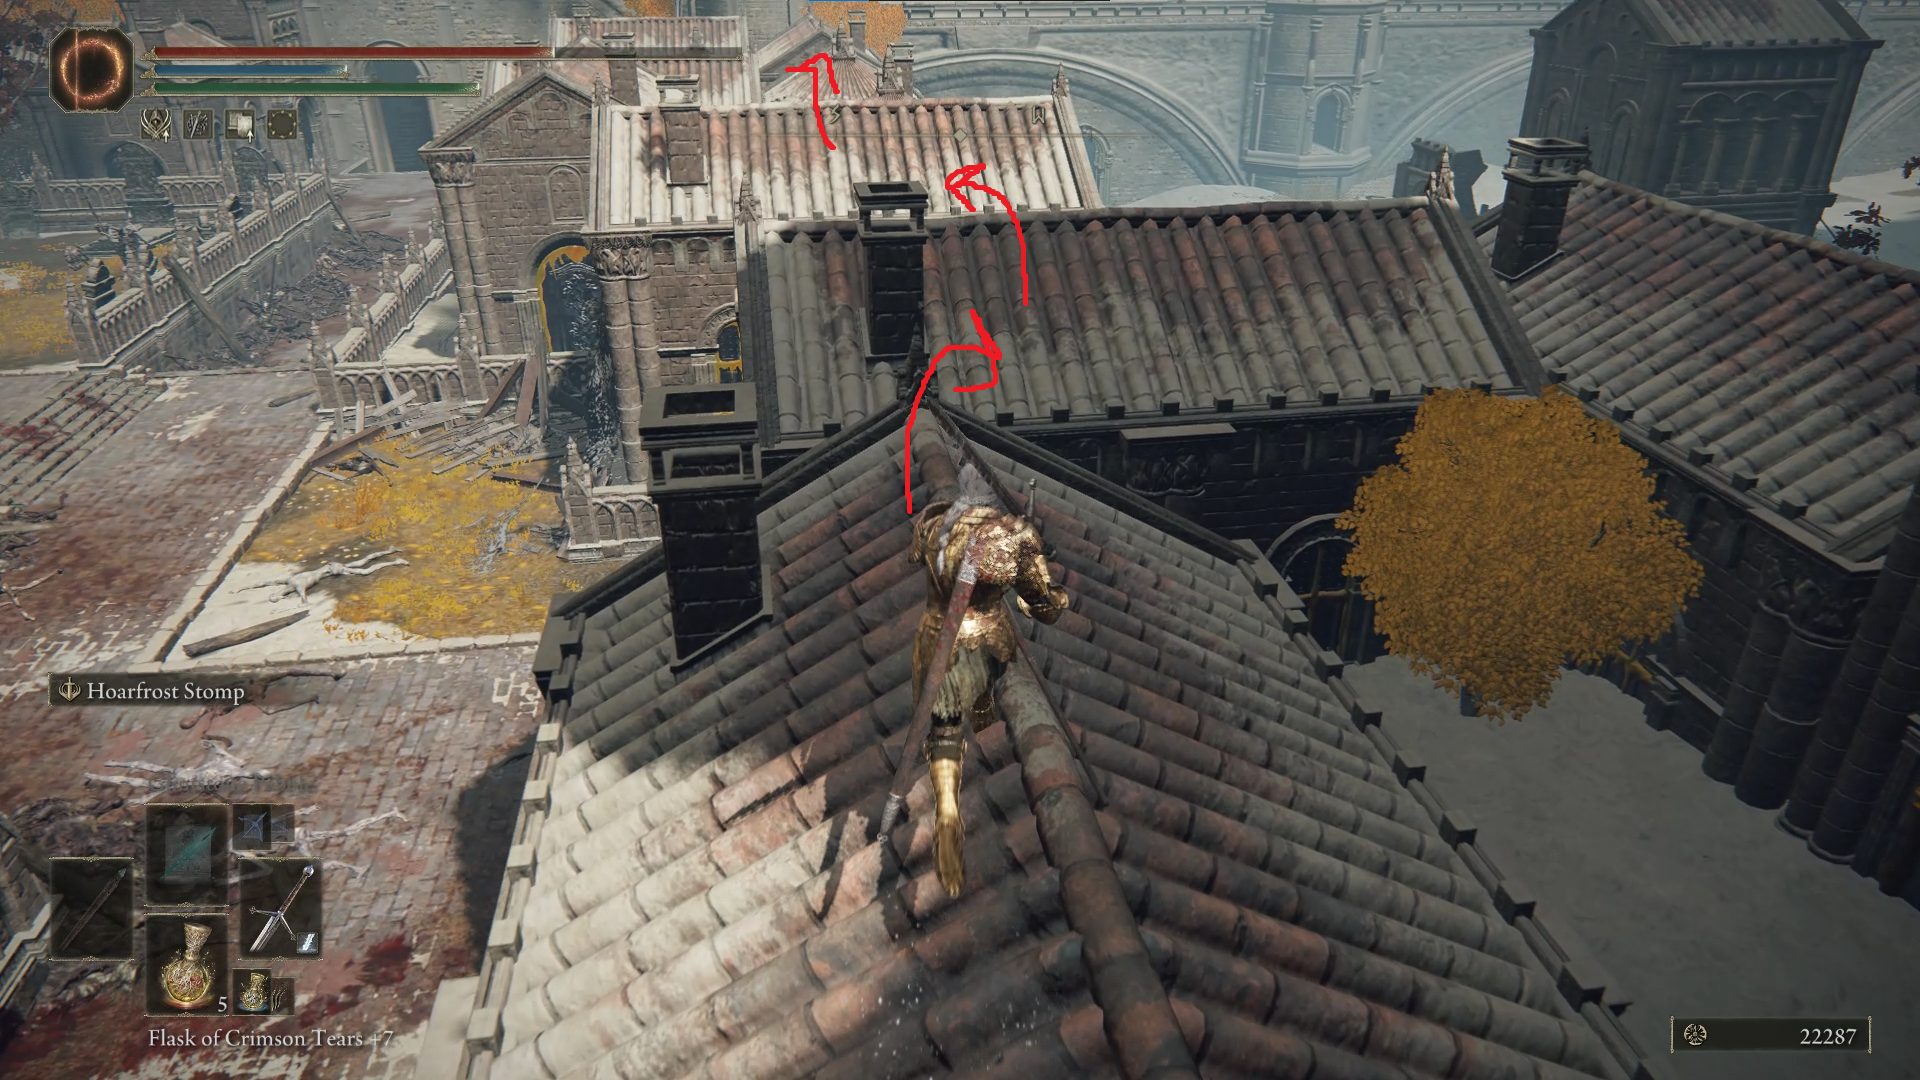
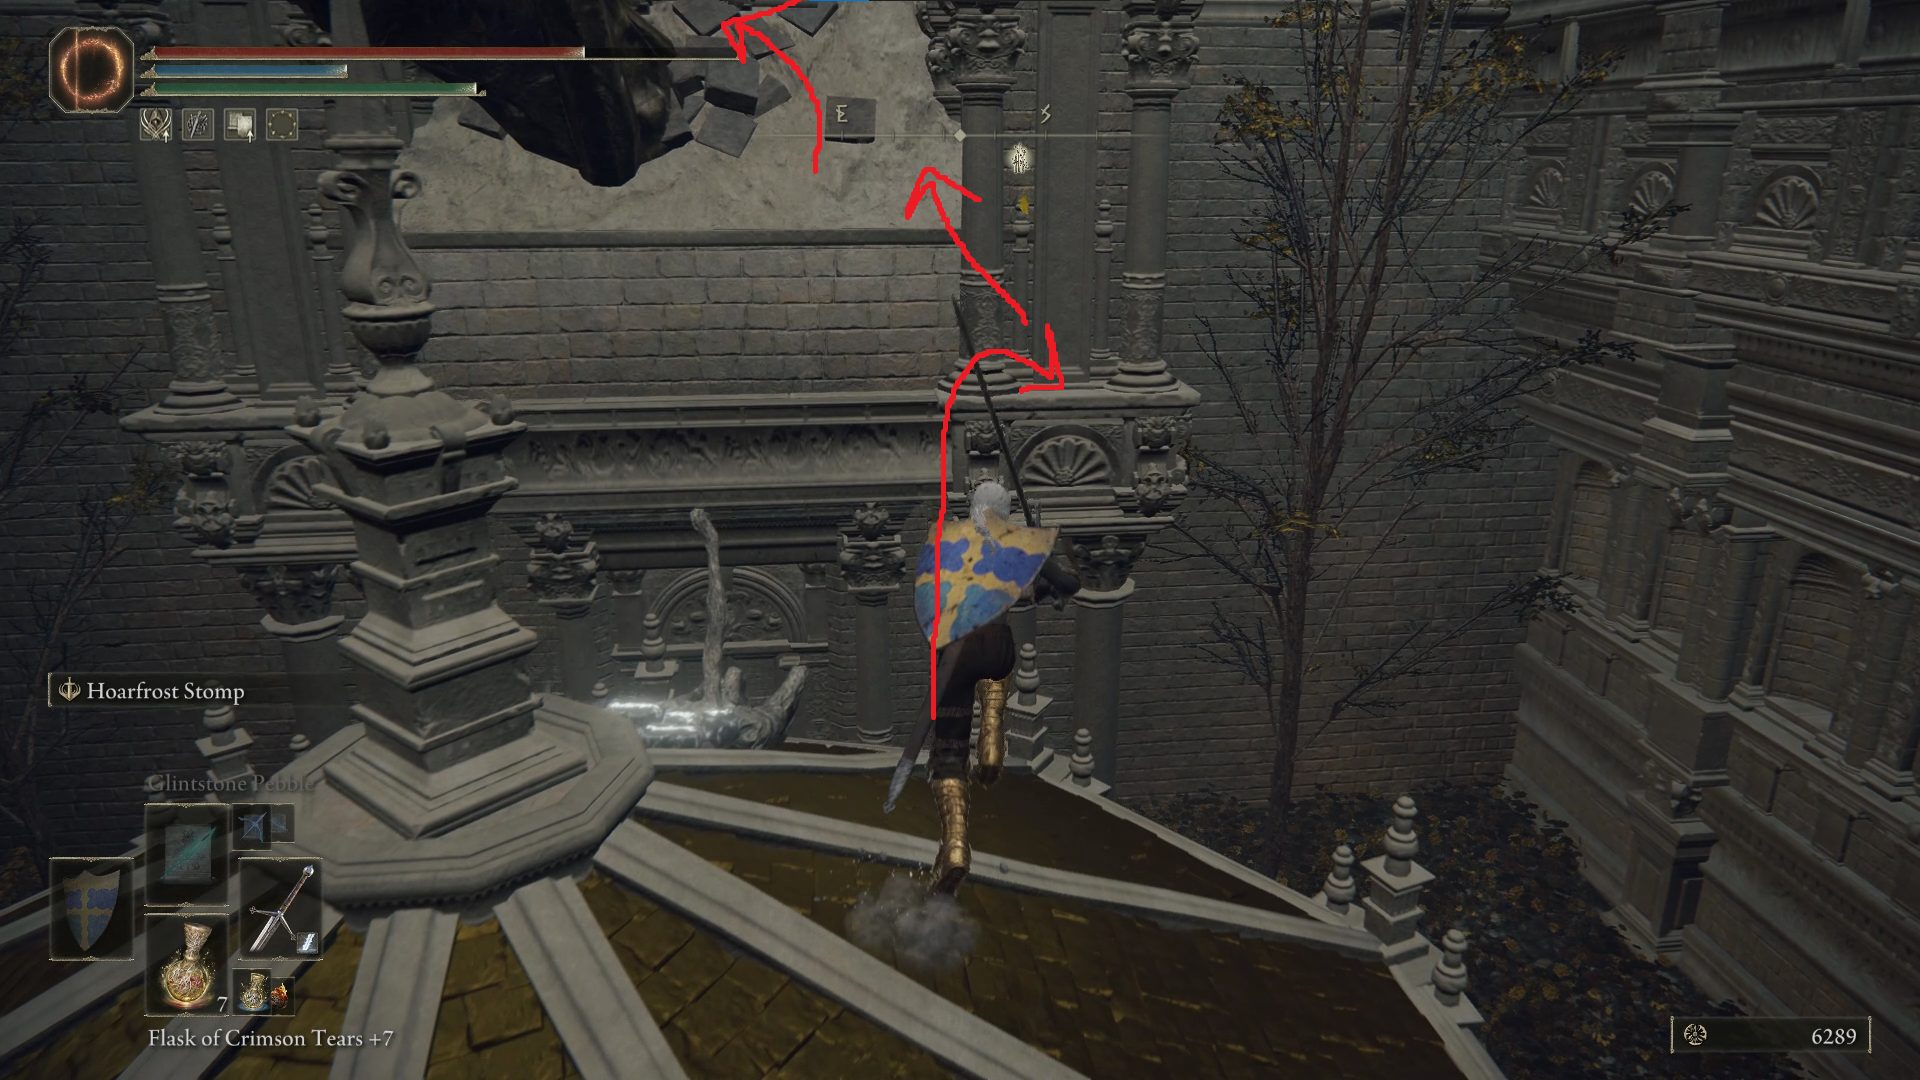
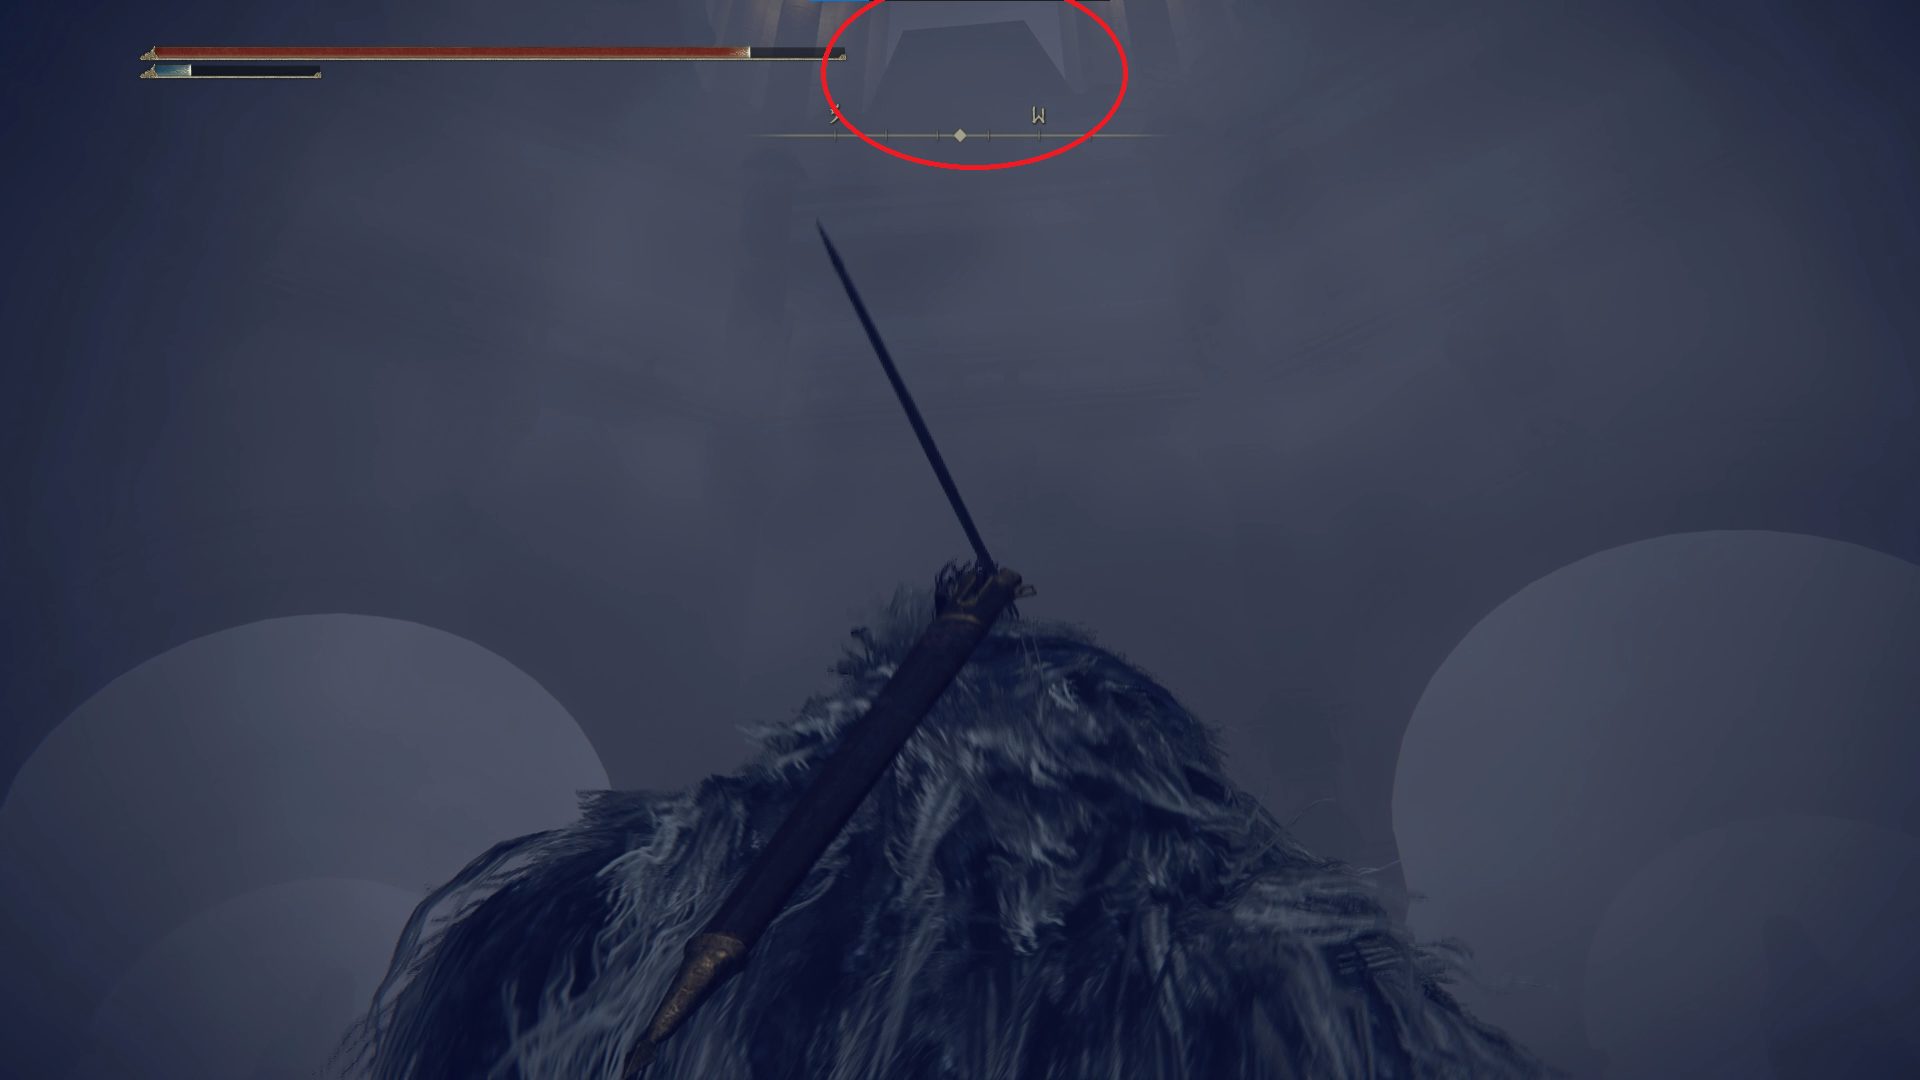
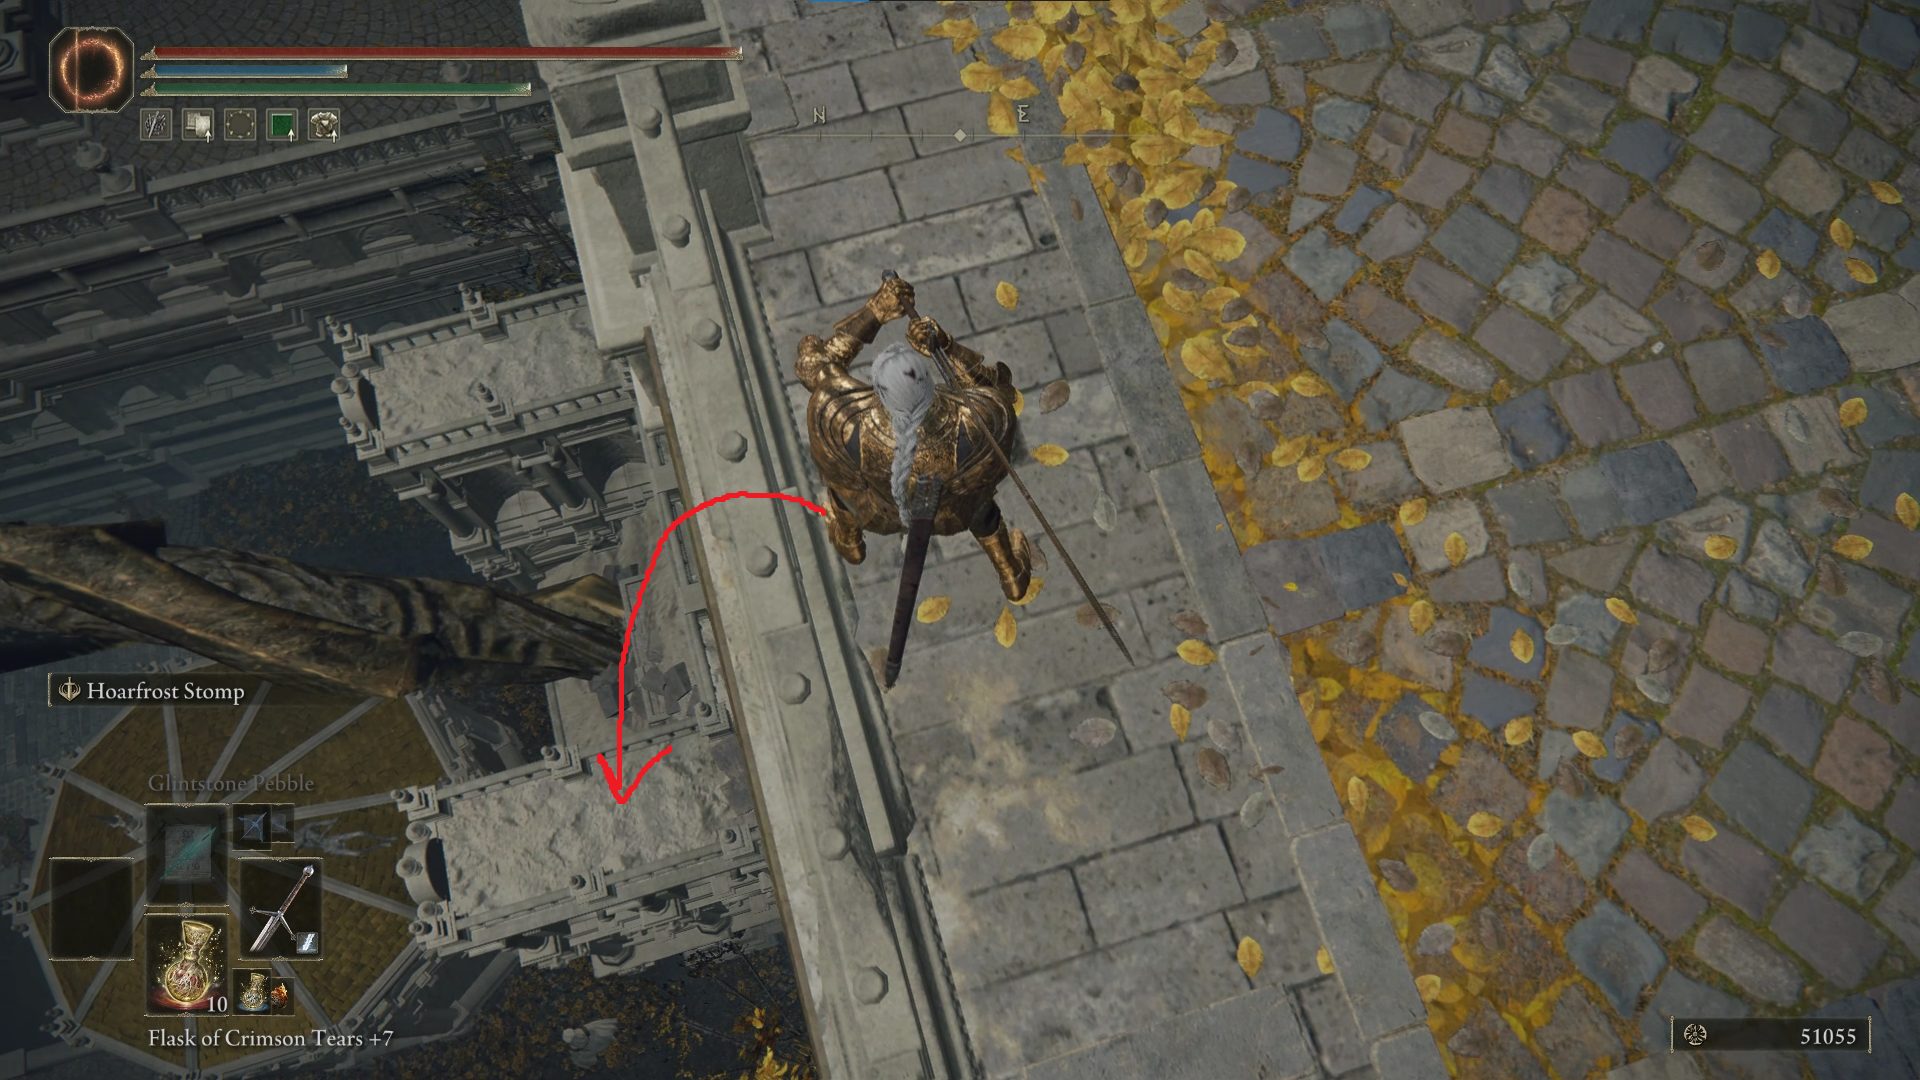
Go back down the stairs and head through the doorway on the west side of the room — go slowly or you may fall off the ledge — and then jump to the rooftop to the northwest [1]. You’ll then need to do a fairly difficult jump onto the roof further to the north, by running off one of the roof sections that extend over the windows [2]. Just on the other side of the roof is a Smithing Stone [5]. Grab it and then jump back the way you came [3].
123
Return to the balcony and go south down the stairs. Two perfumers are here with their backs turned, so sneak up on the nearer one and then take them out. A commoner may get up near the perfumers, so watch out for him as you deal with the robed foes. Go east and keep an eye on your left — a page hides around the corner ready to ambush you. At the far eastern end of the platform you’re on is a corpse with the Upper-Class Robe — grab it and then go to the northern end of the platform and jump over the edge onto the yellow roof below, then continue north onto the bridge.
You’re now where the elevator from earlier brought you, and you can turn left to head west back into the building. This time, continue west through the building and out the doorway, then turn left to head back into the building and then down the stairs. At the bottom of the stairs, go straight and roll through the objects in the doorway to find x10 Miranda Powder on a corpse. (The rooms further north have some knights + other enemies and some Miquella’s Lily, but nothing else, so unless you need crafting materials or like fighting the knights, there’s no need to go further).
Turn around and go back towards the staircase, and continue right past the stairs. Keep going west to exit the building, where you’ll find the source of the flute you’ve been hearing — the musically-inclined page here guards a Smithing Stone [6]. Grab it and then head back into the building, continue past the stairs and take your next left. This room has a perfumer sitting on the left side of the room, and a page plus another perfumer on the right side of the room.
Make sure you take out all the sleeping commoners in the area before this room, otherwise the perfumers will buff them and they’ll wake up
It’s very difficult to fight even just the two enemies on the right at the same time, so try and use a ranged attack (or just sneak far enough into the room) and pull the two enemies on the right towards the door. Here, you’ll have cover from the page’s ranged attacks, and you can attack both enemies as they come through the doorway. Once they’re both dispatched, go back into the room and kill the perfumer on the left, who hopefully is still sitting there thoughtfully. The corpse leaning against the pillar in this room has x3 Warming Stone, and the corpse on the western wall by the perfumer has a Golden Rune [10].
Leave the room via the northern doorway and head northwest down the stairs. Look up at the bottom of the stairs — an out-of-place gargoyle imp lurks above you on the building to the right. Further to the northwest is a lightning knight, who you should defeat before continuing. These guys are like the other knights you’ve met, but with a difficult to dodge lightning attack they usually use if you get too far away (you have to dodge much later than you’d think).
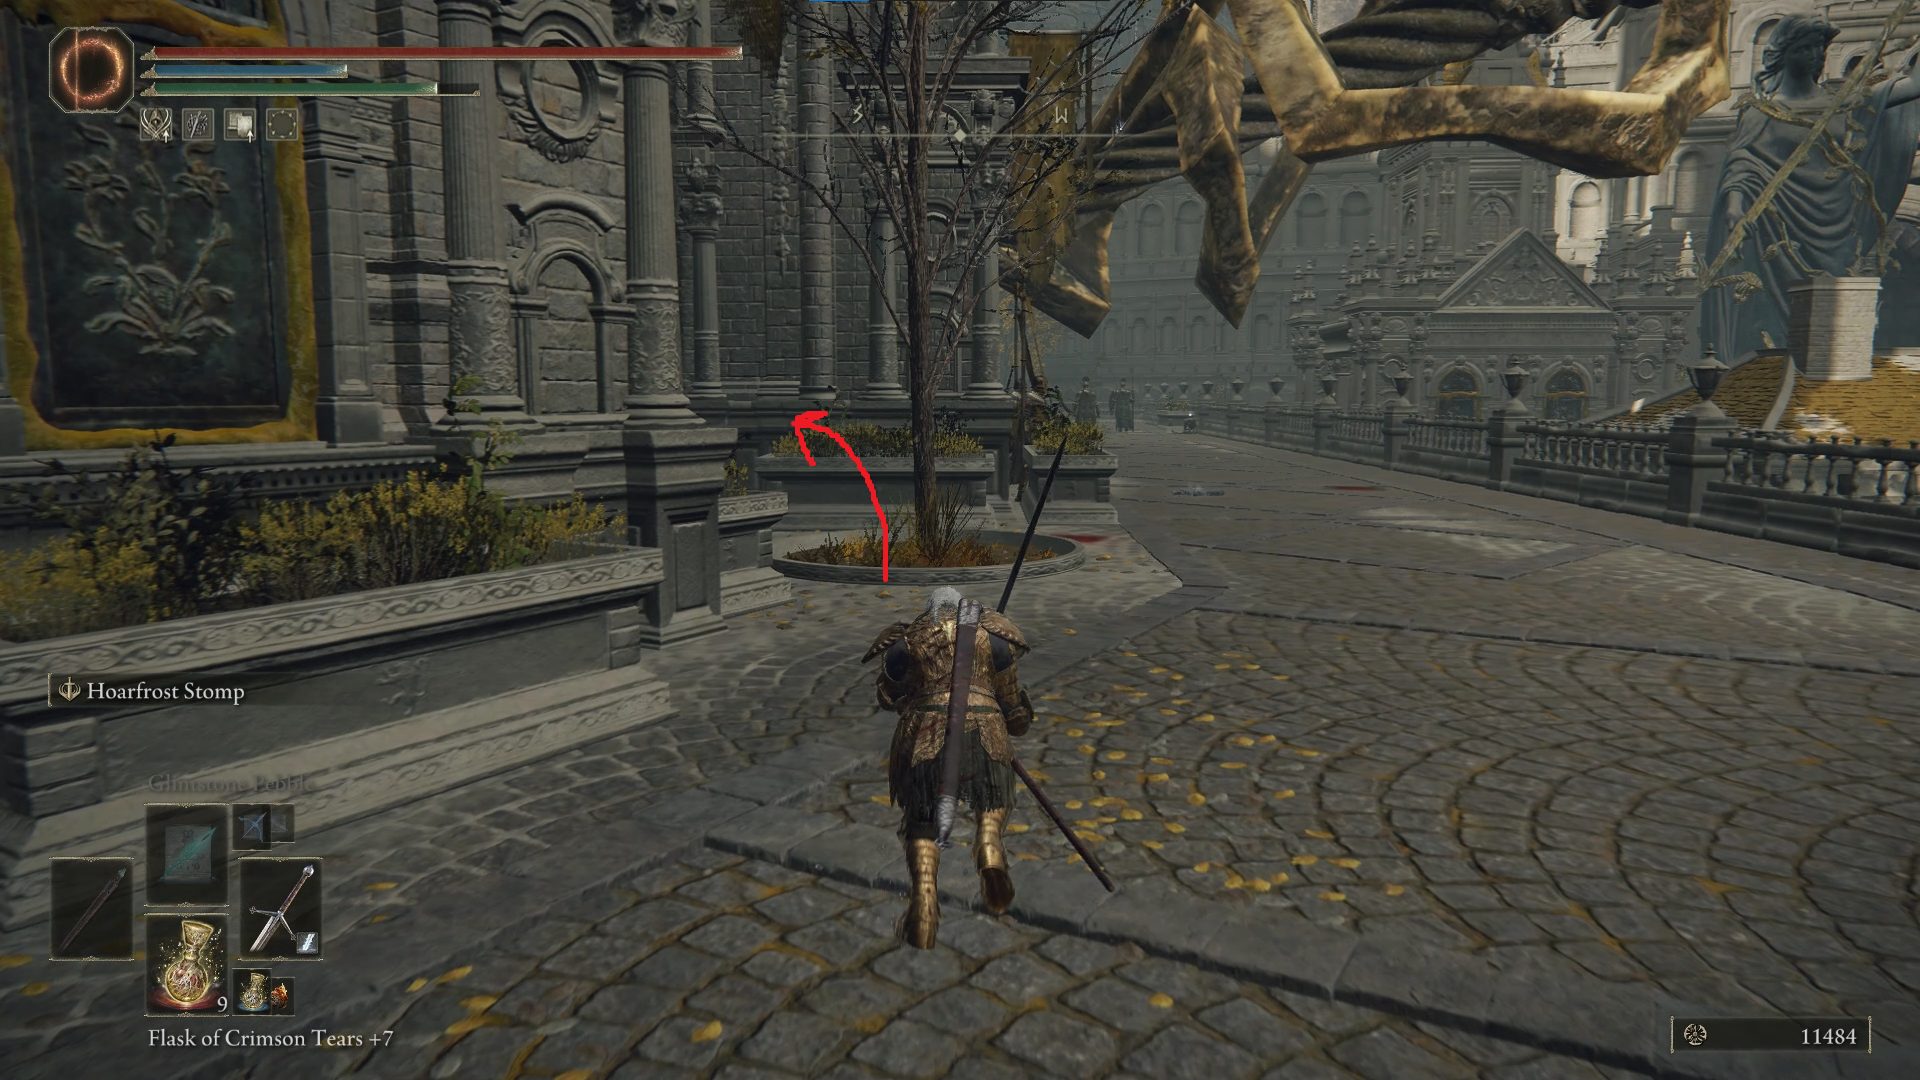
Continue northwest, and you’ll soon pass a cart and find yourself on the main street of Leyndell. Grab the Golden Rune [9] from the far side of the cart, then head southwest down the street. On your right on some stairs will be a corpse with x3 Gold Firefly — once you get about near this corpse, an Erdtree Avatar will drop down from the sky. For now, you’ll want to ignore it and turn right just past where it lands, through the golden gate that has a lit brazier on one side.
Continue northwest down the stairs, and you’ll find the Avenue Balcony site of grace on your right. Rest here, and then teleport back to the East Capital Rampart site of grace — we’ve got some roof-hopping to do!
From the site of grace, exit the room via the western doorway and continue south along the ramparts. Once you reach the section guarded by the disfigured gargoyle, jump down to the right and continue to the balcony with the three envoys, and jump west over the railing, down onto the rooftop below.
You’ll pass a gargoyle imp as you fall — and it will aggro as you pass it — so turn around and fight the lil’ guy once you land. Head west along the rooftops and look northwest, where you should see another rooftop with two gargoyle imps. Take them out from range if you can, and then make the relatively easy jump to the roof where the imps are (or were).
Head to the northwest edge of this roof, and look to the west-northwest, where you’ll see a corpse slumped over the left-hand edge of the roof below. You’ll need to jump down to that roof, but watch out for the imp on the near left corner of the roof. Grab the Golden Rune [9] from the corpse, and then use one of the window-roof segments to jump to the roof to the northeast — there’s a gargoyle imp here waiting for you, so be ready.
(Look down and to the southwest once you land — we’re going to drop down to this area after we grab another item on the rooftops, so note this area.) Make the same style of jump again to the next rooftop further to the northeast. From there, look to the east — the rooftop on the right has a Golden Rune [12] guarded by an imp, so jump there and grab the loot.
Now jump to the rooftop further north, and then again to the next one even further north. Turn left and you’ll see another corpse to the west, once again with a couple of gargoyle imps nearby. Jump to this roof and pick up the Stonesword Key, and take out the two visible gargoyles. A third gargoyle will come from somewhere nearby, so keep your eyes peeled. Once all three gargoyles are dead, retrace your steps to where you picked up the Golden Rune [9], and drop down to the south (on the same level as the nearby lightning knight).
You’ll want to drop down where this corpse (who holds a Smithing Stone [6]) sits below the roofsIf you aren’t sure where this is, find this knight — you can drop down further to the northwest (just make sure you’re landing on the same platform the knight is on)
Grab the Smithing Stone [6], then head southeast towards the knight. You can sneak past this guy or take him out, but either way, head down the dark path to the left of the knight. At the end on the left is a Golden Rune [9] — grab it and then jump north over the balcony and kill the two soldiers that are waiting for you there.
Once they’re dead, you can pick up the Imp Head (Corpse) from the bushes you landed in. Sneak, and go slowly and carefully in this area — there are a number of enemies in the various nooks and crannies here, but if you manage to sneak up on the soldier with the trumpet, you can avoid fighting all of them. Start sneaking, and head north from the Imp Head, taking your first left. You’ll come across two armored soldiers, one of which holds a trumpet (you’ll want to kill this one first), and just beyond them sits a lightning knight.
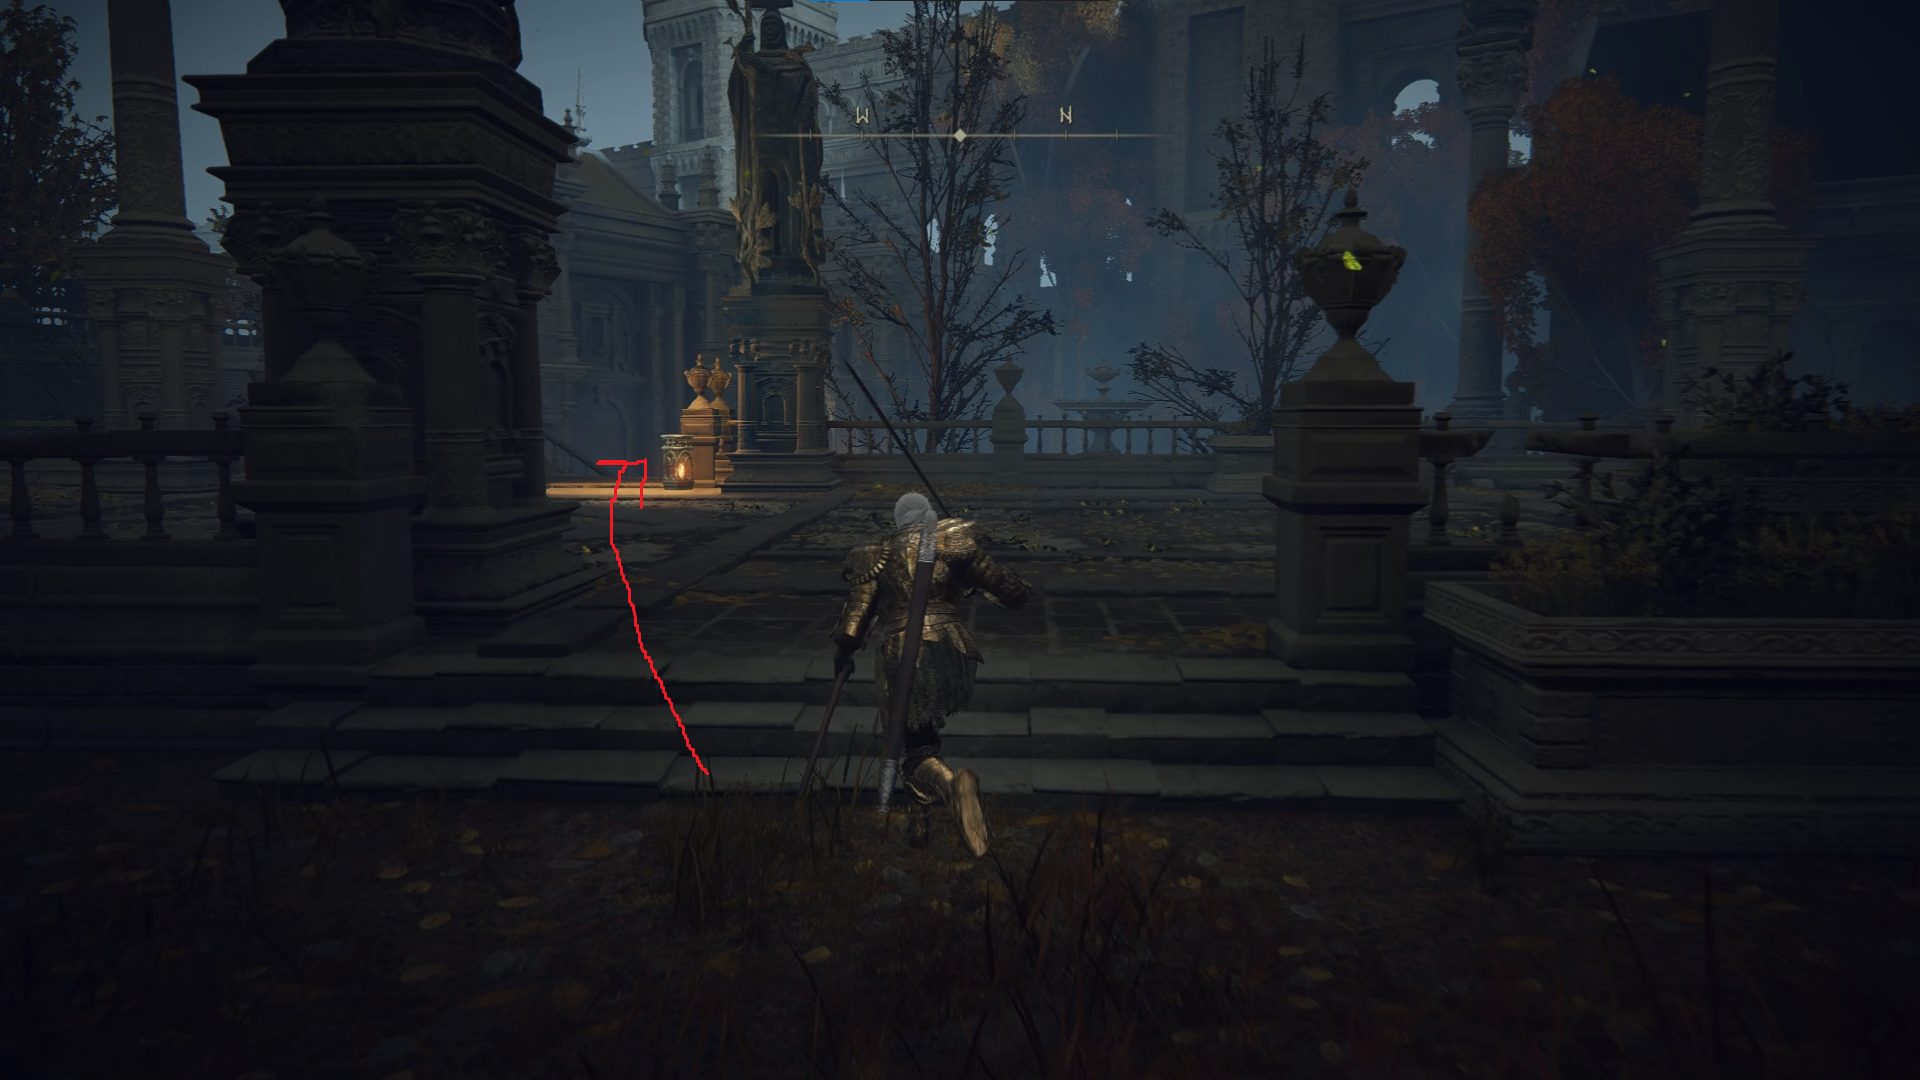
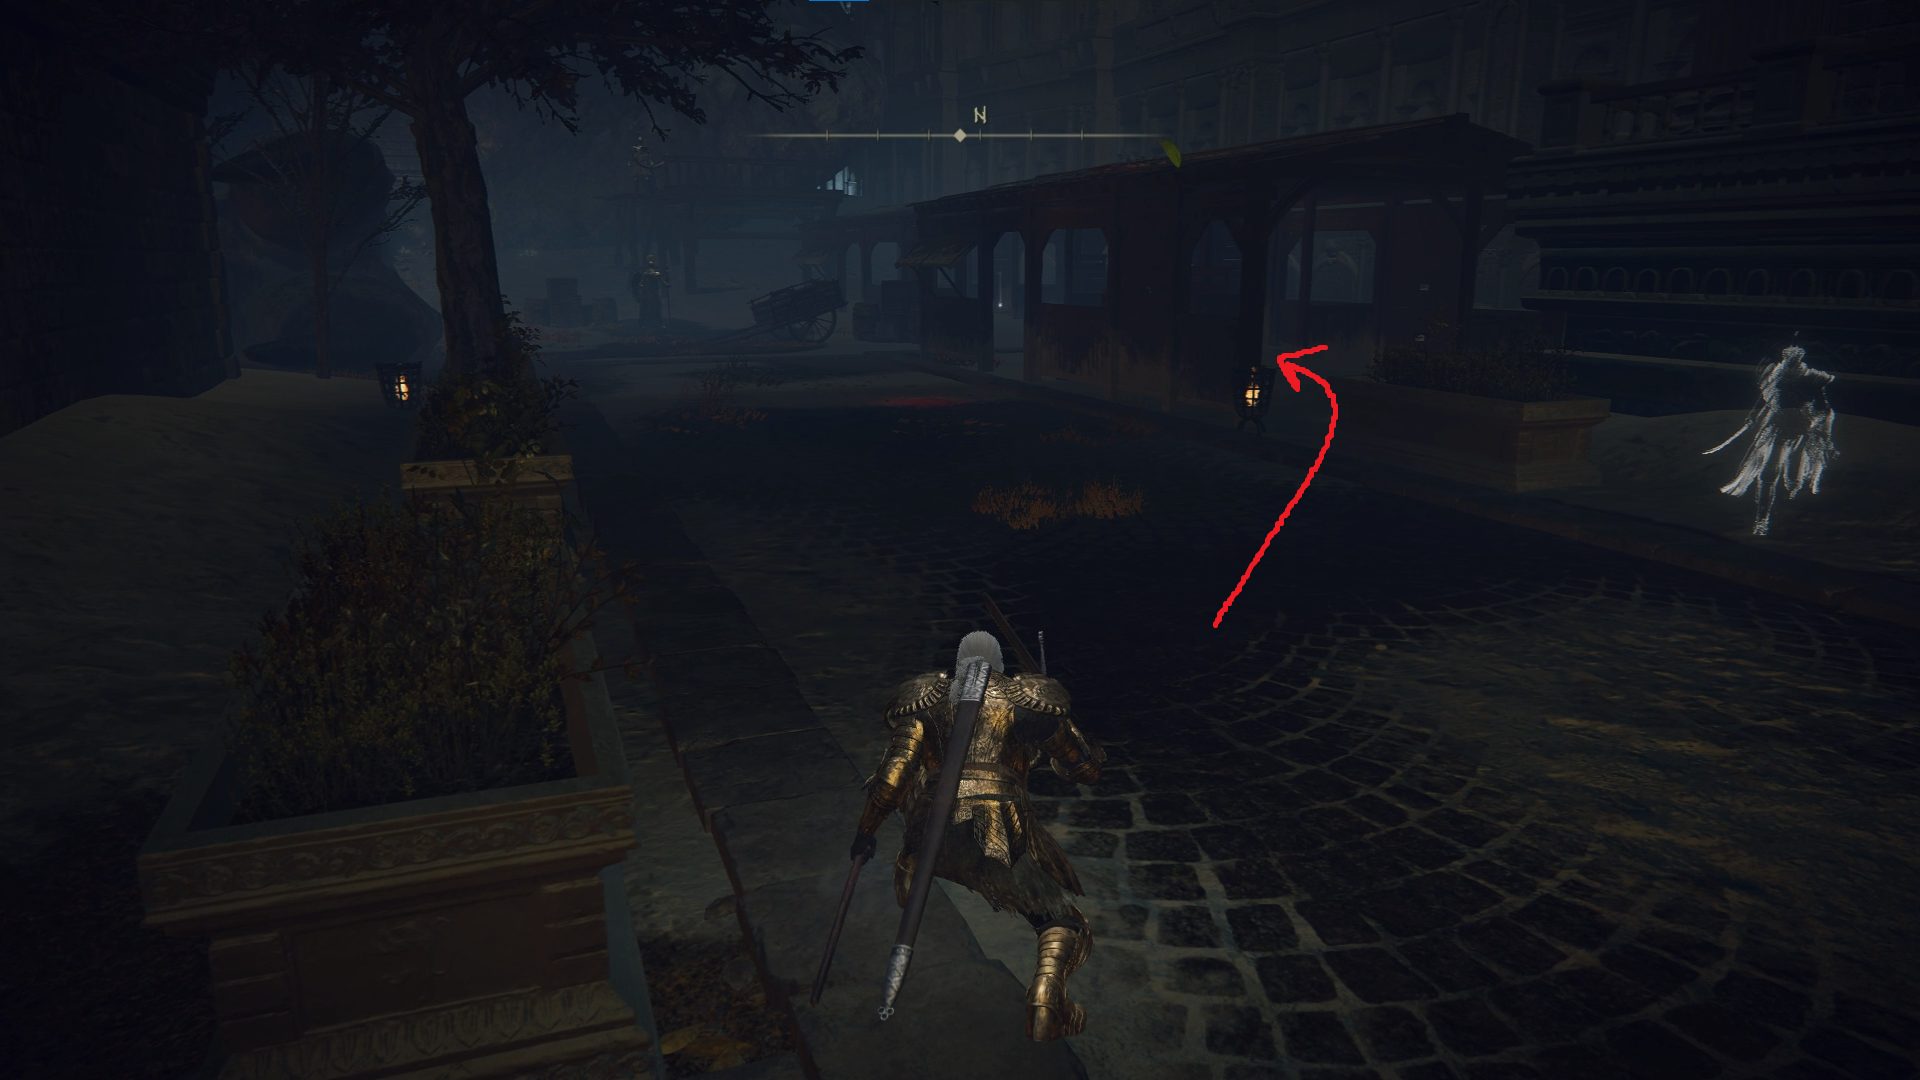
Take these enemies out, then continue west past where the knight sat and take your next left to find x2 Arteria Leaf. Then head northwest and you’ll soon find your way back to the main street — cross the street and head down the stairs (they’ve got a lantern indicating their location).
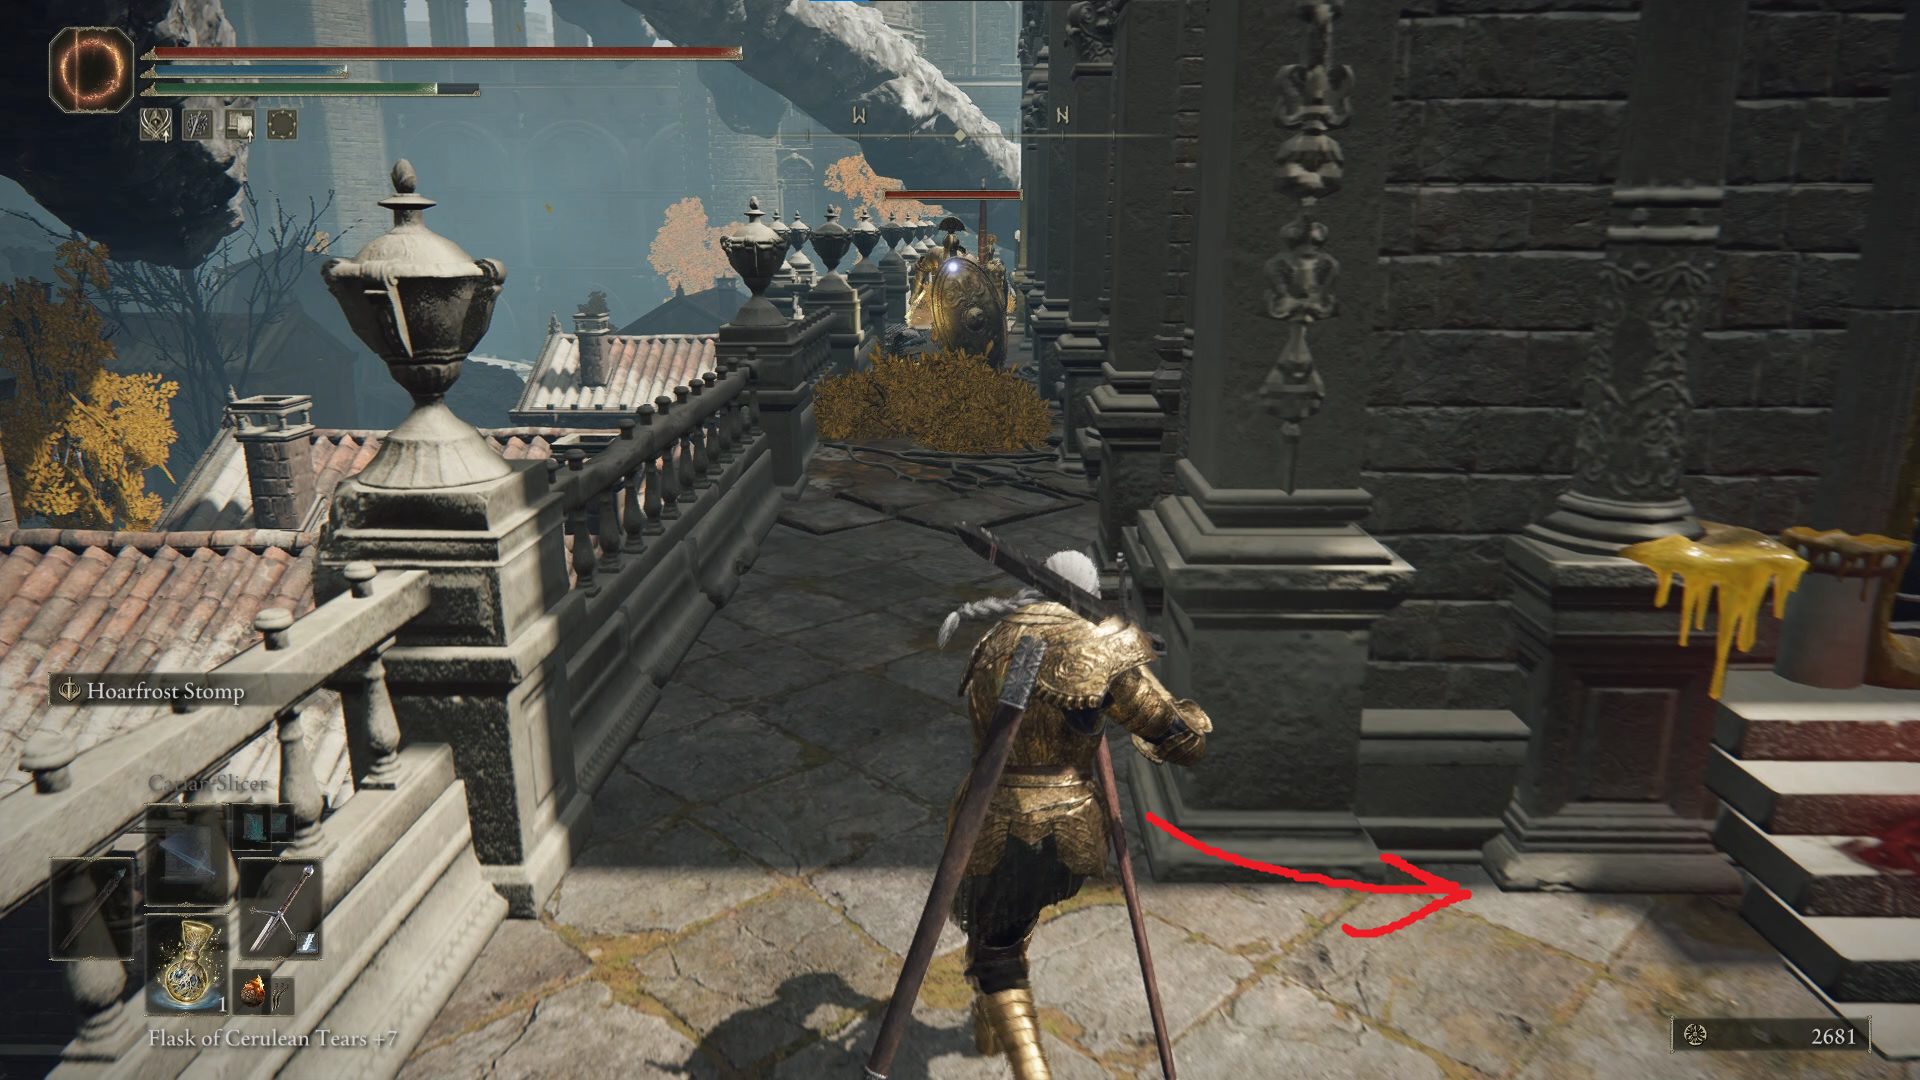
At the bottom of the stairs, you’ll find yourself in a courtyard with lit doorways on your right and left. Head northeast to the right-hand doorway and start sneaking as you enter — there’s a crucible knight with its back turned waiting ahead. He guards a Hero’s Rune [5], and there’s also a Golden Rune [9] on the left as you enter the room. If you want, you can fight this enemy, but it doesn’t drop any items. It’s also relatively easy to grab the item the knight is facing and then run into the hallway on the left side of the room, which leads to an elevator.
Ride the elevator up and you’ll find a door you can open — this is the door we checked out at the beginning of the guide! You can turn left after going through the shortcut door to find the East Capital Rampart site of grace and rest.
This walkthrough continues in the Part 2 tab!
From the East Capital Rampart site of grace, go west out the doorway and down the stairs, then turn right and go through the shortcut door you just opened that leads to an elevator. Ride it down and make your way through the room that has the crucible knight (assuming you didn’t slay it) and then go west out into the courtyard. Cross the courtyard (continuing west-southwest), enter the small structure there, and ride the elevator down.
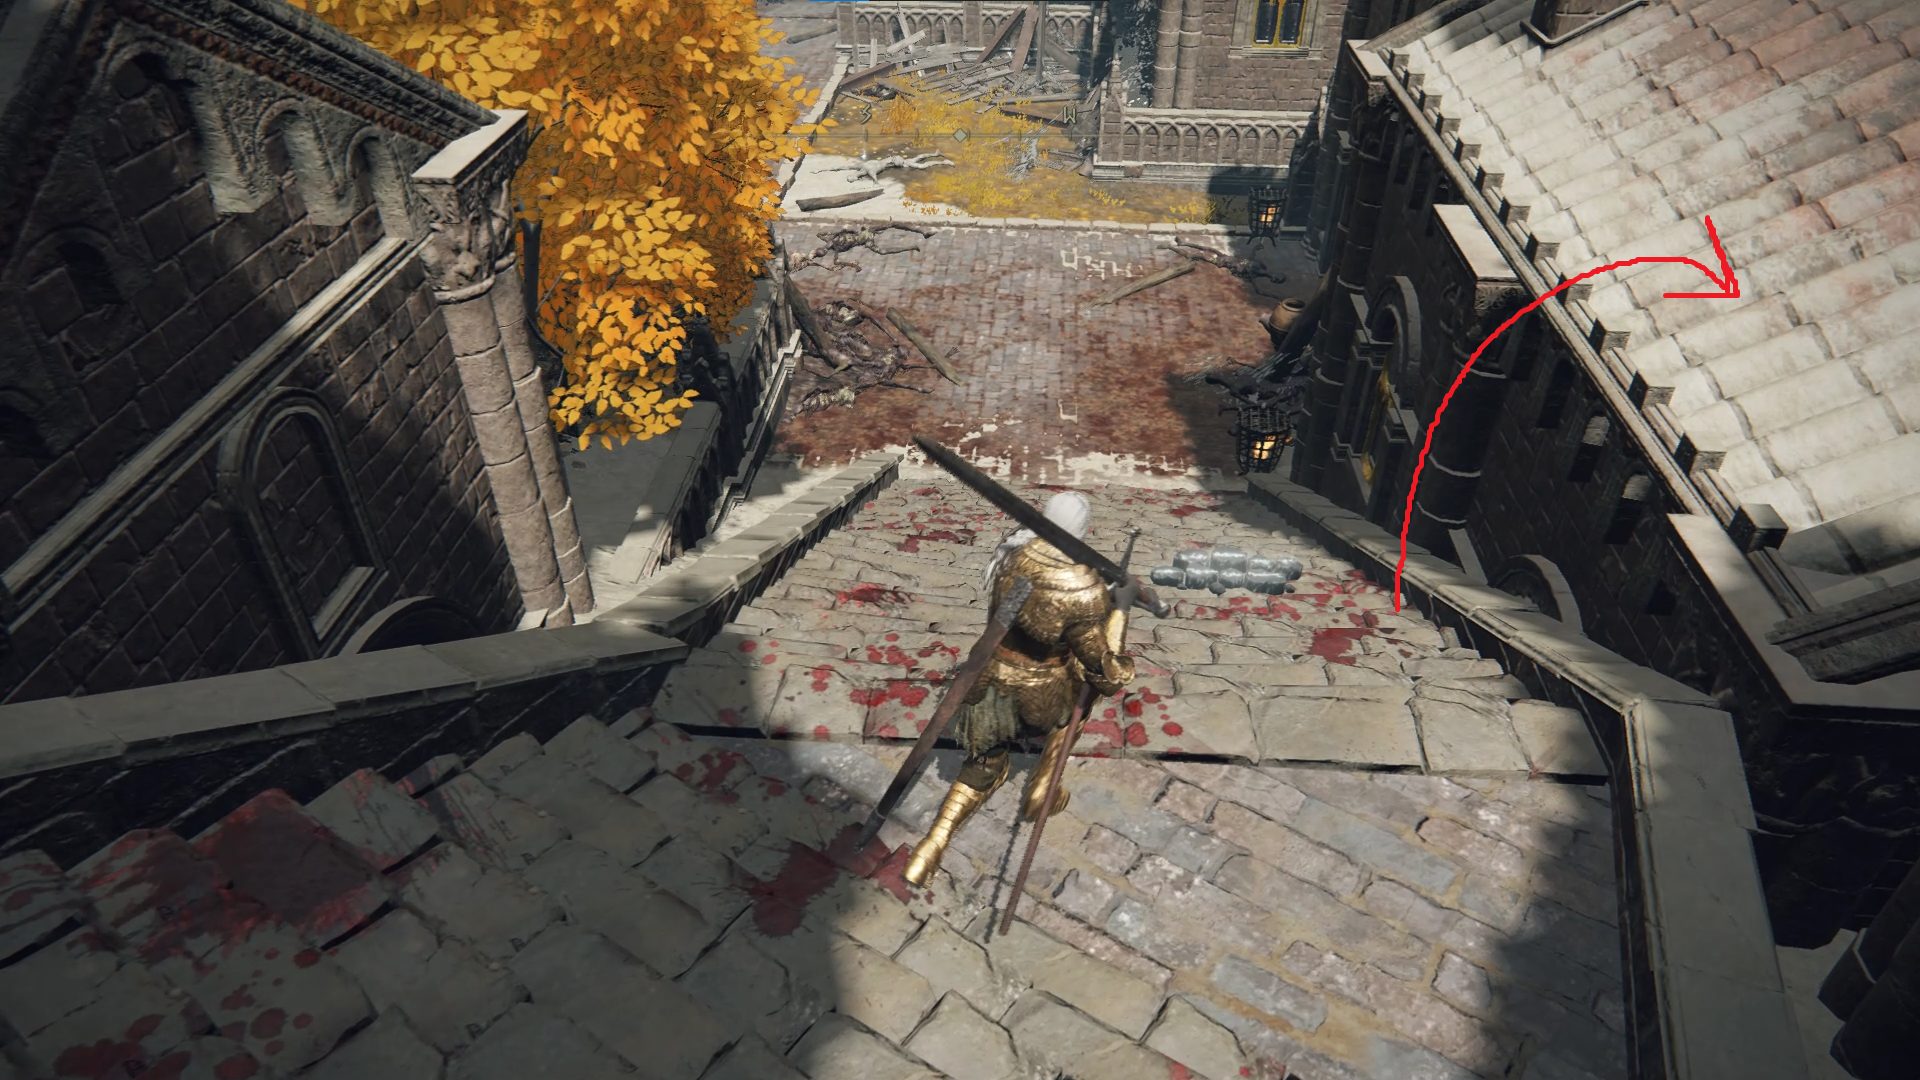
Make your way partway down the stairs and then jump up onto the roof to your right. Continue southwest along the rooftops and you’ll pass (or jump on) a couple of circular roofs. Just beyond them on your right is a corpse with the Black Bow.
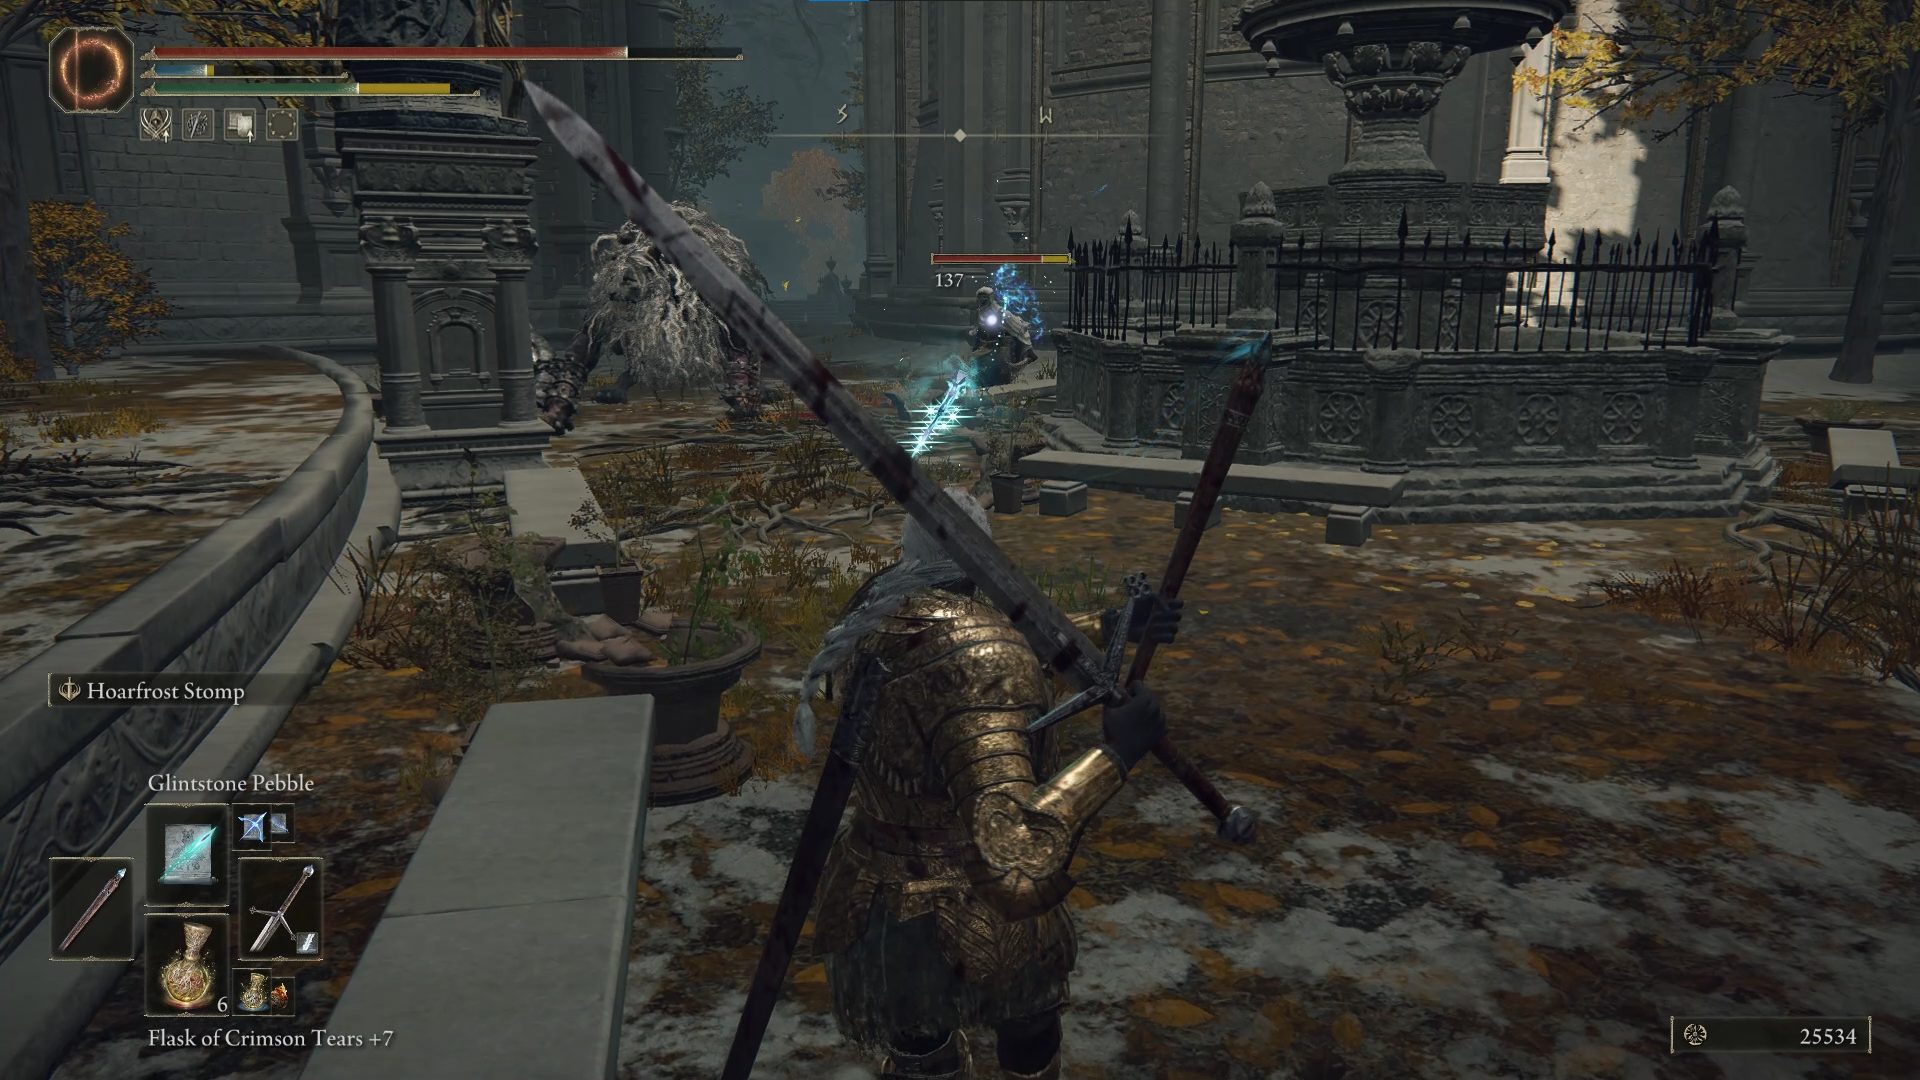
Now turn southeast, where across the street you’ll see a small graveyard that contains a corpse lying on a grave. Drop down to the street below, kill the enemy right in front of you, and turn left to go up the stairs, where there is a corpse on your left with a Golden Rune [9] and a few rotten enemies. Take out the foes here and then turn right: at the top of the stairs to the southeast is a Smithing Stone [4] — watch out for the skeleton that drops from the tree just past the corpse.
From here, go back around the corner, southwest to the corpse on the grave we saw earlier — the skeletons here have their back to you, so take advantage of their inattention to eliminate one quickly before the other stands up (and eliminate the rotten here as well). Grab the Stonesword Key, then return to the stairs and take them down to the southwest. Continue this direction and towards the doorway (but read ahead before entering the doorway).
When you enter this room, there will be an enemy footman waiting to ambush you on the right, and a large group of footmen on the wooden platform above on the right who toss lightning pots. Quickly dispatch the guy on the right and then run up the stairs to the platform. You’ll need to use rolling attacks if you’re melee and continuously move to avoid dying to lightning pots.
Once all the enemies here are dead, grab the Clarifying Boluses from the wooden platform, then open the gate that was to your right as you entered this room — inside is a chest with a Stonesword Key. Leave the chest and head across the room (southeast) to find a ladder. Climb up and open the door — this is a shortcut that leads to the Avenue Balcony site of grace. If you aren’t clear on where this is, go up the stairs to your left to check out the site of grace this shortcut connects to — you can also of course rest there if you need to.
Go back down the ladder and leave the room, and take your first left once you go up the stairs. Note that if you rested, the enemy by the door will chase you outside, so you’ll need to turn around and deal with him.
When you turn left, go down the stairs and cross the short bridge, where you’ll find a rotten praying northwest, towards a large open area — any guesses on what happens when you get too far into that area?
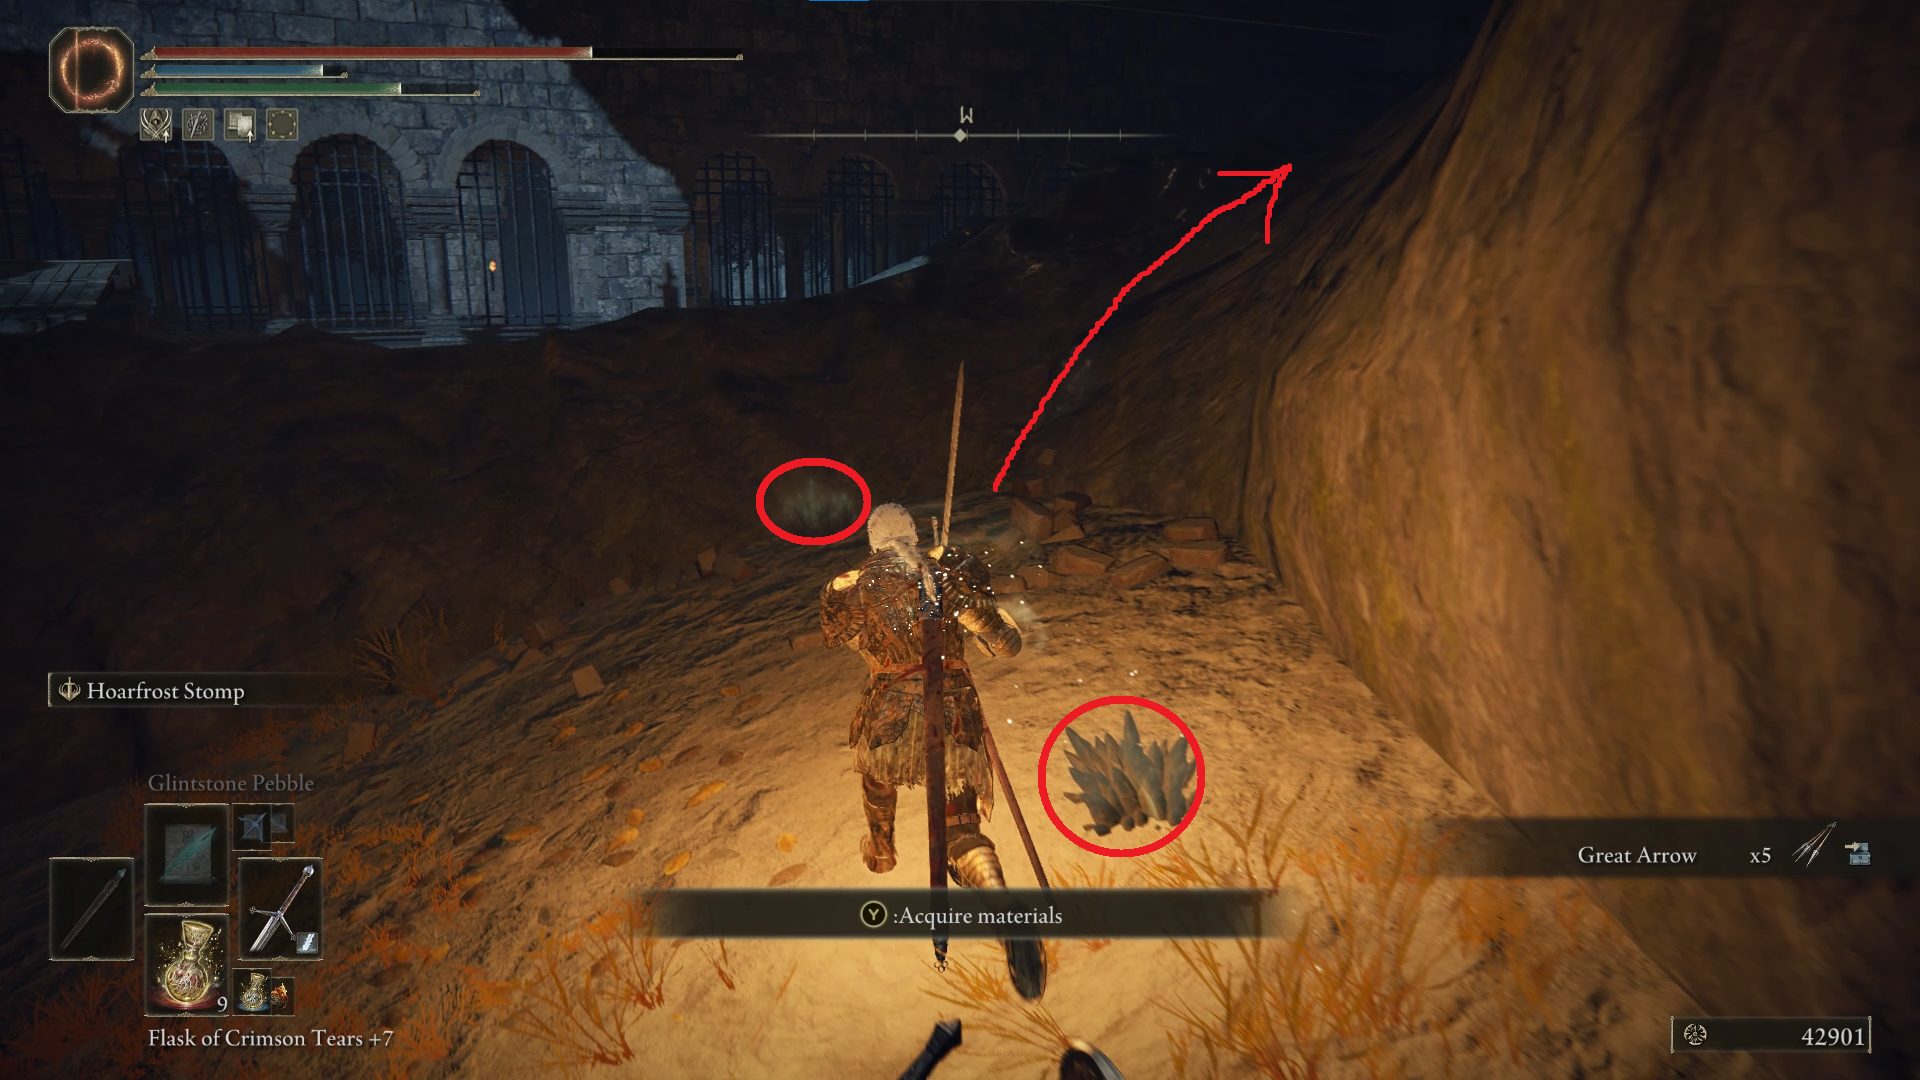
As always, you’ll receive a Golden Seed for defeating this tree spirit (plus 9828) — it also guarded two corpses that hold x15 Golden Arrow and a Smithing Stone [6]. Grab the loot and then head back southeast — when you reach the canal, turn right and head into the doorway there.
On the left as you enter is a Cracked Pot, and in the far right corner is a lightning knight. Take him out and then leave via the doorway in the southern corner of the room. You’ll find yourself at the top of some stairs — jump off of them to the right and head into the tunnel that leads northeast. There are a couple of rats here feasting on a corpse with a Hefty Beast Bone, and further along against the wall is a Golden Rune [8].
Continue northeast down the poo canal, and at the far end of it you’ll find the Guilty Hood. Grab it and head back the way you came (southwest). Look up as you pass the stairs — a hand waits above the entrance to the next tunnel, eager to leap on you as you pass. Deal with it however you please, then go up the stairs on your left. Turn around at the top of the stairs and go up the ladder to the southwest.
At the top of the stairs, there’s a building straight ahead with a site of grace — this room also contains Lionel’s Set and the Deathbed Dress. Ignore the Omenkiller on the left for now — if it chases you, just make sure you tap the grace before fighting it. This foe drops the Omensmirk Mask.
If you turn right after leaving the building with the site of grace, you’ll find a Smithing Stone [6]. Then return to the ladder and take it down, then hop down into the canal and head into the tunnel that leads southwest. Turn left at the next junction, where you’ll find a couple of rats — exterminate them and continue southeast. The tunnel branches to the left, and another hand sits on the ceiling at the split. For now, go straight into the dead end, kill the two hands here, and grab the x8 Poisonbone Dart.
Turn around and this time turn right to head into the tunnel that branches off to the east-southeast. Yet another hand hides on the ceiling here, so take it out before continuing further. This tunnel will dead end, and you’ll see a large hand guarding a corpse. Use Fire Pots or similar to deal with the hand, then claim the Lost Ashes of War it protected. Turn around and head back the way you came, to where you first entered these tunnels (and turned left initially).
If you see this little get-together, you’re on the right track
A rat and a hand are making friends in the left corner here, so break up the party and then pick up the x4 String before continuing northwest. You’ll soon find a place to turn right — there’s x2 Nascent Butterfly down this tunnel, but two enemies will enter the tunnel when you reach the end of it, so be careful. Back in the main tunnel, kill the hand above the next section of tunnel before continuing down it, where you’ll find a disfigured gargoyle guarding some items.
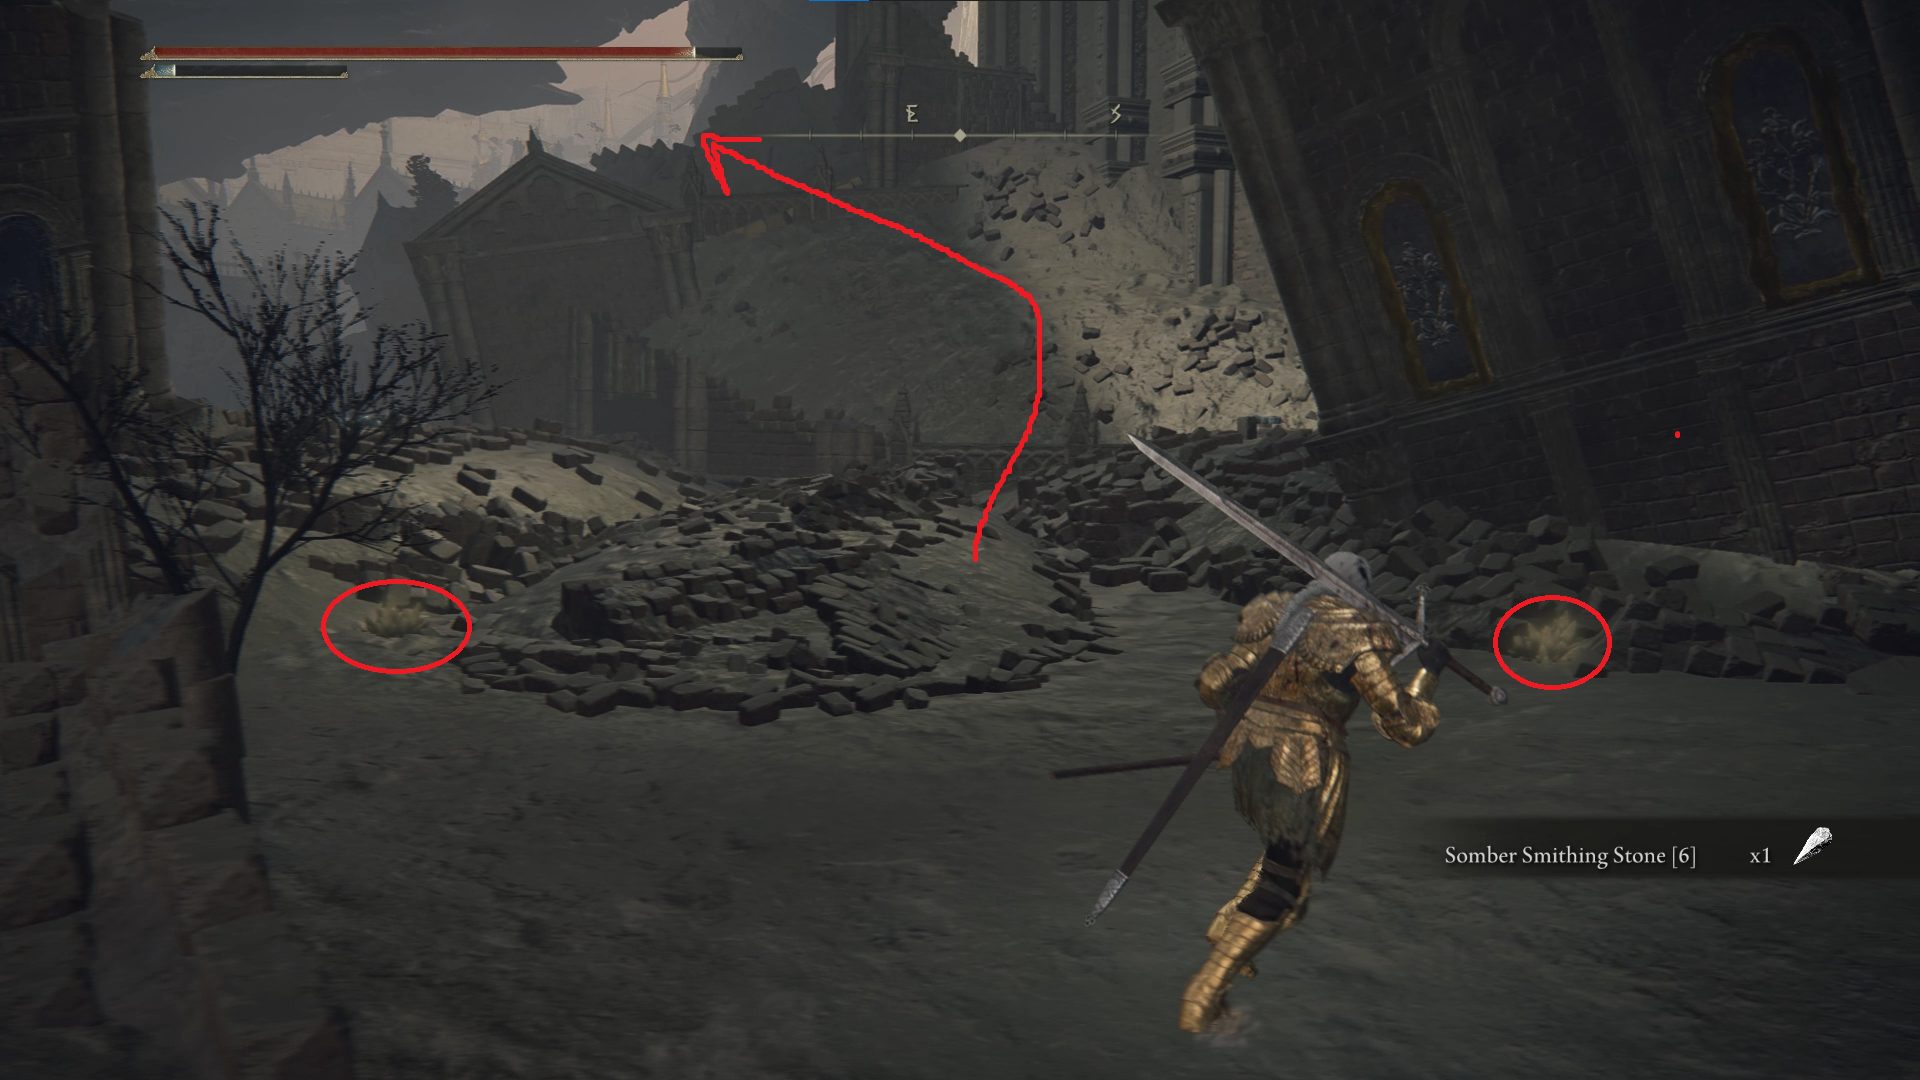
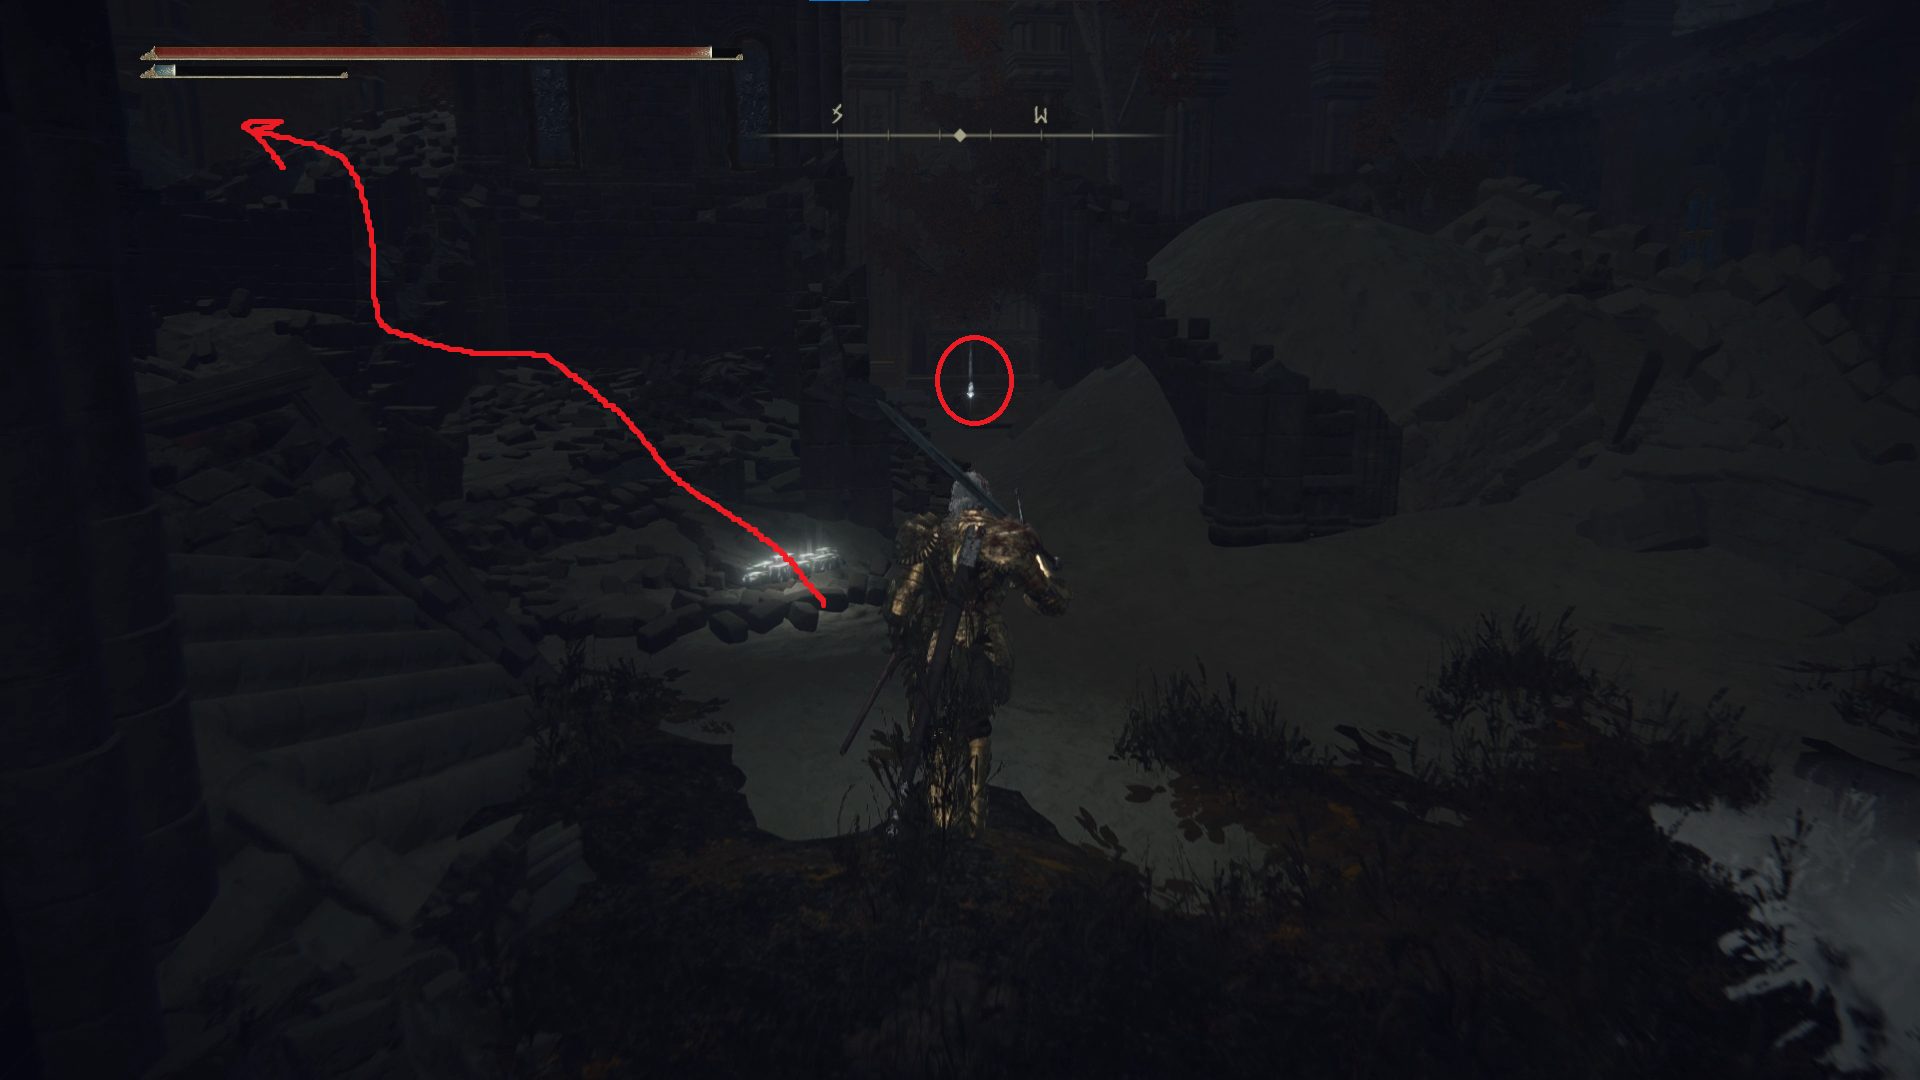
Its back is to you, so it’s an easy kill, and you can then drop down into the room below and pick up the x5 Fan Daggers, Erdsteel Dagger, and Holyproof Dried Liver from the corpses here. Then climb the ladder in the northeast corner of the room. At the top, note the stairs to your right — we’ll head here in a sec. First, go north over the low wall and up the stairs to find some Dragonwound Grease. Then go back south and down the stairs — just before the far corner to the west is Somber Smithing Stone [6]. There are also a few Gravel Stone deposits in this area near the smithing stone — grab them before climbing the nearby pile of rubble to the east.
The path to the Somber Smithing Stone [6]The Gravel Stone + the path over the rubble
Once you’ve climbed to the highest point of the rubble, you can head due east — making your way down the rubble — to find a loot beetle that holds the Ash of War: Thunderbolt. A couple of poo-monsters will attack you as you chase the loot beetle, so be ready. To the northeast of the loot beetle is a corpse with an Albinauric Bloodclot. Just to the south of this corpse is the entrance to the Subterranean Shunning Grounds, but we’ll be heading there in a different walkthrough.
Southwest from the corpse with the bloodclot is a corpse that leans over the edge of a ledge — grab its Smithing Stone [5], then teleport to the Avenue Balcony site of grace.
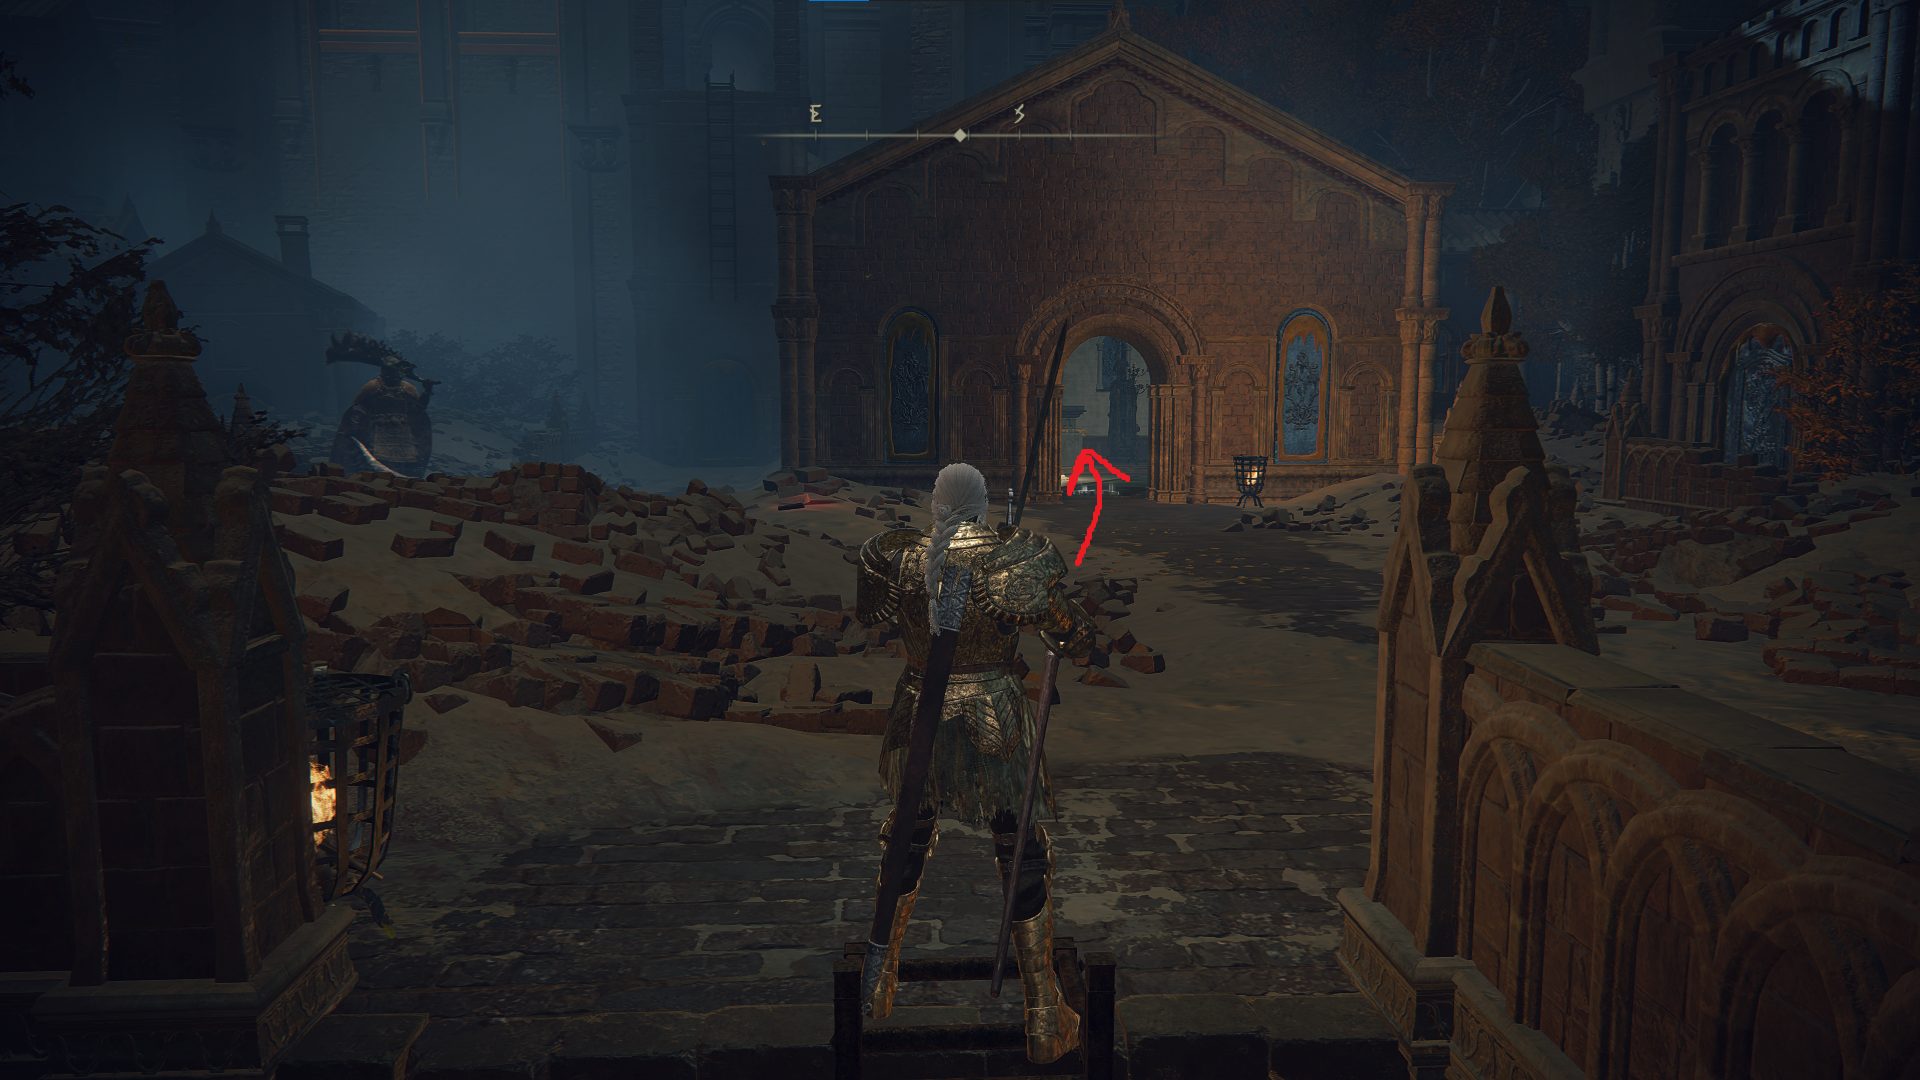
If you’re curious how this area all connects, you can follow the path indicated up to the nearby roof to see the building that contains the Lower Capital Church site of grace.
This walkthrough continues in the Part 3 tab!
From the Avenue Balcony site of grace, head southeast up the stairs and out onto the main street. If you’ve been following this guide from the start of Leyndell, we left the Erdtree Avatar here unslaughtered, so taking the big tree-fella out is our next step — you should find it dropping down from the sky as soon as you go through the gold gate at the top of the stairs.
The boss guide linked below generally contains tips about fighting the boss on horseback, but the Moveset section will still be useful. Because this boss will consistently use its projectile attack if you get too far away, you’ll want to stay in melee range and basically hug the boss, rolling through each attack. Once a combo finishes, you can do your strongest attack and then prepare to dodge the next boss combo or attack. Defeating this Erdtree Avatar nets you a Lord’s Rune and 10,062 (no Mixed Physick tears this time).
You’ll probably want to rest after defeating the boss (unless you managed to kill it without taking any damage, in which case nice work!) — head back to the Avenue Balcony site of grace to rest, and then once more go up the stairs to the main street. Due east of the gold gate at the top of the stairs is an overturned cart; go around to the far side of it and jump up onto the railing next to it, and then on top of the cart, to grab the Holy Grease up there.
We Mario now
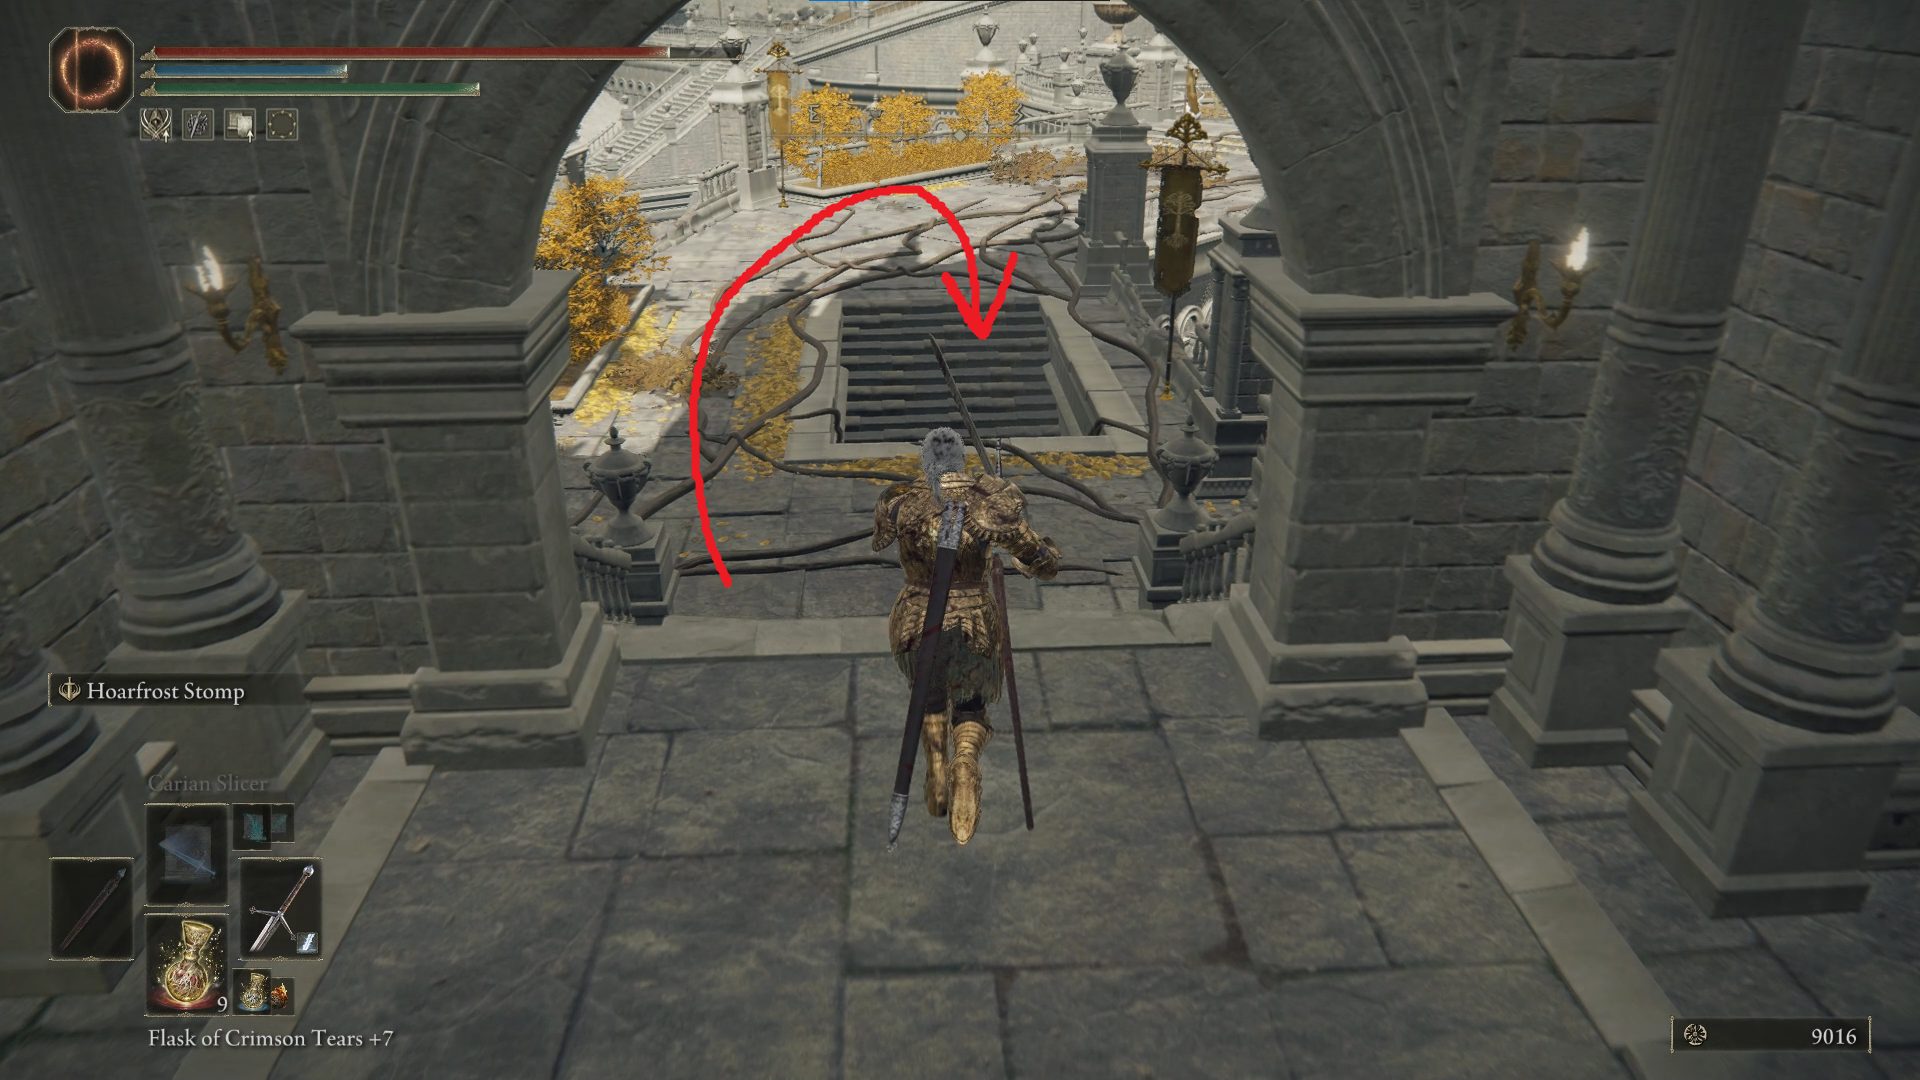
Jump down from the southwestern end of the cart and immediately turn left to head southeast up the stairs. Near the top of the stairs, start sneaking, then turn left at the top of the stairs and use target-lock to find the armored soldier hidden to the northeast beneath a tree. Sneak around wide to the right of this guy and take him out first — doing so will alert the rest of the enemies and you’ll need to manage fighting a few foes at once. The two footmen and the perfumer both go down easy, so be aggressive and take them out one at a time.
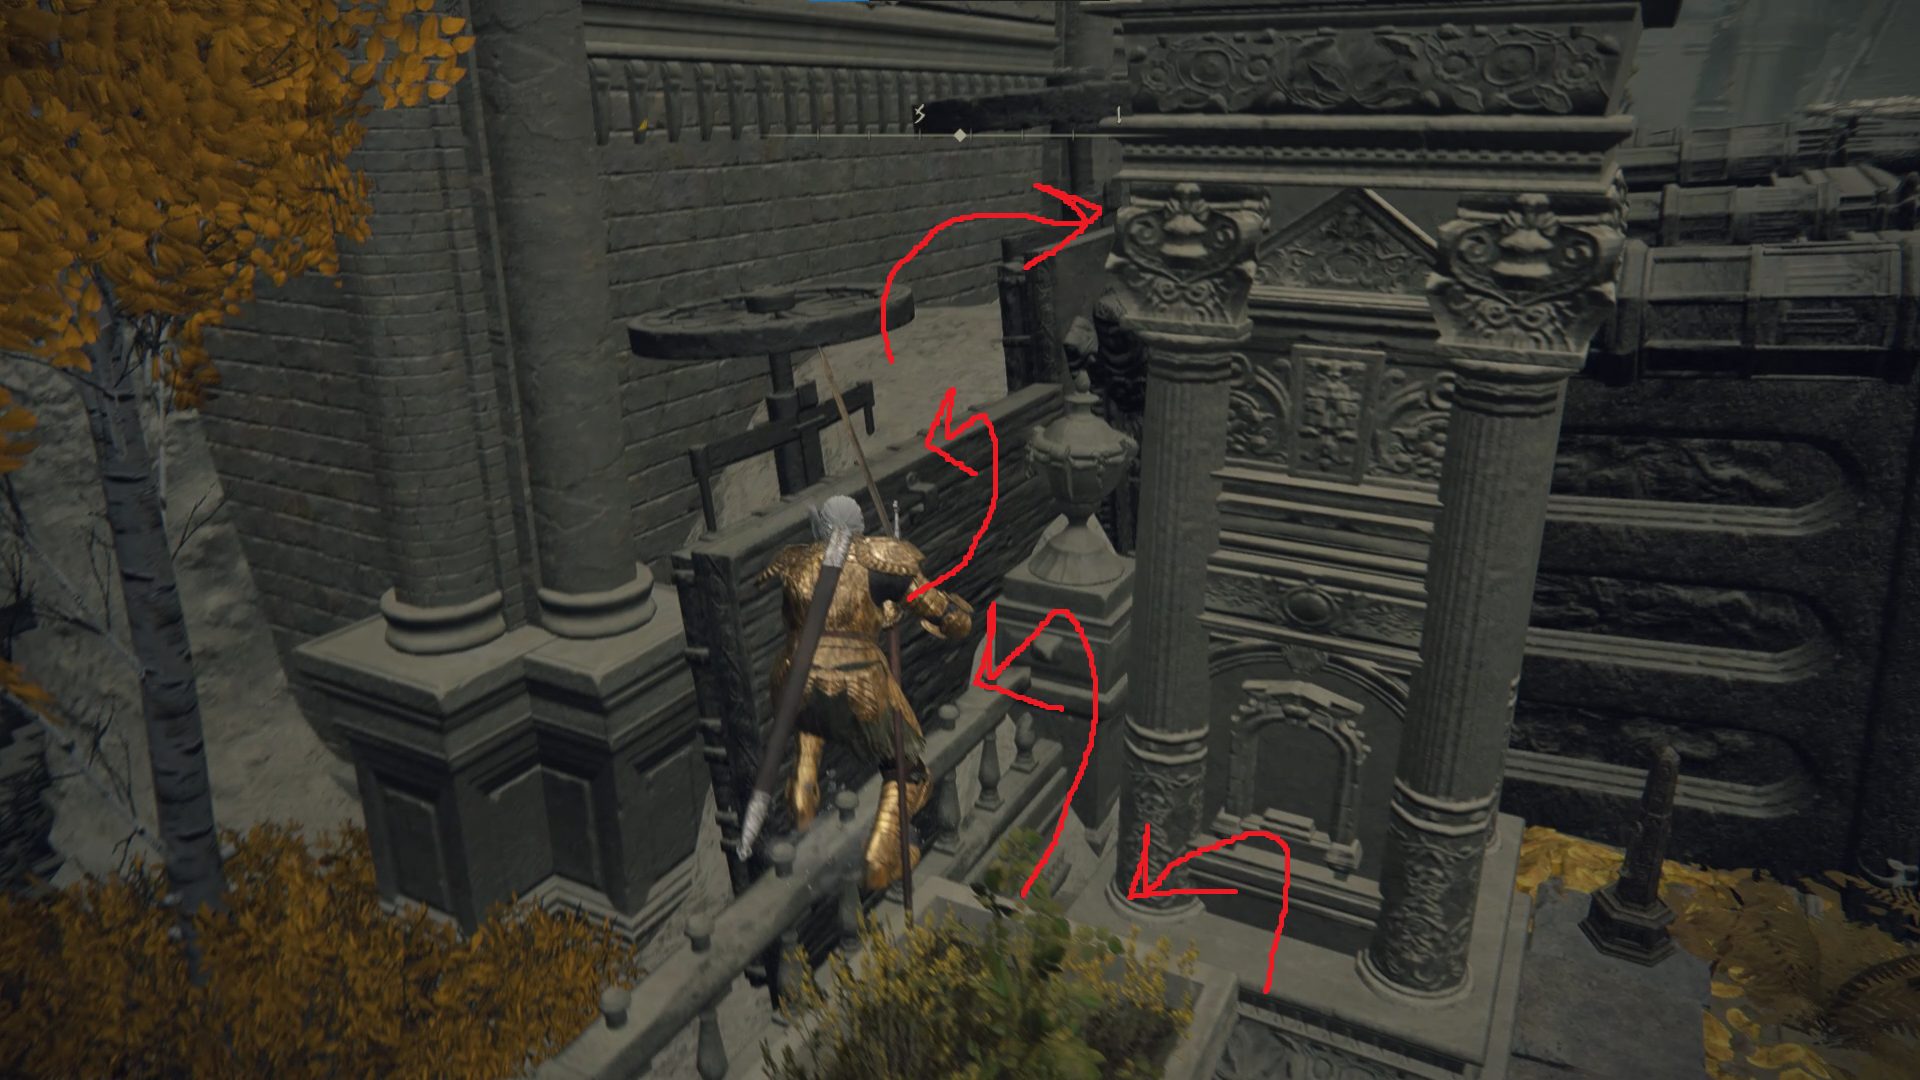
Once all the enemies here are dispatched, head to the northwest side of this platform where the large stone bowl sits on a pedestal — on the far side of the bowl is a corpse with a Smithing Stone [4]. Grab it and then head southeast, where you’ll find stairs that lead up. At the top of the stairs, start sneaking again and ambush the guards that are hanging out to the south-southwest. From where the guards were chilling, head south past the columns to find a corpse with a Golden Rune [8].
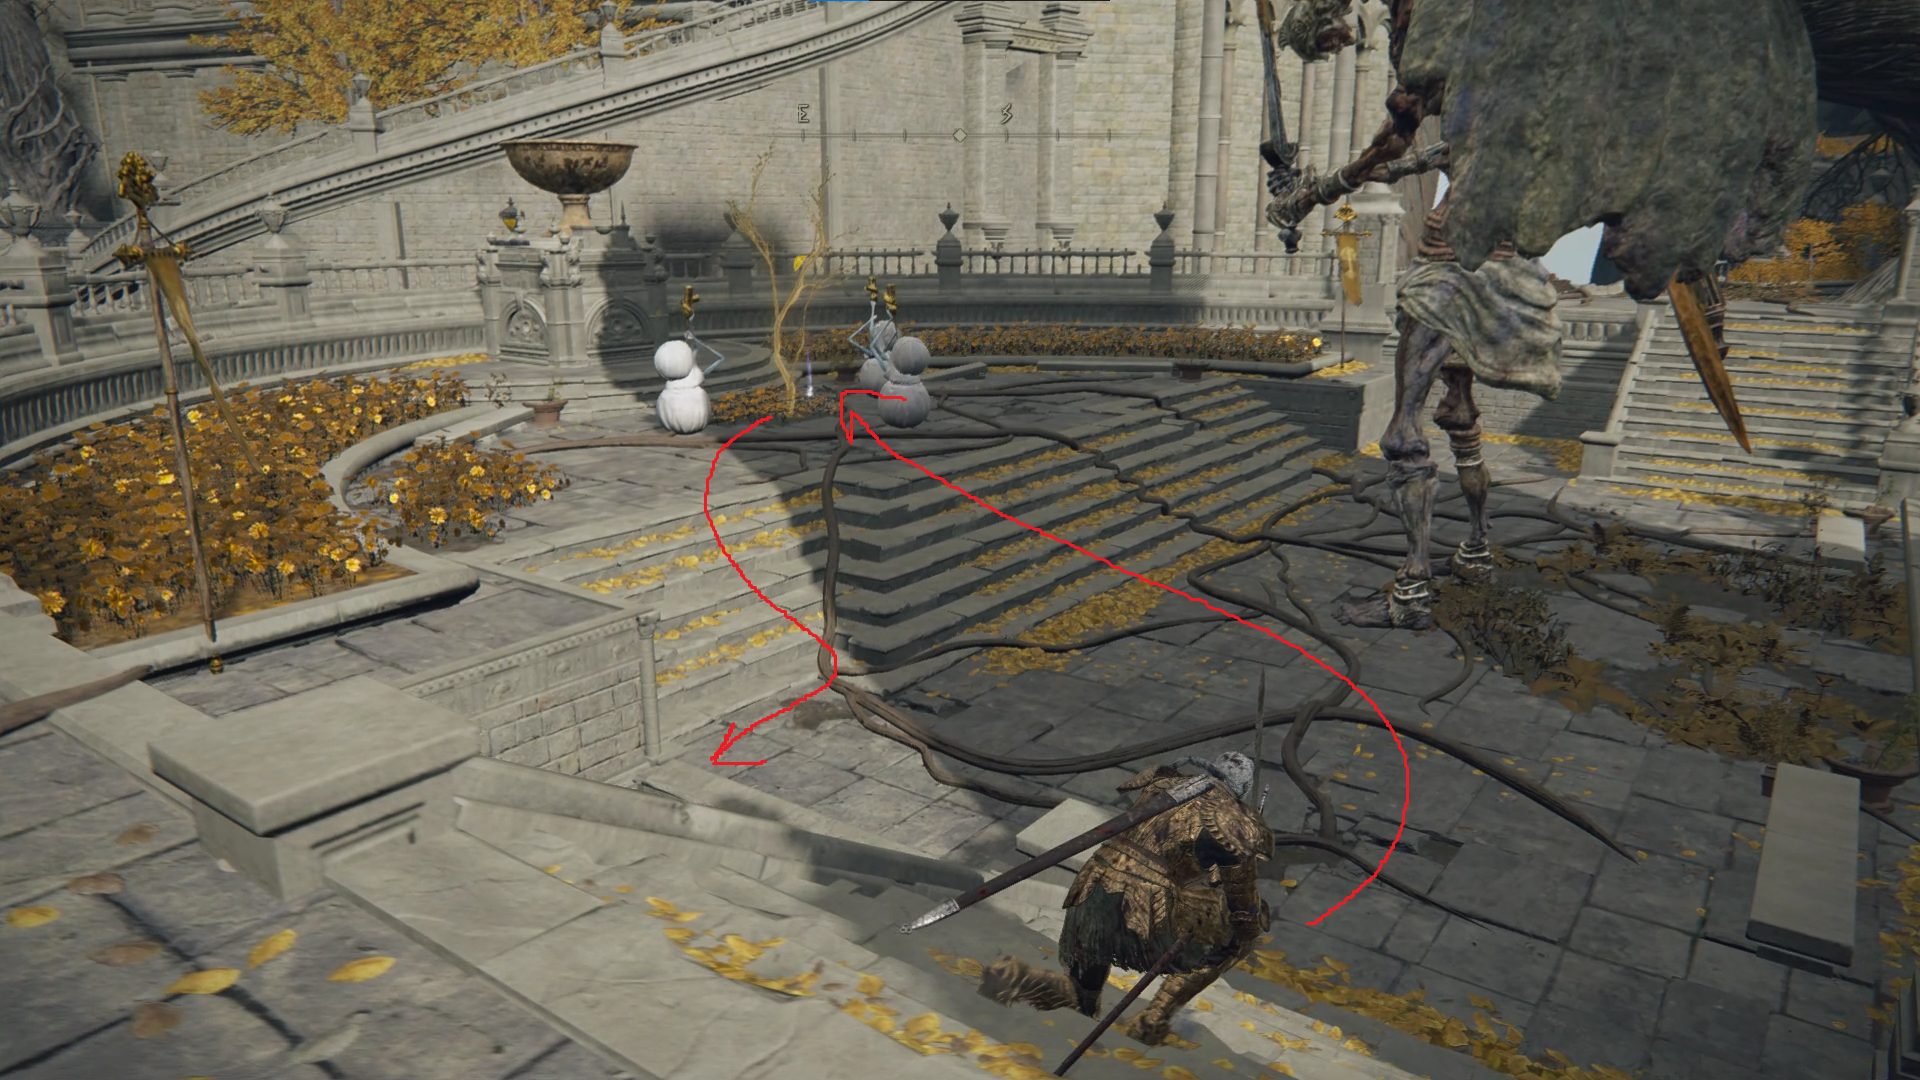
Head north out of the alley and turn right to go east, where you’ll find another group of enemies just lying around or loitering. Kite backwards from the stairs and try to fight these foes one at a time, then continue east down the two sets of stairs. Across the ashen (sandy??) area at the bottom of the second set of stairs is a disfigured gargoyle who sprays flame — you can start sprinting at the top of the stairs and hug the left-hand wall to avoid taking any damage.
Once you get behind (and then kill) the gargoyle, you can loot the three corpses it was protecting to find a Somber Smithing Stone [5], a Golden Rune [8], and a Golden Rune [11]. Then head west, back the way you came, and continue west, then take a left to head southwest past where you snuck up on the two soldiers at the top of the stairs. Hug the left side of the road as you come around the corner and start sneaking — two lightning knights patrol this road and we don’t want to encounter them just yet.
You’ll see a small tree — turn left at the tree and sneak through the alley there. You’ll soon be able to turn right, where you’ll find a soldier sleeping with his back to the wall.
Use a charged attack to kill him, then loot the corpse next to him and go peek right around the far corner — you’ll probably see three more soldiers coming your way. Stay back here behind the building (so the lightning knights don’t aggro) and deal with these foes. Then, head northwest out onto the wider path and try to pull the closer knight back behind the building — the second knight will fire arrows, so just make sure you’re positioning in such a way that they aren’t a threat.
Head back to the wide path and continue southwest, where you’ll soon see a corpse draped over the railing on your left. Loot the x2 Gravel Stone and then also loot the Golden Rune [13] from the corpse further down the road. From this corpse, you can look southeast to see a couple more soldiers — the one sitting on the left will stay seated, but you’ll need to fight the second soldier, plus a couple of footmen who hide behind him.
Get close enough that the soldier with the shield and spear aggros, and then start backing up, going back the way you came. The footmen tend to approach faster than the soldier, and you can draw them far enough away from the soldier that you can kill them first, then deal with the soldier. With that handled, you can go back to where you found these enemies and backstab the guy minding his own business. To the south-southeast behind the nearby stone bowl + gazebo, you’ll find a corpse with x8 Tarnished Golden Sunflower.
From here, head southwest to the railing. This next bit is tricky, so read ahead, then jump down over the railing when you’re ready. Doing so will aggro a Lion Guardian, so prepare yourself for a serious fight. There is also a perfumer on the other side of the fountain here, so try and take it out first so it can’t buff the lion. These lions jump all over the place, but their attacks are fairly telegraphed, so roll well and attack only once it’s clear the lion has finished attacking (shields are also a good option). You can also use the stairs behind you (that lead back the way you came) defensively, as the lion can sometimes get stuck while changing elevation — go up the stairs and jump over the railing when the lion joins you on the high ground if you need space to heal or cast spells.
It can be difficult, but eliminating the perfumer first is almost always the best option here
The Lion Guardian drops a Somber Smithing Stone [6], Beast Blood, and x2 Old Fang when defeated. Once you’ve taken down the lion (or decided to just run past it), head further to the southwest, where you can find two corpses and snag yourself a Golden Rune [10] and a Hero’s Rune [2]. Then go back up the short staircase to the higher ground, and head northeast to the broken section of railing where the soldier was sitting. From here, you can jump to the nearby gazebo roof, where a corpse holds a Stonesword Key.
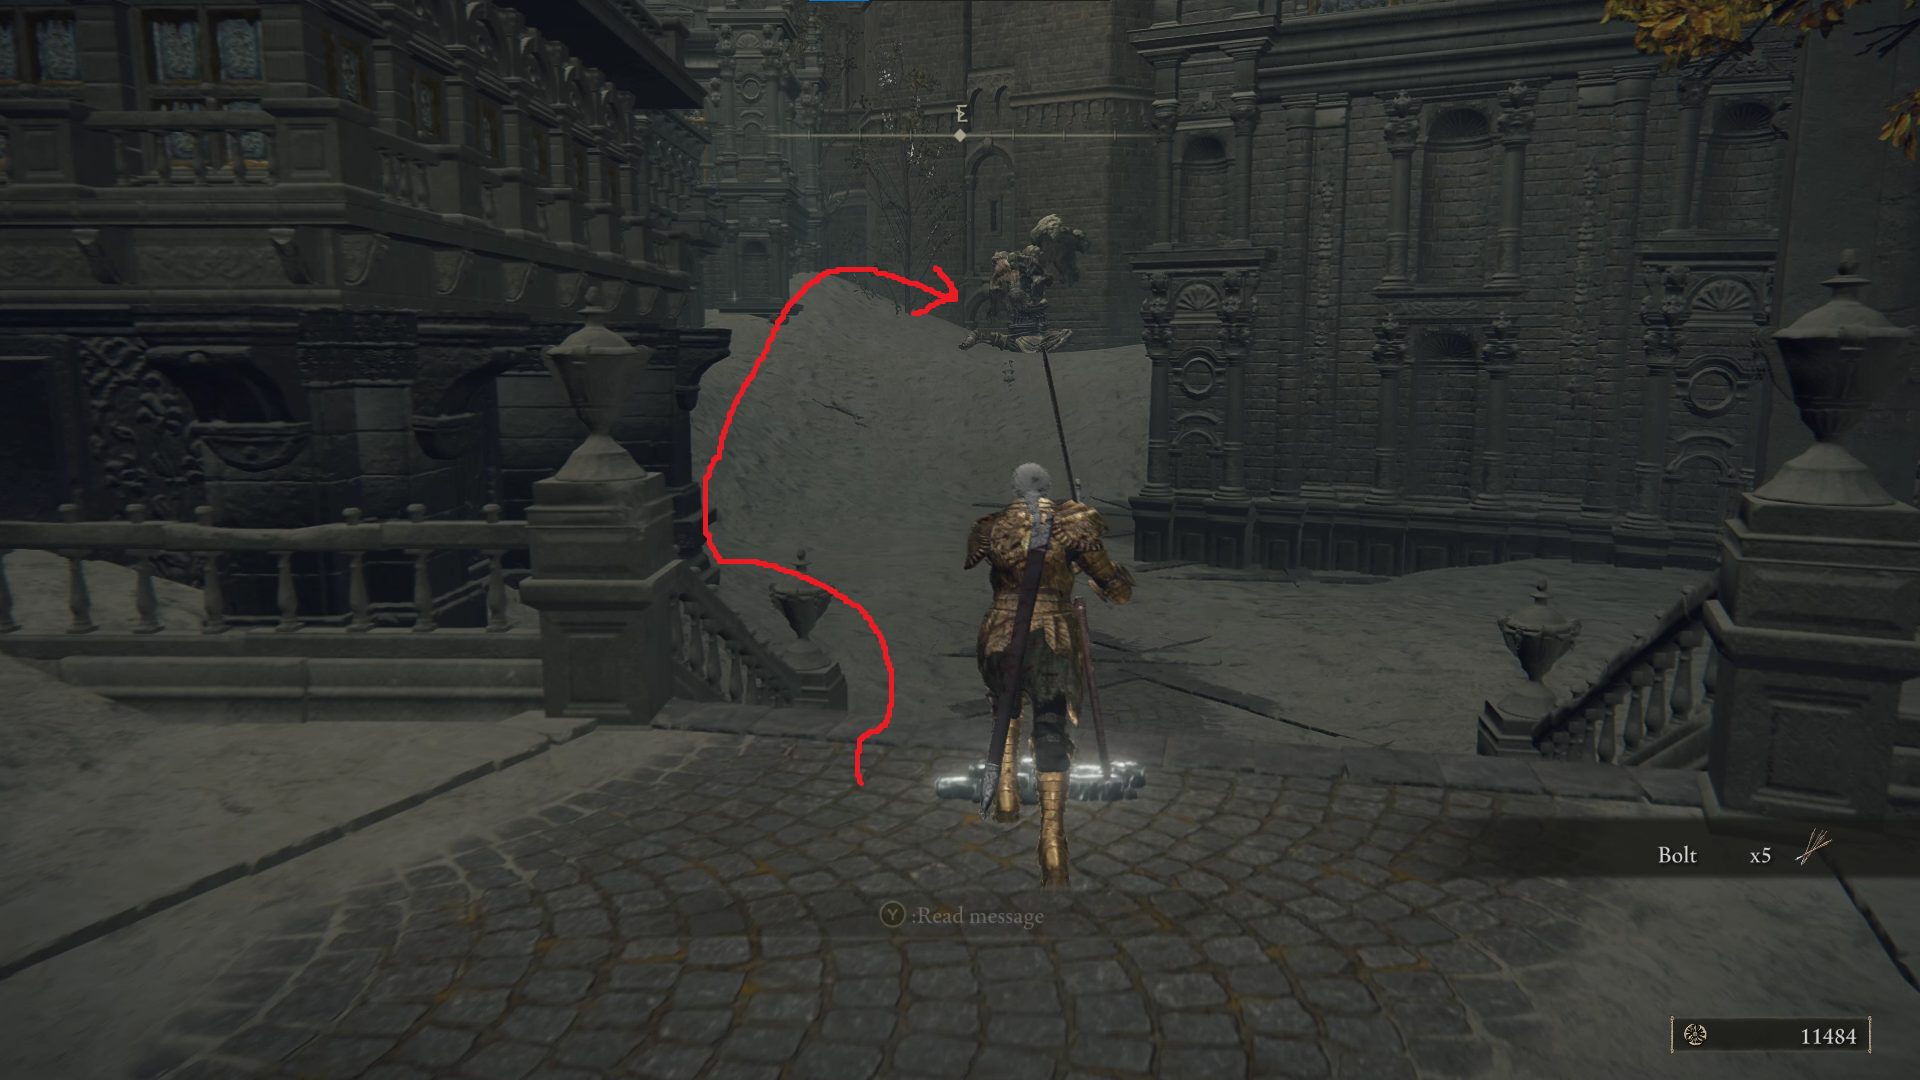
From the gazebo roof, you can jump southeast to the nearby ledge, and then up onto the sandier section, and finally up onto the huge dragon spear. Walk up it to find the Bolt of Gransax (you’ll have to jump over the final bit of spear wrapping). Then head back down and drop down onto the gazebo again.
If you find this jump too difficult, you’ll be able to jump down to where the item in the section after Godfrey, so feel free to skip this for now
To the south below you is a perfumer — jump down and kill it, then go northwest (taking the left-hand path out of here) and follow the alley around a corner. You’ll come across a lit brazier and some stairs on your left — turn left and continue past the stairs, then take another left and head into the dead end to find a Golden Rune [8]. Now head north and then northeast to reach the main street once again (near where you fought the Erdtree Avatar).
On the main street, look southwest, where you should see a series of stairs that lead to a closed door. There are two soldiers and a lightning knight guarding these stairs, so approach with caution. Note that one of the soldiers will blow his horn if you don’t kill him fast enough, and this will draw a few enemies from behind you (unless you’ve killed them and haven’t had to die/rest since), so check your back if this happens. Three corpses on the stairs hold a Golden Rune [8], x2 Lightningproof Dried Liver, and a Golden Rune [12].
We’ve now cleared this side of the city, so head northeast down the street and make a left after the overturned cart to head through the gold gate and go down the stairs to reach the Avenue Balcony site of grace (or you can just teleport there).
From the Avenue Balcony site of grace, go northwest down the stairs, and continue northwest out the gold gate that leads outside. Immediately go to the left and get behind cover, as you’ll come under fire from a bow-wielding lightning knight. Keep going to the left and then turn right at the corner — there’s another knight around the far corner to the northwest that you’ll want to pull away from his companion.
Don’t even attempt to fight these knights while the archer can fire upon you — instead, pull the one without a bow around the corner
The one with the bow should keep firing at you even when he can’t hit you, so you can safely kill the second knight once you pull it around the corner. Instead of heading directly for the bow knight, go back to where you first entered this area (through the gold gate) and head northwest (between the buildings). There should be another knight either around the corner to the right, or else already moving to join his comrades — once again, pull this foe away from the knight with the bow before engaging.
Once the first two knights are dead, you can take on the one with the bow (although watch out, as it will bust out a sword and shield when you get close enough). Then go northeast to the railing and turn left (northwest) — on the railing ahead is a corpse with a Golden Rune [9]. Continue northwest to the corner of the building and turn left to head southwest, then hop up onto the huge dragon wing (where it intersects with the ground) and start using it to make your way southeast.
You’ll want to stick to the left side of the wing to avoid having to jump a bunch — once you can’t go any further to the south, turn right and continue to the northwest, then turn left to follow the broken stone cylinder that leads to the nearby building — you can then leap from the end of the cylinder into the building.
Inside, grab the Rune Arc from the corpse and then climb the ladder to the southeast. Continue up the stairs, and start sneaking near the top — there’s a knight at the top of the stairs you’ll want to backstab. Once he’s eliminated, grab the x5 Gravel Stone from the nearby corpse, and then head up the next set of stairs to continue going southeast. There will be a footman waiting in ambush on your left at the top of the stairs, so roll through or block his attack and then punish him for his impudence. The corpse in this room has a Golden Rune [11], so snag it before continuing further southeast across the covered bridge. On the left in the next room is the West Capital Rampart site of grace, where you can rest and recuperate after fighting all those knights.
This walkthrough continues in the Part 4 tab!
From the West Capital Rampart site of grace, head southeast down the stairs and then go down the stairs that run in the opposite direction.
At the bottom of the stairs, take two rights to grab the Cane Sword from the corpse to the left of the stairs. Then head back to the northwest and into the next room, where three Oracle Envoys are enjoying the view (two on the right, one on the left) Take them out and then pull the lever on the balcony — this will open the large double doors below you. This isn’t a particularly useful shortcut due to the location of the West Capital Rampart site of grace, but you’re here, so you might as well pull it.
Go back the way you came, up the stairs, and turn slightly right to head southwest. Here you’ll see a Valiant Gargoyle and some envoys praying at an Illusory Tree. Fighting these foes here is inadvisable, so instead run past them, grab the Golden Seed, and then take the nearby stairs down.
They weren’t using it anyway, right?
In the alcove to the left of the stairs (relative to when you’re taking them down) is a high page enemy — rather than taking the stairs all the way down, drop onto the page to get the first hit in. The envoys should chase you into this room, so kill them while avoiding the gargoyle’s attacks (it will be unable to enter, but its attacks can still clip through the walls). Once the envoys and the page are dealt with, you can fight the gargoyle (optional, but it nets you the Gargoyle’s Halberd and 16,660).
The strategy linked below is for a fight against two gargoyles, but includes tips and tactics that will be useful in dealing with the lone gargoyle as well. Additionally, you can choose to take advantage of the fact that the gargoyle can’t make it through the doorway to either cheese it with ranged attacks, or bait attacks and then attack it once it finishes. Be warned, however, that it does have a ranged attack it will sometimes use (especially if you get too far away).
Once the gargoyle has been slain (or you’ve decided to skip it) you can go back down the stairs that led to the room with the high page, and then continue out the three doorways to the west and onto the balcony. Here you’ll find a corpse with a Smithing Stone [6] — grab it and then jump down onto the roof below. From here, you can use ranged attacks or projectiles to kill the dogs that roam the low ground to the south and west (fighting them all at once in melee isn’t ideal).
Once the dogs are dead, head to the western corner of the area and jump up onto the roof:
Go northeast onto the next roof, where a corpse draped over the edge has a Golden Rune [9]. Grab it and then head through the broken section of wall to the north, then through the doorway and inside the building.
Inside, go through the doorway on the western side of the room, and you’ll find yourself in a familiar space. On the left against the wall is the Sanctified Whetblade as well as the Hammer. Note the stairs behind you to the east — we’ll come back here later, since the stairs are broken and it’s a one-way trip. Head southwest up the stairs and take a left through the open double doors; in this next room you’ll find the By My Sword gesture and a Hero’s Rune [1]. Head out of this room, and continue northwest across the room and into the hallway.
If you haven’t figured out where you are yet, this next room ought to give it away. Jump up onto the table and snag the Rune Arc, then head northeast up the stairs and loot the Smithing Stone [5] from the corpse draped over the railing. Return to the central room and head right, then take your first right into the hallway. In the next room, you’ll see another set of wooden double doors to the north — head through them and grab the Furlcalling Finger Remedy from the corpse in front of the fireplace.
Leave this room and turn left to head northeast through the double doors at the far end of the room. The next room has nothing, so continue northeast through the next set of doors, where you’ll find a corpse in a chair with a Seedbed Curse. Grab it and head back the way you came, all the way back to the central room with the round table. Turn right again and take the next right, which should lead up some stairs and to a pair of closed doors.
Head up the stairs and open the doors — in the room beyond, the Coded Sword sits on an impressive wooden throne. No one seems to be using it, so pick it up and then return once again to the main room. Turn right and make your first right to go back to the blacksmith’s room, and this time go down the stairs (slowly, so you can grab the Smithing Stone [6] without falling off).
Then go ahead and fall off, and take two lefts to head west-southwest down the hallway. Make sure to snag both the x20 Black-Key Bolt and Two Fingers’ Prayerbook in this room — the doorway in the southeast corner leads to some enemies just trying to cook, so unless you’re roleplaying as a cold-blooded murderer, you can leave them be and head back the way you came, east-northeast down the hallway.
Take your next left to enter a large hall, and then head west to where a corpse (presumably Alberich) sits on the red carpet, holding Alberich’s Set. From poor dead Alberich, go north through the large archway, then immediately turn right and roll through the items in the eastern corner to find a Smithing Stone [5]. Then head through the doors to the west, and then through the doors on the right in the next room. Here you’ll discover the Fortified Manor, First Floor site of grace and the “Flightless Bird” painting. You can now acquire the Fire’s Deadly Sin incantation in the Windmill Village back in Altus — see here for details. Head back to the large hall and turn left — then on your left you’ll find some closed double doors that you can open.
Enjoy the epic door-opening animation, then continue northwest through the next set of doors. As you enter the large hallway beyond, an abductor virgin (iron maiden) will come around the corner ahead. There’s also another one hanging out in the courtyard on your left, so it’s risky to fight this one here in the hallway. Instead, pull it back towards the doors you just came through — it can’t go through the doors, so you can cheese it from the hallway. (Don’t forget that its attacks can still go through the walls!)
Once you kill the first abductor, head into the courtyard and pull the second one to the same spot — it can sometimes get stuck on the stairs, but that works just as well for our purposes.
On the south side of the courtyard is a corpse with the Stormhawk Axe, so snag it and then head northwest across the courtyard to find x3 Nascent Butterfly. Due north of the butterflies are some stairs that lead through an archway — head on through and turn left to head southwest, where you can find a Somber Smithing Stone [6].
On the west-southwest side of the courtyard is an elevator that will take you to the Divine Bridge. If you already have the Blessed Dew talisman, you don’t need to go up here yet. However, you should check to see if you have the site of grace already, and go up and grab it if you don’t — the waygate on the far side of the bridge leads to the Isolated Divine Tower, which is where you can restore Malenia’s Great Rune.
Now head back the way you came, back into the large hall where you found Alberich, and then go out the northeastern doorway that leads outside. Turn left, and you’ll see a couple of lightning knights to the northwest. We’re going to play a familiar game: hide from the knight with the bow while killing another knight. Here, we can accomplish this by using the low barn-like structures for cover, and drawing the knight on the low ground into them.
There are holes in the roof, so make sure you find a spot the arrows can’t hit you
The low ground knight will have the Gravel Stone Seal on his corpse after he dies, so make sure you grab it — then, head to the northwestern-most of the low wooden structures, where you’ll x5 Old Fang. Then head to beneath the bow knight — once you get close enough, it should hop down from its perch. Eliminate it and collect the nearby Gravel Stone deposits, then clamber over the dragon’s foot to head further north, where a corpse holds another x3 Gravel Stone.
Gravel Stone is supposedly dragon scales
Next, go south, and jump up on the dragon’s foot, then follow its claw and use it to jump to the nearby low building to the south-southwest. From there, jump to the taller building to the southeast (through its doorway) — you’ll need a running start, and you’ll be rewarded for your athletic prowess with a Smithing Stone [6] and a Stonesword Key. Once you’ve grabbed both, you can teleport back to the West Capital Rampart site of grace.
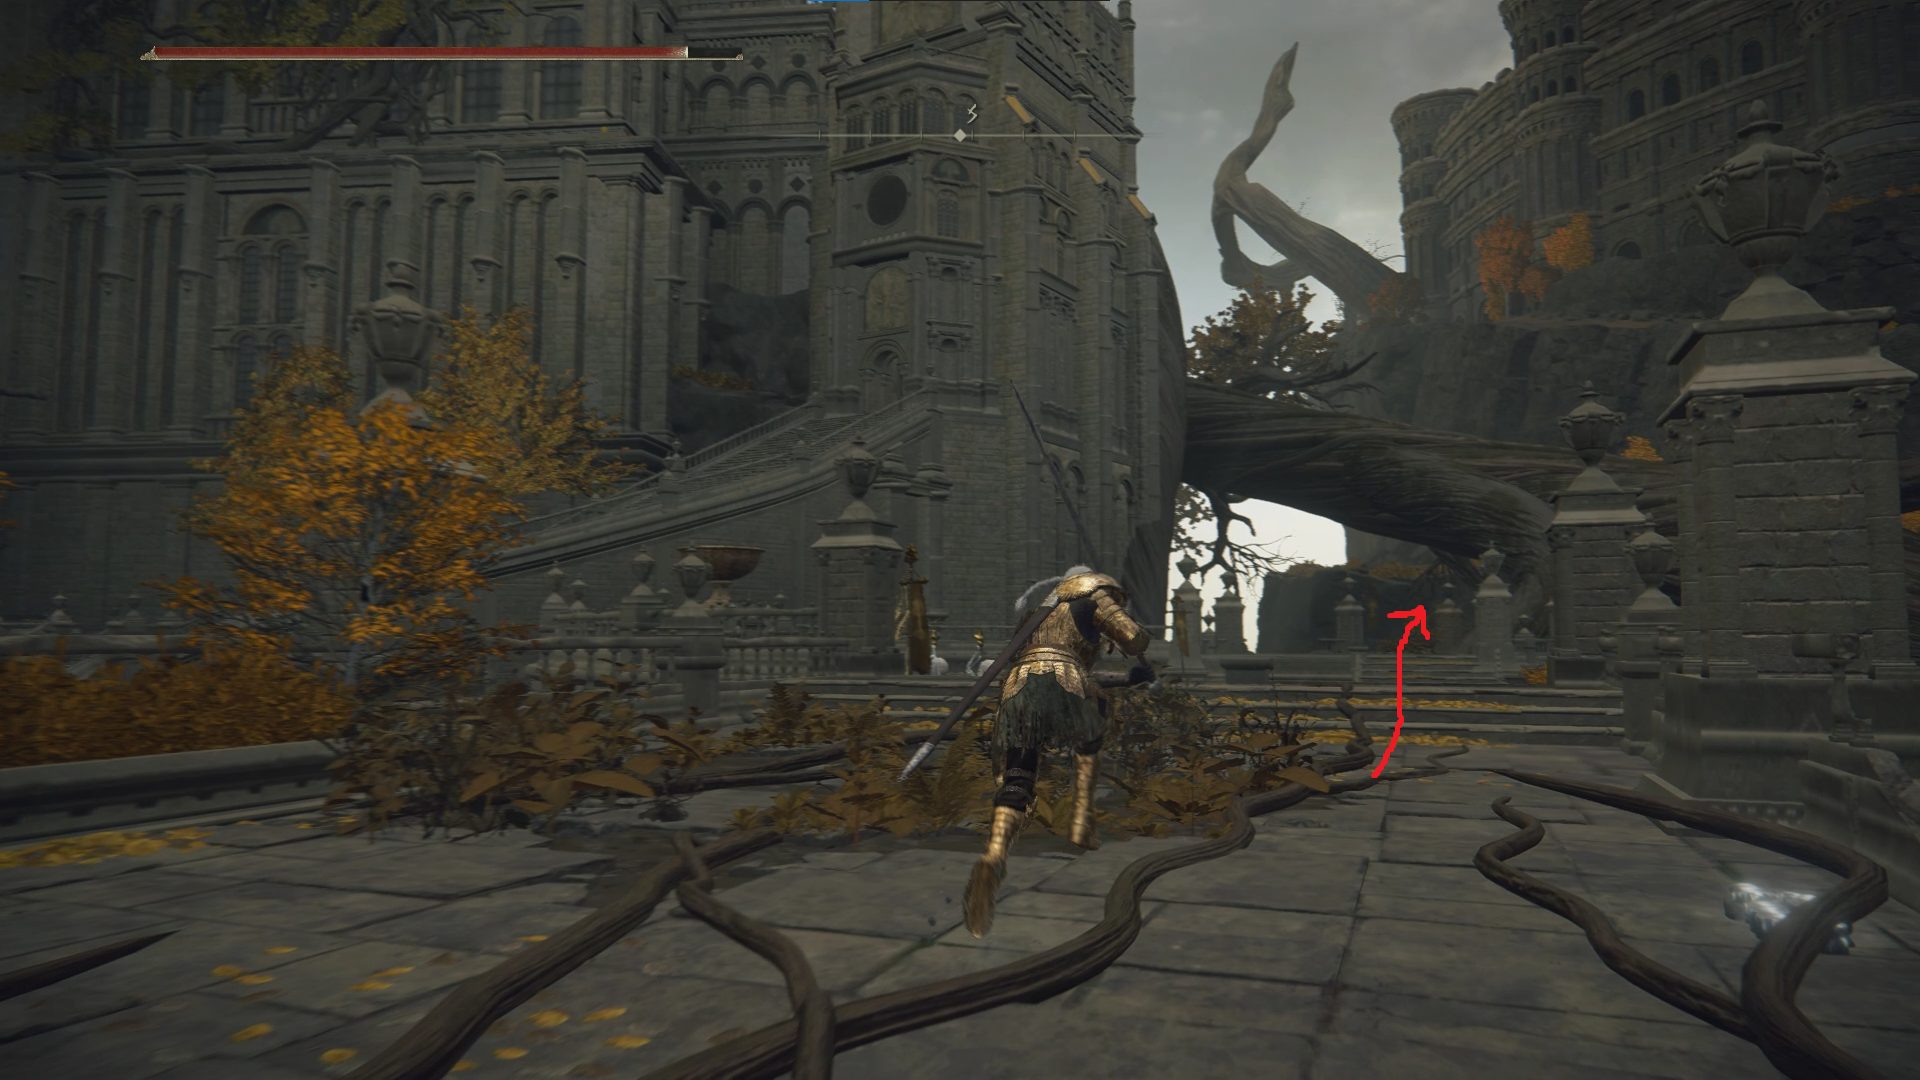
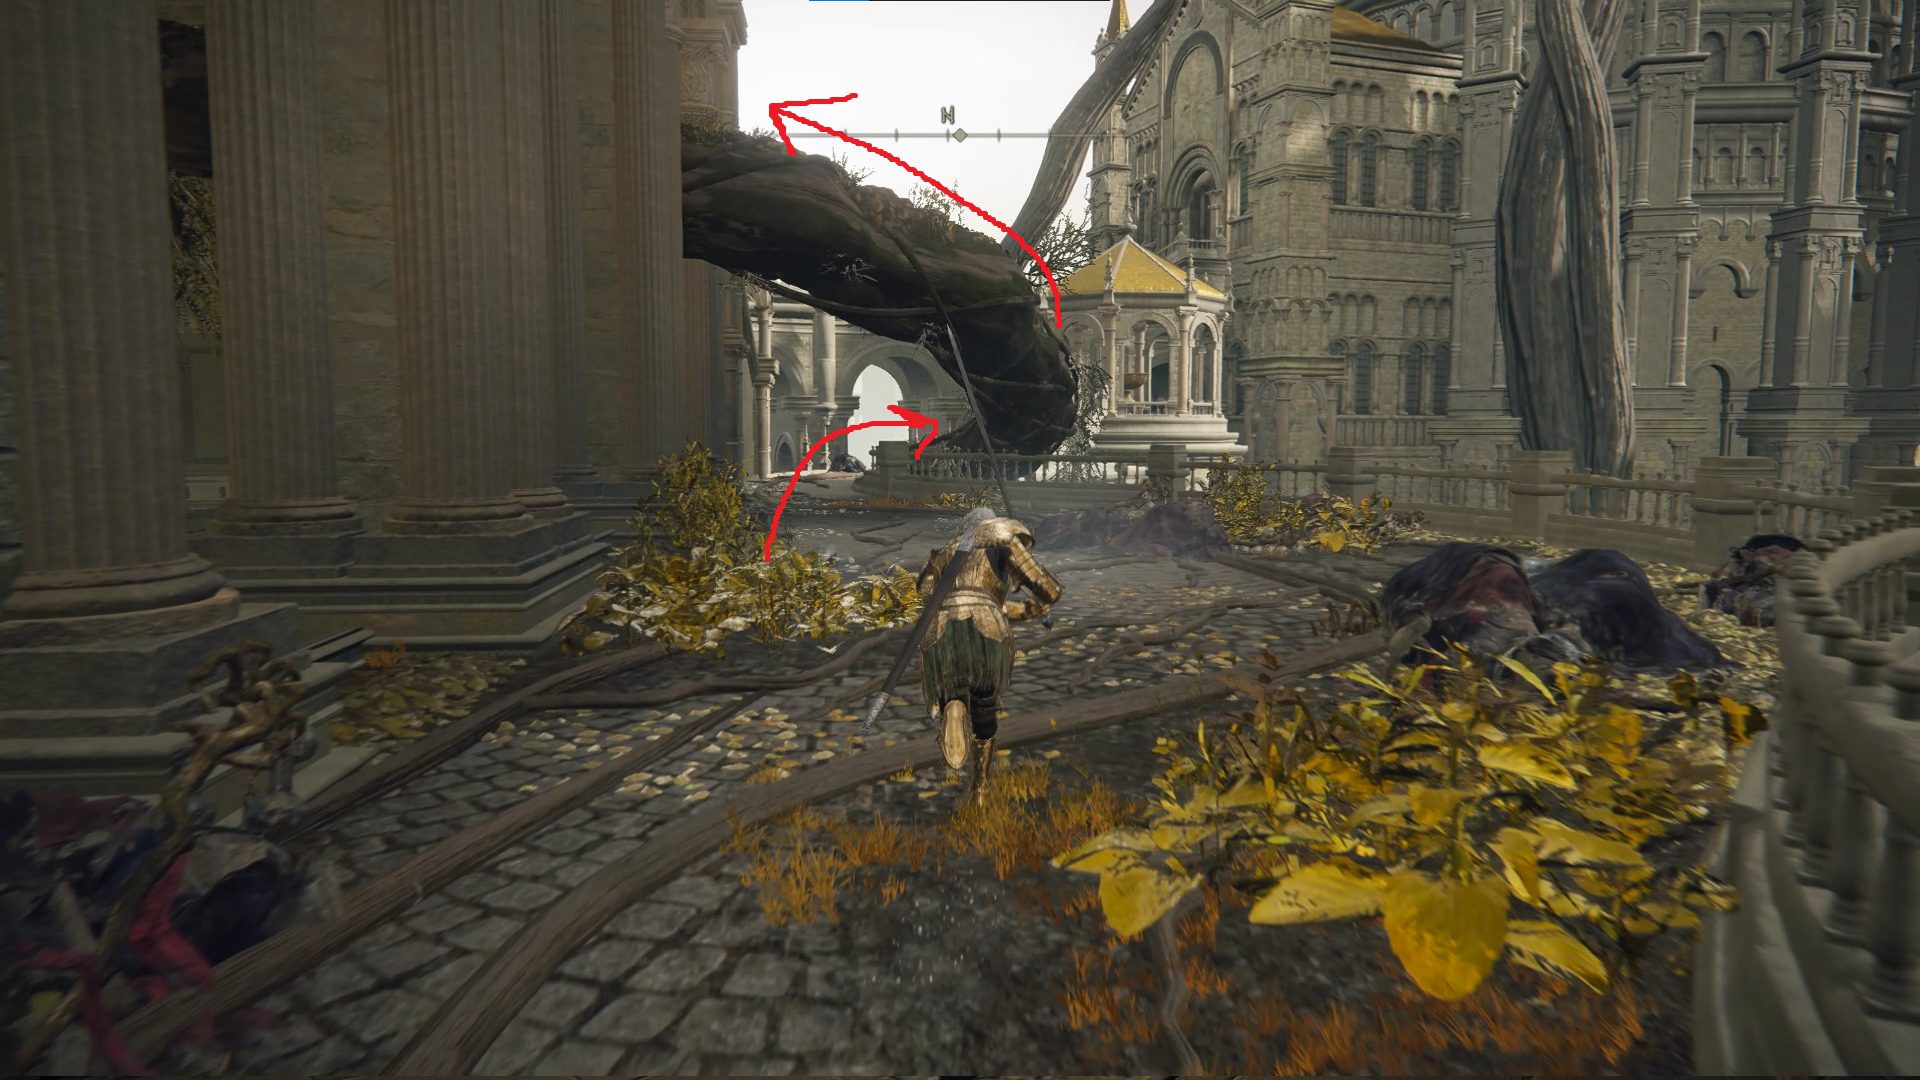
From the West Capital Rampart site of grace, head southeast down the stairs, and go past the next set of stairs and then south past the illusory tree — you’ll want to be heading towards the giant root that stretches over the ramparts.
Continue under the root (we’ll go up it later) and up the stairs, then turn right and start following the stone path that leads northwest up the hill. You’ll soon encounter a Grave Warden Duelist — this is a boss copy/paste, but because it’s two-handing a weapon, it’s much harder to stagger. Once you slay this first one, continue up the path until you reach the colosseum steps, where another duelist guards the Ritual Shield Talisman.
You can head west and then turn left (south) into the next alcove to find a Furlcalling Finger Remedy, then go back the way you came and continue southeast. You’ll pass some commoners sitting facing the Erdtree, but they’re just chilling and you can ignore them if you want — continue around the colosseum and keep an eye on your left (the cliff edge). If you’ve been following their quest, you should soon run into Goldmask, accompanied by Brother Corhyn. Exhaust their dialog, and then head west into the nearby alcove to find the Star Fist. On the southeast edge of the cliff, a corpse holds a Smithing Stone [5].
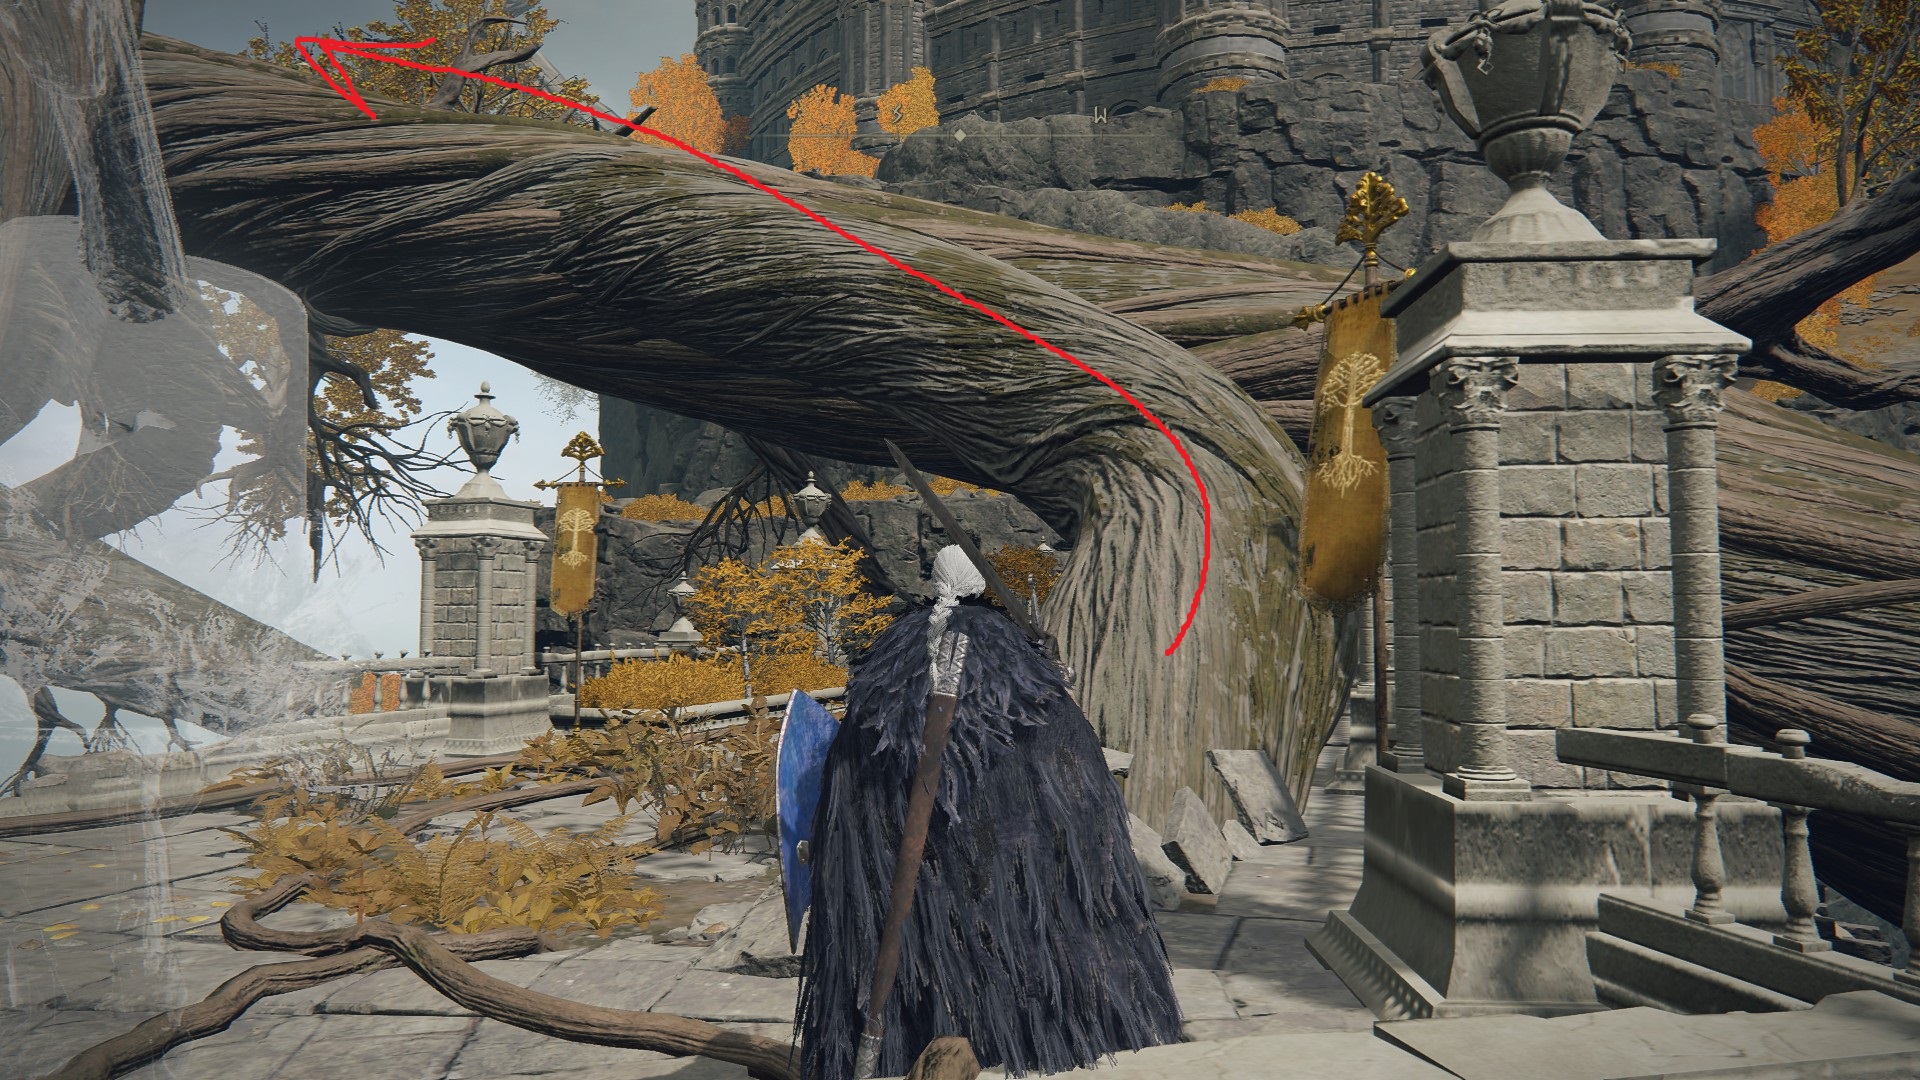
Teleport yet again to the West Capital Rampart site of grace, and head the same way again, southwest and south to the root that stretches down to the rampart. This time however, you’ll want to run up the root and follow it as it curves left to head south.
Most of the enemies on the roots (called tree guardians) in this next section are sitting peacefully — you can choose to ignore many of these foes and only fight the ones that are standing or patrolling, or you can take advantage of their inattention to get some easy runes. Some will stand as you approach, so make your way up to each group slowly to avoid fighting multiple guardians at once.
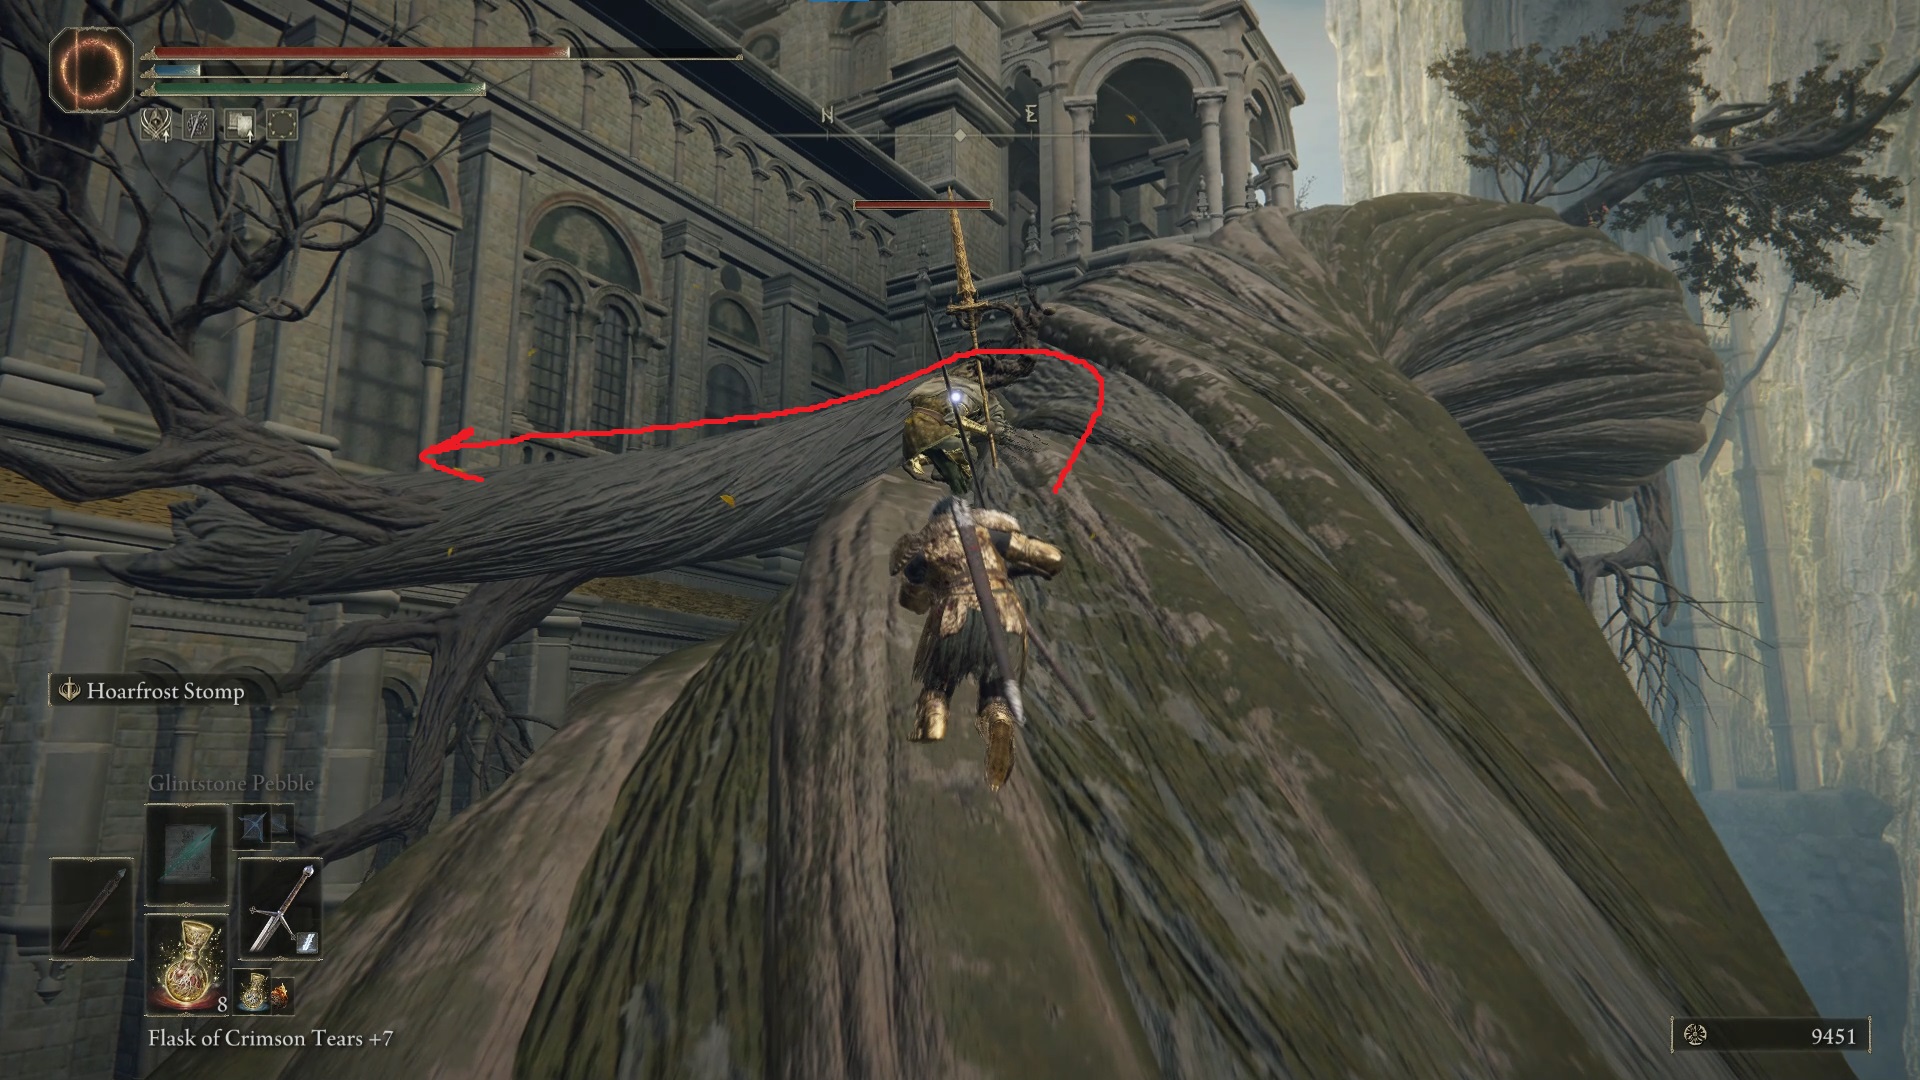
Continue up the root, and you’ll pass a sitting tree guardian, then encounter a patrolling one at a root junction. Once you’ve dealt with this unusually competent tree guardian, head down the left-hand root that curves below the larger root.
Make your way down the root and back onto the ground, then go north past the poison plants — you’ll reach a staircase, and at the bottom of it you can grab a Smithing Stone [6] at the edge of the broken bridge. Next, head back south and go back up the root you came down. Back at the root junction, you can this time take the right-hand root (when facing south), where a pair of tree guardians sits with another on a small root to the right — the enemy on the right will stand up and engage you as you approach.
Past these enemies, the root meets another — turn left here to head northeast and continue up the root, where another group of tree guardians sit. Some will aggro as you get near and some will stay seated, so approach these foes slowly and fight the ones that stand up one at a time. Once you’ve slain them all, you can take a left where the root branches and head down onto the roof ledge.
Continue west off the root and turn right (north) around the corner, where a tree guardian waits in ambush. Kill it and grab the x3 Holy Grease from the corpse here, and then head back the way you came, east up the root. The root will deposit you on a stone balcony, and you can turn left to find the gold fog gate that leads to Godfrey, First Elden Lord.
Once you’ve defeated the golden shade of Godfrey, you’ll be able to activate the Erdtree Sanctuary site of grace and rest there. Then, head east out onto the balcony and turn right. Continue south to the gazebo, where you’ll find x6 Holy Grease on a corpse. Then go back the way you came and continue north past where you exited the Erdtree Sanctuary, and make your way onto and up the root that intersects with the balcony.
The root will take you to the sanctuary’s upper floor — turn right once you’re on the wooden balcony and continue north to go outside. Turn left immediately and jump down onto the roof to the west, where you’ll be able to enter an open window to the south, up the sloped roof.
Once back inside the sanctuary, go southwest to find a chest with the Erdtree Bow. Then continue following the balcony south and then east, where you’ll be able to hop up on another root. Walk up the root to the chair suspended from the ceiling, where you can snag the Golden Order Principia prayerbook (just stand right in front of it and you’ll get the “Pick up item” prompt — no need to become a bloodstain trying to jump to the chair).
Head back down the root and then west on the balcony, and take your first left to find some Celestial Dew and a ladder you can kick — climb down and then head north across the room, where a corpse with x3 Somber Smithing Stone [5] sits in an alcove. Grab ’em and then head back south and take a right to go outside. Go down the stairs and enter the structure, then ride the elevator down.
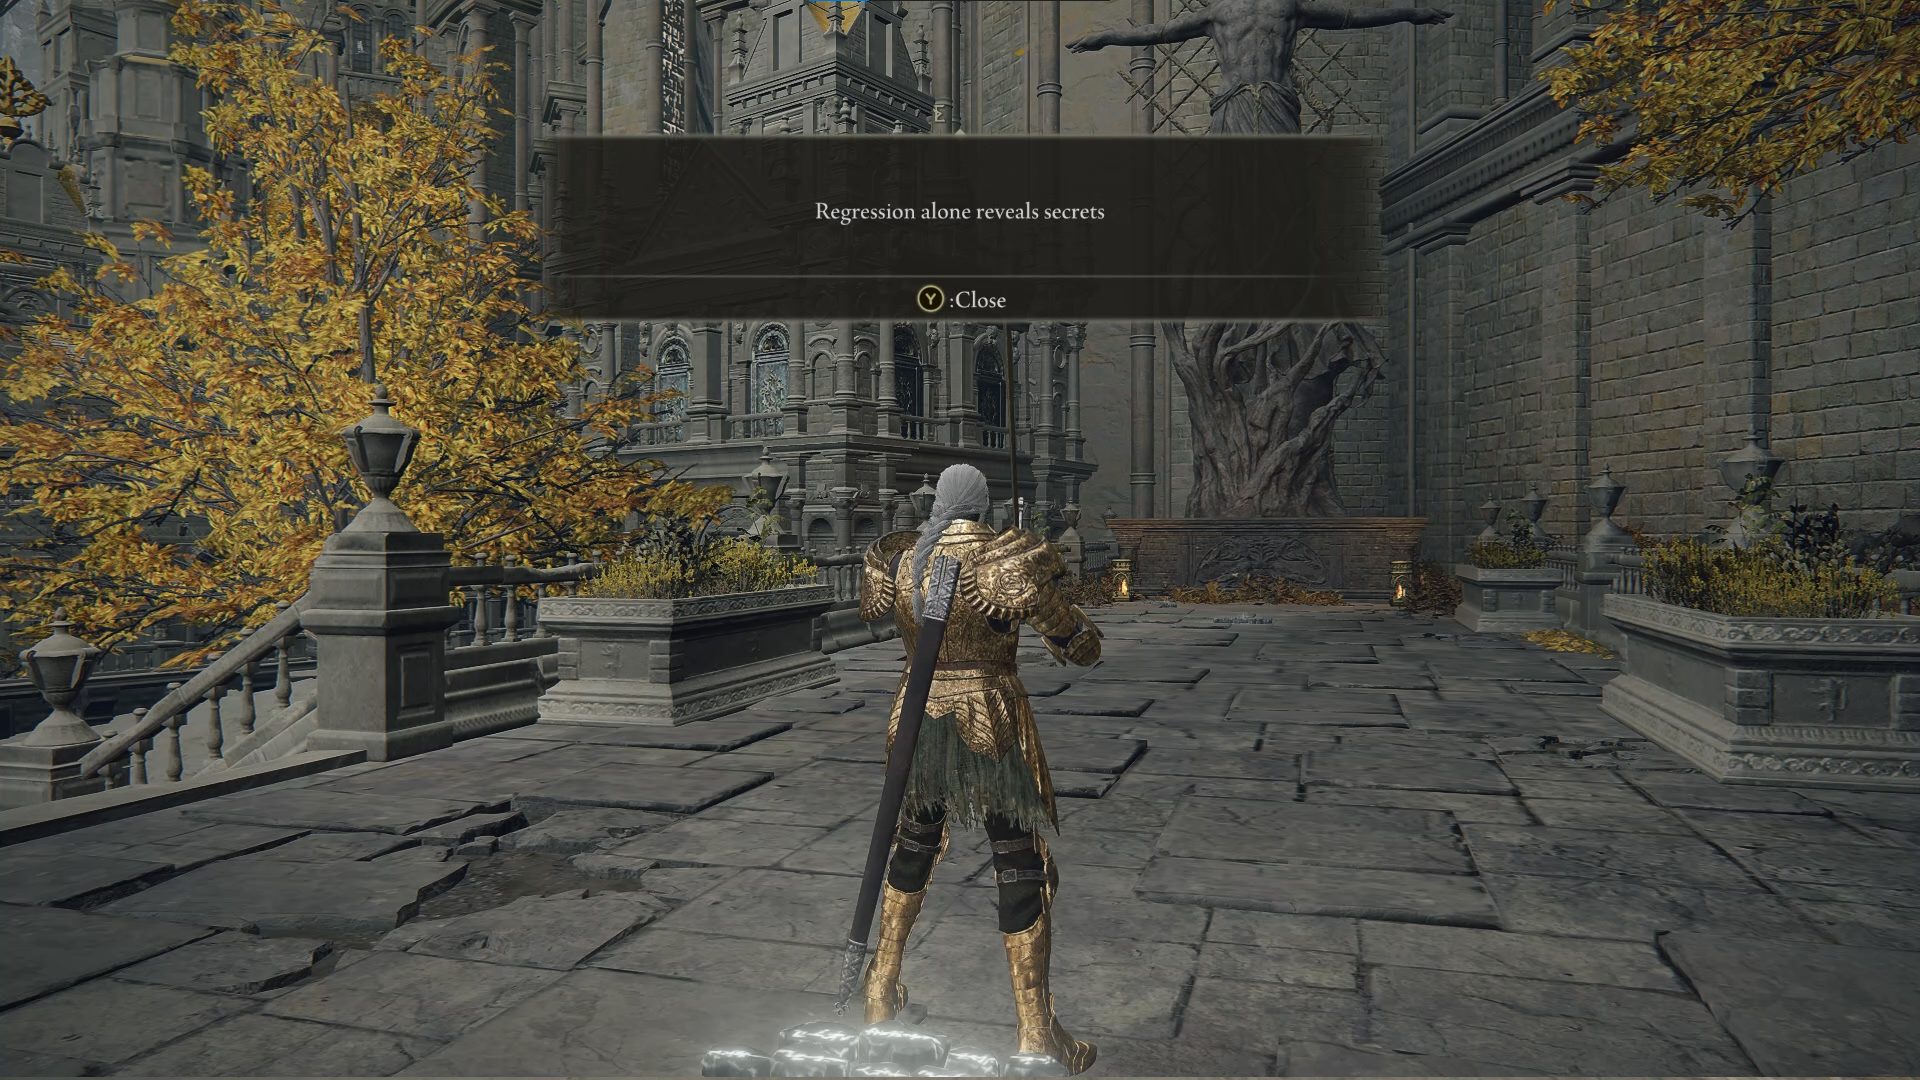
At the bottom of the elevator, head outside and down the next set of stairs. At the bottom of the stairs, you’ll find a message that reads “Regression alone reveals secrets”. If you stand on this message and cast Law of Regression (which is a spell unlocked by the prayerbook you just picked up) you’ll uncover a new, secret message — this is a required step for Goldmask’s questline. Once you’ve read the secret message, return to Goldmask at his location by the nearby colosseum and let him know what you’ve discovered in order to progress his quest.
Continue down the next set of stairs while sneaking, and you can backstab the crouched perfumer at the bottom — eliminate this first foe quickly, as the second perfumer on the right isn’t so easily snuck up upon. Once both are dispatched, grab the x5 Holy Grease from the corpse the second perfumer guarded, then continue northeast along the balcony, where you’ll disturb an invisible loot beetle. If you didn’t grab the Bolt of Gransaxin part 3, you can jump over the railing and down onto the dragon’s spear from this balcony. (image of jump).
The loot beetle will scurry off, and to the northeast you’ll see a crucible knight descending the stairs. The loot beetle drops the Barrier of Gold incantation, so if you don’t want this (or aren’t doing a faith build) you can just teleport back to the Erdtree Sanctaury site of grace now (if you don’t want to fight the knight). The crucible knight ahead only drops a few thousand runes, but fighting it is a nice opporunity to see how powerful your character is (and how good at Elden Ring you’ve gotten), so don’t be shy about fighting it — it’s also kind of tough to hit the invisible loot beetle while avoiding the knight. Past the knight and up the stairs is where the invisible beetle’s path is; watch it for a bit and stand in a spot where it has left a trail, then swing your weapon as it nears you.
Once you’ve claimed your new spell (or decided you don’t want it) you can teleport back to the Erdtree Sanctaury site of grace. From the site of grace, head northeast to go outside, and once again go up the root that leads to the second story of the sanctuary. Then go north and outside again. Cross the curving bridge and start sprinting once you near the stairs — at the top of them is a black knife assassin, and it’s best to sprint past her and activate/rest at the Queen’s Bedchamber site of grace. Like the crucible knight we just encountered, this assassin only drops a few thousand runes, but it’s a pretty fun fight (and the site of grace is very close if you die).
In the queen’s bedchamber you can pick up the Blessing of the Erdtree incantation from the interestingly-shaped bed, and then head outside via the southeastern doorway — up the stairs ahead is a gold fog gate that leads to the Morgott, the Omen King boss fight.
Once you defeat Morgott, you can chat with his withered husk, then head southeast (past the throne he kept crying about tarnishing) and up the stairs that lead into the Erdtree. Don’t get too excited — it isn’t time to enter it yet. Attempt to touch the wall of thorns, and you’ll get a message saying that none may enter the Erdtree. Go back down the stairs and activate the site of grace in the center of Morgott’s boss arena, then rest at it. Melina will appear and speak with you, then give you the Rold Medallion and mark your map.
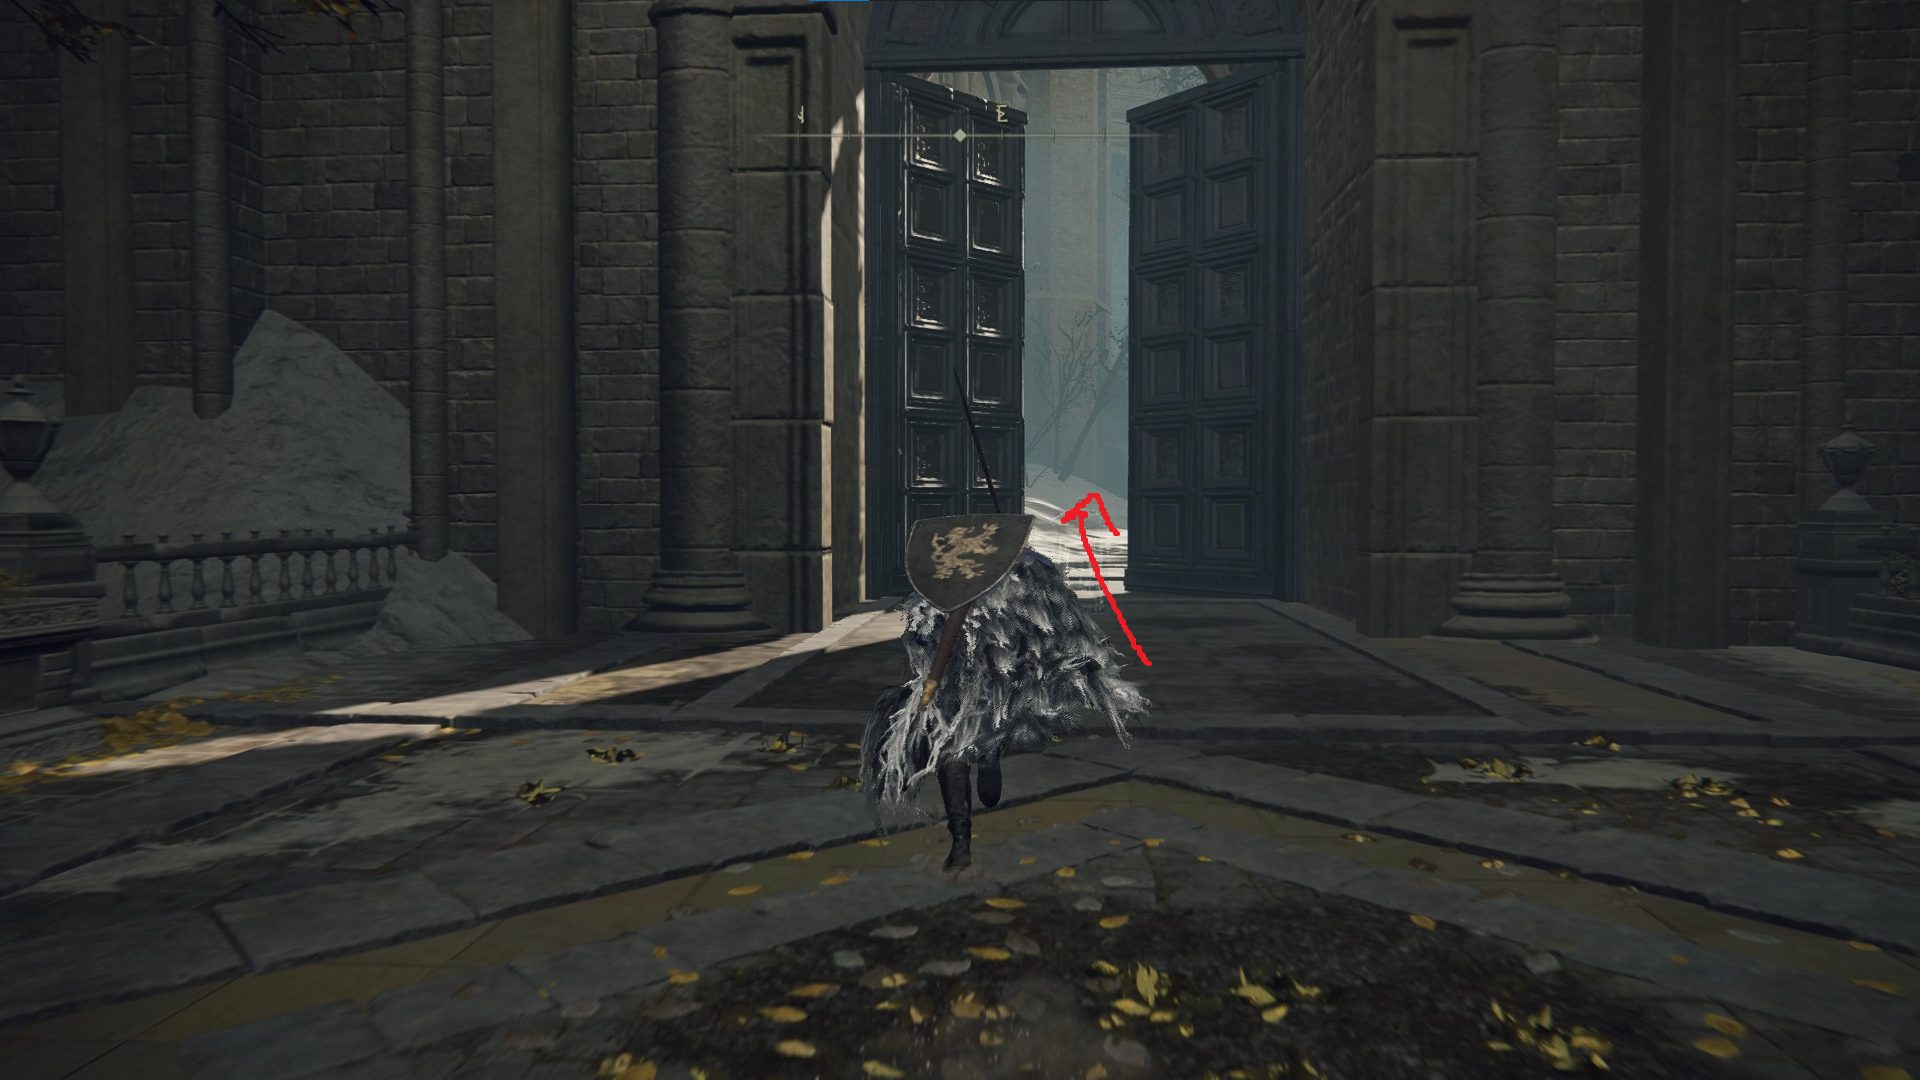
The medallion unlocks the way forward to the Mountaintops of the Giants, but we’ll have to do a bit of hiking to get there. Teleport to the Avenue Balcony site of grace, then head southeast up the stairs and turn left on the main street to head northeast. Stay on the road as it bends east, and continue to the large double doors — push ’em open and head on through.
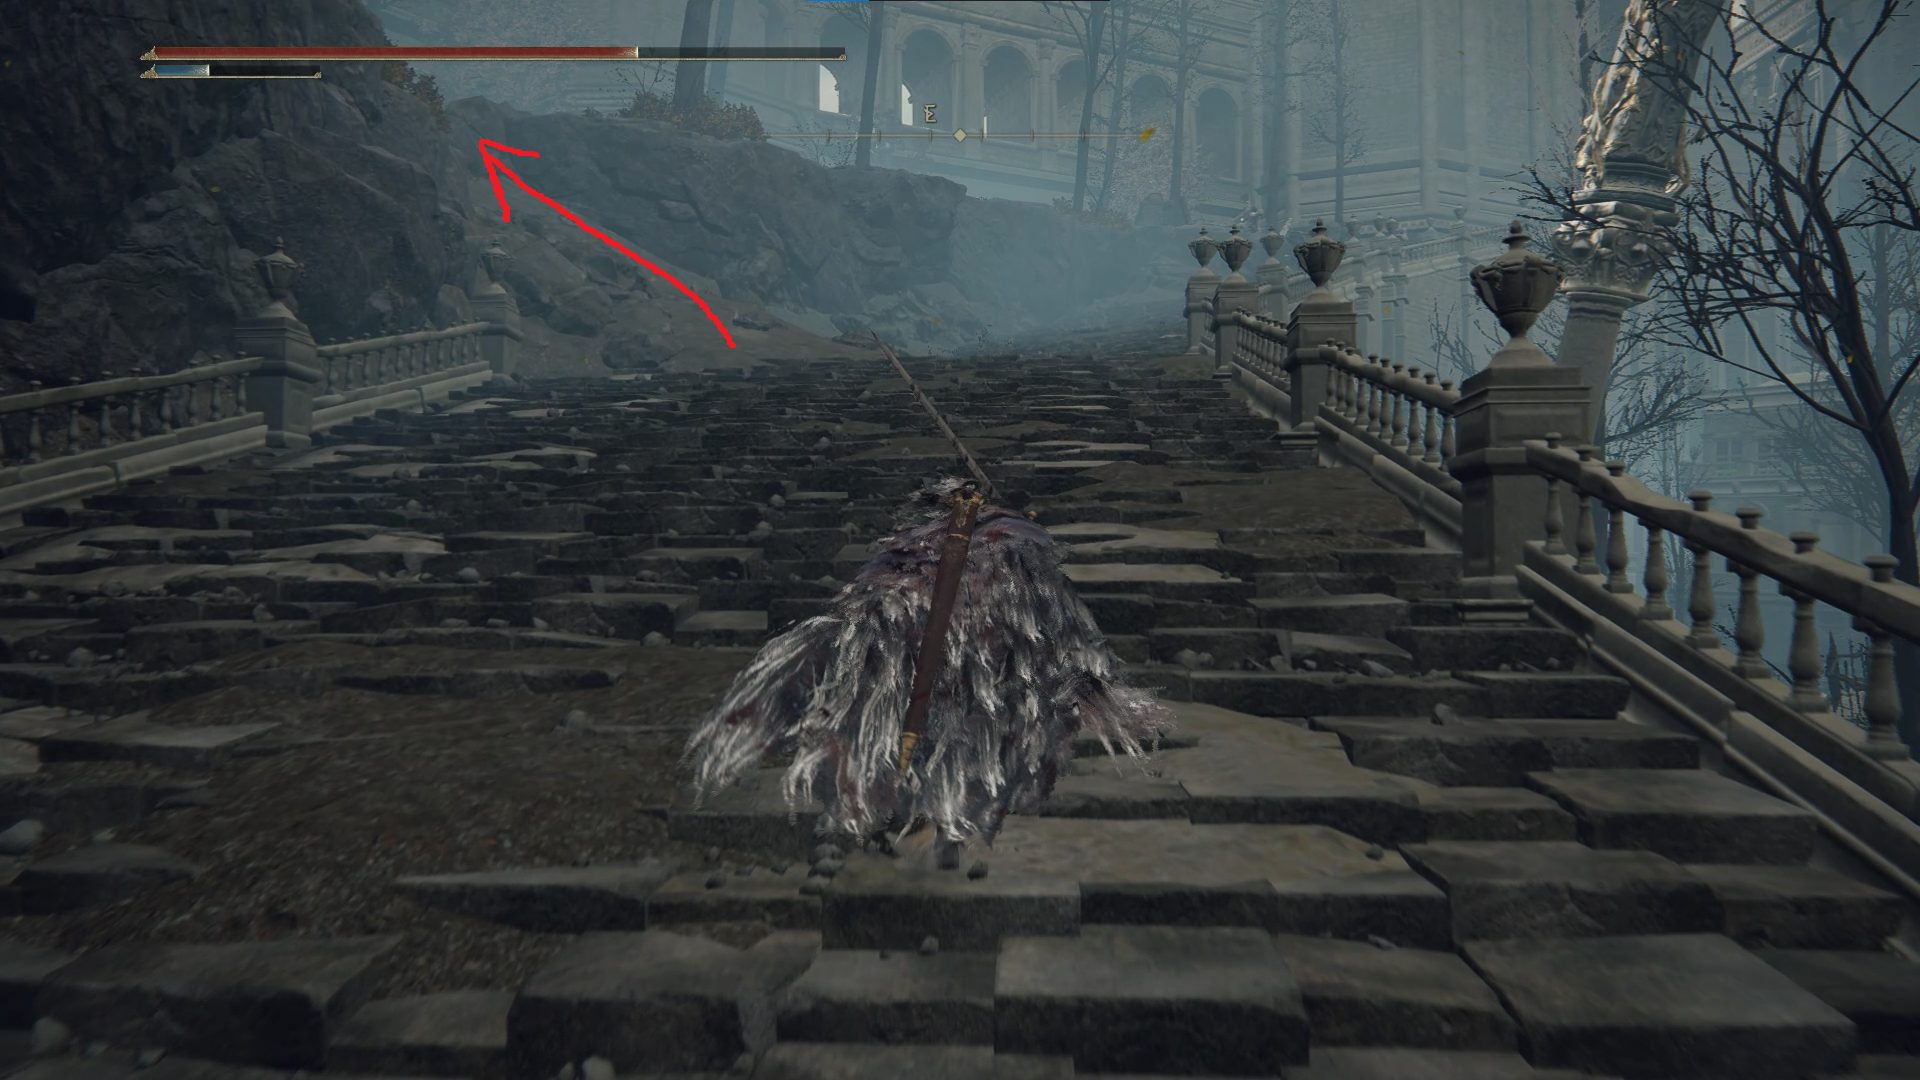
You’ll enter a sandy area with a misbegotten straight ahead — take it out, then turn right (south) and kill the other two enemies here. Grab the x3 Beast Blood and then go east, staying on the low ground (we’ll go up the staircase in a bit). You’ll pass a fountain — keep going, keeping the railing on your right, and you’ll find a couple of dogs around the corner on your left. They’re feasting on a corpse with a Golden Rune [9], so stop them from defiling the corpse so you can rob it. (Watch out for a third dog that’s at the opposite corner of the building, as it sometimes aggros at this point.)
Continue south — you’ll see another dog in front of you, and on the left another corpse with a couple of dogs and a winged misbegotten hanging out near it. Slay them all and grab the Lightningproof Dried Liver, then go even further south. At the end of this area, turn left (east) and you’ll see a dog lying down next to a sleeping Misbegotten Warrior. Jumping attacks work great against this foe, as does running away and flinging spells — you can also just run past him and grab the Perfume Bottle he guards.
Now go northwest, back the way you came, and make your way up the staircase near the start of the sandy area. You’ll soon see a dirt path leading up the rocks to your left — head up it, making sure you use target-lock to find the enemy hiding in the bushes just up the path.
Sneak to the north-northwest and spam target-lock — there’s another misbegotten hiding in bushes ahead. Find and kill it, then turn to the southeast, where a larger misbegotten waits. Slay it as well and then grab the x2 Soporific Grease from the nearby corpse. Next, go east, and you’ll find a small drop down to a statue, where a misbegotten is praying fervently to a statue. There’s a Somber Smithing Stone [6] behind the statue you should grab — you can choose to kill the praying misbegotten, or leave it to its worship.
Head uphill to the southeast, where you’ll find a large group of misbegotten who are also praying. There’s a Misbegotten Warrior here, plus a few perfumers, so it’s not exactly a good idea to fight them all (although summons are available if you do want to engage in battle). Instead, your best bet is to grab the two items from the corpses here and then run up the stairs.
Head south, all the way up the stairs, and continue south until you can turn left and head east into a large elevator room. Pull the lever to start the elevator, and at the top, head south up the stairs. At the top of the stairs, turn right and kill the archer there, then kill the footman and soldier further to the northeast. Make sure you grab the Flamedrake Talisman +1 here — it can be found on the corpse leaning against the tall brazier, just before the stairs that lead through the archway.
Continue east out onto the bridge. On your left is a knight, but you can swing wide around him and engage the mounted knight far enough away that the first one won’t aggro. Loot the Invigorating White Cured Meat from the corpse before going further east on the bridge. You’ll pass between two huge brazier towers, and then see a loot beetle in some rubble on your left. Attack it for a surprise, then kill the surprise to claim a Somber Smithing Stone [6].
Keep going east on the bridge, go up the stairs, and enter the circular structure. Here, you can take the southeastern exit from this room to reach the Divine Tower of East Altus — you’ll need to defeat the Fell Twins boss to enter it — which is where you can restore Morgott’s and Mohg’s Great Runes. It’s best to do this fight later — for now, ride the elevator in the center of the structure down.
While riding the elevator down, stand on the southwestern side of the platform and look down — there’s a spot that you can jump off. It’s pretty hard to see it until you’re very close, so it’s easier to just wait until the elevator gets to the bottom, then ride it back up and jump off.
The ledge you want to jump to
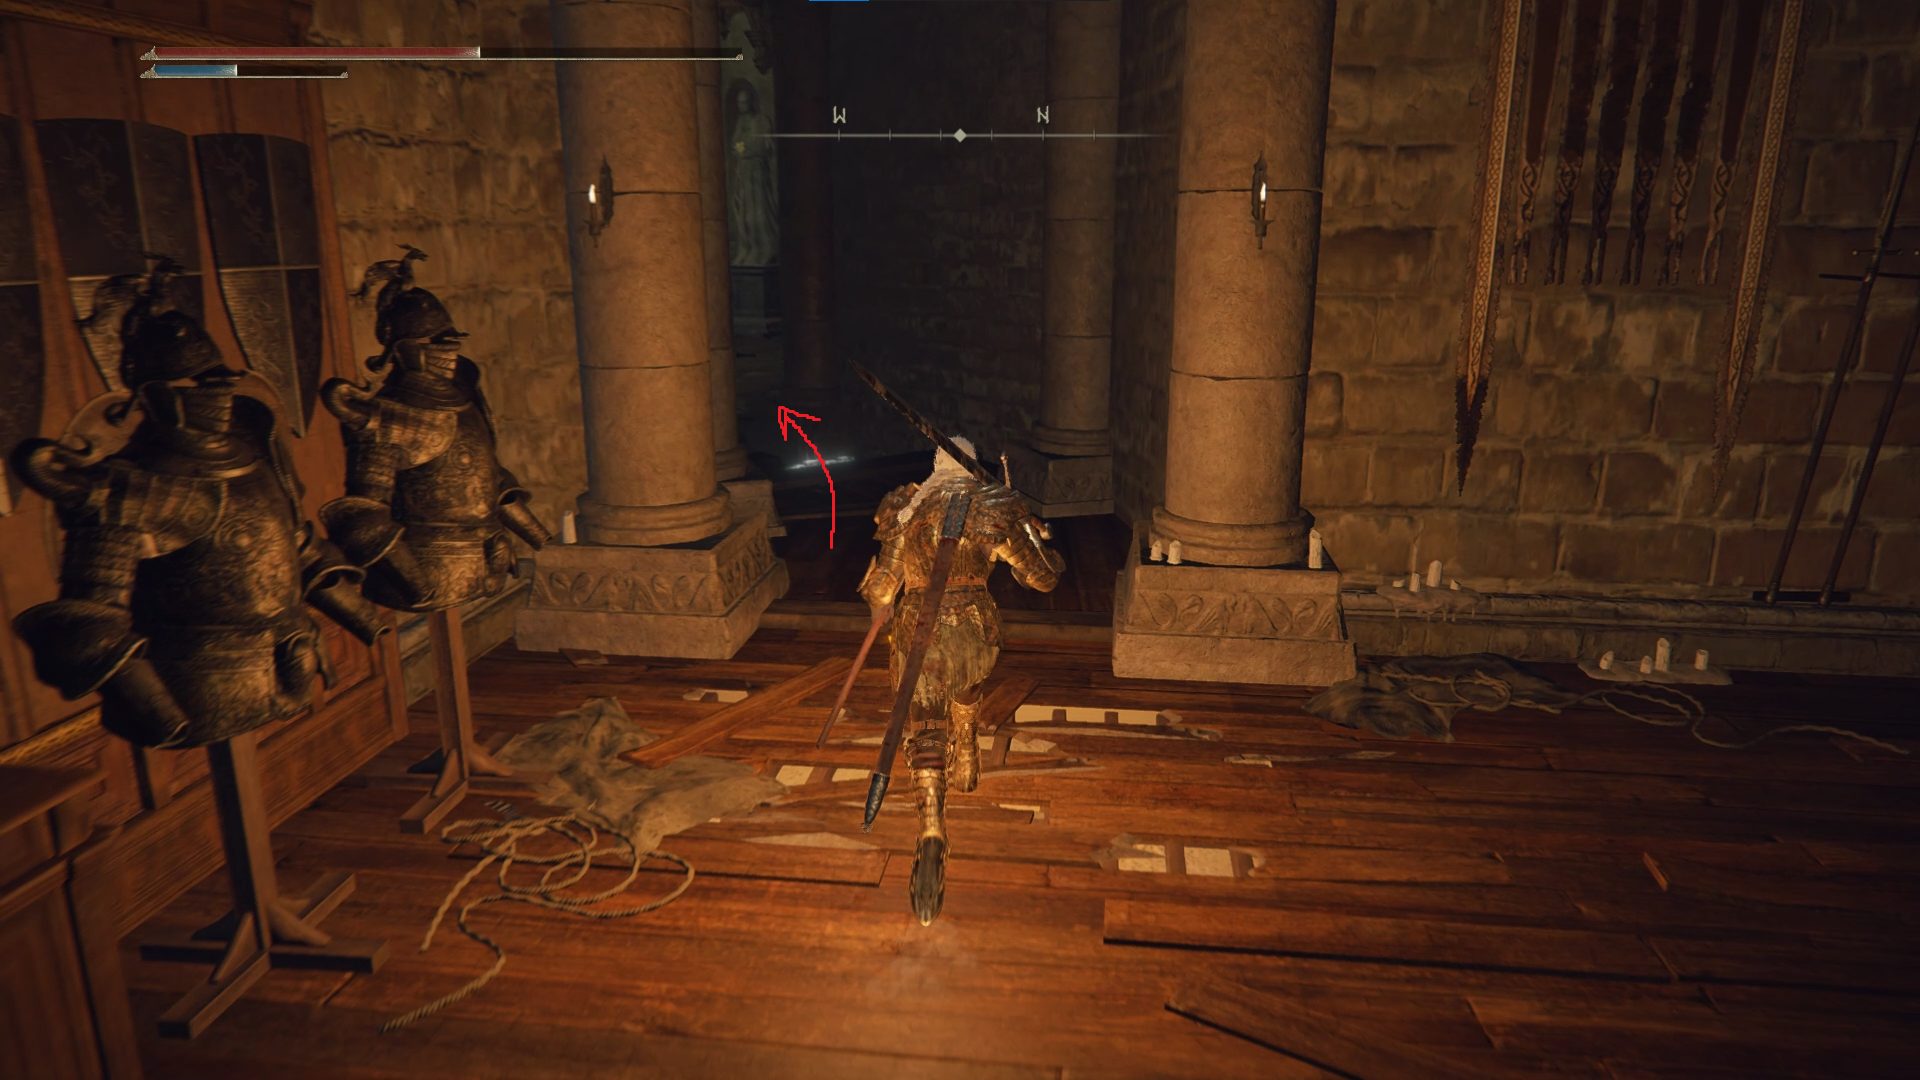
Once you successfully jump into the hallway, you can loot the Official’s Attire from the corpse in the chair, then open the door — in the small room beyond you can find the Blade of Calling (which bears a striking resemblance to the weapon Melina wields if you summon her for the Morgott fight). Then go back down the hallway and drop down, pull the lever to call the elevator (don’t ride it yet), and leave the circular room via the northeastern archway.
You’ll enter the Forbidden Lands, and on your left down the stairs is the Forbidden Lands site of grace. Grab it, rest if you need, and then go back to the elevator and ride it up. At the top, head southeast out onto the bridge to begin the Fell Twins boss fight.
With the Fell Twins defeated, you can enter the Divine Tower of Eastern Altus and restore a rune or two. At this point, you’ve got a few options in terms of where to go next (see the “Where to Go After Leyndell” section below).
This concludes our guide of Leyndell, Royal Capital!
Where to Go After Leyndell
Once you complete Leyndell, the path to the ending is through the Mountaintops of the Giants, via the Forbidden Lands. However, if you haven’t done Nokron and Nokstella yet, the Subterranean Shunning-Grounds, or if you haven’t done Caelid or Mt. Gelmir, you should definitely do those now — they’re probably already going to be a little too easy, and if you go much further you’ll be way over-leveled for them.
Unabashed FromSoftware fanboy still learning to take his time with games (and everything else, really). The time he doesn't spend on games is spent on music, books, or occasionally going outside.
Best of luck (and congrats) on the upcoming wedding! I had to move past the walkthroughs and am now nearing completion of the game, but I look forward to using these in my future playthroughs. I still haven’t found guides as well-written as what you guys have been releasing. Keep up the great work!
Something to include in the walkthrough is that when you jump down to that gazebo where the broken ledges after fighting the nights, you can turn right and jump up onto the ledge there and climb the giant bolt to grab the legendary armament bolt of gransax ( also big congratulations on the wedding!)
I’m unable to execute a jump onto a ledge from that gazebo rooftop. I was able to easily jump down from the avenue above, which is the path to the erdtree sanctuary.
Nice tip, thanks for sharing! I’ll add your suggestion to the guide so that others who can’t get the jump to work can still access the weapon.
Argovaliour
2 years ago
You’re seriously the best walk-through maker of the whole community. I haven’t seen such a detailed and easy to follow walk-through in ages. All the other ones miss a lot of things, but you get every detail and little item! Very much thankful for that since I’m someone who likes to get every single item (even if it’s just a golden rune (1) lol)
Thanks Argovaliour! We try our best to check all the nooks and crannies, but I’m going to apologize in advance for the stuff we (almost certainly) missed — the fine folks at FromSoft are too good at hiding things for us to get ’em all first try.
On top of that, I love how this site uses actual directions i.e. north/south etc. every other one i have tried just is like ok now turn right. Go down here, turn left.
Fishy
2 years ago
Second the comment below, this guide is the best on the web. I’m right here though time to take a break in the hope of the next installment
Love the guides, makes it easy to get the stuff I missed on previous walkthroughs.
On the first level above the preserving bolus and the perfumer before you go up the stairs to get the seed bed curse there is a chest behind the table to the left of the ladder. Idk what’s in it cause I got it on a previous walkthrough.
Nice catch, thanks Oni! (It was a Perfume Bottle, btw).
Last edited 2 years ago by DanielD
02grim
2 years ago
Ok I found an item in leyndell. From the avenue balcony site of grace go northwest down the stairs. Go out the door and turn northeast, and jump on the railing. Then jump on the little ledge and walk around and then jump southeast onto the roof of the building. There you will find a golden rune (12).
Our pleasure! The Shunning Grounds is the section my fellow guide writer Spannah is doing next, so we should have at least a partial version published sometime in the coming week!
Jason
4 months ago
Hey friend. Wanted to let you know I found a inconsistency. In part 2 of leyndell, after ulcerated tree spirit, there’s a part where it says ” On the left as you enter is a Stonesword Key, and in the far right corner is a lightning knight”.
The item was a cracked pot. Not a stonesword key. Thank you!
Hey I figured out that the information is after the fire giant. I just finished everything in the guide up to the point where you have to burn the erdtree to keep going. Thanks so much for this guide it’s been extremely helpful.


Best of luck (and congrats) on the upcoming wedding! I had to move past the walkthroughs and am now nearing completion of the game, but I look forward to using these in my future playthroughs. I still haven’t found guides as well-written as what you guys have been releasing. Keep up the great work!
Thanks Malavesh! Hopefully by the time you’re on your next playthrough we’ll have wrapped these up 🙂
Agreed, awesome guide! Been using it the whole game! Thanks fellow tarnished! ðŸ™ðŸ¼
Likely compliment, therefore, gratitude!  🙠
Something to include in the walkthrough is that when you jump down to that gazebo where the broken ledges after fighting the nights, you can turn right and jump up onto the ledge there and climb the giant bolt to grab the legendary armament bolt of gransax ( also big congratulations on the wedding!)
Thanks Matt — for both the congrats and for the tip about the Bolt of Gransax!
I’m unable to execute a jump onto a ledge from that gazebo rooftop. I was able to easily jump down from the avenue above, which is the path to the erdtree sanctuary.
Nice tip, thanks for sharing! I’ll add your suggestion to the guide so that others who can’t get the jump to work can still access the weapon.
You’re seriously the best walk-through maker of the whole community. I haven’t seen such a detailed and easy to follow walk-through in ages. All the other ones miss a lot of things, but you get every detail and little item! Very much thankful for that since I’m someone who likes to get every single item (even if it’s just a golden rune (1) lol)
Thanks Argovaliour! We try our best to check all the nooks and crannies, but I’m going to apologize in advance for the stuff we (almost certainly) missed — the fine folks at FromSoft are too good at hiding things for us to get ’em all first try.
On top of that, I love how this site uses actual directions i.e. north/south etc. every other one i have tried just is like ok now turn right. Go down here, turn left.
Second the comment below, this guide is the best on the web. I’m right here though time to take a break in the hope of the next installment
Hey Fishy, I’ve got a bit of free time today to work on the guide, so I’m going to try my best to get a meaningful chunk done in the next hour here.
Yeah I see pt3 awesome, don’t sweat it and congrats on the wedding
Thanks Fishy!
This Is So Helpful! Thank You!
Just think of us as your guidance of grace 🙂
Love the guides, makes it easy to get the stuff I missed on previous walkthroughs.
On the first level above the preserving bolus and the perfumer before you go up the stairs to get the seed bed curse there is a chest behind the table to the left of the ladder. Idk what’s in it cause I got it on a previous walkthrough.
Nice catch, thanks Oni! (It was a Perfume Bottle, btw).
Ok I found an item in leyndell. From the avenue balcony site of grace go northwest down the stairs. Go out the door and turn northeast, and jump on the railing. Then jump on the little ledge and walk around and then jump southeast onto the roof of the building. There you will find a golden rune (12).
Best walkthroug EVER. THANK YOU11
Michael, it’s truly our pleasure. We couldn’t do any less than the best for the best game of the year!
Thanks for the guide! Any idea about when the Subterranean Shunning Grounds will be ready?
Thanks for your hard work!
Our pleasure! The Shunning Grounds is the section my fellow guide writer Spannah is doing next, so we should have at least a partial version published sometime in the coming week!
Hey friend. Wanted to let you know I found a inconsistency. In part 2 of leyndell, after ulcerated tree spirit, there’s a part where it says ” On the left as you enter is a Stonesword Key, and in the far right corner is a lightning knight”.
The item was a cracked pot. Not a stonesword key. Thank you!
Also a typo at the bottom of part 4. It says “This walkthrough continues in the Part 4 tab!”
Thanks Jason, I’ll check those bits out and get ’em fixed.
Hey can you help me find the section that talks about burning the erdtree?
Hey I figured out that the information is after the fire giant. I just finished everything in the guide up to the point where you have to burn the erdtree to keep going. Thanks so much for this guide it’s been extremely helpful.