This guide is a living document, and we will continue to add to it as we discover secrets (or EIP users tell us about them!)
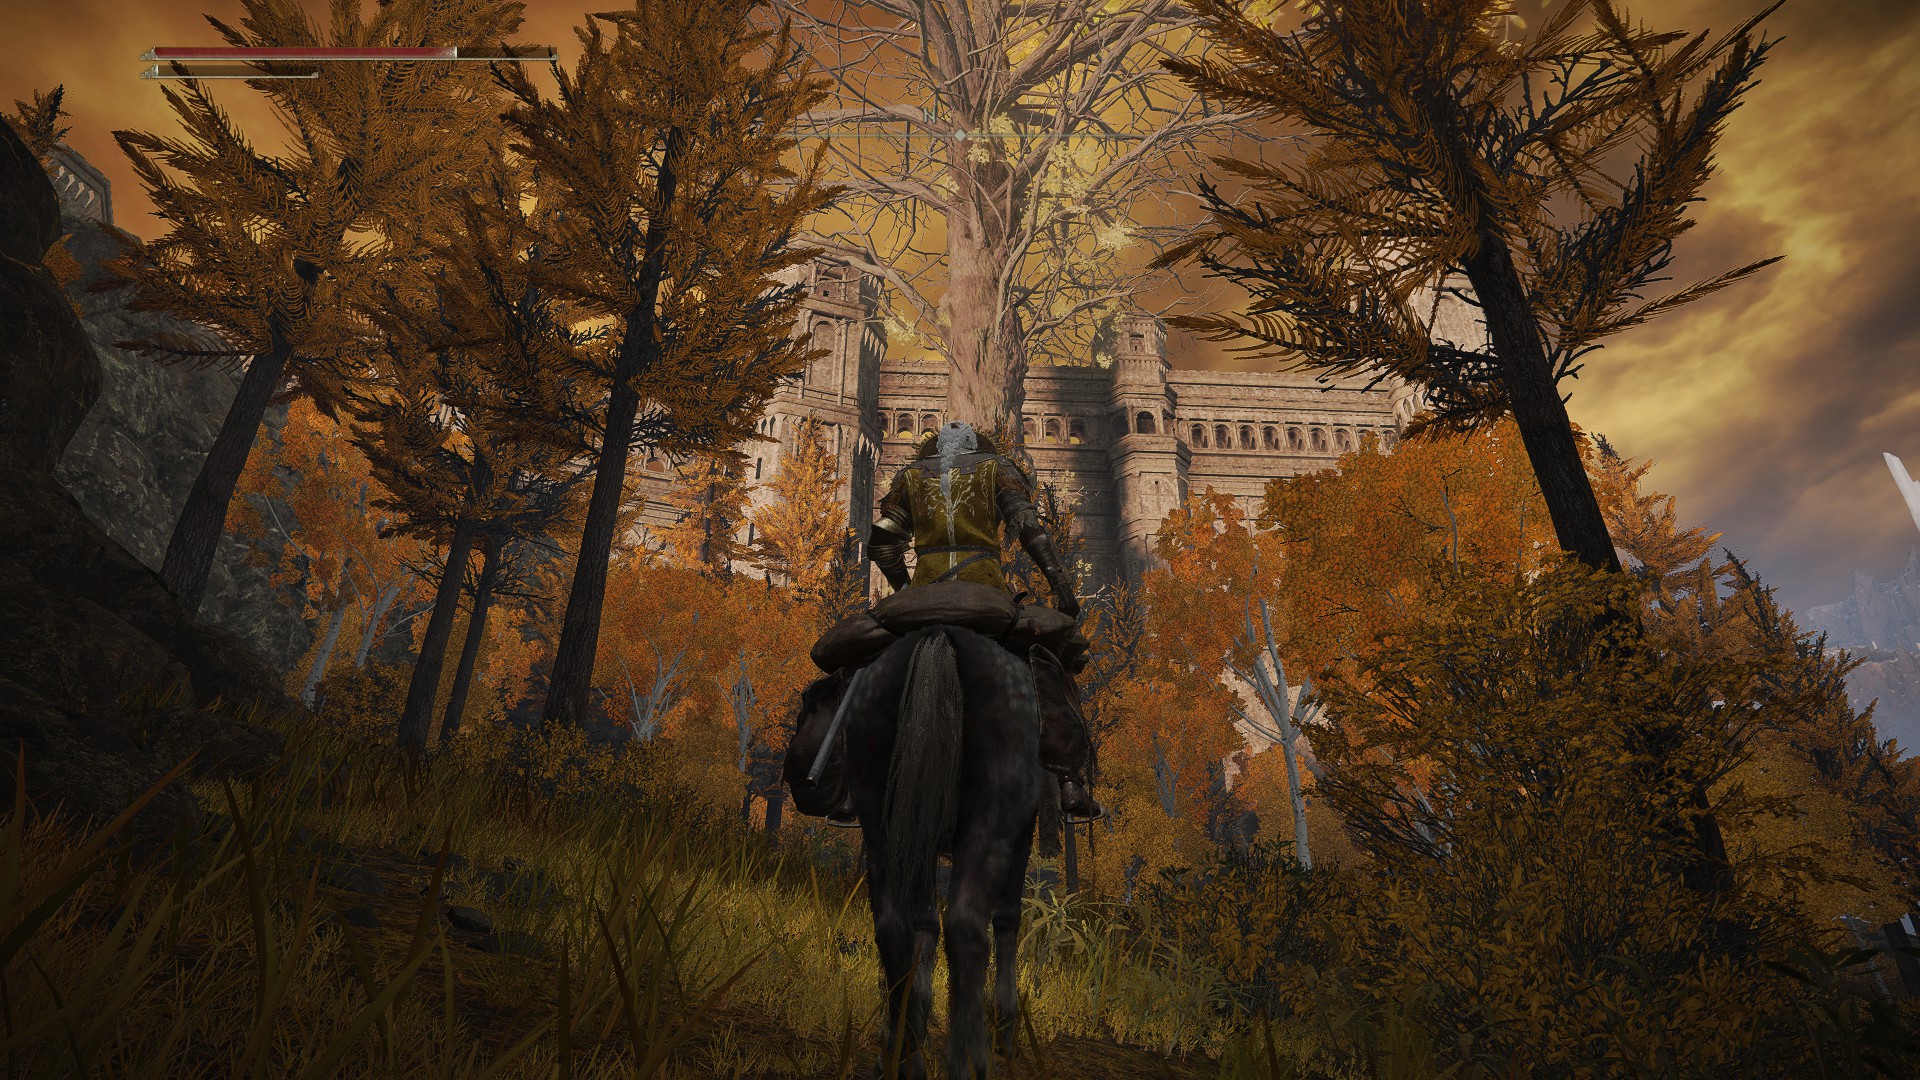
Altus Plateau lies northeast of Liurnia of the Lakes, and is the area you must pass through in order to reach the Royal Capital. It’s smaller than the previous open-world areas, but there’s still plenty to do and see.
How to Get to the Altus Plateau
Ironically, the “Coward’s Path” requires killing a Magma Wyrm, so it really isn’t for cowards. This route to Altus starts in Liurnia of the Lakes — you’ll need to make your way to the Ravine-Veiled Village and then up through some tunnels to the Ruin-Strewn Precipice, and finally face Magma Wyrm Makar. The elevator past the wyrm will take you to Altus Plateau.
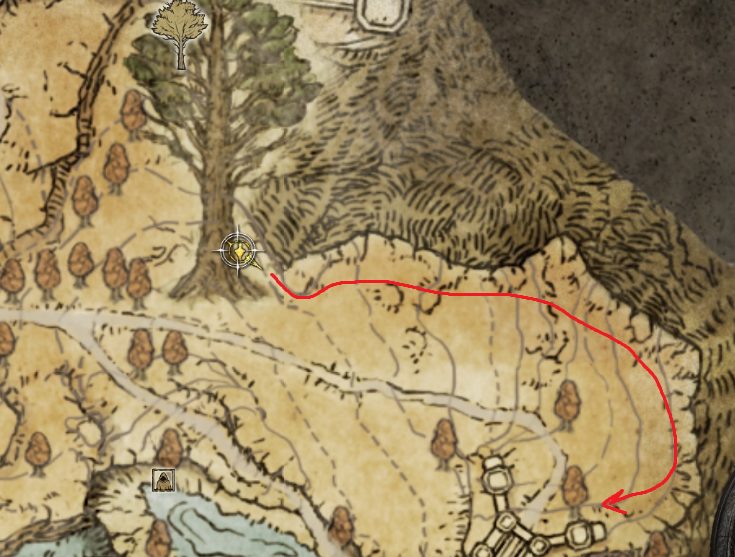
Start from the Bellum Church site of grace, and follow the path down the cliff to the water northeast to reach the site of grace. If you don’t have the Bellum Church site of grace, you can start in whatever site of grace you have in the north of the lake, and make your way northeast to the indicated location.
The path from Bellum ChurchThe Ravine-Veiled Village site of grace
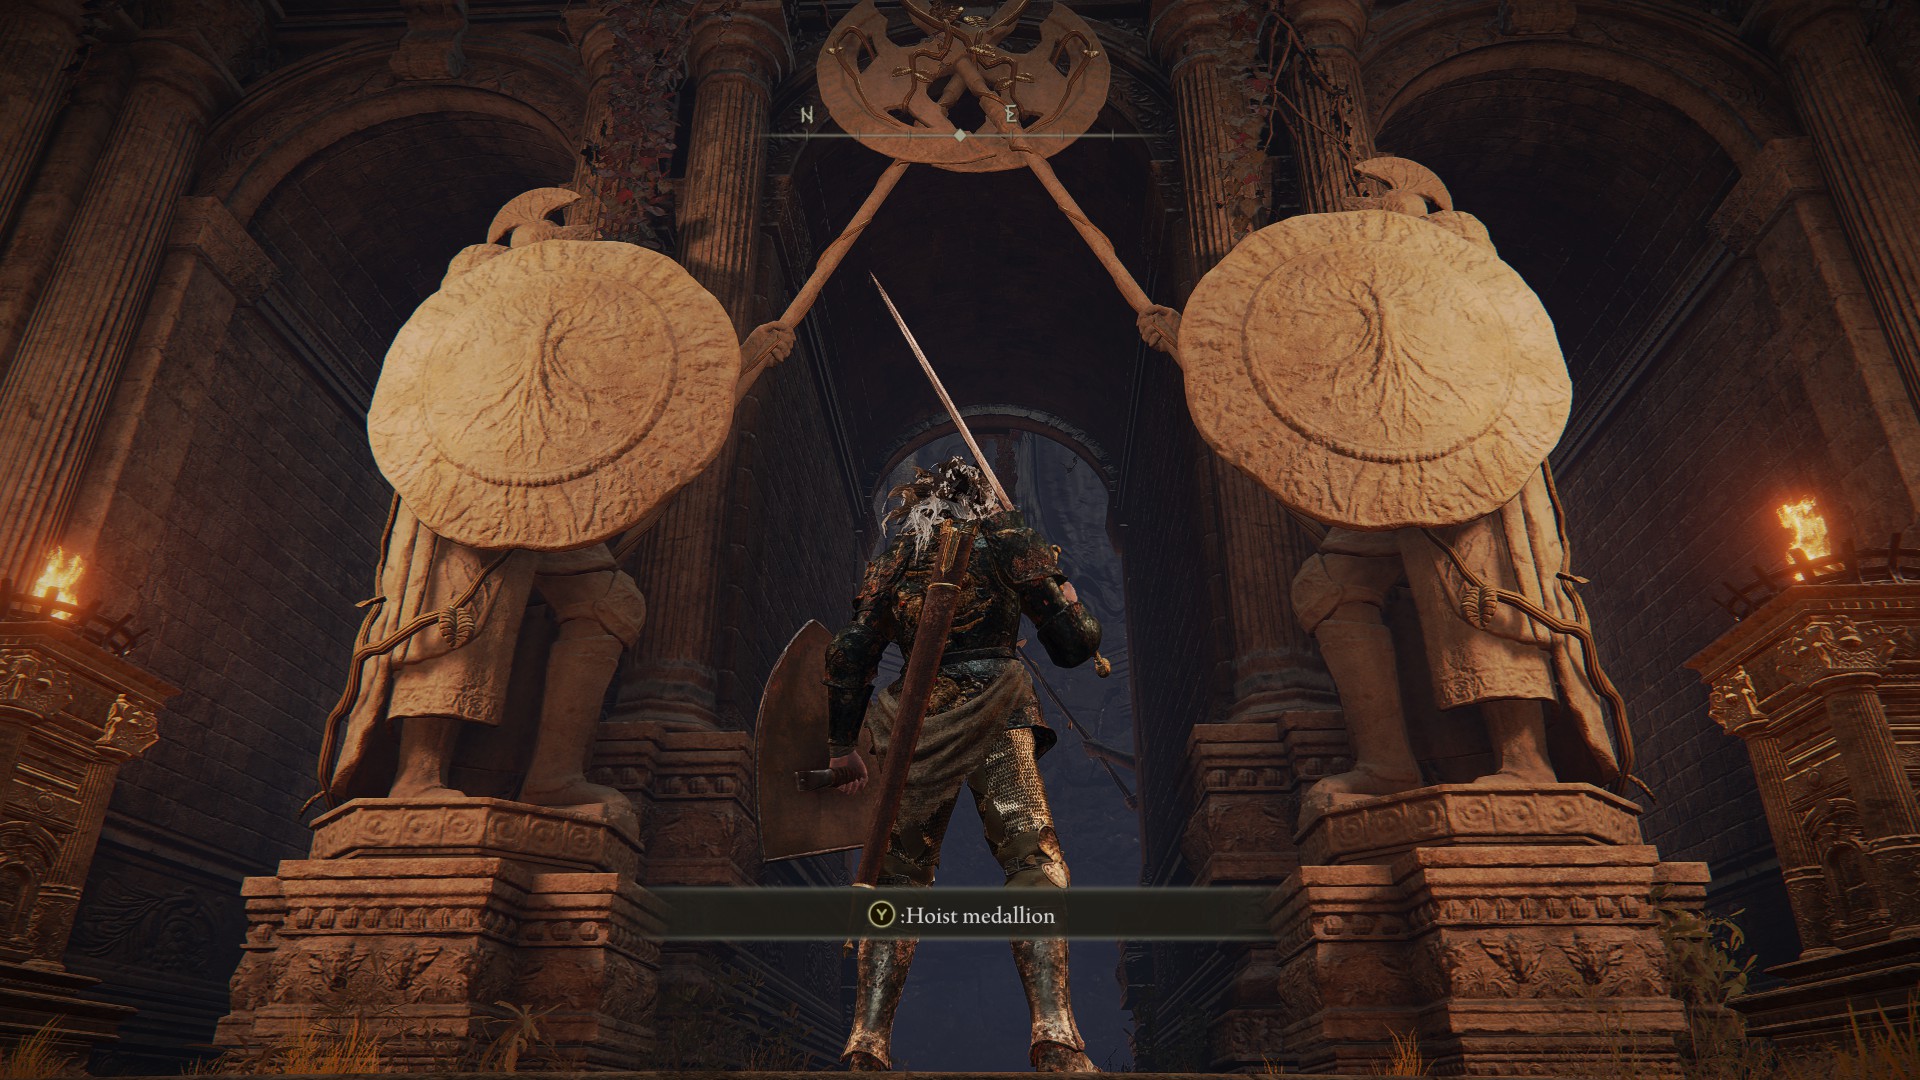
This route is also in the northeast of Liurnia of the Lakes, and Bellum Church is again the closest site of grace. However, you’ll need the Left and Right half of the Dectus Medallion in order to ride the Grand Lift of Dectus. Once you have both halves, you can walk up to the circle on the platform in the large structure with the lift — you’ll be given a prompt to “Hoist Medallion”, which will cause the platform to rise and take you to Altus Plateau.
The left half of the medallion can be found in Limgrave, in Fort Haight — climb the ladder in the fort’s tower find the medallion half.
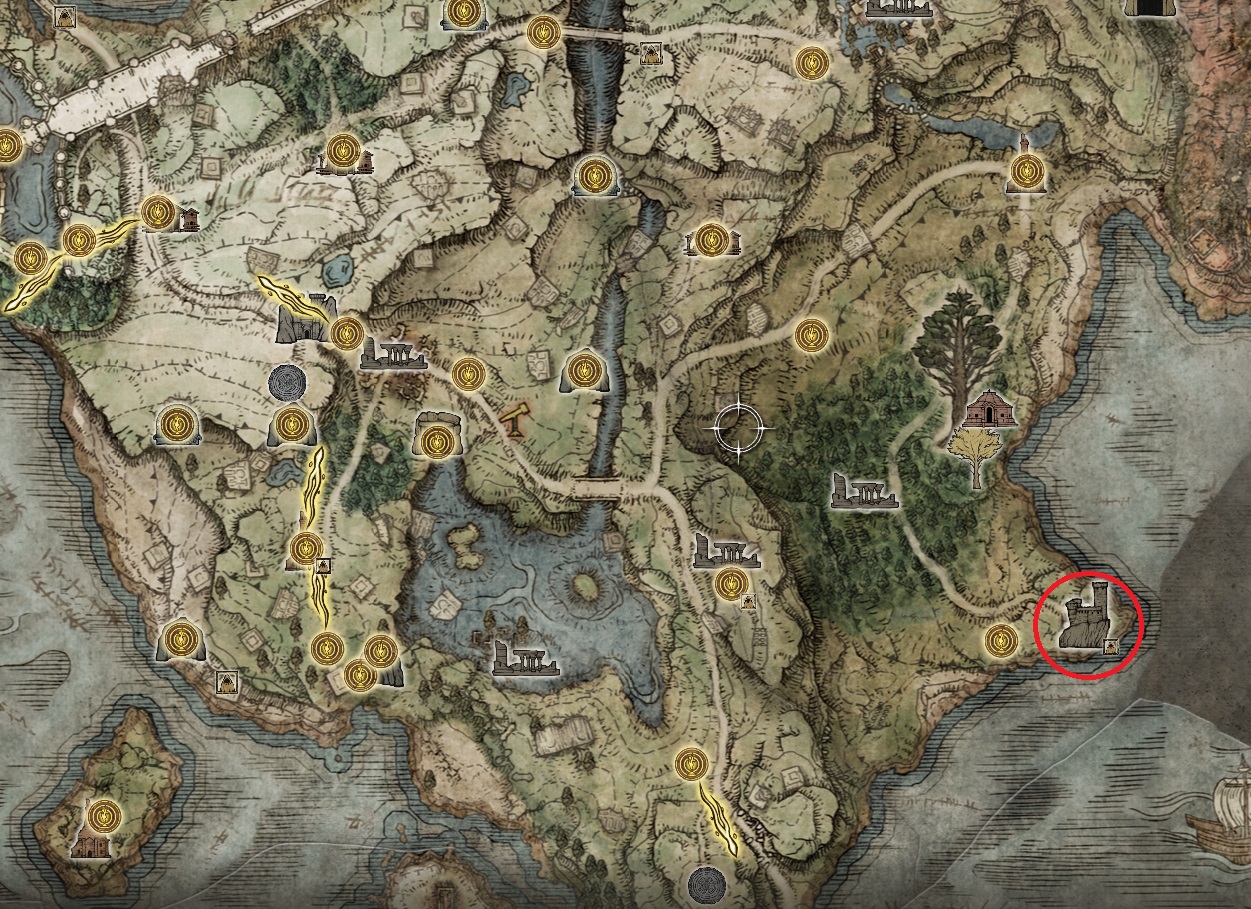
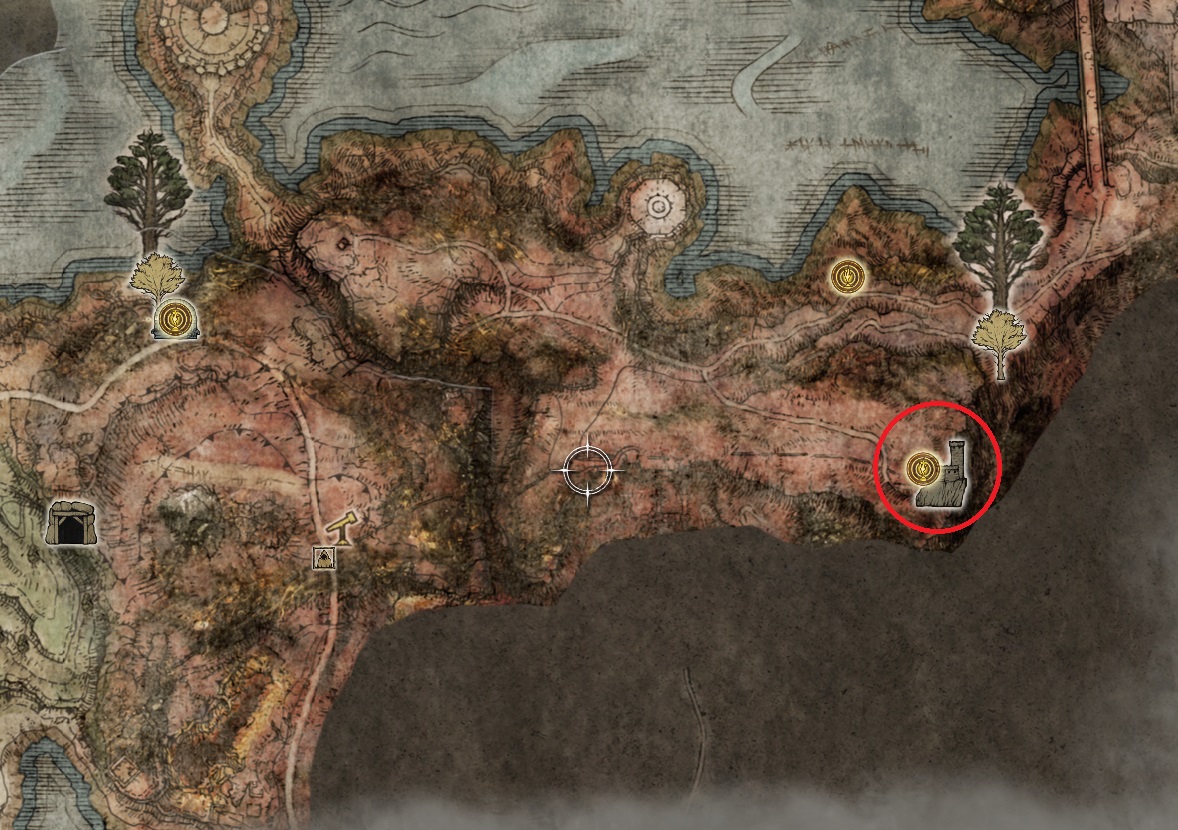
The right half is in Caelid, in Fort Faroth — there’s a ladder in the fort’s first room that leads to the medallion half.
Although there are two ways to get to the Altus Plateau, for this walkthrough we’re going to assume you took the Coward’s Path. Therefore, this guide will start at the elevator you can take after defeating Magma Wyrm Makar. If you took the Grand Lift of Dectus, you can still follow along with this guide — check out the video below to see how to reach the Abandoned Coffin site of grace.
Because this walkthrough is long, it will be organized into a few separate parts to make navigation easier. Part 1 covers most of the western part of Altus, while Part 2 covers the southern bit below the staircase, and the basin in the middle of the plateau, plus Windmill Village. Part 3 will cover the northern stretch of the plateau, plus the eastern area above the staircase. Part 4 will encompass the entirety of the Capital Outskirts.
After riding the elevator up from Makar, head up the hill on the dirt path and then turn north to find the Abandoned Coffin site of grace. Grab it and start following the dirt path that leads west — it will soon bend and start taking you north along the western edge of the lake. You’ll pass a pack of wolves, and then find a loot beetle on the path that contains the Ash of War: Sacred Order. Continue on the road and you’ll soon see some ruins. We’ll check those out in a bit — for now, continue following the path as it leads downwards and to a door with a double imp statue.
Before you enter the dungeon, head south to the edge of the cliff, where you can grab an Arteria Leaf in the southeastern corner. Then, assuming you’ve got the required Stonesword Keys, use them on the statue and enter the Unsightly Catacombs.
Leave the catacombs and head up the dirt path, then turn left once you crest the hill, and head into the Perfumer’s Ruins. As long as you stay mounted, the enemies here will have a hard time hitting you with their perfume attacks as you circle around them on Torrent. Ride up to and kill the enemy wandering around in front of the joint, and also kill any small flowers nearby.
Then go west, up the stairs, and into the large ruined building. As soon as you enter the building a foot or two, roll backwards and out of the building — a big, dual sword-wielding enemy will chase you outside (it’s actually another Omenkiller enemy). You can definitely stay on Torrent while fighting him, circling around him as melee or kiting him as a ranged character. He’ll drop his armor when he dies, which includes his Robe, Gloves, and Boots.
With the Omenkiller dealt with, go back into the building he was in and turn left — draped over a broken section of wall you’ll find a corpse with a Golden Rune [5]. In the center of the building (or what’s left of it) next to a table is a corpse holding a Perfume Bottle, but watch out for the nearby perfumer. It can be hard to see while the flowers are spewing poison, but there’s a chest just west of the corpse containing the Perfumer’s Cookbook [1]. Grab it and continue west up the stairs, taking a right to go up the second flight.
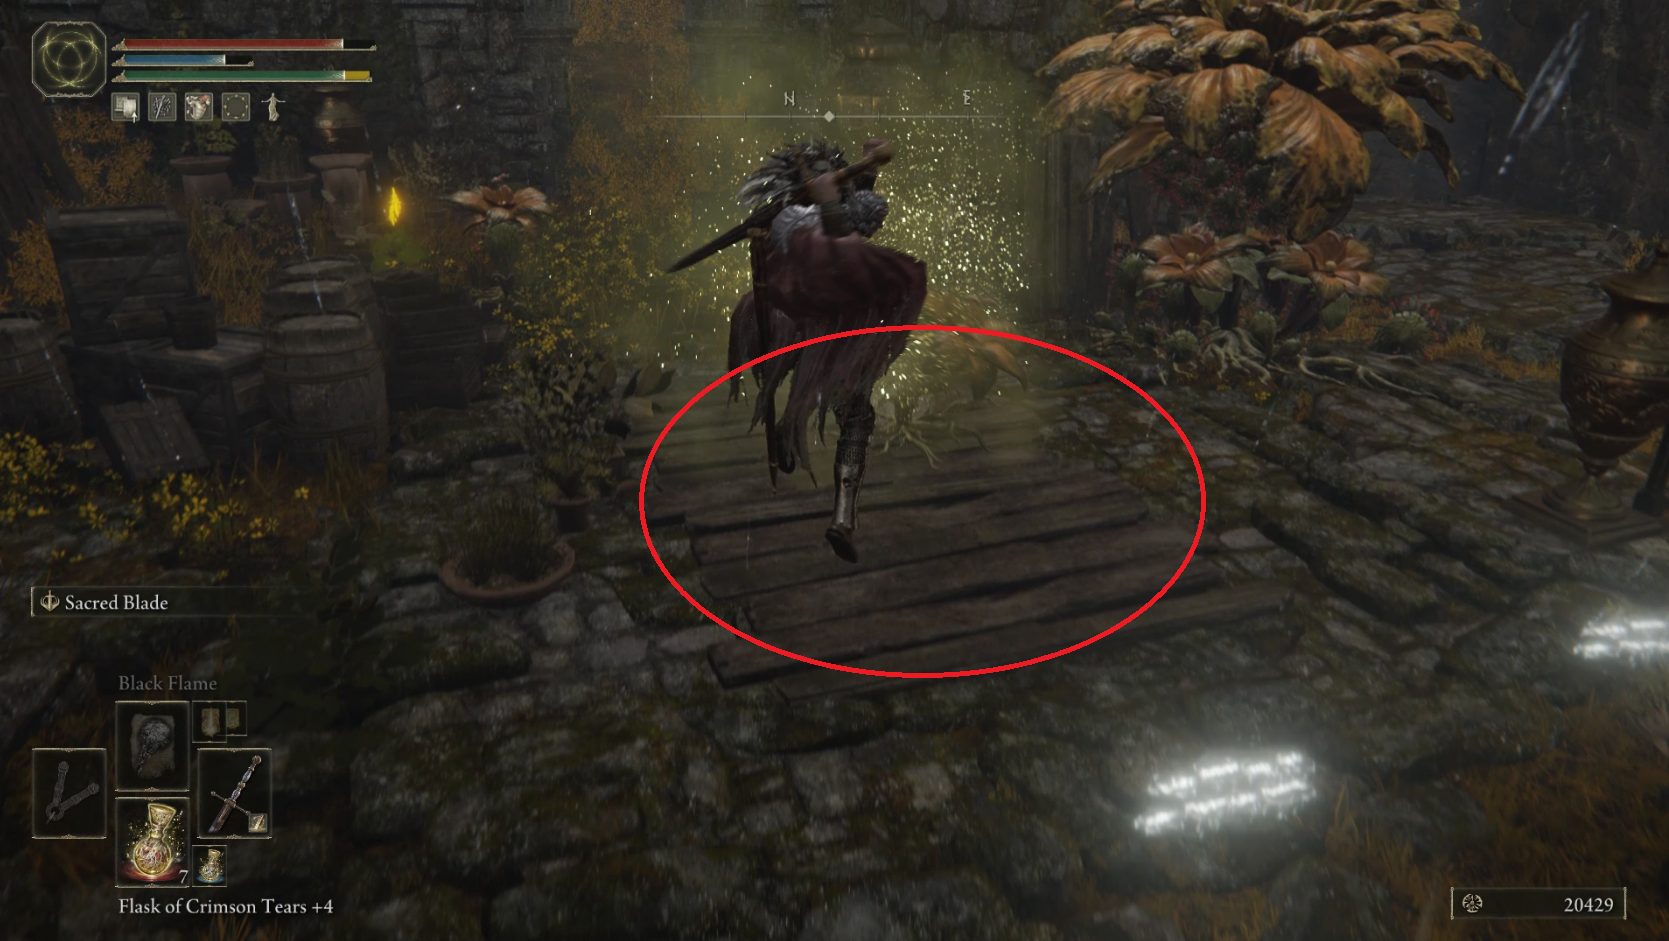
Head through the doorway and look to your right — a Perfume Bottle is on the corner of the stone platform. Now look towards the big flower — just to its left is a row of wooden boards on the ground. Do a jumping attack on these to reveal a hidden staircase. Head down and open the door to reveal a chest containing the Perfumer’s Talisman.
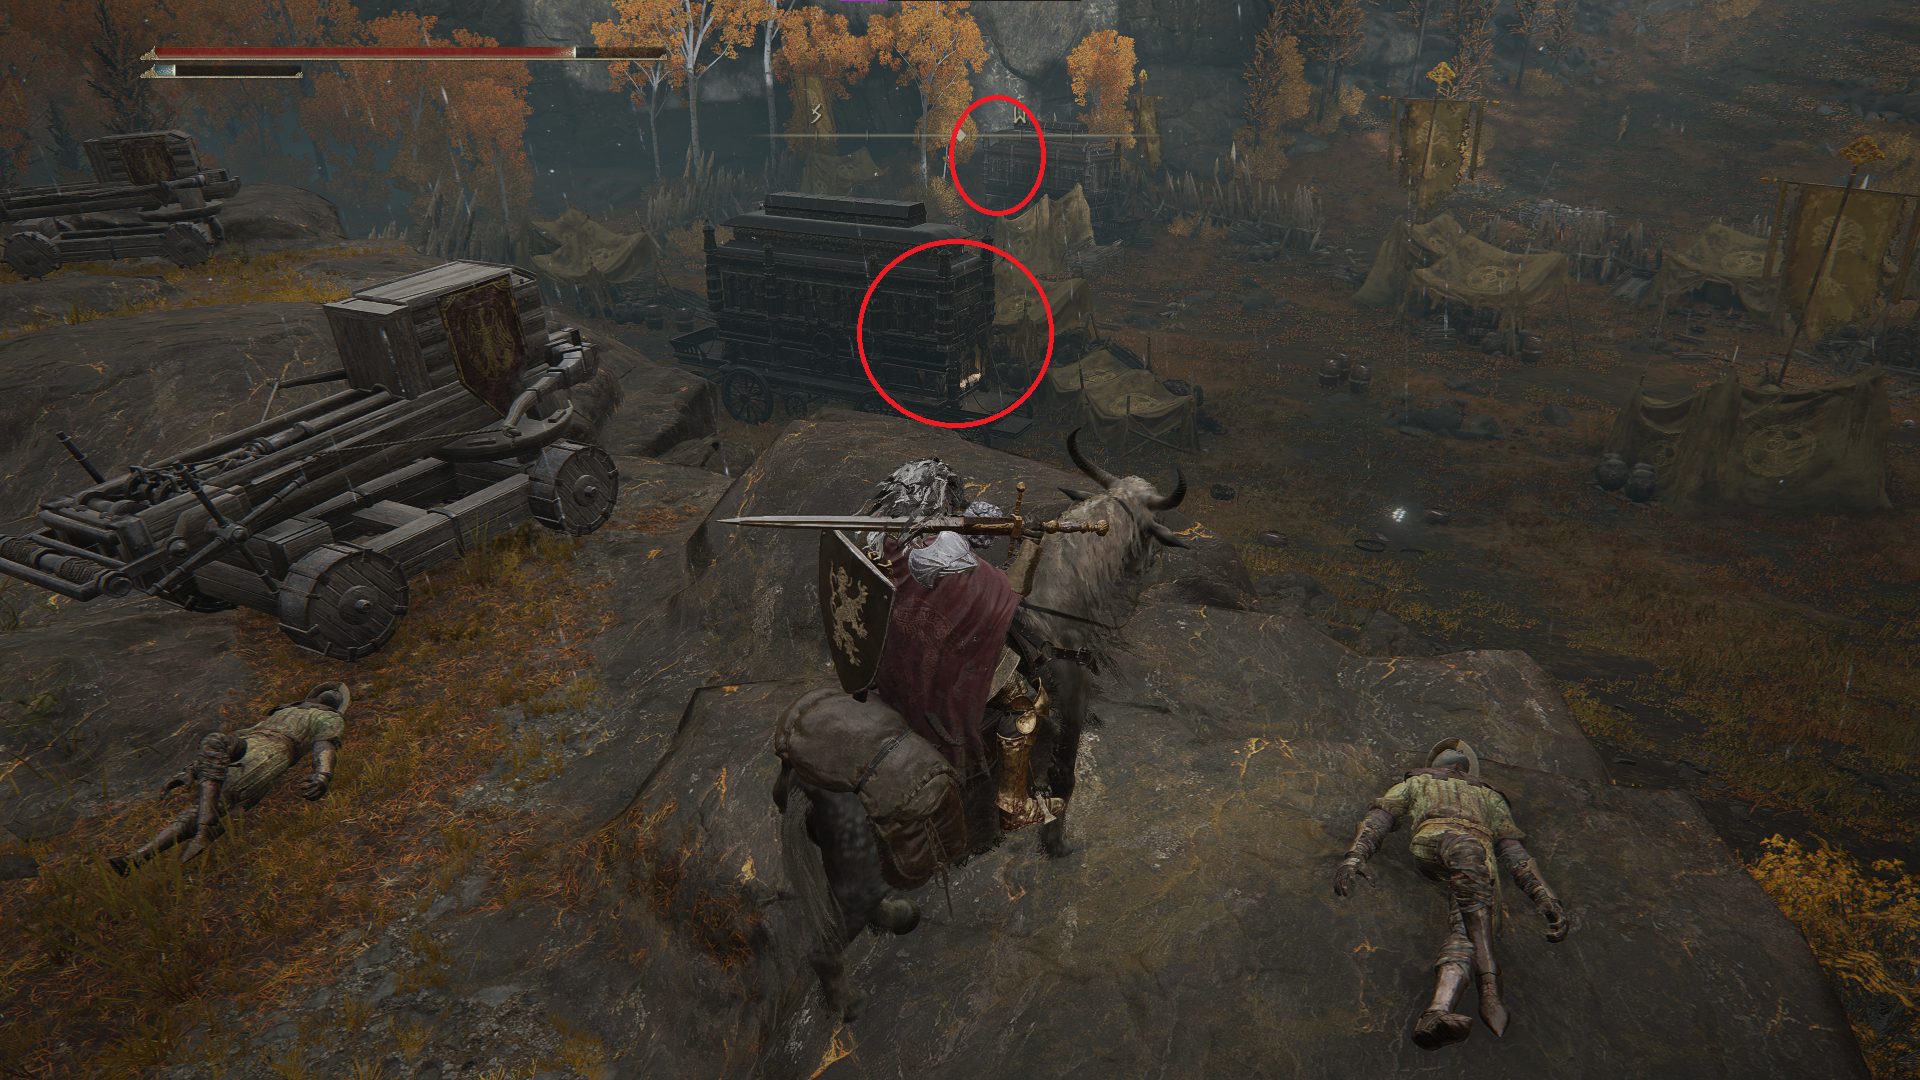
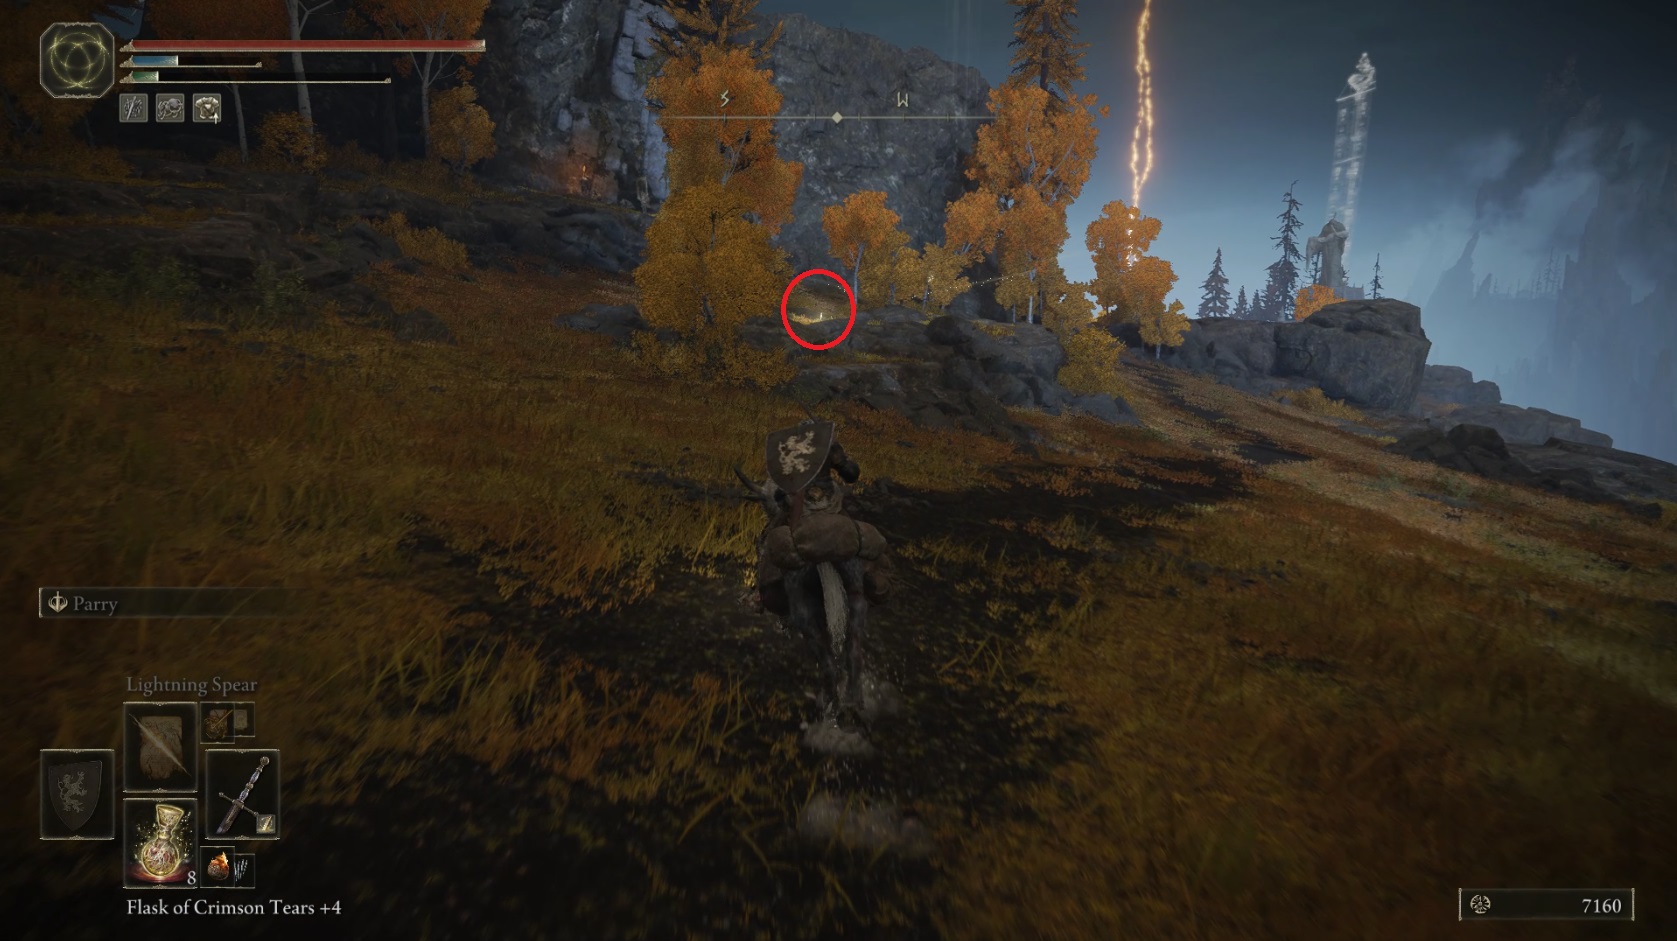
Head back up the stairs and enter the small room hidden behind the large flower to find a Nascent Butterfly. Drop off the stone platform heading east towards the final ruined building, which has a corpse holding x4 Budding Cave Moss. Then hop on Torrent and ride east until you reach the lake. Continue following the shoreline east and slightly north, and look for a corpse surrounded by a few flowers — it’s got a Gold Firefly just for you.
Left circle: corpse — Right circle: cave entrance
A bit south up against the cliffs you’ll find the entrance to the Sage’s Cave.
Once you’ve defeated both bosses in the Sage’s Cave, you can teleport back to the Abandoned Coffin site of grace. Now we’re going to collect some items scattered amongst the fallen carts that lay strewn across the hillside — and start a fight with a dragon. The enemies here have a lot of health and don’t give that many runes, so you can avoid them as you collect the items. First, head around the side of the pile of carts to the northeast — in the middle of them, you’ll find a corpse with a Smithing Stone [5]. The guy hanging out on top of the cars will jump down, so ride in and out to get him to hop off (without letting him land on you), then ride past him and grab the smithing stone.
Now head up the hill, following the dirt path, and you’ll soon come to a cart with a Stake of Marika in front of it, and some items hanging off of the end nearest the road. Grab the Ruler’s Mask and Ruler’s Robe, then continue up the hill a bit to confront Ancient Dragon Lansseax. Stay on Torrent and keep yourself behind the dragon while attacking it. It’s got an AOE lightning attack, so if red electricity starts showing up, ride far away. We won’t go over the moves of this boss too much, since after you die here or do about 20% of its HP, it will fly off — we’ll fight it again later in this guide.
There are a few more items on the cars, but they’re easy-to-find crafting materials, so we’ll ignore them and ride east, further up the hill. The path will turn right as you reach the crest of the hill, and on the right you’ll see the Erdtree-Gazing Hill site of grace. Tap it and then head into the nearby ruins, where — assuming you helped Rya in Liurnia of the Lakes — you’ll find her again. She’ll offer to take you to Volcano Manor — accept her offer and grab the site of grace once you arrive. You can choose to do Volcano Manor now (our guide on the manor is currently a work in progress), or teleport back to the Erdtree-Gazing Hill.
From the Erdtree-Gazing Hill site of grace, look north, where you’ll see one of those statues of guidance. Ride up the rocks to it, then head the way it points, into the watery ruins.
Here you’ll find a Tibia Mariner, a boss you’ve likely faced a couple of times now. The strategy remains the same, although the boss has a new friend — a huge spectral skeleton that has both ranged and melee attacks. As long as you stay on torrent and focus on DPSing down the Mariner, this fight isn’t significantly harder than previous fights against this boss. Defeating this Mariner will earn you a Deathroot, the Tibia’s Summons sorcery, and 14,000.
Once the boss is down, head to the ruined church in the southwest of the ruins and turn left when you go through what’s left of the front door — there you’ll find Smithing Stone [5]. Go northeast to the next set of ruins, where the western building contains x5 Human Bone Shard, and the eastern one a Golden Rune [3]. Then go further north, to the bottom set of steps that leads to another series of ruins. Two crossbowmen will collect their bones and start shooting at you — elminate them and grab the x4 Stormhawk Feather from the corpse there.
Go through the doorway and immediately turn right to find a corpse with a Golden Rune [7]. Then continue up the stairs, and ignore the spearman — instead turn right and right again to take out the skeletal sorcerer on the rock above the stairs. Then clear the spearman and continue through the stone arch and turn right.
After turning right, you should be facing another ruined building. Go through the doorway and head right to clear the crossbow skeleton, then turn around and fight the skeletal warrior that’s probably coming your way. Now you can choose to spend two Stonesword Keys to enter the loot room in the basement of this ruined building. You’ll get the Pearldrake Talisman +1, which offers a pretty sweet suite of resists, but you’ll also have to fight your way through a couple of skeletal warriors plus their sorcerer friend in order to claim it. Kite the warriors up the stairs if you can’t put them down quickly — that way you don’t have to fight all three enemies at once. Then head through the door on the far end of the chamber to find your reward.
Leave the basement and continue up the stairs heading northwest to the final building on the hill — there’s a small room on the left as you enter the building that contains some Dappled White Cured Meat. Then leave the building heading north and you should see a door — head through to enter the Wyndham Catacombs.
Note that you can head northwest through the nearby ravine to reach a part of Mt. Gelmir (a minute or so in is a Golden Seed that’s easy to find), but for the sake of organization we’re going to cover that area in our Mt. Gelmir walkthrough.
Teleport back to the Erdtree-Gazing site of grace, and ride east down the hill towards the camp. Don’t ride all the way down the hill to the camp or you’ll get shot at by a ballista. Instead, bear left before the camp and head northeast towards the shallow water there. You should see a flying loot beetle in the middle of the water — ride towards it and it will drop to the ground, allowing you to bust it open for the Ash of War: Blood Blade. Continue north and you’ll hit a dirt path, which you can follow past some giants as it curves west — you’ll see the entrance to Old Altus Tunnel just up the hill.
You’ll need to decide whether or not you’re spending the x2 Stonesword Key to enter the tunnel quickly, as the enemies here will chase you to the entrance. You’re invlunerable while unlocking the statue, however, and you can run inside and tap the site of grace without too much danger.
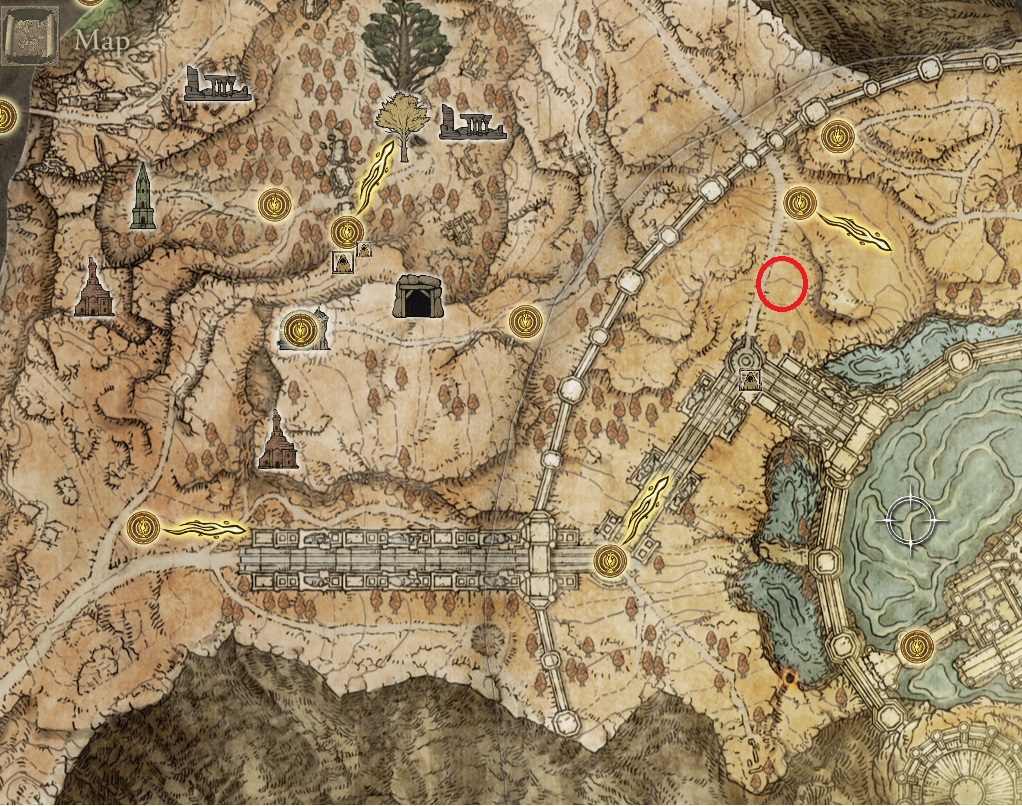
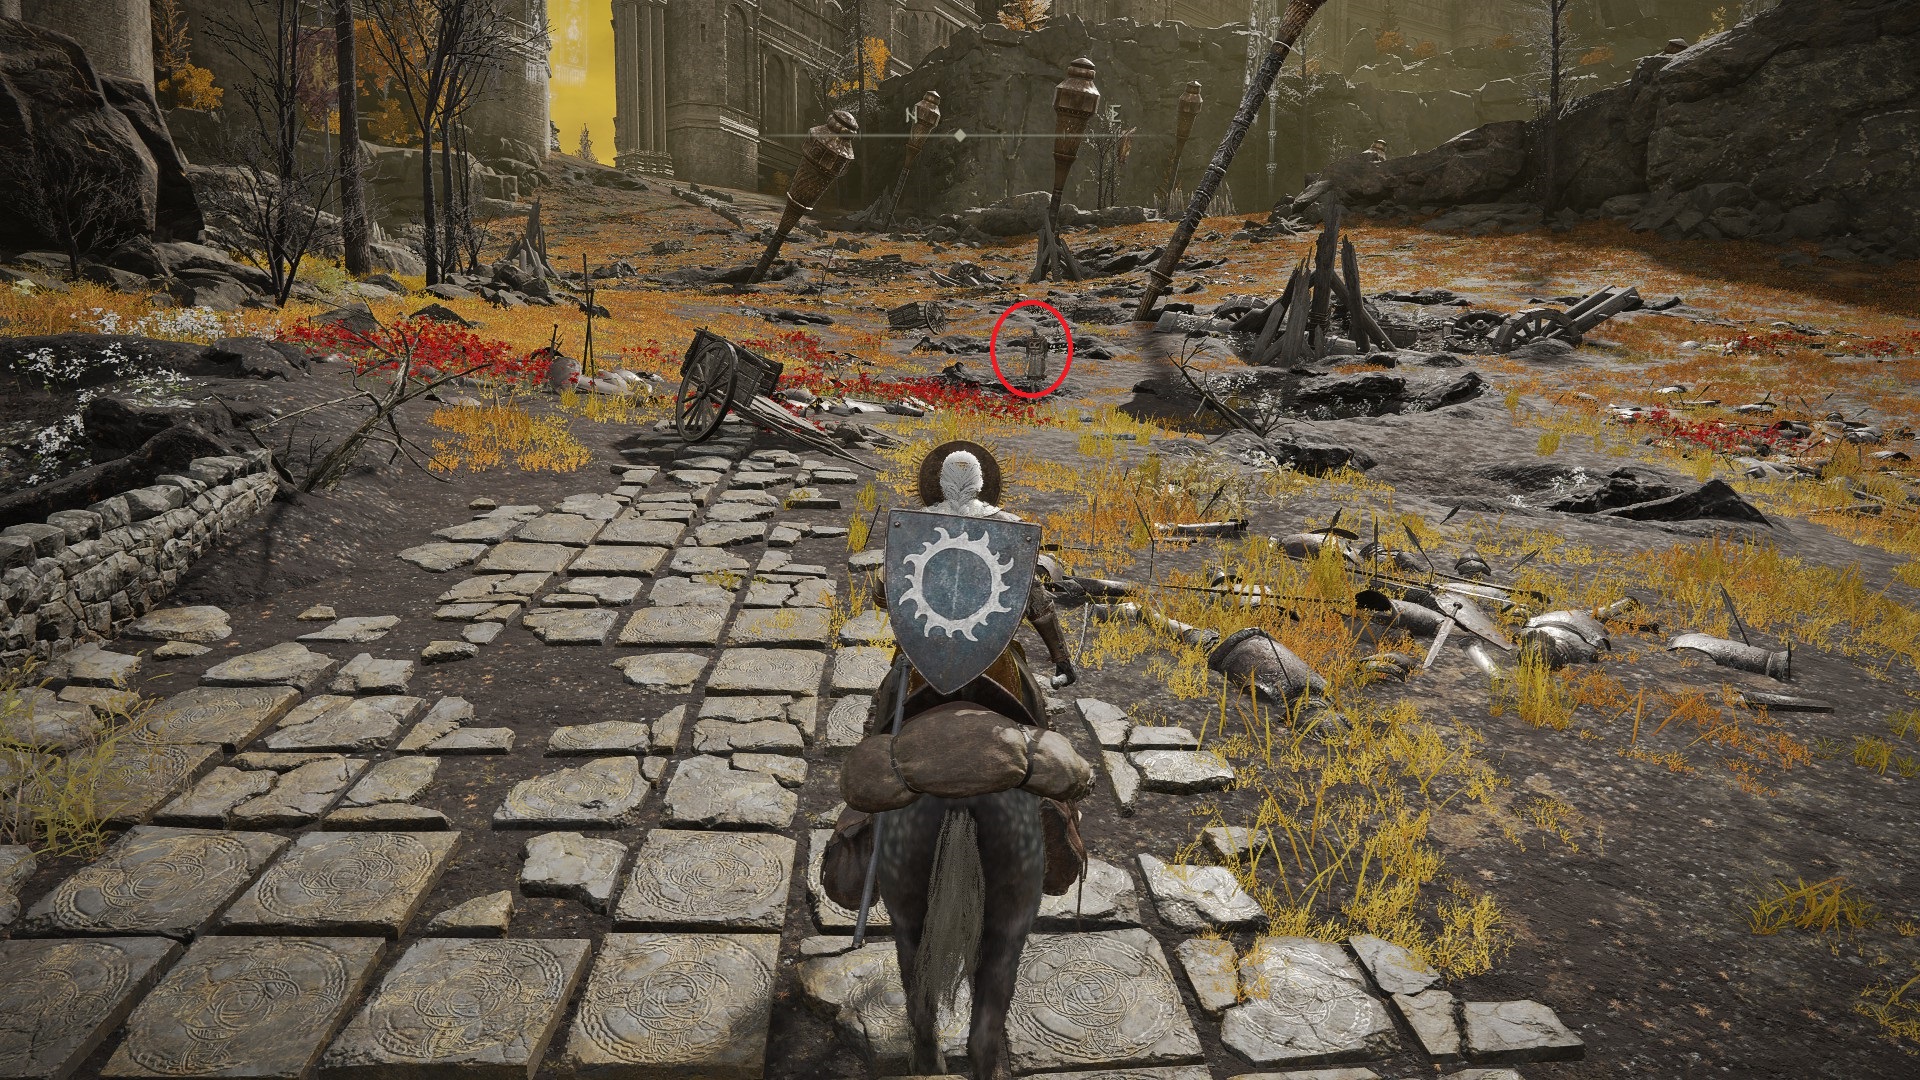
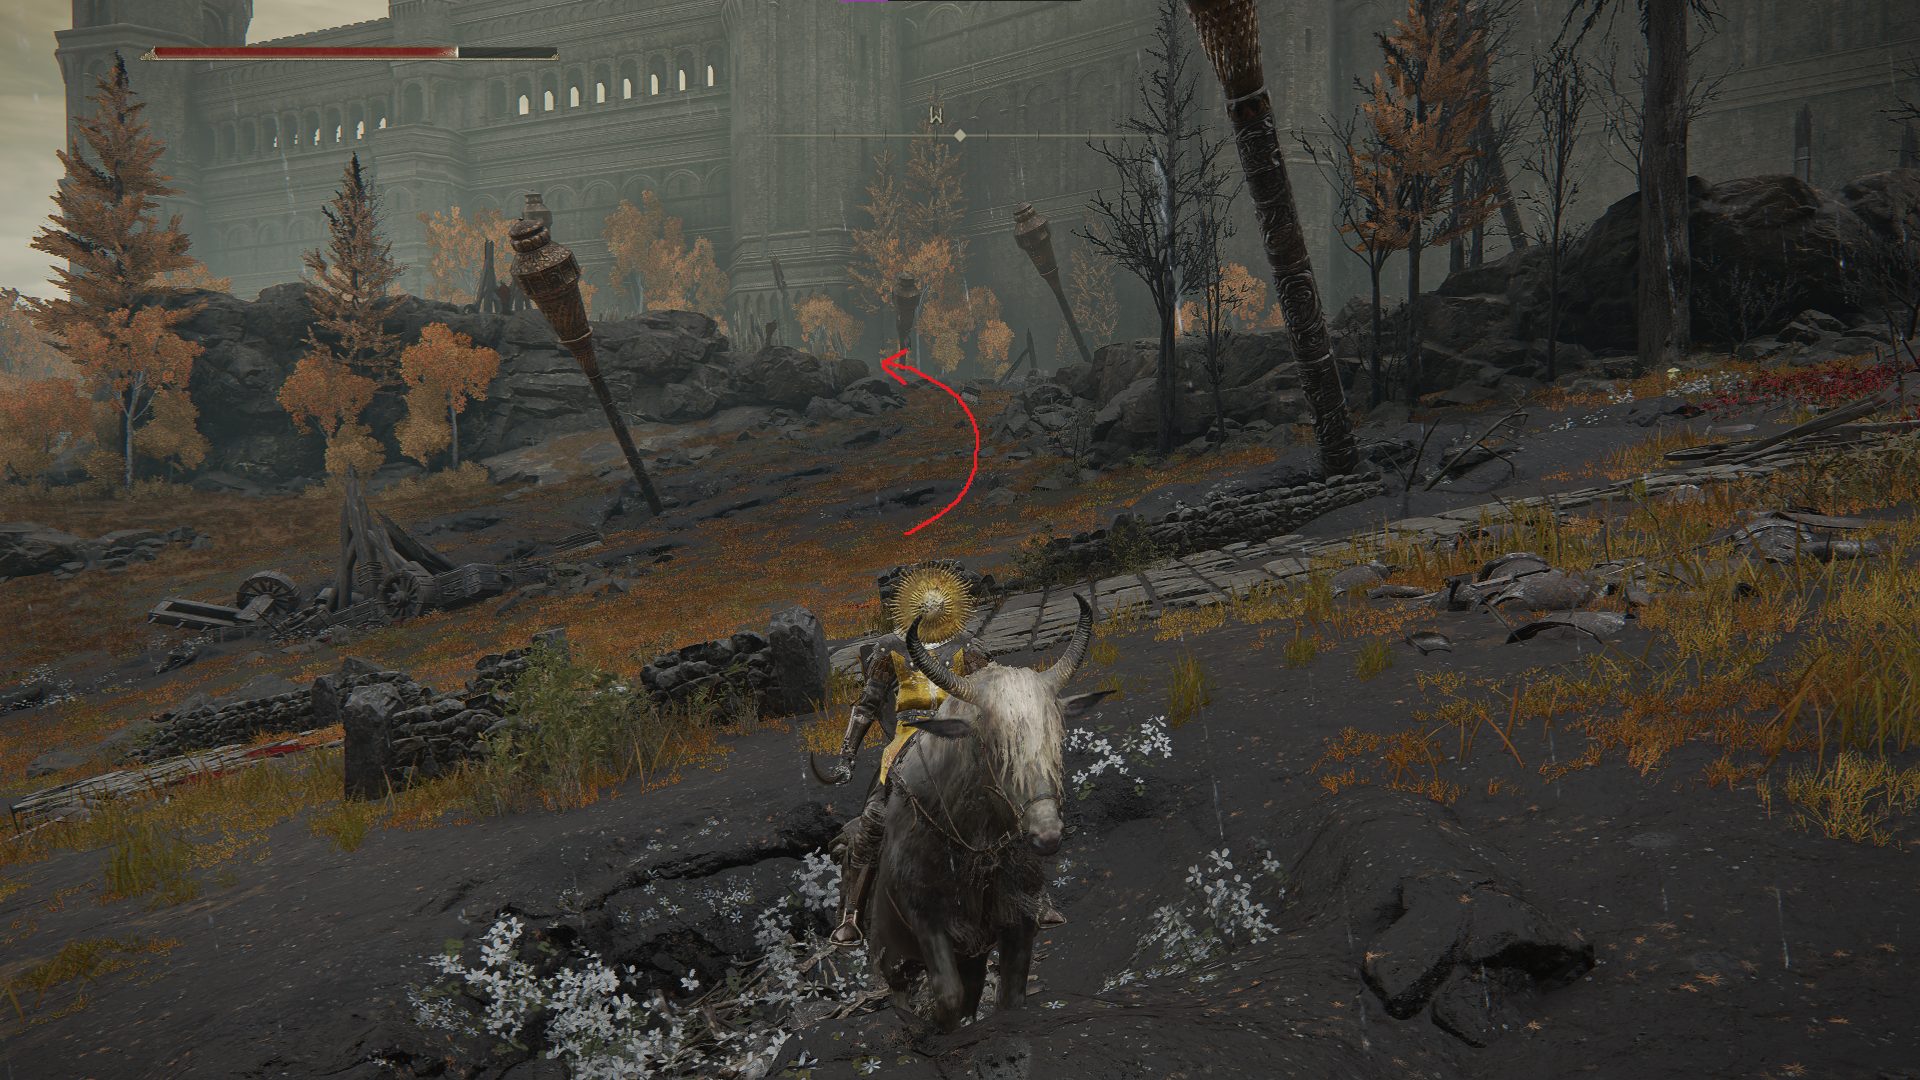
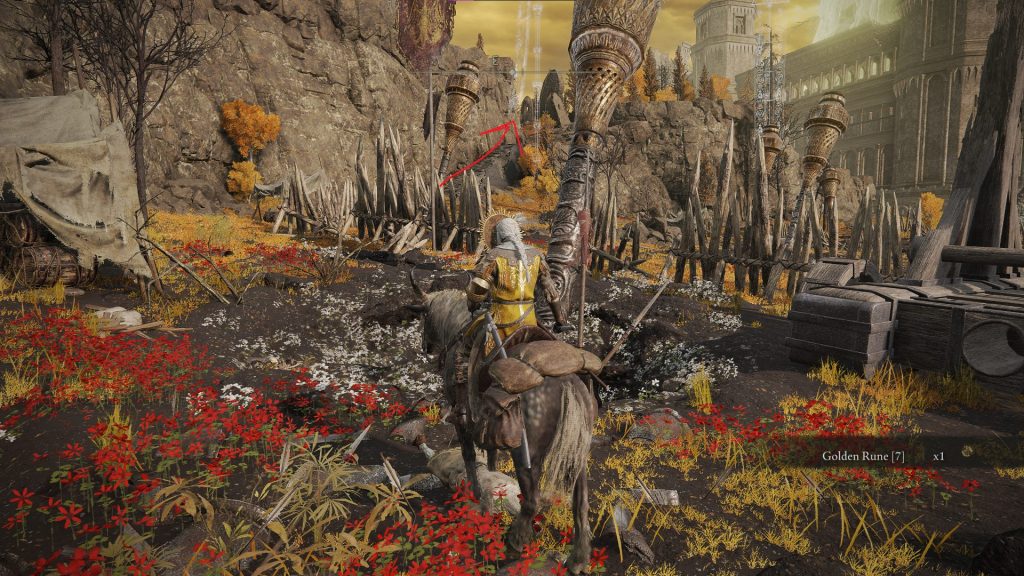
From the Old Altus Tunnel entrance, head northeast — you’ll see a rock jutting up from the ground pointing away from you that has a corpse on it with a Golden Rune [3]. Continue north through the pass between the rocks, and you’ll soon reach the Shaded Castle.
Once you’re finished with the Shaded Castle, you can teleport back to the Erdtree-Gazing Hill site of grace once more.
From the Erdtree-Gazing Hill site of grace, follow the dirt path southeast down the hill, but don’t head into the camp. Instead, bear right before the fence and ride in between the rocks and the wooden palisade to go around the camp. Continue southeast and you’ll soon hit the path again. It will lead to a tunnel — enter it and kill the two vulgar militiamen and their sorcerer friend at the far end, then exit the tunnel and continue south to find the Golden Lineage Evergaol.
This evergaol has Godefroy the Grafted inside — no, that’s not a typo. This boss is identical to Phase 1 of the Godrick the Grafted fight, and you can use all of the same strategies to defeat the boss in this evergaol. Doing so will earn you the Godfrey Icon, a powerful talisman for characters that frequently use charged attacks or skills. After defeating Godfroy (or giving up for now), head west and use Torrent to jump up the rocks here. You’ll have to double-jump in places, and eventually you’ll need to go more northwest than west.
Once you climb to the top of the plateau here, you’ll find yourself behind the Grand Lift of Dectus. Continue around the back of the lift and you’ll see a cluster of rocks to the north — head there to find the Altus Plateau site of grace.
From the site of grace, ride northwest, where you’ll soon find a broken cart with an item next to it. Continue north-northwest up the hill to head towards the Lux Ruins, which have a few easy-to-kill demihumans scattered around and within. Ride up the stairs and into the ruined building at the top of the ruins. Here you’ll find some corpses with x3 String and a Golden Rune [3], but watch out for the demi-humans that somehow crawl out of the ground like they’re skeletons or something.
Leave out the back door (opposite the way you came in), and you’ll see the entrance to the boss ahead of you: the stairs leading underneath the ruins flanked by lit torches, just to the left of the bottom flight of the stairs you’re on. Before you go in, look at the ruined building to the right of the stairs — in the “room” closest to you is a loot scarab with the Ash of War: Shield Crash.
The Demi-Human Queen Gilika waits underneath the ruins, guarding the Ritual Sword Talisman.
With Gilika dealt with, you can now teleport back to the Altus Plateau site of grace. From there, ride east across the road towards the small camp there. Note that you’ll have to dodge the arrows from the giant that guards the lift unless you kill it (which isn’t particularly tough, since they’re so slow).
The camp is full of misbegotten, but you can stay mounted on Torrent (and even use summons) to make it easier to fight them. You can also just grab the Stonesword Key from the corpse on the northern side of the camp and then ride out. Just east of the camp is a bit of raised rock — on top is a sleeping misbegotten and a corpse with a Golden Rune [4].
Now ride north and slightly west and you’ll approach the large camp we avoided earlier, but this time from behind. You should see a section of the camp with a Pumpkinhead enemy — on a corpse in this area are x5 Fan Daggers. Head northwest on the path through the wooden stakes to the next section of the camp, where you’ll find a handful of soldier enemies as well as a corpse with a Warming Stone. Make sure you take out the soldiers on the ballistas that are facing west — it’ll make it much safer to grab the items in the carts below.
Once all three ballistas have no one to shoot them, you can head down and grab the chests in the two carts — don’t bother destroying the ballistas, as these respawn for whatever reason. The closer cart contains the Troll’s Golden Sword, while the far cart has the Greatshield Talisman. There’s also a corpse in between the two with some Lightning Grease. When you’ve collected all the loot, head back the way you came to just behind the ballistas.
From the area east of the ballistas, take the path northeast between the wooden stakes and immediately turn left when the path branches — here you’ll find a patrolling knight with a lance, plus a knight sitting on the ground. Fight them one at a time (or avoid the patrolling foe entirely). There’s a chest by the seated knight, and inside is a Sacrificial Twig. Be careful, as if you linger here too long, a couple of tough soldiers will enter from the northwest, and they aren’t weaklings like their red and green look-alikes in Limgrave.
From this little camp, exit via the northwest opening in the palisade, then turn right to head northeast. You’ll see smoke from a small fire — the corpse here only has some Turtle Neck Meat, and he didn’t even pickle it for you! Ah well. East of the dead guy who clearly didn’t know how to pickle stuff, you’ll see a few ogres guarding a corpse that holds a Perfume Bottle. These guys have a lot of health and don’t drop a ton of runes, so feel free to ignore them and grab your loot, then ride south and slightly east from the corpse to find the Altus Highway Junction site of grace.
Continued in Part 2 — use the tabs above to continue to the next section of the walkthrough!
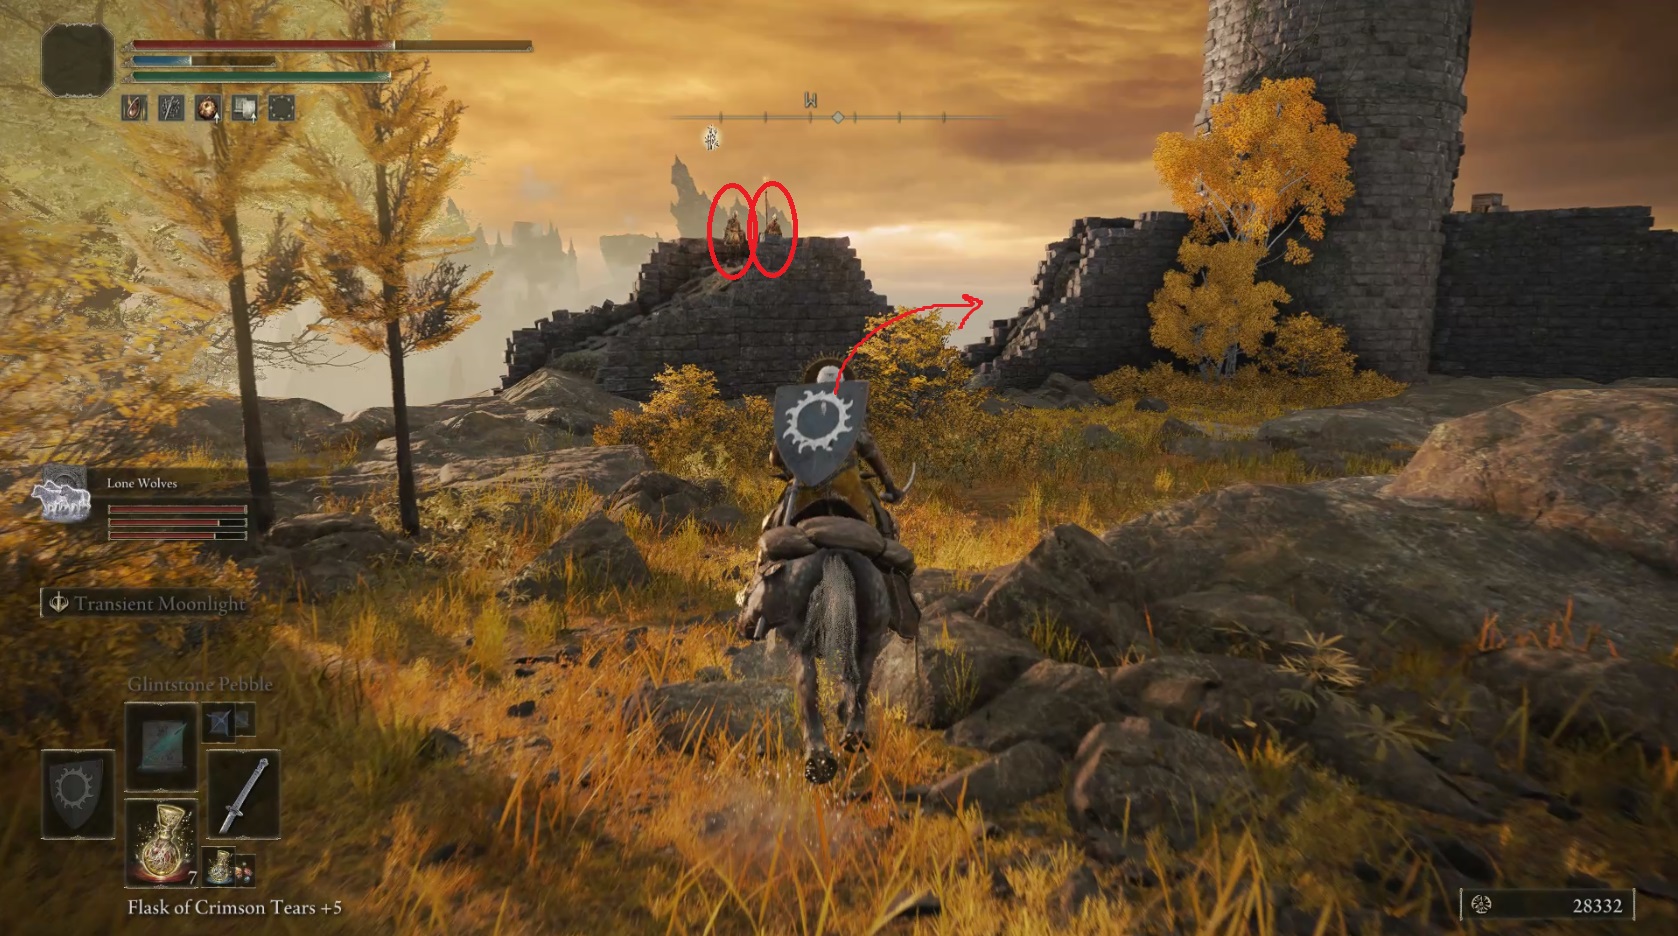
You should be at the Altus Highway Junction site of grace. To the northeast of the site of grace is a raised stone platform with a knight on top — the corpse up there has x3 Old Fang, so if crafting isn’t your bag you can skip it. Also note that there’s a Night’s Cavalry boss that spawns patrols the road just south of this site of grace — wait for night at the site of grace if you want to fight him.
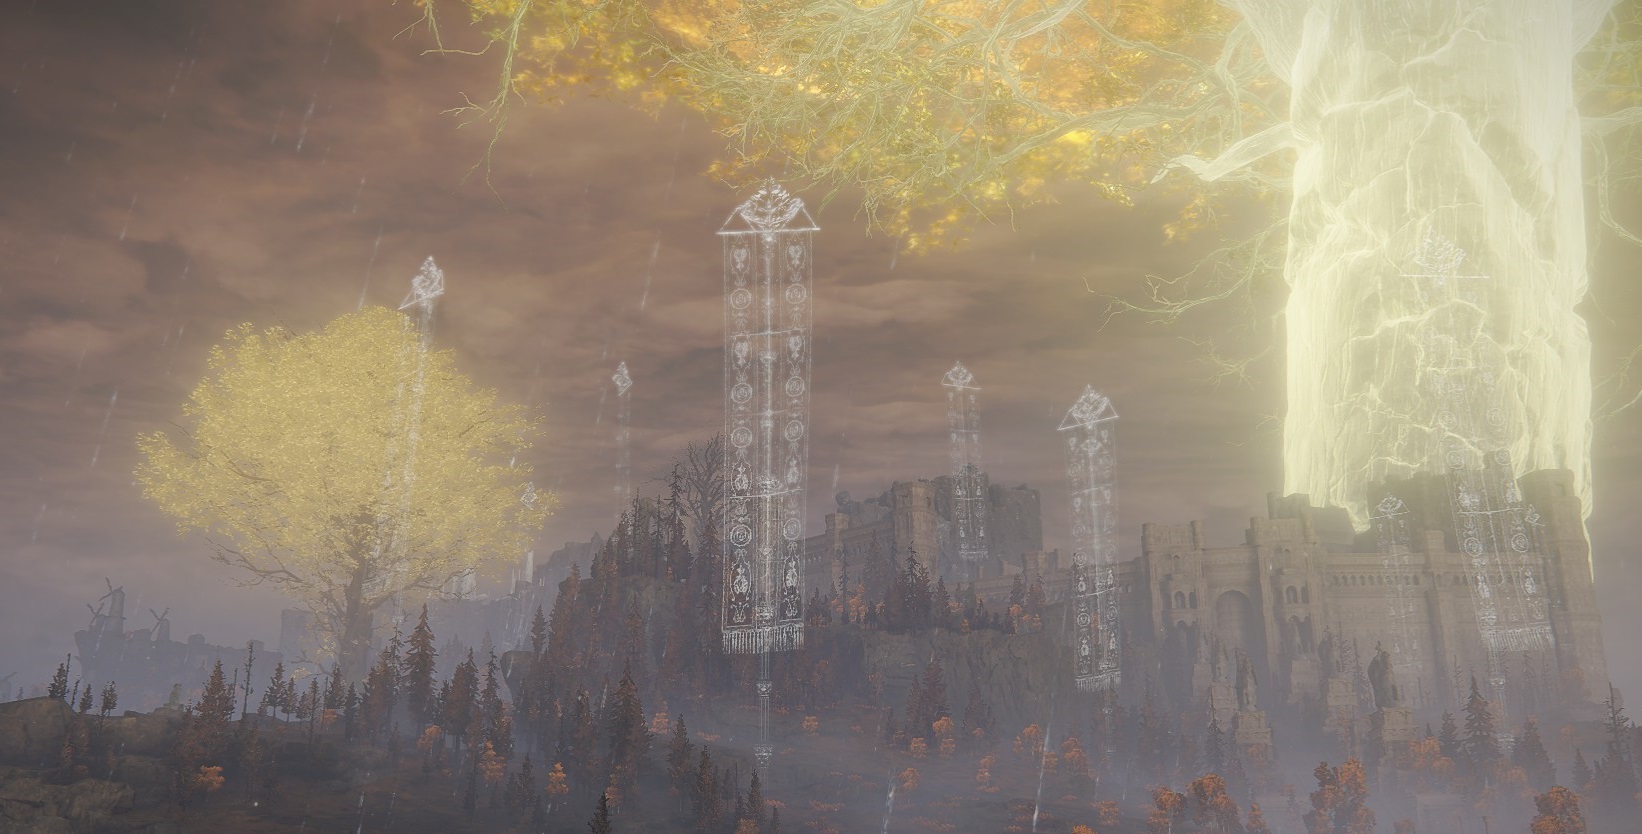
Next, we’re going to take a detour into the Royal Capital Outskirts really quick to grab some Golden Seeds, since having more charges of your flask is always awesome. Ride straight up the nearby giant staircase that leads east, ignoring all the enemies — including the boss(es) you’ll meet at the top of the stairs. Head through the doorway towards the Illusory Tree in the center of the circular stone pavilion; once you tag the Outer Wall Phantom Tree site of grace, the Tree Sentinels should stop chasing you and teleport back to their spawn point.
Grab the two(!) Golden Seeds next to the site of grace, then head to the monument just to the east and get the Map: Leyndell, Royal Capital while you’re here. Then teleport back to the Altus Highway Junction site of grace. Ride southeast and then, once you’ve gone across the wide stone road, ride east up the hill to the right of the grand staircase.
You’ll pass a guard patrol or two, and then find some meteor pits being mined. Peek inside all of them as you ride past — you can find Gravity Stone Chunks and Fans in a few. At the top of the hill you’ll see a sorcerer praying to a huge impact crater — approach the crater and you’ll be able to face the Fallingstar Beast.
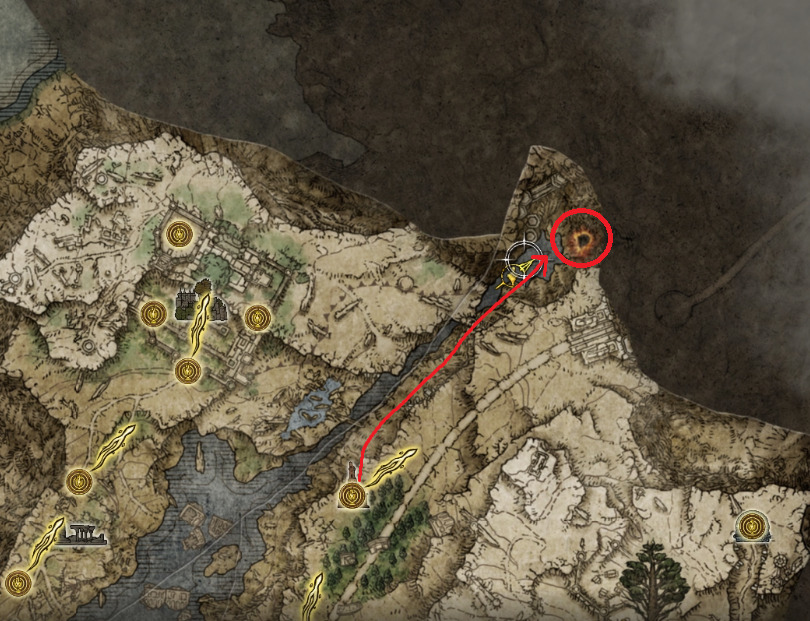
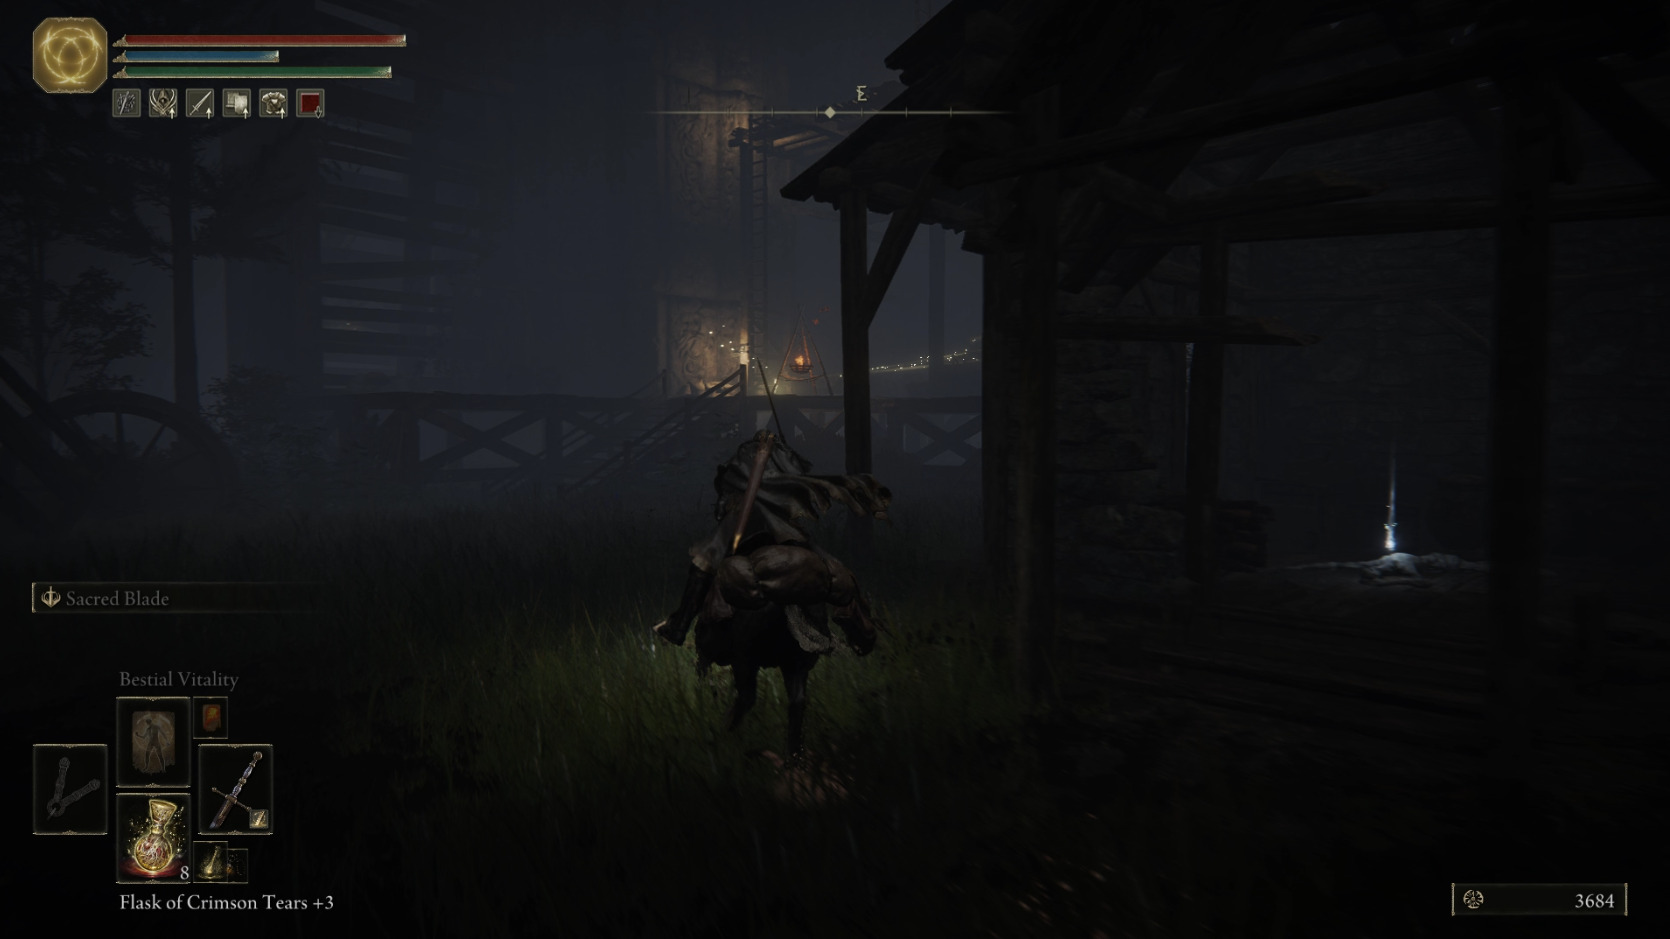
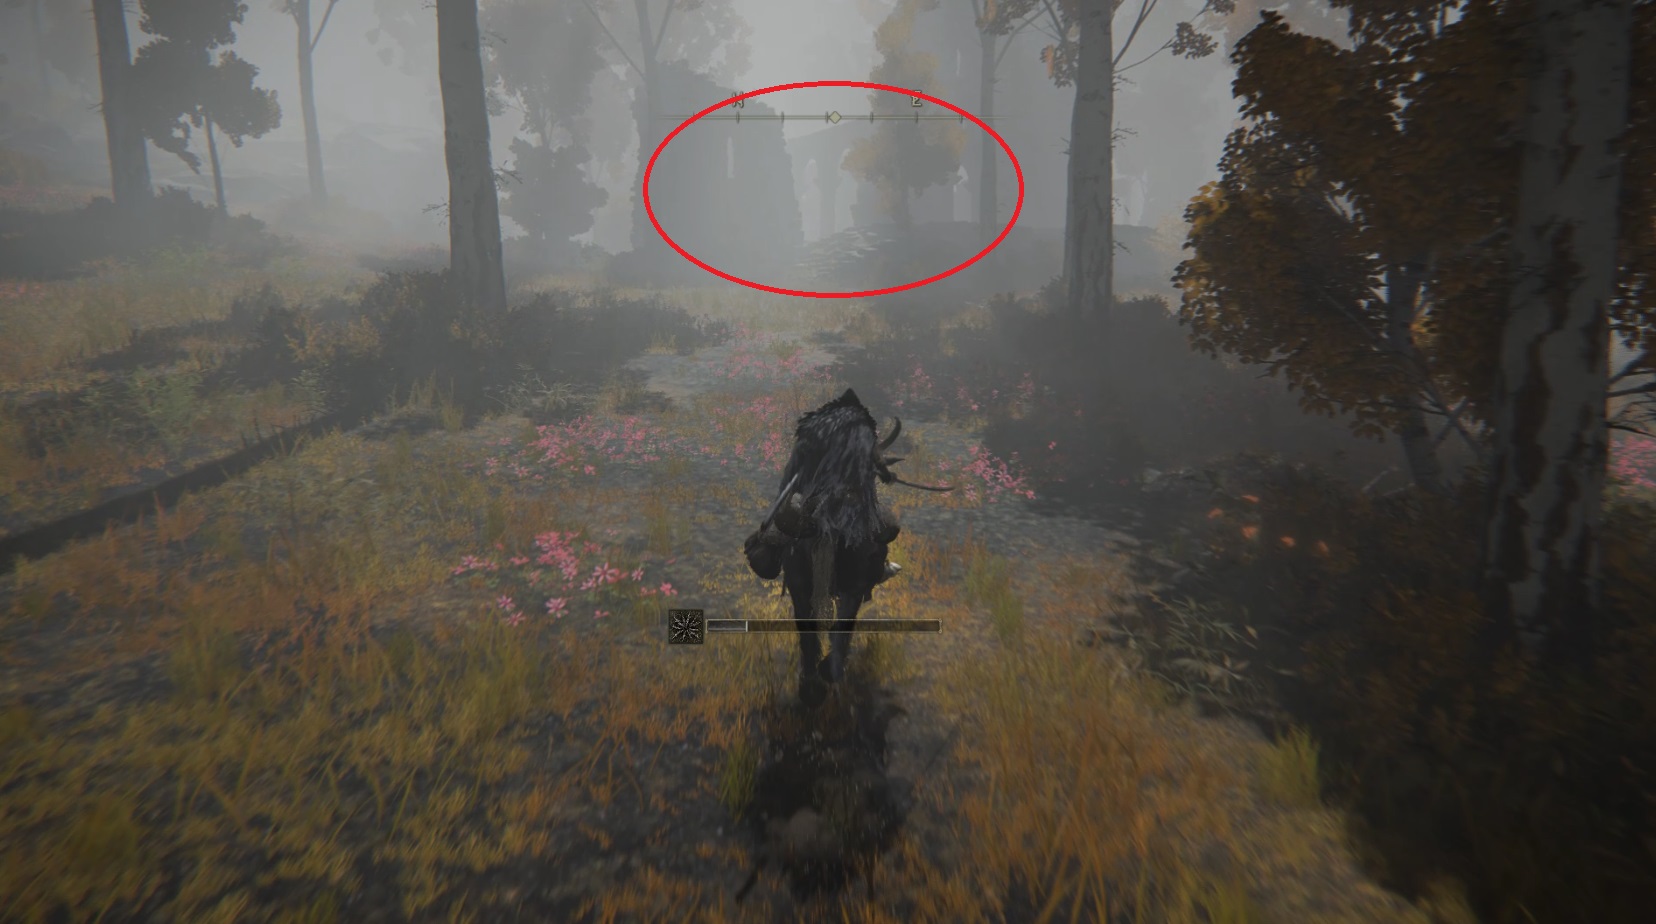
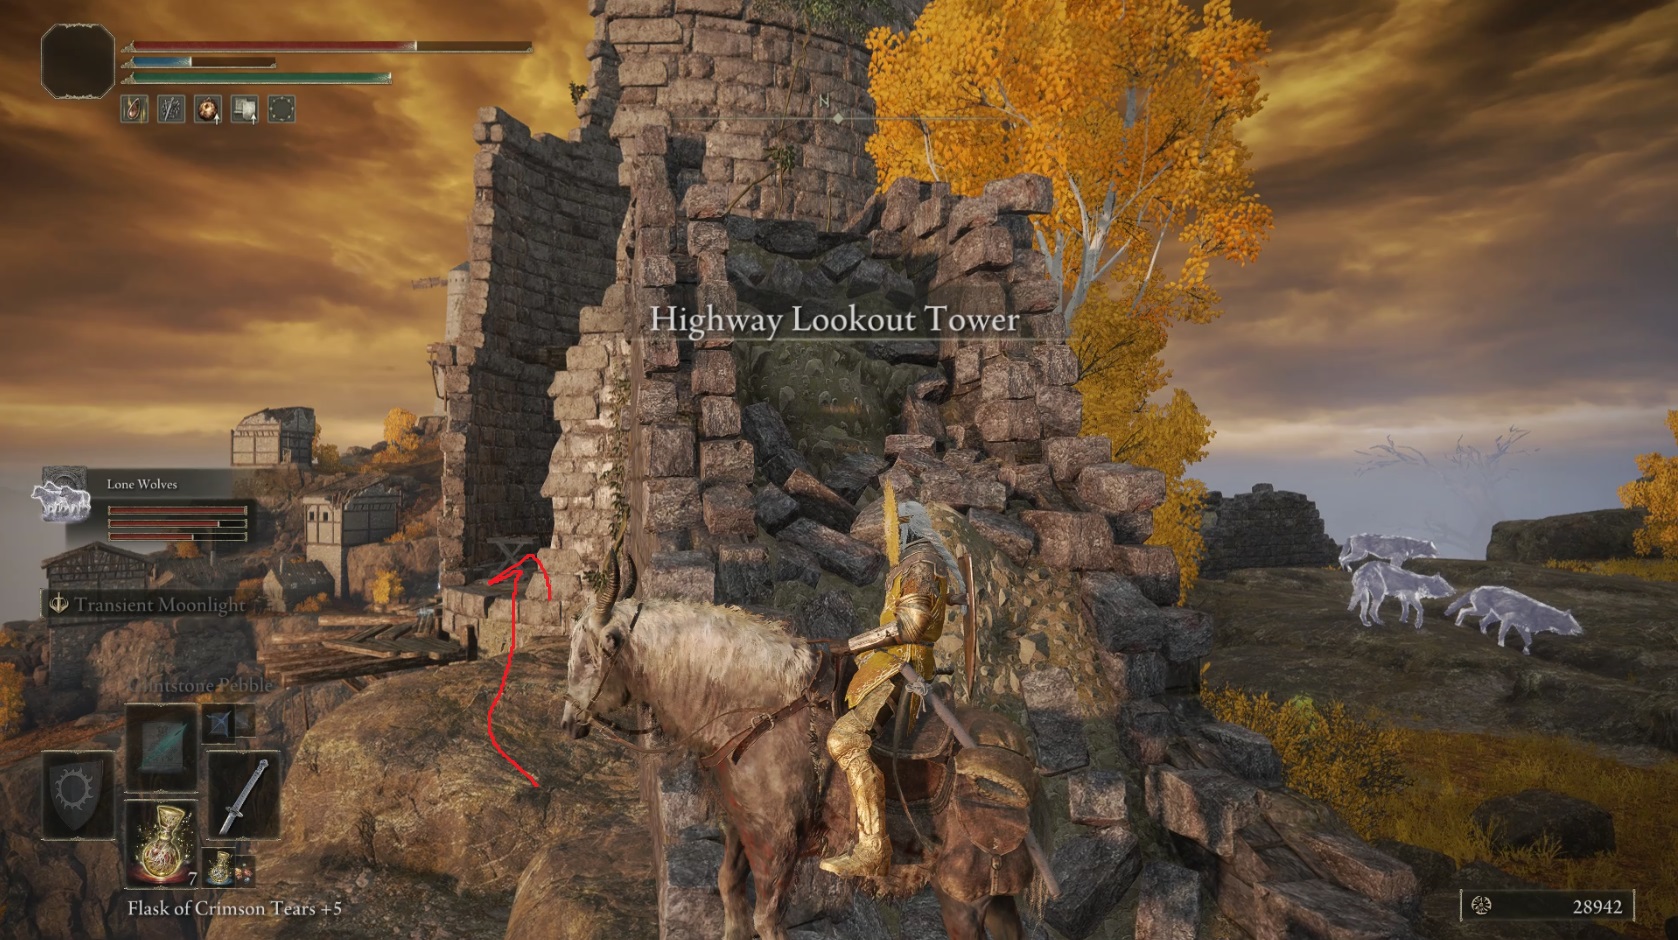
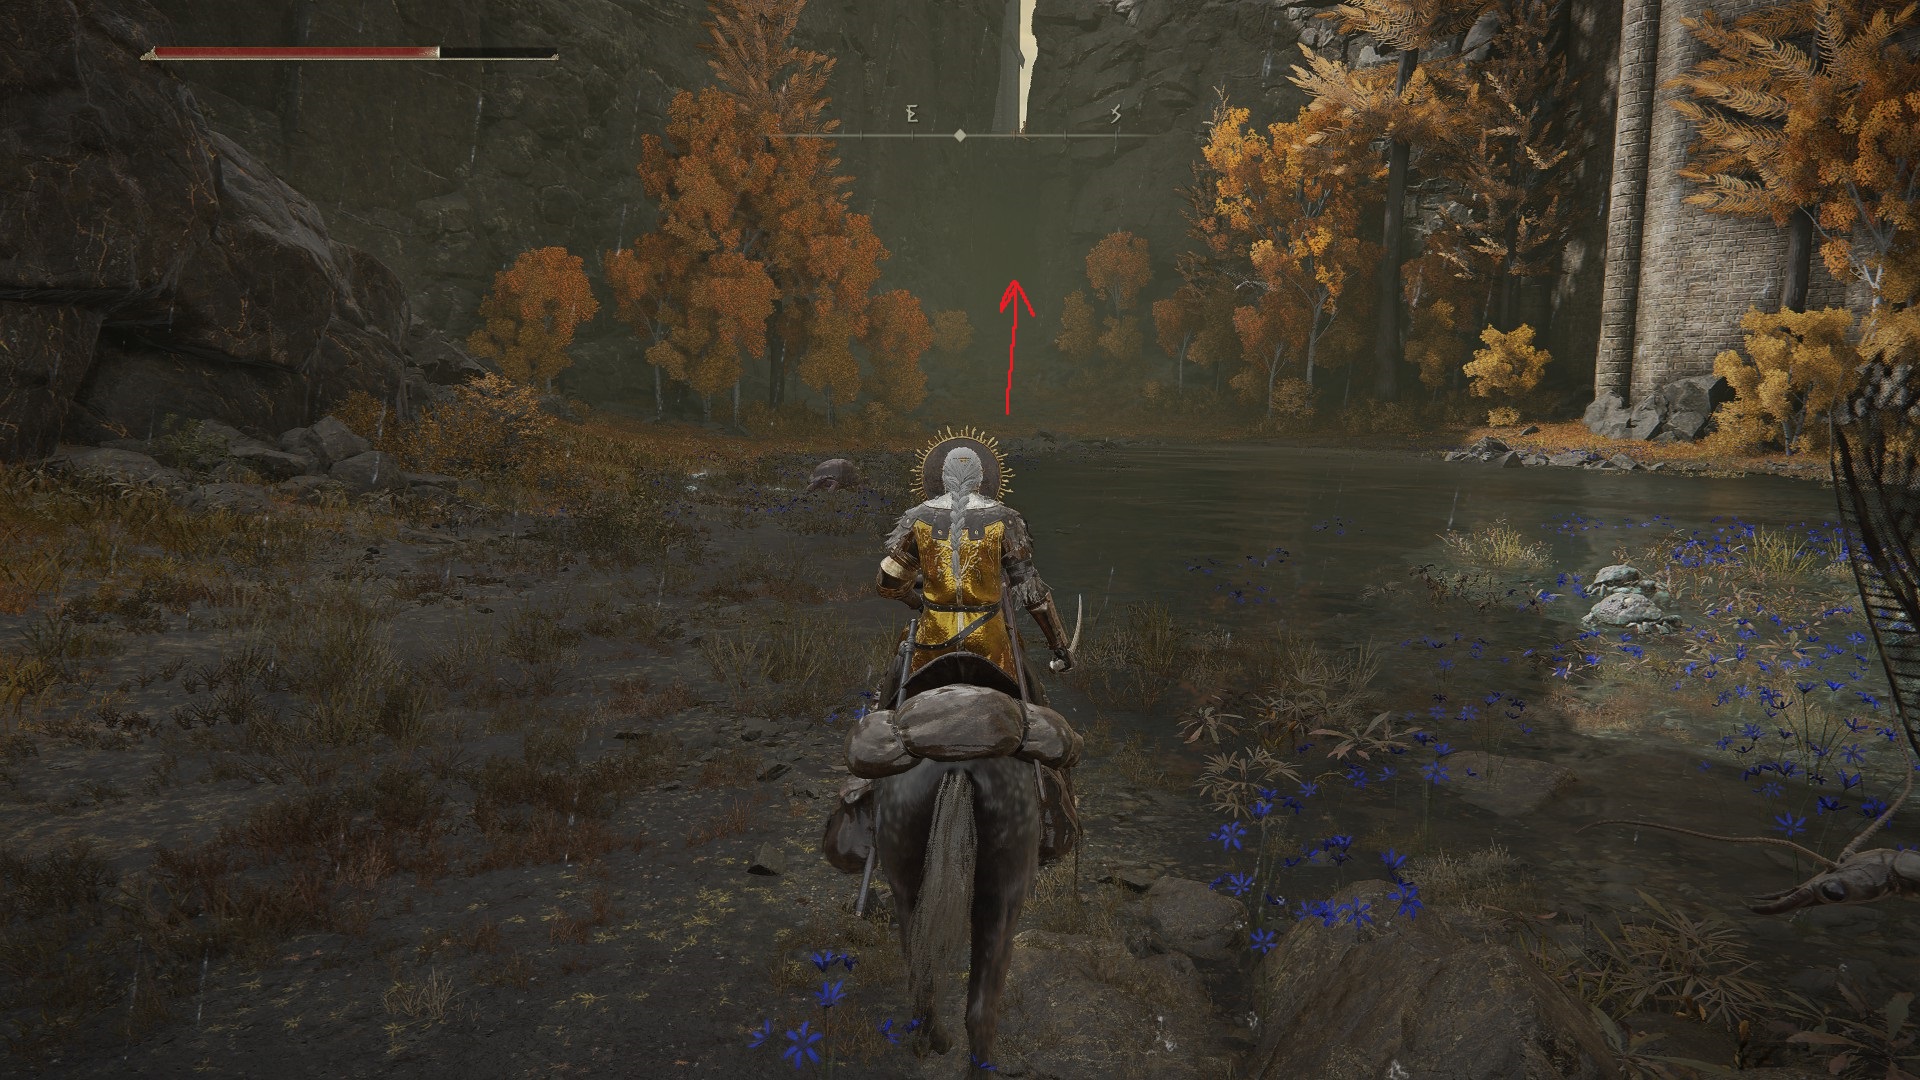
Teleport once more back to the Altus Highway Junction site of grace, and ride to the base of the long staircase. From there, look left (north) and you should see a path leading off into the darkness.
Follow the path indicated above and you’ll go through a tunnel — on the other side of it, you’ll find a bunch of mini tentacle monsters circling an item — the Amber Starlight. This item is part of Seluvis’s questline, and so may come in handy later, assuming you want to help him (I know I don’t).
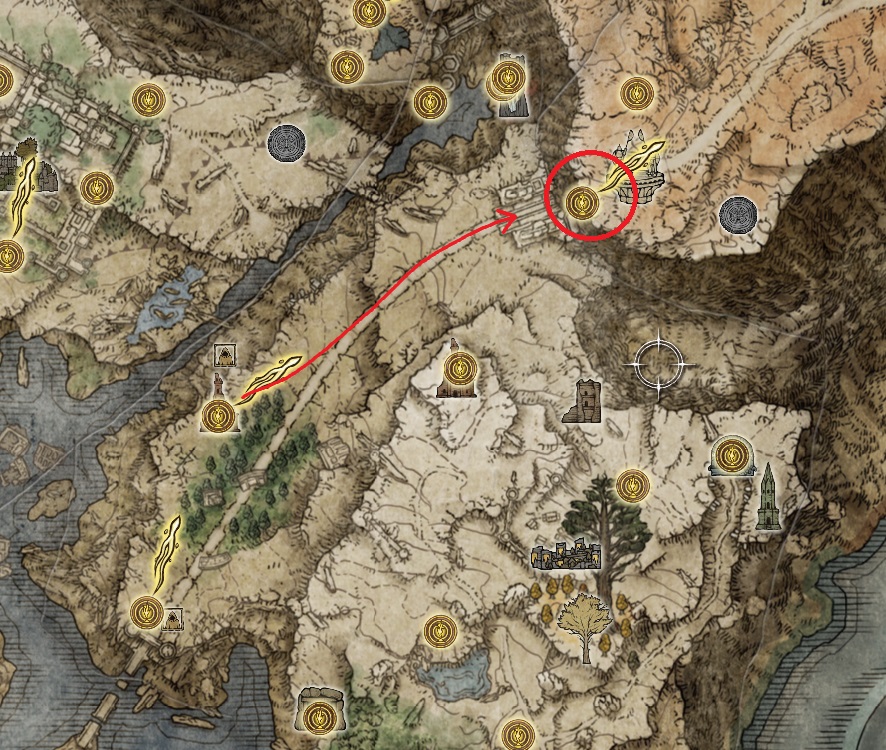
Head back out the way you came in, and then turn left before the stairs to follow a dirt path that leads east, keeping the staircase on your right. You’ll want to avoid the huge rune bear that guards this path further up the hill, then keep going as it narrows — the path will eventually end you’ll have to jump up some rocks to continue east. Keep going until you find a large poison flower — behind that flower is the entrance to the Perfumer’s Grotto.
Once you’ve defeated the bosses of the Perfumer’s Grotto, teleport back to the Altus Highway Junction site of grace, then head north on the road. You’ll soon see an Illusory Tree to the left of the road — grab the Golden Seed at its base, then continue north on the road. You’ll soon find Brother Coryhn, next to a monument with the Map: Altus Plateau at its base. Speak with him and exhaust his dialog, grab the map fragment, and then continue on the road.
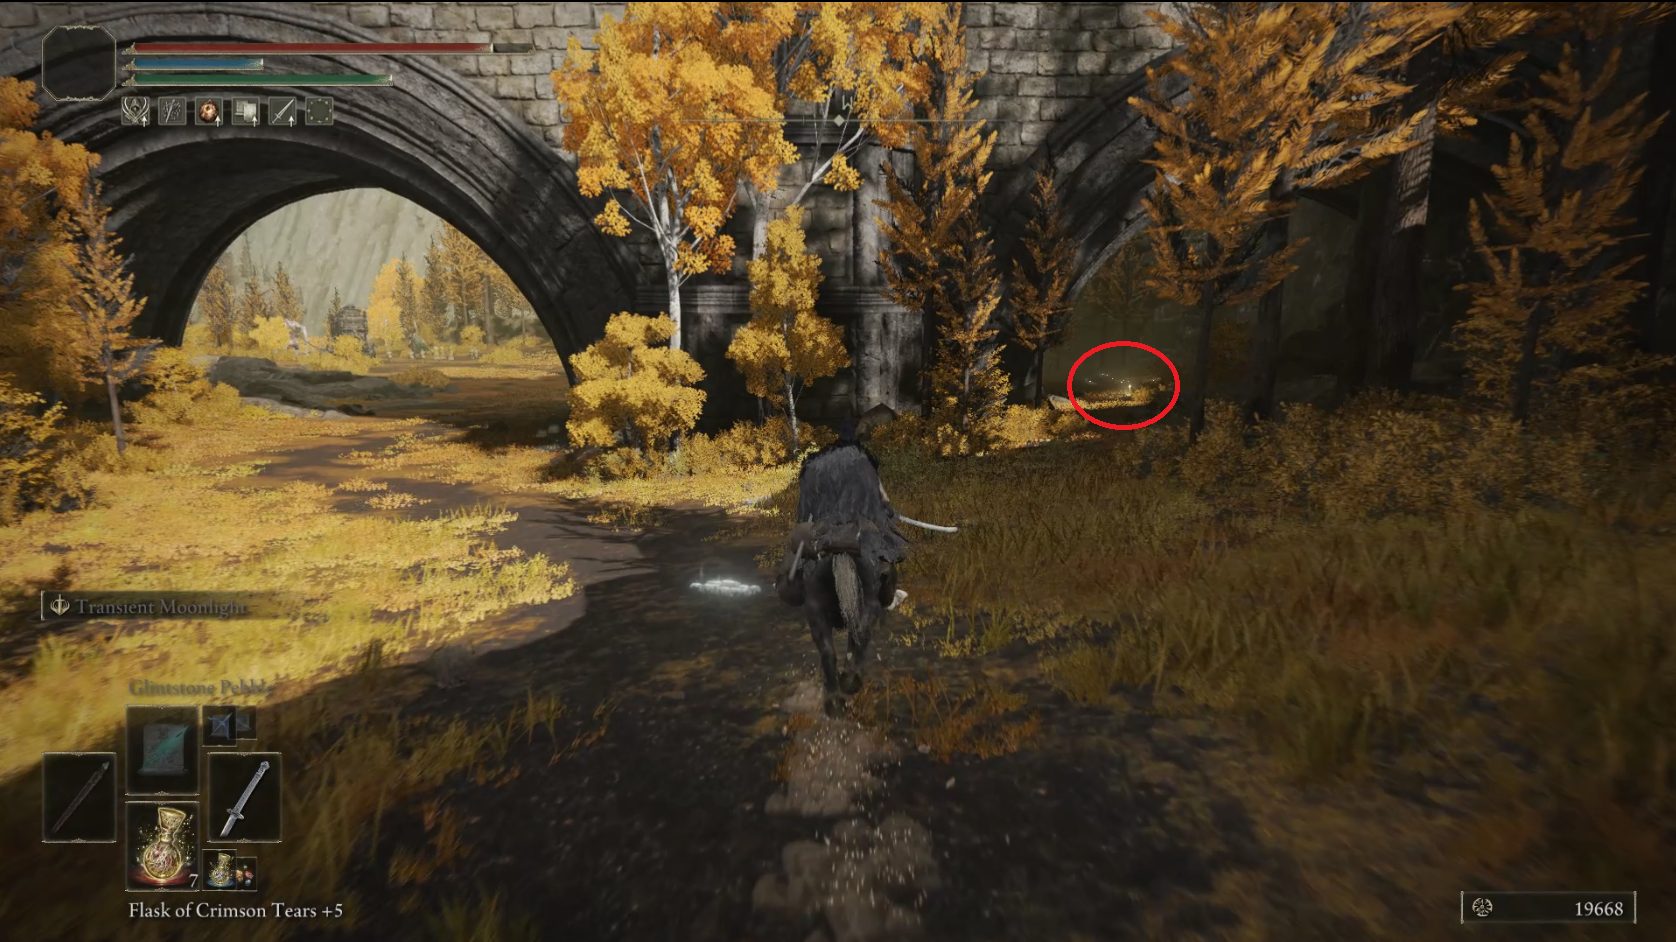
The road will eventually curve east — stay on it, and feel free to avoid or fight any patrols you pass. (If you’re feeling under-leveled, it’s usually worth killing the trash mobs you find while traveling.) Follow the road until it ends at a destroyed bridge, where you can grab the Forest Spanning Greatbridge site of grace — feel free to talk to the creepy old finger lady before you grab the site of grace. Turn around from the site of grace to find a Nomadic Merchant who sells a Cookbook and has some Stonesword Keys, among other useful things.
Head southeast over the rocks to the small camp, where you can find a Lump of Flesh — you’d think these would be easy to come by given all the flesh you’re probably hacking with your weapon(s), but hey. Return to the broken bridge, and use Torrent to safely leap north to the next busted section. Kill the soldiers here and grab the x10 Golden Arrow, then continue down the broken bridge — leaping the next gap — until you reach the bottom, where you’ll find your first wormface hiding behind a crashed cart. Be careful, as these enemies can spew a cloud of Instant Death, much like the Basilisks you met in and around the Shaded Castle.
Fight it to get a feel for its moveset, since there will be a lot of them around this area. When it spews its Instant Death clouds, move away and wait — they’re aggressive and will usually come to you. Once your first wormface is dead, head east to the Minor Erdtree, where, instead of the now-familiar Erdtree Avatar, you’ll find a boss version of the wormface you just met.
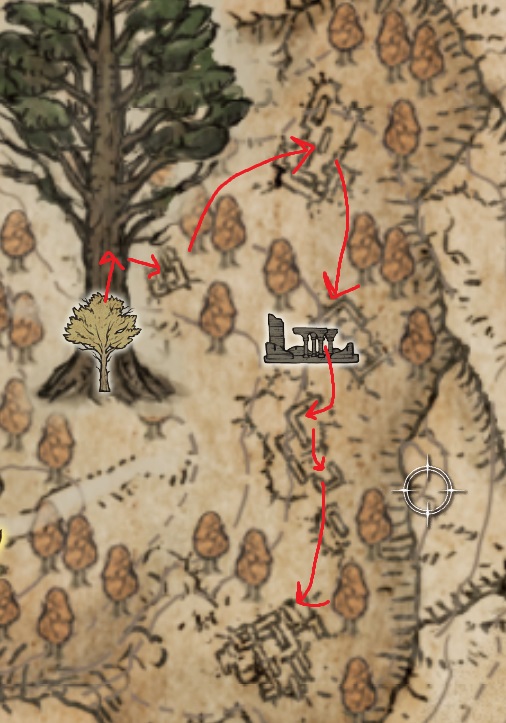
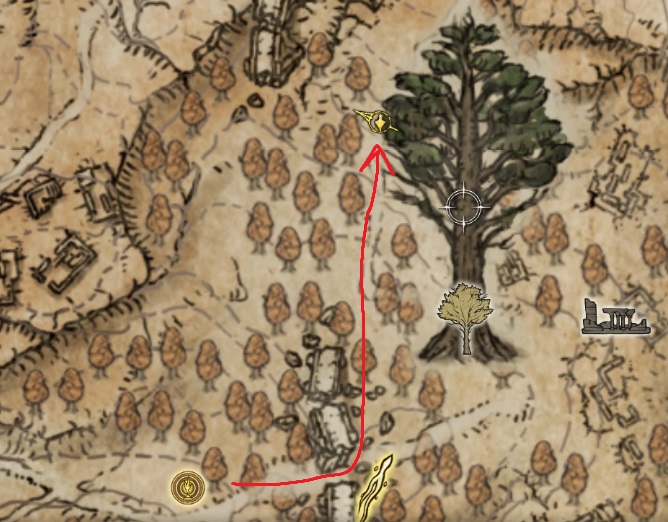
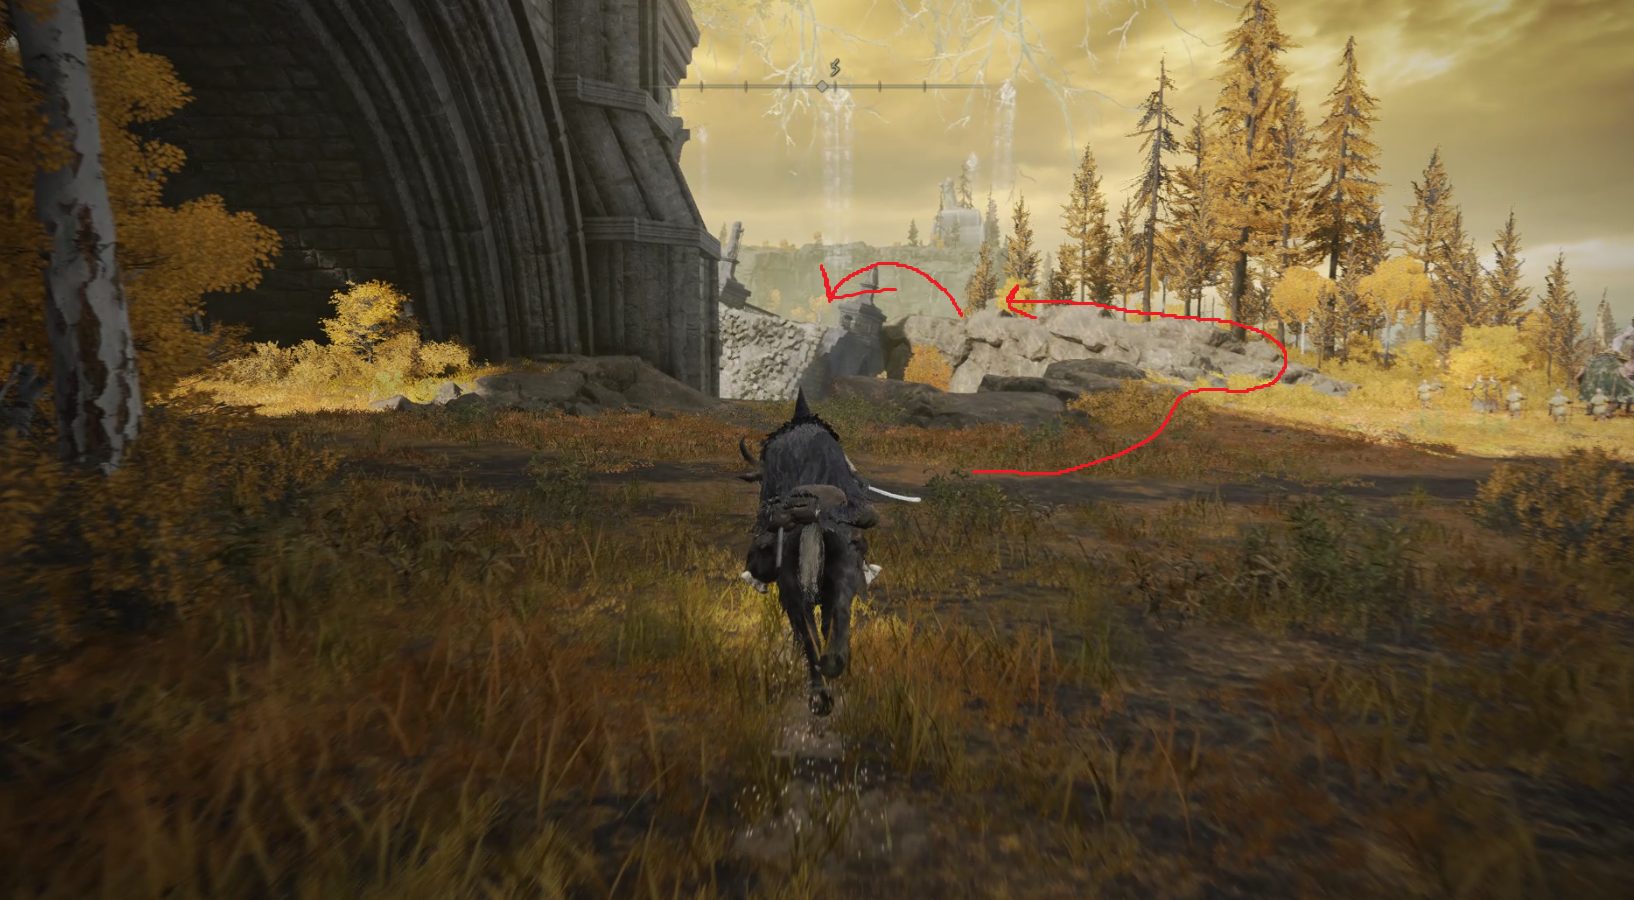
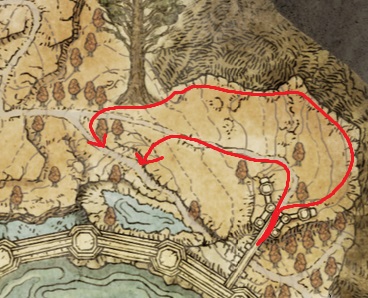
Once you’ve killed the Wormface boss, we’re going to do a clockwise loop and hit all the ruins in the area.
The next few paragraphs relate to the route seen here
First, enter the ruins directly north of the Minor Erdtree to find the Nomadic Warrior’s Cookbook [19] in the corner, and then look east — you’ll see a loot beetle near a broken segment of wall. Chase it out of the ruined building and slay it to grab the Ash of War: Golden Slam. Then head southwest back into the building, where you’ll find a corpse with x2 Beast Blood. Next, ride northeast, where there is another ruined building.
Ride quickly through the building and grab the Icon Shield and x2 Gravel Stone, then exit the building and go south to the next bit of ruins. You’ll see two wormfaces hanging out near a corpse — ride past them and pick up the Invigorating White Cured meat. Then turn to the west and find the group of slugs facing what remains of a stone corner — there you’ll find some Soft Cotton. Continue due south, but look slightly southeast to find yet another item in a ruined corner — this time it’s x5 Poisonbone Dart.
South-southwest you’ll find the final bit of ruins, with a bunch of wormfaces hanging out in a group inside. Just behind them are some stairs that lead down to a door, beyond which is a chest containing the Wrath of Gold incantation. The wormfaces are all sitting when you show up, so you have a bit of time to find the stairs before they start attacking you. After you loot the chest, mount torrent and ride quickly up the stairs and then south out of the ruins. When you hit the cliff wall, go right (west) and you’ll soon find the entrance to the Altus Tunnel (it’s also visible on your map).
From the entrance of the Altus Tunnel, head north down the hill, passing the first bit of ruins on your right. When you reach the second set of ruins on your right, turn left to head down the hill — there’s technically a path here running west-southwest, although it’s a lot more visible on the map than it is when you’re actually following it. Continue southwest and you should see a wormface enemy patrolling just before the broken bridge — go around this foe on their left and jump up onto the rocks that the left-hand bridge support column rests on, where you’ll find x4 Fulgur Bloom and a couple of surprised soldiers.
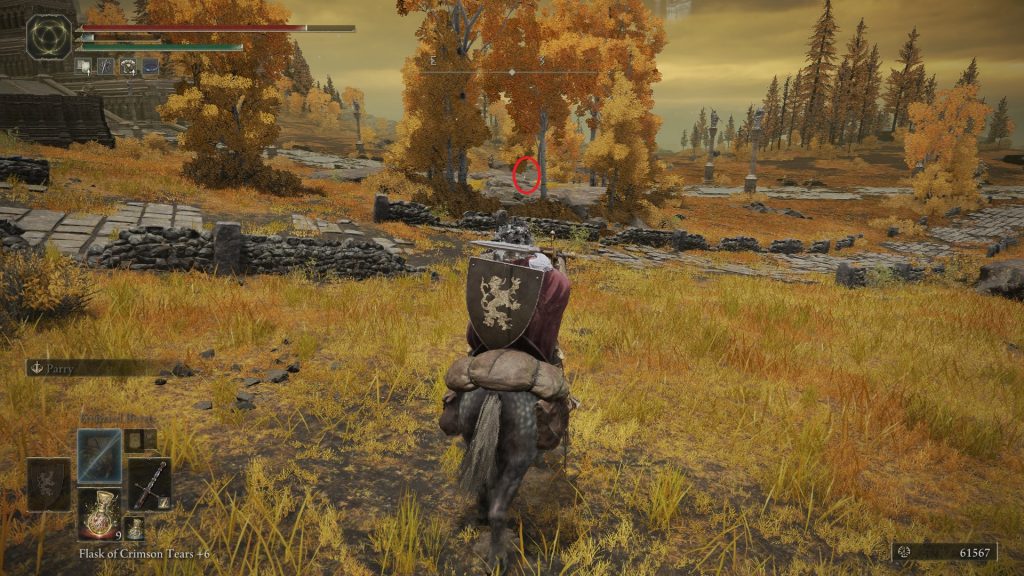
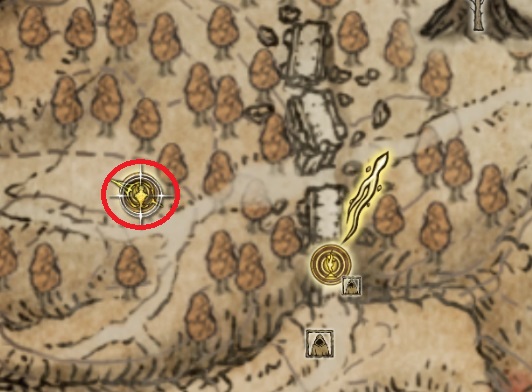
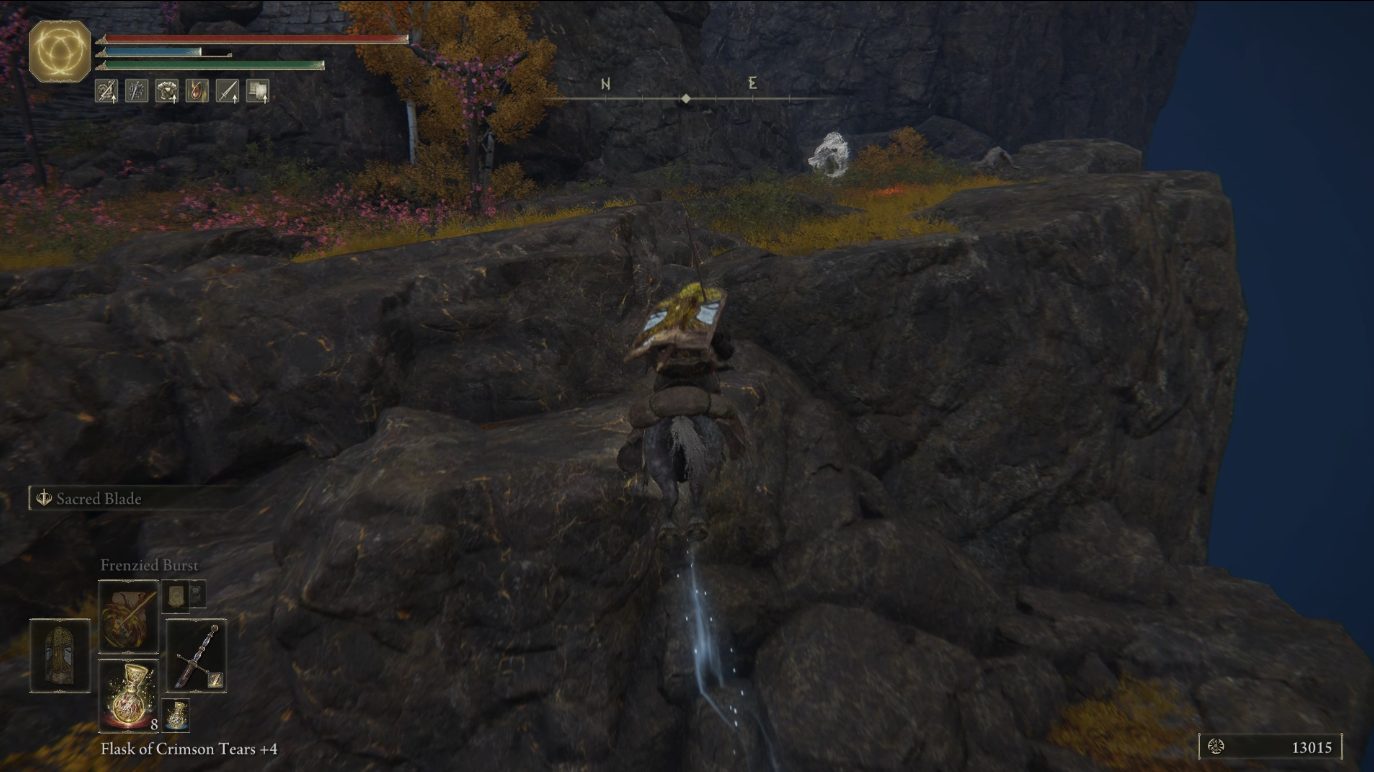
Jump down from the rocks and continue west, and you’ll soon come to a site of grace on your right. It’s easy to miss, so here it is on the map just in case:
The site of grace lies just above the “path” that runs east-west through the middle of the broken bridge
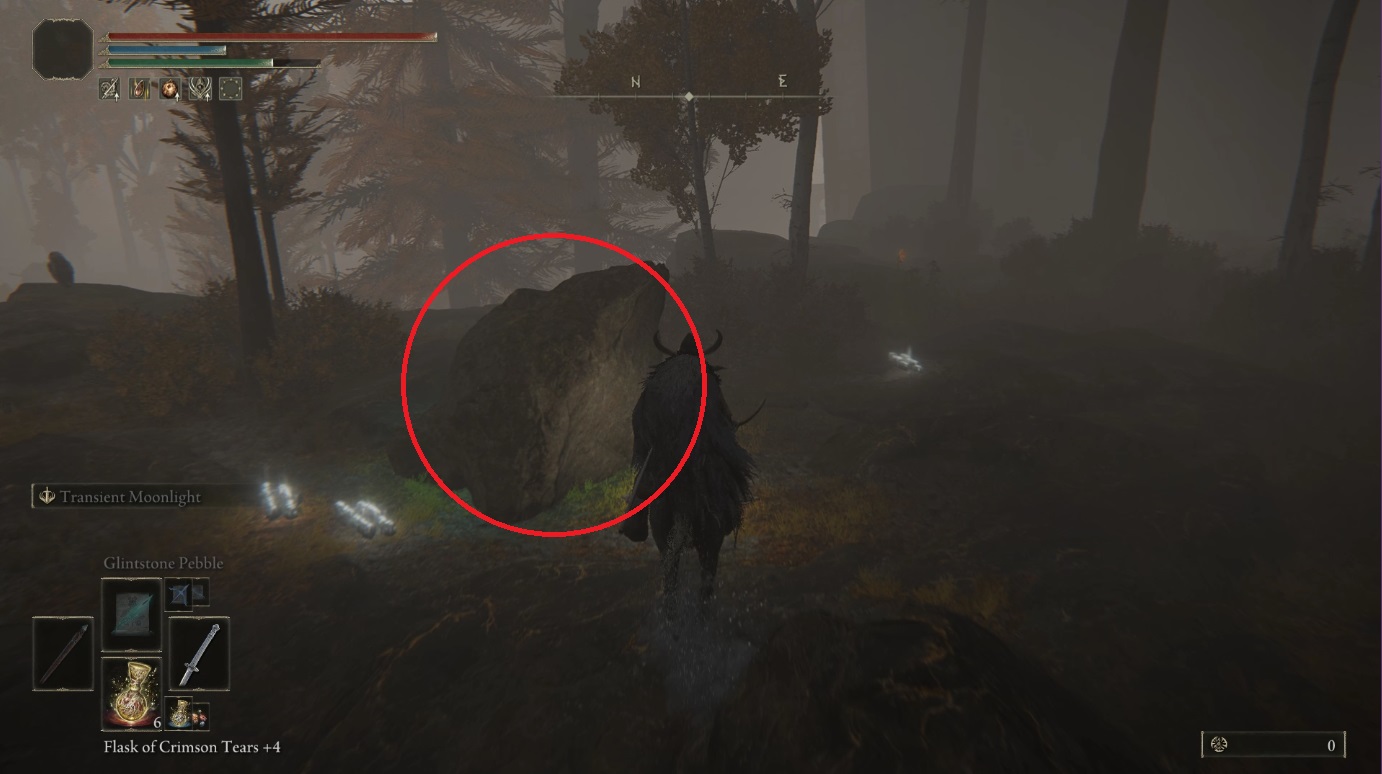
Look southwest from the site of grace and you’ll see three wormfaces walking in a circle around a loot beetle — ideally, use ranged attacks on this beetle, but you can probably ride in and kill it before the wormfaces can react. It will drop you a Somber Smithing Stone [5], and then you can ride due west to find a corpse with a Golden Rune [3] (there’s a wormface in the bushes a bit further west, but if you don’t ride past the corpse it won’t aggro). Once you grab the golden rune, jump up the rocks to the north, and just ahead you’ll see an imp statue with a floating seal next to it.
Interact with the statue to get the Mirage Riddle map, and then touch the seal next to the statue (you have to do this on foot). Next, head southwest (to the bottom left corner of this area) to find the next seal — some phantom imps will show up, but once you hop off of Torrent and touch the seal, they’ll disappear. Then teleport back to the Bower of Bounty site of grace and ride south; you’ll soon see another phantom imp — ride past it and turn left to head north onto the high ground here, where you’ll find a rock (see below) that you can hit to reveal the final seal. Touch it to finish the puzzle, then hop back on Torrent.
Now you can ride west again, back to where the imp statue was. There will be a tower there now — enter it and climb the ladder, then continue out the doorway and up the stairs, where you’ll find the Unseen Blade and Unseen Form sorceries in a chest, and x5 Slumbering Egg on the corpse behind the desk.
Teleport back to the Bower of Bounty site of grace, and then ride south. Once you come to the cliffs and can’t go further, turn right to head west. Follow the path (again, you can see it much better on the map) and it will take you uphill. Continue southwest as the path curves, and you should soon see a church on some low ground (it’s more west than southwest). Drop down and carefully eliminate the two dogs here — unless they’ve patched the issue, these dogs can one-shot you with their bleed damage.
With both dogs dead, head into the church, where — if you successfully helped him in Liurnia just before Raya Lucaria — you’ll find Yura. He’ll speak a few words before perishing, and you’ll be able to pick up the Nagakiba from his corpse. Grab the Sacred Tear from in front of the statue of Marika, and then look left into the northwestern corner of the church — you’ll soon be invaded by Eleonora, Violet Bloody Finger. She’s very aggressive, and so ranged characters may struggle a bit — use the columns in the church to slow down her movement. Defeating her will net you the Purifying Crystal Tear, Eleonora’s Poleblade, 3116 and a Furlcalling Finger Remedy.
If you didn’t do the previous part of Yura’s quest, a Sanguine Noble will come out of the ground inside the church, but you won’t be able to interact with Yura or have Eleonora invade you. UPDATE: This seems to have been changed as of 1.05 — Eleonora will invade even if you missed Yura’s quest.
Head around to the back of the church, where you’ll find a corpse with x6 Human Bone Shard. Then go north and hop down to the lower section of the graveyard, where you’ll find another corpse with some Magic Grease. Then teleport once more to the Bower of Bounty site of grace, and ride back east. Turn left after passing under the bridge and continue north on another impossible-to-see road. You should soon run into an Illusory Tree with a Golden Seed at its base — here’s its location, since it’s easy to miss:
Continue on the path (it becomes visible soon) as it curves uphill to the northeast, and you should soon see a wooden fence and some windmills. Ride through the fence and either kill or avoid the enemies here, and then turn around once you’ve passed all the buildings. On the steps of the house on your left, you’ll see a corpse holding some Poison Grease — grab it and then continue up the road heading east. You’ll come to an intersection — continue east across the road, following the path you’re already on. Go through the wooden arch to find the Dominula, Windmill Village and its site of grace.
From the Windmill Village site of grace, you can head southeast to find a spirit cowering behind a cart — speaking to it will give you a bit more insight into what the party in the village is all about. Then, go north until you hit the edge of the cliff, and follow the cliff east-northeast — you’ll soon come to a corpse carrying the Celebrant’s Skull.
Location of the Celebrant’s Skull
Head back the way you came and follow the path up the hill, continuing past the first trio of dancing ladies. You’ll crest the hill and see a huge number of enemies — go around them to the left and enter the small animal barn attached to the building there. In the corner nearest the house, a corpse holds a Golden Rune [5].
Head southeast, pathing through another low barn that’s empty, then crossing the path to enter a building where you can grab a Rune Arc. Leave the building and head east to the edge of the cliff, then turn left and use Torrent to jump up the rocks to the northeast.
Stay to the right (you should see a dog hanging out by the edge of the cliff), then continue east — you’ll see one of the celebrants and just beyond her a corpse with some Holyproof Dried Liver.
Again using Torrent, jump up the rocks to the north, then turn left and head west to the building that overlooks the village. Follow the wooden walkway from the left side all the way around the house (it’s easier if you dismount) and you’ll find x3 Stormhawk Feather. Go back the way you came, then get back on the path to the north and continue up the hill. Turn right as you pass the next building and go around the corner. There’s an enemy hiding around the corner, so be careful — deal with her and grab the Lightning Grease from the corpse hanging off the edge of the rocks.
Head up the hill on the path once more, and you’ll soon see a Stake of Marika and a summoning pool on your right. Turn left here and you’ll see a building — follow the wooden walkway attached to it, and drop down onto the roof to the southwest, then continue forward and drop onto the smaller section of roof to find some Exalted Flesh. Drop down and go back up the path again, and you’ll reach the top of the hill, where the road forks. Ahead of you is the boss, so take a hard right on the path to go around the windmill and head south.
Just one more thing to grab, then we’ll go beat up that boss
At the end of the path are a few more gleefully giggling gals, with a Gold Firefly on the ground behind them. Grab it and then go back the way you came to face the boss of the Windmill Village, the Godskin Apostle.
Once you’ve defeated the Godskin Apostle, you can teleport back down to the Windmill Village site of grace. Ride west down the steps to reach the road, then turn right and head north on the road. Almost immediately, you’ll want to turn right off of the road to head northeast towards the windmill there. Ride into the barn on the right where a dog guards an Arteria Leaf, then exit and go to the barn on the other side of the windmill, where another dog protects x10 Raw Meat Dumpling. Then head ride to drop off the rocks and reach the road again.
Continue following the road as it runs generally north, and look to your right — you’ll see another windmill uphill from the road. Head towards the windmill, where you’ll see some more celebrating ladies. In the middle of the celebrants are two corpses — collect the Noble’s Traveling Set and the Twinned Knight Swords, but do so quickly, as they’re surrounded by enemies that will chase you and then explode.
Ride back towards the road, but then turn right to bear west and ride across the lake. There are a number of Nascent Butterflies you can collect here, but look out for the zombie-like enemies that will crawl out of the water. Continue across the lake and then go southwest up the path that leads up and out of the lake. You’ll crest the hill and find some rats — clear them, then turn right and head towards the barn. Inside are a lot more rats, and the Giant Rat Ashes. Turn around and ride east, and look to your left — there’s a sorcerer on the edge of the rocks that you should sneak up to and attack.
He’ll drop you the Battlemage Set and the Haima Glintstone Crown when he dies, which is nice of him. Next, head to the nearby bridge (it should be to the southeast assuming you didn’t travel far while battling the sorcerer). Ride to the end of the bridge to find Goldmask — attempt to speak with him (he won’t say anything), then grab the Dragonwound Grease at the very edge of the bridge. Now teleport once more back to the Windmill Village site of grace.
Now that you’ve found Goldmask, you can return to Brother Corhyn and tell him where Goldmask is — he’ll move to Goldmask’s location, and where you’ll be able to purchase a new (but currently terrible) incantation from him thanks to what he’s learned from Goldmask.
You’ll again head down the steps to the road, but this time continue west-southwest down the hill (following the path you first took to reach the Windmill Village), and then turn right when the road forks. Turn left as you pass the buildings and you’ll see a stone platform off to the west with a loot beetle on it — ride over there and whack it a few times until it gives up the Protection of the Erdtree incantation. Then ride northeast back to the road and turn left to continue west — there are a number of soldiers hanging out here to watch out for. You’ll approach the underside of a bridge — through the right-hand arch, you’ll find the Road of Iniquity Side Path site of grace.
Resting here will reset the cart caravan that starts its path just on the other side of the bridge’s supports — attacking the caravan is our next step, unless you have no interest in acquiring the Great Stars, in which case you can ignore the caravan.
As always, you can choose to get some runes and kill all the guards, or you can just ride to the front of the caravan, hit one of the trolls once, then ride to the back and jump off of torrent onto the platform with the cart — you’re invulnerable while opening the chest, and can usually grab what’s inside and re-mount torrent without taking too much damage.
Next, head to the southeast (or due south if you’re going straight from the site of grace) and make your way to the rocks that abut the section of broken bridge. You can ignore the enemies here and jump down onto the piece of bridge.
On the first segment of broken bridge, you’ll find a corpse with x2 Stimulating Boluses. Then jump further south onto the lower bit of broken bridge, and continue all the way to the southern edge. You’ll probably want to get off your horse to grab the item here, the Radiant Gold Mask. If you don’t have an SSD, drop down to the south and then ride north on the left side of the bridge to find a Spiritspring Jump that’ll take you back up to near the site of grace — if you do have an SSD in your Elden Ring platform, go ahead and teleport back to the Road of Iniquity Side Path site of grace.
From the site of grace, follow the road west and look right — you’ll soon see some large tombstones to the northwest. Ride over to them, where you’ll find lots of easy-to-kill enemies scrabbling in the dirt. Head to the left side (northwest) of the area — in the back near the cliffs is a mob with a treasure chest, who will drop a Golden Rune [10] if you kill him. He’ll try to run, but it’s a very slow,pathetic kind of stumbling jog.
Hug the cliff to the west and ride south, looking down over the edge — you’ll see a Pumpkin Head sitting down lookin’ sad (I guess it’s hard to tell with the helmet on, but its body language really says “sad” to me).
Head a bit further south to avoid fall damage and then hop down and grab the x2 Gravel Stone behind poor Pumpkin Head. From there, ride due south, crossing the road, and you’ll find the Writheblood Ruins. Use target-lock and move slowly in this area, as there are a number of dangerous bleed-inducing dogs about. The ruins have three buildings — head into the rightmost one first and grab the Golden Rune [5] from behind the huge bloody lump, then go east into the middle one (keeping a careful eye out for the dogs). Amongst a bunch of the gross little lump thingies, you’ll find stairs that lead down to the Sanguine Noble boss, who guards the Bloody Helice.
In the western-most structure of the ruins, you can find a summoning sign that lets you invade Magnus the Beast Claw — this is part of White Mask Varre‘s questline.
NThe Stake of Marika and summoning pool are both on the third building’s southern side, so make sure to activate the summoning pool befoer you leave if you want some easy Rune Arcs — this boss is a quick and easy option for co-op.
Get back on the road and continue west. You’ll soon come across a broken cart with its chest already looted — as a consolation prize, there’s x2 Blood Grease on the ground by its back wheels, just past where the chest is. Continue west towards the bridge, and then turn left at the bridge and head south across the grass. You’ll get to the end of the cliffs and find another enemy holding a treasure chest with a Golden Rune [10] inside. WIth that done, you can ride back to the bridge, and this time go right and jump up onto the lowest part of the rocks there, then go left and go up the ledge to find some weak enemies and a Golden Rune [4]. That done you can drop down and finally cross the bridge — on the other side you can secure the Bridge of Iniquity site of grace.
The path continues west onto Mt. Gelmir, but we aren’t quite done with Altus yet! Teleport to the Windmill Village site of grace, wave goodbye to your now-familiar dancing friends, and head down the steps to the road once more. This time, turn left to head southeast on the road. Follow it for a bit, and you’ll see a dirt path that veers to the right and leads to a catapult — take it.
Pass the first catapult, and then as you near the second you should see a cart off the path to the right, with x3 Four-Toed Fowl Foot in front of it. Stay on the path as it curves south and winds through some trees. You’ll soon come to some ruins — enter the first building and go through it, and by the edge of the cliff you’ll see a corpse in a chair, with an enemy sitting just beyond it. Grab the Somber Smithing Stone [5] from the corpse and eliminate the weird tree-guy.
Then go back through the small building and turn right to enter the larger structure. In the far right corner (next to the other doorway) you’ll see an enemy cowering in the corner. When attacked, this guy turns into a Lion Guardian, an enemy type that can be pretty tough to deal with. It drops a Larval Tear when killed, so if you want to respec and don’t have any Larval Tears left, you should take it out, but otherwise feel free to skip this fight.
One way to cheese the fight with the Lion Guardian is by standing near the cliff to the southwest while you fight him — the lion will often end up jumping off, and you can then safely throw projectiles or spells at him while he growls up at you from the low ground.
Continue south on the dirt path to find another group of mobs scavenging around some broken catapults. Off the road to the left, next to the catapult on its side, is x3 Lightning Greatbolt. Keep going on the path and keep an eye to the right — you should soon see a graveyard down the hill to the west. Unless you hate free runes, go down there and grab all the loot — just watch out for the poison flowers hiding in the grass. Head back up to the path and keep heading southwest, and you’ll be headed straight for the Rampartside Path site of grace.
Pass time until noon at the site of grace (this will matter in a little bit), then head east past the rocks and then turn right to continue south — you should have the castle walls on your left and the hillside on your right as you go forward. You’ll come across a small merchant’s camp, although sadly the merchant seems to have died some time ago. Grab the Land Octopus Ovary and continue southwest on the path.
You’ll enter an area with some large tombstones — there’s a skeleton already hangin’ around, but a few more skeletons will wake up as you near them. They are fast and carry long weapons, so if you choose to ignore them you’ll need to be fast yourself as you pick up the next few items here. Grab the first item (a Golden Rune [6]) from the ground behind where the first enemy is standing. Then continue downhill, where you’ll find a Silver-Pickled Fowl Foot to the left of the Spiritspring jump. Turn around (face northeast) and up on some rocks in front of a tombstone is a Golden Rune [3].
You can now jump up the Spiritspring Jump heading northwest — you’ll land partway up a hillside. Assuming you didn’t take too long and it’s still close to noon, you’ll be able to ride further up the hill (to the northeast) to face the Ancient Dragon Lansseax. Note that if you die while fighting Lansseax and want to explore the rest of the area, you can go northeast from the site of grace and around the hill to reach the rest of the described sections (it’s a bit faster). Also note that you have to pass time until noon at the site of grace each time you want to face Lansseax, since when you die you’ll respawn during the morning.
From the base of the hill where Lansseax spawns, turn north and look for a stone platform — the corpse on it has a Stonesword Key, but watch out for the knight guarding it. Next, head southwest down the hill, where you should see a loot beetle sparkling — it drops the Ash of War: Lightning Ram when smacked enough, allowing you to imitate the lightning ram’s roll attack. You can also head into the nearby sword graveyard and read the monument to get a bit of lore (and fight the knight there if you’re so inclined). Down the hill to the west is a much more useful graveyard, with regular coffins and actual loot. Head south down the path between the two graveyards once you’ve got all the Golden Runes.
There’s a church to your right, but a knight on horseback patrols here — you’ll need to take him out or he’ll follow you into the church, or possibly surprise you when you’re clearing the other mobs in there. With the knight deadified, go into the church — watch out for the enemies on either side of the entrance who fling Lightning Pots — and grab all the loot. There’s a Sacred Tear in front of the statue of Marika, x10 Lightning Greatbolts on a corpse, and a chest with the Dragonbolt Blessing in the eastern corner (behind where one of the soldiers was hiding).
Now leave the church via the front entrance and go northeast, up the path you came down to reach the church. Continue due north, and you should soon enter a field of red flowers with a tomb on your left — that’s our next destination. A Black Knife Assassin sits in front of the church, and she’s got some cooler moves than her lookalikes in the previous areas.
If you want to skip this fight for now you can gallop past the assassin and open the door (you’re invulnerable while doing so). Then roll your way to the elevator and ride it down to enter the Sainted Hero’s Grave.
After clearing the Sainted Hero’s Grave and defeating Ancient Dragon Leansseax, there’s only a teensy bit more left to do in Altus! From the Rampartside Path site of grace, head northeast on the path, and follow it all the way back to the spot where some enemies are scavenging around the broken catapults. There, you’ll turn right to head northeast up the hill; you’ll see a soldier wielding a long torch — that’s the way you want to head.
There are two soldiers in the road here, plus crossbowmen on either side up on the rocks, so it’s best to take out the ranged enemies first. Then continue up the path, and look left (northwest) once you crest the first rise, and you’ll see an illusory ree at the edge of the rocks. Grab the Golden Seed, but do so quickly to avoid getting hit by the catapult that’s probably firing at you.
Go south, swinging to the right around the catapults, and eliminate the guys manning all three of them. Then ride through the large archway to the southeast (heading into the Capital Outskirts), and continue down the road a little ways to grab Outer Wall Battleground site of grace — just activate it, don’t rest yet.
Then ride back the way you came, and look right as you reach the wooden spike defenses — there’s a small camp there with some tents, and a corpse in front of them with Golden Rune [9] (and the soldiers here are easy kills). Then ride north towards the next camp. Head through the opening in the spike wall and kill the loot beetle that’s sitting in the middle of the camp to get the Ash of War: Lightning Slash. You can then ride away to drop aggro, or fight the foes here — it’s totally doable on Torrent, but you’ll want to kite back the way you came (so as not to draw the enemies here into the next group).
Once you’re done with this camp, head northwest to the ruined tower. You can summon spirit ashes here, and it can help to get rid of the enemies (which include a mounted knight). Use target lock near the trees between where you came from and the mounted knight — a soldier is sitting with his back to you in the thick bushes beneath a tree, and you should find him and kill him before engaging the rest of the enemies. Move in slowly, and you should be able to pull just one or two at a time.
Once all the baddies hanging out in the field are finished, head towards the left wall of the tower, and kill the two enemies standing on top of it, then go right around the broken wall closer to the tower. You’ll then need to jump from the stones to the inside of the tower– easily done while mounted on Torrent.
There are two enemies here on the ground floor, and a couple more will come down the ladder in a bit — for now, you can go out onto the wooden walkway to the west and turn right to follow the walkway to the corpse with x6 Golden Arrow — it looks like you have to jump, but if you hug the tower you can walk on the wooden boards out to the corpse.
Then go back into the tower and deal with the enemies that probably came down the ladder, then climb it yourself. Grab the x10 Hefty Beast Bone from the corpse draped over the wooden beam, then climb the next ladder, then one more, to reach the top of the tower and the chest with the Greatbow (and some arrows to go with it).
With that accomplished, you’re all done with the plateau outside the capital’s walls. The only thing left to do before heading into the Capital Outskirts is take out the double Tree Sentinal bosses that guard the main entrance to the Royal Capital Outskirts. Teleport to the Outerwall Phantom Tree site of grace (the one to the east of the large staircase in the south of the plateau).
From the Outerwall Phantom Tree site of grace, head southeast on the path between the statues. It will fork, continuing straight and turning right (south). Take the right-hand path and follow it to the small camp. There are some enemies within, but once you get close enough to the camp, an Ulcerated Tree Spirit will fall from the sky and crush most of them. Summon a spirit when you get the icon, which should pop up once you’re near the camp. Latenna is a good choice, since she’ll help you DPS tree spirit.
As with most field bosses, Torrent makes this fight relatively straightforward — stay just within range of the tree spirit’s attacks, then ride out of range when it attacks and gallop back in to do some damage as the attack ends. It’ll drop a decent chunk of runes and a Golden Seed upon death, and you can then open the cart in the camp to find the Giant-Crusher, then head back the way you come, to where the path branched. Look east, and you’ll see a stone platform with a corpse on it, guarded by wolves. Grab the x2 Holy Grease from the corpse, then follow the path uphill to the southeast.
A single enemy roams the road here, but it’s easily dispatched or ignored. You’ll find the Minor Erdtree Church at the top of the hill — inside, grab the Missionary’s Cookbook [4] from the corpse on the left, then continue past the site of grace to find the Golden Order Seal on the corpse that sits in front of the minor Erdtree. There are also a large number of Golden Centipedes to pick up around the tree. Finally, rest at the site of grace — Melina should show up and give you a new gesture.
Teleport back to the Outerwall Phantom Tree site of grace and ride due east. You’ll come to the edge of a cliff, but you can make your way down to the valley below by jumping on the rocks on your left — you’ll have to actually jump at one point, so go slowly until you find the gap.
An invisible loot beetle is running its route in the water here — the easiest place to catch it is probably in the narrow gap through the rocks that’s to your north once you reach the low ground. It drops the Prayerful Strike Ash of War, which is pretty great if you’re running an axe or hammer. Next, ride to the southern end of the watery valley and look right (southwest), where you’ll see the entrance to the Sealed Tunnel.
After defeating the Onyx Lord, leave the boss arena via the southern doorway and head down the stairs. Go tap the site of grace — this is one of the towers that lets you restore Rykard’s Great Rune, which you can get from the Volcano Manor on Mt. Gelmir. If you have it, head up the tower and use it, otherwise go ahead and teleport back to the Outerwall Phantom Tree site of grace one last time, and this time ride up the stairs to the northeast. Once available, summon your spirit of choice, and then prepare to face the Valiant Gargoyle, who’ll swoop down once you’re far enough up the stairs.
Note that you can ride around the stairs to the left if you don’t want to face this boss. It only drops its weapon and 2,835, so if you don’t want the Gargoyle’s Great Axe, and the gargoyle is kicking your butt, feel free to skip it for now.
Continue up the stairs and you’ll find another Illusory Tree, again with two Golden Seeds at its base. You can also speak to the nearby Finger Reader Crone if you want some creepy encouragement. Next, head up the stairs to the southeast, and look up at the balcony on your left — you should see a loot beetle there. However, you won’t be able to lock onto it from below. Stay away from it, as it will disappear if you get too close. You can either use a telescope to aim a spell or projectile at it, or else go further up the stairs and approach the loot beetle from above (where you’ll be able to use target-lock and hit it with a throwing knife or similar). It drops the Ash of War: Golden Parry, which is a nice ash of war if you use a shield but struggle with parrying.
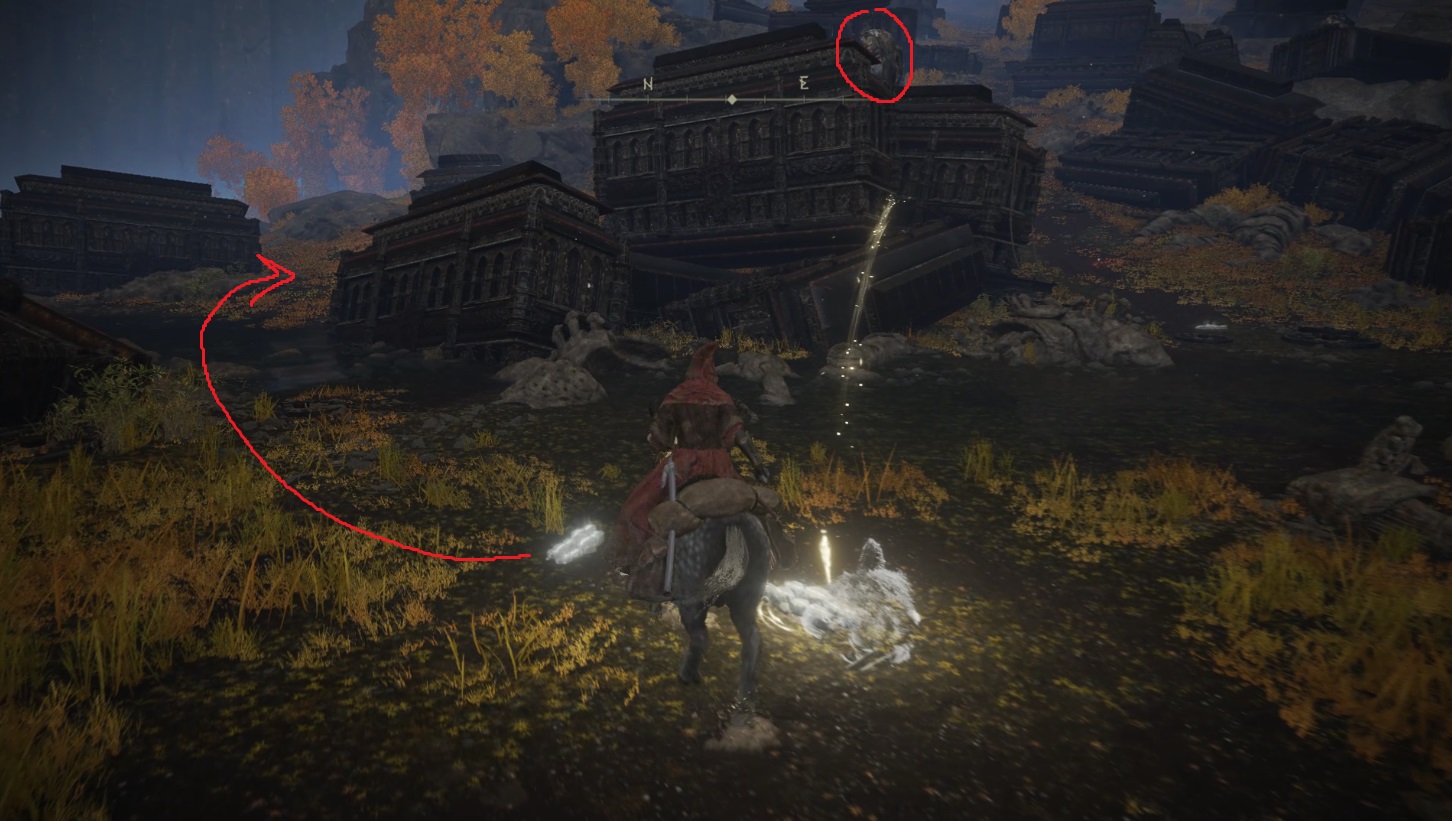
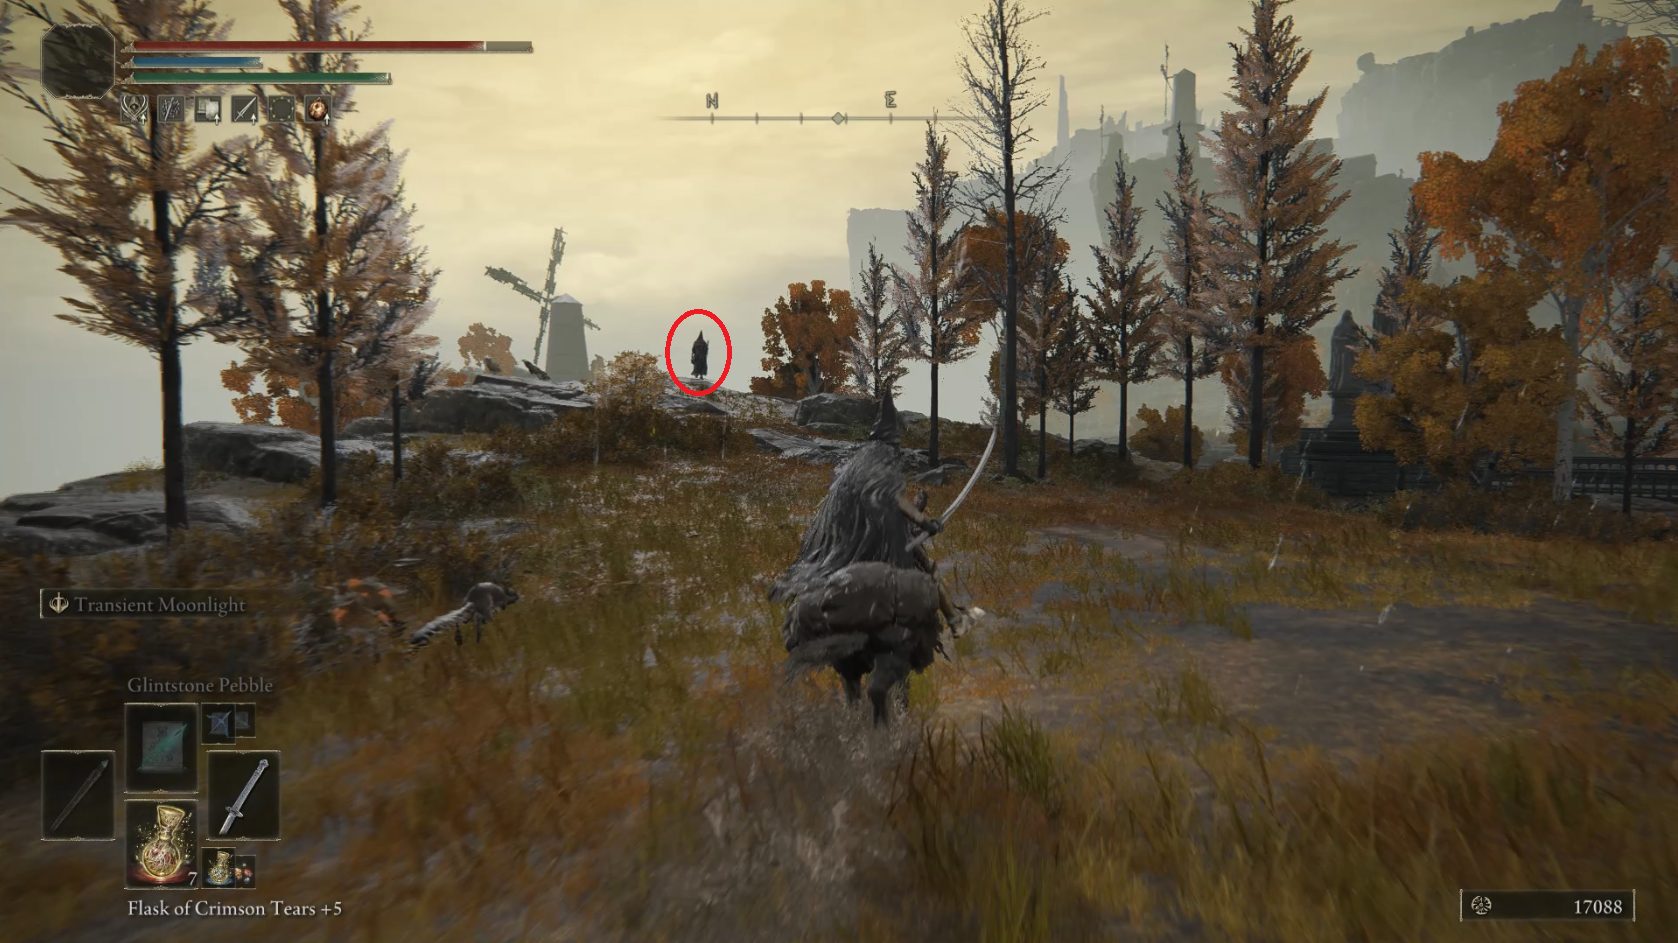
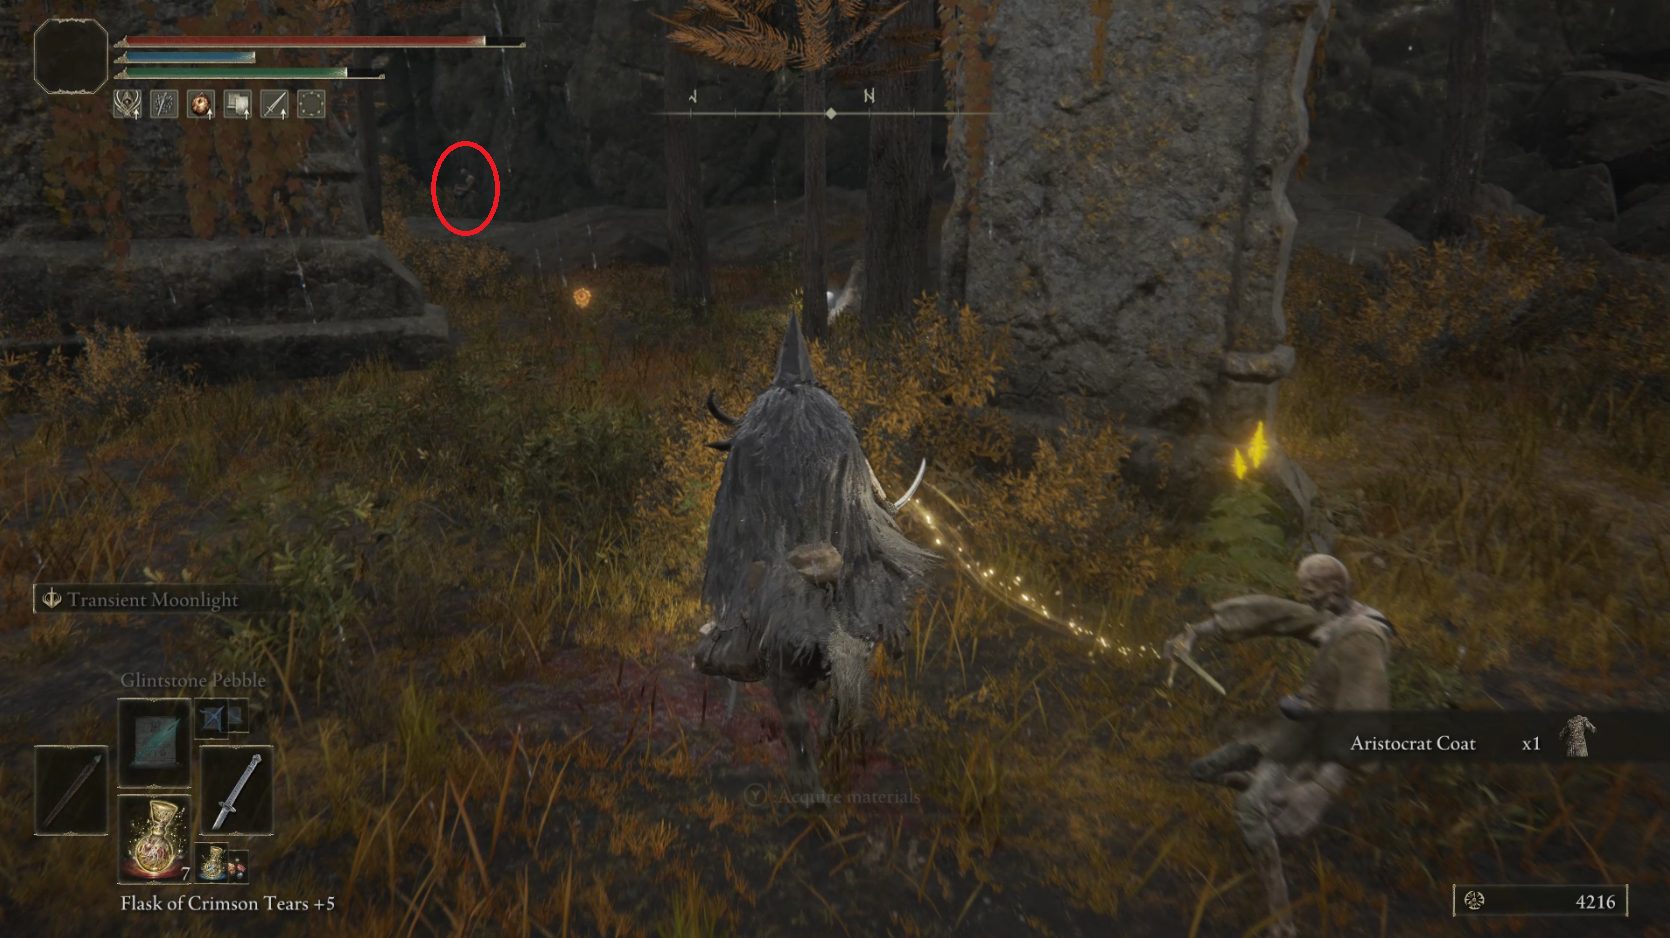
Now ride all the way up the stairs to the big doors at the top — the corpse in front of them has some Lost Ashes of War. Head back down the stairs to the Illusory Tree and then take the road that leads north uphill. Right where the stones of the road end, you should see an enemy standing off to the right of the path. If you get close enough, this enemy will transform into Margit, the Fell Omen (he’s identical to the previous encounter, but it’s easier on Torrent) — defeating him here will earn you the Viridian Amber Medallion +1.
Margit’s locationApproach the circled enemy to fight Margit
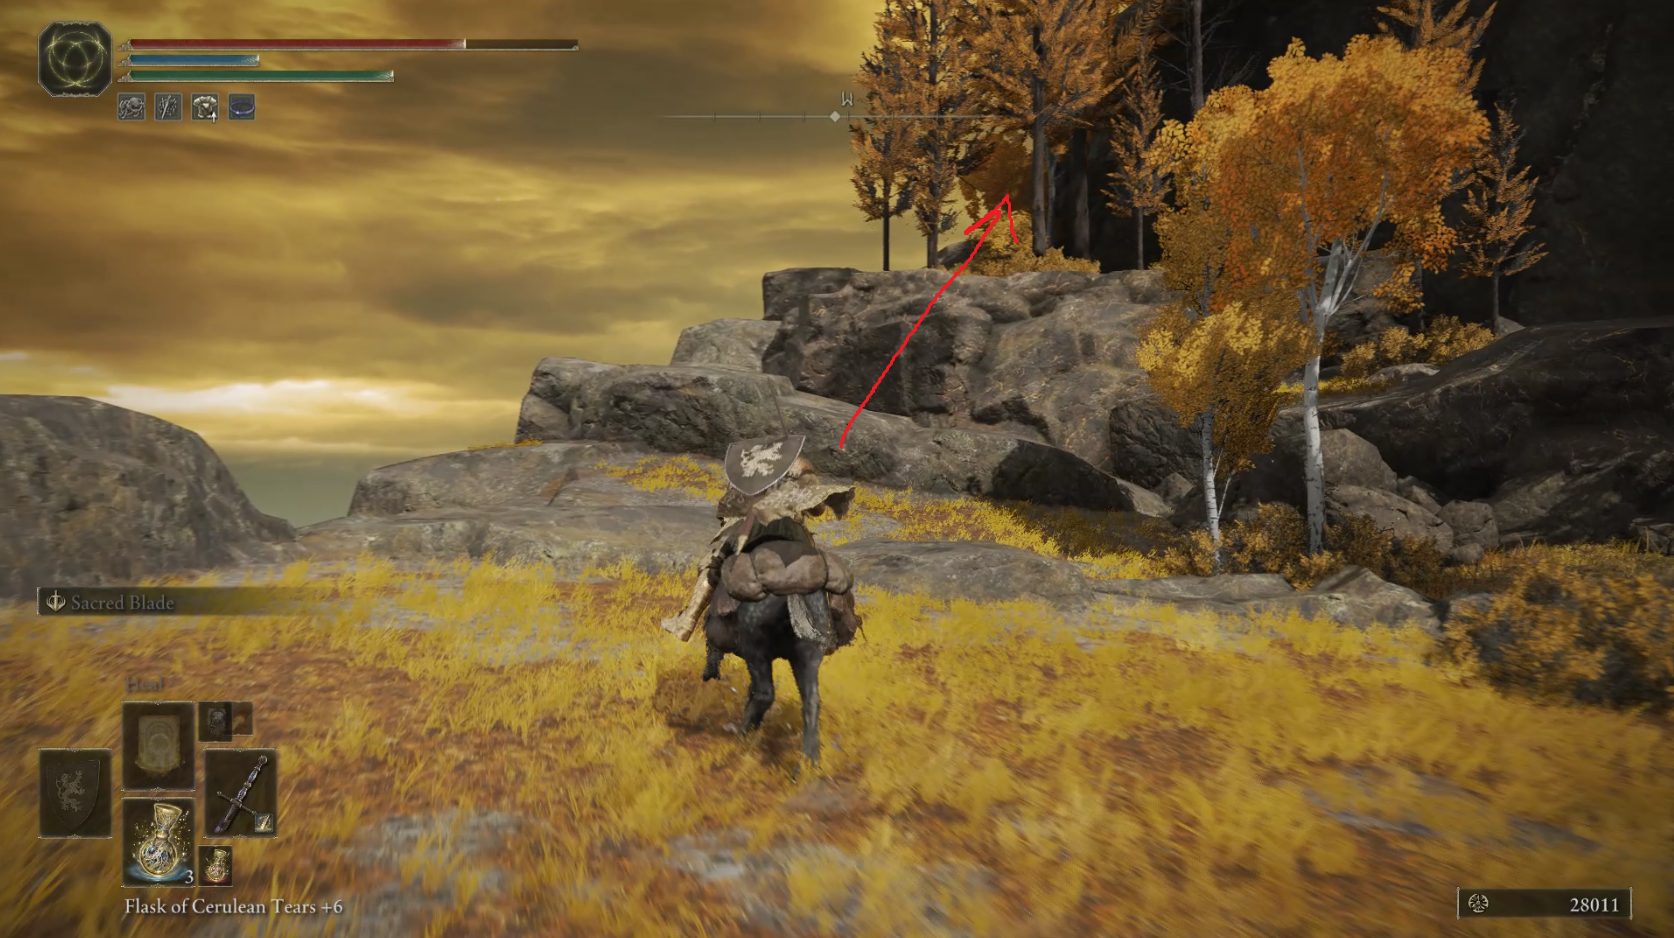
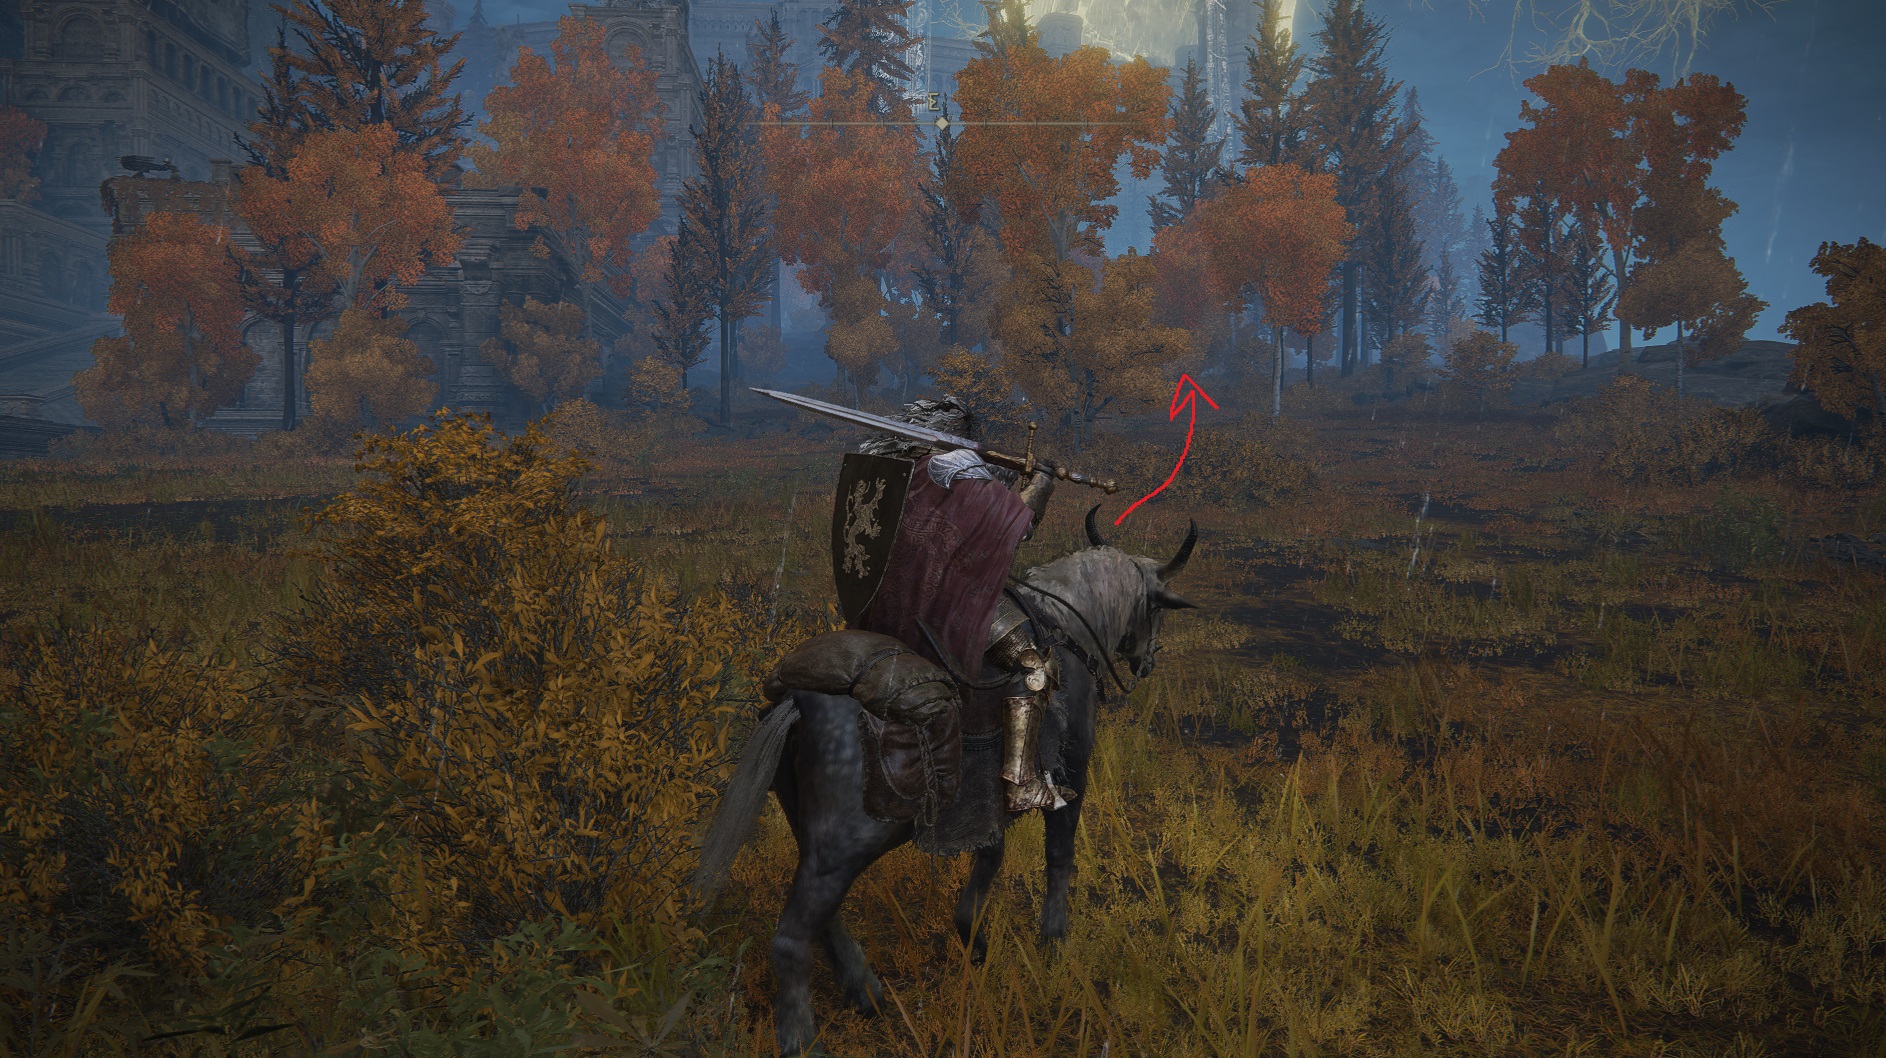
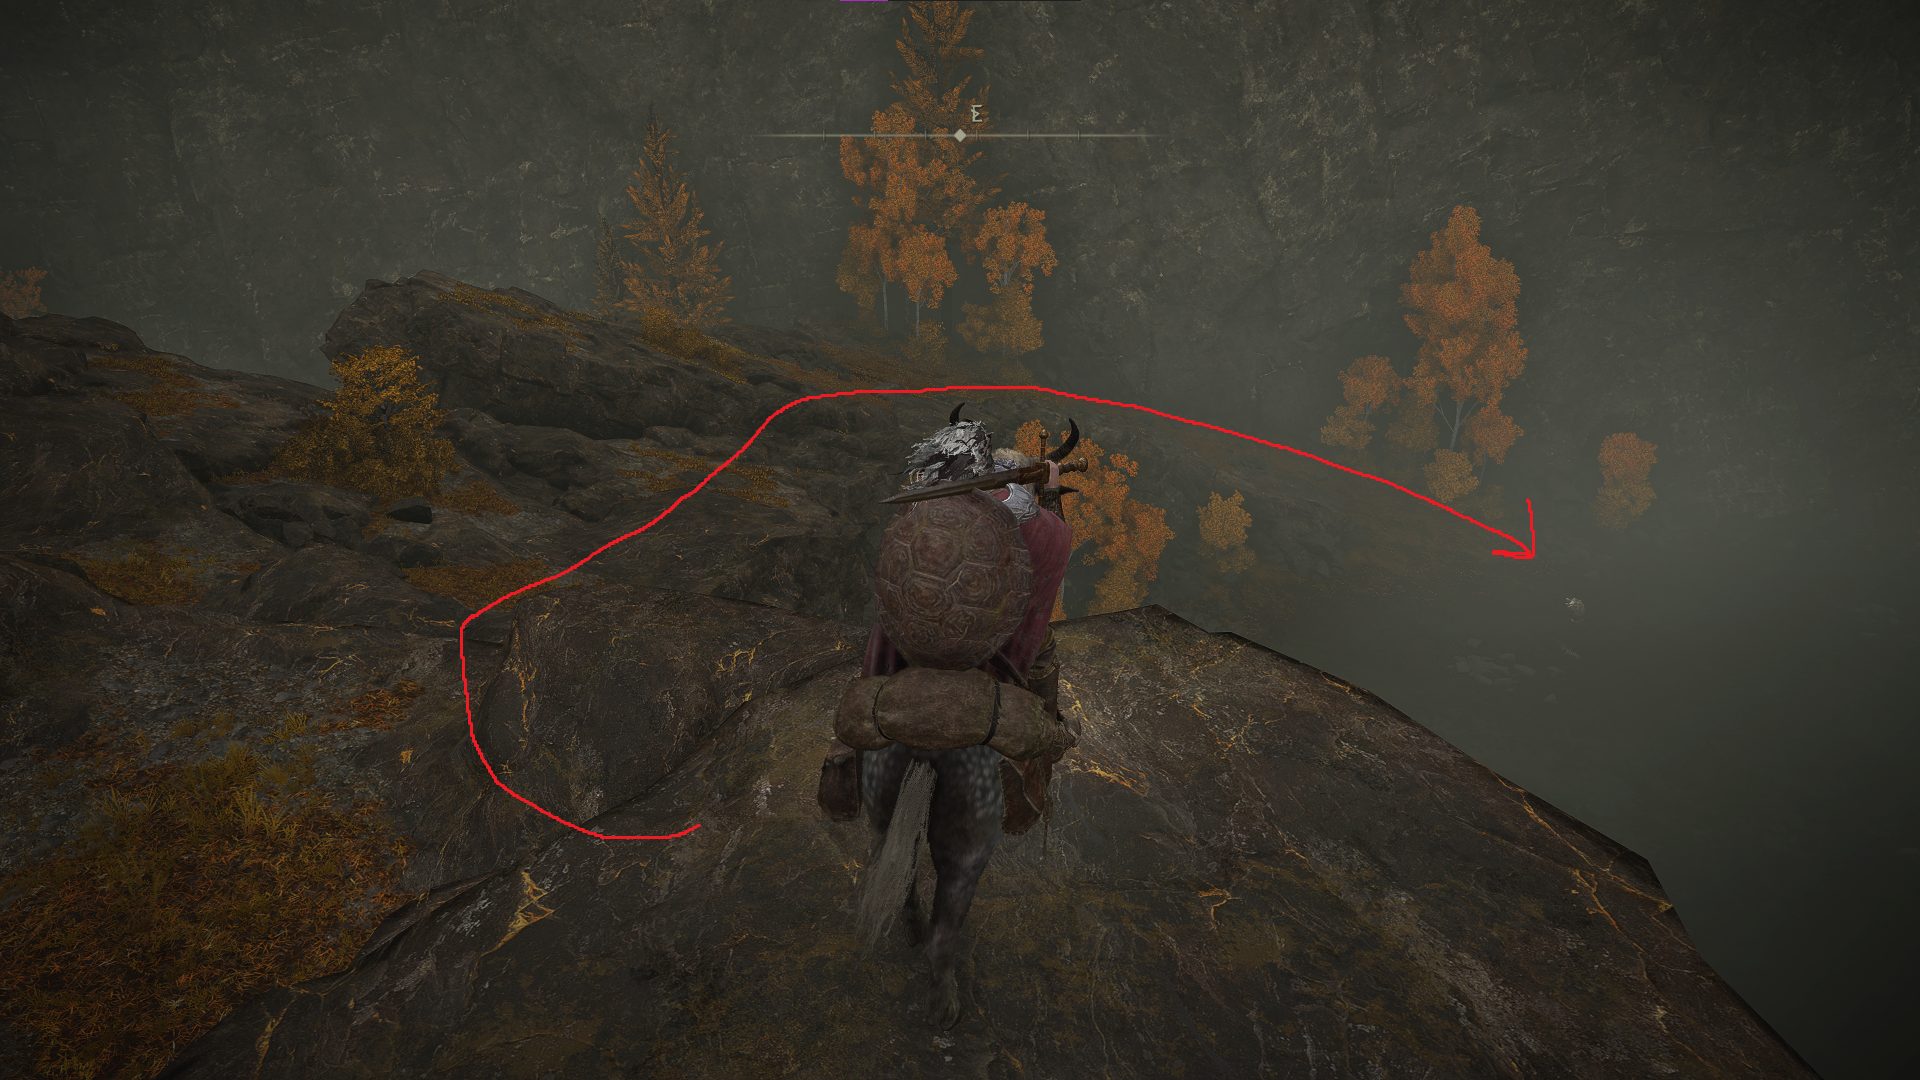
From where you found Margit, look west — you should be able to see bat wings flapping just over the rise there. Take the below-indicated path, going west and then turning left to head southwest.
Find the harpy hanging out near some craters, and slay her — she’ll drop a Golden Rune [9]. In a crater with a massive spear sticking out of it, just south of where the harpy was sitting, is a corpse with a Golden Rune [10]. Grab it and then head northeast, where you’ll soon find a surprisingly intact catapult — a corpse sitting on it holds x3 Arteria Leaf. Continue northeast and — if you need to — rest at the Outer Wall Battleground site of grace we grabbed near the end of Part 3.
Go east from the site of grace, where you’ll find another catapult with craters in front of — in between the craters is a corpse with a Golden Rune [7]. Continue east and up the easy-to-miss stairs that lead into a large graveyard.
Take your first left to head northwest and grab the x3 Grace Mimic off of the corpse on the path. Continue west on the path and you’ll soon see another corpse off to the right, this one with a Smithing Stone [5]. You’ll then pass through a few skeletons, at which point you’ll hit a T-intersection — turn left and rest at the Hermit Merchant’s Shack site of grace just ahead (to reset the enemies that are probably chasing you). Then pass time until nightfall (we’re going to find a night-only boss soon).
In addition to the other night-only boss we’re going to go find, you can fight the Bell Bearing Hunter here as well. To get him to spawn, you’ll need to speak to the merchant, then teleport to a different site of grace, then teleport back and pass time until night — the boss will spawn where the merchant was.
Once it’s night, go check out what the merchant in the shack is selling — he’s got some Rune Arcs and a Perfume Bottle, plus some arrows if you’re into that sort of thing. Leave the shack and take the path east, going uphill this time. Watch out for the skelesnails (see right-hand image) in this area — they’ll often pop out of their “shell” once you pass them and roll into you or cast spells. Continue following the path until it bends right and goes down the hill. At this point, don’t follow the path — instead, head northeast, where a bunch of skelesnails are hanging out around a stone basin that contains the Winged Crystal Tear.
As you near the tear, the Deathbird will land (if it’s night). This fight is can be challenging, but Torrent lets you retreat if things go badly and you need to drink from a flask. You can also abuse the boss’s leash range (ride away until it starts backing to its spawn) to cast spells at it. The numerous skelesnails around where the Deathbird lands can make it more challenging than the previous fights against this boss; it’s best to clear the adds if you aren’t able to kill the Deathbird quickly.
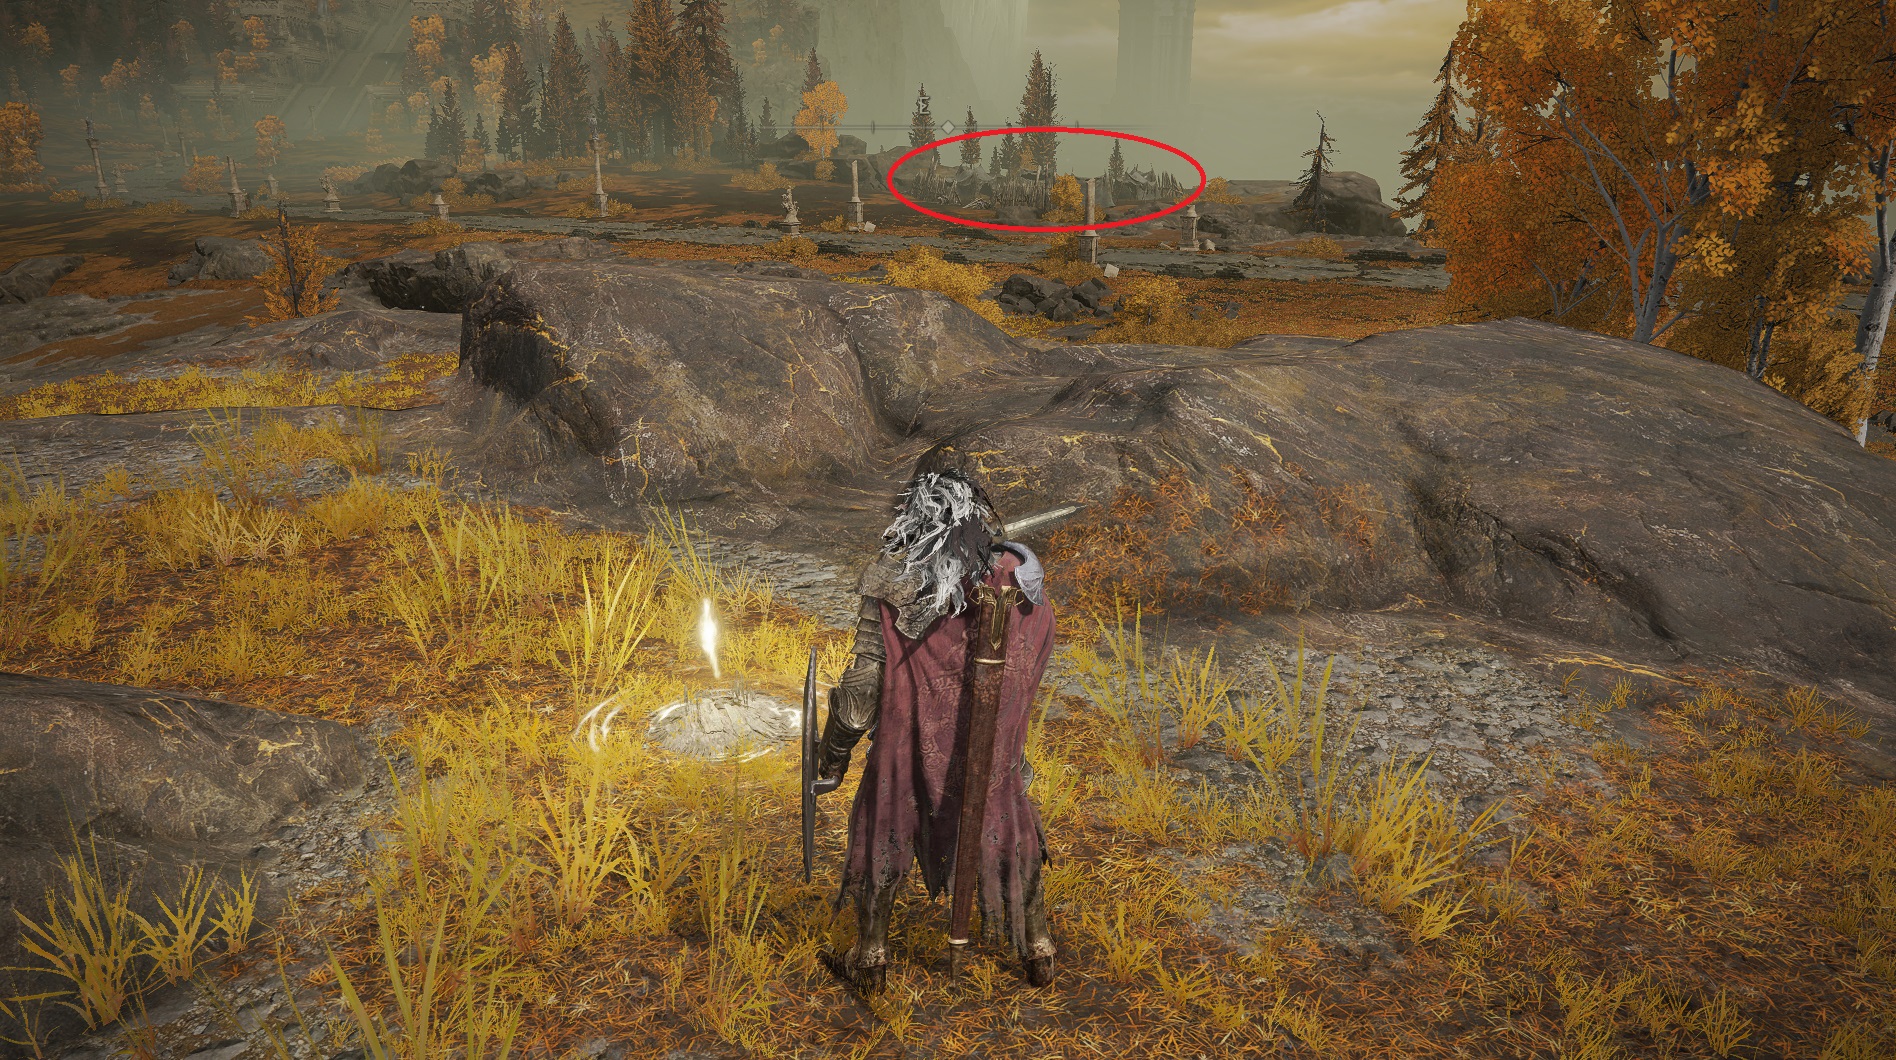
With the Deathbird down, you can now follow the path’s bend and go southwest down the hill. Look out for the skeletons hanging over the path — they’ll drop down as you pass underneath the tombstone that leans over the path. As you pass underneath it, go off the road to the south to find a corpse sitting under one of the large stone tombstones. Grab its Golden Rune [4] then continue on the path, which will fork — go left to head south, and you’ll soon hit a perpendicular path. Go left to continue east, and ride up and over the crest of the hill.
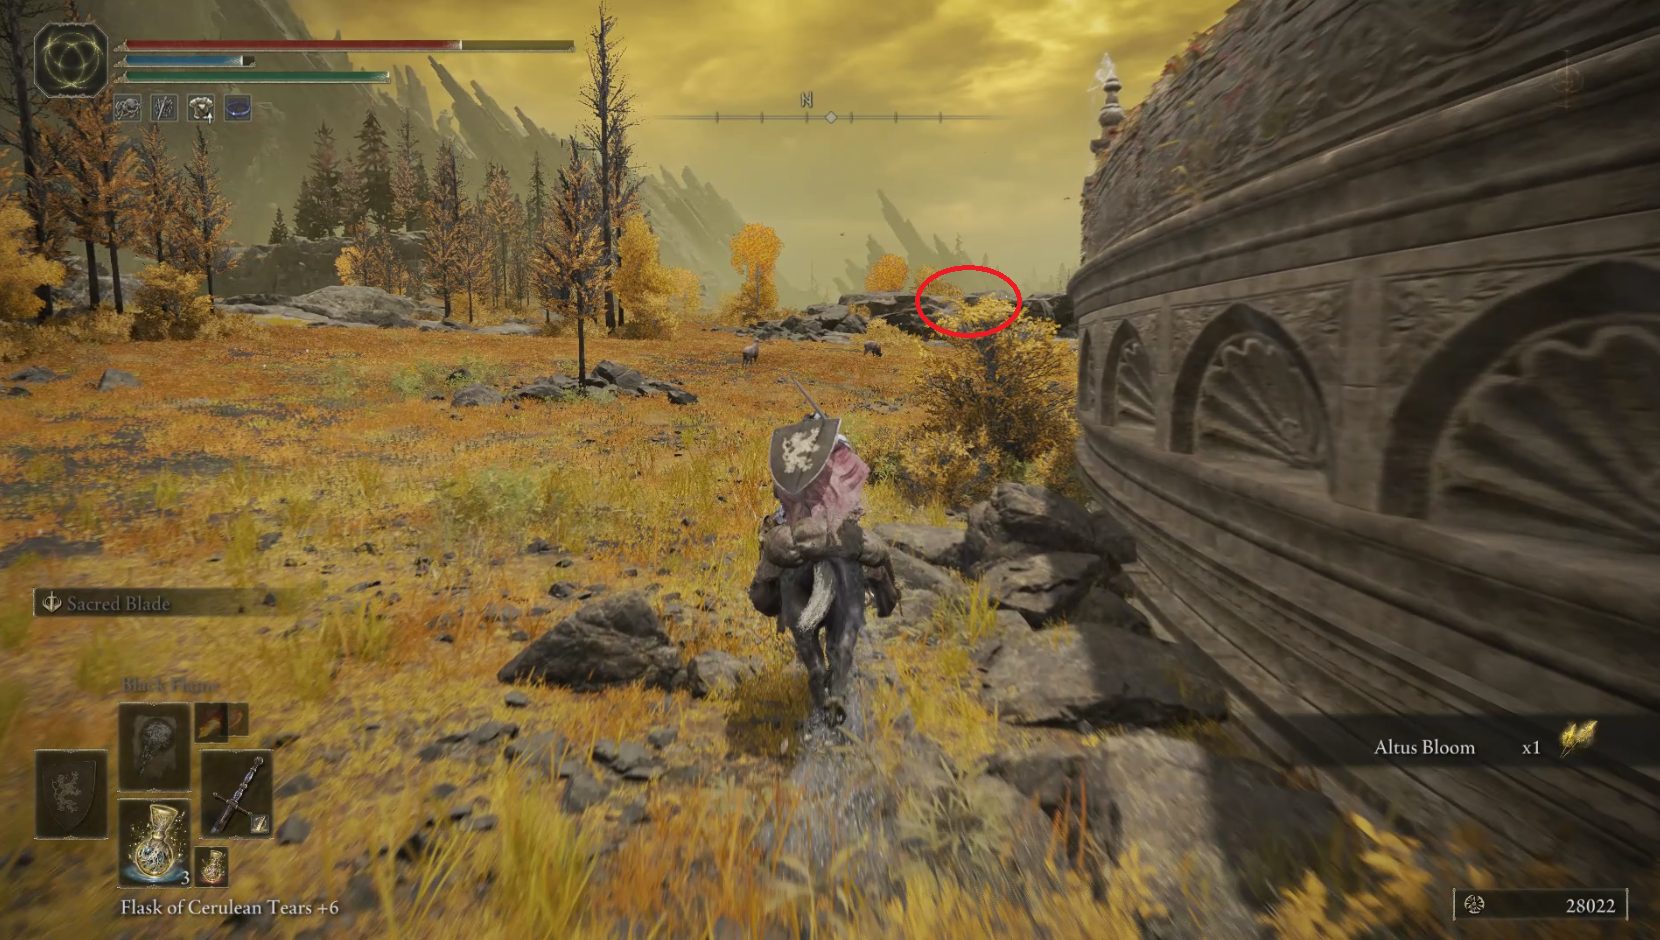
Continue downhill, and soon a new path will split off to the right — we’ll head that way a little later. For now, continue straight a few more paces, and then look left — you should see a Minor Erdtree to the north.
Head up the hill towards the tree, where you’ll find an ogre and a few smaller foes hanging out. In a stone basin at the base of the tree (just behind the enemies) you can grab the Twiggy Cracked Tear and the Crimson Crystal Tear. Be careful, as the small enemies can Death Blight you. Grab the tears and then ride south, and once you can, ride east along the edge of the cliff. (We’re going this direction to avoid getting shot by the two giants with huge bows.)
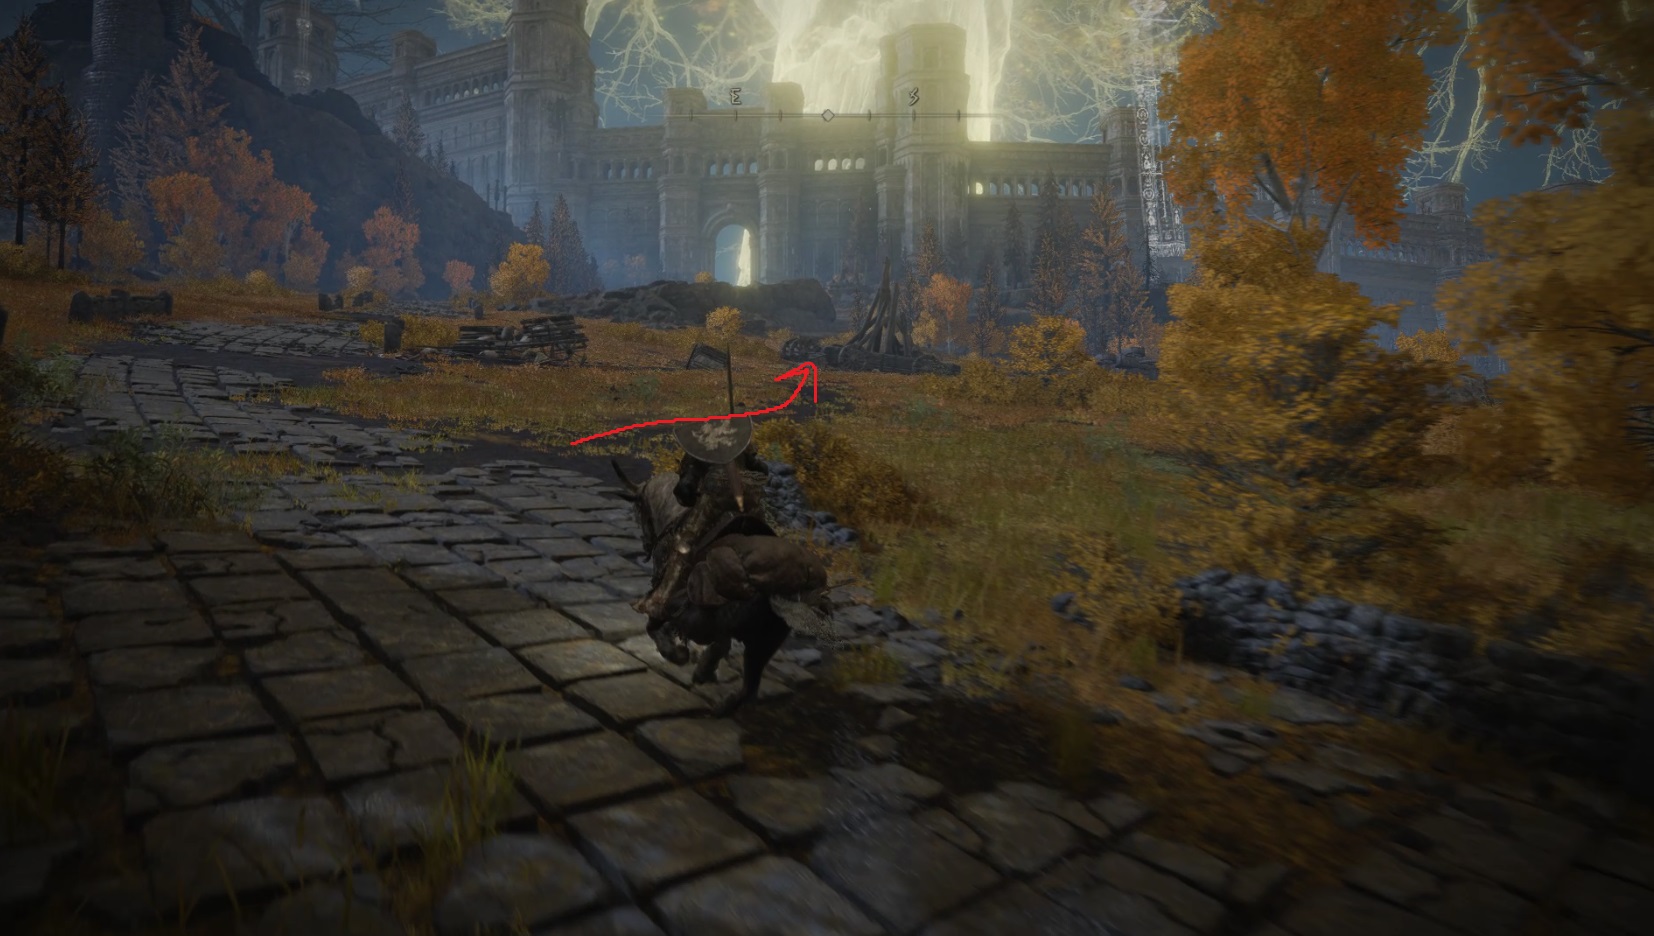
Follow the cliff’s edge while galloping on Torrent. You’ll swing south eventually, at which point you should see a golden fog gate guarded by a boss — the Draconic Tree Sentinel.
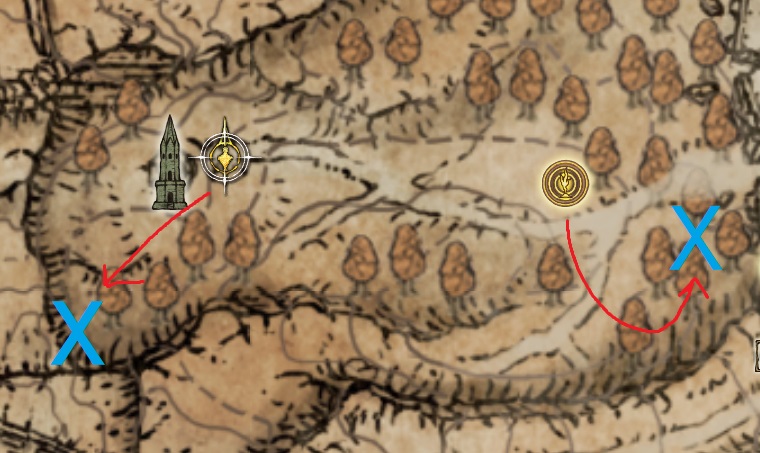
With the Draconic Tree Sentinal dealt with, you can go up the stairs to the southwest and out onto the bridge. Grab the Capital Rampart site of grace — this is our way into the capital later — and then go back the way you came and out onto the plateau again. Now you have two choices: you can grab a few items and risk death, or you can go back the way you came, around the edge of the cliff, and then return to the fork in the road and take the path that leads downhill to the southeast.
If you want the items, follow the path northwest down the hill and kill the giant with the bow by hitting it in the orange parts of its ankles. You’ll need to avoid arrows from the giant to the southwest while you do this, however (and you can kill that one too if you want). Ignore the other giant and continue down the path — on the right on some rocks is a corpse with a Smithing Stone [5], then a bit further down the hill and further off the road to the left is another corpse with x10 Great Arrow. Continue west and jump off the rocks, where you should find a path — turn left to head southeast down to the lowground.
The two path choices described above
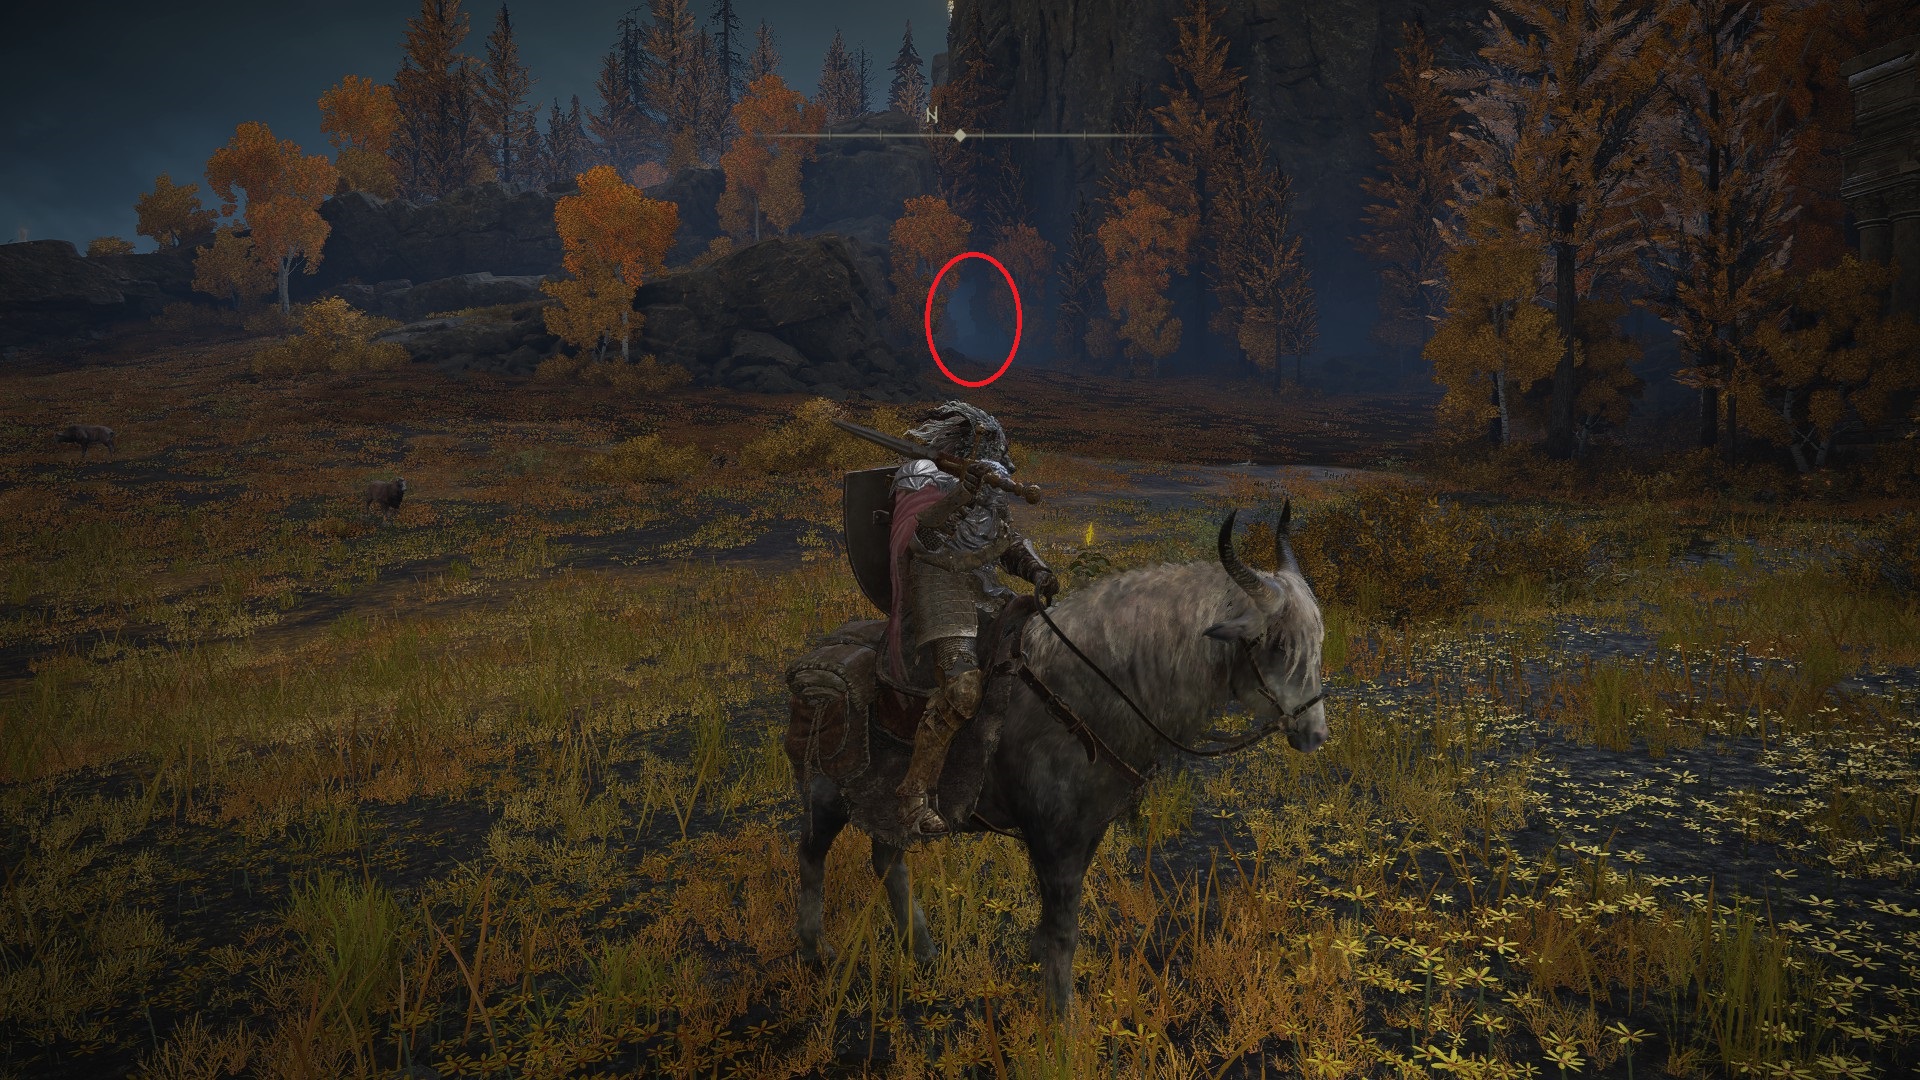
To the west you’ll see the Blackguard (assuming you interacted with him enough in Liurnia) — now he’s got crab! You can also ask him about the (loathsome) Dung Eater if you like. To the southwest you’ll see three crabs in a triangle eating — stand between them and then turn left to look south, where you’ll see a corpse with a Golden Rune [6] hiding behind some rocks. Then head east, to the dark cleft between the rocks there.
You’ll exit the narrow passage and find yourself on another dirt path that leads past a statue and towards the Auriza Hero’s Grave. First, kill the two bears near the statue (one’s standing and one sleeps to the right of the first one). Then, open the door to the hero’s grave, but don’t enter. Instead, ride northeast until you find a huge rune bear hiding behind some trees. Lead it back to the statue you passed, and stand just behind it. The rune bear should destroy the statue, letting you snag the Smithing Stone [6] within. Then ride to the hero’s tomb (now you see why we opened the door) and get in before the rune bear gets you.
From the entrance to the hero’s grave, ride north-northeast along the edge of the cliff (but watch out for the rune bear). Follow the cliff edge and you’ll soon see the entrance to the Auriza Side Tomb on your left.
This concludes our time on the Altus Plateau! See the section below for info on where to go next.
Where to Go After Altus Plateau
As always, you have a number of options for where to go next. If you haven’t done Caelid, that’s the obvious choice. If you’ve done Caelid but not Nokron, the Eternal City, then the Eternal City should be your next step. If you haven’t done Deeproot Depths yet, you should do that now before it gets too easy.
Otherwise, you can head west to Mt. Gelmir. You can also choose to skip the optional Mt. Gelmir and instead continue into Leyndell, Royal Capital, via the Capital Rampart site of grace.
Share this article:
DanielD
Unabashed FromSoftware fanboy still learning to take his time with games (and everything else, really). The time he doesn't spend on games is spent on music, books, or occasionally going outside.
I just wanted to drop a quick thank you here. These guides are so well-done, and I really appreciate that you leave WIP notes to indicate what has been added or is coming soon. I’m anxiously awaiting completion of this one and Caelid.
Thanks for the feedback Malavesh! I also wish we could get these walkthroughs done faster, but FromSoft blessed us with a pretty huge game this time around.
TerminaT
2 years ago
Great work!!! Congratulations!!!! Just an information, at night at the Hermit Merchant Shack a Bell Bearing Hunter appears, just rest in grace. Another thing… after the Sealed Tunnel, will we activate any runes in the Divine Tower?
Thanks for the heads up, I’ll see if I can get that hunter to spawn myself. Good question re: the tower… The Divine Tower after the sealed tunnel is apparently for Rykard’s Great Rune (which can be obtained from Volcano Manor). I’ll add that info to the guide!
Weird… I tried doing it the way you describe, and it didn’t work — I had to go somewhere else to get the hunter to spawn. FromSoft makes great games but sometimes they’re a little buggy 😀
Josh
2 years ago
Just past the unsightly catacombs entrance in the southeast corner of the cliff edge there’s an arteria leaf.
Thanks a lot for the detailed guides. This has definitely improved the overall game experience for me and actually made it much easier to follow along with the main storyline, all the characters and side stories.
Awesome to hear that Zman! To give you fair warning, it’s unlikely our walkthrough hit all the side stories — people usually find secrets and hidden NPC locations months after the game launches, so we’ll be constantly updating these guides. Also, you’ll be able to look for NPCs in our database eventually, we’re planning on adding specific instructions for following all the stories (once we finally get the time to do so!).
That will be awesome! TBH when I started playing the game, I wasn’t really enjoying it, there wasn’t a lot of direction and I was trying to pursue the main story line and the mobs and bosses got really hard all of a sudden. Then coming across your guides changed the whole experience for me!
Soulbight
2 years ago
Best guide around. So thorough and such a good read.
Thanks!
We’ve been discussing the best next steps internally, and I think we mostly agree — although we may end up sending people to Nokron right after Caelid (since that’s when you open up the route to Nokron, and Nokron feels easier than Altus).
GParg
2 years ago
This is by far the most in depth and well explained guide I can find for Elden ring, the only problem is I am in the giant mountaintops, will you be getting the other areas done anytime soon do you think?
Thanks GParg, and sorry we haven’t gotten to where you’re at in the game yet. To be honest, I don’t think we’ll be at the mountaintops “soon”… right now I’m working on the areas for Ranni’s quest (Nokron and Ansiel, plus Liurnia’s Divine Tower) and after that, I’m going to do Leyndell; my partner on this project is finishing Caelid before moving on to Mt. Gelmir. We do plan on working hard to get it all done ASAP though!
Mark
2 years ago
Hey just wanted to say thanks again. Do you have a time line of when volcano manner will be completed? Also do you have a guide on deeproot depths?
You’re very welcome (again)! Volcano Manor should actually be published and ready in the next day or so! Deeproot Depths is on the (long) to-do list of walkthroughs, and I’m still deciding whether to complete it before or after Mountaintops of the Giants/Mt. Gelmir.
Good to know. Looking foward to it maybe do deeproot then Mt gelmir since it’s next to plateu
Adam Graefe
1 year ago
At the Minor Erdtree Church site of grace, Melina didn’t show up after I rested there. On the Fextralife wiki it says any grace in Leyndell will cause her to appear, but references the East Capital Rampart specifically. I am not sure if I made her appear already or not (I don’t have that site of grace), but thought I would flag this for you.
Love the guide, thank you so much for all the hard work!
Thanks for the info Adam, it’s definitely been hard to pin down when Melina shows up! There are so many possible iterations of first-grace-rested-at-in-the-area that it’s difficult to get this stuff 100% accurate.
Chris W.
1 year ago
It’s possible I missed it listed elsewhere, but in the walkthrough after the repeat open Margit fight, and collecting the items where the harpy and bats are, you can go a little further south west and from the connected area below collect several other higher level Golden Runes from corpses among giant tombstones as well as an Old Fang on top of one.
Bruce K
1 year ago
Hi mate, loving the guide have been following it for a completionist playthrough on my 3rd playthrough. I seemed to have missed the mt gelmir section from wyndham ruins all the way round the volcano to the shack where comet azur is etc. What section is it in? Cheers
Sorry for the confusion Jocker — an SSD is a Solid State Drive, a type of hard drive that loads things much faster than the previous generation of hard drives. That part of the walkthrough was designed so that people with a fast hard drive would teleport, while people who have longer loading screens would travel on Torrent instead.
HellzReign
2 years ago
After fighting the dragon, there is a spectral dude on a chair on the northwest side of the ridgeline, after running through him he drops the harp bow
There is a Celebrant’s Skull Great Hammer at the Windmill area – just northeast of the Windmill Village site of grace, past another windmill, is a brief stretch of cliffside. Weapon pick up is prominent on a corpse.
Also, minor edit you likely have seen: your subsection title for this Altus section is misspelled ‘party’ vs. ‘Part 2’. Thanks again for a terrific guide!
Once again, thanks for your help with the stuff we missed Chris!
Cyn
1 year ago
On my fourth full run through (I get bored with NG+) and am a bit of a completionist and I still find your guide very helpful. Just a note if you ever go back and update, on the way to the Shaded Castle from the Old Altus tunnel, there is an Arteria leaf tucked back on the right (E/Ne) as you head down the slope, and a golden sunflower and sacramental bud on the left. Since these are a little more rare for crafting materials thought it would be useful to point out.
Last edited 1 year ago by Cyn
Jason
5 months ago
Hey is there any part of the guide that isn’t done yet? Its mentioned here that volcano manor guide isn’t finished but it looks like it is. It’s also mentioned that mt gelmir isn’t done. Their respective buttons for next page are not on the altus plateau or mt volcano manor.
Hi Jason, it should all be finished now, we just missed cleaning up a few of the guides/adding references to finished guides. Thank you for the heads up!
Thank you. Your guide is the best out there. You(and/or your team) should feel proud.
Jason
4 months ago
Hey there. In part 3, after the weak enemy that holds a chest with a golden rune 10, it says to hug the east cliff but it’s actually west. Keep up the great work! Thank you!
Also, in the writheblood ruins, in the west-most ruin, there’s a sign that lets you invade Magnus the Beast Claw. He’s there for progressing whitemask varre quest line for anyone playing offline, which is a good amount of people. (anyone playing modded or without Internet)
One question. Is the guide complete or are there parts that are still not done?
Adding on to previous comment( couldn’t edit because of time spent editing)
Killing Magnus *once* is sufficient for progressing Varre’s questline. If you can’t kill him, you can instead just attempt 3 times to complete the quest. the player can invade him and then use the Finger Severer item to quickly fullfill this condition.
Killing Magnus drops :
Runes
Furlcalling Finger Remedy
Rune Arc
Great Stars
Somber Smithing Stone (6)
Thank you once again Jason, I’ll get the info on Magnus added – must have missed this addition to the 1.06 patch! There are a handful of minor NPCs whose questlines we don’t cover, and some of the NPC questlines are mentioned in the area info (the dropdown at the top) but are not actually referenced in the body of the walkthrough. Both of these are issues we hope to correct before the DLC drops though!
I’ve also added the info about the Golden Rune [4], much obliged.
Last edited 4 months ago by DanielD
Jason
4 months ago
At the part where you can take a left at the bridge in part 3 to find an enemy holding a chest with a golden rune 10; if you instead take a right at the bridge and jump up on the lowest part of the rocks with torrent, then take a left and go up the ledge to the edge of it, there’s some weak enemies next to a golden rune 4 that can be easily grabbed. After that you can safely drop down and head across the bridge.


I just wanted to drop a quick thank you here. These guides are so well-done, and I really appreciate that you leave WIP notes to indicate what has been added or is coming soon. I’m anxiously awaiting completion of this one and Caelid.
Thanks for the feedback Malavesh! I also wish we could get these walkthroughs done faster, but FromSoft blessed us with a pretty huge game this time around.
Great work!!! Congratulations!!!! Just an information, at night at the Hermit Merchant Shack a Bell Bearing Hunter appears, just rest in grace. Another thing… after the Sealed Tunnel, will we activate any runes in the Divine Tower?
Thanks for the heads up, I’ll see if I can get that hunter to spawn myself. Good question re: the tower… The Divine Tower after the sealed tunnel is apparently for Rykard’s Great Rune (which can be obtained from Volcano Manor). I’ll add that info to the guide!
Hi Daniel, to respawn you only need to pass time for the night in the grace and then when it is night rest in grace.
Weird… I tried doing it the way you describe, and it didn’t work — I had to go somewhere else to get the hunter to spawn. FromSoft makes great games but sometimes they’re a little buggy 😀
Just past the unsightly catacombs entrance in the southeast corner of the cliff edge there’s an arteria leaf.
Thanks Josh, I’ll note that in the guide!
Thanks a lot for the detailed guides. This has definitely improved the overall game experience for me and actually made it much easier to follow along with the main storyline, all the characters and side stories.
Awesome to hear that Zman! To give you fair warning, it’s unlikely our walkthrough hit all the side stories — people usually find secrets and hidden NPC locations months after the game launches, so we’ll be constantly updating these guides. Also, you’ll be able to look for NPCs in our database eventually, we’re planning on adding specific instructions for following all the stories (once we finally get the time to do so!).
That will be awesome! TBH when I started playing the game, I wasn’t really enjoying it, there wasn’t a lot of direction and I was trying to pursue the main story line and the mobs and bosses got really hard all of a sudden. Then coming across your guides changed the whole experience for me!
Best guide around. So thorough and such a good read.
Thanks!
Our pleasure, and thank you for the kind words!
Thanks a lot for those guides, love them. Just a note, I think you’ve missed Wyndham Catacombs.
Thanks Beton, you’re absolutely right. I even checked that wall, but the door is impossible to see until you’re closer! Really appreciate it.
Your forgetting Nokron the underground city I feel that goes after altus but before dragonmaw
We’ve been discussing the best next steps internally, and I think we mostly agree — although we may end up sending people to Nokron right after Caelid (since that’s when you open up the route to Nokron, and Nokron feels easier than Altus).
This is by far the most in depth and well explained guide I can find for Elden ring, the only problem is I am in the giant mountaintops, will you be getting the other areas done anytime soon do you think?
Thanks GParg, and sorry we haven’t gotten to where you’re at in the game yet. To be honest, I don’t think we’ll be at the mountaintops “soon”… right now I’m working on the areas for Ranni’s quest (Nokron and Ansiel, plus Liurnia’s Divine Tower) and after that, I’m going to do Leyndell; my partner on this project is finishing Caelid before moving on to Mt. Gelmir. We do plan on working hard to get it all done ASAP though!
Hey just wanted to say thanks again. Do you have a time line of when volcano manner will be completed? Also do you have a guide on deeproot depths?
You’re very welcome (again)! Volcano Manor should actually be published and ready in the next day or so! Deeproot Depths is on the (long) to-do list of walkthroughs, and I’m still deciding whether to complete it before or after Mountaintops of the Giants/Mt. Gelmir.
Good to know. Looking foward to it maybe do deeproot then Mt gelmir since it’s next to plateu
At the Minor Erdtree Church site of grace, Melina didn’t show up after I rested there. On the Fextralife wiki it says any grace in Leyndell will cause her to appear, but references the East Capital Rampart specifically. I am not sure if I made her appear already or not (I don’t have that site of grace), but thought I would flag this for you.
Love the guide, thank you so much for all the hard work!
Thanks for the info Adam, it’s definitely been hard to pin down when Melina shows up! There are so many possible iterations of first-grace-rested-at-in-the-area that it’s difficult to get this stuff 100% accurate.
It’s possible I missed it listed elsewhere, but in the walkthrough after the repeat open Margit fight, and collecting the items where the harpy and bats are, you can go a little further south west and from the connected area below collect several other higher level Golden Runes from corpses among giant tombstones as well as an Old Fang on top of one.
Hi mate, loving the guide have been following it for a completionist playthrough on my 3rd playthrough. I seemed to have missed the mt gelmir section from wyndham ruins all the way round the volcano to the shack where comet azur is etc. What section is it in? Cheers
It’s been a little while since I was on Mt. Gelmir, but I believe the section you’re looking for can be found in part of our Mt. Gelmir guide.
Just curious what’s ssd in don’t understand that..its by where you find the golden mask?
Sorry for the confusion Jocker — an SSD is a Solid State Drive, a type of hard drive that loads things much faster than the previous generation of hard drives. That part of the walkthrough was designed so that people with a fast hard drive would teleport, while people who have longer loading screens would travel on Torrent instead.
After fighting the dragon, there is a spectral dude on a chair on the northwest side of the ridgeline, after running through him he drops the harp bow
Thank you for the info, much obliged!
There is a Celebrant’s Skull Great Hammer at the Windmill area – just northeast of the Windmill Village site of grace, past another windmill, is a brief stretch of cliffside. Weapon pick up is prominent on a corpse.
Also, minor edit you likely have seen: your subsection title for this Altus section is misspelled ‘party’ vs. ‘Part 2’. Thanks again for a terrific guide!
Once again, thanks for your help with the stuff we missed Chris!
On my fourth full run through (I get bored with NG+) and am a bit of a completionist and I still find your guide very helpful. Just a note if you ever go back and update, on the way to the Shaded Castle from the Old Altus tunnel, there is an Arteria leaf tucked back on the right (E/Ne) as you head down the slope, and a golden sunflower and sacramental bud on the left. Since these are a little more rare for crafting materials thought it would be useful to point out.
Hey is there any part of the guide that isn’t done yet? Its mentioned here that volcano manor guide isn’t finished but it looks like it is. It’s also mentioned that mt gelmir isn’t done. Their respective buttons for next page are not on the altus plateau or mt volcano manor.
Hi Jason, it should all be finished now, we just missed cleaning up a few of the guides/adding references to finished guides. Thank you for the heads up!
Thank you. Your guide is the best out there. You(and/or your team) should feel proud.
Hey there. In part 3, after the weak enemy that holds a chest with a golden rune 10, it says to hug the east cliff but it’s actually west. Keep up the great work! Thank you!
Also, in the writheblood ruins, in the west-most ruin, there’s a sign that lets you invade Magnus the Beast Claw. He’s there for progressing whitemask varre quest line for anyone playing offline, which is a good amount of people. (anyone playing modded or without Internet)
One question. Is the guide complete or are there parts that are still not done?
Adding on to previous comment( couldn’t edit because of time spent editing)
Killing Magnus *once* is sufficient for progressing Varre’s questline. If you can’t kill him, you can instead just attempt 3 times to complete the quest. the player can invade him and then use the Finger Severer item to quickly fullfill this condition.
Killing Magnus drops :
Runes
Furlcalling Finger Remedy
Rune Arc
Great Stars
Somber Smithing Stone (6)
Thank you once again Jason, I’ll get the info on Magnus added – must have missed this addition to the 1.06 patch! There are a handful of minor NPCs whose questlines we don’t cover, and some of the NPC questlines are mentioned in the area info (the dropdown at the top) but are not actually referenced in the body of the walkthrough. Both of these are issues we hope to correct before the DLC drops though!
I’ve also added the info about the Golden Rune [4], much obliged.
At the part where you can take a left at the bridge in part 3 to find an enemy holding a chest with a golden rune 10; if you instead take a right at the bridge and jump up on the lowest part of the rocks with torrent, then take a left and go up the ledge to the edge of it, there’s some weak enemies next to a golden rune 4 that can be easily grabbed. After that you can safely drop down and head across the bridge.