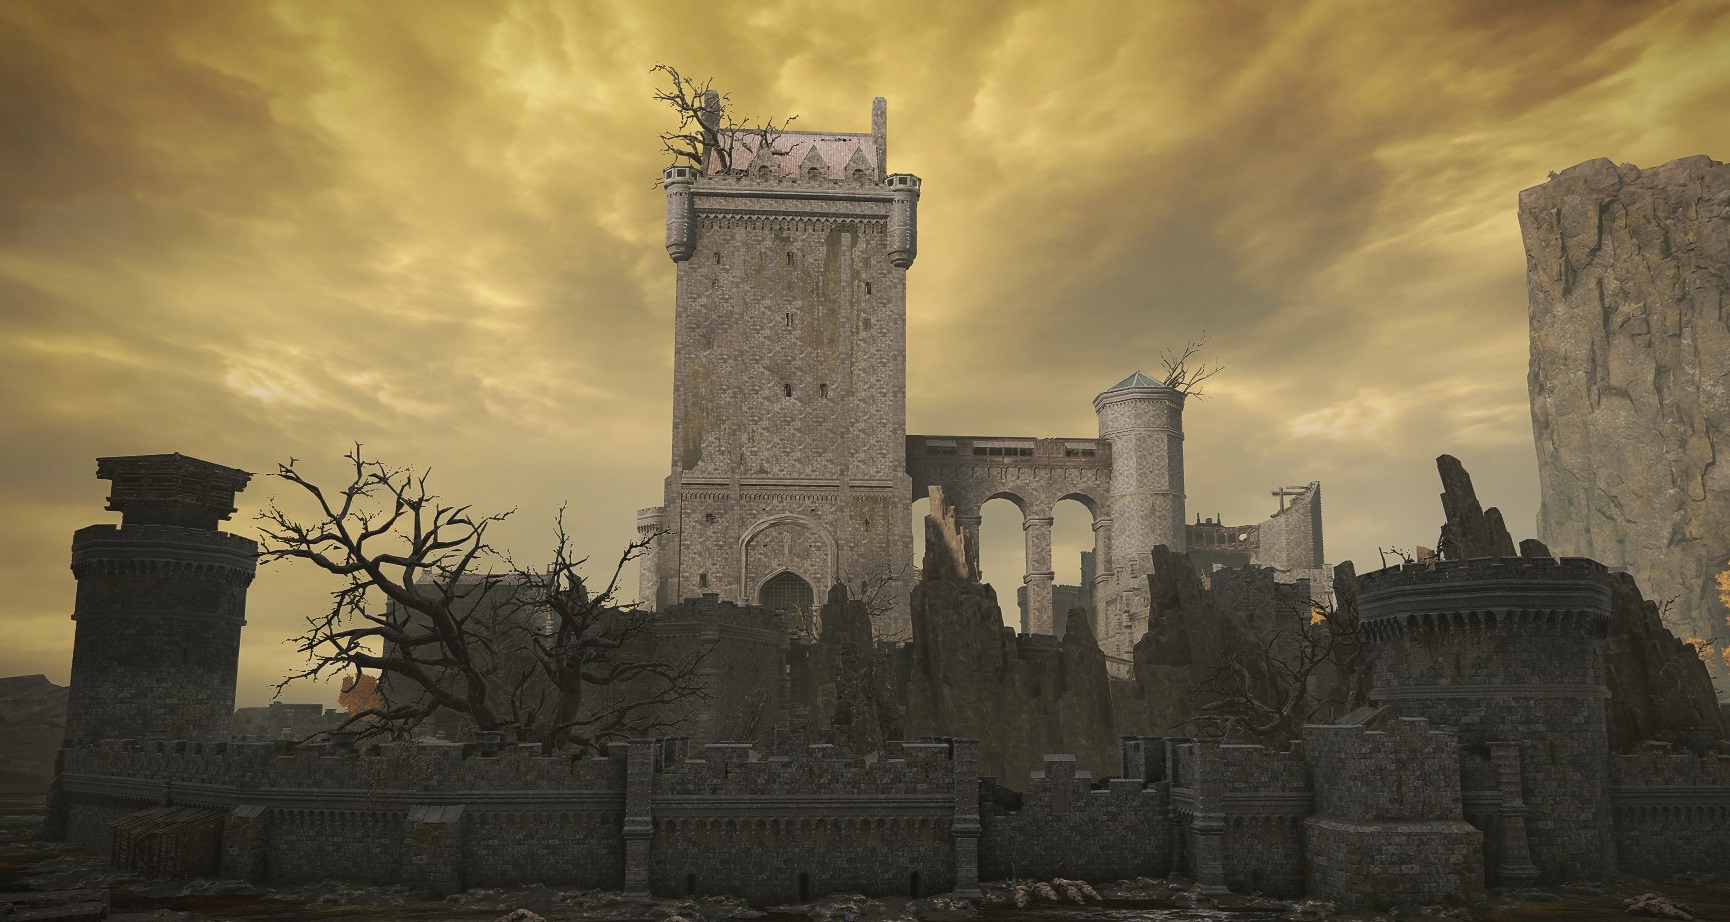
Found in the north of the Altus Plateau, the Shaded Castle is a decently large area to explore, with a number of tough enemies and plenty of poison to wade through.
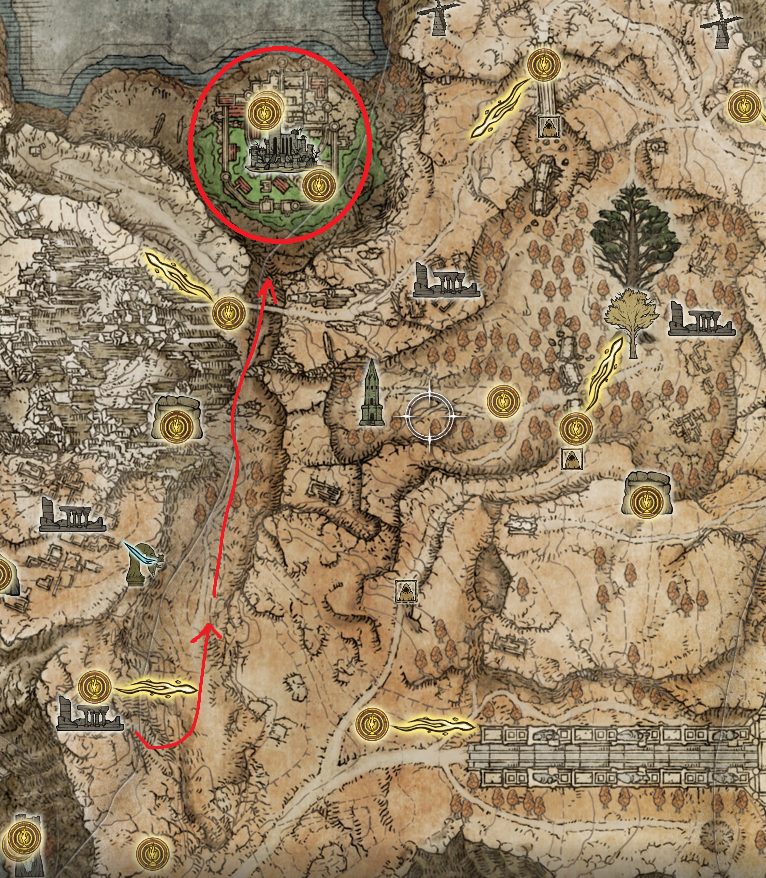
The Shaded Castle is accessible via the pass to the south. Go north through the valley that lies just east of the Erdtree-Gazing Hill site of grace, and hug the western side of the valley as you go north. You’ll eventually reach a pass through the rocks.
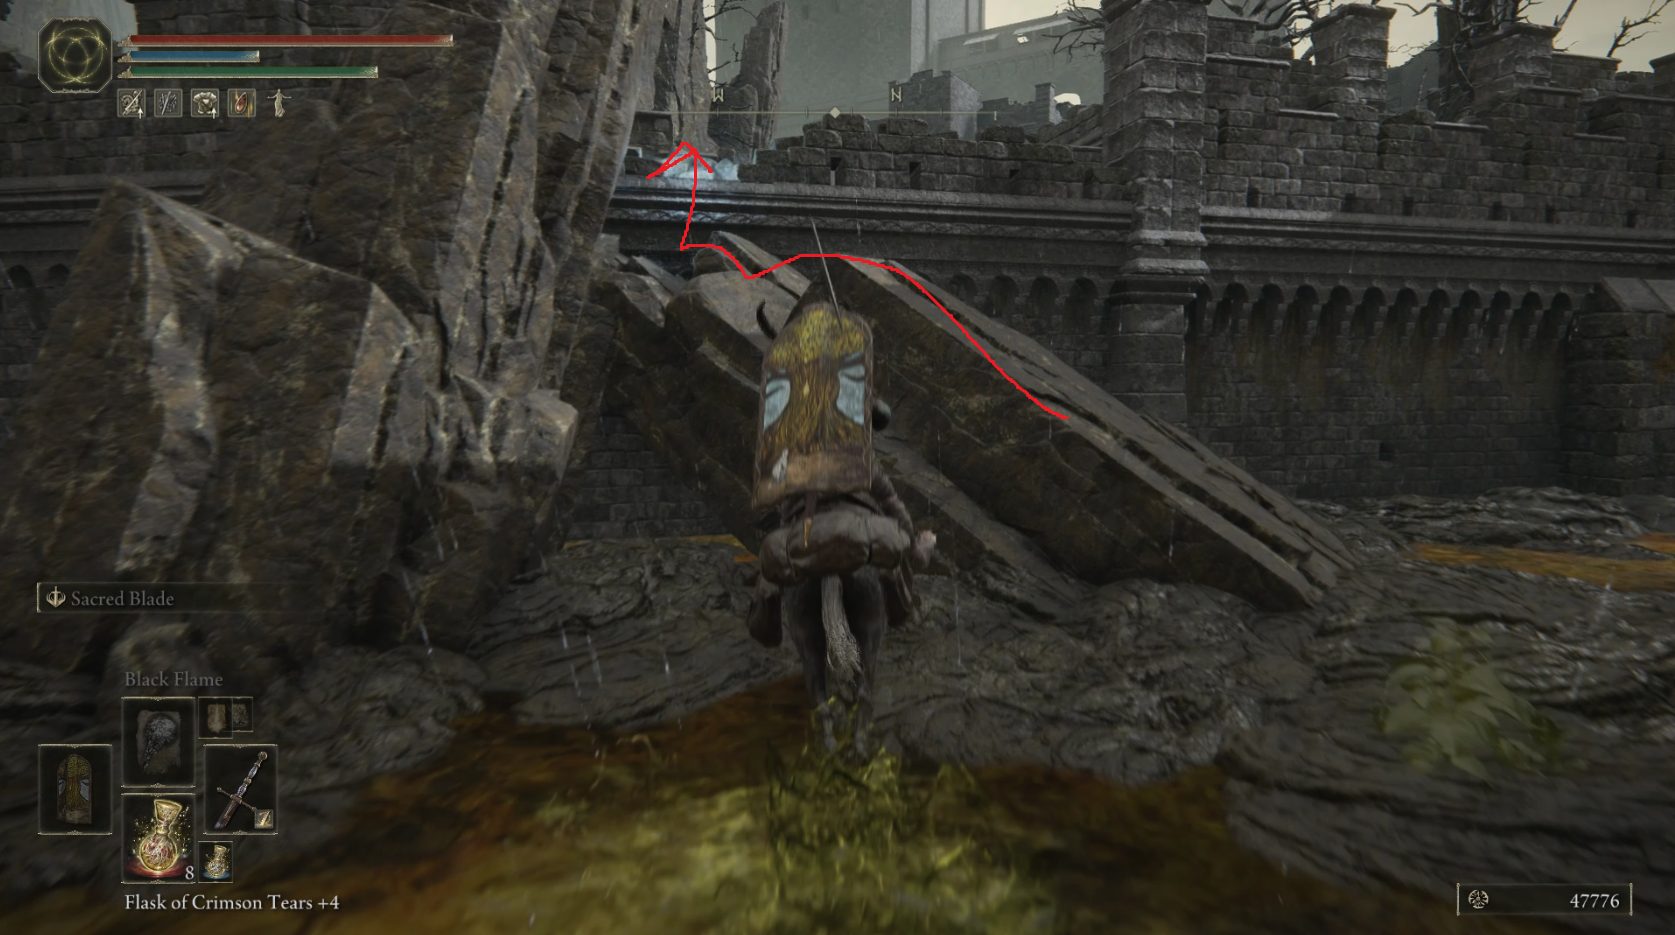
At the front of the castle, you should see a cluster of slugs facing a corpse — kill them and grab the Golden Rune [3] they were so interested in. There’s actually a bit more to do outside of the castle, but the first thing we’re going to do is grab the site of grace. From the front of the castle (facing it from the south), go right and ride around the eastern side of the castle. You’ll pass more slugs (which you can probably 1-shot for some easy runes), including one that’s staring at a corpse with some Poison Grease. Soon, you should see some rocks that form a ramp leading up to the castle wall.
Use Torrent to make your way up the rocks and onto the ramparts, being careful of the enemy that’s hanging out just to the left of the broken crenellation. Turn right to head northeast, and take your first left up the stairs to find the Shaded Castle Ramparts site of grace. Tap it and then go back the way you came and jump back down, to the outside of the castle walls. Ride west and then northwest around the castle, and you’ll see a couple clusters of poison plants. Go past them to the northwest, then bear west and head past the tall rocks into the field full of rubble.
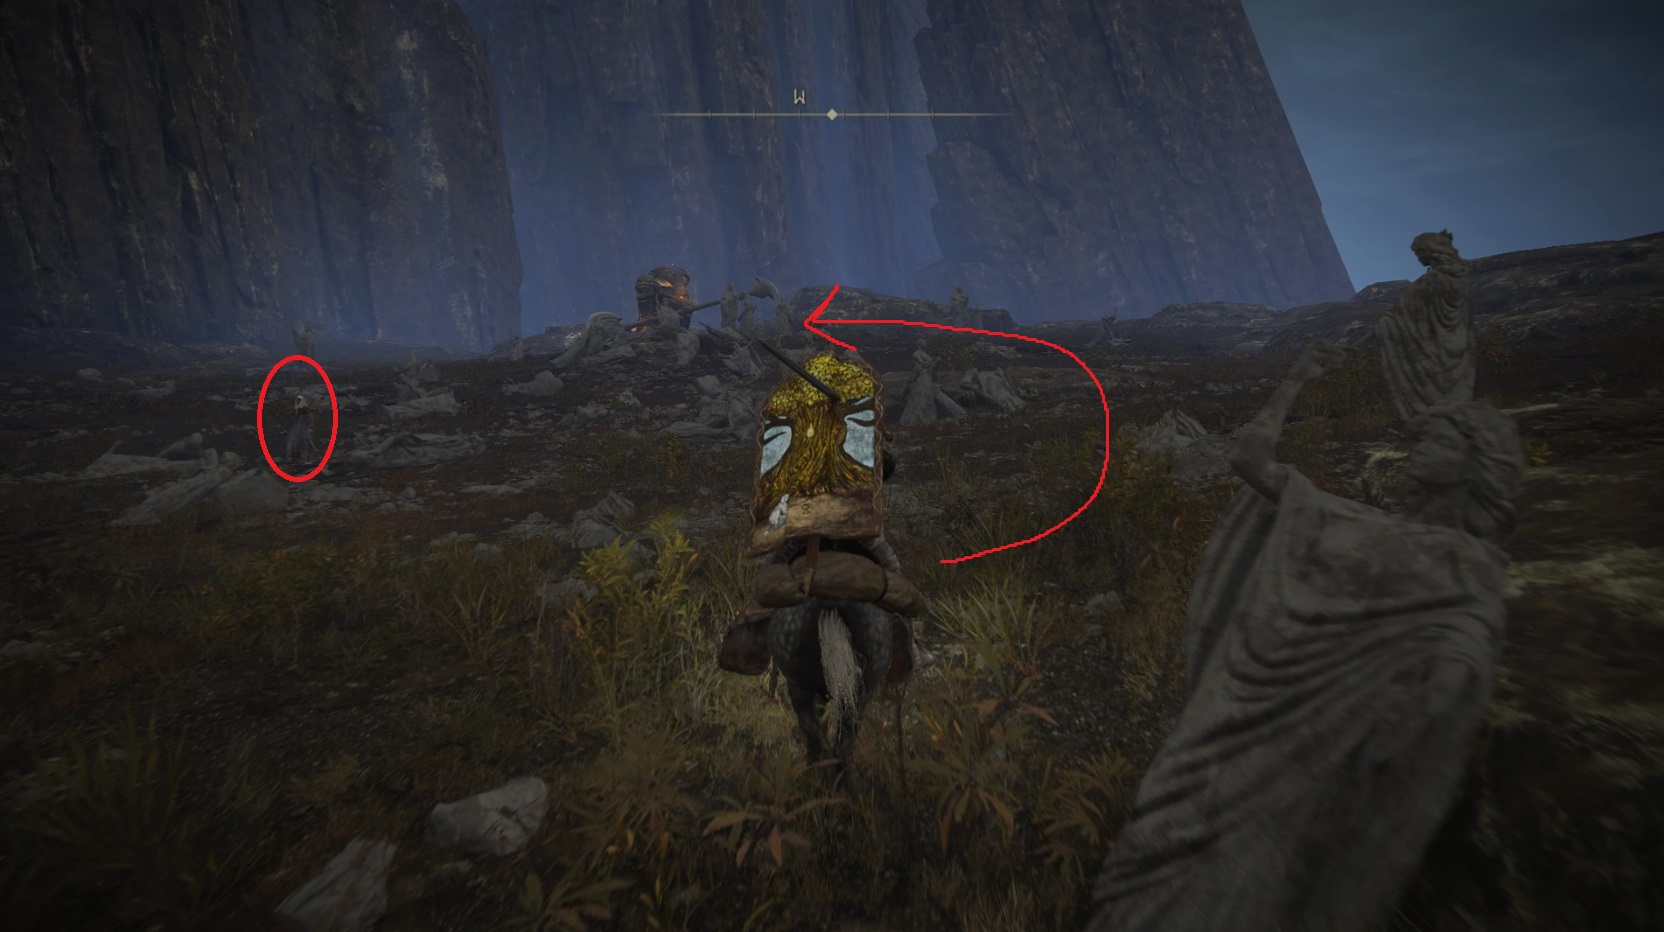
As you enter the area, a giant on the far side will stand up — we want to engage the giant without aggroing the human enemy nearby, so swing around to the right in a wide arc and then engage the giant (you can also grab the Smithing Stone [5] near where the giant was lying as you engage).
Stay on Torrent and attack the giant’s vulnerable ankles — as long as you’re patient and ride away while the giant attacks, this fight is easy. When retreating, try to retreat in any direction but towards the human foe we passed coming in. If the other enemy does aggro, just ride away from the giant to lead them away, then ride back and attack the giant some more. The giant will drop the Golem’s Halberd when defeated, and the human (who you can go handle once the giant is down) drops the Antspur Rapier, Marais Mask, and Marais Robe. With both foes defeated, you can head to the rubble field’s northwestern edge to find a corpse with a Smithing Stone [5]. Once the stone is secured, teleport back to the Shaded Castle Ramparts site of grace.
A note on enemies and poison:The many zombie-like enemies here (we’ll call them “rottens” throughout for the sake of brevity) are slow, but have a very damaging attack where they open up their chest and spray poison at you. They also have a nasty grab attack that they’ll do if you stand near them for too long, where they bite you and take a huge chunk of your health. While you’re exploring a section of the castle for the first time, you should always clear these enemies. Once you’re familiar with a section — and you know you’ll be heading past them — feel free to ignore them, since they’ll take a very long time to catch up to you. The other thing to keep in mind throughout this area is to not roll in the poison —if you do so, your meter will continue to fill even when no longer standing in it.
From the site of grace, go down the stairs to the southeast and turn right — past the two rottens and through some barrels is x4 Poisonbloom on a corpse. Now turn around and head northeast along the ramparts. You’ll soon spot a new type of enemy, a perfumer. He’s got a devastating ranged attack where he splashes perfume towards you and it explodes, and it also can stagger you as it’s going through you.
Melee characters will need to time a roll through the perfume and close the distance (you can also immediately sprint at these enemies when you see them to get in range before they can attack you). Ranged characters can just be happy they don’t have to bother. These enemies also have two charges on a crimson flask, so keep attacking them when they’re low to prevent them from healing.
Continue forward on the rampart and turn right to go up a set of stairs, where you can sneak behind another perfumer — be careful of the rotten that hides around the corner on the right, at the top of the stairs. Sneaking up the stairs seems to un-crouch you, so go slowly up the stairs and make sure you’ve crouched once you’re at the top. Take down both enemies and then grab the Golden Rune [6] from the nearby corpse. Go back down the stairs and look to the southwest — there’s a broken section of rampart with a rock that leads down into a pit of poison.
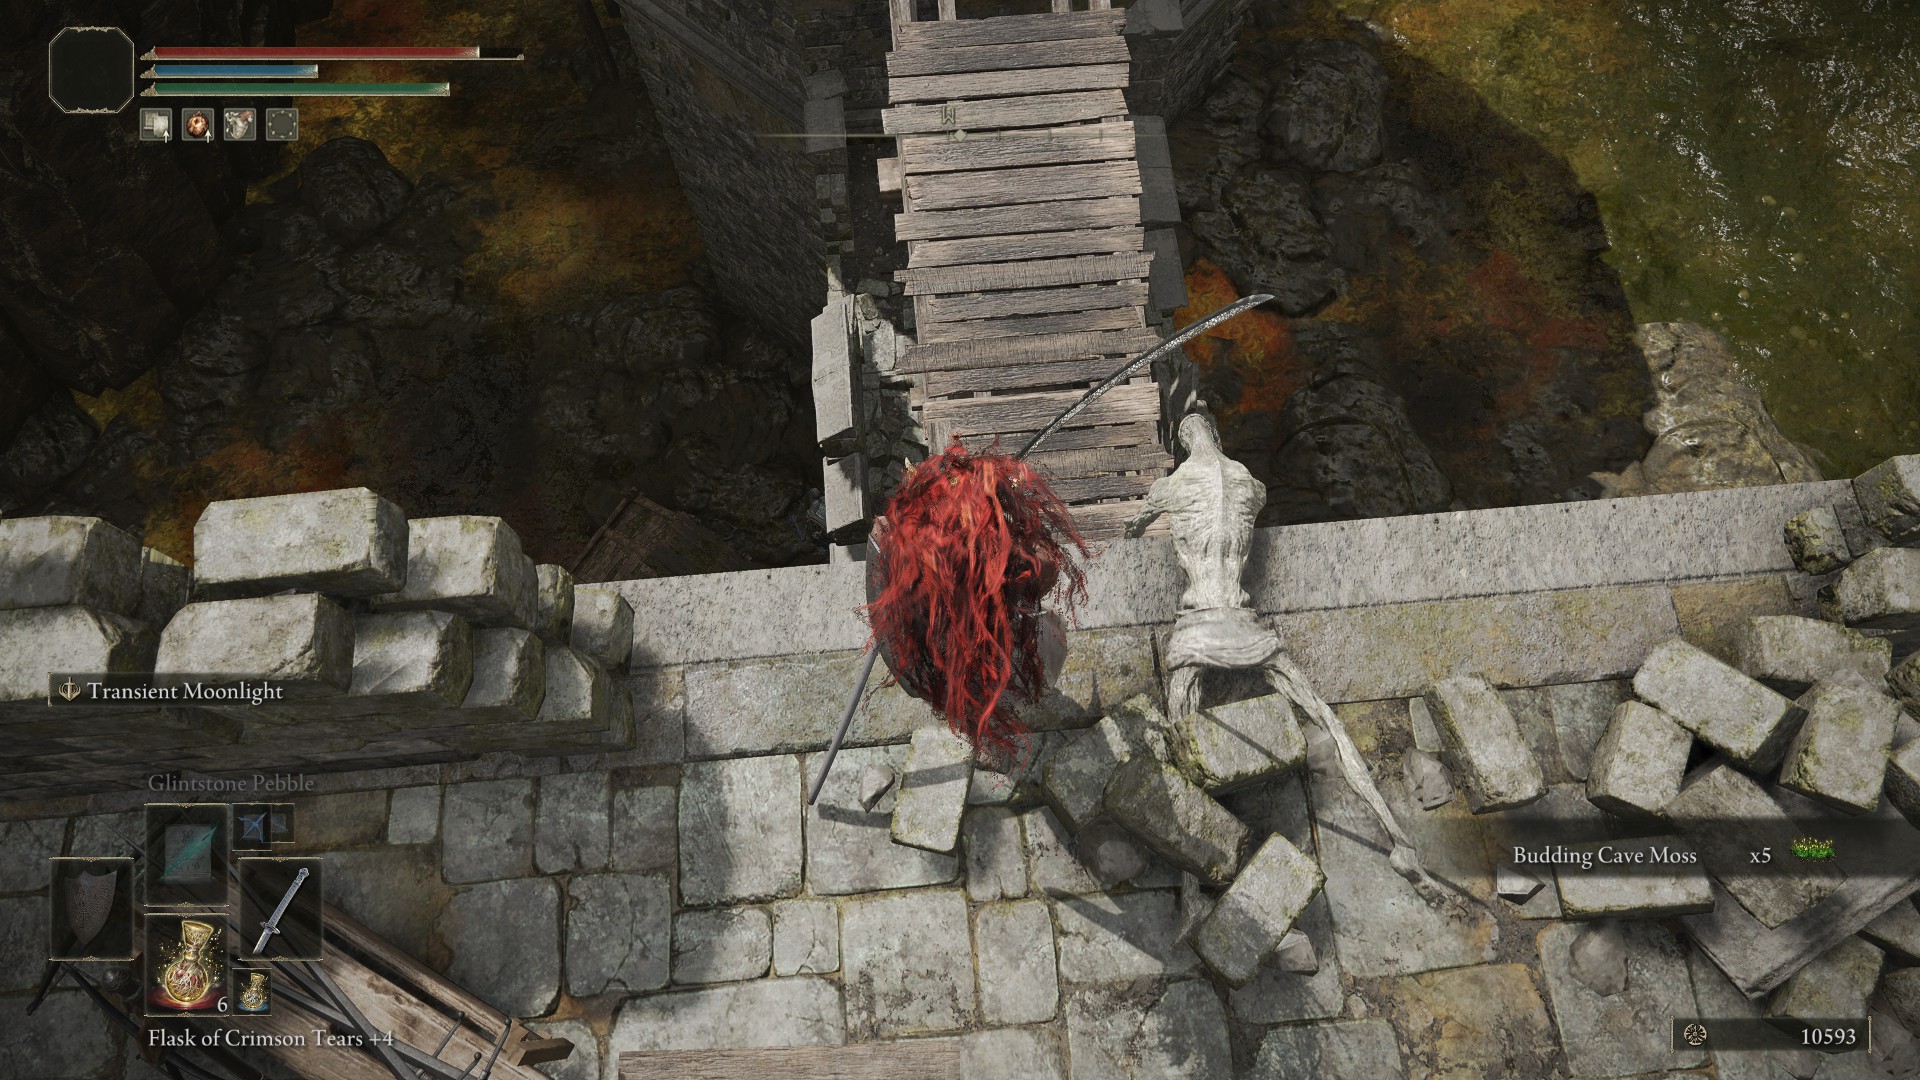
Numerous rottens will crawl out of the ground once you near the poison, so be quick as you grab the x5 Poisonbone Dart and the Glass Shard. Then run towards the small wooden structure in the northern corner of the little pit you’re in. Climb the stairs to find the “Champion’s Song” painting, and then make your way back to the Shaded Castle Ramparts site of grace. You can now access the Harp Bow on the Altus Plateau — see here for details.
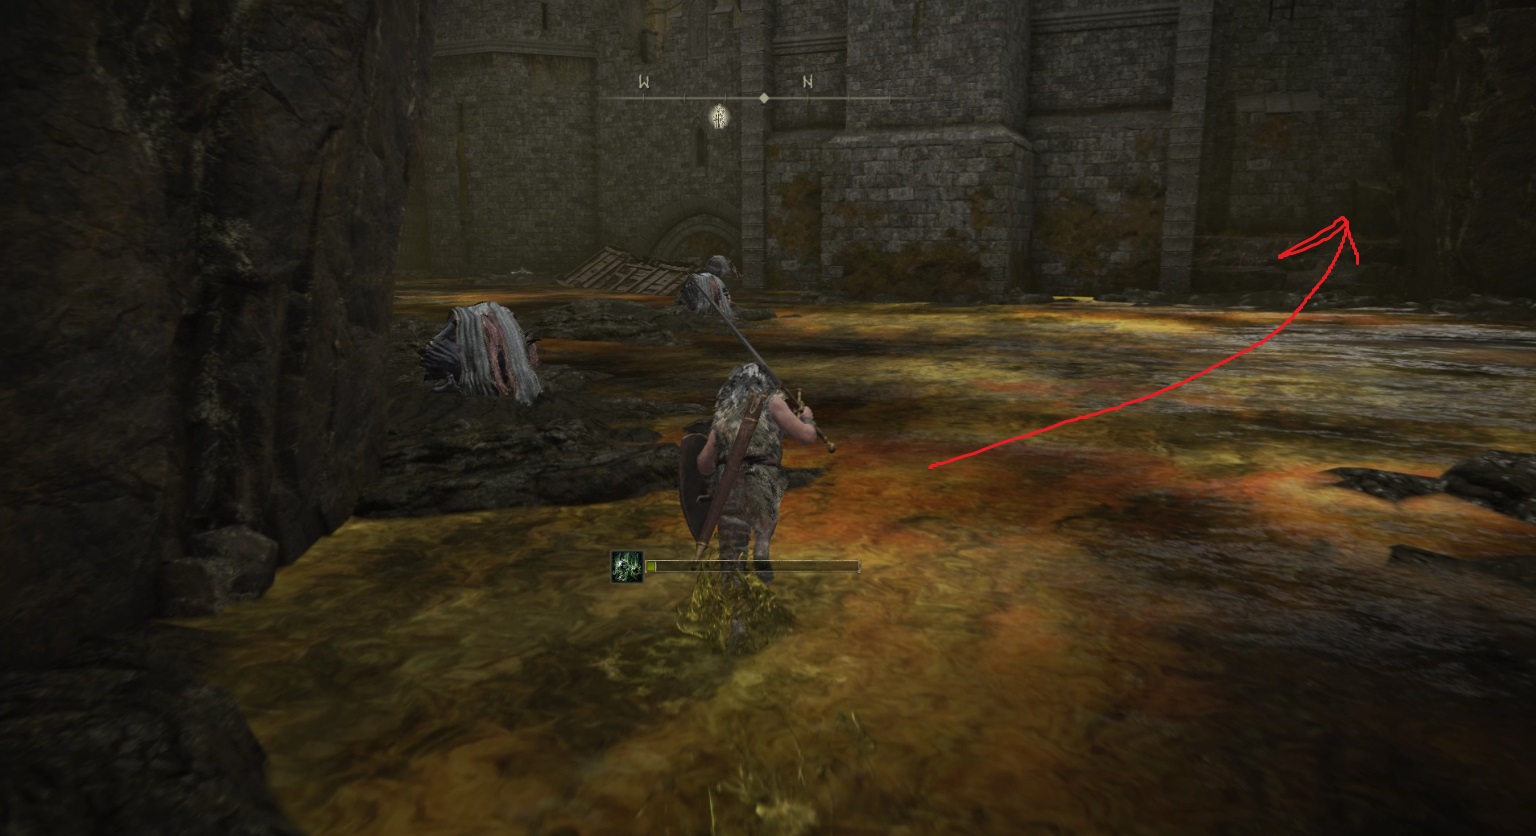
Climb down the ladder just southwest of the site of grace, and then head north — just around the corner on the right is an enemy you should take out. This will likely aggro the enemy on your left, so run to that one next, and continue killing the albinauric sorcerers that are nearby. Next, you’ll need to follow a series of tricky jumps to reach a Stonesword Key. You can click/tap the first image to open the gallery, and use the arrows on the right/left to advance or go back.
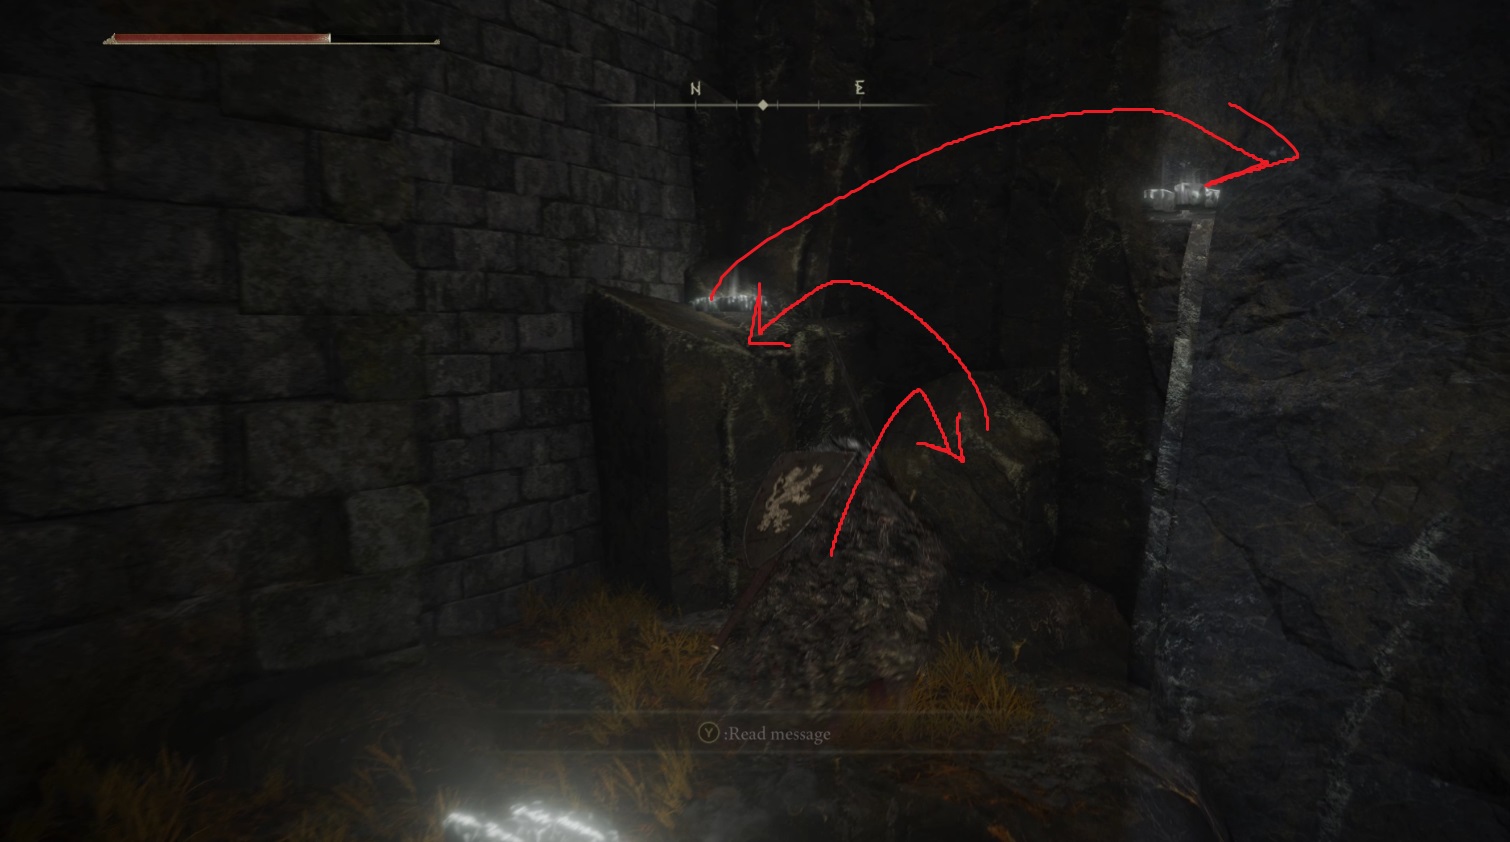
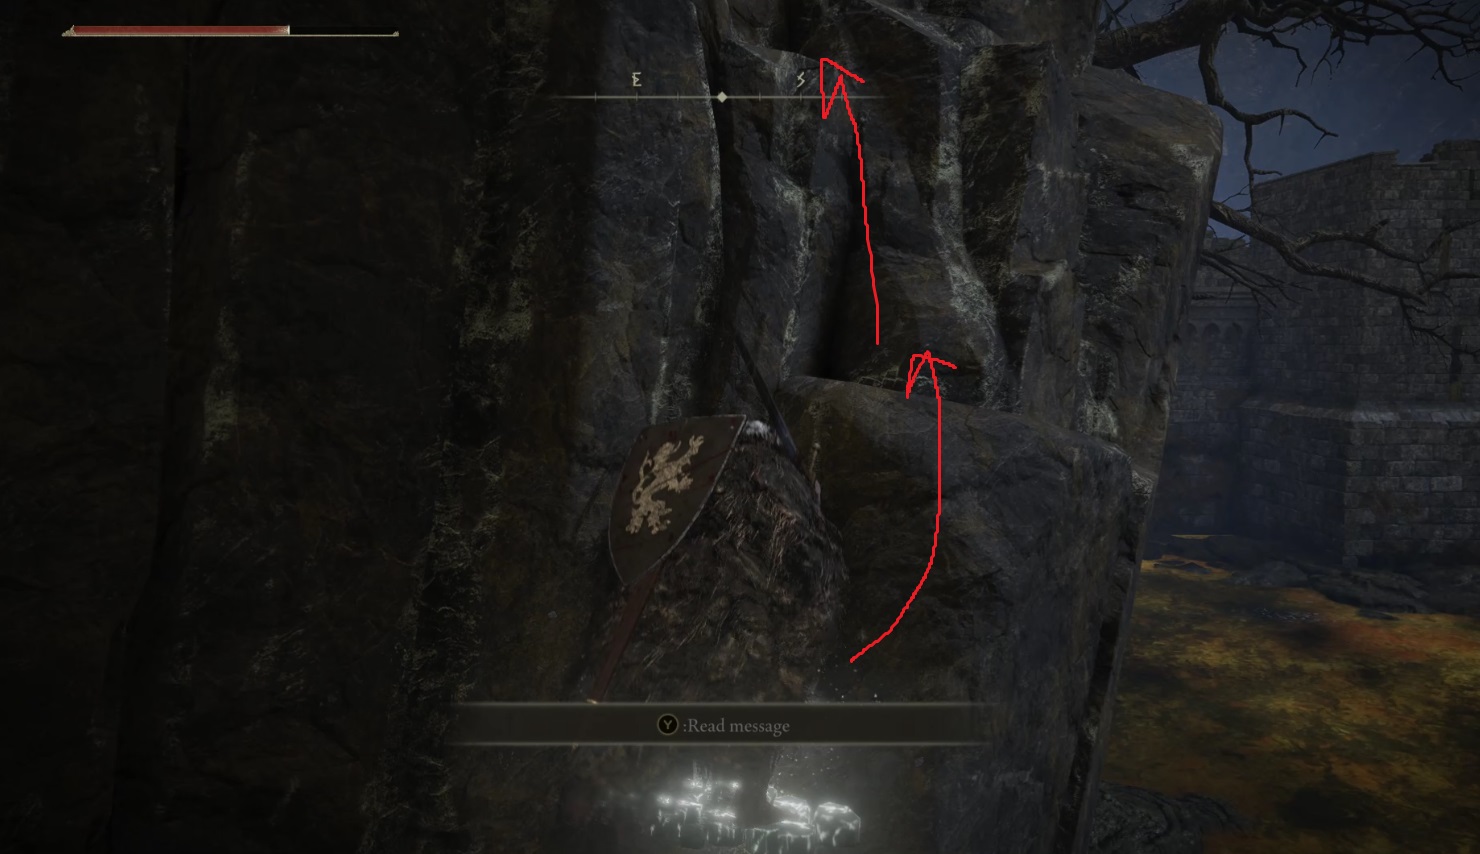
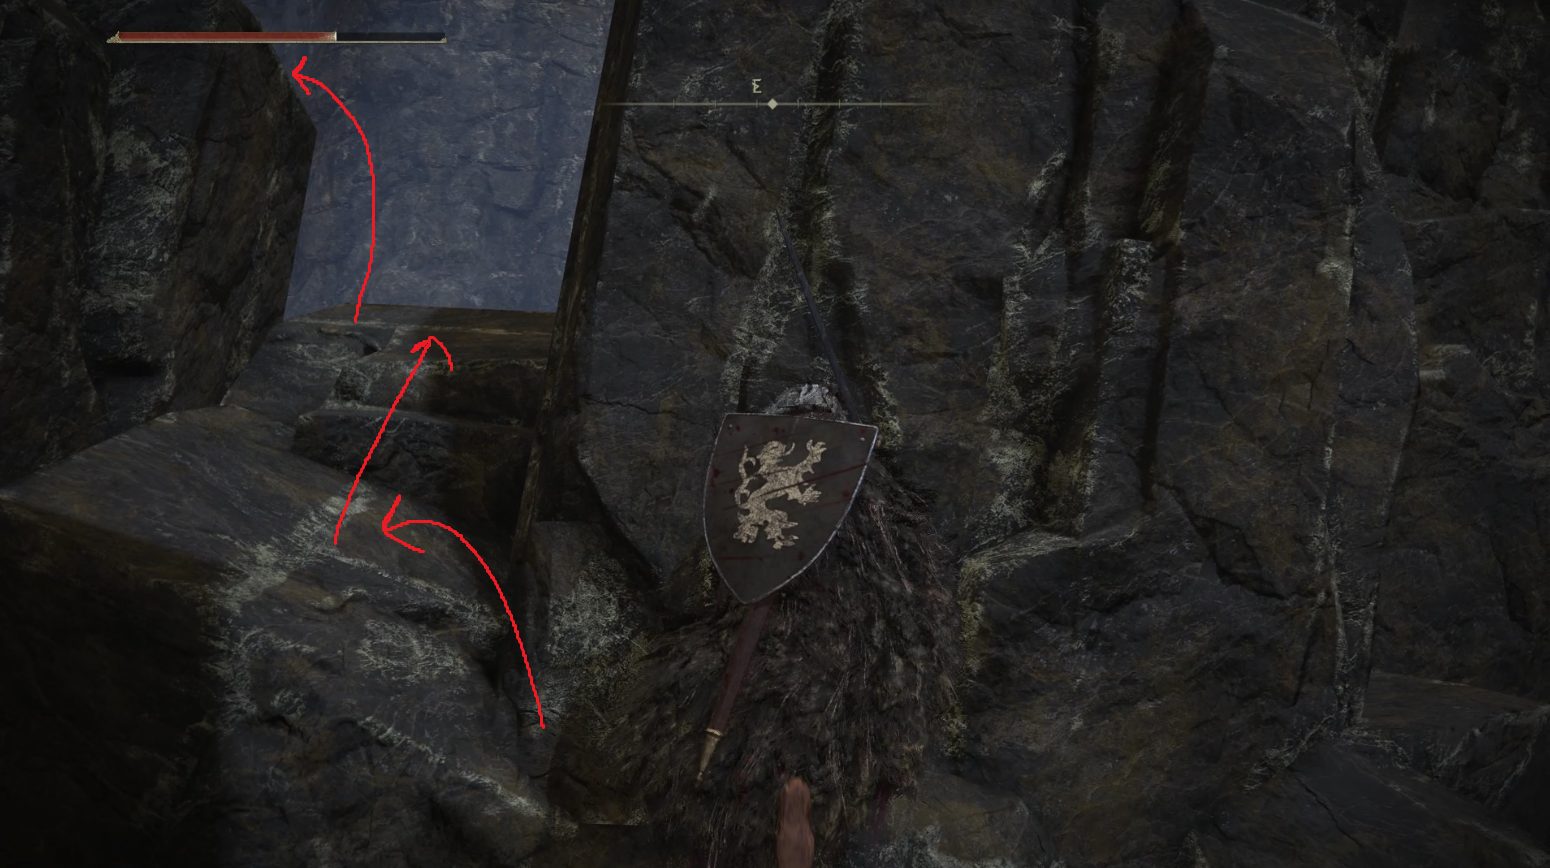
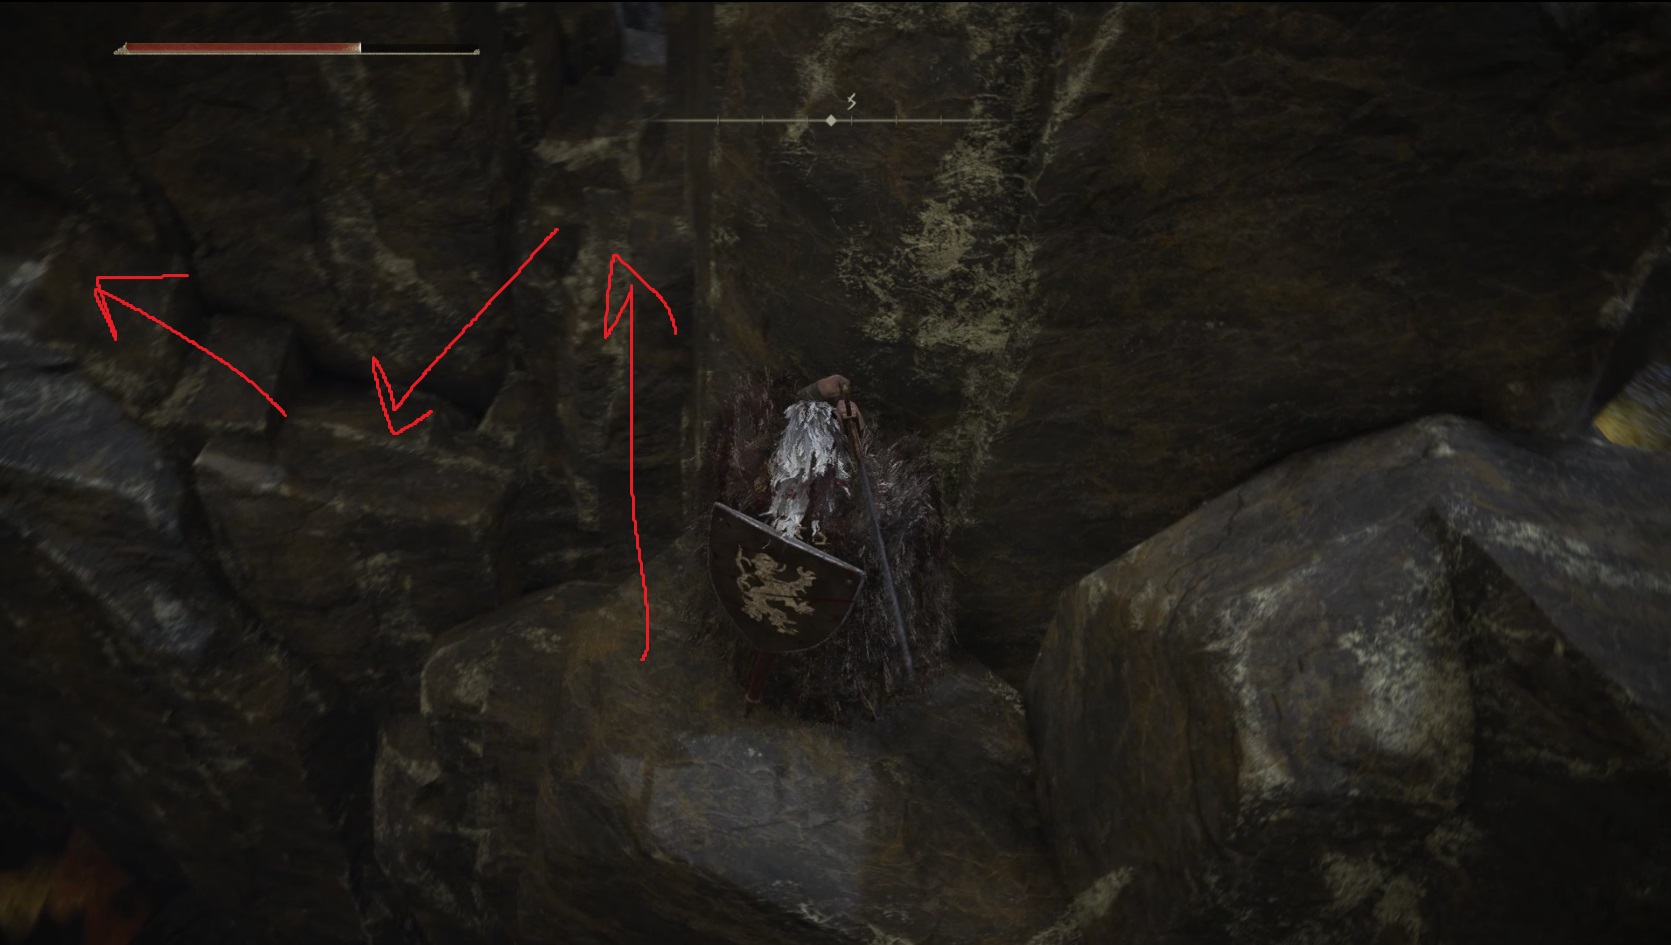
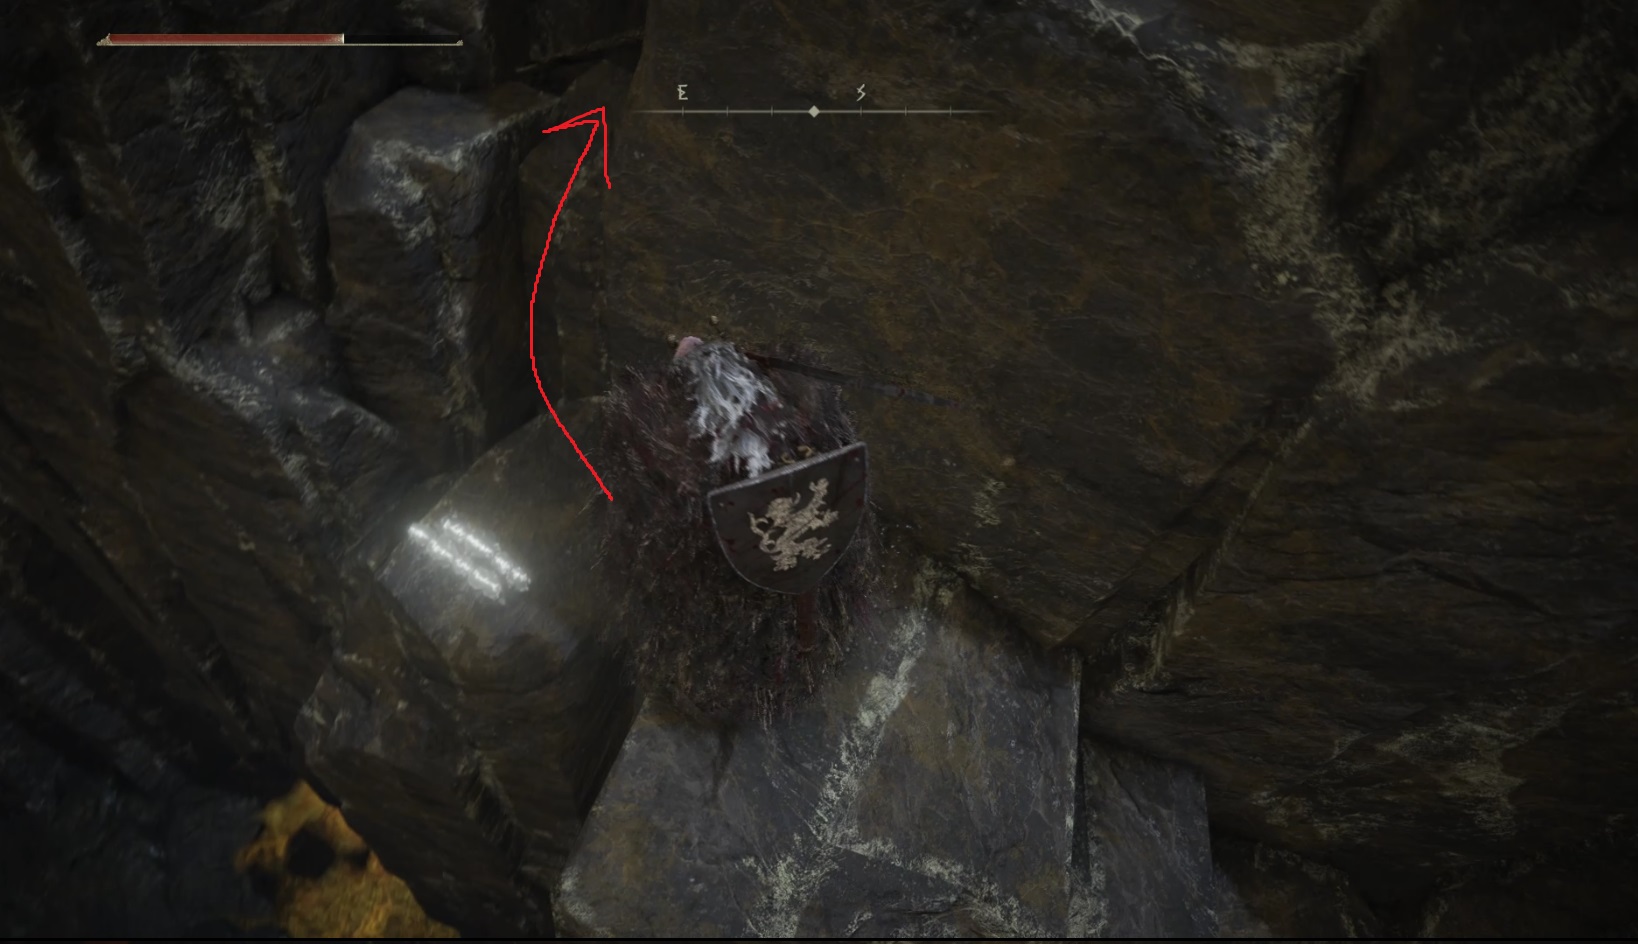
1 – Jump up onto the nearby dry land to the north.2 – Jump onto the middle rock, then the left-hand one, and then jump southeast as high as you can go.3 – This next bit is tricky — you need to jump slightly to the right in order to get onto the next rock here. 4 – Then it’s easy to turn left and face east-southeast and jump onto the next section, then further east onto the flat bit of rocks. Go to the eastern edge of the flat rocks, then turn left and jump up onto the rock to the north.5 – Now you’ll need to jump south to the higher flat rock, which can be tricky since you can’t see where you’re going. Hug the northern wall and then hold sprint and run south before jumping.6 – Next, you’ll jump around the corner to the south to land on the rocks that are about level with your current position, and then drop down to the east and continue until you reach another drop.7 – Do the same kind of jump as in step 6, forward and around the corner. You’ll be under a branch, and below you is the item — drop slowly and carefully down towards it.
With your Stonesword Key claimed, drop down onto the poison below and make your way west, trying to stick to dry land wherever possible (to avoid being poisoned). There are two enemies around the corner near the sunken wooden roof that you may not have cleared, so be on the lookout for them. Just past them is another wooden structure with stairs leading up it — head on up and grab the Smithing Stone [4], then go back down and continue southwest. There’s yet another enemy around the corner coming up, so don’t miss him (and end up with him casting spells at your back). Note the ladder just beyond this foe, but ignore it for now and instead head south towards the group of slugs.
Take a left at the slugs and go up the stairs, and you’ll find yourself on a platform facing a rooftop with a couple of basilisks. Probably the most loathed enemies since Dark Souls 1, these enemies spew a cloud that inflicts the Instant Death status effect — if the bar fills up, it does exactly what it sounds like, so use ranged attacks or else make sure you stay the heck out of their clouds. Be patient — wait or reposition so there’s clean air to stand in while attacking.
Once you’ve dealt with the basilisks, go south to the corpse on the end of the diagonal wooden walkway to grab the Golden Rune [6]. A green basilisk will come out of the poison nearby — kill it before moving on. To the east by the tree is another corpse that holds a Smithing Stone [5], but be careful — one basilisk will appear in front of you, and another ambushes you from behind the tree. You can go around the left side of the tree to take out the hiding basilisk first, and then deal with the one that rises from the muck. Finally, go northwest and hop up on the building.
Continue west on the roof and look down to find another basilisk waiting to ambush you — remove it from the Lands Between (at least until you die or rest) and then grab the nearby x2 Drawstring Fire Grease. Then jump back up onto the building and use it to leap west to the platform you entered this area from. Go down the stairs and head west onto the roof with a perfumer, remembering to close the gap quickly if you’re melee. From the roof, take the wooden walkway onto the nearby ramparts, then turn right — you’ll see another perfumer. Once he’s dealt with (plus any rottens that aggroed), turn around and head southeast on the ramparts.
Be careful as you come to the next area with enemies (where the rampart opens up into a larger area) — a rotten is hiding around the corner on the right. Take ’em all out, then go east to find a perfumer with his back turned — remarkably, there’s no one waiting in ambush here, so sneak up on him at your leisure. Up the stairs to the south is a Smithing Stone [5] — grab it and then run back the way you came, going west on the ramparts and then taking the wooden ramp down onto the roof again.
To the north, you’ll see more slugs checking out some Beast Blood, and then you can hop up onto the nearby roof, and leap northwest onto the ramparts through the broken crenelation.
Turn left and head south on the ramparts to find a corpse with x2 Neutralizing Boluses, which will come in handy if you end up poisoned while fighting in the castle’s muck. Now go north, past where you jumped onto these ramparts, and you’ll find a bunch more enemies. Kill or avoid them, and you’ll find another broken section of crenelation where you can go right and drop onto another roof. You’ll want to move quickly here, ignoring the enemies, and head into the southeast corner with the flowers to grab the Smithing Stone [5]. Turn around and jump up the path the roof sections make, then go back the way you came.
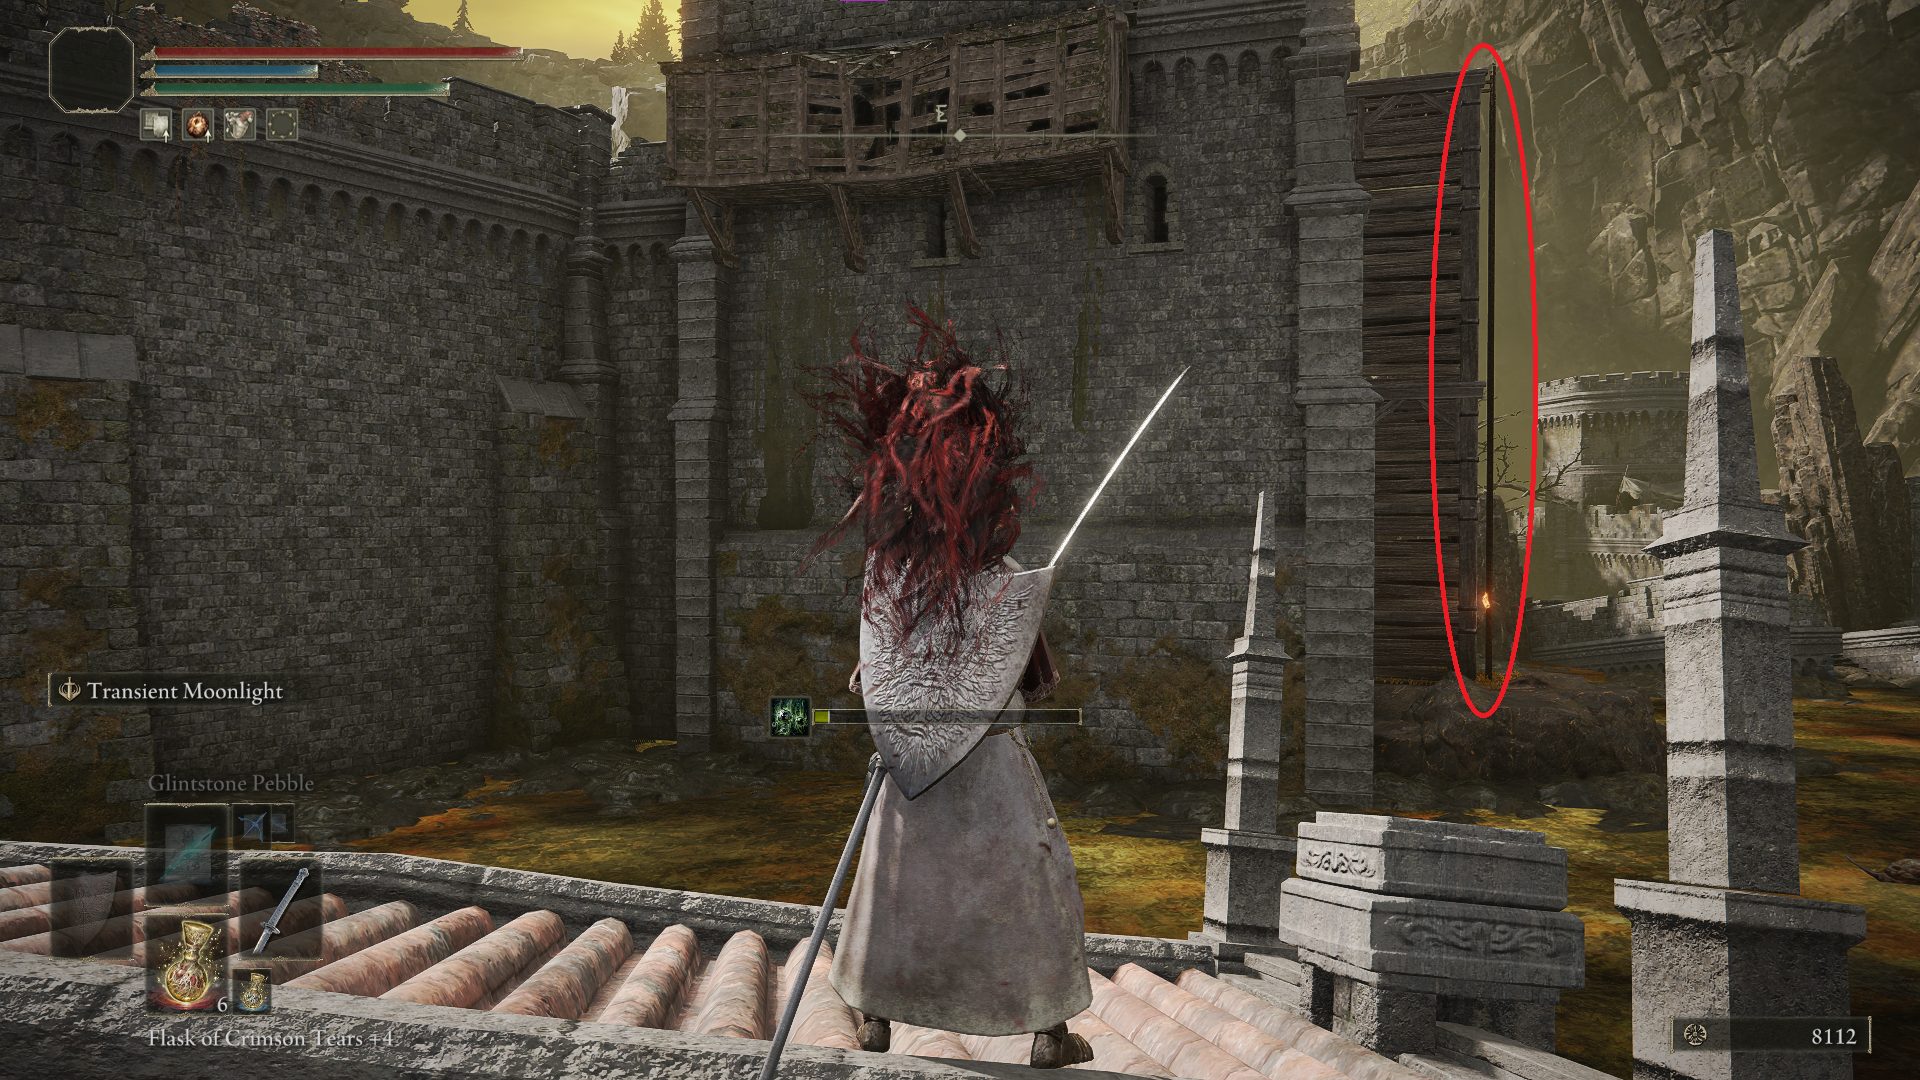
Return to the spot where you first jumped onto this section of rampart, and jump back onto the roof. If you look to the north, you’ll see an item on the low ground (a Somber Smithing Stone [5]) past the tree there. If you approach that area, a Royal Revenant will spawn and attack you. This can be a very tough fight, although you can make it a little easier by turning around and getting back on the roof once the revenant comes out of the ground (this will let you fight without standing in the poison).
You can check out our guide on this enemy type for more help fighting it, or you can just grab the item and then run to the ladder we passed earlier (it’s east and slightly south of the roof you’re probably still on while reading this). Just know that you’ll miss out on the Ghost Glovewort [4] the Royal Revenant drops upon death.
The ladder you’ll take next
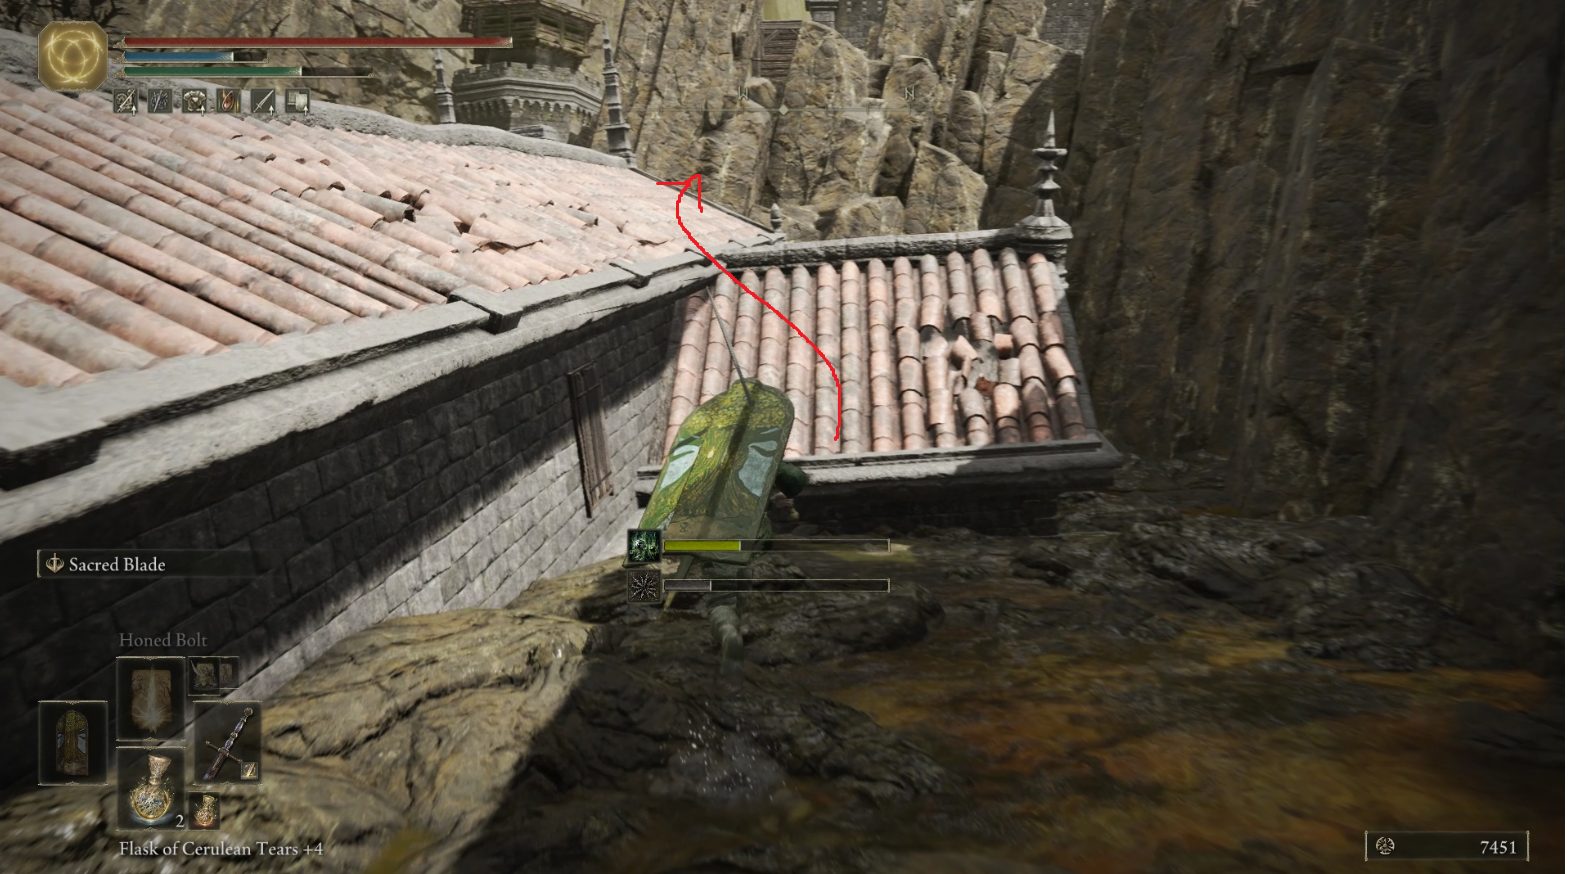
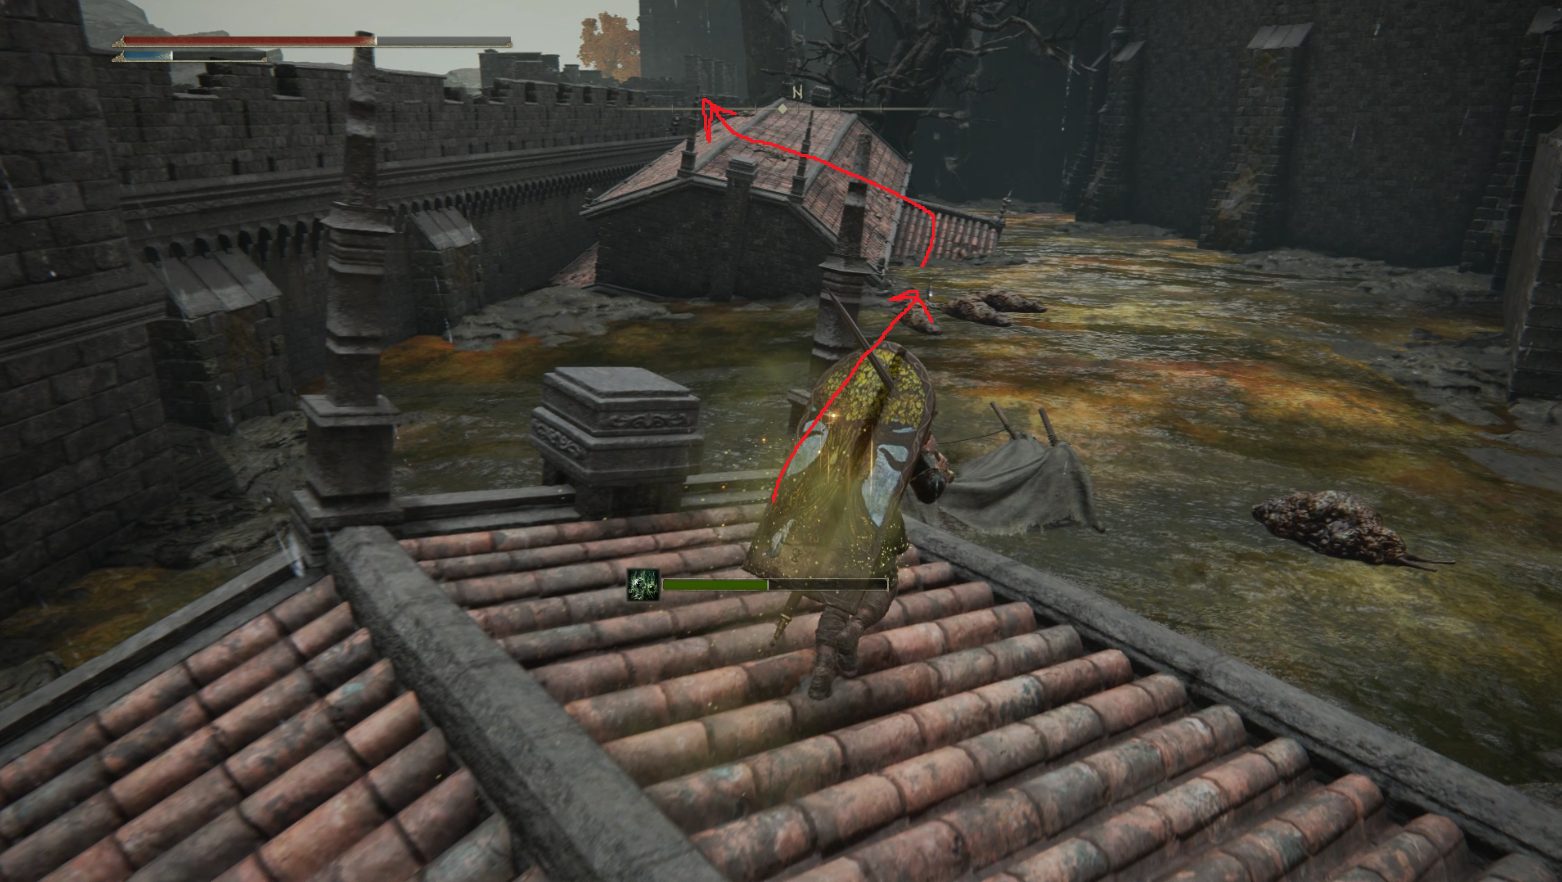
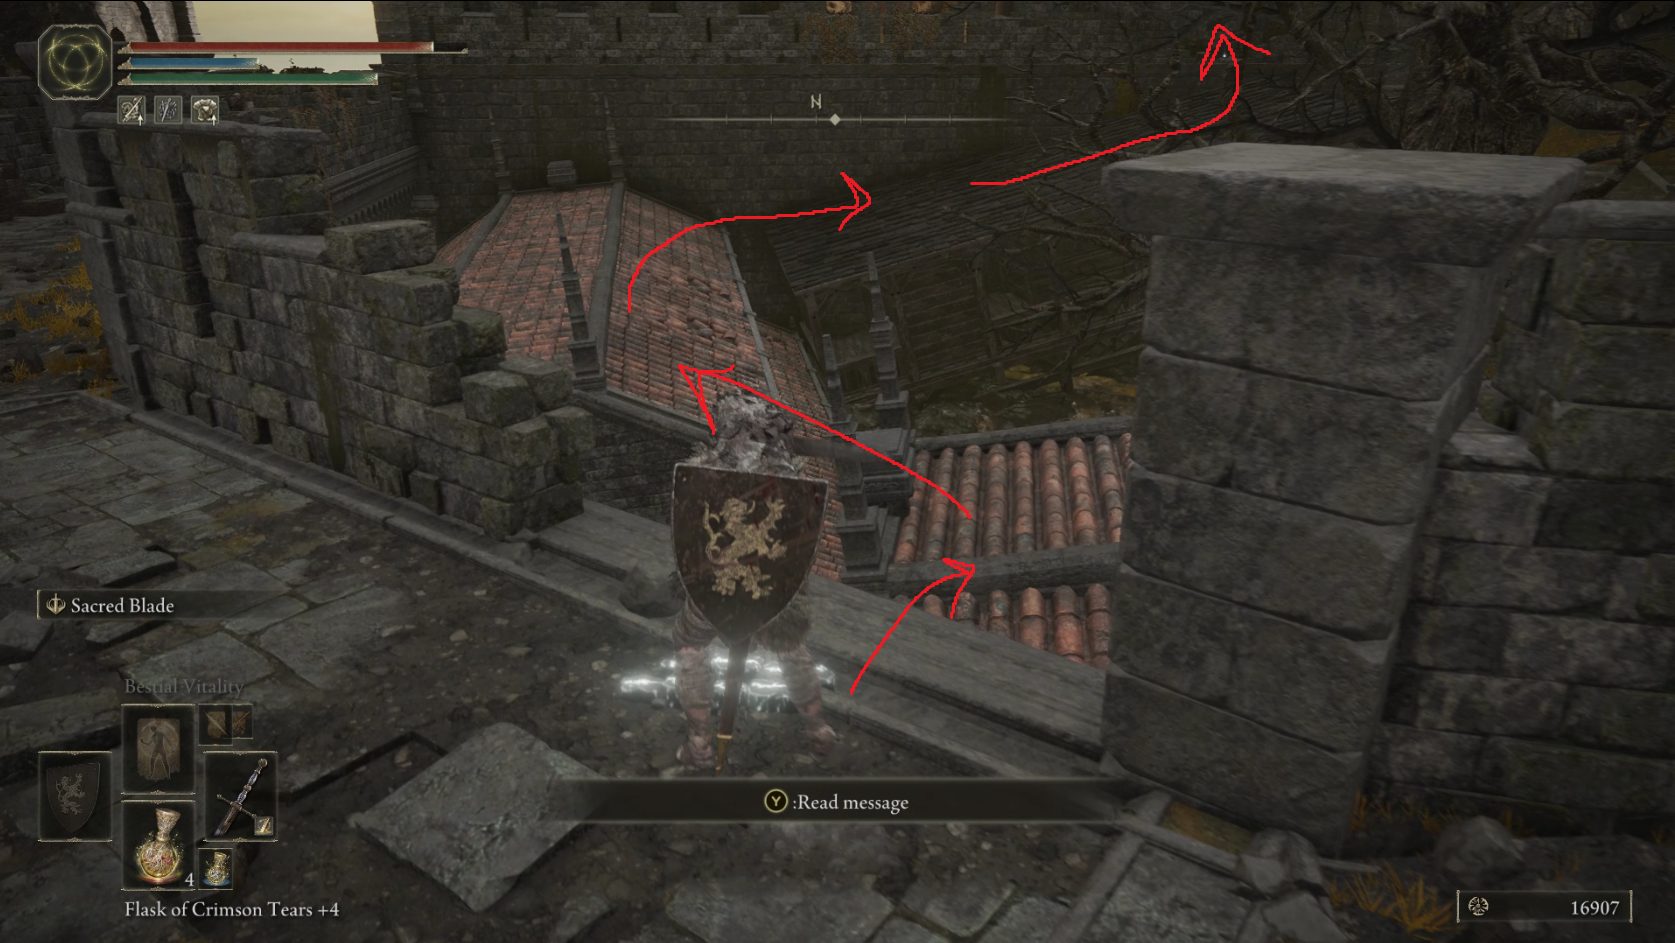
Either way, climb the ladder when you’re ready. At the top, there’s an enemy on the left hidden by objects you should take out before you go down the stairs — where you’ll find another hidden enemy on the left. There’s a lot to do in this area, but first we should grab the site of grace. Go left from the bottom of the stairs and you’ll quickly find another broken bit of crenelation. Look north and you’ll see a series of rooftops you can follow to reach the site of grace:
If you fall while attempting this path, you can return to the base of the first rooftop here, which has a path you can jump up to return to the rooftop
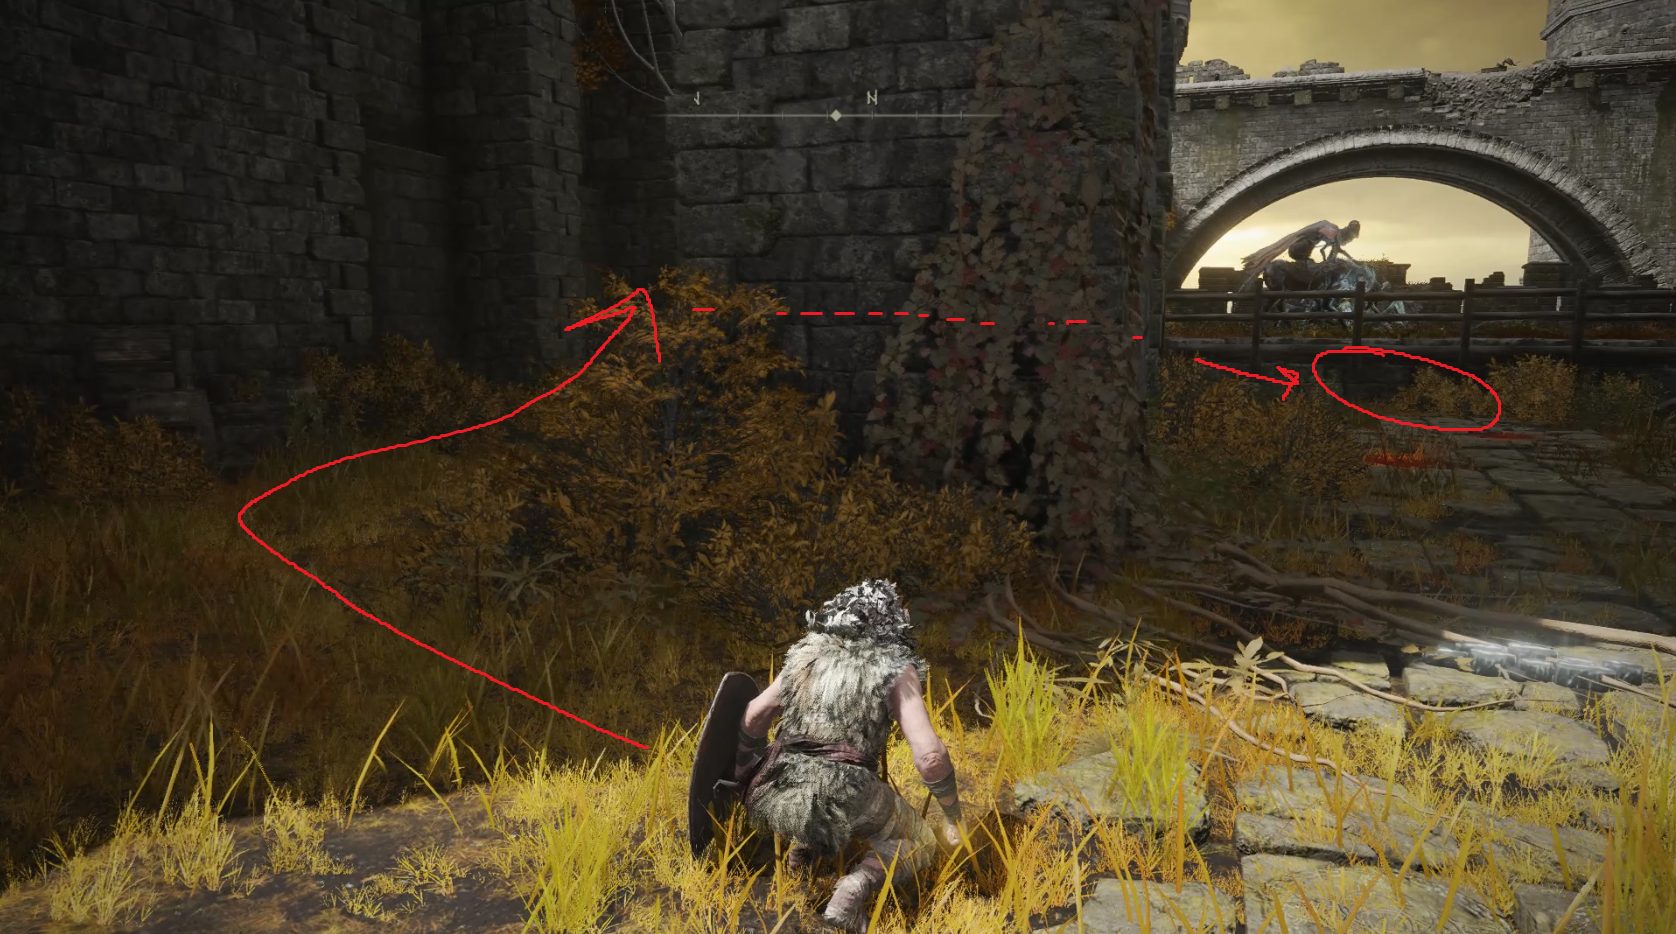
Grab the Golden Rune [4] from the corpse at the end of the path indicated above, and then just around the corner to the northwest is the Shaded Castle Inner Gate site of grace. Rest if you need to, then head south and turn left to go east, where you’ll find a ladder to take down. Go up the stairs to the left and stop at the last step. If you have access to Heal or a similar spell, you can sneak around to the left, hugging the wall and then the raised area. Another Royal Revenant will spawn, but won’t aggro if you’re sneaking — stand in the indicated spot and cast Heal twice and it should die.
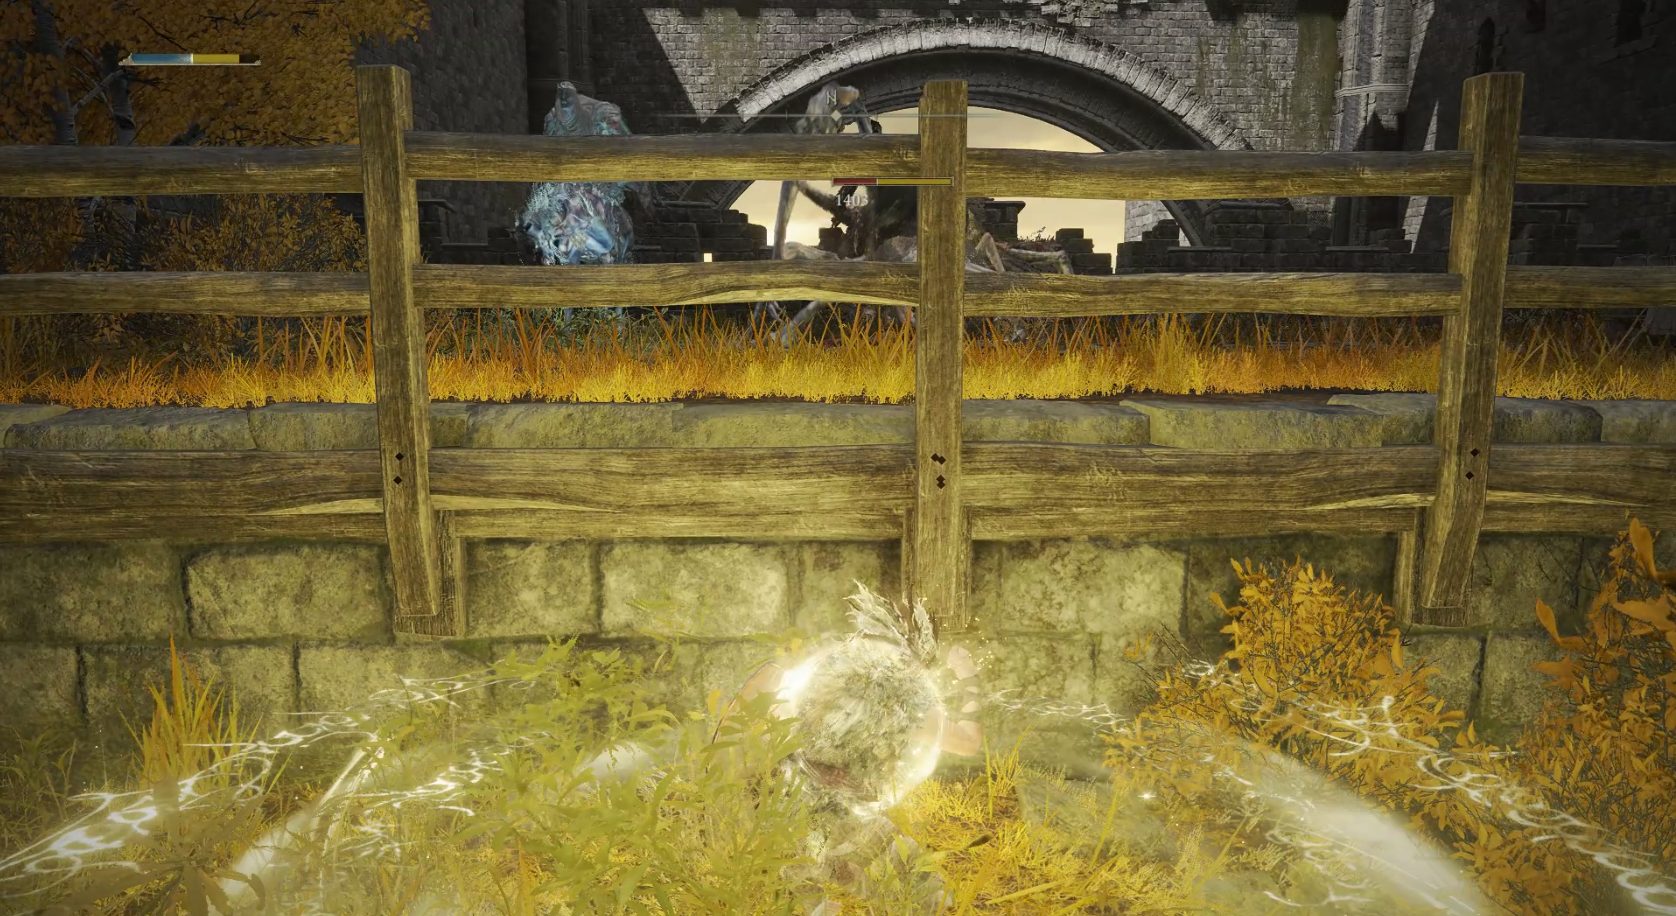
Otherwise, your best bet is waiting until the mounted enemy gets close enough to pull with a projectile, fight that guy on the stairs, and then go 1v1 the revenant. It drops another Ghost Glovewort [4], and protects x3 Rot Grease, but you can of course always skip this enemy.
Whatever you decide, you can next head south down the stairs, where you’ll see two albinauric sorcerers making their way towards you from the building on the left, and another spectral horseman patrolling the poison. Note that the poison here is very deep and you can’t run in it, so plan your paths across the poison carefully. Ranged characters can deal with the horseman first, while melee characters should rush the sorcerers and kill them before engaging with the horseman. With all three enemies made not-alive, look to the southwest towards the tree — there’s a Golden Rune [6] on a corpse near the tombstones you can grab.
Then go northeast and jump into the wooden structure there. Kill the enemy and grab the Smithing Stone [4], then jump back out and head towards the ladder to the southeast. At the top of the ladder, turn left and sneak north — you’ll come to a dead end with two perfumers sitting, and a Smithing Stone [5] behind some barrels in the corner on your left. This can be a tough fight even with the opportunity to backstab one of the perfumers, so if you don’t need the smithing stone, consider skipping it.
Now go back the way you came, south on the ramparts, and continue southwest past the ladder you just came up. You’ll see a perfumer making his way down some stairs. Deal with him, then kick the ladder to the left of the stairs and go up ’em. (This shortcut isn’t particularly useful, but it feels good to kick the ladder anyway). Go up the stairs, and grab the Perfume Bottle from the corpse on the right, then drop down onto the wooden walkway below.
Continue forward on the ramparts for a while, ignoring all the rottens, until you find a corpse with x2 Glass Shard hanging the edge of a broken section of rampart. At this point, turn around and eliminate any of the enemies that are still (slowly) following you. Once they’re dead, you can continue forward and fight the Cleanrot Knight (click the link for tips on beating this enemy). In the room she’s guarding, open the chest to acquire the Valkyrie’s Prosthesis, then teleport back to the Shaded Castle Inner Gate site of grace.
Head north and go right at the intersection to find a dog waiting for you. Eliminate it and get a bit of lore from the nearby spirit. You can then head west, where you’ll find a ladder on your right (somewhat hidden by the wall) leading up. When you get to the top of the ladder, there will be two dogs lying down in the middle of the tower you’re on — they blend in pretty well with the stone, so it’s easy to miss them. Attack them before they get up, then go up the nearby stairs and through the doorway.
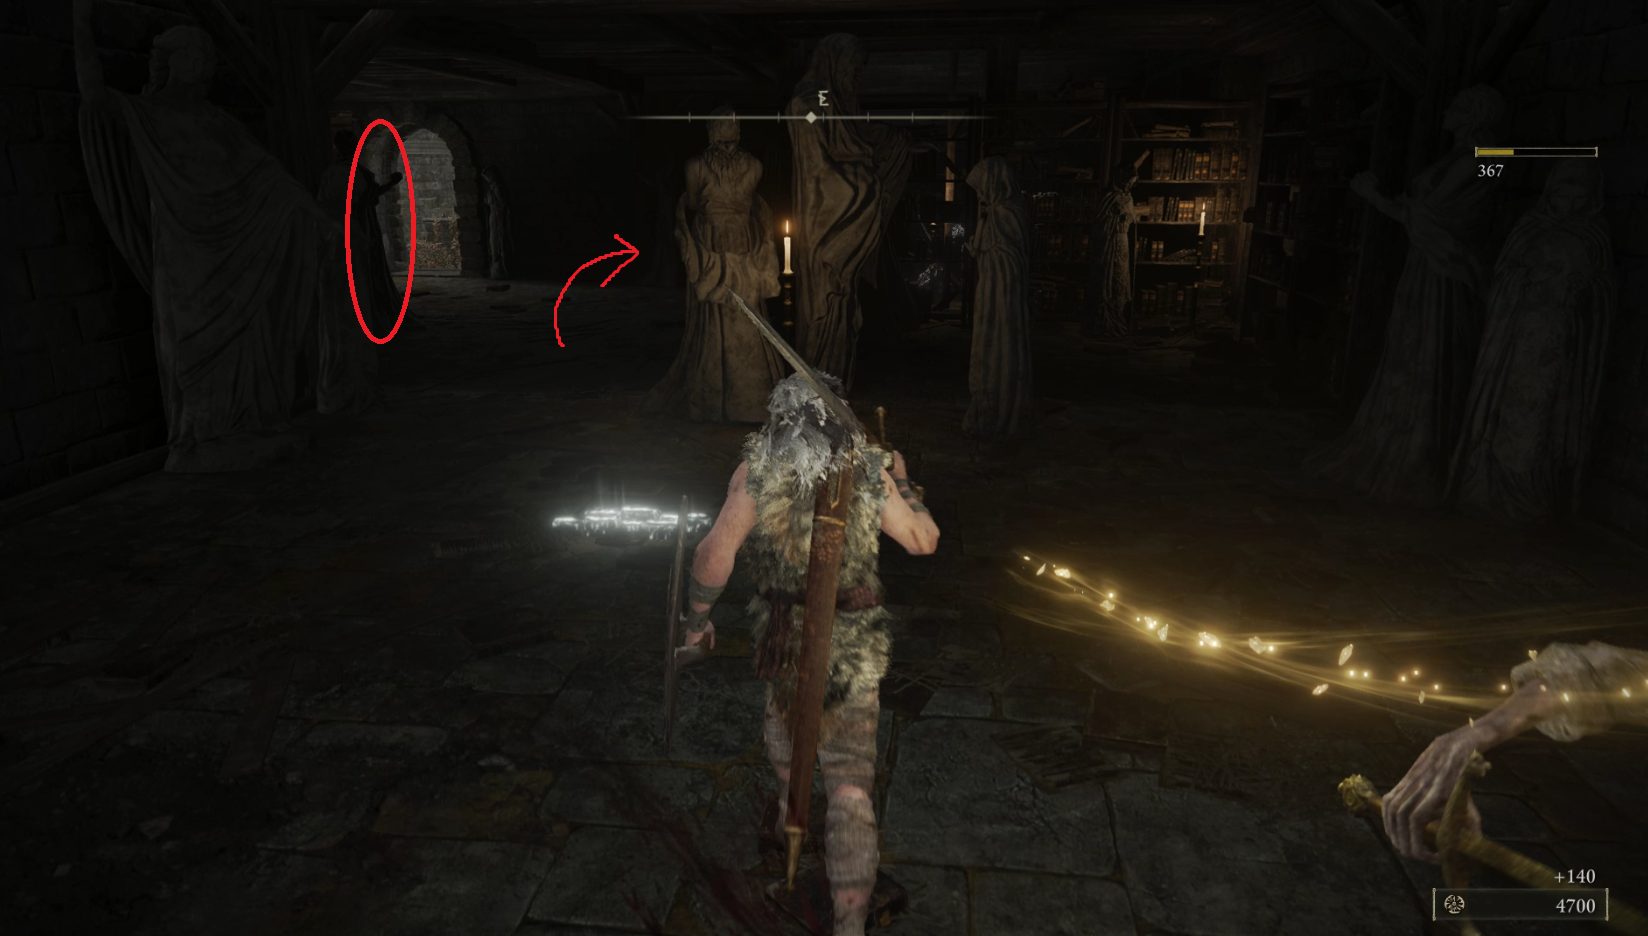
There’s a weak enemy waiting to ambush you on the right, and a comparably pathetic sorcerer nearby. Further into the room on the left behind a statue is a tougher enemy — it’s one of the pages found just before Knight Loretta in Caria Manor. Shields are effective vs these foes, as are ranged attacks. There’s also a sorcerer behind the bookshelf who will cast spells at you as you fight the page, so draw the page backwards towards the way you came in to avoid a 1v2.
The page hides behind the circled statue — the ladder is to the right as indicated by the arrow
Next, climb the ladder on the other side of the bookcases to find the Perfumer’s Cookbook [2] on a corpse in a chair to the northwest. Then go back down the ladder and exit the room via the doorway to the north. Turn right and kill the dog, then grab the x4 Hefty Beast Bones, then head across the bridge to the northeast and fight the Cleanrot Knight there. This one’s got a different style of ranged attack, but the strategies for dealing with it remain the same. After defeating the knight, continue across the bridge and turn right, then go left up the stairs and through the doorway.
You’ll find yourself in another room full of statues — at the eastern end of it is a corpse with x2 Gold Firefly, but watch out for the enemy hiding behind the statues in the middle of the room. Go up the stairs to find another page, and once they’re defeated, sneak towards the doorway that leads outside. You’ll see a Cleanrot knight patrolling — be patient, and wait for it to check the corner near you. It will then turn around and head past the doorway it came out of, heading south. At this point, sneak out the doorway and go right, where you’ll find a dog eating a corpse that holds a Smithing Stone [5].
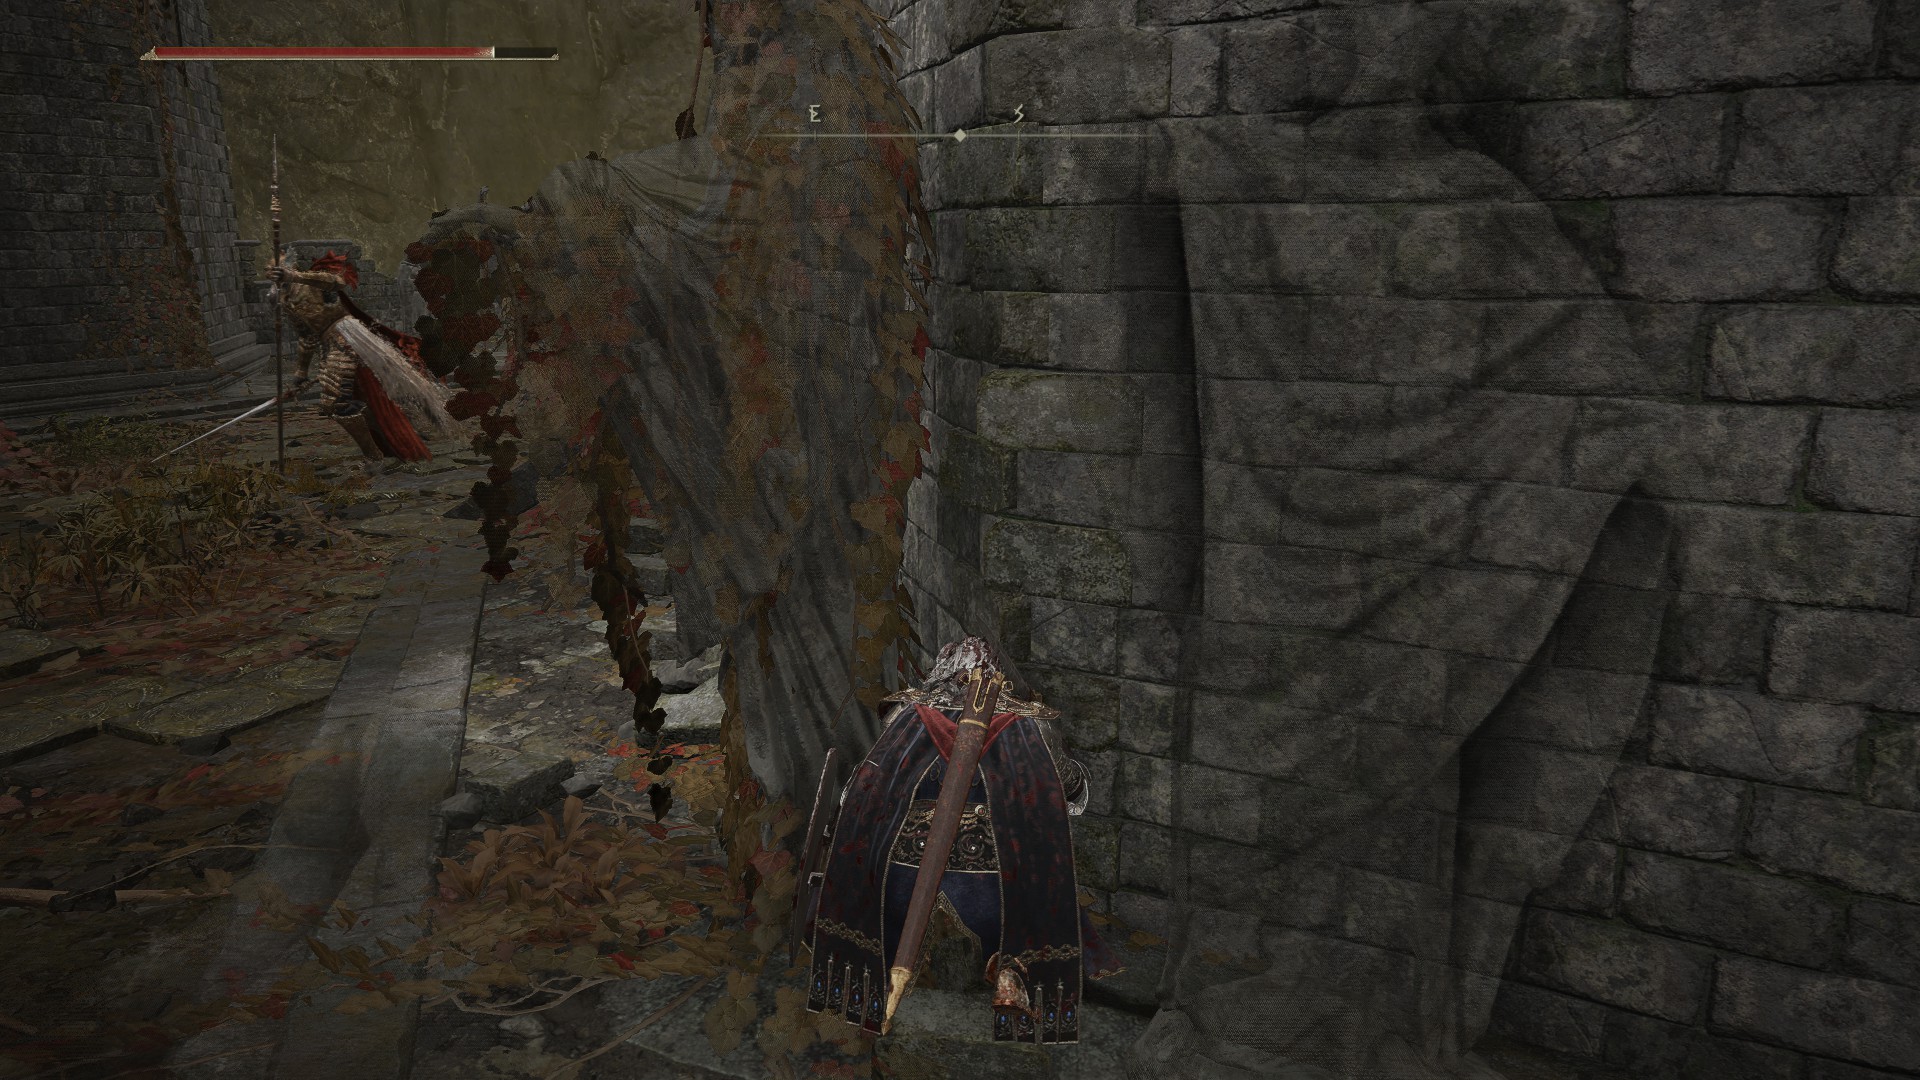
Kill the doggie and take the stone, then go hug the right-hand wall near a statue as seen below. When the knight gets a bit closer, you can go right past her as long as you’re crouching — she’s too busy dragging herself along to notice you.
Continue south (note the stairs up to an elevator on your right) to find two dogs chilling — kill them quickly and head southwest towards the lit lantern on the ground. There’s a ladder here you can kick to open a shortcut. It’s another pointless shortcut (there’s a Stake of Marika for the boss in the next area), unless you die to the Cleanrot Knight here . You can now either 1v1 the knight, or just run into the room with the elevator and ride it up. When the elevator stops, cross the bridge and enter the fog gate to fight the Shaded Castle’s boss, Elemer of the Briar.
Unabashed FromSoftware fanboy still learning to take his time with games (and everything else, really). The time he doesn't spend on games is spent on music, books, or occasionally going outside.
Loving these guides, the best around imo. Only thing worth adding is after you fight the Golem & Maleigh Marais, if you continue around the back of the castle there is a stone astrolabe with a starlight shard. Looking forward to the expansion!
Marcus J
1 year ago
near the rubble field’s NW cliff edge is a corpse with a Smithing Stone 5. (field with the giant and human in it)
Keep up the great work. After the painting if you just make your way back up the sloped rock and then hop on the broken wall to your right, you can approach the stonesword key from this side and it’s a lot easier(well it was for me lol).
Thank you Josh! I actually tried reaching it from that side and thought it was impossible, so thanks for proving me wrong (and giving people another option).
02grimreaper
2 years ago
I have been following your guides. They are wonderful. Thank you for all the hard work
One spot you missed was the two perfumers to the left of the perfumer making his way down the stairs. There is a smithing stone 5 back there with them (not sure if it’s worth the fight)
Thanks grim, nice catch. I think when I was doing the guide I didn’t even notice that item behind the barrels! It may not be worth the fight for some people, but it’ll be good to have in the guide regardless 🙂


Loving these guides, the best around imo. Only thing worth adding is after you fight the Golem & Maleigh Marais, if you continue around the back of the castle there is a stone astrolabe with a starlight shard. Looking forward to the expansion!
near the rubble field’s NW cliff edge is a corpse with a Smithing Stone 5. (field with the giant and human in it)
Thanks Marcus, I’ll get that in the guide!
Keep up the great work. After the painting if you just make your way back up the sloped rock and then hop on the broken wall to your right, you can approach the stonesword key from this side and it’s a lot easier(well it was for me lol).
Thank you Josh! I actually tried reaching it from that side and thought it was impossible, so thanks for proving me wrong (and giving people another option).
I have been following your guides. They are wonderful. Thank you for all the hard work
One spot you missed was the two perfumers to the left of the perfumer making his way down the stairs. There is a smithing stone 5 back there with them (not sure if it’s worth the fight)
Thanks grim, nice catch. I think when I was doing the guide I didn’t even notice that item behind the barrels! It may not be worth the fight for some people, but it’ll be good to have in the guide regardless 🙂