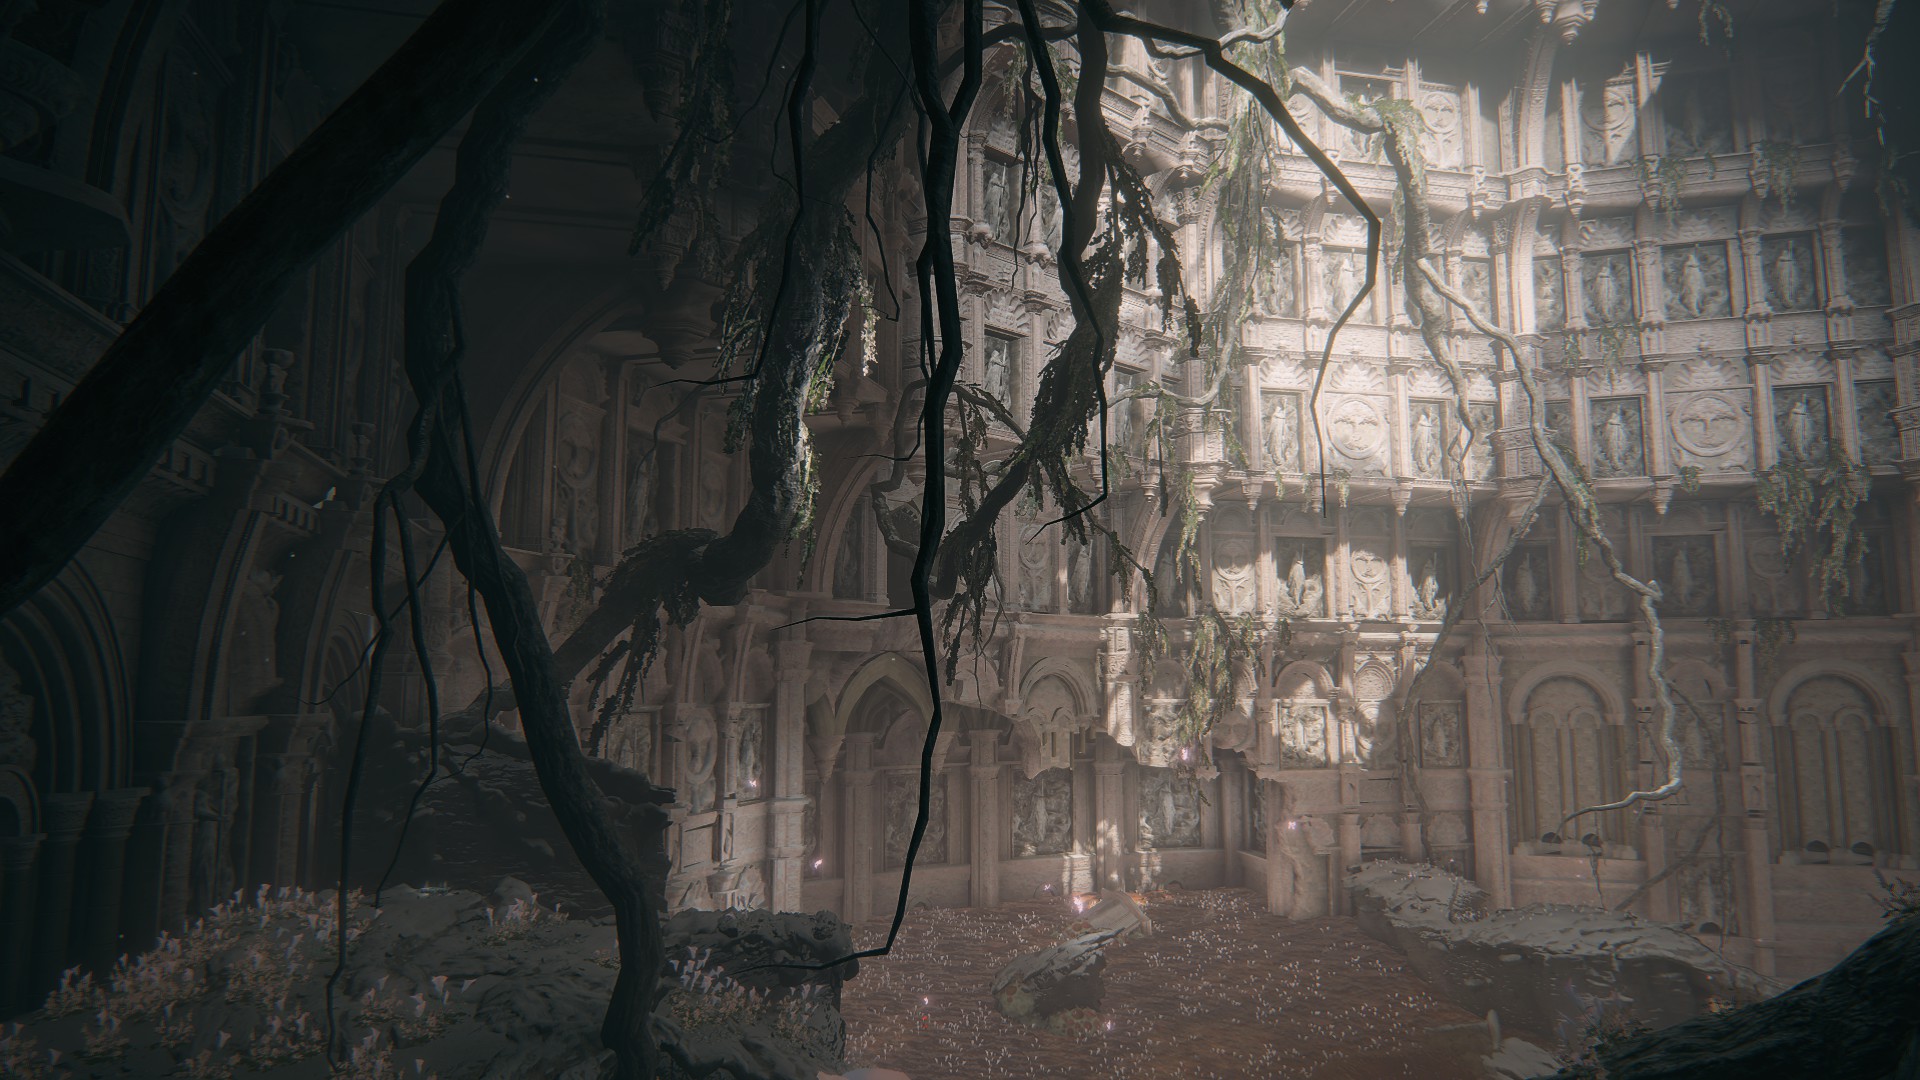
Elphael, Brace of the Haligtree is an optional legacy dungeon connected to Miquella’s Haligtree. Home to perhaps the most loathed (and pined after) boss in Elden Ring, this area offers a challenge even for powerful, high-level characters.
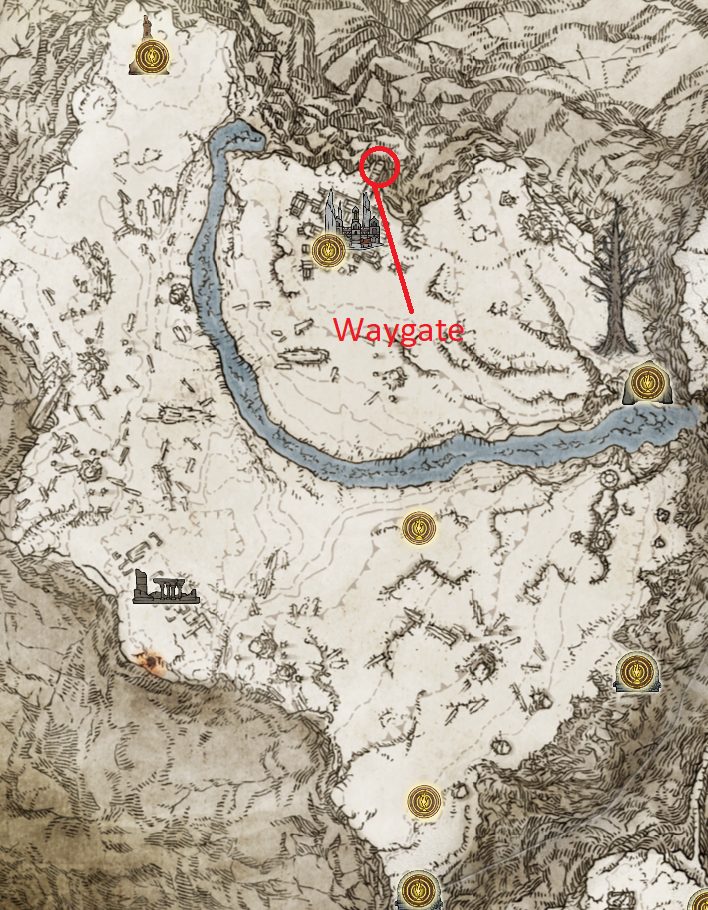
Elphael is accessed by making your way through Miquella’s Haligtree and defeating Loretta, Knight of the Haligtree. To reach Miquella’s Haligtree, you’ll have to pass through the waygate in the Consecrated Snowfield, which is only accessible after completing the evergaol puzzle in Ordina, Liturgical Town.
Walkthrough
This walkthrough starts at the Prayer Room site of grace — if you haven’t yet reached this grace, take a look at the last section of our walkthrough of Miquella’s Haligtree. Once there, start with the “Elphael’s Walls” section below, and use the tabs to navigate between sections.
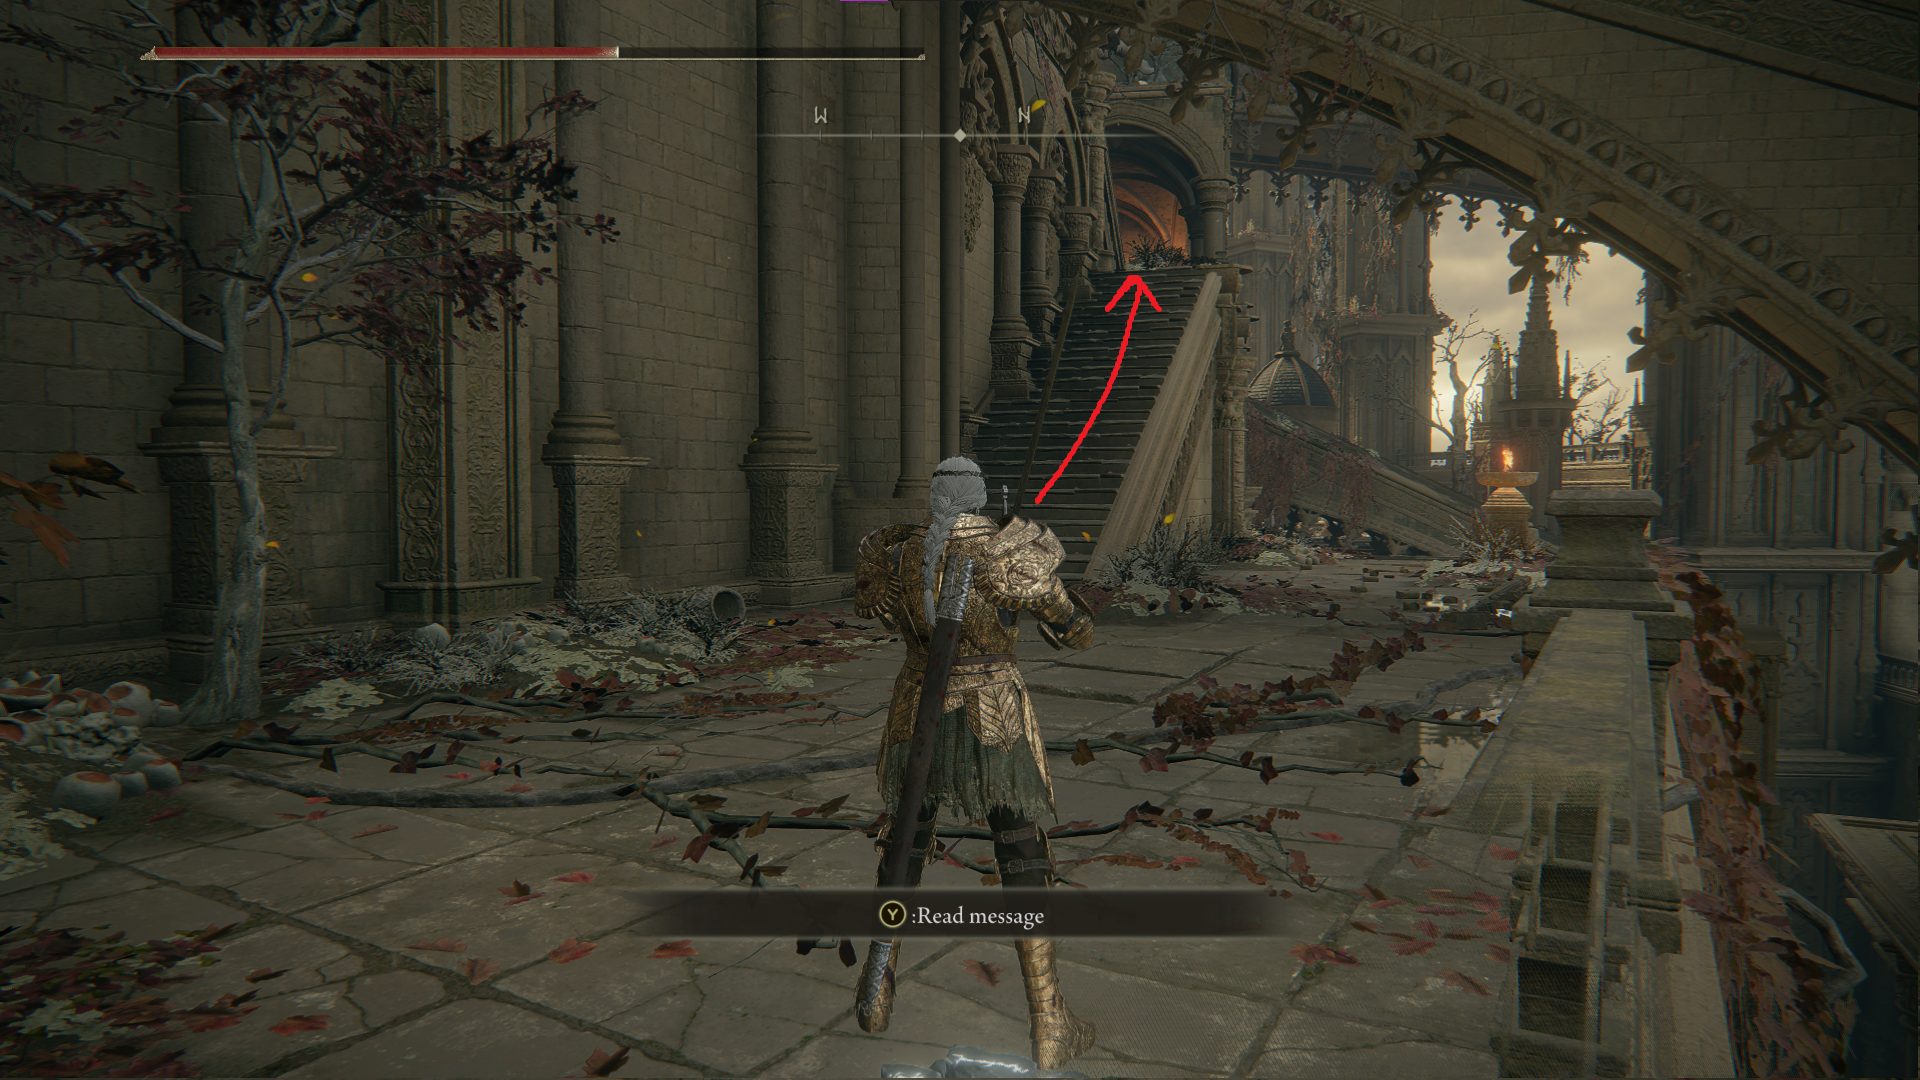
From the Prayer Room site of grace, go northeast out the doorway and down the stairs. At the bottom of the stairs is a soldier with a trumpet, looking out over the railing, who you’ll want to kill ASAP — there are lots of soldiers who will come running if he toots his horn, including a patrol that’s making their way towards you. The two footmen in the patrol are glowing with holy light — this indicates that they can run at you and blow themselves up, so make sure to roll away from them if they throw their hands in the air and then run towards you.
After you’ve dealt with the patrol, you can continue north and then take a left into a small room, where two soldiers are resting. Eliminate them and then pick up the Golden Rune [12] from the corpse. Leave the room and head north again, down another set of stairs. You’ll encounter another soldier looking out over the view who you can backstab — from him, turn west and head inside. There’s a sleeping soldier on your left as you enter — take him out and then continue up the stairs, where another soldier waits.
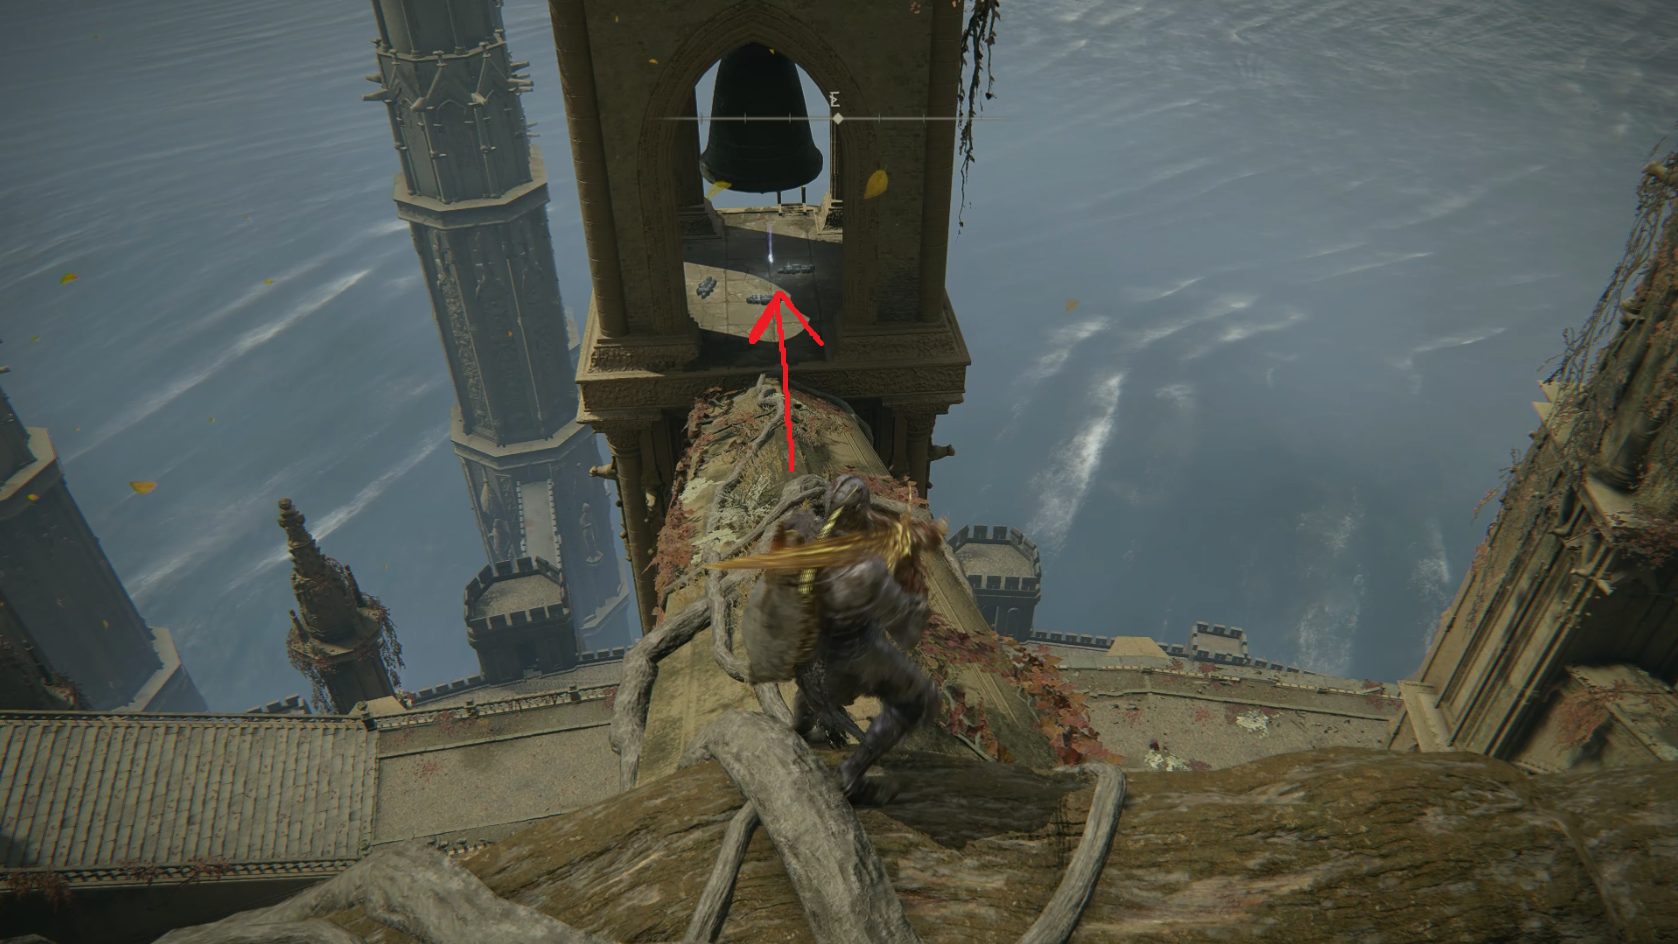
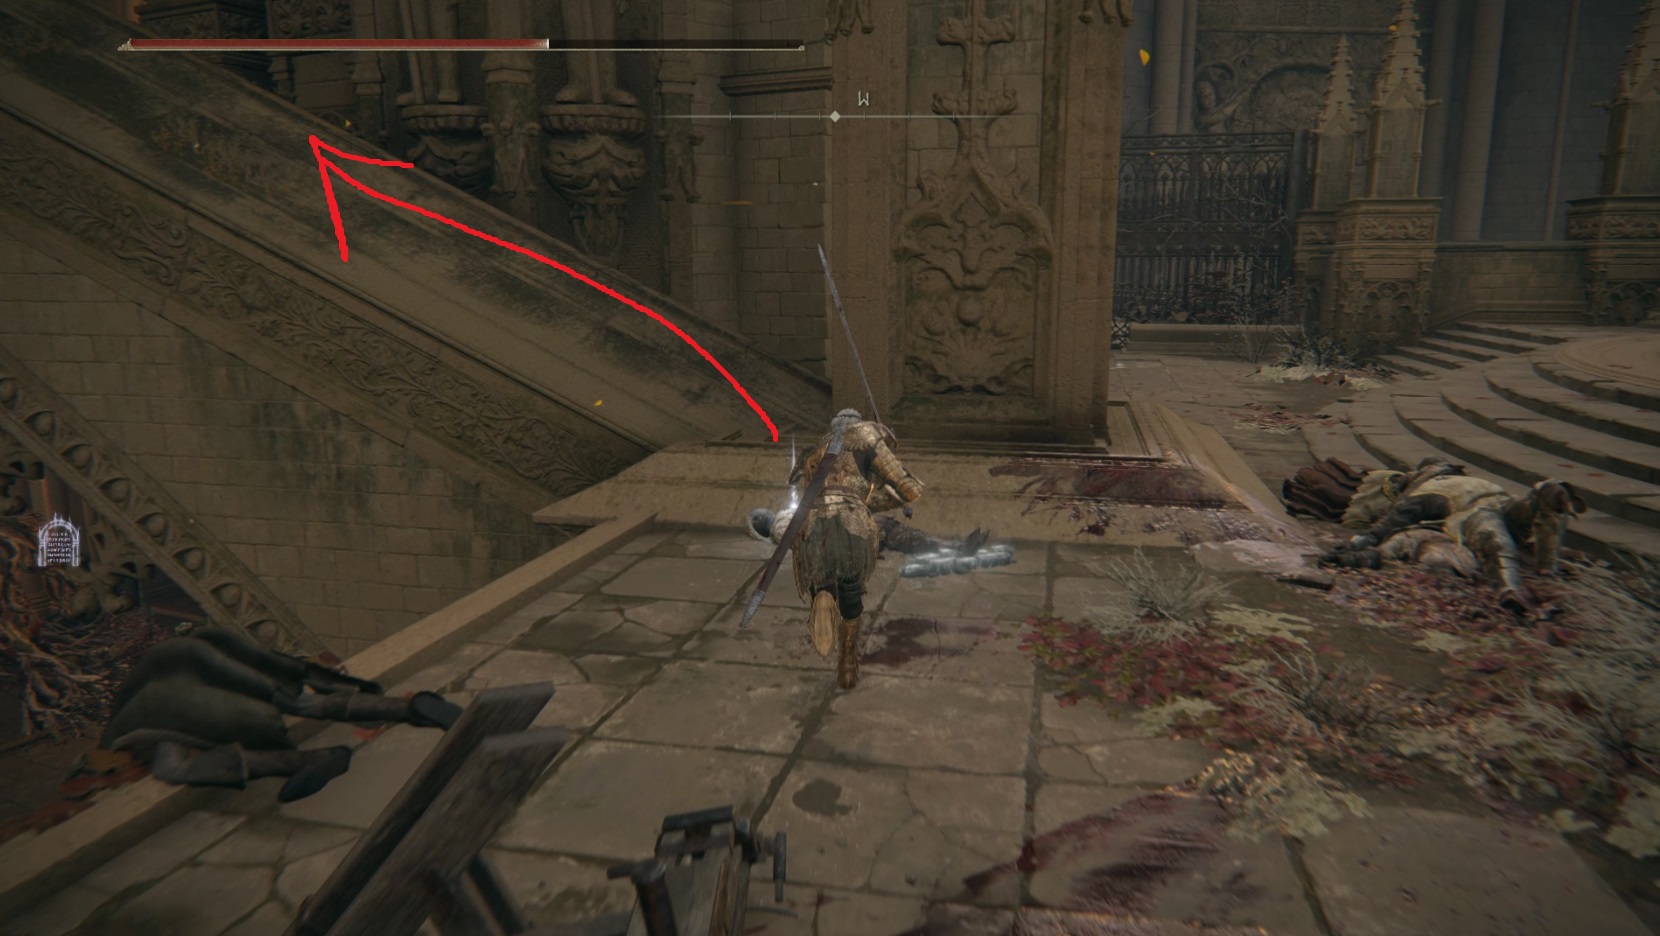
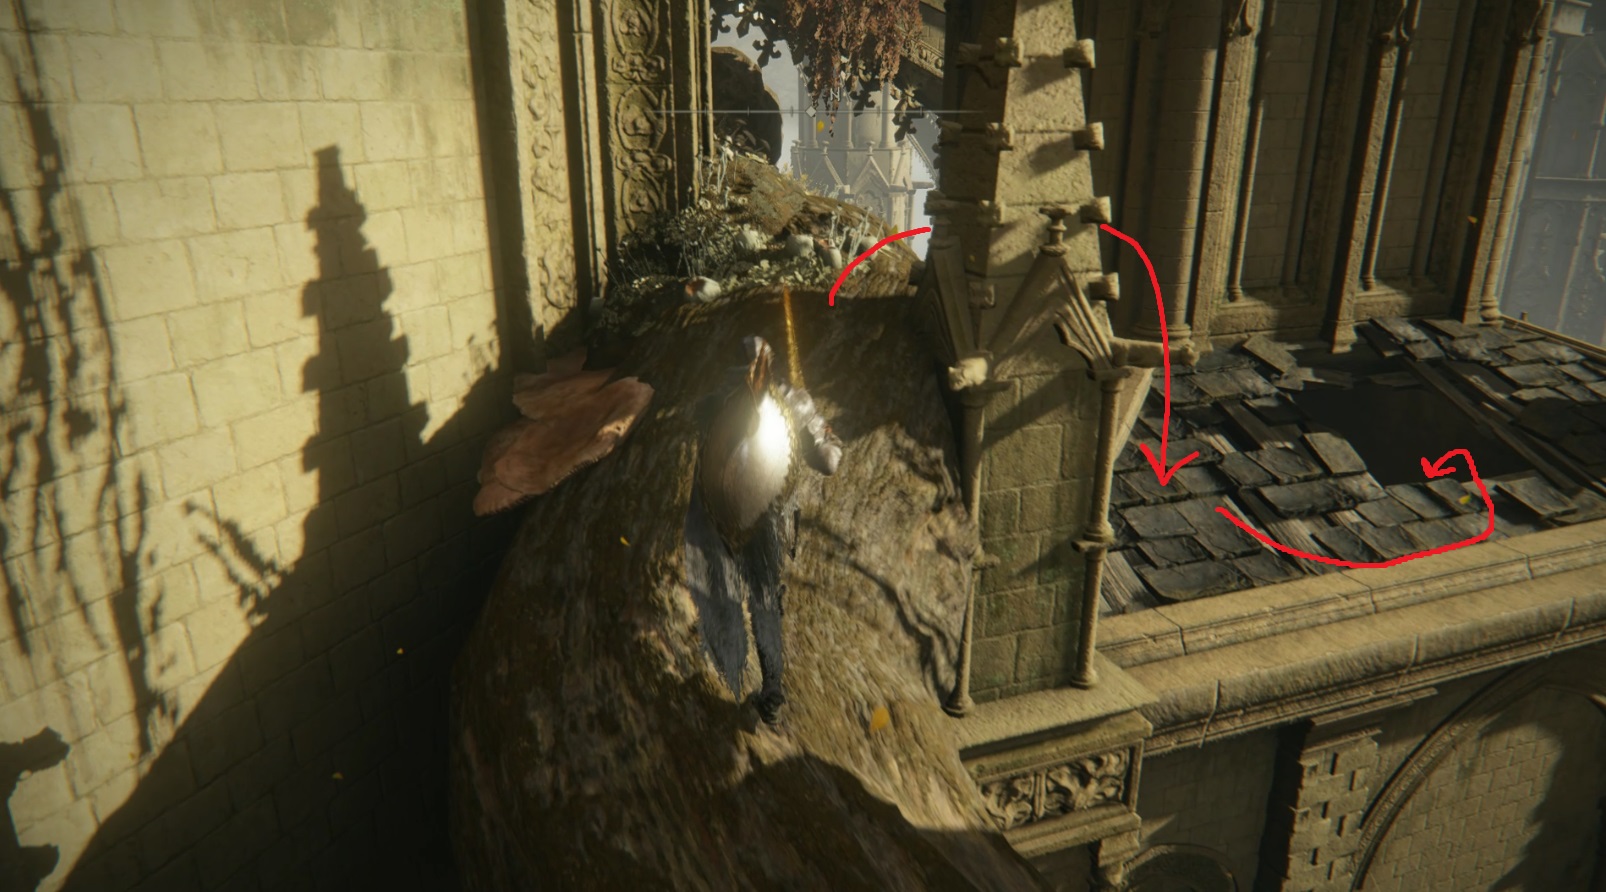
Once he’s down as well, head east-northeast outside, and snag the Smithing Stone [8] from the corpse on the edge of the ledge. Kill the nearby soldier with the torch, and then hop up on the nearby branch and follow it upwards to the south. You’ll come to a buttress running perpendicular to the branch — hop onto it and head east to grab the Miquellan Knight’s Sword from beneath the bell (which unfortunately doesn’t ring when you hit it).
On the eastern side of the belltower is a ladder — slide down it onto the ledge below. From here, you can use ranged attacks on the Putrid Avatar that roams the bridge below (or at least throw a few Fire Pots at it). You’ll need to use the tower for cover against the ranged attacks, which can be deadly if you fail to avoid them. Once you’re out of ranged options, if it’s still alive, you can hop down and face it up close and personal.
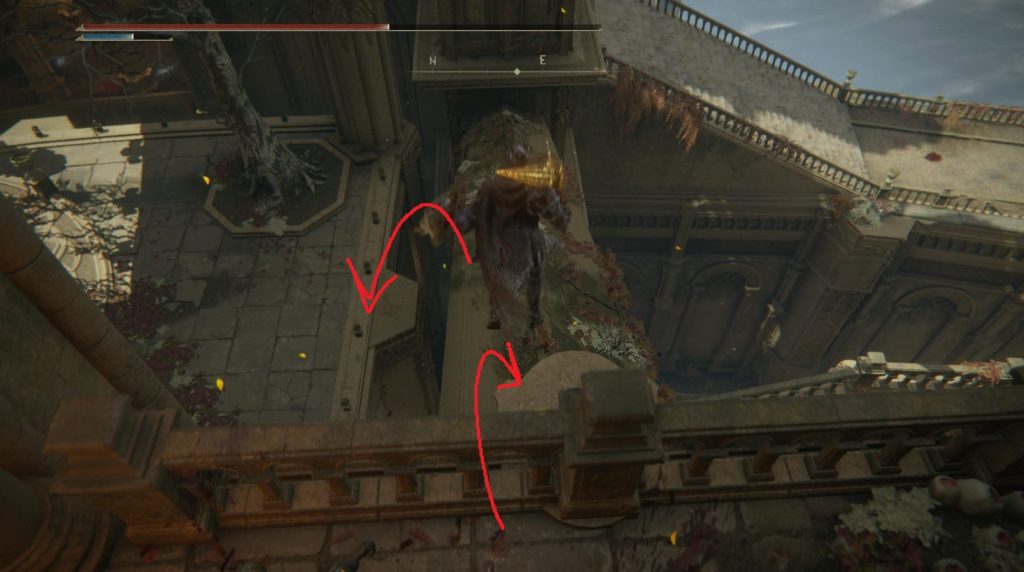
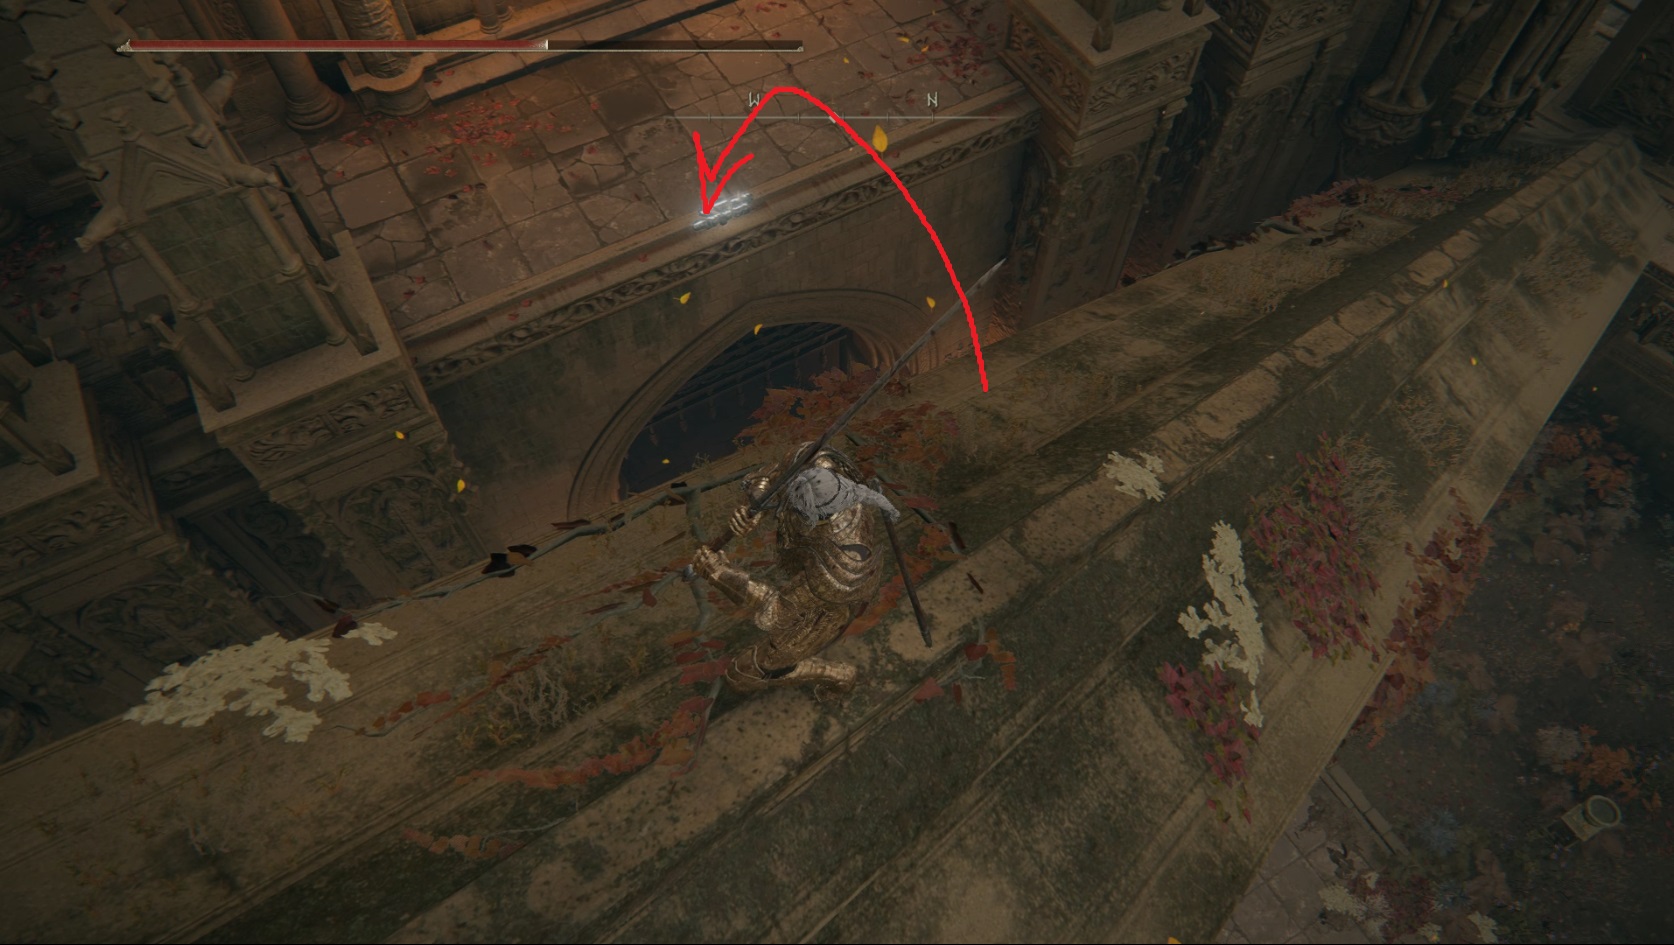
In the building at the top of the stairs, you’ll see a crystalian sitting in a small room on the far side. The corpse on its right has a Somber Smithing Stone [9], and you can choose to ignore the crystalian and grab the item if you like. From the larger room, a running jump to the southwest will bring you to the balcony across the street.
If you fail this jump, you can reach the room with the Cleanrot Knights from the Prayer Room site of grace, by sticking to the ramparts and going down stairs wherever possible
The corpse on the balcony has a Golden Rune [10], and in the attached room are two Clean Rot Knights. It’s a tough fight, and you can choose to ignore them if you like — they won’t chase you too far, but it will make navigating the next section more difficult as you’ll have to run past a few foes. In the northern corner of the room is a corpse with a Smithing Stone [7]; grab it and then head back outside via the southeastern doorway — on the left as you exit is an Immunizing White Cured Meat.
Make your way up the stairs, where two soldiers wait on the landing. Take them out and then go up the next set of stairs. If you don’t have an incantation build and/or don’t care about getting the Triple Rings of Light Incantation, you can skip the next three paragraphs.
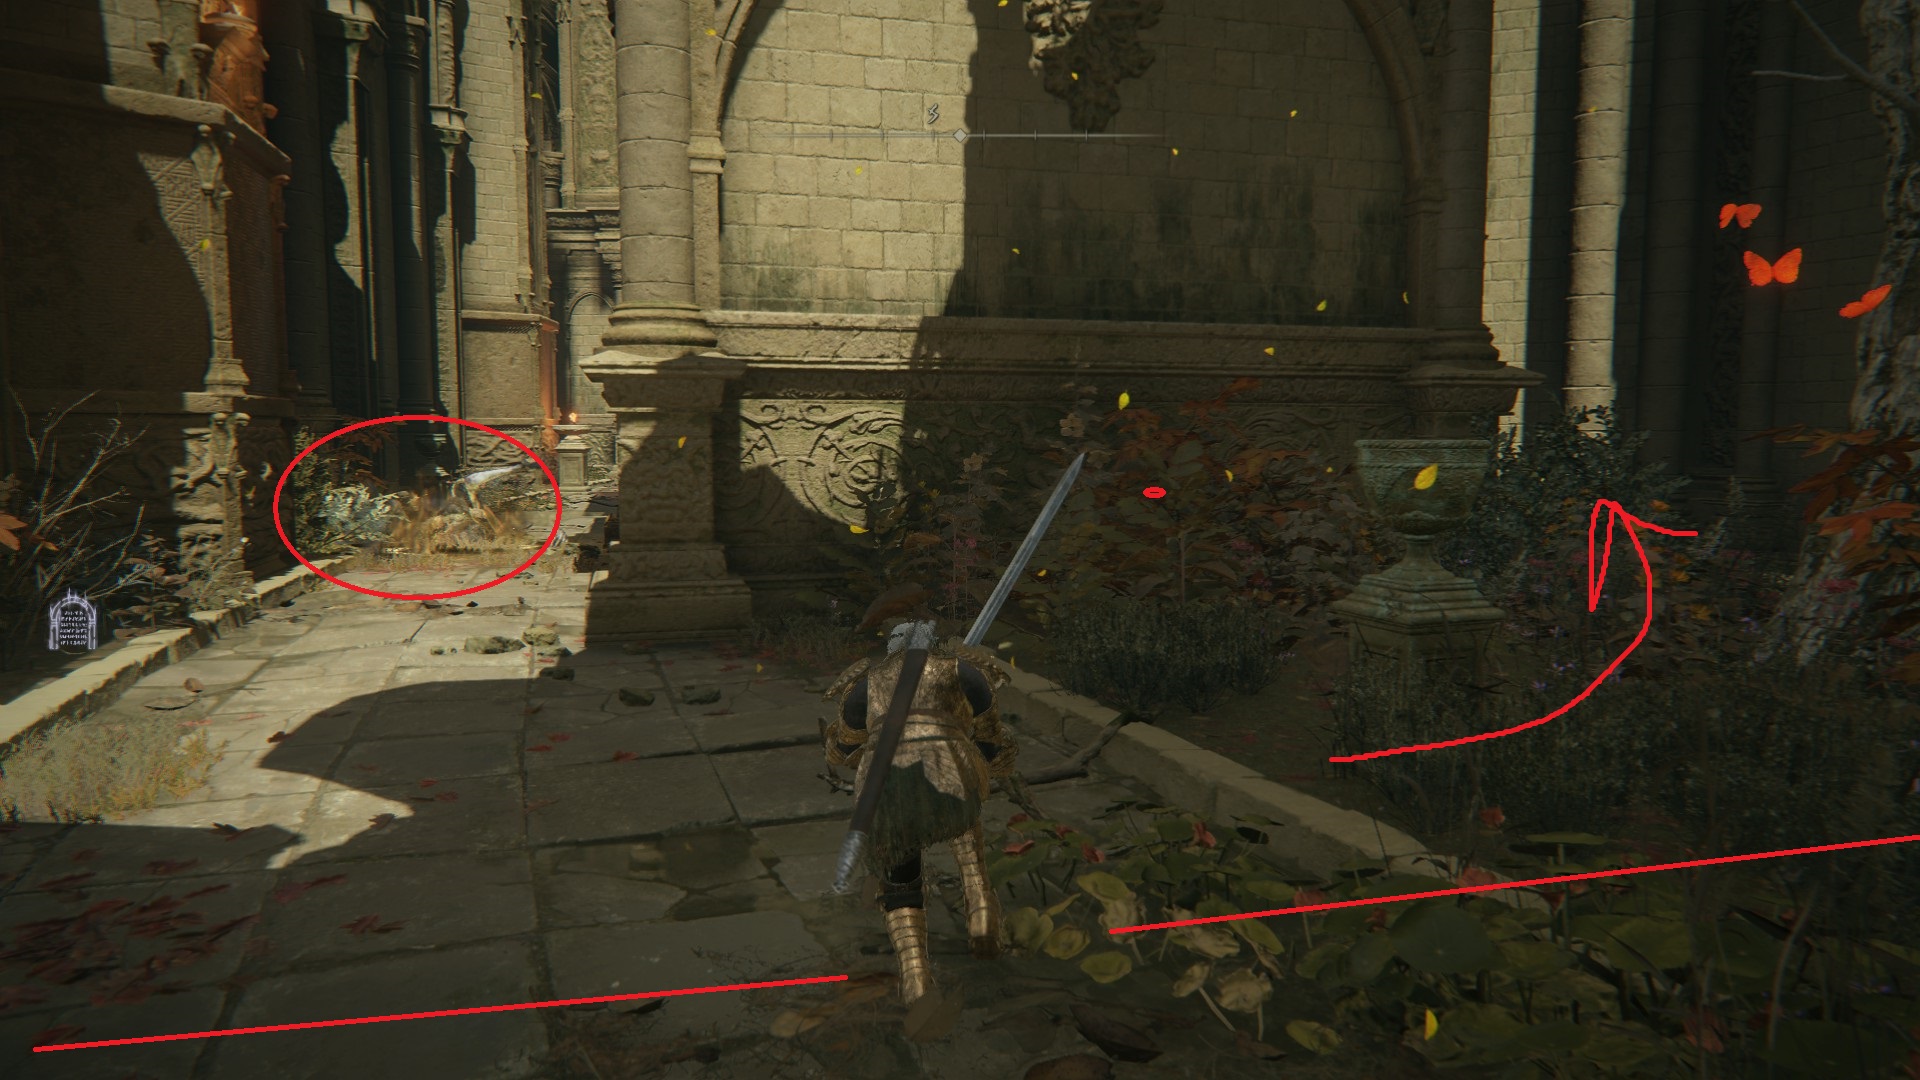
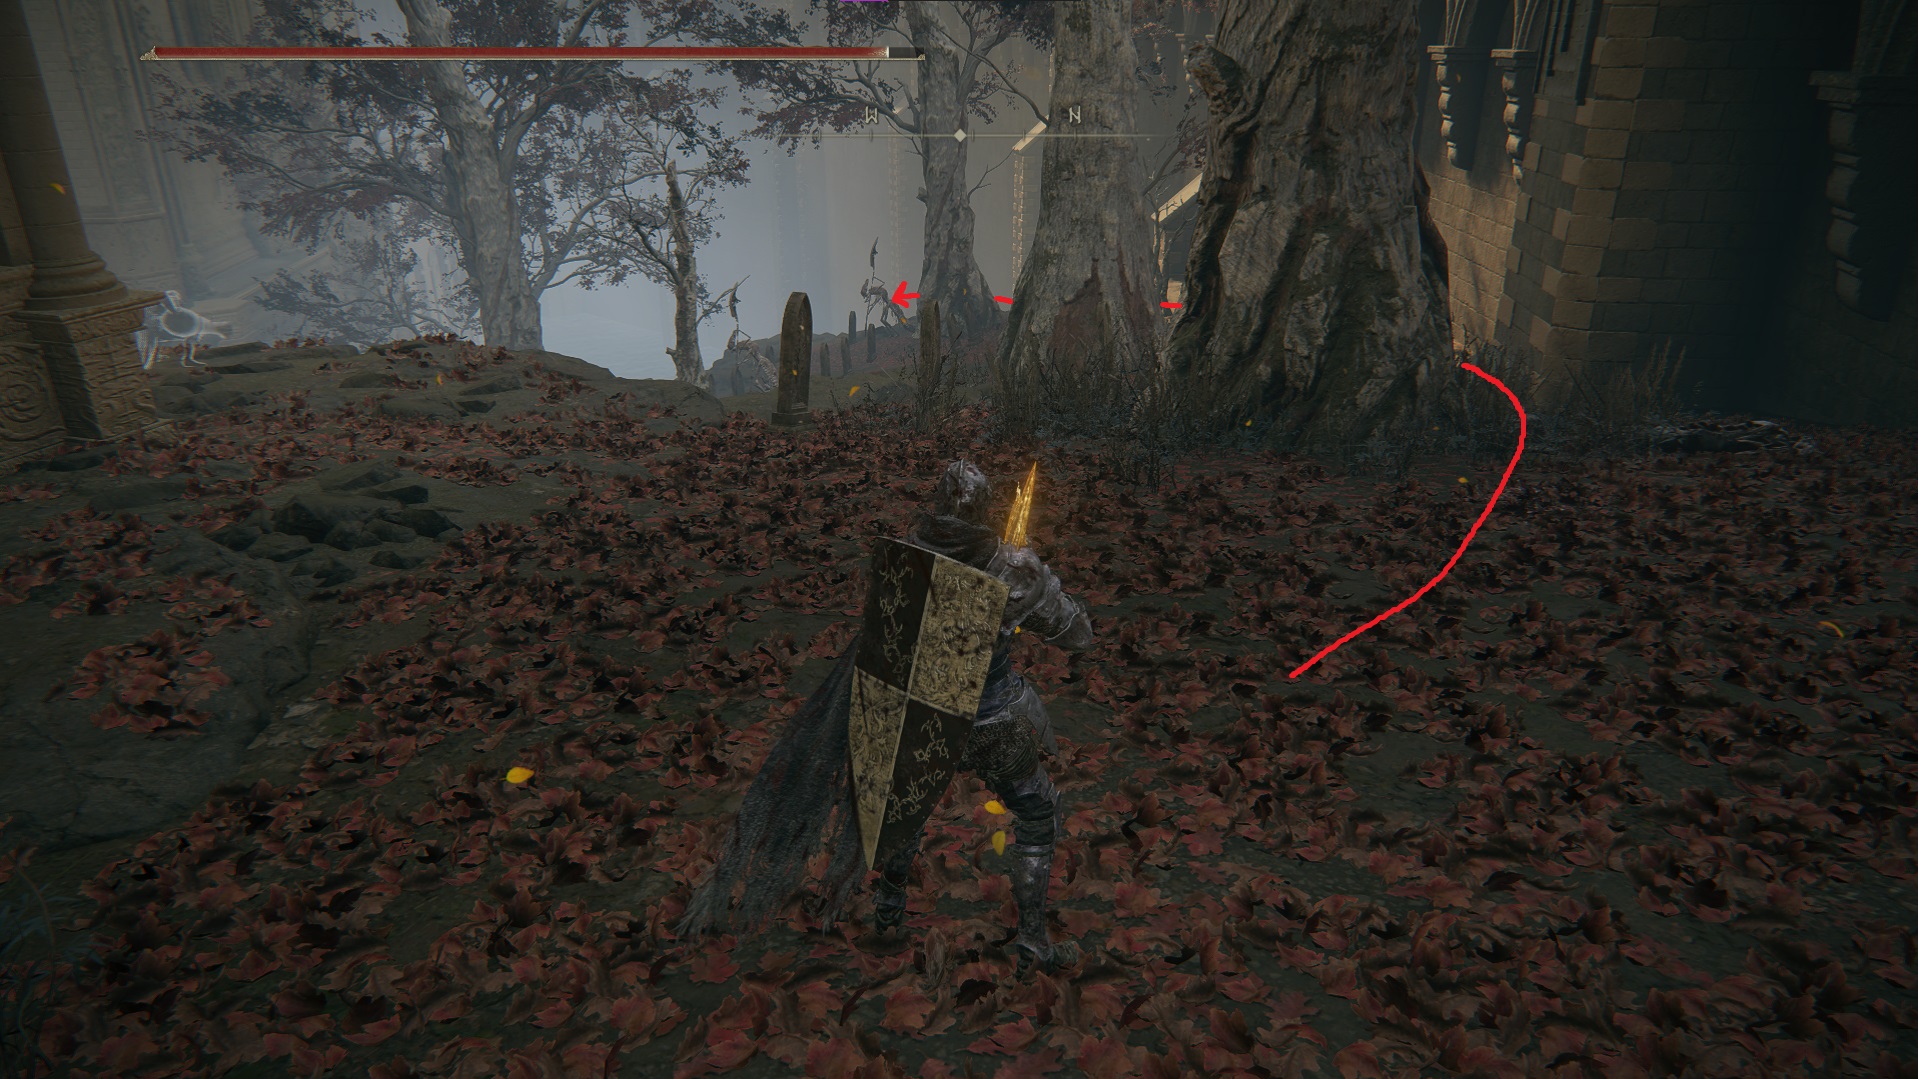
Continue south and the way forward will narrow considerably. You’ll see a soldier with spear and shield patrolling — let him see you and pull him towards you, as further ahead there are enemies on the right.
Don’t cross the line when pulling the shield soldier
Once the soldier with the spear is dead, you can continue forward and turn right into a dark alcove. A soldier will be right in your face as you turn the corner, but the other two in here won’t move until you’re very close. Once the first guy is down, turn right and head north into the alcove and kill the guy staring at the barrels. Then roll into the objects on the northern side of the room to reveal a Smithing Stone [7] — you can leave the guy on the other side alone if you want.
Head back outside and continue south, where you’ll have to fight another soldier and exploding footman. Beyond them is a gargoyle imp statue — if you spend a Stonesword Key you can enter the room it protects and loot the chest for the Triple Rings of Light incantation. Then head north, back the way you came.
Next, head up the stairs opposite the small tree:
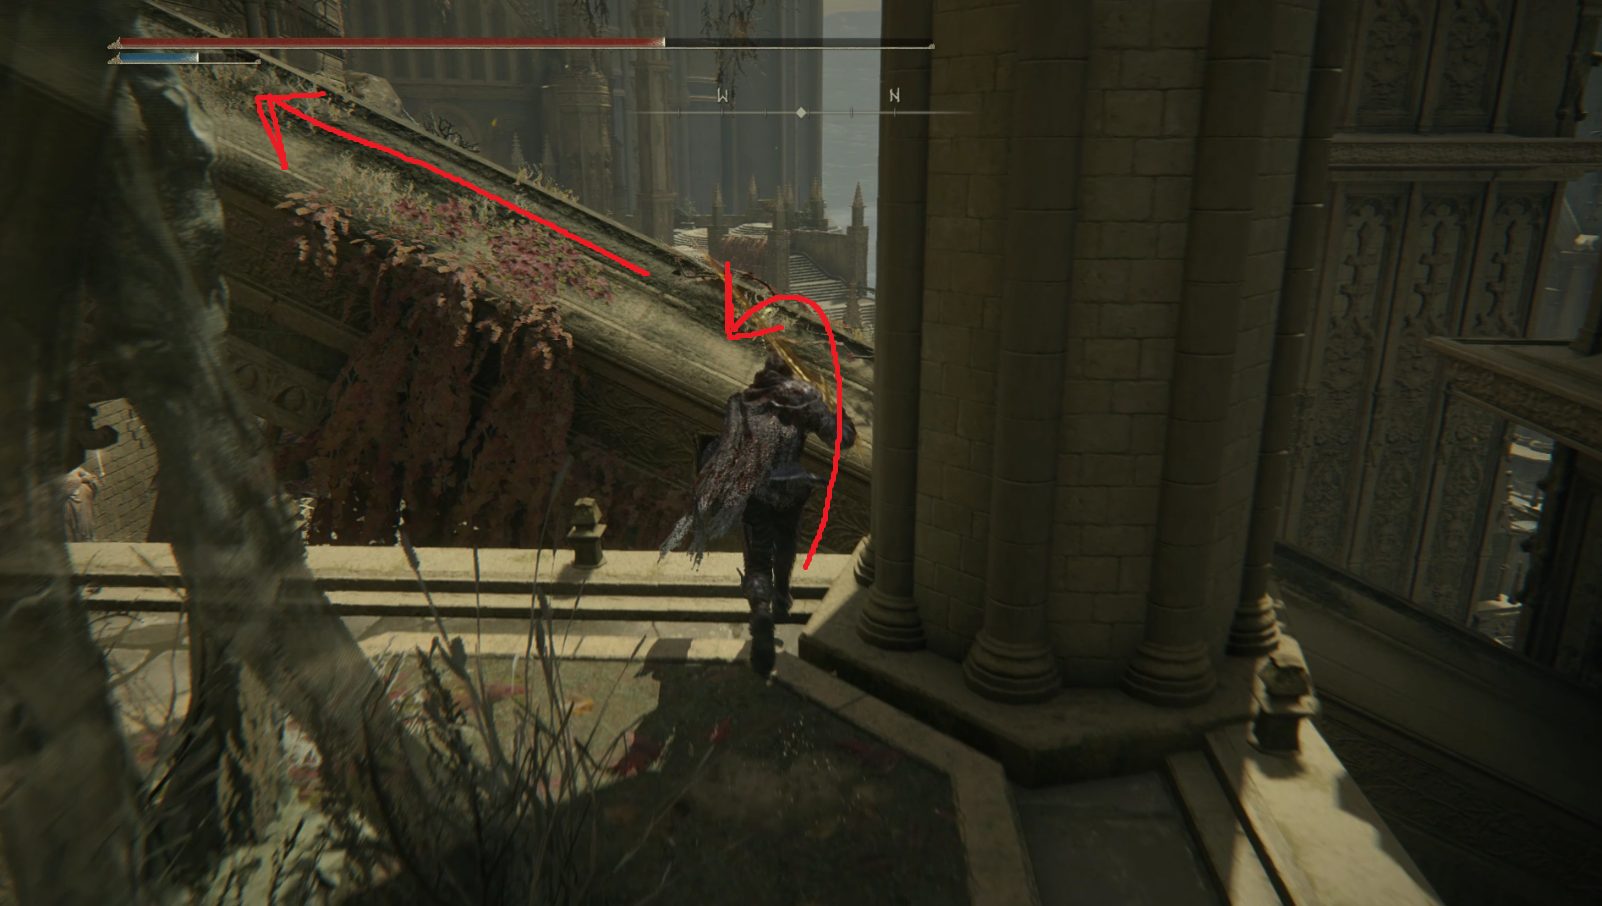
At the top of the stairs, you’ll see a soldier to the northwest with a torch — hidden to his left in the shadows is another exploding footman. Kill both enemies and then grab the x5 Lightning Greatbolt from the corpse draped over the guardrail. Go northwest to the unbroken section of guardrail and hop over it onto the buttress — from there, it’s an easy jump northwest onto the platform with the small gazebo. You’ll be attacked by a Cleanrot Knight when you land, so be ready!
In the gazebo is a red flask beetle if you need to replenish your healing, and then you can take out the guard standing on the right of the door to the southwest. Head inside the building and loot the chest for the Cleanrot Knight Finlay ashes. Go back outside and then to the northern corner of the platform. From there, jump northwest onto the buttress and then turn left to head up it and onto the ledge.
Turn right once you’re on the ledge, and then take an immediate left into the dark room — inside is a chest with a Somber Ancient Dragon Smithing Stone. Leave the room and continue northwest on the ledge — it will curve left and you’ll see a corpse in a chair. Grab the Seedbed Curse and then drop northwest off the ledge onto the branch. From the branch, you can drop south onto the ledge and grab the Aeonian Butterfly, then turn around and fight the soldier that’s probably waking up. Around the corner you’ll find a corpse with x5 Old Fang — from there, you can drop southeast off of the platform and continue southeast into the room ahead.
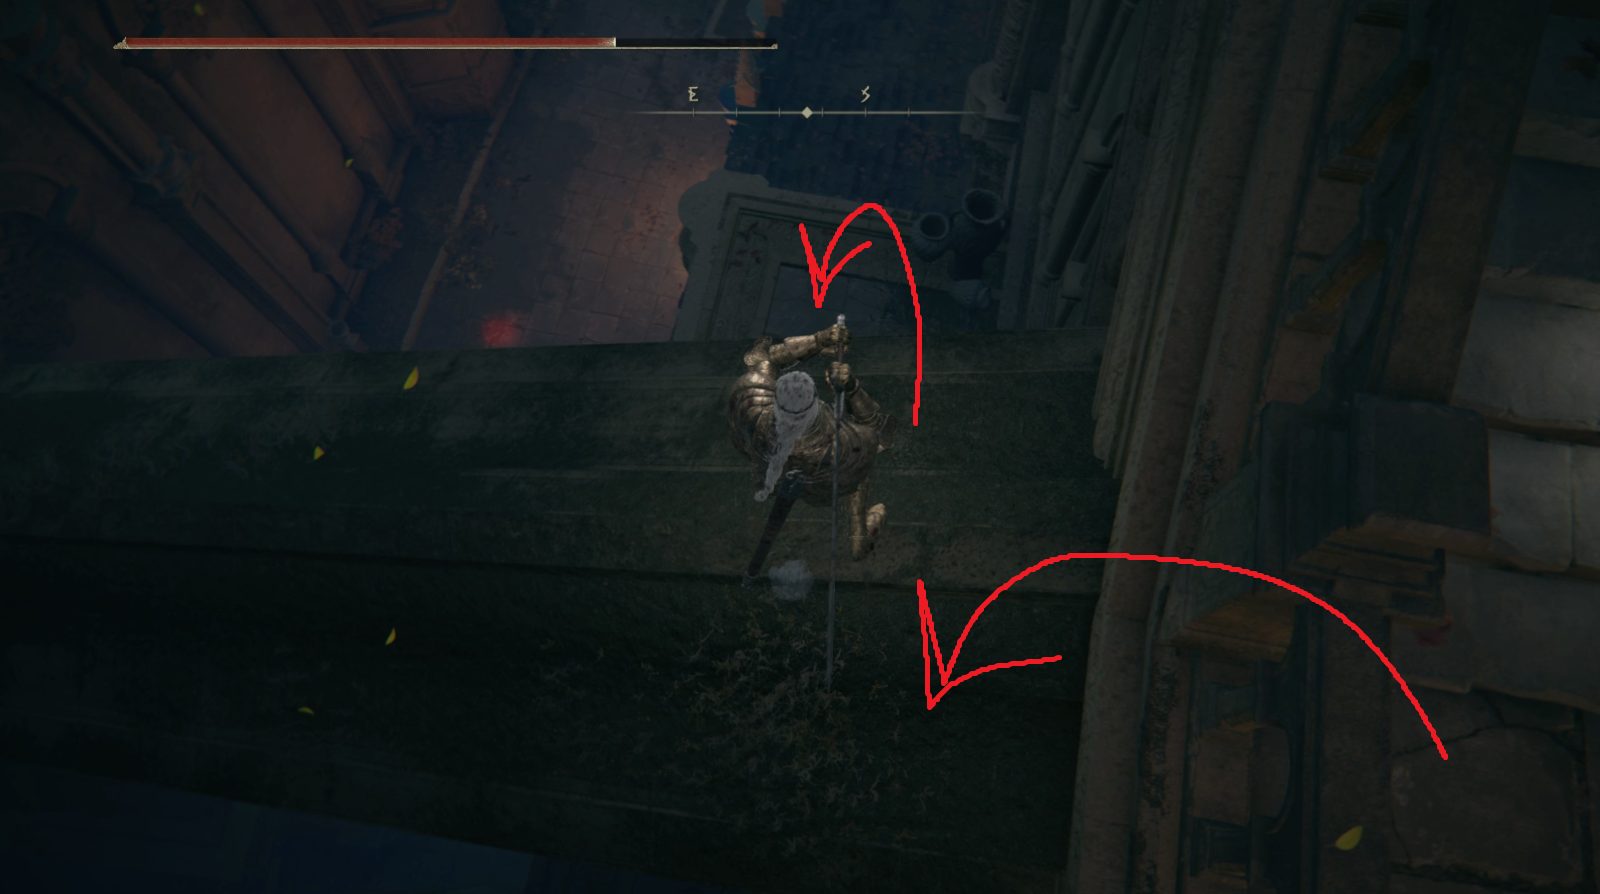
If you killed the Cleanrot Knights, you can pass easily through the next room, otherwise you’ll have to make sure you dodge their attacks as you make your way through. Once you exit through the southeastern doorway, turn left and jump over the railing onto the buttress, and from there drop down onto the balcony below.
Go through the doorway on the balcony and down the stairs. It’s pretty dark in here, so turn on your Lantern to avoid falling off the interior balcony. Continue halfway down the next set of stairs and then fall off the right side of them — just ahead is a corpse in a chair with a Seedbed Curse, so grab it and then look down into the room below. Here there are three crystalians guarding some loot: directly beneath you is a Pickled Turtle Neck, and on the southwestern wall is a somewhat more important Somber Smithing Stone [9]. It’s inadvisable to fight the crystalians in here — instead, just pick up loot and run out of the doorway (which is in the northern corner of the room).
Start sneaking after you leave the room, turn right, then right again to go around the corner and head southeast (if you’re very unlucky, the nearby revenant may aggro, but it’s unlikely). Once you go about 10 meters, you can stop and decide what you’re going to do next — just check behind you first to make sure nothing’s chasing you. This next section has the following optional loot: x3 Beast Blood, x5 Aeonian Butterfly, Golden Rune [12], and Marika’s Soreseal (which requires a Stonesword Key to access and is pretty useless this far into the game). However, you’ll have to either fight or avoid three Royal Revenants, who each drop a Ghost Glovewort [9]. If you want to complete the optional section, click the “Optional Loot” button below, otherwise continue to the next paragraph.
If you decide you want the loot but you don’t care about the Ghost Glovewort [9] and/or really hate fighting revenants, you can put the Twiggy Cracked Tear into your Flask of Wondrous Physick, and then run to pick up the items — this way, you won’t have to worry about dropping your runes if the revenants get you. You can also summon spirit ashes here, which can make fighting the revenants much easier.
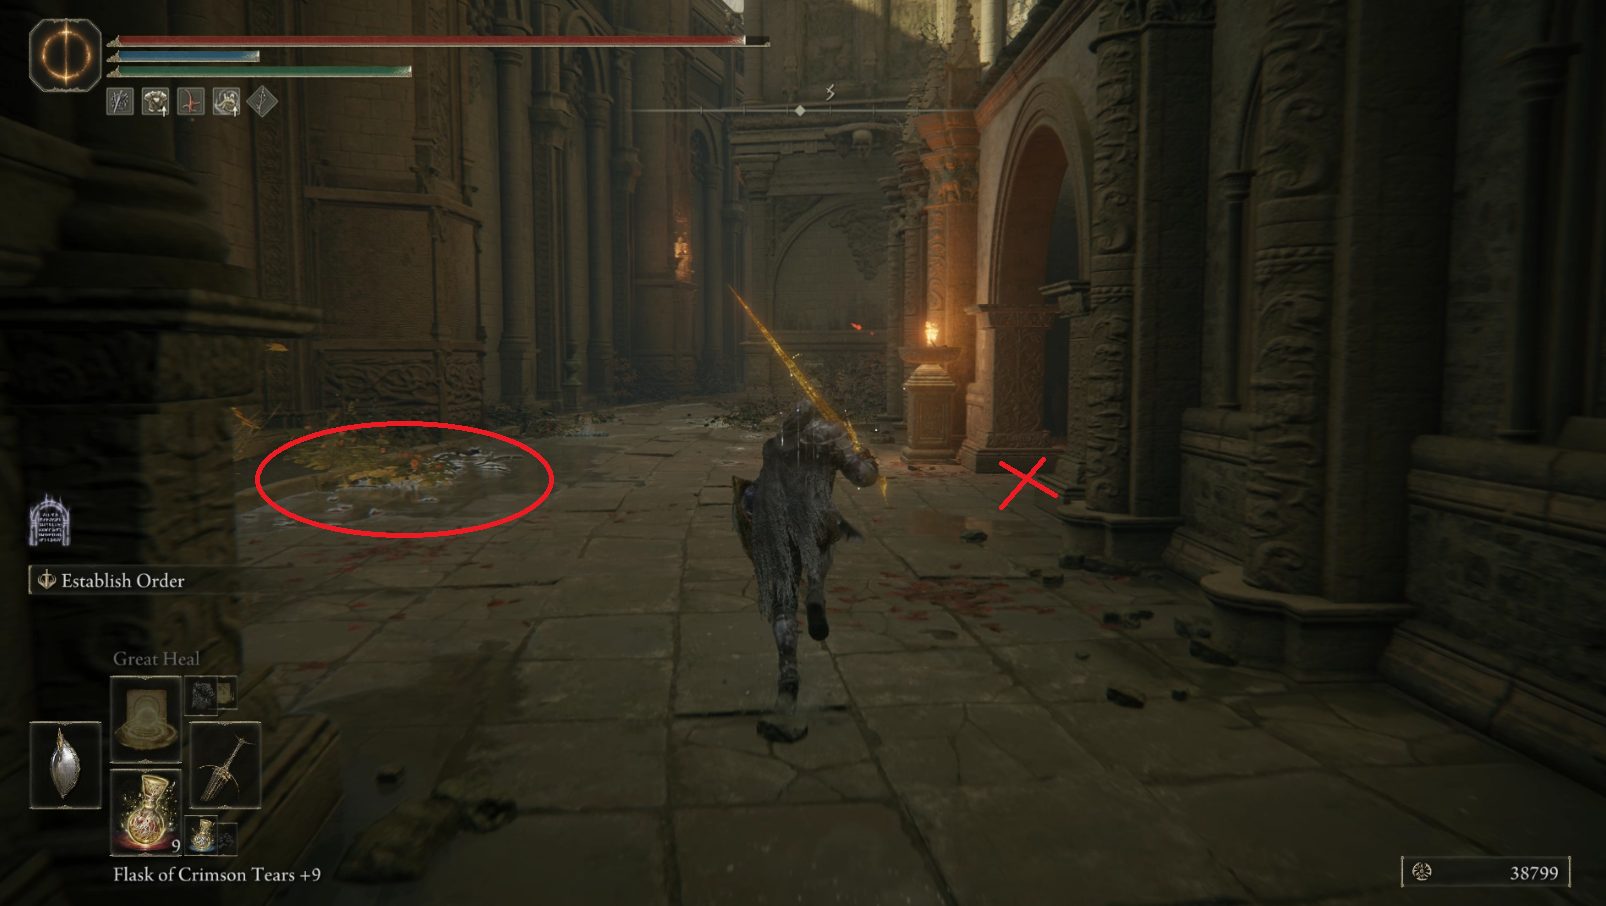
Continue southeast and you’ll soon come to an archway lit by a brazier. Once you turn right (west) and walk under the arch, a revenant will spawn behind you. (Incantation users should use spells like Great Heal to destroy the revenant as it spawns).
Once you reach the spot marked with an X, a revenant will spawn in the circled location
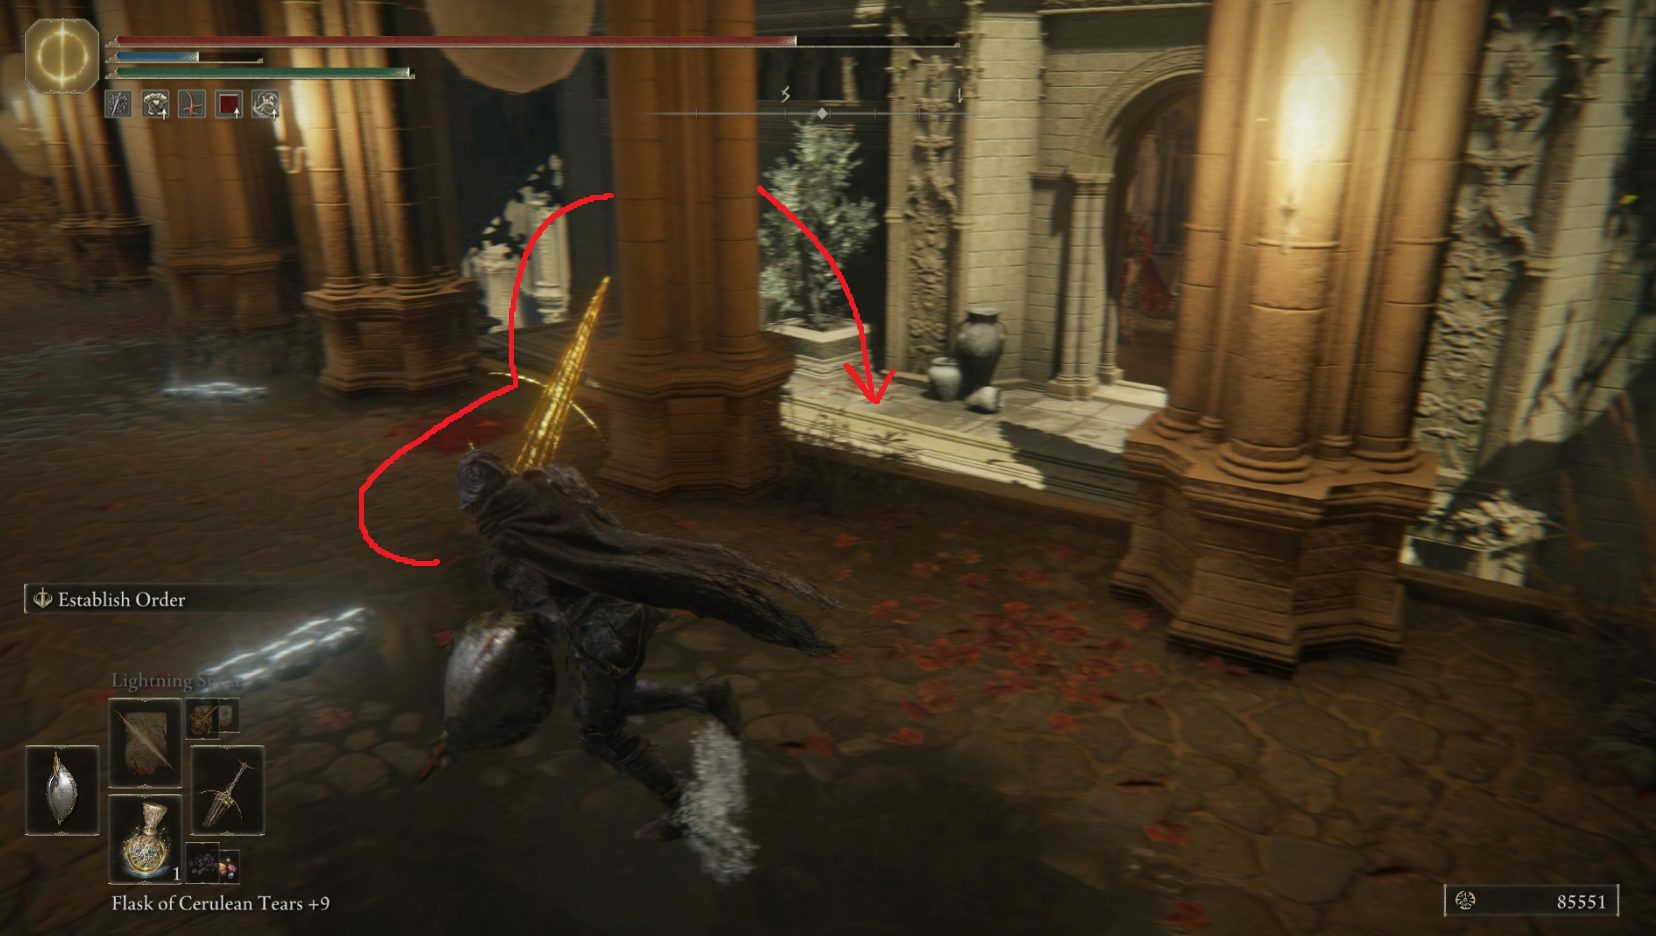
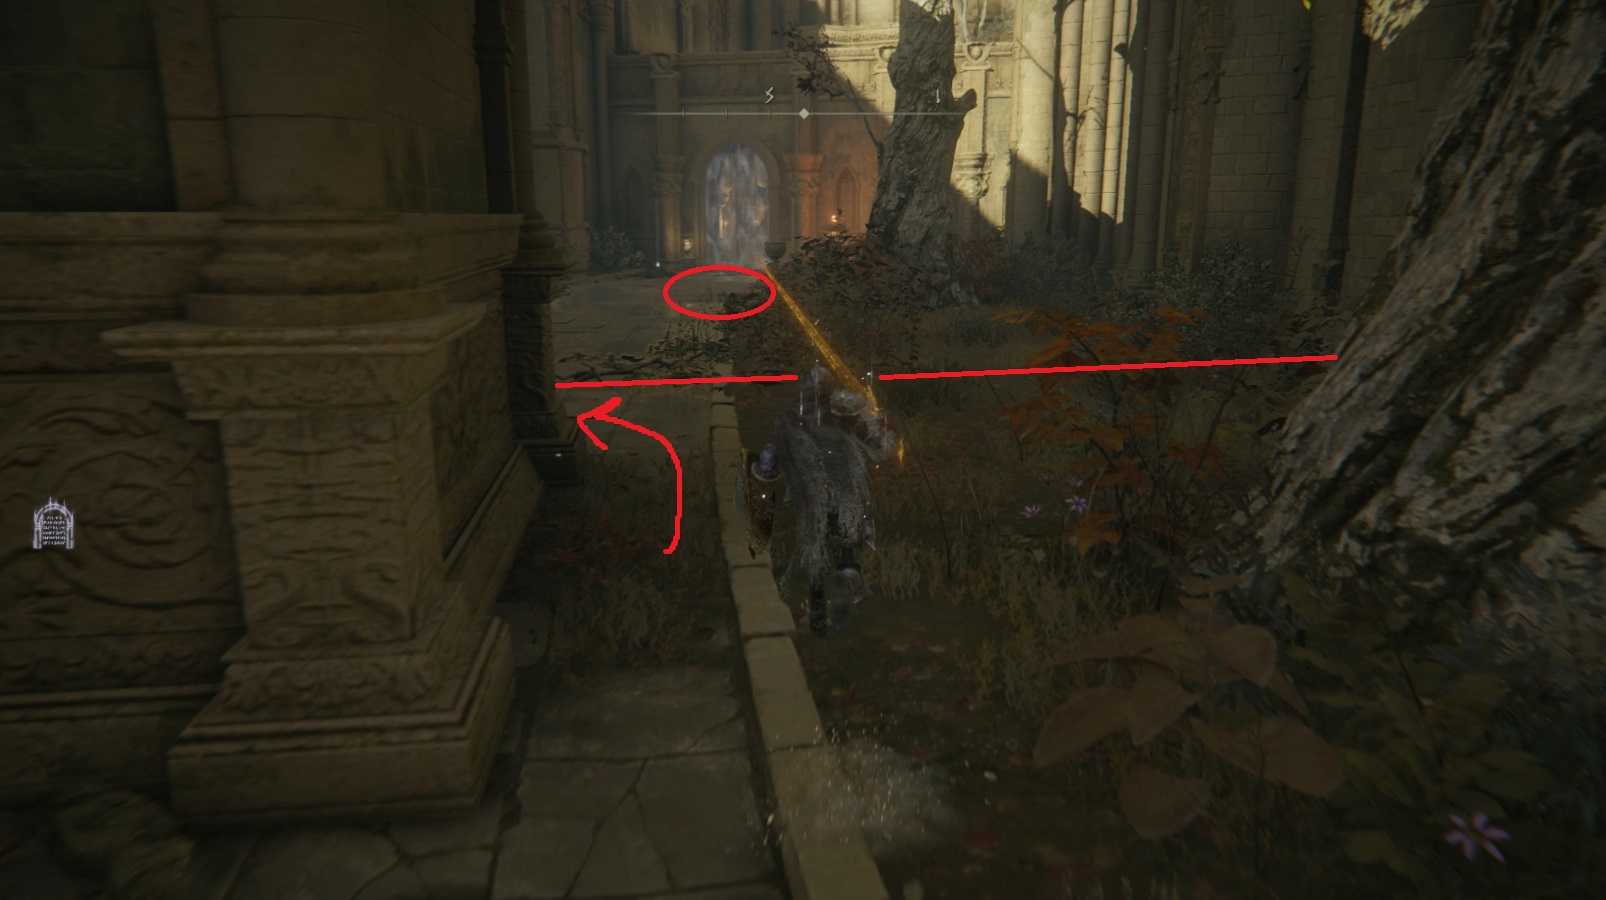
In the small alcove beyond the arch is a corpse with x3 Beast Blood. Grab it and then head back out to the street and start running south again — you can grab an Aeonian Butterfly from beside the tree before where the street narrows again. Once you’re about lined up with the butterflies, another revenant will spawn on the left-hand path ahead and start moving towards you — if you’re just running past them, it’s easier to go right around the huge column here.
This revenant seems to spawn when you cross the line indicated — going around him can be done by following the arrow
Continue south past the second revenant’s spawn location, and you’ll be able to see the stonesword imp fog wall in the doorway ahead. In this final revenant-infested area (at least in this direction), turn left (east) around the corner indicated below to find a corpse with x4 Aeonian Butterfly — there’s also a Golden Rune [12] just to the left of the door — if you pay the Stonesword Key entrance fee, you can head inside the room and pick up Marika’s Soreseal from the basin against the far wall.
Once again, crossing the line indicated will spawn the revenant in the circled location
Once you’ve got all the loot, you can run back the way you came, generally north-northwest, until you’re back where you left the room with the three crystalians.
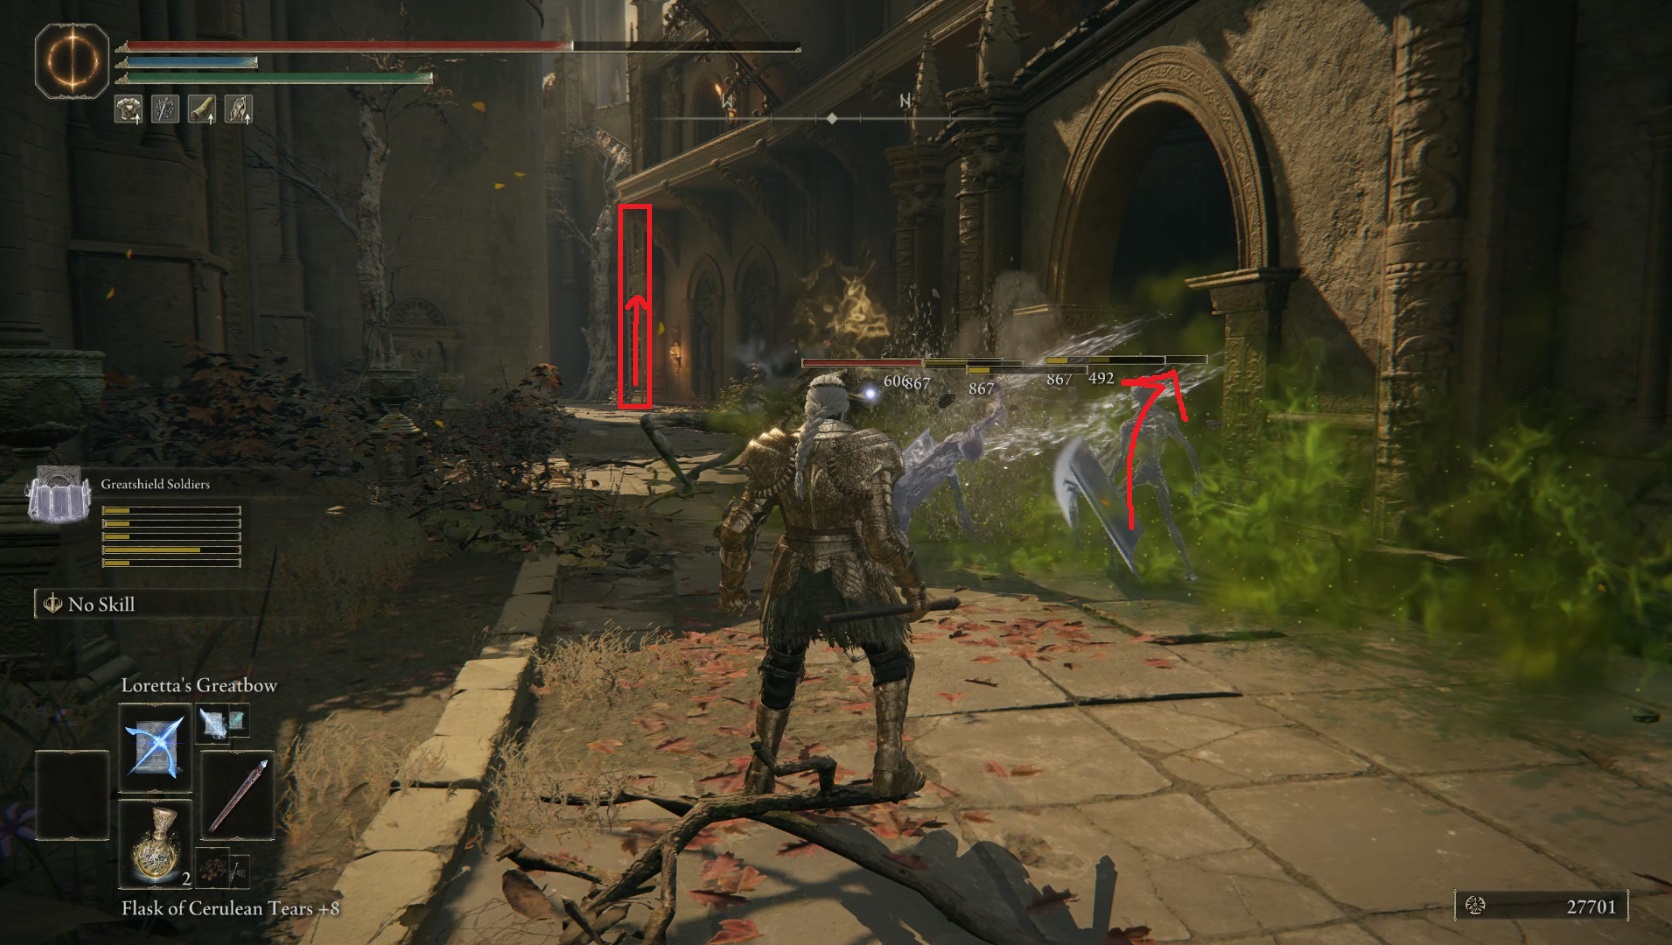
From just outside the room with the three crystalians, face northwest and you’ll see a revenant either staring at you or already making its way towards you. It’s not a bad idea to call in some spirit ashes for backup — the other option is just running past it, but we’re going to get a couple of items, aggro more revenants, and climb a ladder, so killing it is actually the safest choice.
Tests have confirmed the Greatshield Soldiers are not effective against the revenants… The arrow indicates the alcove with the Lord’s Rune — note the position of the ladder as well
Once the revenant is dead, you can go into the nearby alcove and grab the Lord’s Rune, then head back onto the street and go northwest. You’ll pass a ladder that leads up to a balcony — note where it is, as we’ll be desperately running back to it shortly. Past the ladder, the street will turn left (south-southwest), and so should you. In the courtyard ahead, there is a corpse with a Smithing Stone [8] on the left, by a tree. Pick it up and then sprint back to the ladder — two revenants spawn will spawn behind you, so unless you want a serious challenge, discretion is the better part of valor here.
Once you climb the ladder, start sneaking — we’re going to pretend we’re playing Sekiro for a bit (unless you really want to fight two Cleanrot Knights alongside some other mobs, in which case go ahead and run in swinging). Position yourself so you can see inside the building, and then wait for the patrol to enter the building and get out of your way. You can then sneak inside, grabbing the x10 Spiritflame Arrow from the corpse at the desk. Going northwest will take you to the doorway and back outside, but you can choose to first follow behind the patrol and grab the x2 Warming Stone that they’ll pass on their route — as long as you’re fast, you’ll have enough time to sneak out before they turn around and notice you.
This patrol will end up turning around and going back outside and up the stairs, so if you take too long in the following section, they’ll end up attacking you from behind
Continue northwest out the doorway and then further east up the stairs. There is a soldier who will aggro as you exit the building — he’s just to the right of the doorway, but you don’t want to fight him near the building (it will draw the enemies inside). Instead, get most of the way up the stairs and then turn and face him, then continue up the stairs when he’s dead. You’ll find yourself facing a couple of ballistas — kill the footmen manning them, then turn around and deal with the soldier approaching from the northwest. Once all three enemies are dead, you can pick up the Haligtree Soldier Ashes from in front of the ornate stone goblet.
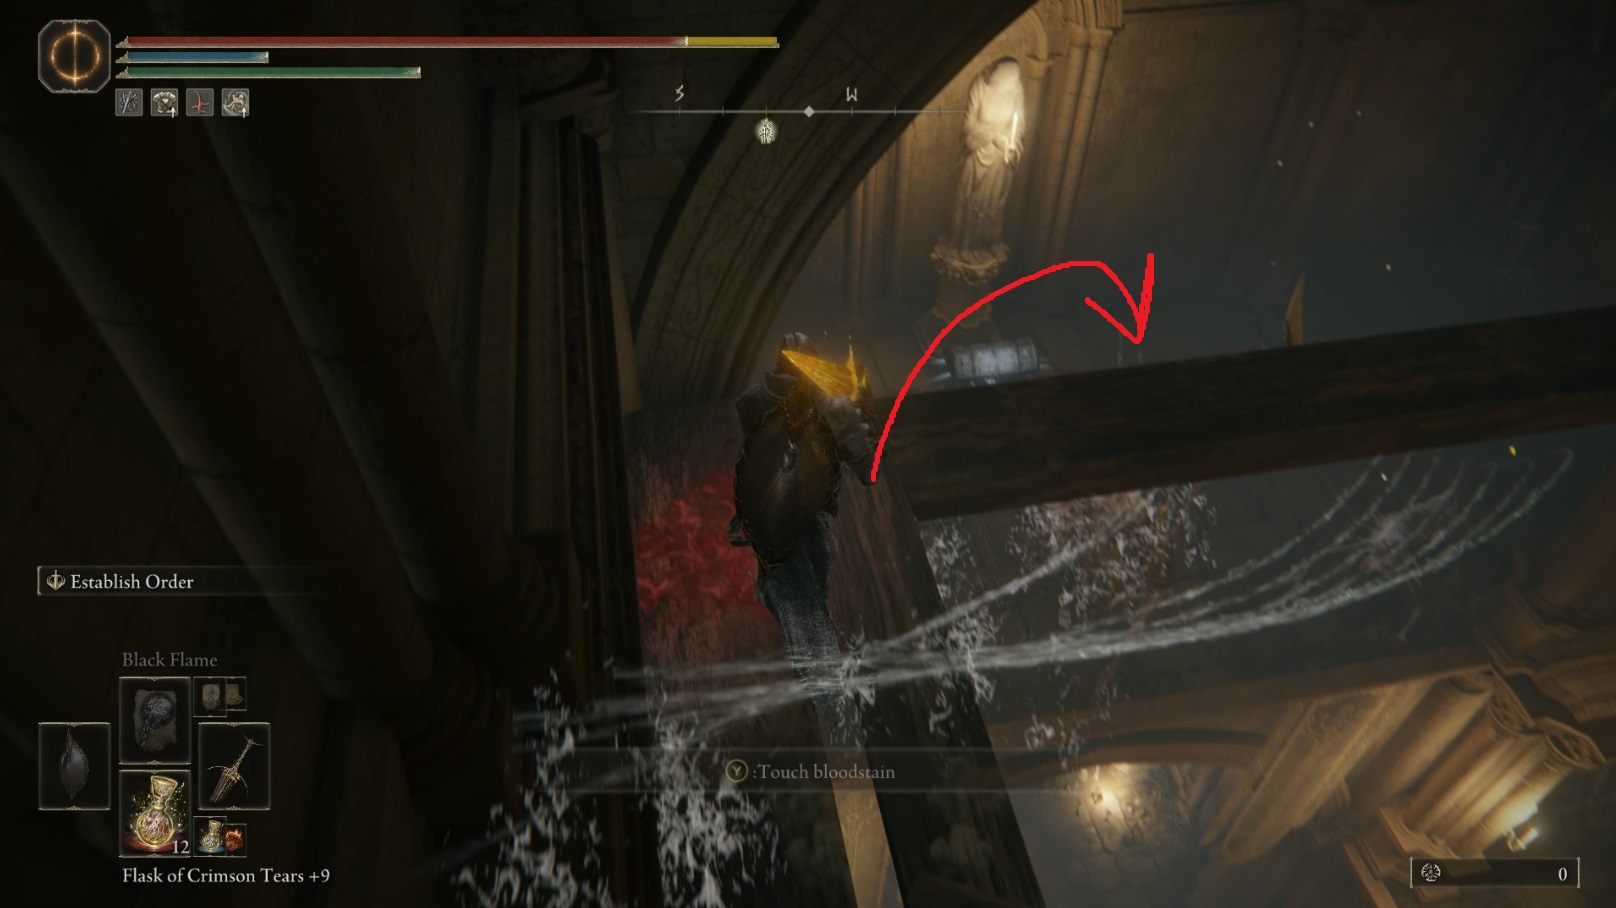
At this point, the patrol could be getting close, so check the stairs and make sure they aren’t here yet, then grab the Smithing Stone [8] from in between the two ballistas. Go west from in front of the ballistas and run up the buttress, then jump west-northwest to the balcony about halfway up — you want to jump when you’re lined up with the door on the balcony.
Head through the doorway to find the Haligtree Knight Helm on a corpse, then drop west off the ledge and turn left (south) to find the Elphael Inner Wall site of grace. On the wall to the north-northwest is a corpse with a Smithing Stone [6] you can pick up. Next, we’re going to backtrack a bit now to pick up some items we skipped. If you just want to continue making your way to the boss, you can go to the Inner Elphael tab now. You can also ignore the following instructions about killing the enemies and just run to grab the items if you want.
From the site of grace, go north and then turn right to face east in the doorway — ahead of you is a Putrid Avatar who drops a Lord’s Rune and 27,090 upon death. He’s flanked by two knights, so you’ll need to pull him with a ranged attack or projectile; make sure you don’t use melee attacks on him until he’s at least halfway down the hallway or the knights may aggro. Pull him all the way to the site of grace — at this point, you can choose to cheese him from the bottom of the stairs that are south of the site of grace. If you can get him to stand in the right spot, his projectiles will miss and you can continue using ranged attacks on him. He may teleport back to his starting location, but that’s fine, since it just means you can kite him all the way back to the stairs again (his health won’t regen).
Once you’ve taken care of the avatar, go back to the hallway north of the site of grace and then continue in and exit the building. There is a knight on either side of the doorway — pull the left-hand one back towards the site of grace. The other knight (who has a greatbow) will also aggro, so you’ll need to pull the first knight around the corner before engaging him. Kill him quickly, as his partner is coming!
Once both knights are dead, you can go outside — you’ll come under fire from ballistas on the ledge to the north, so zig-zag and keep moving. Just to the right of the entrance, hidden in some bushes, is a corpse with a Sacramental Bud. Northeast of the corpse are two ballistas, and right in front of them is an Arteria Leaf. Grab it, then continue east onto the middle of the bridge (making sure you’re dodging back and forth the whole time) to snag a Golden Rune [11]. That done, you can run all the way back to the Elphael Inner Wall site of grace and rest.
This walkthrough continues in the next tab, Inner Elphael!
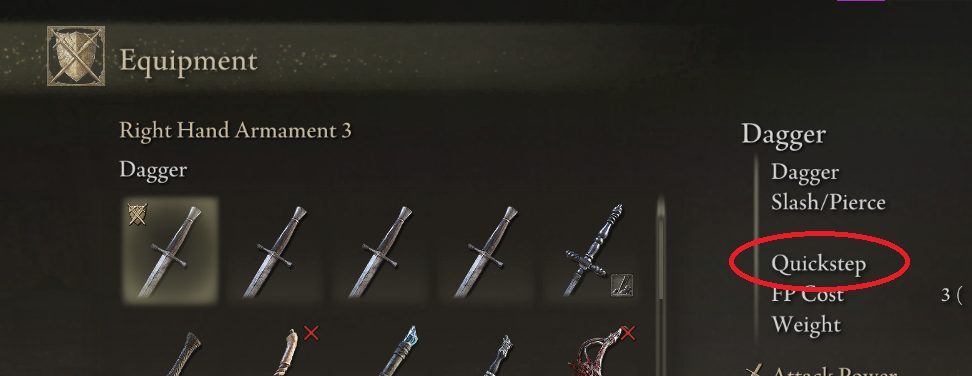
Before you continue, either memorize Flame, Cleanse Me, or else make sure you have some Preserving Boluses readily available. Additionally, equip a dagger or some other weapon with the Quickstep weapon skill. By two-handing the dagger and using Quickstep, you can make your way across the rot in the next area quickly and potentially avoid becoming infected.
From the Elphael Inner Wall site of grace, go down the stairs to the south. At the bottom, you’ll be able to walk east onto a root that leads up over a clump of roots — from the top, you’ll see three crystalians sitting by a chest. Just like the last time we found three crystalians guarding treasure, we aren’t going to fight them. You’re invincible during the chest-opening animation, so sneak down the root to the floor and then get as close as you can to the chest while sneaking. When they notice you, run and open the chest and snatch the Rotten Crystal Sword, then sprint back the way you came — up and over the root ball — and then turn right to go back up the stairs.
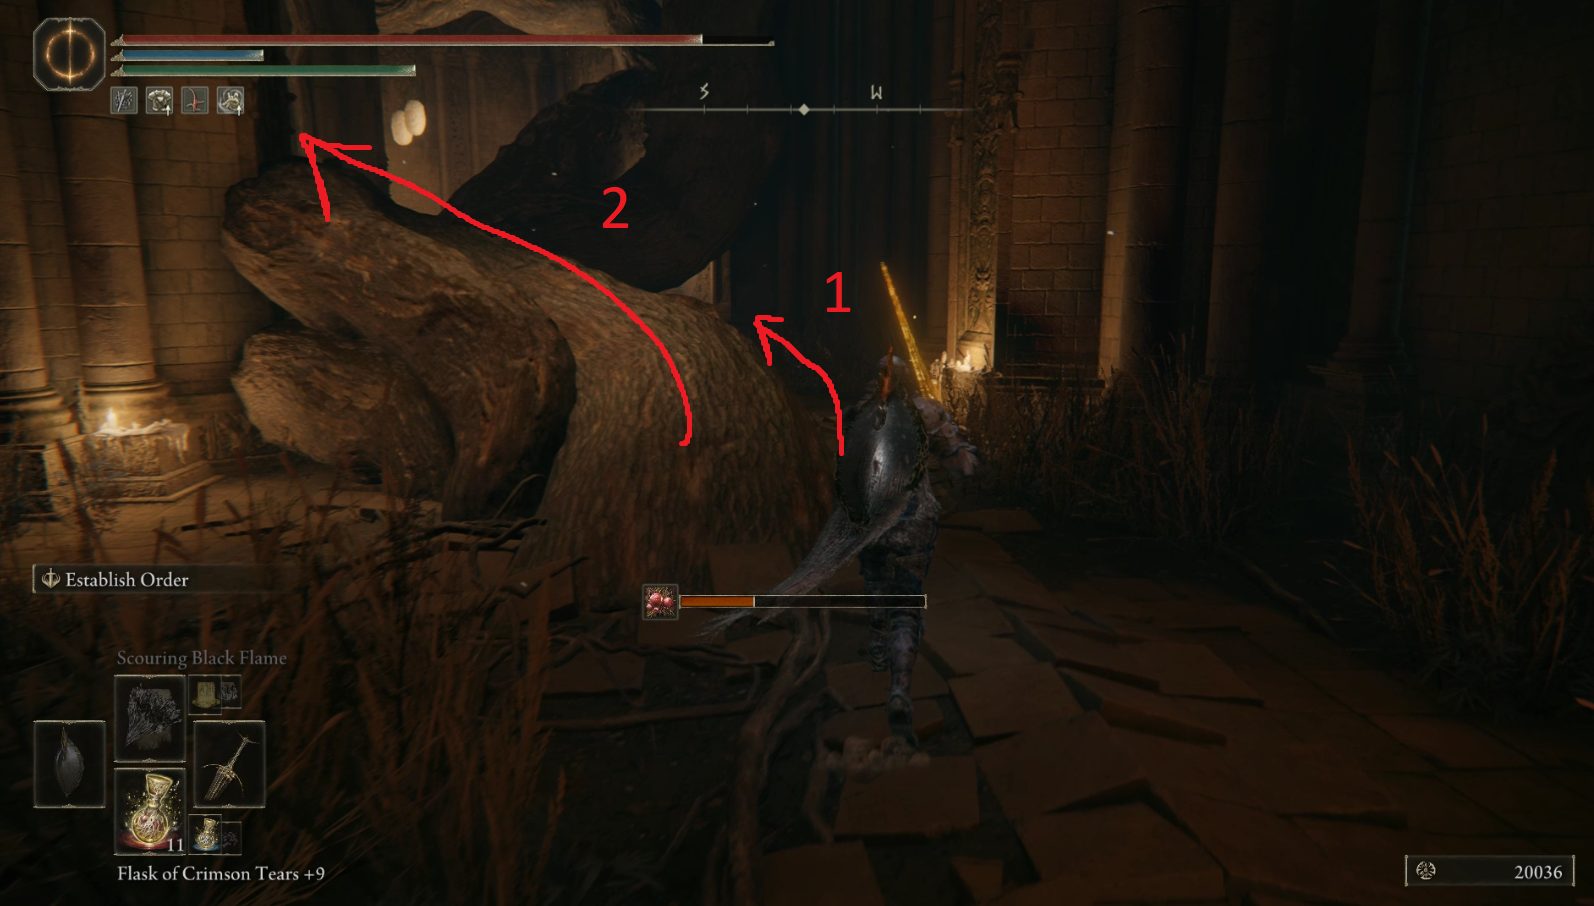
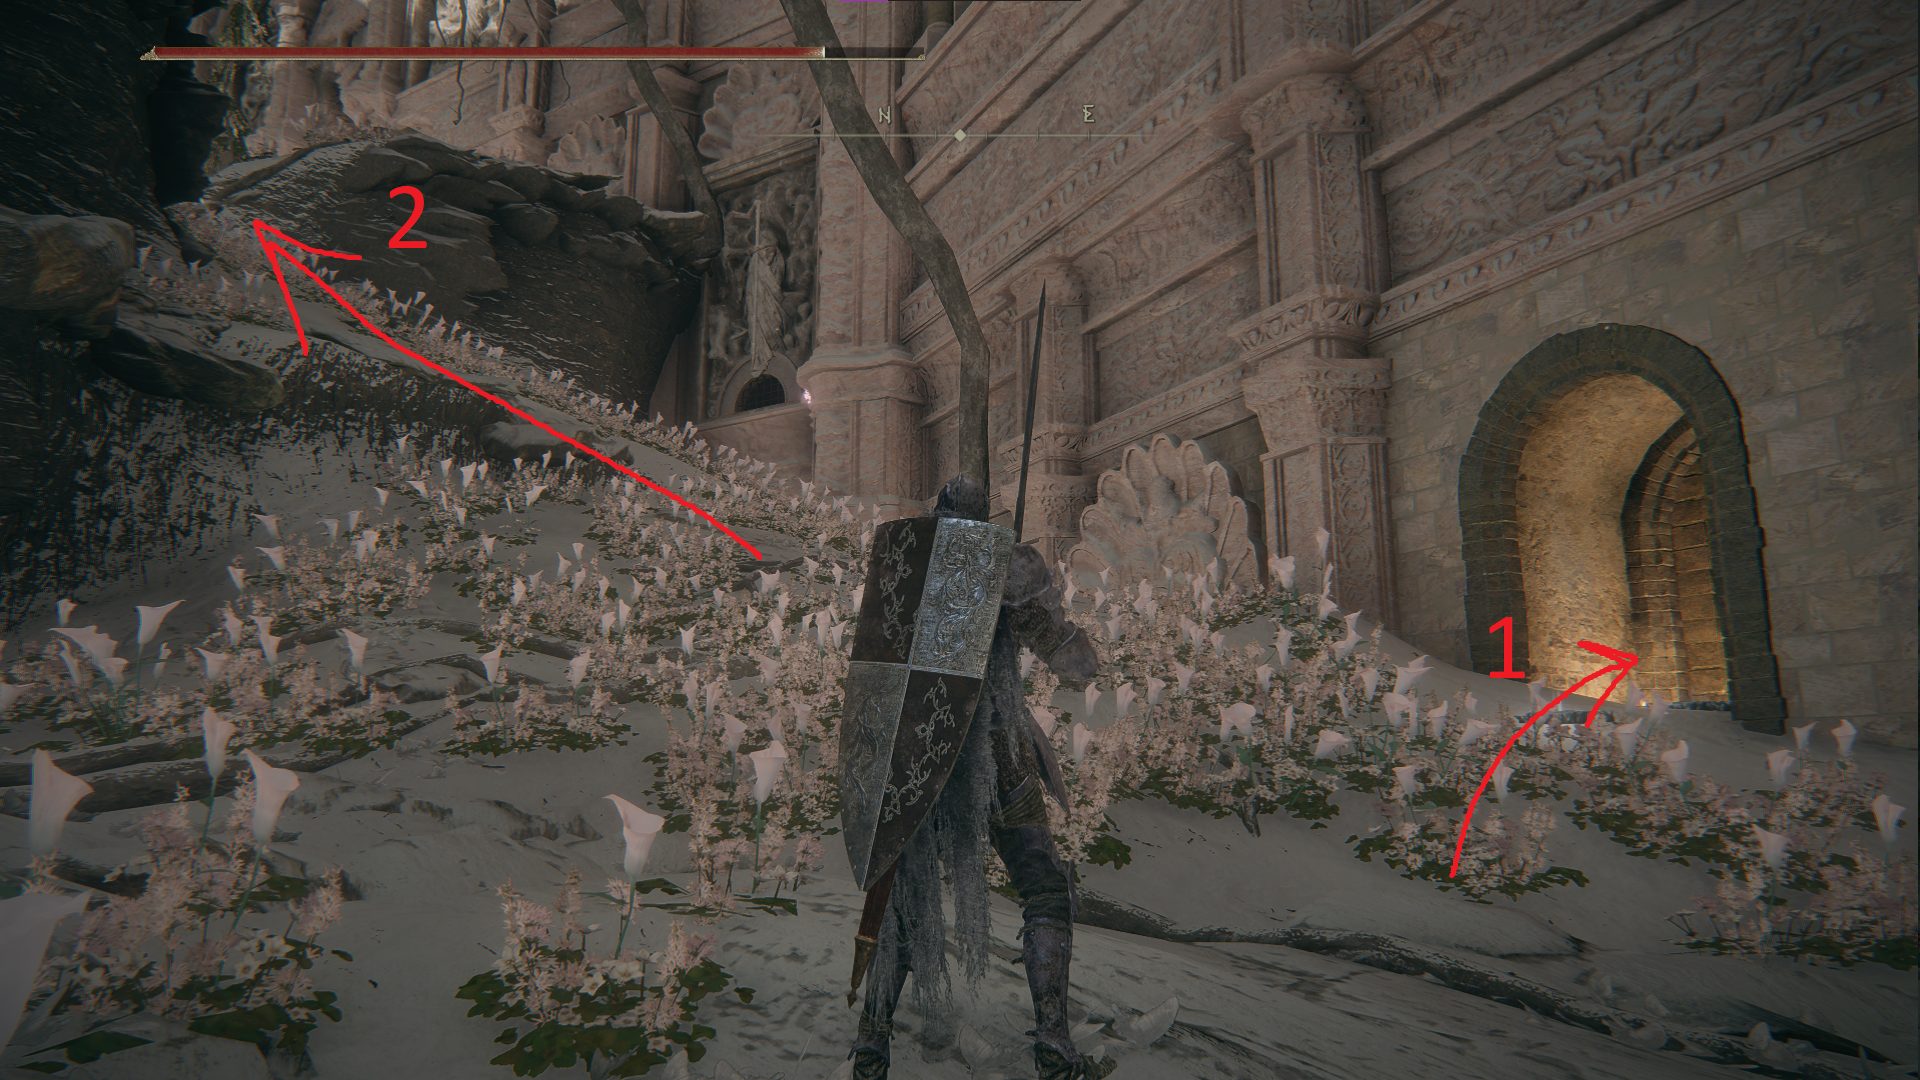
Rest at the site of grace to reset the crystalians’ aggro, and then go back down the stairs, this time turning right. Continuing southwest, you’ll come to a root that leads up to a hole in the eastern wall. That’s the way forward, but for now continue past the root (path 1 below), under the next root, and to the far end of the hallway, where a Hero’s Rune [5] sits behind a large brazier. Grab it and then head back to the root and follow it up through the hole in the wall (path 2).
Follow the root through the hole, and stay on it as it curves down towards the ground. Once off the root, turn around and face southwest — if you use target-lock, you’ll find a well-camouflaged pest lying down in the flowers. Sneak up and backstab it, and you’ll end up kicking it off of the ledge. Then grab the nearby Aeonian Butterfly and head northeast to the higher ground. Jump up the rocks, and at the top, continue northeast to the edge and look over.
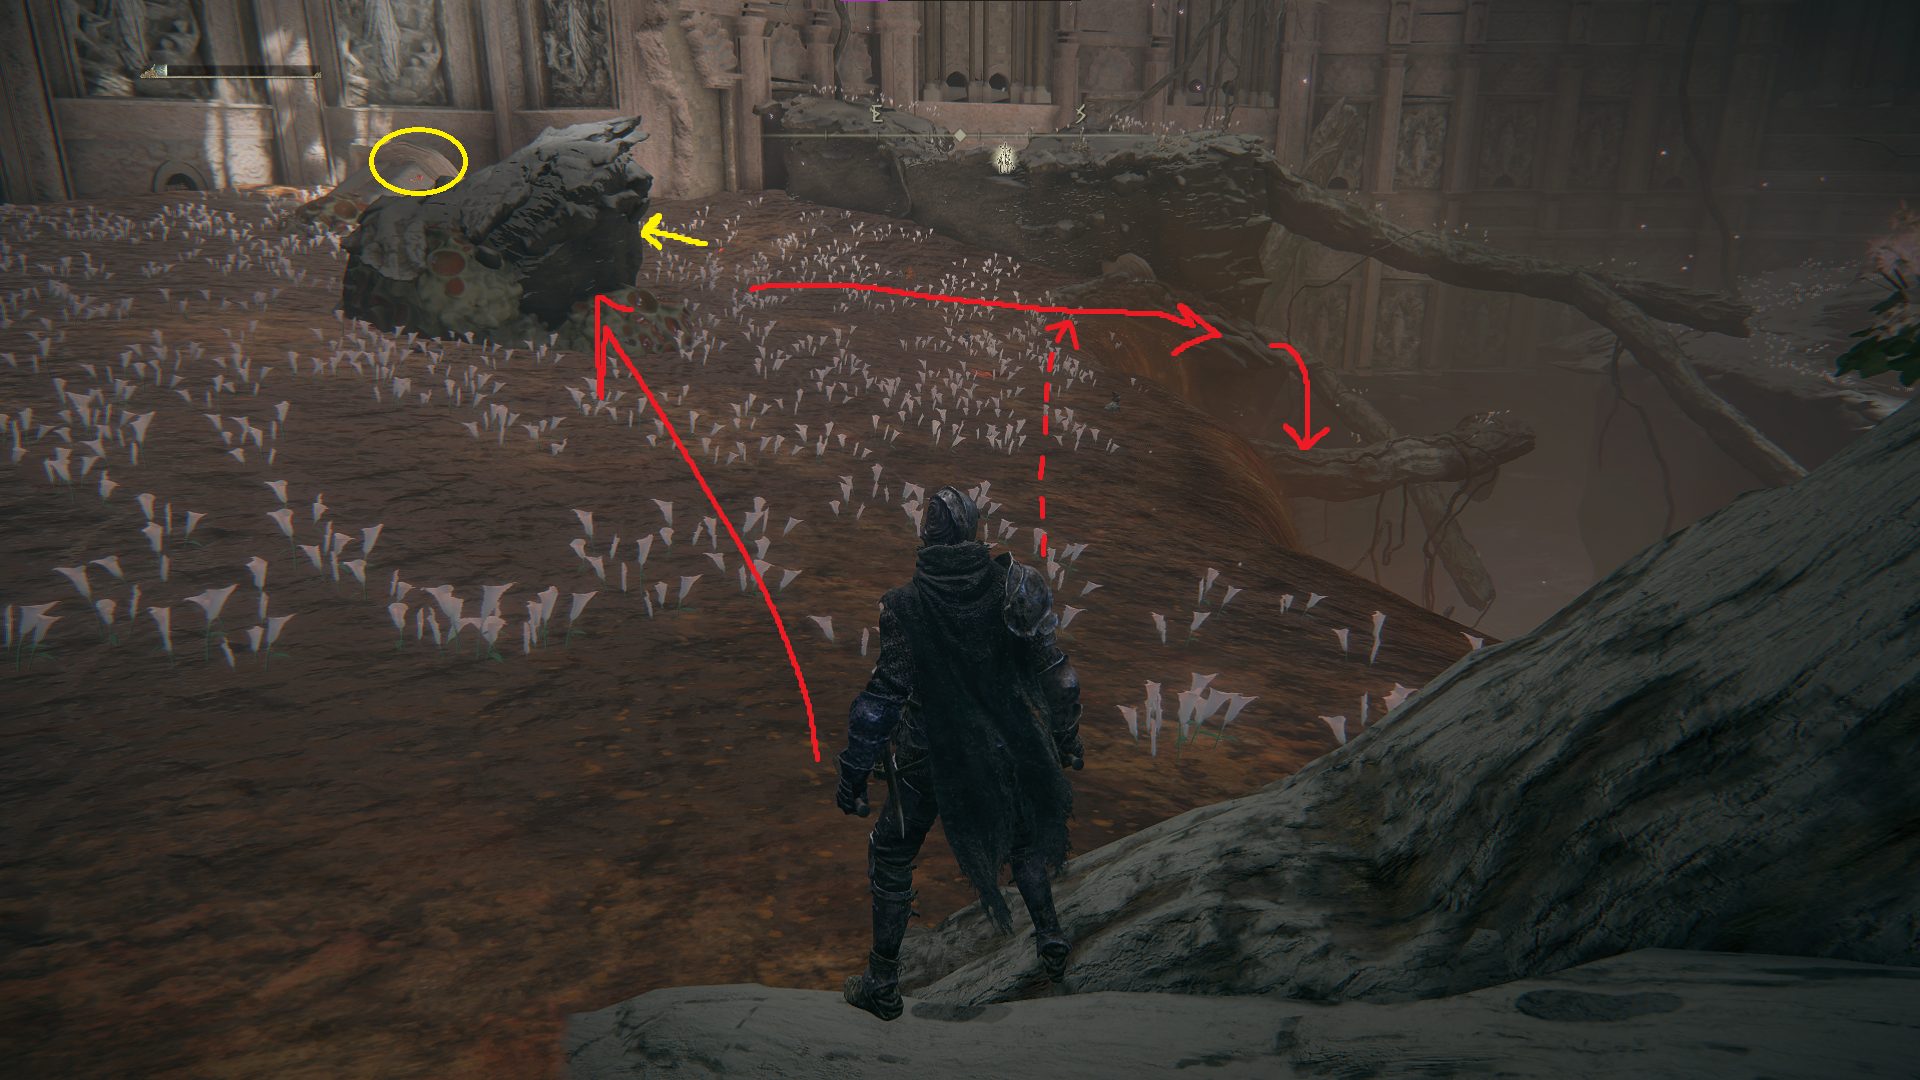
You’ll see another pest down there, and you can use ranged attacks (fire being especially effective) rather than facing him in melee — although you’ll still have to dodge his projectiles, this is generally safer/easier. Then jump down onto the Rot Grease and then Quickstep your way south-southeast off of the Rot. Back on dry land, follow the nearby root southeast as far as you can, to the edge of the rot lake. From here, you have a few options, depending on your tolerance for risk and whether or not you have an abundance of ways to remove Scarlet Rot.
First of all, you have two choices in terms of routing: you can either head to the “island” in the middle of the lake, and from there to the far shore. It’s possible to Quickstep to the island without your rot bar filling completely, and you can jump up onto the dry land (it’s at the tip of the arrow in the image below). You can then wait there and let the Rot deplete. However, you’ll have to fight enemies while you wait on the island. Alternatively, you can head straight across — you’ll definitely get Rot, but this allows you to avoid fighting any enemies.
There are a number of baby pests in the Rot– they aren’t nearly as dangerous as the big ones, but attack quickly and can overwhelm you with their numbers. There are also a couple of places to grab Aeonian Butterfly in the Rot, although you’ll have to fight more baby pests and one grown pest if you go for the butterflies.
The dotted arrow indicates the straight path — the yellow arrow and circle indicate where the butterflies are
If you choose to make your way to the island, you should clear some of the enemies out from dry land, since you’ll aggro quite a few as you head for the island. Use target-lock to find the nearby enemies and use some kind of ranged attack to kill them, or at least pull them towards you. You can then go out into the rot, aggro a few more, then go back to your starting point and wait until your Rot meter is at zero before heading across.
Regardless of what strategy you choose, your ultimate goal is to make it to the dry land — really just a column and some broken bricks — to the southeast. From there, you can drop southwest down onto a root. Follow the root southeast and then drop to the next root — it’s best to jump forward as you do so, since then you’ll land somewhere the root is a little thicker. When you land, turn around and go to the end of the root to grab another Aeonian Butterfly, then go southeast to make your way off of the root.
Once you’re back on solid ground, you’ll see a doorway on your right, and a path uphill on your left. Path 2 leads to some goodies (and the end of Millicent’s quest), but first you should take path 1 to secure the next site of grace.
Go through the doorway, grab the Golden Rune [10] on the far side of the room, then go down the ladder. Continue east through the tunnel and you’ll enter a chamber with the Drainage Channel site of grace. Rest here and, if you can cast spells with your character, make sure you have at least 3-4 Cerulean (blue) flasks. Alternatively, craft or otherwise prep as much ranged fire damage as you have available, or else some kind of status effect-inducing projectile like Kukri or Rot Pots, etc.
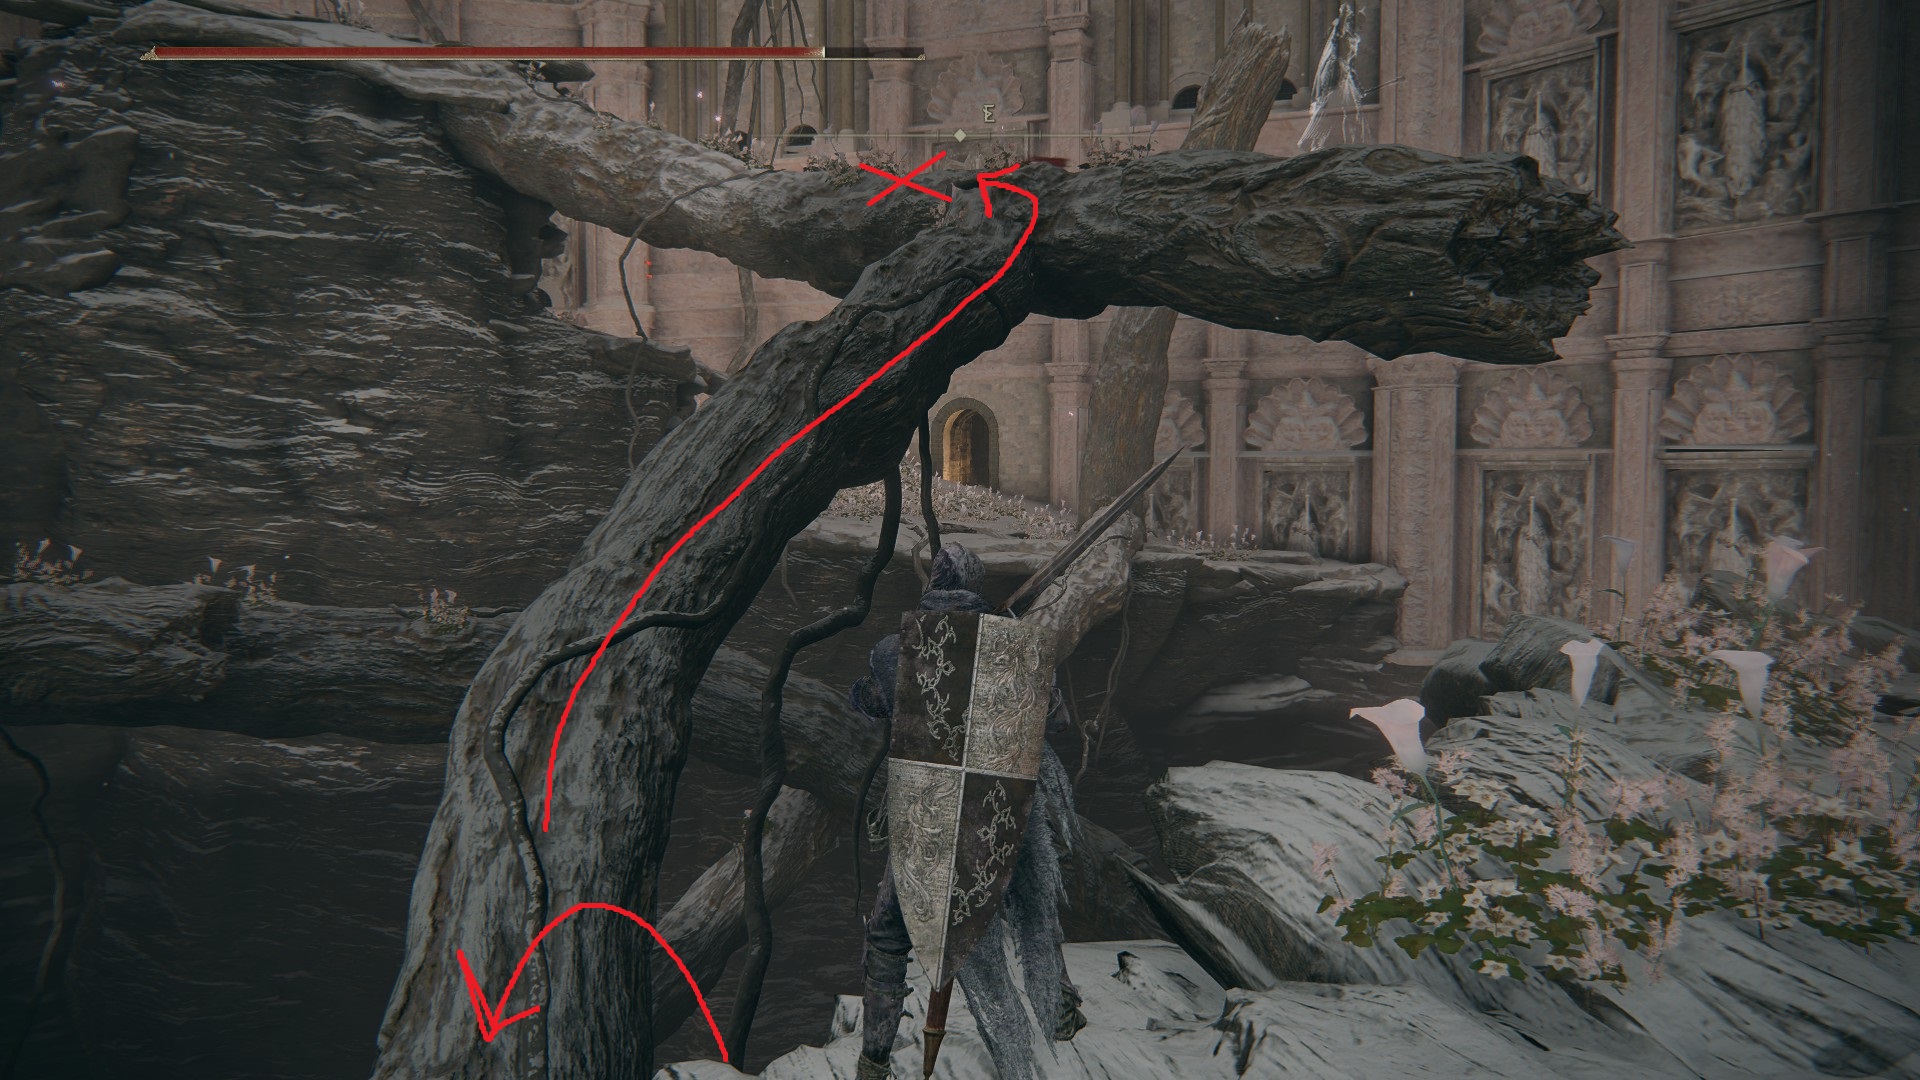
Then go back the way you came, west through the tunnel and up the ladder. Then head west through the doorway and turn right to go northwest up the hill. Start sneaking near the top and you’ll be able to ambush a pest that’s lying down at the crest of the path. After dealing with the pest, head south-southwest and you’ll be able to walk out onto a root that leads across the pit. Drop off of the end of the root to the ground below and you’ll see a legendary item in the pool of Rot ahead — don’t approach it yet! When you get close, an Ulcerated Tree Spirit will spawn.
Instead, turn around and take a look at the route back up the branch (1) — this is how you’ll cheese the tree spirit. Once you’re ready, run towards the item in the Rot pond, and once your screen starts shaking, turn around and sprint to the branch indicated in image (1) below. Drop down onto it and run up past where the branches meet. Then stay as far away from the tree spirit as you can while still being in range of whatever projectile or ranged attack you’re using — as long as you stay at where the branches meet or further back, the tree spirit shouldn’t be able to hit you. Once it’s dead, you’ll receive a Golden Seed and 26,460, and it’ll be safe to grab the Great Grave Glovewort from the Rot pond.
(1)(2)
If you’ve been following Millicent’s questline, you can then head to the high ground above the northwestern side of the pond — here there will be two summon signs that allow you to fight or assist Millicent.
Next, teleport back to the Drainage Channel site of grace and head east to go outside. Turn left (north) and drop down onto the root, then follow it north until it ends. Then turn east and drop down onto the buttress below, and continue down the buttress until you can drop down to the left (north) onto another root. This one leads to yet another buttress — jump down onto it and then run up it heading southwest. Near the top, you’ll be able to go north again onto another root.
This one leads to a roof with a hole in it — drop down on the roof and then through the hole, making sure you’re on the lowest part of the roof before you step through the hole (1). You’ll come under fire when you land, so read ahead before dropping down. Upon landing, you’ll be on a wooden platform just above some balconies. Turn left and jump west off the wooden platform, down onto the balcony with the chest (2). There are three pest babies as well as a full-grown one — use AOE attacks if you have them and try to take the big one down first. Then, open the chest and loot the Dragoncrest Greatshield Talisman. (This is one of the strongest PvE talismans in the game, as it reduces physical damage from non-player enemies by 20%.)
(1)(2)
Head to the southeastern end of the balcony and then drop down to the northeast, killing the baby pest as you do so. Then continue forward (northeast) and take a right out onto the balcony, where you’ll find a corpse with a Nascent Butterfly. Go back inside and — if you have ranged options — take out the two pests on the ground floor before dropping down. Then go out the doorway on the northwestern side of the room, where another pest and a baby pest guard an Aeonian Butterfly. Head back inside and go up the stairs and through the doorway on the southwestern side of the room, then continue down the stairs and onto the elevator.
At the bottom, straight ahead to the southwest is the Haligtree Roots site of grace. Activate it, but don’t rest unless you really need to, since we’re going to go back through the room above shortly. You can see the gold fog gate that leads to Malenia, Blade of Miquella from here, but there are a few more items we can collect before facing the boss. First, go southeast from the site of grace and into the room with the large Rot flower. In this room are a number of Aeonian Butterflies, and you can also collect the Traveler’s Clothes, Manchettes, and Boots from in front of the large flower. You can also go up the stairs and into the room with the elevator to find one of the more pointless shortcuts in the game, but there isn’t really any reason to do so.
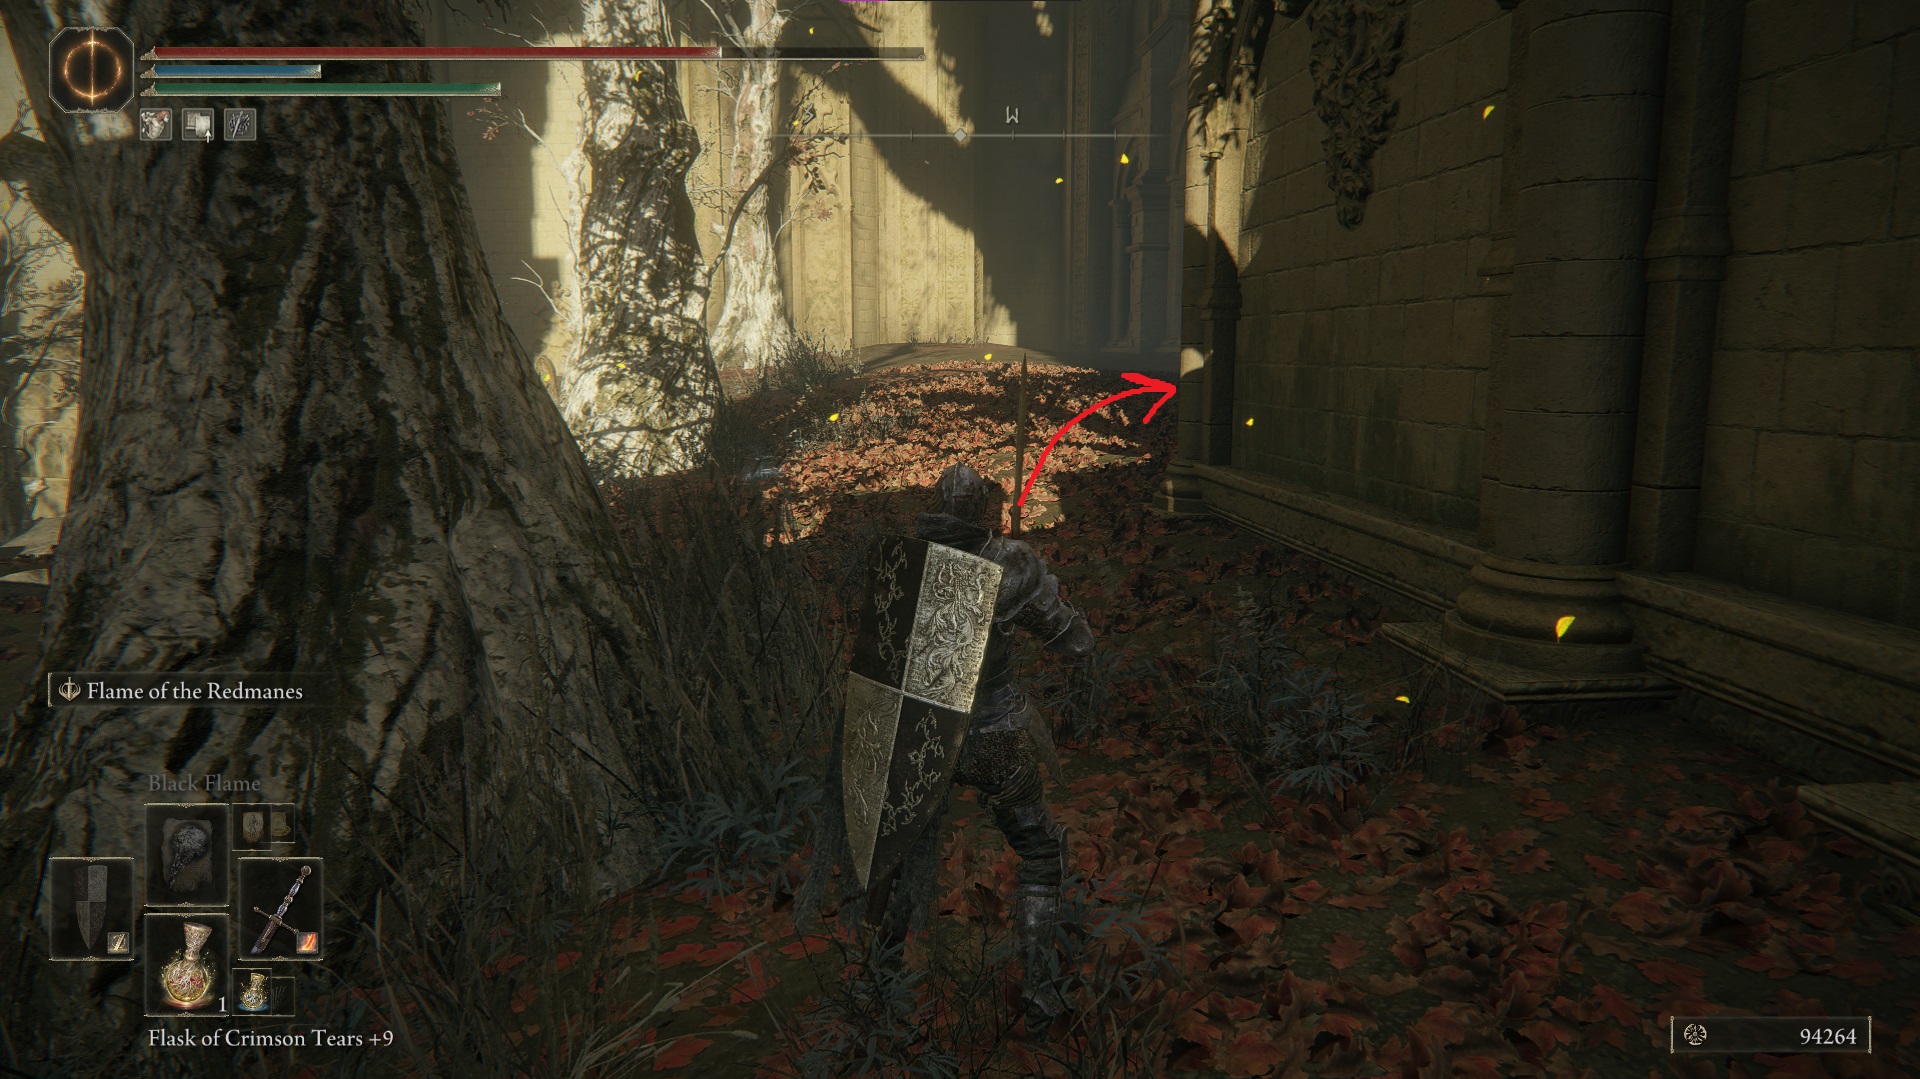
Next, head back to the elevator northeast of the Haligtree Roots site of grace and ride it up. Continue northeast through the doorway that leads outside, then turn right to head southeast. Turn right again at the corner of the building to continue southwest, and then get ready to fight the knight hiding around the corner just ahead. There are numerous Miquella’s Lily in the following area, so they won’t all be mentioned in the guide.
After defeating the knight, go southeast to the edge of a small drop and identify the two groups of enemies nearby. You can choose to sneak between these two groups of enemies — neither will spot you if you’re basically between them as you make your way southeast down the hill.
The knight waits around this corner
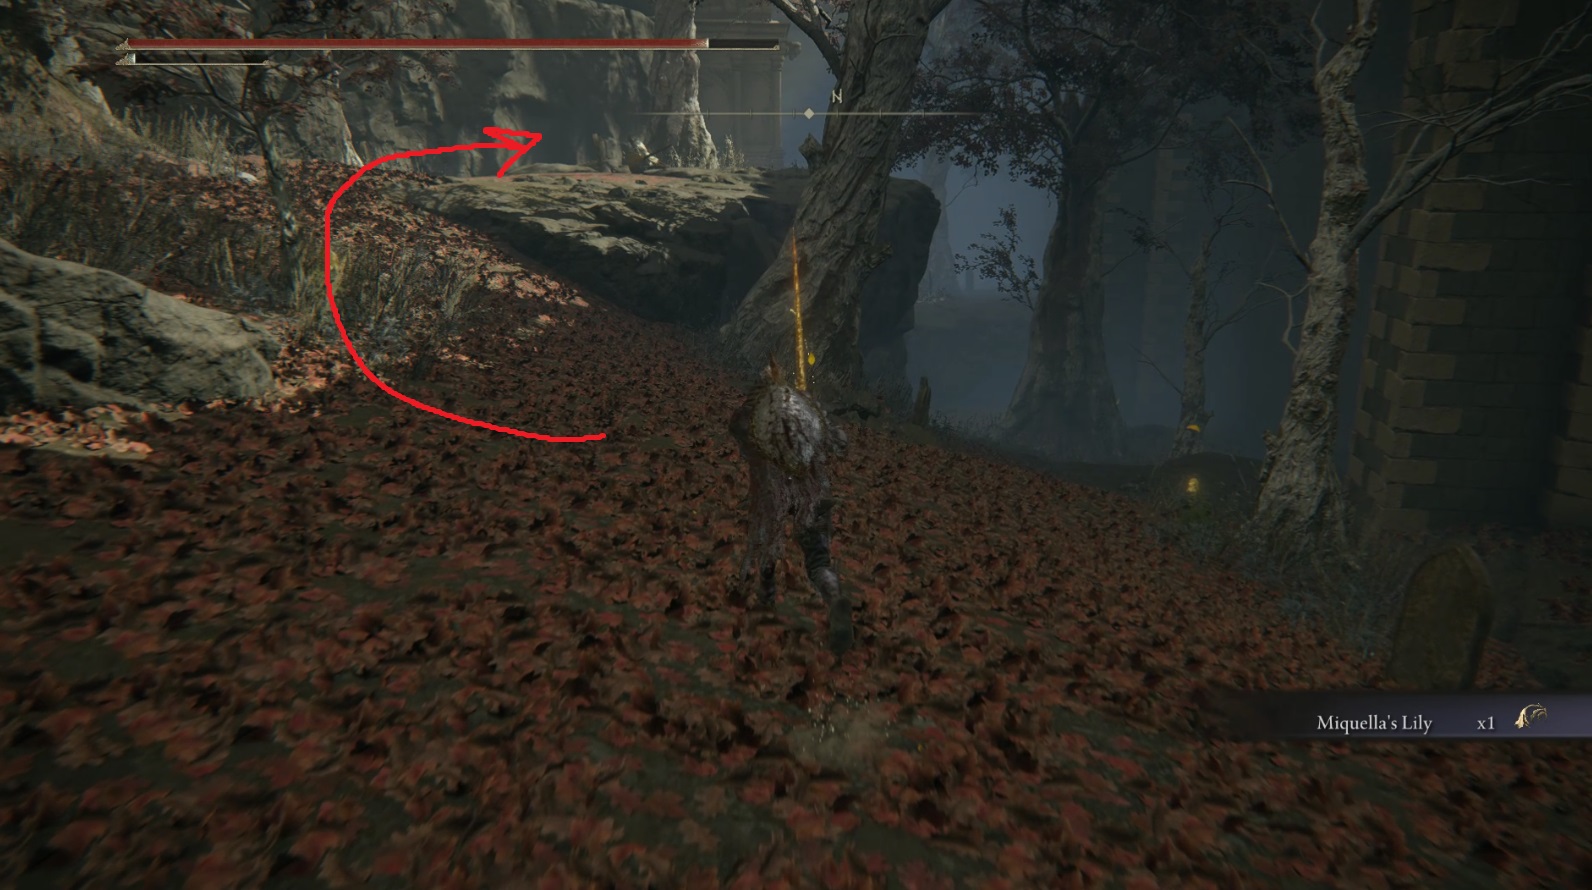
Further down the hill, You’ll come across a corpse with x3 Arteria Leaf — grab it and continue southeast down the hill, where you’ll find a clearing with another corpse with a Hero’s Rune [5] — nearby, two knights sit facing graves. You can sneak past the near knight, but the one to the east (with the greatbow) will get up as you approach. As long as you fight him near where he sits, the other knight should stay seated. From the greatbow knight, turn north and you’ll see two paths, one low and one high.
There’s nothing back there but more Miquella’s Lily, so if you aren’t interested in them, you can just sneak back to the front of the building where you found the Dragoncrest Greatshield Talisman. If on the other hand you do want them, take the upper path, and start sneaking as you near the soldier at the grave.
Backstab him, then keep going north, staying on the high ground. There’s another soldier you can backstab, and then you’ll have to take a very narrow path against the side of the building — ahead are two more soldiers in a small area with a lily by the tree. Kill them and then drop down to the northeast. Sneak up on the greatbow knight here and take him out, making sure you grab the lily on the northeastern side of the tree before you drop down to the southeast, where a bunch more lilies are growing amongst the trees.
Sneak back the way you came, uphill and generally north-northwest, until you’re back at the front of the structure that had the pests and the now-empty chest. Continue northwest from the building’s exit (staying outside) and you’ll soon reach another graveyard — this area is very similar to the last graveyard, except presumably pests are buried here instead of people. In this area, the aggro range of the large pests seems very inconsistent — sometimes you’ll find that enemies described below will leave their starting locations and move towards you, even from very far away. Therefore, the directions below are a suggestion only, and may not accurately describe the positions of the various enemies. When in doubt, kite back the way you came and use the trees for cover from the pests’ ranged attack.
You’ll want to sneak around to the right — watching out for the two baby pests that hide behind the first tree in the image below — and get to the far pest near the edge of the cliff. There is also one pest that patrols this section of the graveyard, so keep an eye out for him; he’ll probably aggro once you attack something.
Once the three big pests in this area are dead, you can safely grab the Ghost Glovewort [7] from amongst the graves and then continue southwest. On the left here is a single grown pest with his back to you, and straight ahead three baby pests and two grown ones all face a corpse on a raised bit of rock, with a third adult pest on the rocks above. They’ll stand up when you get near even if you’re sneaking, so try to pull them away from the one on the rock with a projectile or ranged attack — alternatively, cast a large AOE spell or skill on all five pests on the low ground.
As long as you kite backwards, the one on the rocks shouldn’t enter the fight. Once the low ground ones are dead, you can kill the pest on the high ground, pick the Ghost Glovewort [7] from in front of the nearby grave, and then grab the Numen’s Rune from the ledge. From the corpse with the rune, go northwest and jump up the rocks and onto the ledge that runs along the outside of the building. Continue northwest on the ledge a bit, until you’re past the tree — then, look down to the northeast, and you should be able to ambush a pest below and then pick a Ghost Glovewort [7] from in front of the nearby grave.
Further downhill is a final pest, a Ghost Glovewort [9], and the Ghost-Glovewort Picker’s Bell Bearing [3]. Once you’ve snagged this loot, you can teleport back to the Haligtree Roots site of grace, and when you’re ready, head southwest down the stairs to face Malenia, Blade of Miquella.
Unabashed FromSoftware fanboy still learning to take his time with games (and everything else, really). The time he doesn't spend on games is spent on music, books, or occasionally going outside.