Once you get past the Bridge of Sacrifice you will arrive to another open-world area: the Weeping Peninsula. This being a new zone, you will not have access to a detailed map until you find the corresponding map fragment. With that in mind, head southeast from the Bridge of Sacrifice site of grace and you will meet Irina on the left side of the road.
Exhaust her dialogue and accept to deliver Irina’s Letter to her father, who you will find later in Castle Morne south of here. But for now, continue following the road until you reach the area with a broken down carriage, a giant, and a few more enemies. Once it’s safe enough, you can open the chest in the back of the carriage, which contains the Morning Star.
Continue through this area and follow the road going south. On the road, you will find a loot beetle that drops the Ash of War: Mighty Shot, and you will reach your second site of grace on the left side of the road. Grab the Castle Morne Rampart site of grace, and check out the nearby Nomadic Merchant’s wares if you have extra souls. At night, the road next to this site of grace is where you can find this zone’s Night’s Cavalry boss. This boss is entirely optional and drops Ash of War: Barricade Shield and Nightrider Flail.
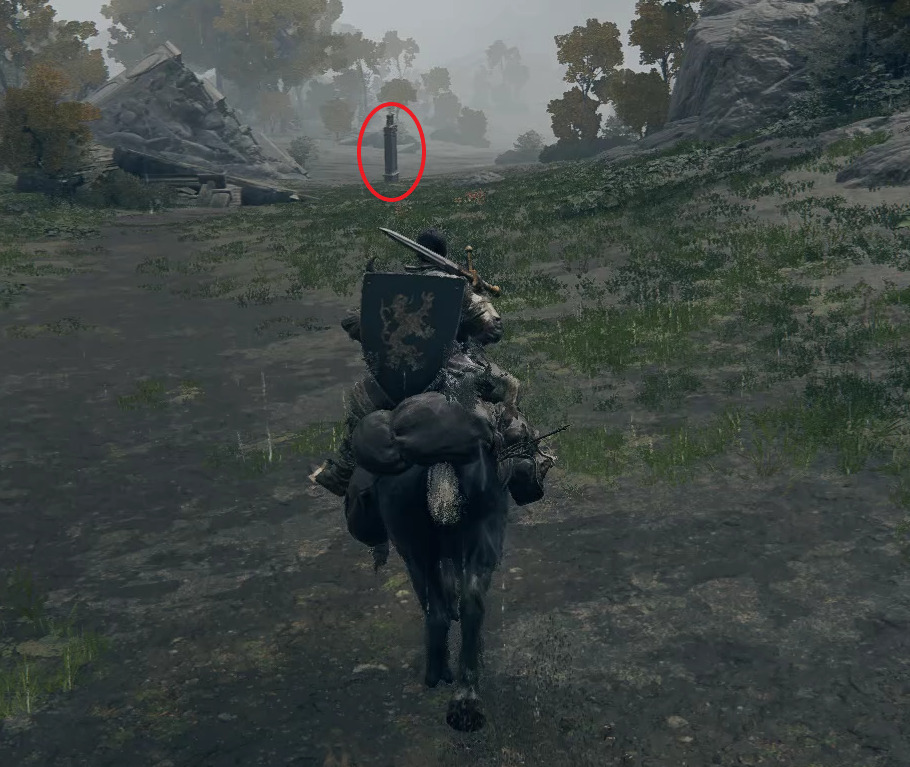
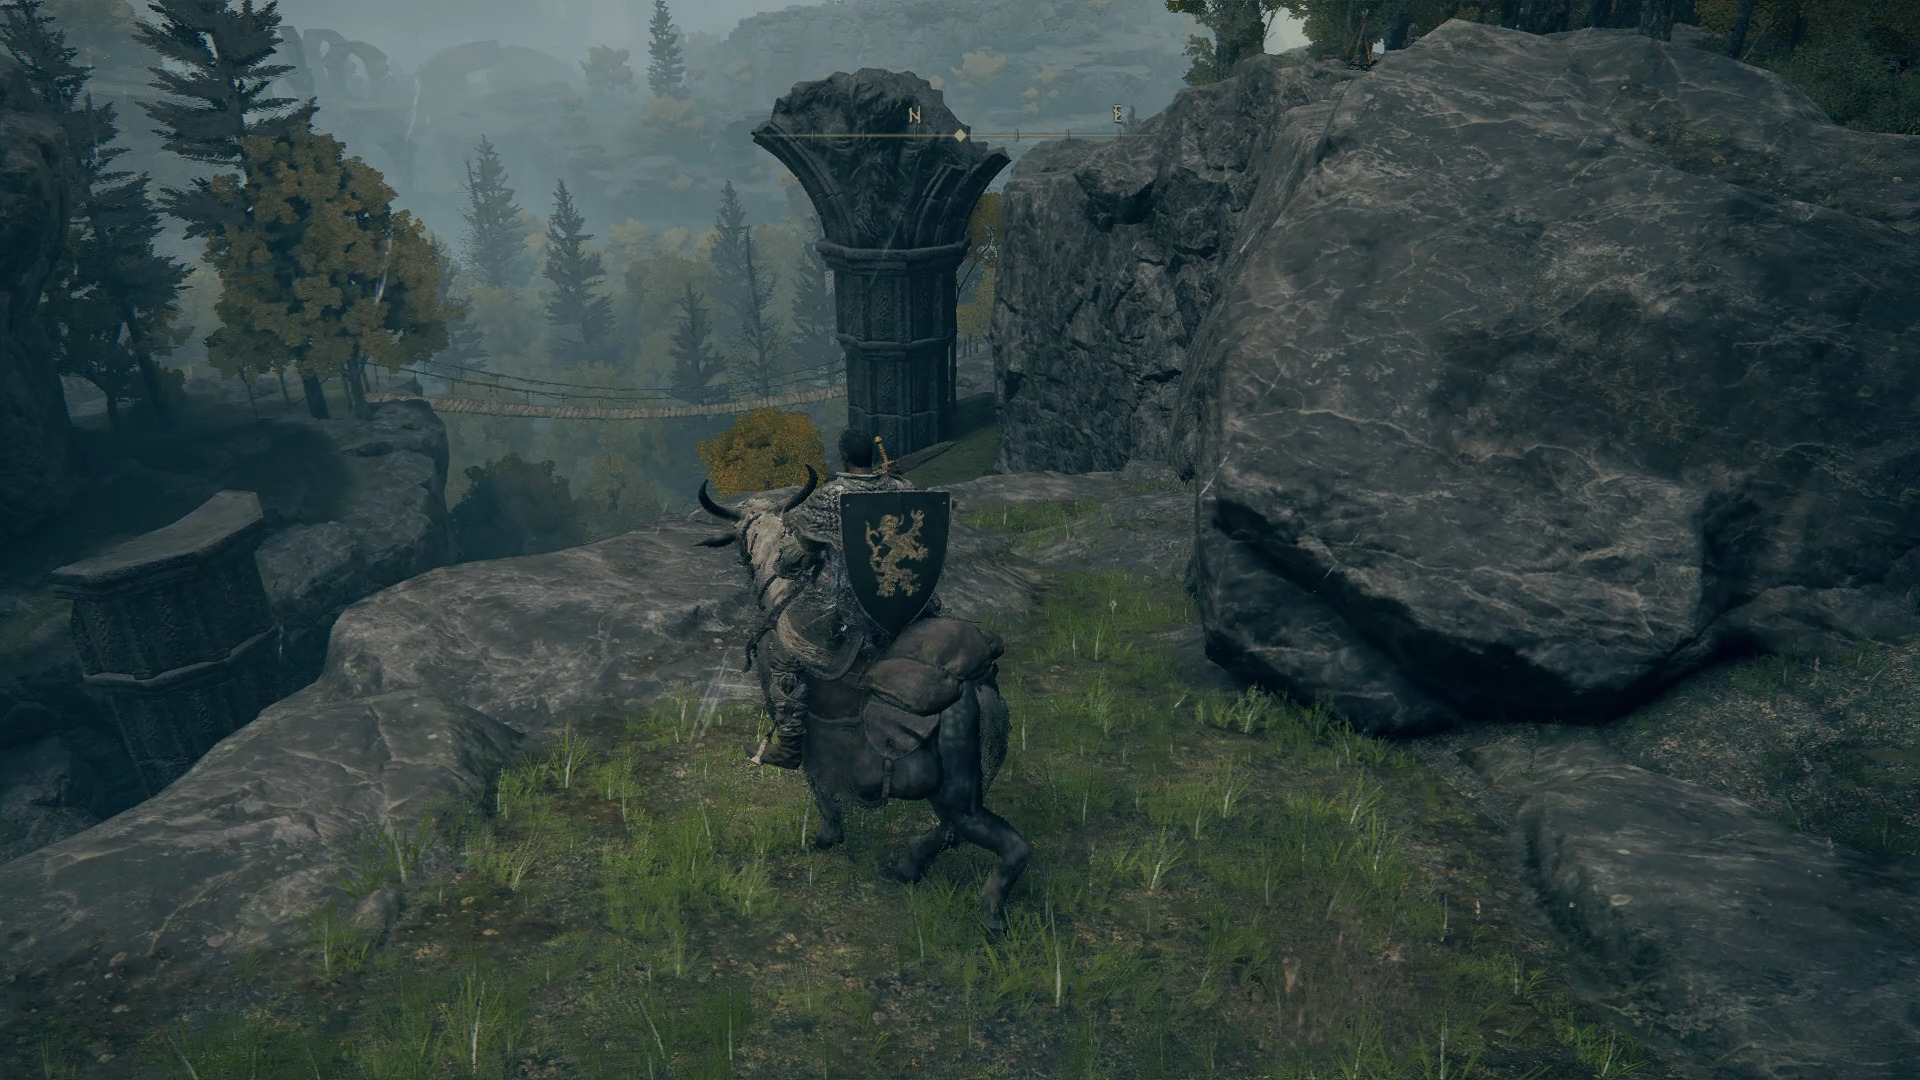
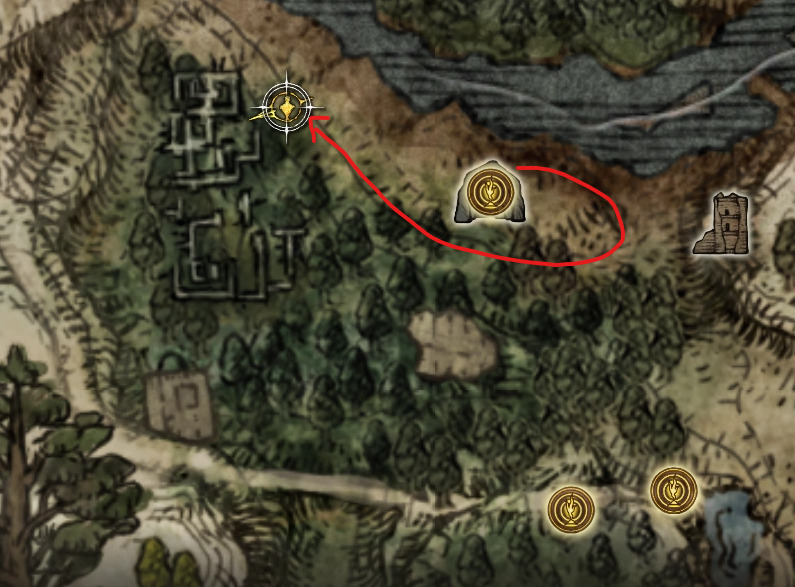
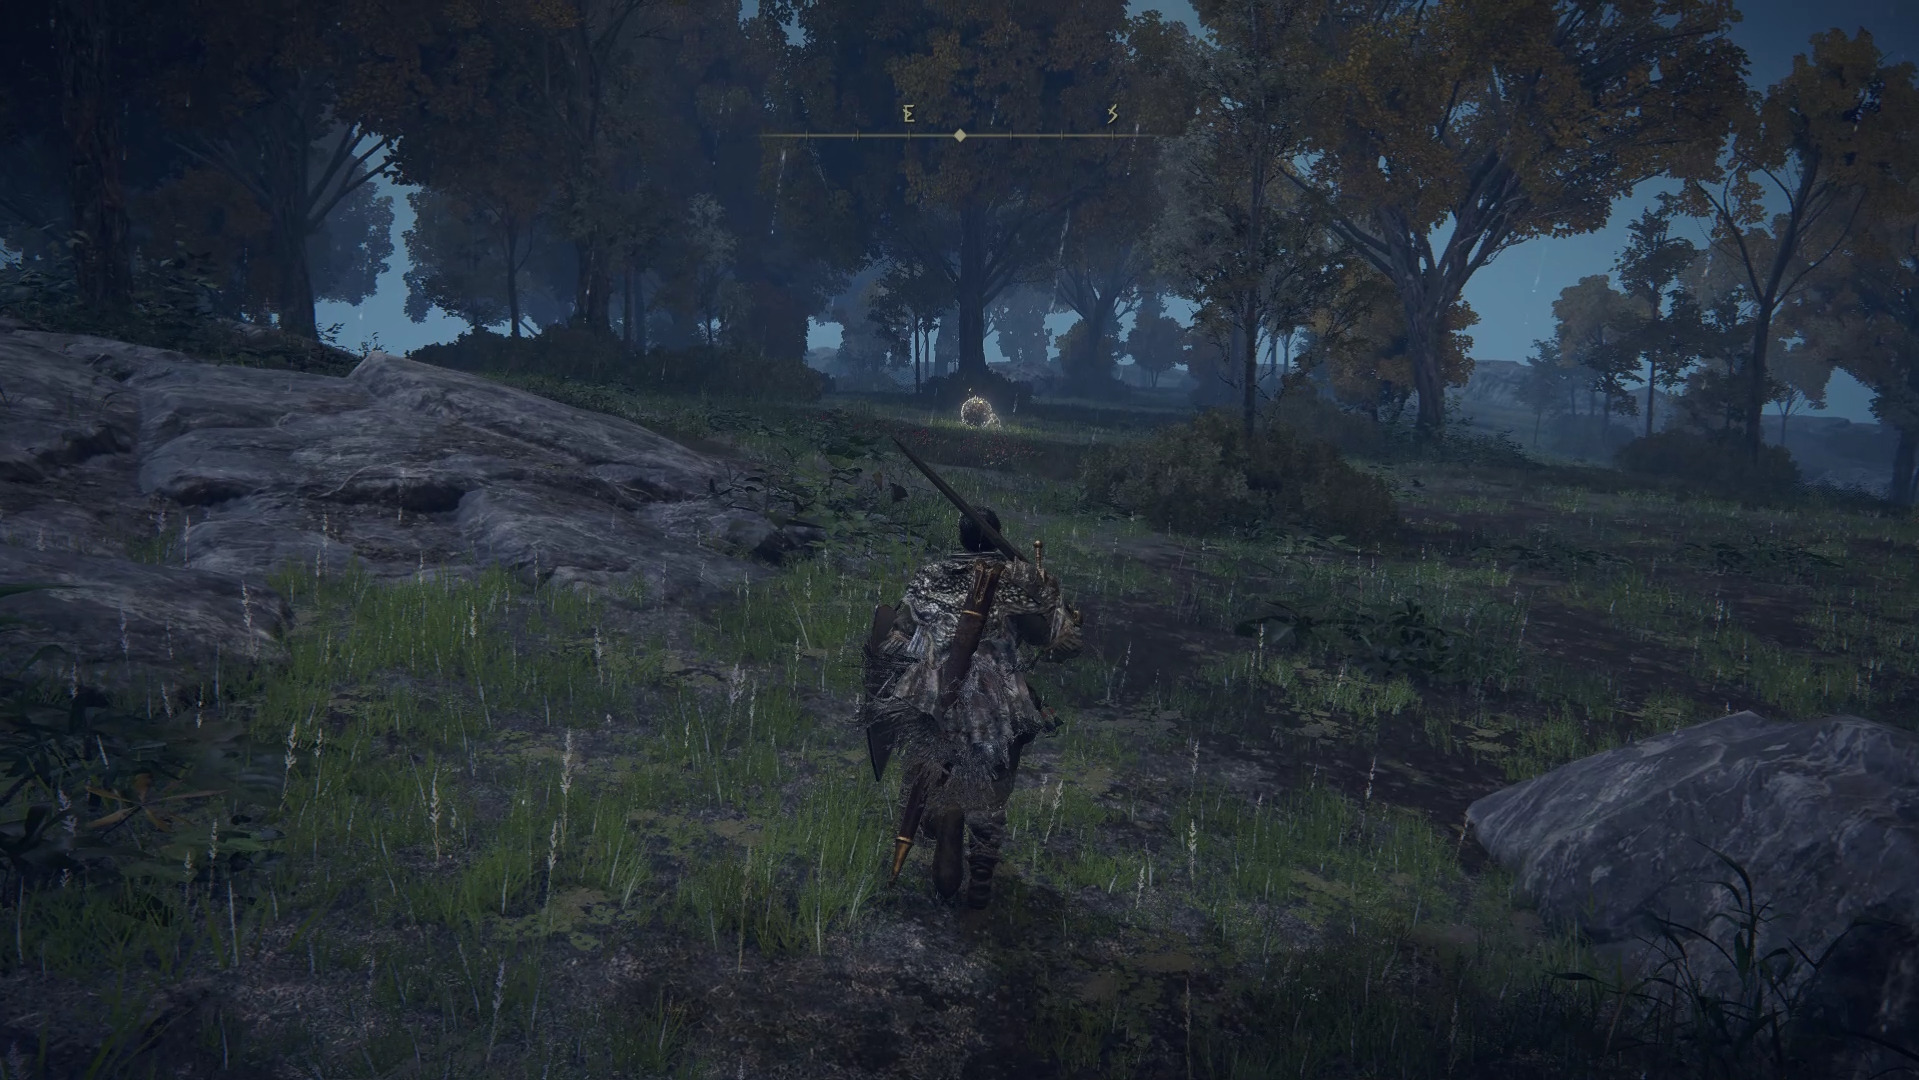
Now follow the road leading south once again, and go through the broken wall to find a monument in the distance, which is where you will find the Map: Weeping Peninsula.
On your way to the monument you will be shot at from the distance, so grab the map quickly, before retreating back from where you came. Now that you have the map of the zone, it will be much easier to navigate your surroundings, and we can start exploring the area properly before heading towards Castle Morne.
The Impaler’s Catacombs dungeon will be our first destination, and now that we have a map, it will be much easier to find. Since there isn’t much to pick up on your way there, you can just follow this path while picking up and killing anything you like!
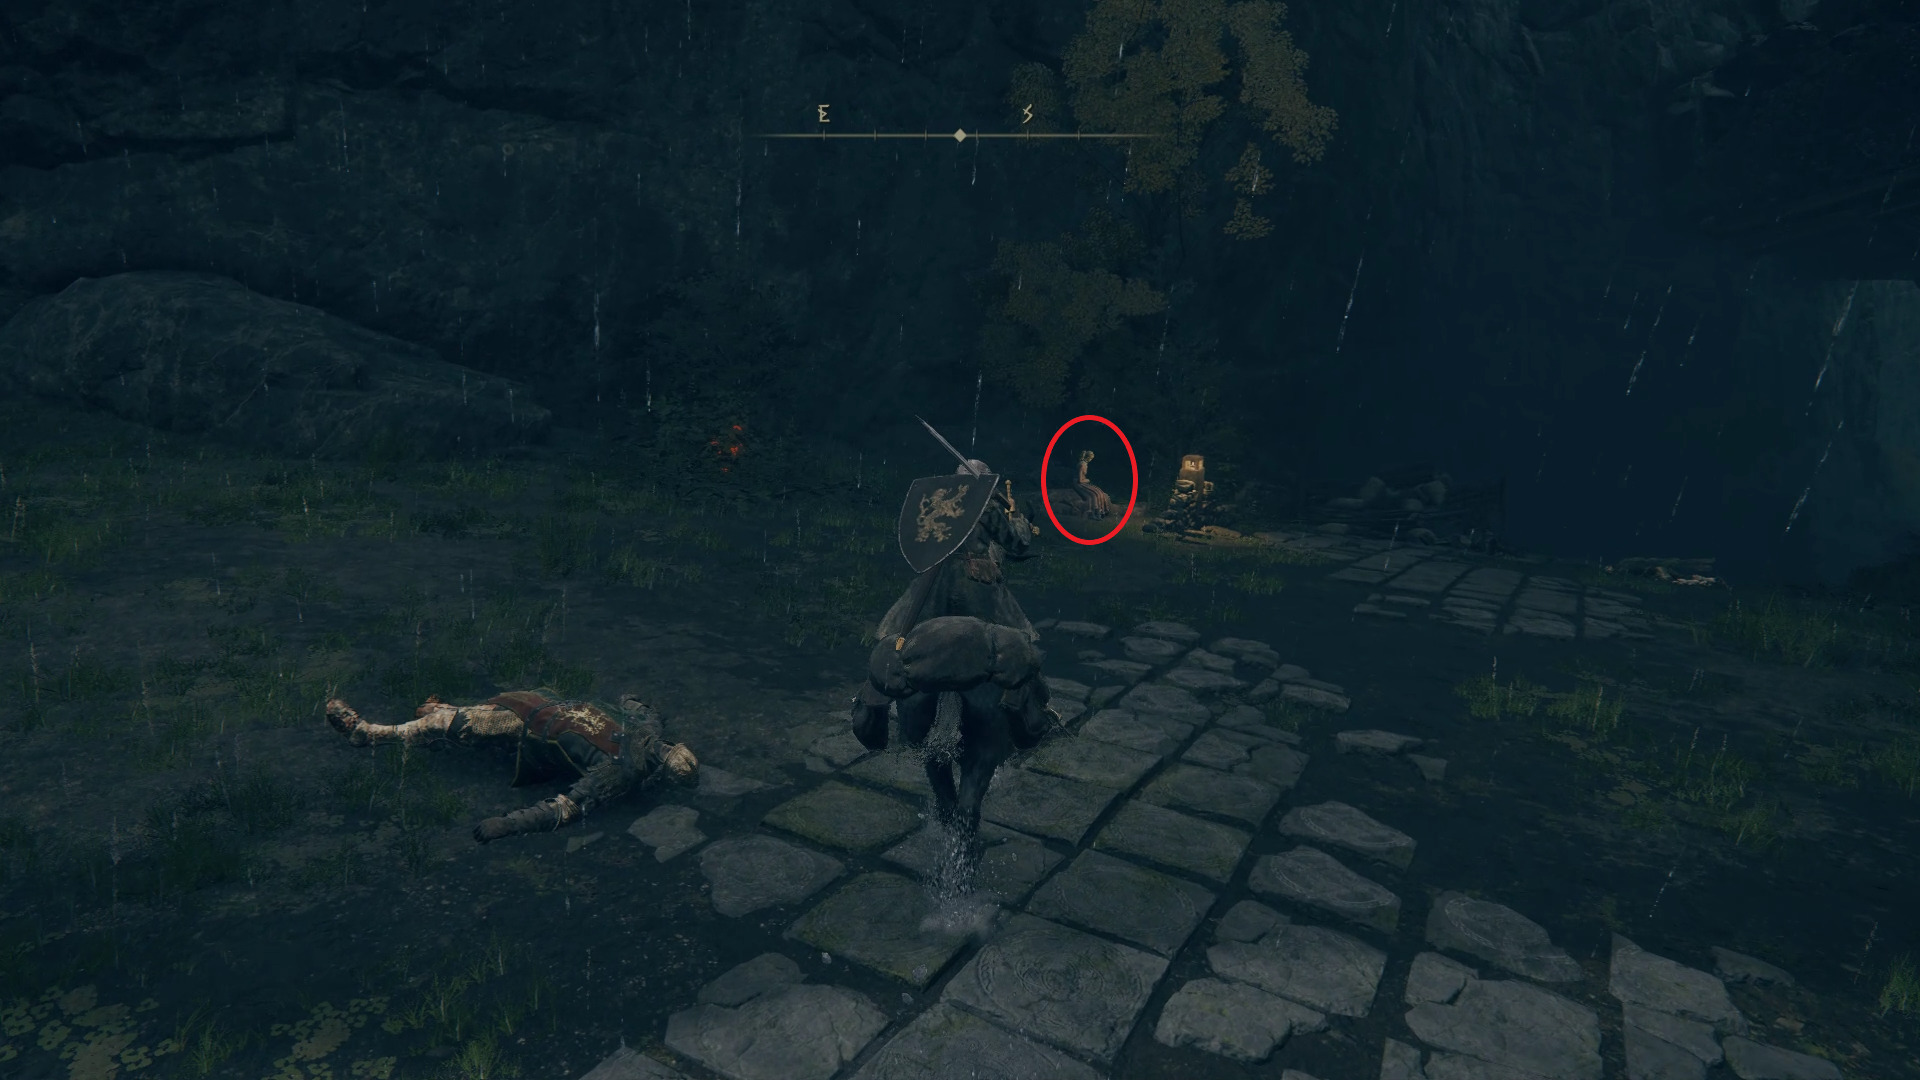
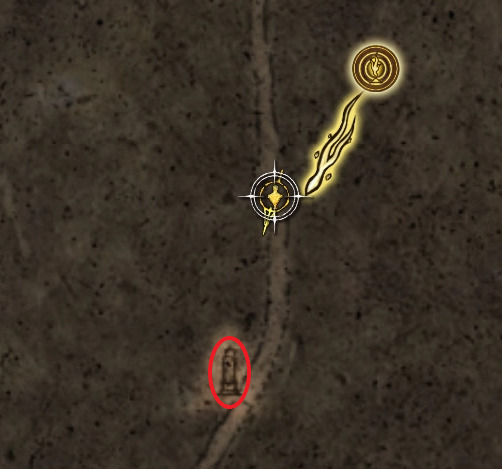
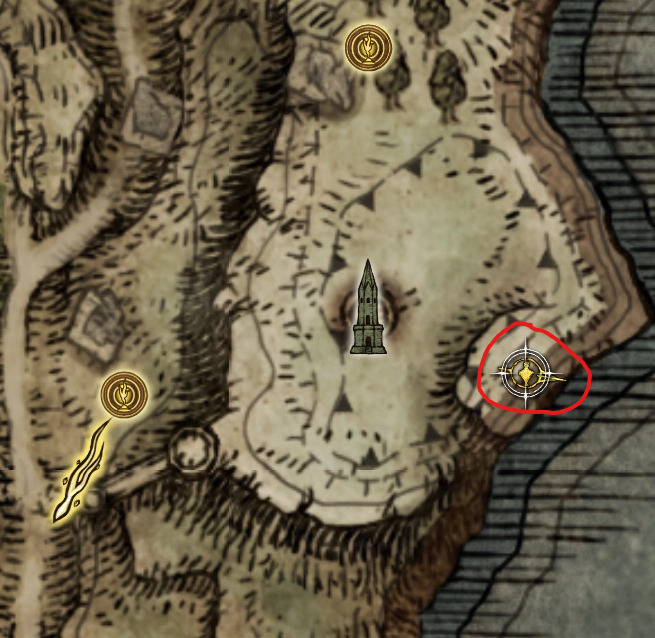
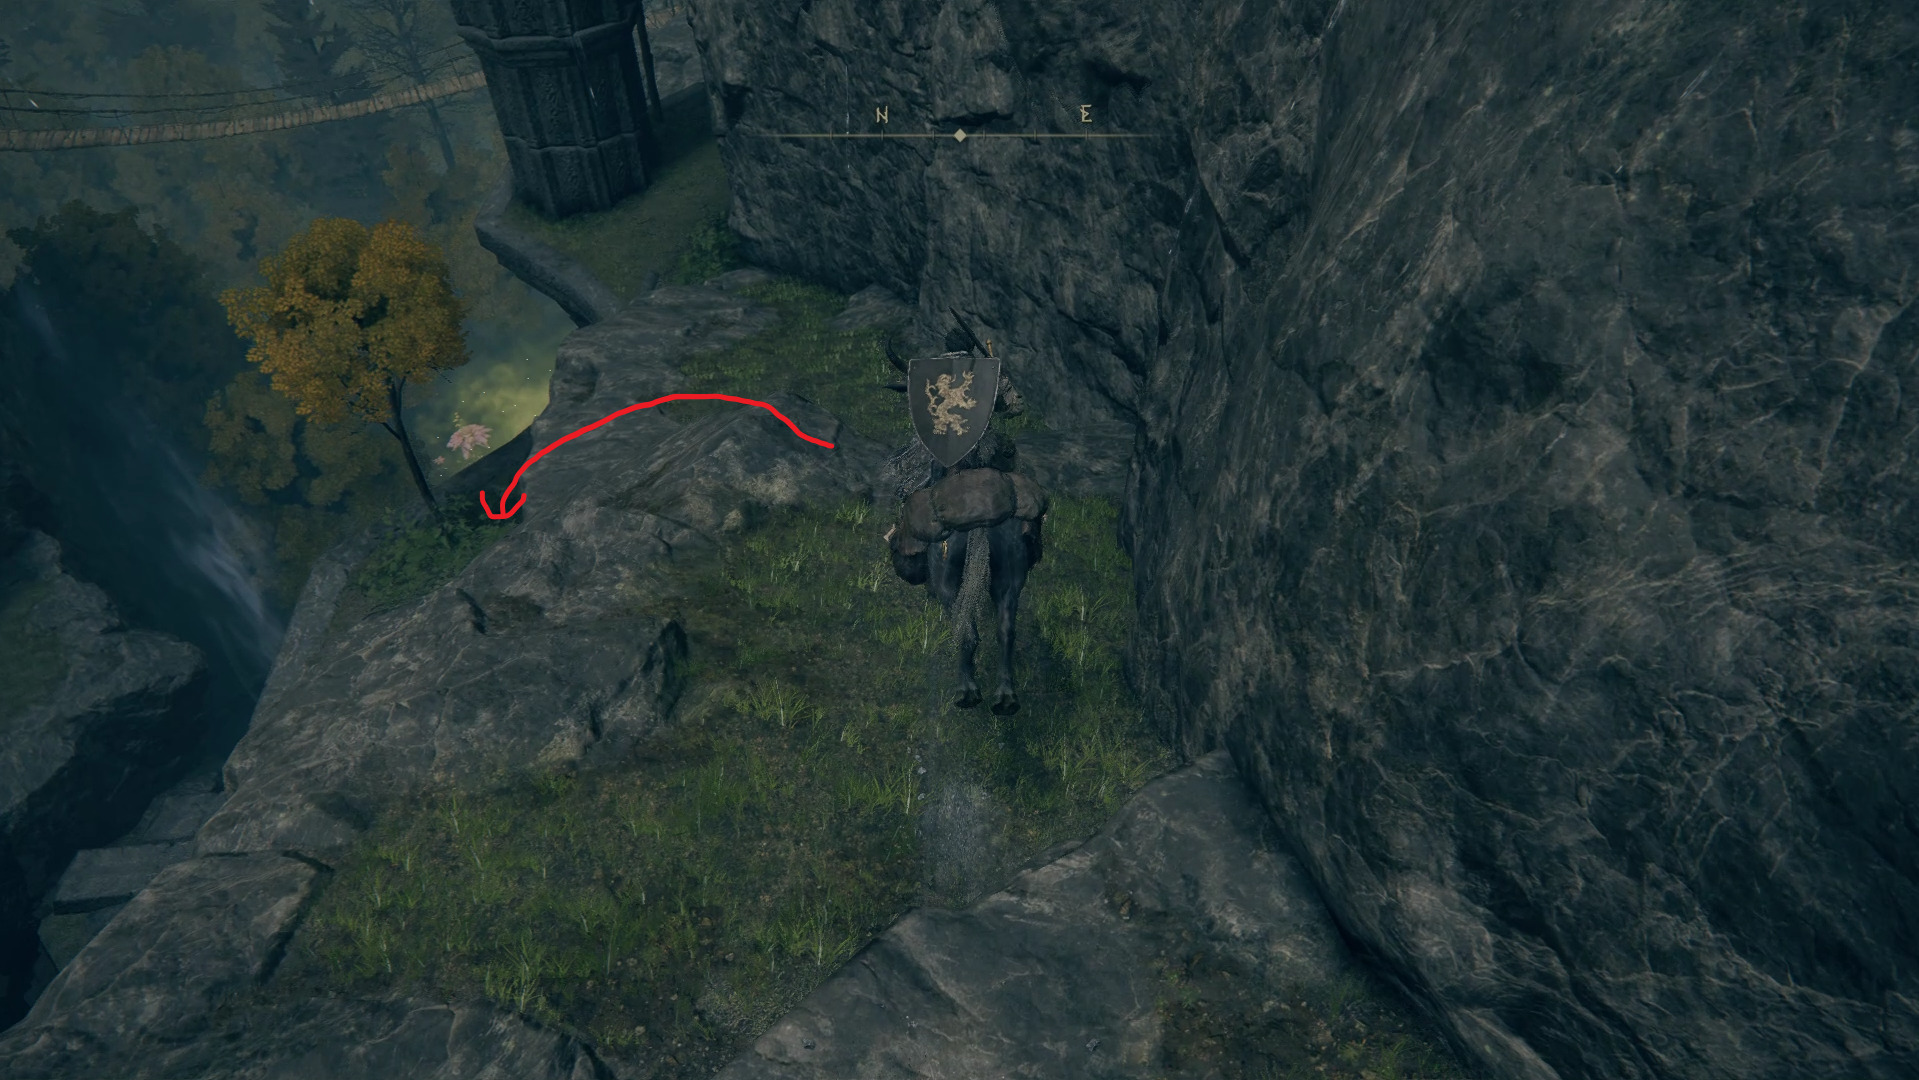
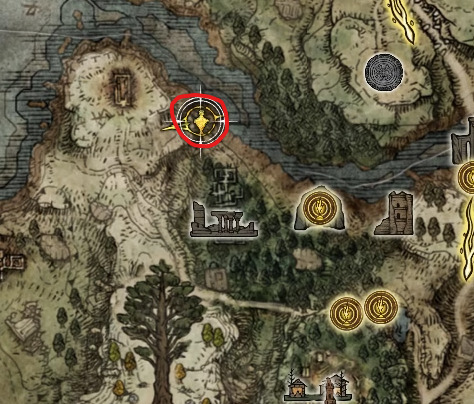
Start by going north-northeast from the Castle Morne Rampart and turning right to pick up the Beside the Crater-Pocked Glade site of grace (A), and from there, head northeast until you reach the edge of the peninsula and follow the edge until the entrance to the Impaler’s Catacombs. Before entering the dungeon, grab the Stonesword Key from the corpse resting in a chair above the dungeon, which can always come in handy later.
Now that we’re done with this dungeon, go south to grab the Starlight Shards next to Oridys’s Rise.
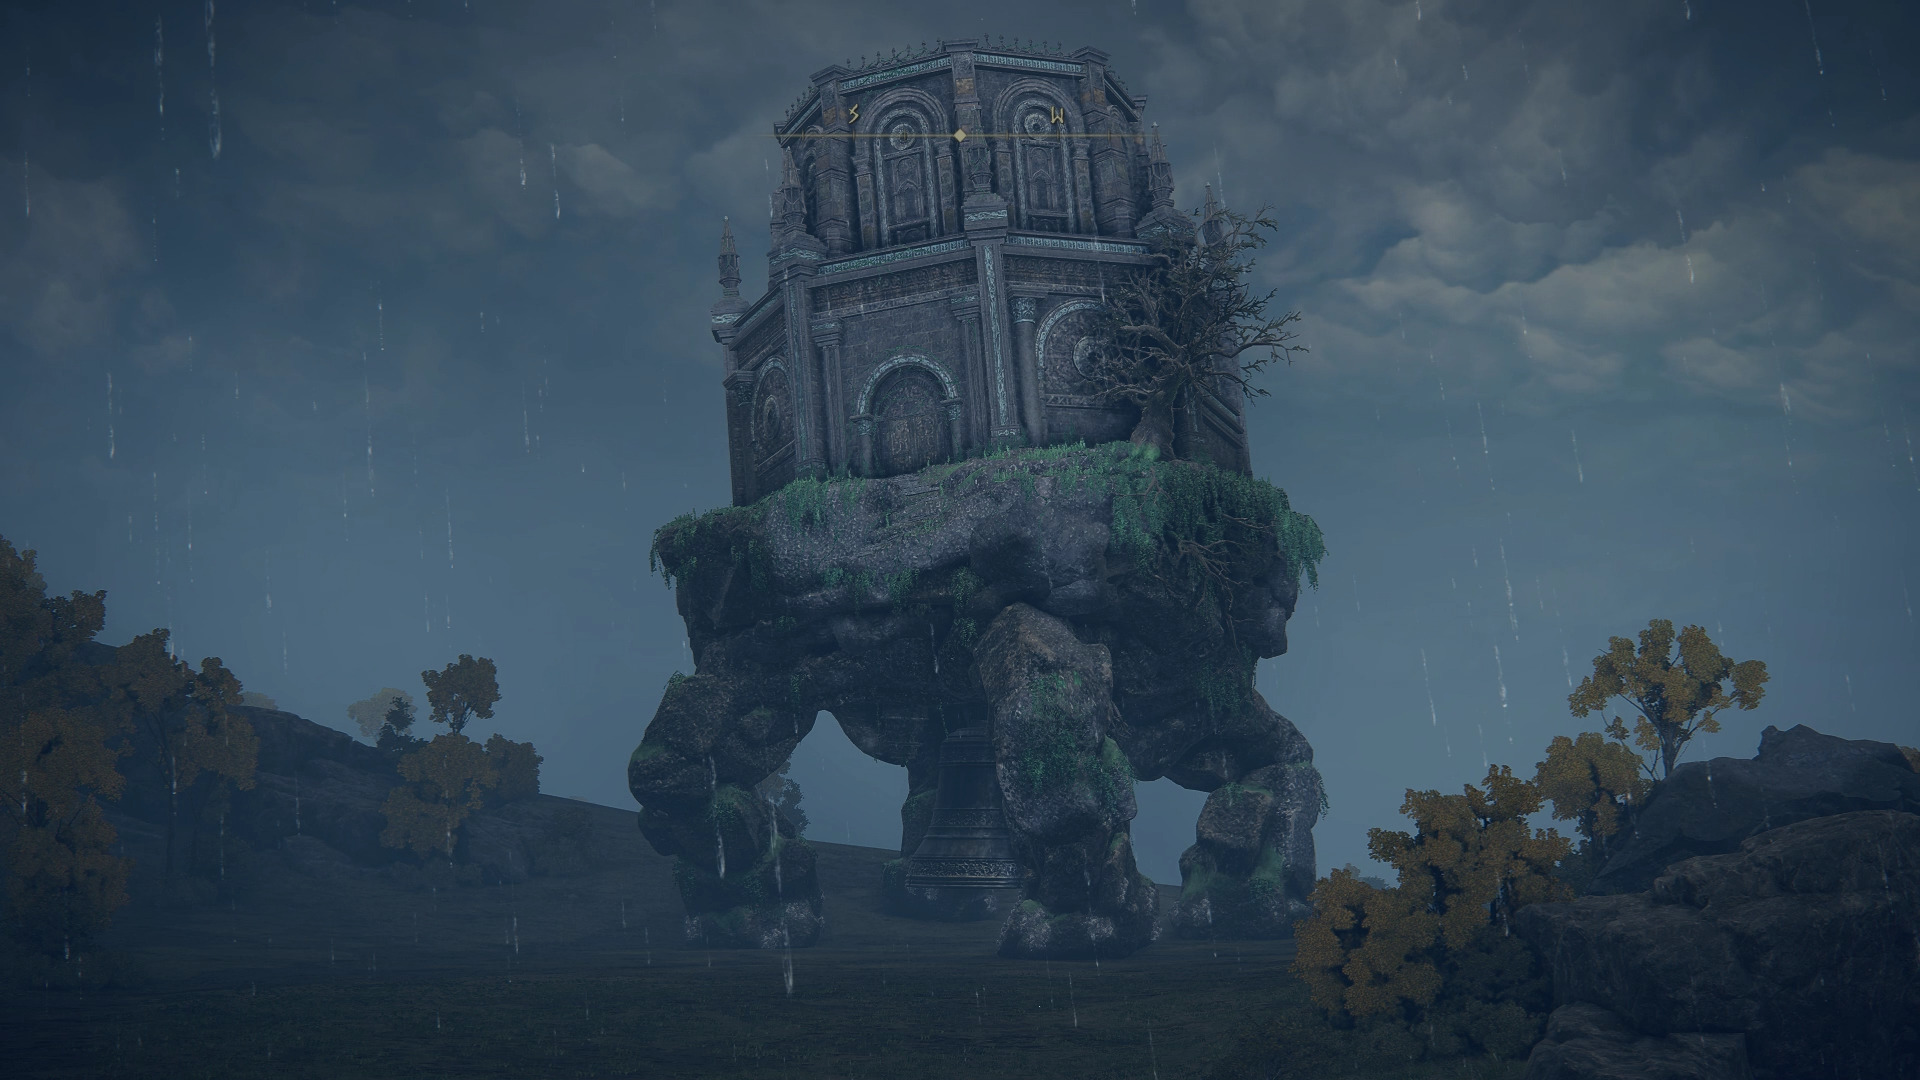
As for Oridys’s Rise itself, while it may look closed at a first glance, there is a way to access it and grab its loot.
How to Enter Oridys’s Rise
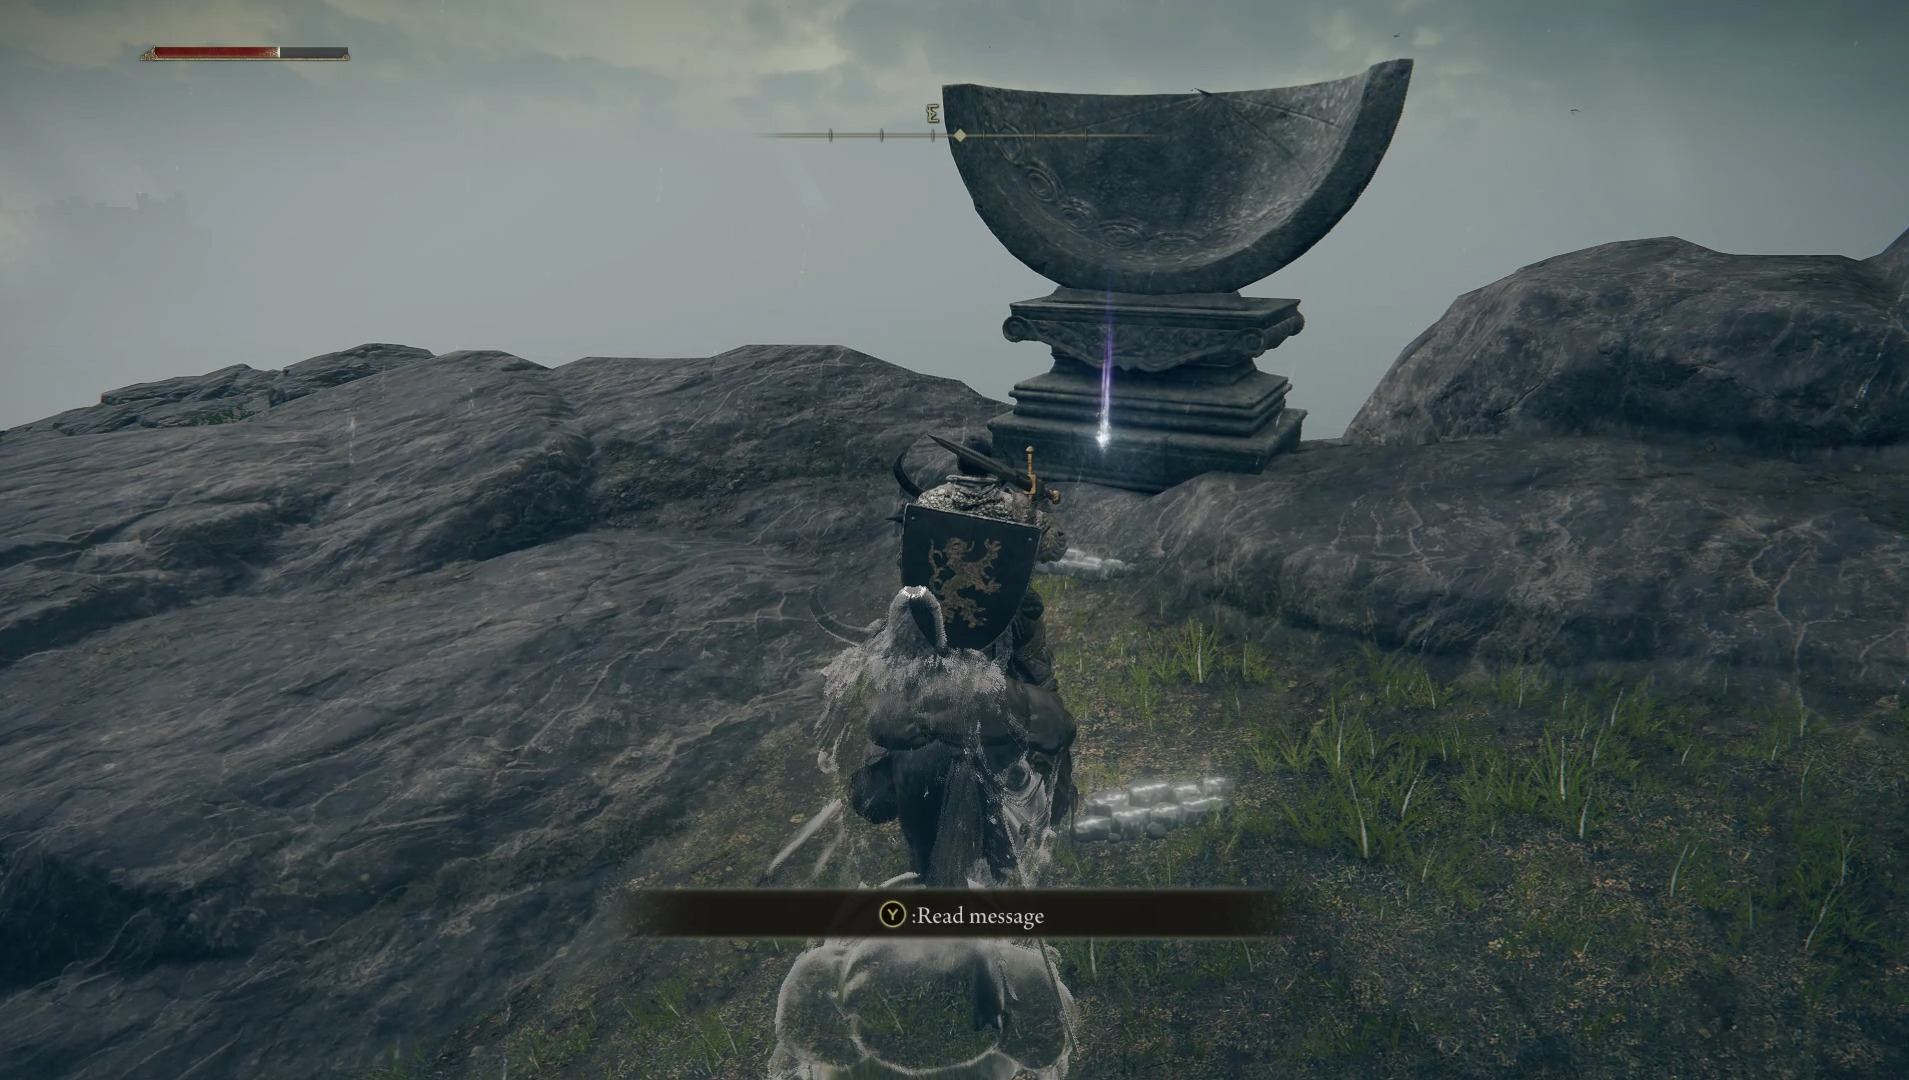
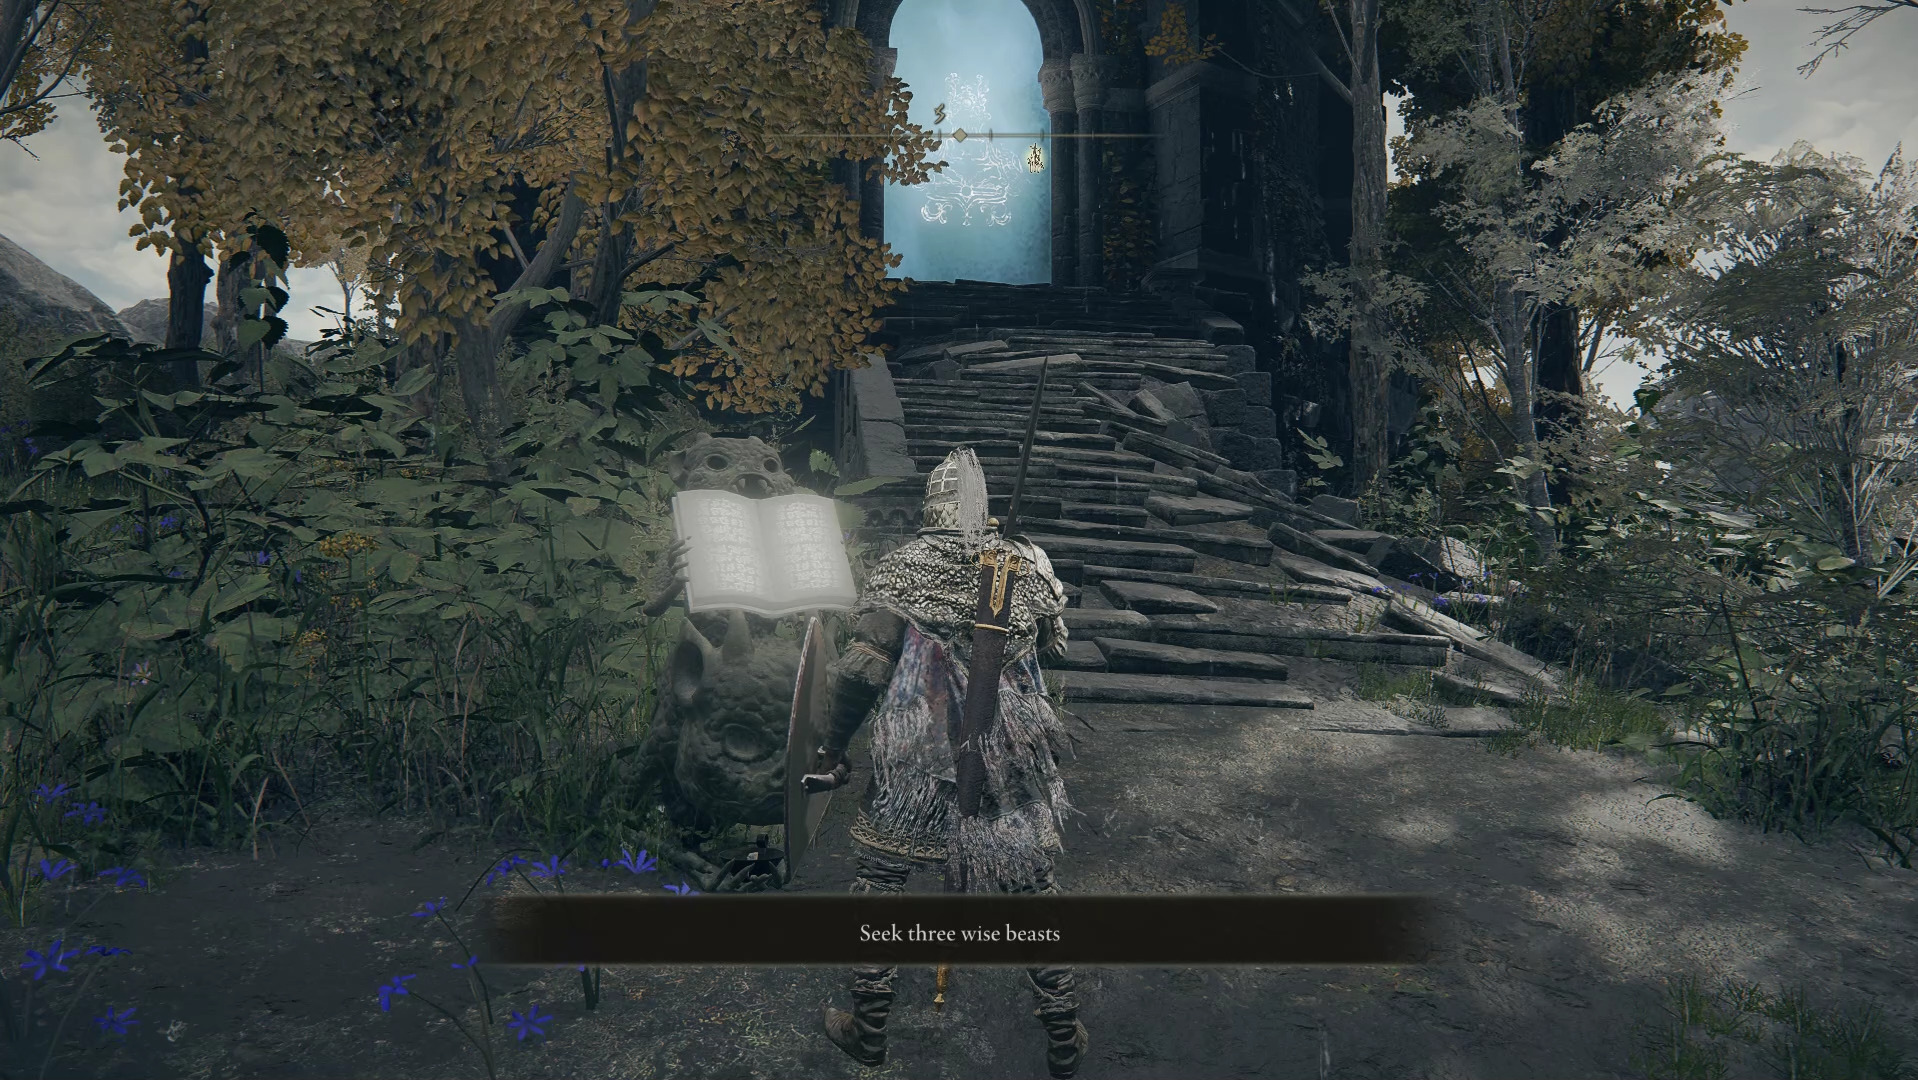
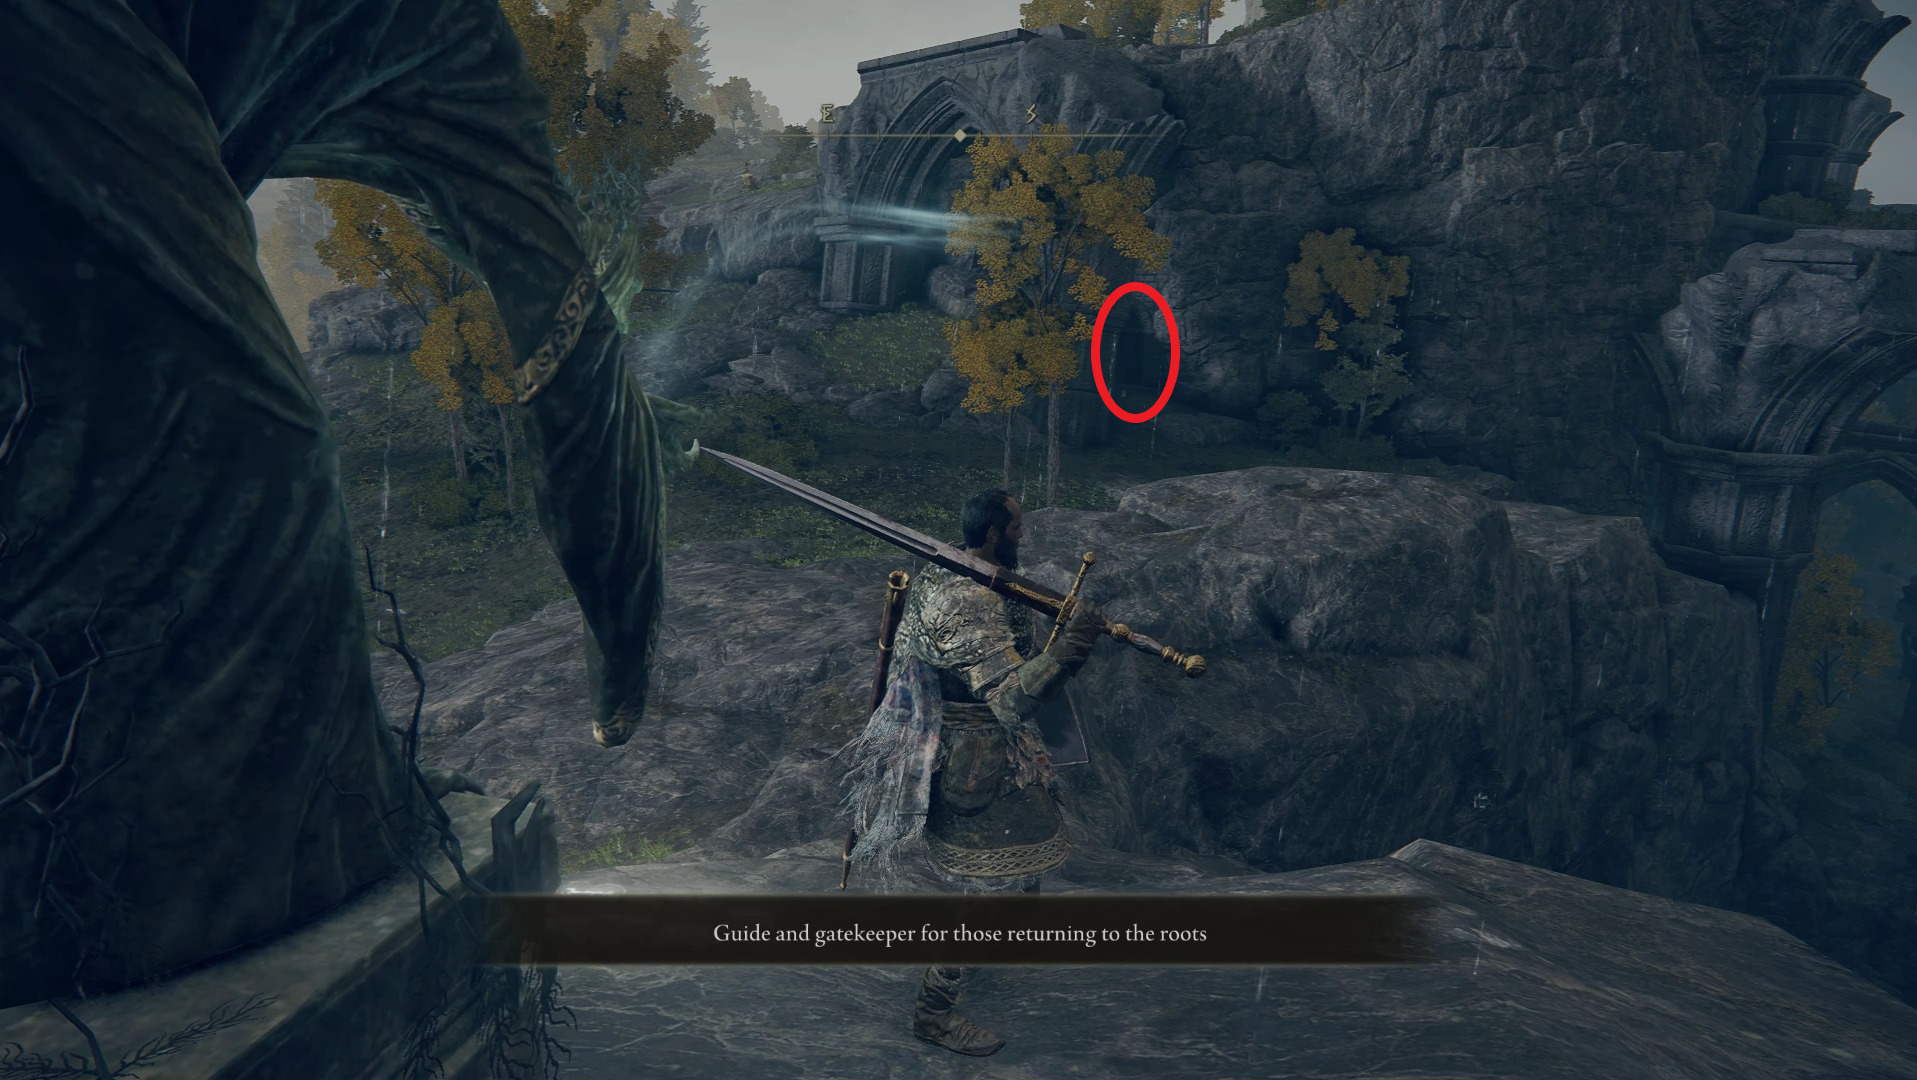
The clue to opening the tower’s entrance is located in a book held by an imp statue near the entrance.
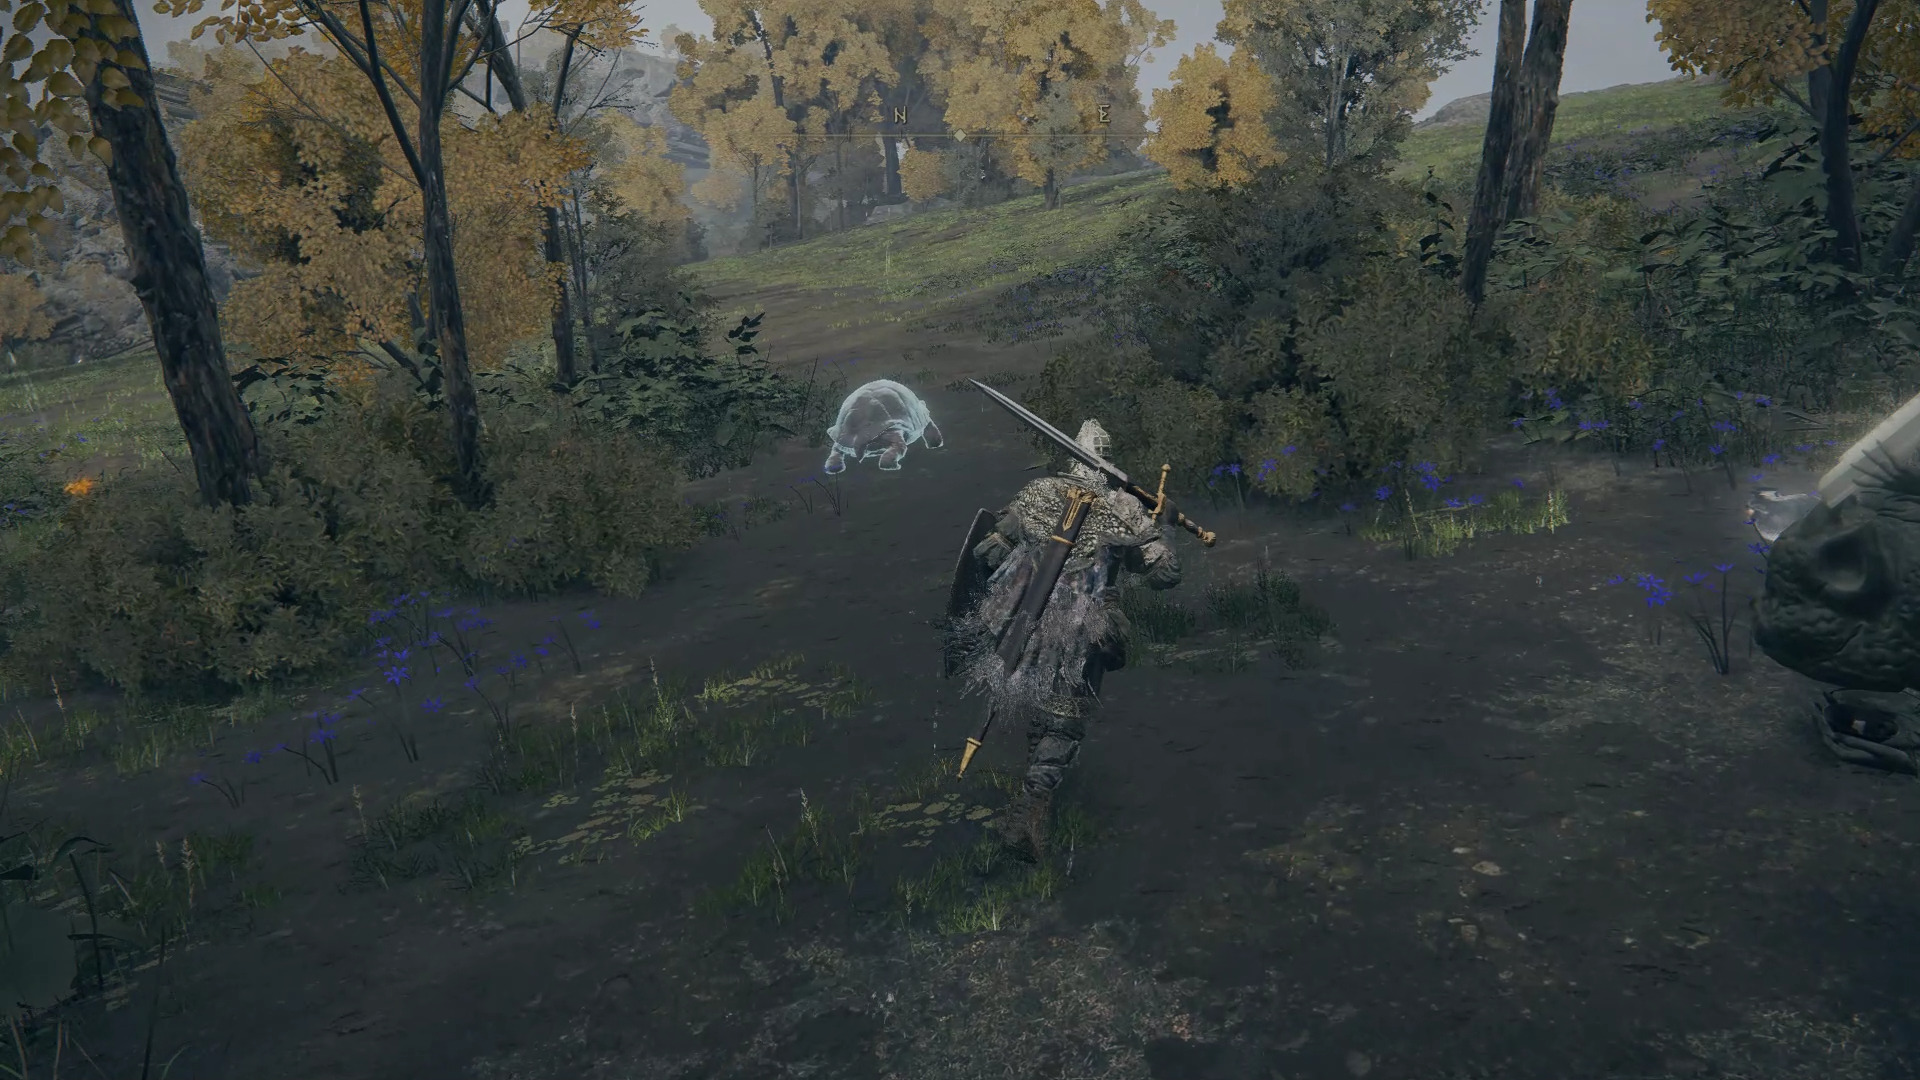
Luckily, you will not have to comb through all of the Weeping Peninsula to find these three wise beasts as they are all located around this tower. As always, we’ve got you covered as to where exactly you can find these.
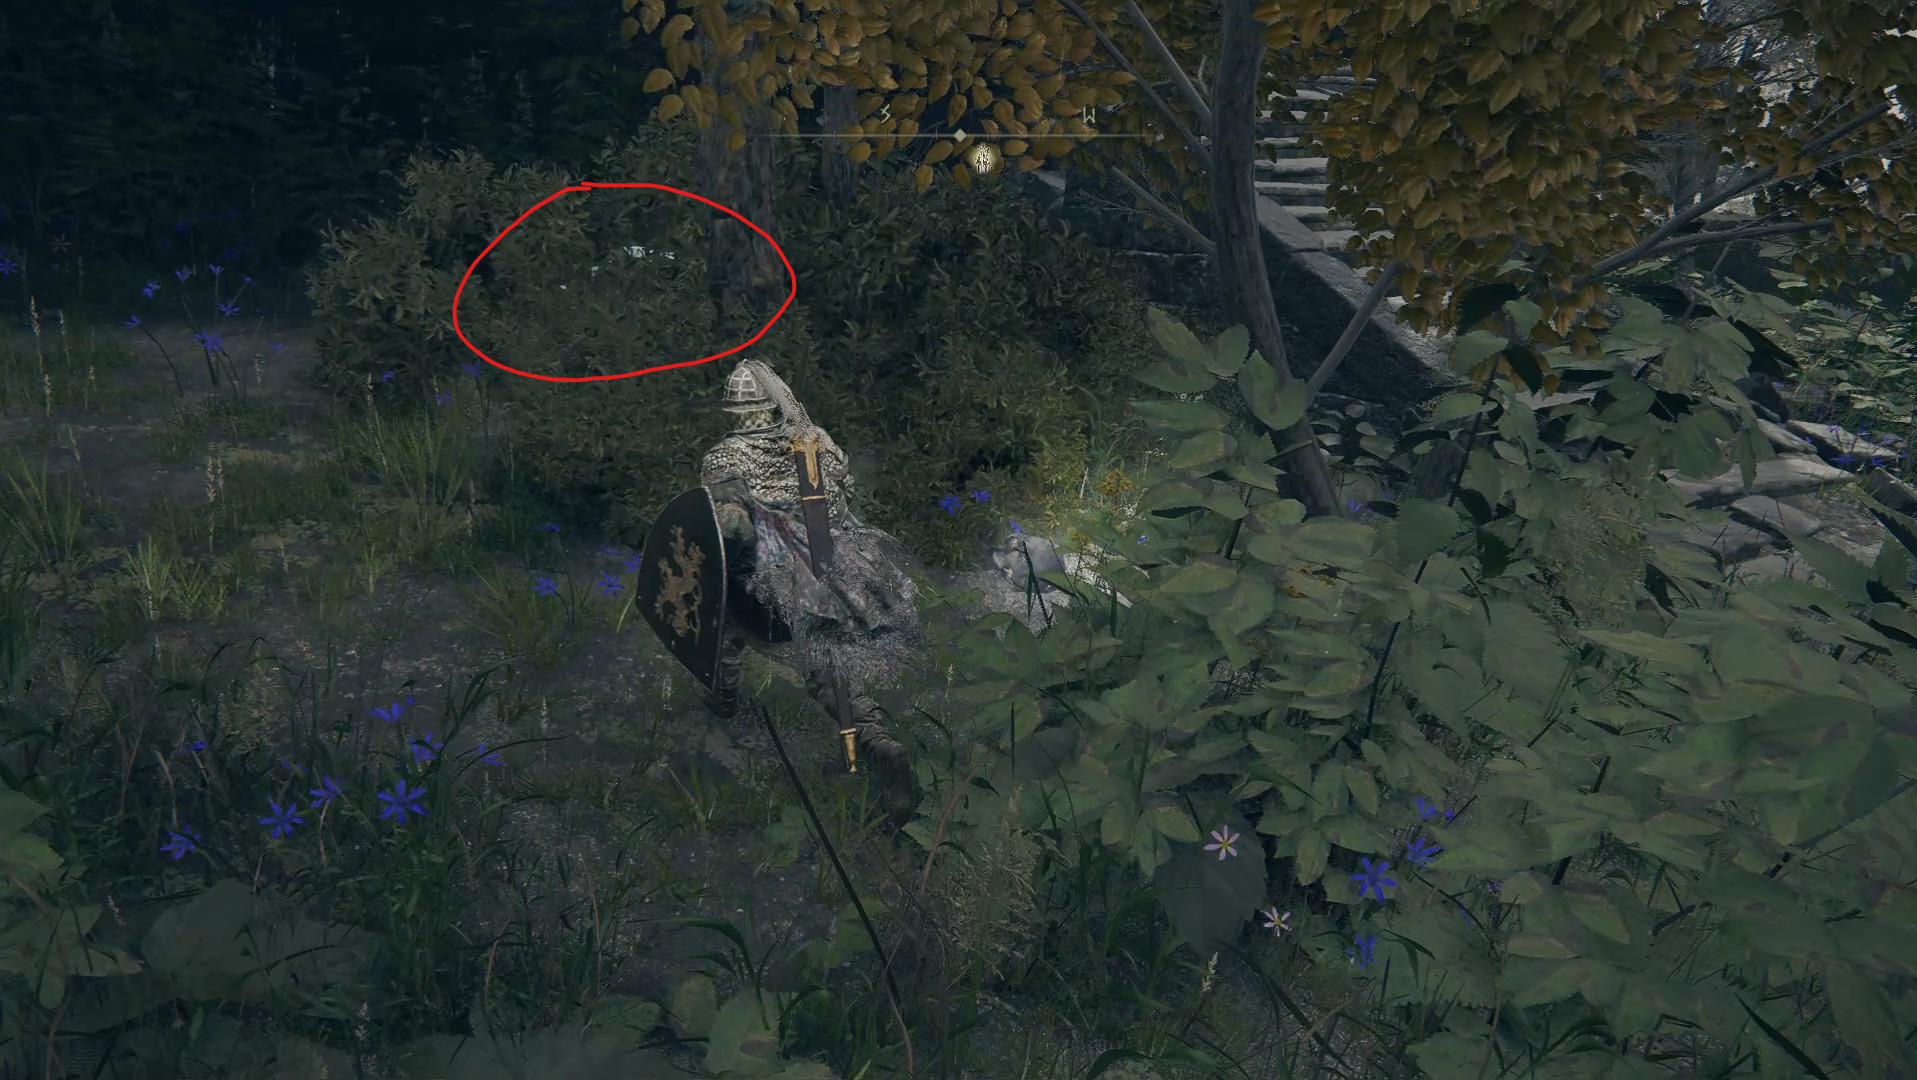
On the path to the towerTo the left of the tower’s stairsInvisible in the pond behind the tower
While the first two are relatively easy to find with one being on the road leading to the tower, and the other being in the bushes to the left of the tower’s stairs, the third one is a bit trickier. Behind the tower, you will see small ripples in the middle of the pond. While you could mistake these for a giant crab playing a prank on you, it’s in fact the third turtle’s location. You don’t have to do anything special to get it, just swing your weapon in that area and you should be able to defeat the turtle that mastered invisibility.
Now that the three wise beasts have been slain, you can enter the tower and lay claim to the Memory Stone located in a chest at the very top of the tower.
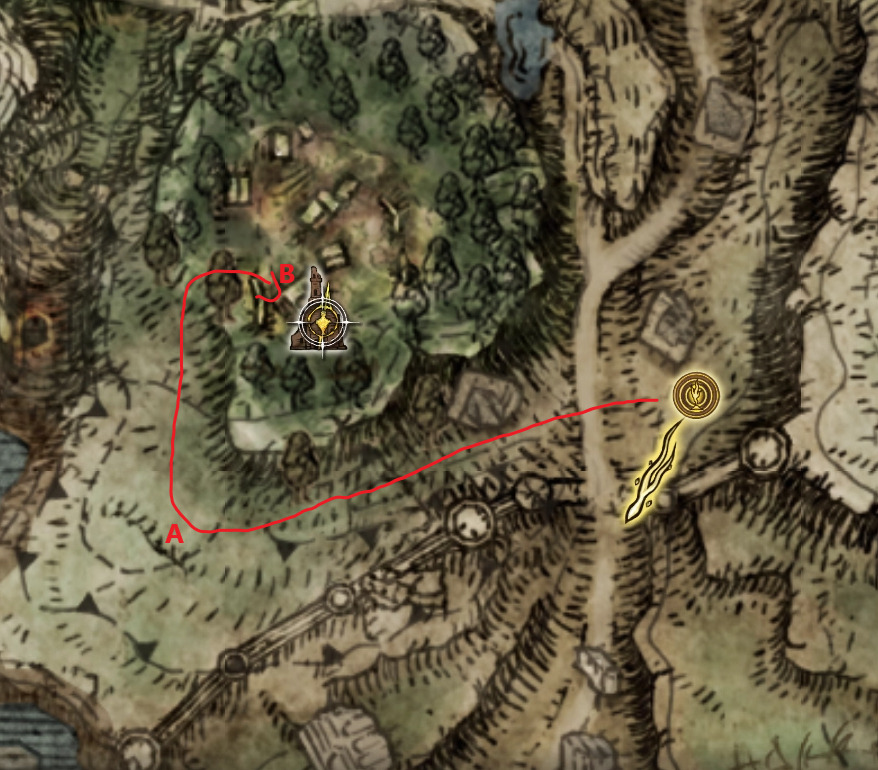
Now travel back to the Castle Morne Rampart site of grace and go west through the forest until you reach a (A) small cabin with angry rats walking around. They shouldn’t pose much of a threat from the top of your mighty steed, which will make it easy to pick up the Yellow Ember from the nearby corpse. From there, you can continue heading towards the next location: (B) Callu Baptismal Church. There you will have to defeat a mischief of rats accompanied by their daddy rat. As a reward for slaughtering the rodents, you will be able to loot the nearby Sacred Tear and The Flame of Frenzy incantation.
After sacking the church, it’s time to sack the Ailing Village right in front of it. While the frenzied villagers do not have many valuables, the Flame Crest Wooden Shield found in one of their homes is one thing that you can yet deprive them of. While there aren’t many valuables around the village itself, except for a few crafting materials, there is a place we can still explore nearby. Head west from the Ailing Village until you reach the edge of the cliff.
From there, you will have to follow a specific path to go down from the cliff until you reach a clearing. While this will be optional for most players, this clearing is where you will find the loot beetle that drops the Lightning Strike incantation.
Make sure to jump to the small ledge before descending to the clearing itself. This clearing will be defended by a cauldron of bats, and will be hit by periodic lightning strikes. You want to go for the loot beetle first so it doesn’t run away with your Lightning Strike incantation, and then deal with the bats to be able to travel to a site of grace.
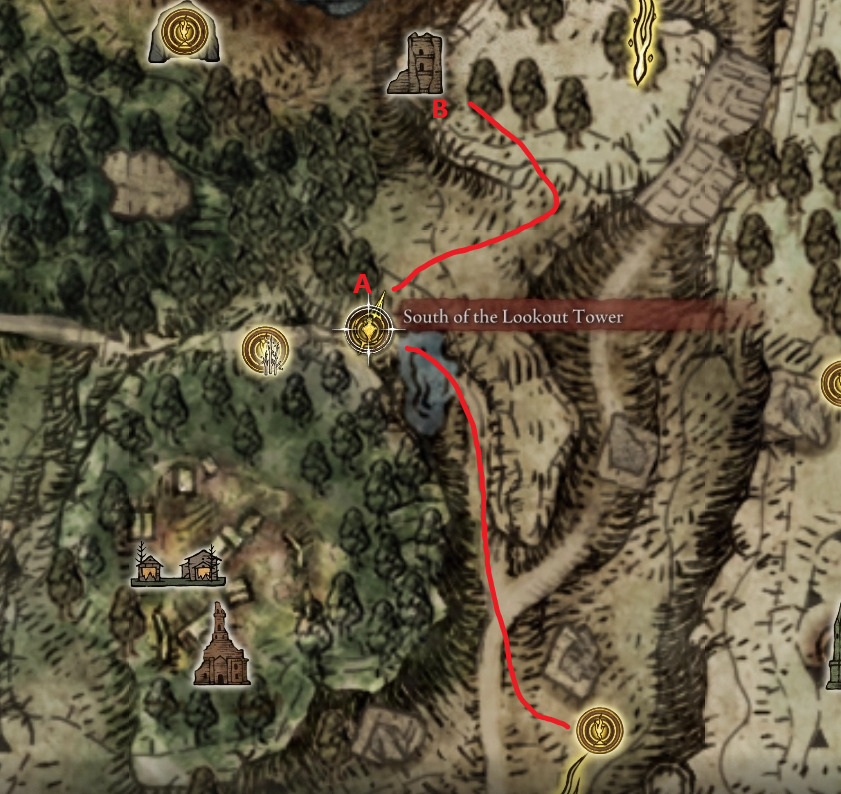
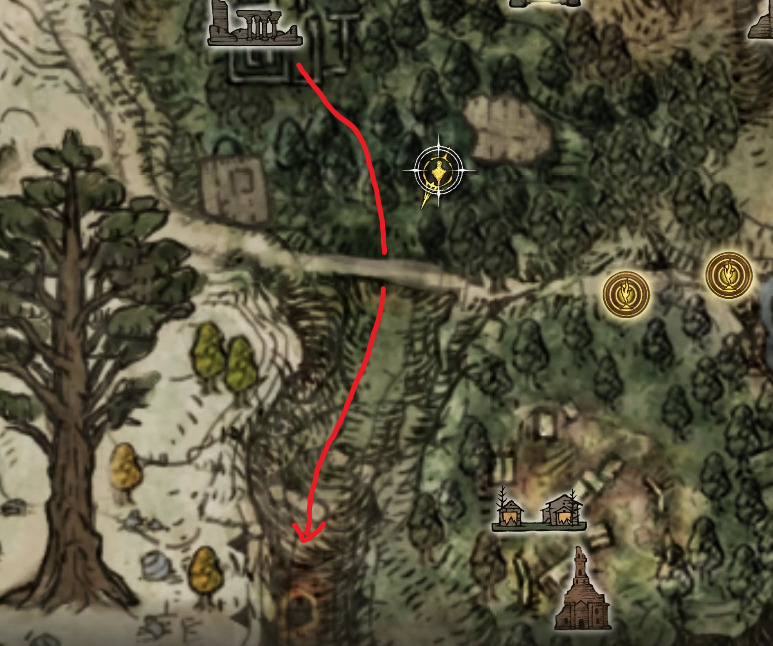
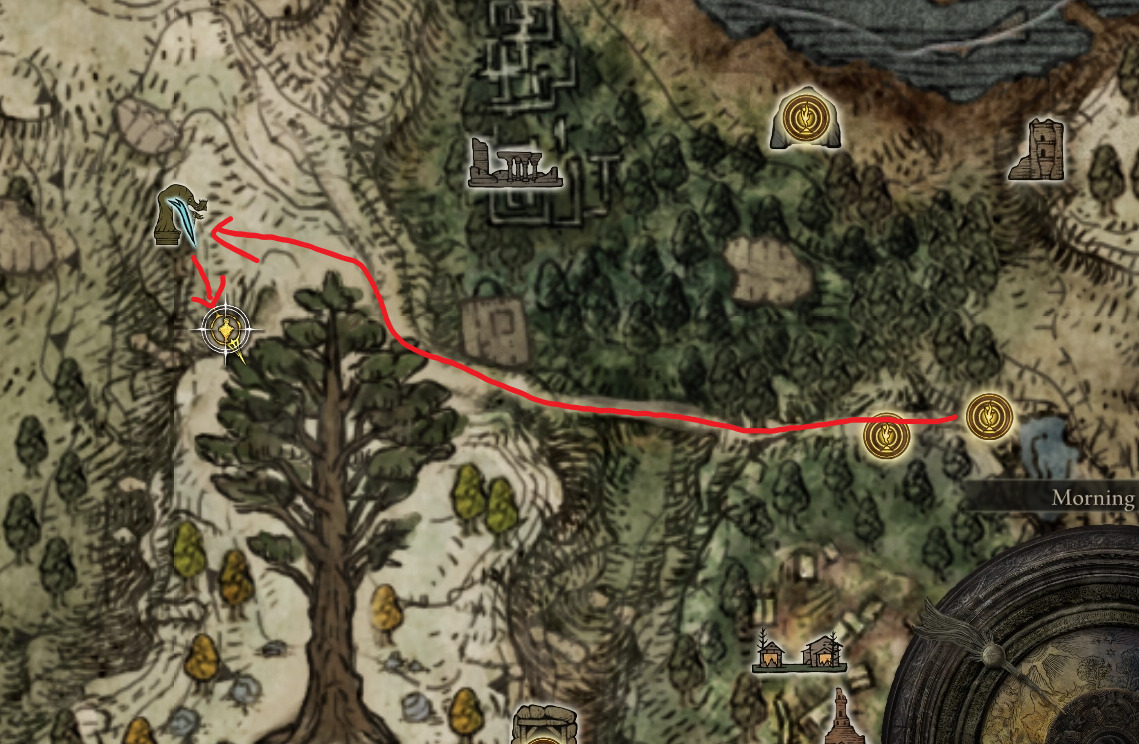
Travel back to the Castle Morne Rampart site of grace and head northwest to find the (A) South of the Lookout Tower site of grace. From there, if you look north you will notice the (B) Forest Lookout Tower that this site of grace is referencing and it will be our next destination.
Clear out the enemies defending the tower, which shouldn’t be much of an issue on horseback. At the very top of this tower you will find a chest containing the Hand Ballista, an interesting ranged option for Strength focused characters.
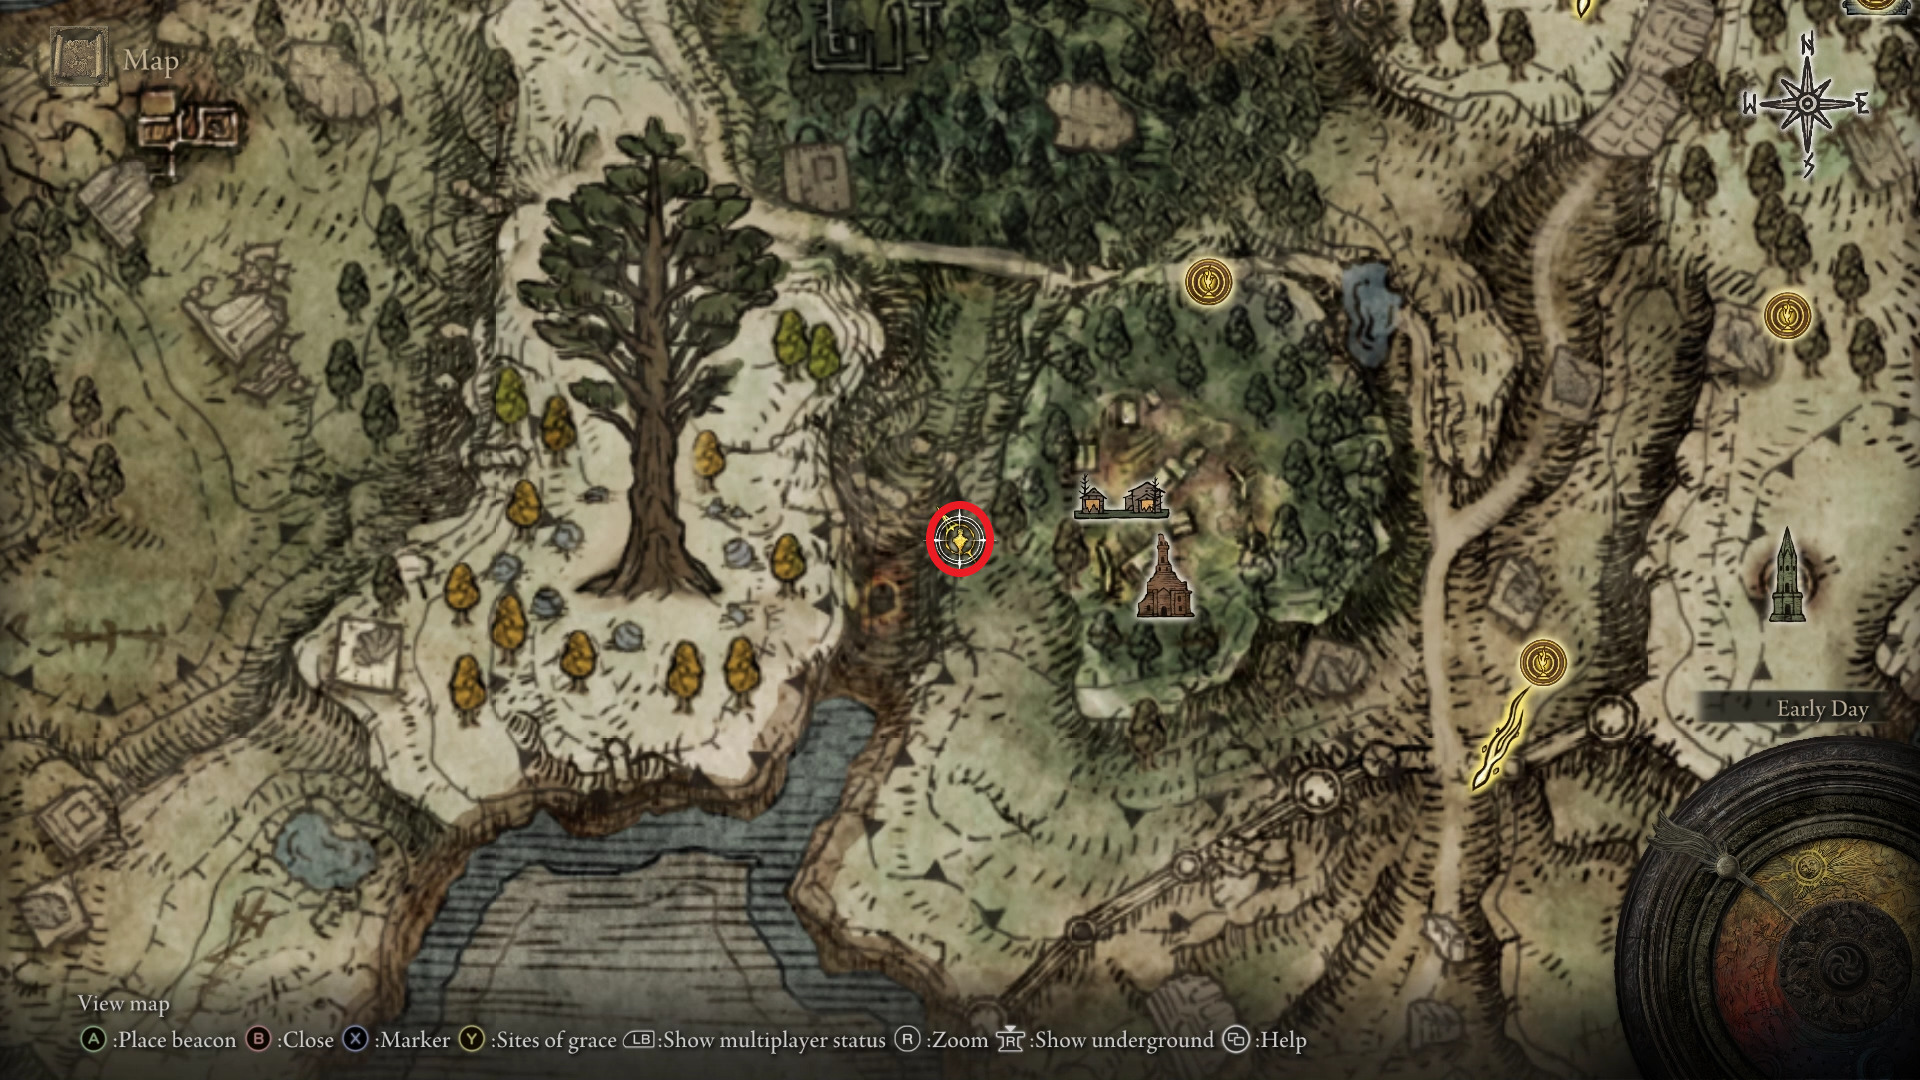
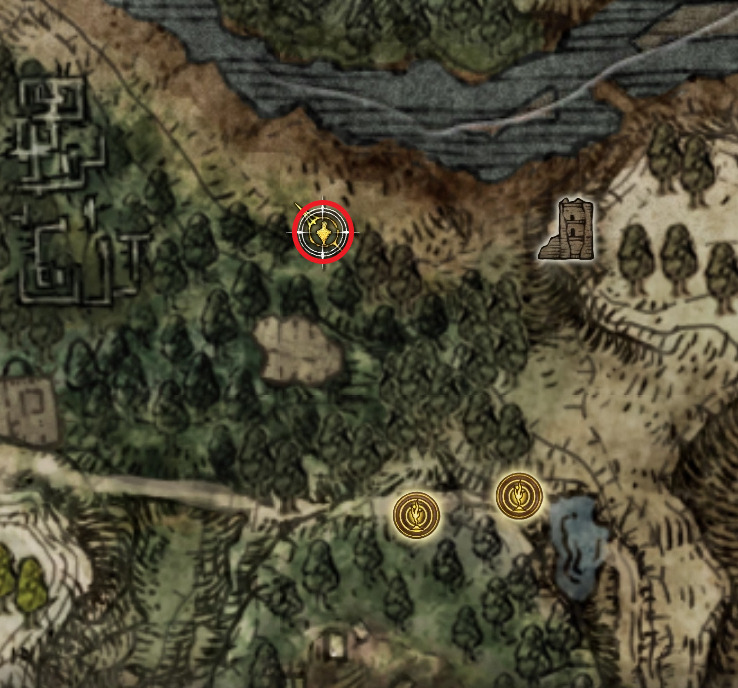
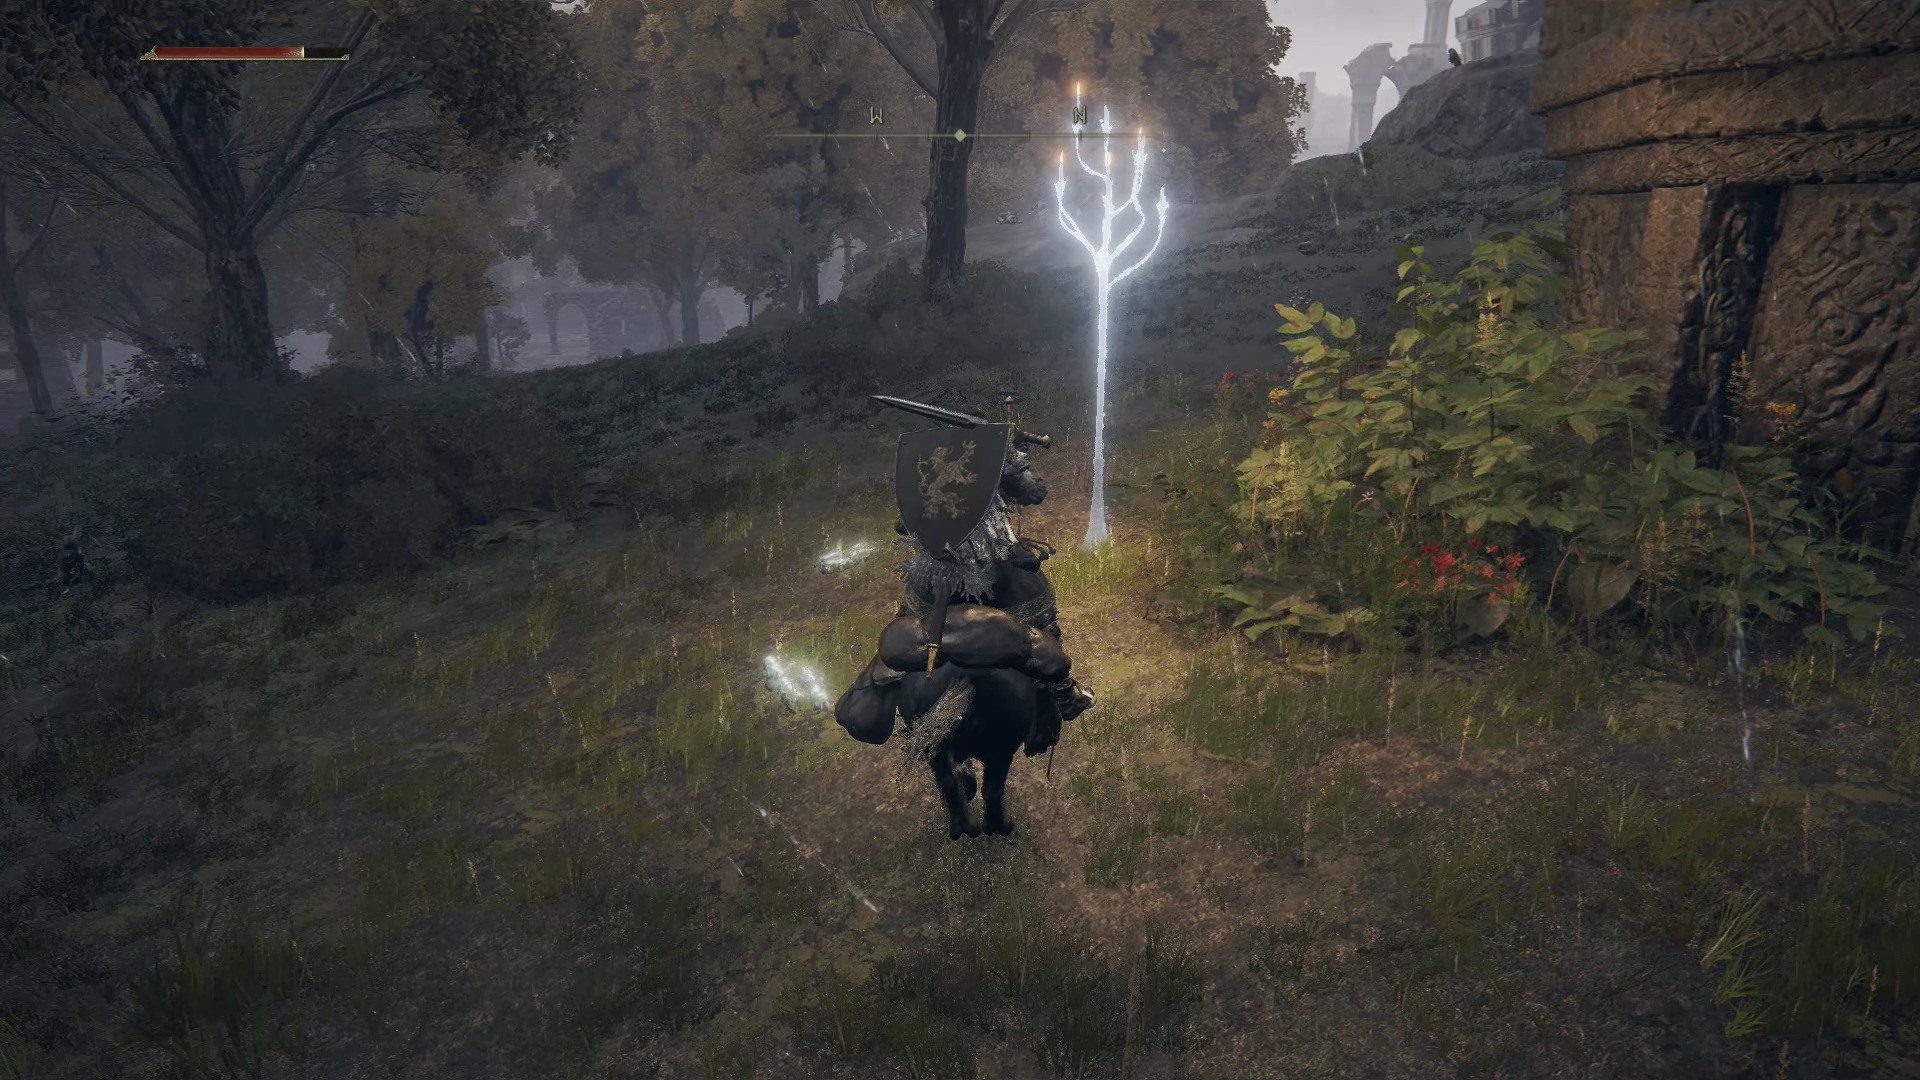
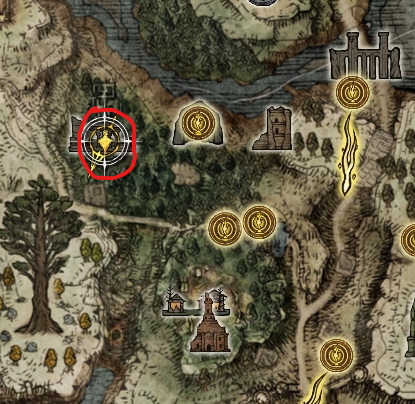
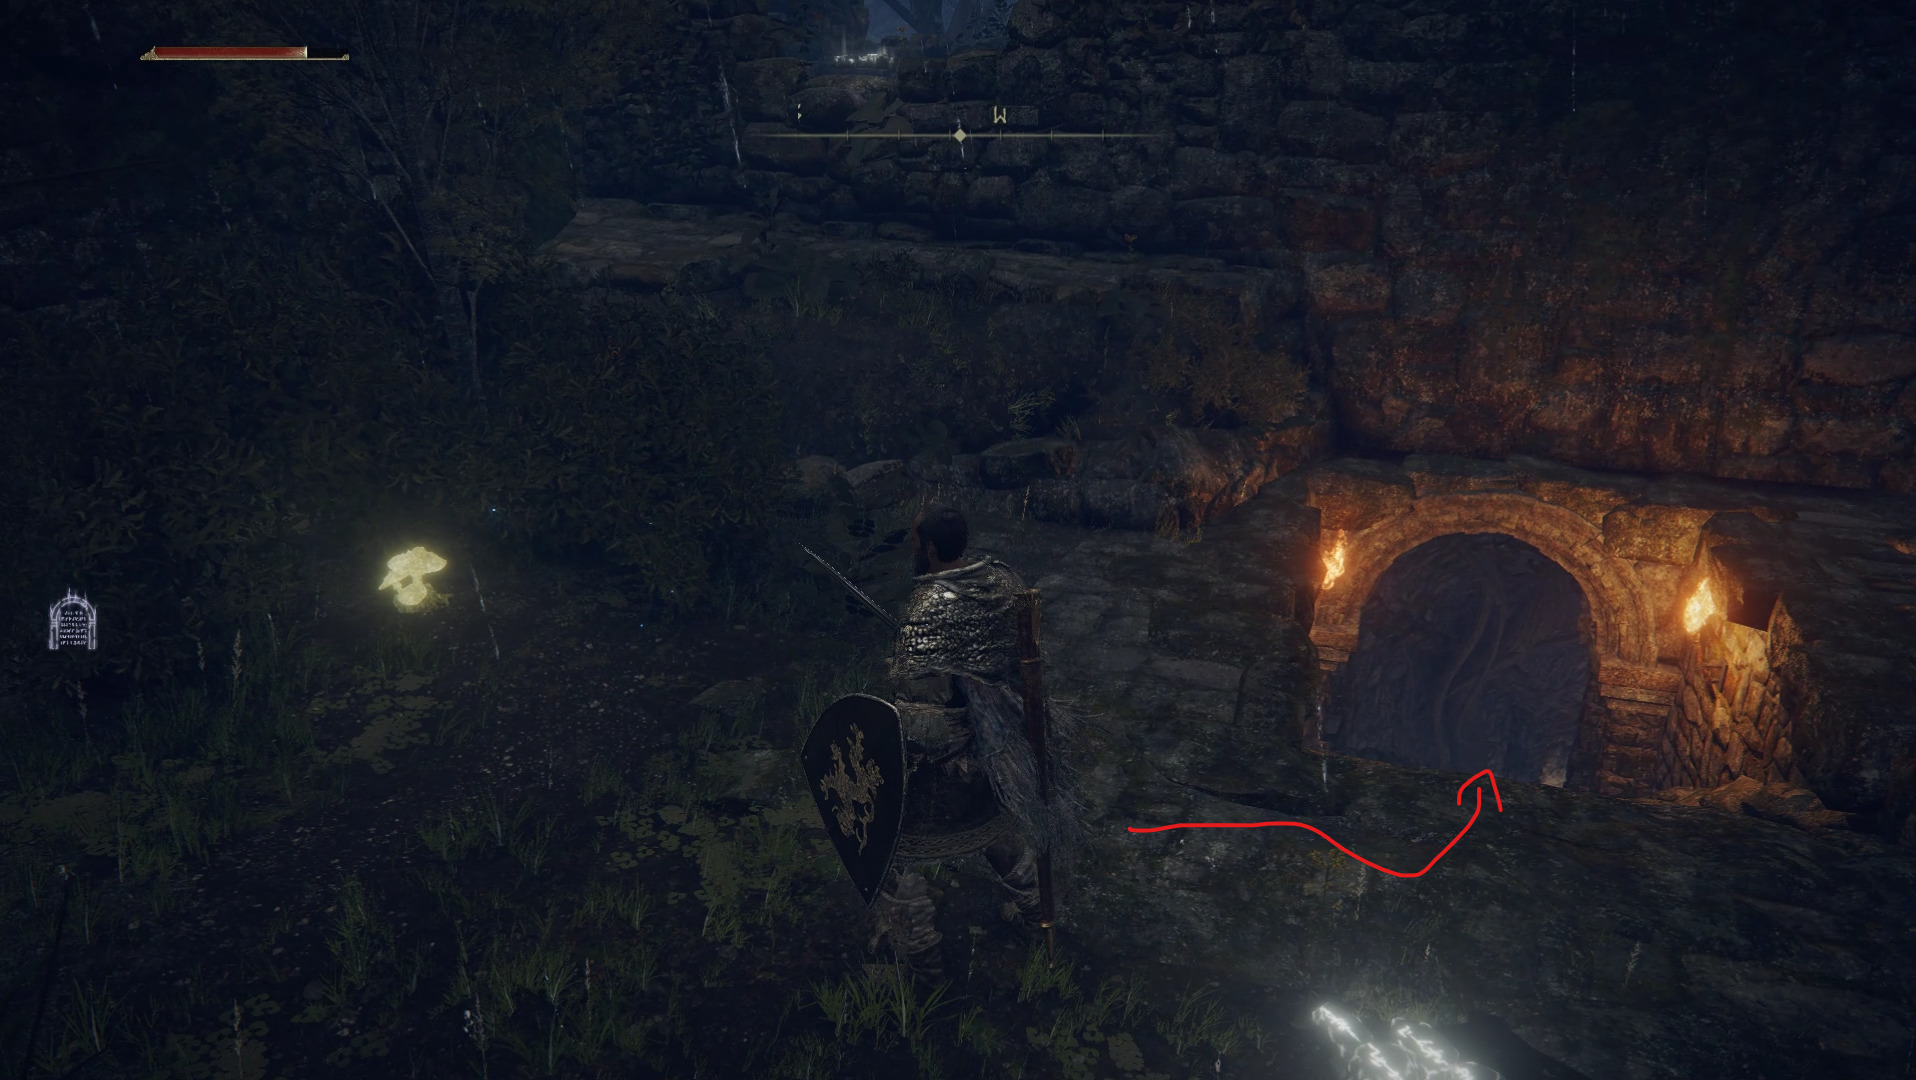
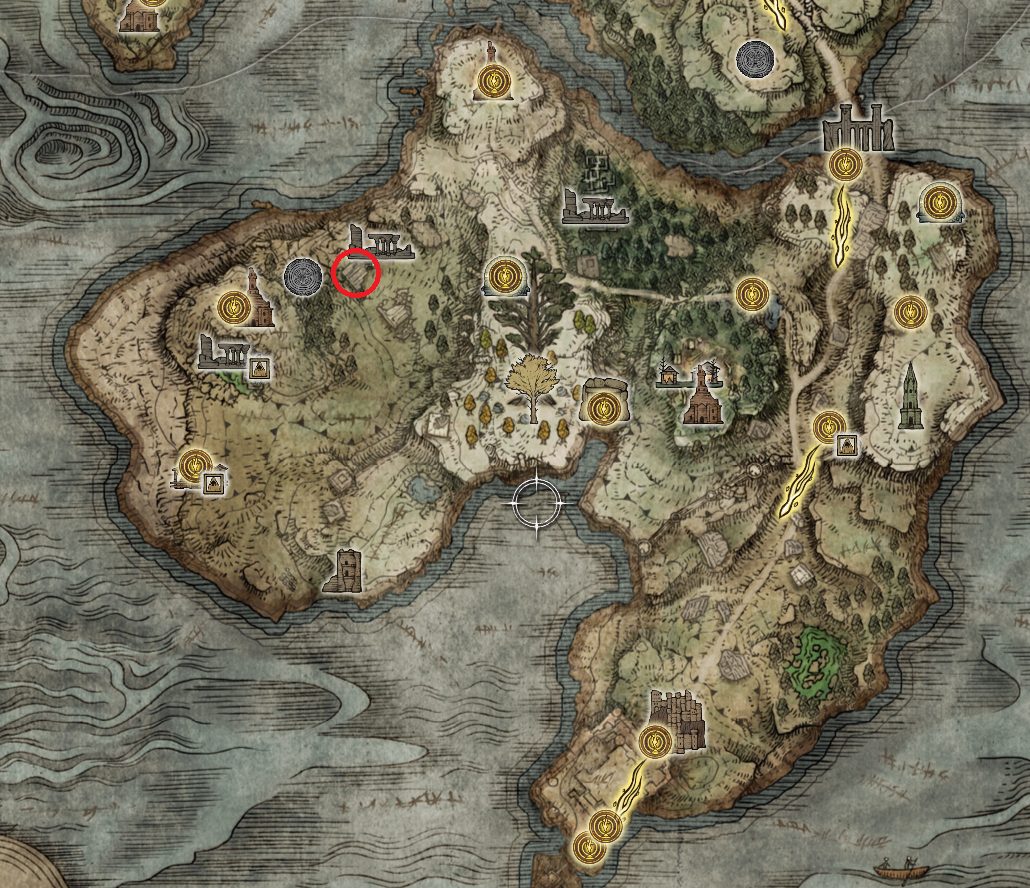
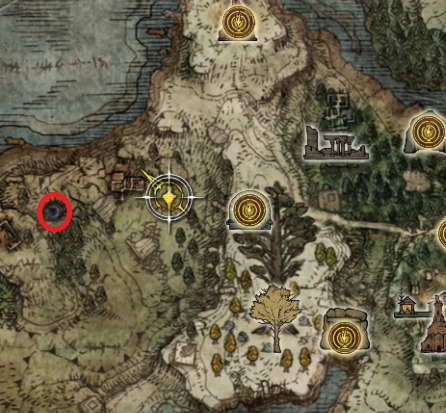
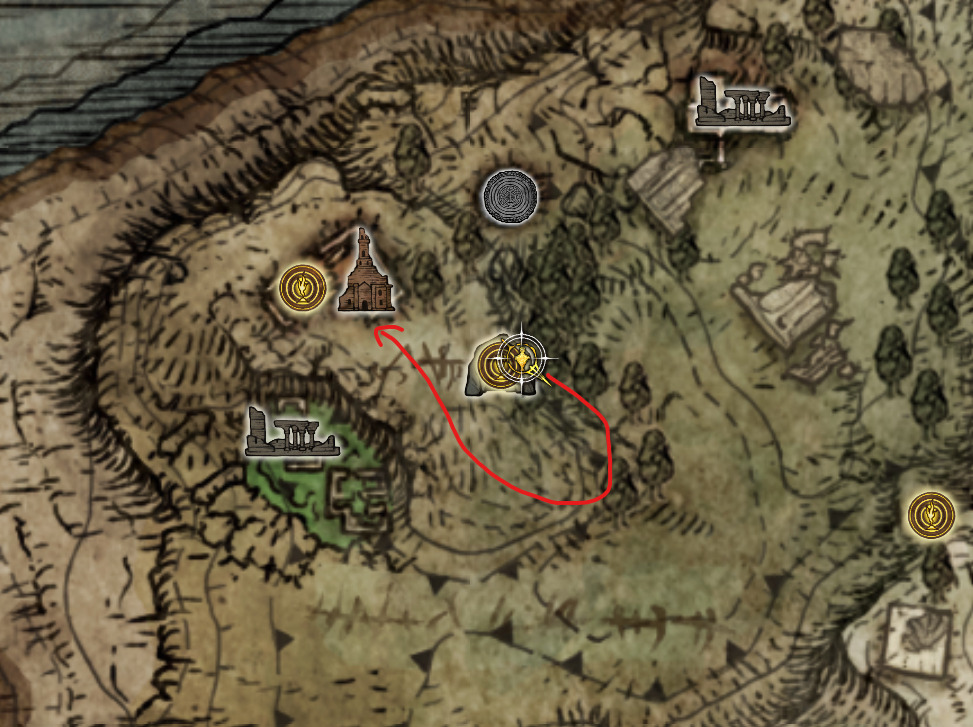
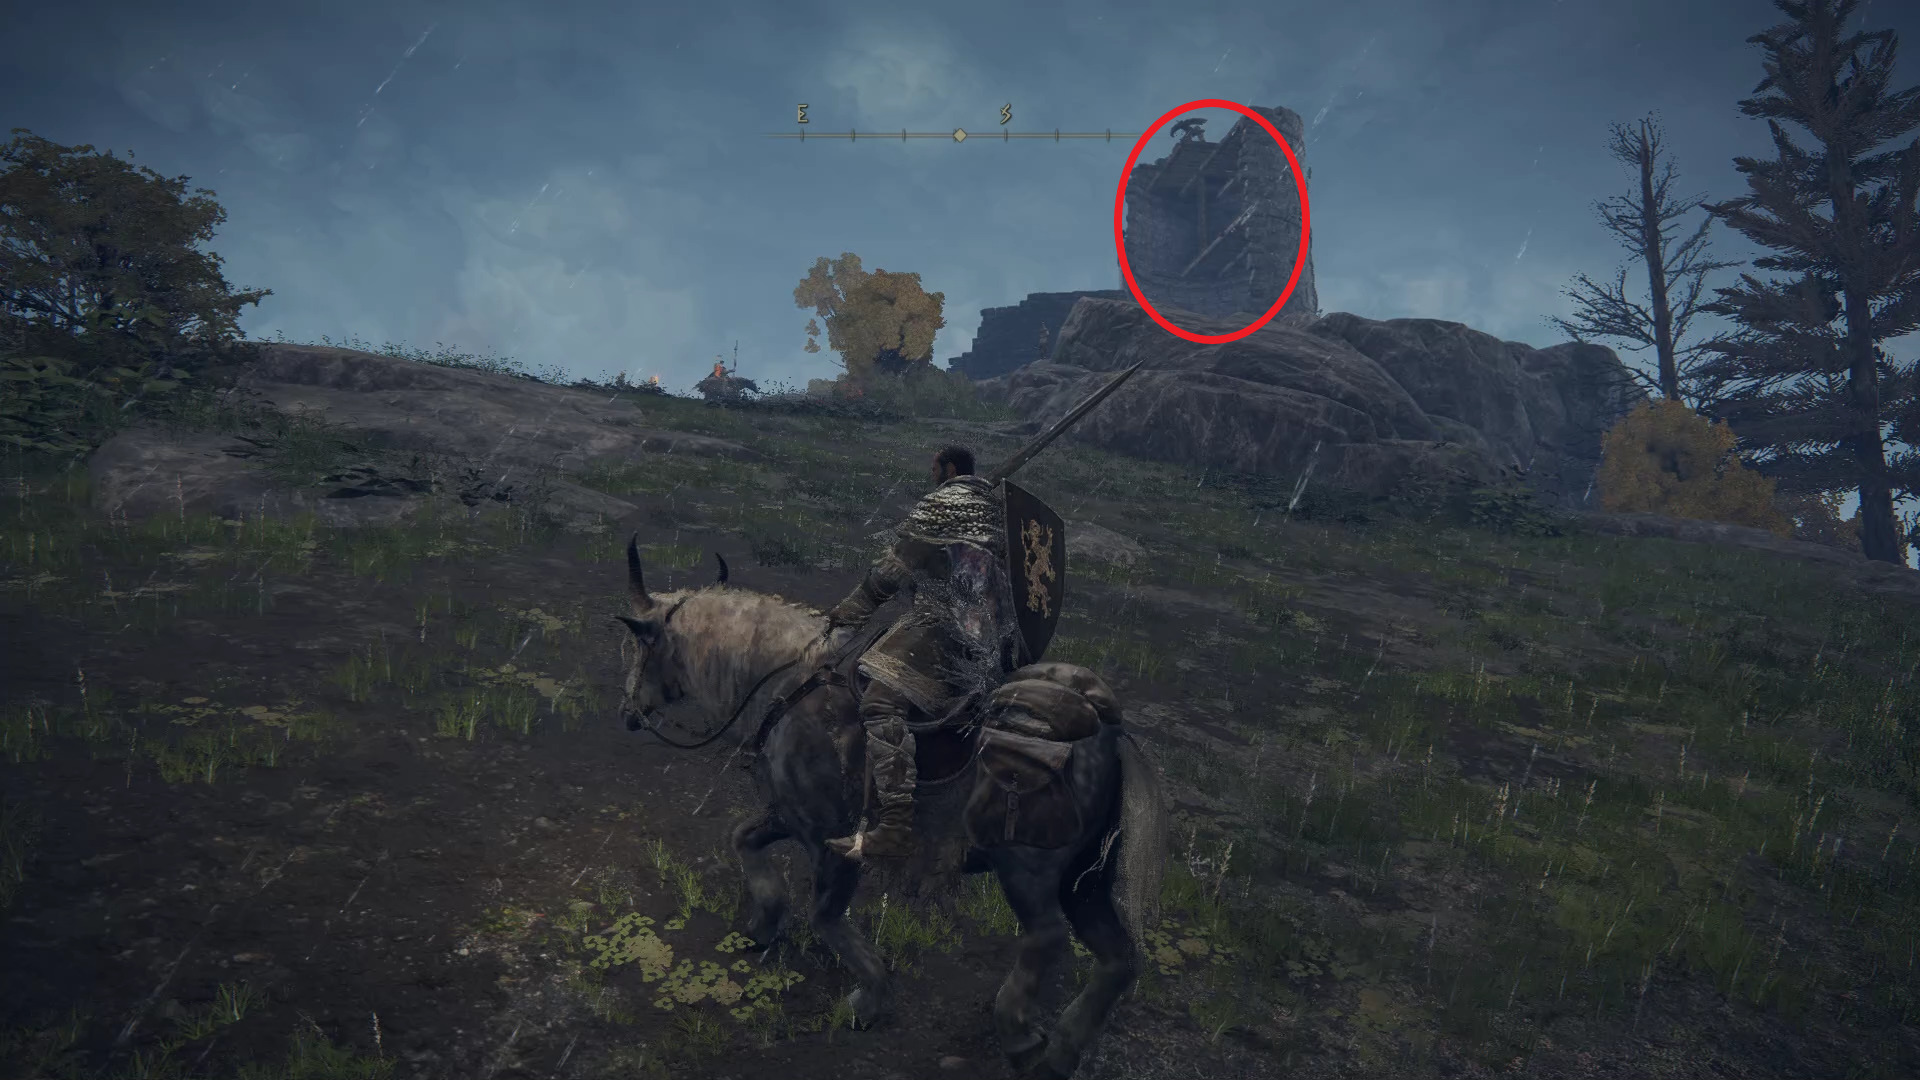
From the Forest Lookout Tower, start heading west until you find a ghostly candle holder. Examine it, which will bring out a ghost buddy leaving a trail that leads straight to our next dungeon: Earthbore Cave.
Teleport back to the entrance, and from there start heading west until you reach the next stop: the Demi-Human Forest Ruins.
Enter through the gap in the wall, which is where you’ll find the poorly defended Demi-Human Queen. Keep circling around her while mounted to avoid her blows, until she’s dead. The few demi-human guards that protect her will not pose much of a threat, and if you need to heal up you can simply run out and do so with relative ease. Defeating the queen will grant you the Demi-Human Queen’s Staff, as well as the Crystal Burst sorcery.
Northwest from this room is a small clearing with 3 aggressive flowers defending an item. Kill these and grab the Faith-knot Crystal Tear that they died defending until their last breath.
Once the flowers are murdered and their belongings are stripped from their lifeless bodies, go back to Demi-Human Forest Ruins and start exploring the southern part, which is where you will find the last bit of loot from this area: the Shield of the Guilty. The place you’re looking for is a closed-off room, with a staircase leading underground.
You will need to use your mount’s double-jump ability to enter the room through a part of the wall that’s lower than the rest. There, simply go down the basement and open the chest containing the Shield of the Guilty.
While we have almost explored this part of the map, there is still one dungeon nearby that needs to be cleared: Morne Tunnel. To reach this dungeon, you will just have to head south from the Demi-Human Forest Ruins.
The path to Morne Tunnel is pretty straightforward, and both the giant flowers and the bats you will meet on your way can be avoided entirely.
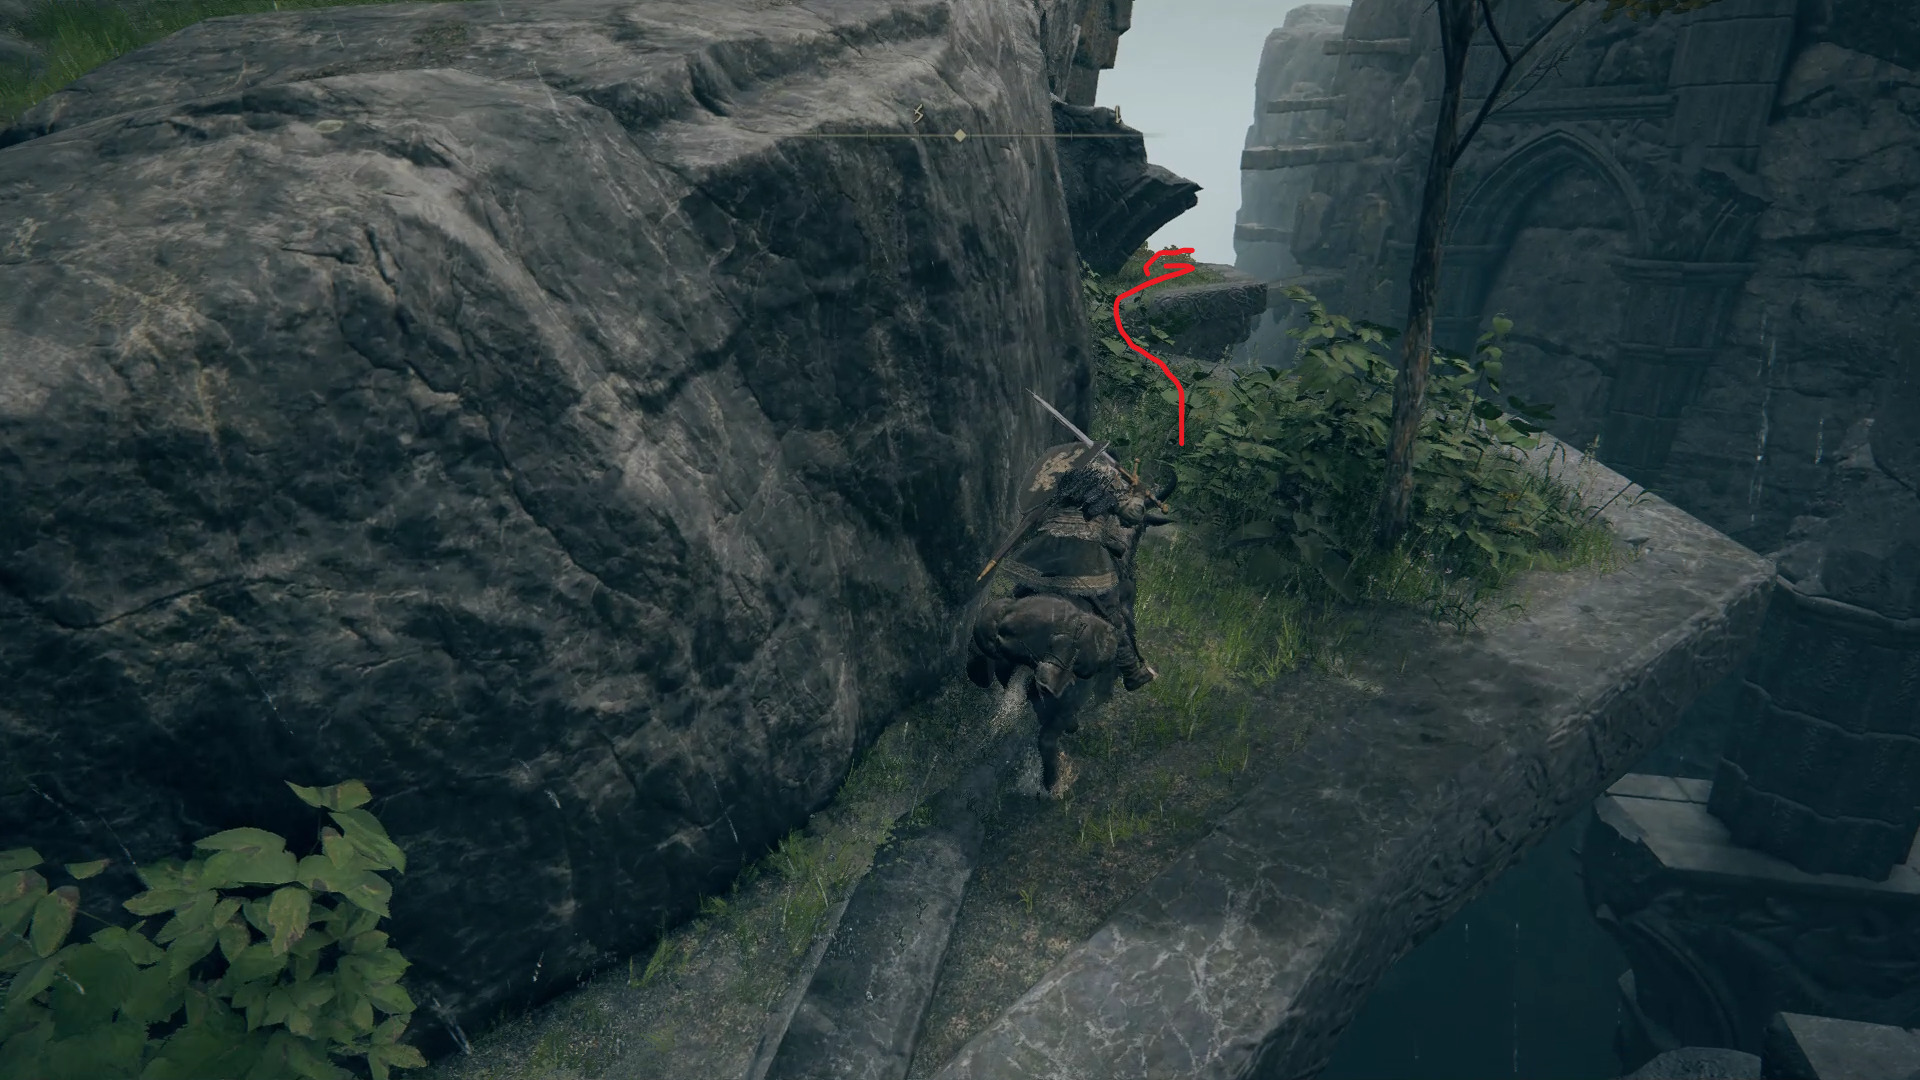
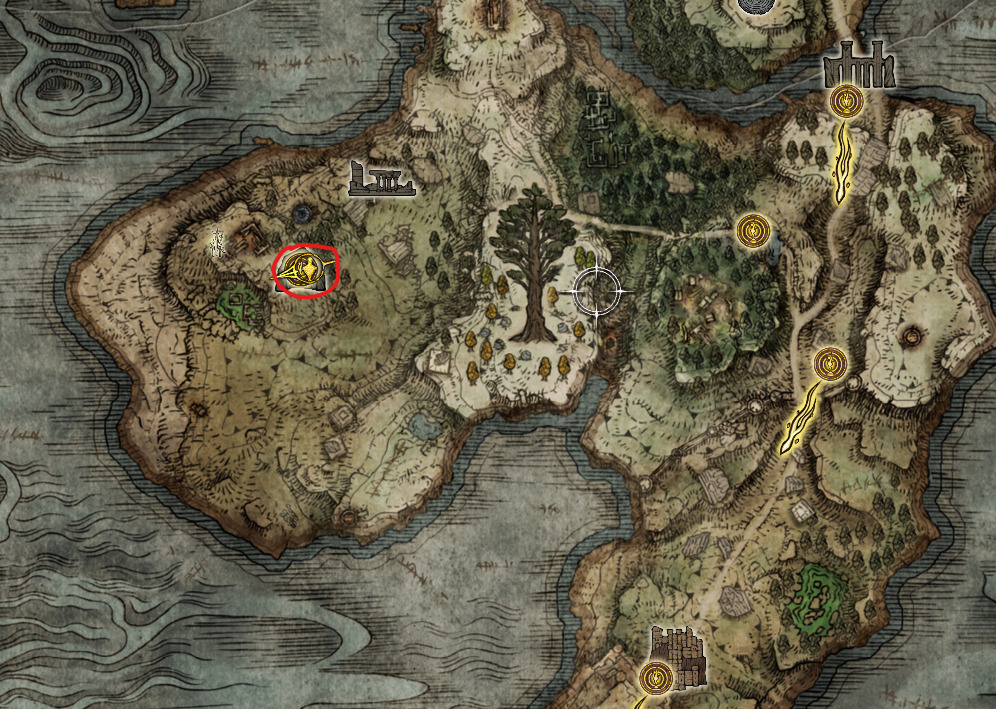
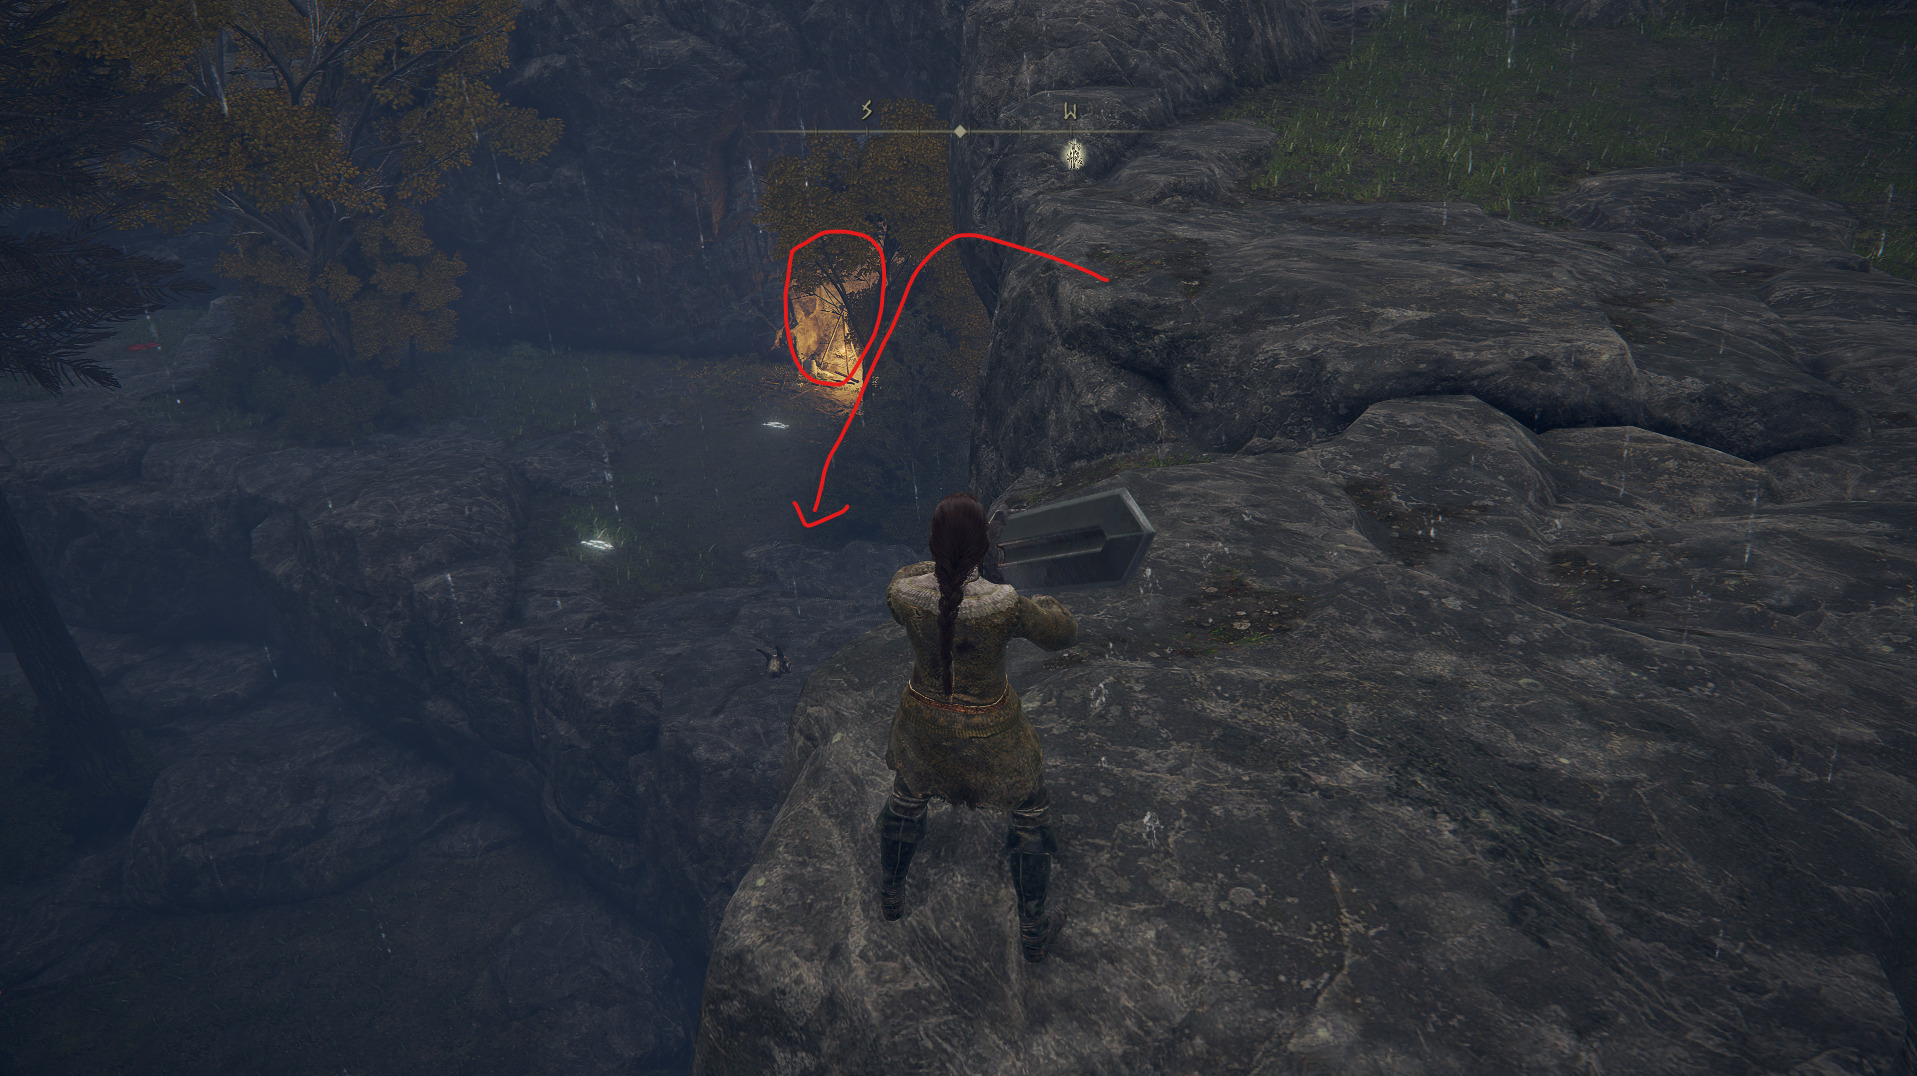
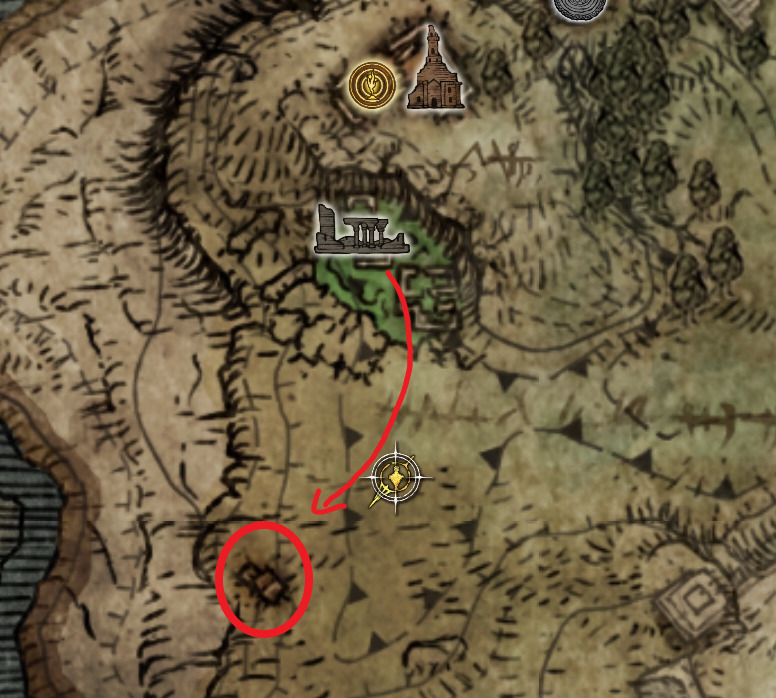
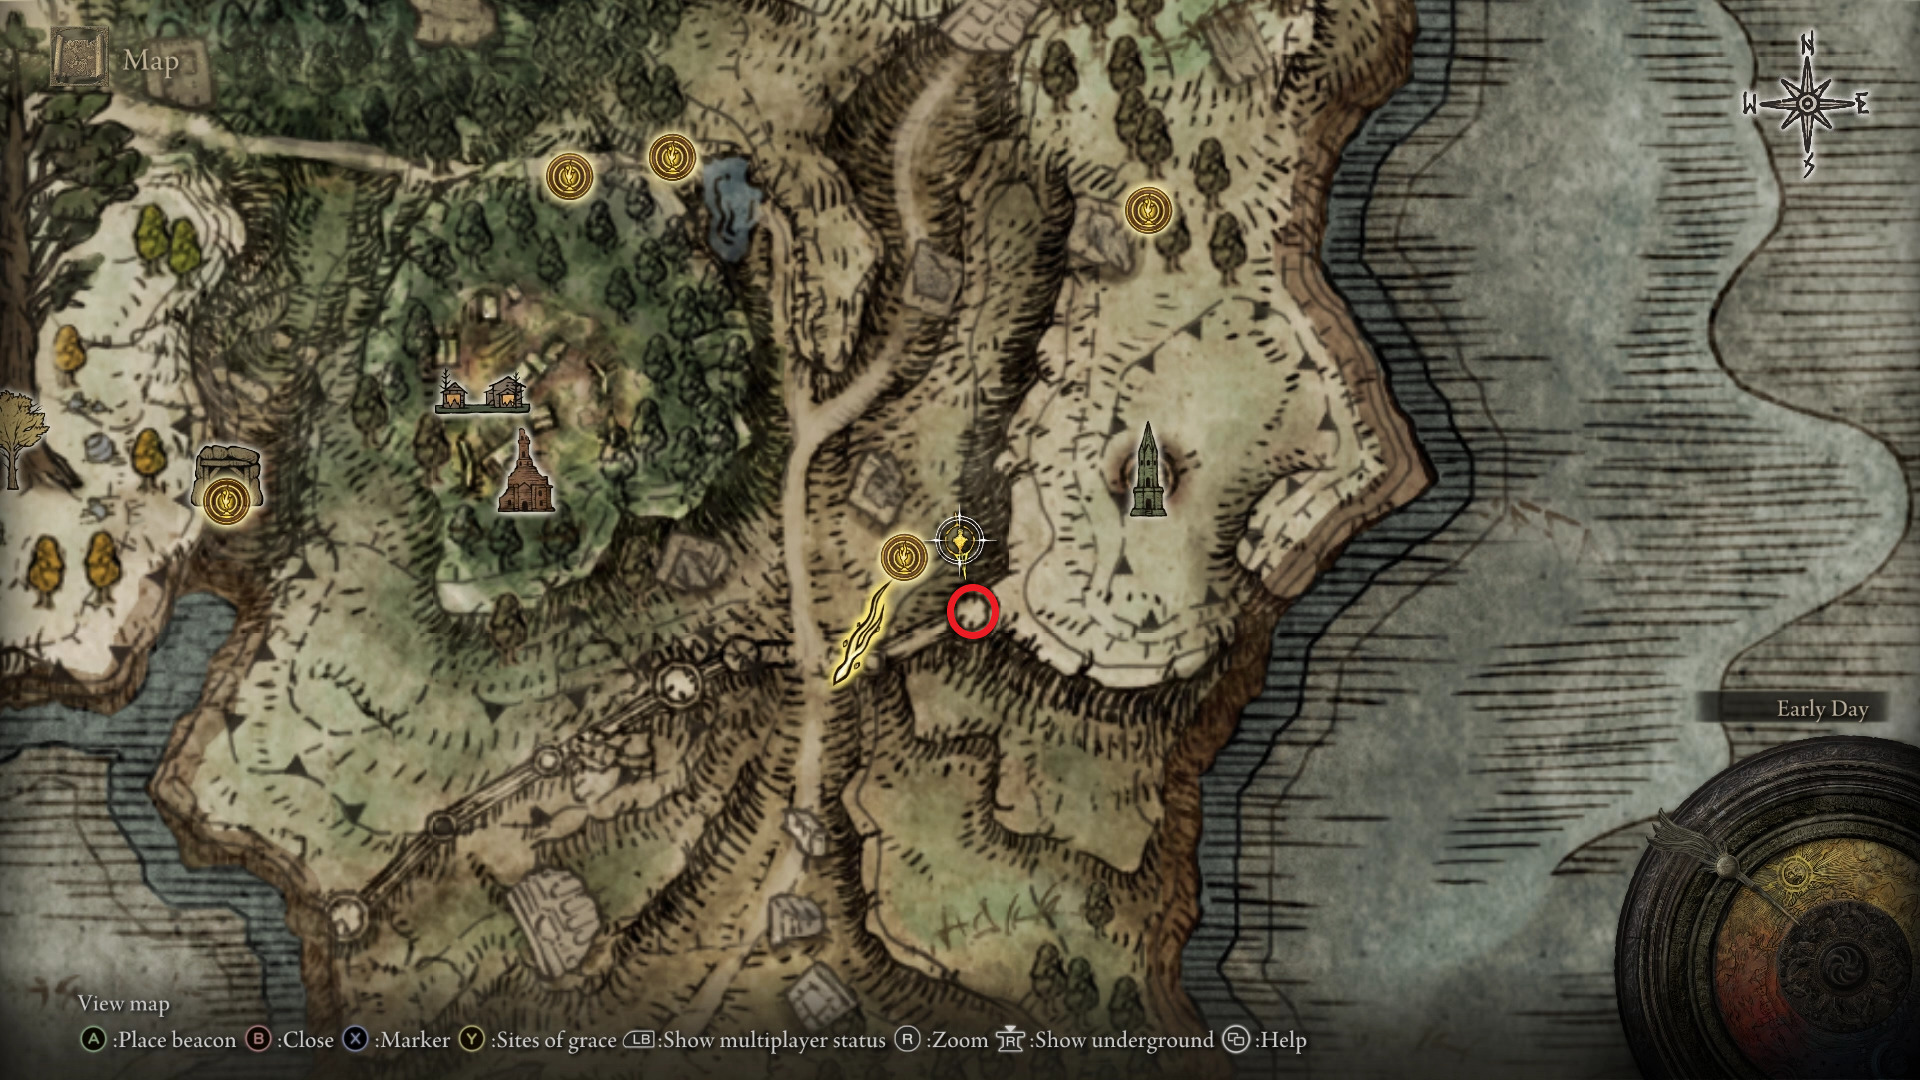
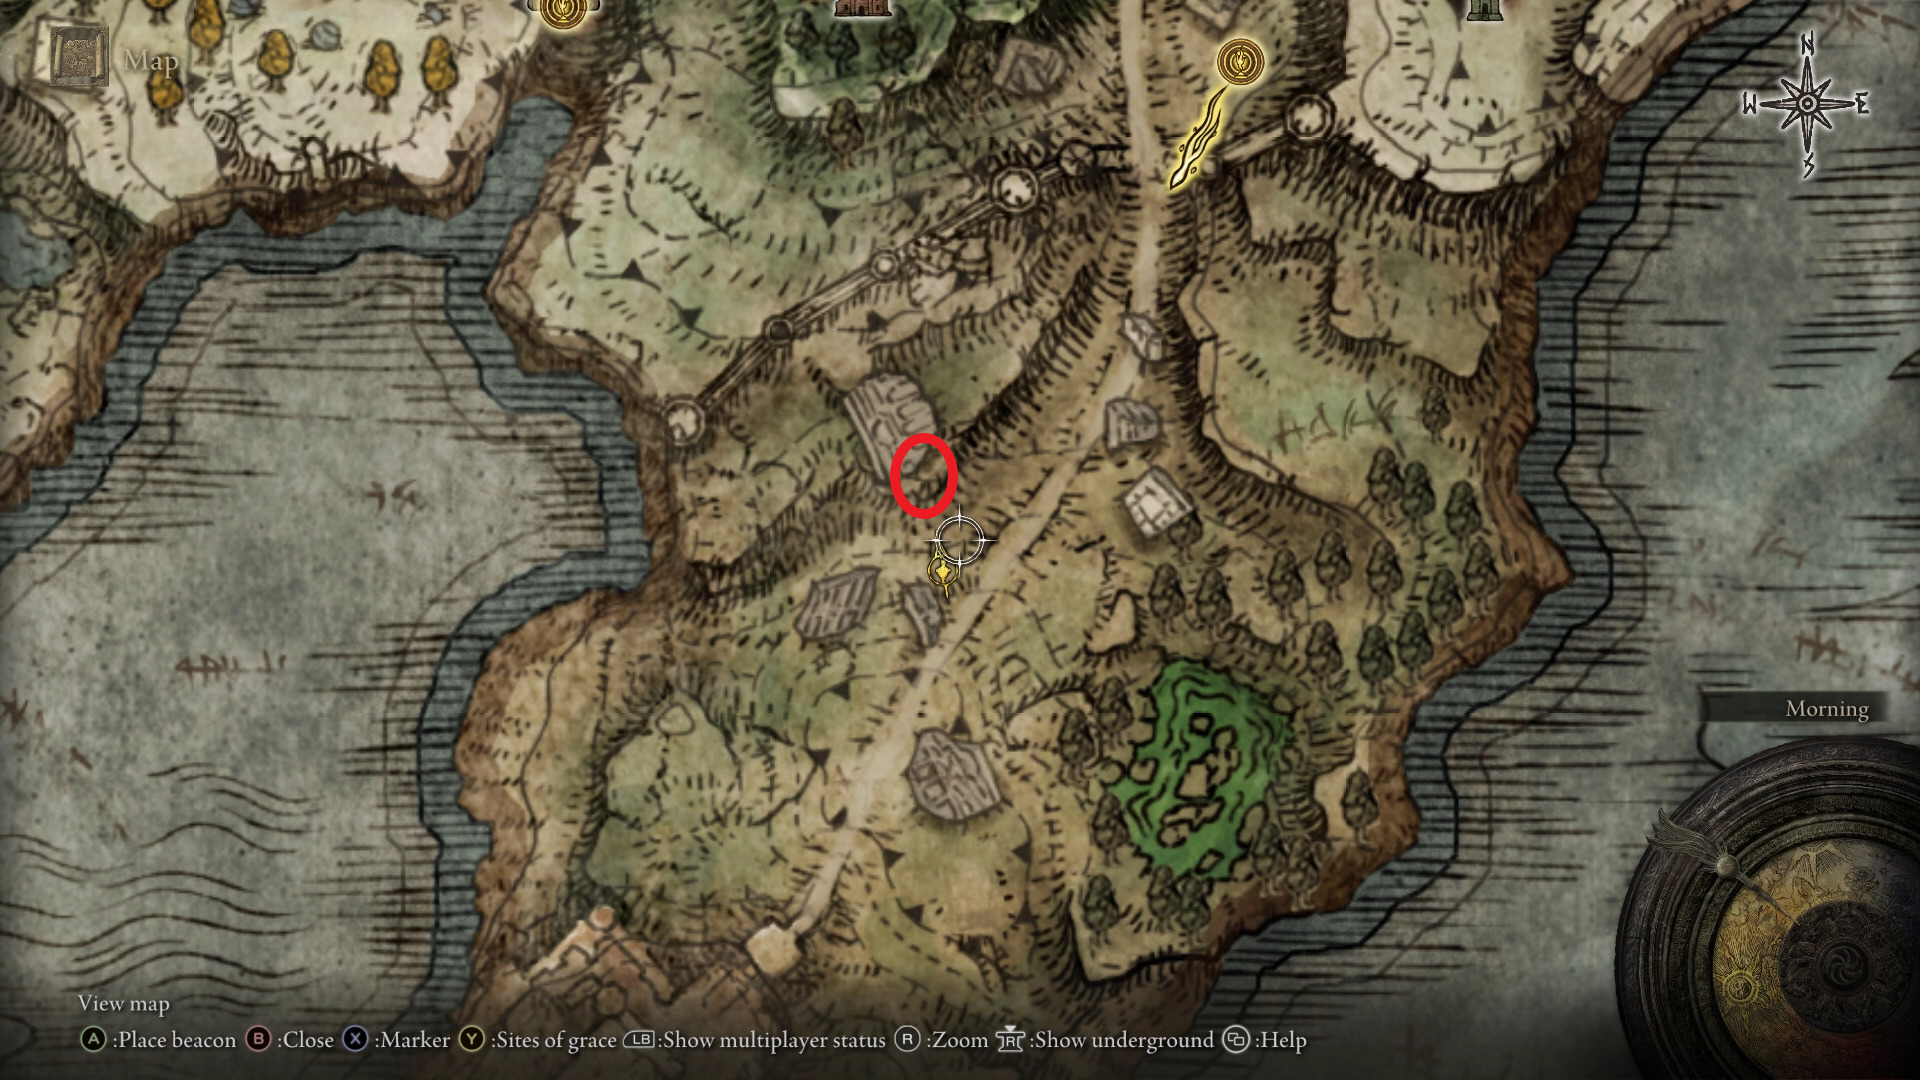
After clearing the dungeon, travel back to the South of the Lookout Tower site of grace. From there, head west across the bridge, and continue heading west until you find a guiding statue. Interacting with a message next to it will cause the statue to show a faint path towards a nearby dungeon: Tombsward Catacombs.
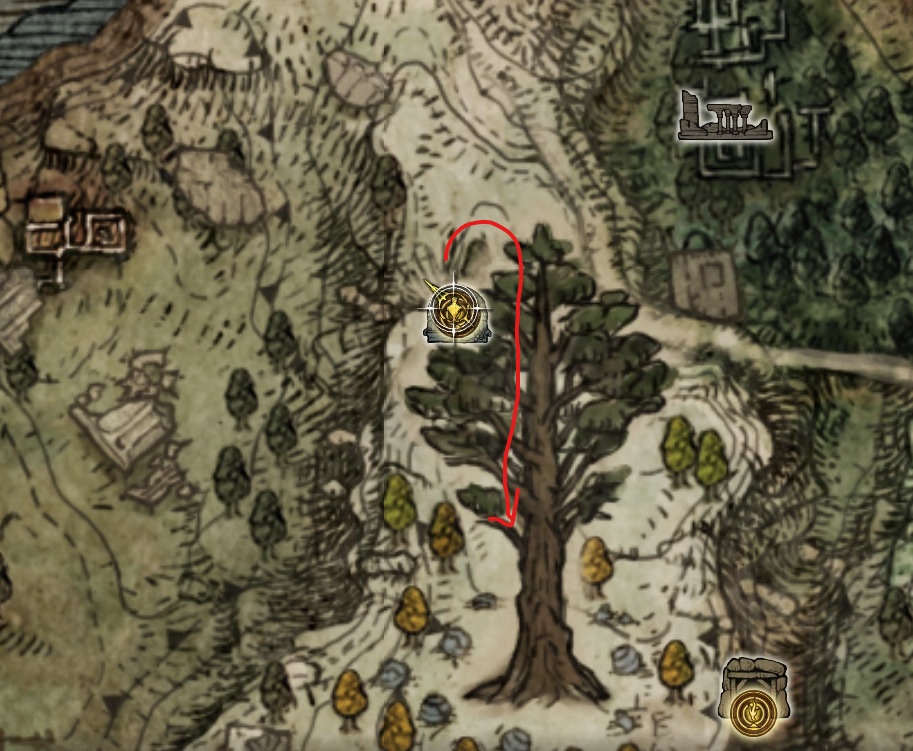
As you’re leaving the dungeon, there is another spot nearby that you should explore. You may have noticed the giant tree on your way to this place, and that’s where we’ll be heading to next. From the Tombsward Catacombs, head south until you reach the Minor Erdtree.
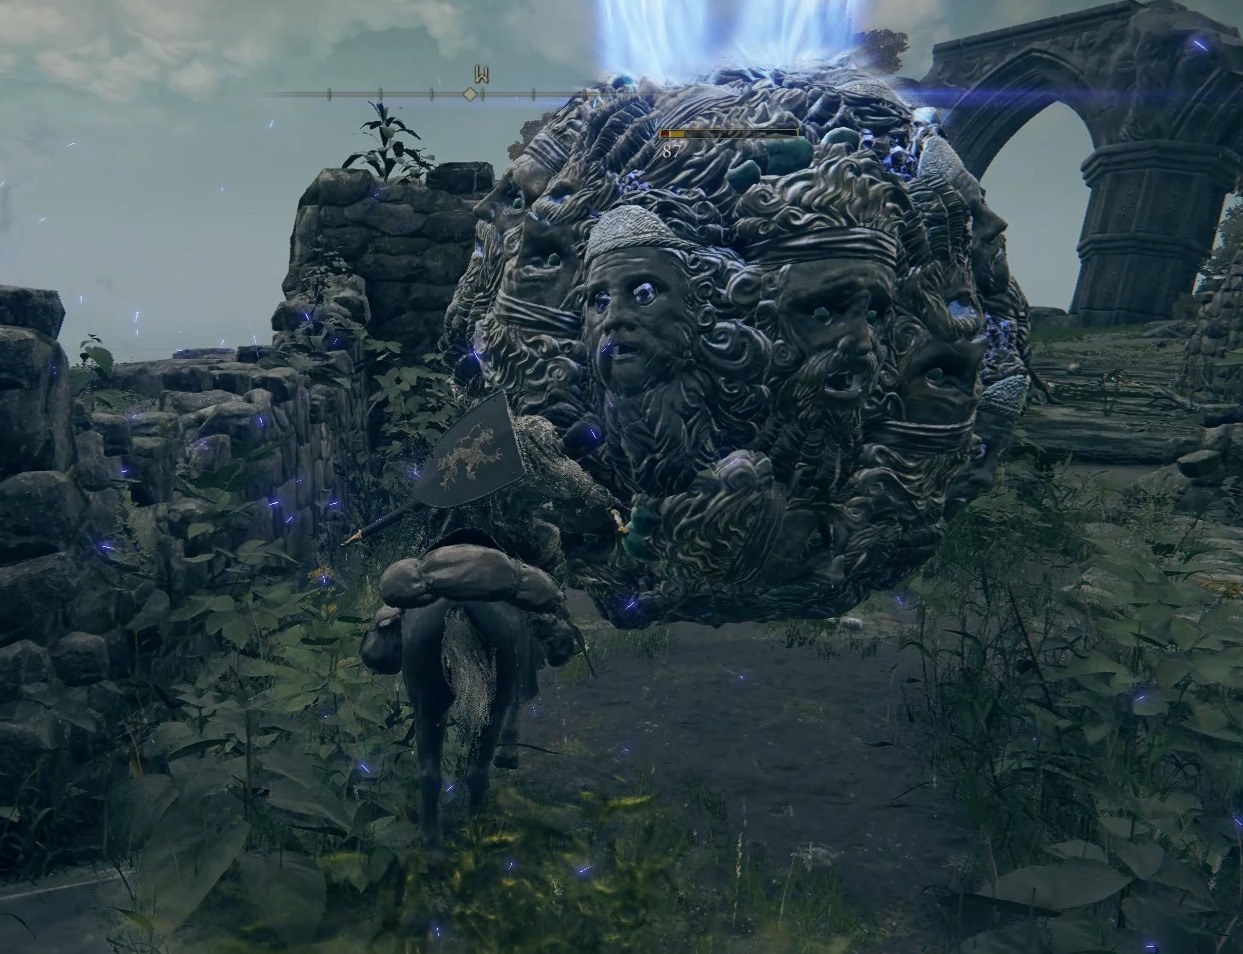
While you may have previously found Tear items just laying next to these trees, here you will have to earn them. The Erdtree Avatar open-world boss is patrolling in front of the Minor Erdtree, and you’ll have to beat the Opaline Bubbletear and the Crimsonburst Crystal Tear out of him. Luckily, you can both remain on horseback and summons are available in the area. If you have access to spells, you can run around while continuing to damage the boss. If you’re a straightforward kind of Tarnished, wait for the boss to finish an attack before running in for a couple hits, and then running back out. In both cases, summons will be able to grab the Erdtree Avatar‘s attention, which will make this fight much easier.
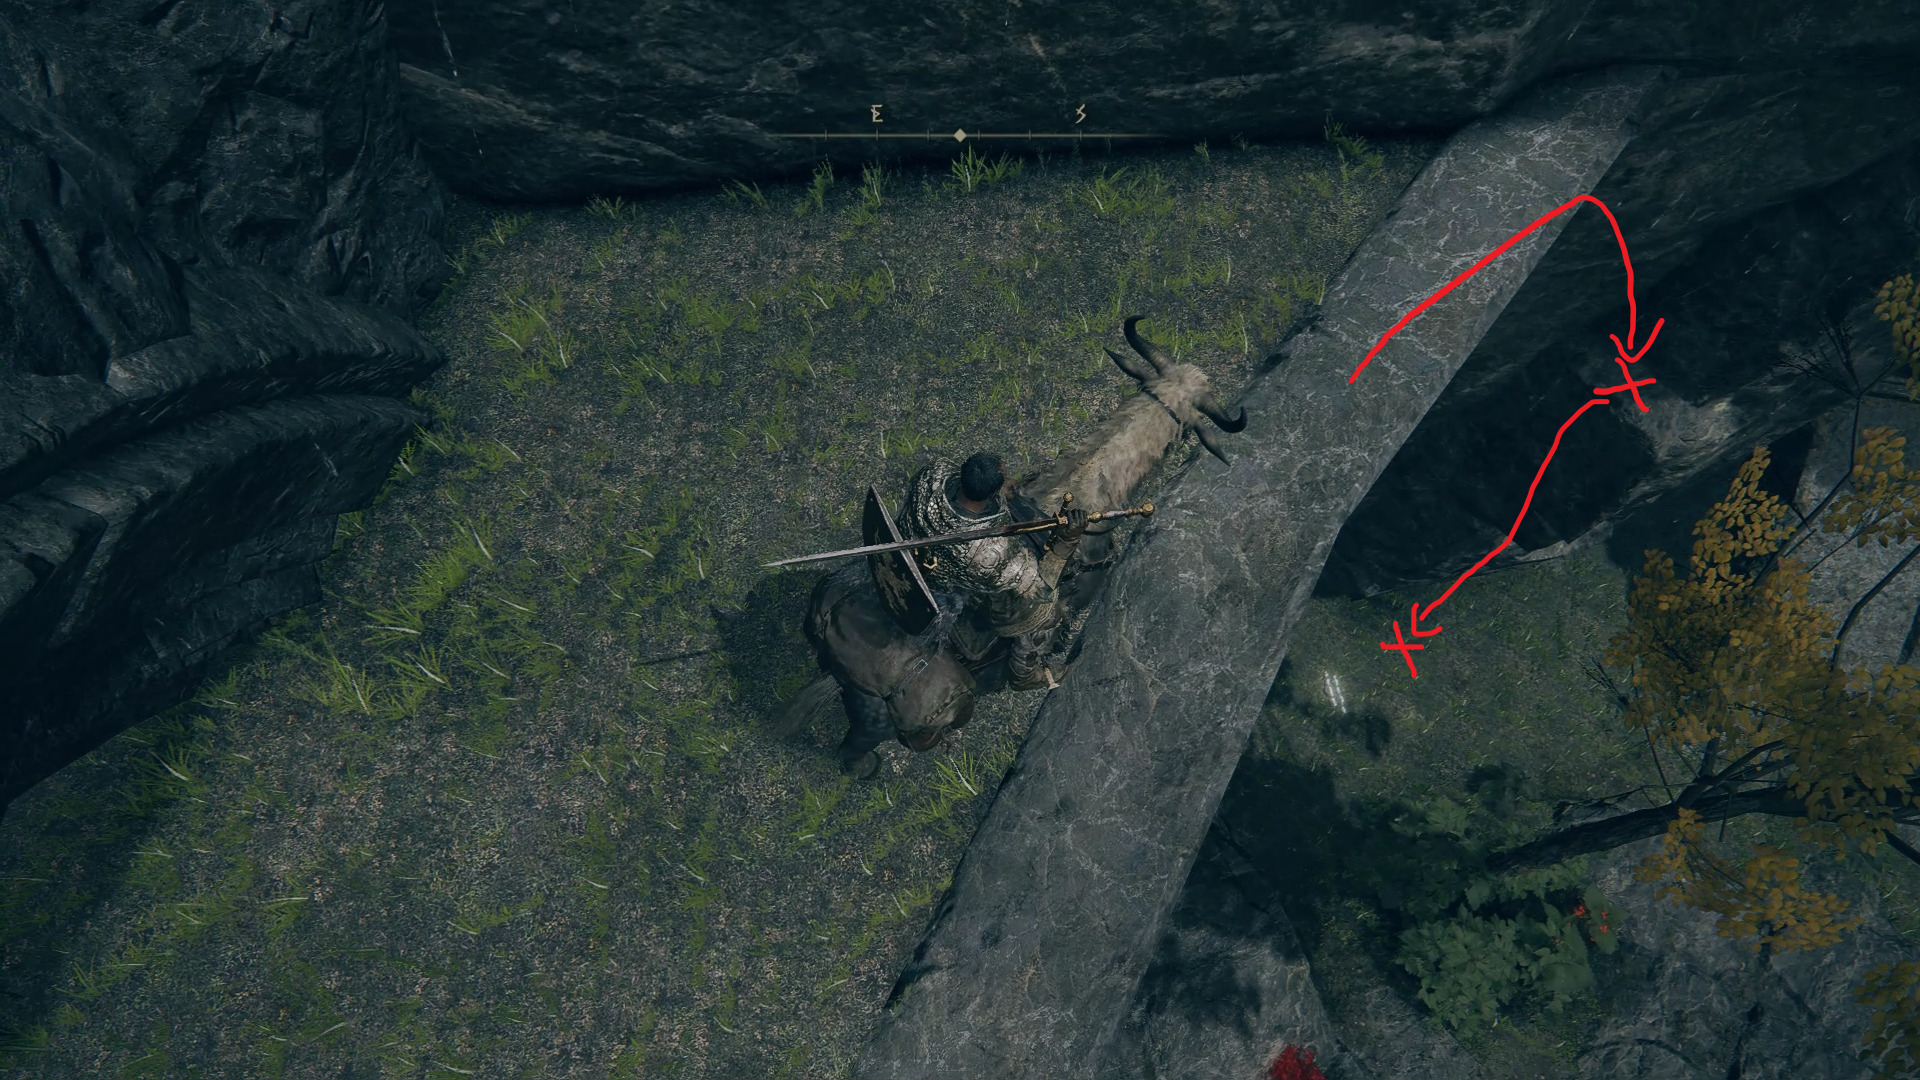
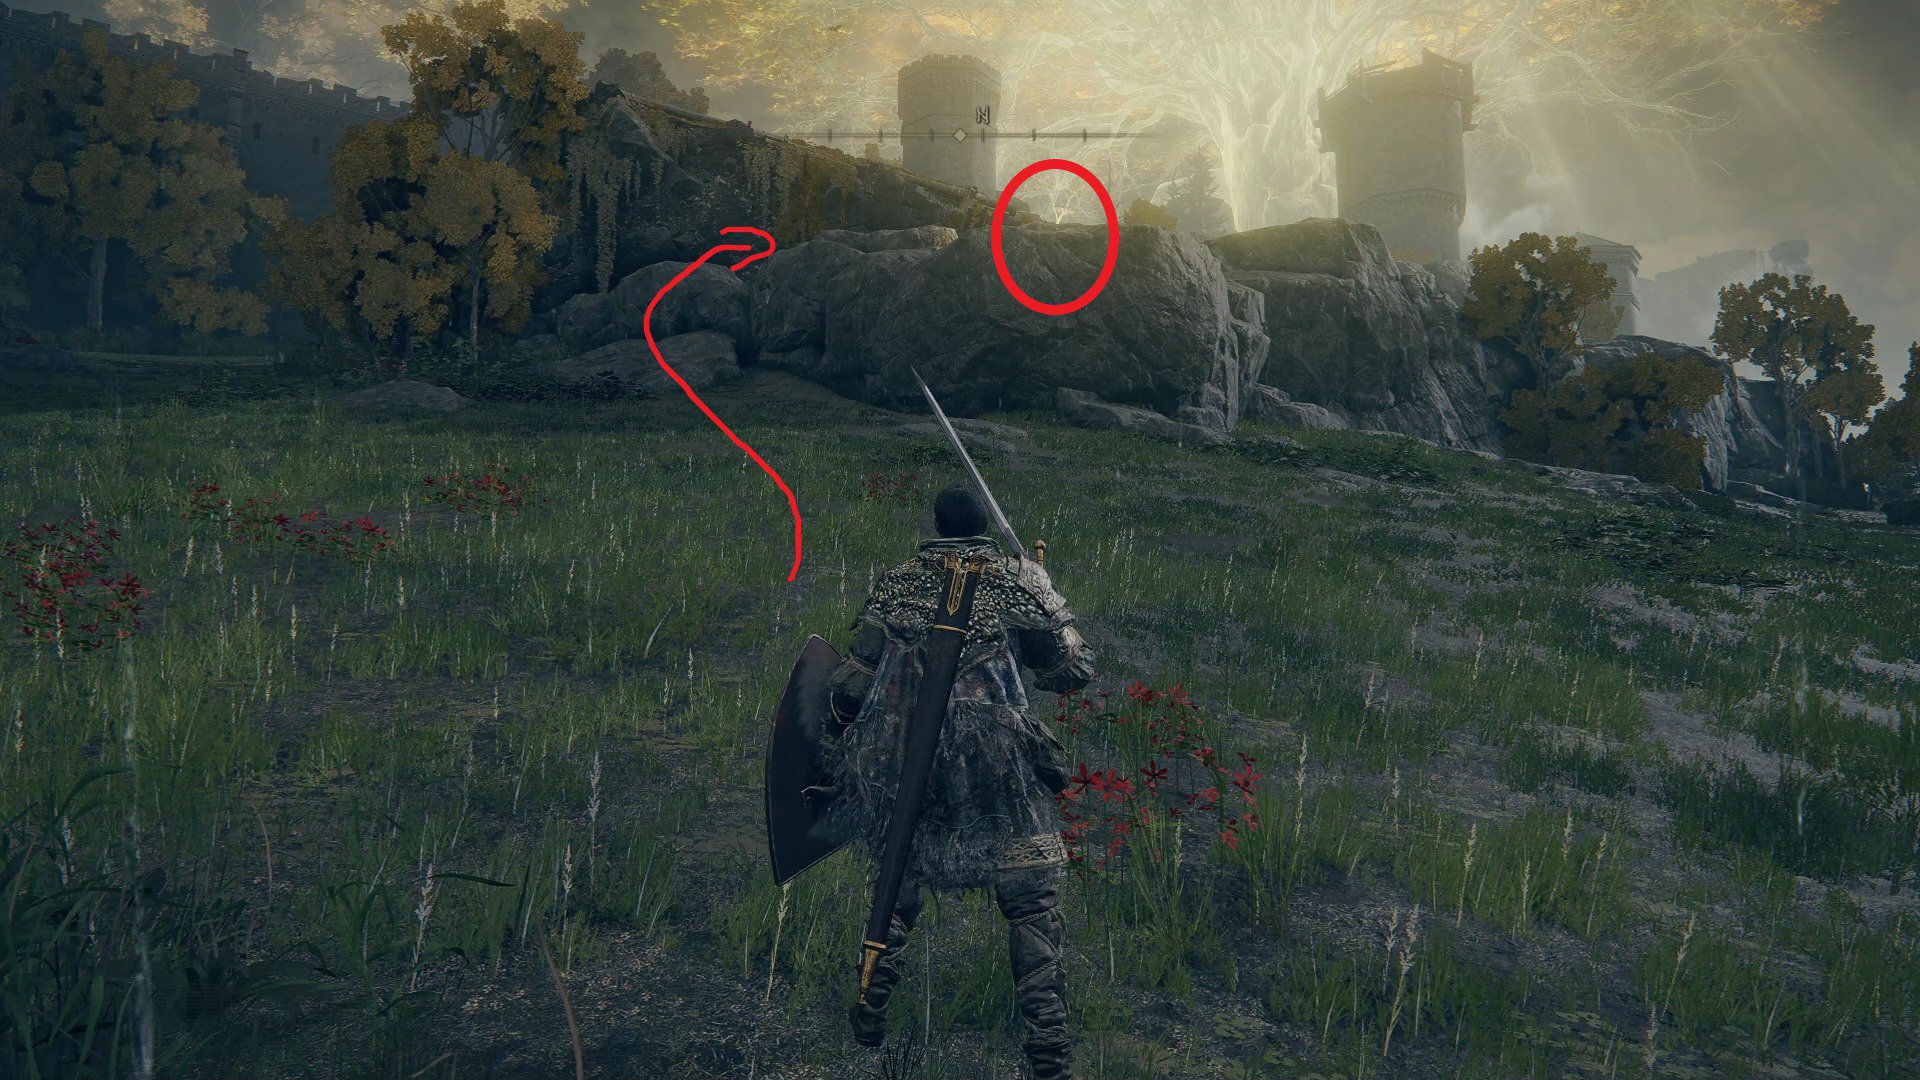
Once you grabbed your hard-earned tears, we’re going to grab the Eclipse Crest Heater Shield. From the base of the minor Erdtree, head northwest and drop down to the grassy platforms below. On the northern side of the platforms, look down to the west for a drop with a corpse below, who holds the shield. Note that you’ll need to jump once more, down to the broken pillar just to the south, to avoid dying from fall damage.
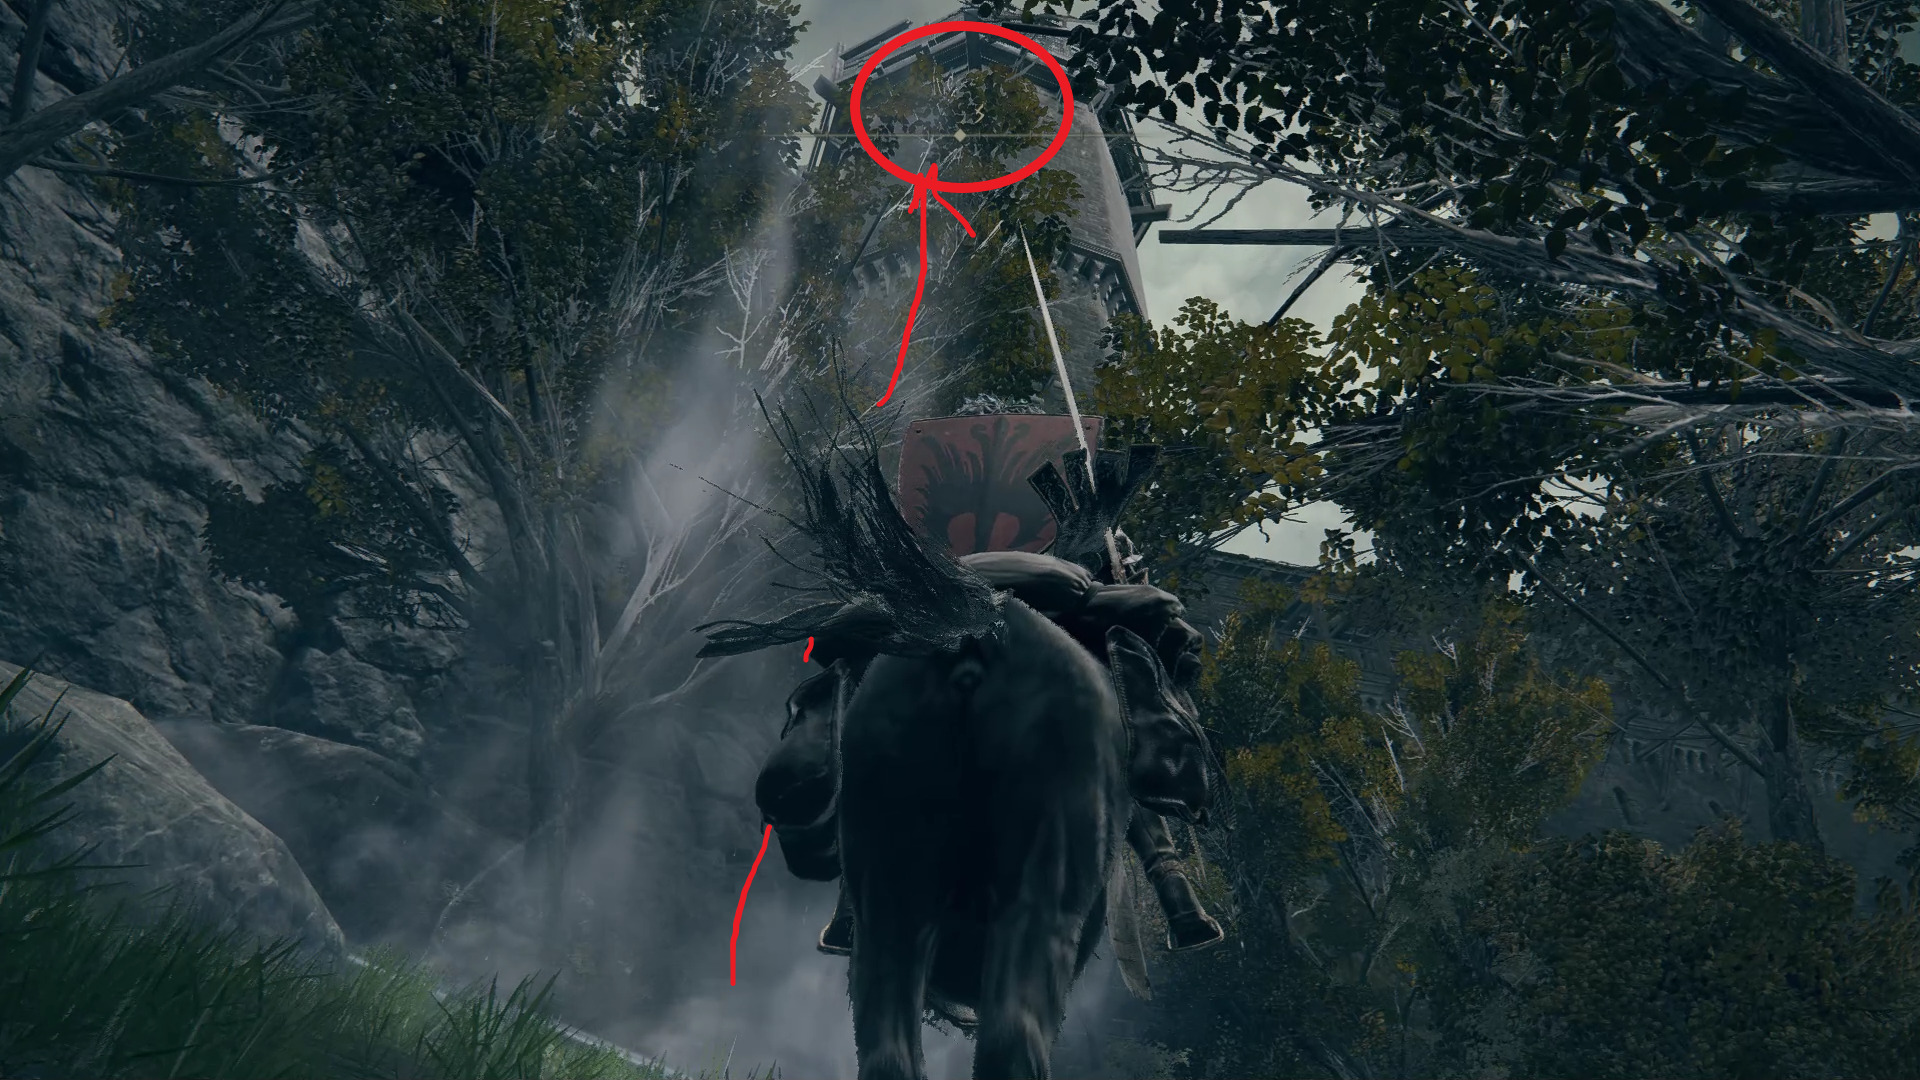
You can then go up the hill heading north to reach the church at the top of the hill.
At the church, grab the Church of Pilgrimage site of grace and the Sacred Tear next to a nearby statue. Here you can take a short break and speak with Melina at the site of grace, before heading back out for some grave robbing in the cemetery west of the church to grab the Gilded Iron Shield. If you found the Prophecy Painting in Stormveil Castle already, you can go to the northern tip of the cliffs here to find the painter spirit, who’ll drop the Warhawk Ashes. Once you’re disturbing the dead, head southwest to the Tombsward Ruins.
What you’re looking for here, is a staircase leading underground. The good news is that it’s not hidden, the bad news is that it’s well defended. In the underground room, you will find two enemies that have both dangerous ranged attacks, and are equally as much of a threat in melee combat. Defeating them will allow you to proceed through the room and access the room with a chest containing the Winged Scythe.
Climb up the ruined piece of tower due southwest of the ruins to find the a loot beetle that drops the Divine Fortification incantation. West of the Tombsward Ruins you can find another optional boss, trapped in the Weeping Evergoal: Ancient Hero of Zamor.
Loot BeetleEvergaol
To open the access to this Evergoal you will need to use 1x Stonesword Key, and the reward for defeating this boss is Radagon’s Scarseal.
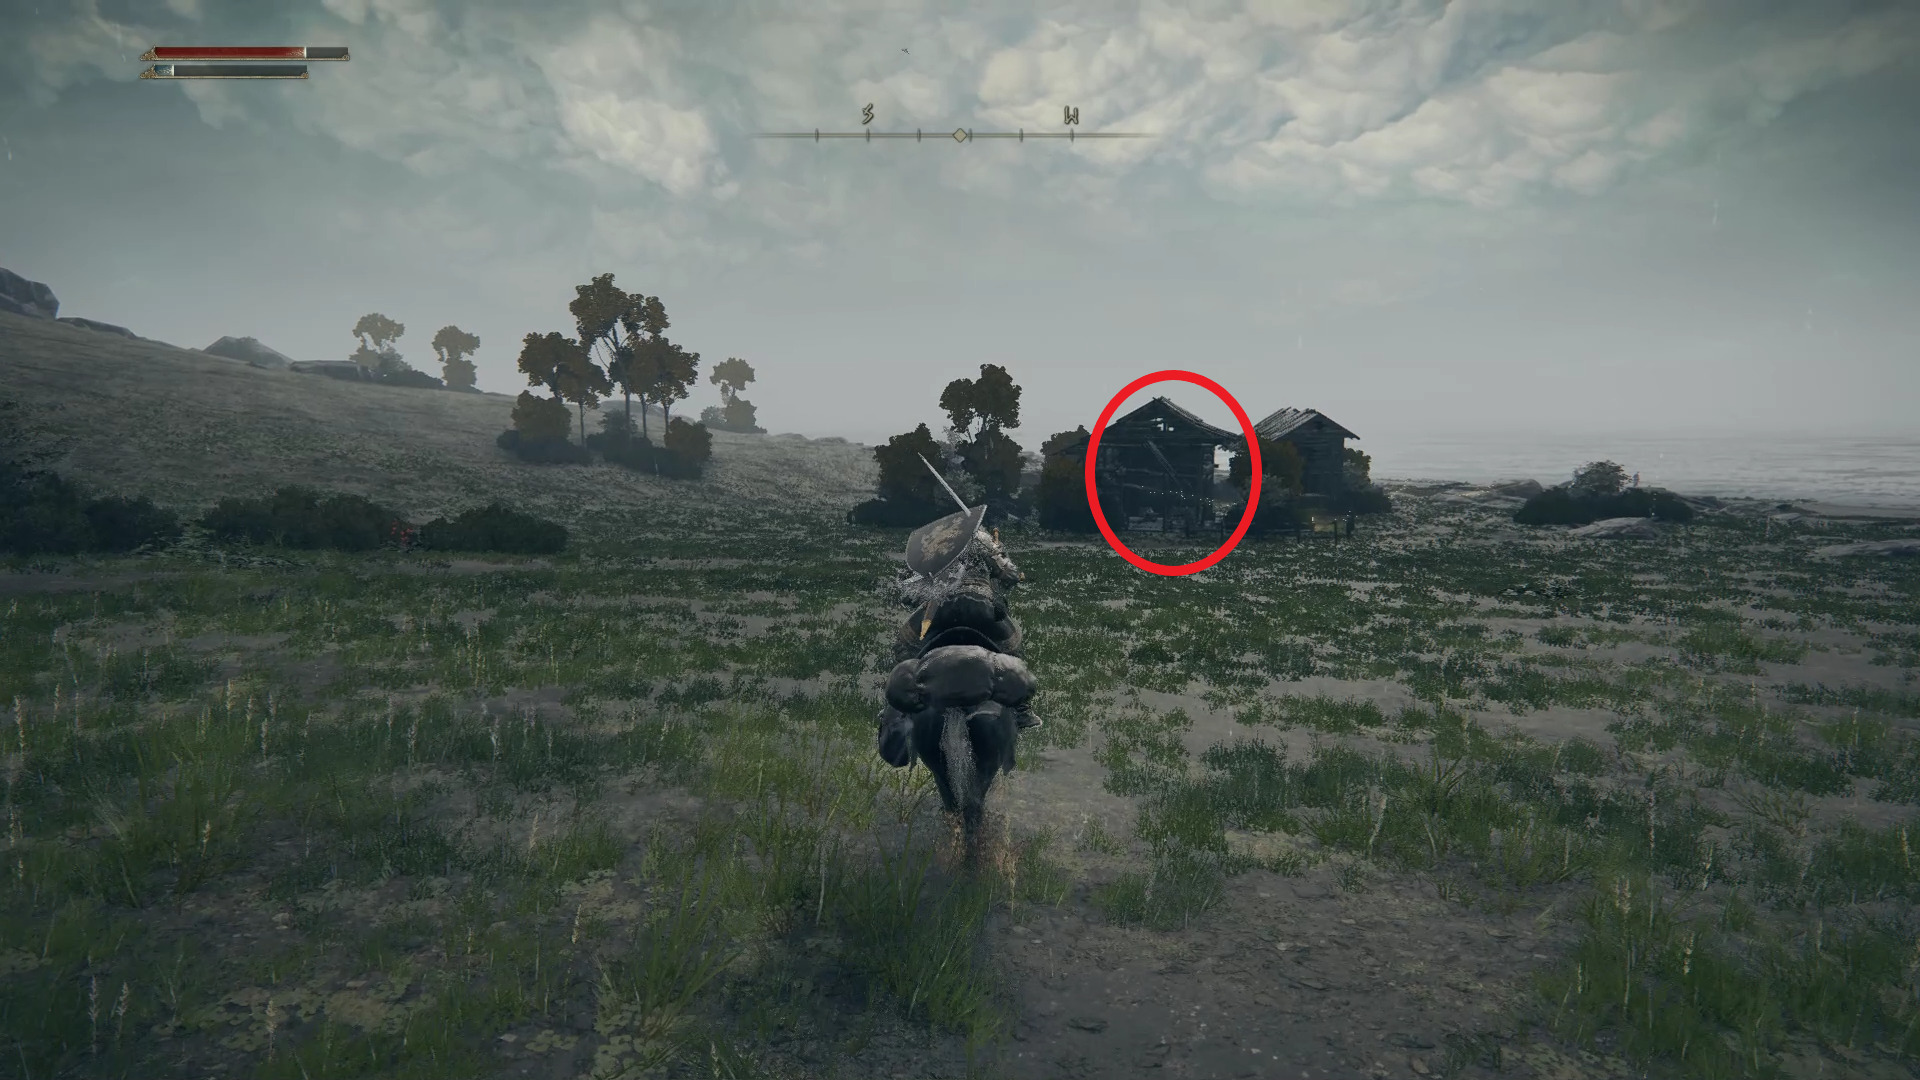
When you come out of the dungeon, head to another nearby church: the Fourth Church of Marika.
As with the previous church, you will find another Sacred Tear next to the statue and a site of grace. Once you’re done resting, there is another set of ruins that we can explore nearby. From the Fourth Church of Marika, head southwest to the Witchbane Ruins. One thing to note here is that the reason these ruins appear in green on your map, is that they are flooded with poison. While exploring, looting and killing, stay mounted on your trusty steed as it appears that Torrent is immune to poison. Additionally, while there are a few rather basic enemies, one of them can be more troublesome than the rest.
Well, it would be troublesome if it had legs. You can completely ignore this enemy as it will never chase after you, and the only reward for killing it is a miniscule amount of runes as well as 1x Mushroom growing next to him. One important thing to visit here is the basement. As always, locate the set of stairs that leads to the basement, which is where you will find the Ambush Shard sorcery, as well as a trapped sorcerer looking a lot like Sorceress Sellen from Limgrave. Do not attack the NPC, as that will not free her. Instead, you will need to progress through Sellen’s quest in order to free this NPC.
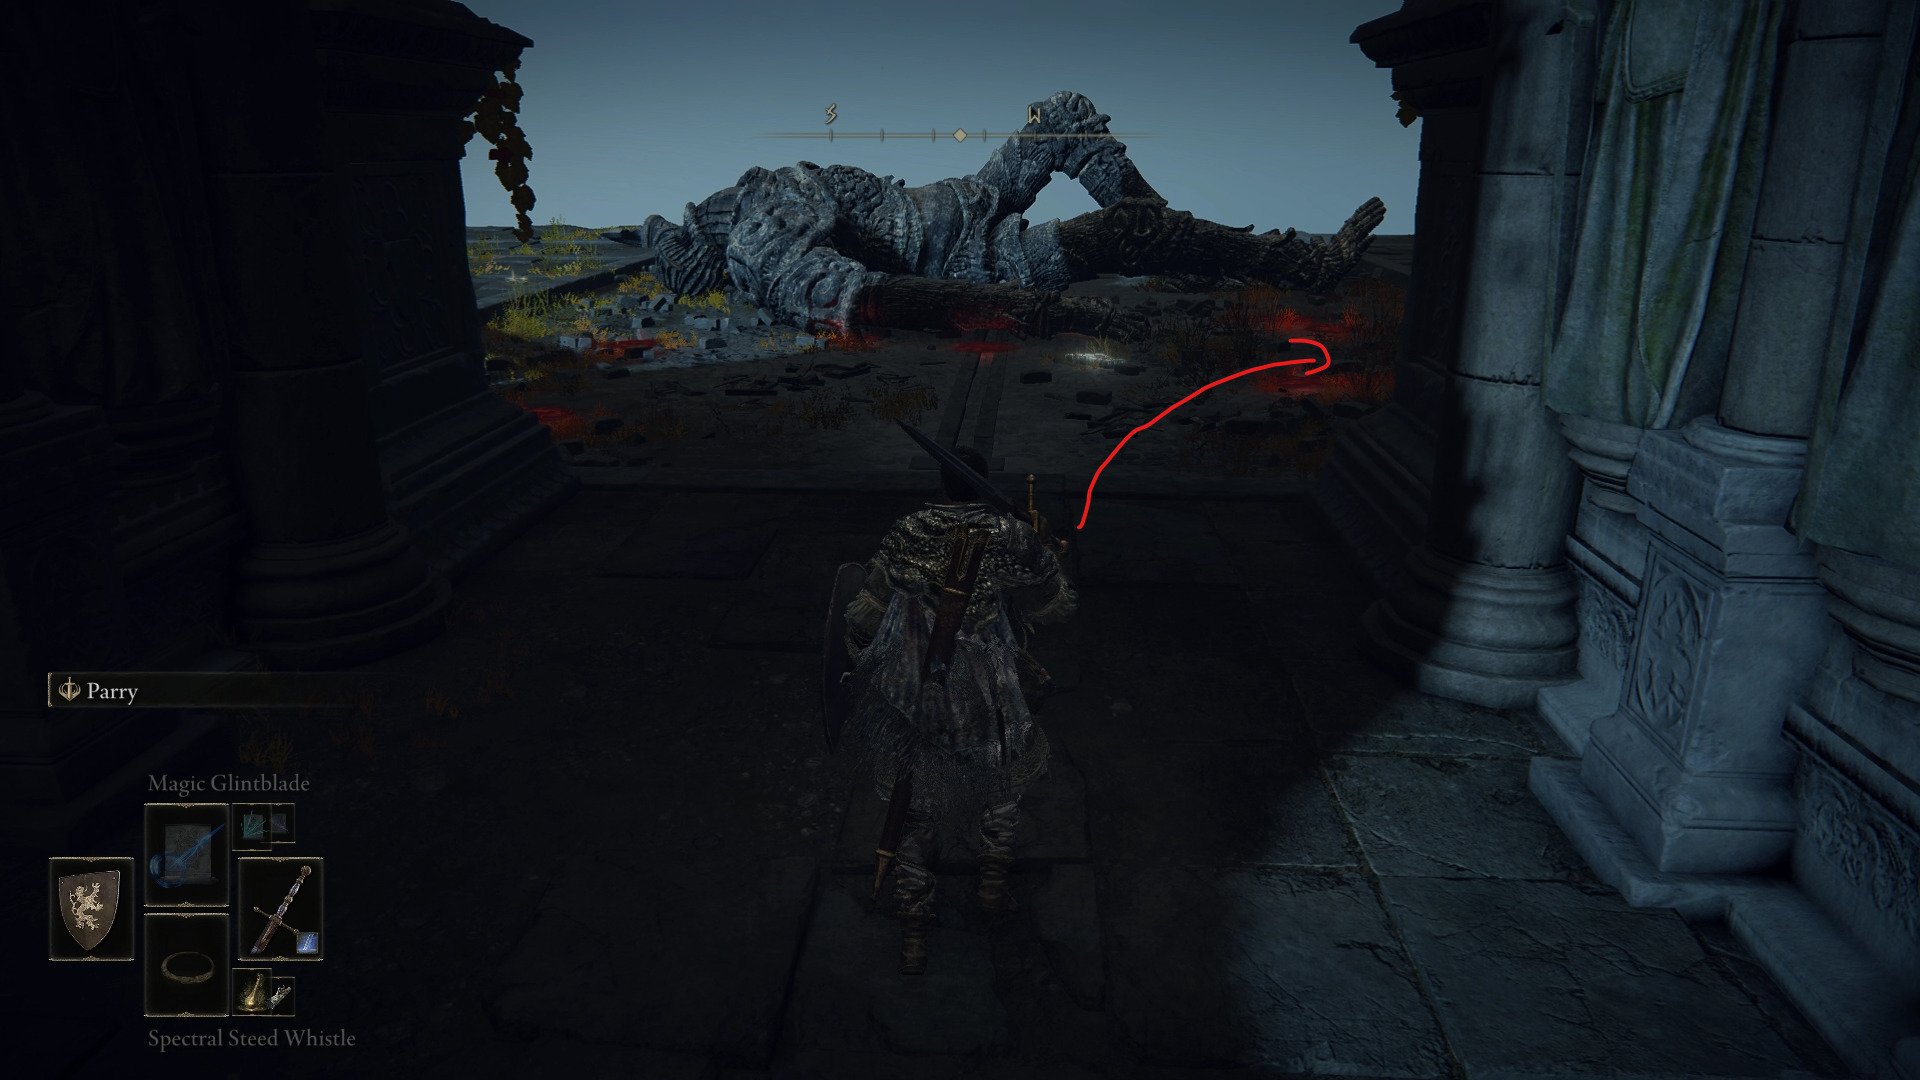
Let’s now turn our attention towards the Walking Mausoleum nearby. You no doubt noticed the huge creature walking around the nearby clearing.
To be able to enter the Walking Mausoleum, we will first need a clue, very conveniently sold by a nearby merchant. While you don’t have to buy the item to access the creature, you should still visit the Isolated Merchant’s Shack and grab its site of grace.
We can now work on gaining access to the Walking Mausoleum.
How to Enter the Walking Mausoleum
The merchant in the Isolated Merchant’s Shack sells a clue on how to stop the Walking Mausoleum. This clue says the following:
“To stop the Mausoleum’s stride, you’ll need to clean up around its feet first.”
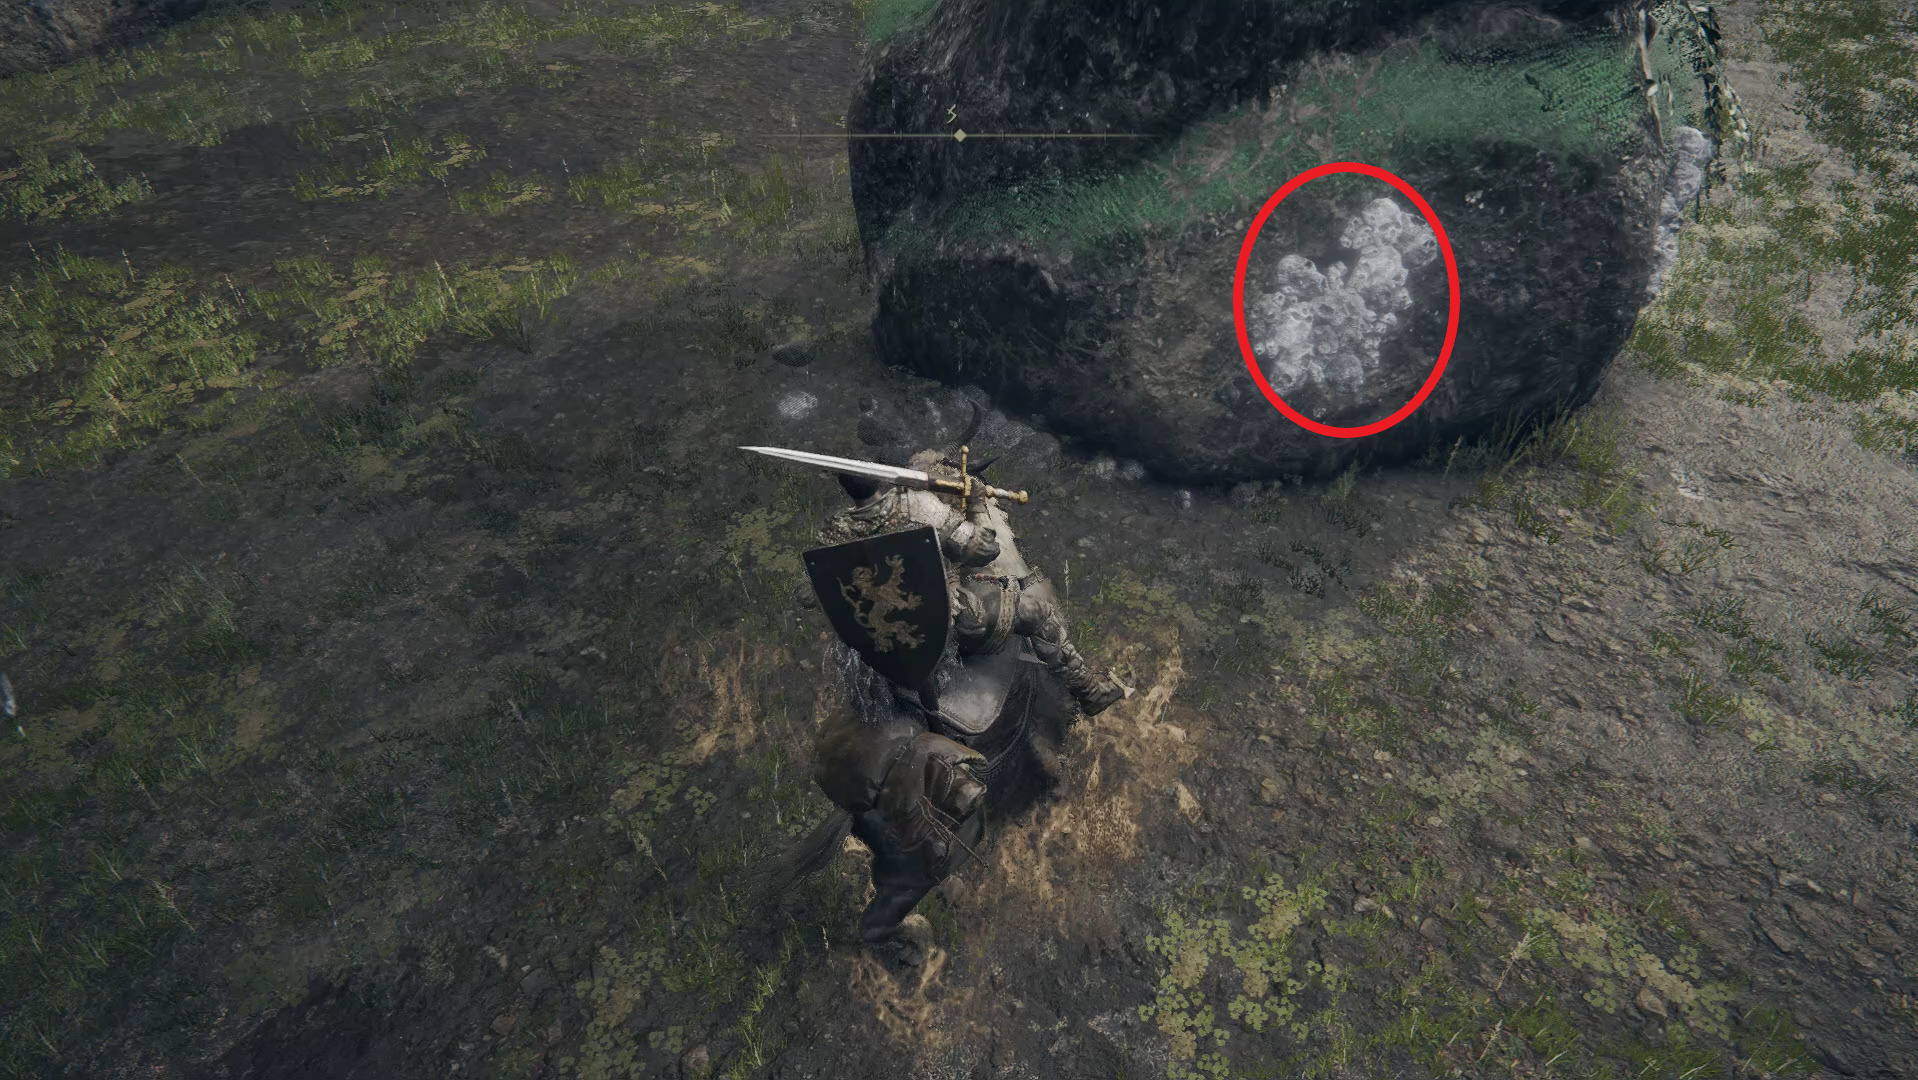
This being Elden Ring, violence is the solution. Run up to the Mausoleum’s feet, and wait for him to stop. While it will usually be stomping around, there are times where the mausoleum stops for a few moments. This is your window to safely run up to to one of its feet and start attacking the white skulls that are stuck to its feet.
You will be able to get several hits in before having to run out, so it will take you a few attempts to completely clean one of its legs. While this is relatively safe, you will still need to be attentive to the mausoleum’s movement as to not become another stain on its rocky feet.
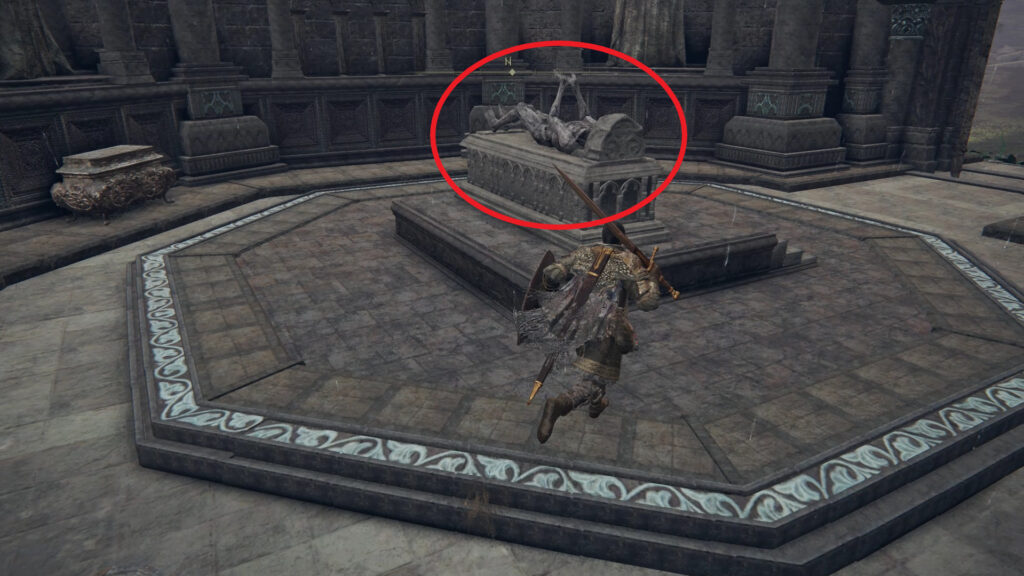
Once you finish cleaning its second foot, you have to immediately run out from under the mausoleum as it will be starting to stop, causing several boulders to fall from its bottom. Shortly after stopping, it will get low enough for you to access the mausoleum’s door, which leads to a room with a tomb that can be used for Remembrance Duplication.
The duplication allows you to duplicate a previously acquired Remembrance, such as Remembrance of the Grafted. These remembrances allow you to either get a large number of runes, or can be traded for a weapon by speaking to the Finger Reader in Roundtable Hold. While the duplication includes remembrances that you already used, there is a limit of one duplication per mausoleum, so choose wisely.
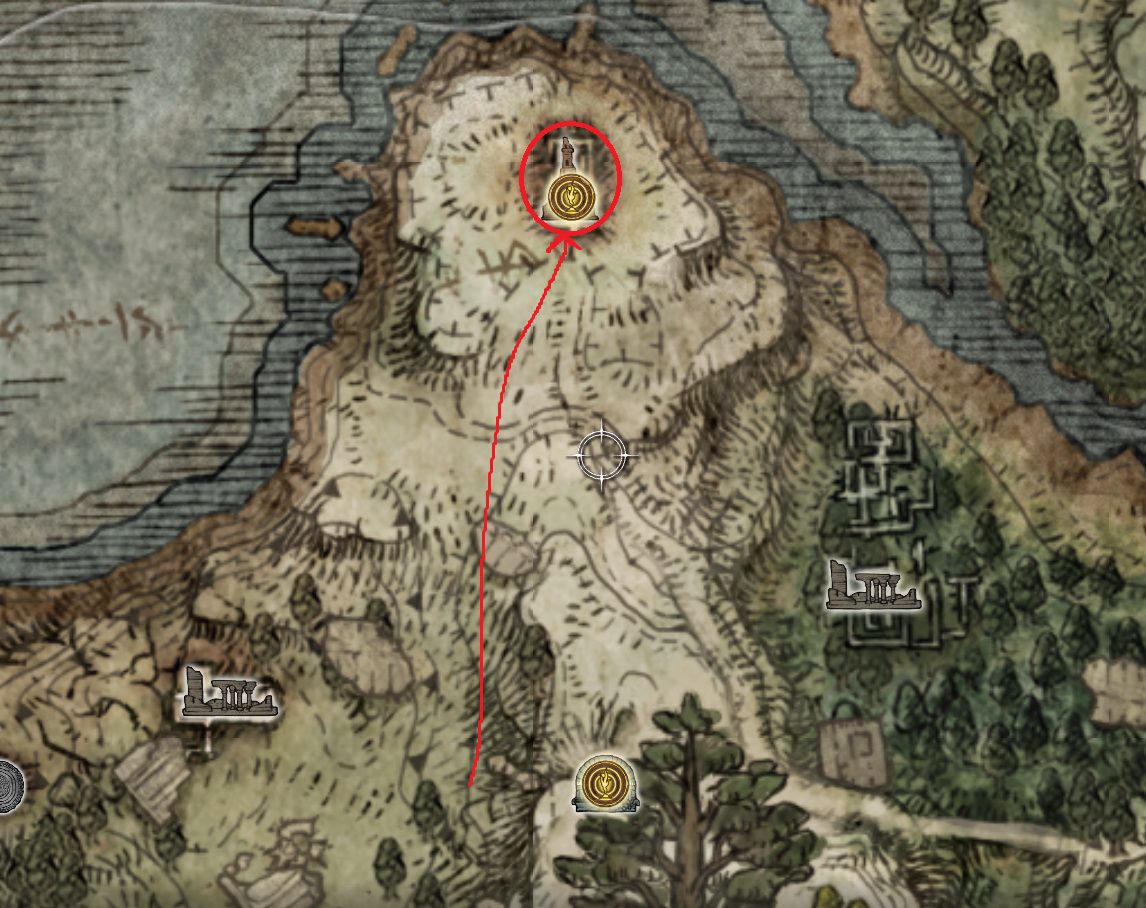
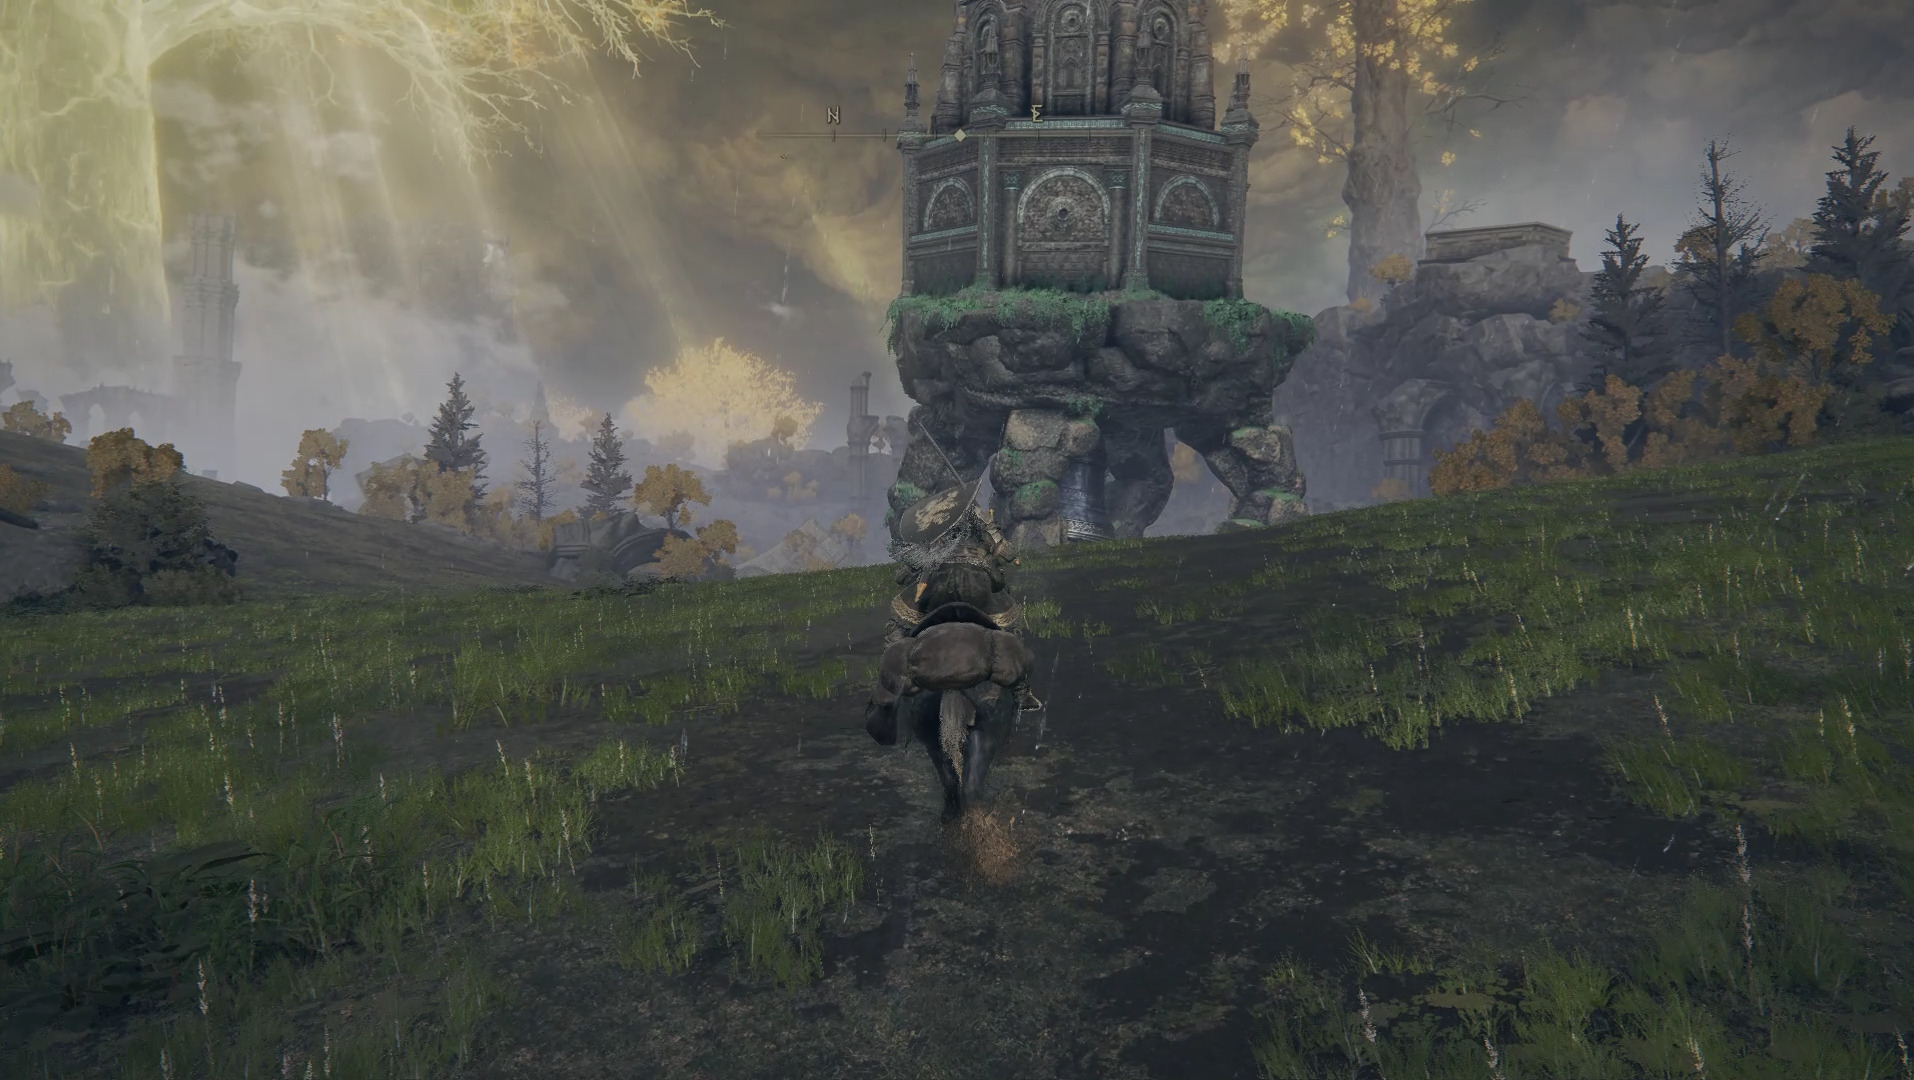
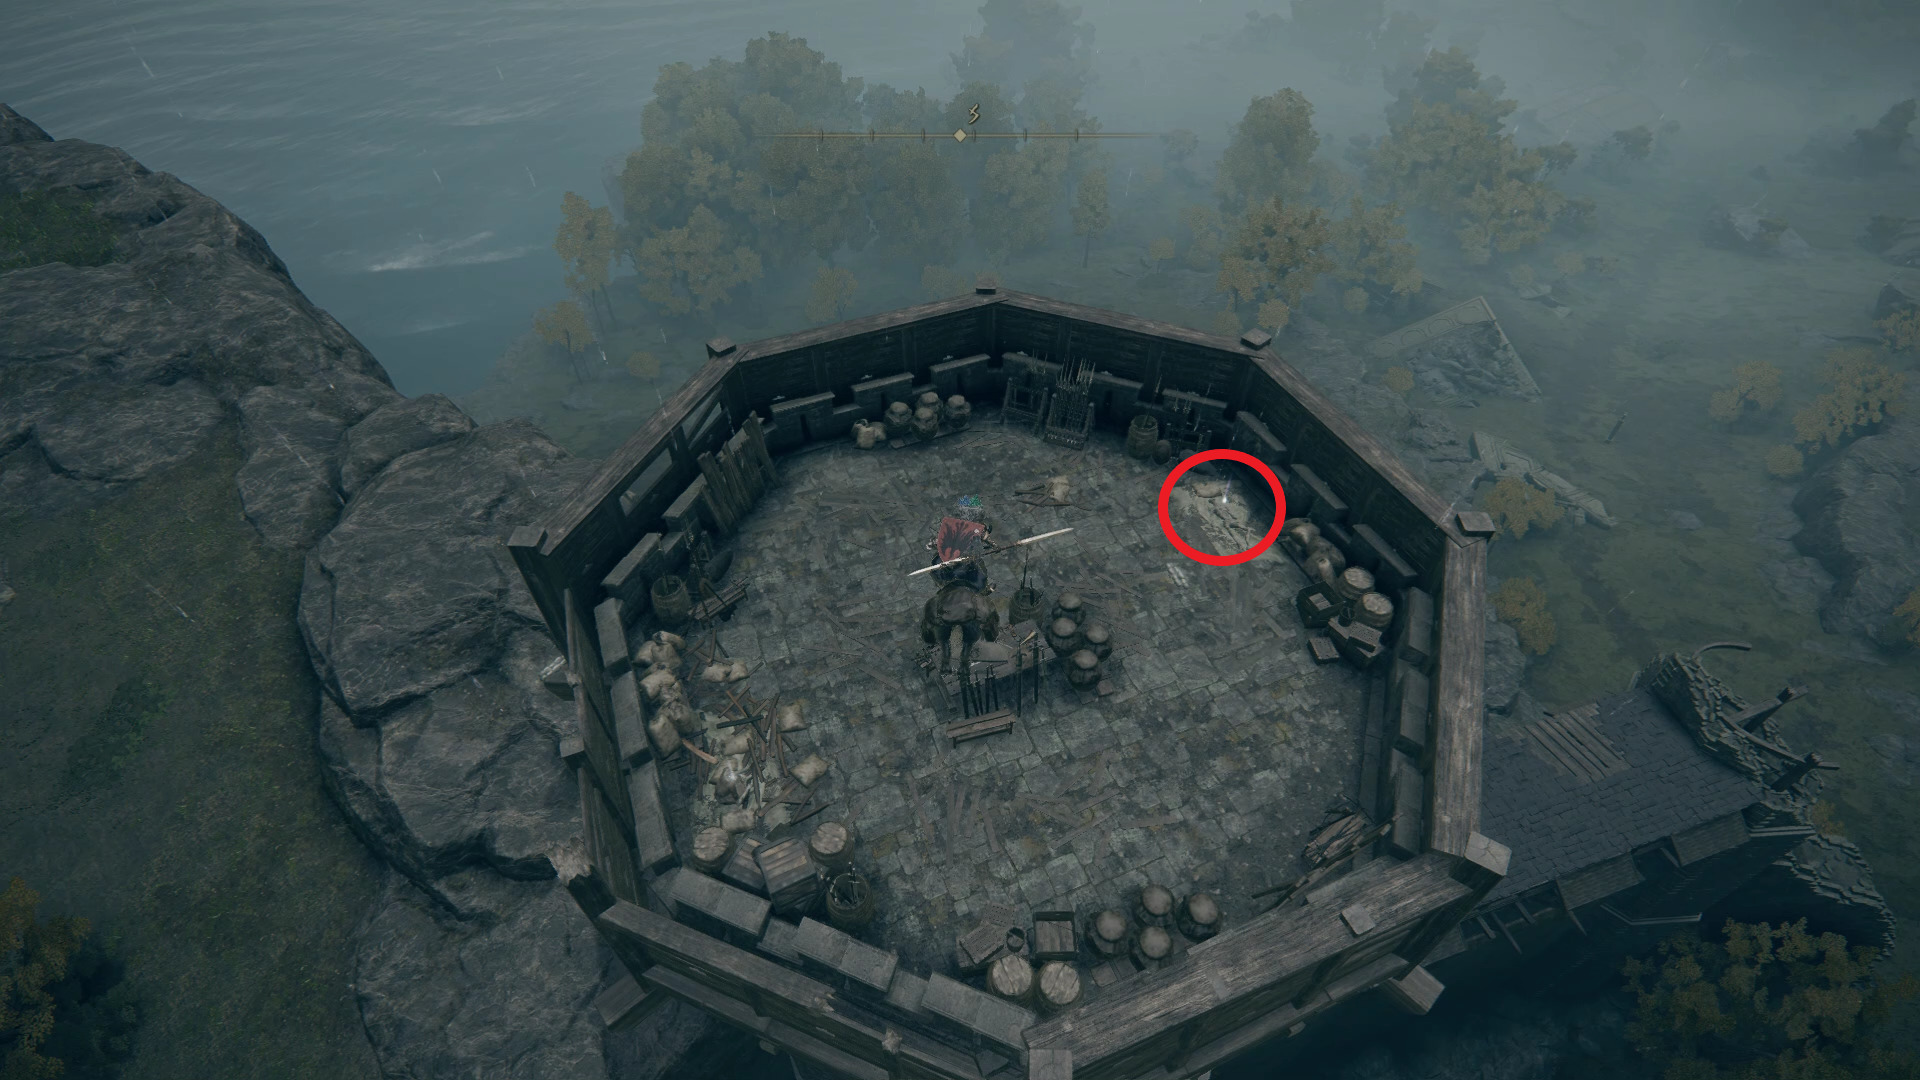
Now travel back to the Isolated Merchant’s Shack site of grace and start heading southeast. The place we’re looking for is the Tower of Return, located at the edge of the southeastern cliff.
This tower is heavily guarded by several soldiers, a mounted knight, and a ballista at the top of the tower. If you choose to engage the enemies in front of the tower, rush the knight first, and attack him and his horse until he falls off and becomes an easy target. The foot soldiers won’t stand a chance against you, and you won’t have to worry about the ballista if you stick close enough to the tower.
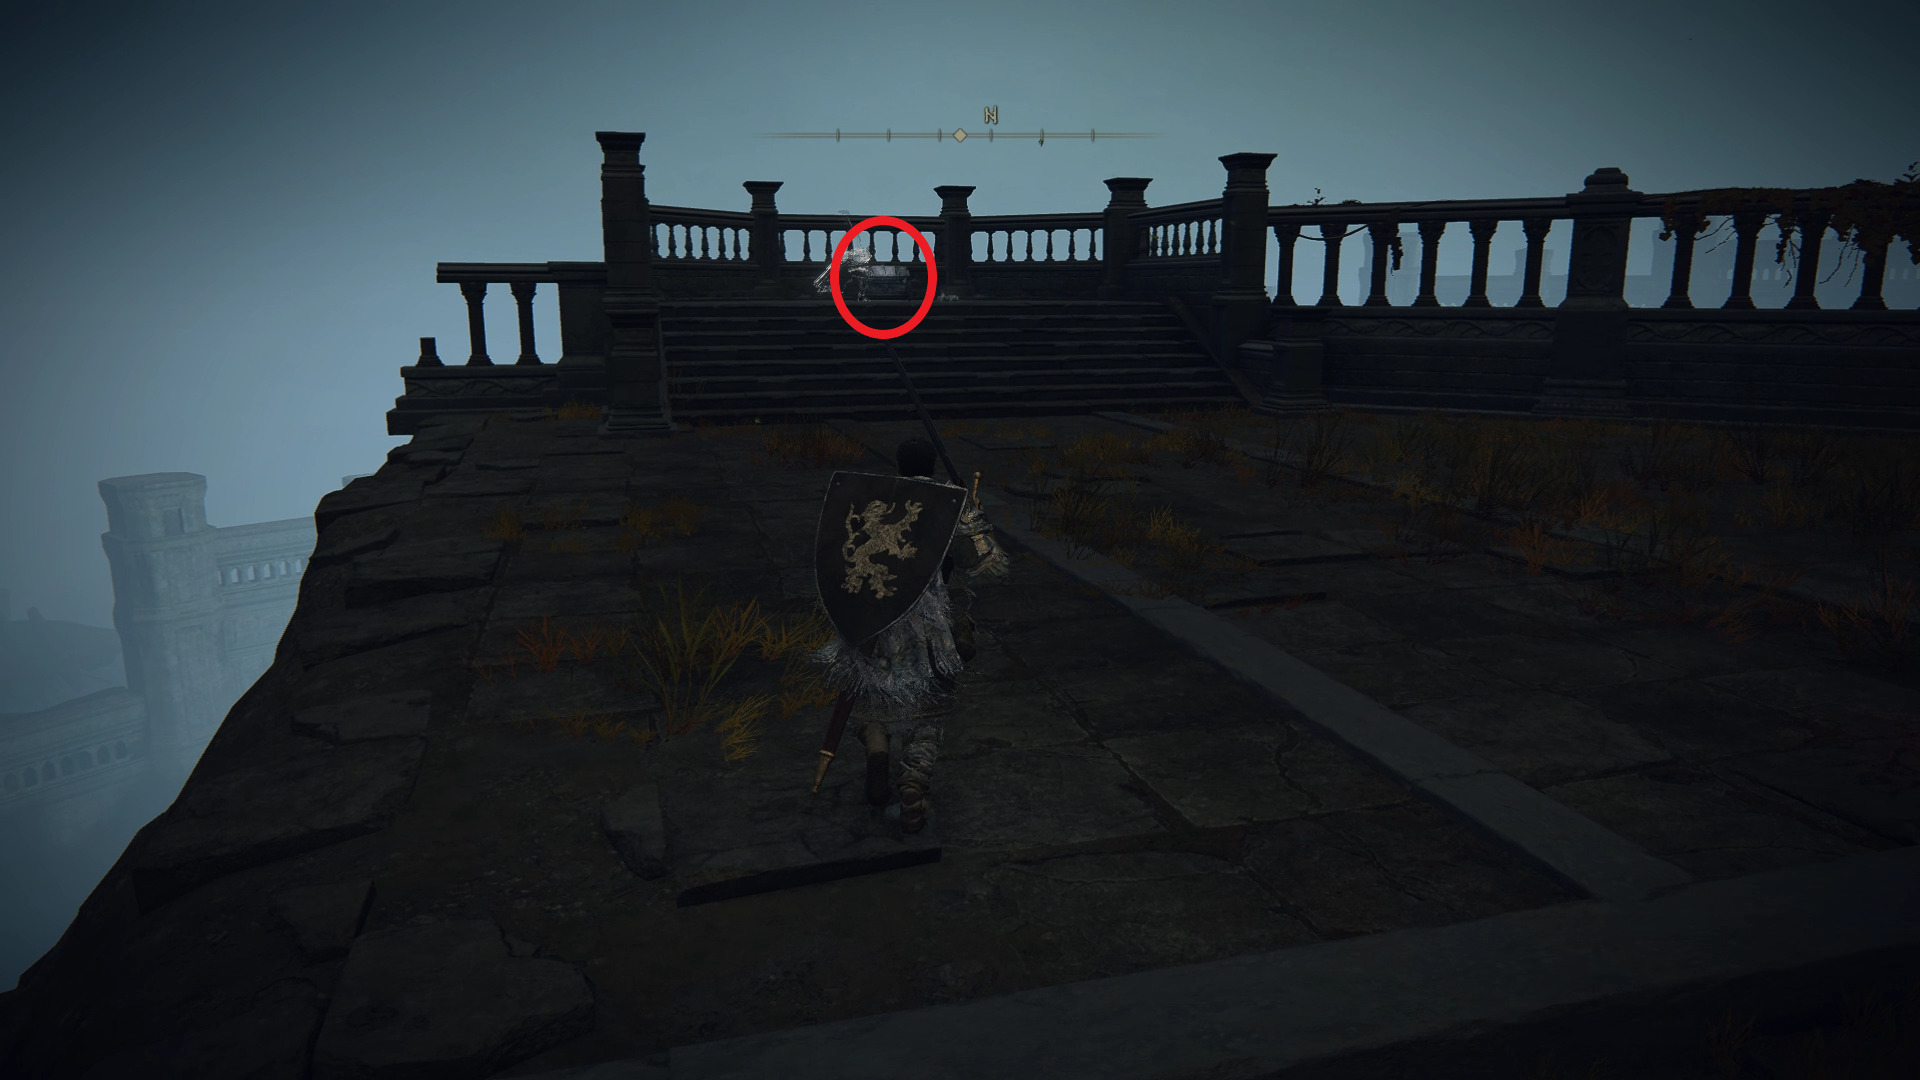
Alternatively, you can just run past the enemies and start climbing the tower. Even if they choose to follow you by climbing the ladder, it will not matter once you interact with the chest located at the very top of the tower, next to the ballista. This is another trapped chest that will teleport you away, but it’s worth opening nonetheless. Once you open the chest, you will be transported to Leyndell, the Royal Capital.
Unlike the trapped chest in Limgrave that made it really painful to go back, here you can grab the nearby Divine Bridge site of grace which will make you able to travel away from here. Instead of leaving, go through the door with the sleeping giant. While the giant is intimidating, he is fairly easy to deal with. His attacks are slow and predictable, and attacking his weak ankles will make him fall down, which will be an opportunity to initiate a critical attack at his chest. When he’s getting back up, use a couple charged attacks on his ankles and he will fall down again, which will leave him unable to retaliate altogether. Once he’s defeated, go right and loot the chest containing the Blessed Dew Talisman.
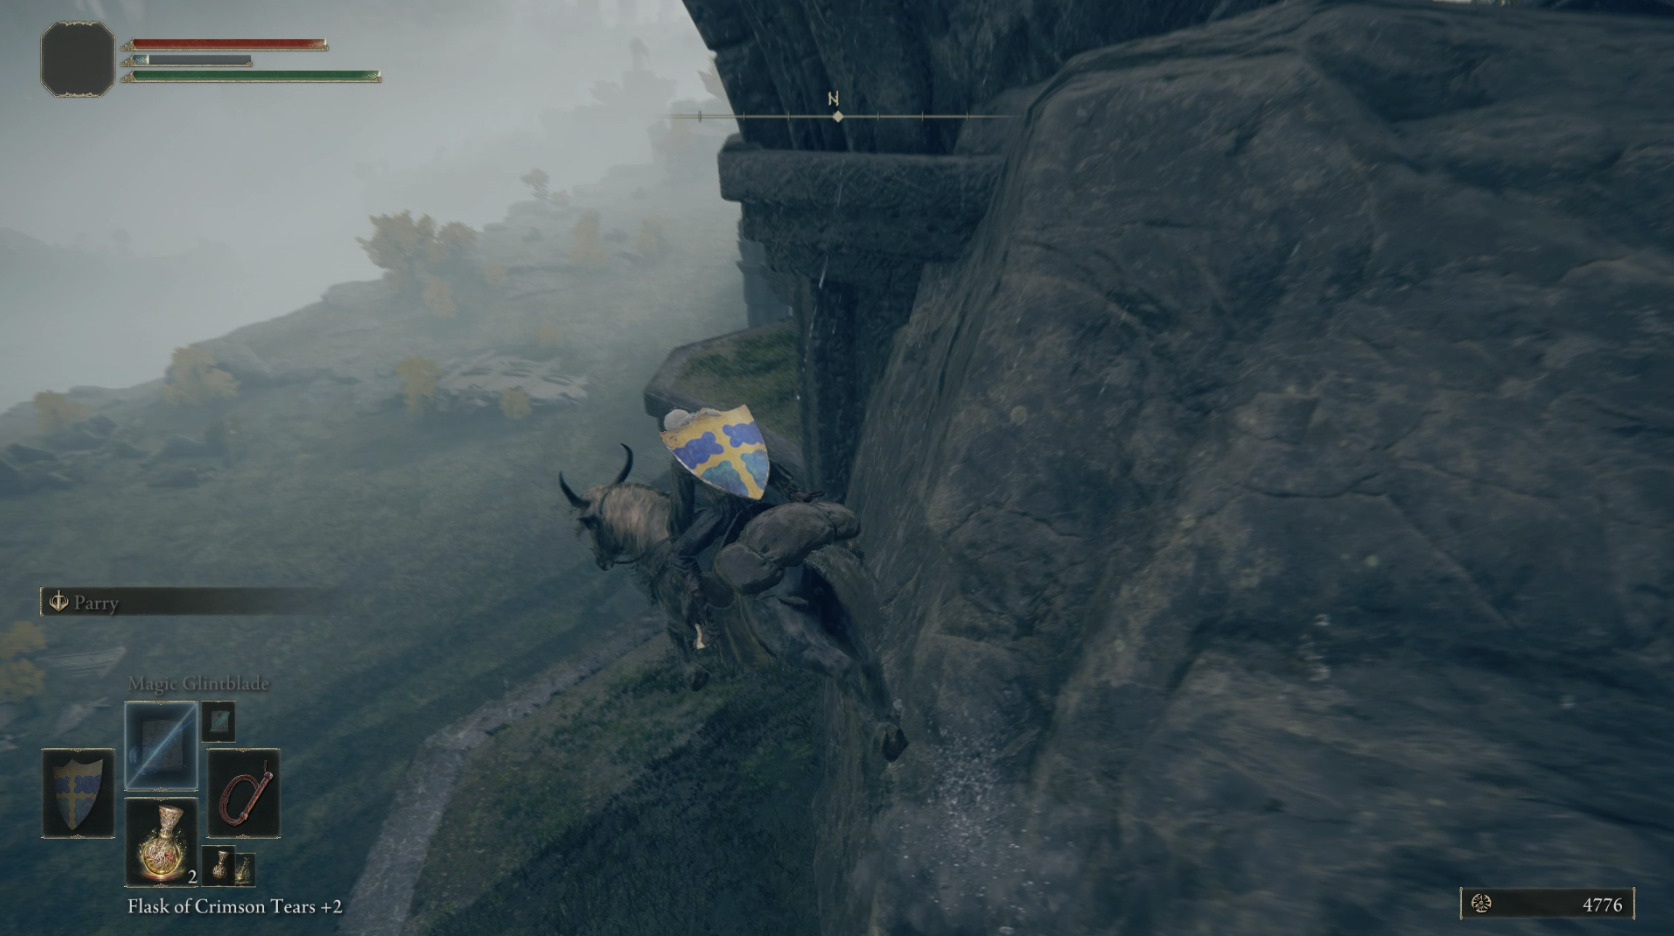
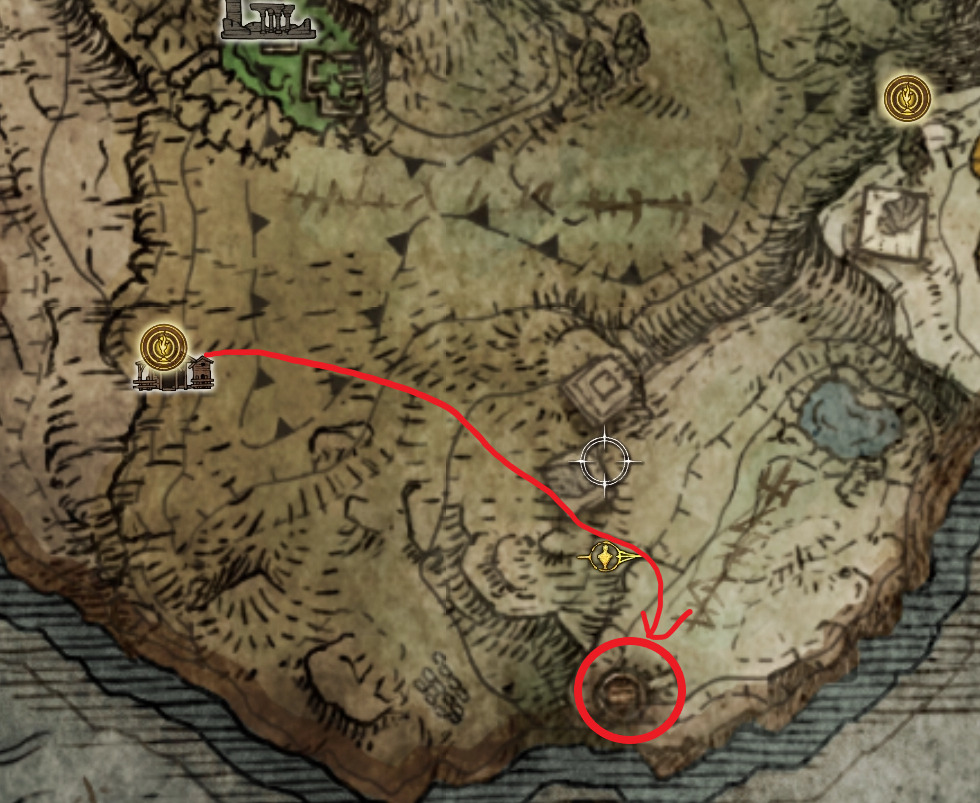
Travel to the Castle Morne Rampart site of grace look for the nearby spiritspring east from there. By using it to jump on top of the nearby located at the top of the cliff, you will be able to snag a Great Turtle Shell shield as well as a Warming Stone.
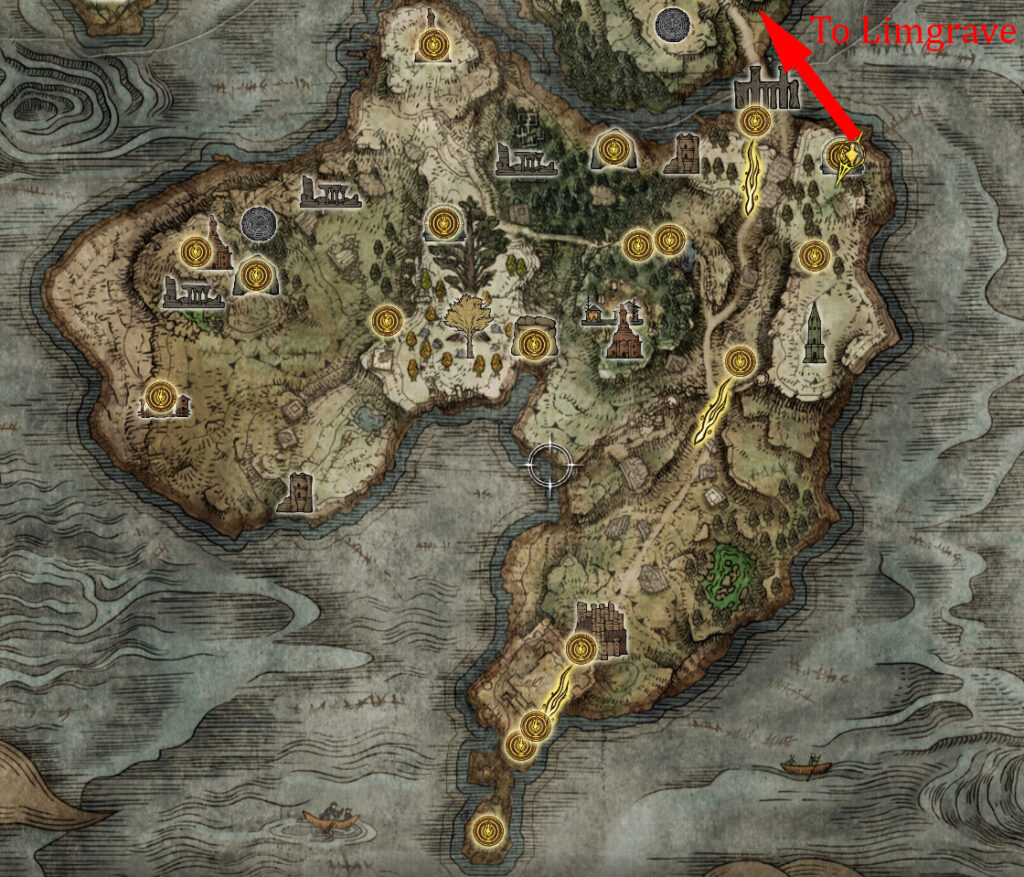
Southern Weeping Peninsula
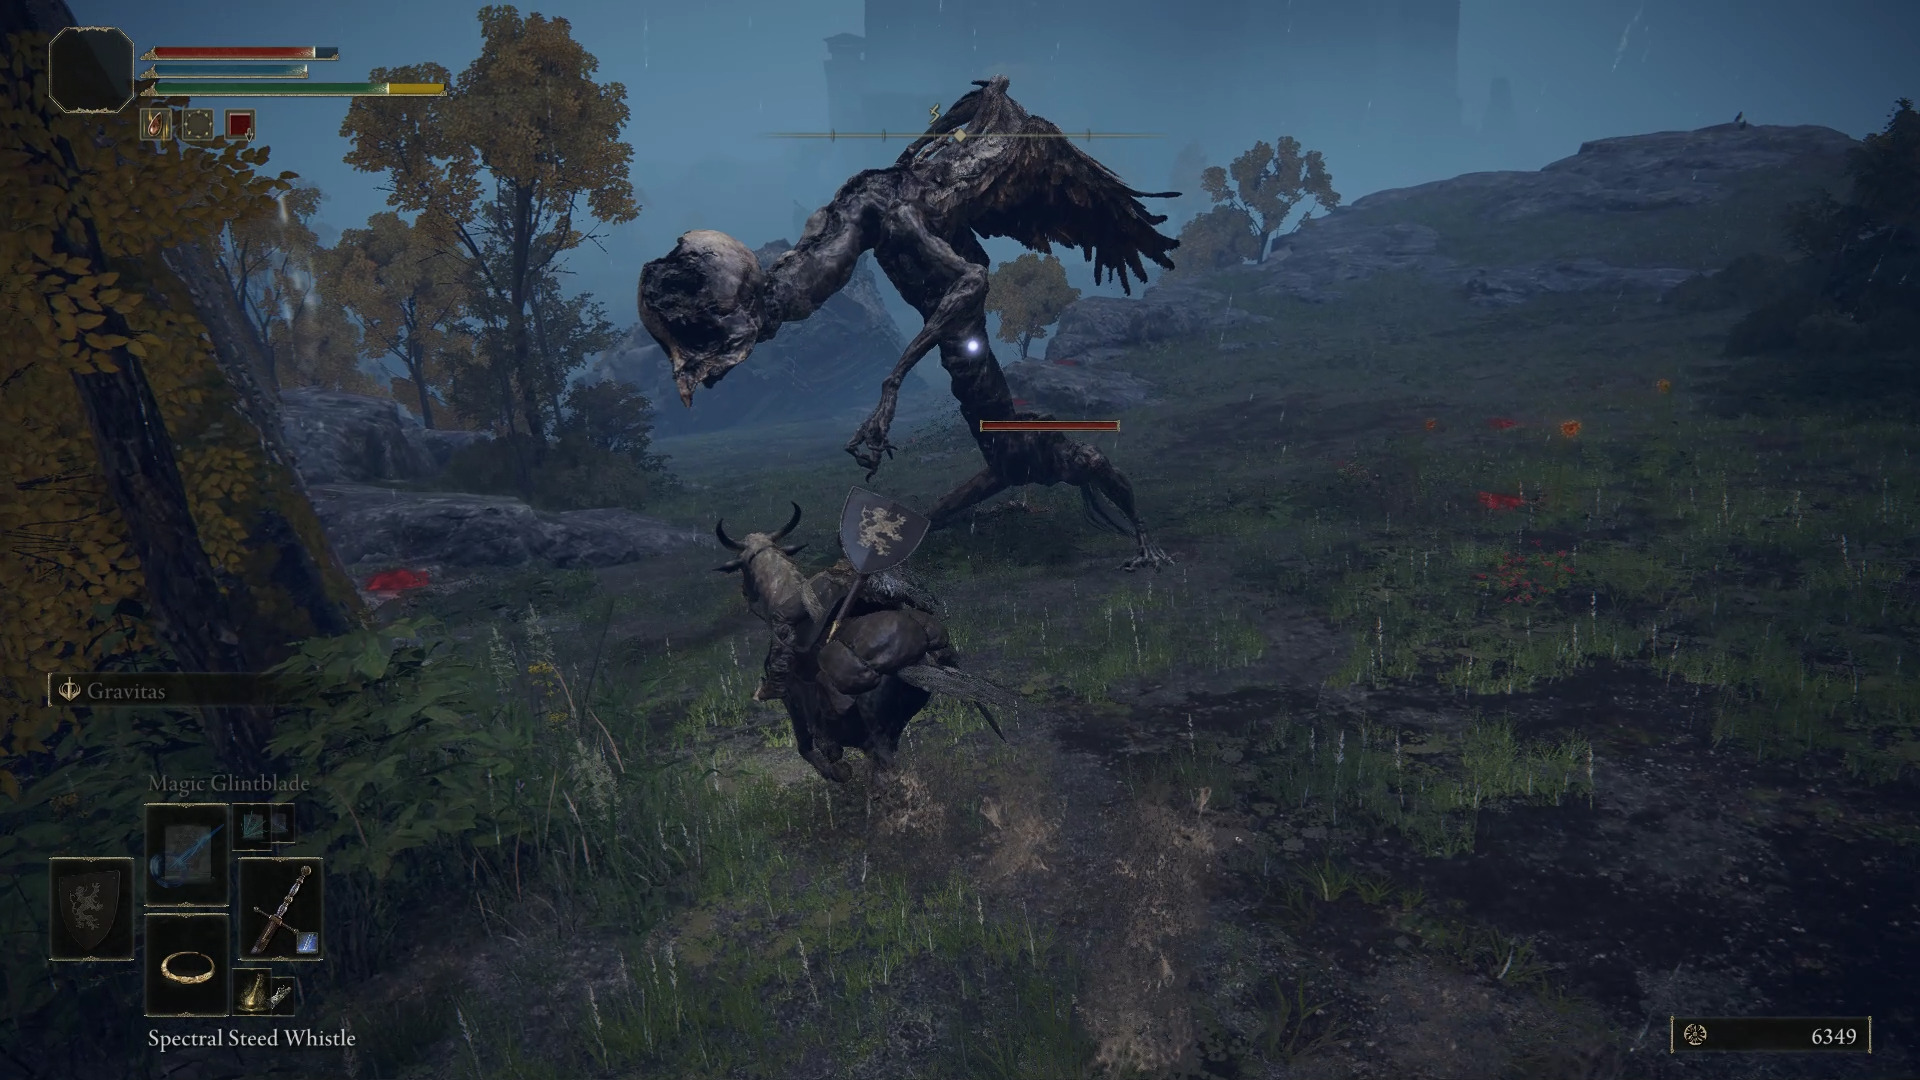
It’s time to head back to the Castle Morne Rampart site of grace and start exploring the area around Castle Morne. From the site of grace, head southwest to find another optional boss that appears at night: Deathbird.
Once you approach this area, Deathbird will fly down and the encounter will begin. Defeating this boss awards you with the Sacrificial Axe.
While exploring the rest of the area, you might notice a giant, shooting giant arrows with a giant bow. We can just ignore him for now as he will not be able to reach you from where he is.
Nearby, you can find a Golden Seed next to an Illusory Tree, so make sure to grab it before continuing to explore the area.
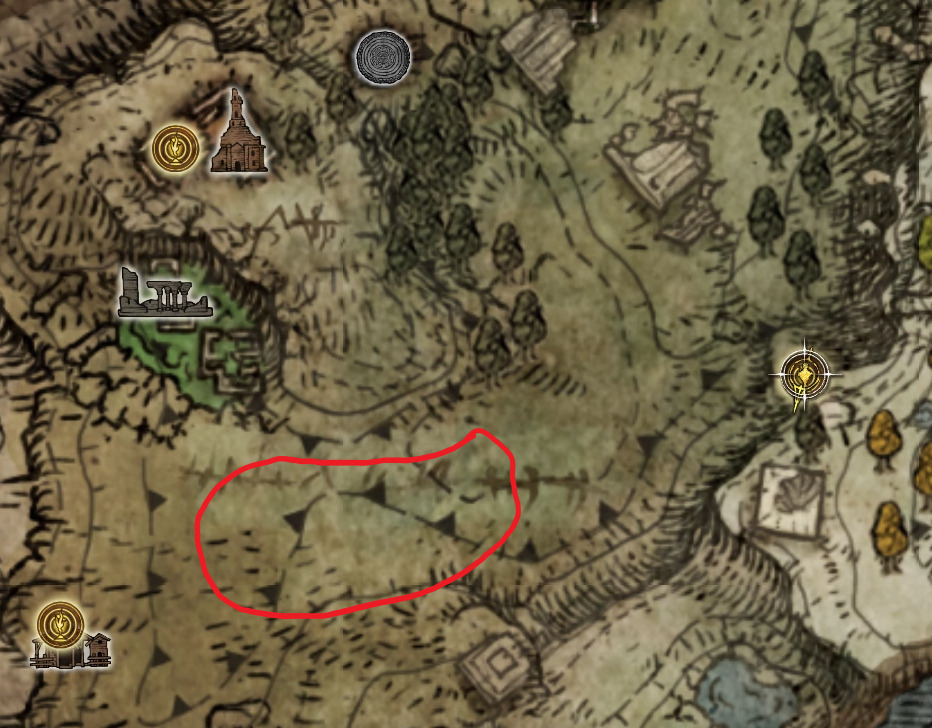
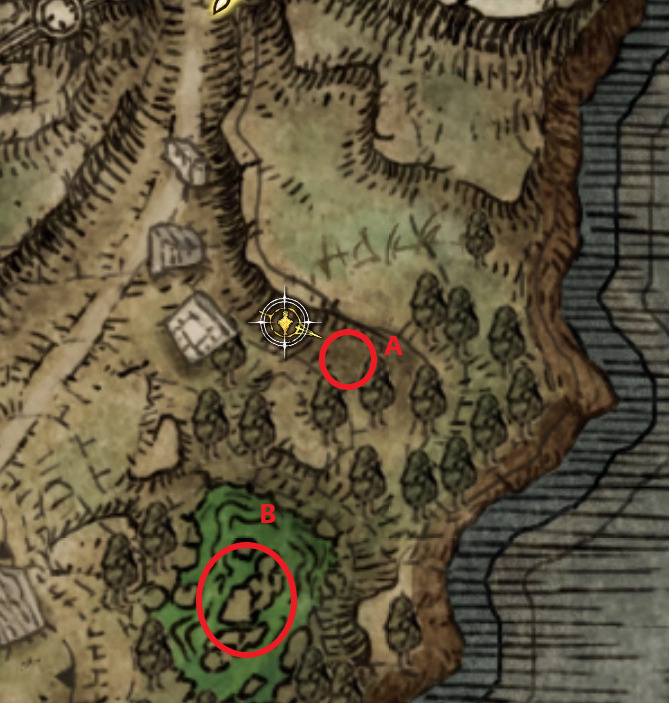
With the western side of the area explored, it’s time to head east. This side of the map is equally as quick to explore, but there are a couple items that you might want to get your hands on. First, kill the (A) loot beetle that drops the Poison Mist incantation. This loot beetle is quite slippery and will teleport around the small clearing as you try to go in for a hit. If you remain mounted and dash for the beetle as soon as it teleported away, you should be able to catch up to it without too much trouble. Once that’s done, visit the (B) poison pond, which is where you can find a few runes, and a lot of Poisonbloom. If you ever need to stock up on Poisonbloom for any reason, this is a great place to do so as it’s very close to a site of grace, and you can ignore most of the enemies as you make your rounds.
While there is one more location to explore, it’s way too close to the giant to be able to comfortably do so, so it’s time to deal with him. On the main road leading to Castle Morne, you can find several rocks and structures that you can use to hide behind while approaching the giant. Hide behind some cover until he shoots, and then dash towards the next hiding spot, inching ever closer to the giant’s weak ankles. Additionally, the giant will sometimes start slowly walking towards your hiding spot, but you might have to dismount and crouch for him to become curious enough to do so. Alternatively, you can approach the castle through the western beach, which will make it even easier to get close to the giant.
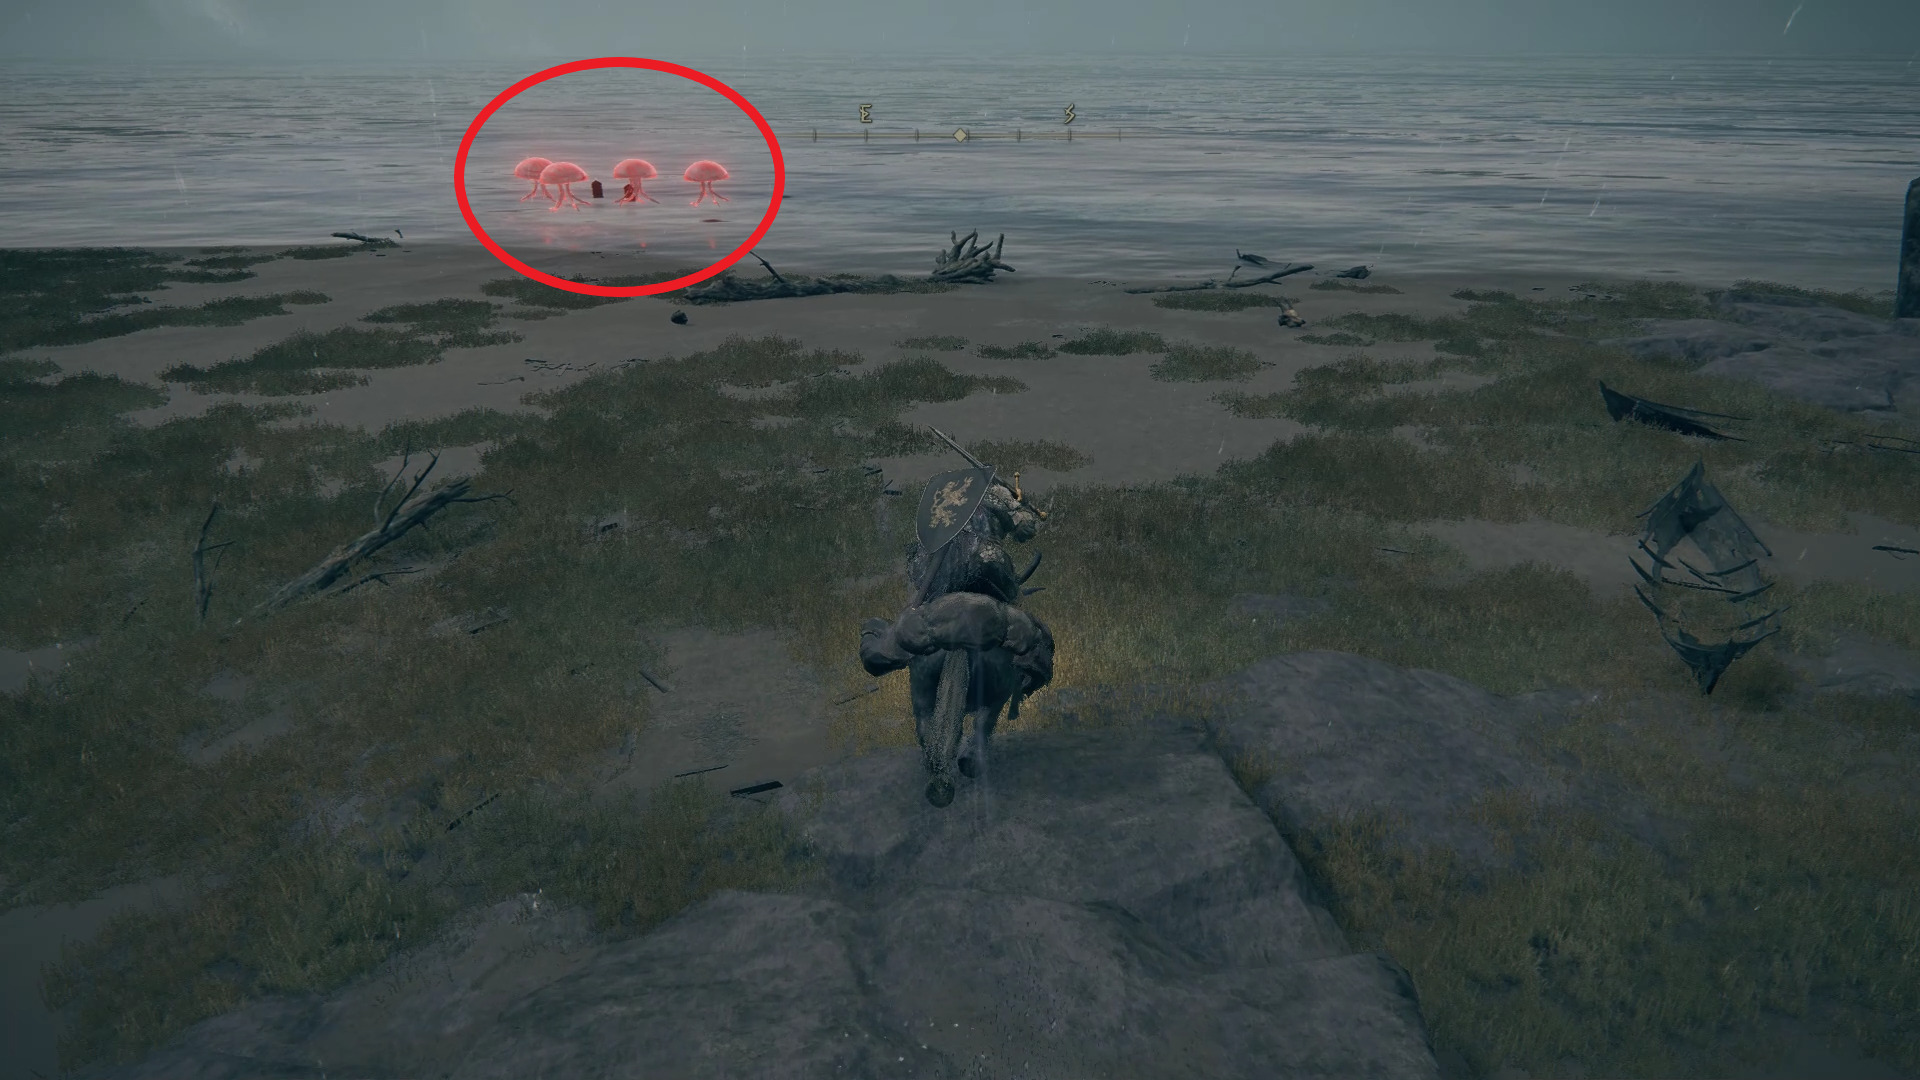
Once the giant has been dealt with, there is one last location you might want to visit. South of the poison pond, you can find a Somber Smithing Stone [2] and an Arteria Leaf guarded by several angry jellyfish.
With everything important looted in the Weeping Peninsula, we can finally enter its last dungeon: Castle Morne.
All that’s left now is to travel to the Bridge of Sacrifice site of grace and look for Irina. After reuniting Edgar with his daughter, you will have completed the entirety of the Weeping Peninsula.
Video game fan since TMNT: The Manhattan Project, I'm always on the lookout for games that could top Outer Wilds or Disco Elysium, or for new songs to listen to.
Thanks a lot for the kind words, glad you find it useful!
SREJ29
1 year ago
Loved this guide on my last run, the best around imo. Literally the only thing I think still worth mentioning from the Weeping Peninsula is that if you go to the pond North East of the Tower of Return you can get around 10 Gold Fireflies every time you visit (used to craft Gold-Pickled Fowl Feet, that you should use for as many boss encounters as possible!) Also, West of the tower is a rune graveyard (rune tombs?). Looking forward to the expansion!
Dynamic
2 years ago
Praise this mans work. He has achieved what no other information site has.
Kumitsu
2 years ago
Awesome guide man, as soon as I found this, bookmarked it and followed it to the letter. Thank you, I hope more will be released as I am a lost cause for this game. Again thanks for all you’ve done here.
Hey Kumitsu, thanks for your kinds words, so glad you’re finding our guides helpful! Wanted to let you know that we’re working really hard on getting the rest of our walkthrough out ASAP, so please bear with us and look for updates (which should be almost daily).
Josh
2 years ago
Just stumbled upon your guide and just wanted to say thank you. It’s really well laid out and easy to follow.
For any whom may struggle to defeat the deathbird next to castle morne. Lure it towards the cliff edge to the west south west of the initiation point. Then stay under its legs. It constantly jumps around. It will throw itself off the cliff. Cheers
TripleHTv
2 years ago
Great guide. There is something that I found that you might add. Once you drop[ through the broken wall and defeat the praying enemy and 2 ranged enemies, there are actually 3 routes. A takes you to edgar and B takes you continuing through the castle. But to the right is a ladder down that has two enemies. (One which is lying in ambush behind crates. Next to second enemy is a smithing stone (2)
digitalkill
2 years ago
Hey great guide, Helped me find a few items I was missing.
One thing however, I don’t know if you guys have found it and haven’t updated it yet. but slightly east of the “Castle Morne Rampart” grace there is a power jump (Don’t know if that’s the correct term.) that lets you land on top of the tower where you can find a “Warming Stone” and some runes (This one I don’t remember)
I noticed this response was a couple months old and maybe you haven’t had a chance to check it out yet, but there is also a turtle shell shield on top of the tower.
There is also a Stonesword Key on a corpse sitting in a chair at the northern tip of the upper plateau in Eastern Weeping Peninsula (just north of and above Impaler’s Catacombs).
wubiwuster
2 years ago
thank you SO MUCH for this. I just finished weeping peninsula bc of u. Hoping for daily updates so I can beat the game.
Bushy
2 years ago
great stuff, but weeping penninsula, you missed tombsward cave, its south of 4th church of maricka
damn, i haven’t even finish eploring stormveil castle even though i had defeated Godric. it’s a castle deep and wide enough, now even the weeping peninsula is that wide.
Yggdrasil
2 years ago
Love that there is so much time spent on a walkthrough. But there is 1 thing, that keeps coming back, that i actually hate with a passion. 1 example would be:
Once you grabbed your hard-earned tears, turn around and start heading north to the ruined church in the distance.
Than you add a picture with details, so at that point most ppl would open their map, pinpoint it, and as the walkthrough just said, start heading to the destination. Once arrived, i would proceed reading the guide which goes as following: Before you head north to the church, you can grab the Eclipse Crest Heater Shield if you like.
Like… seriously??? U just made me run elsewhere… why not give all info before you send ppl to the other side of the map 😅 why not, before u head north, grab the shield at said spot, and continue to the next spot. And this example i gave, this is aaaaaallll over the walkthrough. If you are like me, ADHD for the win, you will run so many extra miles following this guide 😳
Thank you for the feedback, it’s always helpful to get a better understanding of how people use our guides. I can see how that section is formatted could lead to frustration.


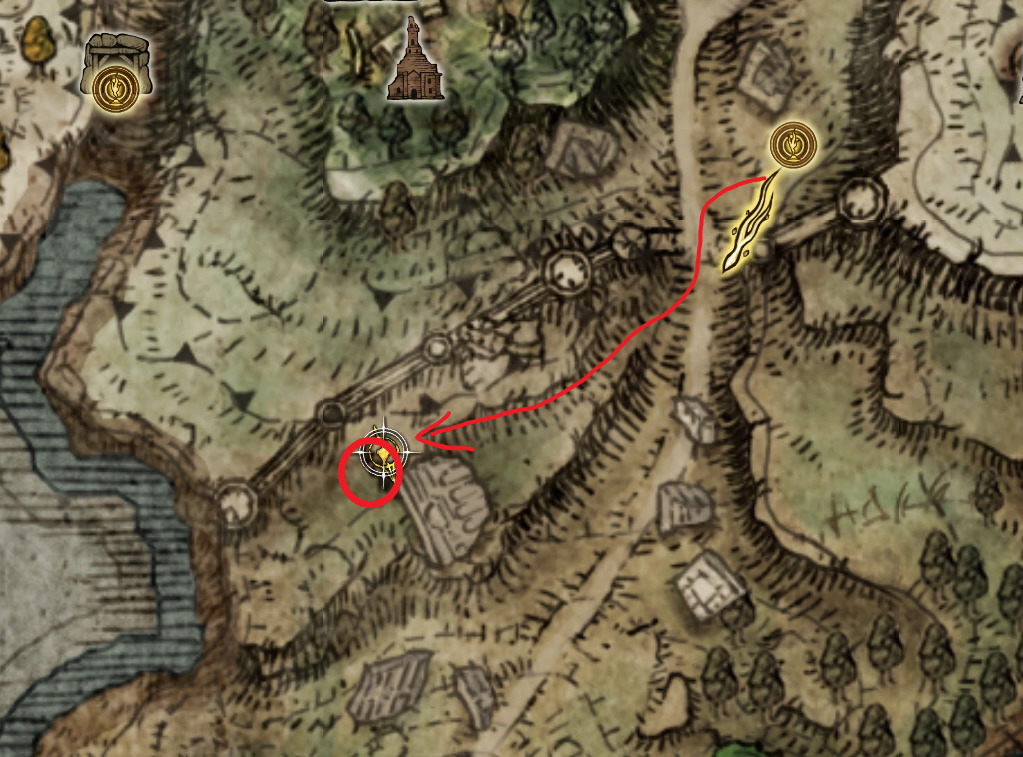

![weeping peninsula somber smithing stone [2] location map elden ring](https://eip.gg/wp-content/uploads/2022/02/weeping-peninsula-somber-smithing-stone-2-location-map-elden-ring.jpg)


Thank you so much for your work on this. It’s a really great walk-through and beautifully organized.
Thanks a lot for the kind words, glad you find it useful!
Loved this guide on my last run, the best around imo. Literally the only thing I think still worth mentioning from the Weeping Peninsula is that if you go to the pond North East of the Tower of Return you can get around 10 Gold Fireflies every time you visit (used to craft Gold-Pickled Fowl Feet, that you should use for as many boss encounters as possible!) Also, West of the tower is a rune graveyard (rune tombs?). Looking forward to the expansion!
Praise this mans work. He has achieved what no other information site has.
Awesome guide man, as soon as I found this, bookmarked it and followed it to the letter. Thank you, I hope more will be released as I am a lost cause for this game. Again thanks for all you’ve done here.
Hey Kumitsu, thanks for your kinds words, so glad you’re finding our guides helpful! Wanted to let you know that we’re working really hard on getting the rest of our walkthrough out ASAP, so please bear with us and look for updates (which should be almost daily).
Just stumbled upon your guide and just wanted to say thank you. It’s really well laid out and easy to follow.
Much appreciated, thank you!
For any whom may struggle to defeat the deathbird next to castle morne. Lure it towards the cliff edge to the west south west of the initiation point. Then stay under its legs. It constantly jumps around. It will throw itself off the cliff. Cheers
Great guide. There is something that I found that you might add. Once you drop[ through the broken wall and defeat the praying enemy and 2 ranged enemies, there are actually 3 routes. A takes you to edgar and B takes you continuing through the castle. But to the right is a ladder down that has two enemies. (One which is lying in ambush behind crates. Next to second enemy is a smithing stone (2)
Hey great guide, Helped me find a few items I was missing.
One thing however, I don’t know if you guys have found it and haven’t updated it yet. but slightly east of the “Castle Morne Rampart” grace there is a power jump (Don’t know if that’s the correct term.) that lets you land on top of the tower where you can find a “Warming Stone” and some runes (This one I don’t remember)
Thanks digitalkill, glad it was helpful — and thank you for the tip! We’ll go take a look and adjust the guide accordingly.
I noticed this response was a couple months old and maybe you haven’t had a chance to check it out yet, but there is also a turtle shell shield on top of the tower.
There is also a Stonesword Key on a corpse sitting in a chair at the northern tip of the upper plateau in Eastern Weeping Peninsula (just north of and above Impaler’s Catacombs).
thank you SO MUCH for this. I just finished weeping peninsula bc of u. Hoping for daily updates so I can beat the game.
great stuff, but weeping penninsula, you missed tombsward cave, its south of 4th church of maricka
more like south east
damn, i haven’t even finish eploring stormveil castle even though i had defeated Godric. it’s a castle deep and wide enough, now even the weeping peninsula is that wide.
Love that there is so much time spent on a walkthrough. But there is 1 thing, that keeps coming back, that i actually hate with a passion. 1 example would be:
Once you grabbed your hard-earned tears, turn around and start heading north to the ruined church in the distance.
Than you add a picture with details, so at that point most ppl would open their map, pinpoint it, and as the walkthrough just said, start heading to the destination. Once arrived, i would proceed reading the guide which goes as following: Before you head north to the church, you can grab the Eclipse Crest Heater Shield if you like.
Like… seriously??? U just made me run elsewhere… why not give all info before you send ppl to the other side of the map 😅 why not, before u head north, grab the shield at said spot, and continue to the next spot. And this example i gave, this is aaaaaallll over the walkthrough. If you are like me, ADHD for the win, you will run so many extra miles following this guide 😳
Thank you for the feedback, it’s always helpful to get a better understanding of how people use our guides. I can see how that section is formatted could lead to frustration.