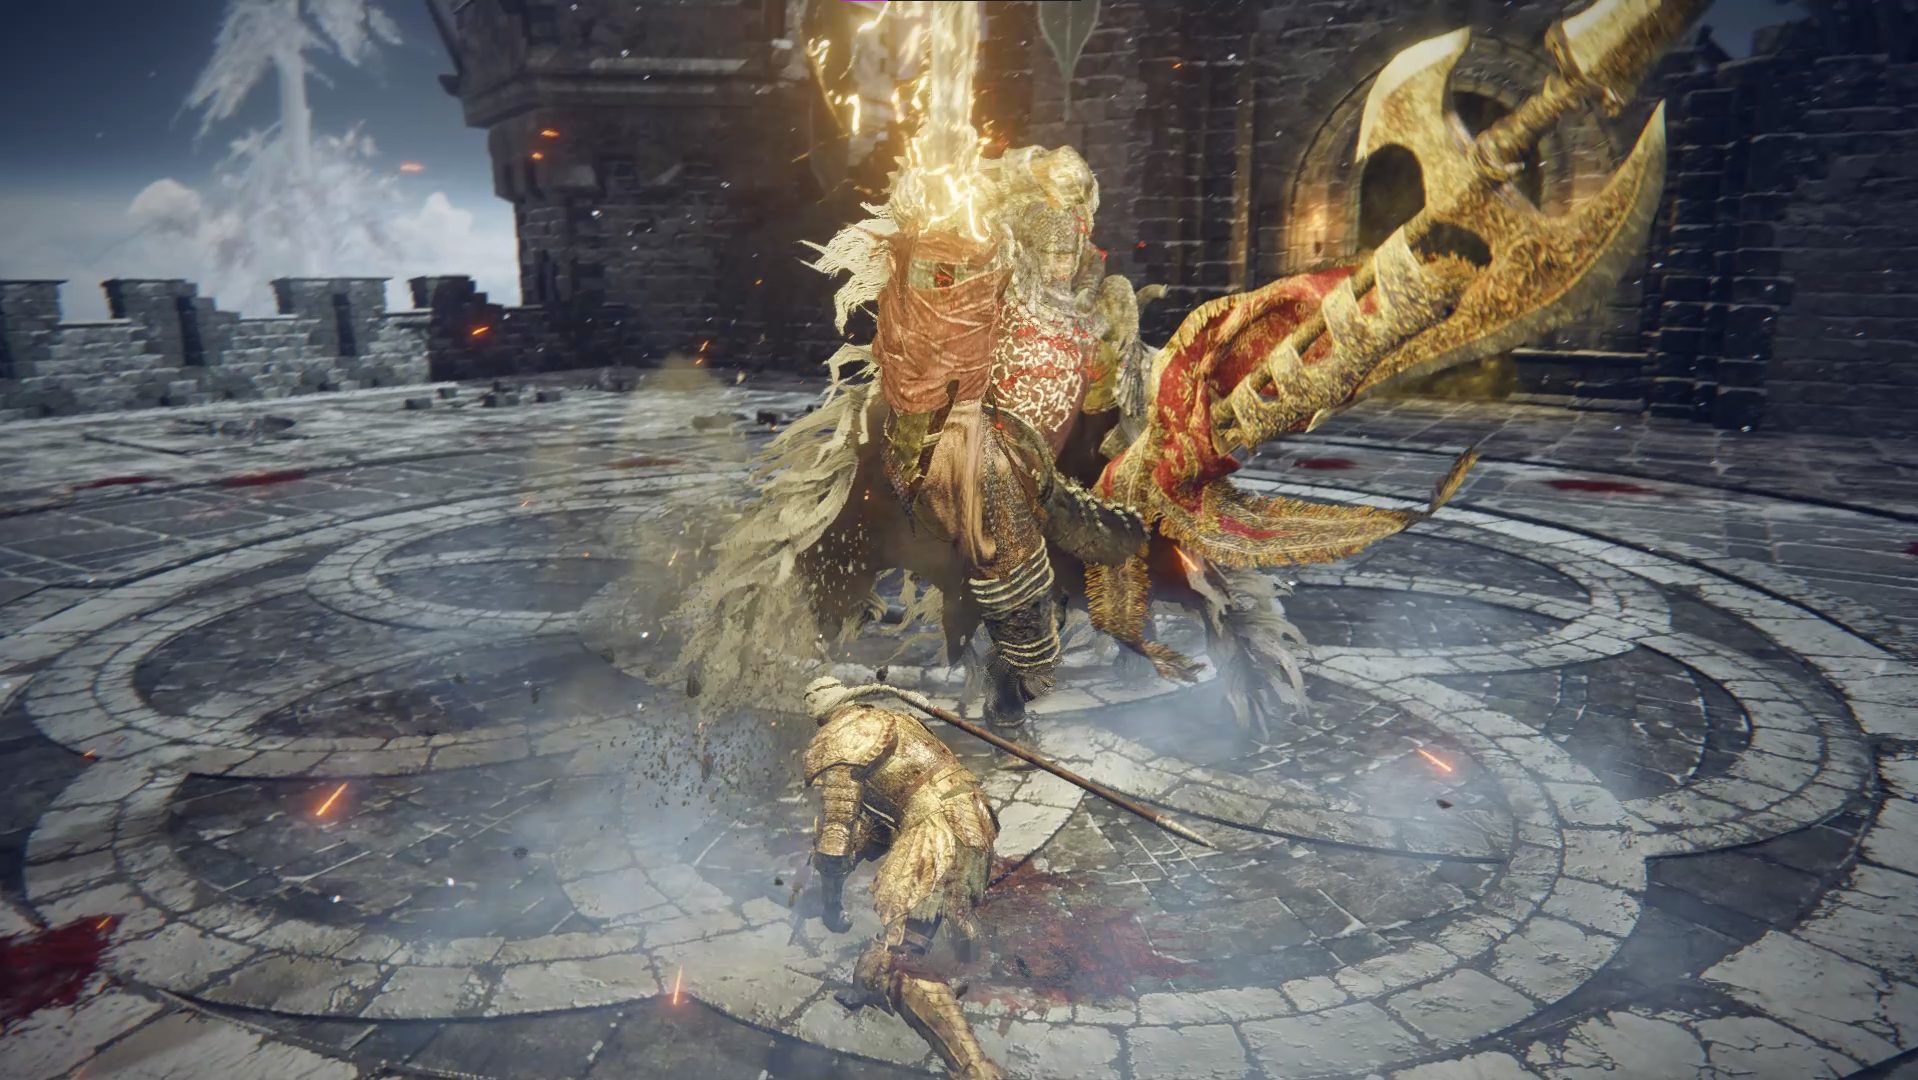
Found at the end of Castle Sol, Commander Niall guards the second half of the Haligtree Secret Medallion, which allows access to the Consecrated Snowfield. While Niall can be one of the game’s more challenging bosses, we’ve got a couple of strategies for you: a simple method to make him incredibly predictable, and a cheesy method if you don’t want to face him at all.
General Tips
Both Lightning and Frost Resistance are useful for this boss — he also does a decent amount of Physical damage.
Commander Niall can be both parried and staggered. To bait melee attacks, stand close to him. Getting enough jumping attacks in within a small enough period of time staggers him — if your spirit summon is attacking him as well, this becomes much easier.
If you leave the shield-bearing spectral knight alive, Commander Niall won’t enter his second phase until ~50% HP. Generally, Niall will enter Phase 2 right after both knights are killed.
Strategies
In this guide, we’ll first go over how to deal with the two knights Niall summons. We’ll then explain how bait Niall into doing an easy-to-avoid combo over and over, and how ranged characters can get Niall to 50% HP before starting Phase 2. After that, we’ll show you how to cheese Niall from outside the arena. Finally, we’ll cover Niall’s moveset (for anyone who wants to learn how to fight him without either of the cheesier techniques).
Phase 1 – Handling the Knights
Niall always summons the same two knights at the start of the fight. Don’t summon your spirit ashes yet — instead, sprint to the right-hand knight’s spawn location (the one with two swords) and get behind him. Once you can target-lock the knight, you’ll be able to backstab him. (Ranged characters can skip the backstabbing if they don’t have a decent melee weapon). After backstabbing the knight, run to the entrance of the arena — the dual-wielding knight chases you much faster than Niall or the other knight. Kill the dual-wielding knight once he gets close — if you can’t do so before the other knight shows up, just run away again, and the dual-wielding knight should once again get to you first.
Now you have two choices as a ranged character: you can either eliminate the other knight in the same fashion (he’s slow, but still faster than Niall), or you can leave the shield knight alive and just run away from him while attacking Niall. This takes a while, but lets you keep Niall in his much weaker Phase 1 for longer.
You’ll need to let the knight chasing you get in range for an attack (you can see me move towards him to trigger this) or he’ll chase you forever. Once he misses an attack, you can attack Niall
Melee characters won’t have an easy time with this, and while it’s still viable, you’re probably better off just killing the second knight and starting Phase 2.
Phase 2 – Baiting the Leap Attack
Niall likes to punish ranged attacks with his Leaping Leg Strike — so much that he seems to do it almost every time he’s hit by enough projectiles. What this means is that you can summon Latenna the Albinauric while Phase 2 begins, and then use your own ranged attacks to keep aggro. Niall will use the same attack over and over — while it isn’t the easiest move in the world to avoid, you should get enough practice that it becomes straightforward to time your roll. After the initial roll to dodge the leaping attack, immediately do two more rolls away from the boss to avoid the rest of the combo, and then you can attack.
This strategy works with melee characters as well — you can use Bone Darts or similar, and it will cause Niall to behave the same. If Latenna isn’t upgraded enough, she won’t do a lot of damage and the fight will take a long time, however. Fortunately, you can use a rolling attack after dodging the initial leap, and this will cause Niall’s next attack to miss. Note that you can’t immediately roll after this rolling attack, but instead must wait a moment and time your next dodge with Niall’s final swing in the combo.
Make sure you summon Latenna on one side of the arena, and then stick to the other side to prevent splash damage from hitting Latenna. If you don’t attack Niall with ranged attacks, he’ll target Latenna instead, so make sure you’re always hitting him at least once after he finishes his combo — it doesn’t seem like you have to hit him more than once or twice a cycle to keep aggro. As long as you attack him before or right as he’s beginning his combo, he’ll attack you instead of your summon.
This isn’t a fool-proof technique, and sometimes Niall will do different attacks — if you find yourself unable to get Niall to do the Leaping Strike repeatedly, you’ll want to use the General Tips above and the Moveset tips below to help you with countering his other moves (or you can just do the Bow Cheese).
Bow Cheese
If you don’t want to fight Niall fair, you can equip a bow, purchase/craft a ton of arrows, and cheese him from outside the boss arena. Depending on how much damage you can do with the arrows — and if you’re using a status effect inflicting arrow — you may need more or less ammo. If you’re doing 50 damage per shot, you’ll need at least ~330 arrows. If you can’t equip a bow, go to Rennala and respec so that you can — you should have plenty of Larval Tears by now (if you don’t have enough, you probably haven’t been to Nokstella yet).
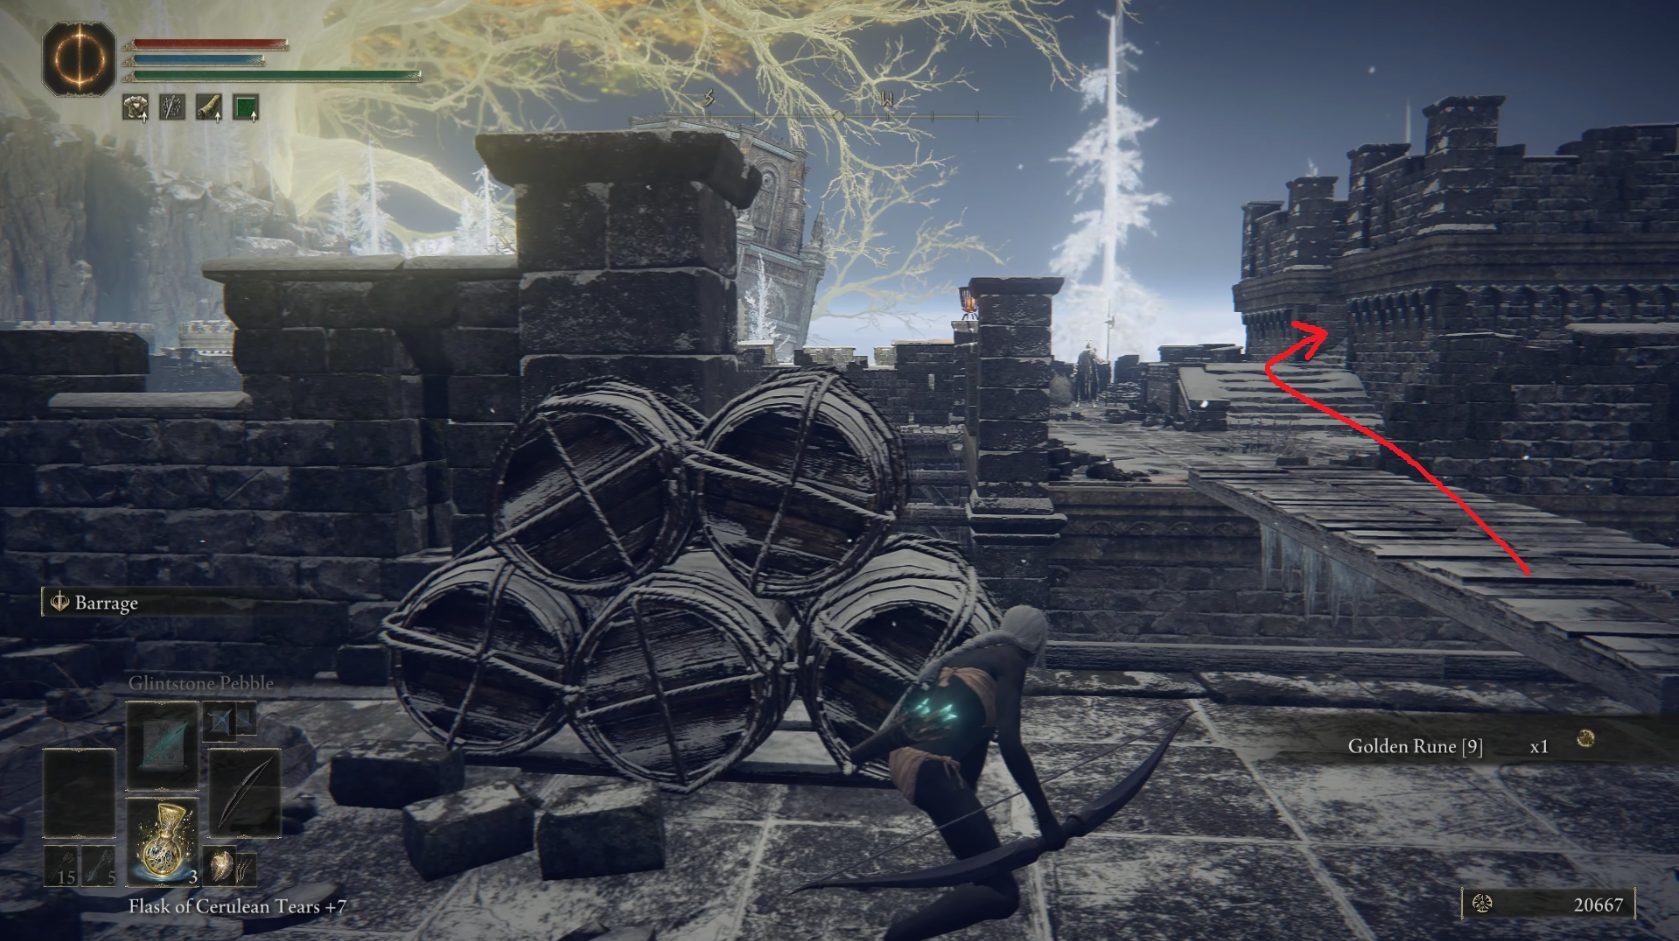
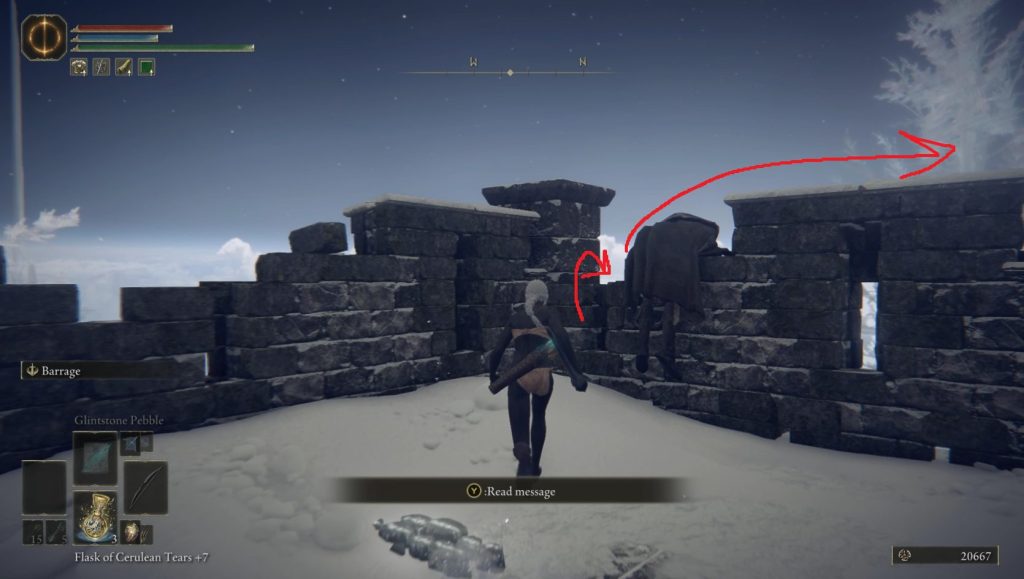
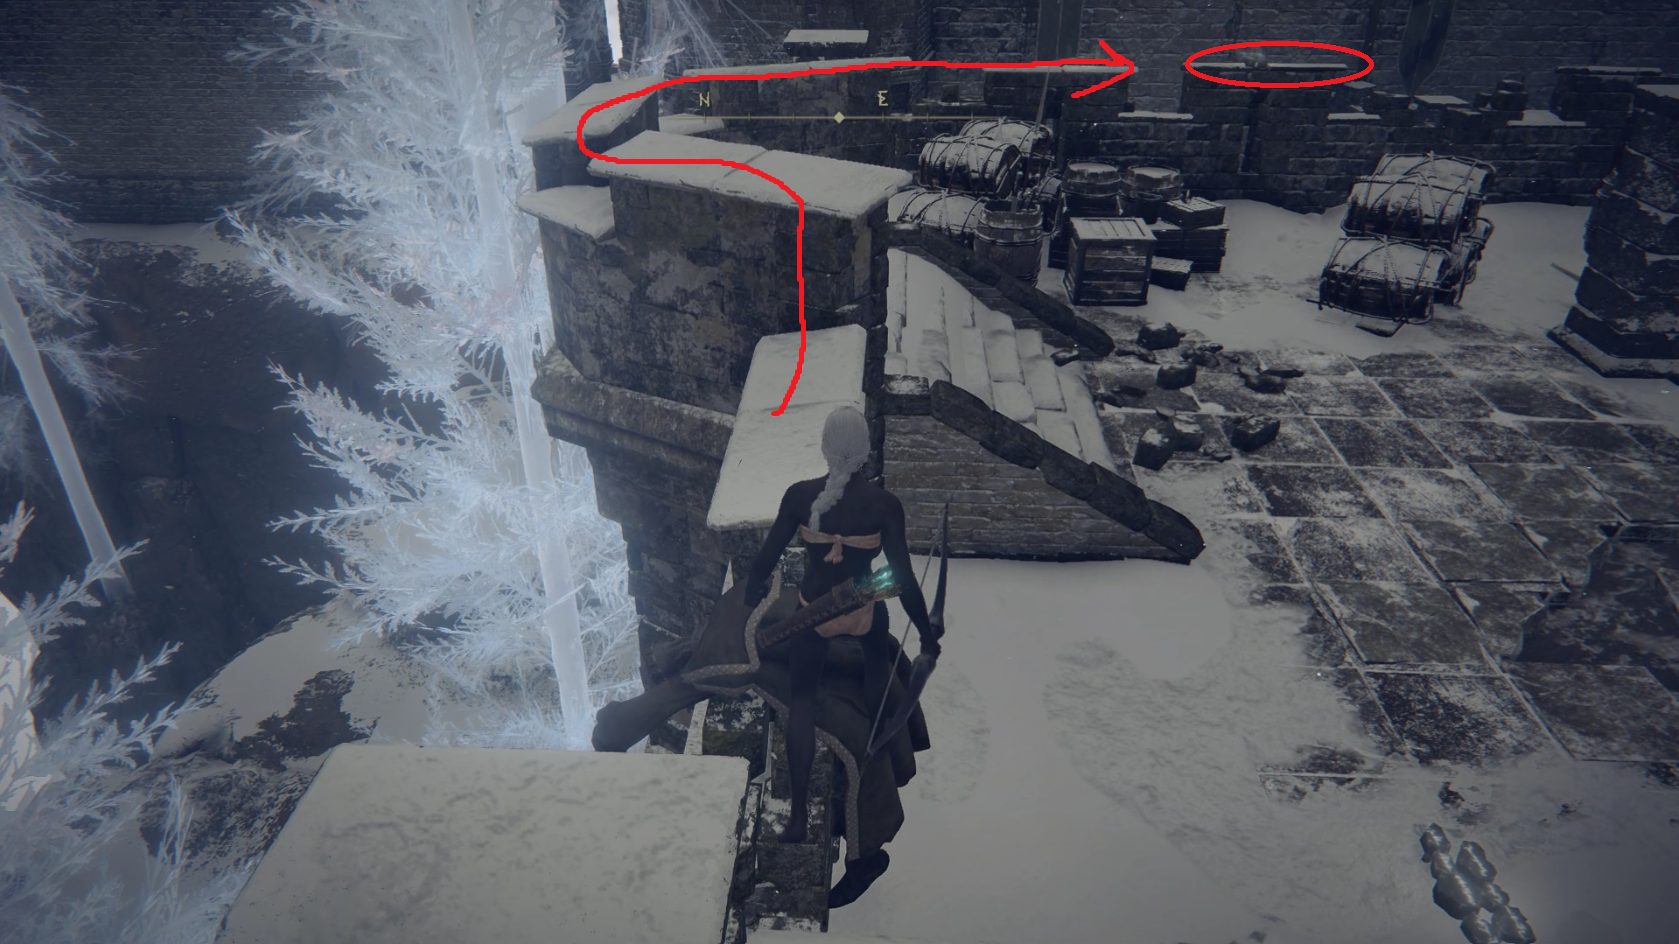
Once you’re properly equipped, follow the steps in the gallery below. Click/tap on the first picture to zoom in, then you can use the left and right arrows to navigate.
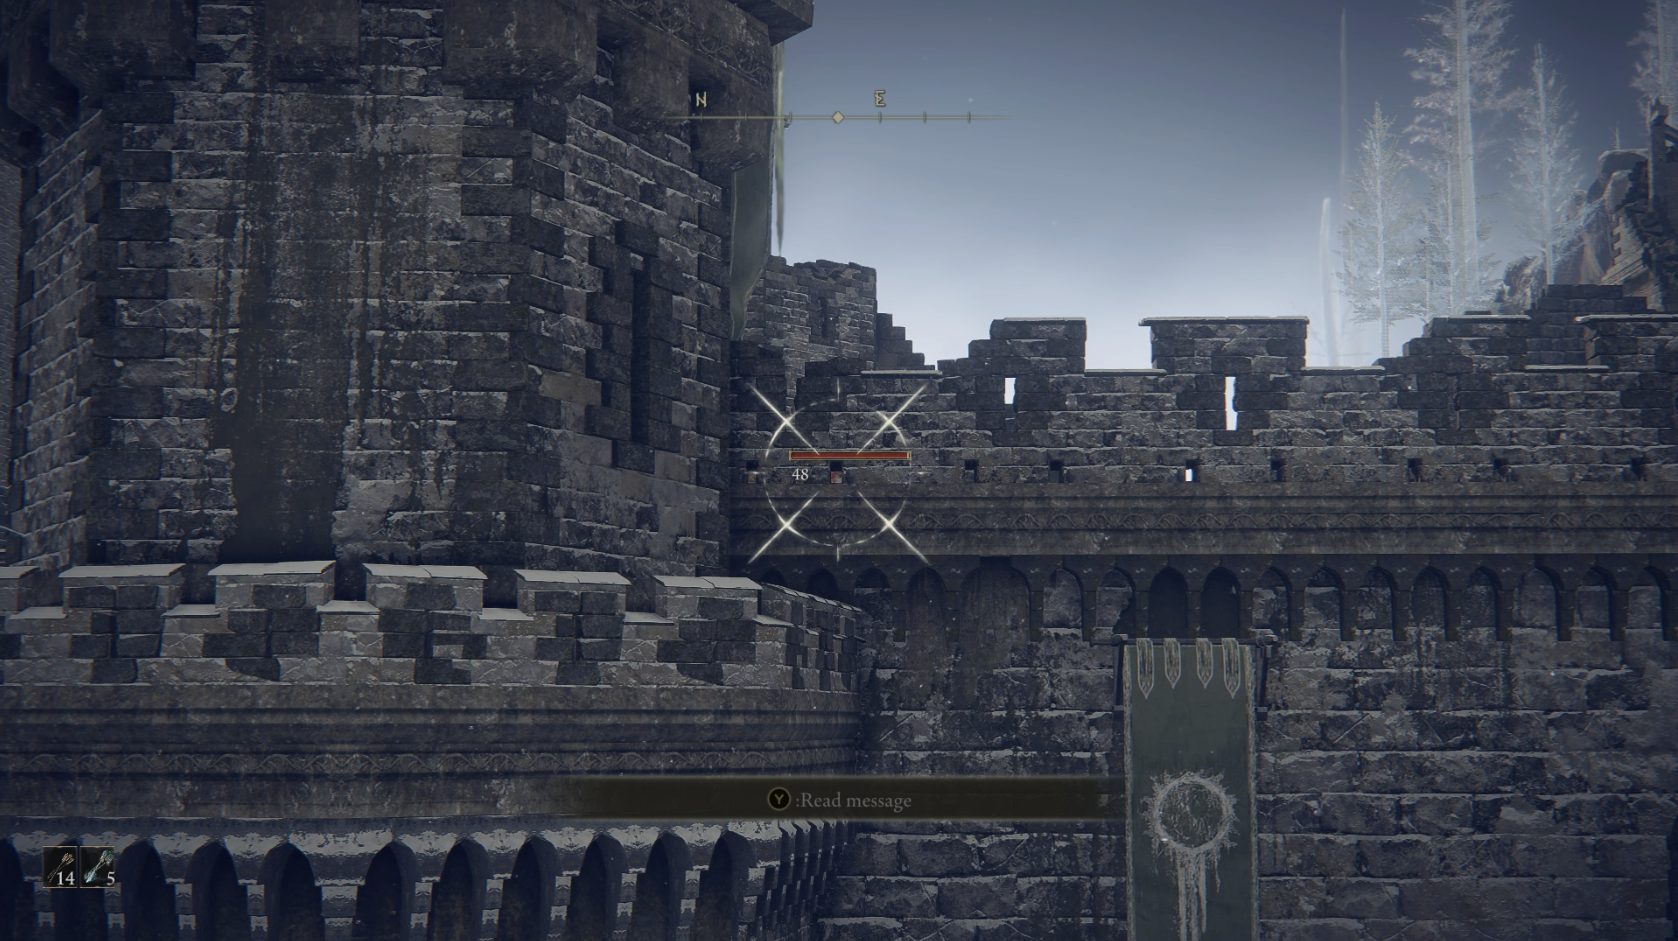
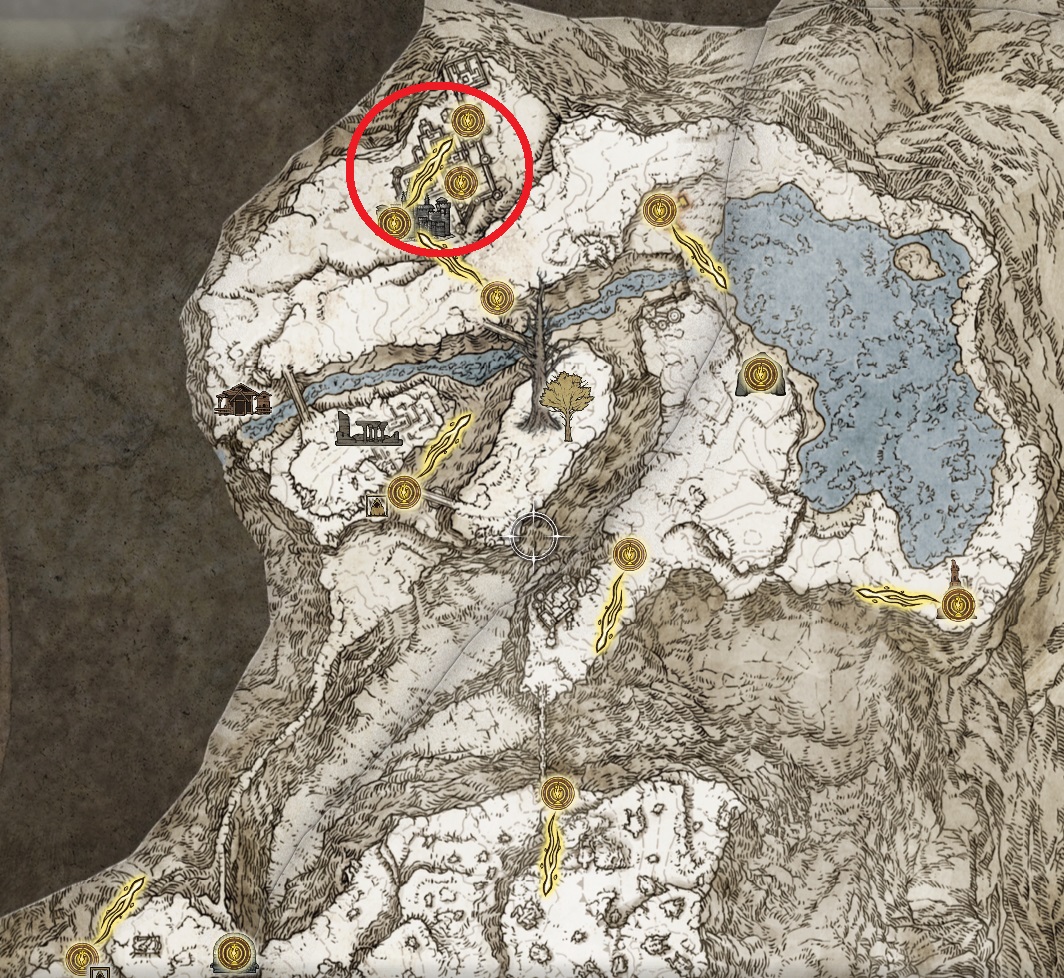
Get to the bridge you pass from the boss elevator — jump off of the elevator when it’s about halfway up to reach the bridgeEither sneak or fight your way past the enemies here, and get up into the small towerJump onto the crenelation next to where the corpse is, then turn right and make your way northeast along the crenelation Move slowly and carefully — after you jump up on the initial higher bit of crenelation, you can walk the rest of the way to the circled areaFrom there, aim through the second small hole from the left as indicactedAdjust your aim until you see damage numbers show up, then just keep firing until the boss goes down
Note that you will have to enter the boss arena for your kill to count, so once you stop seeing damage numbers (or just when the health bar appears empty), make your way to Commander Niall’s boss arena.
Moveset
You can of course fight the boss “normally” — doing so will require learning the boss’s moveset, as blocking isn’t particularly viable vs Commander Niall in Phase 2. Many attacks are chained into other attacks — moves marked with [P] have windows where you can punish (attack him) after the attack ends. You can choose to attack after other combos, but he will often chain them into other attacks, so you risk taking damage if you try it.
The words “standard” and “halberd” are used interchangebly in these descriptions.
Phase 1
You can block the melee attacks in Phase 1 fairly reliably, which is a good way to learn their timing.
Rallying Standard (Attack) – Commander Niall strikes his standard on the ground and a red circle appears — his two knights will now have their attack power increased.
Rallying Standard (Defense) – Commander Niall strikes his standard on the ground and a white circle appears — his two knights will now have their defense increased.
[P]Quick Jab Combo – Commander Niall jabs with his halberd, then does a horizontal strike, and finally a diagonal upwards attack.
[P]Heavy Jab Combo – Commander Niall raises his halberd over his shoulder and stabs with it, then does two horizontal strikes, and an overhead slam as the final attack. There are long delays between each of these attacks, so be patient and dodge on reaction (rather than anticipating).
[P]Backwards Jab Combo – Commander Niall strikes at a target with the butt of his halberd, then follows this with a horizontal slash.
[P]Slash Combo – Commander Niall slashes twice horizontally with his halberd, then finishes with an upwards diagonal attack.
[P]Heavy Slam – Commander Niall raises his standard high, then slams it down onto his target.
All four of the melee combos can be parried fairly easily, or you can roll to avoid them. The best way to roll to avoid these combos is towards the boss once, and then twice more further away in the direction you initially rolled — rolling backwards makes it easier for him to hit you with the followup attacks in the combo. Also note that sometimes, these combos won’t finish, and he’ll just do one or two of the moves from it instead.
Phase 2
Phase 2 begins at ~50% HP or after both knights die. The Rallying Standard moves go away, but the rest of the Phase 1 attacks remain. The transition to phase two involves him creating a whirlwind of frost, then slamming his prothesis into the ground and doing AOE lightning damage — you’ll want to just stay away from him while he transitions to Phase 2.
Leaping Leg Strike – Niall stamps his prosthesis on the ground and creates a small frost whirlwind around him, then electrifies his prosthesis and leaps towards his target. Upon landing, he creates a fairly large electrical explosion, and then follows up with a jab, then often also a swipe from his halberd (he sometimes only does the jab). You’ll need to roll right as Niall hits the ground to avoid being damaged — you can then do a rolling attack out of this roll to avoid the jab, but you’ll have to then wait a moment and then roll the followup swipe if it comes.
Prosthesis Ground Slam – Commander Niall electrifies his prosthesis and then quickly smashes it into the ground, doing damage in a large AOE. Often chained into a melee combo. If you are far away, move further away and you can avoid this, but if you’re close, you’ll need to time a roll for right when his leg hits the ground.
[P]Whirlwind Slash – Commander Niall spins his standard once in a circle while creating a frost whirlwind, then slashes horizontally with his halberd. After rolling to dodge the halberd swipe, you have time for one jumping heavy.
[P]Whirlwind Dash Uppercut – Commander Niall spins his standard once in a circle while creating a frost whirlwind, then dashes towards his target and swipes upwards with his halberd. Often followed up with Standard Ground Slam. If you’re locked on, you can simply strafe to the left as he dashes in and this attack will miss.
Standard Ground Slam – Commander Niall waves his standard a bit and winds whirl around it, and he then slams the butt of it into the ground, creating a frost whirlwind that does damage in an AOE. Often chained into the Whirlwind Slash. If you are far away, move further away and you can avoid this, but if you’re close, you’ll need to time a roll for right when his standard hits the ground.
[P]Whirlwind Dash Slash – Commander Niall holds his standard over his shoulder and channels a frost whirlwind — he then swings his standard in a circle three times, creating a damaging whirlwind each time that gets larger (it eventually encompasses a large portion of the arena). After the third whirlwind, he spins two more times, then slide-dashes towards his target while dragging his halberd on the ground, then slashes horizontally with it when he reaches his target. Roll when he gets near you, and then start doing leaping heavy attacks (or your weapon art if it’s powerful) — he rests on one knee for a long time after doing this attack.
Unabashed FromSoftware fanboy still learning to take his time with games (and everything else, really). The time he doesn't spend on games is spent on music, books, or occasionally going outside.
Bow cheese not easy as a respec. Spent hrs leveling bows, killing mercs for easy arrow purchases, farming runes just to get detroyed tons of times by devil knightxwolves. Finally figured them out and at one point, my character went retarded and fell off making me tele to a grace resetting it all. Bows make you do dumb movement and rolls when they feel like it I guess. Did it again but turned back towards cliff before manual aiming. I fell off but not into the area below. However, after getting him down to a quarter before half life, no arrows will ever hit him unless they are great arrows and great arrows are severely limited. This game is so badly made.


Bow cheese not easy as a respec. Spent hrs leveling bows, killing mercs for easy arrow purchases, farming runes just to get detroyed tons of times by devil knightxwolves. Finally figured them out and at one point, my character went retarded and fell off making me tele to a grace resetting it all. Bows make you do dumb movement and rolls when they feel like it I guess. Did it again but turned back towards cliff before manual aiming. I fell off but not into the area below. However, after getting him down to a quarter before half life, no arrows will ever hit him unless they are great arrows and great arrows are severely limited. This game is so badly made.
That bow cheese strat for Niall is gold.