Limgrave, the starting region of Elden Ring, is filled with challenging bosses that test a Tarnished’s skill from the very beginning. From open-world threats to dungeon-dwelling foes, each battle demands strategy and perseverance. Below, you can find the full list of bosses in the region, and the strategies to defeat them. If you’re looking for a complete walkthrough of Limgrave, head here.
Limgrave Bosses
Limgrave NPC Invasions
- Anastasia, Tarnished-Eater (Invader)
- Blood Finger Nerijud (Invader)
- Recusant Henricus (Invader)
- Old Knight Istvan (Invasion)
- Mad Tongue Alberich (Invader)
In the endless depths of the Siofra River, far beneath the surface — and even most of the caves — of Limgrave, you will find a series of torches that you can light. Upon lighting them all, you can use an ancient corpse to access the Ancestor Spirit, a dangerous — if graceful — spectral foe that represents nature.
Despite appearances and build-up, the Ancestor Spirit is not too difficult of a fight. It’s moves are very readable, it doesn’t have too much health, and its move variety is fairly small. You should keep in mind that it is easiest to fight the boss from near the Spirit’s
Within the Groveside Cave, the Beastman of Farum Azula is likely to be the first boss that you’ll encounter that you’ll be able to take on at the beginning of the game (unless you decide to slam your head against the Tree Sentinel for a while). This strange enemy is actually a common enemy from a late-game area, and so will give you a good idea about what to expect much further along in your journey.
This boss has several lunge attacks, and all of them are easily avoidable by either running backwards, or rolling backwards. It’s most dangerous attack is its six-strike combo, requiring you to be precise in your movement not only to avoid the Beastman, but also to punish him. Thankfully, the Beastman of Farum Azula is fairly easy to stagger, so if you can hit him once you will probably be able to get several hits in.
- Summons Available: No
- Location: Warmaster’s Shack (Night Only)
- Rewards:
The Bell Bearing Hunter is a recurring nighttime boss that appears near merchants and can hit extremely hard. In order to get him to appear at night, you may need to rest at the Grace a second time. While its attacks are intimidating, a shield with 100% physical resistance makes the fight significantly easier. Spirit Summons, especially those that stagger frequently, can be very useful in distracting the boss and interrupting its moves.
Melee fighters should use jumping heavy attacks to stagger the boss and create critical strike opportunities, while ranged characters can keep their distance and attack while summons take the boss’s aggro. If no summons are available, blocking with a sturdy shield and rolling at the last moment will help mitigate its powerful combos. Stay patient, avoid the glowing red attacks, and punish after its long recovery periods to claim victory.
The Black Knife Assassin in the Deathtouched Catacombs is a fast-moving, agile boss that can overwhelm aggressive players with constant slashes and tricky movement. The fight takes place in a dark room, so bringing a Lantern helps, and spirit summons are allowed if you want extra support. The boss excels at punishing first moves, so patience is key — wait for it to initiate before striking. It’s especially vulnerable to well-timed rolls and light attacks during or just after its combos.
Melee players should two-hand their weapons and aim to interrupt the Assassin during its openings, particularly after the dragging slash. Shields can help learn the moveset, but aren’t ideal for long-term success. Parrying is effective and worth practicing here due to the short runback. For ranged users, roll through the boss’ opening attack and immediately create space to cast spells safely. Repeat this rhythm to win the fight with minimal damage taken.
Bloodhound Knight Darriwal
- Summons Available: No Ashes, but the NPC Blaidd the Half-Wolf can be summoned as part of his quest.
- Location: Forlorn Hound Evergaol
- Rewards:
The Bloodhound Knight Darriwal is a fast and aggressive boss found hidden within the Forlond Hound Evergaol, who you can summon by interacting with the Evergaol’s center. Its rapid attacks, Bleed buildup make it a challenging fight, especially for melee players. However, if you have interacted with Blaidd the Half-Wolf in Mistwood (capable by returning to Mistwood after your first visit and using the Finger Snap gesture you can get from Merchant Kalé), then he will appear during this fight, and can be a massive help.
As for the actual strategies: a hit-and-run approach works best; wait for the boss to use its claw-dragging leap attack, then counter with a jumping strike or a spell. Always sprint to maintain distance, only rolling when necessary to conserve stamina. Heavy weapon users can take a more aggressive approach, using leaping attacks to stagger the boss while staying mindful of its quick counterattacks.
The Burial Tree Watchdog is the boss at the end of the Stormfoot Catacombs, and can be a quite formiddable foe if it is the first time you encounter one. With a strange, mechanical moveset, this Watchdog is the first of many you will encounter on your path, and poses a good chance to start to learn how to react to its odd attacks.
As for strategy: the boss itself is slow, but the attacks that it can do have harsh delays and come out fast. Because of this, take your time against this boss and try to learn timings. Not only will this let you dodge or block its attacks at the right time, but it will also let you learn how to punish the boss as it recovers from an attack.
Crucible Knight
- Summons Available: No
- Location: Stormhill Evergaol
- Rewards:
 2,100
2,100- Aspects of the Crucible: Tail
- Summons Available: No*, but the Deathbird can be lured to an area with summons.
- Location: Near Warmaster’s Shack
- Rewards:
Deathbird is a recurring nighttime boss found in various locations across the Lands Between. This towering, skeletal creature relies on medium-range attacks, but struggles to punish players who stay close beneath it. Its vulnerability to holy damage makes  Holy Water Pots especially effective for reducing the fight’s difficulty. While the Deathbird does not spawn in an area where you can summon, there is a nearby enemy camp that it can be lured toward so that you can summon.
Melee players should stick between Deathbird’s legs, where most of its attacks can’t reach, and roll through its backward steps to maintain pressure. Ranged players can cast safely from horseback at maximum range or stay close like melee fighters, carefully timing spells to avoid sudden retaliations. Holy damage remains the key to an easier victory.
Within the Coastal Cave, you will find two powerful Demi-Human Chiefs. Possibly your first fight with multiple bosses, the Demi-Human Chiefs are fast and deadly, with some tough combos. These two not only protect the  Sewing Needle needed to progress
  Boc‘s test, but also protect the tunnel leading to the Church of Dragon Communion, where you can learn Dragon Incantations.
The Demi-Human Chiefs themselves can be pretty tough, but you will have an easier time if you are able to be aggressive enough to kill the one closest to you before the other one arrives. Their moveset is fairly simple, and they can be stunned by attacks with heavy weapons, so aggression is warranted. If you do find yourself against both of the Chiefs at the same time, try to make enough room to separate them long enough to get hits on one.
Dragonkin Soldier
- Summons Available: Yes
- Location: Siofa River
- Rewards:
- Summons Available: Yes, Blood Finger Hunter Yura
- Location: Near Dragon-Burnt Ruins
- Rewards:
Flying Dragon Agheel is a field boss residing in the large lake near the Dragon-Burnt Ruins. You will first encounter Agheel when he pummels in from the sky, wiping out some undead before getting ready to fight you. Being your first dragon encounter, it can be very worthwhile to take your time and learn the moveset; Agheel uses the same moveset as almost all of the dragons you will encounter over the course of the game.
The key to fighting any dragons is to remain mobile. You should be on Torrent almost all the time while fighting dragons, where you can get good shots against the Dragon’s legs and avoid move of its attacks. Its deadliest moves are its fire breath attacks, which almost always require you to position yourself away from the flames. If you find yourself struggling, you can find the Summon Sign of Bloody Finger Hunter Yura in the lake if you talk to him (to the north) after dying to Agheel at least once.
This hefty brute, found at the end of the Murkwater Catacombs, is a good introduction to the kinds of opponents that are relentless and straightforward.
While reacting to bosses like these well will make short work of them, panicking or struggling to find a time to heal can lead to you dying in short order. You will need to practice getting through and then punish combos in order to take on this boss, but one you are able to dodge chained attacks, he shouldn’t prove too difficult.
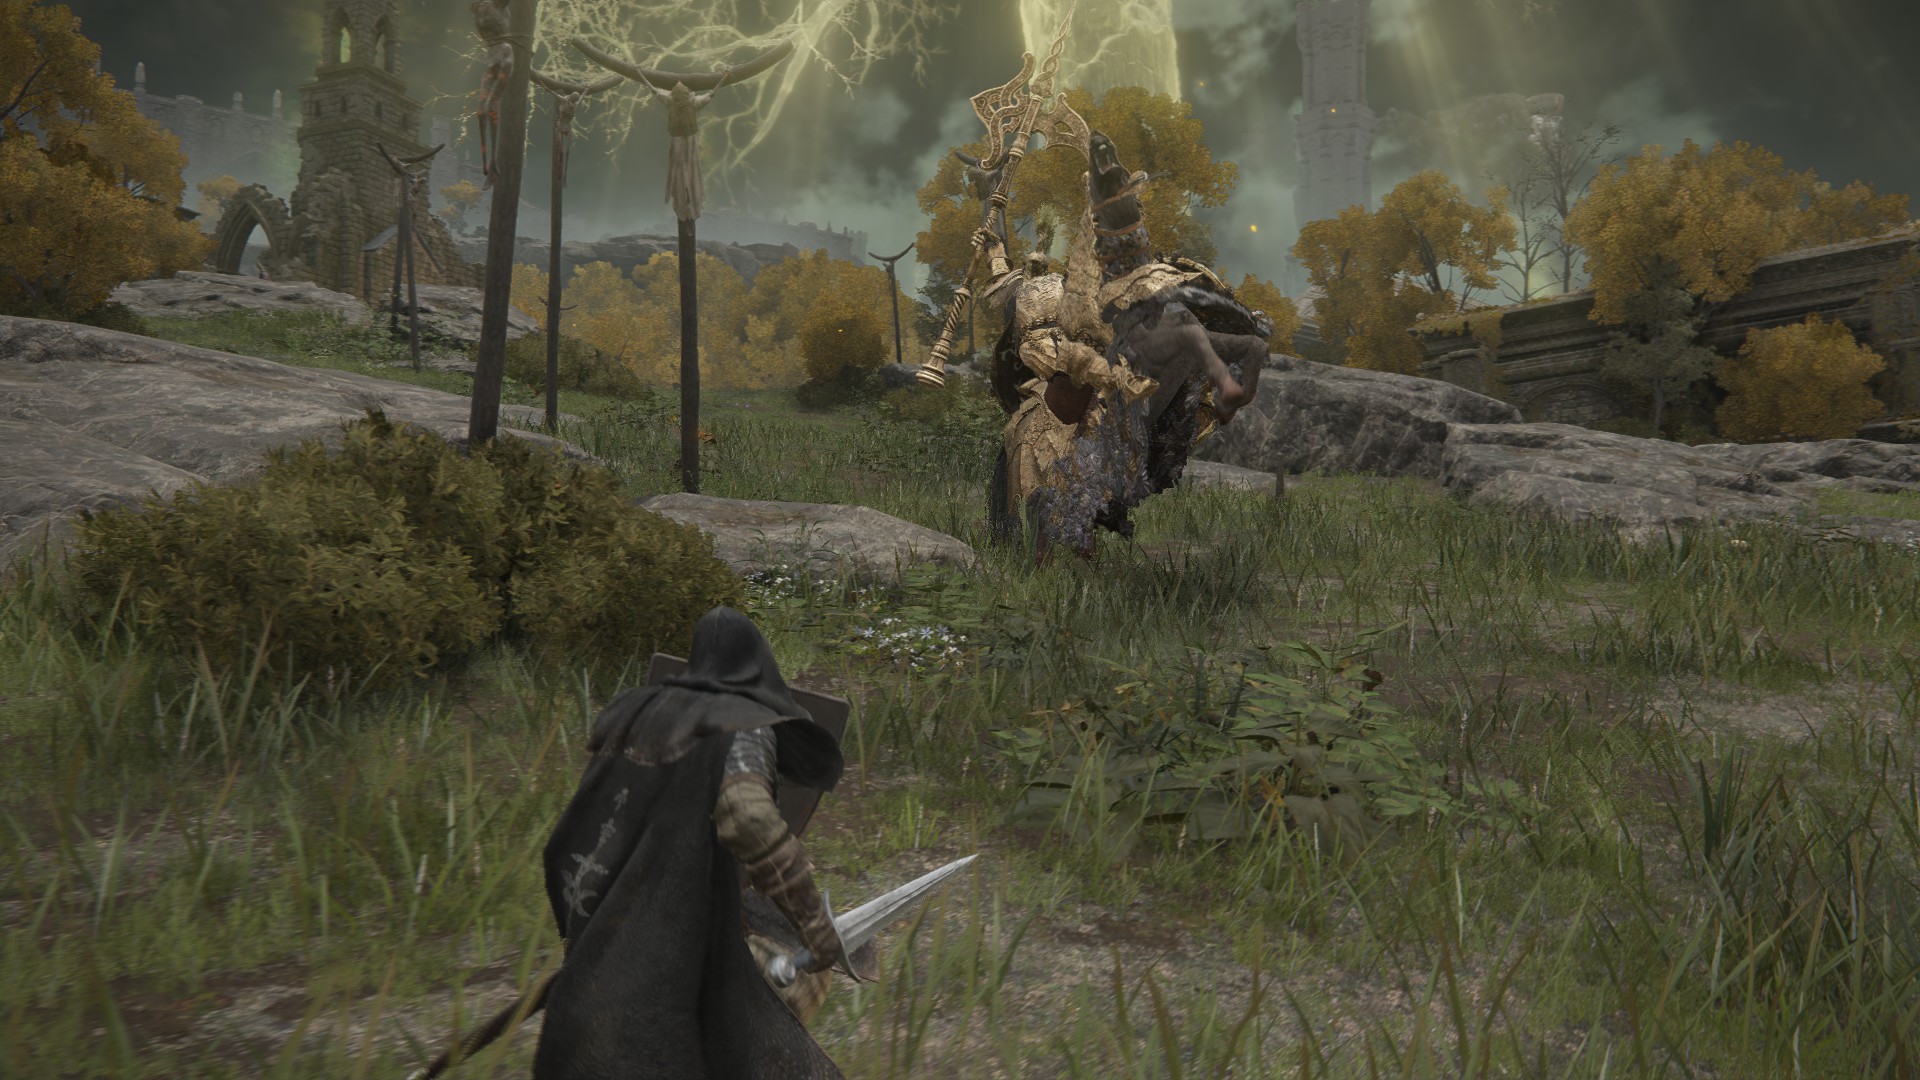
Godrick, the master of Stormveil Castle, is proably the first Great Rune holder you’ll meet, and defeating him is a big step on your path to becoming Elden Lord. He can be intimidating, but even all his arms won’t save him from you (and your summons). You will need to be at your most prepared when going to face Godrick, and should make sure your weapons and stats are upgraded before going in.
Once inside, you should prioritize learning Godrick’s extensive moveset and being prepared to dodge his variety of attacks. He has a wide, but very exploitable, moveset — if you react correctly, you can deal massive damage in return. If you can get Godrick to his second phase (after a really cool cutscene), it can actually be easier, as Godrick’s new dragon attacks are mostly easier than the attacks from the first phase.
The Guardian Golem is a massive, slow-moving boss, and is the boss variant of an enemy you might’ve seen elsewhere (like the Weeping Peninsula). Like the non-boss versions, you just need to focus attacks on its ankles to break its stance and stagger it for a critical hit. Melee builds should stick close, two-hand their weapon, and hammer the legs with heavy or jumping attacks. The golem has poor coverage at its feet, but if it drops to all fours to spew fire, back off immediately and return when it’s done.
Ranged players can also focus on the ankles while maintaining a bit more distance. Time spells to fire between attacks, and sidestep the more dangerous moves like the fire breath or charging slam. The golem’s few ranged counters are predictable and easily avoided with good positioning. If you run out of FP, you can switch to melee and stay close—it’s still the safest spot. Whether casting or swinging, consistent pressure on its legs will topple the giant in short order.
- Summons Available: Yes
- Location: Waypoint Ruins
- Rewards:
- 1,300
- Access to Sorceress Sellen
In a small crypt in the Waypoint Ruins, you will find the Mad Pumpkin Head, a suped-up variant of the Pumpkin Heads you might’ve seen in other parts of the world. He blocks the way to Sorceress Sellen in the next room, and therefor must be dispatched in order to access her shop and questline.
While the Mad Pumpkin Head can be tough — especially if you attack its armored head — it is also very slow, and has long recovery periods after attacks. Once you know how to dodge and block its moves, you just need to make sure you get into a good position to deal damage to parts other than the head in order to take this one down.
- Summons Available: Yes, Sorcerer Rogier
- Location: Castleward Tunnel (Leading in to Stormveil Castle)
- Rewards:
Waiting for you at the entrance to Stormveil Castle, Margit, the Fell Omen is one of the hardest fights in the early part of Elden Ring. With a sizeable moveset, massive damage, and lots of mobility, Margit can put a roadblock to your progress early on. When you reach him, make sure to head to the Round-Table Hold after resting at the Castleward Tunnel Site of Grace and using the NPCs there to help buff you. And don’t be afraid to come back later!
As for the actual fight: Margit has a mix of quick attacks, slow devastating strikes, and attacks that are delayed to bait you into dodging prematurely, which makes him a formidable foe. Additionally, the boss will become more dangerous during Phase 2, which begins around 60% health.
- Summons Available: No
- Location: On Bridge Near Agheel Lake North
- Rewards:
These mounted warriors appear only at night and can be found in multiple locations across the Lands Between. The first one you will encounter is on the bridge near the Agheel Lake North site of Grace. Having Torrent is essential for these fights, as mounted combat makes the encounter much easier.
The best strategy is to ride directly at the boss, passing on their weapon side while attacking. This allows you to hit while avoiding their swings. If their horse falls, punish the rider before they can recover. For ranged builds, simply ride in circles while casting spells. Be mindful of Flail-wielding variants, as they have a spinning attack that cannot be countered with a charge.
- Summons Available: No
- Location: Murkwater Cave
- Rewards if Spared:
- Rewards for Killing Patches
Returning from many previous FromSoft games, Patches is a devious and tricky NPC boss — possibly the first you will encounter in the game. He will surrender partway through your fight, allowing you to spare him so he can show up again later (or you can kill him for his loot, including his  Bell Bearing).
As far as the fight goes, Patches is not too tricky. Because of his shield, you will need to attack at the right moments — likely after blocking or dodging — in order to do any damage. In addition, his spear’s range can be deceiving, requiring you to back off a bit more than you expect. However, Patches has a low health pool and isn’t particularly damaging, so you should be able to best this familiar foe with just some decent timing.
Soldier of Godrick
- Summons: No
- Location: Stranded Graveyard
- Rewards:
- 400
The Stonedigger Troll is a massive boss with a slow but wide-reaching moveset that can crush unprepared players. Thankfully, it’s moveset is exactly the same as the regular troll enemies . The Slow Slam creates a large opening for attacks, while the Repeated Slams signal danger and are best avoided entirely. Stick close, roll through legs or stomps, and punish openings with jumping attacks.
For ranged players, keeping mid-distance is key. Standing too far invites long-range slams with massive shockwaves, but staying close lets you dodge through attacks and slip in casts during recovery windows. The Repeated Slams are the best moment to create space and cast safely. Whether up close or at a distance, patience and smart positioning make this boss more manageable than it looks.
Tibia Mariner
- Summons Available: Yes
- Location: Summonwater Village
- Rewards:
- Summons Available: Yes
- Location: First Steps
- Rewards:
The Tree Sentinel is the first boss you will encounter during your playthrough, and it’s definitely not the easiest. While you can choose to fight him straight away, you can always decide to do this boss later on. If and when you do decide to take him on, the key is to always respond to his attacks. You never want to attack while he is idle, unless you know you can move fast enough to be able to dodge his telegraphed attacks.
The first of many Ulcerated Tree Spirits in Elden Ring, this is one of the most difficult enemies you can find in all of Limgrave. Waiting at the bottom of the Fringefolk Hero’s Grave — the dungeon that you will pass at the very start of the game — this formidable and deadly foe requires learning to read its twisting limbs and strange moves, or else fall pray to it.
The most difficult part of this fight — aside from how much health the Ulcerated Tree Spirit has — is learning how to avoid the many strange attacks the Tree Spirit can do. It’s most deadly, a dangerous grab attack, is also notoriously hard to dodge. But, once you do learn how to dodge the amorphous creature, you will be able to punish it hard.


Hello