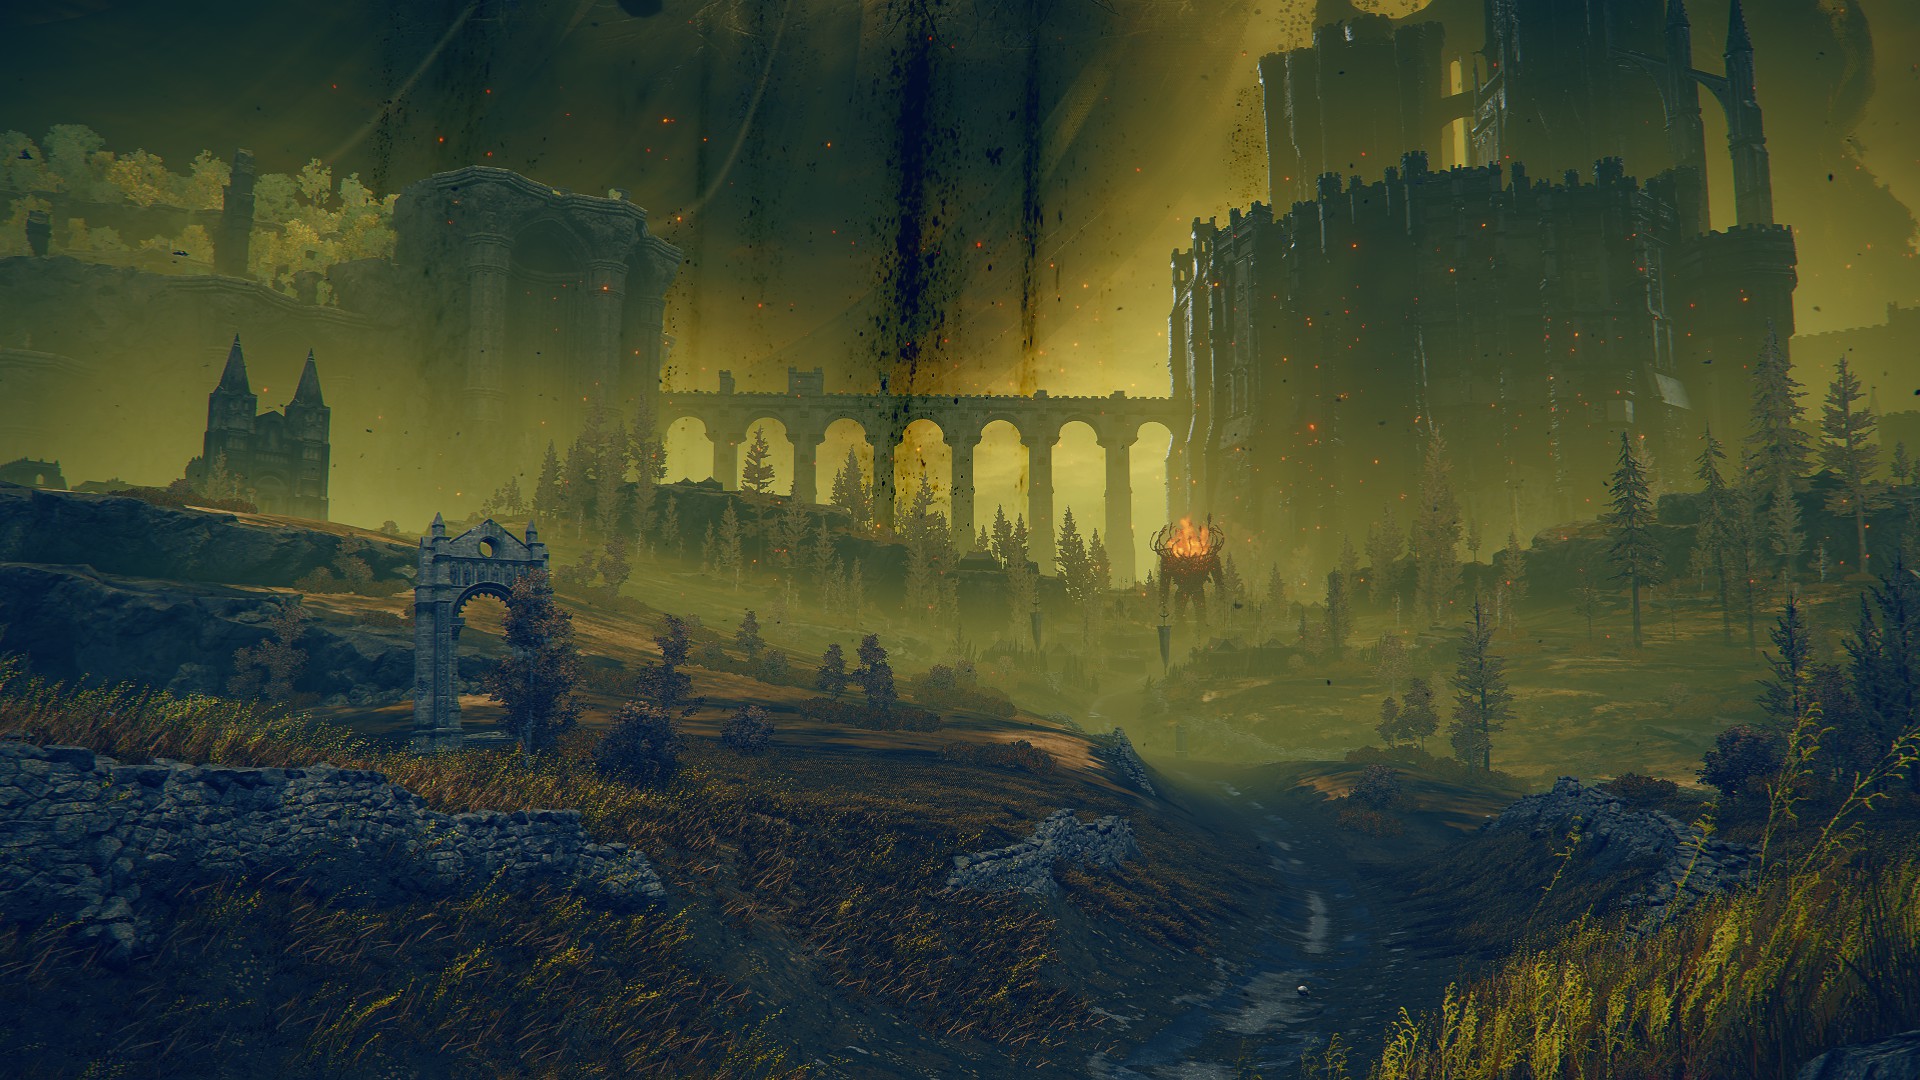
Scadu Altus is the second area most players will want to explore in the Land of Shadow. There are a couple of ways to reach this area, and quite a bit to do once you’re here — the enemies get even tougher, so it’s best to have gathered all the resources you can from the Gravesite Plain before coming to Scadu Altus.
How to Get to Scadu Altus
You can access Scadu Altus from the Gravesite Plain. There are two ways (that we know of) to reach Scadu Altus:
Castle Route – The “normal” way is to go through Castle Ensis and defeat the boss Rellana — doing so will give you access to the Highroad Cross site of grace.
Fort Route – You can skip Castle Ensis if Rellana is giving you trouble, and instead make your way to Scadu Altus via the spiritspring jump by the Elder’s Hovel. Jumping up the cliffs using the two jumps will allow you to reach the Behind the Fort of Reprimand site of grace, and boom, you’re in Scadu Altus.
Scadu Altus – West
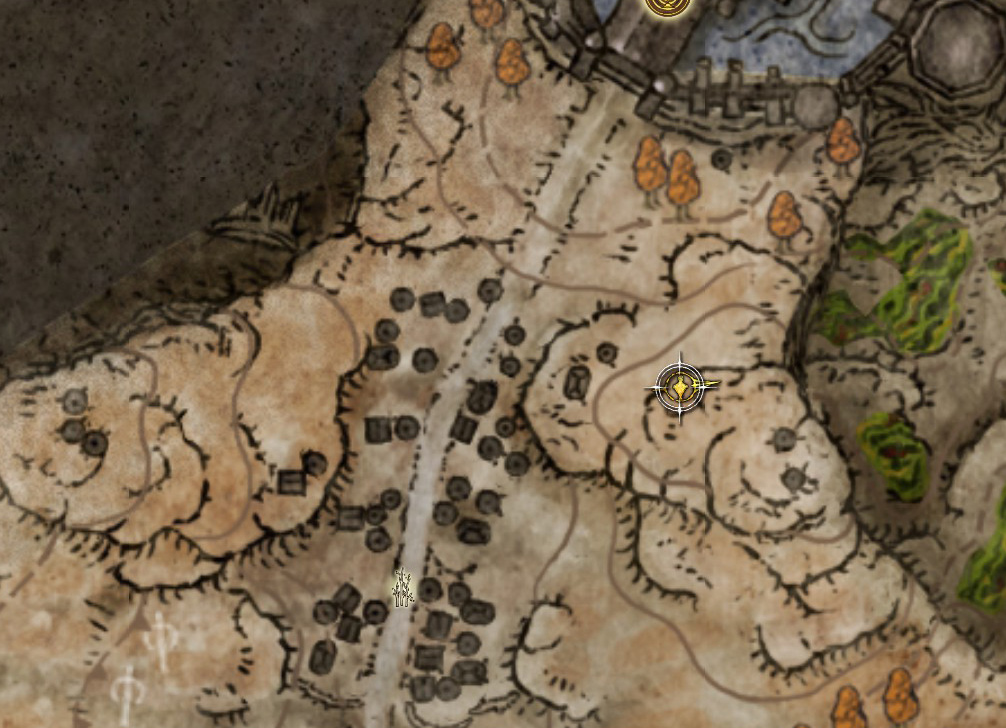
First things first, we’ve gotta get the map so we know where the heck we’re going. If you came via the castle route, simply follow the road north a ways — if you came from Fort Reprimand, you can also follow the road from the fort north-northeast. Where the two roads meet is the map monument, and at its base, the map fragment for Scadu Altus.
You’ll be able to see the map monument marker on your map once you’re close enough
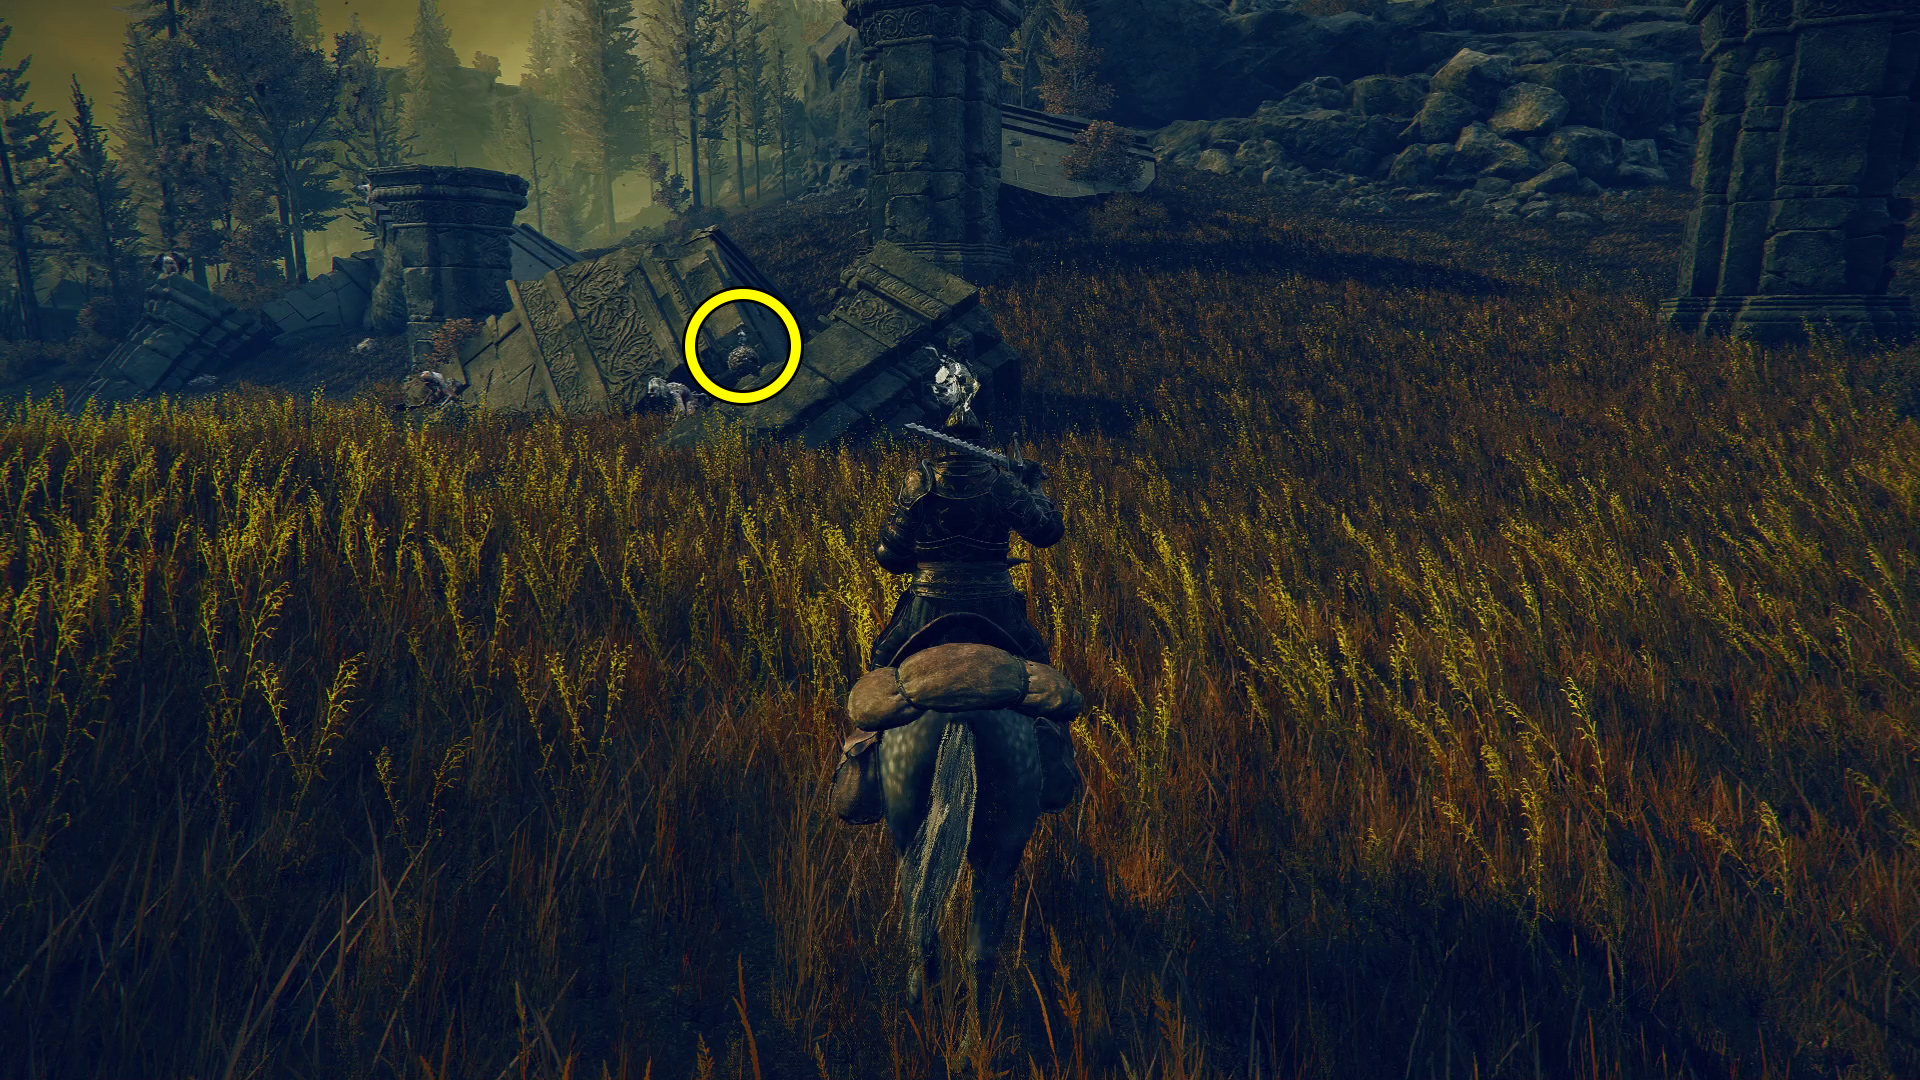
Where the two roads meet is the map monument, and at its base, the map fragment for Scadu Altus. You’ll probably meet a mounted black knight on the road — these guys drop Smithing Stone [5] and [6]s, and also have a decently high drop rate for their armor pieces, so if you like their drip, give ’em a stab.
Now that we have the map, we can start exploring! Note that we’ve labeled a couple of places on the map that aren’t actually labeled on the in-game map (Shadow Keep Camp and the waygate) for the sake of navigational clarity.
Just a few things to do and see
Highroad Cross
Unique & Important Items
Monk’s Missive
May the Best Win gesture
Scadutree Fragment
Empyrean-Blood Burgeon
New Cross Map
You can reach the Highroad Cross by simply walking out of the exit of Castle Ensis (from the Ensis Moongazing Grounds site of grace, go north). Here you’ll find another, Miquella’s Cross, another Scadutree Fragment, and another Blood Burgeon. Exhaust the dialog of both NPCs, pick up all the items, and make sure you unlock the Highroad Cross site of grace while you’re here.
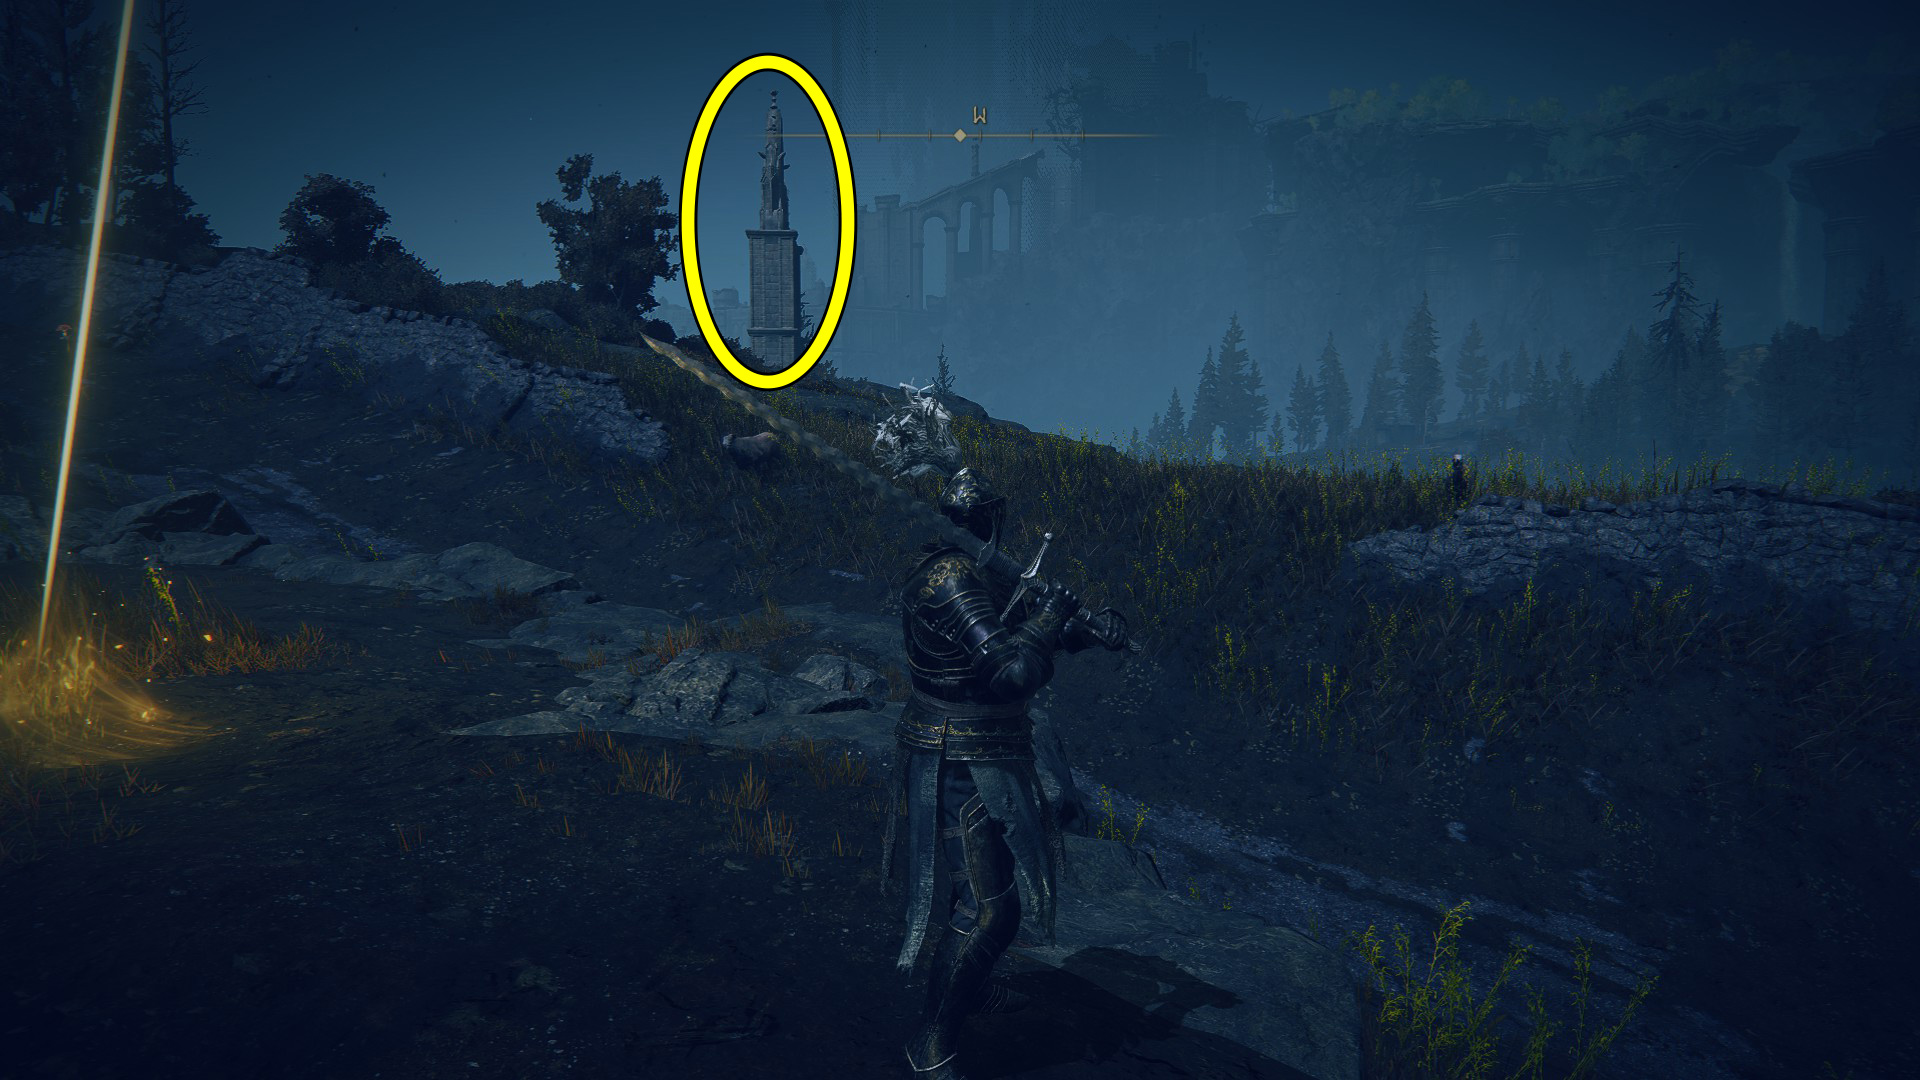
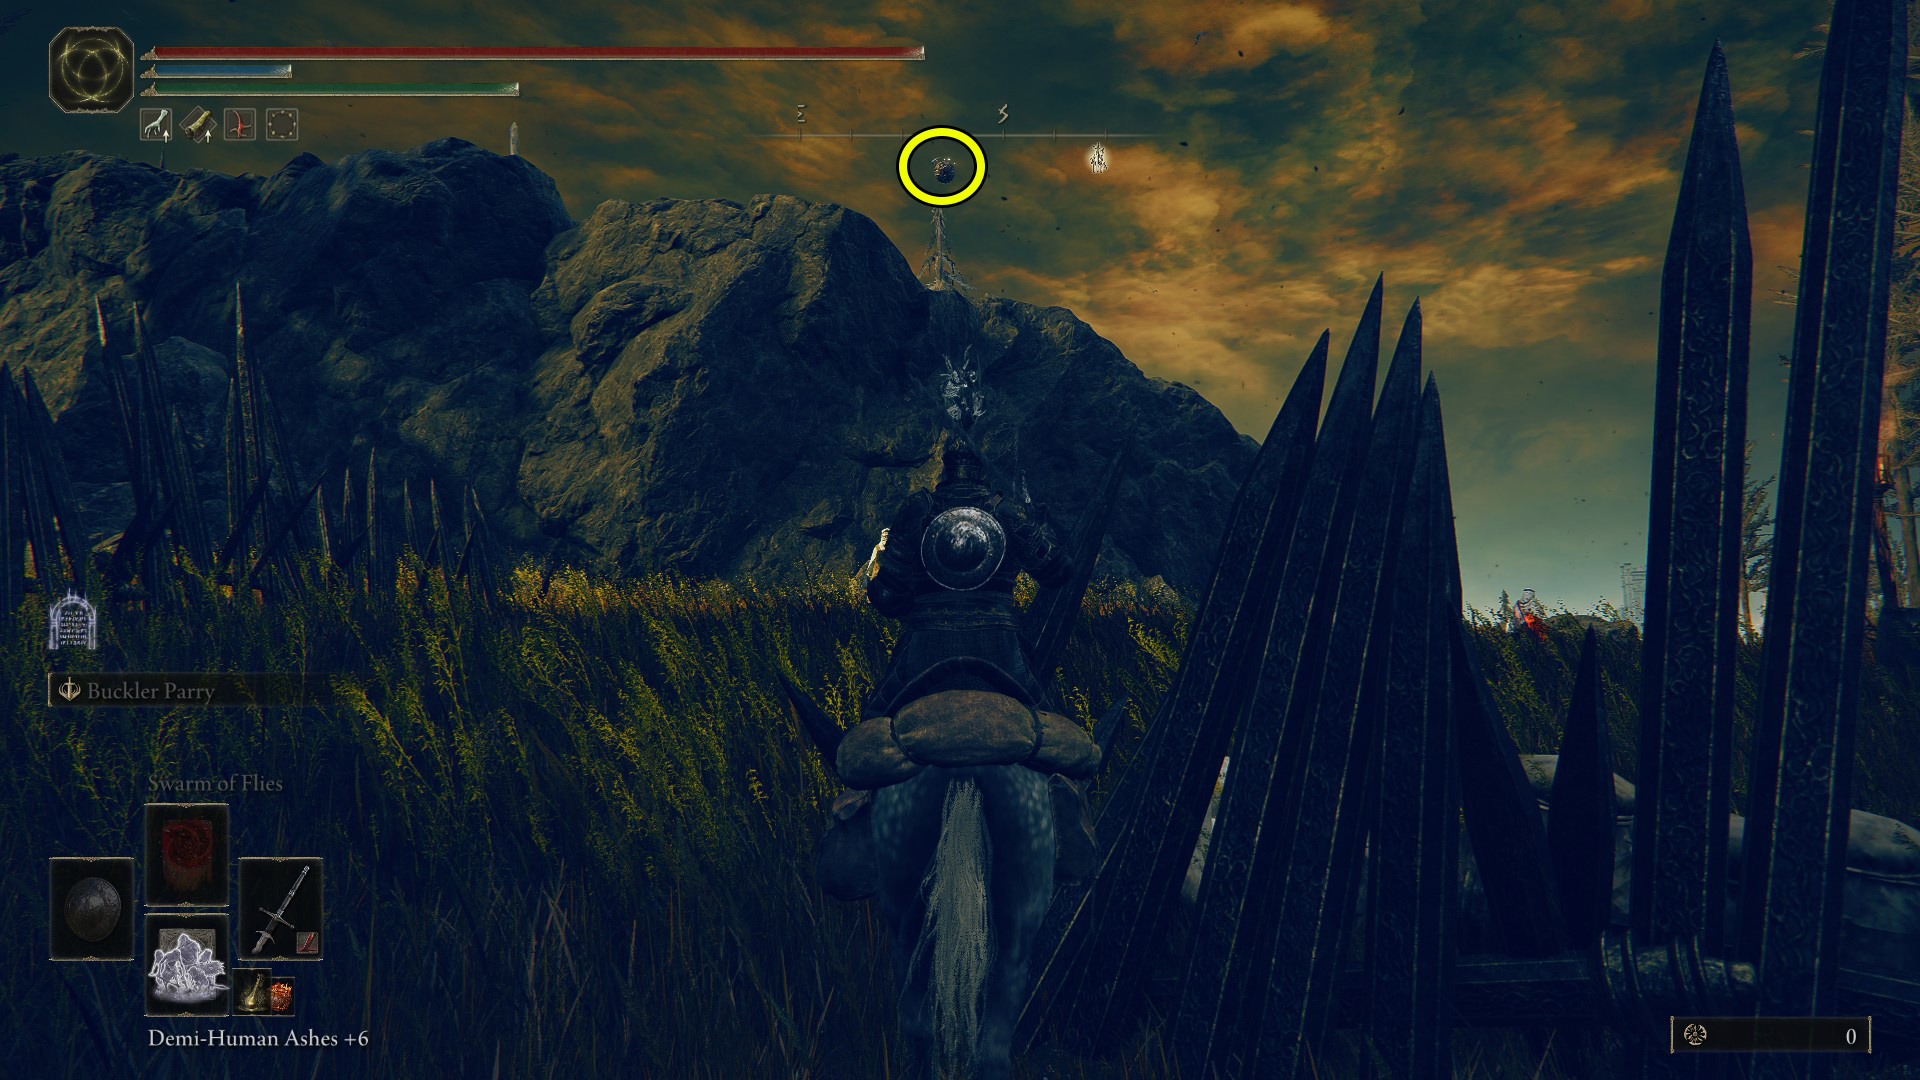
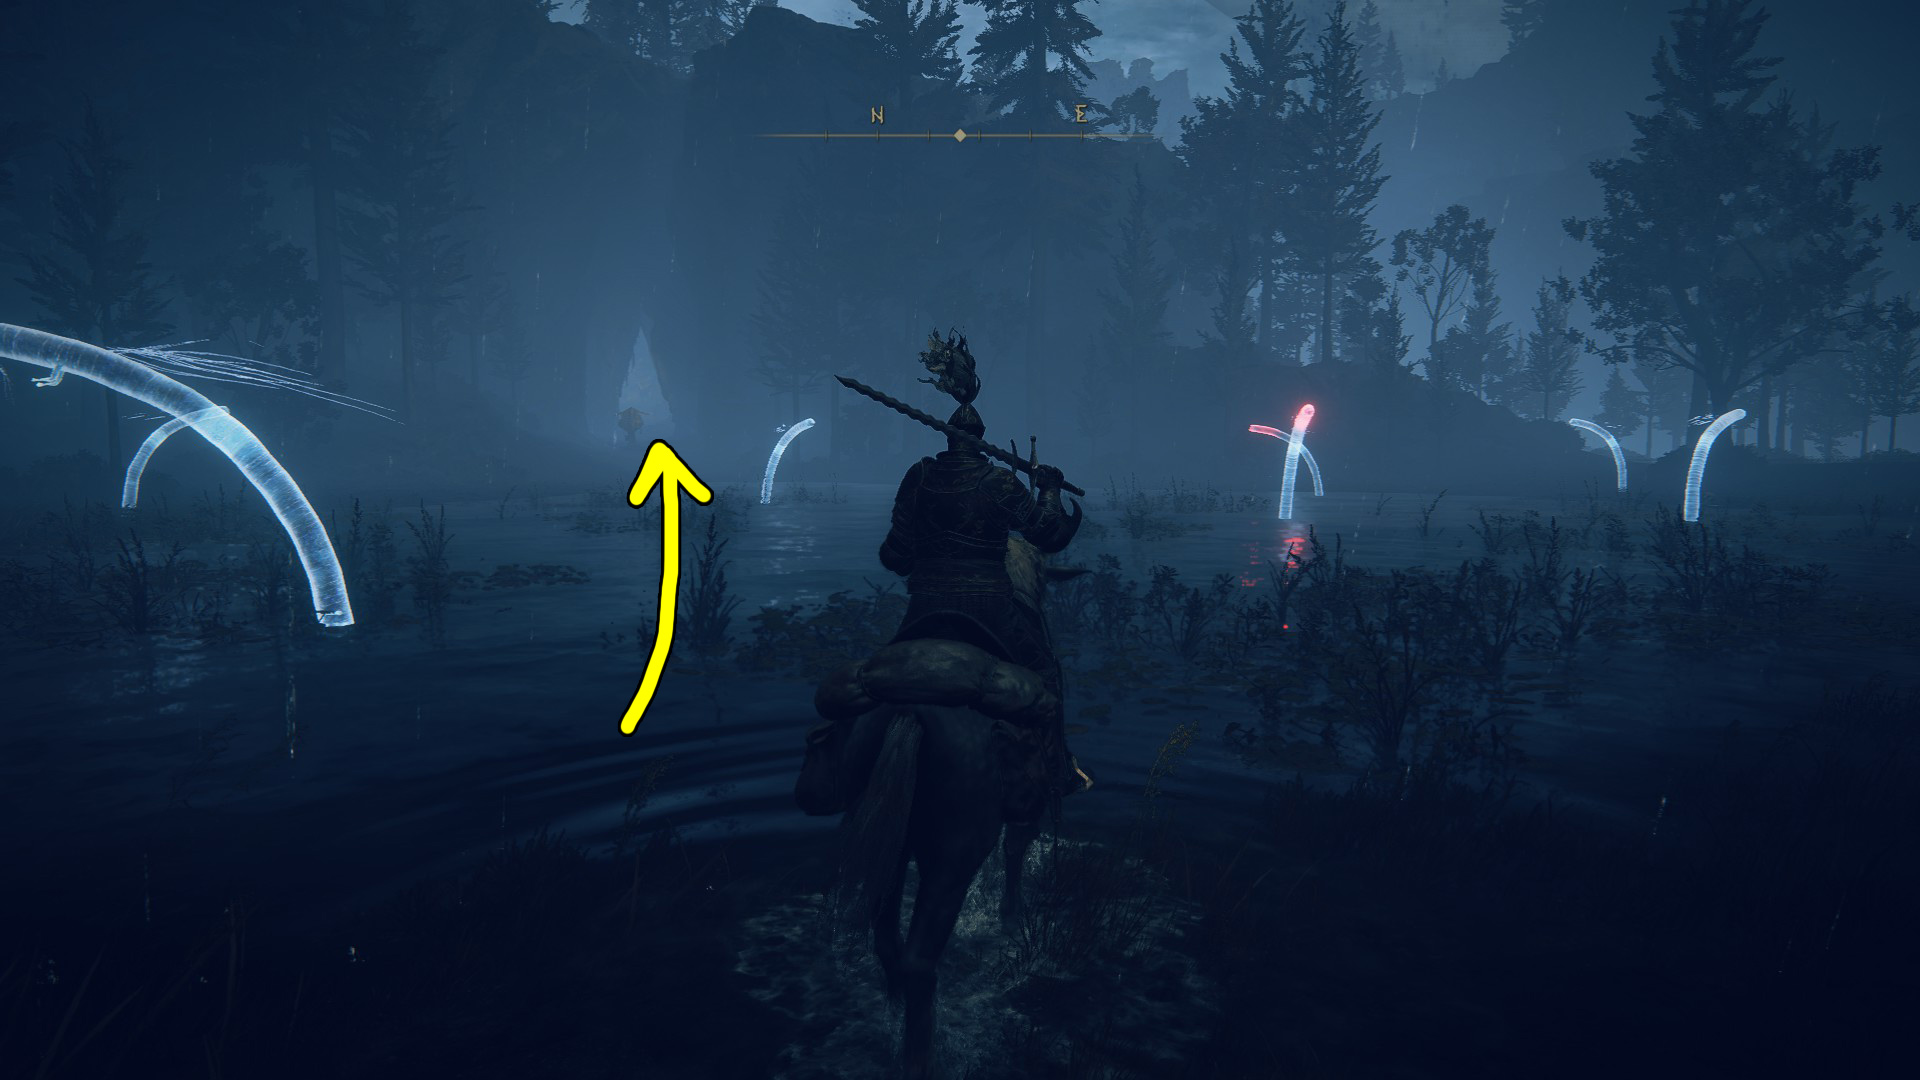
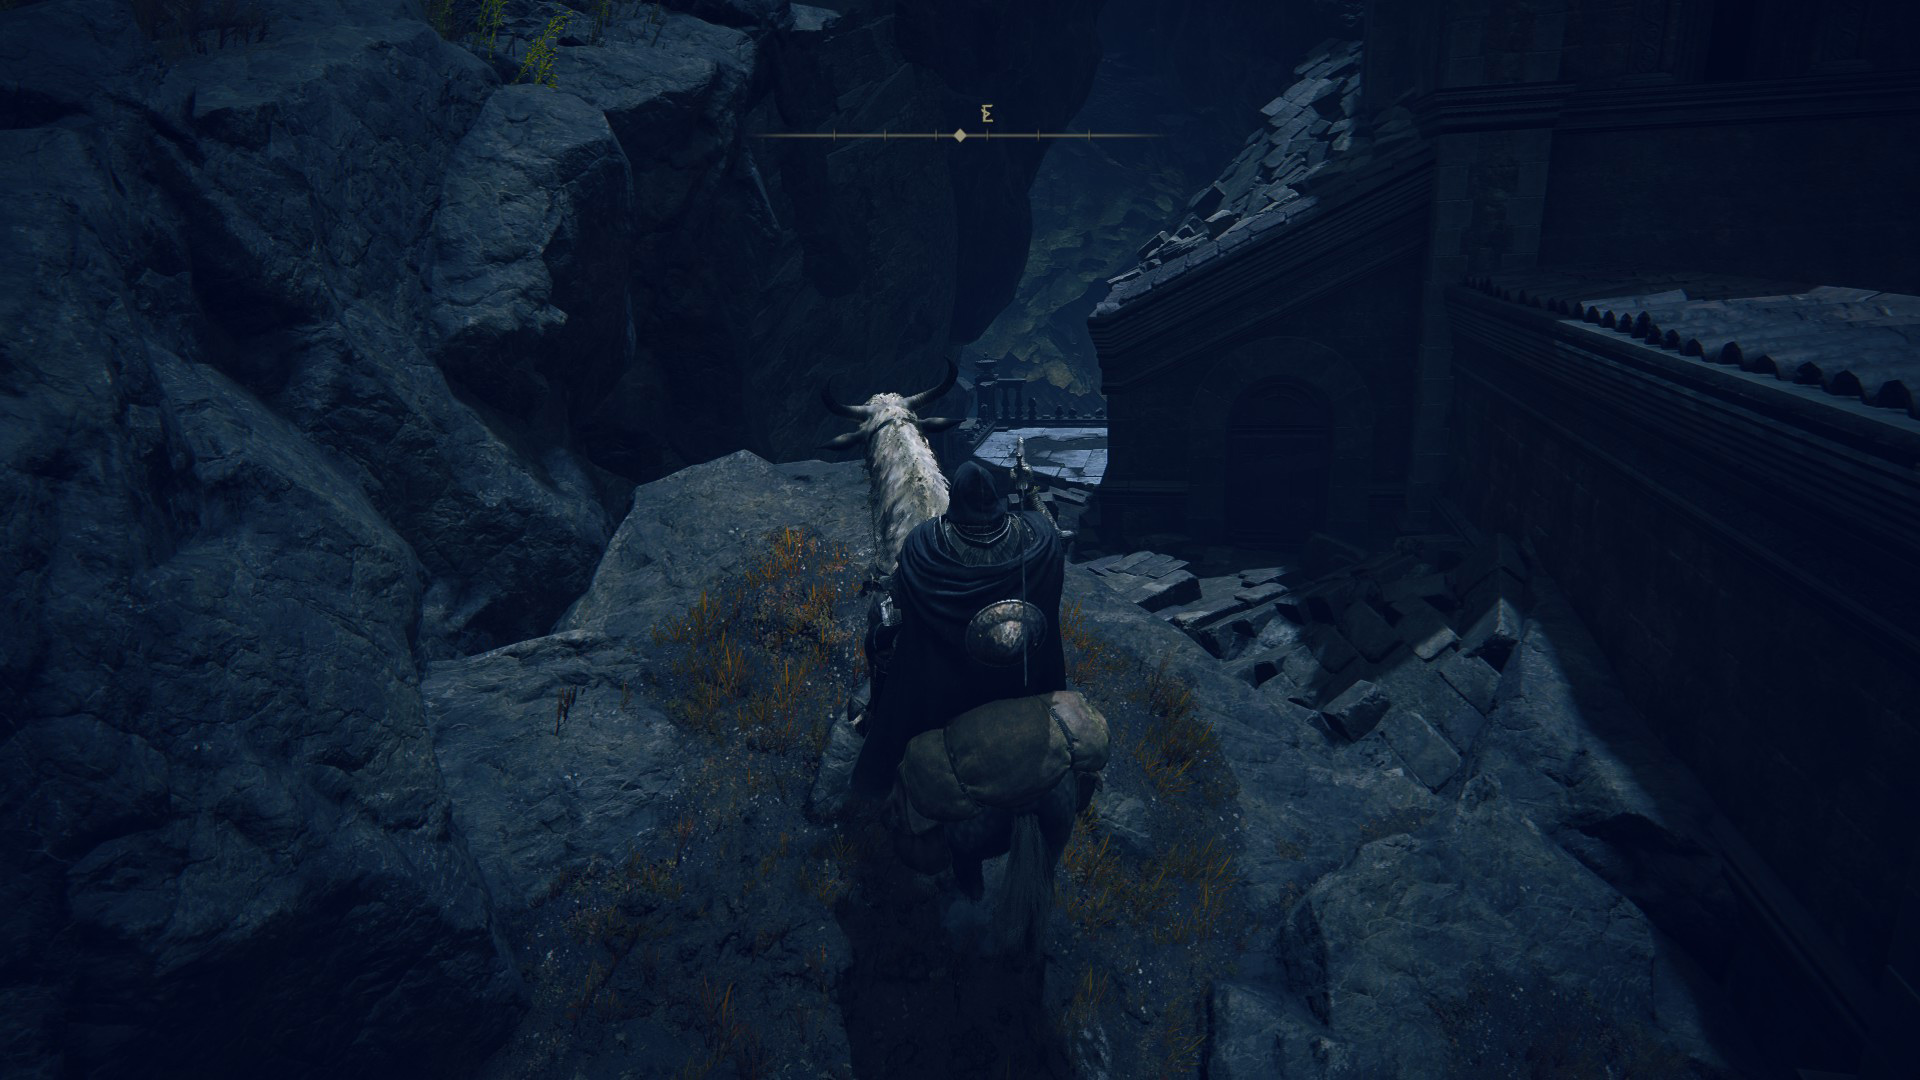
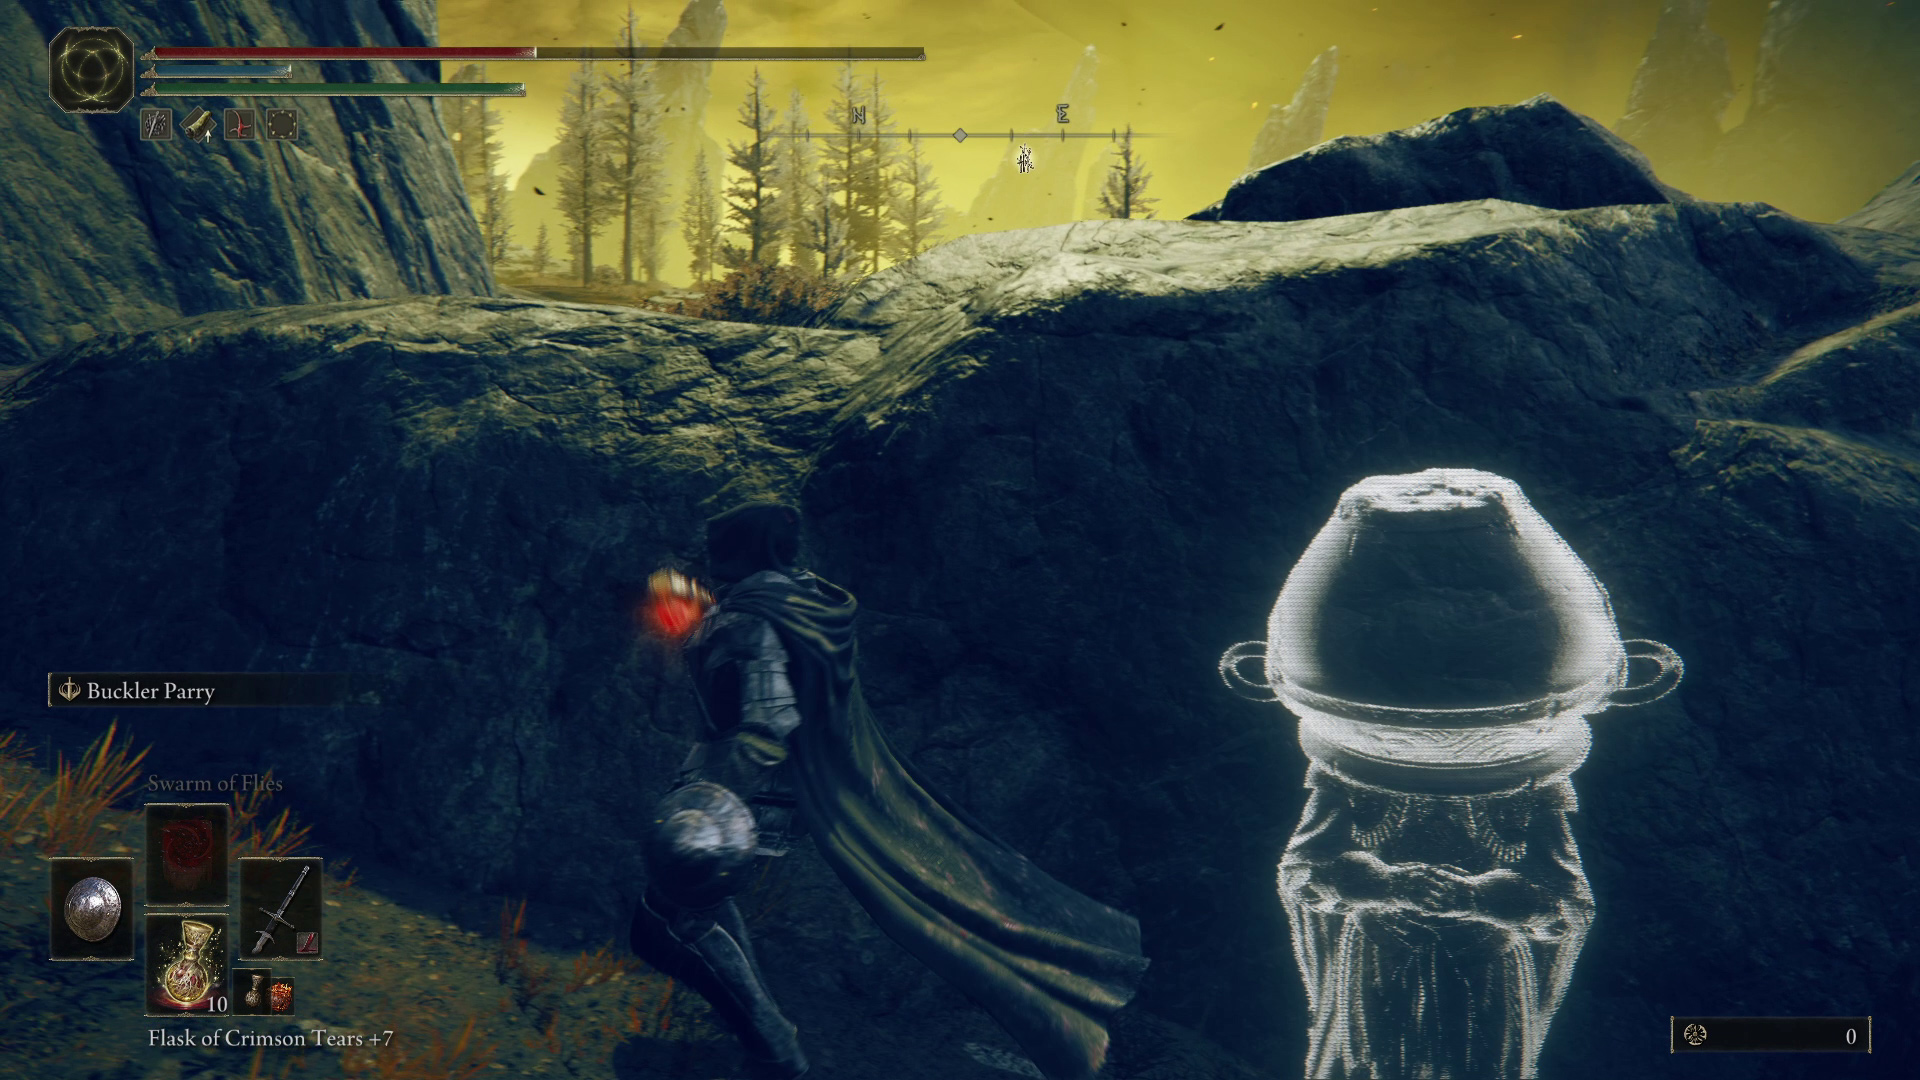
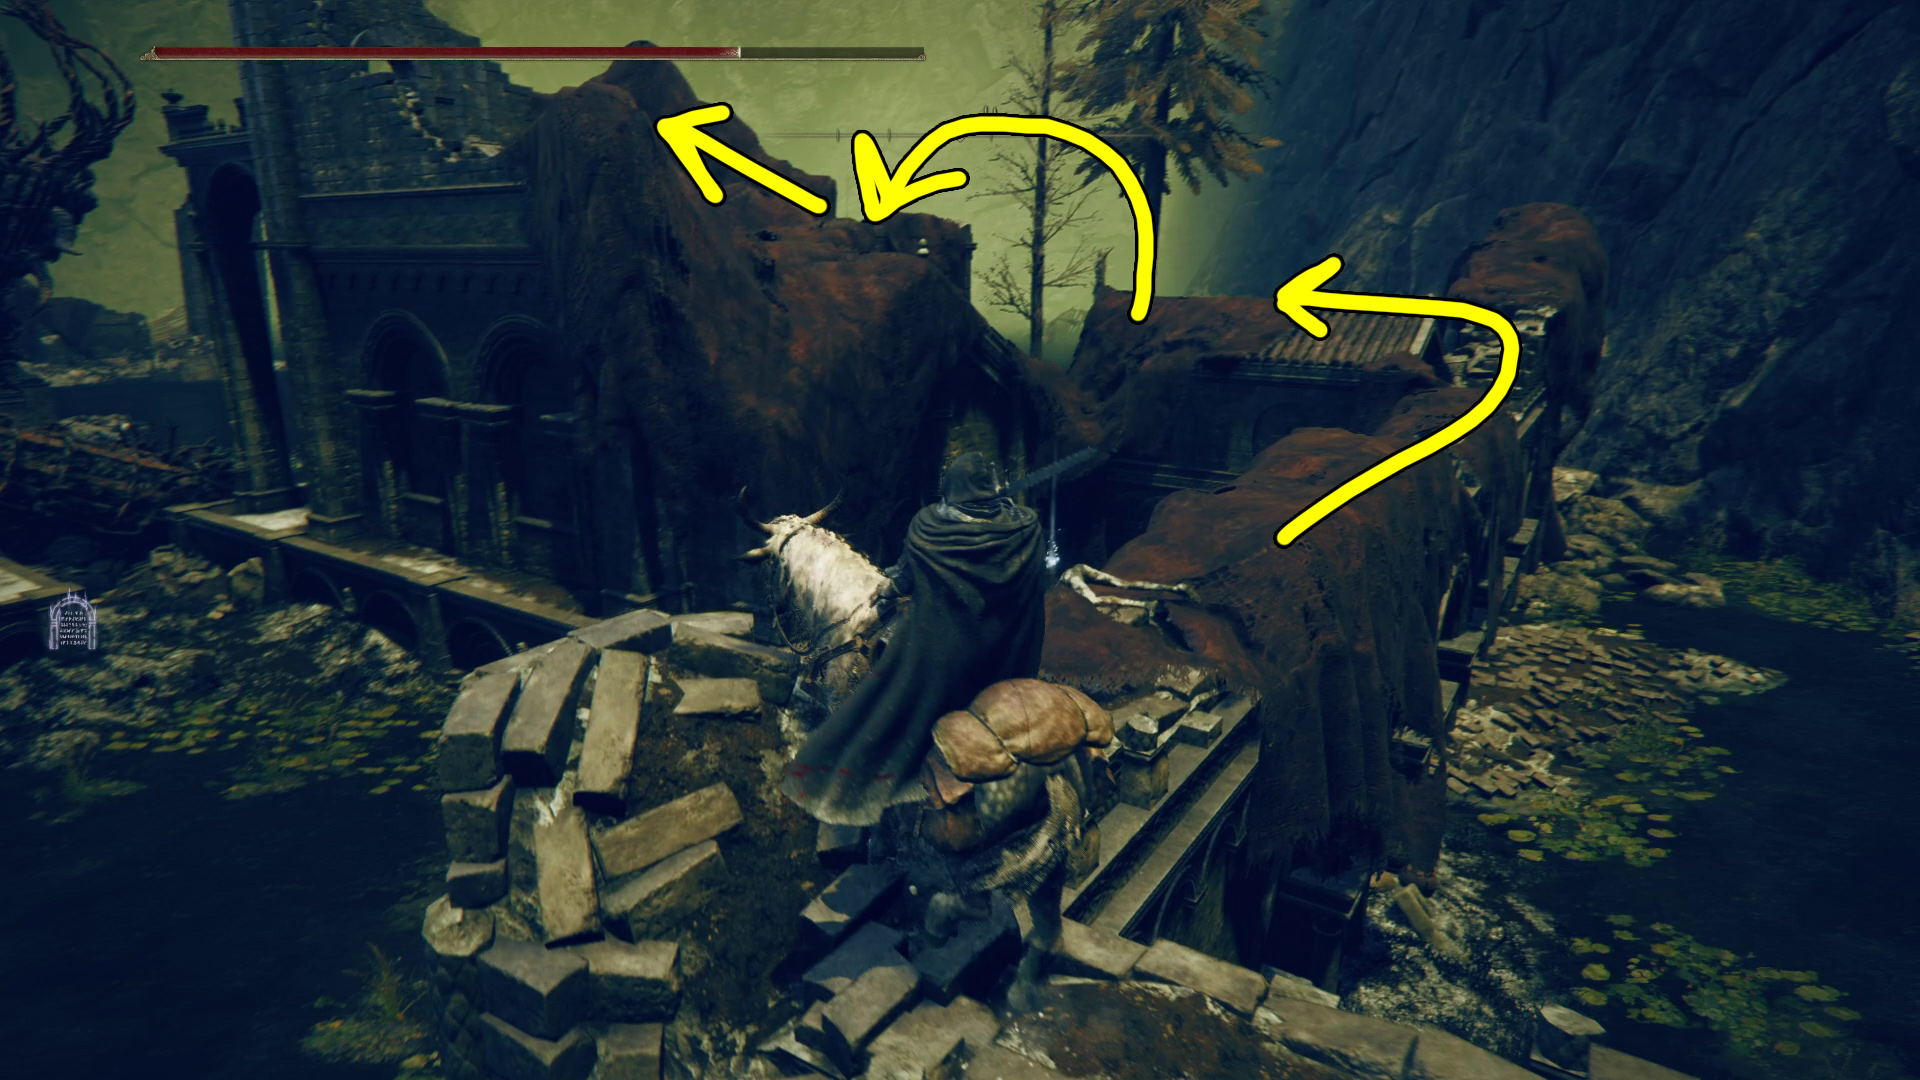
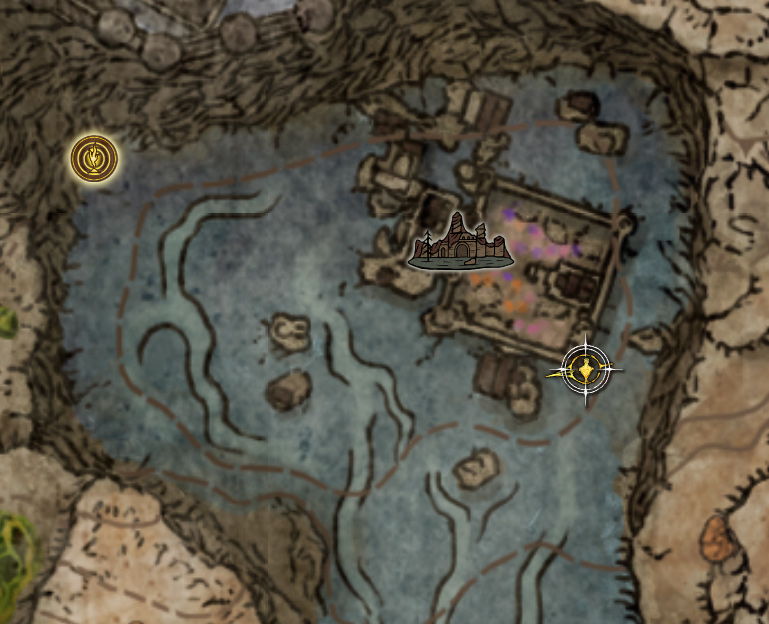
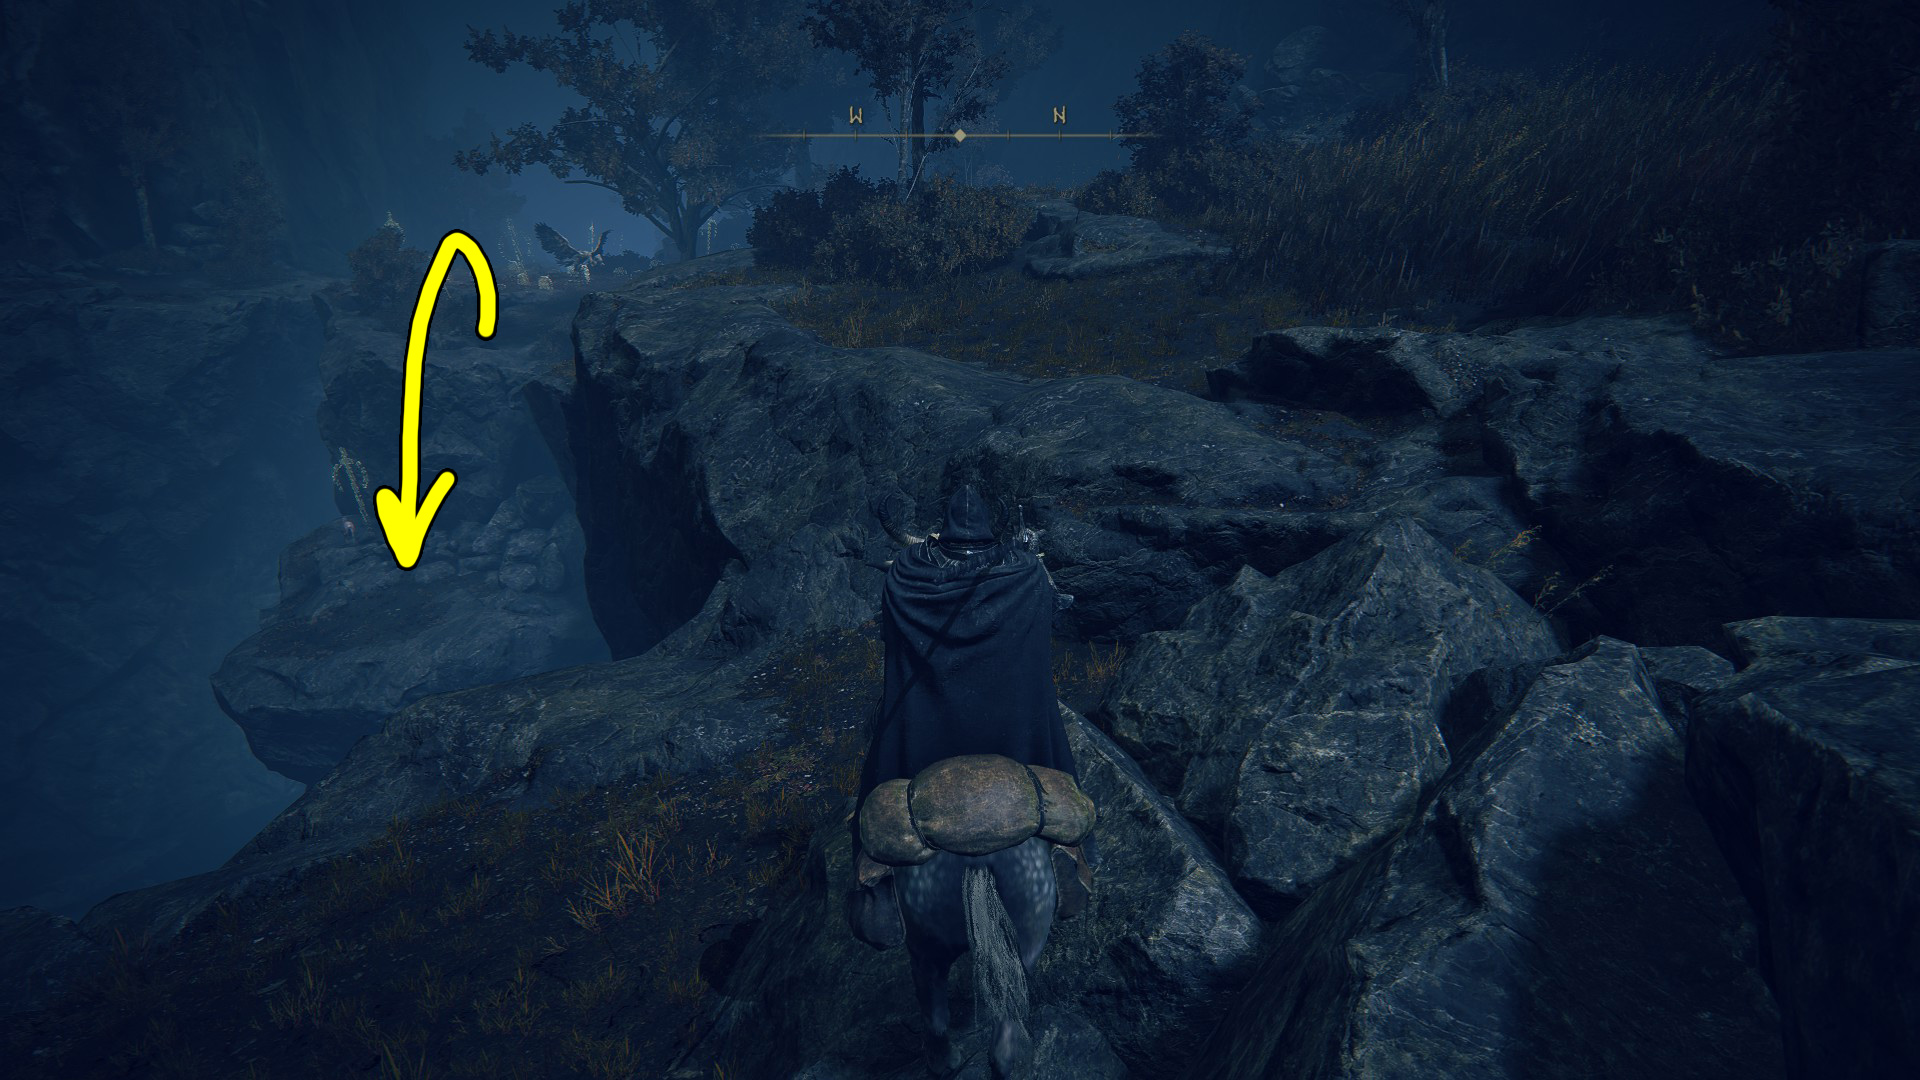
This location isn’t on the in-game map, so don’t look for it. However, if you’re rocking a high equip load build and want a talisman that buffs your dps, you can spend an Imbued Swordkey and unlock the waygate. Go due west from the Highroad Cross site of grace and you’ll find some water — find a good spot to jump down without dying, avoid the ghostly giga-knight, and head up to the top of the hill to find the waygate (you can actually see the waygate from the site of grace by looking west (Image 1).
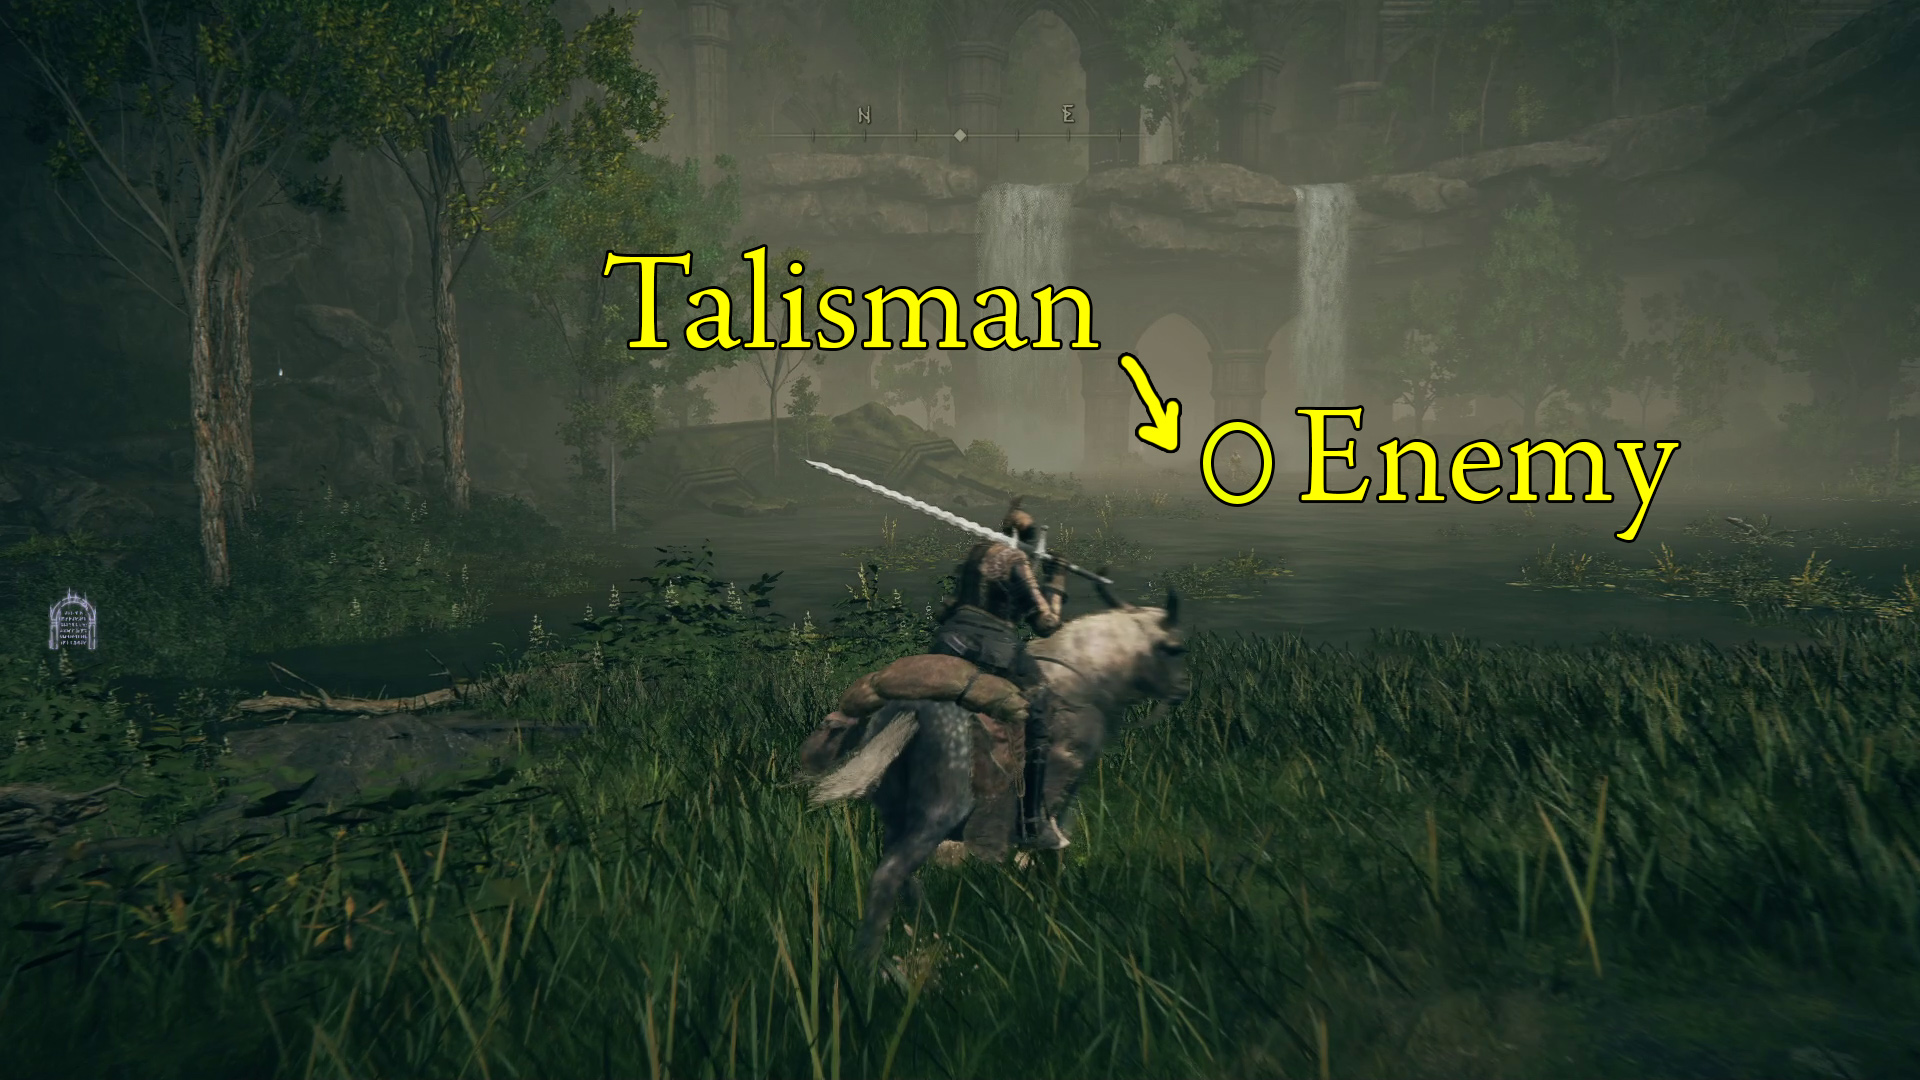
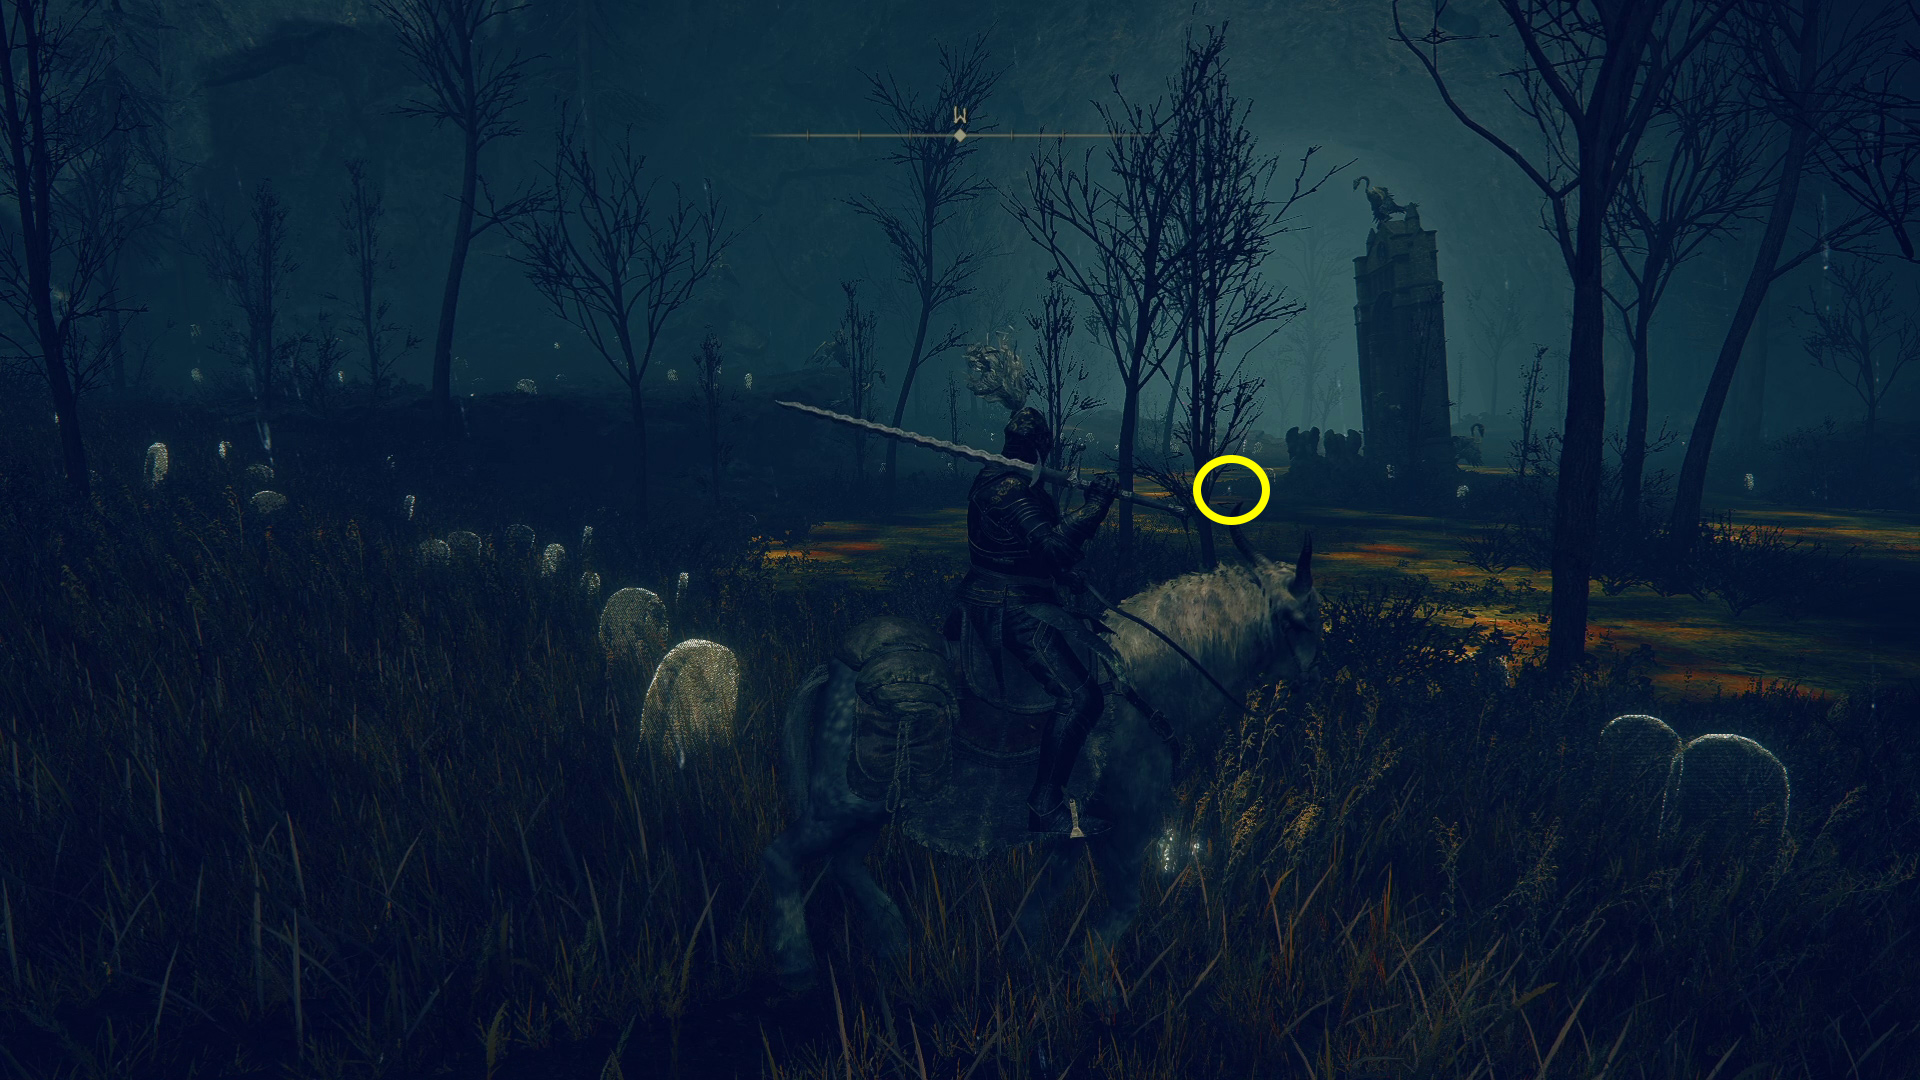
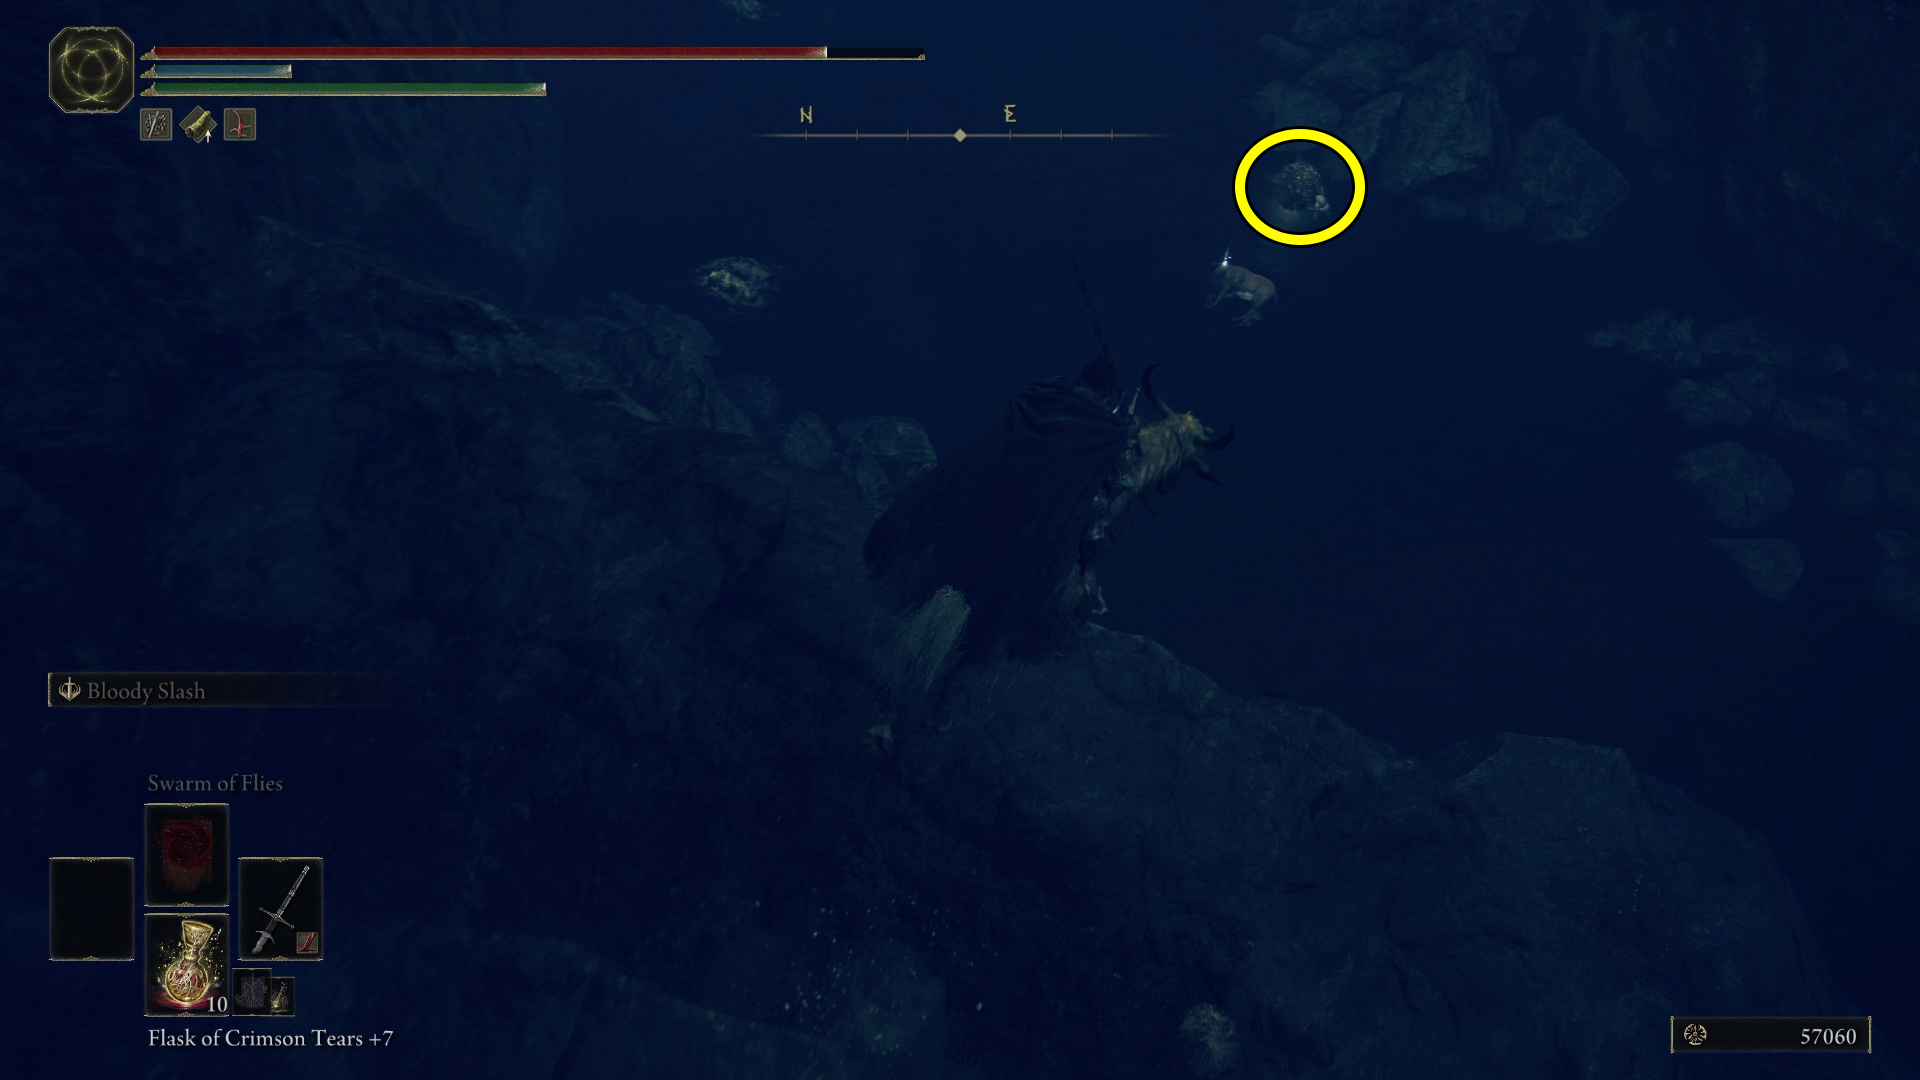
You’ll be teleported to a grassy area in the Ancient Ruins of Rauh. Head northeast to the shallow lake, where you’ll find a tough foe that drops Somber Smithing Stone[9]. Beyond the foe, in between the waterfalls, is an altar with the Verdigris Discus talisman at its base (Image 2).
Image 1Image 2
Scadu Altus, West
You can reach the Scadu Altus, West site of grace by heading west from the Highroad Cross site of grace and then skirting the water around the waygate, heading north and then west — the Scadu Altus, West site of grace is on the edge of a cliff overlooking Fog Rift Fort.
Fog Rift Fort
Unique & Important Items
Greater Potentate’s Cookbook [3]
Arrow’s Soaring Sting Talisman
Serpent Flail
Black Steel Greatshield
You can reach Fog Rift Fort by following a series of drop-downs onto ledges right near the Scadu Altus, West site of grace (detailed description on that is available in the Fog Rift Fort guide). The fort is pretty darn tough to clear — you’ll want some kind of fire projectile to help you clear it if you aren’t rocking a ranged build.
The church is due north of the Scadu Altus, West site of grace, but you’ll have to head northeast to reach the base of the hill and then head northwest to the church.
There are a number of enemy patrols you probably don’t want to fight, so keep an eye out for them as you approach. Inside the church, you’ll be invaded by Fire Knight Queelign — like with most humanoid NPCs, jumping attacks are your best bet, or else ranged attacks that can’t be roll-dodged. If you’re having a hard time defeating this NPC, you may want to grab the Scadutree Fragments in front of the statue that’s near the back of the church (so you can use them before fighting Queelign). Queelign drops the Crusade Insignia when defeated. There’s also a rune arc on a corpse in the southern alcove.
Shadow Keep Camp
Unique & Important Items
Crimsonburst Dried Tear
Scadutree Fragment
Battlefield Priest’s Cookbook [3]
Ash of War: Rolling Sparks
You can reach the Shadow Keep Camp by heading north on the road from the Highroad Cross site of grace. This can be a challenging area to collect items from, thanks to the large amount of tough soldiers, a knight at each entrance, and the furnace golem (who drops the Crimsonburst Dried Tear) casually strolling through the center of the camp. You can handle this a number of ways, but the “easiest” — assuming you don’t mind an unlucky death or two” is to simply run through the camp and grab everything. If you want the Crimsonburst Dried Tear, you can also try and draw the mobs into the attacks of the golem as you fight it.
You can find the Scadutree Fragment at the base of a statue on your right as you enter the camp from the south. Continuing north through the camp, a corpse on your left has Drawstring Messmerfire Grease. There are also two tents you can enter, in the very last row of tents to the north — one has a Shadow Realm Rune [4], the other the Battlefield Priest’s Cookbook [3].
If you look on your map, you’ll see tents on hills east and west of the road. The eastern hilltop has perfumers, and it’s where you can find the Ash of War: Rolling Sparks from a loot scarab that’s flying above near the top of the hill. You can also find a Somber Smithng Stone [6] in the tent at the very top of the hill.
Ash of War: Rolling SparksThe exact location of the scarab (look up!)
The hill to the west has a large amount of soldiers, but you can swing wide around them to the north (right) as you go up the hill. At the very top of the hill is a black knight wielding the Black Steel Twinblade — they’ll drop the weapon when killed.
Shadow Keep Main Gate
Unique & Important Items
Crimsonburst Dried Tear
Scadutree Fragment
Battlefield Priest’s Cookbook [3]
Ash of War: Rolling Sparks
Before you head south to continue with western Scadu Altus, you might as well grab the Shadow Keep Main Gate site of grace by entering the large castle and riding the elevator to the top. Note that approaching the gate will cause a “great rune to break”, which almost certainly affects all the NPC questlines. We’ve confirmed you can go back and get new dialog from the NPCs at the Highroad Cross site of grace, but if you want to be safe, go and talk to all the folks you’ve met so far.
After grabbing the site of grace and riding the elevator back down, turn left (east) and you’ll find a few soldiers scavenging the remains of some furnace golems, and you’ll be able to up the Furnace Keeper’s Note (which gives a hint regarding taking down the furnace golems) and a handful of Furnace Visages.
Ralva The Great Red Bear
Unique & Important Items
Highland Warrior Set
Pelt of Ralva (boss drop)
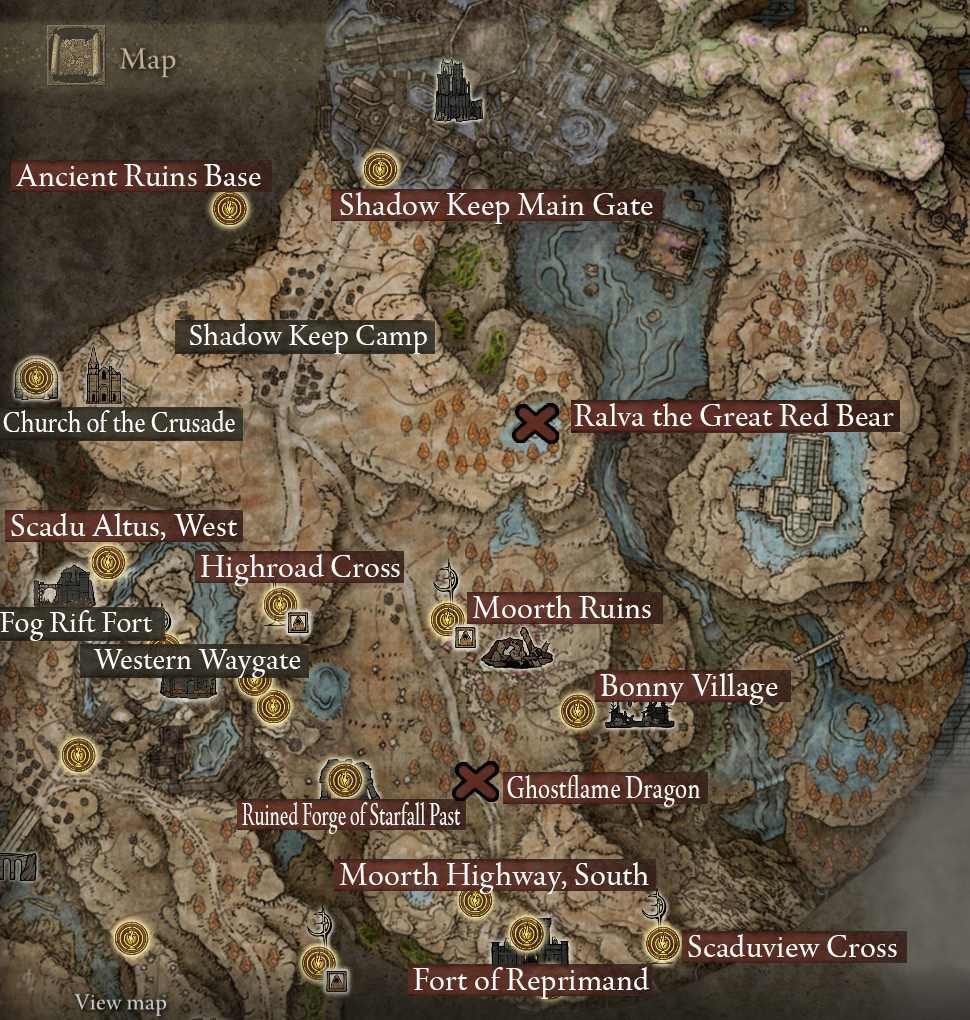
If you enjoyed fighting the Rune Bears from the base game, this’ll be even more fun! The boss drops a very sweet bear pelt helm, and you can also find the Highland Warrior armor set right next to the boss’ Stake of Marika — it’s kind of hard to spot, so here’s a map:
We’re going to head to the Moorth Ruins site of grace now, which is almost due east of the Highroad Cross site of grace. You’ll need to take the road to get there without dying, however, so wherever you’re coming from, make your way to the T-intersection between Shadow Keep and Highroad Cross, then go east-southeast and stay on the road — you’ll soon see the Moorth Ruins site of grace on your left. We’re just grabbing the grace for now, as the ruins lead to another area. You can also fight Dryleaf Dane here now, by using the May the Best Win gesture in front of him — he’ll drop Dane’s Hat and Dryleaf Arts.
Before we head to the forge, however, we’ll want to head west across the road from the site of grace and check out the small camp there — at the base of a statue is a Scadutree Fragment, and in the large tent next to the statue is the Fire Knight’s Cookbook [1]. A couple of black knights patrol the area, so make sure they are either away, or else pick them off one at a time before attempting to fight anything in the camp.
Next, we’ll make our way to another forge full of upgrade materials — it’s visible on the map before you reach it, the square structure to the southwest. You can stop by the nearby lake if you want, southwest of the Moorth Ruins site of grace. In the lake are a few crafting materials and a Shadow Realm Rune [2], guarded by a lobster. It seems less aggro than the usual lobstrosities, so you may be able to simply go around it.
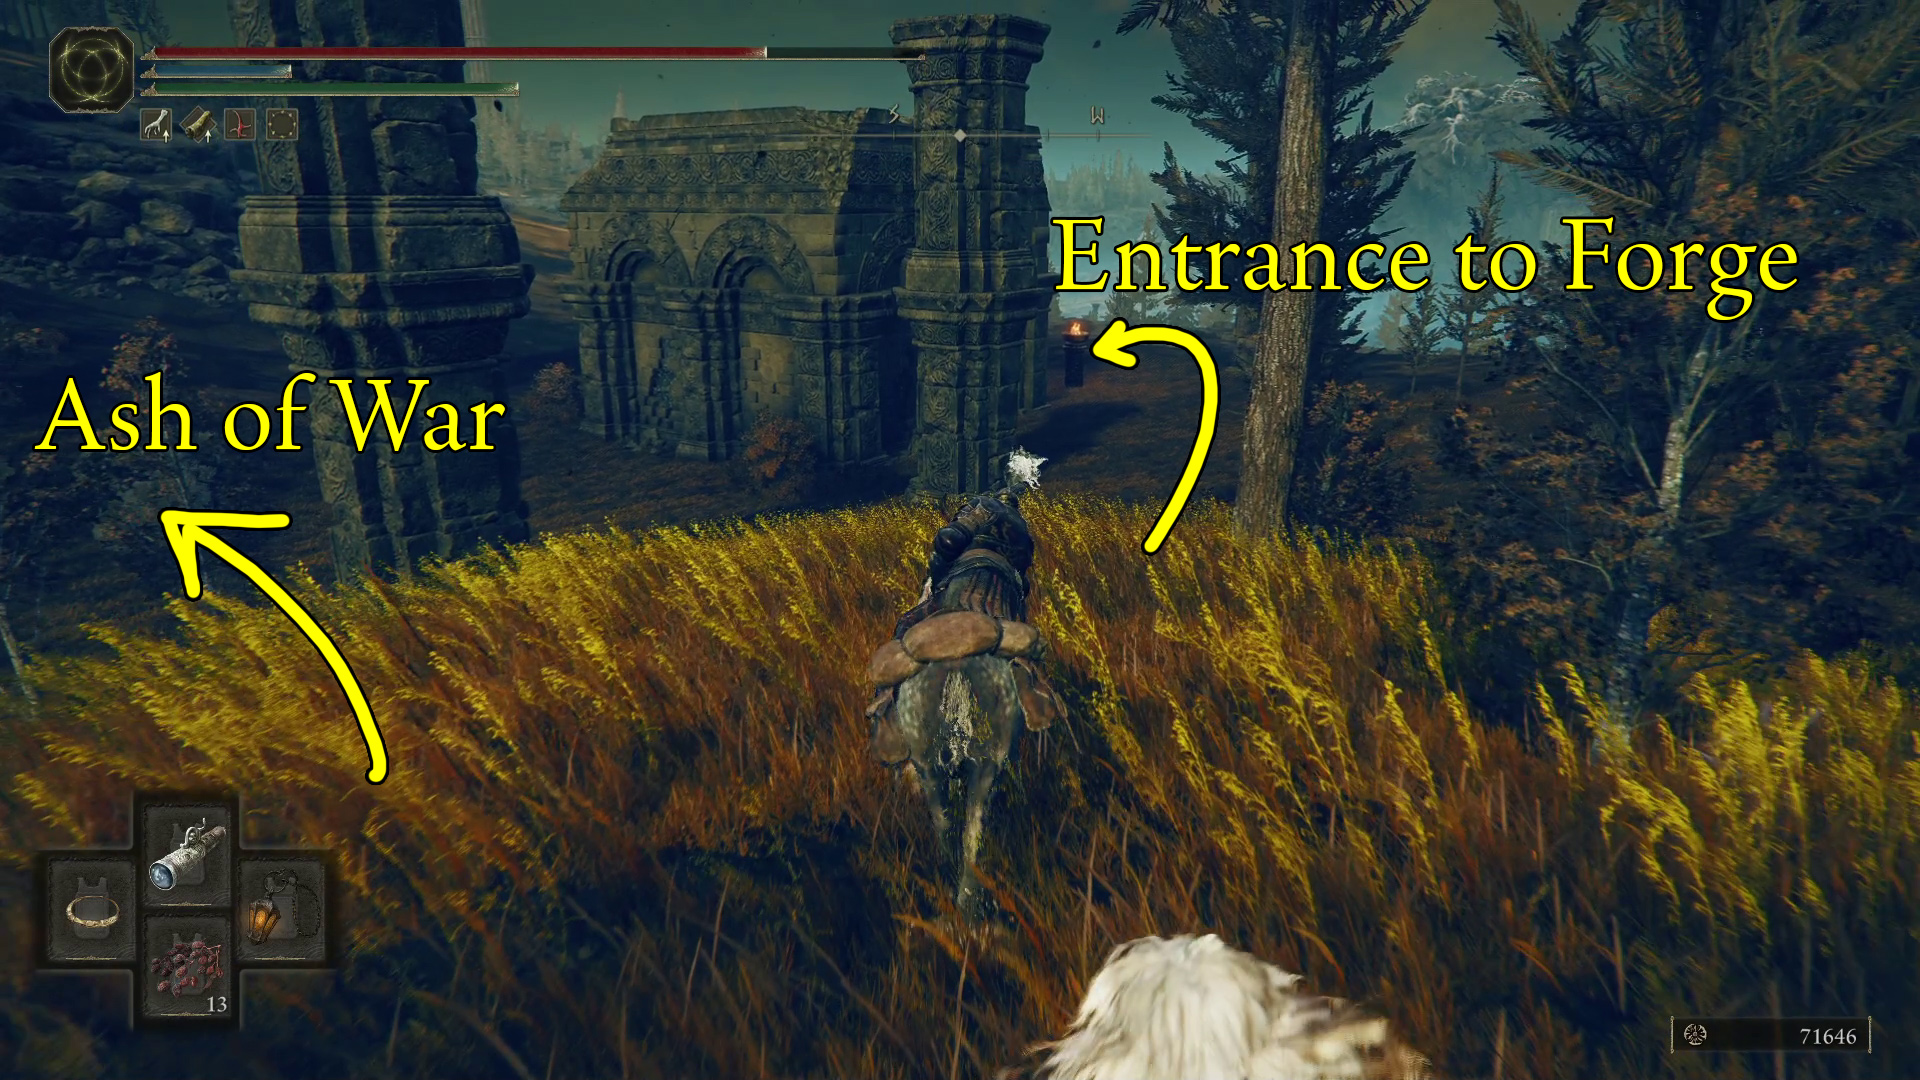
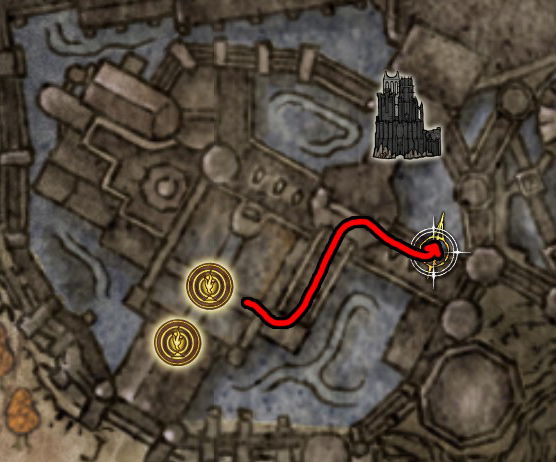
If you’re coming from the lake, you’ll crest a hill and then see the back side of the forge’s entrance (Image 1). Before you go in, however: in a crack between two broken sections of pillar, just east of the Ruined Forge, is a loot beetle that holds the Ash of War: PIercing Throw (Image 2). The enemies nearby will be a problem as you chase down the beetle, so either have full HP and some poise, or else try and lure the enemies away before attacking the beetle (which explodes on death, by the way). There’s another corpse tucked between the rubble further east that has x4 Smithing Stone [1].
That done, you can make your way around the large stone top of the forge, past the sleeping guards, and head inside.
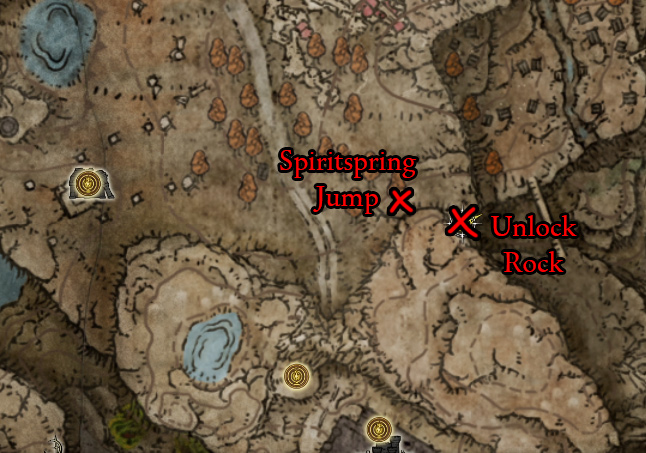
From the Moorth Ruins site of grace, head south on the road, and when you see the the dragon fighting the soldiers in the road, head southeast off the road. You’ll come to a locked spiritspring — continue east to the edge of the cliff and then south around the corner and you’ll find the rock you need to destroy to unlock the spiritspring (Image 1). Lots of bats are between you and the rock, however. Once it’s unlocked, head back to it and use it to jump south up onto the cliffs.
You’ll see a path that leads south through some birds — just follow the path as it slowly curves east and takes you up the hill to the Scaduview Cross site of grace. Stay mounted and tap the sprint key regularly if you want to avoid the birds, as there are quite a few visible and hiding along the path. As always, make sure to grab the nearby items, in this case a Scadutree Fragment and three Blood Burgeons.
From the Moorth Ruins site of grace, once again take the road south. You’ll encounter a Ghostflame Dragon fighting some soldiers — defeating the dragon will earn you the usual Somber Ancient Dragon Smithing Stone and a Dragon Heart. The road continues south through a tunnel, and on your right after you reach the fort is the Moorth Highway South site of grace.
Fort of Reprimand
If you already grabbed the Behind the Fort of Reprimand site of grace while in the Gravesite Plain, you can simply teleport there and start the dungeon from the back. If you’d like to follow our guide, however, or if you’re simply someone who likes to have all the sites of grace, you’ll want to instead teleport to the Moorth Highway South site of grace and then head in the front door.
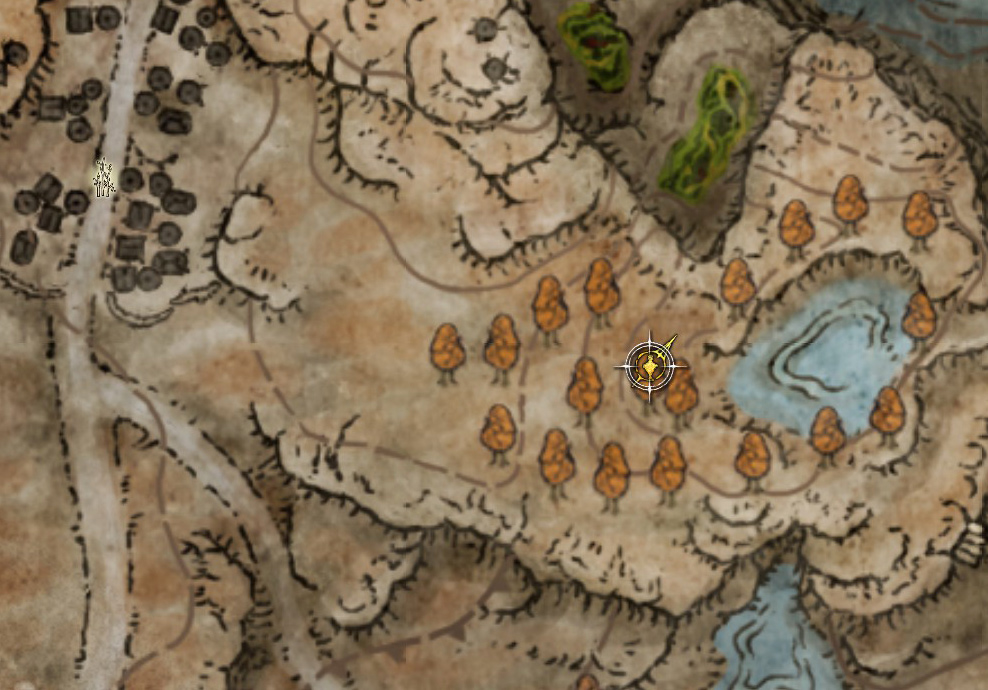
For this section, we’ll be making our way to the Rauh Base region and grabbing a site of grace for when you’re ready to do that region (and grabbing some loot on the way). From the Moorth Ruins site of grace, ride due northeast until you hit a shallow lake. Go to the northern edge of the lake, where you’ll find a narrow tunnel in the rocks). At the entrance to the tunnel is a statue with a Scadutree Fragment at its base. Grab it and continue into the tunnel, grab the Shadow Realm Rune [3] and the sunflowers from the ground by the poison flowers, and then in the next room pick up the Heal from Afar incantation from the base of the tree.
The tunnel
Continue north up the narrow tunnel that leads out of the cave and you’ll reach an area full of birds and poison. Despite being a fairly wide area, there ain’t much here, and you don’t have to fight any of the birds if you don’t want to. Ride north downhill, to near the edge of the cliffs on your right, and you’ll find a forager (Image 1). Speak with it to recieve the Forager Brood Cookbook [5] and a Pearlescent Scale. From the forager, look west-southwest and you’ll see a monument — at its base in the “water” are the Gravebird Anklets (Image 2).
Image 1Image 2
Head west and then northwest to continue downhill, and at the base of another, smaller monument you can grab x5 Smithing Stone [3]. A bit further northwest, you’ll enter Rauh Base, and just ahead is the Ancient Ruins Base site of grace.
Moorth Ruins (2)
Unique & Important Items
Shattered Stone Talisman
Golden Arcs
OK, this time for real. Teleport to the Moorth Ruins site of grace, and head southeast towards the large arch (if you need runes, it can be worth killing the shadowy mobs here, as they drop a lot of runes relative to how easy they are to kill). Once you go through the arch, you’ll be able to go through the doorway straight ahead to find a talisman — kill the mob hiding around the corner on the left, continue onto the tiled roof, and go left around the corner to find the Shattered Stone Talisman on a corpse. Head back out of the building and turn right (northeast), jump up and grab the Shadow Realm Rune [3] on the corpse hanging off the ledge, then continue around the corner beneath the corpse to find the path that leads deeper into the ruins (see Image 2).
RoutingImage 2
Drop down, and watch out for the two shadow dogs guarding the nearby corpse (which is only holding x3 Whiteflesh Mushroom) — up the stairs you’ll find another corpse with x2 String. Now head back to where you dropped down and continue southwest, dropping down into a tunnel. Turn around and go east to find a corpse with x1 Golden Horn Tender, then head back west and continue forward until you drop down once again, into a larger cavern. There’s another drop ahead onto a roof, but three mobs are lurking just out of site, so be ready. Once they’re dead, you can head into the small structure and grab the Golden Arcs incantation from the open chest.
Go west to the edge of the roof, then drop down onto the baclony below, and from there you can drop down again (Image 3). Beneath the balcony is x4 Shadow Sunflower, and the way forward is southeast. You’ll head uphill through a tunnel and then reach a ladder — climb up, and you’ll be right in front of the Bonny Village site of grace.
Scadu Altus – East
This area is reached via the path to the Bonny Village, through Moorth Ruins (see previous section).
Bonny Village
Unique & Important Items
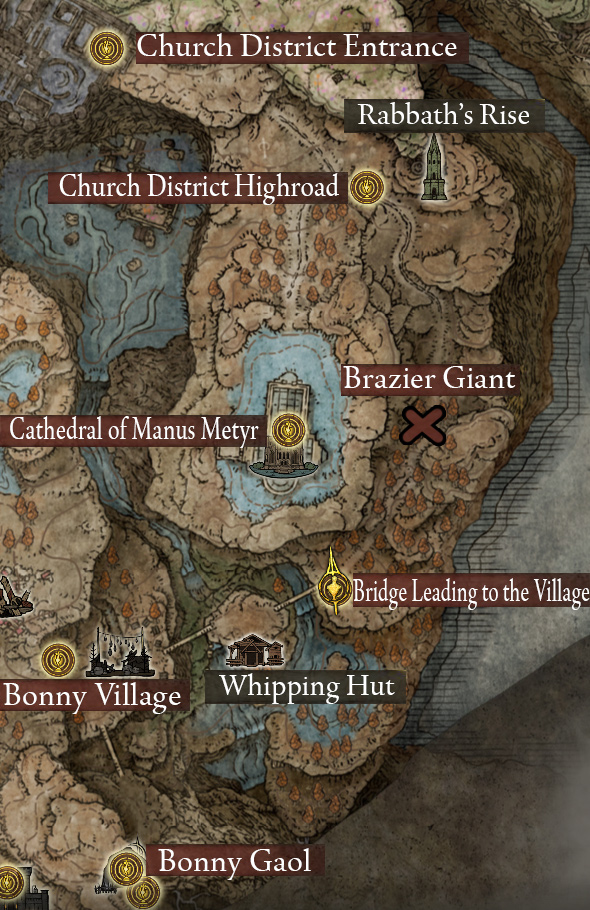
x2 Hefty Cracked Pot
Bonny Butchering Knife
Revered Spirit Ash
To reach the Bonny Village, you’ll need to go through the Moorth Ruins (see previous section). From the Bonny Village site of grace, head southeast down the path into the village. There are tons of shadowy mobs here, so either move quickly or clear them as you go. At the intersection ahead, a Greater Potentate patrols — these guys don’t drop anything, but if you want to fight them, stay on Torrent and take advantage of their sharpening animation to get some strong attacks in.
Turn right (south) where the paths meet, and you’ll find a Hefty Cracked Pot on a corpse right in front of you (plus a small rune above). Continuing south will take you across the bridge to the Bonny Gaol, but for now, we’ll continue northeast past where the Potentate patrols — on the left in a ruined house is the Bonny Butchering Knife.
Continue forward, and drop down where the broken bridge is — you’ll land amongst a couple of dogs, so take them out and then loot the three corpses. Head north down the ravine, watch out for the large dog in the nexts ection, and then at the end of the ravine you’ll find a Revered Spirit Ash. Go south to the other end of the ravine, and you’ll find a path to the left (northeast) that leads out of the ravine.
Follow the path as it bends north — on your right is a bridge that leads out of town (guarded by another Potentate), but before you cross the bridge, continue north, where you’ll find a Potentate guarding another Hefty Cracked Pot. Keep going north out of the village, and the path will lead to a tree with the O Mother gesture. That done, you can head back into the village and take the bridge we passed northeast out of town to reach the Whipping Shack.
Bonny Gaol
Unique & Important Items:
Night Armor Set (Helm of Night, Armor of Night, Greaves of Night, Gauntlets of Night)
Shield of Night
Stalwart Horn Charm +2
Curseblade Meera Ashes (boss drop)
To reach this dungeon, start from the Bonny Village site of grace and go southeast down the path into the village. Turn right (south) where the paths meet, cross the bridge, and follow the path until you can turn right into a cave. Spam sprint on torrent once you cross the bridge, otherwise you’ll have to fight some scorpion/spider hybrids.
From the Bonny Village site of grace, go east through the village and across the bridge to reach the Whipping Hut, which lies to the south of the path.
Bridge Leading to the Village
From the Bonny Village site of grace, go east through the village and across the bridge that leads northeast. Go past the Whipping Hut, and continue northeast across the next bridge — on your right, you’ll find the Bridge Leading to the Village site of grace.
Church District Highroad
Unique & Important Items
Cerulean-Sapping Cracked Tear
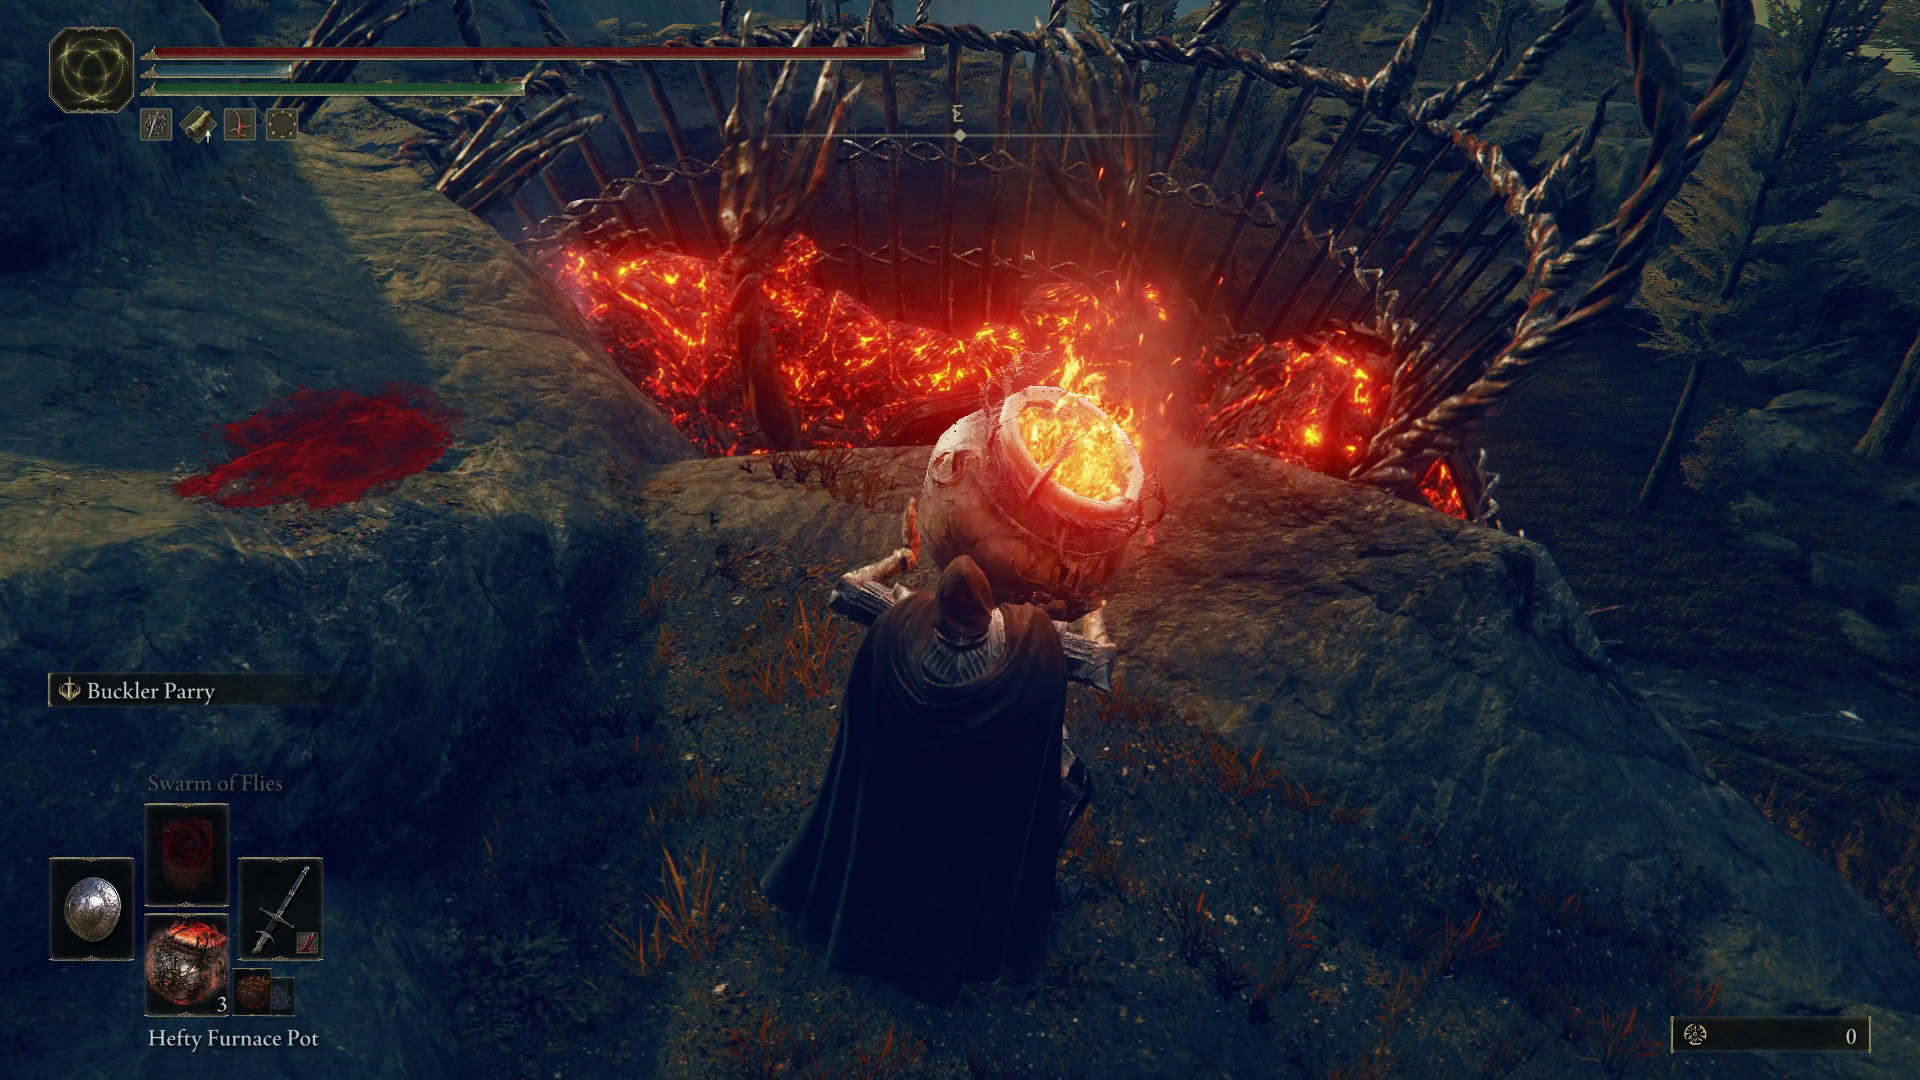
If you want to fight the Furnace Golem, craft at least x3 Hefty Furnace Pots before heading out.
From the Bridge Leading to the Village site of grace, follow the road northeast and then north — along the road you’ll startle a bird and doing so will aggro all the wolves in the area, so keep going and tap sprint on Torrent to avoid getting swarmed. You’ll go through a tunnel and then come out in front of a furnace golem. On the left is a spiritspring jump right next to the road (Image 1) — take it up and then run southwest to the hiding spot (Image 2) until the golem walks over to the cliff you’re on top of. Wait for him to do an attack, then rush out and throw three Hefty Furnace Pots into the top of his flaming basket (Image 3) — you can chain throw them one after the other. The golem will die after the third furnace pot and you’ll recieve the Cerulean-Sapping Cracked Tear.
Image 1Image 2Image 3
That done, you can get down by going southwest, then go east back to the road and continue following it north. The road will wind west up the hill, and soon on your right-hand side you’ll find the Church District Highroad site of grace.
Rabbath’s Rise
Unique & Important Items
Rabbath’s Cannon
Jolán and Anna (With Swordhand of Night Jolán)
From the Church District Highroad site of grace, go due east to the nearby tower. Head inside and go up the stairs, and then walk over to the southwestern wall and hit it to reveal a hidden balcony. Destroy the stone on the ground to unlock the nearby spiritspring, then jump east off of the balcony and make your way around the tower until you find the spiritspring jump. Use it to jump southwest, and hold forward on the left stick to make sure you stick to the stairs when you land. Continue up the stairs and you’ll find a chest that contains Rabbath’s Cannon.
The hidden balcony
You can also enter another secret area in Rabbath’s Rise from the Shaman Village in Scaduview. To do so, go to the Shaman Village, then go to the cliffside to the south. You can descend this in order to reach the upper level of Rabbath’s Rise, where you can find the body of Swordhand of Night Anna, Jolán’s sister.
If you received the Swordhand of Night Jolán after defeating her at the end of the Cathedral questline (as opposed to the Sword of Night), then interacting with Anna’s body will turn the Swordhand of Night Jolán spirit ashes into the Jolán and Anna spirit ashes, some of the best bleed summons in the entire game.
Cathedral of Manus Metyr
Unique & Important Items
Hole-Laden Necklace
Ruins Map
Greater Potentate’s Cookbook [4]
Ymir’s Bell Bearing
High Priest Set
Maternal Staff
Swordhand of Night Jolan OR Sword of Night
Cherishing Fingers
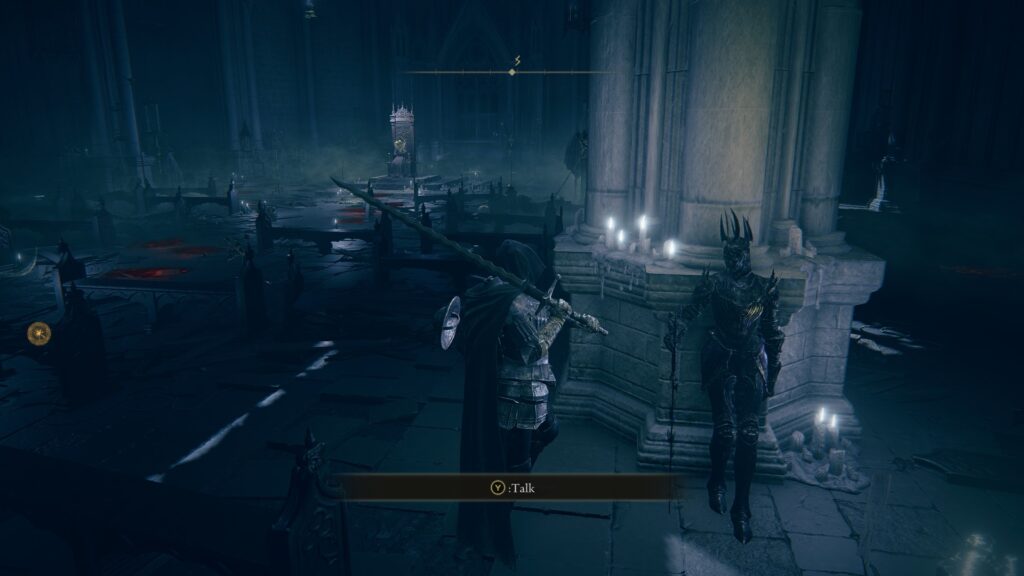
From the Church District Highroad site of grace, take the road that leads west, and follow it as it curves south towards the cathedral. There are a number of marrionete soldiers on the road and in the woods, so be aware of your surroundings if you choose to engage them (such as if you go around the Cathedral to the east to locate the Greater Potentate’s Cookbook [4]. Inside the cathedral, speak with Count Ymir, exhaust his dialog, and purchase any sorceries you want — speaking with him nets you a map that begins a long questline. Make sure you also exhaust the dialog of the knight in black (Jolán), who can be kind of hard to spot.
After heading to the two locations that the maps indicate (the Finger Ruins of Dheo and the Finger Ruins of Rhia) and ringing the Hanging Bells there, you can return to the Cathedral and speak to Ymir and then rest at a Site of Grace in order to open the path to the Finger Ruins of Miyr.
After defeating the boss there, Ymir and Jolán will both be hostile to you, and will need to be defeated. See our Boss Guide to see how best to take on both.
After dispatching them, you will be able to find Jolán slumped over where she used to be. After a brief exchange, you will be able to give her either an Iris of Grace or an Iris of Occultation:
Giving Jolán an Iris of Grace will have her turn into the spirit summon Swordhand of Night Jolán, and will allow you to continue her quest in order to turn that summon into the more powerful Jolán and Anna summon at Rabbath’s Rise.
Giving Jolán an Iris of Occultation will see her give up and die, giving you her Sword of Night, a powerful bleeding katana. This will end the questline, meaning that finding Anna’s body at Rabbath’s Rise will no longer create Jolán and Anna.
After you have defeated Jolán and Ymir, you can return to the graveyard to the east of the Cathedral in order to find the Cherishing Fingers sorcery.
Church District Entrance
From the Church District Highroad site of grace, take the road northwest into the tunnel. Wolves will come out from the grass as you enter the tunnel, so be wary. Keep going through the tunnel, up the ramp, and you’ll reach the Church District Entrance site of grace.
Scadu Altus – Lower (Recluses’ River)
This area of Scadu Altus is a bit different than the other two, as the only way to reach it is through a hidden passageway beneath the Shadow Keep. Like eastern Scadu Altus, it’s not particularly dense, but there is still a lot of useful loot, including x2 Scadutree Fragments
How to Get to Lower Scadu Altus
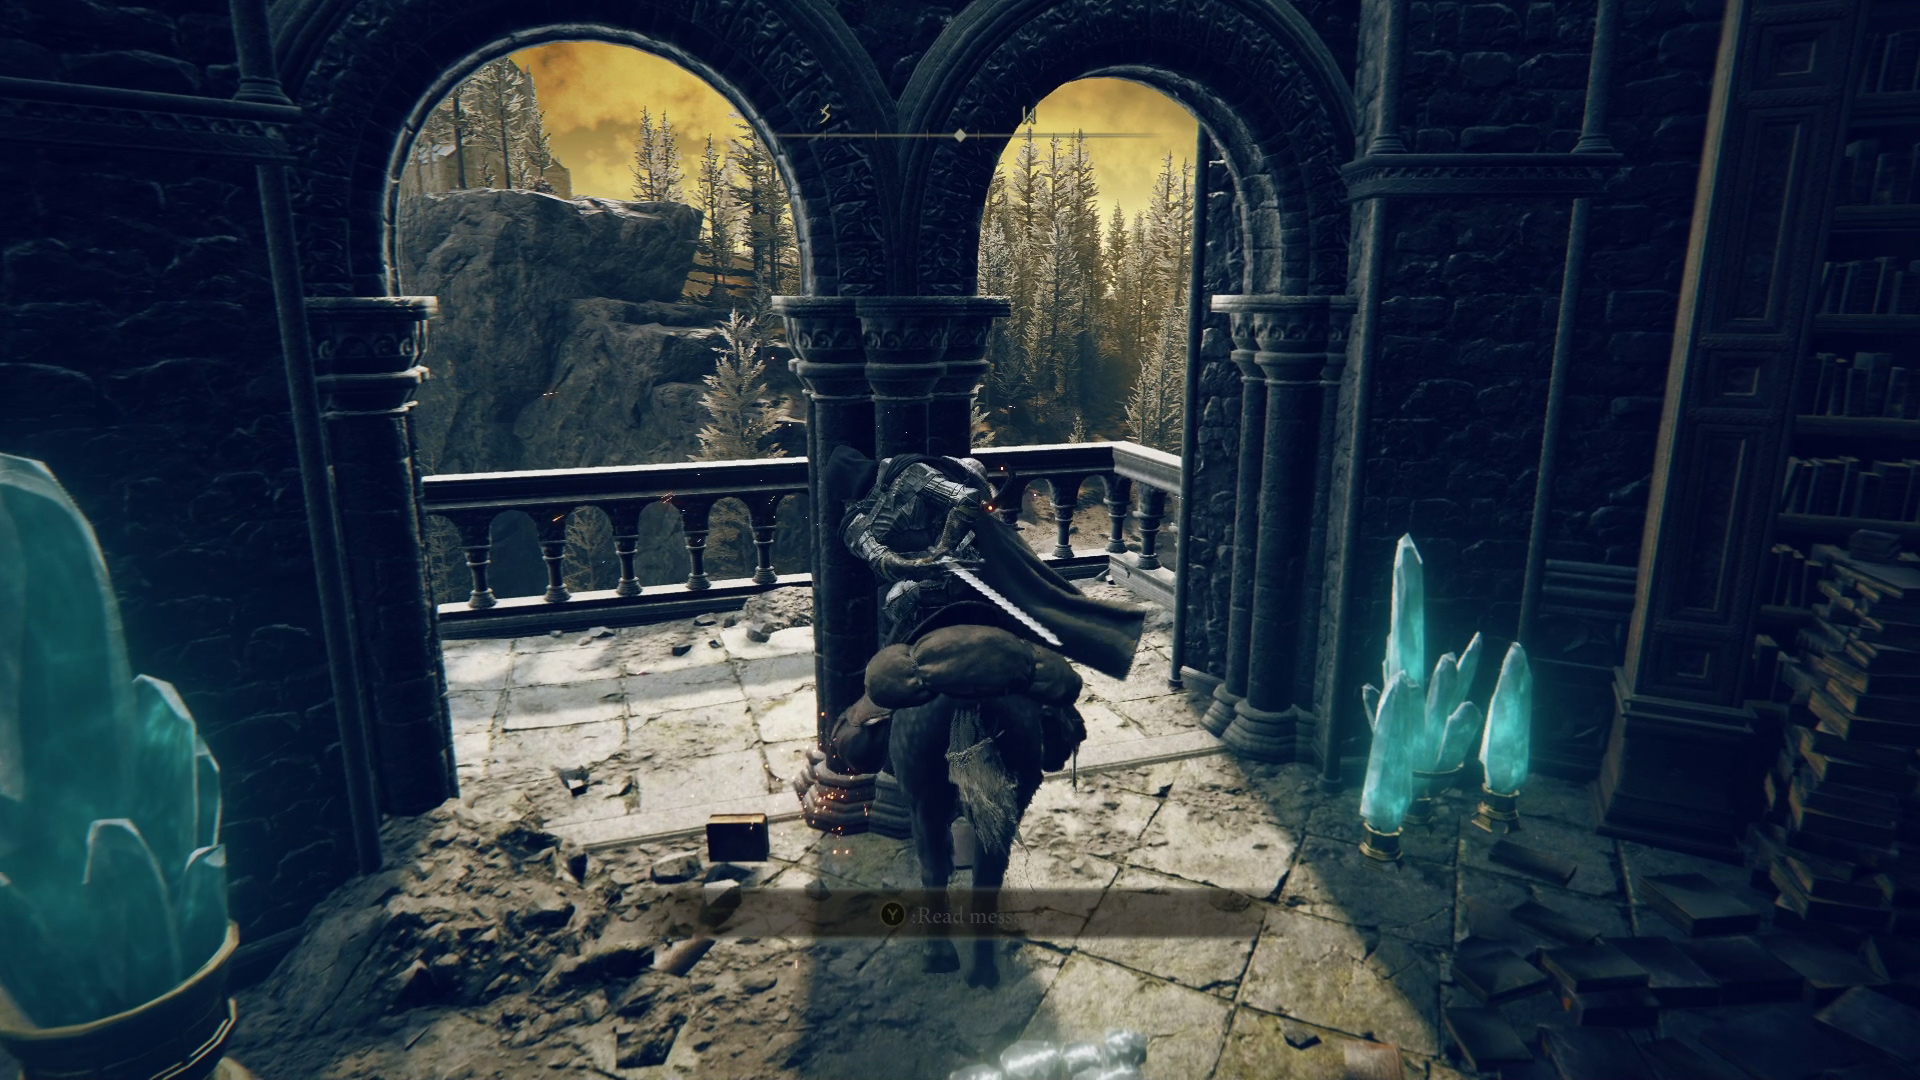
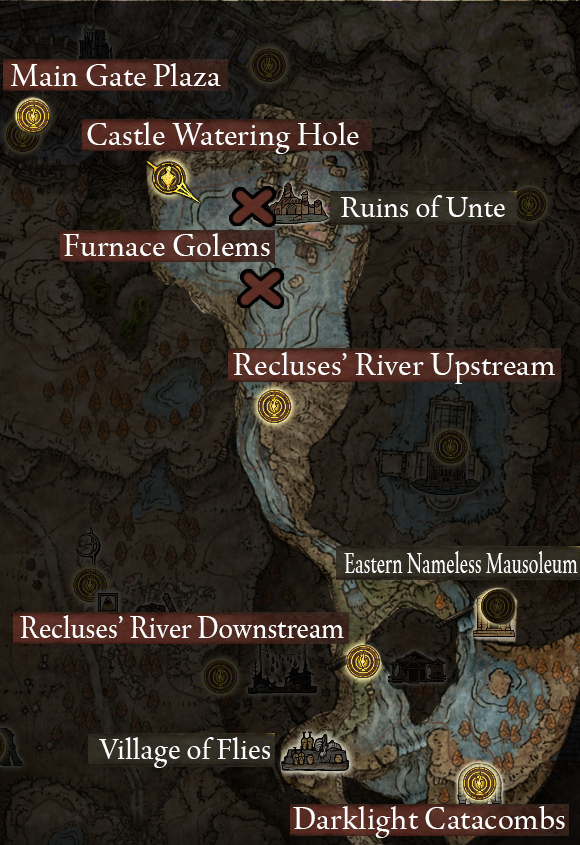
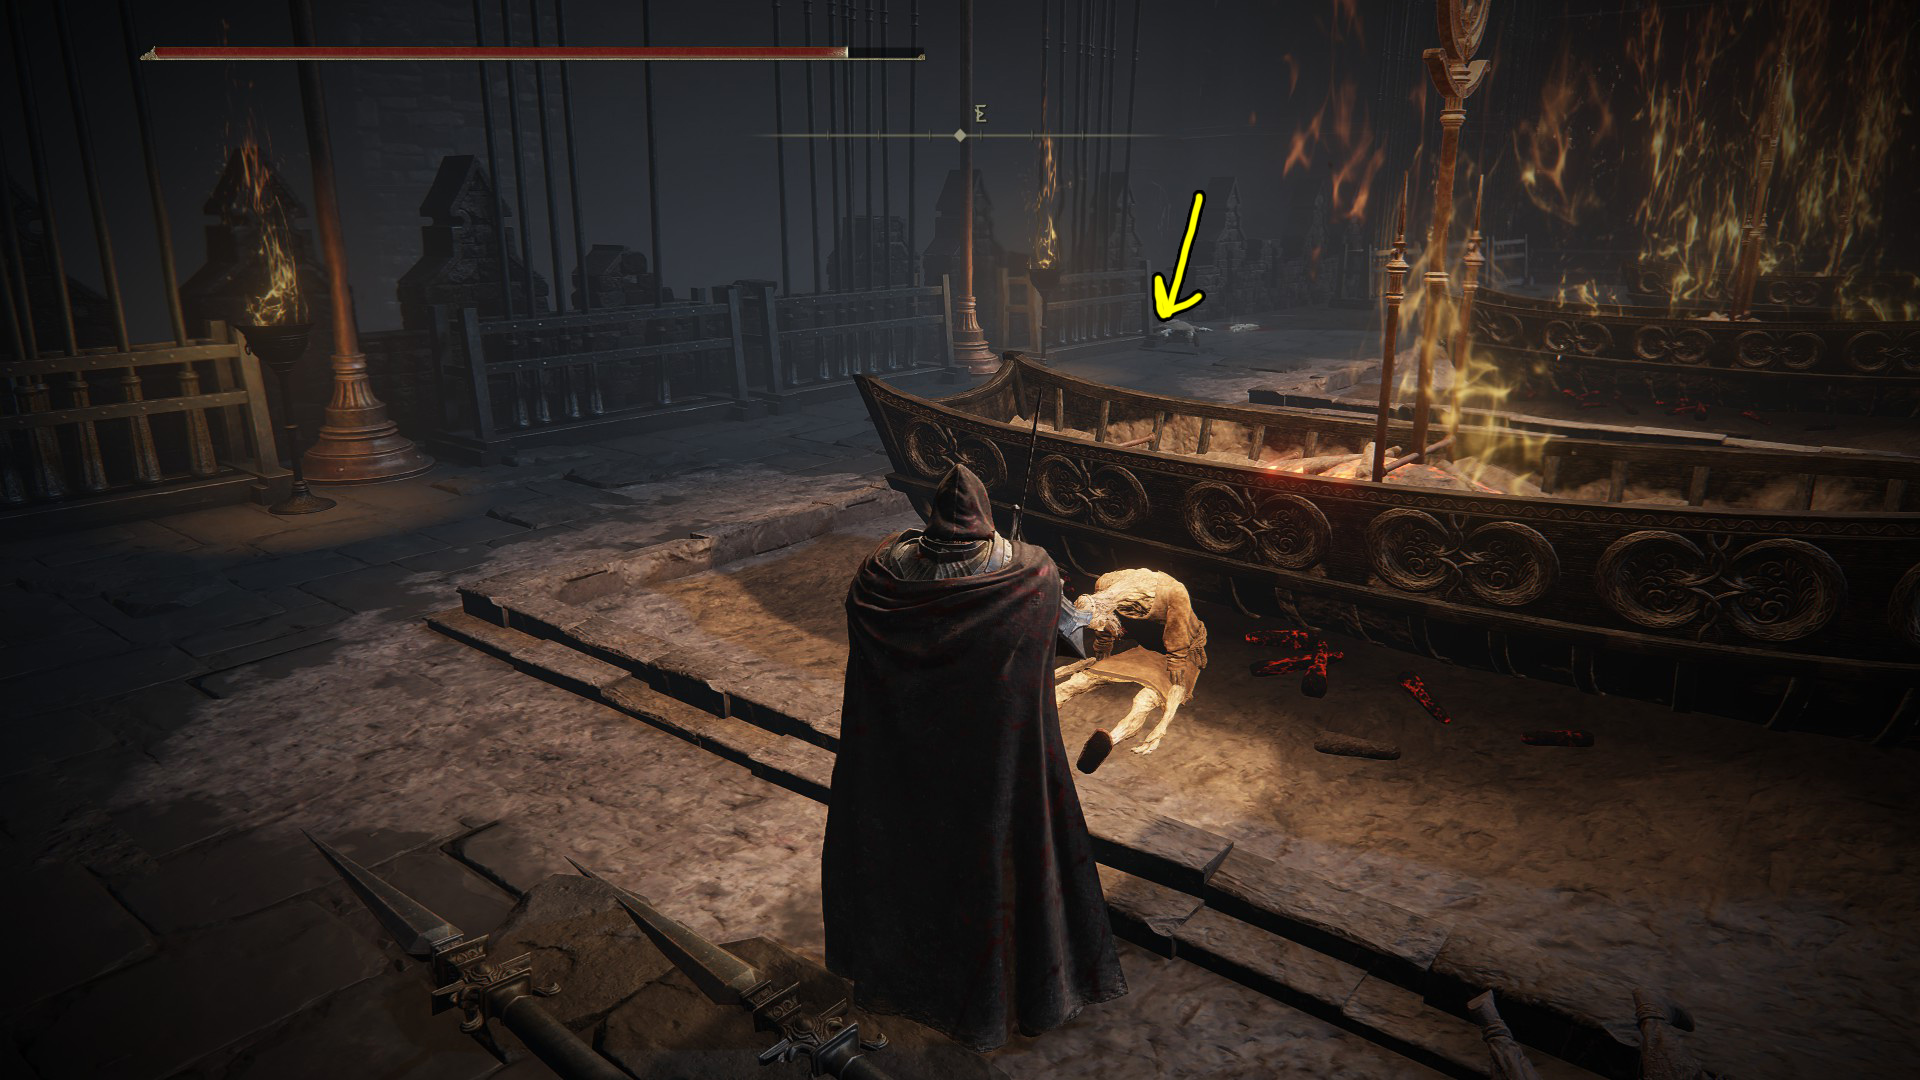
If you haven’t already, you’ll need to defeat the Golden Hippo at the start of Shadow Keep. Teleport to the Shadow Keep Main Gate site of grace and then and make your way through the castle until you reach the outdoor area with the burning boats — at the southeastern end of this area is a ladder that leads down to the water (Image 1). The route is simple if you’ve unlocked the shortcut back to the Main Gate Plaza site of grace (Image 2): from the site of grace, go southeast through the doorway, go up the ramp, then turn right to head generally east to the ladder, which is on the northern side of the platform.
Image 1Image 2
Go down the ladder, then take a left into the tunnel behind the waterfall, and go down the next ladder. Continue into the room with the “Domain of Dragons” painting. After you check out the painting, attack the center of the southwestern wall to reveal a secret tunnel. Go down the ramps and you’l come to a coffin — interact with it to get inside, and you’ll be transported to the Recluses’ River. Head southeast out of the building and you’ll find the Castle Watering Hole site of grace!
There are 9 Furnace Visages you can collect from the nearby golem corpses as you make your way south from the Castle Watering Hole site of grace, but near the second-to-last one, a Furnace Golem will stand up and attack you. This one is Armoured and you’ll need to attack it by waiting for its ranged attack where it bends over, and then tossing a Hefty Furnace Pot into its basket (see our guide on Furnace Golems for details). This one drops the X Tear when defeated.
Due east of the Castle Watering Hole site of grace are the Ruins of Unte. There are two ways inside — either by waking up another Furnace Golem, or with some jumping.
Via the Furnace Golem: Head to the left (north) side of the ruins and enter the small house where you can go up the stairs (Image 1). Continue out onto the balcony and across the rubble (Image 2), making sure you grab the Lost Ashes of War from the corpse along the way. Continue to the highest point of the rubble, and you can throw a Hefty Fire Pot into the top of the Furnace Golem’s basket to wake it up. This one drops the Bloodsucking Cracked Tear when defeated, but more importantly, it’ll get out of the way of the ruins’ entrance when it gets up.
Image 1Image 2
Via Jumping: Go to the southeastern corner of the main ruins structure (Image 3), then jump as indicated in the GIF (Image 2).
Image 3Image 4
Once inside the ruins, grab the Stone-Sheathed Sword from the grave, then head into the small structure to find a chest containing the Giant Golden Arc incantation.
There’s a Furnace Visage right in front of the main entrance to the ruins (where the sleeping Furnace Golem is), and there’s one more Furnace Visage south of the ruins as well you should grab before continuing further south. Additionally, there is a Revered Spirit Ash against the eastern wall, just south of the ruins.
Location of Revered Spirit Ash
Recluses’ River Upstream
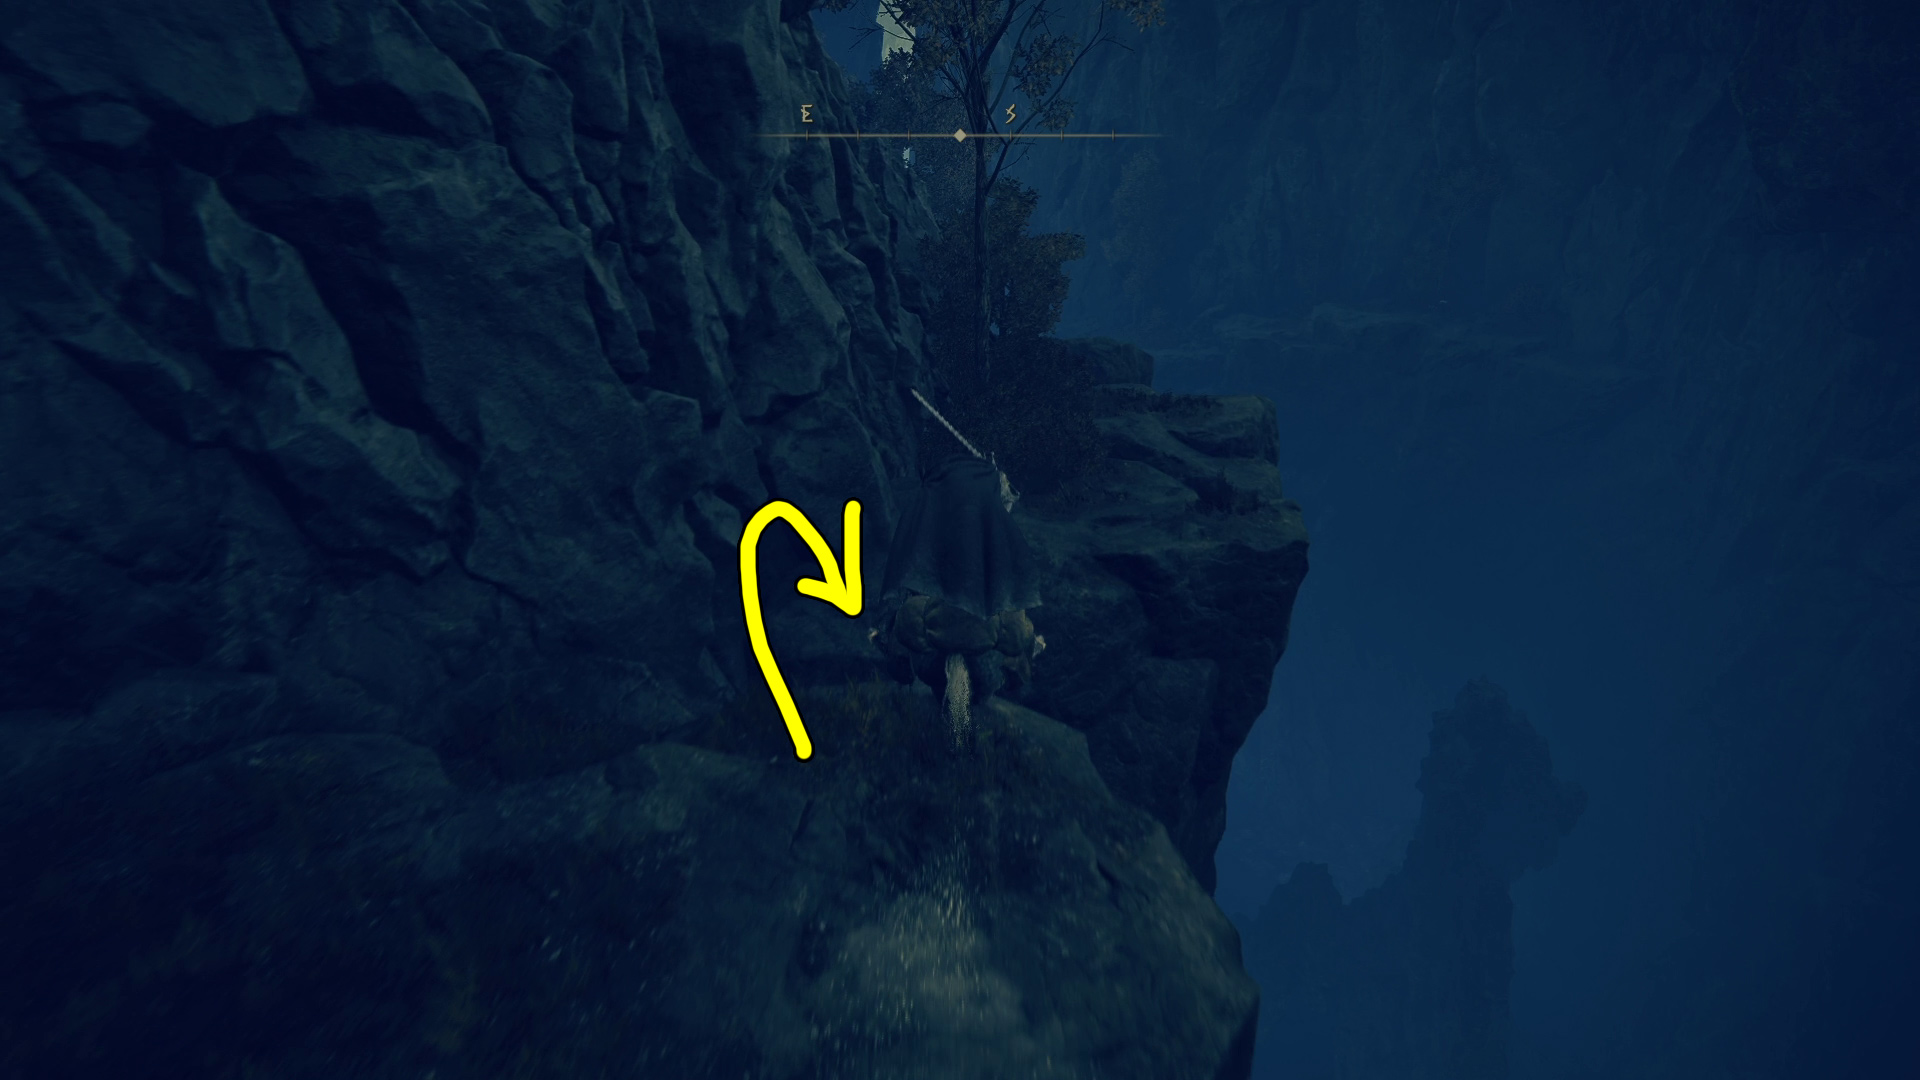
From the Ruins of Unte, you can head due south to the waterfall, then hug the left wall — just past the falls on the rocky path will be the Recluses’ River Upstream site of grace. Keep following the cliff path south as it widens, and go slow… there’s a gap you can fall into (and die – see Image 1). Because of this, it’s best to be on Torrent so you can double jump back up onto the cliff if you fall off — just resist the urge to sprint! There’s another jump coming up, but this one is much easier to see (and requires Torrent’s double jump).
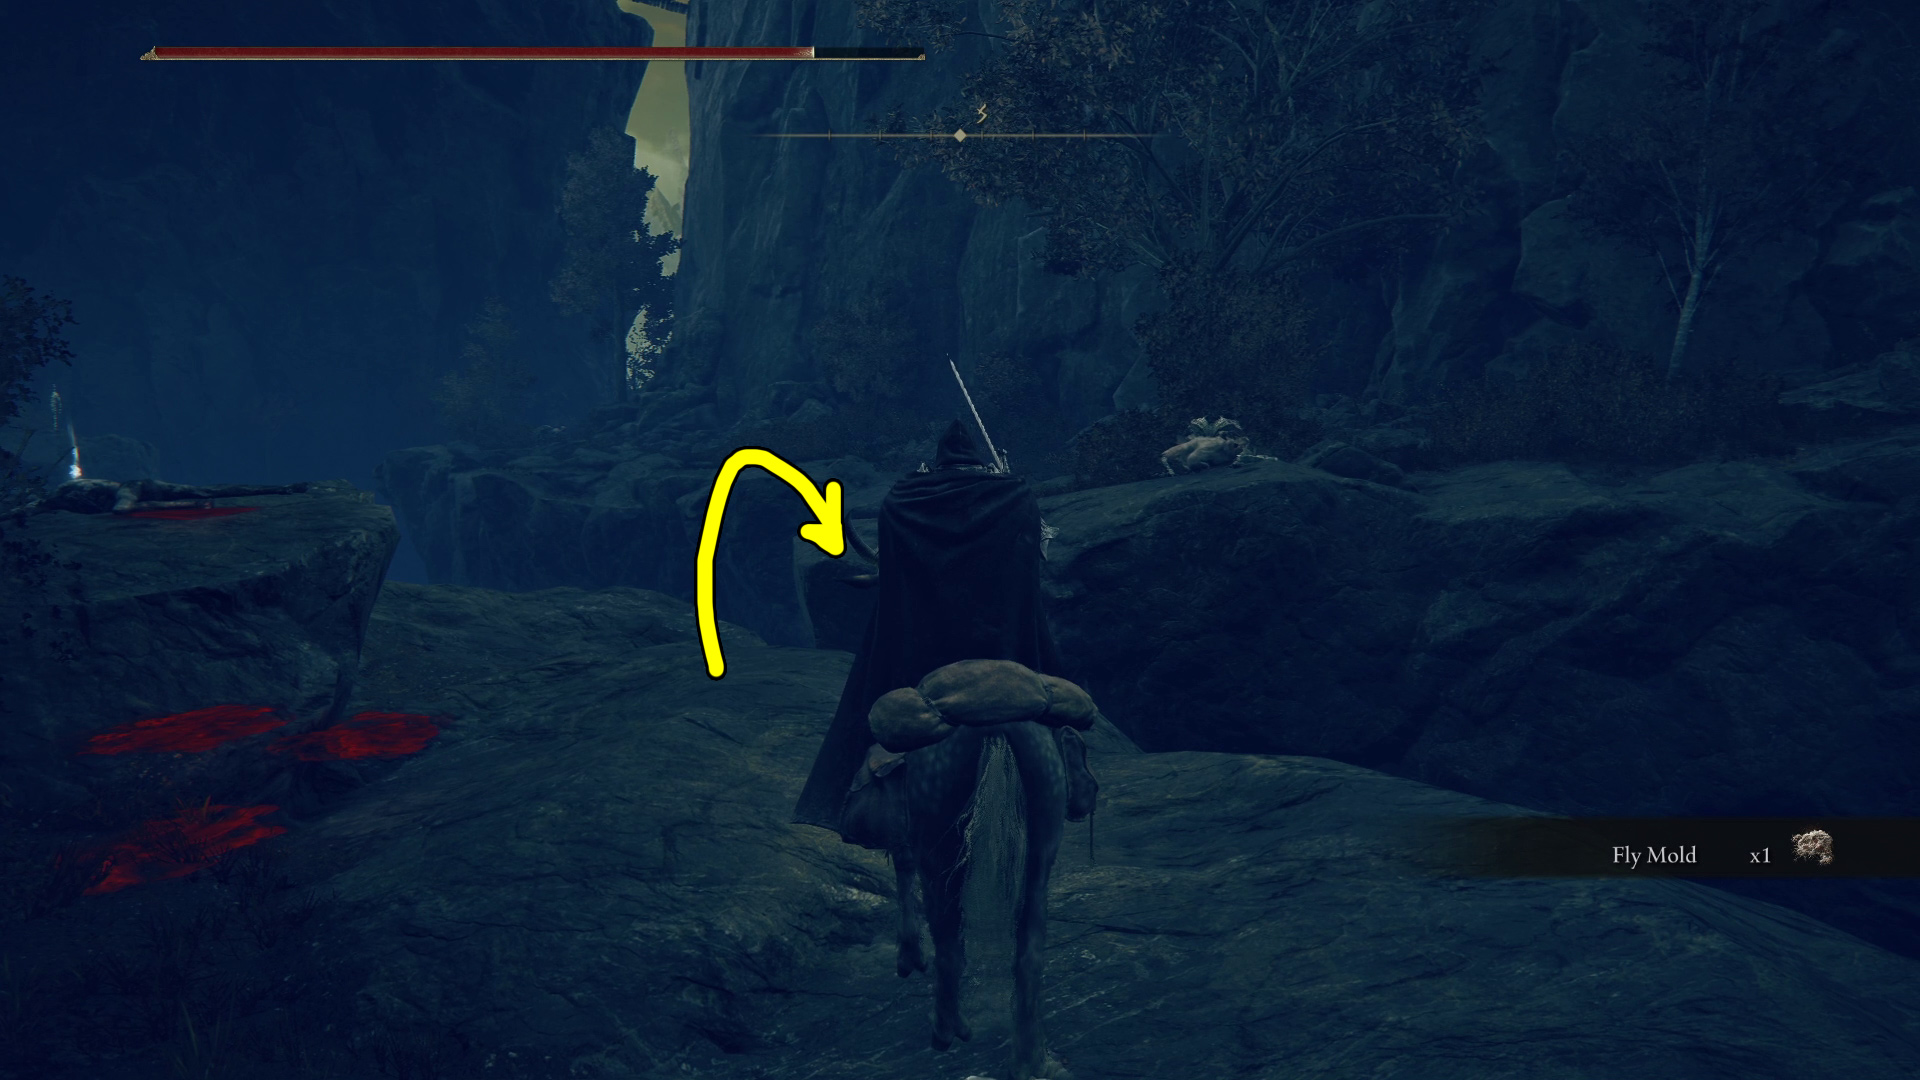
The path will open up a bit, and you’ll encounter a trio of fly guys — it’s best not to leave enemies behind you on the cliffs, as if you pause to look around, you might end up pushed off the edge. Take ’em out and then grab the x6 Thin Beast Bones from the corpse before jumping south towards a fourth fly fellow (Image 2).
Image 1Image 2
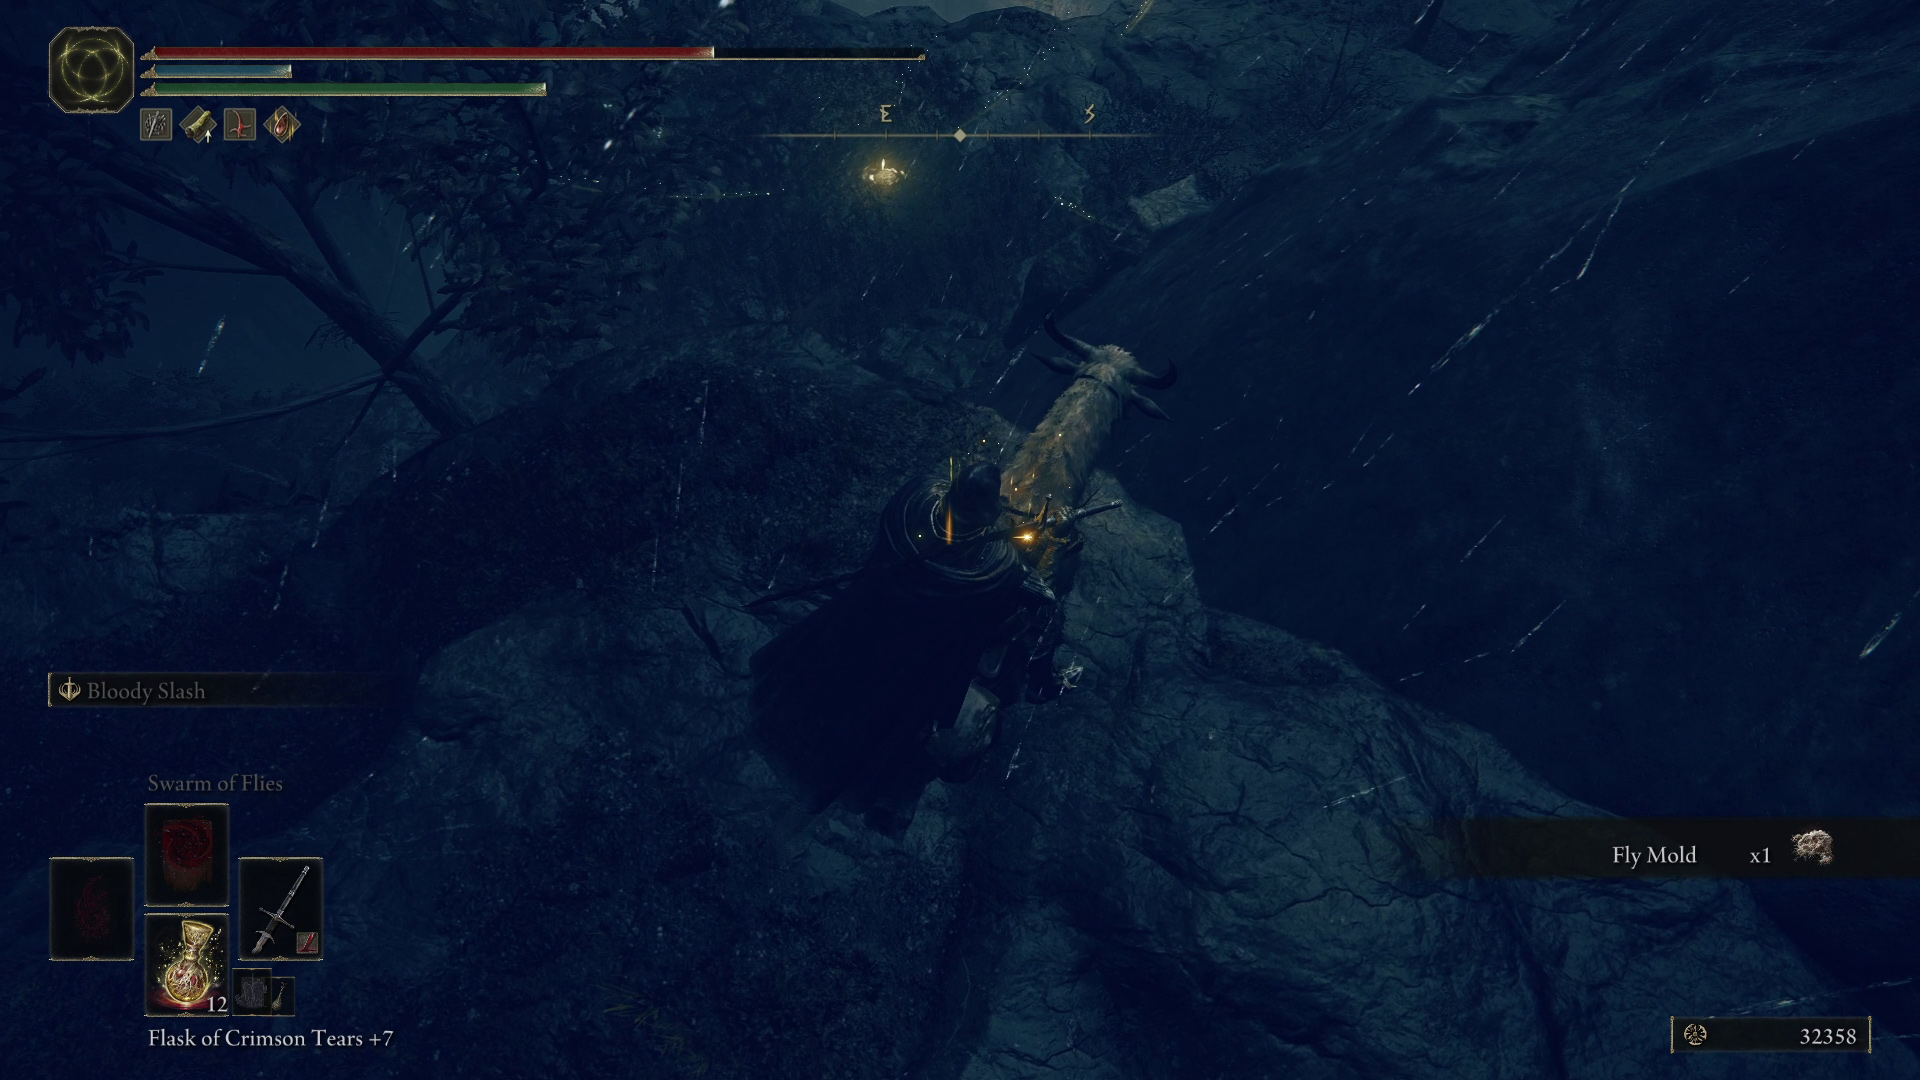
From the fourth fly, you can follow the path west to find a corpse with x4 Fly Mold — two flies will crawl up from the side of the cliff when you grab it, so you may not want to bother. Continuing southeast from where you jumped in Image 2, and you’ll see a fly chilling by a bush, with another hiding just beyond, and a third further down the path. Past the third fly, further to the south, you’ll find a much larger group of flies, and a corpse hanging off the ledge to your left with x2 Smithing Stone [3]. Continue south-southwest to the end of the path, and you’ll be able to see the Recluses’ River Downstream site of grace below you to the east (Image 3).
Go rest up and scrape the fly off you and Torrent.
Recluses’ River Downstream
Unique & Important Items
Dryleaf Seal
Dryleaf Set
x3 Scadutree Fragment
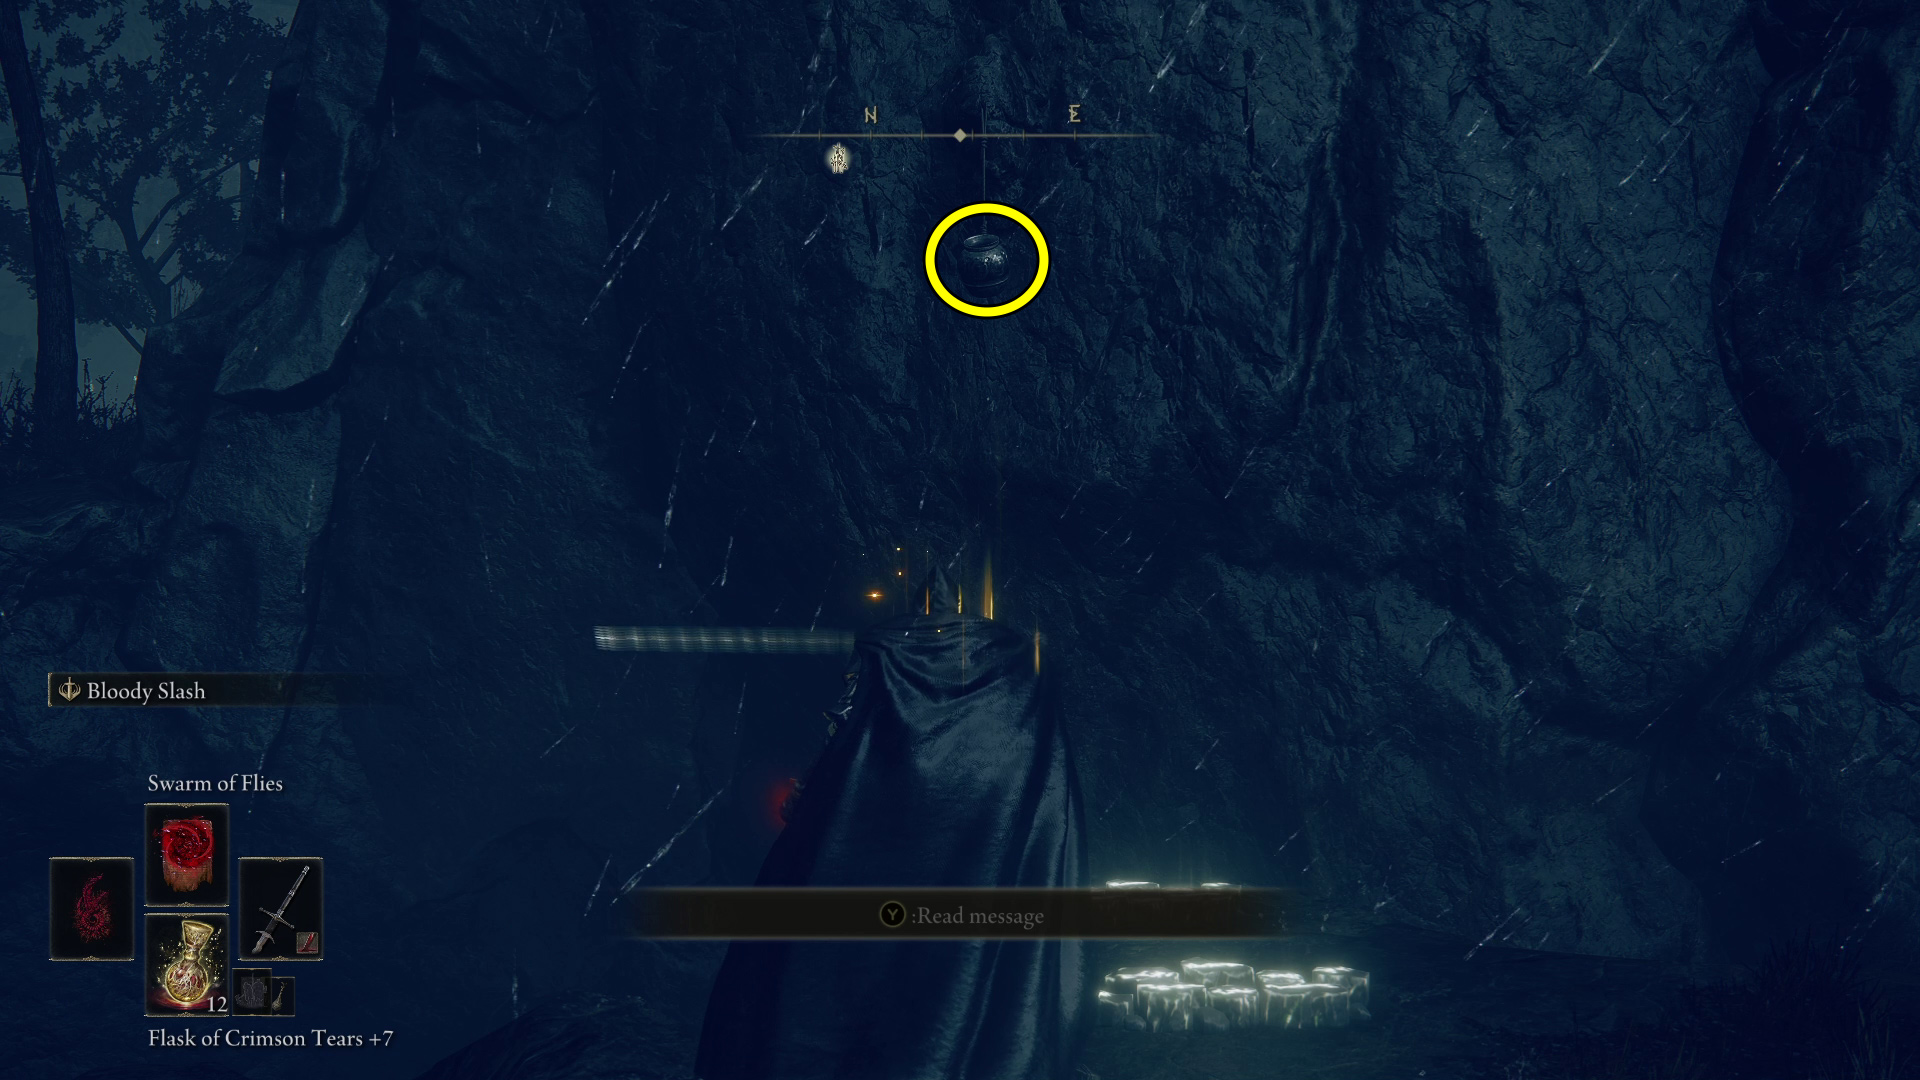
From the Recluses’ River Downstream site of grace, look northeast, and you’ll see a bell-bearing pot (Image 1). Shoot it down with the ranged weapon of your choosing — we’ll go pick it up later. Go north and follow the path as it curves northeast. Hug the right-hand wall, which will lead into a cave that holds a corpse with x2 Nascent Butterfly. A group of flies will drop one by one down from the ceiling — clear ’em out, then continue out of the cave and head to the spot indicated in Image 2 by going northwest from the cave and then dropping down. You’ll find the Dryleaf Seal on the corpse.
Image 1Image 2
Walk torrent off the ledge while going east, then walk off the next ledge going west, and you’ll be safely next to the waterfall. Ride northwest past the waterfall and into the river, making your way quickly past the oozes so they don’t stab you. Eventually, you’ll reach an area with some large poison flowers, where a corpse has a Somber Smithing Stone [7] — continue northeast to the waterfall and grab the Scadutree Fragment from the corpse in the coffin just before the falls.
Ride back the way you came (generally south and then southeast) and jump up on the rocks to the left of the waterfall, then make your way down the rocks going southeast. You’ll see a loot scarab in the water (Image 3) — go kill it for a Somber Smithing Stone [8].
Image 3
If you continue east, around the bend in the river you’ll find another waterfall, and to its left the Eastern Nameless Mausoleum (see below). It’s not super convenient to come back to this spot, so if you don’t mind potentially being stuck on a boss for a bit, you may just want to enter the mausoleum now.
Whatever you choose, from where you found the loot scarab (or from the mausoleum), head west and then look under the waterfall to the northwest to find the Dryleaf Set. From the waterfall, ride south down the river to the next waterfall. In the water, you’ll find the Moldmonger’s Bell Bearing from the pot you shot earlier.
Now hug the western wall and look south, where you’ll see some tombstones in the cliff face. You can simply walk Torrent south most of the way safely, and he’ll drop to the next tombstone fine so long as you keep holding the left stick forward all the way (you’ll have to turn around for the last drop and go north). Once in the water, head east, where you’ll find two patrolling hippos. They both drop a Scadutree Fragment when killed, so they are well worth killing — note you can summon Spirit Ashes here to help you in this fight. If you’ve already fought the Golden Hippo, these guys have the same basic move set as the boss’ Phase 1.
There’s a small island in the middle of the eastern lake where the two hippos are found, where you can find a Smithing Stone [1] — it almost feels silly pointing it out, but it’s there! From here, you can now head to the Darklight Catacombs (see below).
Eastern Nameless Mausoleum
Unique & Important Items
Rakshasa’s Great Katana
Rakshasa’s Set
You can reach this mausoleum by making your way down the rocks near the Recluses’ River Downstream site of grace (see the previous section for more details) and following the river east-southeast. In the mausoleum is a diffucult spectral foe who drops both his sword and his armor set upon defeat.
From the Recluses’ River Downstream site of grace, go south-southwest, keeping the cliff on your right. You’ll drop down onto a rocky path full of flies, and then drop down again. Around the corner just ahead on your left is one of those deadly spinny slicey jumpy guys — this one doesn’t drop much or even offer many runes, so you may want to ignore him. The Village of Flies is around the corner to the right, up the narrow path that runs west, so you can simply continue to hug the right wall to make your way into the village.
There are a large number of flies here, basically everywhere, so we won’t point them all out. Just know that your options are to slow down and fight each group one at a time (use target-lock to find them), or else use Torrent to fly through the town (pun intended) and grab the two items.
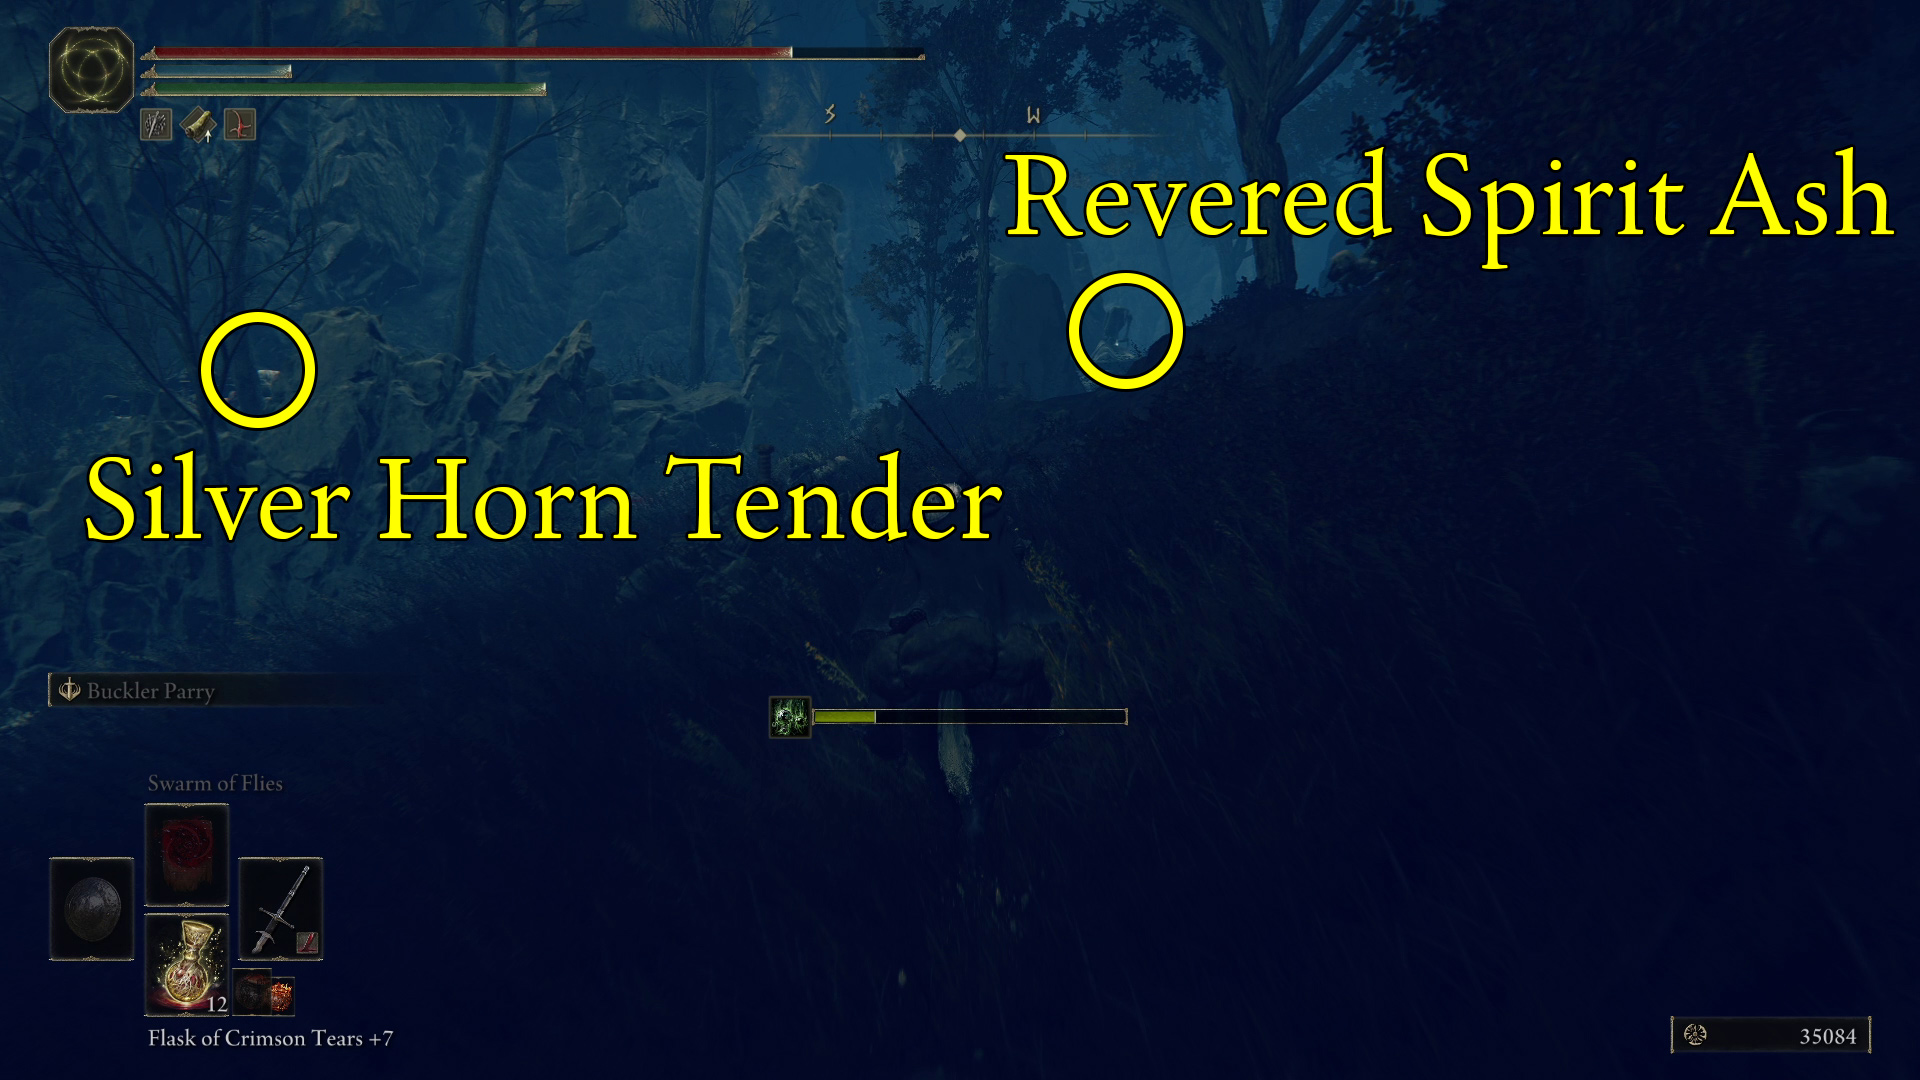
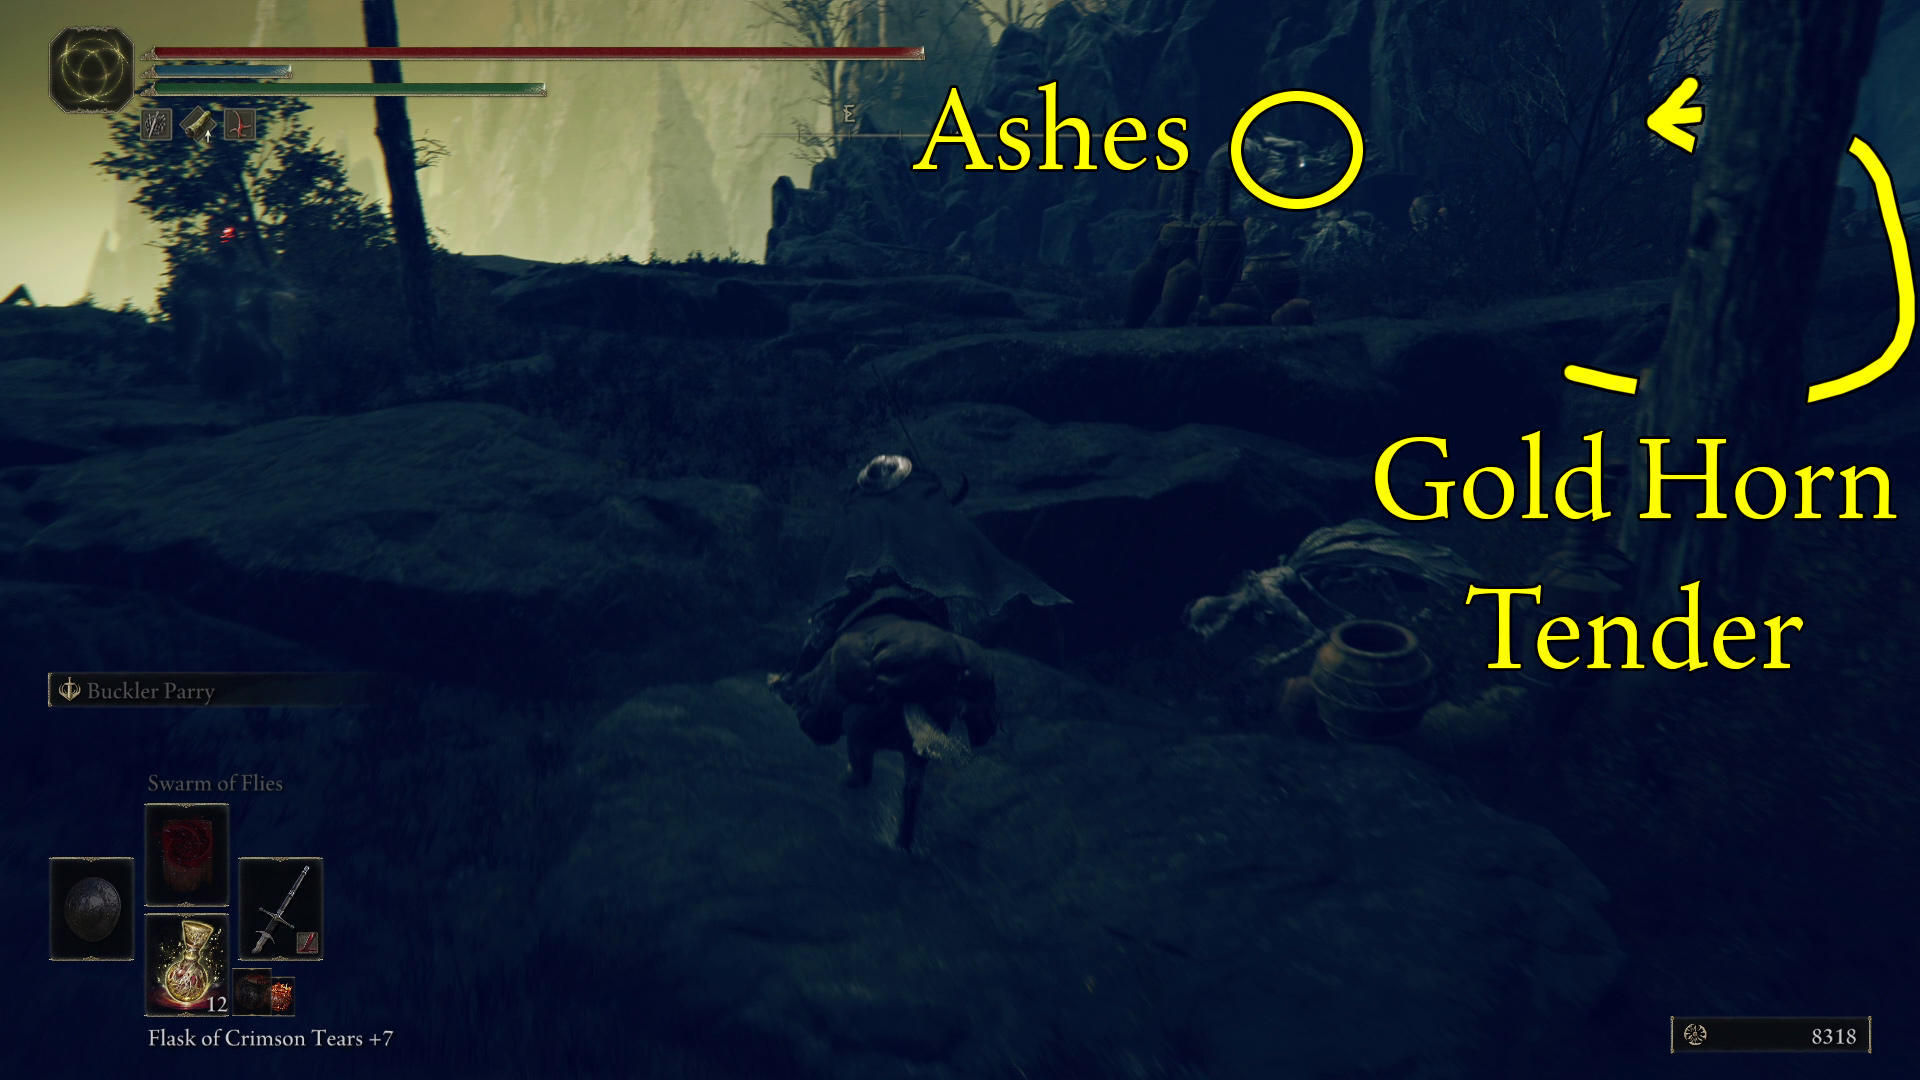
There are two important items to grab here, so first, continue hugging the right wall and follow the path as it winds around to the southeast. You’ll come to an altar surrounded by flies, and on the altar are the Man-Fly Ashes (Image 1). You can go right around the statue, and behind it you’ll find a Golden Horn Tender. Next, go back the way you came, down the path to the southwest, and ahead to the west you’ll see a statue with a Revered Spirit Ash (Image 2). That’s all to find unless you want to brave more flies to grab the Silver Horn Tender southeast of the statue on a corpse.
It’s worth noting that if you leave the village and follow the path that leads southeast, you’ll eventually find another route down to the Darklight Catacombs — but there’s nothing useful on the path itself, so unless your next destination is the catacombs, don’t bother.
Darklight Catacombs
Unique & Important Items
Bigmouth Imp Ashes
Viridian Amber Medallion +3
Deathknight Set
Great Ghost Glovewort
From the low ground south of the Recluses’ River Downstream site of grace, look over the edge of the cliff to the southeast and you’ll see tombstones you can use to make your way down to the large open area to the south. From there, continue downstream to the waterfall, and go left (east) of the waterfall — look over the edge to find some more tombstones you can take down to the low ground. Watch out for the many vulgur militiamen hiding beneath and near the tombstones! Head east while hugging the left wall and you’ll soon come to the entrance of the Darklight Catacombs.
Both sets of tombstones you’ll use to reach the catacombs are visible on your map
If you haven’t begun clearing Shadow Keep yet, that should be your next stop — Cerulean Coast is another good option if you haven’t done it yet, as is the Rauh Base.
Unabashed FromSoftware fanboy still learning to take his time with games (and everything else, really). The time he doesn't spend on games is spent on music, books, or occasionally going outside.