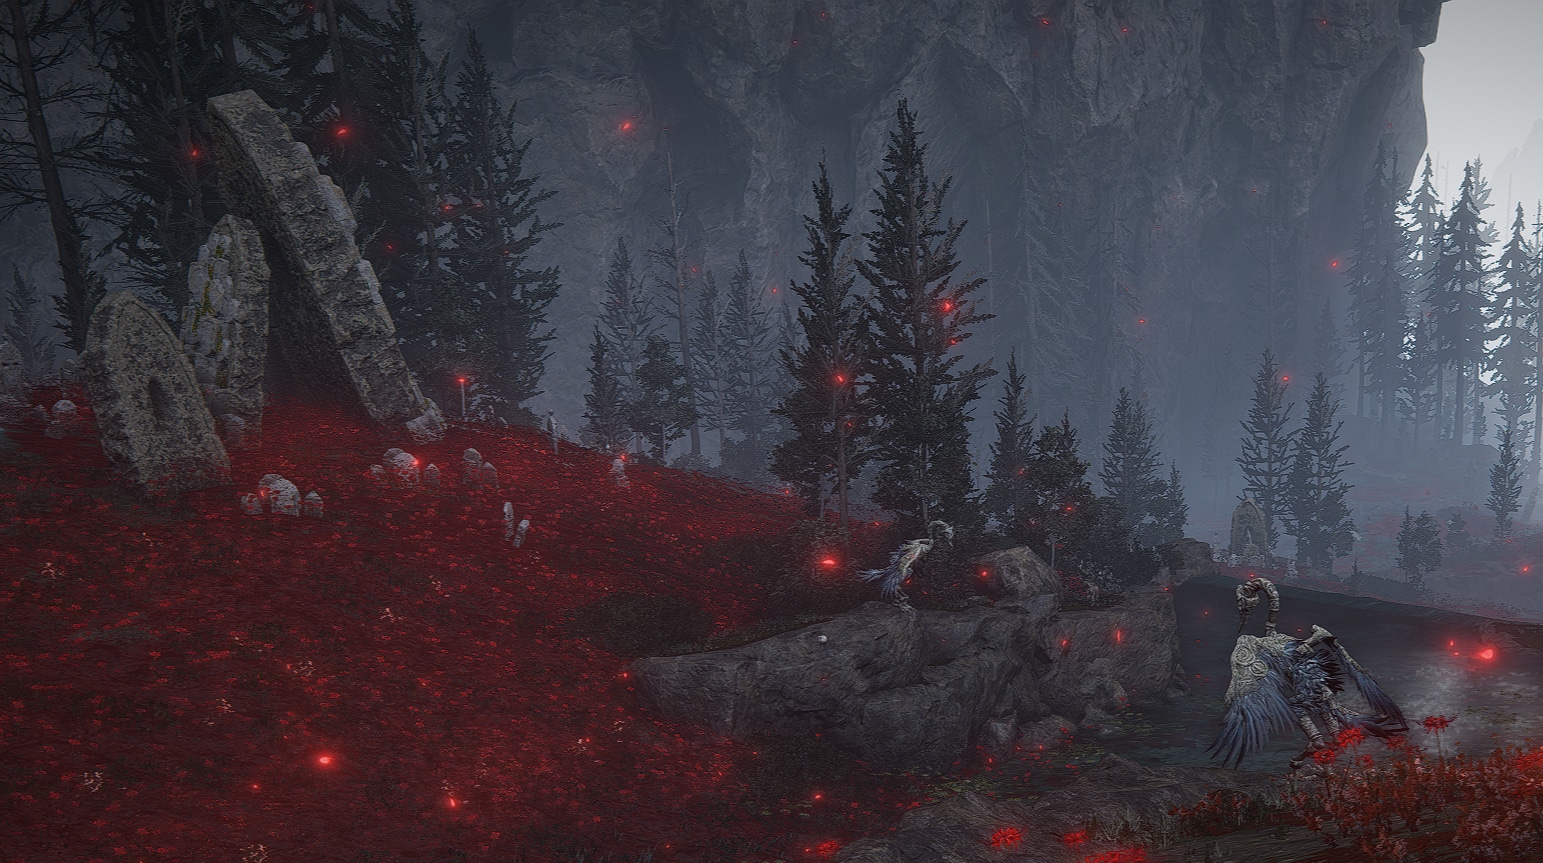
After leaving Dragon’s Pit and taking a right (instead of going forward to get to the Jagged Peak), you will pass by the Grand Altar of Dragon Communion to arrive at Charo’s Hidden Grave, a small area of red flowers, familiar enemies, and a few secrets befitting its name. In this walkthrough, we will guide you through the red-topped plateaus and secrets of the Hidden Grave.
How to Get to Charo’s Hidden Grave
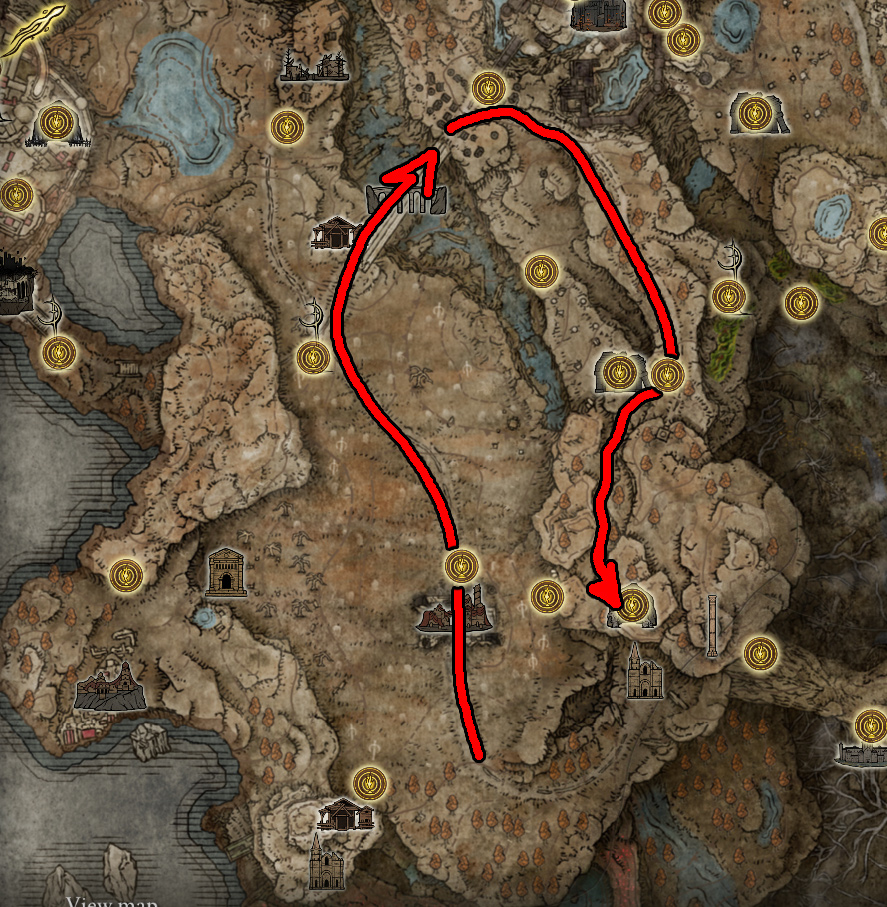
To reach Charo’s Hidden Grave, you will first need to get through the Dragon’s Pit, a dungeon in the Gravesite Plain, near the start of the DLC. You can find the Dragon’s Pit on the highground north of the Church of Consolation — reaching it requires that you cross the Ellac Greatbridge and then follow the path that leads south from the Gate Front site of grace.
After defeating the Ancient Dragon-Man at the end of the Dragon Pit dungeon, you’ll be able to open the large double doors on the southern side of the boss arena. Through the doors is a tunnel that leads to Dragon’s Pit Terminus site of grace — continuing down the tunnel will take you out of the dungeon, leading to the Dragon’s Pit Terminus Site of Grace.
Path to the Dragon’s Pit dungeon
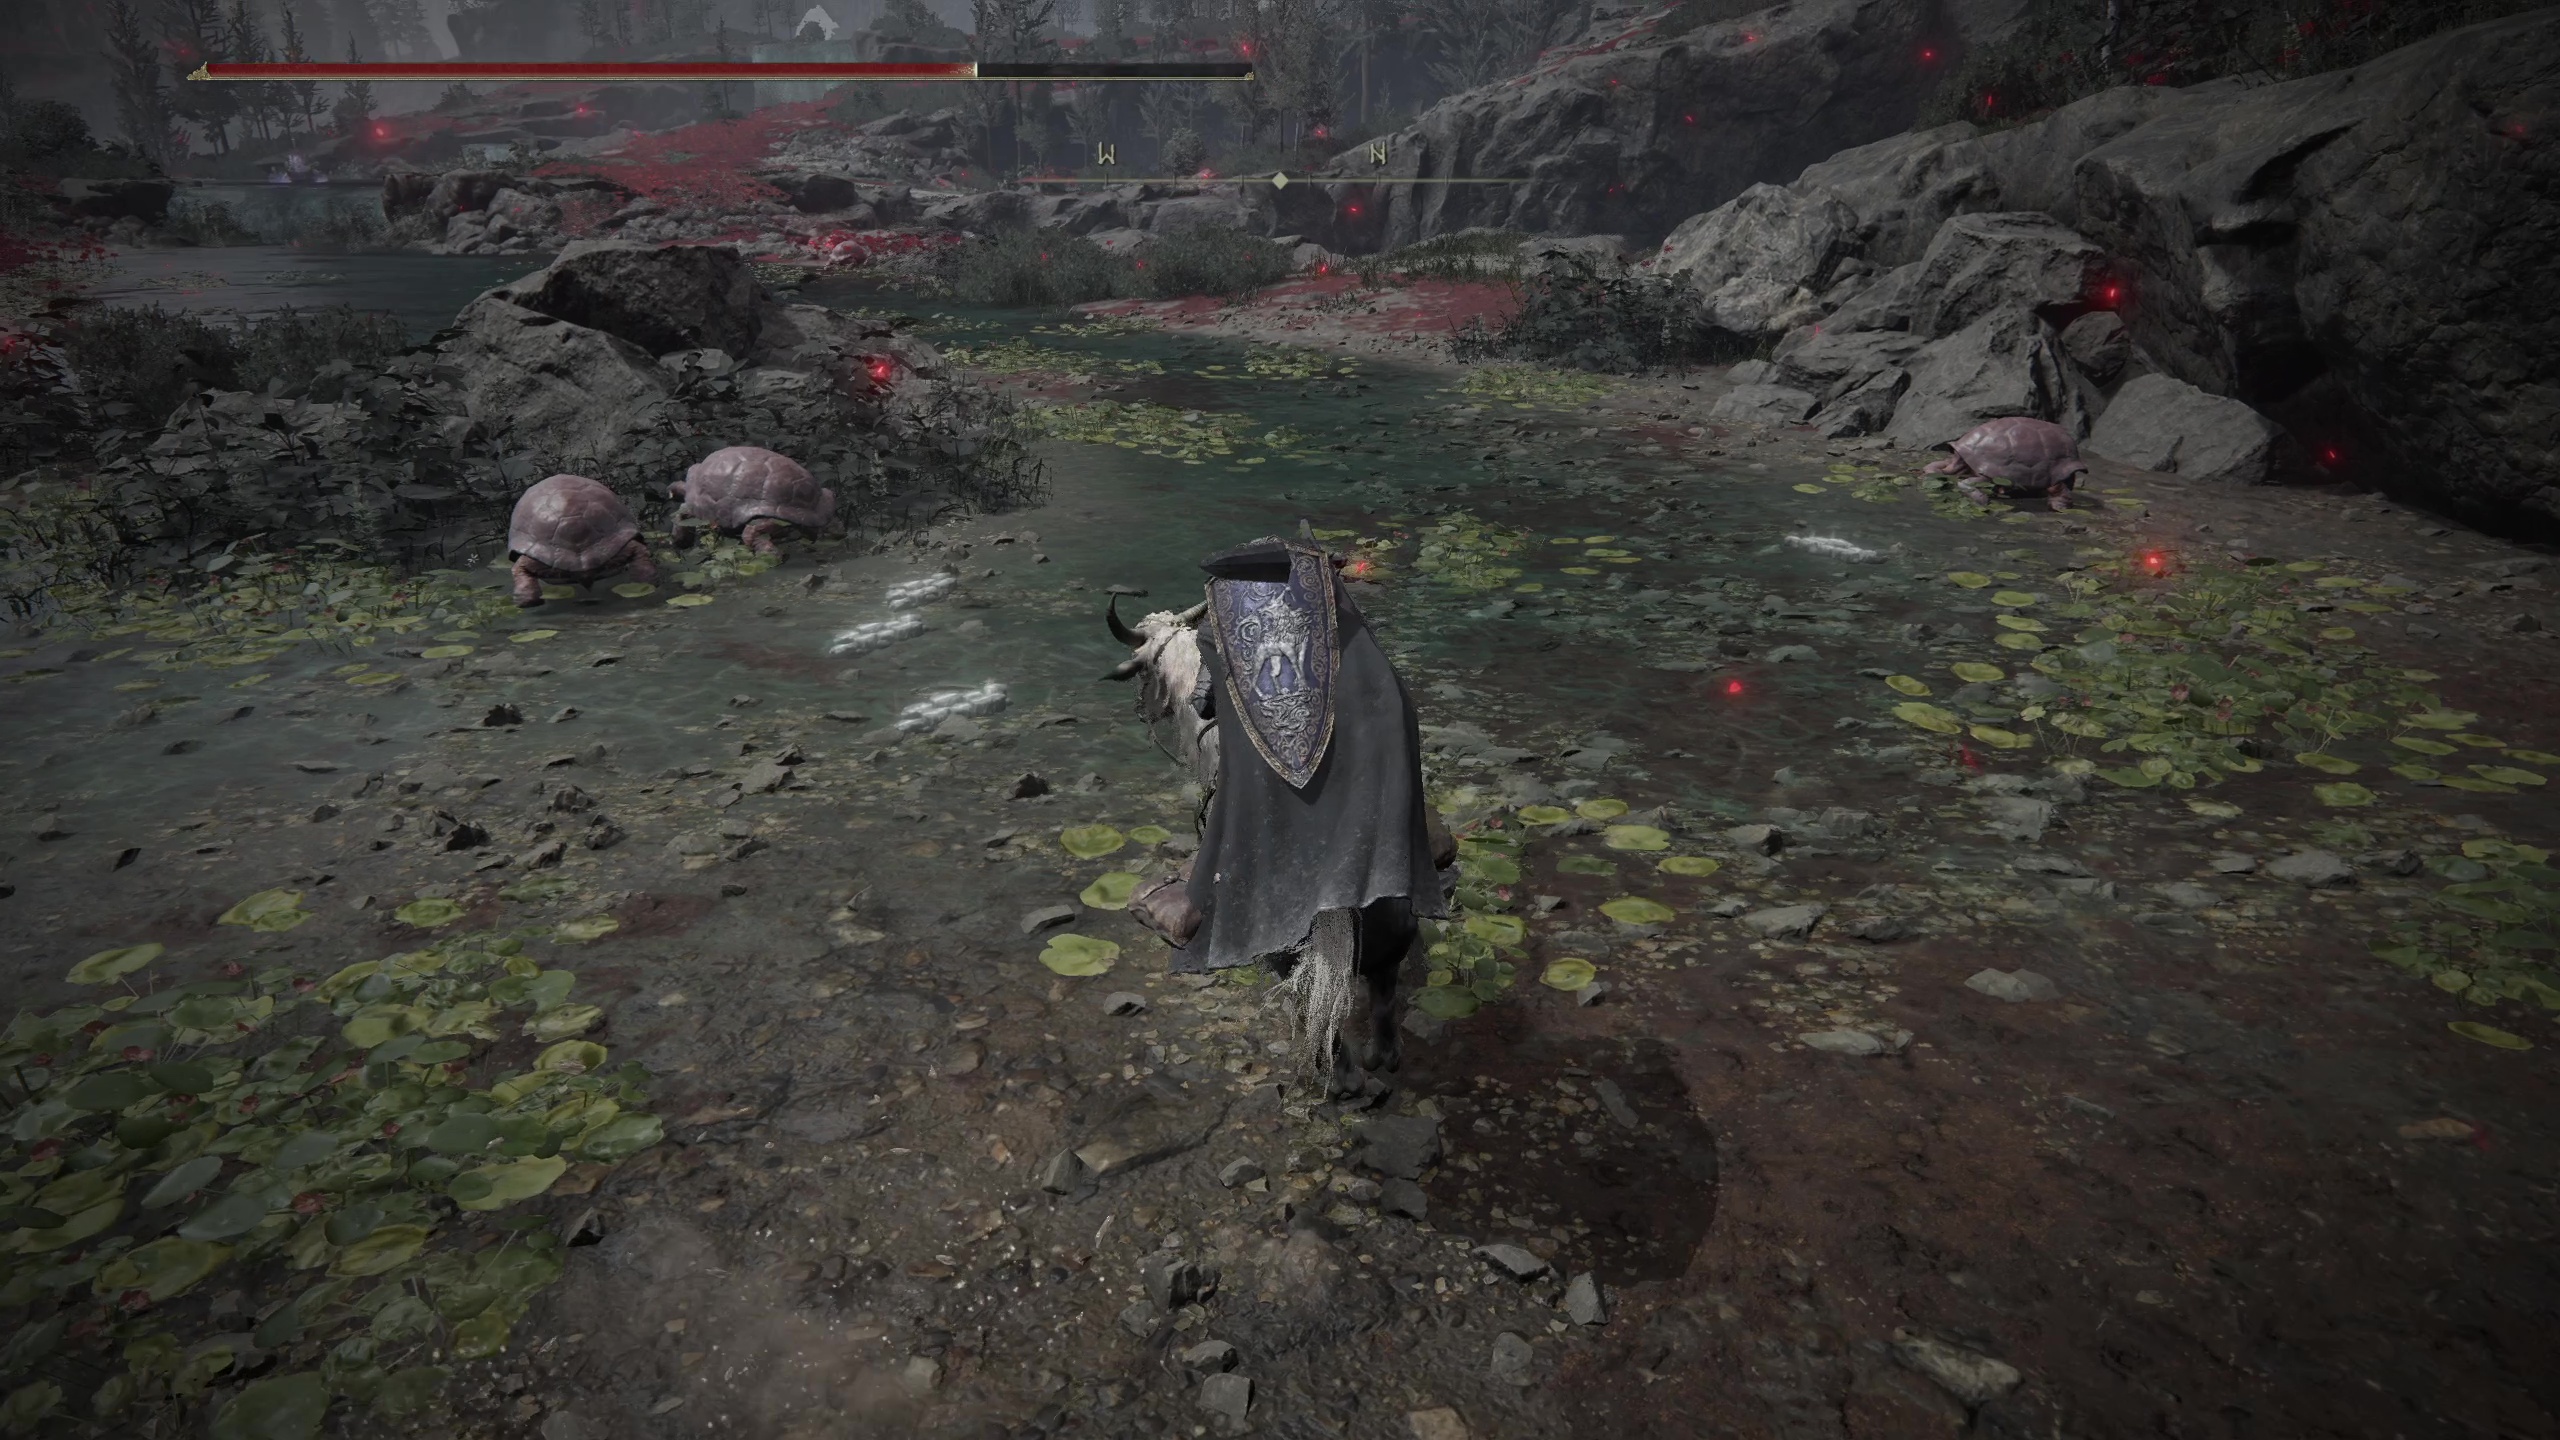
From here, continue forward until you reach aJagged Peak Drake in a small lake. Take a path to the right of the Drake in the lake, and then continue forward, being on the lookout for a few weak enemies on the way. This will take you to the Grand Altar of Dragon Communion, which can be very useful for the quest involving Bayle and the Jagged Peak. To get from here to Charo’s Hidden Grave, simply go to the right of the Grand Altar, going up and over the lower part of the giant dragon’s wing until you reach an area with red flowers; this is the start of Charo’s Hidden Grave.
Path to Charo’s Hidden Grave from Dragon’s Pit Terminus
Charo’s Hidden Grave
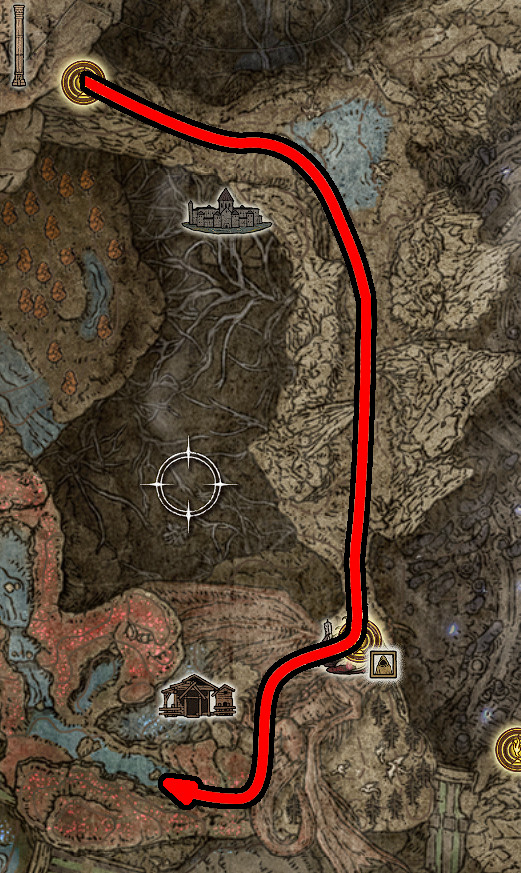
Before we begin, it should be noted that the Map Fragment for Charo’s Hidden Grave is actually located in the area below, the Cerulean Coast, near where you can fight a Ghostflame Dragon. It is a good idea to grab that before you begin Charo’s Hidden Grave (though the Grave is small enough that you might be fine without it), and so you can check out our detailed Cerulean Coast Walkthrough to see how to get that.
There are only a few things to do in Charo’s Hidden Grave
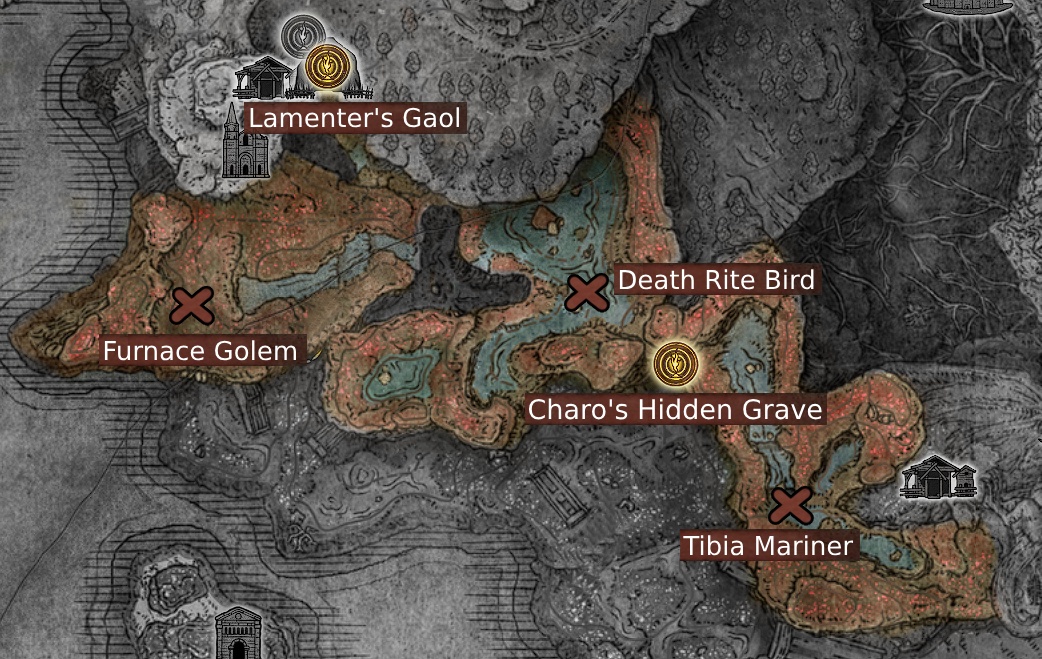
Tibia Mariner
Unique & Important Items
Grave Keeper’s Cookbook [2]
Tibia’s Cookbook (boss drop)
Rings of Spectral Light
In the first area of Charo’s Hidden Grave, southeast of the Charo’s Hidden Grave site of grace, you will come across a shallow river. In the lowest part of this river, where you enter the area, you can find a corpse holding the Grave Keeper’s Cookbook [2] hidden on the opposite side of a large rock.
After grabbing that, you can continue forward. In the next rise up in the river, you will find a mini-boss version of the Tibia Mariner boss from the base game. This one is especially nasty, as they will very quickly teleport up to a higher section of the arena and summon a Royal Revenant. Because of how much of a (literal) pain Royal Revenants can be, it is a good idea to take it out before you whallop the Tibia Mariner as it tries to retreat upriver. Don’t forget AoE healing spells stun and heavily damage the revenant. The Mariner drops the Tibia’s Cookbook.
After you’ve dispatched the Tibia Mariner, head back downriver toward where you encountered it. Near the back of a small gulch, you will be able to loot a Grave Keeper’s Brainpan, which you can use to craft Calls of Tibia, a consumable that summons a spinning skeleton where you throw it. If you go up and to the right of this gulch, you can reach a cliff. Guarded by several Beast Skeletons, you can find a Grave Glovewort [7] and some Ghostflame Blooms.
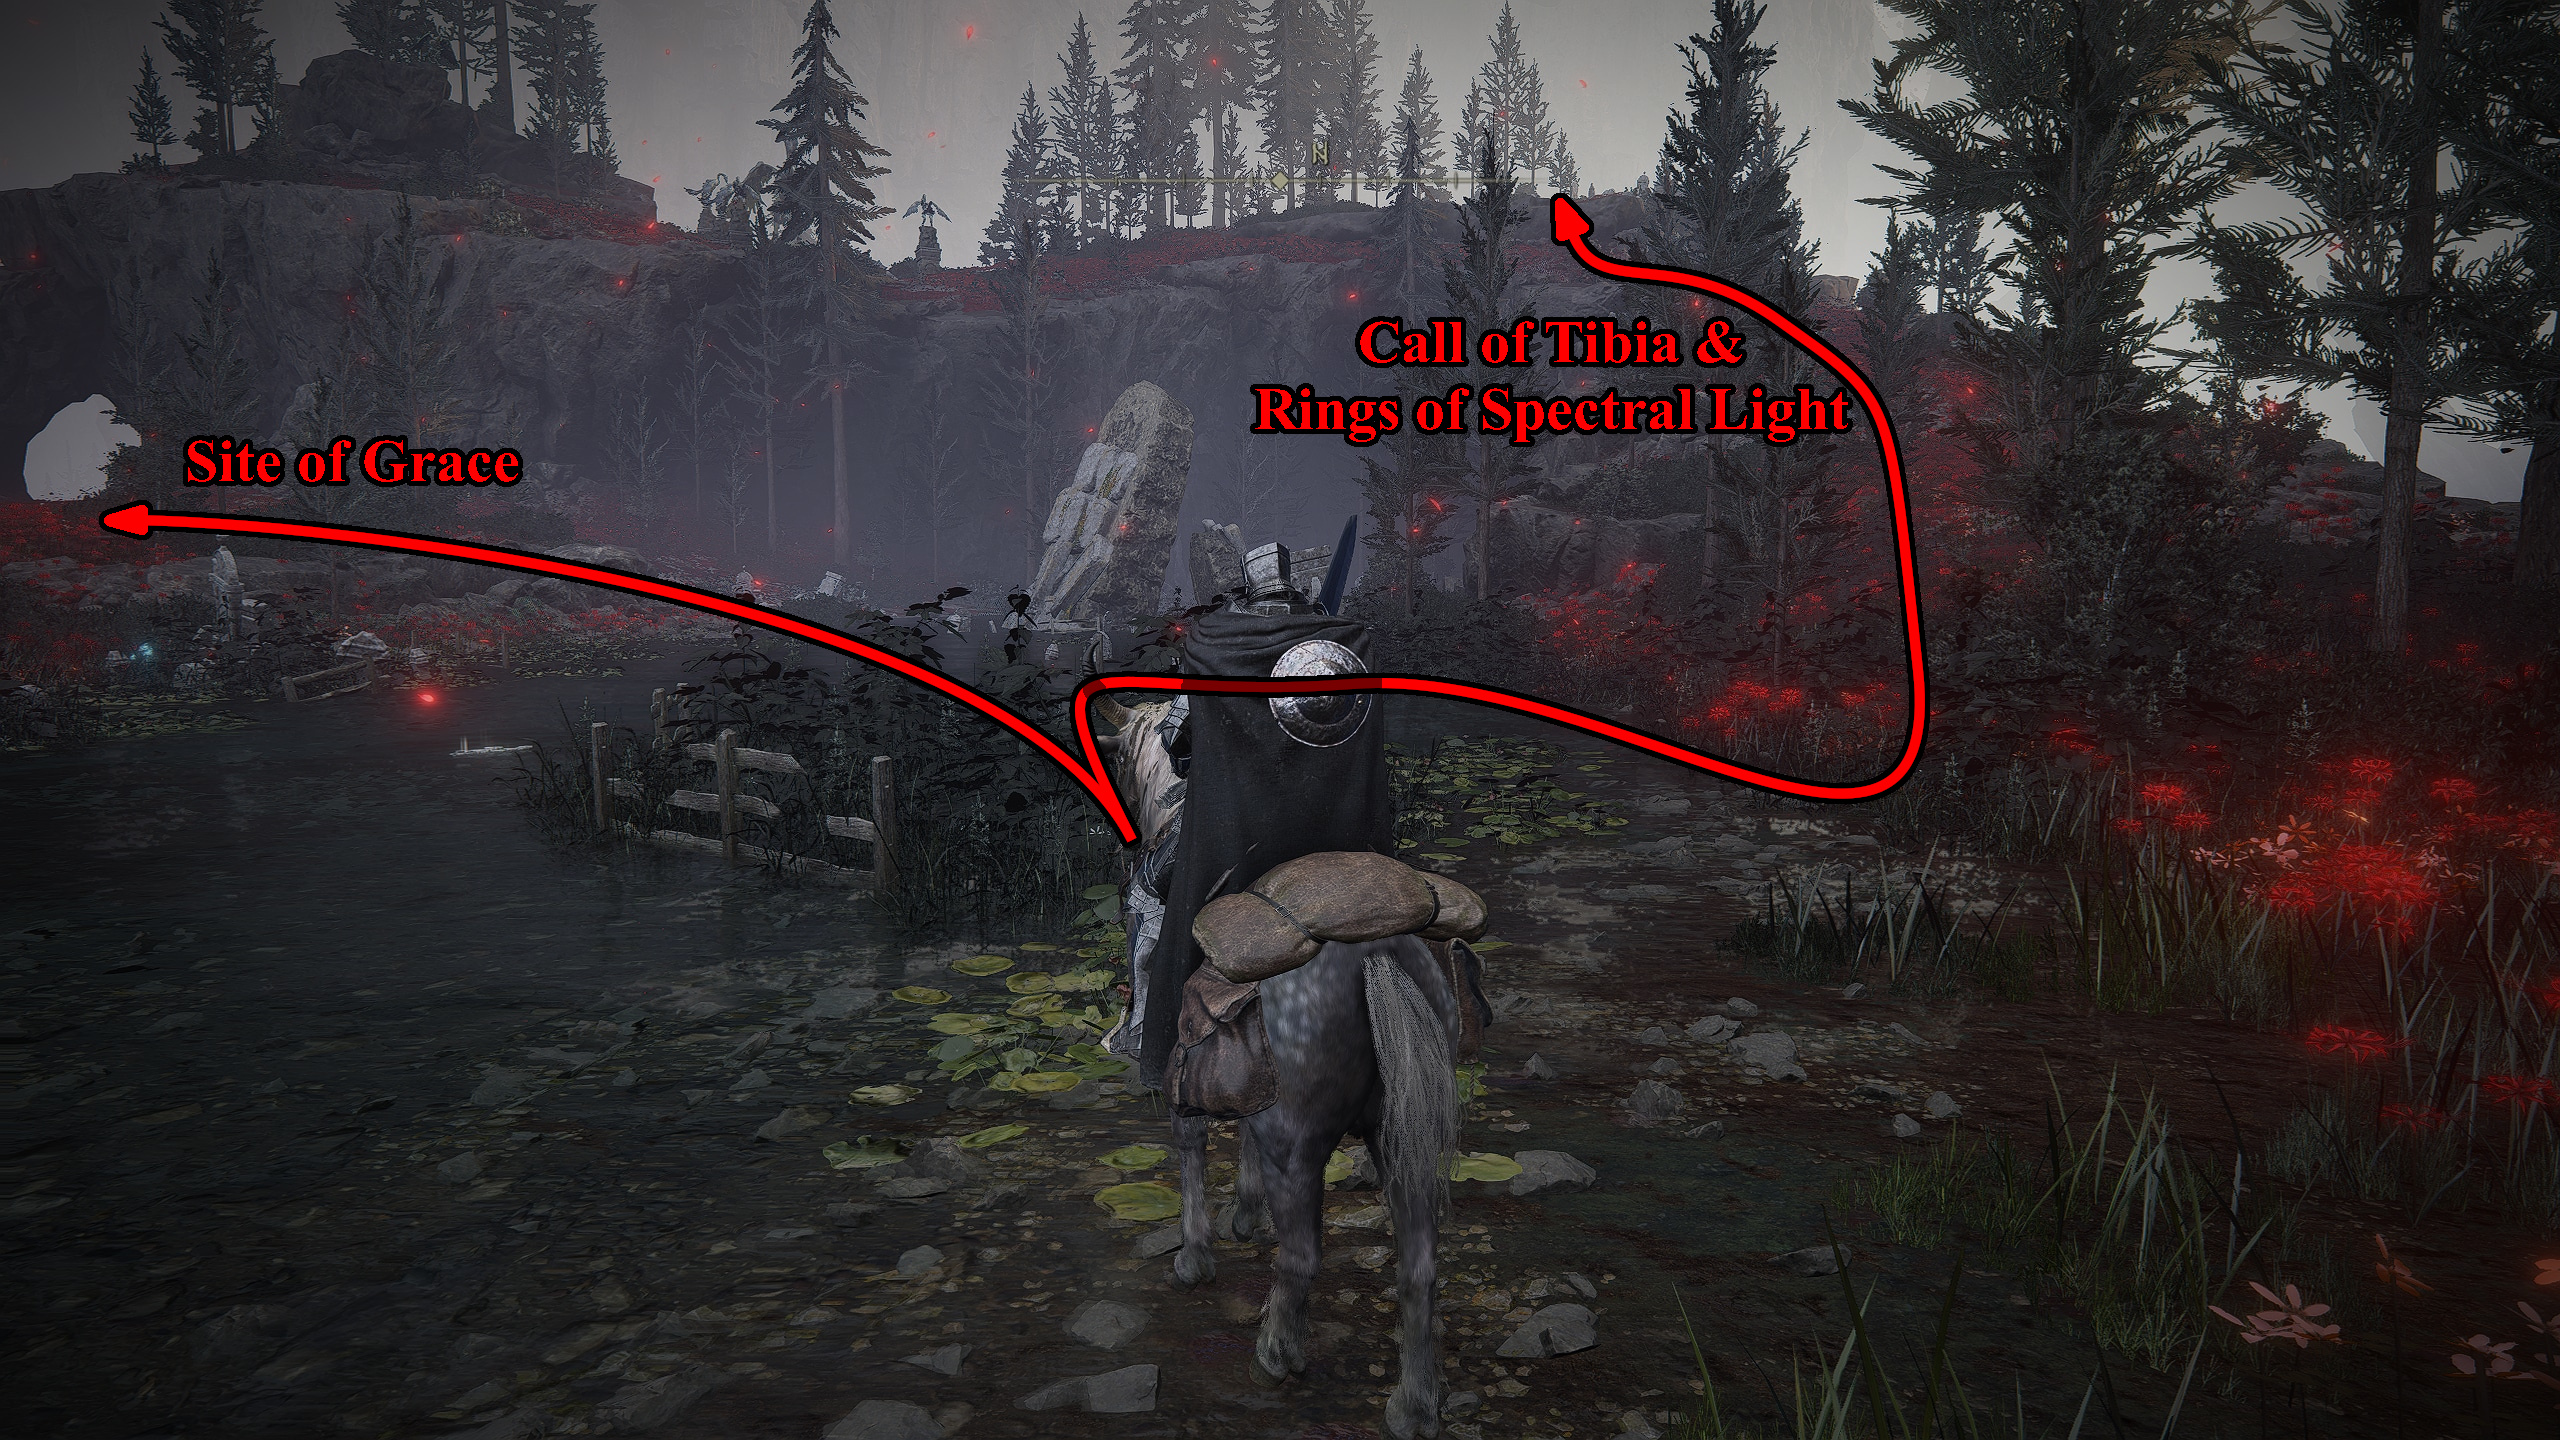
Now, head back to the area at the top of the small river, where the Tibia Mariner likely teleported to by the end of the fight. There are a few Beast Skeletons in this pond (including some large ones), as well as some Ghostflame Blooms, Grave Crickets, and a Grave Keeper’s Brainpan. From here, you can go up the hill to the left and activate the Charo’s Hidden Grave Grace.
Before continuing on, go back to the lake and up the hill on the other side of it, using Torrent to jump up some rocks to reach a set of graves. There are a number of Beast Skeletons gaurding this area, but none are large. Here, you can find a Call of Tibia, as well as a variety of Ghostflame Blooms, Grave Crickets, and a Grave Keeper’s Brainpan.
Go down the hill to the west until you reach a Gravebird Altar. There are five Gravebirds standing guard over this Altar. Attacking one Gravebird with a ranged attack will not activate the others; the only thing that will activate all of the Gravebirds at once is stepping up to the Gravebird Altar for the item. After dispatching them, you can pick up the Rings of Spectral Light Incantation. If any Gravebirds are waiting when you approach it, they will activate and attack.
While you can continue forward to where the Greater Potentate’s Cookbook is from here, it is better to teleport back to the Charo’s Hidden Grave Grace so that you can tackle the next area more completely.
Charo’s Hidden Grave Grace
Unique & Important Items
Ash of War: Ghostflame Call (boss drop)
Spirit Glaive
Greater Potentate’s Cookbook [14]
Scadutree Fragment
From the Charo’s Hidden Grave Grace, you can go northwest through the arch to reach a large, grave-strewn lake. To your immediately left, there is a body with a Grave Glovewort [9]. After grabbing it, there are several Gravebirds hanging out around this lake, which you should try to take out before continuing to the middle of the lake, where a a Death Rite Bird will appear. This one does deal high damage and have high health, but has the same moveset as the base-game version. To remind yourself how to take them on, check out this guide.
After this, turn right after continue deeper into the lake, sticking far to the right/east. There is a path to the direct north that leads to the Lamenter’s Gaol Dungeon, which we will be going to later, but you will want to keep going all the way to the east of the lake.
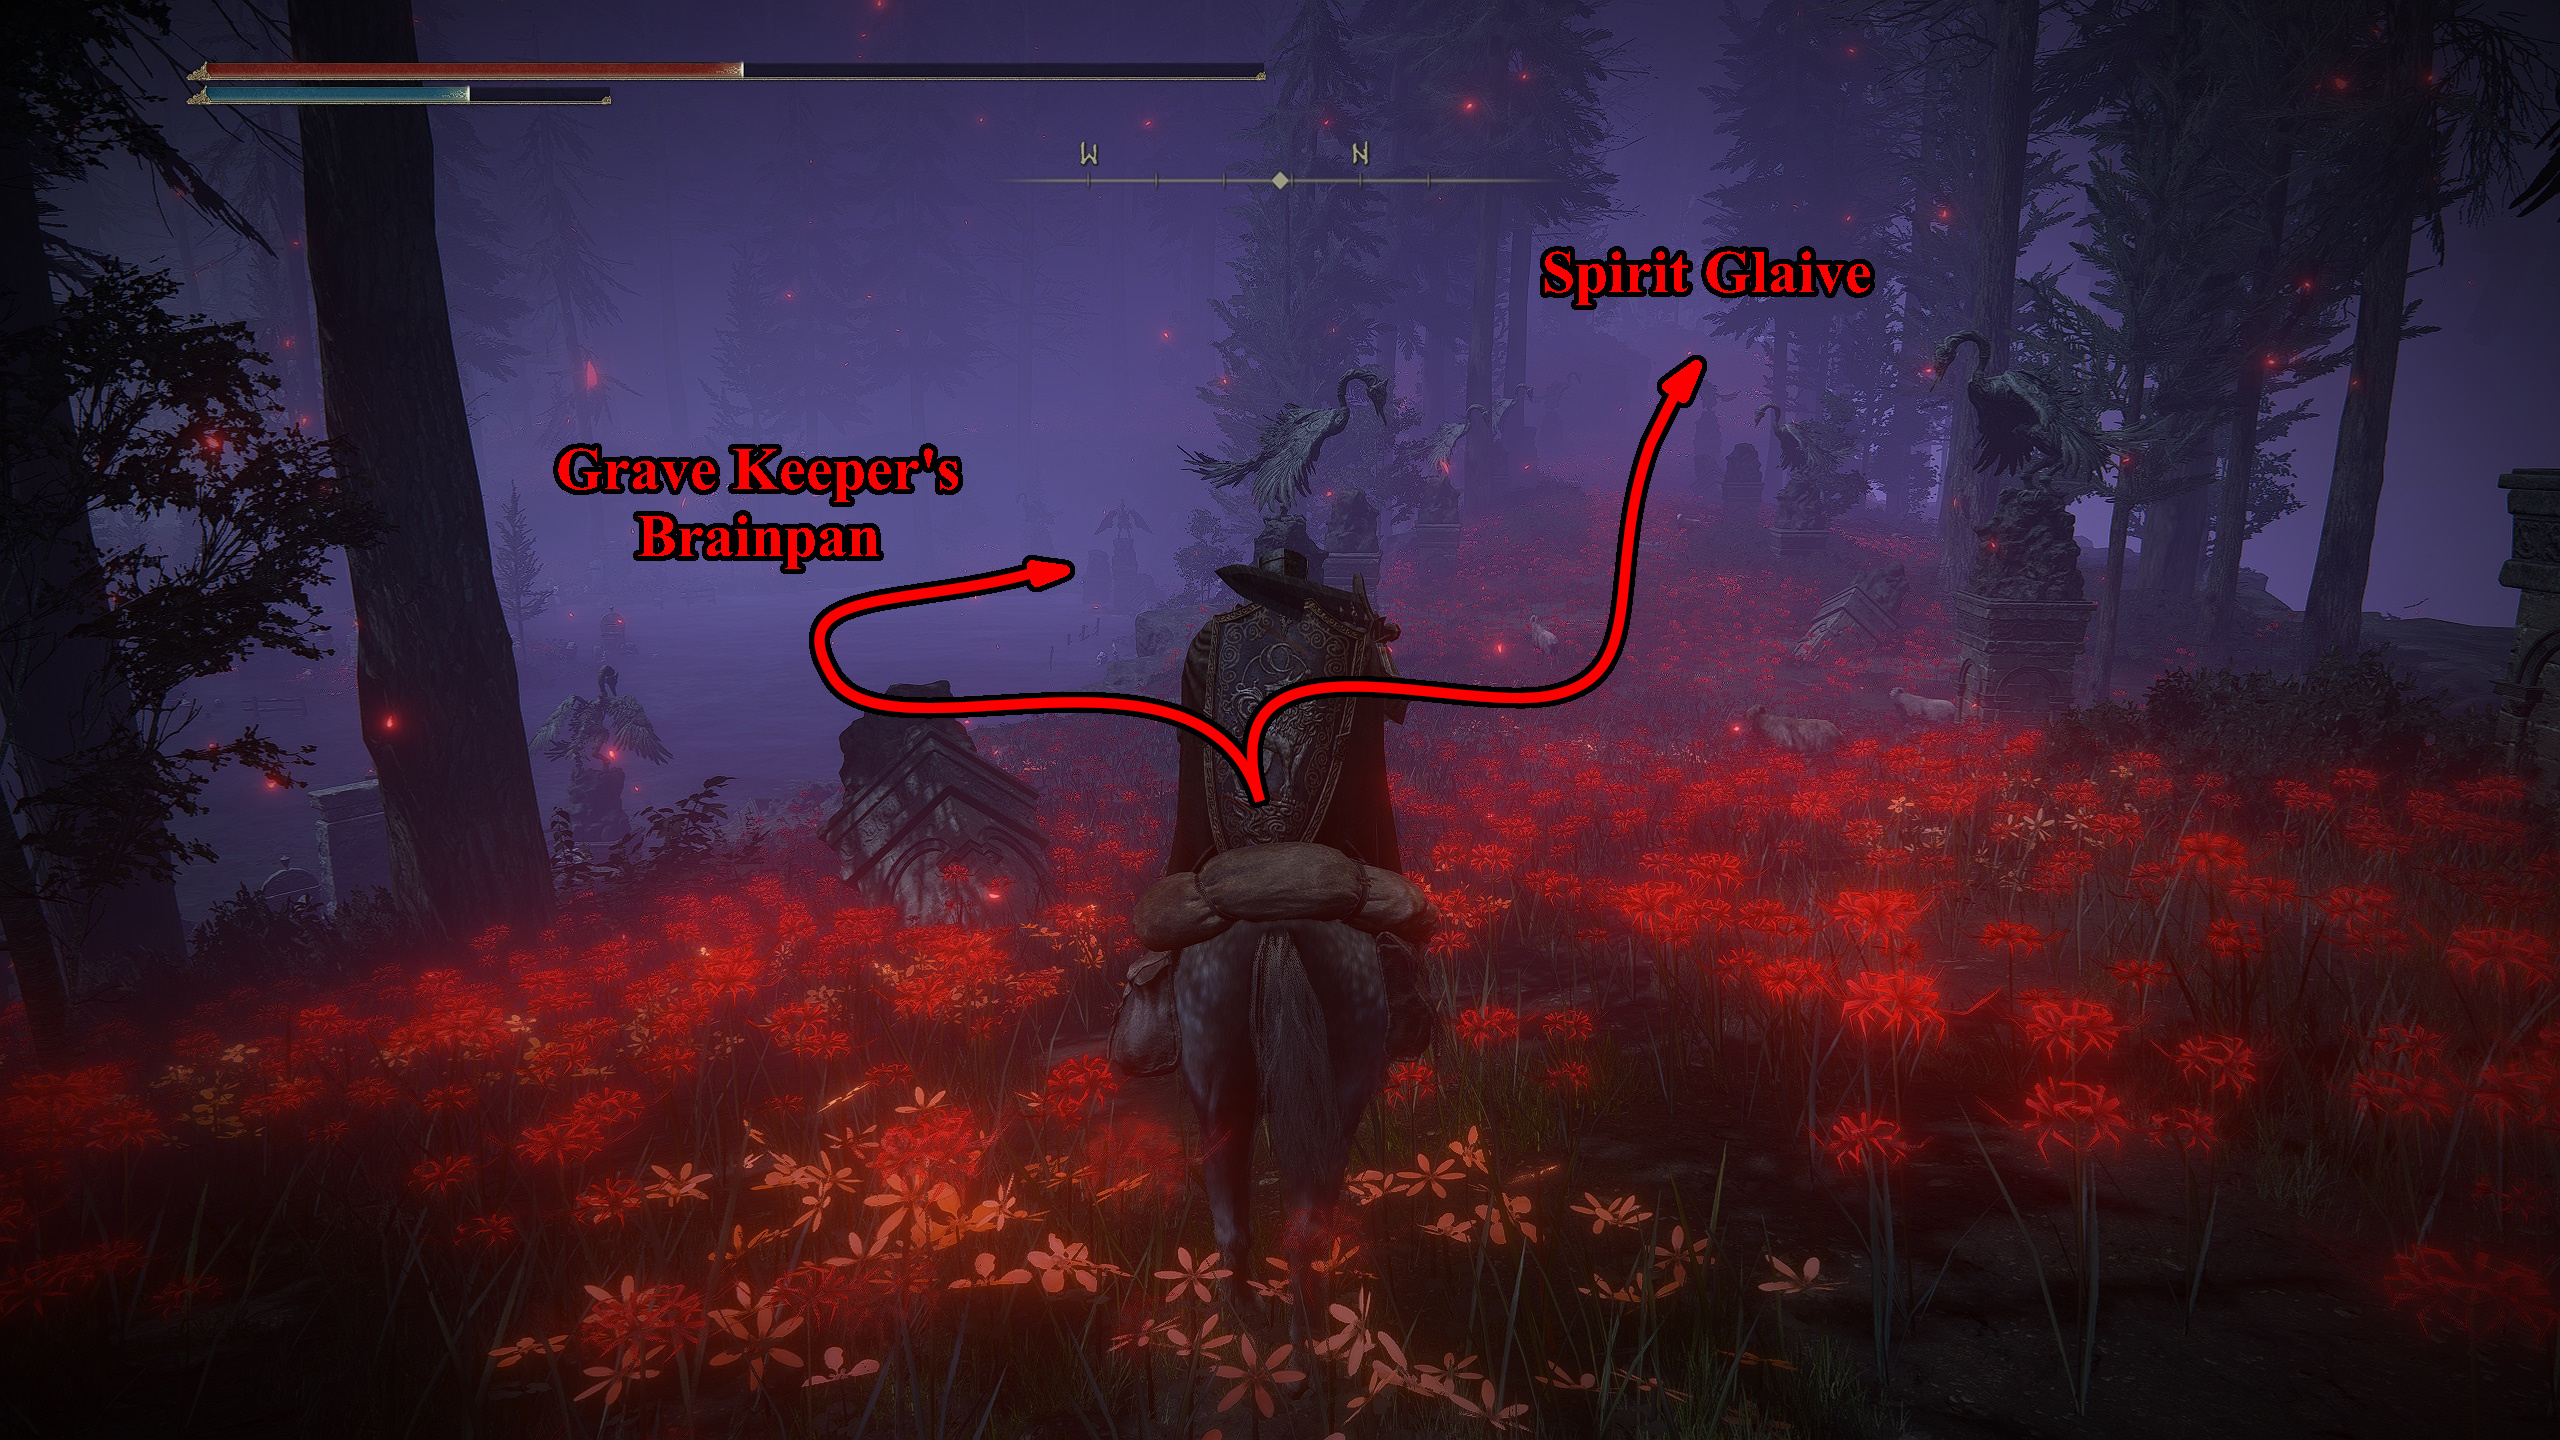
Here, under the overhang of the cliff above, you can find a Grave Glovewort [9]. Then, further to the right/east, you can find an incline guarded by several Gravebird statues (these ones aren’t alive). Go up it, and you will find the Spirit Glaive at the end of the path. There is also a lower path even futher to the right that leads to a single Grave Keeper’s Brainpan.
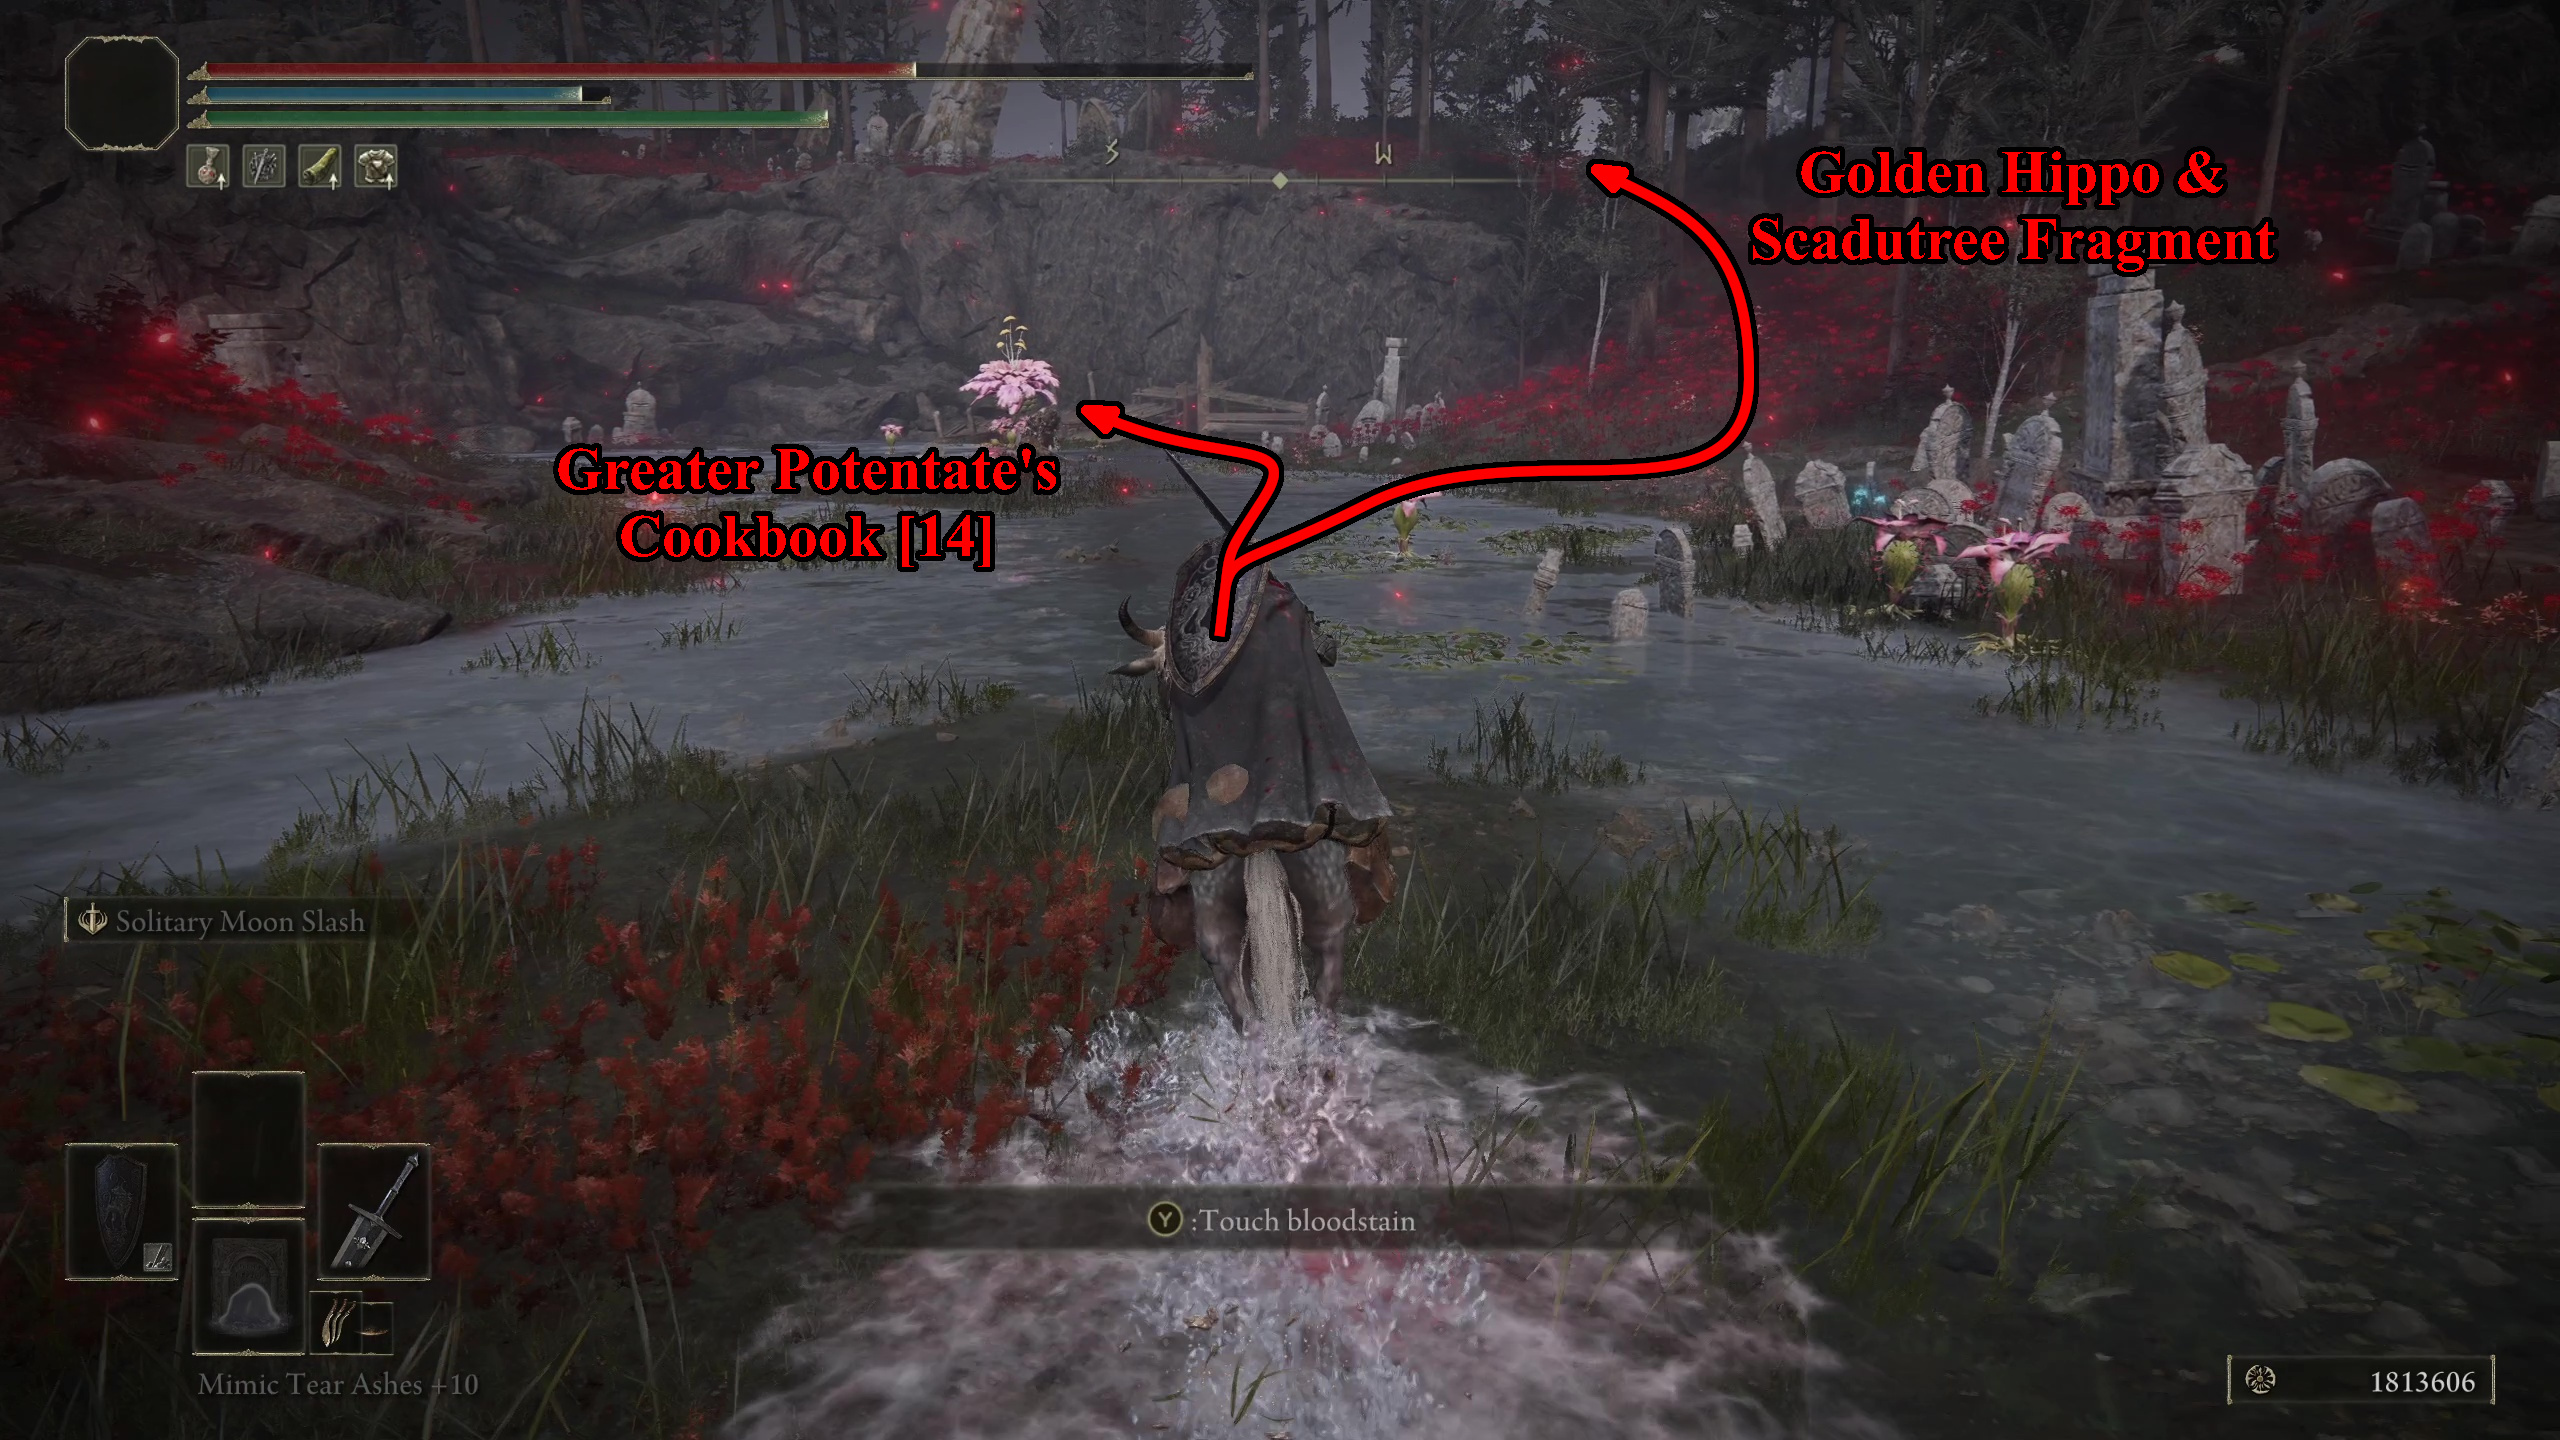
After grabbing those items, turn back and go across the lake. There will be several Miranda Flowers, including a large one, and some Beast Skeletons. Behind the large Miranda Flower, you can find a corpse with the Greater Potentate’s Cookbook [14] (can you believe they made 14 of ’em?).
After this, you can go up the hill behind the large Miranda Flower and make a short jump to reach a pool of water with a Golden Hippopotamus mini-boss in it. This one is weaker than the full boss, but it can be taken on using the same methods to yield a Scadutree Fragment. In the pool, you can also find a Grave Keeper’s Brainpan nearby and 4 Ghostflame Blooms on a body.
After you are done, you can then leap off to the northwest to enter the Furnace Golem area.
Furnace Golem
Unique & Important Items:
Glovewort Crystal Tear (boss drop)
Gravebird Ashes
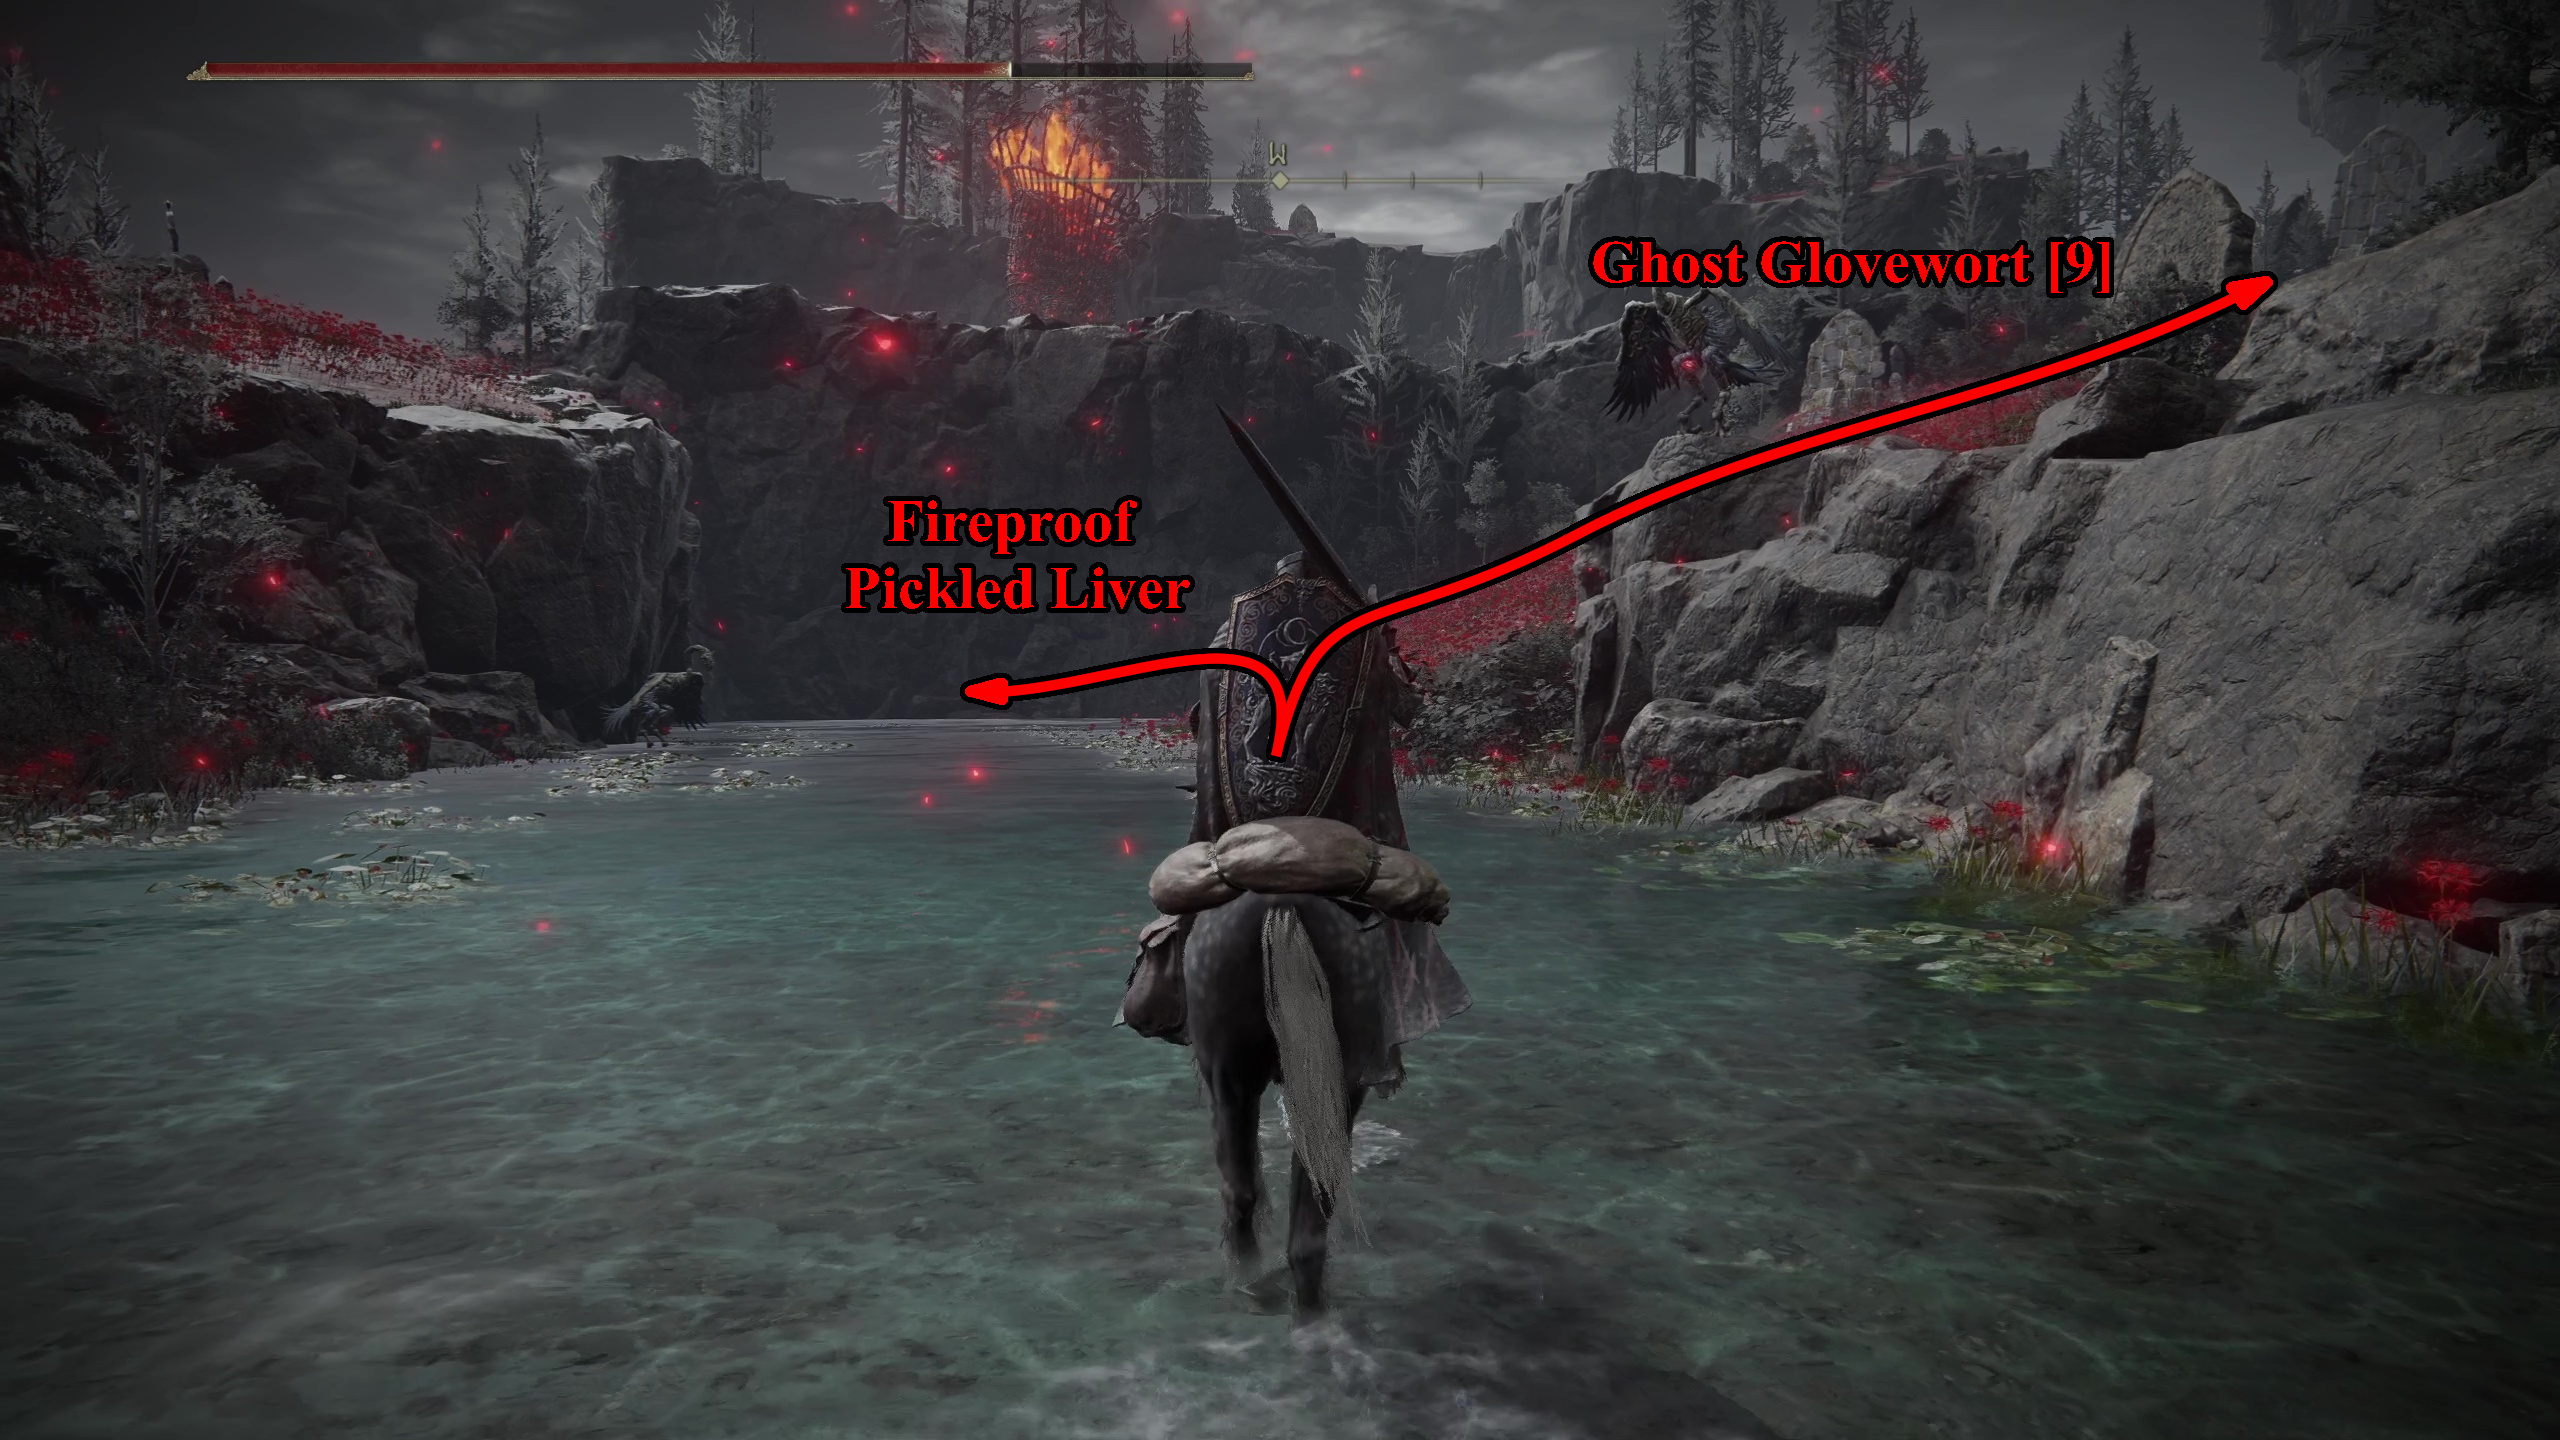
Going toward the Furnace Golem, there are several Gravebirds surrounding the ponds and streams. At the top of these, just below the cliff where the Furnace Golem roams, you can find a body with a Fireproof Pickled Liver. To the right of this, near a bunch of Gravebird statues, there is also a body with a Grave Glovewort [9]. The Fireproof Pickled Liver might be useful, since the Furnace Golem might see you and activate its Fire Tornado Mortar, sending meteors of fire toward you. If it does, keep on the move and try to use cover to block the meteors.
To take on the Furnace Golem, which is armored (meaning you can’t damage it on the ground), you will need to get above it. To start, go up the hill toward it, and then run past it toward the cliffs to the west. There is a Spiritsling near them, which you can use to jump up to get above the Furnace Golem. While you are there, right in front of where you land, you can find the Gravebird Ashes.
From the top of the cliff, you can now destroy the Furnace Golem. You want it to be right below the cliff, but if its position is off, you can leave and re-enter the game to bring it close again. You will need several Hefty Furnace Pots, which you can toss into the Furnace Golem‘s brazier to deal massive damage and to it. Be careful, though, as both the Fire Golem’s Fire Tornado Mortar and a jumping swipe can hit you and deal massive damage. Once defeated, it will drop the Glovewort Crystal Tear and a Furnace Visage.
Once you’ve finished with it, you can head back down the hill. Eventually, you will reach a stream that you can follow to the left to reach the Lamenter’s Gaol.
Lamenter’s Gaol
Unique & Important Items (All in Dungeon):
Chilling Perfume Bottle
Clarifying Horn Charm +2
Lamenting Visage
Hefty Cracked Pot
Lamenter’s Mask (Boss Drop)
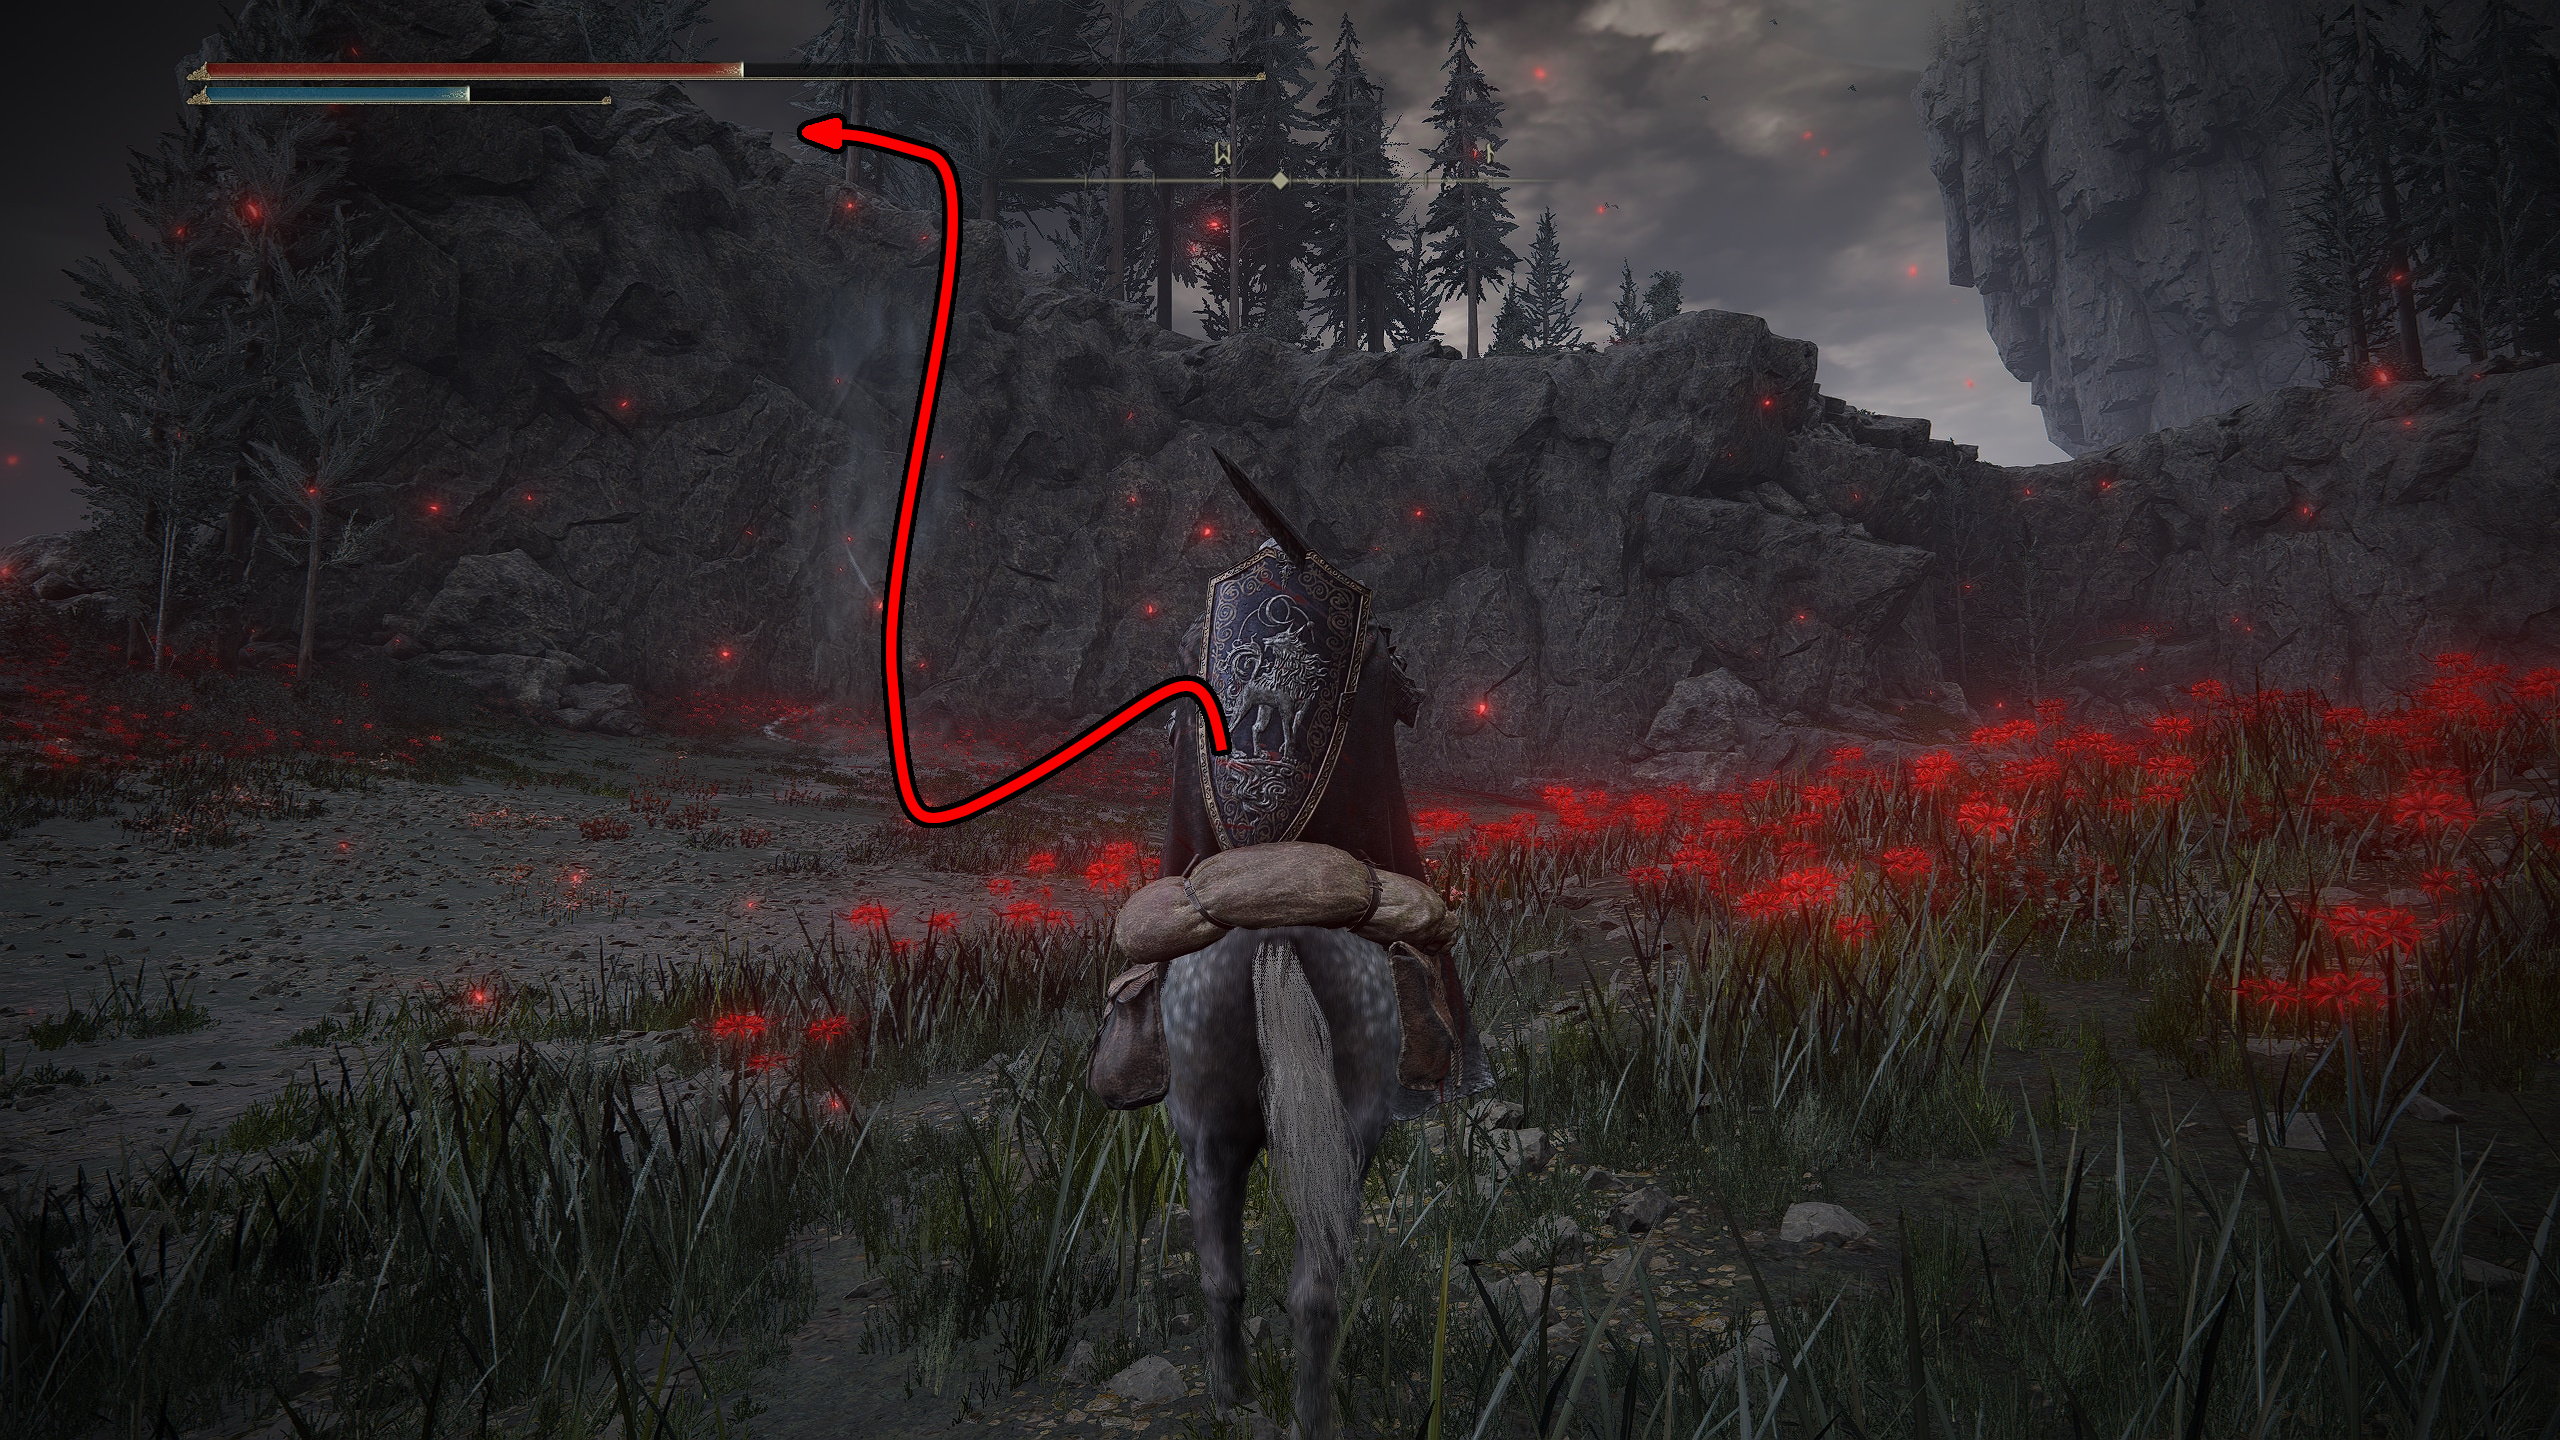
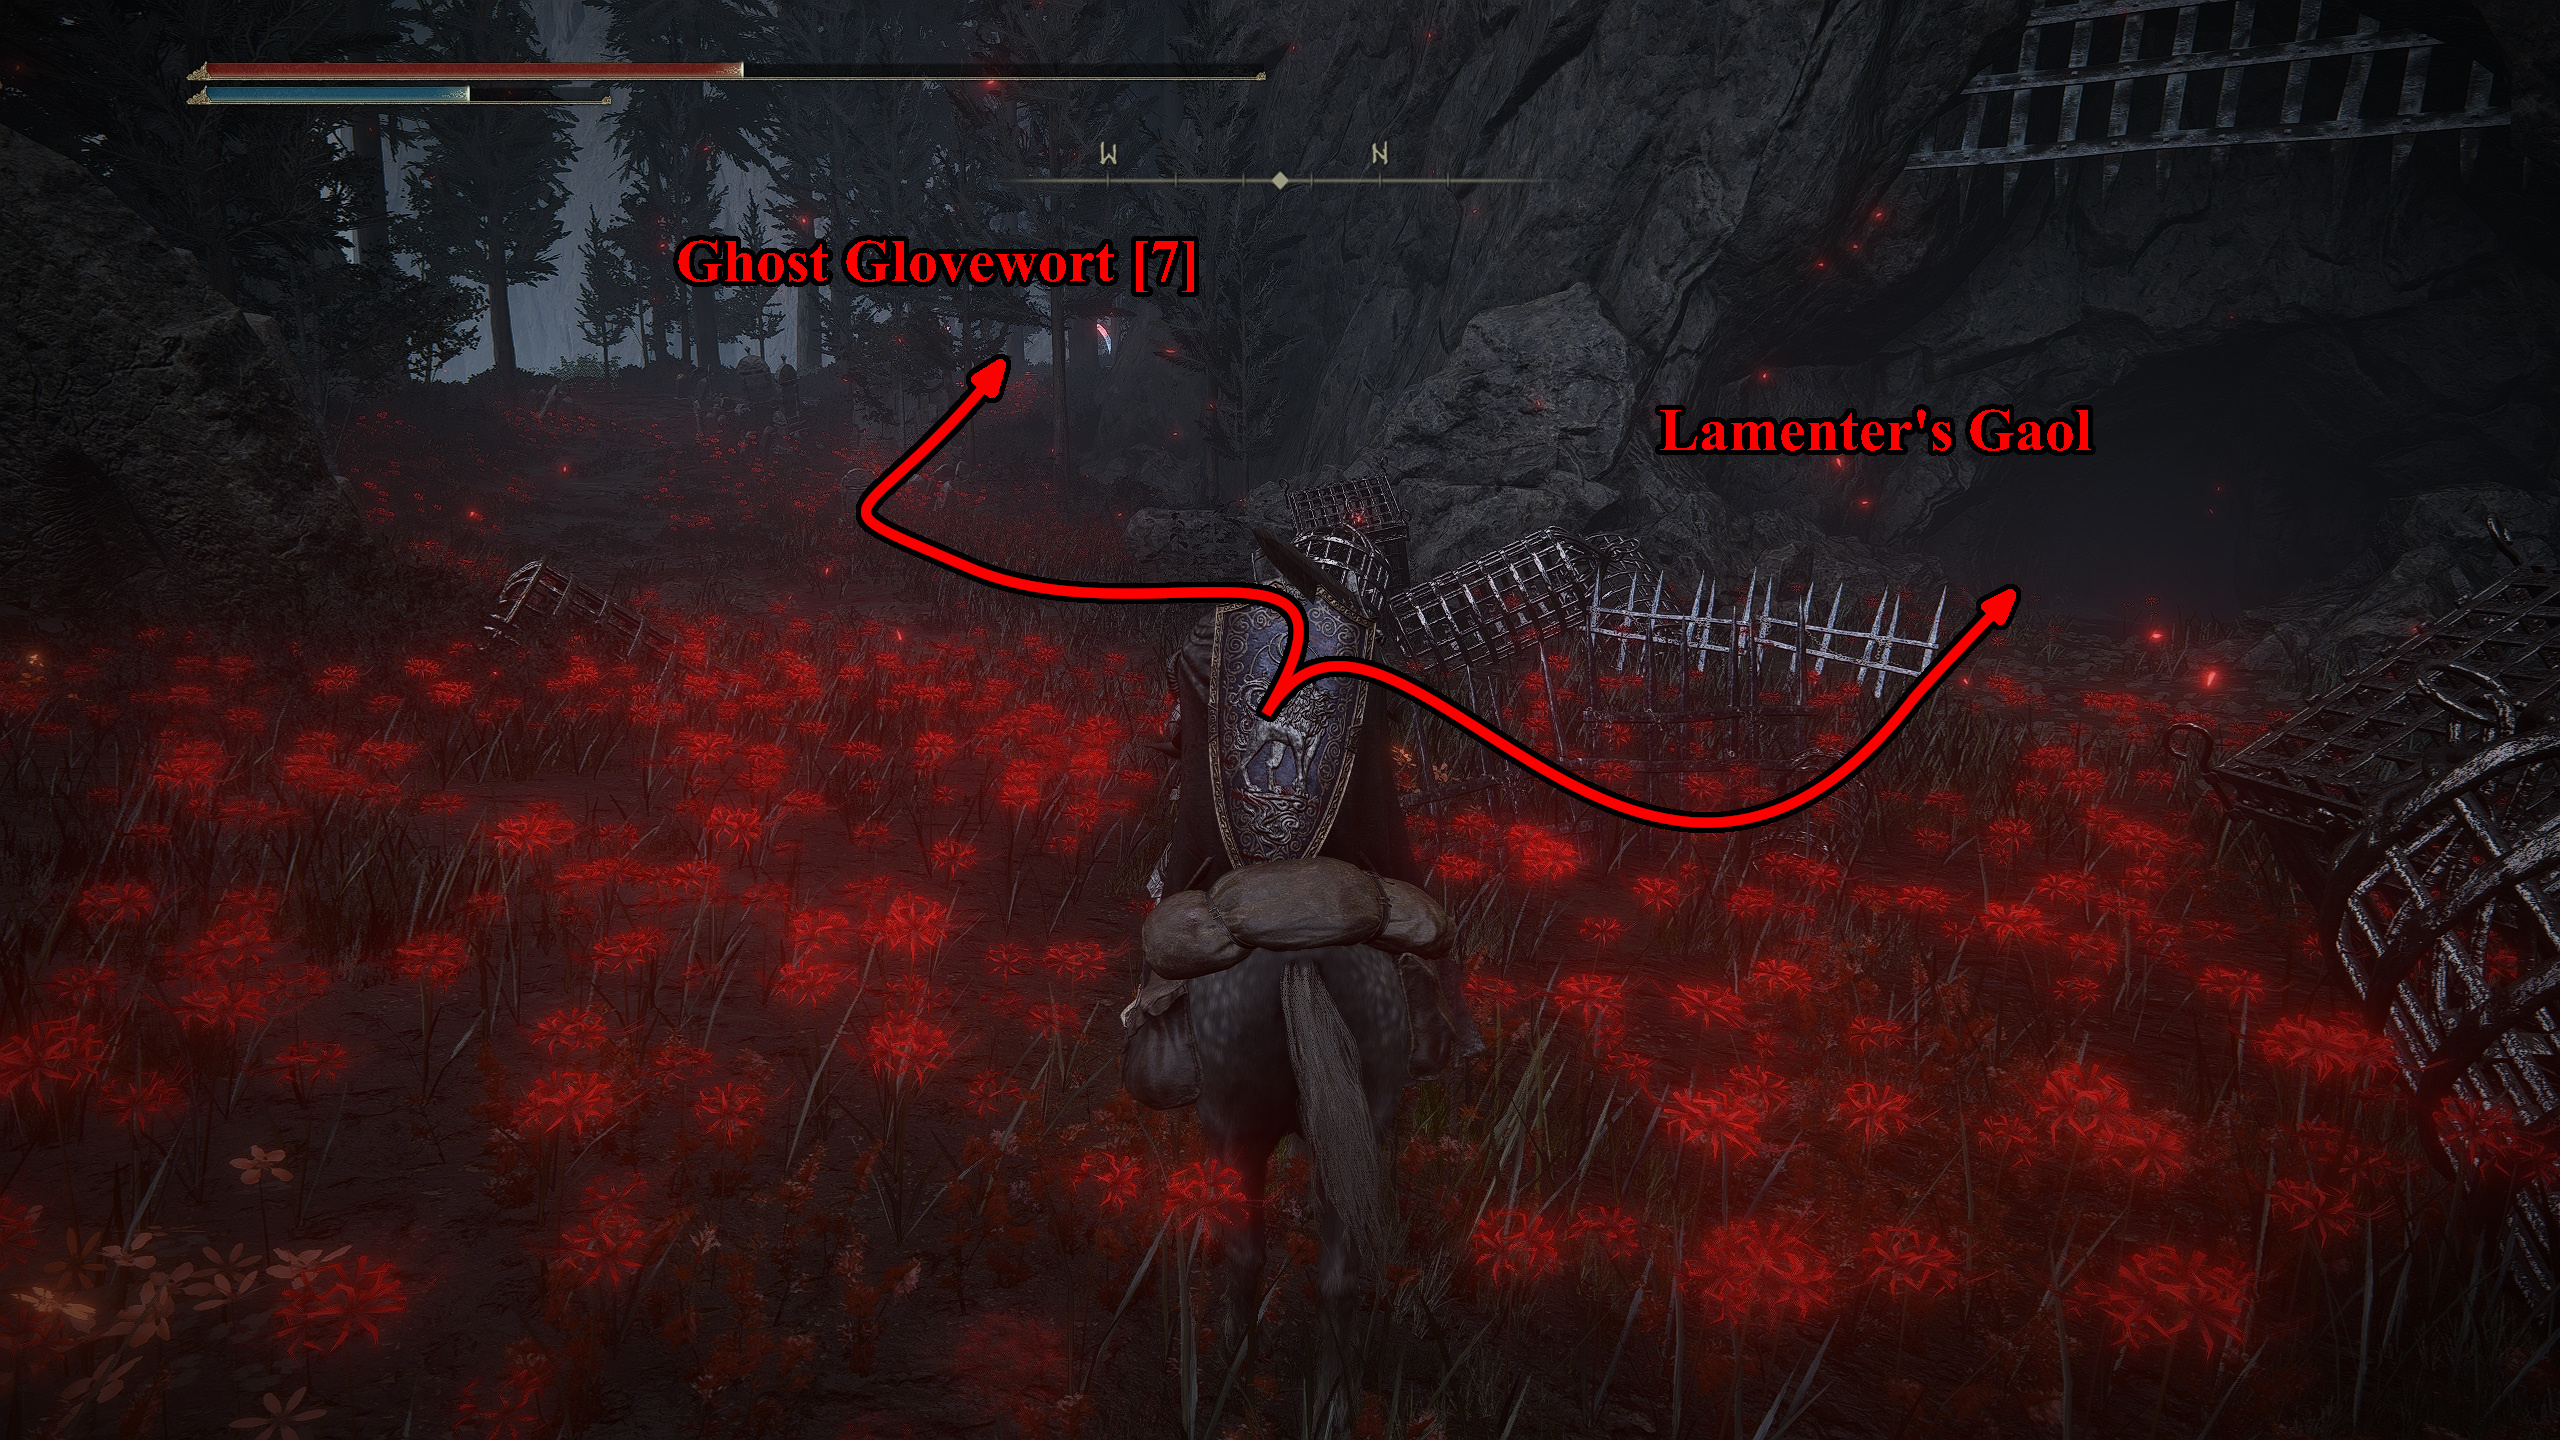
The Lamenter’s Gaol, hidden under the cliffs above, is easy enough to notice with its giant portcullis-gate. Before you enter, you can go past the Lamenter’s Gaol to the left to find a field of Spirit Eels. Amongst them, you can get a Ghost Glovewort [7].
After this, you can head back to the Lamenter’s Gaol entrance. See our detailed Lamenter’s Gaol Dungeon Guide below to work your way through its despairing depths.
Graves is an avid writer, web designer, and gamer, with more ideas than he could hope to achieve in a lifetime. But, armed with a mug of coffee and an overactive imagination, he'll try. When he isn't working on a creative project, he is painting miniatures, reading cheesy sci-fi novels, or making music.