Between all of the Perk and Cyberware options in Cyberpunk 2077, you might feel a bit overwhelmed with all of the special Abilities and creative ways to take out enemies — quickhacking enemies with debilitating effects, recharging explosives and rocket launchers, bullet deflecting, poisoned knife-throwing… but what if you want to keep things simple? Is a Classic Run & Gun playstyle viable in a game with so many additional options?
It absolutely is.
And not only is it viable, it’s crazy fun.
Body Attribute & Shotgun combination is very powerful in Cyberpunk 2077, and the Obliterate mechanic you can unlock will make you feel like you are blasting out insta-death rounds to take out groups of enemies with just one shot.
It’s also one of the more flexible builds where as long as you maintain your survavibility, you end up with a lot of free Perk Points you can play around with (which also means your build will get very deadly relatively early in the game). You can easily lean into certain aspects of the build, or combine it with your favorite mechanic from another tree. If you wanted to play around with your options, we put our basic recommended perks for you in the official Cyberpunk Build Planner. Otherwise, we will make some suggestions for you in the sections below.
Let’s get started!
Run & Gun Stats
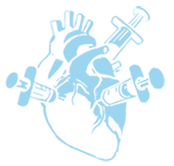
Body (20) – This is our core Attribute for the build, which will give us our core weapon damage buffs and our Obliterate mechanic (from the left tree), as well as a chunk of our survivability (middle tree).
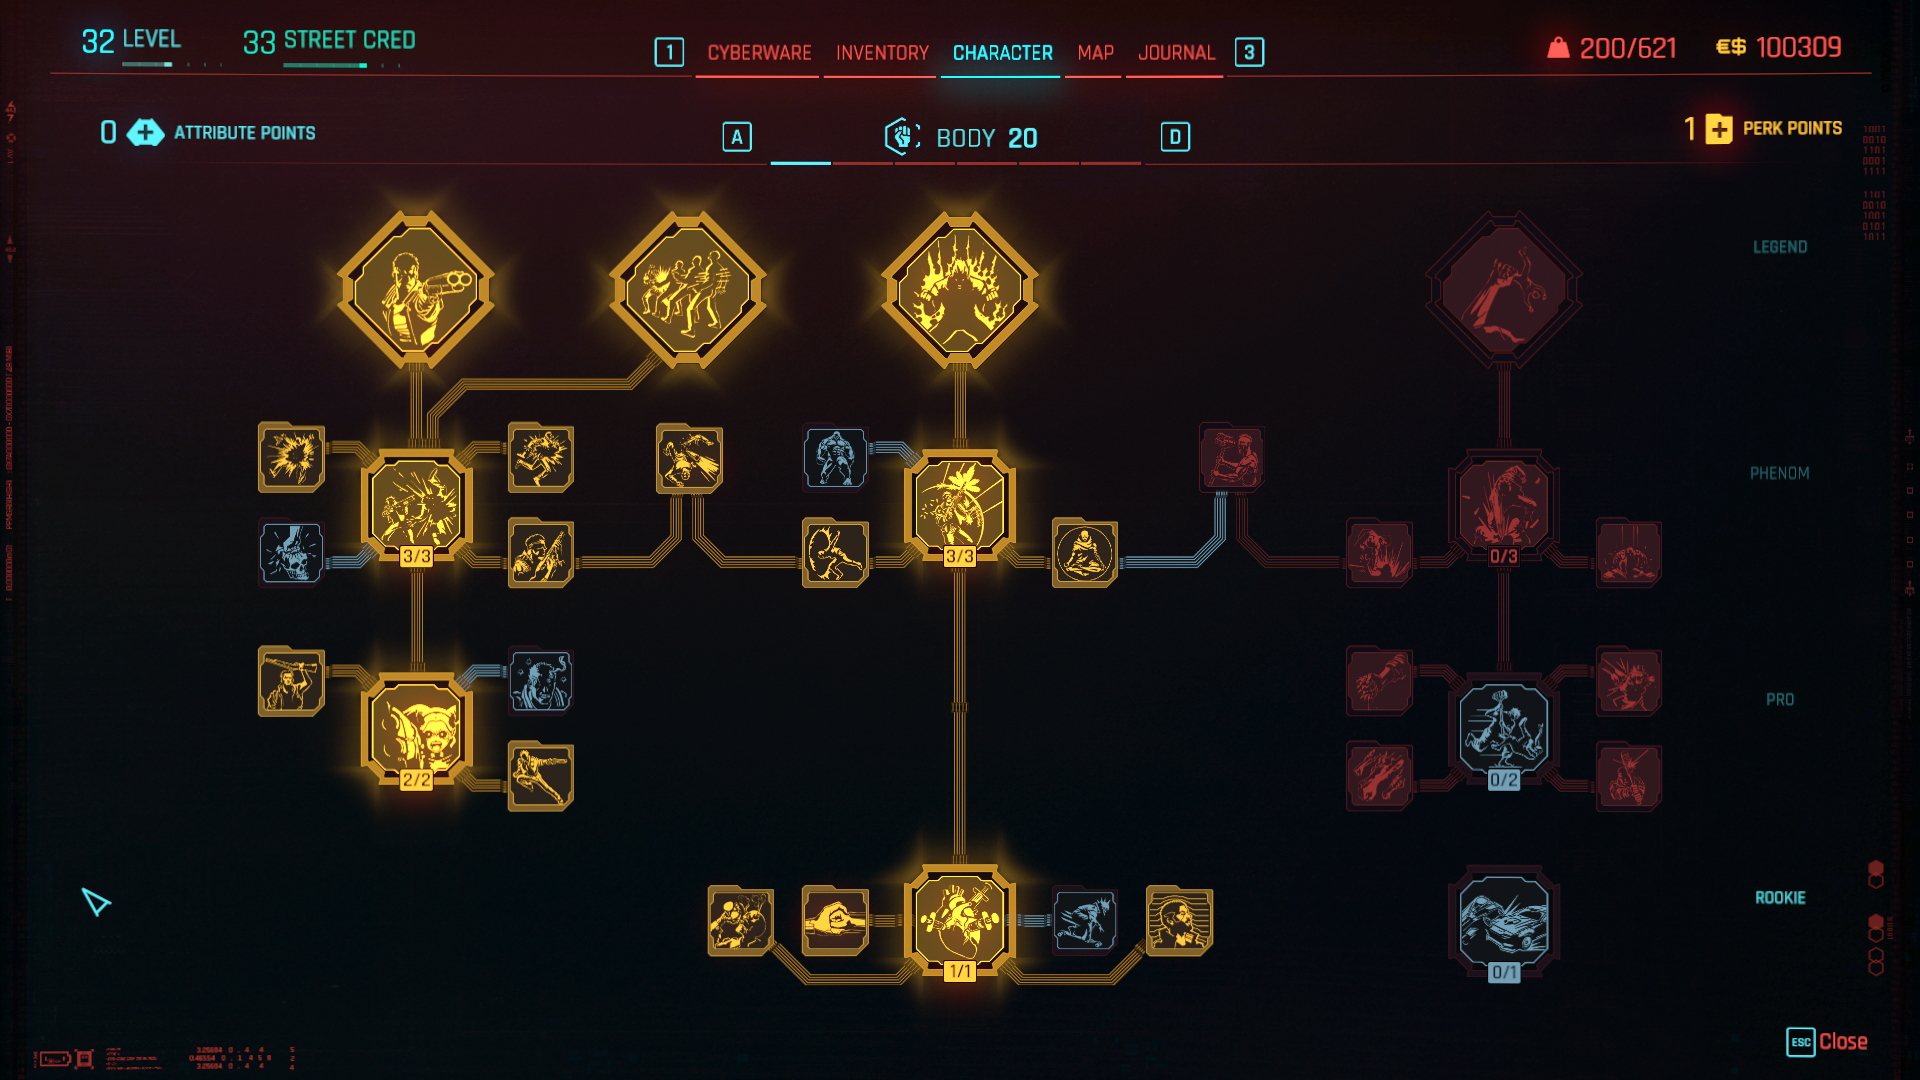
Technical Ability (up to 20) – Tech’s middle tree will be excellent for boosts in all categories, both offense and defense, since it improves our Cyberware stats and gives us additional Skeleton slots, and if you are willing to go up to 20 and test your health sustain, then the Edgerunner perk can be used as a great additional power boost.
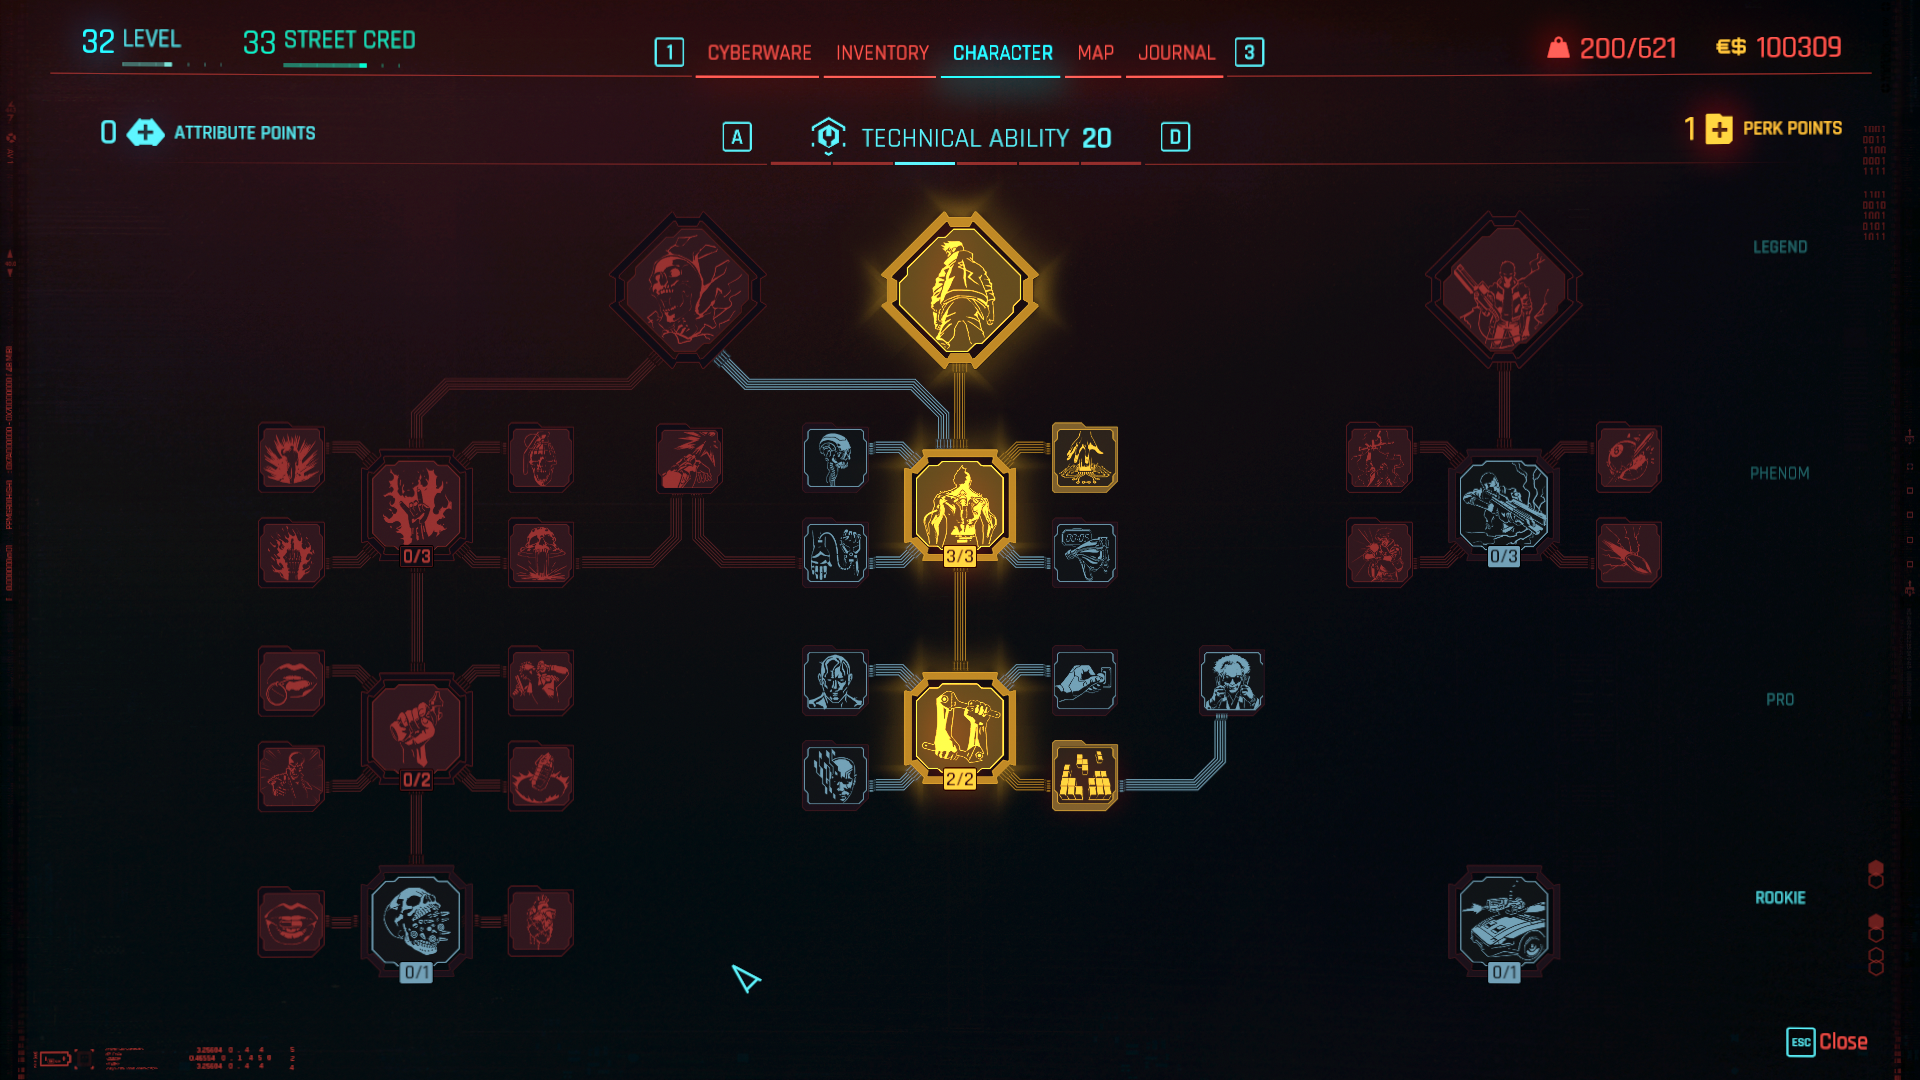
Reflexes (remaining points) – If you are into the “Run” aspect of the Run & Gun, this is where you can both speed up how quickly you take out enemy groups as well as Mitigate some damage while maneuvering between your targets. Having more points here in general will increase your Crit Chance, which is great for our damage.
Best Skill for Run & Gun Build
The core playstyle of the build will synergize with the Solo Skill the most — getting you extra Health, Crit Chance in close combat, and eventually some Adrenaline Rush and Berserk bonuses. It will boost your Gorilla Arms, if you wanted an easy option for an Arms slot and a 3rd weapon. Gorilla Arms Cyberware also goes well with the Berserk Operating System, and gets easy & powerful boosts from Relic Perks, if you have the Phantom Liberty expansion. (However, we will list some alternatives for you to consider as well.)
You will find the Solo Skill easy to level, since you will get the XP from just killing enemies with your Shotgun & LMG combination, and you can speed it up by taking advantage of Body Attribute interactions, like forcing doors open.
Run & Gun Perks
Body
Body is the core of the Run & Gun Build, not only because it gives crucial boosts to our main weapon types (Shotguns/LMGs/HMGs) as well as survivability, but also arms us with our most powerful ability — Obliterate.
(The full list of perks is in the tabs at the bottom of this section.)
Shotgun/LMG/HMG Perks
You will notice in the list below that the perks, especially further up the tree, will give you a lot of incentives to use Shotguns and LMGs, which will be our primary two weapons for the build — Shotgun is our best default weapon in close range, boosted by Quick Melee Attacks, and LMGs will come handy if there is a little bit of a distance between you and the target.
Notice, however, that if you pick up powerful HMGs whenever there is an opportunity to do so (e.g., from a turret), you will get boosts to these already quite powerful weapons (plus, it will help you level your Solo Skill even faster).
If you notice yourself leaning very heavily into either a Shotgun or an LMG, you don’t have to pick up both the Rip and Tear and Onslaught at the top of the tree — first one is meant for you to weave in Quick Melee Attacks between your Shotgun shots to increase their damage (very powerful, by the way — you will dispatch most of your enemies in one to two hits with this one), while the latter extends your ammo for LMGs (which is great if you use an LMG with increased fire rate like Wild Dog).
Still, we highly recommend you give the Shotgun playstyle a try — you will deal tremendous damage alternating between Shotgun shots and Quick Melee Attacks with Rip and Tear.
Survivability Perks & Adrenaline Rush
Next up are our middle section perks. We start with Painkiller and perks around it for powerful Health Regen: we will be fighting up close a lot, so passively regaining health will be very important with us. You should also get comfortable with the Mitigation ability when facing strong-hitting enemies — we will start with the ability to Mitigate every time we use a Health Item (from Dorph-head), but there will be more options for us under the Reflexes as well.
Earlier in the game, balance these early perks from Body, Reflexes, and Tech Ability with your damage output. If you are dying too often, slowly developing your damage might not help you as much as Health Regen, Skeleton Cyberware, and Mitigaion, for example. Later in the game, feeling comfortable with your survivability will let you lean more heavily into Edgerunner, which will synergize quite well with our Obliterate ability.
Adrenaline Rush is a slow creeper, but it pay off a lot as we grab more perks around it: it will start off as a quick expire, but perks like Calm Mind, Pain to Gain combined with Health Items, and, more importantly, Bloodlust that will benefit from our Obliterate ability will extend the duration of this one quite noticeably, giving you the ability to charge right into enemy groups and against powerful targets and maintain uninterrupted offense.
Spontaneous Obliteration
Now let’s talk about the said offense. This build comes with a very strong core ability, and arguably one of the most fun instant-kill mechanics in the game — Obliteration (acquired from Spontaneous Obliteration). In summary, as soon as you get an enemy to low health, you start getting a chance to instantly dismember them.
But wait, there’s more: once you output enough damage from your Shotgun, you might get to a point where Obliterate just procs every shot Shotgun, which is crazy powerful.
Oh, and just one more thing: after you grab Dread, you should start feeling much more comfortable within enemy groups, since the instant kill will spread to nearby enemies as well and power a lot of your “neutralize” perks, including the Edgerunner under the Tech Tree.
Level 2: +20% Health Regen bonus to all Health Regen effects from all sources.
Level 3: Unlocks Adrenaline Rush mode.
In addition to their base effects, Blood Pump cyberware and health items now also give Adrenaline equal to 30% Max Health. (up to a max of 50% Max Health). Adrenaline is indicated by a yellow bar and acts like extra health by absorbing damage. It also decays over time. Adrenaline Rush remains active as long as you have Adrenaline available.
+100% damage for the next Quick Melee Attack after shooting an enemy with a Shotgun. +100% damage for the next Shotgun shot after hitting an enemy with a Quick Melee Attack.
When Adrenaline Rush is active: +20% Health Item recharge after neutralizing an enemy.
Technical Ability
Our recommended perks in this section are brief, focusing on those sweet extra stats and boosted armor from the extra Skeleton slot and the Cellular Adapter (a powerful option for the Integumentary System on higher Tiers) but note that you can grab many more perks to boost your character in just about every way, since Cyberware is such a core system in the game — you can grab Chrome Constitution, Ambidextrous, Extended Warranty, and Chipware Connoisseur, for example, if you have some extra perk points to spare.
You will primarily be working up to Edgerunner, which will become your “higher risk, higher reward” perk, in a sense that, the more comfortable you are with your survivability, the more powerful the effects are going to be from Fury, which you will trigger often because of the Obliterate ability, to help you Obliterate even quicker. If you get here early in the game, you might not want to increase your Cyberware Capacity right away (say, from Renaissance Punk), to let yourself go over the capacity without requiring more Cyberware than you are willing to afford.
If you are using a Tech Weapon Shotgun in your rotation, such as the Iconic Ranged Weapon Order, you can throw some points into the right section of the tree as well. Note that higher-Tier Cellular Adapter, which we will be grabbing a perk for, will boost your Tech Weapon damage among its bonuses, so you already have the incentive if you like charging up your shots.
All Things Cyber — Max Level: 2 — Requires: Technical Ability (9)
Level 1: +10% to all cyberware stats modifiers.
Level 2: -20% Cyberware Capacity cost for cyberware in the Integumentary System and Skeleton.
Unlocks Cellular Adapter cyberware for the Integumentary System. It can be purchased and installed at ripperdoc clinics. This Perk is required to use it properly.
Allows you to exceed your cyberware capacity by up to 50 points, but at the cost of -0.5% max health per point over capacity. When you neutralize an enemy during combat, there is a 0.1% chance for each point you are over capacity that you you will break into a Fury. In this state, you gain: +10% damage, +30% critical chance, +50% critical damage. Duration: 12 sec.
Reflexes
Reflexes is a great investment not only for the satisfying mobility (for the ease of getting into the thick of your enemy groups), but also for getting to your most powerful targets faster, neutralizing your enemies in quicker succession, and for triggering Mitigation to significantly increase your survavibility while you find your way around the battlefield.
Note that the passive bonus from the Attribute is an increase to your Crit Chance as well, if you needed some extra encouragement.
You can spend as many points here as you are willing to, but we recommend that you grab at least a few of these perks, since even the early ones can improve your assault efficiency and defense substantially.
Painducer (Integumentary System) – Turns 25% of the damage you take into damage-over-time, which gives you a larger window of opportunity to heal yourself when dealing with deadly opponents.
ProxiShield (Integumentary System) – Since you are going to be fighting in close range most of the time, reducing damage when there are targets nearby will be quite useful.
Cellular Adapter (Integumentary System) – If you follow our suggestions, you will get Built Different perk at some point, which will let you equip this one. On Tier 3+ it will get you quite a bit of armor, as well as Health Item recharge speed and even a Tech Weapon damage boost (if you are using a Tech Weapon Shotgun in your rotation, for example).
Notice that you will get an extra slot for Skeleton Cyberware if you follow our Tech Ability tree suggestions, so make sure to make use of that as well.
You might want to consider a couple of options for your Hands:
Ballistic Coprocessor (Hands) – If you lean into your LMGs, you will find a few of them to be Power Weapons, like the Iconic M2067 Defender, or the Phantom Liberty’s Iconic Wild Dog, and this Cyberware will boost their ricochet.
Microgenerator (Hands) – On the other hand, this option is very powerful for Double-Barrel Shotguns (which already deliver more damage on average), boosting your next shot with electroshock every time you reload.
Note that you could equip both of these if you grab the Ambidextrous perk.
Berserk (Operating System) – Berserk tends to be a solid option for Body-heavy builds, protecting some portion of or all of your health for a brief period of time (which you can use to Dash around the battlefield, for example). Most of these will require you to use melee weapons for the duration, but you get an easy option for that:
Gorilla Arms (Arms) – Is a great option if you go with the Berserk Cyberware. It will get direct bonuses from Solo Skill, which you are already leveling, as well as from your extra Relic Perks (if you have the Phantom Liberty expansion), making it an easy and effective option for a melee weapon in close range. You can boost it even further by investing into right section on the tree for Blunt Weapons, if that’s your thing.
Sandevistan (Operating System) – Alternatively, you might find the good ol’ slow motion dashing around the field more satisfying, especially if you lean into Reflexes. This combination will help you make easier use of your Vulnerability Analytics (Relic Perks), or charge up your Tech Weapon Shotguns, if you have one in your rotation. If you don’t mind completing Regina’s missions, getting Axolotl Frontal Cortex to go along with that will be a good idea.
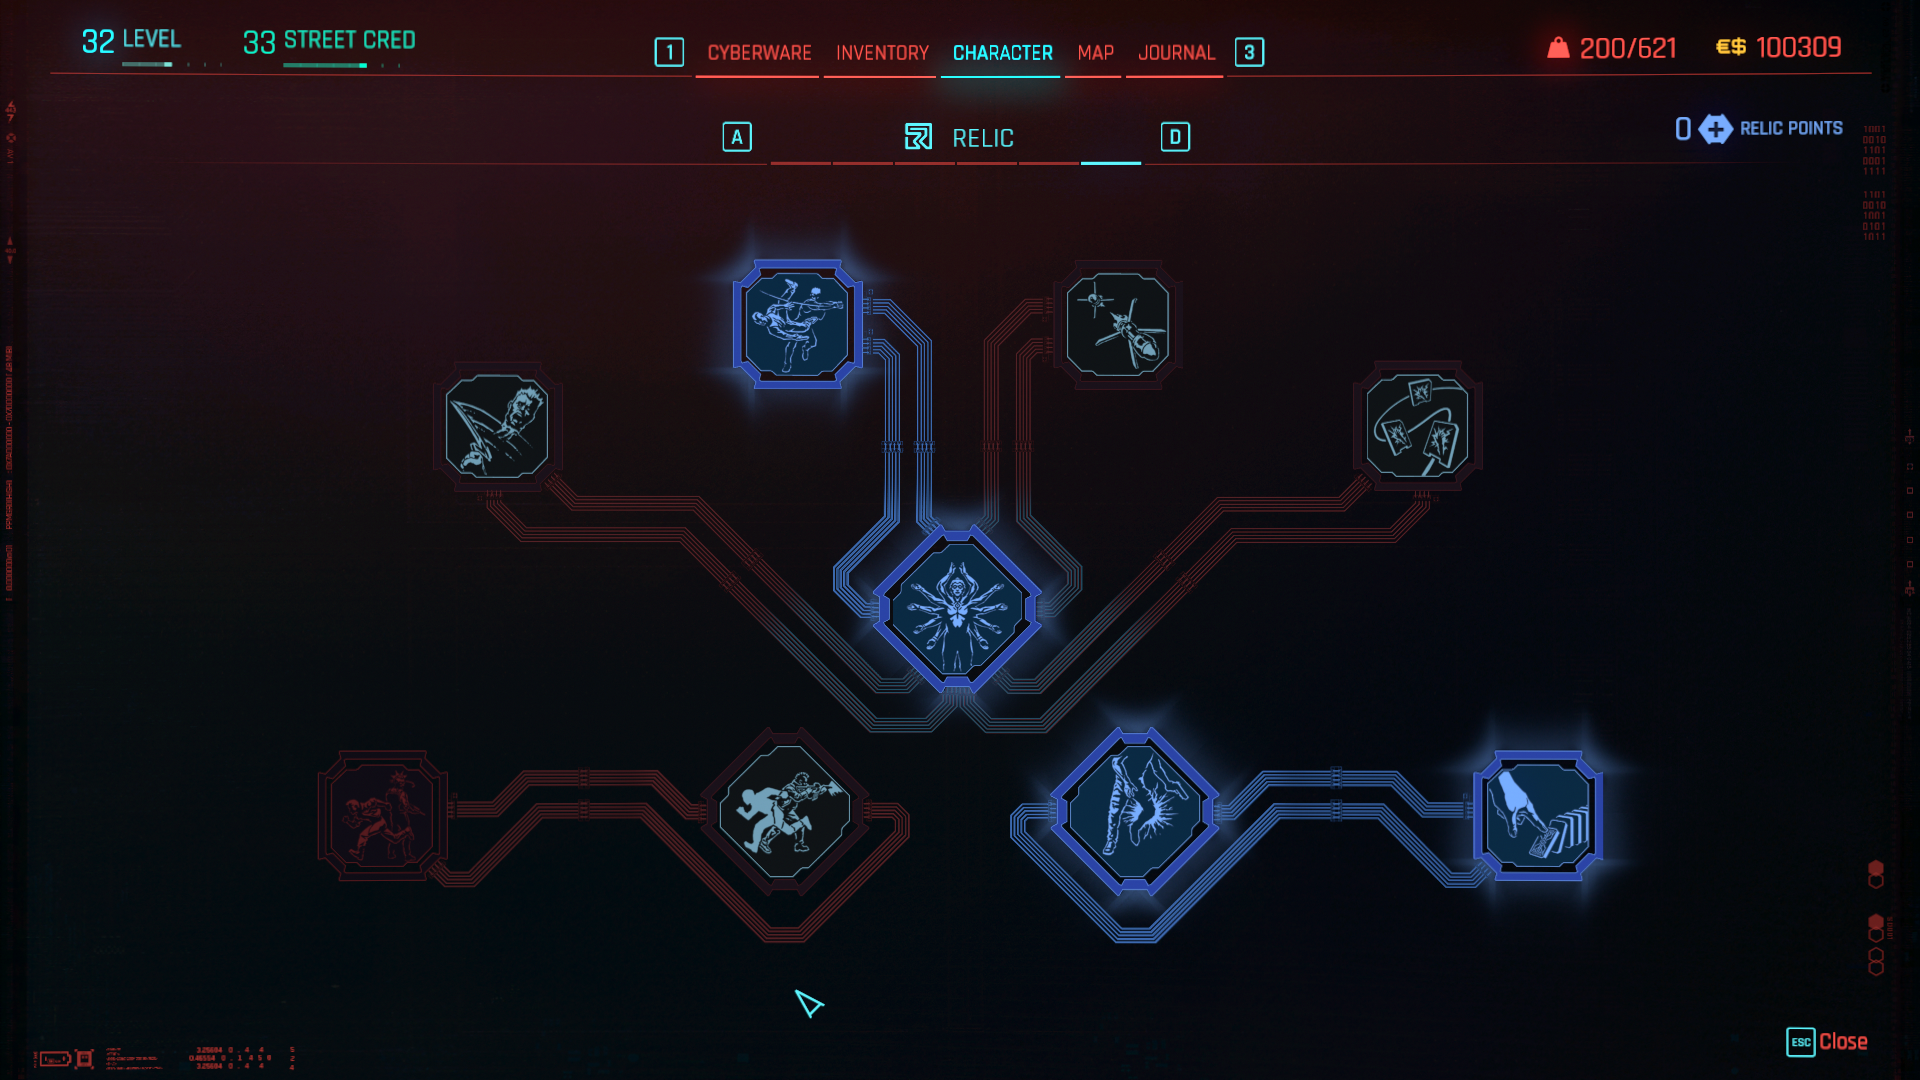
Relic Perks
Requires Cyberpunk 2077: Phantom Liberty expansion.
Vulnerability Analytics pairs amazingly well with this build — if you take advantage of the vulnerable spots, you can take out multiple enemies with a single shotgun blast. Machine Learning will make them come up more often and give a stacking bonus per Vulnerability hit.
If you do decide to make use of Gorilla Arms, the Jailbreak & Limiter Removal combination will make it that much more powerful.
Unlocks new abilities for Arm cyberware: Mantis Blades, Gorilla Arms, Projectile Launch System and Monowire.
You can now overcharge the Projectile Launch System by holding Middle Mouse Button. This launches a burst of 5 projectiles that cover a larger area.
Attacking with Gorilla Arms now charges them up. When fully charged, a Strong Attack deals massive damage and creates a shockwave, staggering nearby enemies.
Neutralizing an enemy this way will send their body flying.
Dismembering an enemy or performing a Finisher with Mantis Blades will charge the next Leap Attack.
Hold Left Mouse Button and release to perform a long-range Leap Attack.
A charged Leap Attack with Mantis Blades has +30 m. longer reach and deals massive damage with a wide slash that hits the target and other nearby enemies.
Killing an enemy with this attack also dismembers them.
The Monowire now has a dedicated slot for Control quickhacks.
To use the installed quickhack, charge the Monowire by holding Left Mouse Button. When fully charged, release the attack to deal damage and upload the quickhack without paying its RAM cost.
The shockwave from a charged Gorilla Arms attack now knocks down all enemies within range.
Best Weapons for Run & Gun Build
We already discussed this earlier in the guide, but Shotguns and LMGs will be our primary weapon types for the build. Shotgun is our best default weapon in close range, boosted by Quick Melee Attacks, and LMGs will come handy if there is a little bit of a distance between you and the target.
Try to pick up powerful HMGs whenever there is an opportunity to do so (e.g., from a turret), especially earlier in the game — a few of our Body perks boost these already powerful weapons, and this will help you level your Solo Skill even faster.
Also boosted by our Solo Skill is the Gorilla Arms Cyberware, which will make for a great 3rd weapon if you go with the Berserk Cyberware, giving you a melee option when you are under its status effect.
We’ve had some good experiences with the Wild Dog LMG, which is an Iconic Power Weapon LMG from Phantom Liberty expansion — the more you hit with it, the higher the crit rate and the faster it fires.
You will also find some opportunities to lean into Tech Weapons, if you so choose (we mentioned those a couple of times in this guide), and if you enjoy charging up powerful shots with your Shotgun, it could be a great option for bringing your enemies to low health quickly. Consider the Iconic Order Shotgun, for example, which deals a lot of damage. Having this in your rotation will give you a very powerful single-target option (which, in our case, also means spreading kills to surrounding targets).
Share this article:
KainHighwind27
I'm a huge gamer who especially loves the Final Fantasy series. I will play just about any game, especially if it has anything resembling a Dragoon.