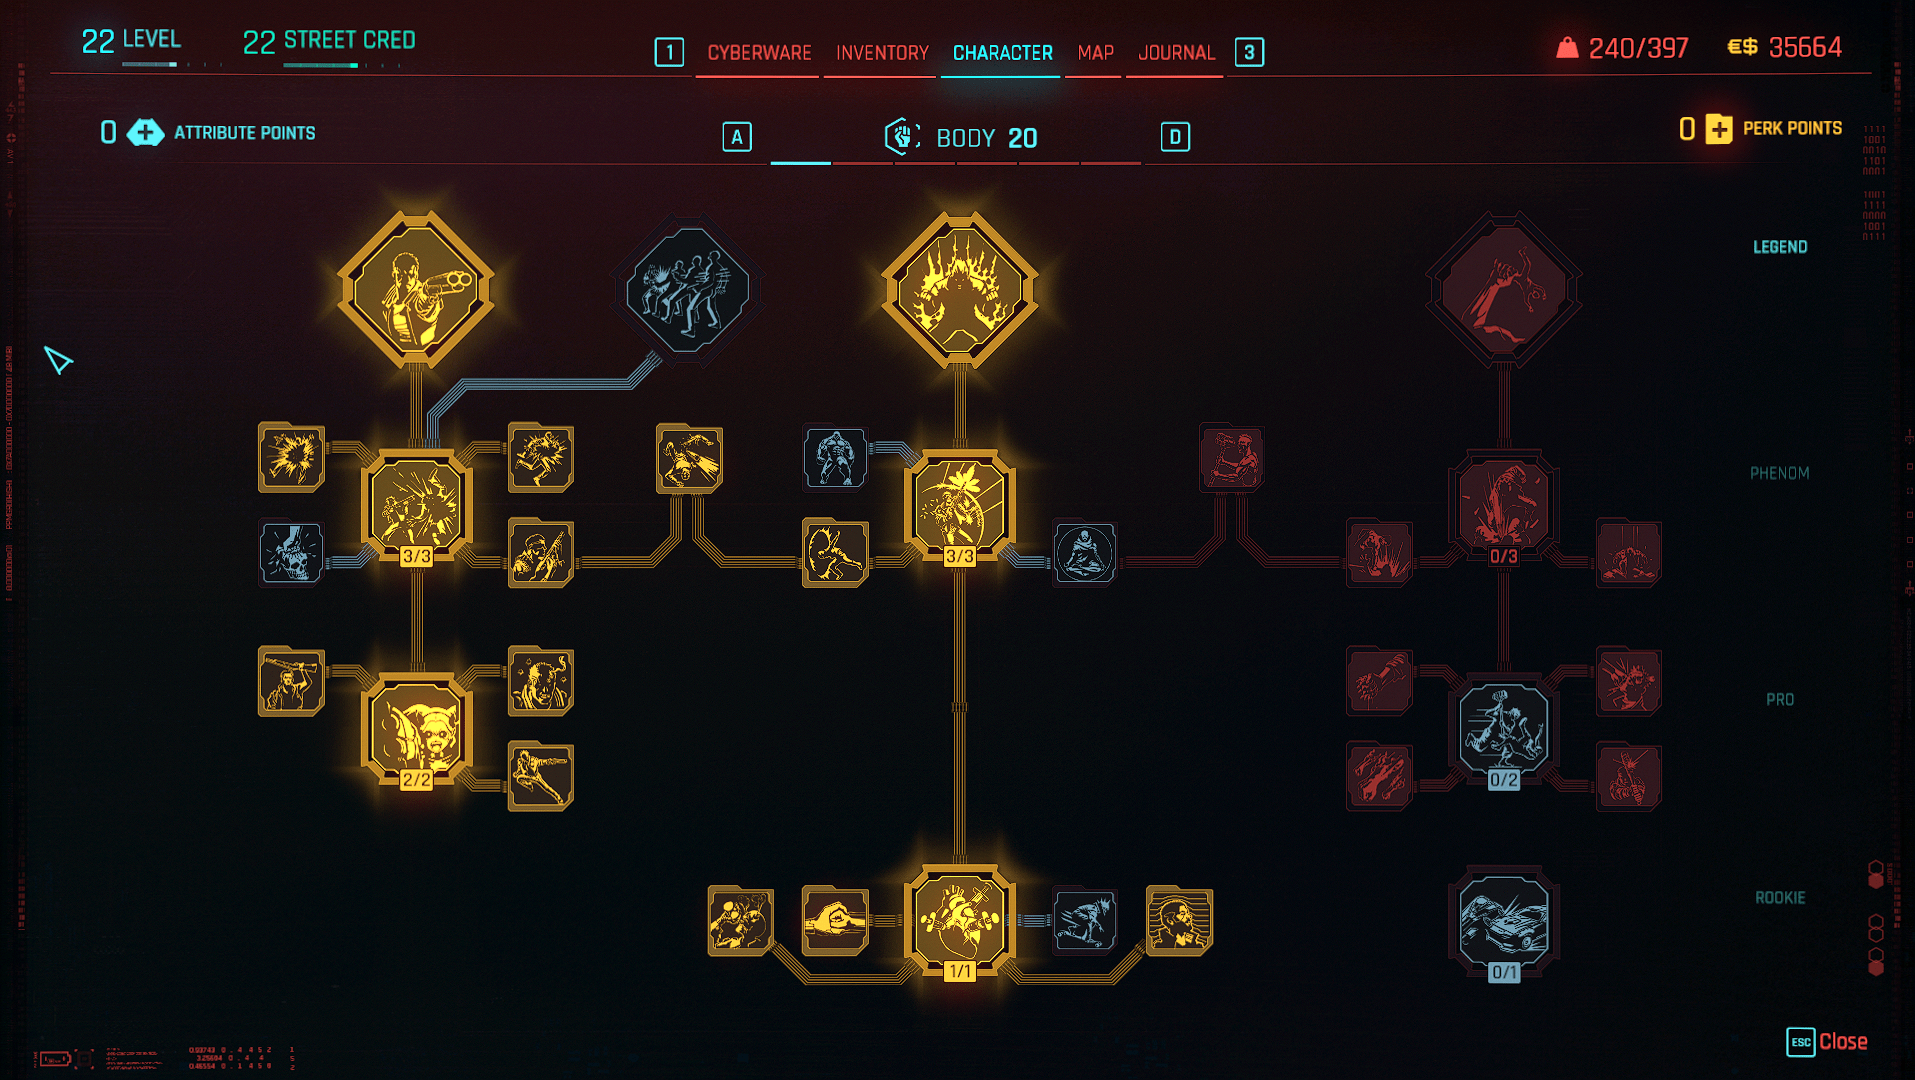
Body Perk Tree is perfect for players who like to punch, shoot, and run through any obstacle in their way: where it lacks the finesse of trees like Reflexes, Intelligence, and Cool, it offers raw stamina and health sustain, and powerful Shotgun, LMG, HMG, and melee weapon damage. Even if specializing in it is not your cup of tea, Body Perks offer excellent health and stamina boosts for just about any other build.
The Body Tree’s vehicle perk is  Fury Road, which makes car collisions more viable as a method of assault.
Best Body Perks
 Spontaneous Obliteration (level 3) — might be the most powerful and satisfying perk on the Body Tree. It only works with Shotguns, LMGs, and HMGs, but it gives you up to 20% chance to Obliterate (instantly kill and dismember) enemies at low Health. It’s like an ongoing Finisher chance.
- If you are leveling this side of the tree, don’t underestimate shotguns: you will be unlocking powerful combos with melee attacks, and if you adopt this playstyle,
 Close-quarters Carnage perk will get you a noticeable bonus to the Obliterate chance.
 Painkiller — inhalers are now a valuable resource, and if you aren’t boosting that with Tech Tree’s
  Health Freak branch, you gotta grab this perk to regen your health passively: you will be in combat mode often, and while you run around dispatching enemies, you need something to keep you going.
- If you like pressing that Shift down, also grab
 Speed Junkie for that massive 60% regen boost.
- If you like getting right in the middle of enemy crowds,
 Army of One will get you a 10% extra regen for every enemy nearby.
 Comeback Kid will get you out of low health much faster and is another great perk for tanking your way through.
Full Body Perks List
 Die! Die! Die! — Max Level: 2 — [Only affects Shotguns, LMGs and HMGs] — Requires: Body (9)
- Level 1: -15% recoil at low Stamina.
- Level 2: Increased fire rate as Stamina decreases (max. +25% at 0 Stamina).
 Like a Feather — Max Level: 1 — [Only affects Shotguns, LMGs and HMGs] — Requires: Die! Die! Die! (2)
- No movement speed penalty with Shotguns, Light Machine Guns and Heavy Machine Guns.
 Don’t Stop Me Now — Max Level: 1 — [Only affects Shotguns, LMGs and HMGs] — Requires: Die! Die! Die! (2)
- When below 33% Stamina: +15% Mitigation Chance, +5% Mitigation Strength.
- Painkiller — Max Level: 1 — Requires: Body (4)
- Unlocks slow Health Regen in combat.
 Dorph-head — Max Level: 1 — Requires: Painkiller
- When using Blood Pump Cyberware or a Health Item: +100% mitigation chance for 2 sec.
- Mitigation – grants a chance to reduce incoming damage by current Mitigation Strength (default 50%)
- Fury Road — Max Level: 1 — Requires: Body (4)
- In vehicle collisions: +50% damage to enemy vehicles and their occupants -50% damage to your vehicles.
- You take no damage as a vehicle occupant in collisions.
 Wrecking Ball — Max Level: 2 — [Only affects Blunt Weapons] — Requires: Body (9)
- Level 1: -15% stamina cost for attacks with blunt weapons.
- Level 2: Allows you to barrel into enemies while sprinting and blocking with blunt weapons, causing damage and a chance to knock them down.
 Breakthrough — Max Level: 1 — [Only affects Blunt Weapons] — Requires: Wrecking Ball (2)
- -40% enemy armor for 7 sec. after hitting them with a strong attack.
 Kinetic Absorption — Max Level: 1 — [Only affects Blunt Weapons] — Requires: Wrecking Ball (2)
- Blocking an attack gives +10% stamina and +30% damage with blunt weapons for 5 sec.
 Clapback — Max Level: 1 — [Only affects Blunt Weapons] — Requires: Wrecking Ball (2)
- +100% Knockdown chance with Defensive Attacks.
- Cooldown: 10 sec.
+100% Stun chance with Counterattacks.
 Fly Swatter — Max Level: 1 — [Only affects Blunt Weapons] — Requires: Wrecking Ball (2)
- -40% incoming ranged damage when blocking with blunt weapons.
- Spontaneous Obliteration — Max Level: 3 — [Only affects Shotguns, LMGs and HMGs] — Requires: Body (15), Die! Die! Die! (2)
- Level 1: -15% recoil at low Stamina.
- Level 2: +10% damage against nearby enemies.
- Level 3: unlocks Obliterate – the ability to sometimes instantly kill and dismember enemies at low Health.
- The chance increases as enemy Health decreases (max. 20% Obliterate chance).
 Skullcracker — Max Level: 1 — [Only affects Shotguns, LMGs and HMGs] — Requires: Spontaneous Obliteration (3)
- Increases damage of Quick Melee Attacks as Stamina decreases (max. +200% at 0 Stamina)
 Dread — Max Level: 1 — [Only affects Shotguns, LMGs and HMGs] — Requires: Spontaneous Obliteration (3)
- -15% enemy armor when using ranged attacks.
- Dismemberment spreads the effect to nearby enemies.
 Adrenaline Rush — Max Level: 3 — Requires: Body (15), Painkiller
- Level 1: +35 Max Health.
- Level 2: +20% Health Regen bonus to all Health Regen effects from all sources.
- Level 3: Unlocks Adrenaline Rush mode.
- In addition to their base effects, Blood Pump cyberware and health items now also give Adrenaline equal to 30% Max Health. (up to a max of 50% Max Health).
Adrenaline is indicated by a yellow bar and acts like extra health by absorbing damage. It also decays over time.
Adrenaline Rush remains active as long as you have Adrenaline available.
 Unstoppable Force — Max Level: 1 — Requires: Adrenaline Rush (3)
- When Adrenaline Rush is active : gain immunity to movement penalties and non-damaging status effects such as Knockdown, Blinding, etc.
 Bloodlust — Max Level: 1 — [Only affects Shotguns, LMGs and HMGs] — Requires:
  Rush of Blood,
  Juggernaut
- When Adrenaline Rush is active: +50 Adrenaline on dismemberment of a nearby enemy.
 Calm Mind — Max Level: 1 — Requires: Adrenaline Rush (3)
- When Adrenaline Rush is active: +3 sec. delay before Adrenaline begins to decay.
 Quake — Max Level: 3 — [Only affects Blunt Weapons] — Requires: Body (15), Wrecking Ball (2)
- Level 1: -15% Stamina cost for attacks with Blunt Weapons.
- Level 2: +20% attack speed with Blunt Weapons.
- Level 3: Press [Q] to violently slam the ground, damaging and staggering nearby enemies with a chance of knockdown.
- Quake can also be performed from midair (a superhero landing).
Cooldown: 10 sec.
 Epicenter — Max Level: 1 — [Only affects Blunt Weapons] — Requires: Quake (3)
- When Quake is performed from the midair (a Superhero landing), its area of effect and damage scale with your fall speed and fall distance.
 Aftershock — Max Level: 1 — [Only affects Blunt Weapons] — Requires: Quake (3)
- +30 stamina for each enemy hit with Quake.
 Rip and Tear — Max Level: 1 — [Only affects Shotguns] — Requires: Body (20), Spontaneous Obliteration (3)
- +100% damage for the next Quick Melee Attack after shooting an enemy with a Shotgun.
+100% damage for the next Shotgun shot after hitting an enemy with a Quick Melee Attack.
 Onslaught — Max Level: 1 — [Only affects LMGs] — Requires: Body (20), Spontaneous Obliteration (3)
- +20% ammo refill after neutralizing an enemy with a Light Machine Gun.
 Pain to Gain — Max Level: 1 — Requires: Body (20), Adrenaline Rush (3)
- When Adrenaline Rush is active: +20% Health Item recharge after neutralizing an enemy.
 Finisher: Savage Sling — Max Level: 1 — [Only affects Blunt Weapons] — Requires: Body (20), Quake (3)
- Unlocks a Blunt Weapon Finisher.
Press [F] when an enemy’s Health is low. Enemies affected by Stun are more susceptible.
Restores 20% Health.
- Hold [F] to throw the enemy instead, killing them and damaging other enemies where they land.