All Collectibles & Map — Alone in the Dark

Whether you are looking to scratch that completionist itch or check off some achievements, you have stumbled upon the right guide: this one will help you find all of the Locks & Keys, Clues, and Lagniappes in Alone in the Dark.

In the section below you will find an extensive map of all of the collectibles in the game with a simple list to follow along. The rest of the guide will feature a detailed legend with links to our dedicated guides if you get stuck or prefer to take things step by step.
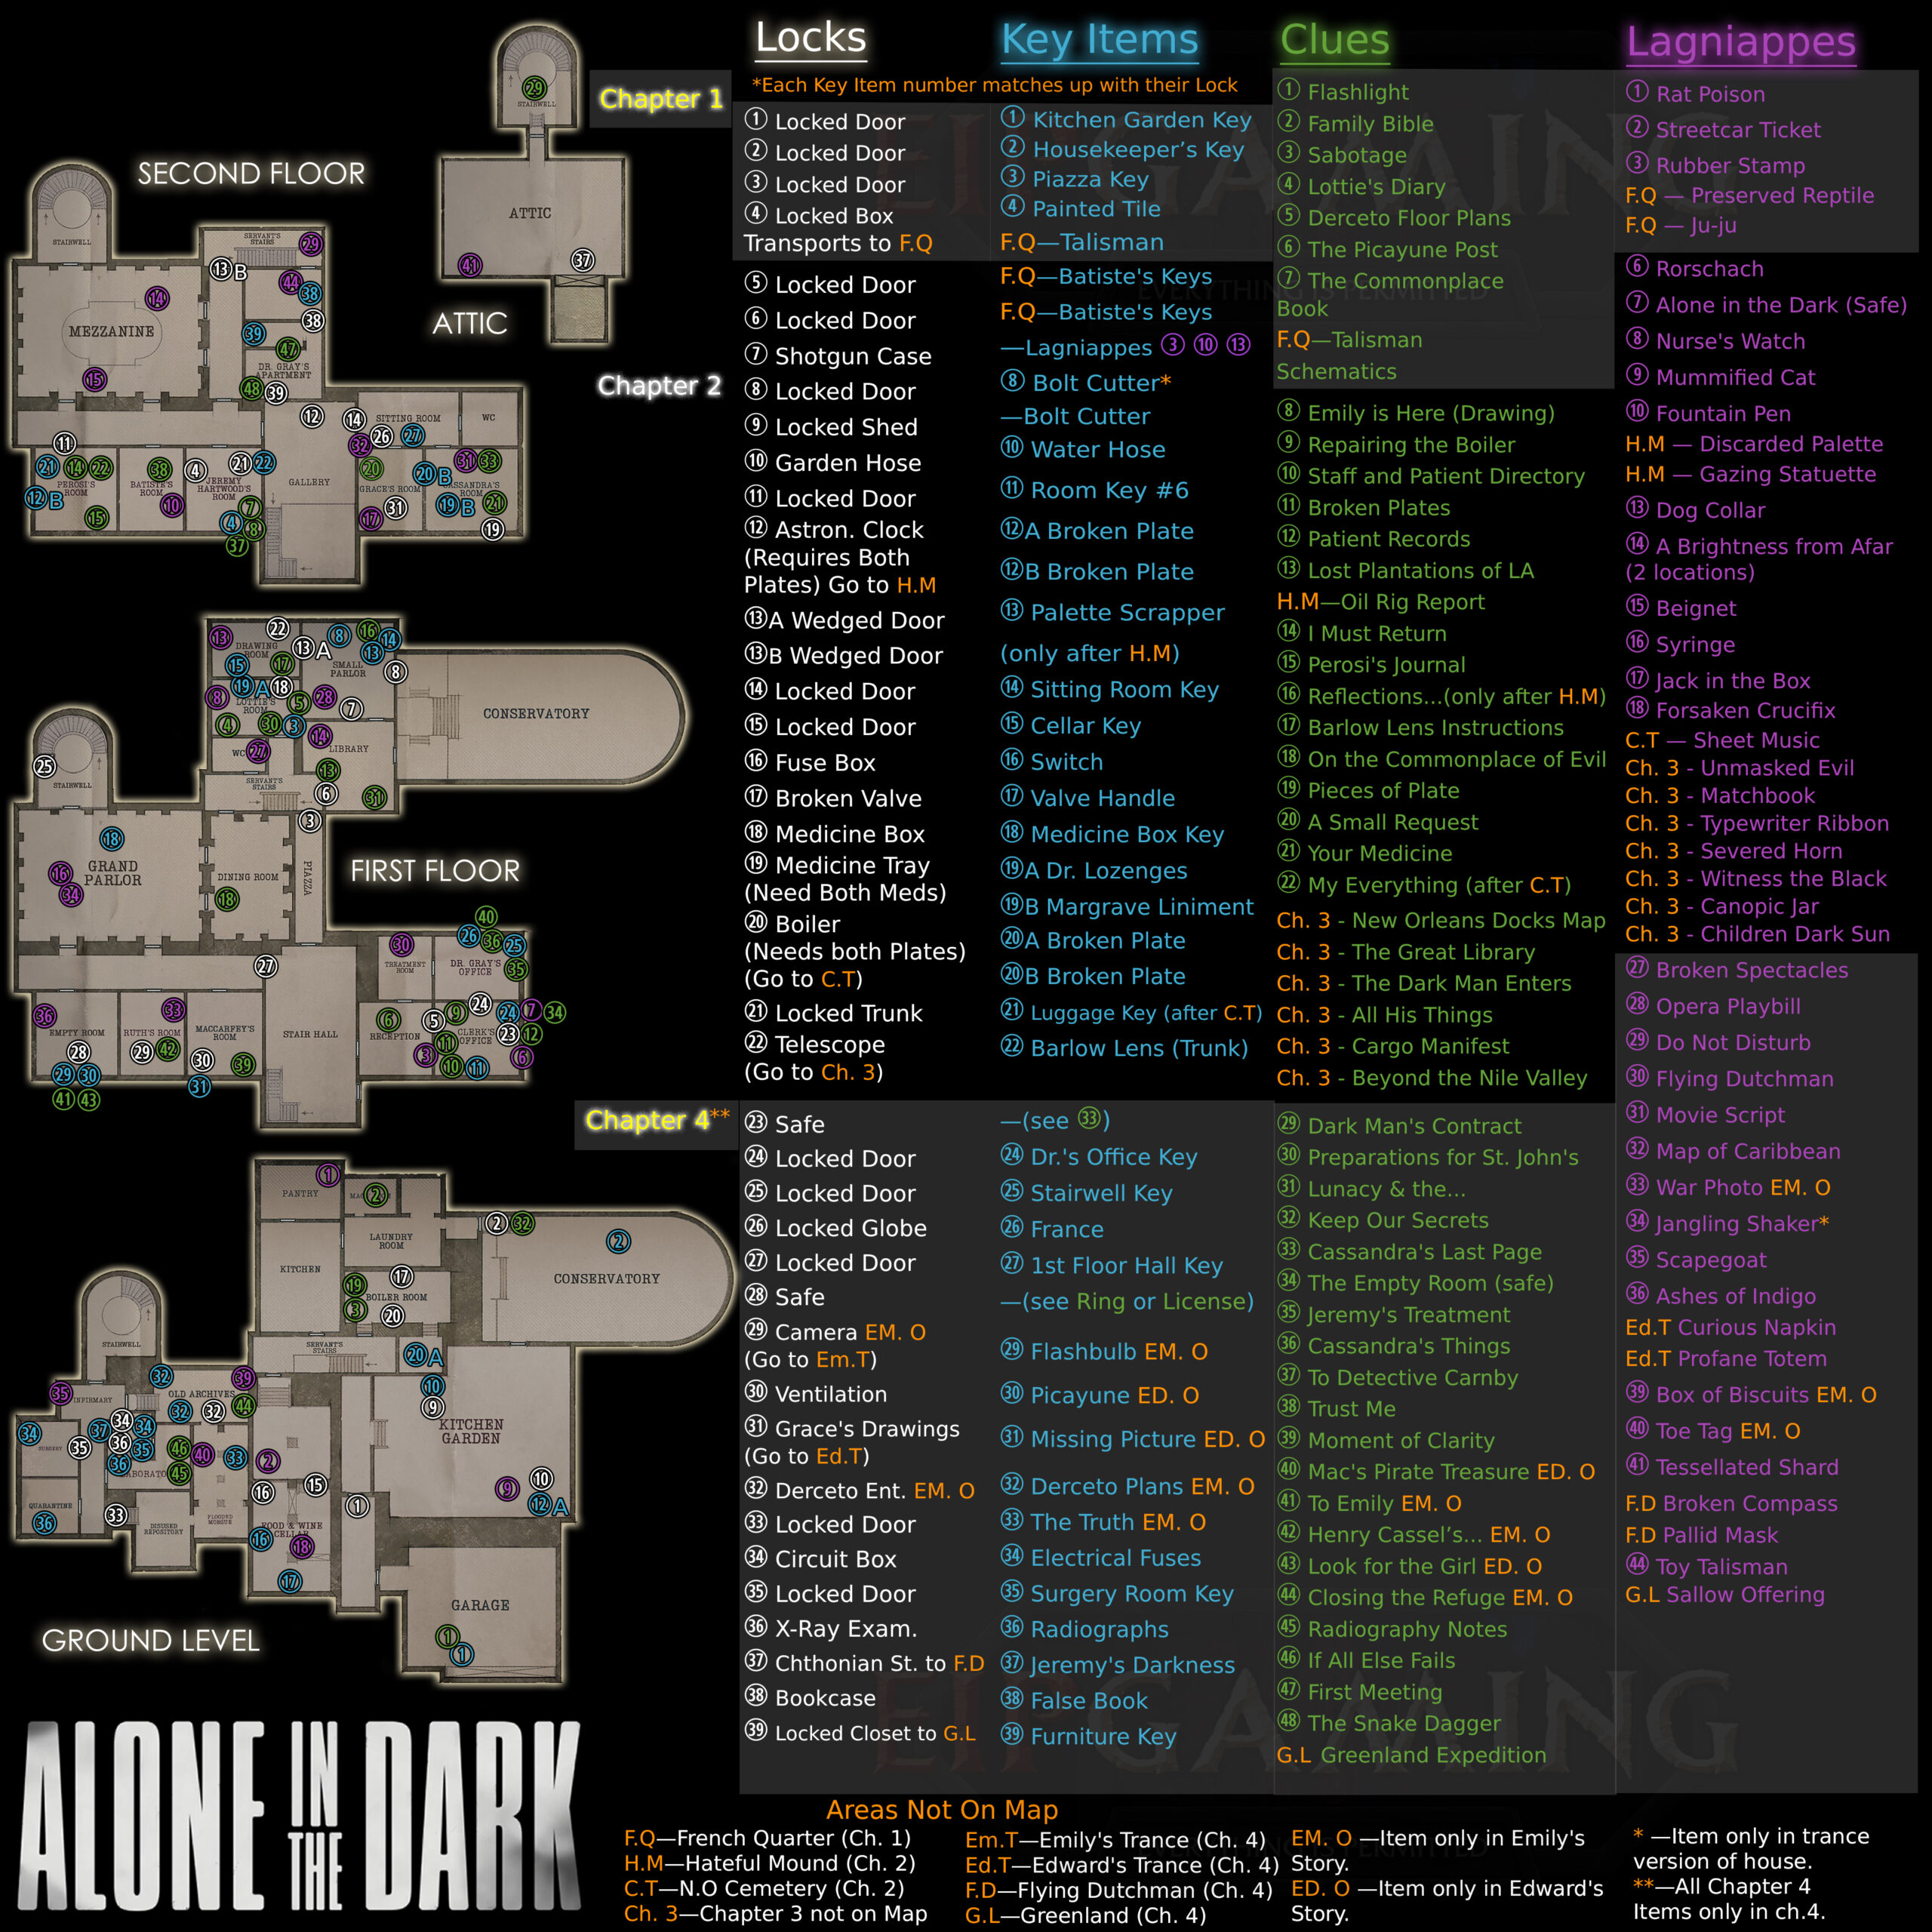

The image below will be your shortcut to finding all Locks, Key Items, Clues, and Lagniappes in the game. Note that some of the areas, as well as Chapter 3, are not depicted on the maps.

You can follow the list for your 100% completion of Collectibles, for achievements like “You Can’t Keep Me Out!” (Open all of the safes and locks in the game), “Look At All the Free Stuff I Got!” (Find all the Lagniappes), and “Librarian” (Read all the clues). Note that you will have to play the game both as Edward and Emily to get all of the items.

Click on the image to view it in full resolution. PC users may want to right click and select “Open Image in New Tab” to better view it at full size.

alone in the dark all collectibles map walkthrough all keys all locks all clues all lagniappes final fixed 3 23
  • F.Q – French Quarter (Chapter 1)
  • H.M – Hateful Mound (Chapter 2)
  • C.T – New Orleans Cemetery (Chapter 2)
  • Ch. 3Chapter 3 items are listed, but not depicted on the Map
  • Em.T – Emily’s Trance (Chapter 4)
  • Ed.T – Edward’s Trance (Chapter 4)
  • F.D – Flying Dutchman (Chapter 4)
  • G.L – Greenland (Chapter 4)
  • EM. O – Item only in Emily’s Story (Chapter 4)
  • ED. O – Item only in Edward’s Story (Chapter 4)
  • * – Item only in trance version of the house
  • ** – All Chapter 4 items are only in Chapter 4

Alternatively, you can follow along with our comprehensive walkthrough guides, and we will help you pick all of these up along the way. If you just want to focus on the collectibles, sections below will provide additional help with every item listed on the map.

Note that each Lock item number matches up with their Key.

  • 1 – Locked Door
  • 2 – Locked Door
  • 3 – Locked Door
  • 4 – Locked Box – Transports to French Quarter (Chapter 1)
  • 5 – Locked Door
  • 6 – Locked Door
  • 7 – Shotgun Case
  • 8 – Locked Door
  • 9 – Locked Shed
  • 10 – Garden Hose
  • 11 – Locked Door
  • 12 – Astron. Clock – (Requires Both Plates) Go to Hateful Mound
  • 13A – Wedged Door
  • 13B – Wedged Door
  • 14 – Locked Door
  • 15 – Locked Door
  • 16 – Fuse Box
  • 17 – Broken Valve
  • 18 – Medicine Box
  • 19 – Medicine Tray – (Need Both Meds)
  • 20 – Boiler – (Needs both Plates) (Go to N.O. Cemetery)
  • 21 – Locked Trunk
  • 22 – Telescope – (Go to Ch. 3)
  • 23 – Safe
  • 24 – Locked Door
  • 25 – Locked Door
  • 26 – Locked Globe
  • 27 – Locked Door
  • 28 – Safe
  • 29 – Camera [Emily Only] – (Go to Emily’s Trance)
  • 30 – Ventilation
  • 31 – Grace’s Drawings (Go to Edward’s Trance)
  • 32 – Derceto Ent. [Emily Only]
  • 33 – Locked Door
  • 34 – Circuit Box
  • 35 – Locked Door
  • 36 – X-Ray Exam.
  • 37 – Chthonian St. – to F.D
  • 38 – Bookcase
  • 39 – Locked Closet – to G.L

Note that each Key item number matches up with their Lock.

  • 1 – Kitchen Garden Key
  • 2 – Housekeeper’s Key
  • 3 – Piazza Key
  • 4 – Painted Tile
  • F.Q—Talisman
  • 5 – French Quarter (Chapter 1)—Batiste’s Keys
  • 6 – French Quarter (Chapter 1)—Batiste’s Keys
  • 7 – Lagniappes #3, 10, 13 (“Rubber Stamp”, “Fountain Pen”, “Dog Collar”)
  • 8 – Bolt Cutter – Item only in trance version of the house
  • 9 – Bolt Cutter
  • 10 – Water Hose
  • 11 – Room Key #6
  • 12A – Broken Plate
  • 12B – Broken Plate
  • 13 – Palette Scrapper – (only after Hateful Mound)
  • 14 – Sitting Room Key
  • 15 – Cellar Key
  • 16 – Switch
  • 17 – Valve Handle
  • 18 – Medicine Box Key
  • 19A – Dr. Lozenges
  • 19B – Margrave Liniment
  • 20A – Broken Plate
  • 20B – Broken Plate
  • 21 – Luggage Key – (after N.O. Cemetery)
  • 22 – Barlow Lens – (Trunk)
  • 23 – (see Clue #33, “Cassandra’s Last Page” – Safe)
  • 24 – Dr.’s Office Key
  • 25 – Stairwell Key
  • 26 – France
  • 27 – 1st Floor Hall Key
  • 28 – (see Clues “Ring” or “License”)
  • 29 – Flashbulb [Emily Only]
  • 30 – Picayune [Edward Only]
  • 31 – Missing Picture [Edward Only]
  • 32 – Derceto Plans [Emily Only]
  • 33 – The Truth [Emily Only]
  • 34 – Electrical Fuses
  • 35 – Surgery Room Key
  • 36 – Radiographs
  • 37 – Jeremy’s Darkness
  • 38 – False Book
  • 39 – Furniture Key

If you need a little extra help, feel free to follow along with our walkthrough: we will help you pick each one up along the way!

  • 1 – Flashlight
  • 2 – Family Bible
  • 3 – Sabotage
  • 4 – Lottie’s Diary
  • 5 – Derceto Floor Plans
  • 6 – The Picayune Post
  • 7 – The Commonplace Book
  • French Quarter – Talisman Schematics
  • 8 – Emily is Here (Drawing)
  • 9 – Repairing the Boiler
  • 10 – Staff and Patient Directory
  • 11 – Broken Plates
  • 12 – Patient Records
  • 13 – Lost Plantations of Louisiana
  • Hateful Mound – Oil Rig Report
  • 14 – I Must Return
  • 15 – Perosi’s Journal
  • 16 – Reflections on the Power of the Verb in Certain Texts – (only after Hateful Mound)
  • 17 – Barlow Lens Instructions
  • 18 – On the Commonplace of Evil
  • 19 – Pieces of Plate
  • 21 – A Small Request
  • 22 – Your Medicine
  • 23 – My Everything – (after N.O. Cemetery)
  • Ch. 3 – New Orleans Docks — Pier #11
  • Ch. 3 – The Great Library
  • Ch. 3 – The Dark Man Enters
  • Ch. 3 – All His Things
  • Ch. 3 – Cargo Manifest
  • Ch. 3 – Beyond the Nile Valley
  • 29 – The Dark Man’s Contract
  • 30 – Preparations for St. John’s
  • 31 – Lunacy & the Astarte Artists’ Colony
  • 32 – Keep Our Secrets
  • 33 – Cassandra’s Last Page
  • 34 – The Empty Room – (Safe)
  • 35 – Jeremy’s Treatment
  • 36 – Cassandra’s Things
  • 37 – To Detective Carnby
  • 38 – Trust Me
  • 39 – Moment of Clarity
  • 40 – MacCarfey’s Pirate Treasure [Edward Only]
  • 41 – To Emily [Emily Only]
  • 42 – Henry Cassel’s Zoetrope [Emily Only]
  • 43 – Look for the Girl [Edward Only]
  • 44 – Closing the Refuge [Emily Only]
  • 45 – Radiography Notes
  • 46 – If All Else Fails
  • 47 – First Meeting — Transcript
  • 48 – The Snake Dagger
  • Greenland – Greenland Expedition

(Note that we have a dedicated guide for All Lagniappe Locations that lists each set and all of the individual items to help you find them.)


With that, you should be able to collect all of the various Collectibles in Alone in the Dark! If you need help getting through any tough sections, make sure to check out our Walkthrough. Aside from the, enjoy your stay at Derceto.

Share this article:
Graves
Graves

Graves is an avid writer, web designer, and gamer, with more ideas than he could hope to achieve in a lifetime. But, armed with a mug of coffee and an overactive imagination, he'll try. When he isn't working on a creative project, he is painting miniatures, reading cheesy sci-fi novels, or making music.

Articles: 498
Subscribe
Notify of
guest

0 Comments
Inline Feedbacks
View all comments