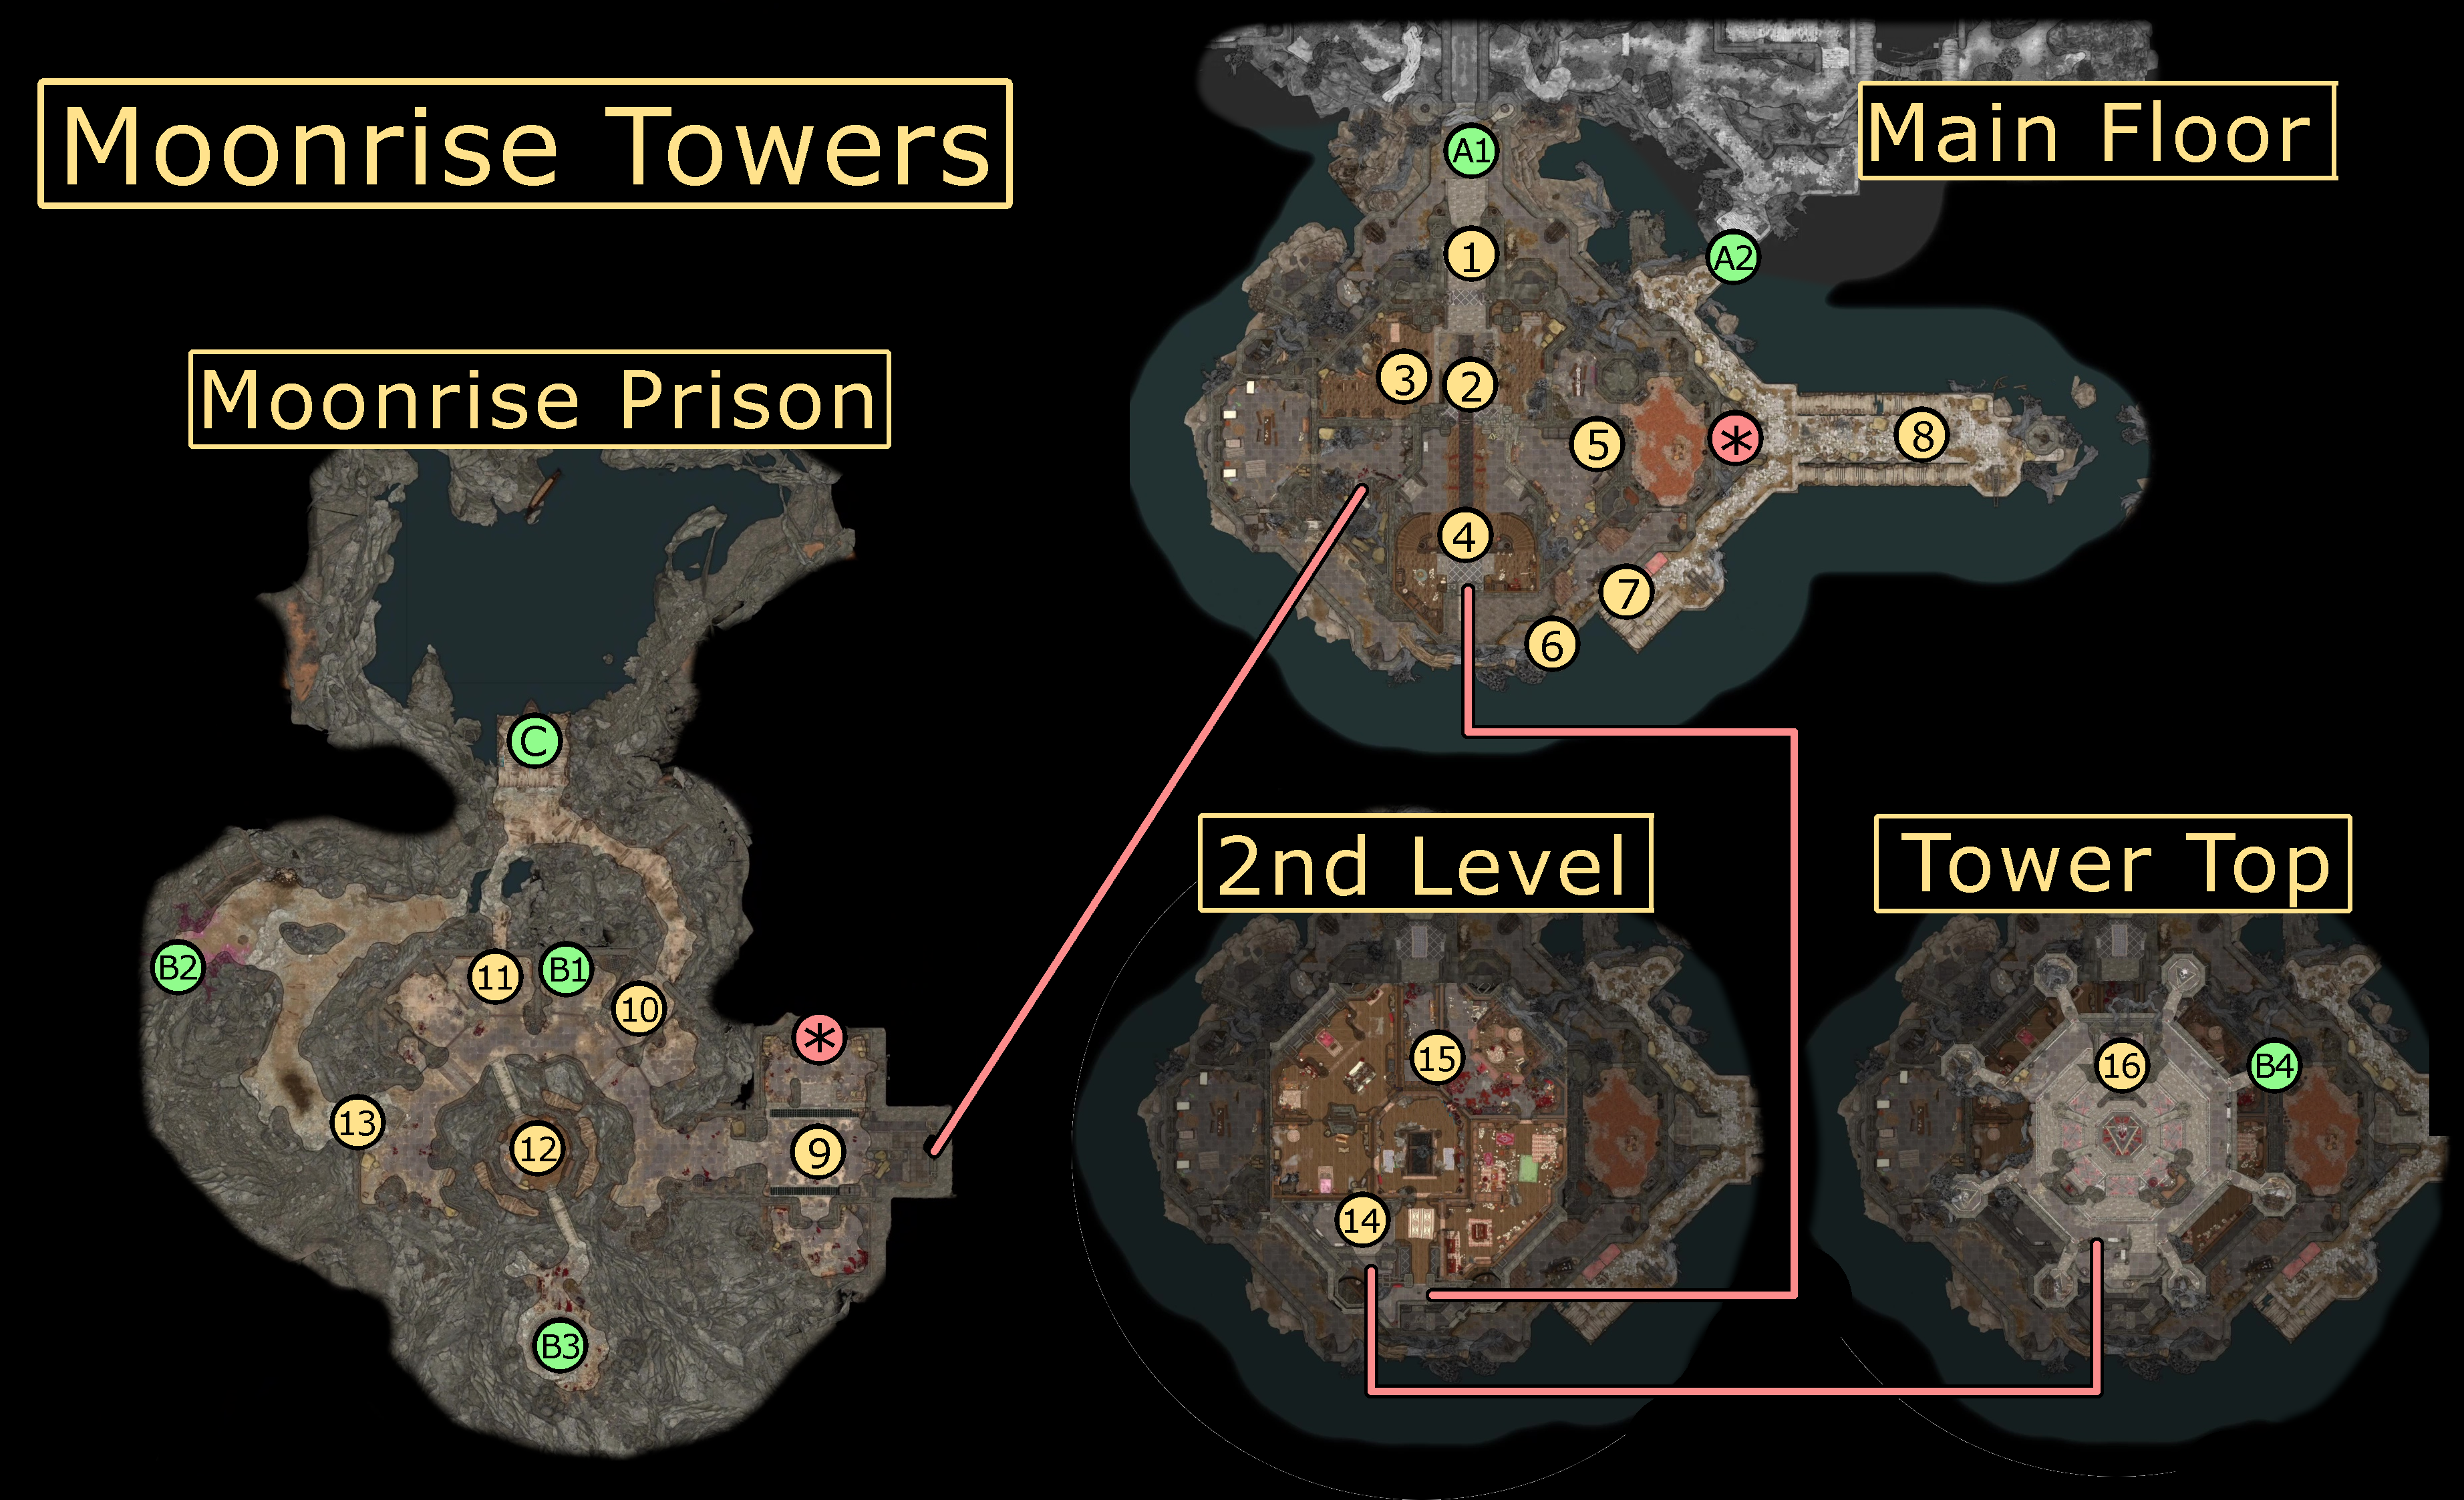
The center of the Absolute’s worship below and Ketheric Thorm’s rule above, the Moonrise Towers are pivotal to completing Act 2 of Baldur’s Gate 3. However, with many decisions to be made, many ways to approach them, and many secrets and tangents to explore, it can be very easy to end up doing something you regret. This walkthrough should help you avoid that, though; it will guide you through Moonrise Towers regardless of your chosen path, ensuring you find everything along the way.
NOTE: If you wish to rescue the trapped Tieflings and Deep Gnomes, the prison section (#9 to #11) of this guide should be done BEFORE completing the Gauntlet of Shar.
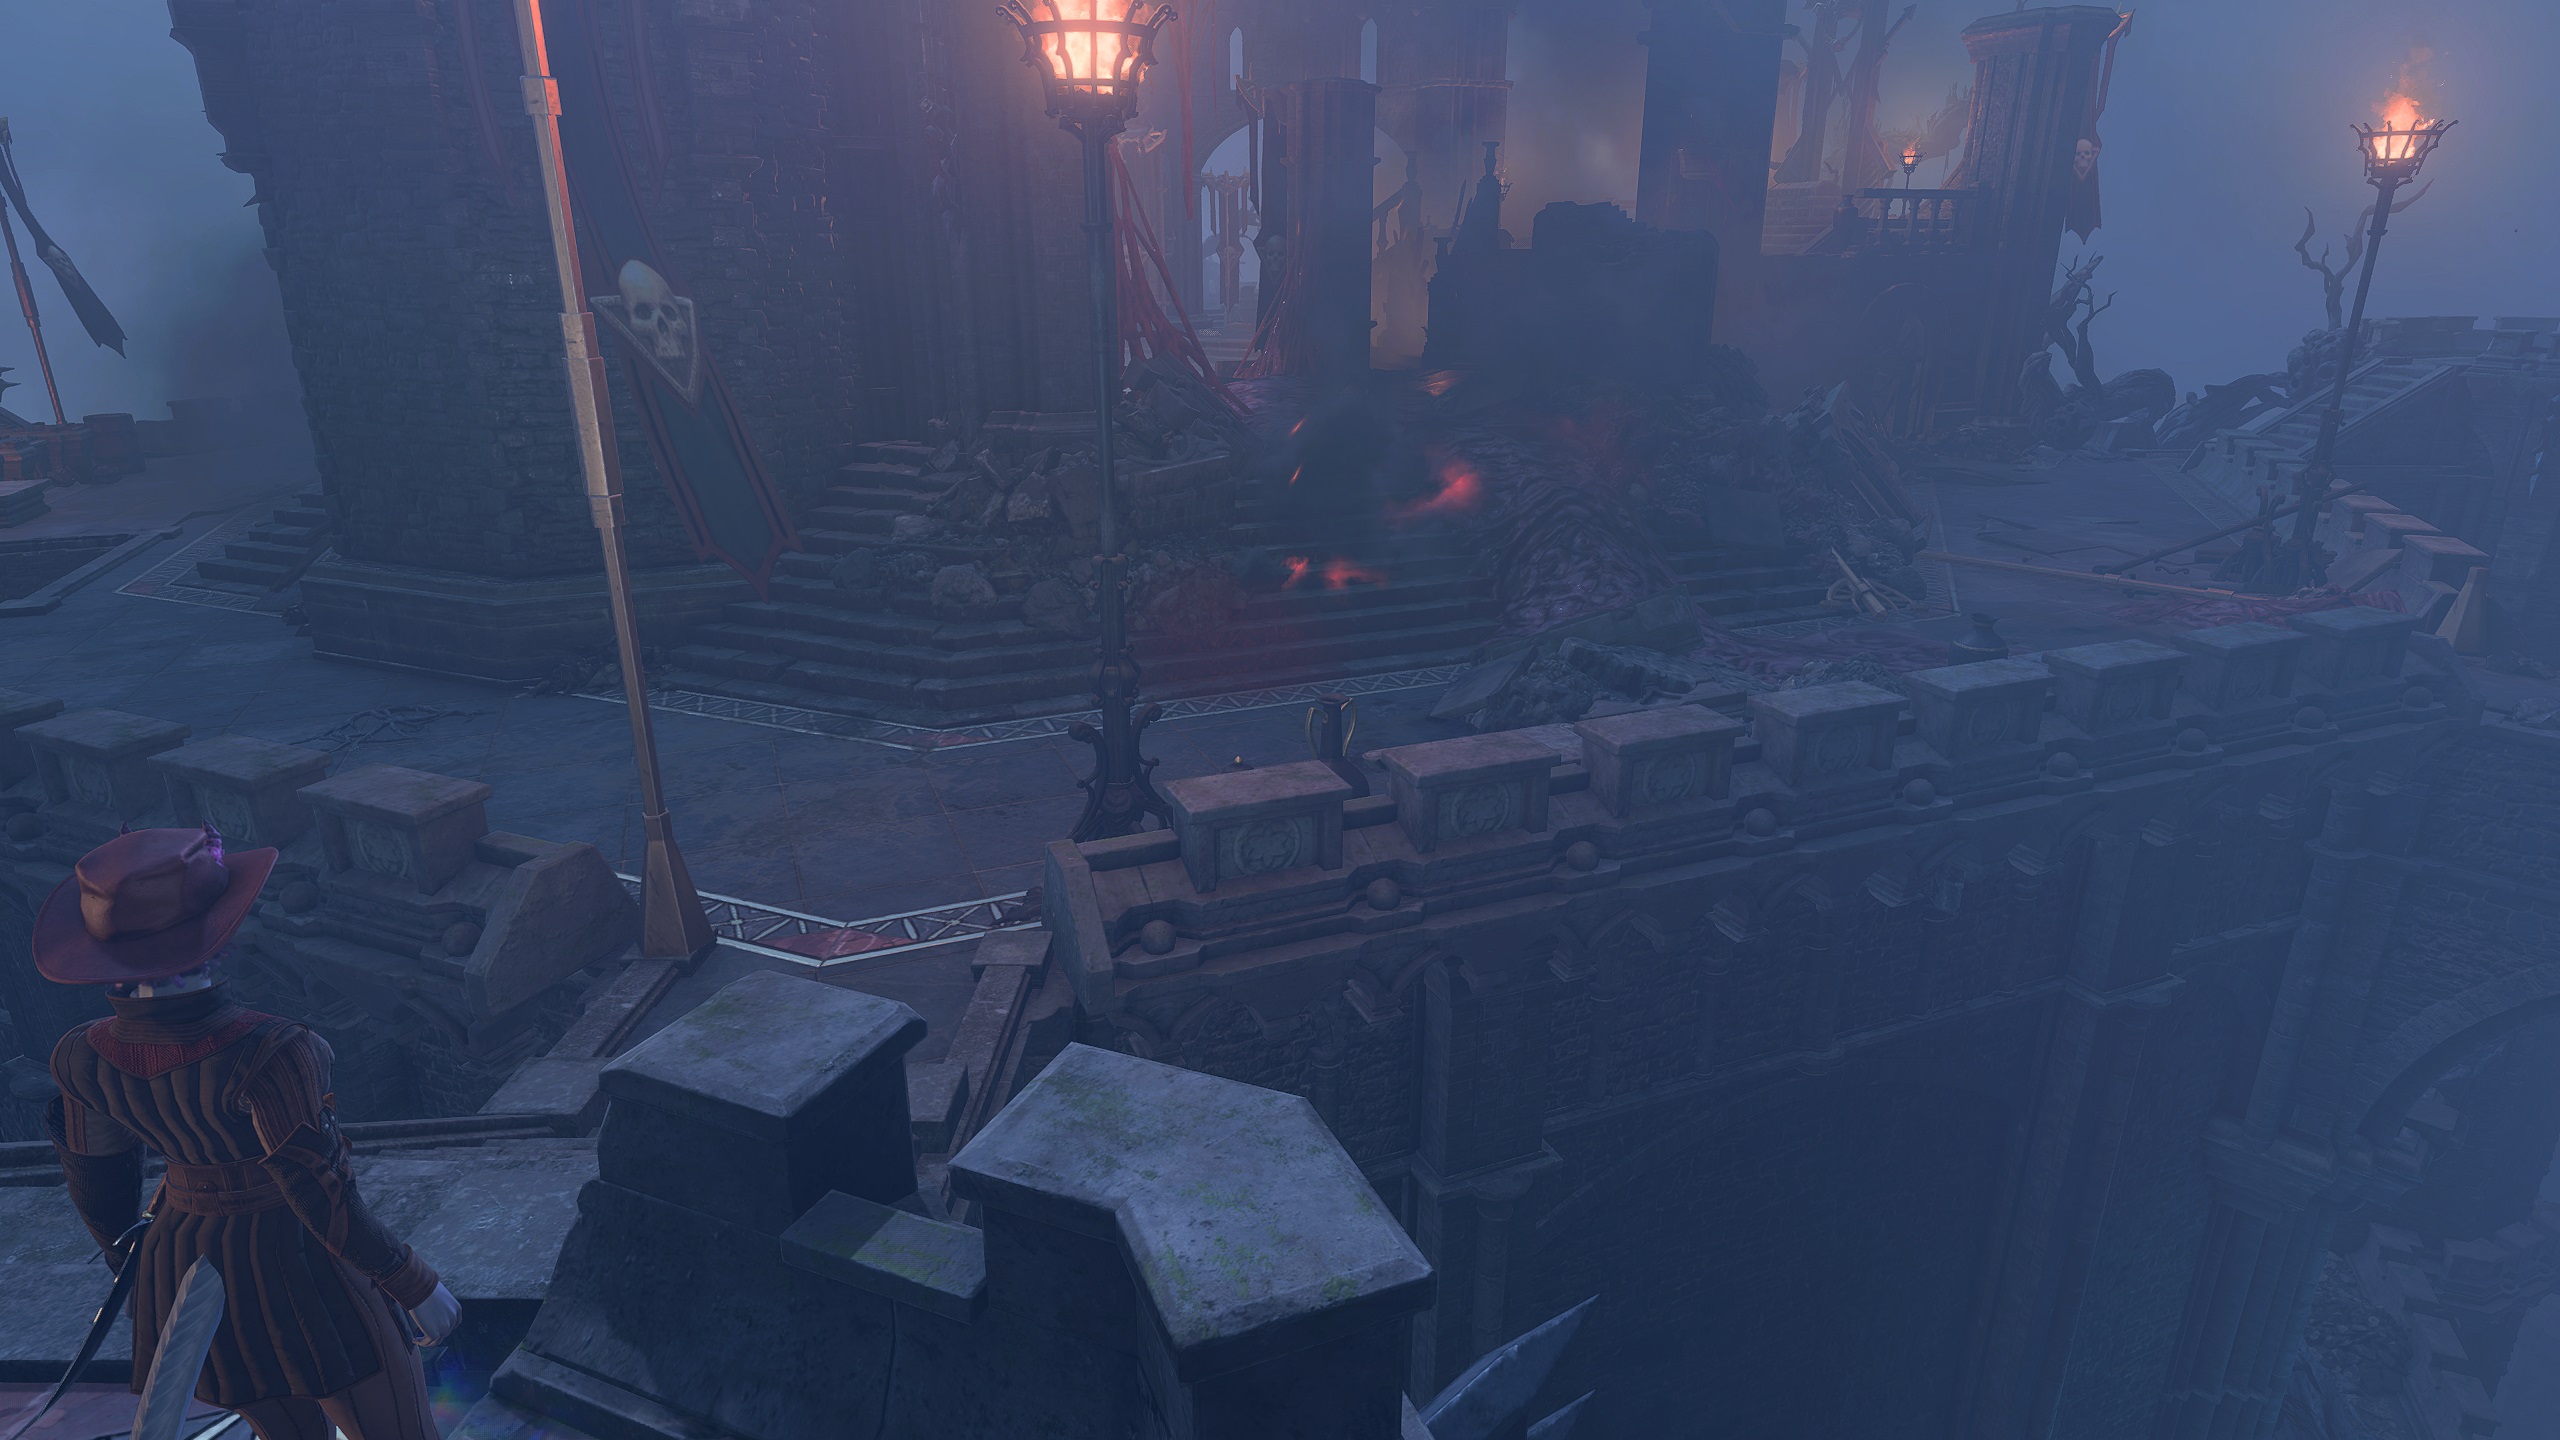
The entrance to Moonrise Towers is strictly guarded. Fortunately for you, you come with the key: the guards will let you into Moonrise, whether you arrive with the Drider Kar’niss or alone, so long as you are a True Soul (so long as you are not playing as Minthara, who will be attacked on sight). After entering the Tower, the guards here will request that you report to Disciple Z’rell within.
Should you cause a disturbance, or later should you assault the Tower (often with Jaheira and the other denizens of Last Light Inn), you will have to deal with the hefty presence of guards (more if you are mounting a proper assault). These guards can prove hard to kill, thanks to the “Dark One’s Blessing” that will moderately heal any guards that hit 0 HP once.
If it is not being assaulted, the Main Hall of Moonrise Towers is fairly unremarkable, aside from the merchants (#3). However, during an assault, the Main Hall becomes one of the largest fights in the game so far, with numerous enemy types (and several possible allies). Between the Zealots (with their “Dark One’s Blessing”, preventing them from being quickly killed), gnolls, trolls, and even a few named characters, this fight can be quite a slog, especially if you haven’t acquired a few allies to assist you.
With Jaheira, the Harpers, the Flaming Fists, Isobel, and the Nightsong (Dame Aylin), however, the fight becomes manageable, so long as you take advantage of what your allies are doing to either focus on their targets, or to let them take hits while you focus on others.
There are two merchants very close to each other in the main hall of the Moonrise Towers. So long as Roah Moonglow didn’t die in the Goblin Camp in Act 1 (and she does not fight with the goblins, so she is likely to survive even if you kill them), then she will appear here. While she will have a few lines of dialogue about the Goblin Camp, she is mostly just a merchant.
Lann Tarv, however, is a bugbear merchant with a lot more to him. Firstly, you convince him to give you a discount by getting him to respect you, which you can do with a variety of DC-6, DC-14, and DC-16 Persuasion, Intimidation, or Deception checks. These checks are determined by your class, the character you are playing as, and what you have previously accomplished. Most checks are DC-16 Persuasion check, though you can get advantage often.
Lann Tarv should also be specifically spoken to with Karlach in your party, though, as he will give her 3 Soul Coins for free, so long as you listen to him tell you about all three of the souls contained within.
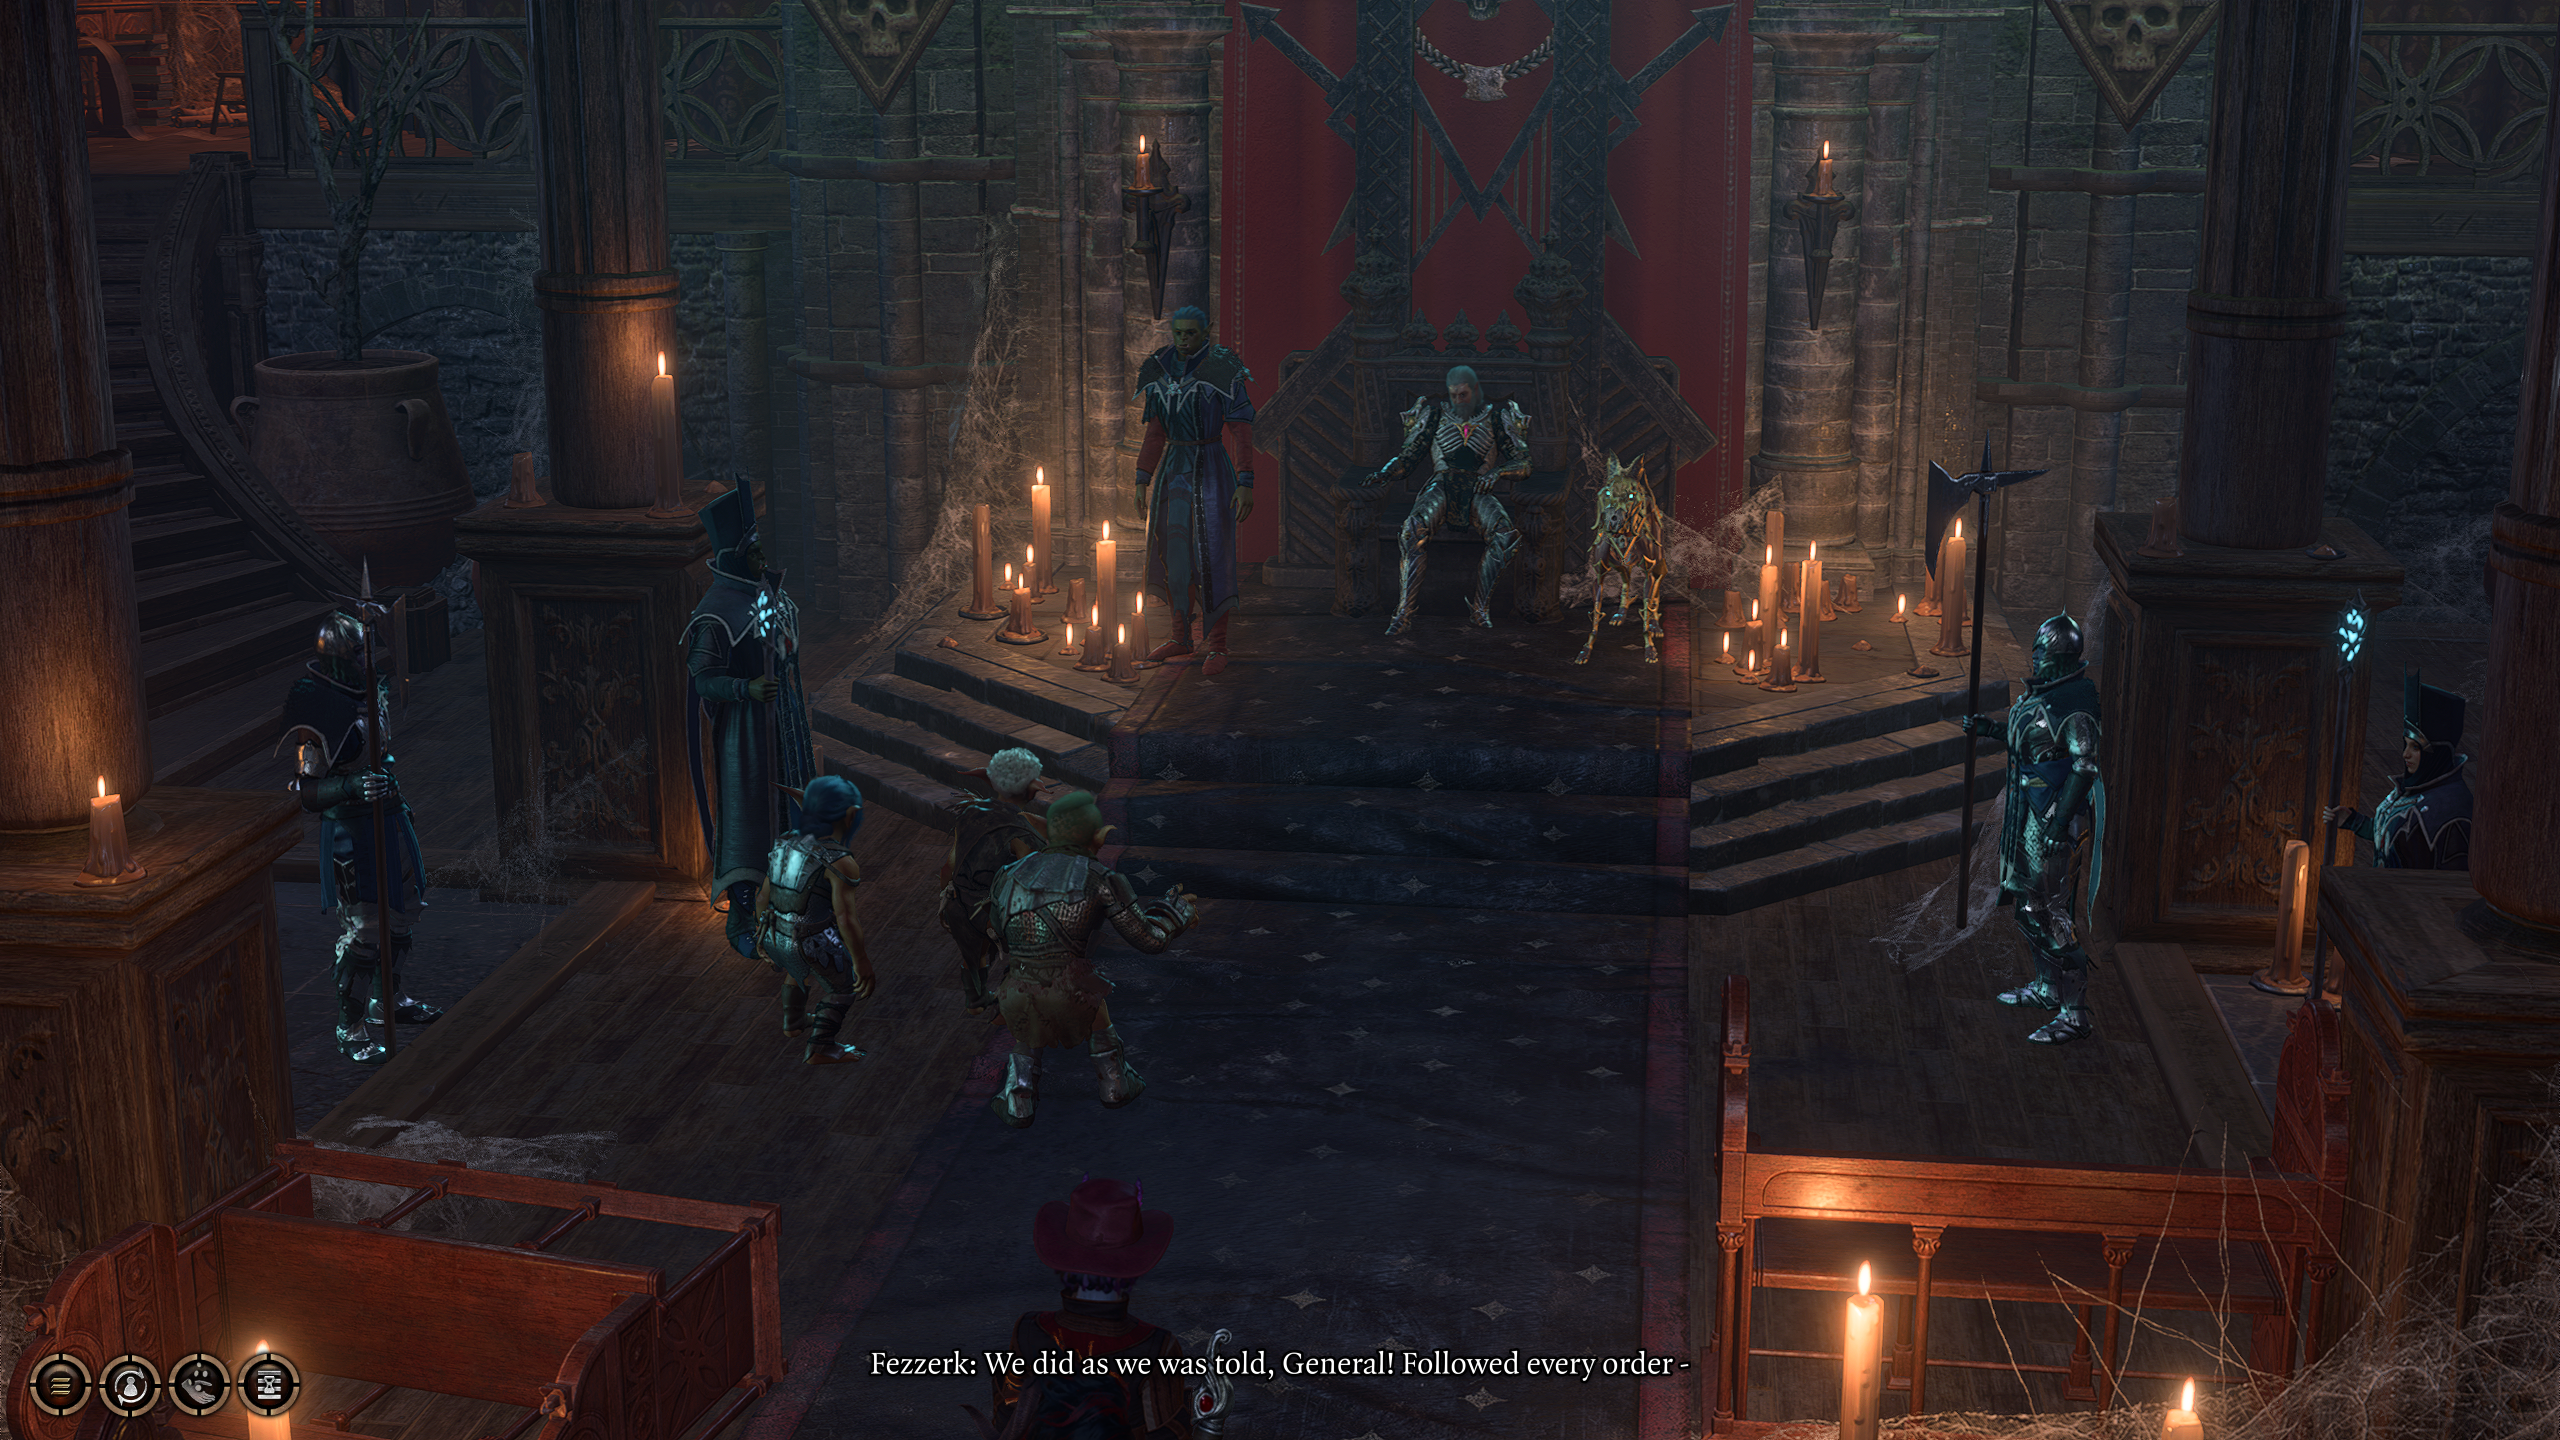
The first point at which you will encounter J.K. Simmons Ketheric Thorm. When you come across Ketheric on his throne, he will be interrogating a group of his followers about their failures, debating what should be done about them. Who heads this group will depend on who is available at this point in the narrative, but it will be one of 4 possible characters:
Sazza: If you rescued Sazza from the Emerald Grove in Act 1 and Minthara is unavailable, she will be standing trial.
Fezzerk: If you killed all the goblins (and Minthara) in the Goblin Camp in Act 1, but did not kill all the goblins in the Blighted Village, then Fezzerk will be standing trial.
Drenn: If there are no other available characters, Drenn will be standing trial.
Regardless of who is on trial, it will take shape in the same way: Ketheric Thorm will interrogate the speaker for the group before turning his attention to you, as a True Soul. To test you, he will ask you to execute the prisoner before retiring to the top of the tower, and you will be given a choice as per how to proceed.
Notably, this is one of the few points in the game where there are almost no ability or skill checks in an important dialogue, meaning that whether an action will work or not is pre-determined. The only exception to this is if Minthara is on trial, where you can make a DC-21 Wisdom check to influence Ketheric to declare Minthara innocent, a DC-16 Wisdom check to influence Disciple Zrell to let Minthara live, or a DC-14 Wisdom check to force Minthara to declare her own guilt.
For any of the prisoners except for Drell (who will always be executed), you will have the choice (which will be respected) to either execute them, fight them to the death, or order the guards to free them. Once the ordeal is finished, you will be given free rein to continue exploring Moonrise.
Araj Oblodra is, primarily, a merchant of potions and other bobbles in the Moonrise Towers. However, much more interestingly, she is also keenly interested in blood. A DC-14 History check will explain this, as it related to the history of her noble house.
Specifically, she is interested in the blood of True Souls. She will ask if she can have some of your blood, and if you agree, she will give you a potion she concocts from it as a reward (as well as some gold). The potion that she will give you will be based on the character’s race and will typically help you in checks and rolls, and each character can only donate blood once. So long as any character donates blood, Araj will appear in Act 3.
Araj is also keenly interested in vampirism, and so if you are playing as Astarion or have him in your party, Araj will ask to be bitten. You can accept or refuse this offer. Accepting this offer will heavily displease Astarion (if he is not the player character), but will get you a potion that permanently increases Strength by 2 by whoever consumes it.
Steelclaw is a cunning killer, a brutal assassin adept at all forms of combat.
Steelclaw is also a cat. Actually, Steelclaw is pretty much just a cat. If you pay attention to her dialogue, however, she will point you toward the Cat Hole (#7), enabling quick transport if you are able to squeeze through it.
The Cat Hole connected the main level of the Moonrise Towers (or at least the rear balcony) with the lower level. The main level leads into the Throne Room (#4), and Merchants (#3), whereas the lower level leads to the Docks (#8) and the Prison (#9).
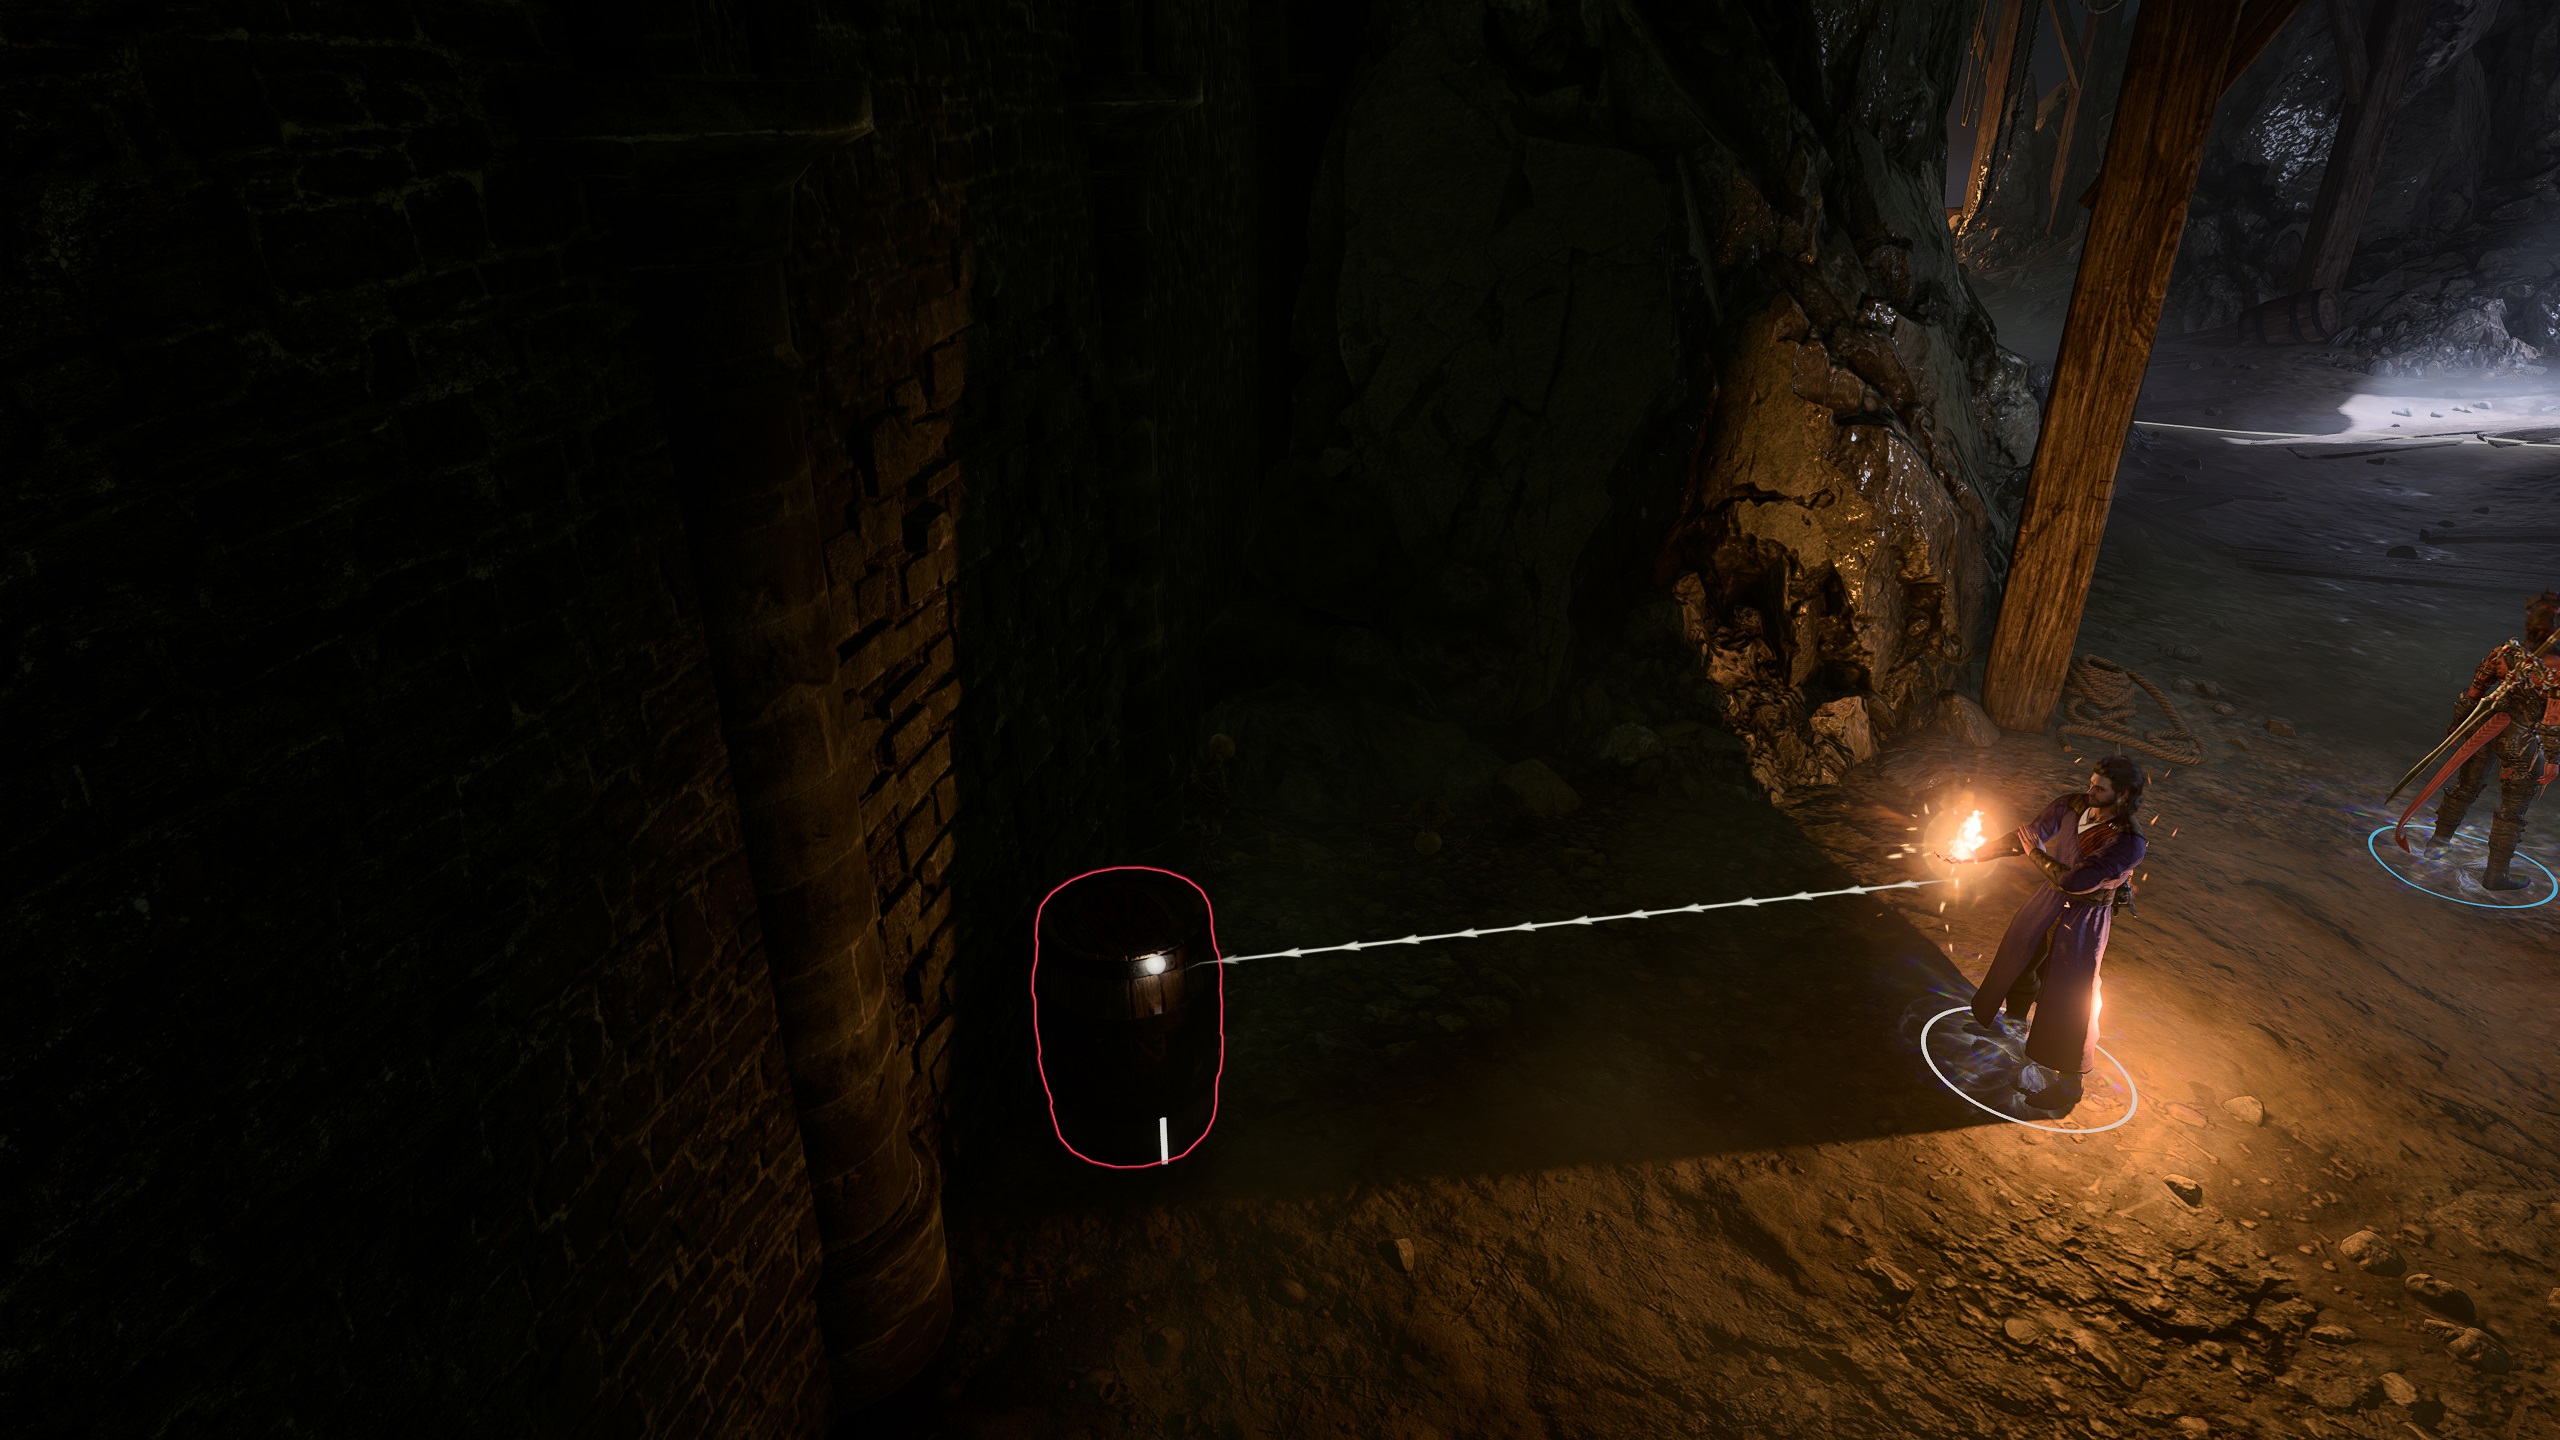
On the Moonrise Docks, you will find a Zhentarim Shipping Crate. Inside, there will be2 Mind Flayer Tadpoles, which you can take or destroy. However, you will need to be prepared to fight the 3 guards on the docks if you are caught interacting with them. However, you can make it easier to get away with this by passing a DC-14 Persuasion or Intimidation check for the guards to let you check the cargo, giving you a better chance to steal the tadpoles.
When you enter the prison from the Docks (#8) or from near the Main Hall (#2), you will come into the prison entrance. While there isn’t much to say to the guards here, they will be prepared to attack in the event of any prison break, if they catch on. If you are trying te be more stealthy with your prison break, or simply want to avoid these guards, you will likely have to take the boat hidden behind the prison walls (C).
Provided you didn’t slay the Tieflings in the Emerald Grove in Act 1, a good number of them will be imprisoned here, including Dammon’s siblings. Speaking to the imprisoned tieflings will not yield much useful information, but it will enable you to rescue them.
There are a few ways to rescue the Imprisoned Tieflings. Of course, you can simply break them out by picking their prison cell’s lock or by opening the cages using the levers in the Warden’s Office (#12). However, by using an explosive or high-damage weapon on the back wall, after having accessed the opposite side of the back wall by taking the Trait to the Boat (#13), you can much more easily enable the Tieflings’ escape (and perhaps the Deep Gnomes at the same time).
There are a few ways to rescue the Imprisoned Deep Gnomes. Of course, you can simply break them out by picking their prison cell’s lock or by opening the cages using the levers in the Warden’s Office (#12). However, by using an explosive or high-damage weapon on the back wall, after having accessed the opposite side of the back wall by taking the Trait to the Boat (#13), you can much more easily enable the Deep Gnomes’ escape (and perhaps the Tieflings at the same time).
They will want you to free them, so long as they are still alive (don’t complete the Gauntlet of Shar first). The easiest way to do so is to break the wall in the back and get them to the boat.
You can head into the Warden’s Office, but it is off-limits to trespassers (which you are). While you can speak to the waarden while she is wandering around the prison, entering this area will make any guards or scrying eyes that catch you immediately hostile, causing them to descend upon you.
If you are able to sneak or dispatch them, however, you can find the levers to open all of the cells in the prison here, opening up one possibility to enable escape for the Deep Gnomes (#11) and Tieflings (#10) imprisoned here, though it is likely to make you hostile to those in the Moonrise Tower unless you get them to the boat (#13 and C). There are also numerous randomized chests in both floors of the office.
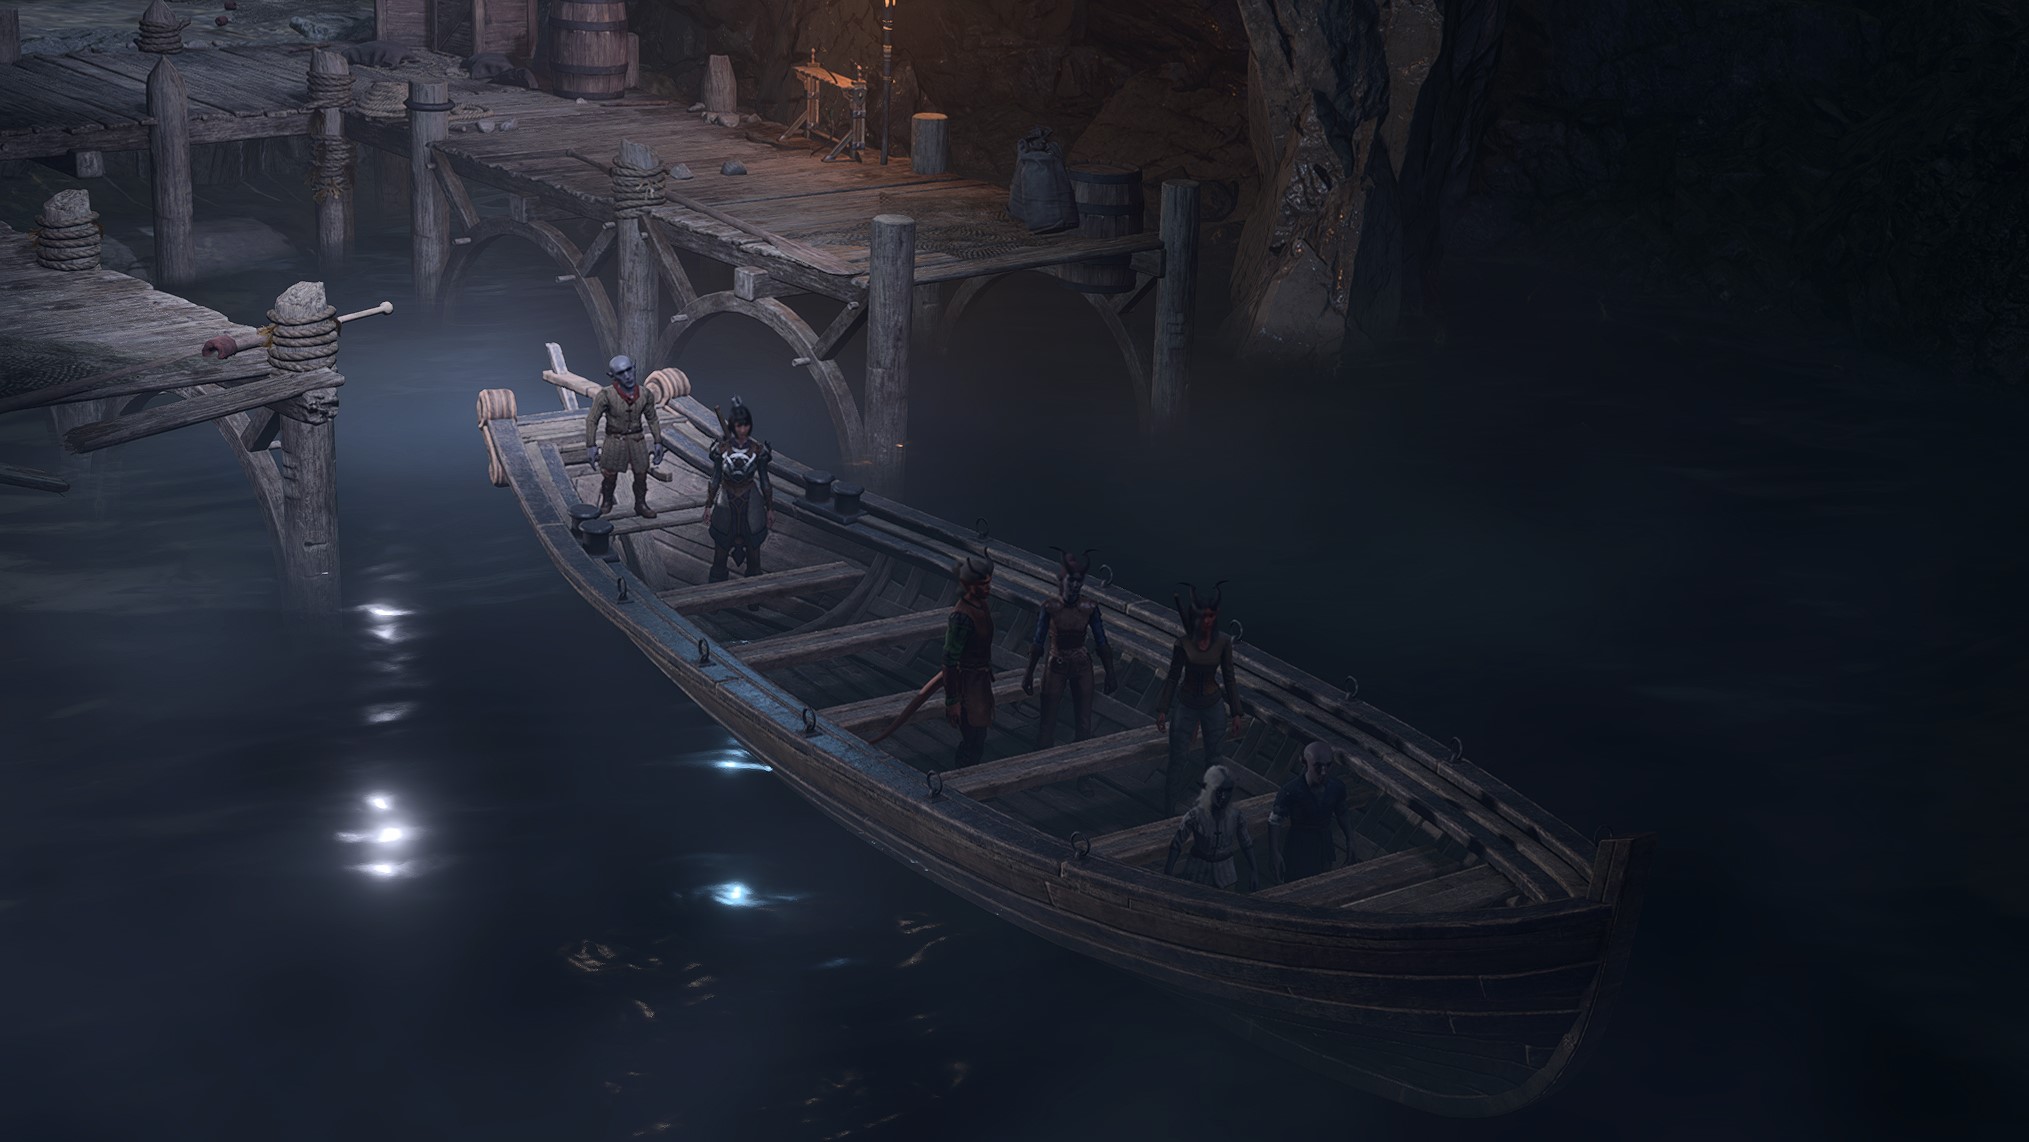
By jumping up a ledge, you will gain access to a trail that leads behind the prison cells, as well as one of the entrances to the Obliette underneath the prison in the Moon Flayer Colony (B2). Heading down this path will lead to a boat, as well as to two weak walls that can be blown up to free the prisoners. Once all of the prisoners (#10 and #11) make it to the boats (no doubt with enemy guards in tow), they will leave to Last Light Inn (C), at which point the player and their party can opt to join them (escaping and avoiding further confrontation), or remain in the prison.
Before you are able to have an audience with Ketheric Thorm, you must either fight your way to him, or earn your right to have audience with him. Should you opt to assault Moonrise Tower, with or without the assistance of the Nightsong in the Gauntlet of Shar, you’ll simply be able to walk through this door after you have dispatched the Zealots and other followers of the Absolute guarding the place.
However, if you wish to gain audience with Ketheric Thorm without provoking hostilities, you will need to jump through hoops, as will be pointed out by Disciple Z’rell. She will ask you to abduct Isobel from Last Light Inn and to assist Balthazar with acquiring the Nightsong in the Gauntlet of Shar (and she will indicate for you to pry through his room (#15) to help you with this, giving you the key), and will not permit you entry before that point.
While you speka with Z’rell, a variety of Persuasion, Wisdom, and Deception checks may appear, allowing you to understand her or Ketheric better, but these do not change the tasks required to access the roof. You can tell Z’rell that you are “done with orders” and speak with Ketheric immediately, but doing so will anger him and put you in a worse position to bargain with.
You are permitted free access to Balthazar’s Room if you are friendly with the denizens of the Moonrise Towers, as you will not be seen as trespassing, but rather as investigating Balthazar’s whereabouts. However, you can avoid the DC-14 Sleight of Hand lockpicking check if you speak to Disciple Z’rell (#14) first and get the key.
First things first, you can locate a Moonlanter to the right of the stairs at the entrance to the room. This lantern, when held, will enable you to travel through the thick Shadow Curse that enveloped Reithwin Town without taking damage as you do so.
More interesting, you will be able to find an altar nearby, next to some bookshelves. One of the books on these shelves has a clue, but picking the wrong one will cause a trap to spring and damage you. Look for the bookshelf which is labelled “Protruding Book”, which will reveal what you will need to place on the nearby plinth: a heart.
Thankfully, there are hearts on many of the corpses in this room, which you can place on the plinth next to the bookshelf in order to access Balthazar’s secret chamber. In this room, you can do several things: firstly, you can find out the whereabouts of Balthazar in the Gauntlet of Shar. You can also craft a Shadow Lantern (a unique version of the Moonlantern capable of summoning Shadows) by interacting with the ritual circle in this room or, if you have Gale with you, you can get him to disrupt the ritual circle, giving him permanent advantage on concentration checks when spellcasting.
There are essentially 2 ways to approach Ketheric Thorm — either by assaulting Moonrise Tower, or by gaining audience with him by completing his tasks.
If you gained audience with Ketheric Thorm by completing (or at least attempting) to acquire the Nightsong from the Gauntlet of Shar and Isobel from Last Light Inn, then he will have a conversation with the player where he will, ultimately, ask them to kneel before a tentacle-full altar. Doing so will progress the main quest, teleporting the player into Balthazar’s clutches, where they will need to escape and deal with Ketheric violently anyway.
No matter what, you will eventually need to fight Ketheric Thorm. This can only really be done after dealing with the Gauntlet of Shar, which will cause Ketheric’s invulnerability to be weakened, but it is still a difficult fight. If you sided with the Nightsong in the Gauntlet of Shar or Jaheira from Last Light Inn, you will have plenty of allies during this assault, which will be necessary because of just how strong Ketheric and his minions are. In addition to Ketheric himself, he also has a large army of Necromites and the mage Susdera.
The best strategy for Ketheric is to make heavy use of your allies, allowing them to take some hits while you deal with Ketheric’s minions. Once he is by himself, he will be much easier to deal with thanks to the advantage you will have in amount of turns. If you are taking on this fight alone, however, then ensuring you have tanks with extremly strong AC (including with buffs) and casters with large AoE spells is the most viable strategy, as the battle is sure to be a slog.
Once you have dealt enough damage to Ketheric, he will flee, creating a hole in one of the towers that leads down to the Mind Flayer Colony (B4).
NOTE: Once the party enters the Mind Flayer Colony through the rooftop (B4), they will be unable to leave it — even to return to their camp — until they complete it. You should choose your party carefully before going into the Mind Flayer Colony proper. Wyll and Gale (especially Wyll) both have unique interactions within the Colony relating to their companion quests.
You can take the boat to the Last Light Inn, before or after rescuing the Tieflings and/or Deep Gnomes. Any that you rescue in the prison can take this boat to the Last Light Inn with you, rescuing them.
Where To Go Next
There are 3 locations you can go to from the Moonrise Towers.
Mind Flayer Colony: Underneath Moonrise Towers, there lies a secret. Accessible several ways, you will need to end up here in order to end Act 2.
Reithwin Town: Heading back into Reithwin Town can give you a chance to clear it out, or to move through it to reach the Gauntlet of Shar. So long as you have a Moonlantern.
Last Light Inn: Should you opt to rescue the imprisoned Tieflings and/or Deep Gnomes in the prison, you can use that as a chance to return safely to Last Light Inn.
Graves is an avid writer, web designer, and gamer, with more ideas than he could hope to achieve in a lifetime. But, armed with a mug of coffee and an overactive imagination, he'll try. When he isn't working on a creative project, he is painting miniatures, reading cheesy sci-fi novels, or making music.