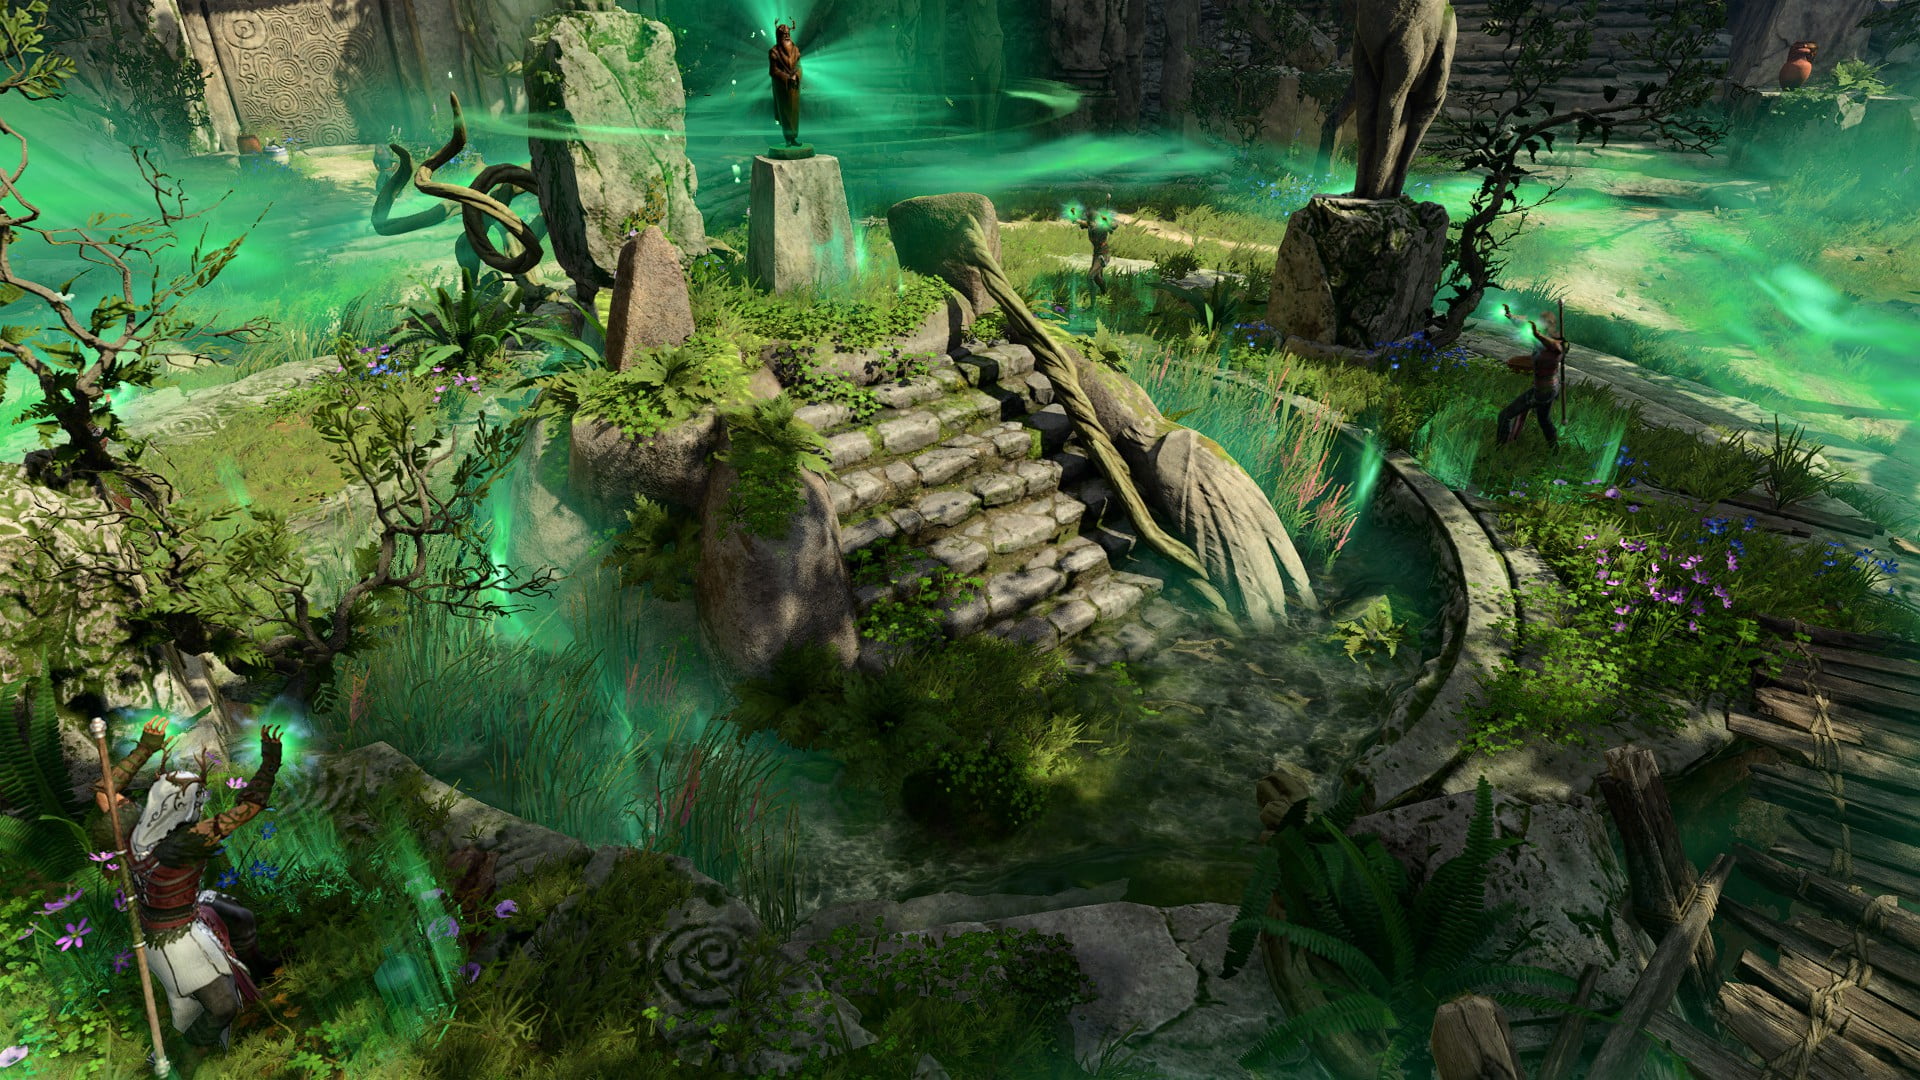
In this walkthrough, we’ll guide you through all of the things to do and see in the Emerald Grove, and cover the many possible quest paths you can follow. This is a fairly dense encampment, with plenty of little conversations and fun interactions, so while this guide won’t list every single NPC interaction you can have, we’ll make sure to hit all the key spots, including anything that gives a reward or has relevance to quests.
Saving Nadira
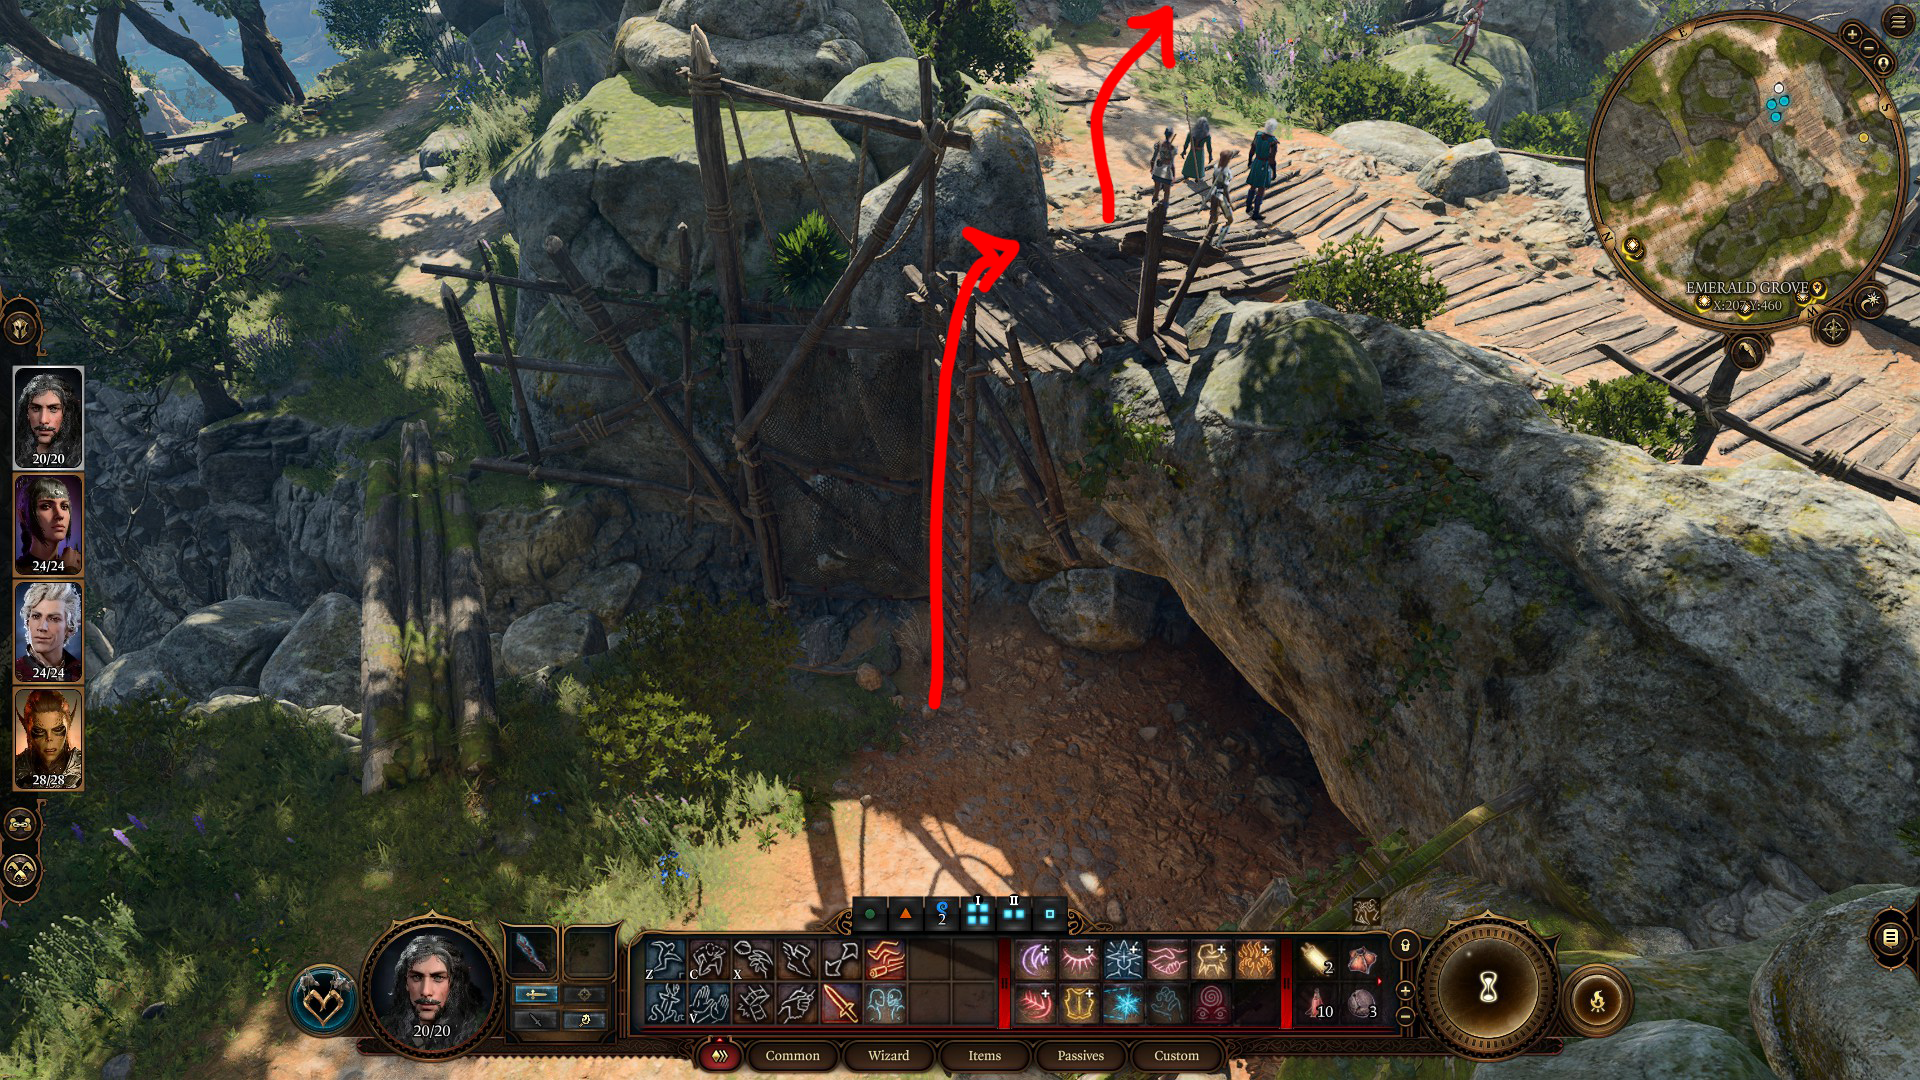
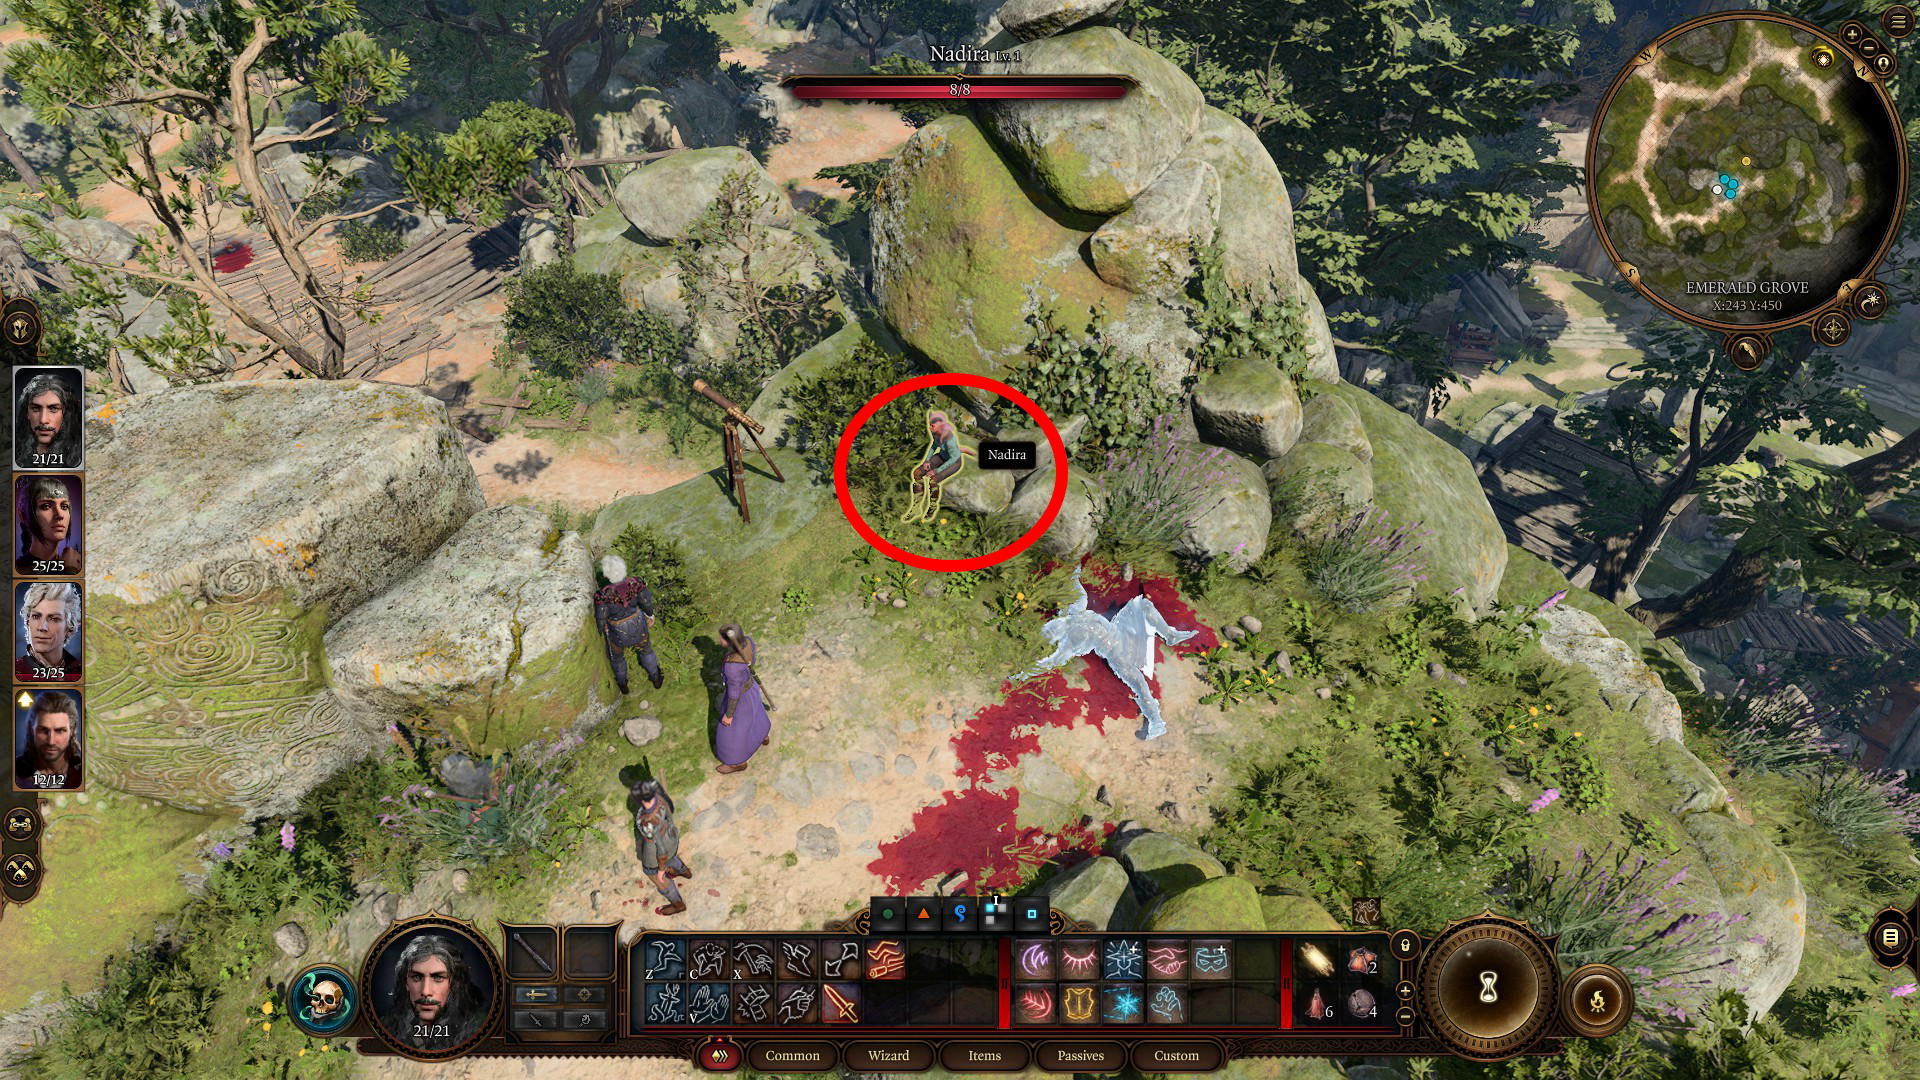
Upon entering the Emerald Grove, you’ll almost immediately find a ladder on your right. Climb up, then continue southeast up the path that winds up a small hill (1). Where the path bends north, you’ll surprise a bugbear assassin who was preparing to ambush the tiefling Nadira, and combat will begin. It should be a 4v1, making cleaning up the bugbear quite simple. Once the assassin is toast, Nadira will return and sit on a rock near the telescope — loot the bugbear, then click on her to begin a conversation (2).
12
She’ll accuse you of being sent to retrieve a valuable object from her, a Soul Coin, which she’ll give you if you succeed on any of the Ability Checks present in the conversation. However, the Deception check will gain you favor with Shadowheart, so it’s worth trying first if you don’t mind being a liar.
Robbing Kamon
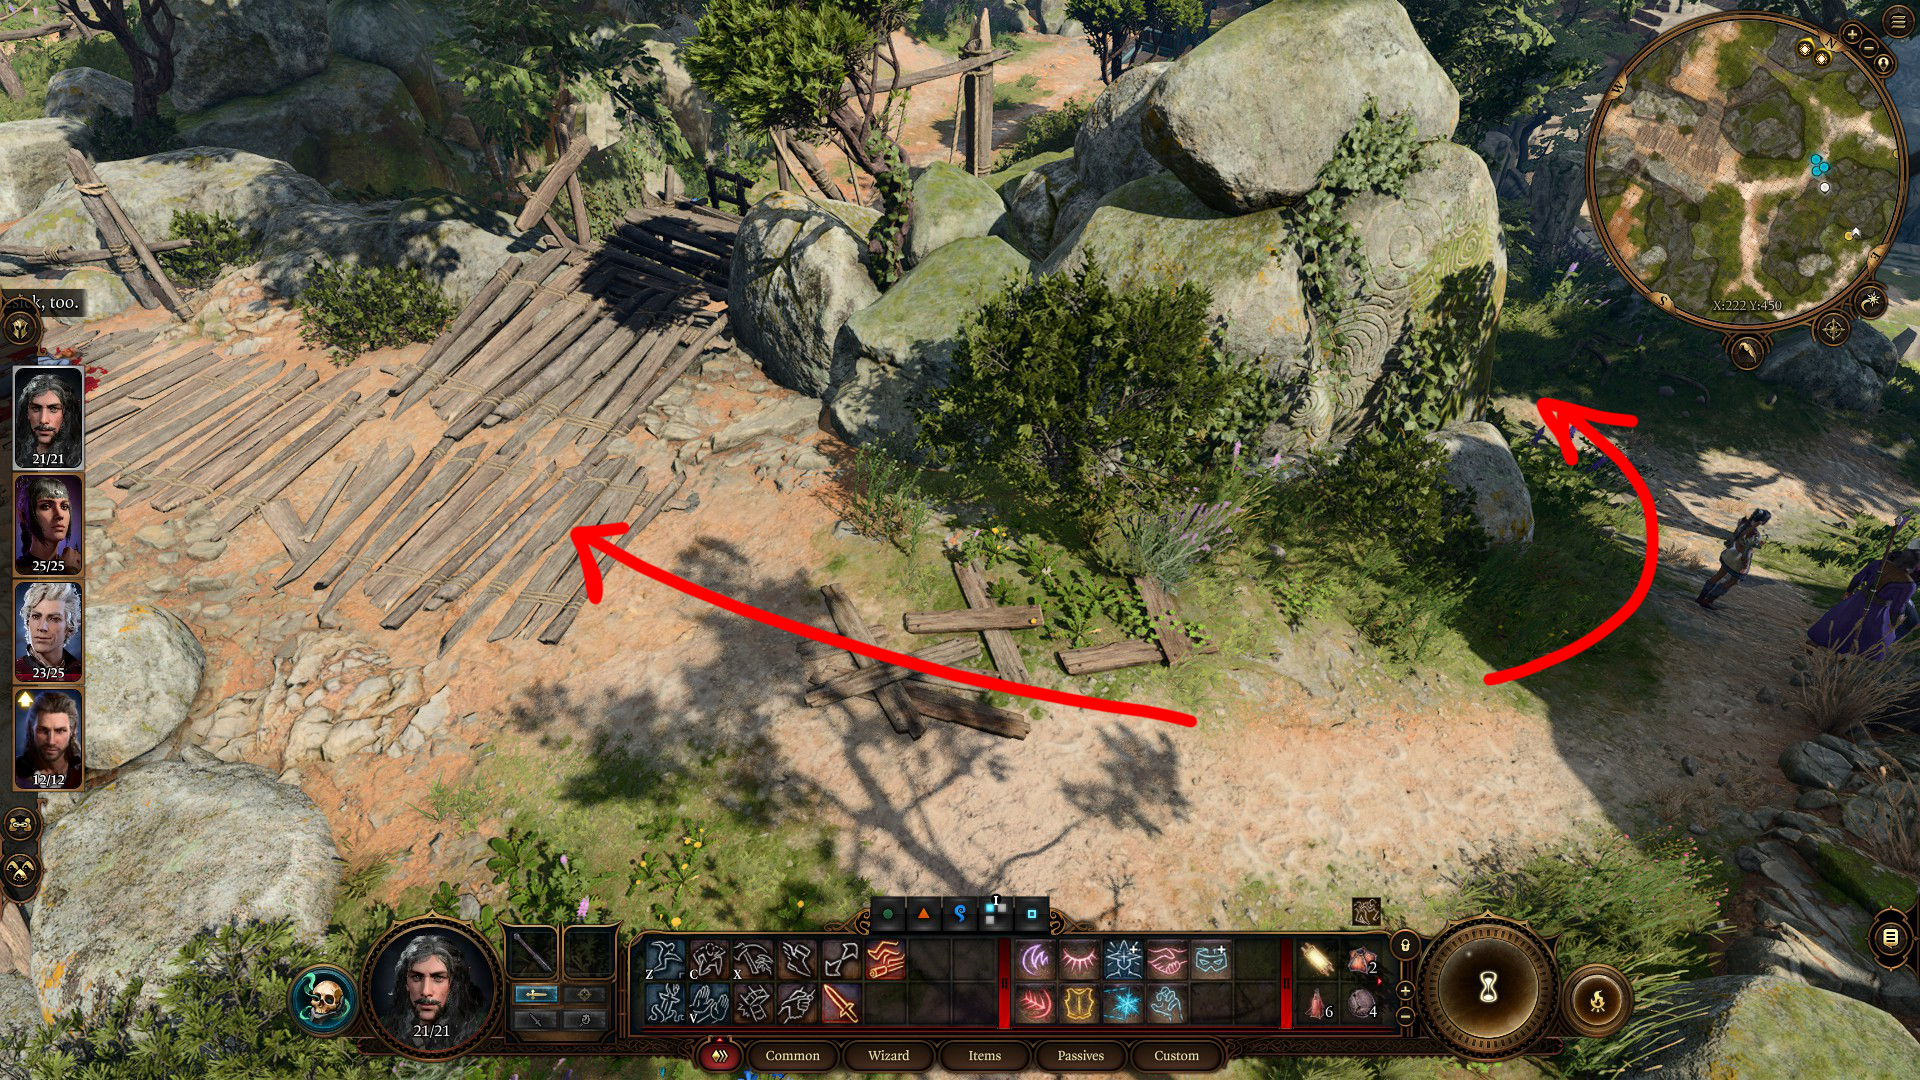
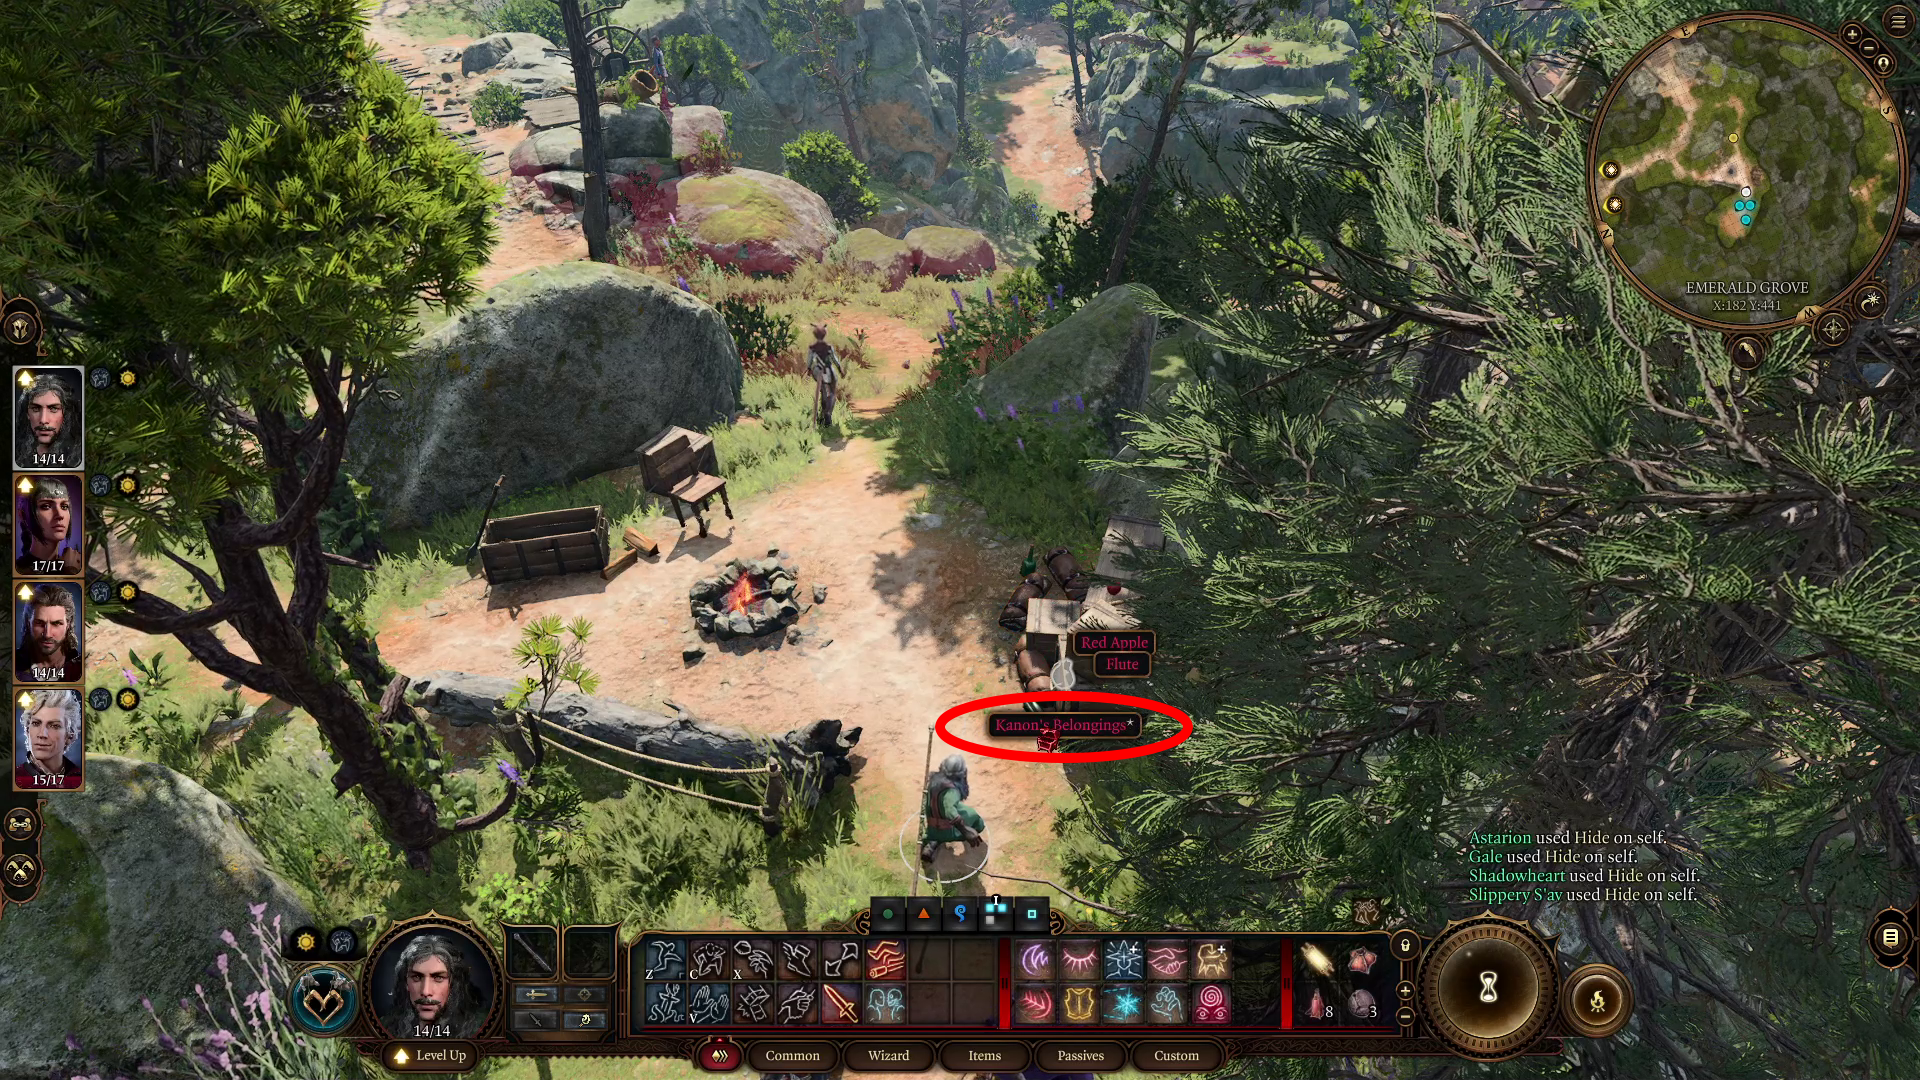
Once you’ve been given the Soul Coin, go back the way you came, down the hill. Where the path forks (1), you can go left to do a bit of thieving, or continue down the hill to start a conversation. If you want the free loot, go left and continue to the small camp with the crates and the fire. Stand as indicated below (2) and wait for the nearby tiefling to be walking away from you, then highlight the nearby items and pick up Kamon’s Belongings. You can then follow the path that leads north, downhill, to reach the aforementioned conversation.
12
Speaking to Zevlor
Once you get close to the path that leads north of the main gate, a dialog will begin between Aradin and Zevlor. You can gain approval from Shadowheart and Gale by choose to Persuade the two men not to fight, but regardless of the outcome (up to and including Zevlor getting knocked out), you should speak with Zevlor once the initial conversation ends.
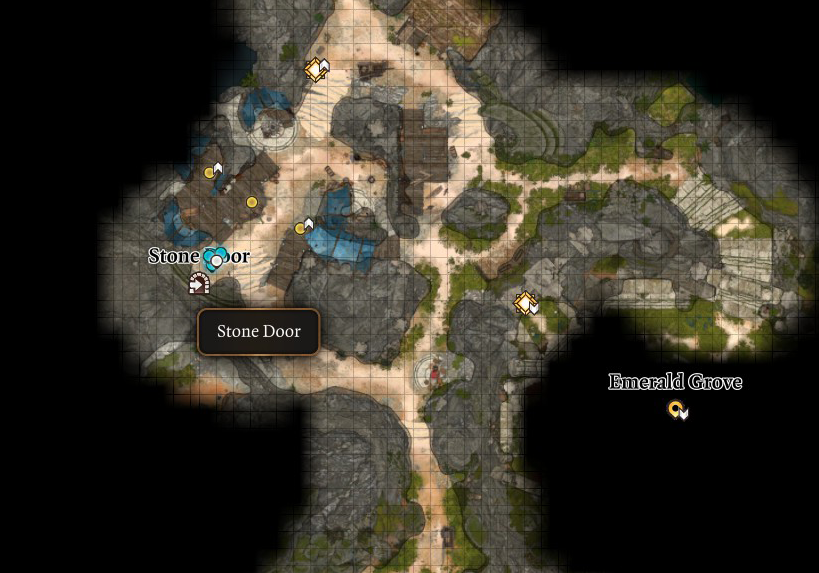
By speaking with Zevlor, you can learn more about what’s going on in the Grove, and begin the quest “Save the Refugees” by asking about what the Druids are up to. If you tell Zevlor you are too busy to help him, you’ll gain approval from Astarion. You can also ask Zevlor about Zorru (getting Zorru’s location by doing so), assuming you’ve begun the quest “The Githyanki Warrior” by freeing Lae’zel. Note that if you fail to speak with Zevlor now, you can find him through the Stone Door northwest of where you first encounter him.
The Hollow
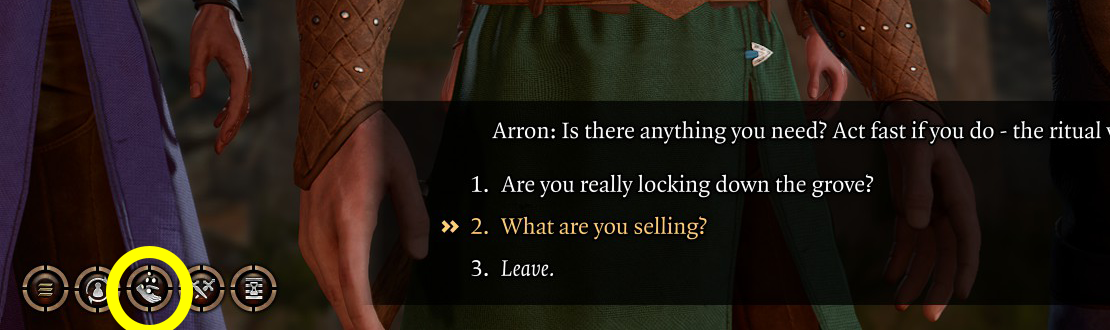
Continue north on the path, and where it forks, you’ll enter The Hollow. On your right is the halfling merchant Arron — if you’ve already collected a good deal of junk, now’s the perfect time to unload it. To trade with a character, click the Trade button on the bottom left of the conversation screen; sometimes you’ll also be able to pick a dialogue option like “What are you selling?”.
Once you’ve finished trading with Arron, take a left (west) at the fork to head downhill, deeper into the Hollow. There are a handful of just-for-fun conversations you can have in this area, and there are also a few NPCs worth mentioning.
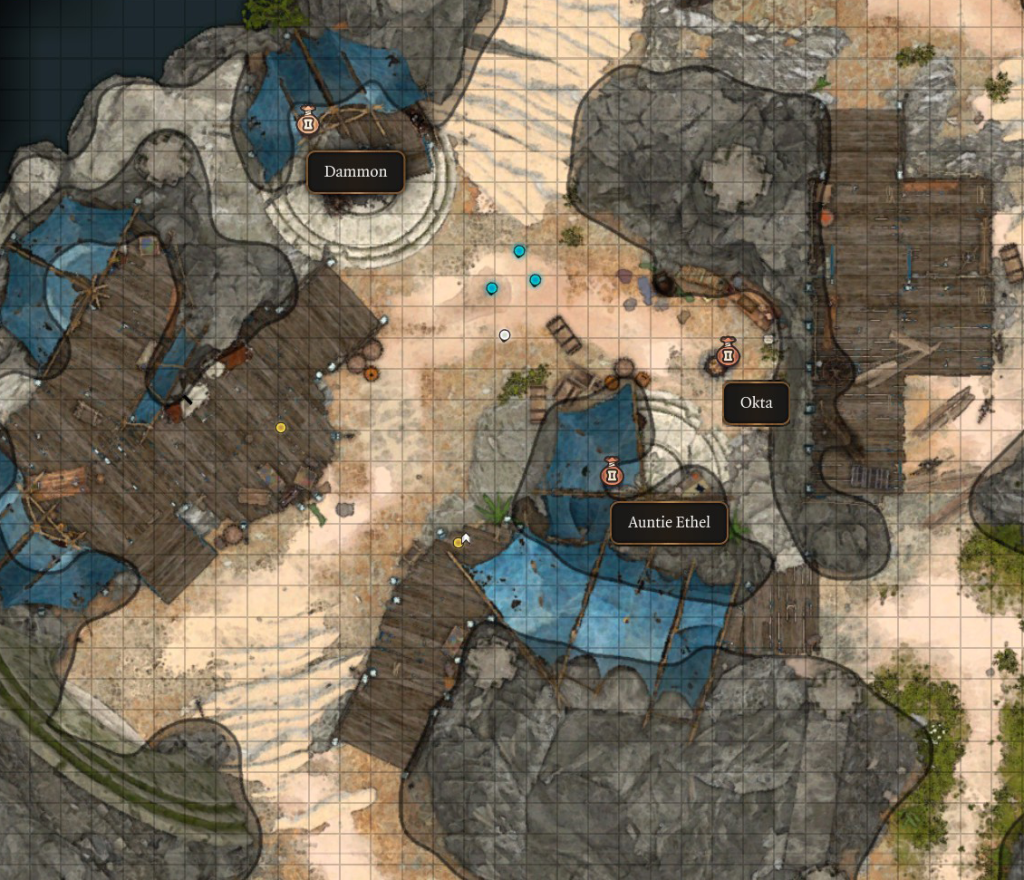
Dammon the smith (who is a useful character if you’ve got Zarlach in your party) can be found in a tent next to the ramp to the north — he sells equipment.
Okta will offer each character in your party x1 Gruel — while only worth 1 Camping Supplies, it’s also a consumable boasting 3d4 healing, so it’s worth switching to each character and having them accept some Gruel from Okta. (Note that the Gruel may end up in your Camp Supply Pack; it’s best to move it to your main inventory to avoid using it for a Long rest.)
Auntie Ethel will mark your map with the location of her house if you tell her about the Mind Flayer parasite you’ve got in your head — she also has a few useful odds and ends for sale.
After doing any talking and shopping you like, head north up the ramp near Dammon. At the top of the ramp are a couple of tieflings, including Zorru — if you have Lae’zel with you, a conversation between the two will begin. Telling Zorru to bow when he speaks to you will earn you approval with Astarion and Lae’zel, but lose you approval with Shadowheart. This conversation will soon end, updating the “Find the Githyanki Crèche” quest in your log; you now know that a gith patrol can be found to the northwest.
The Goblin Sazza
Beyond the tieflings is a door that leads north, into the Makeshift Prison. Head through the open door and a dialog will begin. If you don’t choose to move between Sazza and the tiefling, the tiefling will kill Sazza. Getting in the way of the tiefling will earn you Gale’s approval, and then you’ll need to convince the tiefling not to fire. You’ll have a few different options — simply pick the one with the most bonuses, as using Detect Thoughts has a DC of 12 and failing will result in immediate combat (although succeeding lets you pick the dialog option “What would Kamon think”, which will end the encounter). Failing the first Ability Check simply lets you try another tack — fail a second check, and combat will begin.
Once you convince the tiefling to leave (either with words or weapons), you’ll be able to talk with Sazza. She’ll speak of a goblin priestess, who Sazza will offer to bring you to if you free her. Spoiler alert: the priestess can’t really help you with your problem, but if you want to free Sazza for the fun of it, you certainly can. Doing so makes it easier to get into the goblin camp, and is also a good choice if you think you might want to team up with the goblins. To free her, all you have to do is lockpick her cage and then speak with her, and have her follow you. You can then lead her out of the grove via the Underground Passage — once you get far enough away, she’ll tell you to meet her back at the goblin camp.
Underground Passage
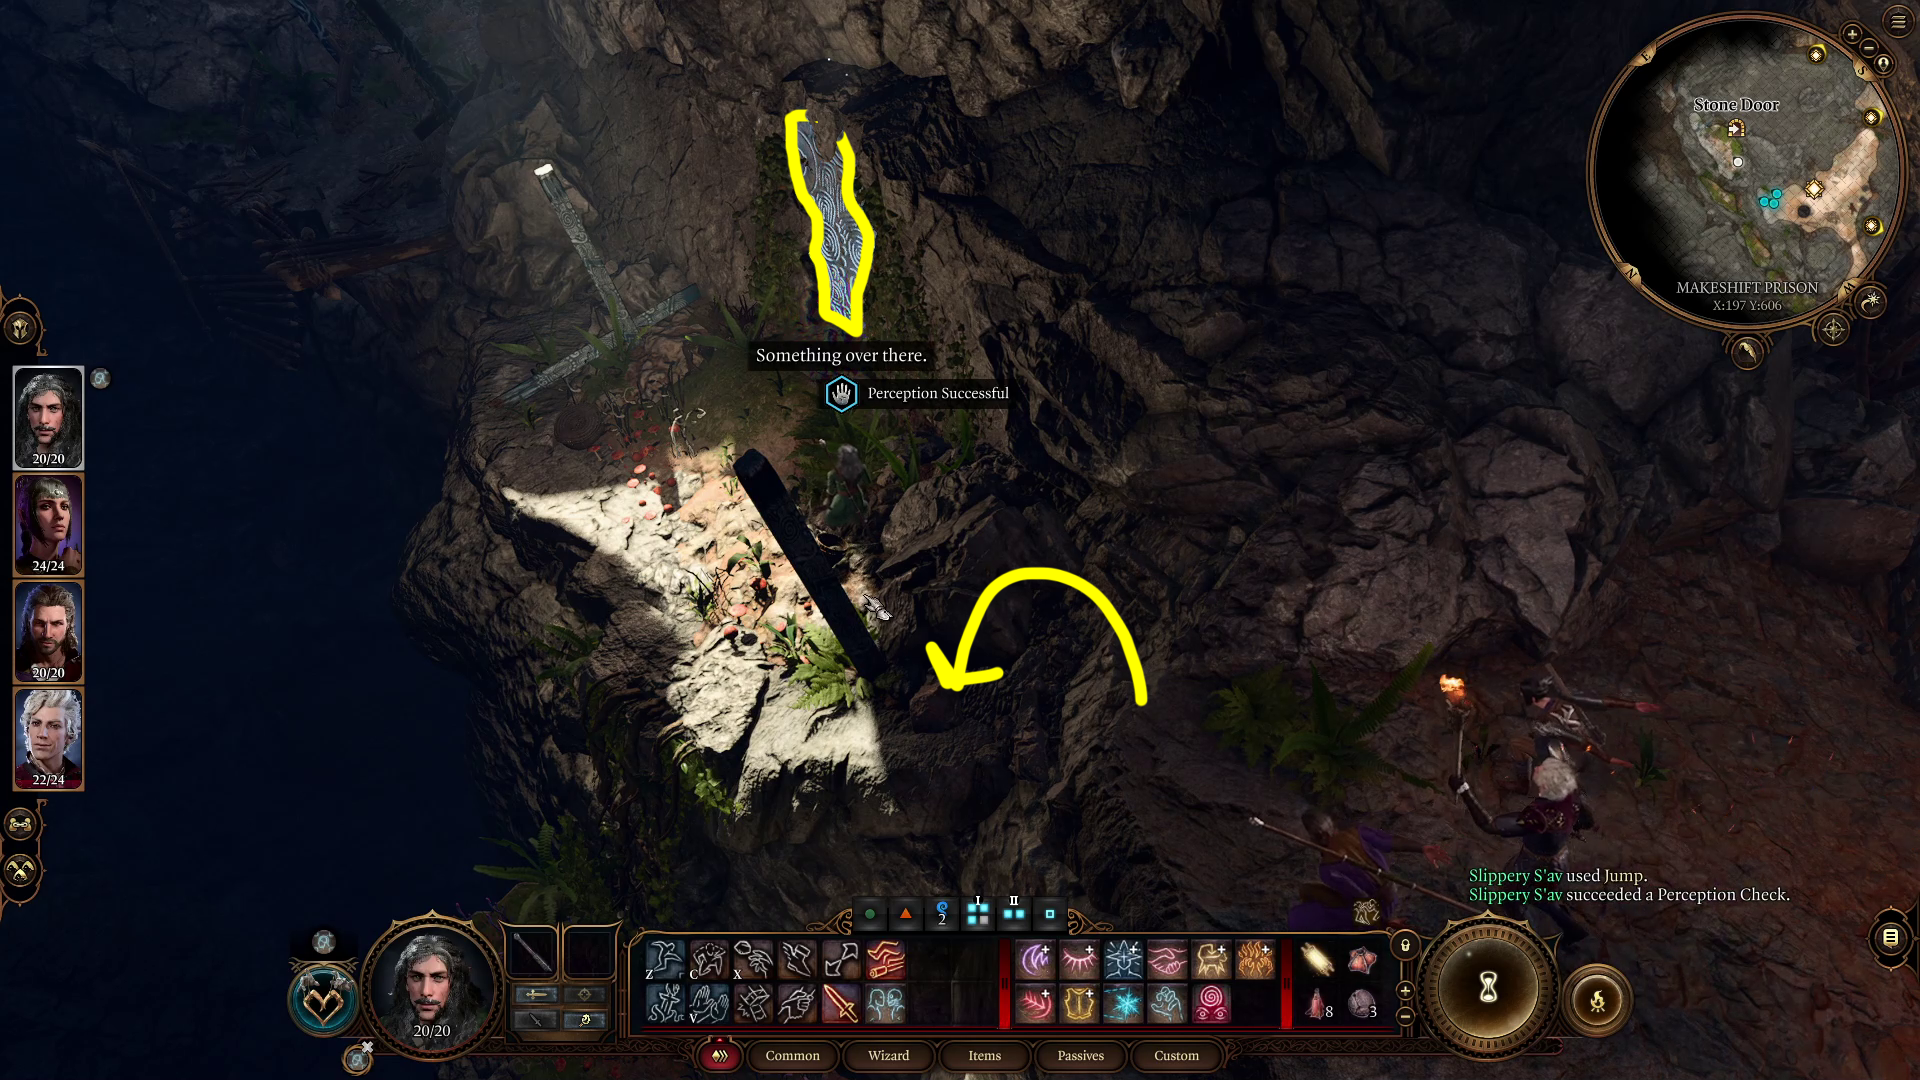
Behind Sazza’s cage, there is a path you can reach by jumping. Walking forward just a bit will roll Perception checks, and you’ll very likely discover a Stone Door that leads to the Underground Passage. If you want some loot and the Nature’s Snare quarterstaff, it’s worth venturing inside.
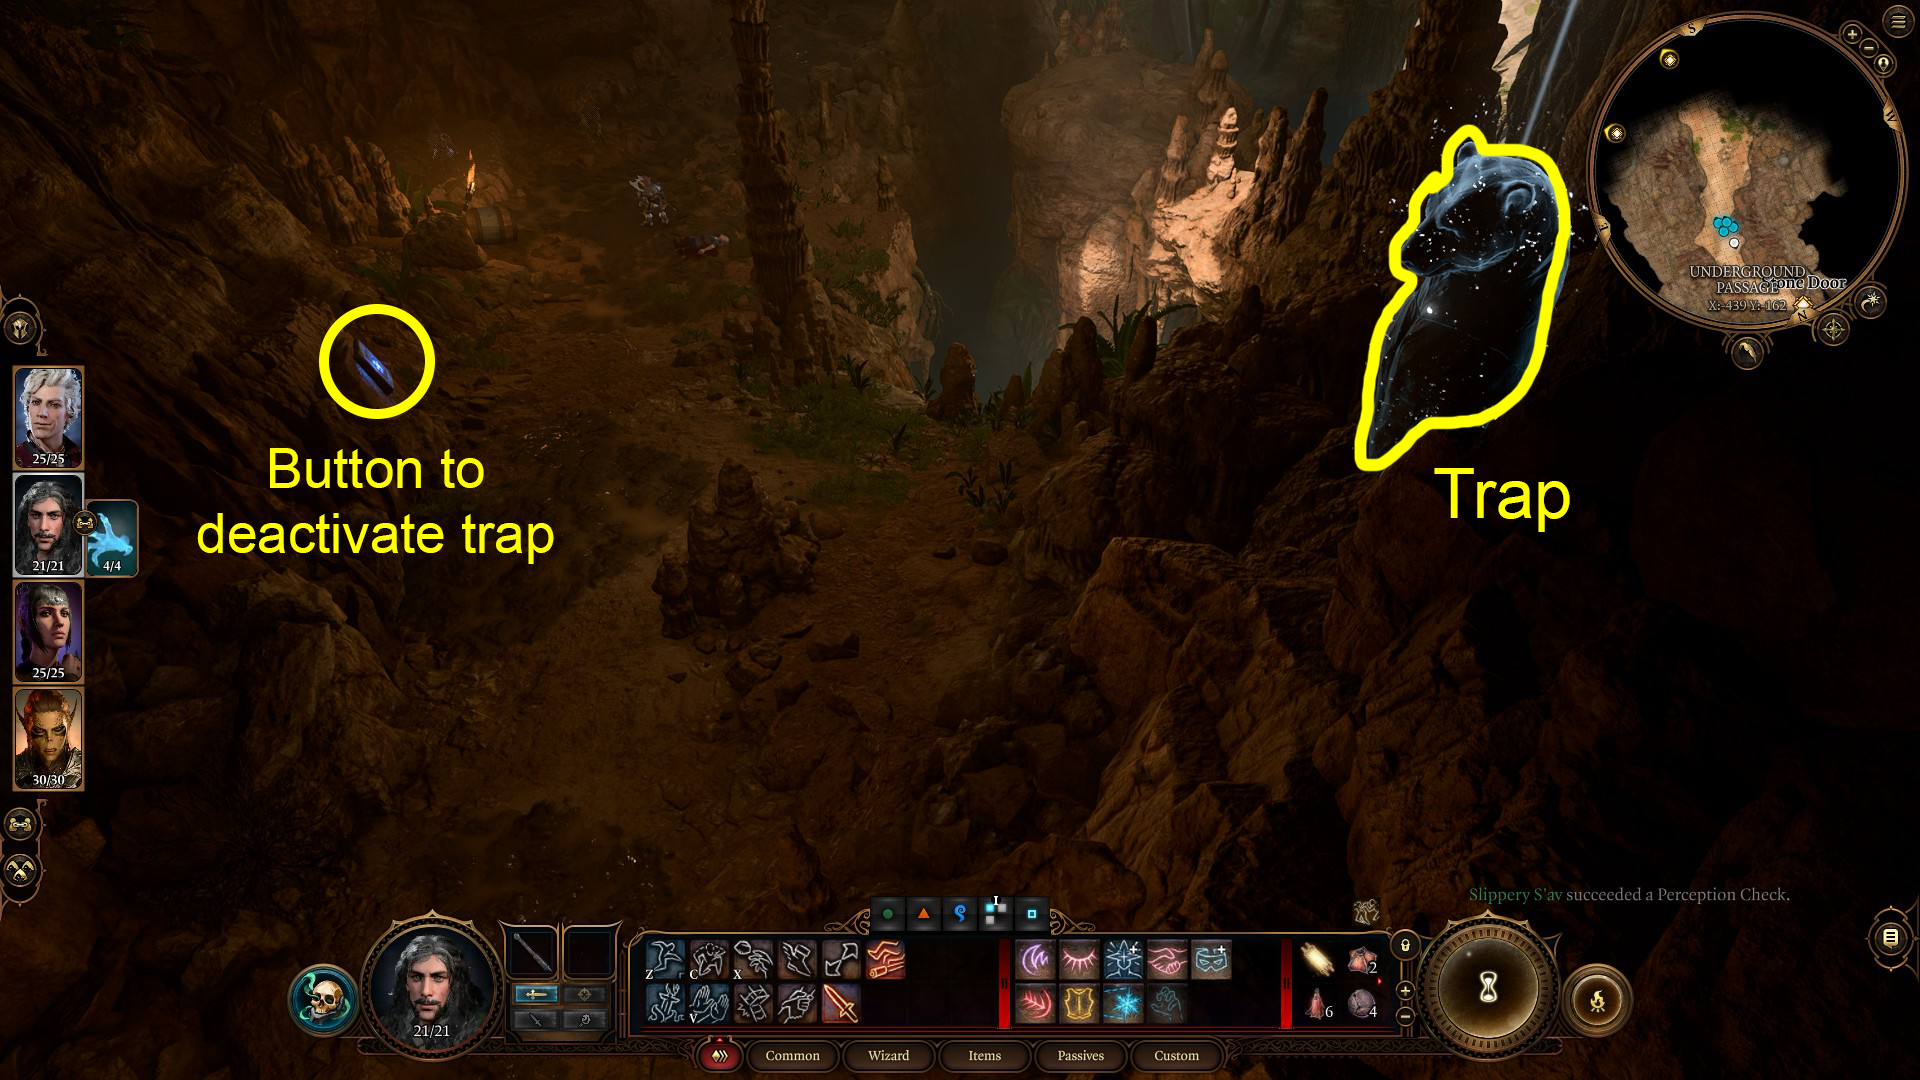
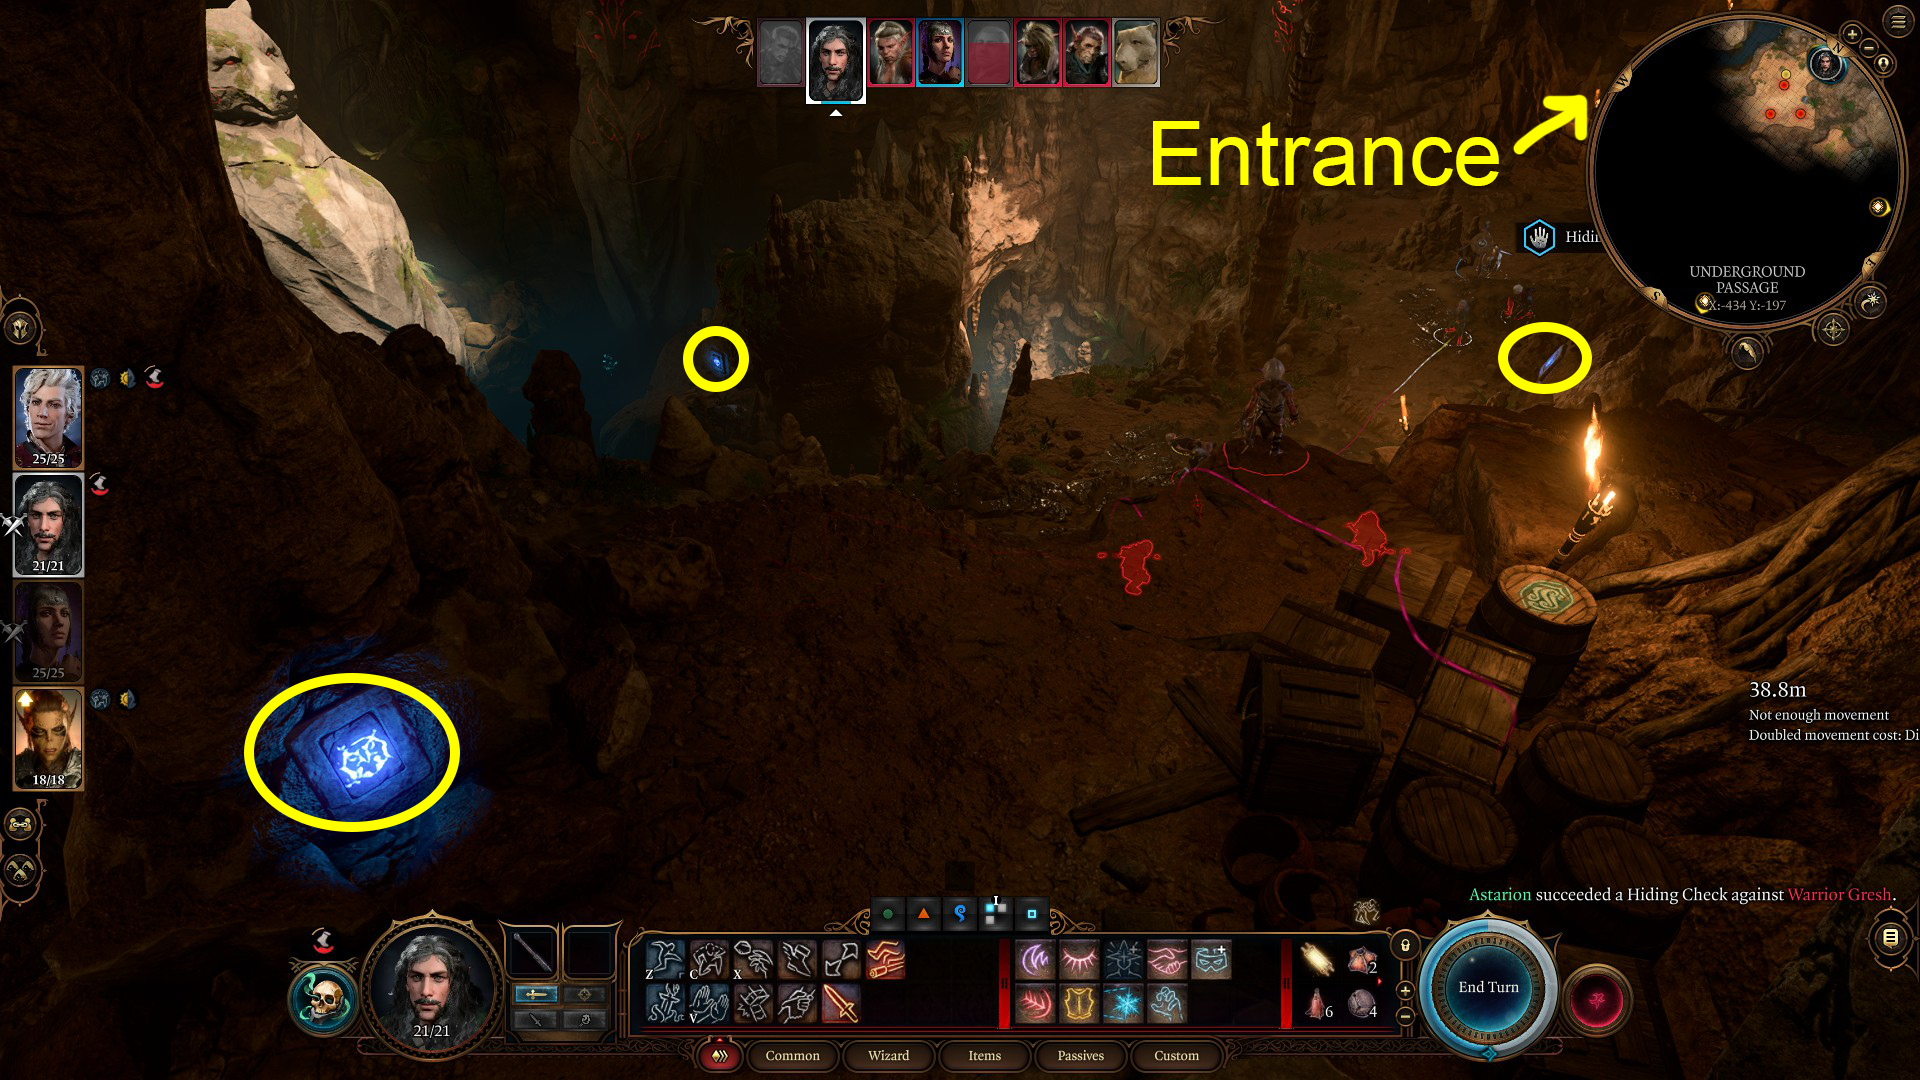
Don’t rush forward upon entering the passage, as there is a large statue that will blast your party with fireballs just ahead. Instead, either sneak or use a Mage Hand to press the button on the wall ahead (1). Don’t just sneak past the statue, as if you leave it active it will fire upon your party during the upcoming combat. If you do use mage hand, try and hit the other buttons as well before it expires — there are 3 in total in the room (2). (Note that you’ll need to use the Fly action to reach the button in the water.)
12
If you don’t manage to hit the other two buttons, you can always do that after fighting the goblins, who you’ll need to defeat in order to progress further into the passage. There is a lot of mud that will severely limit movement, so plan your turns accordingly. After defeating the enemies here, loot their corpses, and then use some kind of healing spell or item on Findal, who lies near death in the mud. He’ll wake up, and then you can speak with him.
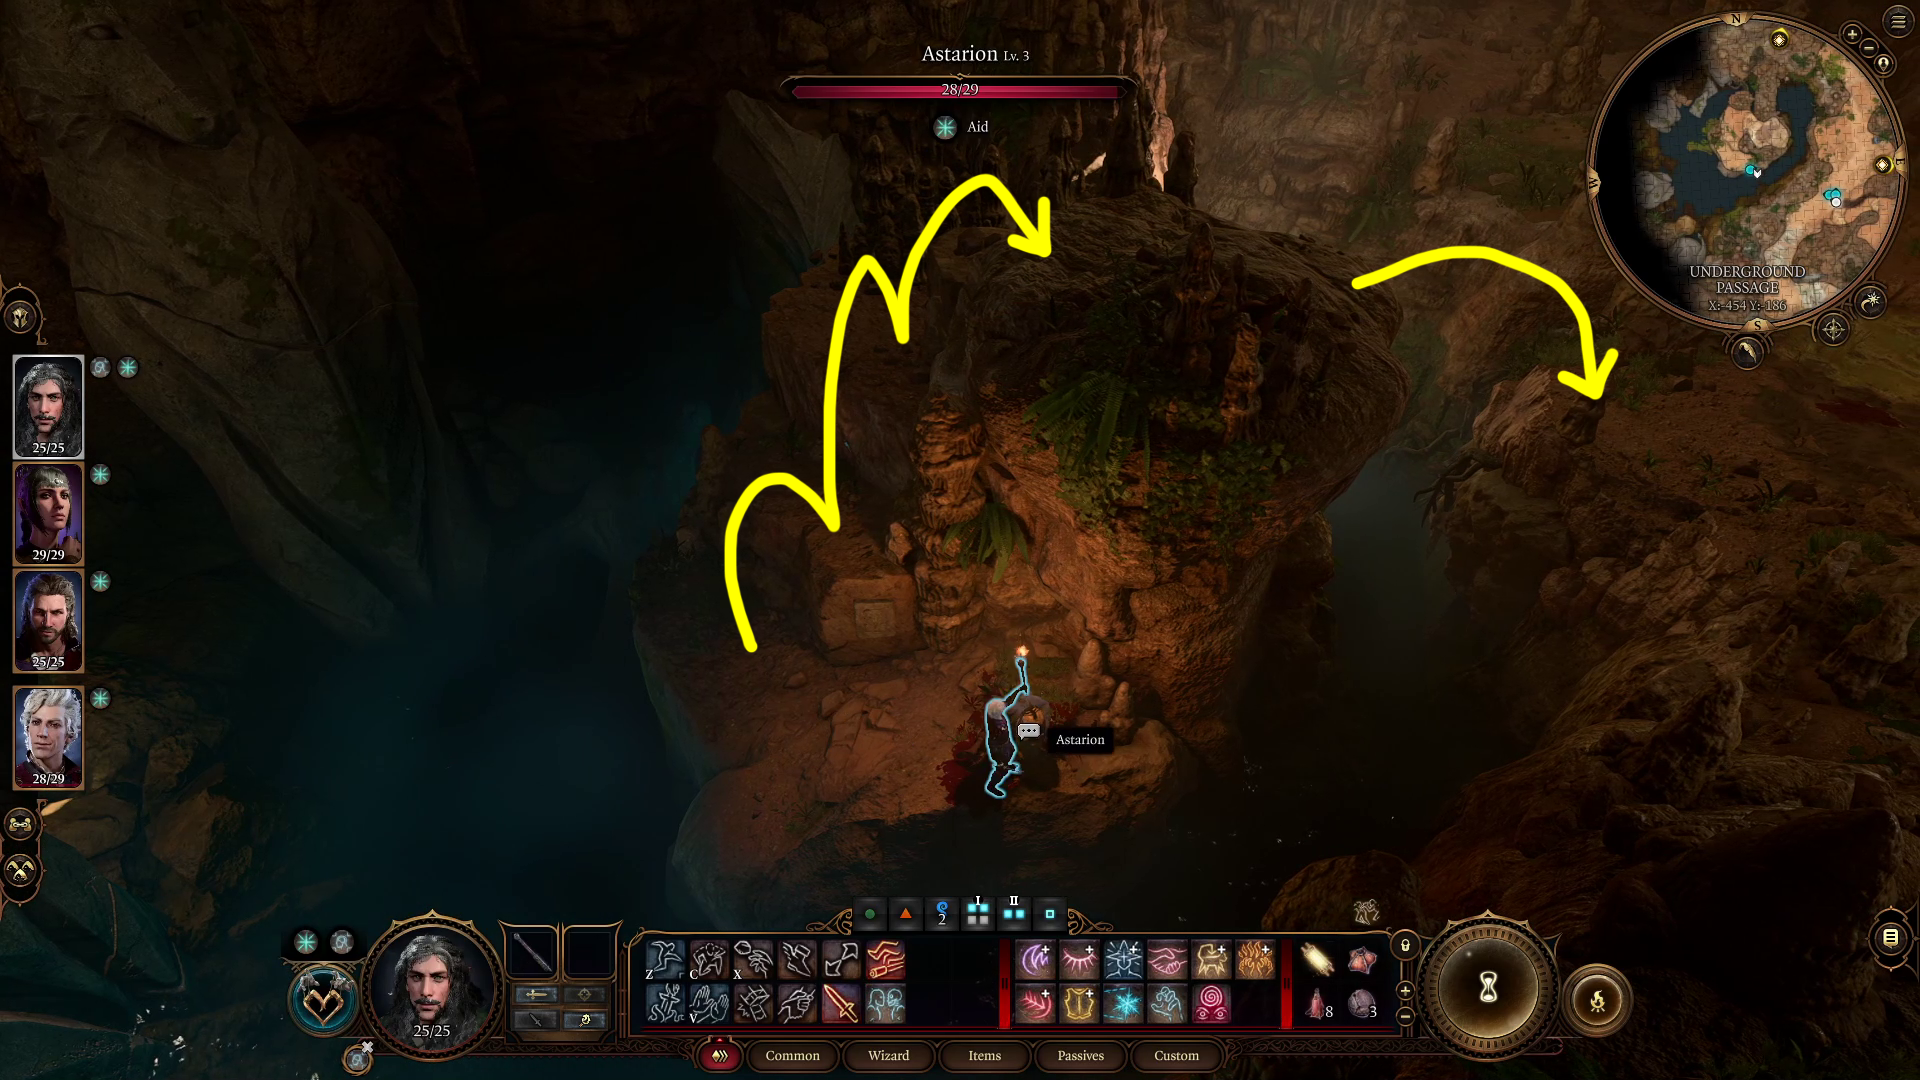
After he runs off, deactivate the other two traps either via sneaking or Mage Hand, then use your character with the highest strength to jump to the rock outcropping in the water. Near the button is a corpse you can loot for the Charred Key — corpse looted, you can use a series of jumps to reunite your jumper with your party (1). Then follow the path as it winds to the southeast. It will fork here, with the right-hand path taking you outside the Emerald Grove, and the left path leading to a secret door to the Grove’s inner sanctum.
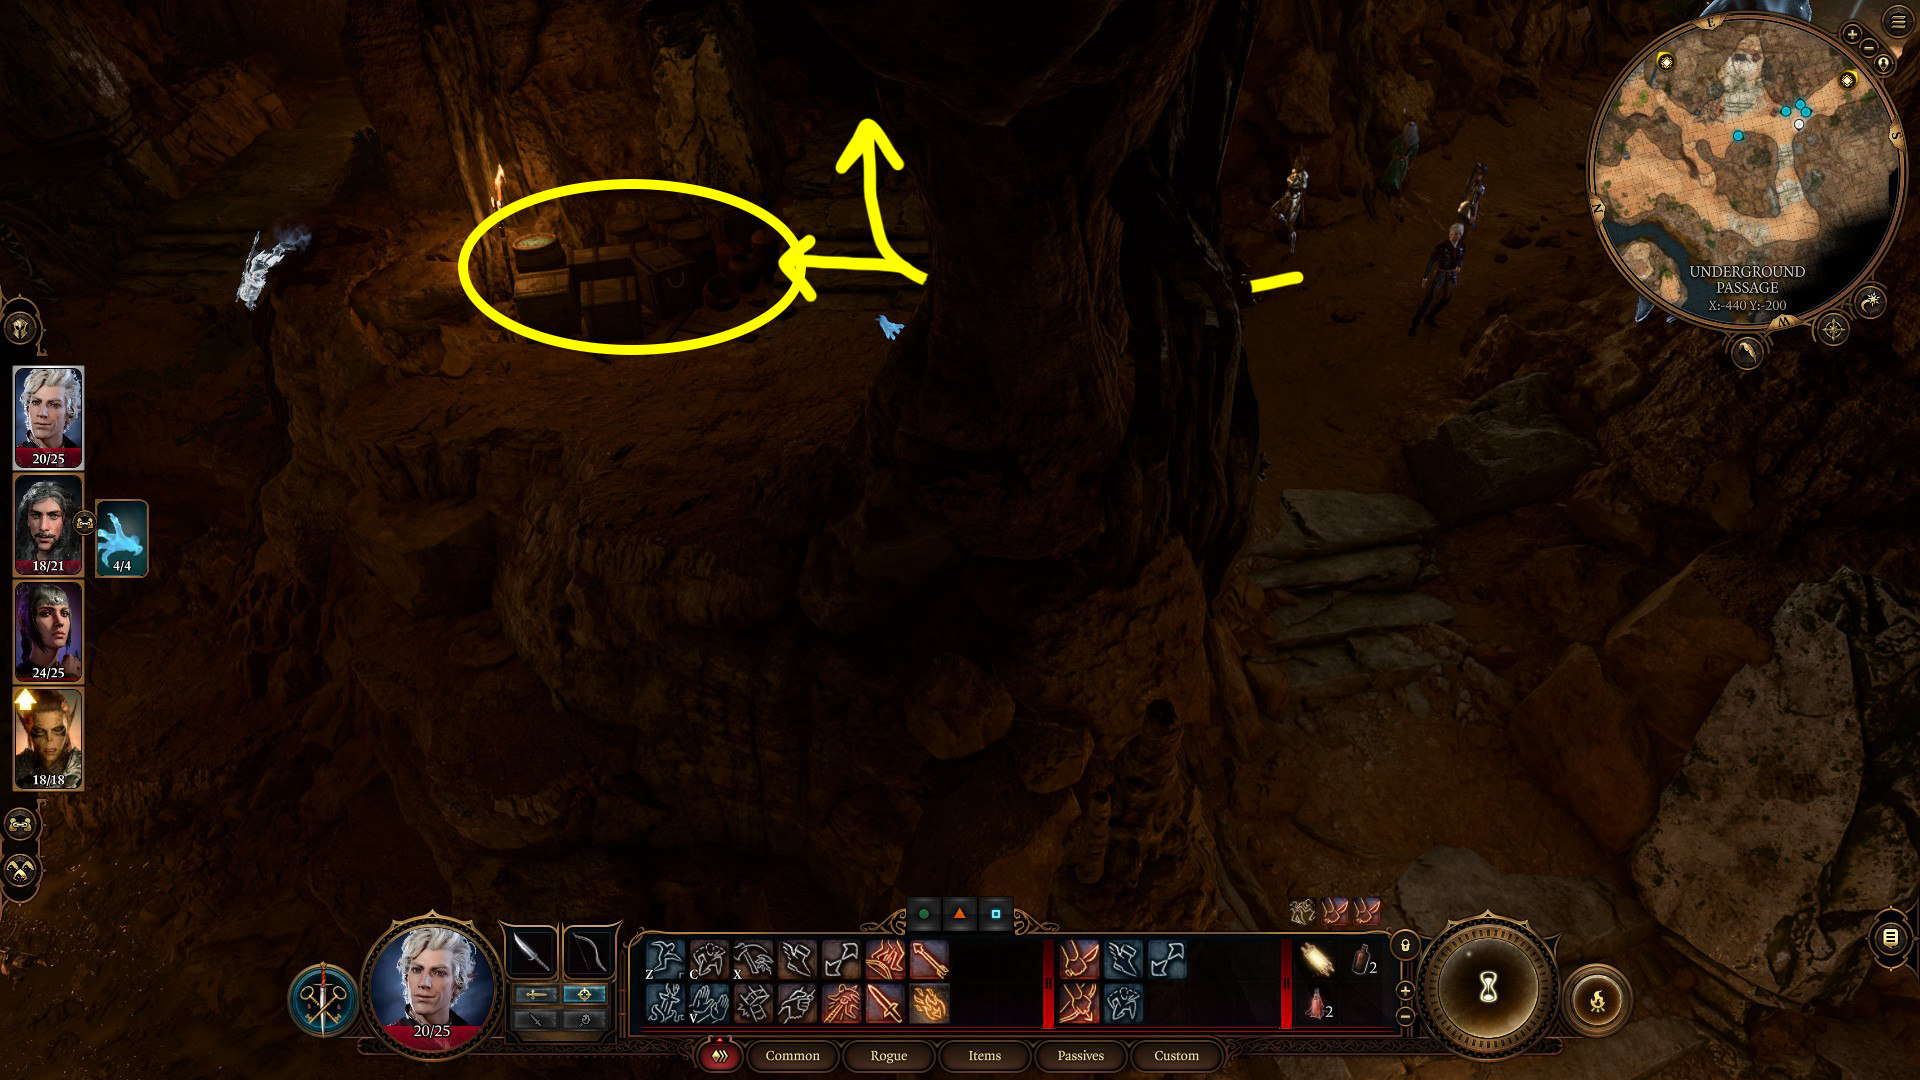
For now, all we really care about is the chest in the dark alcove, and the crates and barrels (2)! The Charred Key you found will open the chest, in which you’ll find the Nature’s Snare quarterstaff. (If you can’t see the chest, swap to a character with darkvision like Astarion, or else activate a light source.) There are also consumables in the nearby barrels and crates. Once you’ve looted all the crates and barrels, and the chest, retrace your steps and exit the Underground Passage via the same Stone Door you entered from.
12The path to the southeast will take you outside of the grove — useful if you’re trying to get Sazza out safely
Pandirna
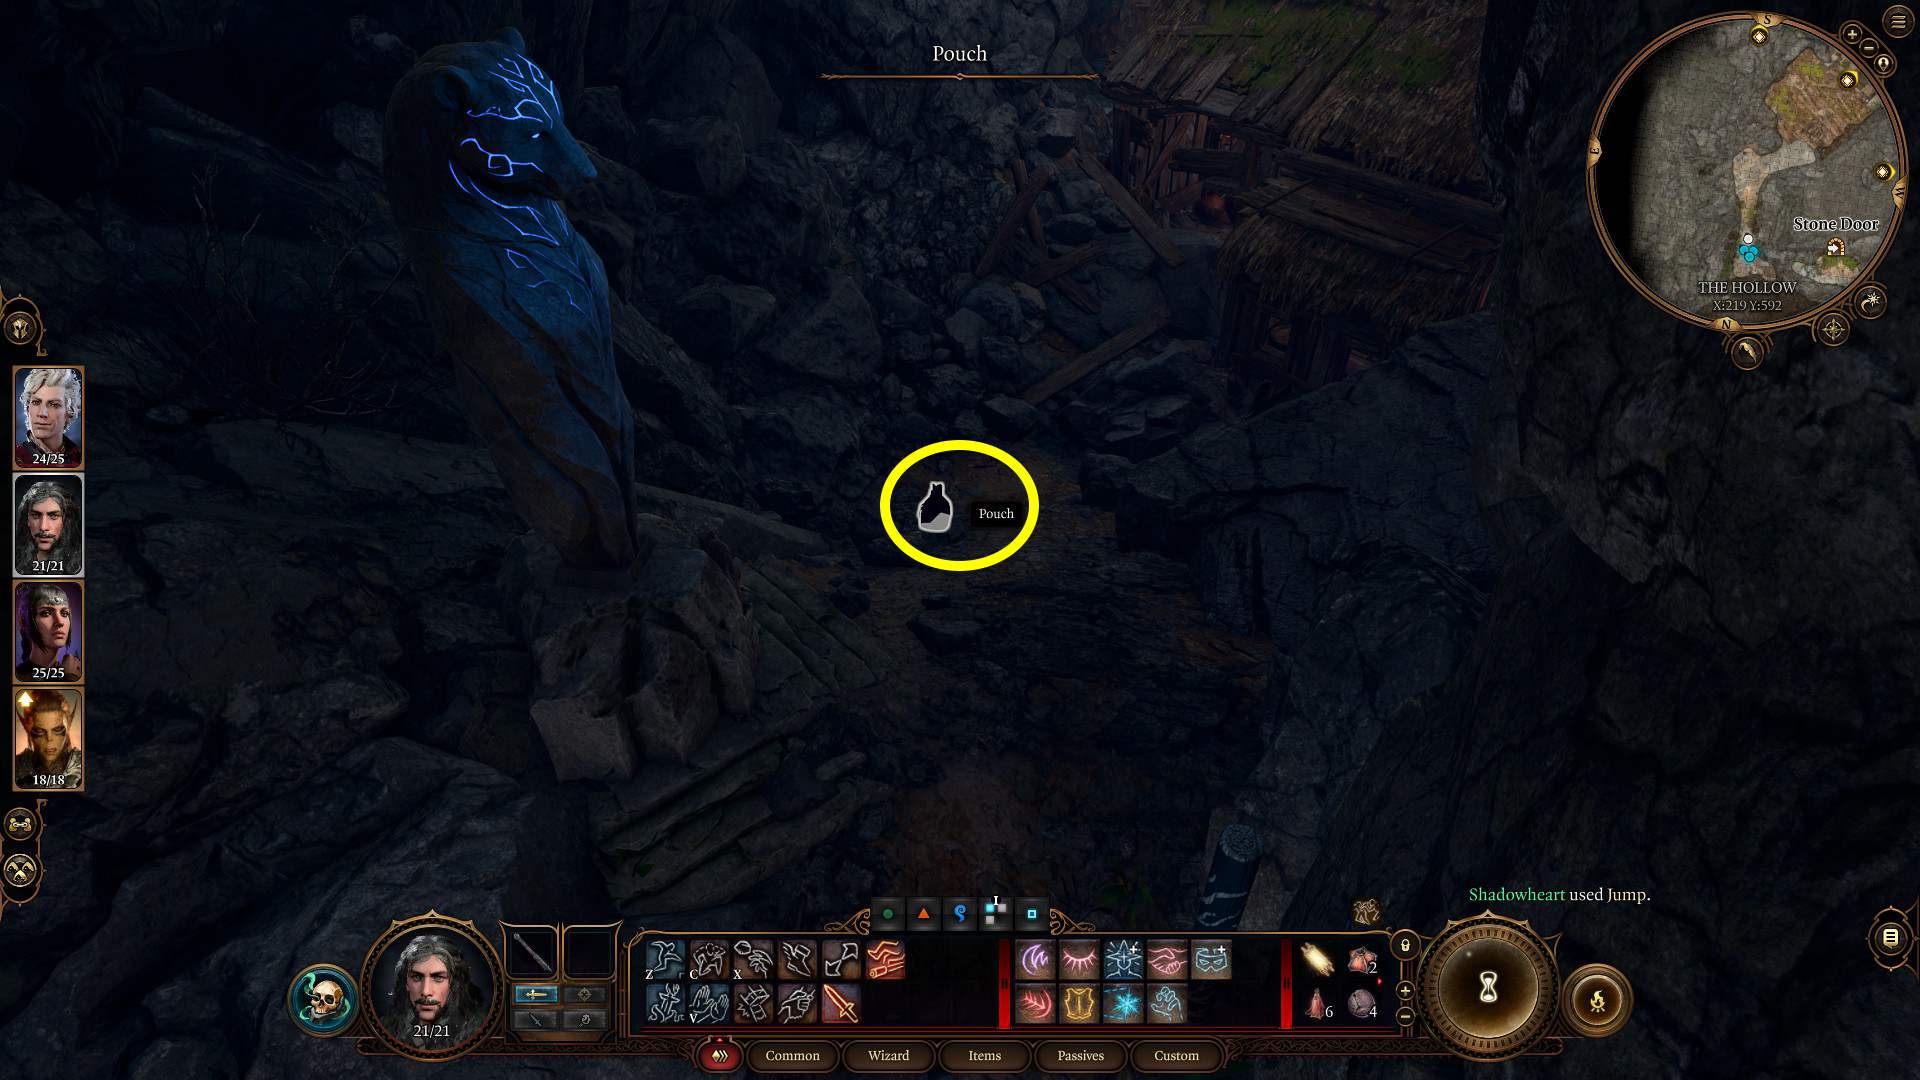
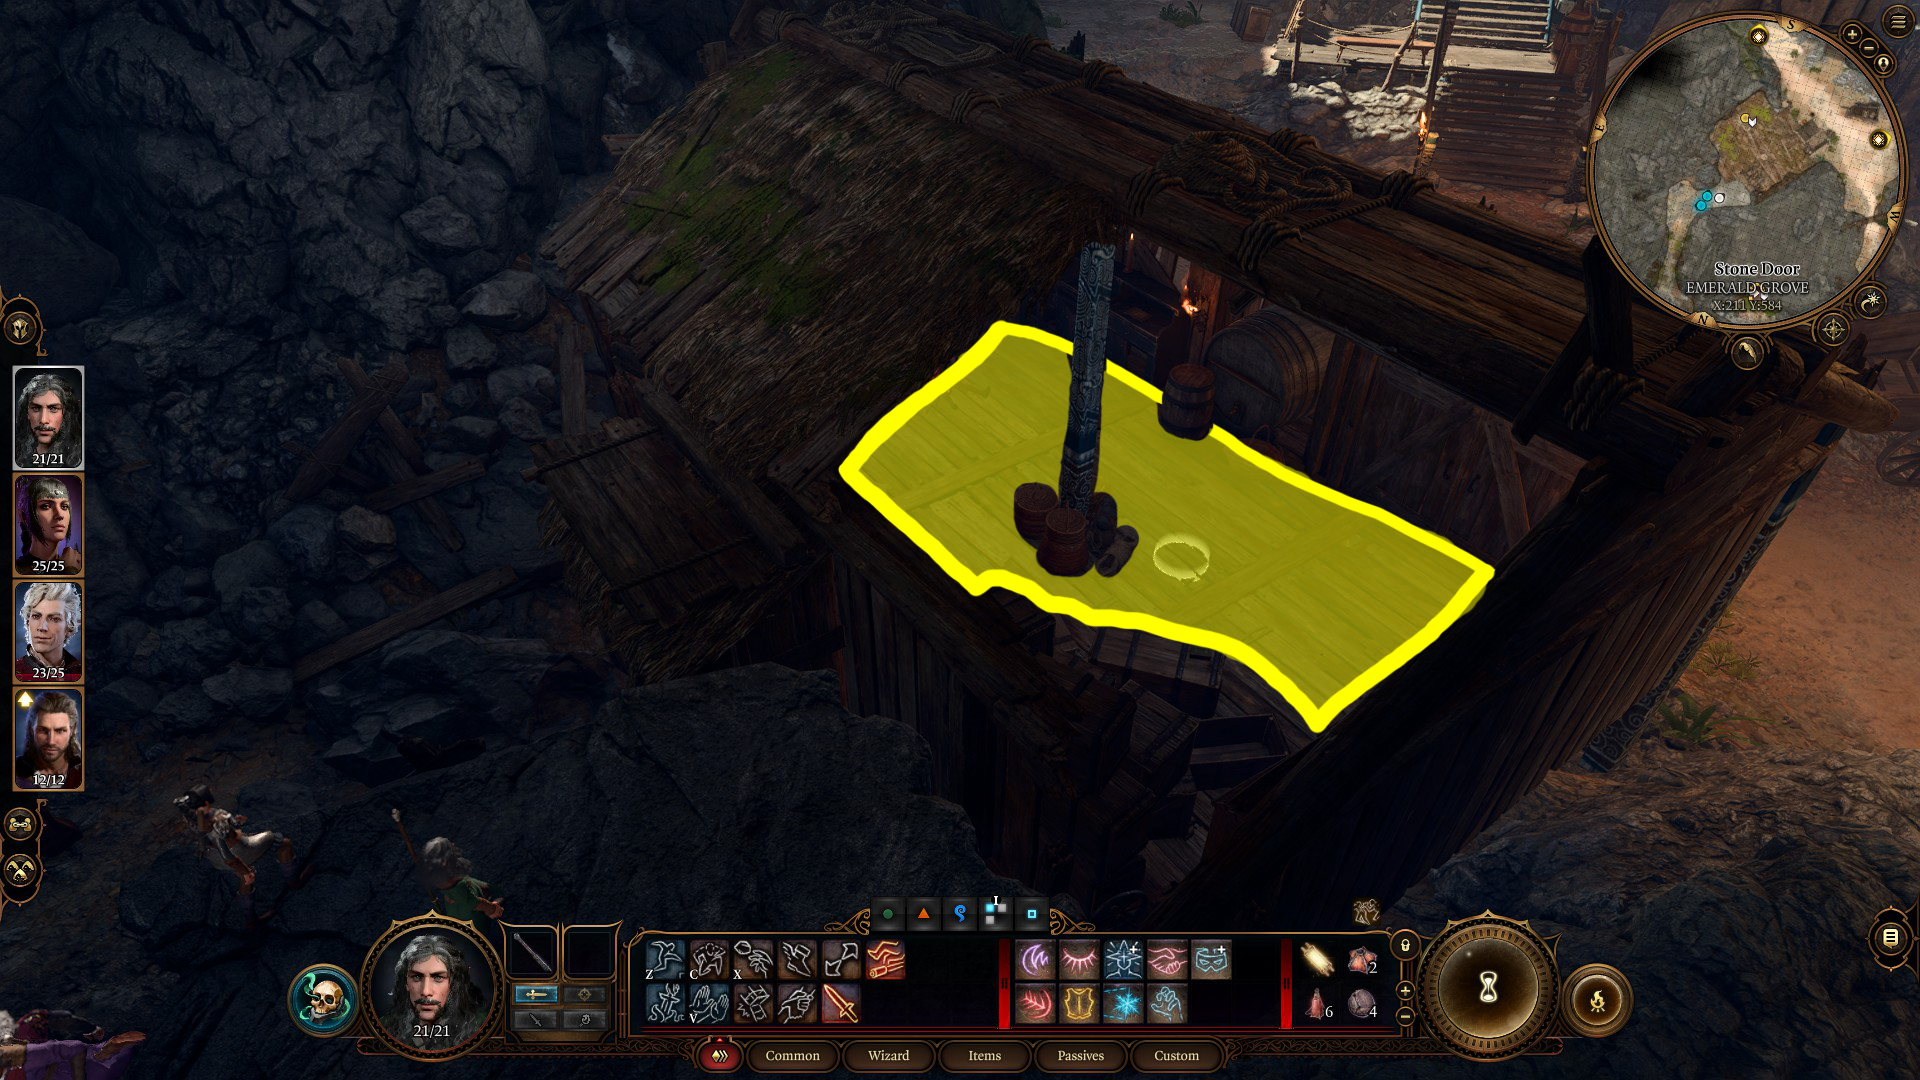
Go east and jump to the remains of the wooden bridge (1), then continue south. You’ll see a pouch on the ground (2) with a decent amount of gold, and then you can pan up and click anywhere on the floor of the nearby structure (3) — your party will clamber their way inside, and a conversation will begin.
123
Unlike a lot of your previous conversations, this one tends to be uni-directional, so you may want to quick save before you make any choices. If you want to be able to easily loot the best goodies in this room, choose the Deception dialog option; passing the Ability Check will allow you to loot the chest Pandirna is sitting against, which will yield the key to the nearby Alchemist’s Cabinet. You can also rob Pandirna of her personal belongings by choosing the “She can’t come after you. Take her bag and leave.” dialog option, netting you some gold and an alchemy ingredient. Although this will make her hostile, and she may call for the guards, they tend to not be close enough for this to matter. The containers in the room have plenty of food and other loot, so search all of them.
Wyll & Misc Tieflings
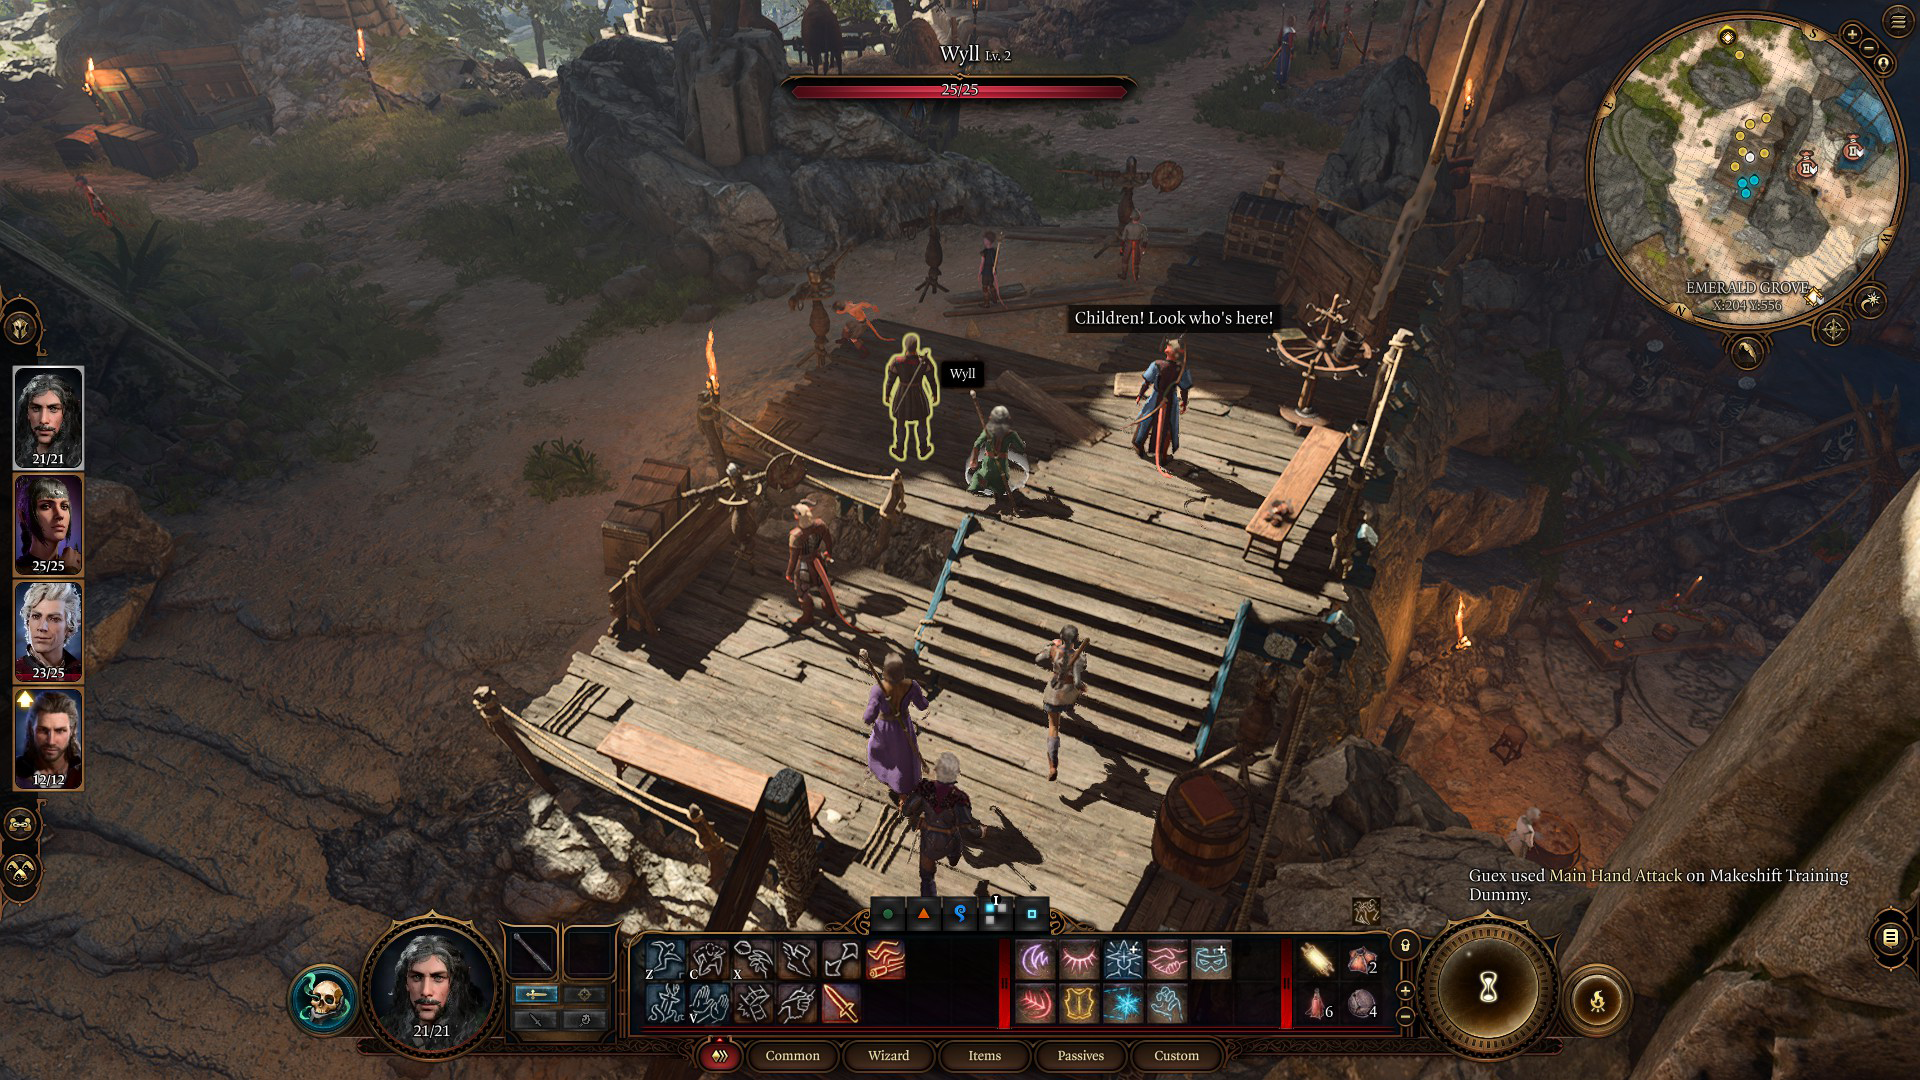
Now you can retrace your steps back past Sazza’s cage, or you can go through the door — doing so will require lockpicking it or breaking it down with attacks (the latter also potentially drawing the ire of guards). Either way, you’ll want to head south from the doorway of Pandira’s little structure, where you’ll find Wyll instructing some young tieflings (1). Speak with him, and choose one of the dialog options that involves teaming up with him. (At this point, you can choose to embark on the first part of Wyll’s companion quest The Blade of Frontiers).
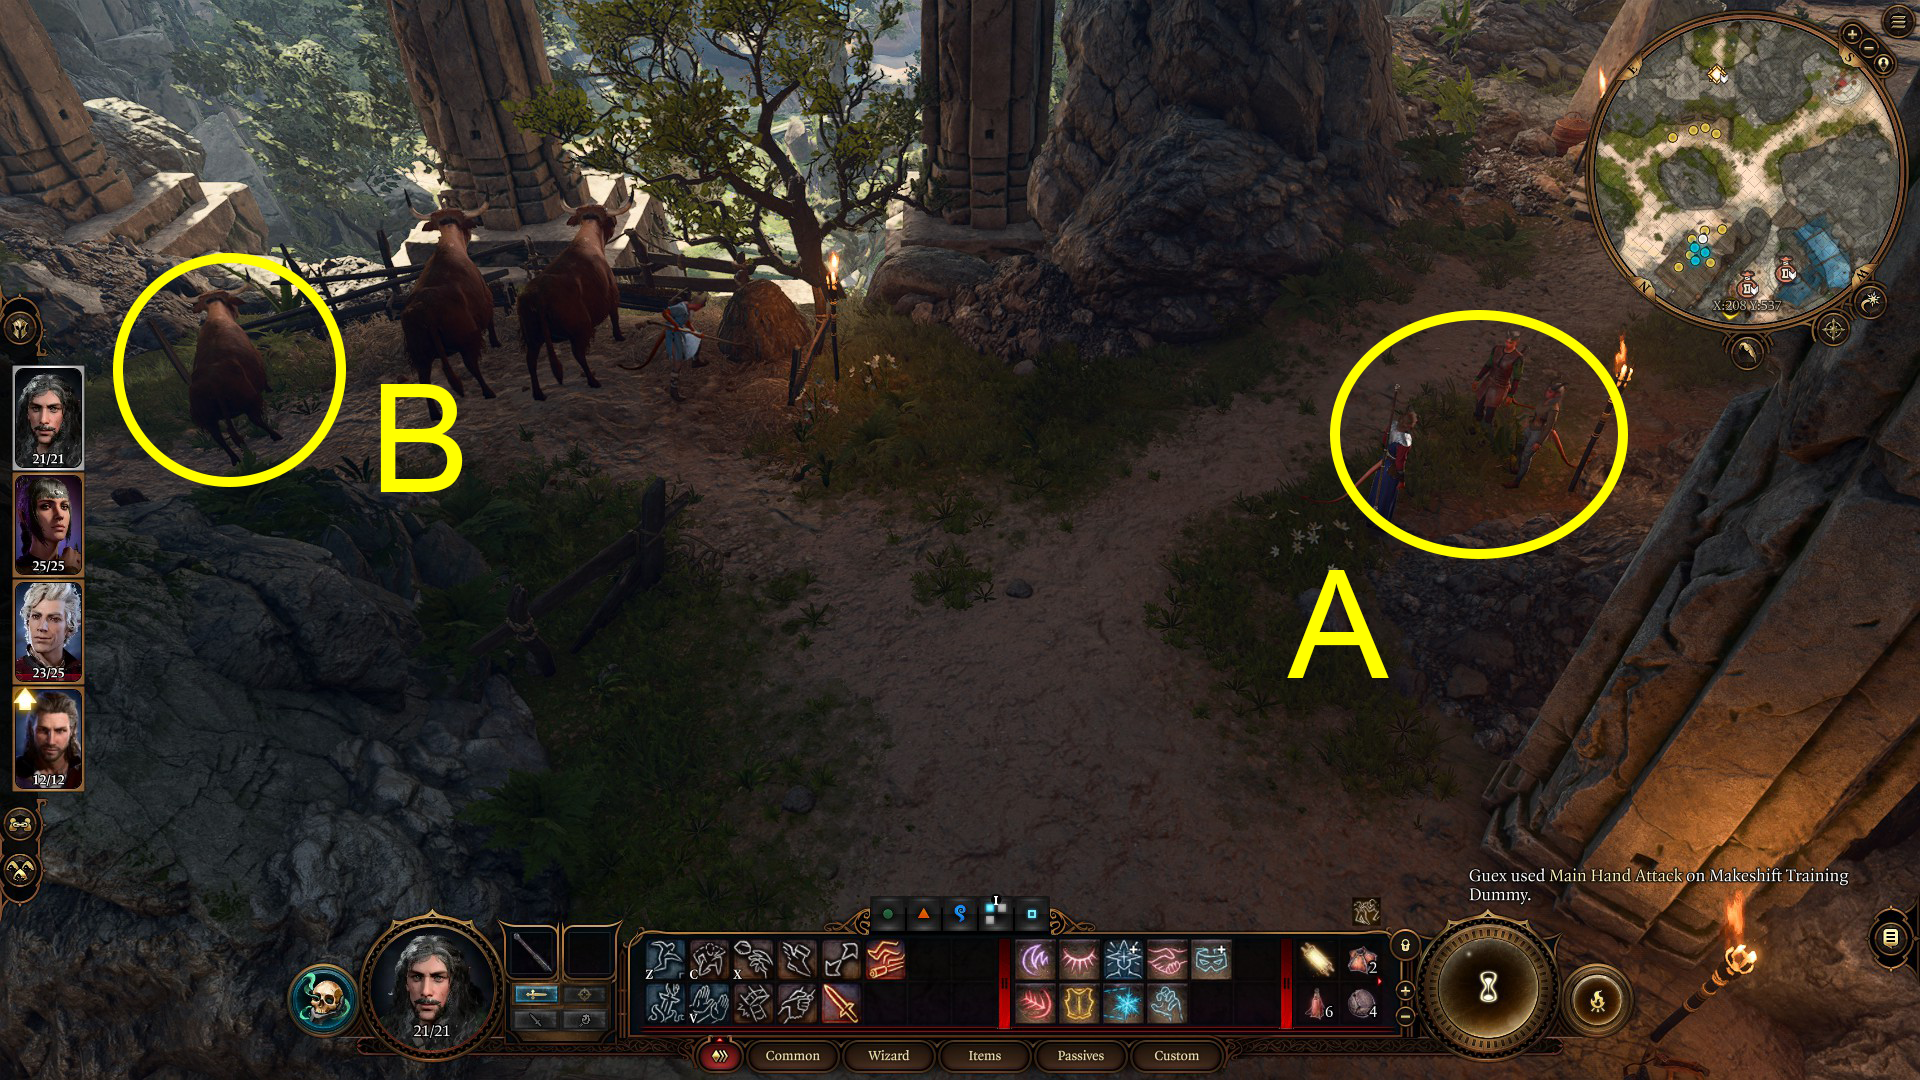
South of where you found Wyll is a group of tieflings (2a); you can convince them to stay and fight, but we aren’t sure what impact that has (if any). Conversely, telling them to get out while they can will earn you approval with Shadowheart.
The Strange Ox is also nearby (2b) — slaughtering it will allow you to pick up the Shapeshifter’s Boon Ring. Offering 1d4 bonus to all checks while shapeshifted, it’s quite useful if you plan on being polymorphed a lot. Nearby tieflings will aggro if you attack it — and it explodes in acid when it dies — but it’s a doable fight; easier still is waiting until you’ve resolved the conflict in the Grove, then returning when the place is empty to slaughter the Ox. Stand near the haystack before you move on — passing a passive Perception check will allow you to find some loot inside. Note that you’ll be able to speak more with the Ox, and learn more about its mysterious nature, in Act II (assuming you leave it alive for now).
12
Southeast of the oxen you’ll meet a tiefling boy named Doni. He’s guarding one of the entrances to the Tiefling Hideout (see below). Near Doni you’ll spot a cart with Metallic Gloves inside and a locked travel-worn chest on the ground next to it. The chest only contains a small amount of gold, so don’t waste any Thieves’ Tools on it.
Further east you’ll find Mattis, whom you can gain Inspiration from if you’ve got the Urchin background (you’ll need to say “Nice trick” and then succeed at a Sleight of Hand check). Simply taking the ring from him will earn you approval from Astarion. Succeeding at a Perception check while looking at Mattis’ wares will allow you to catch his sister Silfy trying to rob you. If you fail to detect Silfy but realize you were robbed, then you’ll trigger the quest Find Your Belongings.
Tiefling Hideout
The Tiefling Hideout is located beneath Mattis’ shop. There are two ways to enter it:
A hole at the bottom of the ladder behind Mattis. You’ll need to beat a passive DC-5 Perception check to spot it. Only small creatures — like tiefling children — can use it.
A concealed hatch to the west of Mattis where Doni is stationed. You’ll have to detect this entrance as well, but you’ll only be able to do it through dialogue with Doni. When you first talk to him, all he’ll do is stare over your shoulder. When you turn around to see what he’s looking at, he’ll scamper through the hatch and disappear. If you pass a DC-10 Perception check and a DC-10 Investigation check, then you’ll spot the hatch.
Otherwise, if you return to the hatch after taking a Long Rest at your camp, then Doni will be back at his post, and you’ll be able to ask him where he went. If you pass a DC-10 Insight check, and then pass a DC-10 Persuasion check or a DC-10 Intelligence (Detect Thoughts) check, or pay him 10 gold, then he’ll show you the hatch.
If you fail at both of the above, then you’ll have to rescue Mirkon from the harpies during the quest Investigate the Beach. At the end, he’ll tell you how to deal with Doni — just tell him that you want to see the “Dragon’s Lair.” When you do, he’ll show you the hatch.
Inside the hideout, you’ll meet Mol, the leader of the tiefling children. To avoid major headaches later, you should only enter the hideout and talk to her if you’ve done something nice for the children — like rescuing Mirkon during the quest Investigate the Beach, or saving Arabella during the quest Save Arabella, or being nice to Silfy if you catch her trying to rob you — or if you’re working on the quest Find Your Belongings. If Mol likes you, then she’ll act as a shopkeeper, and she’ll give you the quest Steal the Sacred Idol. But if she doesn’t like you, or if she doesn’t know who you are, then she’ll demand that you leave, and if you don’t, then she’ll race up to the training grounds and tell everyone that you’ve been threatening children, which will get you arrested.
Note: If you ask Mol why she’s running schemes and tell her you want to invest, then you’ll gain Inspiration if you have a character with the Urchin background.
Arabella, Kagha, & The Ritual
From where you met Mattis, head down the nearby stairs that lead southeast. Once you get far enough down the stairs, you’ll witness a confrontation between some tieflings and druids. You can speak with the parents of Arabella when it ends, but this isn’t necessary — instead, continue down the steps and attempt to go past the druids. They’ll stop you, but after you pick a few dialog options, you’ll be let through and the conversation will end. West of the guards is a Stone Door (1) — head through to find Kagha, who is waiting to speak with you.
Inside, continue down the stairs and a conversation will begin. You’ll have numerous chances to convince Kagha to spare Arabella, if you so choose. (If you do convince Kagha to be merciful, return to Arabella’s parents where you met them on the steps to collect your reward, Komira’s Locket.) You can then speak more with Kagha if you like. Next, speak with Rath, who should be sitting nearby. Offer to help him find Halsin, and you’ll begin the quest “Save the First Druid” (and earn a little XP). Then head northeast into the next room, where you’ll find Nettie.
There are a few options in terms of what to do about Kagha, the ritual, and the refugees — the end of this guide will go into more detail about the available paths.
Nettie
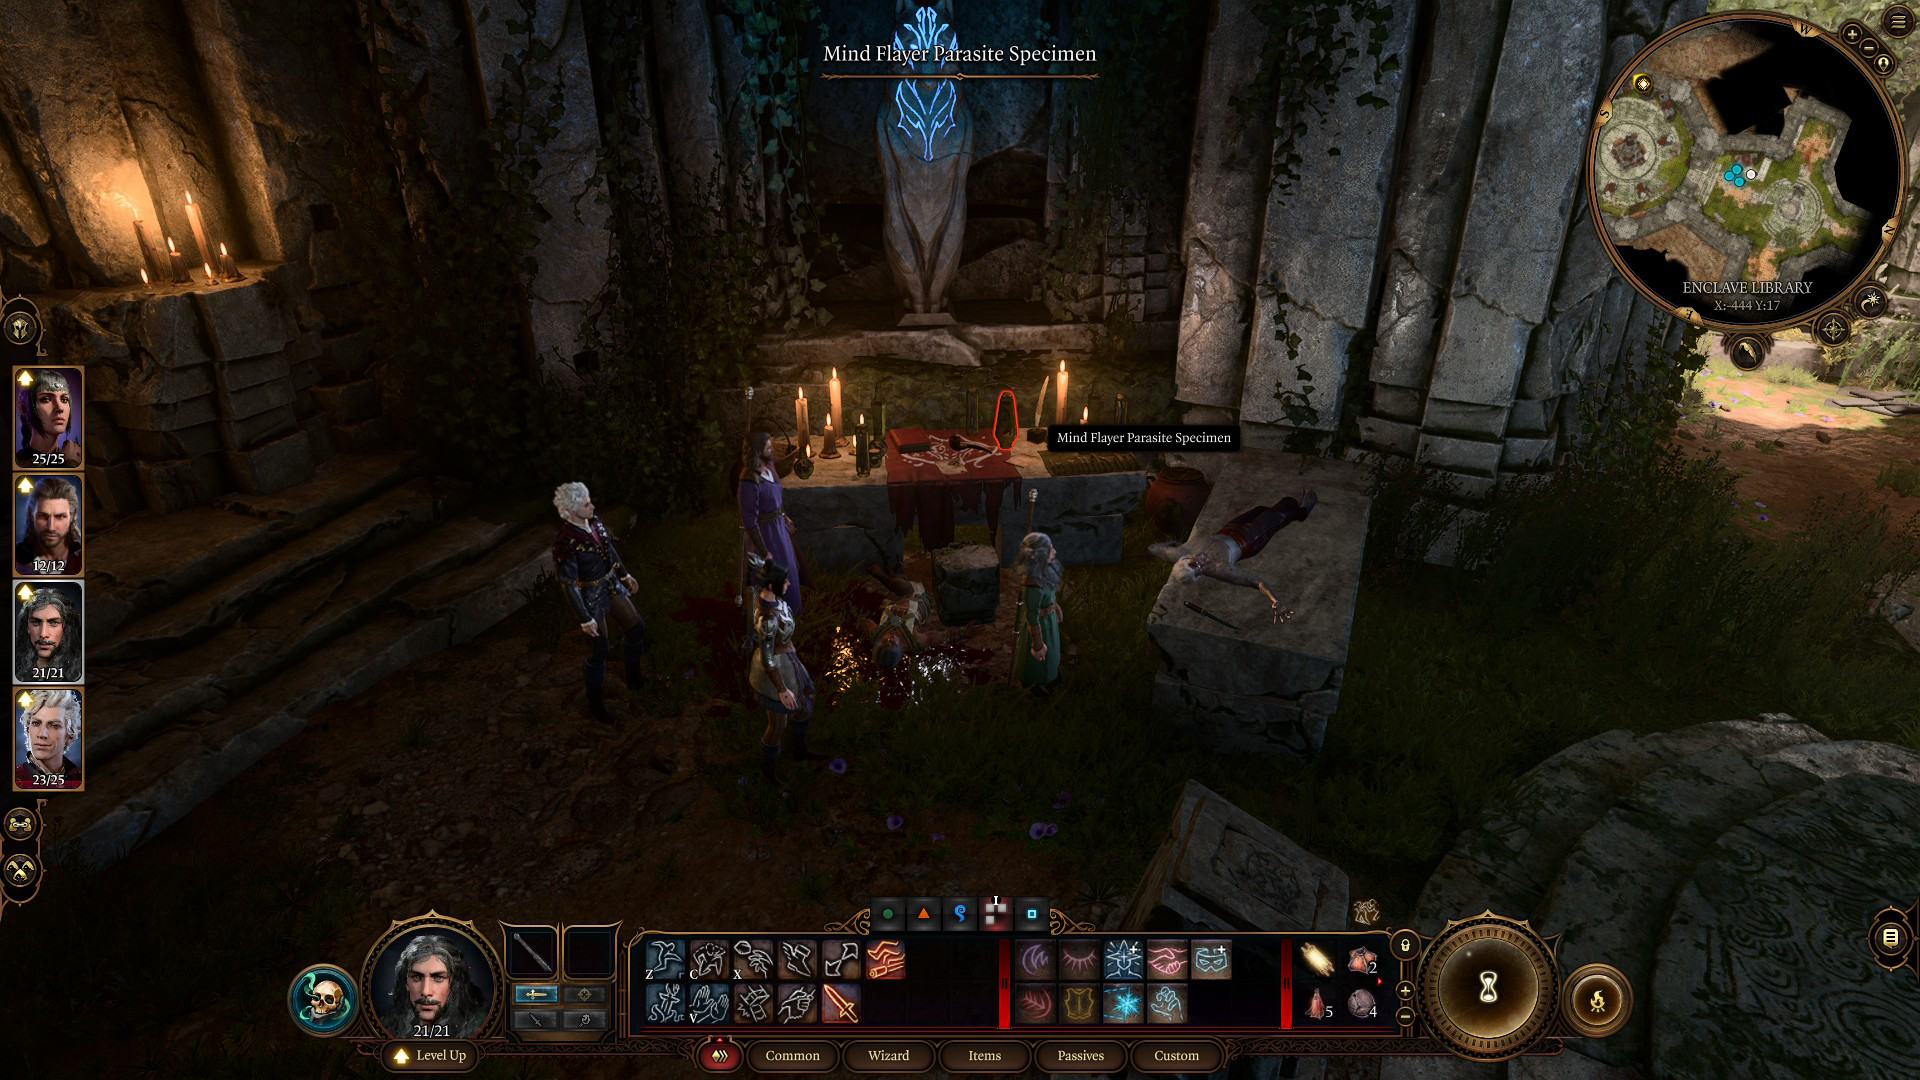
Nettie will ask what you need — choose the dialog option(s) in which to explain to her that you have a Mind Flayer tadpole in your head, and you need her help. She’ll tell you to follow her and open a secret door — stick very close to her and rush through the doorway she opens with your whole party, as otherwise you can end up separated. Another conversation will begin, and Nettie will ask more questions about your illness, and then try to poison you with a spiky branch.
Don’t let her touch you with it unless you want to have to either pass an Ability Check or pickpocket/kill her to get the antidote from her. If you pass a Perception check, you’ll be able to get her to admit she was trying to kill you, and instead she’ll offer you a bottle of poison and make you swear you’ll drink it if you feel yourself transforming — refusing will cause her to attack your party.
If you do end up getting locked in the room with Nettie, you’ll need to equip the Key of the Ancients in order to get the door to open — again, either pickpocketing or killing Nettie will be necessary. Players wanting to explore their Illithid powers should also make sure you snatch the Mindflayer Parasite Specimen from the table.
Head back into the main chamber, where you can inspect the plaques to learn a bit about local history and religion if you so choose. Then go back up the stairs and through the stone door you entered by. Make your way south around the sacred pool until you find the bear Tuffet sleeping on a lift. Interact with Tuffet using your character with the highest Wisdom and/or proficiency in Animal Handling, and convince Tuffet to move for some free XP (and the ability to take the lift later if you like). Then continue southeast from Tuffet, downhill (1), and make the jump indicated (2) to find a chest with some loot in it.
12
The Beach
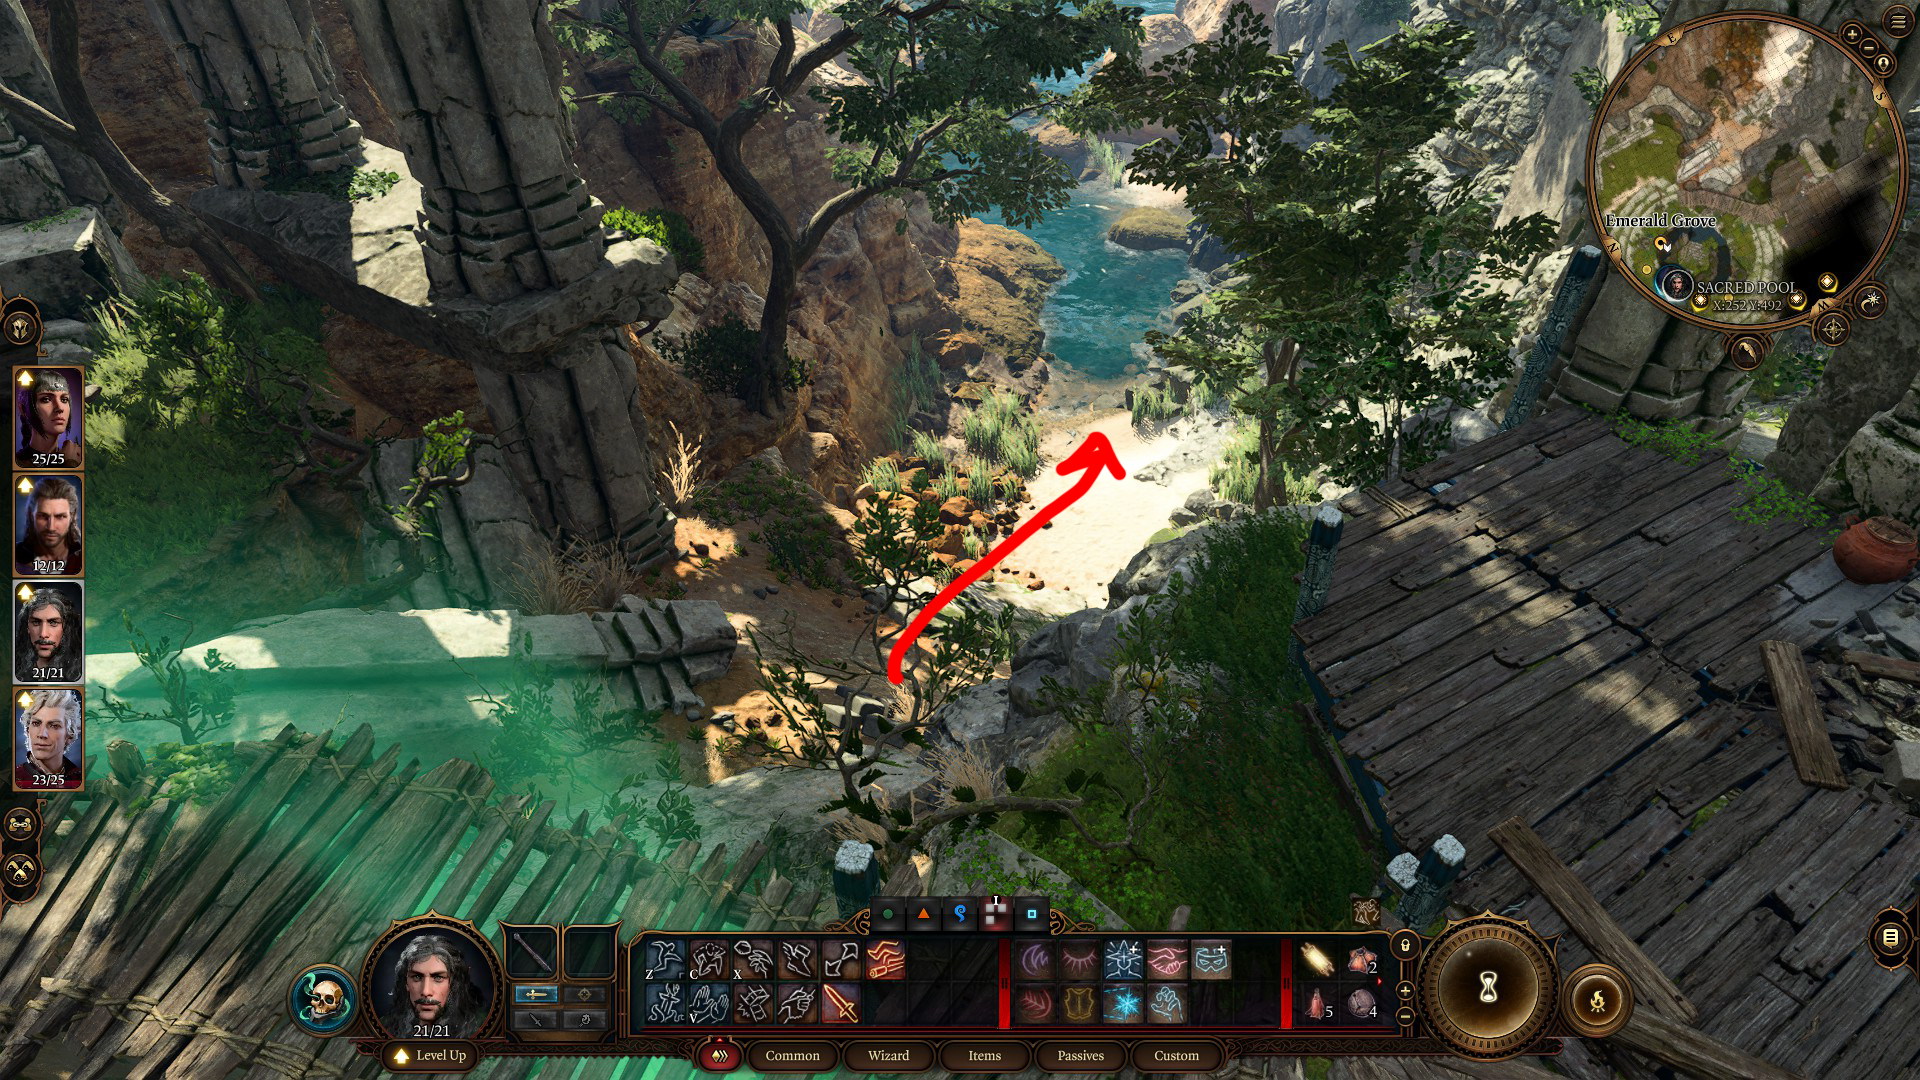
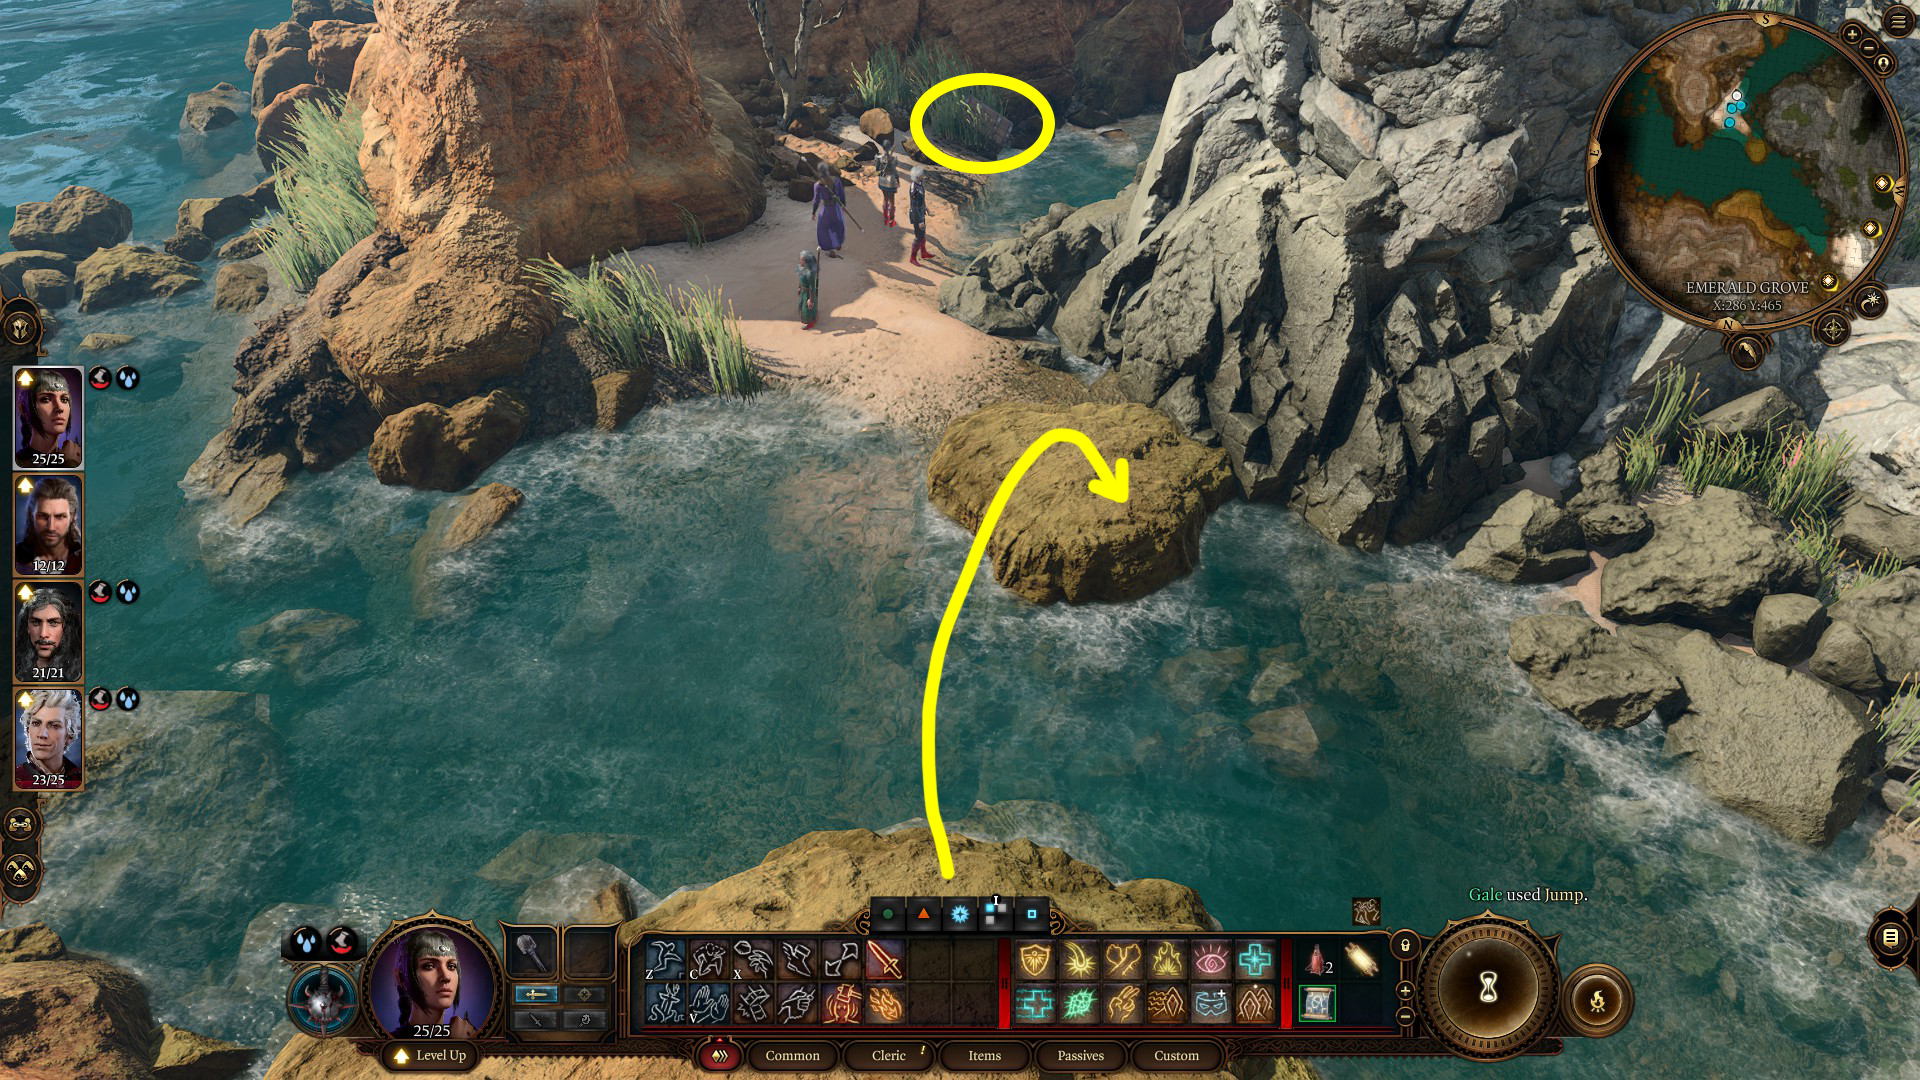
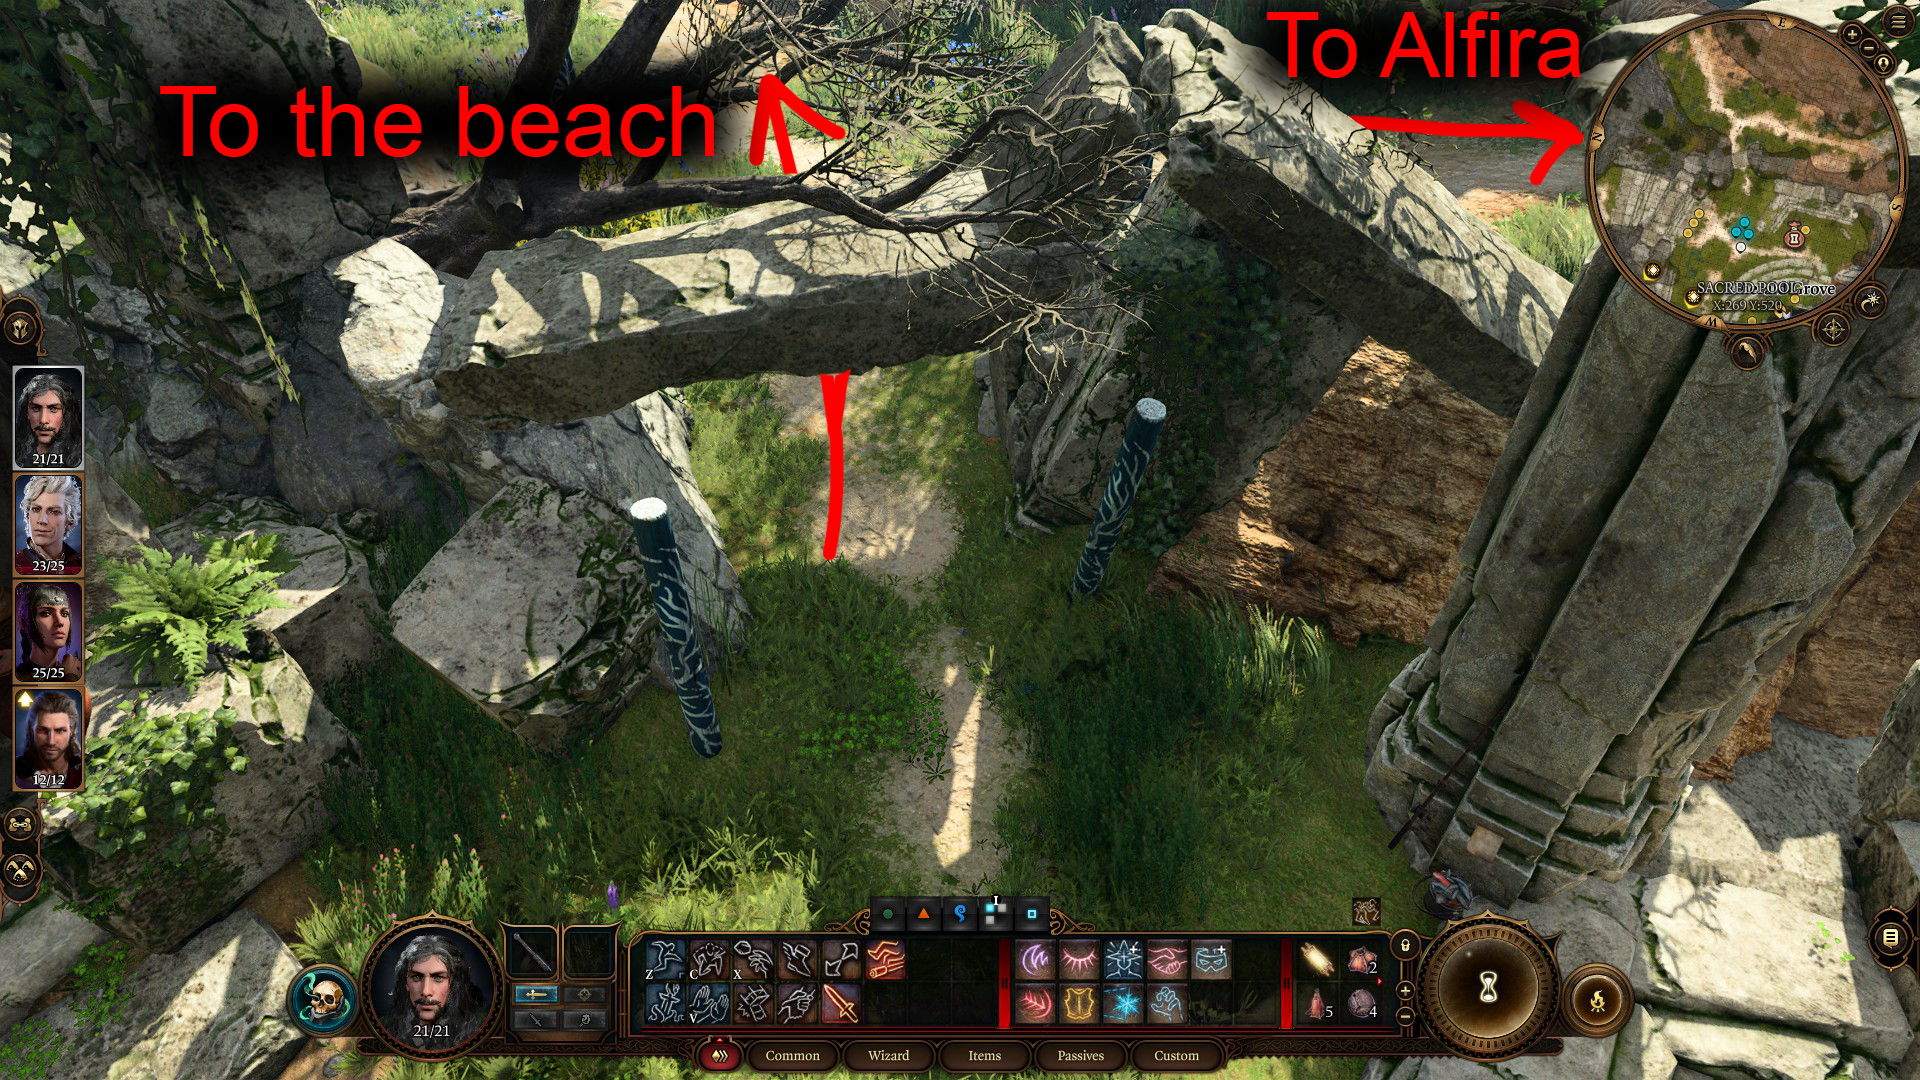
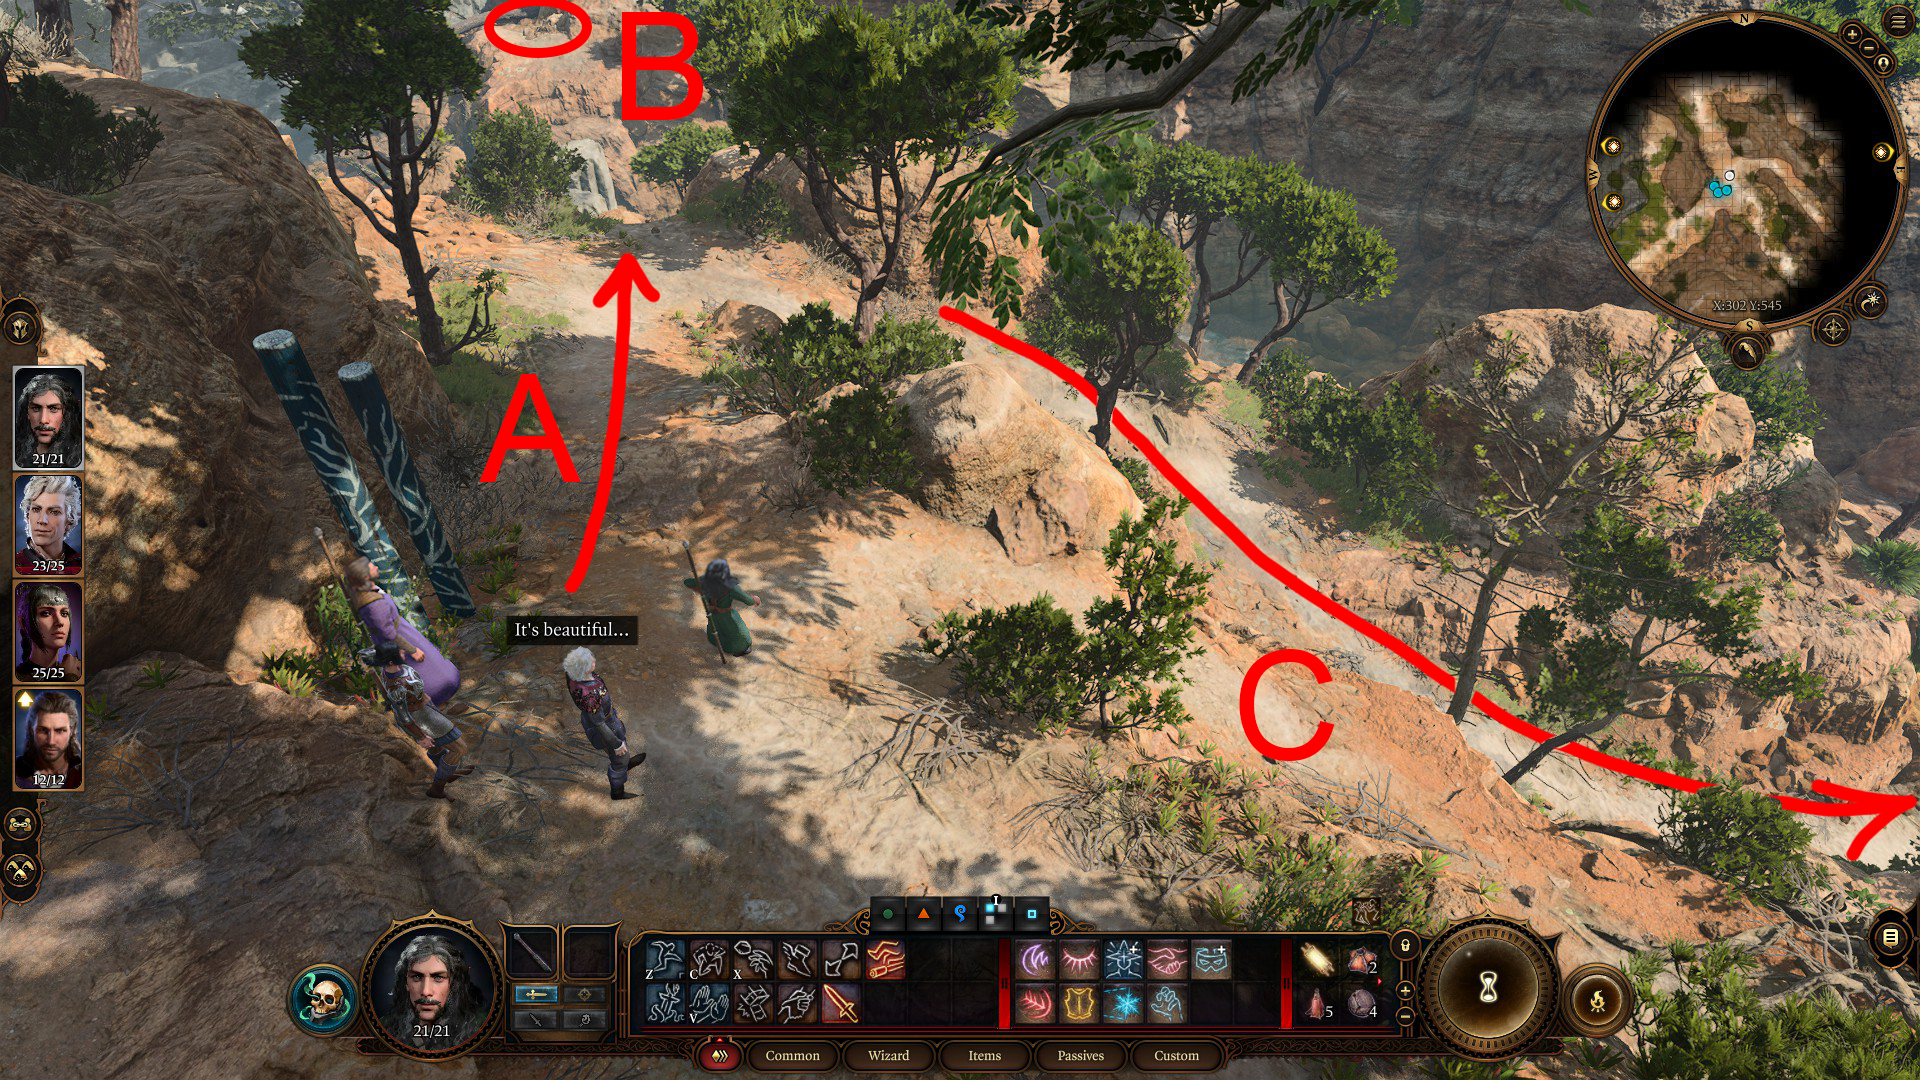
Head back up to where the druids are performing the ritual, then continue to the eastern side of the sacred pool area. Northeast of Volo (who is talking to a bear) is an exit (1). After going through the stone archway, you can go right and up the hill if you want to help Alfira work on her song — or just make fun of her. Going straight leads down to the beach. Once you do head to the beach, take a left at the blue poles (2a), then jump on the pillars to reach a mound of dirt with a chest you can dig up (2b), then hop back and continue downhill to the beach (2c).
12
You’ll find a tiefling boy, Mirkon, entranced by a mysterious song. It’s best to tell him to get away from the water and not attempt to listen to the song, as you can end up starting combat entranced by the harpies. Whatever you choose, combat will begin after a few dialog options. Upon defeating the harpies, Mirkon will return and you can speak to him, and then it’s time to collect our reward for being the hero!
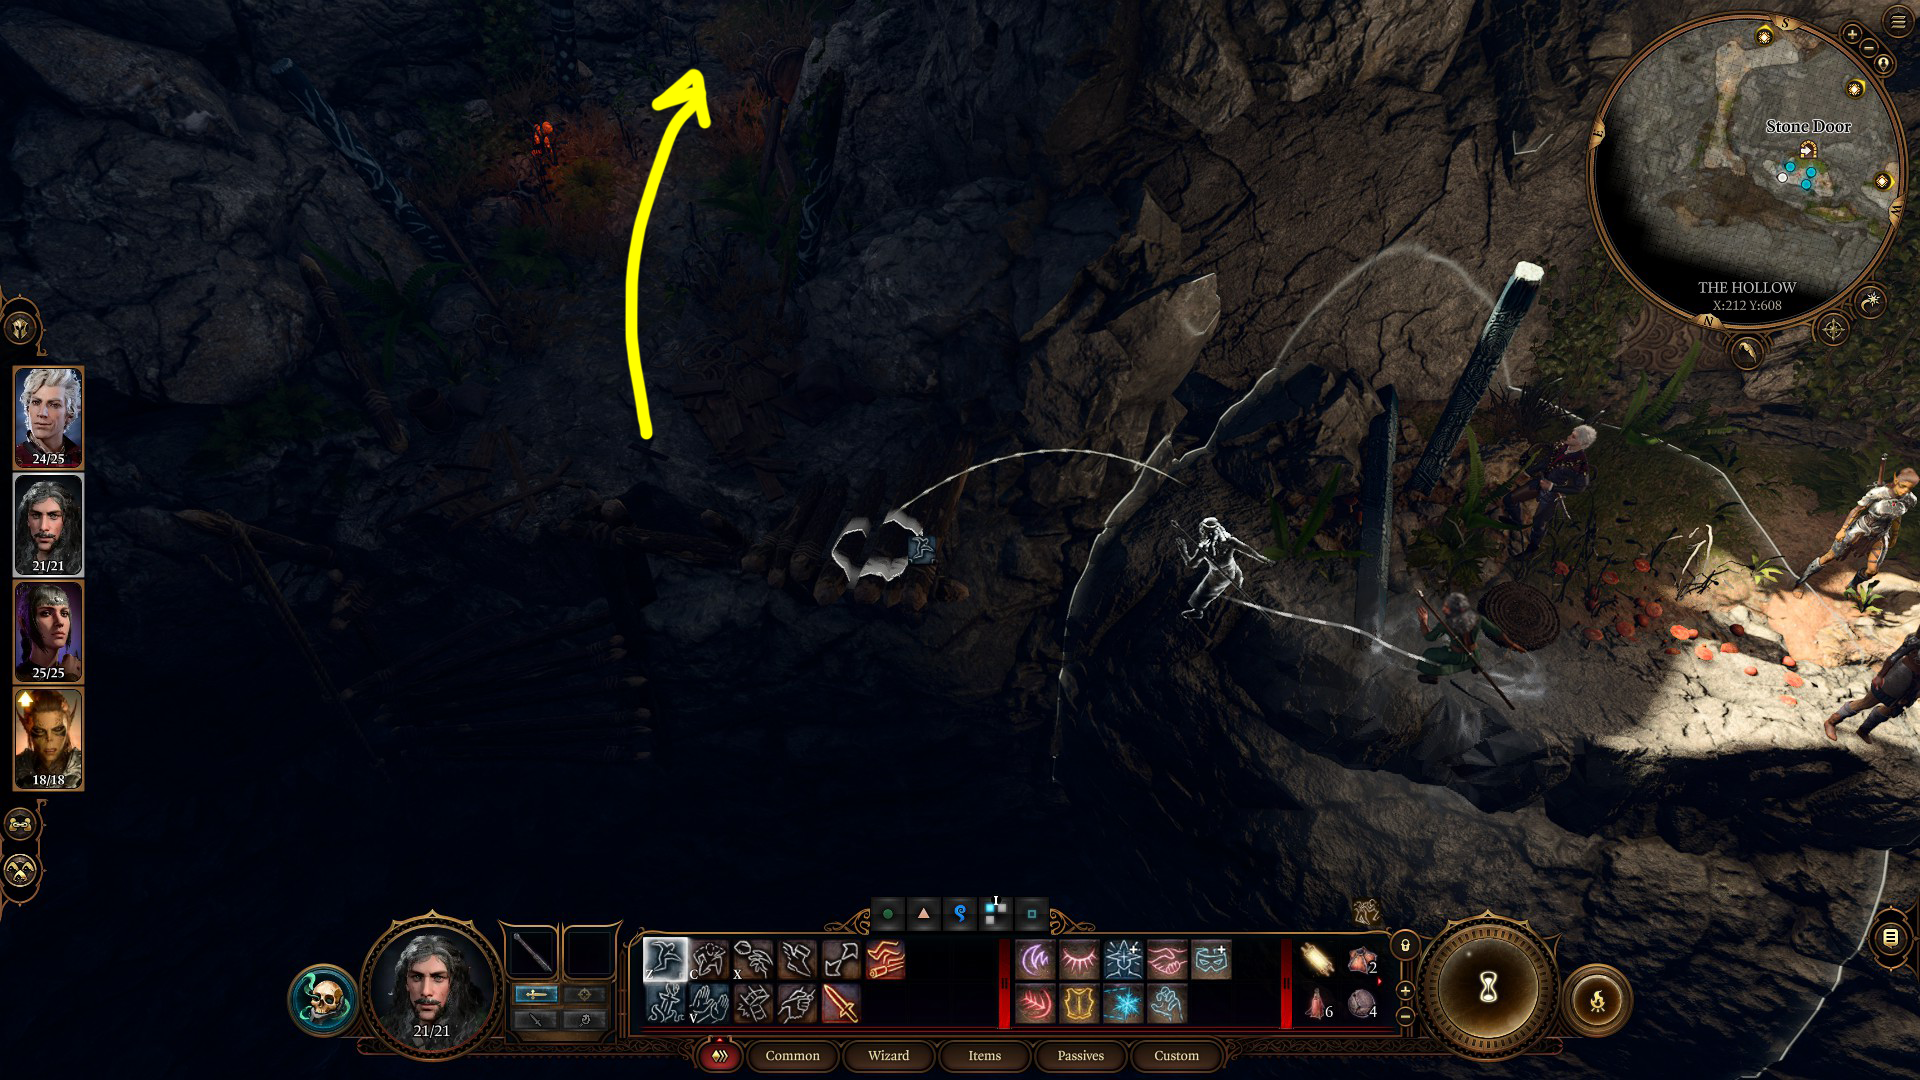
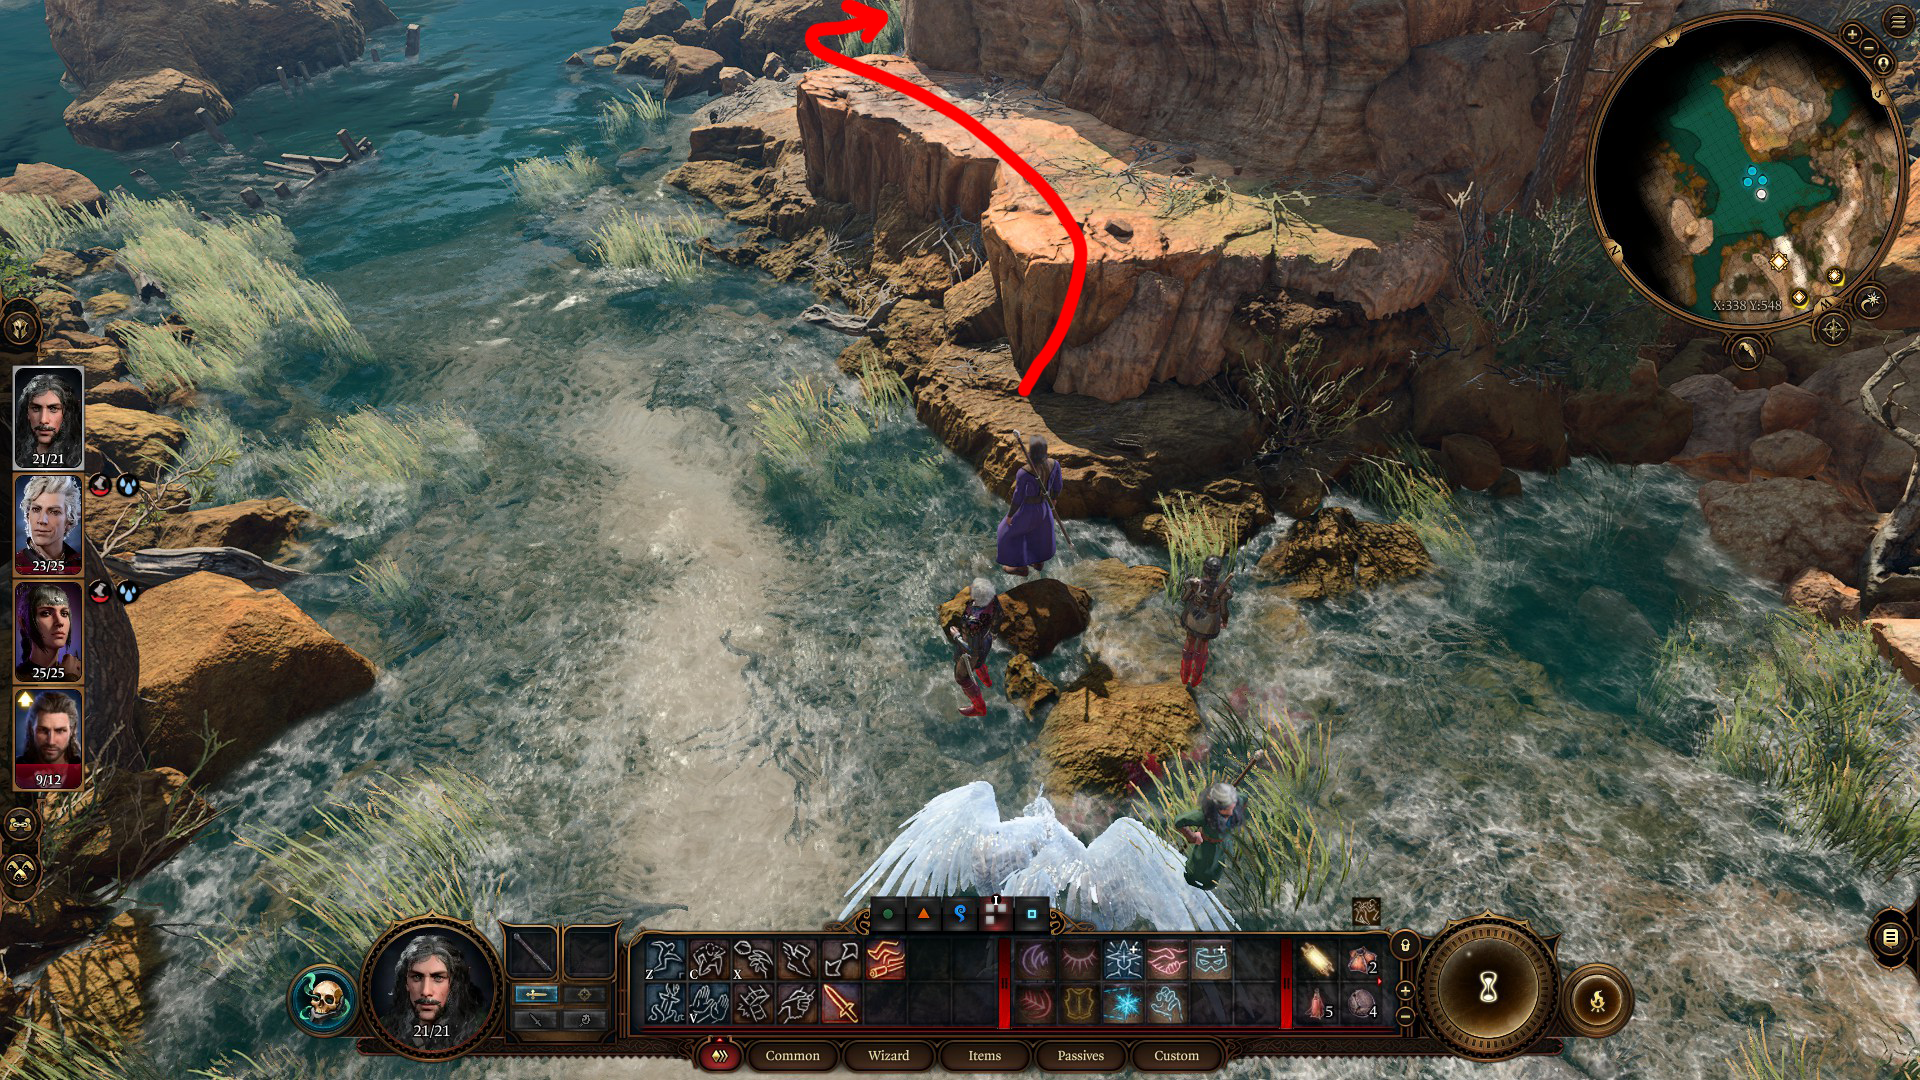
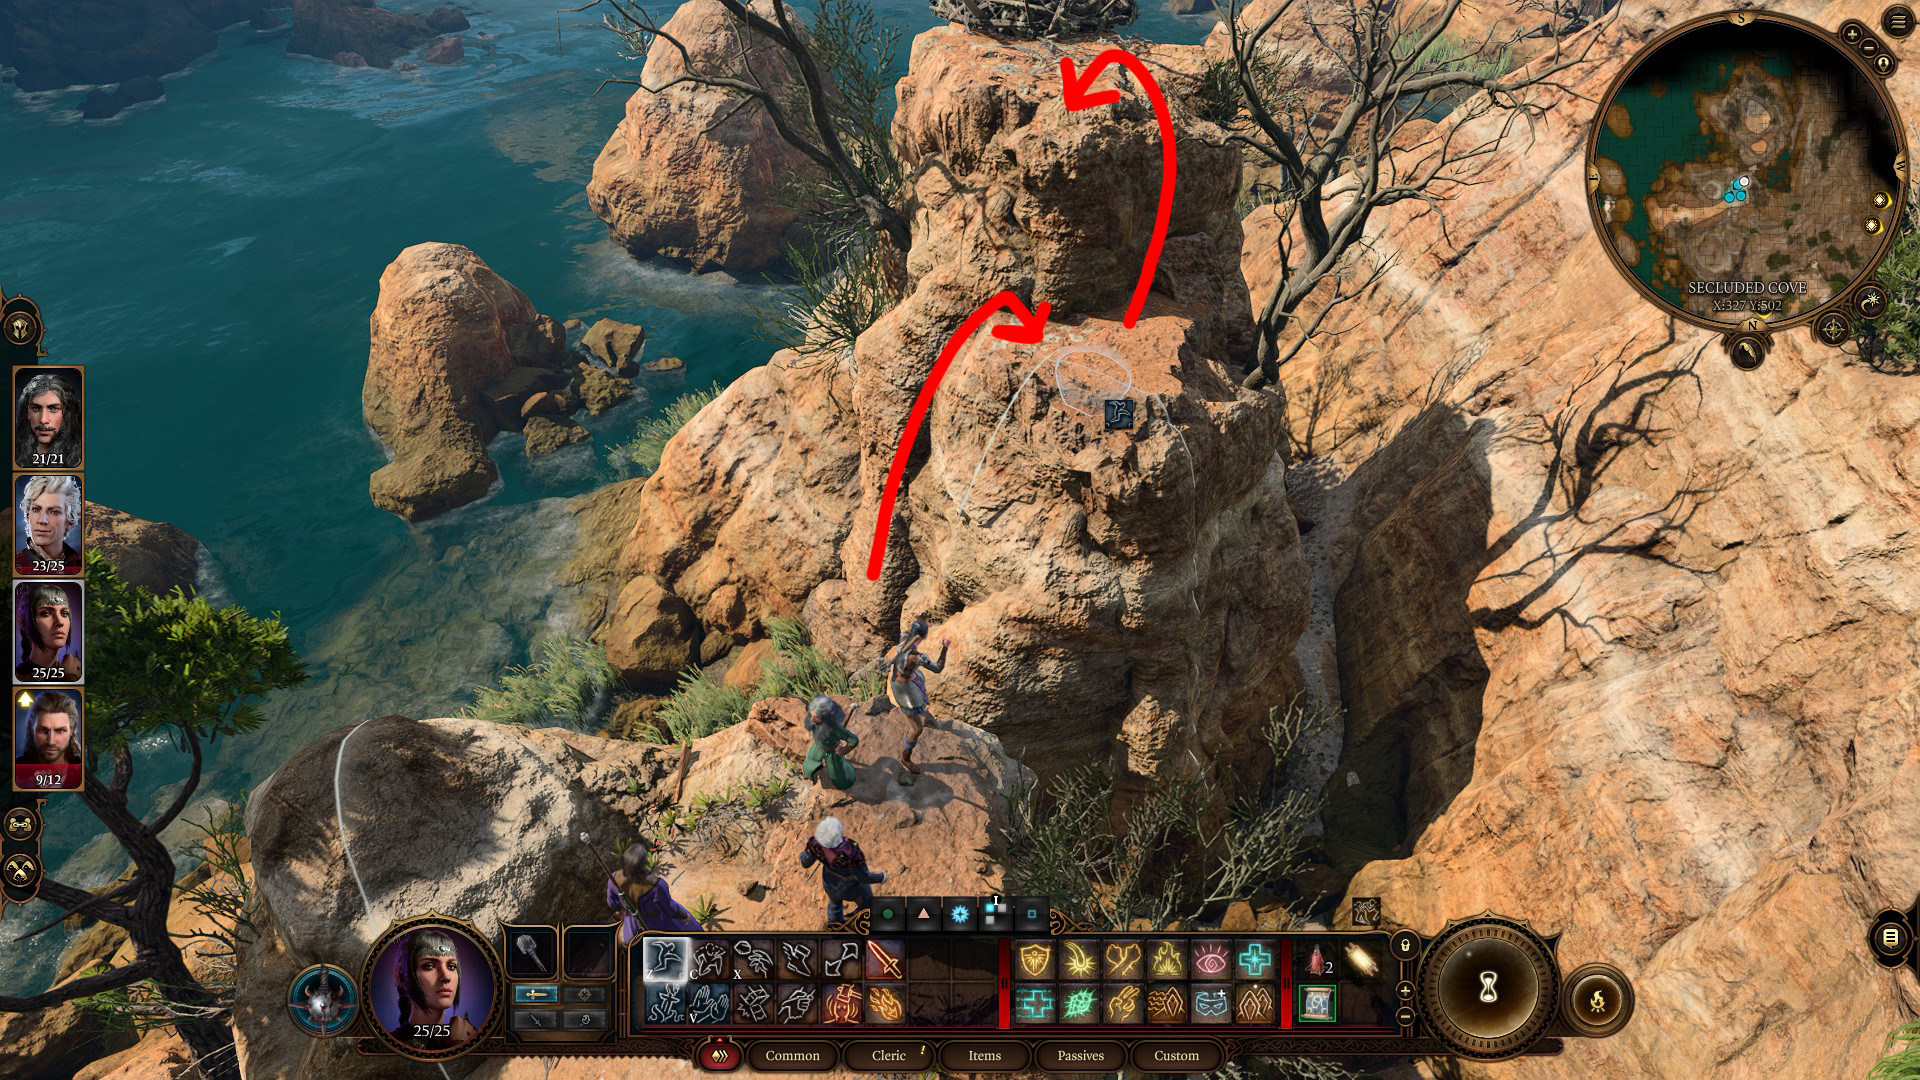
Head east-southeast around the rock formation (1), and then continue south until you can make the jump indicated below (2). Then head up the path to the next jump (3) — some characters won’t be able to make this one — and then a final jump will take you up to the nest. Search the nest to find the Ring of Colour Spray, plus a few extra goodies. There are also notes in the nest from what are almost certainly previous victims of the sonorous bird ladies.
123
Nest looted, you’ve now completed all the major activities in the Emerald Grove, excluding a few big ones we’ll cover below.
Where to Go Next
At this point you have quite a few options, both in terms of where to go next, and as far as how to handle the situation in the Grove:
If you decide to fight, know that this starts a large-scale battle in the grove between the druids and the tieflings. It’s best to position your party around Kagha and begin the fight with a sneak attack from Astarion or another rogue — once you attack, most or all of the druids will rush out of the room, letting you 4v1 Kagha.
Side with Kagha, and go speak with Zevlor, telling him he has to leave “or else”.
While Zevlor and his companion aren’t a tough fight, this can be an unsatisfactory path to take, as there doesn’t seem to be a continuation of the quest from this point. You can inform Kagha that Zevlor is dead, but there doesn’t appear to be a way to actually get all the refugees to leave. Reports online suggest that even slaughtering every last tiefling doesn’t progress the quest further.
Rescue Halsin and/or kill the Goblin Leaders. [Guide WIP]
Halsin, upon being rescued, won’t leave until the goblin leaders are eliminated, so you’ll have to take out the goblin leaders regardless if you want to rescue the refugees an/or protect the grove. With that in mind, you might as well go free Halsin, who can end up part of your party.
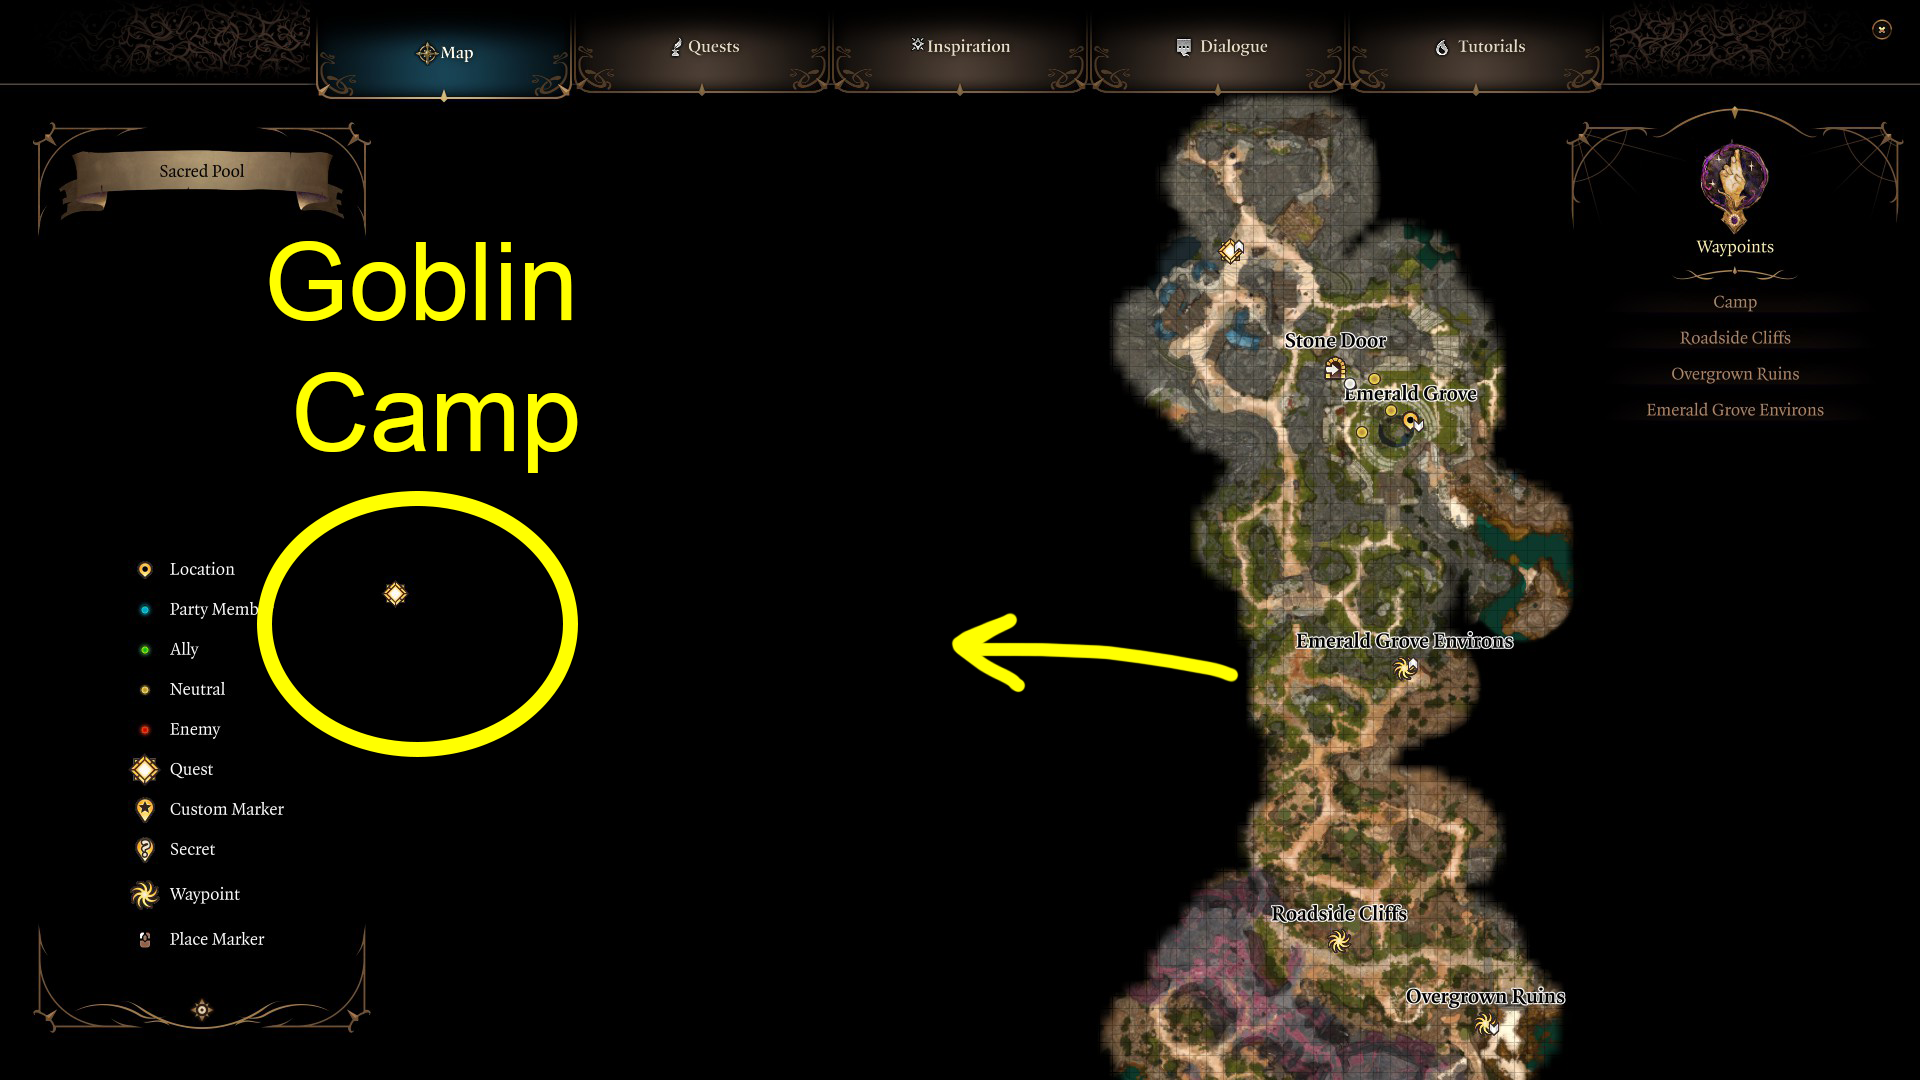
You can also instead decide that no one in the Emerald Grove is worth your time, and side with the goblins. You can do this in the goblin camp.
Regardless of your choice, you’ll eventually need to make your way to the goblin camp found west of the Emerald Grove’s entrance:
You don’t have to head straight to the goblin camp, however. There are a few other tasks you can take care of first:
Unabashed FromSoftware fanboy still learning to take his time with games (and everything else, really). The time he doesn't spend on games is spent on music, books, or occasionally going outside.