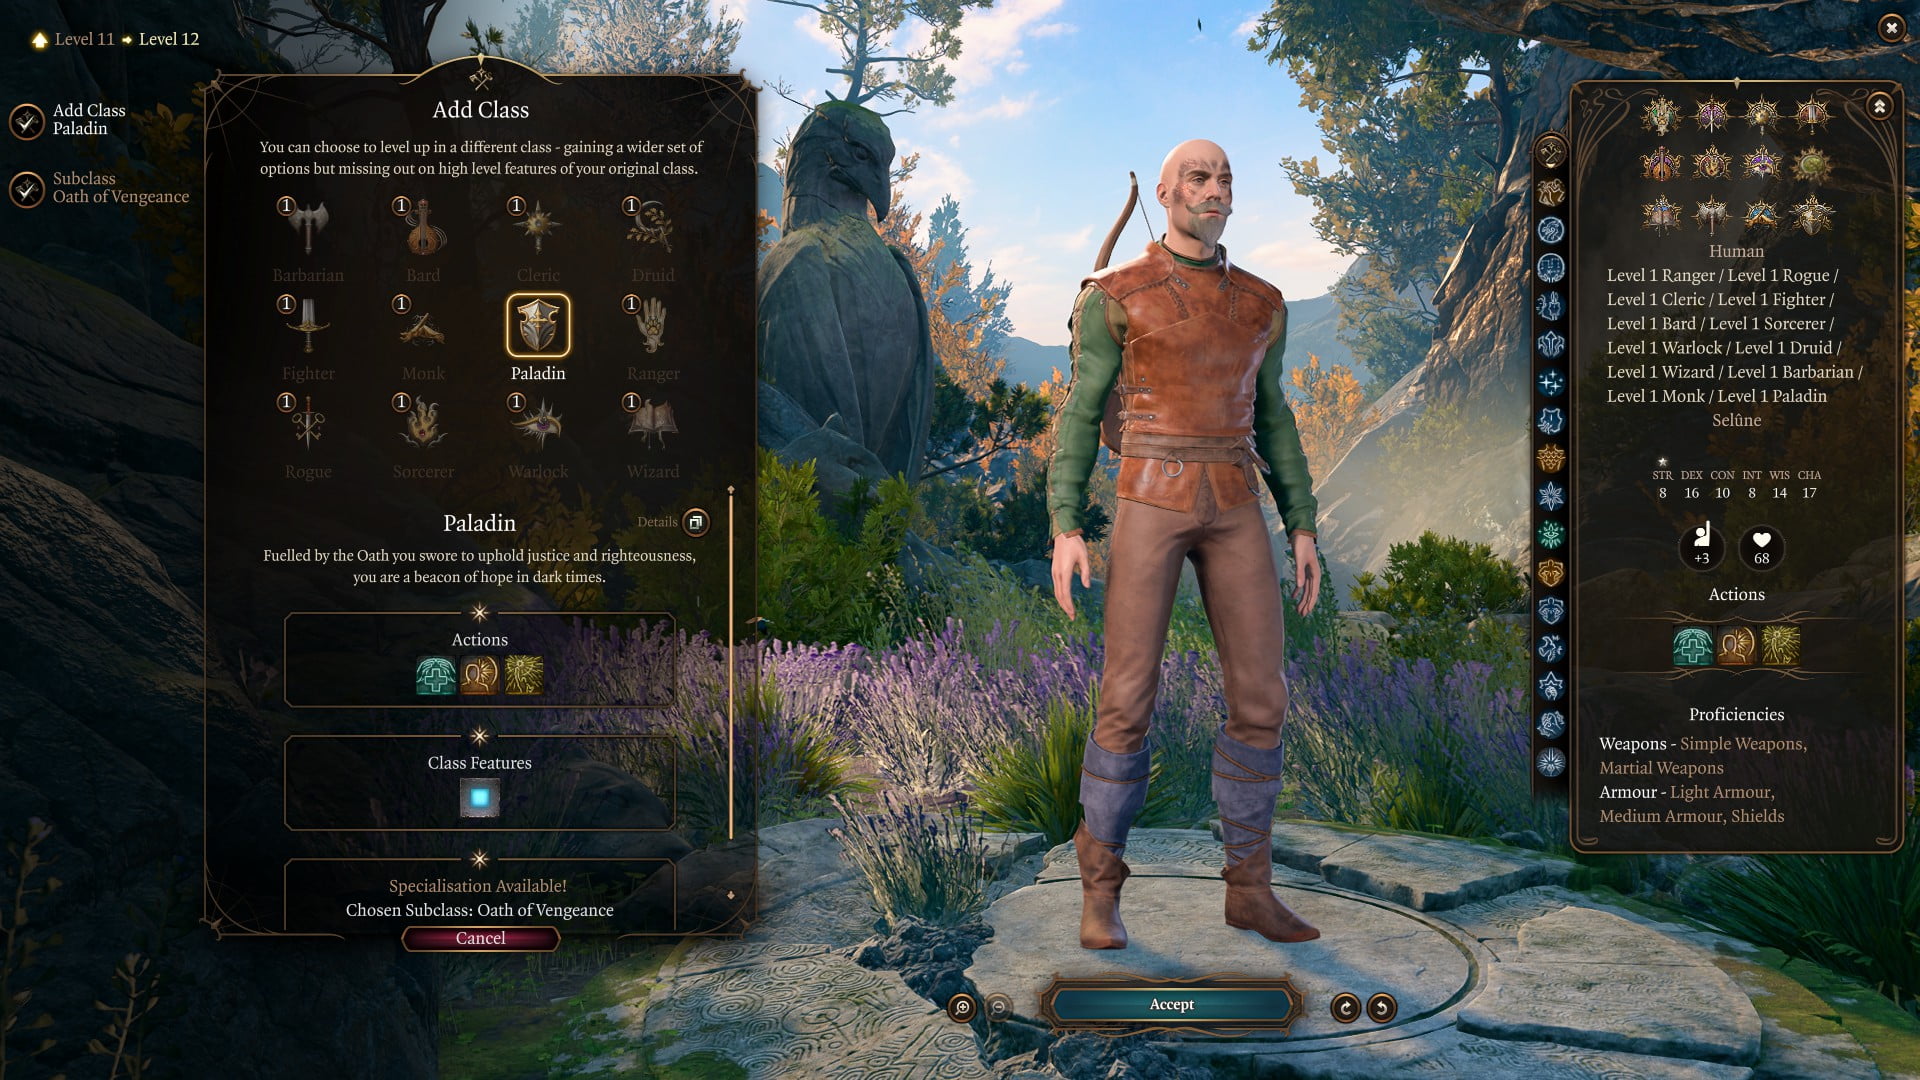
Baldur’s Gate 3 has an interesting achievement called Jack of All Trades that requires you to multiclass into every class in one playthrough, which means picking just one level of every class, as there are 12 classes and the level cap is set at 12 in the game.
And while the achievement itself is extremely easy to earn, the actual challenge of playing through the game with a character that picks a new class on every level up is quite an intriguing one. It goes way beyond the obvious idea of playing the game as a party of three, with the fourth character just tagging along without contributing much. So, if you’d like to know how to make your Jack of All Trades character into an absolute powerhouse of utility and value, this guide is for you.
If you want to see how this build looks like in our build planner, or make any custom alterations, check it out here!
Build Summary
Utilizing some quirks of Baldur’s Gate 3 and the pen and paper system it’s built upon, it’s quite easy to turn our Jack of All Trades character into the ultimate skill monkey proficient in 12 out of the game’s 18 skills, Expertise in 4 of them, and high attribute values across the board to support them. We’ll also be capable of casting all the exploration spells (S peak with Animals,
  Speak with Dead,
  Detect Thoughts,
  Longstrider,
  Disguise Self, Enhance Leap,
  Feather Fall), supporting the team with useful buffs, and making sure no enemies can hit us thanks to at times excessive application of the Radiating Orb debuff. We’ll also be fairly tanky, in the later stage reaching around 40 AC with all defensive spells active (
 Haste,
  Warding Bond,
  Shield of Faith,
  Mirror Image).
And while we won’t be as good as a dedicated character at anything, such is the fate of a jack of all trades. But even so, we’ll be more than capable of performing just about any task in the game. The one thing we’ll never excel at is dealing a lot of damage, as there’s no getting around the extra attacks and high-level spells other characters get. Still, we won’t be entirely useless in the damage-dealing department either, as for some inexplicable reason Larian decided to let every class use spell scrolls. And since we are every class, we’ll be the ideal choice for hoarding and using all the scrolls, while our party members will get to focus on their real spells.
Character Creation
This particular build is pretty finicky when it comes to creating and leveling our character, as we’ll want to maximize our skill proficiencies early while giving ourselves the tools we’ll need around the time we’ll need them. After some tests, we concluded that the optimal starting class for a Jack of All Trades is the  Ranger.
We’ll be playing as a  Human, the ultimate generalist race, for the bonus skill proficiency. The extra carry weight will also come in handy.
Starting as a Ranger gives us some nice proficiencies, when it comes to both gear and skills. And the Entertainer background isn’t covered by any of the companions and gives us two situationally useful proficiencies.
Our starting Abilities assume we’ll be getting some specific gear to push our seemingly wonky stat line into impressive territory. Most of that gear is located in the game’s first act, so you won’t be weak and stupid for long, but more on that in the Equipment section. Our Charisma value also assumes we’ll be making a deal with Auntie Ethel to get it up to 18 for a nice +4 bonus.
Advancing Through the Levels
As you might expect, picking our subsequent levels comes with plenty of caveats, and there are multiple ways to go about it. That said, below you’ll find our favorite leveling template for a Jack of All Trades character.
- Level 2
- Level 3
- Level 4
- Level 5
- Level 6
- Level 7
- Level 8
- Level 9
- Level 10
- Level 11
- Level 12
With the way the game treats multiclassed spell slots, at level 12, this will grant us 4 level 1 spell slots, 3 level 2 spell slots, 3 level 3 spell slots, and one Warlock spell slot that recharges on Short Rest. So, while we won’t actually have any level 2 and 3 spells, with upcasting, we’ll get to cast a lot of instances of  Bless and
  Magic Missile. These will be our two primary spells. More on why later.
With access to Guidance and Bardic Inspiration, plus all our proficiencies and high stats, no skill check will be safe from us.
We pick the Draconic Bloodline for our  Sorcerer level mainly due to its extra HP and easy access to Feather Fall, but the natural AC of this subclass can also enable a variation of this build that eschews heavy armour in favor of a
  Monk or
  Barbarian Unarmored Defence feature. But since the feature doesn’t stack between the classes (you either add your Constitution or Wisdom bonus to your AC, not both), the Heavy Armour route will make us significantly tankier in the later stages. Still, going armourless is totally viable and will even allow us to deal slightly more damage. In case you decide to explore that route, the class progression of Ranger
  Rogue
Rogue  Cleric Sorcerer Monk
  Bard
Bard  Warlock
  Druid
Druid  Wizard Barbarian
  Fighter
  Paladin is preferable.
Even though Paladin actually grants us some nice stuff that works well with our overall build, we get a level of Paladin as late as possible because this build wants to maximize the content we get to see and is great at being a Rogue and convincing people to give us what we want. The rigidity of Paladin Oaths makes that harder, so we avoid the class until the last possible moment.
Equipment
In order to make this build work, we’ll need some specific equipment. Luckily, we can find most of it early-on, with some late-game pieces complementing it really well too.
Chestpiece
- Adamantine Splint Armour
- A great piece of heavy armour you can craft in the Adamantine Forge fairly early in the game.
- Helldusk Armour
- Your ultimate late-game armour. Loot it from Raphael in the House of Hope.
- Potent Robe
- The best option for the Unarmored Defence route. Makes your Edlritch Blasts stronger and grants you some extra health. Complete the Rescue the Tieflings quest in Act 2 to get it.
Shield
- Sentinel Shield
- Bonus Initiative and Advantage on Perception checks. Yes, please. You can get it from Lann Tarv in Moonrise Towers.
- Ketheric’s Shield
- An alternative shield option if you need some help with landing your Eldritch Blasts. Dropped by Ketheric Thorm at the end of Act 2.
Cloak
- Cloak of Protection
- Bonus AC and Saving Throws. Get it from Quartermaster Talli at the Last Light Inn.
- Evasive Shoes
- Bonus AC and Acrobatics. Get it from Mattis at the Last Light Inn.
Headwear
- Warped Headband of Intellect
- A circlet that sets your Intelligence at 17 regardless the starting point. Dropped by Lump the Enlightened, an ogre you encounter in the Blighted Village in Act 1.
Gloves
- Luminous Gloves
- One of the most important items for this build. A pair of gloves that helps inflict the Radiating Orb debuff on our targets. You can find them inside the Potter’s Chest around the Ruined Battlefield in early Act 2.
Rings
The rings listed below are mandatory for the build and create a synergy with Luminous Gloves.
- Coruscation Ring
- Dealing spell damage while illuminated applies the Radiating Orb debuff on our targets. Found inside a chest in the basement underneath the Last Light Inn.
- Callous Glow Ring
- A ring that lets us deal extra Radiant damage to illuminated targets. You can find it inside the vault near where Balthazar is in the Gauntlet of Shar in Act 2.
Amulet
- Amulet of Greater Health
- This is our ultimate goal when it comes to amulets. Sets your Constitution at 23.
Because of how they work, you’ll also want to have the following two amulets to cast their spells at the start of each day and then swap them for something else.
- The Amulet of Lost Voices
- Grants the Speak with Dead spell. You loot it from the chest in the same room where you first encounter Withers.
- Uncovered Mysteries
- Grants the Detect Thoughts spell. You find it on the first floor of the Arcane Tower in the Underdark.
Weapons
- Ne’er Misser
- A hand crossbow that lets us cast an upcasted Magic Missile spell once per short rest. You get it from Roah Moonglow in Moonrise Towers.
- Hellfire Hand Crossbow
- A second hand crossbow (we’ll wear both). Lets us cast Scorching Ray once per short rest. You can loot it from Yurgir in the Gauntlet of Shar in Act 2.
- Staff of Arcane Blessing
- A staff that lets us cast an extra Bless spell and makes all our Bless spells better. You find it in the basement of the Arcane Tower in the Underdark.
- Club of Hill Giant Strength
- A club that sets our Strength at 19. When not casting Bless, this will be our primary melee weapon. You find it on the top floor of the Arcane Tower in the Underdark.
- Blood of Lathander
- A legendary mace that produces its own light and gives us another source of Radiant damage. And while its light is actually inferior to the Light cantrip, it really messes with a lot of Act 2 enemies, trivializing most of it. As such, it’s a great thing to have in your back pocket.
The Gameplan
The strength of this build comes from its versatility and the way Concentration works in Baldur’s Gate 3. Bless, a level 1 spell, is one of the best spells in the game, but a character casting it, can’t cast any other Concentration spells. And since we’ll only have access to level 1 spells, we’ll be the prime candidate for casting Bless. The Staff of Arcane Blessing will help us there by making our Bless stronger when blessing spellcasters. And with us taking care of Bless, our dedicated Clerics can instead concentrate on a high-level instance of Spirit Guardians.
Our other main spell will be the Magic Missile. Together with our gloves and rings setup, our Magic Missiles will apply a ridiculous amount of Radiating Orb debuffs, each stack of which lowers our target’s Attack Bonus by 1. The Radiating Orb debuff is capped at 10 stacks that fall off by 2 every time your target attacks, but even so, lowering the enemy Attack Bonus by up to 10 pretty much ensures we’ll only get hit on natural 20s.
When out of Magic Missiles, we’ll be falling back on Eldritch Blast, a Warlock cantrip that eventually gets 3 instances of damage, rivaling a lvl 1 Magic Missile in terms of Orb stacks, provided all three Eldritch Blast beams hit.
The way our Radiating Orb items synergize is a bit nebulous, and it can be somewhat tricky to know how many stacks each attack will apply. But the general rule to follow to maximize the Orbs is making sure that both you and your targets are illuminated. This is relatively easy to achieve by casting the Light cantrip on yourself and then pressing Shift to check if the cursor looks like a white sun when hovering near a target. The level 3 Daylight spell cast form a scroll or by one of our teammates also helps there. And after the initial attack, the Orbs themselves will illuminate our foes.
Another thing to keep in mind is the way weapon slots work in the game. We have both melee and ranged weapon slots, and just having items there is enough for them to grant their bonuses. Even the shield AC bonus applies when you have your crossbows out. However, the Light cantrip is actually applied to a particular weapon, and switching between weapon sets disables it. So, it’s advisable to cast Light on our ranged weapons, as we’ll be attacking with them regularly. Casting a Magic Missile is an Action, but shooting our off-hand crossbow is a Bonus Action – and that means more Orbs.
Considering all that, when not talking our way out of trouble or disarming traps and opening locks, our job in combat will be to cast Bless, be a hard target to hit, and apply as many Radiating Orbs as possible to make sure our enemies can’t hit even our squishy party members. And whenever we’ll need to actually deal some real damage, we’ll hopefully have stacks upon stacks of spell scrolls to choose from.
All Builds


I’ve been playing this on a secondary/”mess around and find out” sort of save, and I have some findings/thoughts to share based on my experience. Spoilers ahead!
An early-game item that is kind of useful is the Psychic Spark amulet – it adds another dart to your magic missile casts at any level, which is great for adding more radiating orbs (especially since patch 5 upped the limit from 7 stacks to 10).
In previous playthroughs I never really found that much use for Sacred Flame (even with decent WIS enemies always seemed to save against it past act 1) so I would suggest Thaumaturgy for advantage on intimidation and persuasion.
This build is obviously pretty low in HP, so getting the +20 temp HP from finishing the Necromancy of Thay is a lifesaver and can be done pretty soon after reaching the lower city at Sorcerous Sundries, if you’re still worried about being able to take a hit.
Anyway, just some thoughts and ideas I’ve come across in my playthrough.
Slight correction, because apparently I’m a dingus: Thaumaturgy gives advantage on intimidation and performance checks, not persuasion. Clearly, I shouldn’t be posting comments in the middle of the work day.
I believe that wizards can add any spells to their spell book that they have slots to cast. Meaning that you can scribe up to level 3 spells with just one level of wizard. Of course all these spells use your intelligence modifier but with the warped headband you can dump int and still be a semi viable spellcaster just by taking spellcasters first in your leveling pattern.
However I’ve yet to test this so I could be wrong.
I started mine as a dumb wizard, so I could allocated a lot of point in other stat, then I choose monk, berserker fighter. Haven’t yet gone far enough for level 5, but so far, it went pretty well and I increased my intelligence stat with the ogre’s equipment