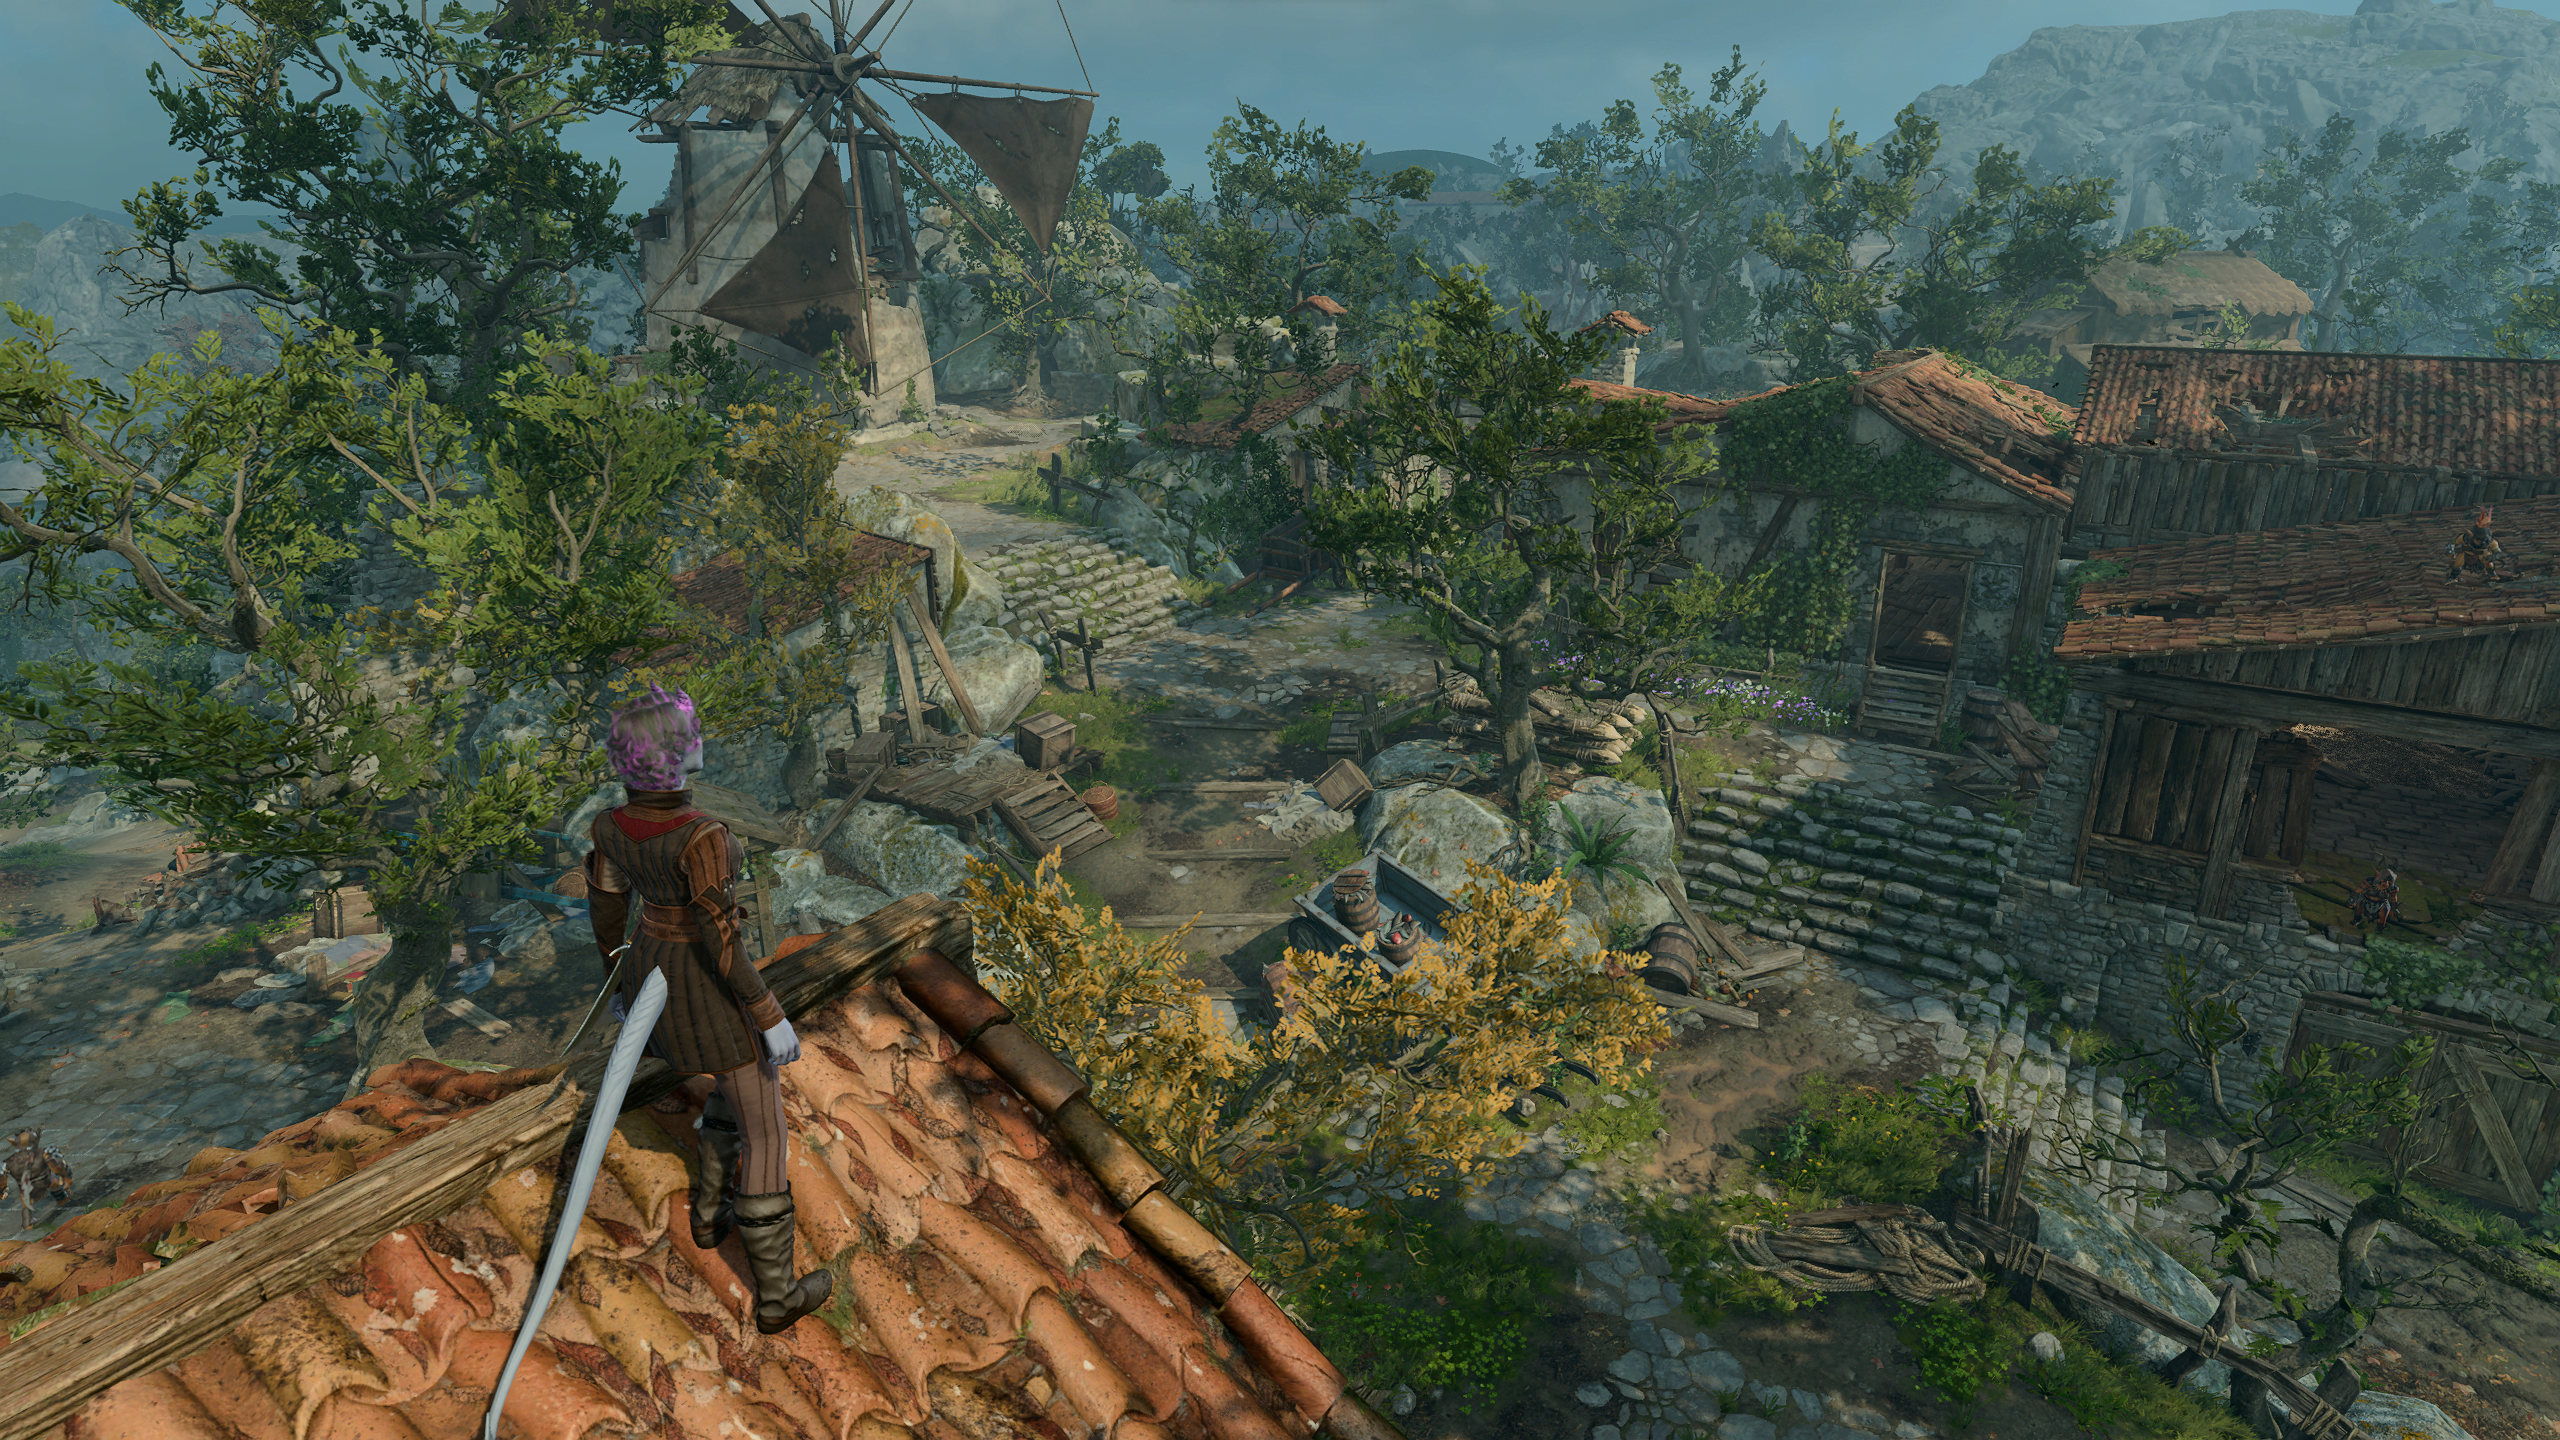
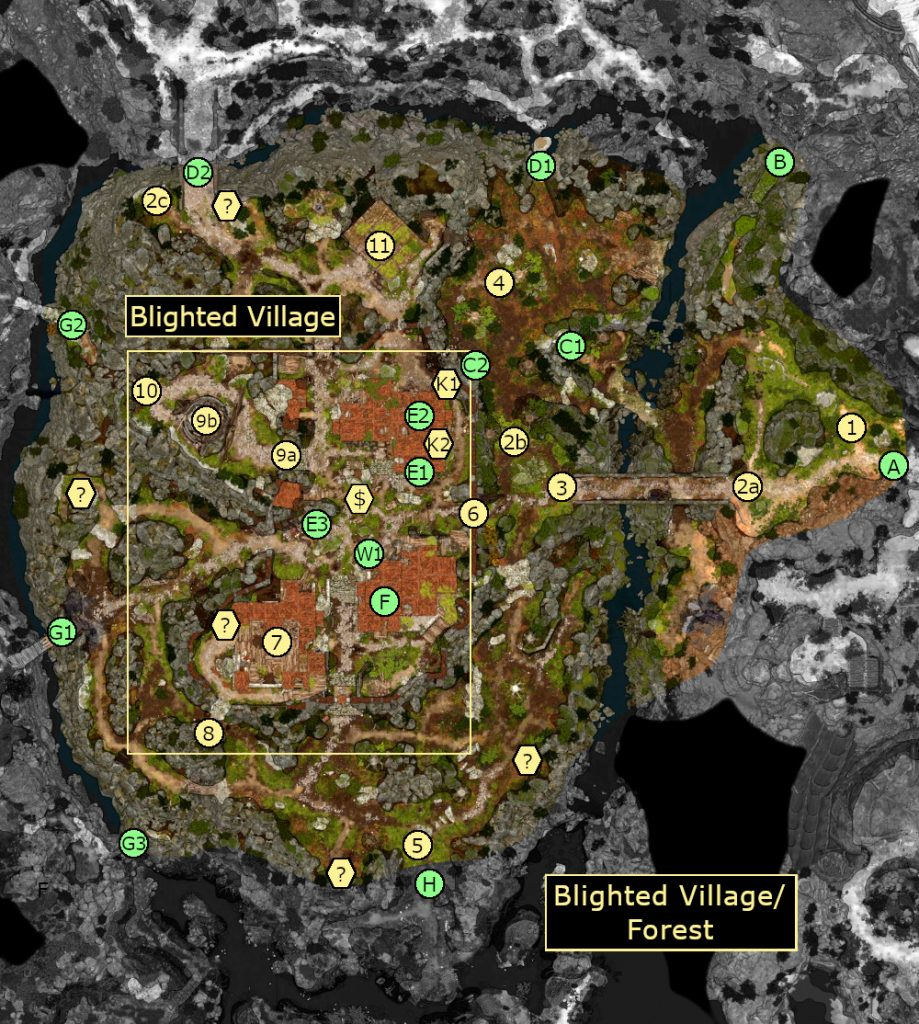
This area walkthrough will help you find your way through the area at the center of the first region of Baldur’s Gate 3. After exploring the Ravaged Beach and Emerald Grove, the Blighted Village and its surrounding forest is where Baldur’s Gate 3 really begins to open up. Not only is the zone itself filled with interesting interactions, but it also leads to a whopping seven different regions, which this guide should help you decide between.
Before crossing the bridge to the Blighted Village itself, you will encounter Andrick and Brynna standing over the body of their dying brother, Edowin, who was mauled by an Owlbear. You’ll overhear the siblings debating what to do next when you arrive. They will be discussing “True Souls”, and if you already happen to be one, you will have a unique dialog check.
No matter what you do, Edowin will die, at which point Andrick and Brynna will speak with you. If you say that you aren’t a True Soul, they will draw on you and try to kill you, but otherwise you will be help them decide what to do next, including convincing them to go after the Owlbear that killed Edowin.
After Andrick and Brynna have departed, you can approach Edowin’s corpse. Using the Strength or Wisdom check here actually prevents you from acquiring the Mind Flayer Parasite Specimen (which you can still choose not to use), so it is often worth it to select the first dialog option: “Let your body guide you – welcome the tadpole’s influence.” After that, you can also cast Speak with Dead on Edowin, though he will have little to add.
Don’t forget to loot Edowin’s corpse. You’ll find a lot of food on him, plus the Shaft of a Broken Spear. If you enter the Owlbear Nest and kill the Owlbear, then you’ll find the Head of a Broken Spear on its corpse. When you have both items in your possession, interacting with them in your inventory will allow you to combine them together, which will net you the unique spear Vision of the Absolute.
Early on in the Forest, you should come across a dead boar. It can appear in multiple places. We’ve marked three of the most common locations on the map above (2a, 2b, 2c). If you pass a DC-10 Medicine check, then you’ll determine that the boar was drained of blood via two bite marks on its neck. If Astarion is in your party, then you’ll get follow-up DC-10 Intimidation and Persuasion checks to coax some extra information out of him (Barbarians get an advantage with the Intimidation check), but succeeding will only cause Astarion to reveal that the marks must have come from a vampire. I wonder who that could be?
This is the spot where Aradin’s adventuring crew skirmished with some goblins before fleeing to the Emerald Grove. The loot on the corpses is randomized, but you’ll always find Thieves’ Tools, a Trap Disarm Kit, some low-level spell scrolls, and a Potion of Healing. One of the dead goblins will also have a Goblin’s Drawing, which will indicate that the goblins have three leaders.
If Aradin survived the battle at the front gate to the Emerald Grove, then after his scuffle with Zevlor inside the grove, he’ll storm off and appear here. When you talk to him, no matter what you say, he’ll tell you about the contract he and his adventuring crew accepted to locate an artifact called the Nightsong. This will trigger the quest Find the Nightsong. After completing your conversation with Aradin, he and his surviving crew members will wander off.
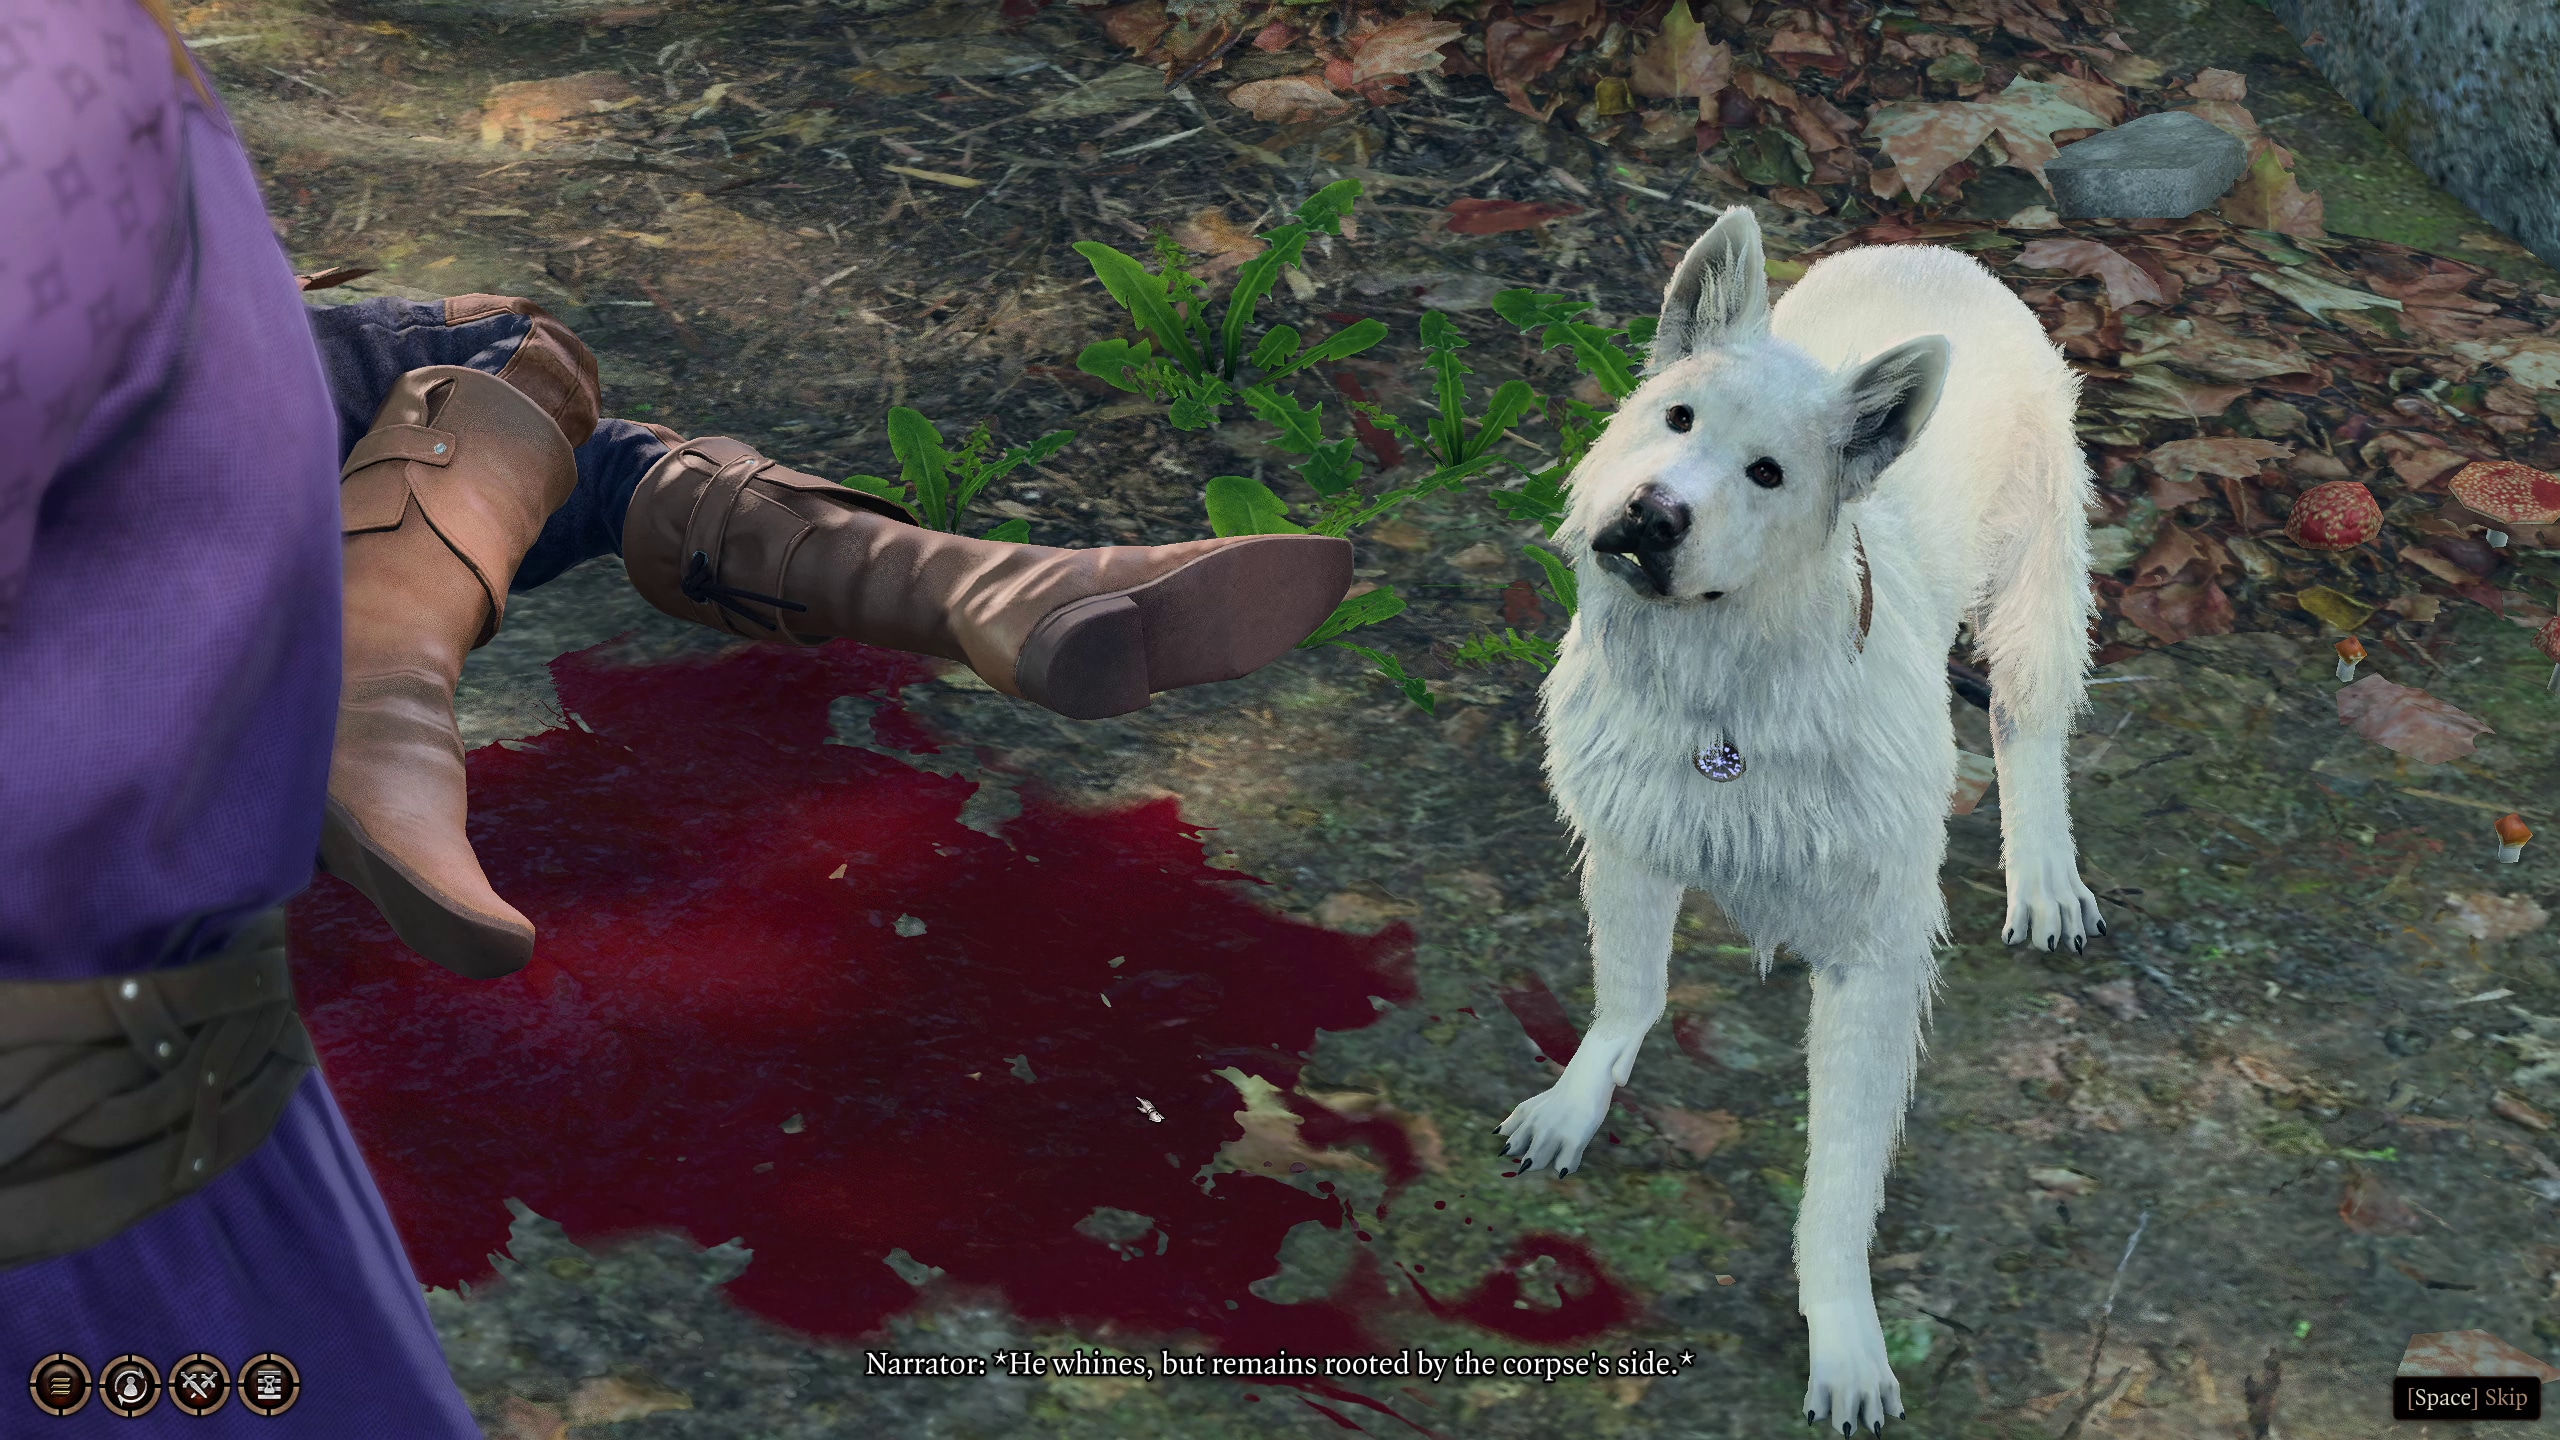
In the Forest outside the Blighted Village, you can find Scratch the dog, guarding the body of his slain master, Gomwick. There are a variety of checks you can perform here in order to convince Scratch to head to your camp, and some unique dialog for a variety of circumstances.
The easiest way to get Scratch to trust you is to pass a DC-10 Perception check, which will allow you to look at his collar and learn his name. Otherwise, there are two main paths to gaining Scratch’s trust:
If you succeed in one of these checks, then Scratch will allow you to loot Gomwick’s corpse, and he’ll follow you to your camp, provided you invite him (if you can speak to him) or let him sniff your hand and learn your scent (otherwise). Just don’t try to prove that Gomwick is dead. This will anger Scratch and cause him to attack you.
Using Speak with Dead on Gomwick won’t really gain you anything. You’ll just learn that he was a courier. However, one of the letters on Gomwick’s corpse will lead you to a buried treasure in Baldur’s Gate.
To the south of the Blighted Village, you will encounter Auntie Ethel having a conversation with Johl and Demir. They are brothers of Mayrina who have come to retrieve their sister from Auntie Ethel. This relates to a much larger quest that is part of the larger quest in The Sunlit Wetlands / Putrid Bog. Despite several checks available to various classes and other ways into the bog, there is no way to prevent Johl and Demir from dying.
As you enter the Blighted Village through the main entrance, you will be greeted by a goblin shouting down at you from the rooftops. She will give you a chance to explain yourself, giving you the opportunity to avoid confrontation. A successful DC-15 Intimidation or Persuasion check will get you through, as will a DC-2 Wisdom check if you have not used your Illithid powers since your last long rest. Drow and True Soul characters can also enter without trouble.
If you choose to enter the Blighted Village through any other entrance, a similar dialog will occur with the first goblins you encounter there.
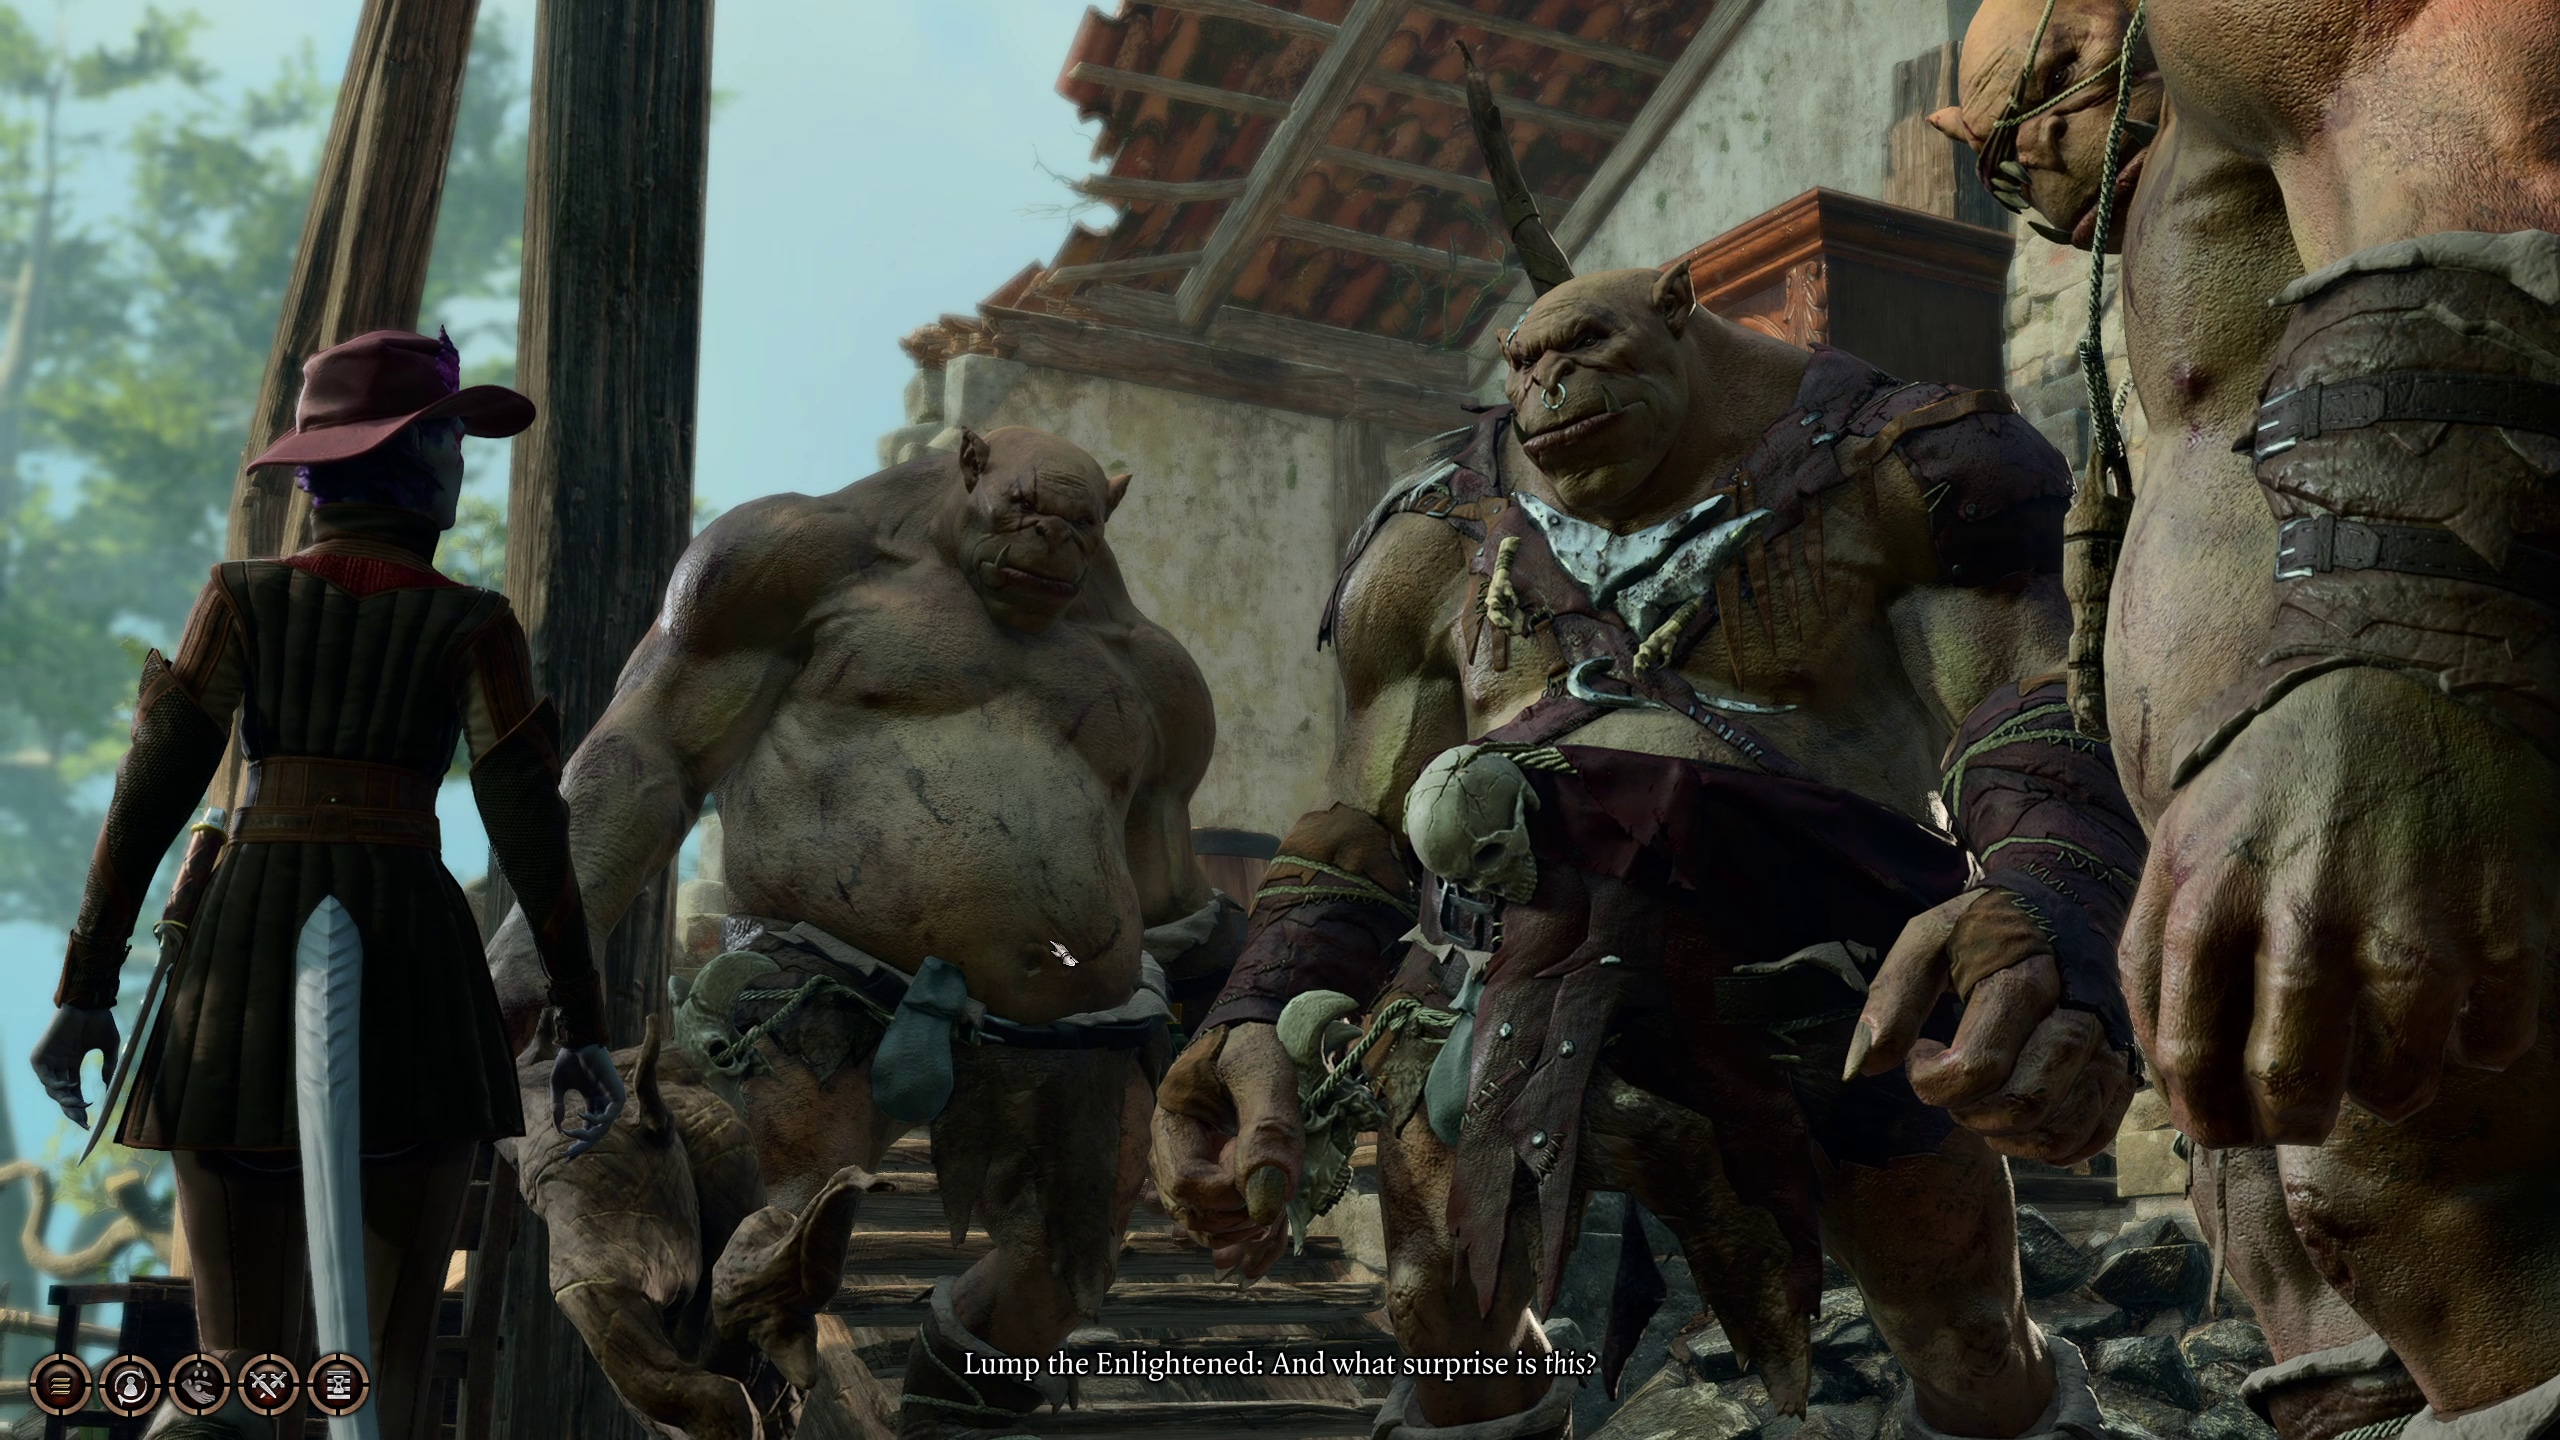
In a ruined house in the Blighted Village, you can find three Ogres talking amongst themselves, considering dinner. A particularly articulate Ogre named Lump the Enlightened seems to be the leader, and will talk to you if you approach. Characters with the Mark of the Absolute from the Goblin Camp will be able to avoid conflict easily, but others will need to pass a DC-10 Deception check. Barbarians can also use a DC-10 Intimidation check (Berserker advantage) to keep the Ogres friendly.
If you convince Lump and his gang not to fight you, then you can suggest that they work for you by selecting the dialog option: “Forget goblins. You should be fighting for me.” From here, you’ll be given a few ways to hire them: a 500 gold payment, a DC-10 Deception check, or a DC-20 Persuasion check. Barbarians can also convince them with a DC-20 Intimidation check (Berserker advantage). Succeeding here will give you Lump’s War Horn, which will allow you to summon the three Ogres to battle.
If your encounter with Lump leads to a battle, then you’ll have to face off against three Level 4 Ogres. Lump casts spells, and they all hit hard, so the fight can be difficult. A good strategy is to use one of the doorways to the house they’re in. The Ogres are big, so while one is in a doorway, the other two will have to run around the outside of the house to get to you. In this way you can divide and conquer. If you’re successful in the battle, then you’ll earn 75 xp per Ogre, and you’ll find Lump’s War Horn and a Warped Headband of Intellect on Lump’s corpse. Of course, with Lump dead, the horn won’t do you any good. (If you don’t fight Lump, then you can still get his headband when you call him with the horn.)
Regardless of how you deal with the Ogres, once they are gone you will be able to cast Speak with Dead on the body of the Tiefling they killed, though she will have little useful to say. But you should find Thieves’ Tools on her corpse.
When you approach the windmill, it will be surrounded by Goblins watching a Deep Gnome they captured spin around the mill’s blades. See the quest Rescue the Gnome for more information.
If you have Shadowheart with you when you encounter the Broken Statue behind the windmill, she will have some brief commentary about the statue. A Sorcerer or Wizard will be able to inquire slightly further, but she ultimately won’t be ready to say much.
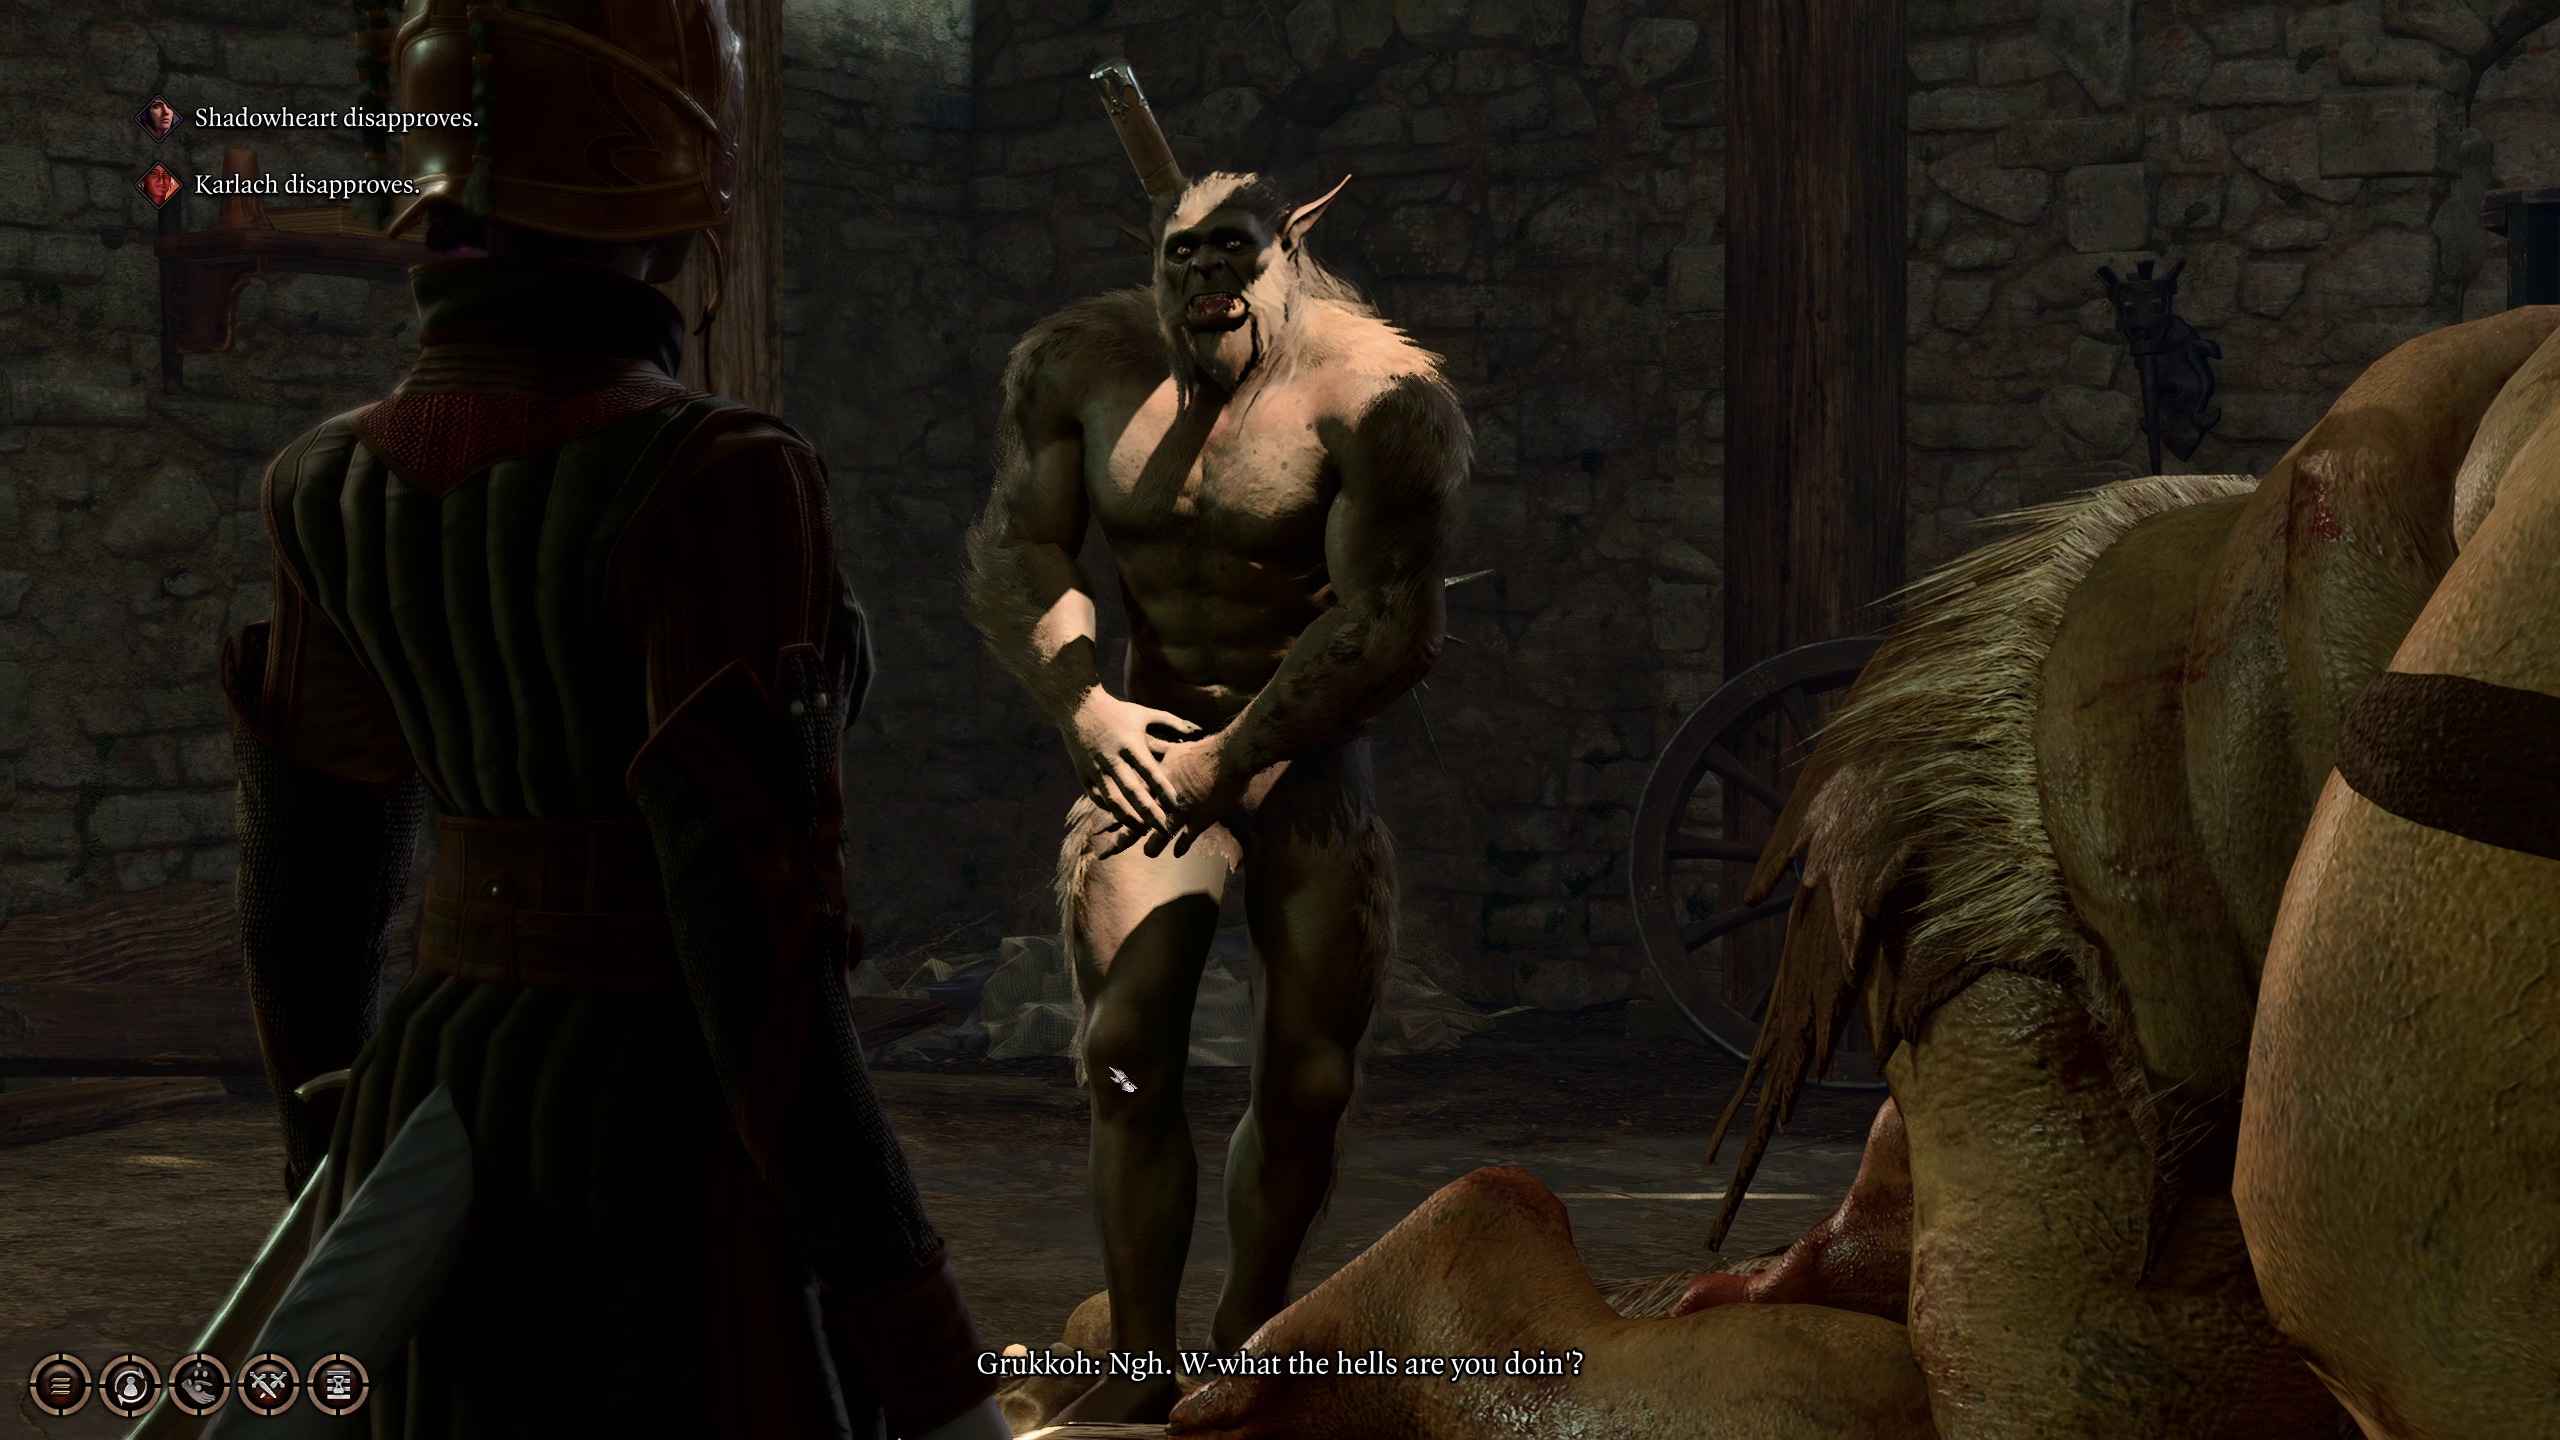
By approaching the doors to the barn north of the Blighted Village, you will be able to hear the sounds of Grukkoh the Bugbear and Buthir the Ogre en flagrante. By opting to open the door despite this, you will have a funny interaction with them. Barbarians and Bards are able to make DC-15 Intimidation and Persuasion checks, respectively, which will not trigger combat, but other options can.
Near the house which connects to the Whispering Depths and forge (E1 and E2), you can find a Heavy Key near a body. This can be used to unlock the door to the forge (E1).
On the second floor of the house which connects to the Whispering Depths, in the same room as the spider webbing (E2), you can find the Old Key, which will open a quest-critical chest within the Whispering Depths that can help you Finish the Masterwork Weapon.
In the center of the Blighted Village sits a Moss-Covered Chest, which can be lockpicked with a DC-15 Sleight of Hand check using Thieves’ Tools, or can be opened with a key on a Goblin Booyahg on a roof to the south. Within the chest is a Helm of Haste, which makes for good “food” for Gale, if nothing else.
There are several Dirt Mounds found throughout the Blighted Village and surrounding forest. These can be located by your party if any of them get successful Survival checks, allowing you to use a shovel to dig them up to receive various kinds of loot.
An owlbear has made her home in a cave in the Forest outside the Blighted Village. If you want to obtain the Owlbear Cub as a camp companion, you should make sure to visit before you go to the Blighted Village.
C1 – The primary entrance is a large cave mouth near the river.
C2 – Near the walls of the Blighted Village, you’ll detect a Rocky Crevice, an alternate entrance to the Owlbear Nest, if you can beat a passive DC-5 Perception check. The entrance requires a character to be either tiny in size (including Mage Hand or a familiar) or a gaseous form.
Behind the counter of the apothecary is a hatch which leads down into the Cellar, which has some hidden treasures, including a dark tome that might be better left forgotten.
The Goblin Camp is on the far side of the Blighted Village from the Emerald Grove, and is the region of the map with the most story content. It can be entered via several paths.
F1 – By passing dialog checks or slaying the goblins at the front of the camp, a character can enter.
F2 – By Jumping, Flying, or Teleporting, one can enter the Goblin Camp through a side path.
F3 – By Jumping, Flying, or Teleporting, one can enter the Goblin Camp through a side path. Be wary of the many traps on the other side.
The primary entrance to the Sunlit Wetlands / Putrid Bog (the name of the location can change) is to pass by Johl and Demir talking to Auntie Ethel to the south, but jumping, flying, or teleporting in elsewhere is also an option. Doing so will not save the brothers.
There is 1 Waypoint in the Blighted Village and Forest region.
Blighted Village
Where to go Next
After you are done with the Blighted Village and Forest, you can go to the following places:
The Sunlit Wetlands / Putrid Bog: Since the Sunlit Wetlands / Putrid Bog has a single, self-contained quest with excellent loot, this is often the next best step after the Blighted Village.
The Owlbear Nest: In order to get the Owlbear Cub, you will need to visit here before going on to the Goblin Camp, so you should prioritize it.
The Whispering Depths: A small area with a quest and a tough boss fight, it is challenging but rewarding to visit here while you are passing through.
The Goblin Camp: The most obvious path forward leads to the Goblin Camp, filled with story content and quest locations. Lots to do here.
The Risen Road: One obvious step on your journey, the Risen Road has several quests and a path forward, but taking this path might lead you to backtrack to the other areas later.
The Emerald Grove: Quite a few quests lead back to the Emerald Grove, even if you’ve already visited.
The Ravaged Beach: Back where you came from, there is likely not to be much left for you to get here.
Graves is an avid writer, web designer, and gamer, with more ideas than he could hope to achieve in a lifetime. But, armed with a mug of coffee and an overactive imagination, he'll try. When he isn't working on a creative project, he is painting miniatures, reading cheesy sci-fi novels, or making music.