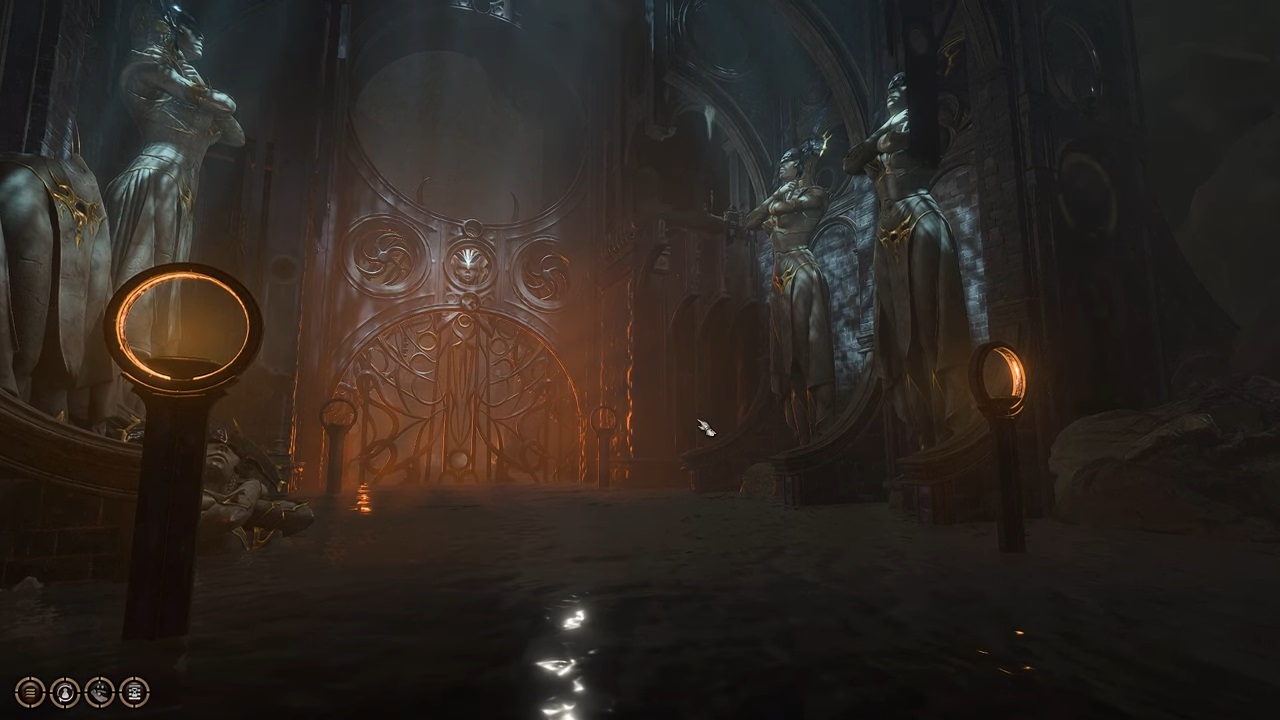
In this walkthrough, we will continue deeper into the Underdark and arrived in the decrepit Grymforge. Currently occupied by Duergar and their Deep Gnome slaves, this area has one of the hardest boss fights in Act 1, tons of traps and secrets, a timed quest to resolve a cave-in, and the legendary Adamantine Forge. But, while this area has a lot going on, we still have you covered with this guide to help you get through the superheated Grymforge.
When you come into Grymforge for the first time across the Dark Lake, you will be accosted by a group of Duergar headed by Corsair Greymon while still on the Lake, who will demand to know who you are. He will not want to let you pass unless you were able to obtain Thulla’s Boots of Speed in the Underdark, but you can convince him if you were Branded back in the Shattered Sanctum, or with a successful DC-10 Deception, Persuasion, or Intimidation check, which can be impacted by whether or not you are a Duergar or Drow.
Alternatively, you can push Greymon into the water with a DC-15 Athletics check or simply choose to fight the Duergar if they try to send you back to shore, starting a fight on the two boats where Shove and other attacks with knockback will probably be your best option.
Once you make it to shore, you will be greeted by two more Duergar. After a brief conversation, they will let you know about the collapse trapping Nere, the Deep Gnome slaves they have, and then attempt to get you to pay a bribe to enter. You can refuse without any dialogue checks, though.
After you head up the stairs from the docks, you will come across Stonemason Kith, a surprisingly articulate Duergar who is examining the stonework and debris in the ruins. He will ask you to help him examine it. If you do so, then successful DC-10 History, Investigation, and Perception checks can reveal new information, and a successful DC-20 Deception check can fool him into thinking you’ve done the same.
If you succeed on all three checks, or if you succeed on a DC-10 History check as a Bard, Kith will give you an Infernal Alloy which you can use to craft special armour with Dammon in the Last-Light Inn, later in the game. Otherwise, you can purchase, loot, or steal the Infernal Alloy off of Kith.
Note that this location has a timed event. If you Long Rest more than one time in Grymforge before resolving the Cave-In, things will change. After your first Long Rest, you will get a mental connection with Nere indicating that he and those trapped with him in the cave-in are running out of air and will eventually die. If you Long Rest a second time, Nere will have killed others in the Cave-In with him when you free him, and if you Long Rest a third time, Nere will be dead by the time you break in to the Cave-In. Leaving the area will have the same result.
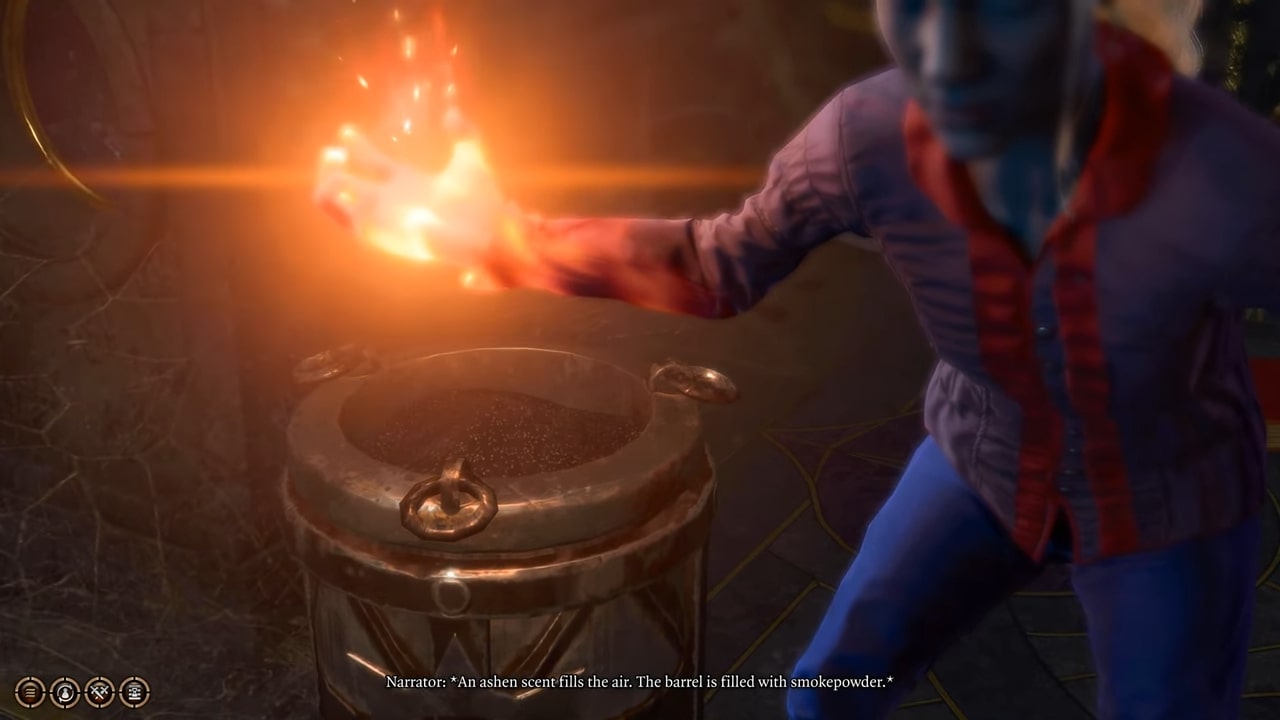
Outside of the Cave-In, a division has been created between those loyal to Nere, and those who want to rebel against him. Sergeant Thrinn represents the loyalist faction, and can be spoken to about the cave-in to get ideas of how to free Nere, where she will suggest using smokepowder, if you can acquire any (such as from Philomeen (#14)). You can also turn in the Boots of Speed to here, if you collected them from Thulla back in the Underdark, for a small reward.
Just outside the room itself, you can find a few Duergar who are planning a revolt against Nere. They can be convinced to mutiny against Nere when you free him, and when they take their gold back from his corpse, they can be convinced with a DC-10 Persuasion check to give you half.
Regardless of who you will end up siding with, you will need to free Nere. To do so, you will almost certainly need to use explosives. Smokepowder, which you can find a barrel of with Philomeen (#14) or can have found many barrels of in the Shattered Sanctum (if you grabbed them before coming to Grymforge) can be placed next to the rubble and attacked (once the Duergar are clear) to blow up the rubble, freeing Nere and giving you the choice to side with him or the mutineers, initiating combat either way.
After the combat, the surviving Duergar will resolve to go to Moonrise Towers, leaving Grymforge.
If you have been asked by the Myconid Sovereign in the Underdark to retrieve Nere’s head, you can do so regardless of how he perished (and regardless of whether or not you succeed the DC-10 Strength check).
Hidden amongst the ruins and down some craggy rocks, you can find what look to be 3 unguarded chest. But beware! These are not chests, but are instead Mimics, placed here by Harpers long ago to protect their stash. You can take on the 3 mimics for their loot and XP, but to find the actual treasure, you’ll need to interact with a tiny toy chest you can find nearby. Once you have it, casting any spell that produces light (like Light, Daylight, or most Fire Spells) will break the illusion and reveal the actual Harper’s stash.
Within a trapped, locked chest (DC-15 Sleight of Hand to disarm and unlock), you can find the unique “Really Sparky Sparkswall” shield, one of several Sparkswall shields.
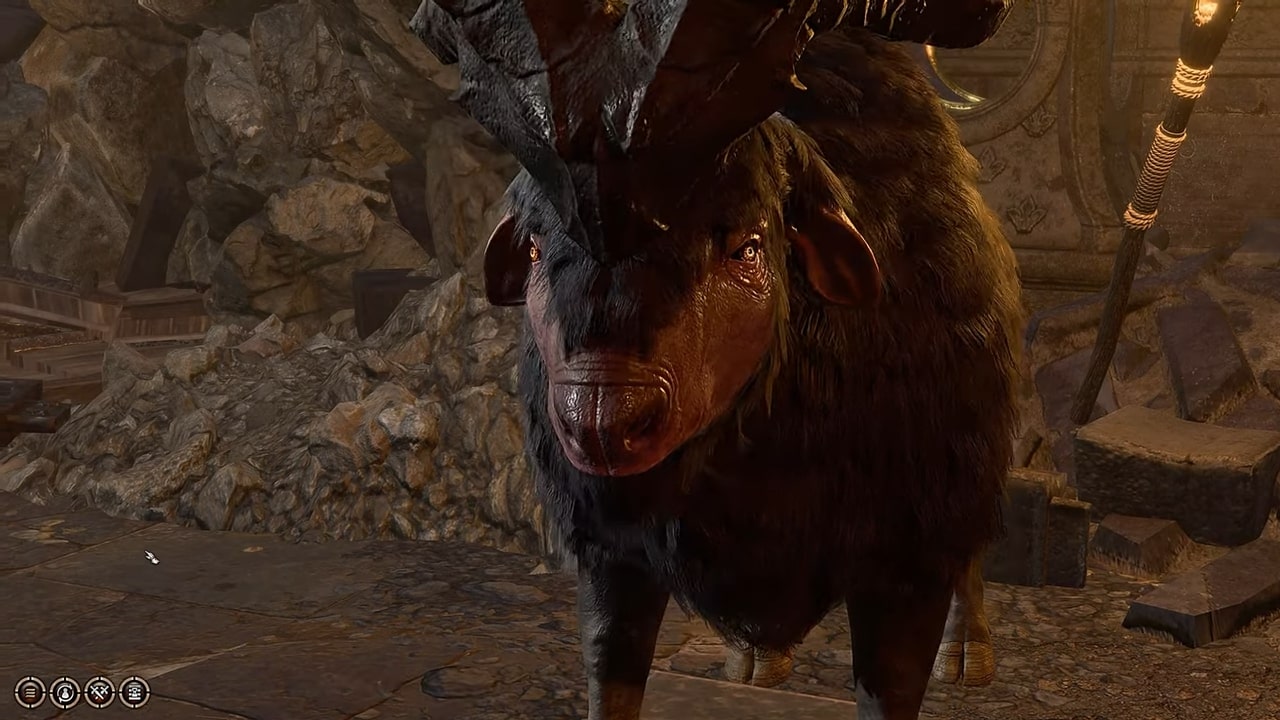
Here, you will come across a group of Duergar forcing two Deep Rothé to excavate away a wall that is blocking passage deeper into Grymforge. When you come across them, Herdmaster Skarjall will accost you, asking you to help him whip the Deep Rothé into working more so they can break down the wall. You can accept, and if you succeed at a DC-15 Animal Handling check or a DC-10 to 15 Persuasion check with Speak with Animals then you can convince the Rothé to either continue and break through the wall, or turn on the Duergar, giving you allies (if you attack the Duergar before doing this, the Rothé will turn on you as well).
If you elect to have the Deep Rothé turn on the Duergar and keep them alive during the fight, you can ask them to break down the wall, which they will gladly do. You can also break it down yourself — it is sturdy, but not impossible to break.
These moving platforms can get you both onto the platform that runs down the middle of Grymforge, and across the gap to the other side of the 2nd floor from where you start, giving you access to the Merregon Legionnaire (#8) and other small goodies. The Platform is activated by two levers, one which raises and lowers it, and another which moves it from one side of Grymforge to the other, allowing you both the lower platform and the rooms across without taking any fall damage.
At first, it might look like you will need to leave a member of your party behind to pull the levers, but this actually isn’t the case: both levers can be activated with Ranged Attacks, letting you manipualte them while all four members of your party are on the platform. Near the platform, there is the Longsword Mould for the Adamantine Forge. At another set of Levers further along the tracks (which work the same way), there is thea Scimitar Mould.
In a side room, accompanied by several Hellsboar, is a Merregon Legionnaire, who will attack you on sight. The Legionnaire is wearing a Devilfoil mask and weilding Firestoker, but the true treasure is just outside of the side room you can find him in, where the Mould for the Shield for the Adamantine Forge can be found.
An extremely deadly walkway filled with invisible traps and Fireball-blasting gargoyles, this walkway should be approached cautiously and with plenty of Disarm Kits in tow. It should be noted that flight, teleportation, or Mage Hand are all valid methods of bypassing the bridge entirely — you can even use any of these from below and behind, since the treasure room is broken open. It contains The Protecty Sparkswall, and Idol of Shar (of interest to Shadowheart), and a few other pieces of randomized loot.
If you elect to approach the traps on the bridge at face value, you will need to proceed with caution, first disabling the Gargoyle behind you (DC-10 Sleight of Hand). There are a number of flat pressure pads on the ground which you can see with or without a Perception check, and you will want to go as one person and jump over those, as well as a circular version in the very center of the bridge. Once you make it all the way across, the only way to open the gate is with the Knock spell. This does mean that, no matter what, some magic is required to get this treasure.
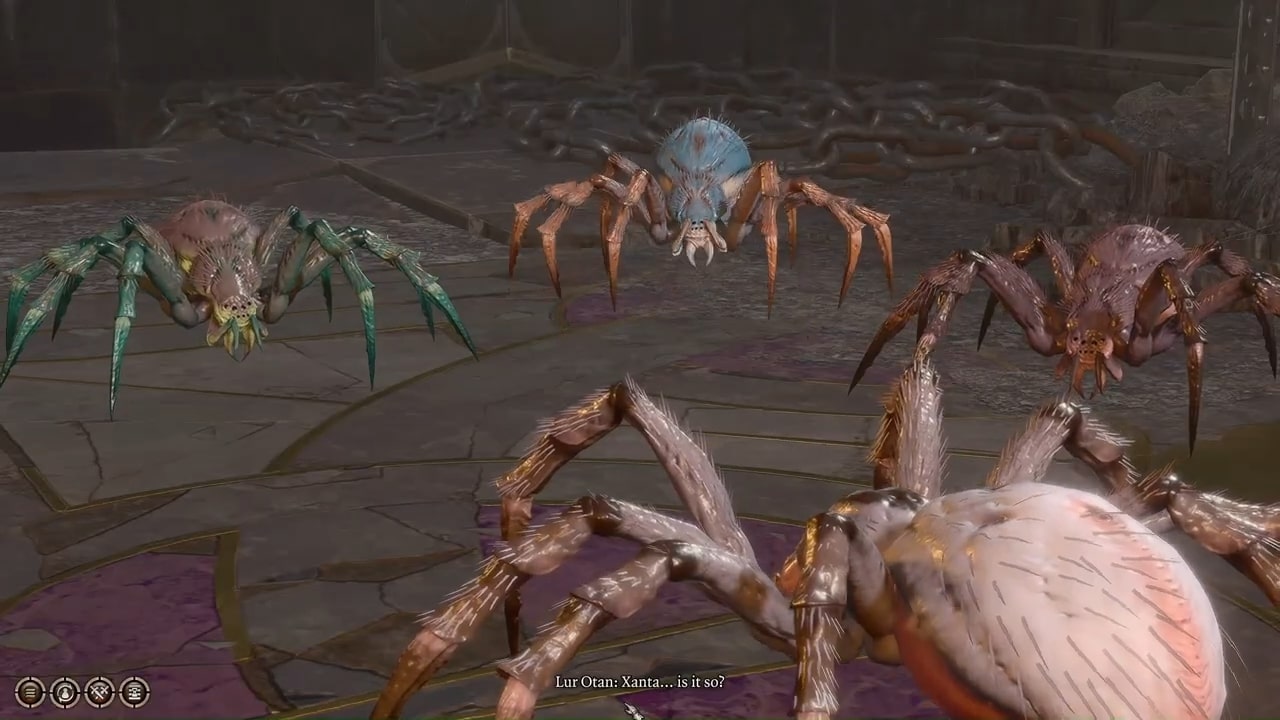
Near the docks, there are a group of four spiders. The largest spider is attempting to convince the other three of something; using Speak With Animals can reveal what (and give you more options than the simple Nature and Animal Handling checks you’d otherwise have). The largest spider, Lur Xanta, is attempting to convince the other three to abandon the Murmath in Grymforge and join her in worshipping Lolth, the spider queen.
There are a surprising number of options here, but they all boil down to either convincing the three spiders to join Lur Xantha and leave to worship Lolth, or convincing them to attack Lur Xantha for her treachery. If the play opts to stay out of it, the argument will always end in Lur Xantha being attacked and killed by the other three spiders.
It should be noted that the nearby Murmath, who raised the three smaller spiders, couldn’t care less about what happens to the Spiders, and will not interfere even if you turn his spiders into followers of Lolth.
On the opposite side of the docks from where you entered, Brathwen and Viss are disposing of a sizable number of Deep Gnome corpses. With DC-10 Perception check, you can notice something on one of the corpses, which you can take with a DC-20 Sleight of Hand check to obtain the Fetish of Calladuran Smoothhands off one of the corpses. If you get caught trying to take it, you can simply trade with Brathwen for it.
In the lower levels of Grymforge, in the door right behind Brathwen and Viss’s Corpse Disposal (#11), a passive Perception check can lead to you locating a hidden button, which opens a door to an explosive cache with 2 Smokepowder Satchels — enough to break through Nere’s Cave-In (#3).
In the flooded backrooms of Grymforge, you can locate a hidden button in the back corner with a successful passive Perception check, allowing you to locate the side path through Grymforge which Philomeen (#14) likely took. Once you open the door, prepare for a fight with some Ochre Jelly, which can descend from the ceiling above to ambush you.
Philomeen has excaped from slavery to the Duergar and left for dead by her compatriots, leaving her all alone. But she isn’t without defense: she was also able to steal away with a barrel of the incredibly powerful, legendary Rune Powder, with explosive power enough to eliminate most any character who faces off against her. And, trapped, she isn’t afraid to use it.
You will need to succeed on a DC-15 Persuasion or Intimidation check in order to convince her to stand down and give you the Rune Powder, or else she will toss it at you — a quick way to wipe your party out. If you have spoken to other Deep Gnomes and promised to help Philomeen, then the DC for the Persuasion check will only be 10. If you also convince Philomeen to give you the Rune Powder, it is an extremely powerful explosive, which you can use to free Nere from the Cave In (#3) or simply as a weapon when you see fit.
Once you’ve traveled for far enough along the raised central platform, you will arrive at the proper entrance to the Adamantine Forge. This entrance, which required you to use the raised platforms above to reach, is home to several sets of defensive Animated Armour sets, which will attack you on sight, as well as 3 Adamantine Forge Moulds (Mace, Splint, Scale Mail). There is also a key by the lava beach, which opens a chest containing a Sentient Amulet at #17.
Protecting some valuable Mithral Ore is a large group of Magma Mephits. Clearing them out gets you access to said ore. If only it could always be so simple.
It’s time to play “The Floor is Lava” with some fire spouts and a deadly Fire Elemental. Oh joy! This part requires precise timing, jumping to avoid the lava as much as possible (though you might be able to handle it shortly), and keeping an eye out for sudden lava spouts on the rocky platforms. As such, it might be wise to enter turn-based mode and traversing the lava field with just one party member, doubly so if you intend to avoid the Fire Elemental noticing you.
If you make it to the central island, you can access the Adamantine Chest, the key for which you can find on a lava beach near the Adamantine Forge Entrance (#15). Inside, you’ll find a Sentient Amulet, starting both some dialog and quest with the… erm… amulet.
All the way on the other side of the lava lake, you can also find a piece of Mithral Ore, though it requires traversing even more lava.
The Adamantine Forge can allow you to procure amazing Adamantine Weapons, so long as you clear out the forge guardian, Grym. We have a full guide on the Adamantine Forge and all of its various moulds, detailing the entire process and possible results of using the forge.
In order to access the forge, you will need to defeat the forge guardian, Grym, who is likely to be the toughest boss you’ll have faced at this point in the game. Thankfully, we have a guide for defeating Grym, including how to heat him up in order to deal damage to him consistently.
You can come in this way, but you don’t leave the same way. Once you have ferried across the Dark Lake in the Underdark, you’ll be in Grymforge. Should you leave or try to teleport out, Nere (#3) will certainly perish before you reach him, which might not be the worst thing.
An elevator up to Moonrise Towers, this is the logical next step for the main story, letting you bypass the Mountain Pass and some of the Shadow-Cursed Lands. Just outside the exit, two Duergar will be bullying a Deep Gnome slave, allowing you to interfere however you wish. The same Duergar will also tell you that you can use the elevator, but without a repaired Moonlantern, it might prove difficult. Still, this elevator is freely accessible.
You can teleport to either of these from Within Grymforge without progressing Nere’s countdown at his cave-in (#3).
Where to Go Next?
After finding the Adamtanine Forge, dealing with Nere, and uncovering the many secrets of Grymforge, you have two main options for where to head next.
Shadow-Cursed Lands: The progression of the game requires you to go hear next, unless you decide to turn back and find a different path. If not, this is your best way forward.
The Underdark: After dealing with Nere (however you decide to) and finding the Adamantine Forge, there are some quests you can turn in and some things you can deal with back in the Underdark.
Graves is an avid writer, web designer, and gamer, with more ideas than he could hope to achieve in a lifetime. But, armed with a mug of coffee and an overactive imagination, he'll try. When he isn't working on a creative project, he is painting miniatures, reading cheesy sci-fi novels, or making music.