A caravan has been massacred and its cargo stolen! Where can you find the shipment, and should you keep it for yourself? We’ll answer all of your questions in our guide.
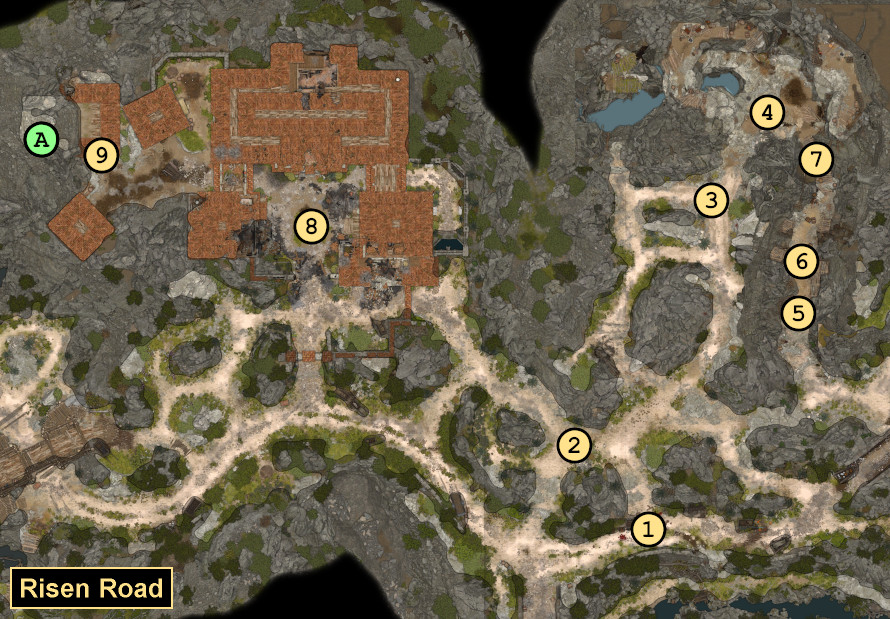
While making your way through the Risen Road, you’ll come across some bloated hyenas at the site of a caravan massacre (#1). When you get close enough to the hyenas, you’ll automatically examine them. If you pass a DC-10 Arcana check, then you’ll realize that the hyenas are about to give birth to gnolls. If you do anything other than kill the hyena that you’re examining, then it will produce a newborn gnoll. If you didn’t pass the Arcana check, then this development will surprise you. But regardless, a battle will start up.
If you examine the remaining bloated hyenas, then you’ll see that they’re suffering from Yeenoghu’s Hunger with 1 or 2 turns remaining (depending on if you got surprised). That’s the countdown until they give birth. The bloated hyenas are only Level 1, and they won’t move or attack, while the newborn gnolls are Level 4 — and they will definitely attack. So try to kill as many of the bloated hyenas as possible before they erupt.
You might also notice a regular hyena with the bloated hyenas. If the gnolls to the north (#2) are still there, then the hyena will run over to them and alert them to your presence, and they’ll join in the fight. So you can either try to kill the hyena before it runs off, or you can kill the gnolls before visiting the massacre site. Or, if you’re feeling brave, kill everything all at once.
After the battle when you search through the wreckage, you’ll discover a Dead Caravan Agent carrying Shipment Orders. The orders will indicate that somebody named NF is expecting a chest, and that opening the chest might prove deadly. Reading the orders will trigger the quest. You can also trigger the quest by meeting the chest’s intended recipients (Exit A), who will ask you to look for it.
Walkthrough
You won’t see any evil-looking chests at the massacre site, but if you explore the nearby roadways, you’ll spot some blood trails and paw prints leading away to the north towards a cave. When you approach the cave, you’ll discover a standoff between a group of gnolls led by the warlord Flind (#3), and the two caravan survivors, who will be holed up inside the cave trying to stay alive (#4). There are two ways to deal with the situation.
Approach the Gnolls
When the gnolls spot you, here’s what should happen: the caravan survivors should decide to stay in the cave and let you deal with the gnolls on your own, and Flind should turn around and talk to you. But what is much more likelyto happen is Flind and the gnolls will simply attack you.
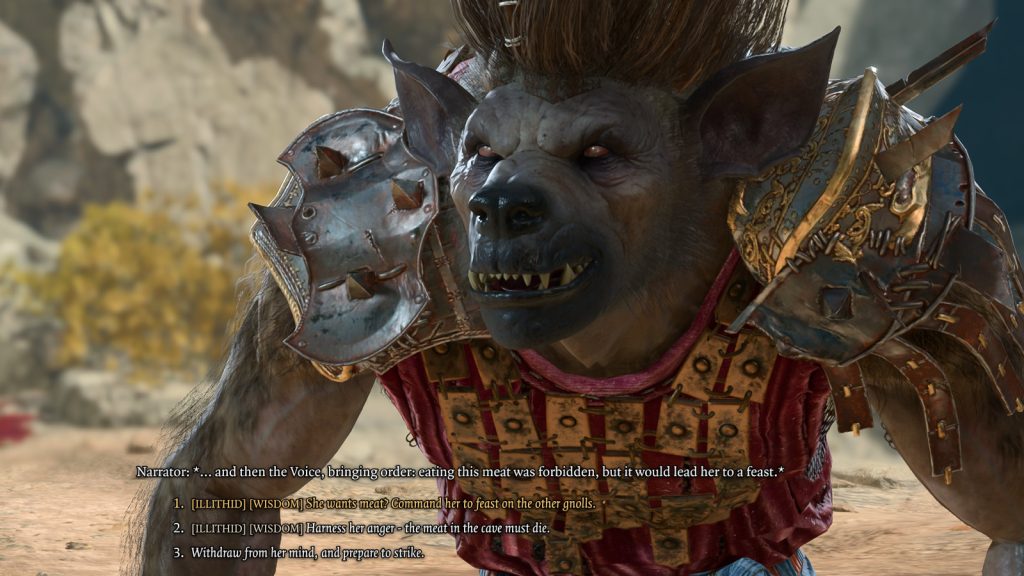
Sneak up on Flind and then command her.
One solution we’ve seen for this is to sneak up to within a few feet of Flind, and then either reveal yourself or let the gnolls spot you. Combat will likely begin, but if nobody from your party or the gnolls attacks before Flind’s turn, then she should stop the fight and talk to you. Flind has a pretty high initiative, so this will usually work.
Talking to Flind is important because she’ll recognize you as a fellow True Soul, and so she’ll resist attacking you. If you have your Illithid authority available, then this will allow you to command her, provided you can beat the necessary Wisdom checks. The commands include:
Eat the survivors in the cave (DC-2).
Eat the other gnolls (DC-15).
Eat herself (DC-10 followed by DC-15).
Leave (DC-10).
The first command you give Flind will have a DC-2 check. After that, the commands will have the DC values listed above. You can only order Flind to eat the survivors with your first command, which is why it’s listed as DC-2. Obviously, the best path is to use the DC-2 check on having Flind eat her companions.
No matter what, you’ll have to fight the five gnolls and two hyenas with Flind, but it’s much easier to do this if Flind is on your side rather than theirs. Then you can decide what to do about Flind when she’s all alone. It’s worthwhile to kill her for her loot (see below).
Circle Around the Gnolls
To the east of the standoff, you’ll find another cave. Inside, you’ll have to destroy some wooden planks (#5); you’ll have to deal with a nasty boulder trap (#6), which will require you to pass two DC-15 Perception checks to detect its tripwires, and two DC-10 Sleight of Hand checks to disarm them; and then you’ll have to jump over a broken bridge (#7). But if you survive all of that, then you’ll end up in the cave with Olly and Rugan, the two caravan survivors (#4).
When you talk to Rugan, you’ll get one line of dialogue to set up your defense:
“I’ll deal with the gnolls.” Olly and Rugan will move a middle distance away from the entrance.
“Hold the line while I prepare for battle.” Olly and Rugan will move close to the entrance.
“You’re on your own.” Olly and Rugan will move far away from the entrance.
You can also try a DC-5 Persuasion check to demand payment for your help. If you’re successful, then Rugan will pay you 38 gold, and he and Olly will move a middle distance away from the entrance.
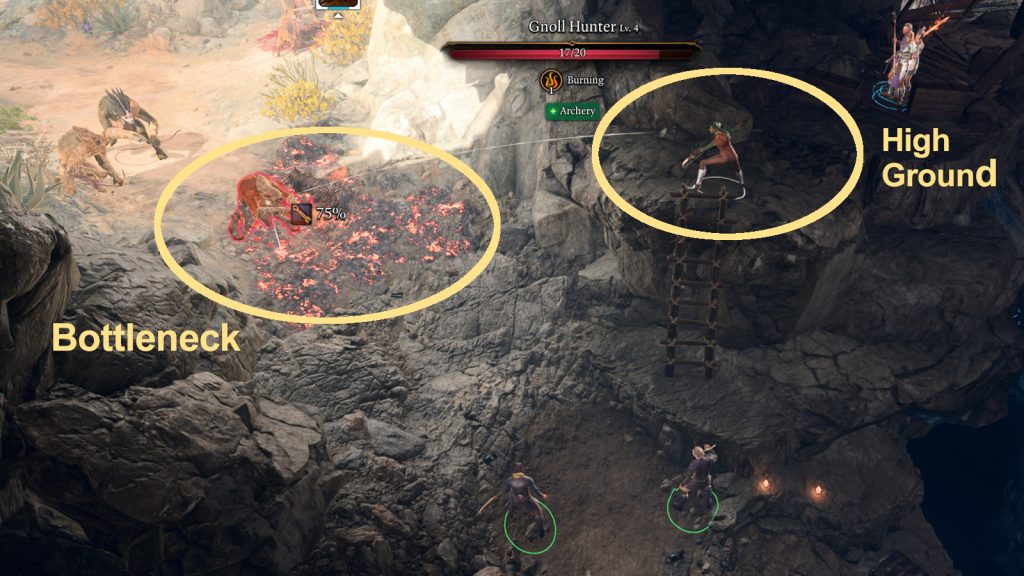
If you tell Rugan to hold the line, then the battle won’t start until the gnolls spot you. It won’t make any difference if they see Olly and Rugan. This will give you a chance to move your ranged attackers to high ground, but you probably won’t be able to set up any sort of trap at the entrance (so those Firewine Barrels in the side cave probably won’t do you any good). Otherwise, the battle will start up almost right away, but you can immediately enter turn-based mode to give yourself at least one move before the gnolls attack. So you’ll have to decide how much you want Olly and Rugan to live. The closer they are to the entrance, the more likely they are to die. But their deaths won’t really change anything for the quest.
Note: Olly with his 12 hit points and Rugan with his penchant for charging into trouble are likely to die regardless. If you really want them to survive, you should confront the gnolls instead.
Setting up a good defense.
When the battle begins, the gnolls will charge at the cave. The cave slopes downward, which will give them the height advantage against you. So try to move your ranged attackers to high ground, and also try to keep the gnolls bottled up at the entrance, where you can hit them with area spells and bombs. Olly and Rugan will use Alchemist’s Fire, and that’s a good choice if you have any of your own. Flind will do a lot of damage and paralyze with her attacks, so focus on her first and then take out the rest.
After the Battle
After the battle when you loot the corpses, you’ll find a Shattered Flail and a Mind Flayer Parasite Specimen on Flind’s corpse (if you killed her). You can also grab the scimitar Speedy Reply from the body of a Dead Caravan Agent outside the cave, and the gloves Reason’s Grasp from a locked chest in the back of the cave.
To continue the quest, you should talk to Rugan. If he died during the battle, then you can use Speak with Dead on him. Zugan will reveal that he and Olly are Zhentarim agents, and that they’re transporting a chest from Elturgard to Baldur’s Gate — but that they’re planning to stop at a Zhentarim hideout next to Waukeen’s Rest along the way. He’ll even tell you the pass phrase for the hideout: “little serpent, long shadow.”
At the end of your conversation with Rugan, you can attempt to liberate the chest from him. This will require you to pass a DC-15 Intimidation check (Barbarian advantage) or a DC-15 Persuasion check (Rogue advantage). If you pass a DC-10 History check to recognize what Tarenths are, and if you’re playing a Bard, then you can also try your luck with a DC-15 Deception check (with advantage). Failing the above, you can also kill Olly and Rugan for the chest (or take it after they’ve been killed), or steal it from them. For a less contentious form of compensation, you can demand money for your assistance, and if you pass a DC-10 Intimidation check, then Rugan will pay you 38 gold (assuming he didn’t pay you earlier).
You’ll find the chest, a Caravan Strongbox, in the middle of the cave where you met Olly and Rugan (#4). It’ll have a DC-20 lock. Opening the chest will make the Zhentarim agents mad at you if you meet them later, but any Criminals in your party will gain the “Open for a Surprise” Inspiration. Inside the chest, you’ll find an Iron Flask, Thieves’ Tools, and some gold.
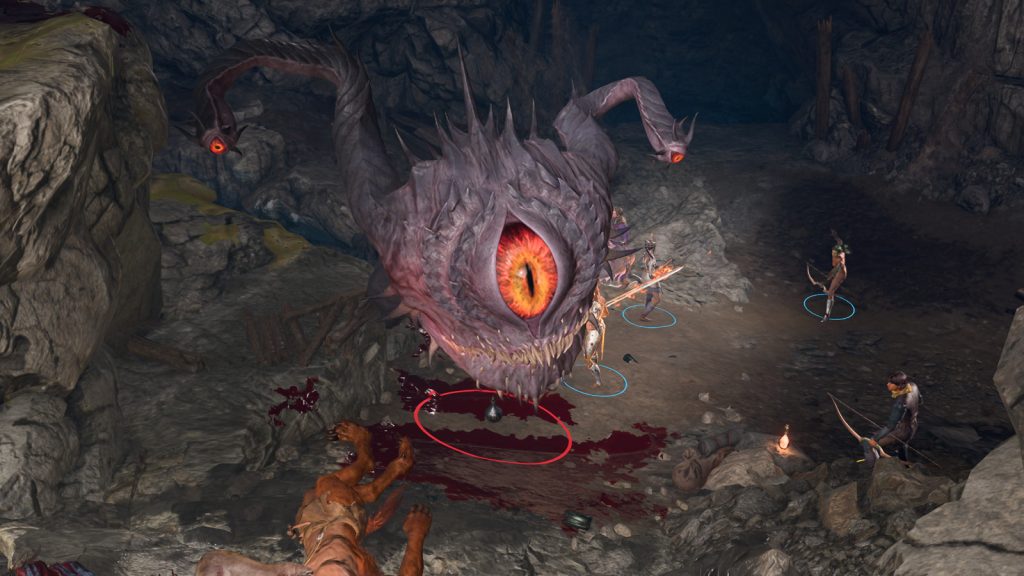
My, what a big eye you have, grandma!
The Iron Flask contains a Level 5 Spectator. Passing a DC-10 Arcana check will give you a hint about this. If you open the flask, then you’ll release the Spectator, and it will attack you. The Spectator is a pretty nasty enemy with 136 hit points and strong attacks, so it’s a good idea to prepare first before summoning it. If you kill the Spectator, then you’ll earn 150 xp, but it won’t drop any equipment.
A better use for the flask is as a battle summons. If you throw the flask onto the ground, then the Spectator will appear where it lands — and attack anybody nearby (but probably focus on you if it has to make a choice). This can come in handy in a few fights, including inside the Zhentarim hideout coming up (if you choose to fight there).
Zhentarim Hideout
You’ll find Waukeen’s Rest located a short distance to the west (#8), but when you first arrive there, it’ll be on fire from a recent raid by gnolls and drow. It’s a good idea to help with the fire — see the quest Rescue the Grand Duke for details — but for this quest you can ignore the flames and head straight for the inn’s outer buildings. You’ll recognize the building concealing the Zhentarim hideout because it’ll have three crates in front of the door and a dead ox nearby (#9).
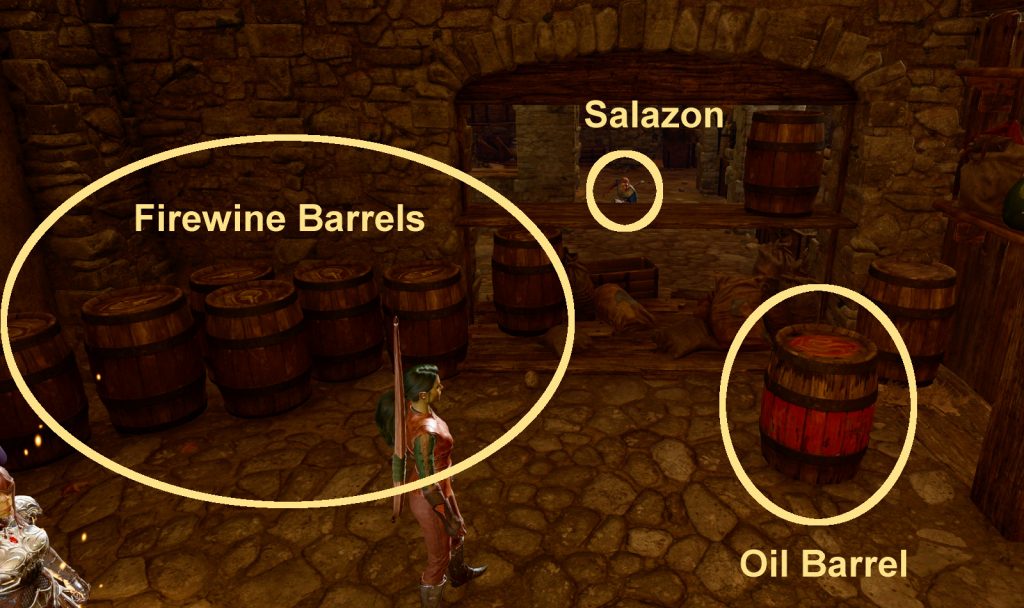
Inside the building, you’ll get stopped by a Zhentarim agent named Salazon. He’ll demand the pass phrase from you. There are three ways to get past him without a fight:
If you learned the pass phrase from Rugan, then you can relay it to Salazon.
If you pass a DC-11 Intelligence check, then you can read Salazon’s mind and learn the pass phrase that way.
If you pass a DC-10 Dexterity check, then you’ll react more quickly than Salazon, which will give you a chance to talk to him. If you follow this up by passing a DC-15 Intimidation check or a DC-15 Persuasion check, then he’ll allow you through.
If you’re convincing with Salazon, then he’ll give you an Engraved Key, and he’ll point you to the hatch in the back of the building (Exit A). The key will unlock the wardrobe in the room below, through which you’ll discover the Zhentarim hideout — aka the Zhentarim Basement.
Barrels, barrels everywhere, but not a drop to drink.
If you’re not convincing with Salazon, then he’ll blow up the Oil Barrel right next to your position, which will subsequently blow up all of the Firewine Barrels in the building — and do massive damage to your party. Meanwhile, Salazon will flee into the hideout. You can mitigate the explosion by removing all of the Firewine Barrels in the front part of the building, but Salazon will always spot you if you attempt to remove the Oil Barrel, so you can’t stop the explosion completely. You can also shoot the Oil Barrel yourself. Amusingly, this will cause Salazon to rush out of his hiding place and accuse you of being a vandal, at which point you can kill him. Nobody in the hideout will notice if he dies.
In the room below the hatch, you’ll need to open the wardrobe against the back wall, either by using the Engraved Key to unlock it, or by picking its DC-12 lock. Inside the wardrobe, you’ll discover a hidden ladder leading down to the Zhentarim Basement.
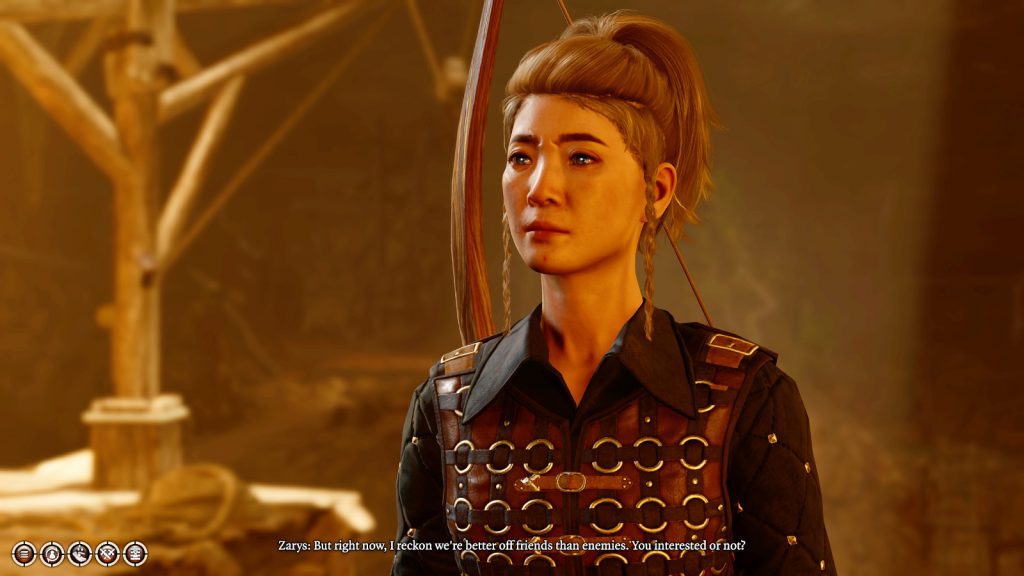
A short ways into the basement, you’ll come to a locked gate where you’ll be confronted by the Zhentarim leader Zarys. If Rugan is still alive, then Zarys will know who you are, and she’ll allow you to enter. Otherwise, you’ll have to convince her to let you in. A few skill checks will work for this: DC-10 Intimidation (Barbarian, Githyanki advantage), DC-10 Persuasion, or DC-12 Intelligence (to read her thoughts). If you fail in your check, or if you pass the DC-10 Stealth check, then Zarys will leave the gate locked, she’ll turn on the traps behind it (which require DC-20 Perception checks to detect), and all of the Zhentarim in the basement will turn hostile. Attacking the Zhentarim will complete the quest, but this is the “bad” ending, mostly because it means you won’t be able to trade with the Zhentarim shopkeeper Brem, who has a lot of nice items for sale, including Gloves of Thievery, The Jolty Vest, and the Titanstring Bow.
Will Zarys be your friend — or not?
Inside the basement, you’ll need to talk to Zarys. Your conversation with her will be different depending on what you did earlier in the quest:
If you saved Olly and Rugan and let them keep the chest, then Zarys will reward you with the unique heavy crossbow Harold, plus 125 gold.
If you saved Olly and Rugan but took the chest from them, then you’ll discover that they didn’t receive a warm reception when they returned to the basement — Olly will be dead, and Rugan tortured. You’ll then have to convince Zarys not to kill you as well. You can do this by passing a skill check: DC-12 History (to quote a Zhentarim proverb), DC-20 Intimidation (Barbarian advantage), DC-10 Perception (Rogue only), or DC-15 Persuasion.
If you’re successful in your skill check, then Zarys will order you to kill Rugan. If you agree, then Rugan will just suddenly die, and Zarys will allow you to complete the chest delivery yourself. However, the quest will end at this point, and you won’t earn a reward for delivering the chest, so you’ll have to decide if you want to keep lugging it around or loot it for yourself. If you fail in your skill check, or if you refuse to kill Rugan, then the Zhentarim in the basement will attack you.
If Olly and Rugan died, then Zarys will hire you to look for them — and the chest. If you give her the chest unopened, then she’ll reward you with the unique heavy crossbow Harold, plus 63 gold. If you opened the chest, even if you didn’t loot it, then Zarys will be upset, and all of the Zhentarim in the basement will attack you.
If you complete the quest without attacking the Zhentarim, then any Criminals in your party will earn the “Friend of the Family” Inspiration.
Share this article:
Steven Carter
Starting with cassette tape games on the TRS-80, Steven has been playing, creating, and writing about games for a long, long time. This makes him experienced, not old. Lately, Steven has been focusing on walkthroughs, making sure everybody knows how to solve Towers of Hanoi puzzles.