From Sorcerous Sundries in the Lower City of Baldur’s Gate, you can go to two separate – but linked – locations: Ramazith’s Tower and the Sorcerous Vaults. These magical locations are home to many magical artifacts, as well as Lorroakan, a powerful Wizard who is on the hunt for one “Nightsong.”
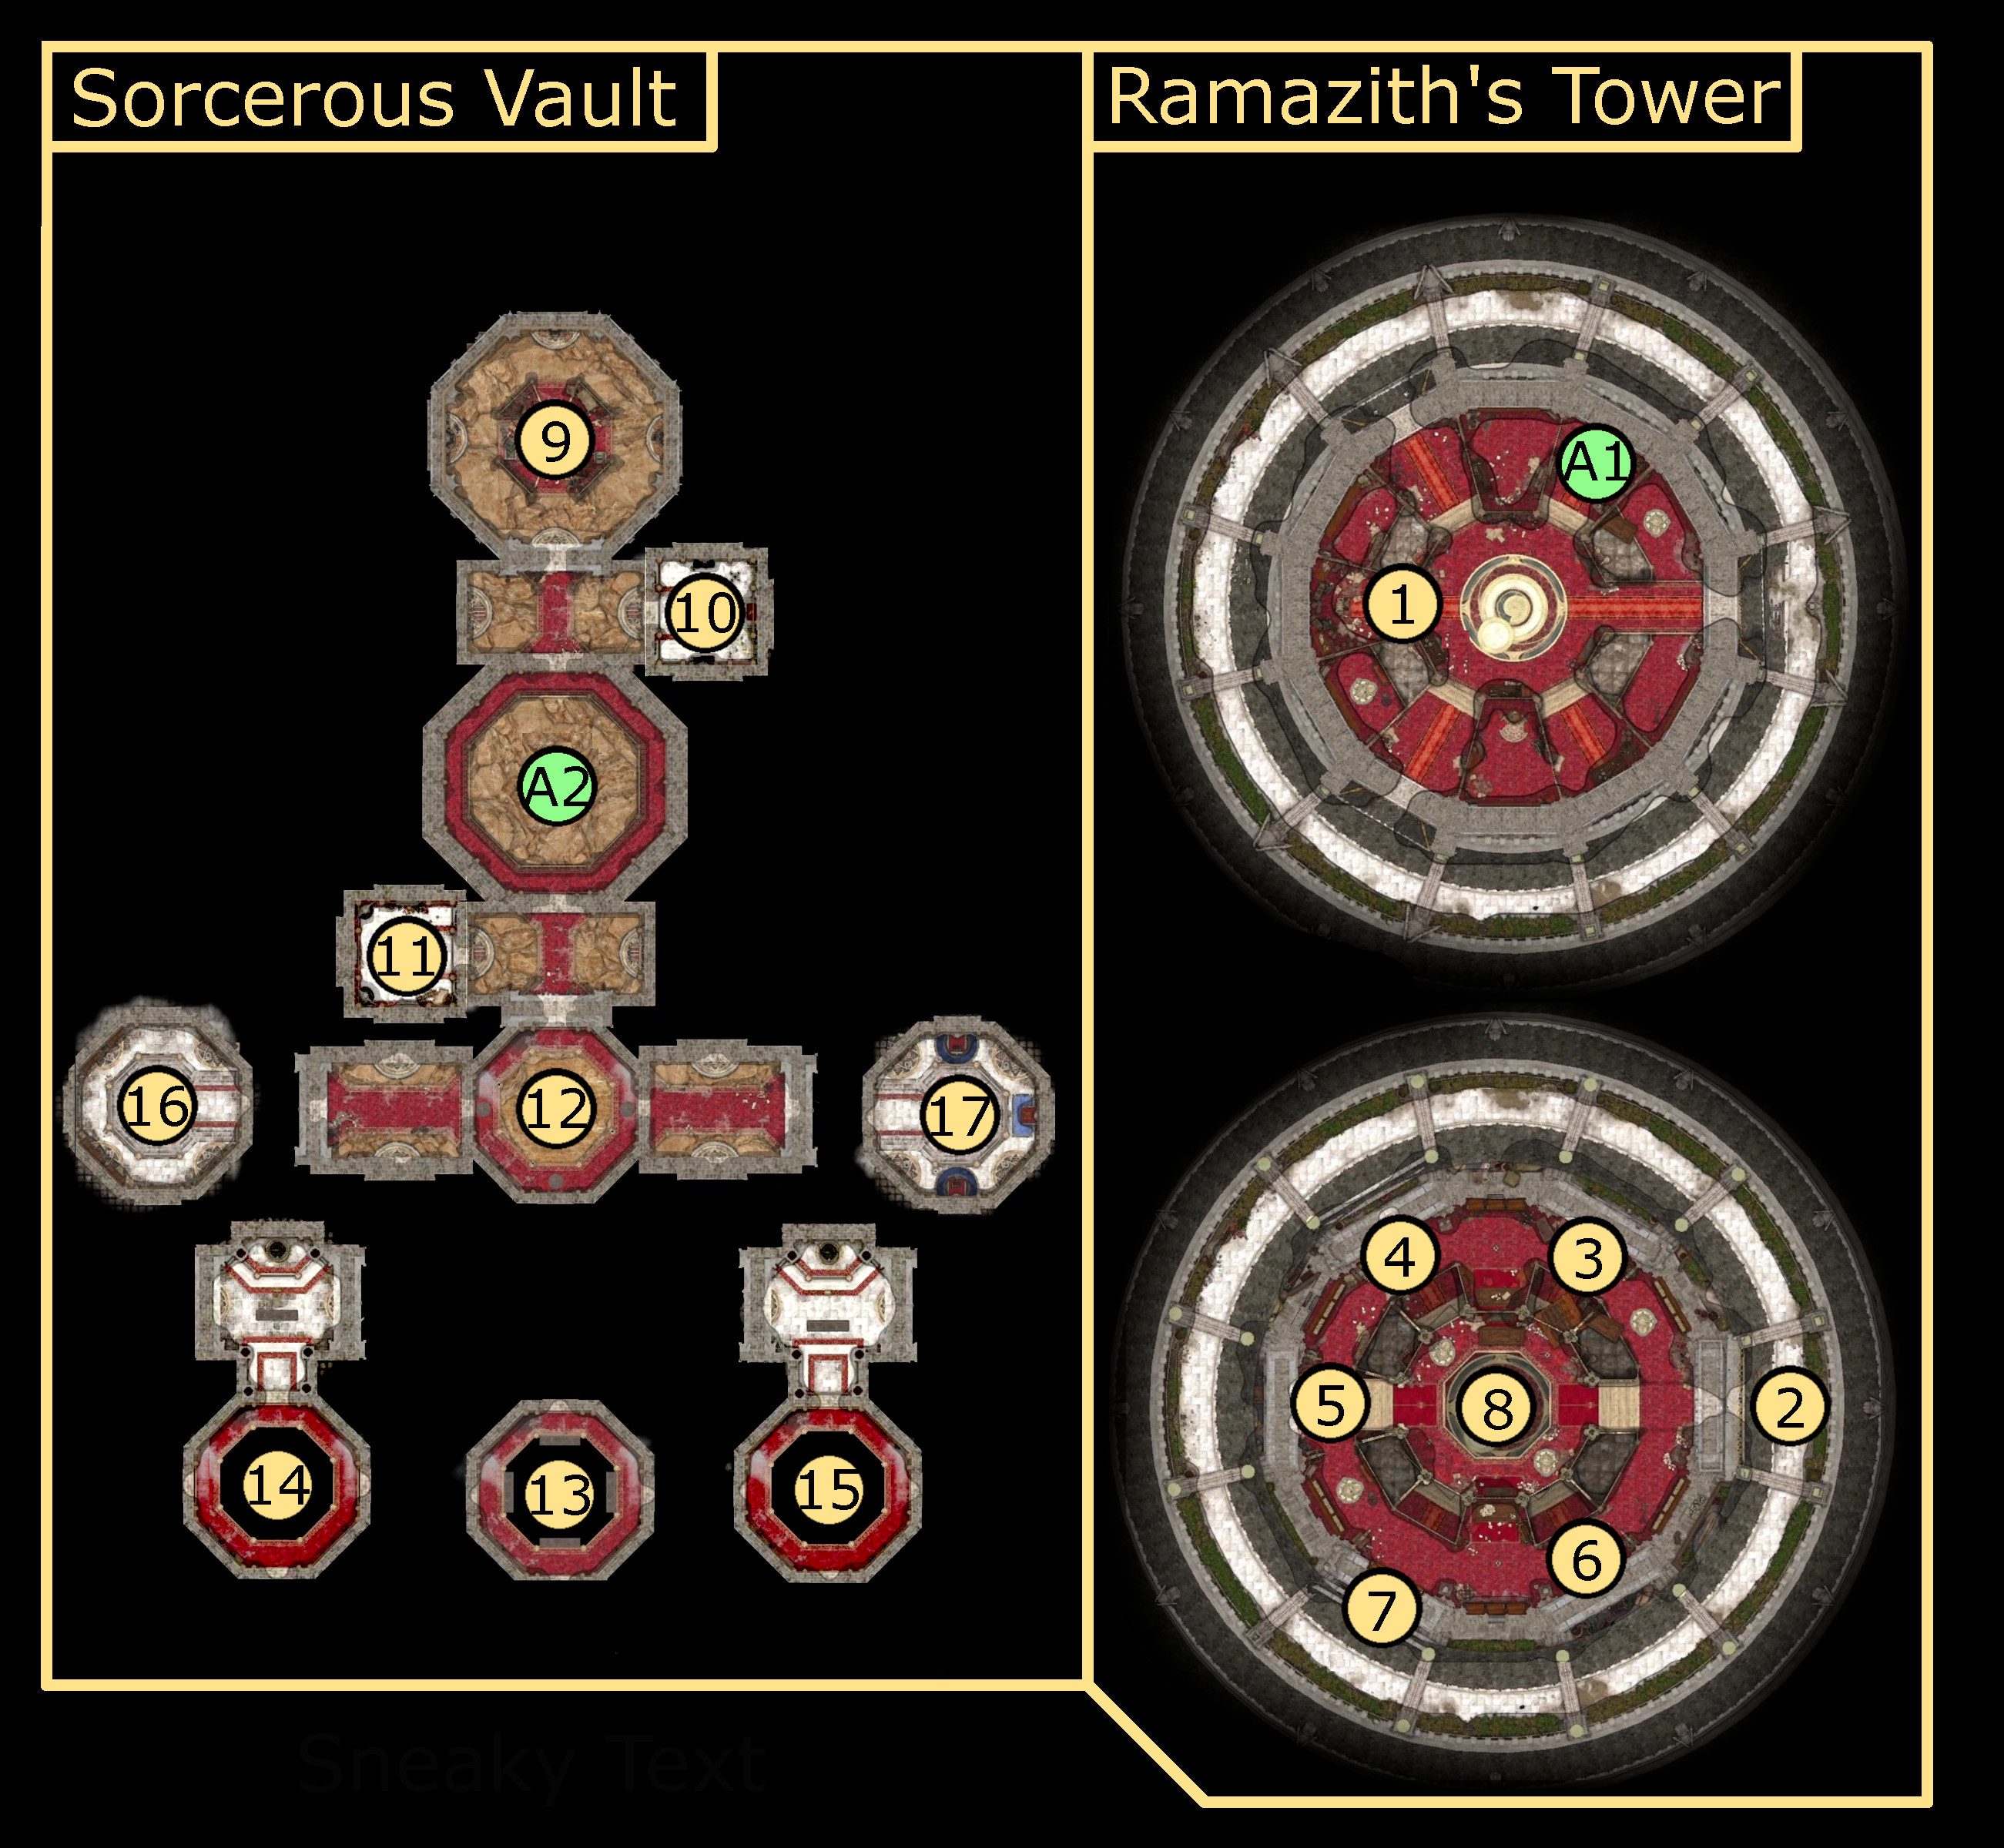
Map
Points of Interest
NOTE: To enter Ramazith’s Tower, you will need to successfully answer the question posed by his Projection on the upper floor of Sorcerous Sundries asking “What is the Nightsong?”. The correct answer, the far left, blue portal, has a plaque stating that “The Nightsong is an immortal being, the child of a deity.” This will take you to Ramazith’s Tower (A1), but any of the other portals will instantly down you and put you in front of Sorcerous Sundries, in need of Aid.
Lorroakan
After entering Ramazith’s Tower, you will have the chance to talk to Lorroakan, the master of the Tower and one of the most powerful Wizards in Faerûn. He has one goal, however: to find the Nightsong, who you learned in Act 2 was actually Dame Aylin, imprisoned.
If Dame Aylin is still alive, can either tell Lorroakan that she is alive, or try to deceive Lorroakan with a DC-15 to -20  Deception check (depending on your prior choices), or you can pass a DC-20
  Intimidation check. If Lorroakan determines that she is alive and at your camp, though, then he will tell you to bring her to him. Whether you agree or not, you don’t need to make a choice at this point. But, if you firmly tell Lorroakan that you won’t bring him the Nightsong after he knows she is at your camp, he will attack you immediately.
After this, the next time you speak to Dame Aylin at camp, then if she finds out that Lorroakan knows where she is (which she will do if Lorroakan knows), then she will insist on going to fight him, despite Isobel’s protests. The only way to prevent this is to lie to Lorroakan and then not tell Dame Aylin about his hunt for her, as if she finds out at any point, she will go to fight Lorroakan.
Returning to Lorroakan after Dame Aylin goes to fight him, you will need to pick a side to support. Should you ally with Dame Aylin, she will fight alongside you against Lorroakan, who will have four myrmidons and a few other minions at his side. If you do so, then Dame Aylin will come to your aid in the final battle, and if Rolan is still alive, and you saved his family from Moonrise Tower Prison in Act 2, then he will also agree to join you for the final battle.
If you decide, instead, to betray Dame Aylin and turn her in to Lorroakan, then you will fight her and 4 “Moonlight Slivers” in this battle instead. At the end of it, Lorroakan will imprison Dame Aylin once again, give you 5000 gold, and agree to help you during the final battle. This will also result in Isobel’s death.
Also worth noting: you can jump on the floating furniture on this upper level to reach the lower level of Ramazith’s Tower, where all the other Points of Interest (#2 to #8)
Fireball Button
This Weave button, on the lower floor of Ramazith’s Tower, can be pressed, and then it will fire two Fireballs into Baldur’s Gate. This has no further effect.
Turret Button
Upon pressing this Weave button, 4 Arcane Turrets will be summoned after a few seconds from various locations around the floor. These Turrets have low health, but their Medium Toughness can prevent some characters from doing much damage to them. These turrets will be hostile, but won’t actually attack on their turns.
Teleport to Below (8)
This button will teleport you to the lowest section of Ramazith’s Tower (#8), where you can find two Globes of Invulnerability and a number of display cases containing valuable magical artifacts and a certain important key.
Trap Button
Pressing this Weave button will cause the various vents around the room to exude  Cloudkill. Which, like… if you wanna do that, you can.
Teleport to Vaults (10)
This Weave button will teleport you into the Sorcerous Vaults (#10), using Lorroakan’s secret back entrance.
Barricade
This barricade can be broken to reach the outside of Lorroakan’s tower.
Globes of Invulnerability
At the bottom of Ramazith’s Tower, you will find 2  Globes of Invulnerability, a Trapped Display Case (that can be disarmed with a DC-15
  Sleight of Hand check) with the Counting House Safe no.1 Key, a Gilded Chest with the “Sorcerous Sundries Mystery Door Key” (which unlocks the door to the Vault Entryway (#12)), and a Display Case with a Scroll of Globe of Invulnerability.
In front of each Globe of Invulnerability, there is an invisible lever. These can be seen by using  See Invisibility, and then a successful DC-20
  Arcana check will allow you to disable the Globe of Invulnerability. The staff Markoheshkir and the Robe of the Weave can be found here, and they are some of the best generalist items for spellcasters in the game.
Ramazith’s Entrance
Accessed either by using the Weave button in Ramazith’s Tower (#6) or by passive a passive  Perception check near the cracked wall to the north in the room accessed via the Tome-Monger’s Office in Sorcerous Sundries (A2).
Within Ramazith’s Entrance, you can find a display case locked with a DC-20 Sleight of Hand lock. Opening it gets you access to The Red Knight’s Final Strategem. This gives all characters the ability to cast Artistry of War one time, and can be written into a Wizard’s spell book for them to cast it whenever. This book is also worth 2000 gold, and so it is probably a good idea to pick it up.
Peculiar Lamp
Behind the chest to the east in the hallway leading to Ramazith’s Entrance (#9), you can find a Peculiar Lamp in a secret room behind the chest. Interacting this lamp will teleport you into the Djinni Lamp, after the Djinni it belongs to sarcastically thanks you for freeing him. Regardless of your response, he will leave you trapped within the Peculiar Lamp.
Anyone outside of the Lamp can interact with the Djinni on the outside, if they were present as the first party member entered it. They can choose to either attack him, ask for gold (at which point he will happily give you 1000 gold), or be allowed to leave.
While the inside of the lamp has a copious amount of powerful potions, you will quickly realize that you are trapped within it. In order to escape, you will need to either have someone else rub the lamp to switch places with you (you can do this with summoned creatures so that a party member isn’t trapped with) or can cast any Summon spell to be teleported out of the Lamp with them. In one of the Gilded Chests in the room, you can even find a Scroll of Summon Quasit that will allow you to do so.
Secret Room
In the hallway leading from the portal to the Sorcerous Vaults (A2), behind the chest to the west, you can walk through the wall to find a secret room. Here, you can find Caution Before the Seelie. Reading it will give you access to a Scroll of Bestial Communion. The book itself is also worth 2,000 gold, making it well worth it to pick up.
Vault Entryway
To get to the Vault Entryway, you need to get through a DC-15 Sleight of Hand locked door, which can also be unlocked using the Sorcerous Sundries Mystery Door Key found in a Gilded Chest near the Globes of Invulnerability (#8) in Ramazith’s Tower.
In the actual room, in front of every door except for Ramazith’s, there is a hidden Pressure Plate that can be noticed with a passive Perception check, as well as several hidden Vents on each of the circular features on the floor. These can all be disarmed with a DC-10 Sleight of Hand check. Should you step on the Pressure Plates, the vents will release Cloudkill.
There are 4 doors:
- Ramazith: this is the door you entered through, leading to Ramazith’s Vault (#9).
- Elminster: Leading to Elminster’s Vault (#17). The door can only be unlocked via Elminster’s Lever (#15).
- Karsus: Leading to Karsus’ Vault (#16). The door can only be unlocked via Karsus’ Lever (#14).
- Silverhand: This leads to Silverhand’s Challenge (#13), which leads to the two levers mentioned above.
Silverhand’s Challenge
The only door that will be unlocked (other than the one you came in through) is the Silverhand door. Going through it will bring you to a new room. 4 Pressure Plates surround the center of the room, and they can be disarmed with a DC-10 Sleight of Hand check to avoid creating a Void Cloud throughout the room.
From here, there are 4 doors, leading to different places:
- Illusion and Transmutation both teleport the player back to the Vault Entryway (#12).
- Destroying the Illusion door reveals a secret room with a chest containing the Hellfire Greataxe.
- Abjuration leads to another room, leading to Karsus’ Lever (#14).
- Evocation leads to another room, leading to Elminster’s Lever (#15).
Karsus’ Lever
The center circular feature that you teleport onto after going through the Abjuration door is actually a pressure plate. As soon as you step off of it, gargoyles will fire Fire Bolts that explode. These shots can be timed to avoid them, or you can disarm the gargoyle traps with a DC-10 Sleight of Hand check.
Going through any door other than the one labelled “Silver” will teleport you back to the Vault Entryway (#12). Beyond this door, there are 3 Pressure Plates on the ground that you can notice with a passive Perception check, which activates 2 Gargoyle Traps at the side of the room that fire Disintegrate. These can all be disarmed with a DC-10 Sleight of Hand check.
Through Silver, though, you will find another room. A plaque in front of a lever will state “To Karsus”, and pulling the lever will, indeed, open the door in the Vault Entryway to Karsus’ Vault (#16).
Elminster’s Lever
The center circular feature that you teleport onto after going through the Evocation door is actually a pressure plate. As soon as you step off of it, gargoyles will fire Arrows of Ice. These shots can be timed to avoid them, or you can disarm the gargoyle traps with a DC-10 Sleight of Hand check
Going through any door other than the one labelled “Wish” will teleport you back to the Vault Entryway (#12). Beyond this door, there are 3 Pressure Plates on the ground that you can notice with a passive Perception check, which activates 2 Gargoyle Traps at the side of the room that fire Disintigrate. These can all be disarmed with a DC-10 Sleight of Hand check.
Through Wish, though, you will find another room. A plaque in front of a lever will state “To Elminster”, and pulling the lever will, indeed, open the door in the Vault Entryway to Elminster’s Vault (#17).
Karsus’ Vault
Karsus’ Vault must first be opened via Karsus’ Lever (#14), requiring you to navigate both the Vault Entryway (#12) and Silverhand’s Challenge (#13). After switching the lever, the door to the Vault will be open.
In this vault, you can find a variety of +1 Magical Weapons, a Scroll of Dethrone (an incredibly powerful spell), and the Annals of Karsus. Reading this book gives you another Scroll of Dethrone, and also gives Gale an idea of how to obtain godhood. This will lead to Gale being invited to speak to Mystra as the Stormshore Tabernacle in the Lower City, and put him on a path that could lead to him becoming a god during the Epilogue of the game, should you encourage him to do so.
Elminster’s Vault
Elminster’s Vault must first be opened via Elminster’s Lever (#15), requiring you to navigate both the Vault Entryway (#12) and Silverhand’s Challenge (#13). After switching the lever, the door to the Vault will be open.
In the vault, there are two gilded chests with some slightly valuable loot, as well as a DC-20 Sleight of Hand locked Display Case containing the Tharchiate Codex. Reading this Codex will curse you with Tharchiate Withering, lowering your  Constitution by 5 points. This must be removed via
  Remove Curse or
  Greater Restoration. After it is cured, it becomes Tharchiate Vigour, which gives 20 Temporary Hit Points after every Long Rest.
The Tharchiate Codex is worth 2,000 gold, making it more valuable than anything else in Elminster’s Vault.
Exits
Each of the two exits from Ramazith’s Tower and the Sorcerous Vaults lead back to Sorcerous Sundries in the Lower City.
- A1: Ramazith’s Tower, top floor, near Lorroakan (#1)
- A2: Sorcerous Vaults, in Ramazith’s section.