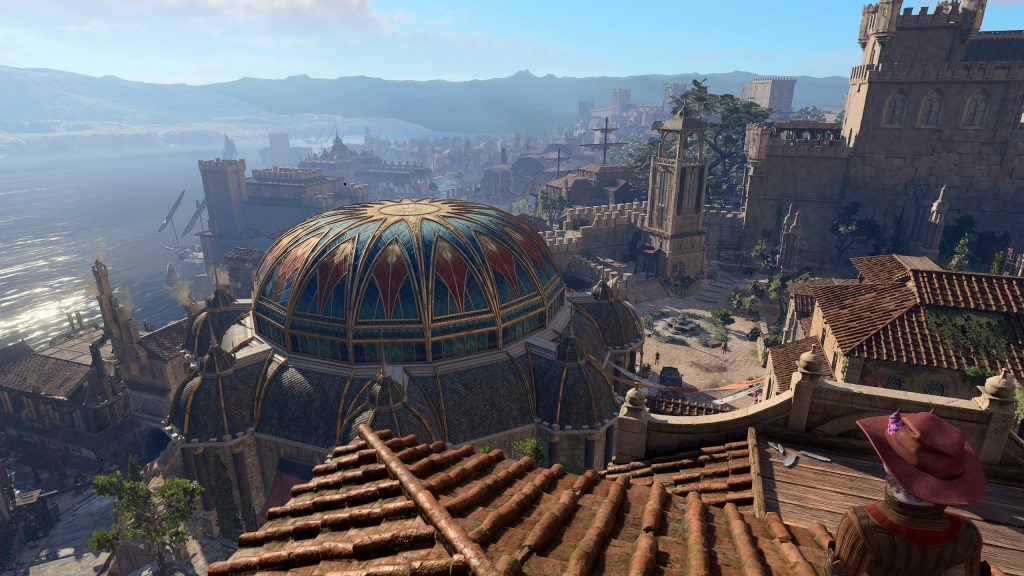
The Lower City of Baldur’s Gate is the largest area in Baldur’s Gate 3, and the most densely packed. Filled with a variety of shops and residences, nearly every building in the Lower City has something to discover within it. As the last main hub of the game, expect the Lower City to conclude many of the threads that were started earlier in the game as you ramp up for the end. And along the way, make sure to enjoy the city life.
Points of Interest (Cont.) 61 – Society of Brilliance Lodge 62 – Lady Jannath’s Estate 63 – Jannath and Oskar 64 – Oskar’s Atelier 65 – House of Grief 66 – Training Rooms 67 – Viconia DeVir & Sharrites 68 – Armoury/Night Orchid Cave 69 – Nocturne 70 -Threshold of Loss 71 – Rioters & Volo 72 – Water-Queen’s House 73 – Cellar Guards 74 – Water-Queen’s Treasure 75 – Hidden Treasure
Exits A – Wyrm’s Rock B – Sewers C – House of Hope D – Ramazith’s Tower & Sorcerous Vaults E – Szarr’s Palace F – Counting House G – Iron Throne H – Steel Watch Foundry
There is a beggar who feels no pain, who you can pay to hit. He will survive seemingly any blow. Lumbar is actually one of the escaped zombies from Mystic Carrion in Philgrave’s Mansion (#38).
Empty House Murder Scene
An Empty House at the end of an alleyway. It’s mailbox contains quite a few clues pointing, eventually, toward both the Undercity (B) and the Murder Tribunal (#8). Inside, you will find the scene of a murder. You can find the Clown’s Severed Pelvis on Gohumberry Tresp’s body, one of seven clownish body parts that you can return to Lucretious at the Circus of Last Days in Rivington.
Secret Stash
In Heapside Prison, you can find a secret stash after a successful passive Perception check. This stash has a healthy supply of useful scrolls and a Potion of Animal Speaking (which might be useful for Skittle the Rat (#4) in the next cell).
Skittle the Rat
Casting Speak With Animals will allow you to speak to a rat in the same cell that you will find yourself in if you get arrested. And Skittle, it turns out, is shocking useful (and pun-derful): they sell the Counting House Safe no. 2 Key, usable at the Counting House, among a few other useful potions and scrolls.
Stormshore Tabernacle
Here, you can maker offerings to several gods of Faerûn, including Selûne, Mystra, Helm, and Tyr. Making a sufficiently large donation (which varies depending on character level) will receive the Annointed in Splendor buff, giving them +2 to all saving throws.
You will also need to return here with Gale after visiting Sorcerous Sundries (#35) and hearing from Elminster, in order for him to have a much-needed conversation with Mystra.
Tabernacle Offerings
By stealing the key from Vicar Humbletoes or picking a DC-10 Sleight of Hand lock on a wooden hatch in Stormshore Tabernacle (#5), you can access the offerings. This basement has traps to prevent interlopers, though you can disable the 2 Marble Plates here (one near where you enter, and one behind the wood door leading to the actual offerings) with a DC-10 Sleight of Hand check.
Each chest has some great loot, but offerings to Tyr, Helm, and the general Offering Chest have specific unique loot. In addition, you can also reclaim any offerings you have made.
However, taking anything from any of the offering chests givers the thief the “Castigated by Divinity” condition, which will see them die (rather than fall unconscious) if their HP hits 0, followed by summoning a hostile Deva (or possibly a Djinni or Cambion, if the thief is a Cleric of specific worships). One can avoid this curse by dragging an item onto the floor first and then picking it up, or casting Remove Curse (though that will still summon the foe).
Candulhallow’s Tombstones
Candulhallow’s Tombstones is the secret entrance to the murderous Bhaal Murder Tribunal. The door to the shop can be opened with a key on Dolor’s body (which you can obtain by defeating him at the Wine Festival (#33) or after he attacks Figaro Pennygood (#52)), or with a DC-10 Sleight of Hand check with Theives’ Tools.
Once inside, you can remove a “Butterfly on Skull” painting on the wall in order to press a button, which will shift the bookshelf to reveal a door with the symbol of Bhaal on it. In order to pass, you will need a password acquired from a note on Dolor or learned if the party kills 2 people on the “Bloodstained Parchment” list of names (most easily found in Fraygo’s Flophouse in Wyrm’s Crossing) and is approached by Olfaith Olumssdottir.
Murder Tribunal
To enter the Murder Tribunal, you will need to present the three Death Knights at the entrance with a hand — any hand — that can be used to verify that the party has killed a suitable target. Possible ways to get these hands are taking them from the bag on Dolor’s body, taking the hand from any of the murder targets listed on the Bloodstained Parchment list, cutting Gale‘s hand off in Act 1 as the Dark Urge, or killing Gortash and taking his hand. If you do not present a hand, the Death Knights will attack. If Dolor is still alive when you get here, you can also challenge him to a fight to the death, as the Death Knights will only allow one of you to enter.
If you enter without violence, that might not last long. You’ll encounter a possibly-familiar face: Sarevok Anchev, as well as the three members of the Murder Tribunal itself. Sarevok will summon the spirit of one of the murder victims and ask how it was slain. To avoid combat (though you might not want to), you must answer with one of the answers indicating joy and providing details. If you didn’t actually kill the victim, then you’ll also need to make a DC-20 Deception check, though no check is necessary if you did kill them.
If you bring Jaheira or Minsc to the tribunal, Sarevok will recognize them, and you must either kill the companion in question, pass a DC-20 Intimidation or Performance check, or fight Sarevok then and there.
If the party becomes an Unholy Assassin of Bhaal, then they will have access to the Echo of Abazigal merchant, who sells very excellent gear.
Investigator Valeria
Investigator Valeria has been kidnapped and brought here as a sacrifice. If you slayed Sarevok Anchev, you can free Valeria. If you were able to pass the Murder Tribunal’s trial, though, then you will have the chance to sacrifice Valeria to take steps to become an Unholy Assassin of Bhaal. To complete this feat, though, you will also need to kill Jaheira and Minsc, and likely upset most of your remaining party in doing so.
Elfsong Tavern
On the first floor of the Elfsong Tavern, you can join Harvard Willoughsby’s Laff Riot, and attempt to use Performance (or Intimidation) to win the comedy competition. Harvard Willoughsby also has the Counting House Safe no.5 Key on him.
On the first floor, you can find Oloric Witmirth, who you can pickpocket to obtain the Counting House Vault no.2 Key.
You can also speak to the bartender in order to purchase a room, giving you a new “camp” to stay and long rest in while you are in Baldur’s Gate. The bartender also has the Counting House Vault no.3 key on him, which can be pickpocketed.
There is a room on the second floor that you can investigate in order to learn more about Duke Stelmane’s death.
Finally, on the roof, you can find Alfira (the best NPC), if she survived Acts 1 and 2, as well as, occassionally, her new girlfriend Lakrissa (who is otherwise working as a barmaid), if she survived as well.
Rat Swarm
In the basement of the Elfsong Tavern, the party will be immediately attacked by a huge swarm of rats. The wine spills on the ground can be set ablaze to make short work of the 1 HP horde.
Secret Button
In the Wine Cellar, you can pass a passive Perception check to notice a button, which will open a secret passage deeper below the Elfsong Tavern.
Gith Hideout
Behind the secret entrance, you will quickly come across a large amount of Gith, using the old “Knights of the Shield Hideout.” They will be immediately hostile to the player. It is wise to kill the 2 Gate Masters as quickly as possible; otherwise they can maintain gates that allow more Gith to enter the fight. Afterway, the Paladin and Avatar of Vlaakith should be looted for unique psionic gear.
At the back of this room, passing a difficult passive Perception check will help you locate a button, opening another secret path leading to the Emperor’s Secret Room (#14).
The Hhune Mausoleum Key (#25) can be found in a Mahogany Wardrobe against the southwest wall of the room.
Emperor’s Secret Room
After pushing the button in the Gith Hideout (#13), you will uncover the Emperor’s old room, still filled with items from his time in Baldur’s Gate. In addition to several objects you an interact with to learn more about the Emperor’s past, you can also find the Sword of the Emperor, and the Cerebral Citadel Armour and Gloves.
Baldur’s Mouth Gazette
On the main floor of the Baldur’s Mouth Gazette, you can find Ettvard Needle, who will threaten players the first time they interact with him, letting them know that he is going to publish a story that will destroy their reputation. You will have until your next long rest to resolve this.
His office is behind him, locked with a DC-20 Sleight of Hand lock, the key to which is on Ettvard. Inside, there is a “Document Chest” with the same lock, itself containing an Ink-Splattered Key (though Ettvard also carries a copy himself) that can be used to unlock the door to the basement, bypassing the DC-15 Sleight of Hand door to the elevator or DC-20 Sleight of Hand metal door to the basement.
Accessing forbidden areas of Baldur’s Mouth is most easily done through use of Invisibility spells, scrolls, or potions.
Steel Watchers & Plates
In the basement hallways, you’ll come across 2 Steel Watchers. These can be snuck by easily enough using invisibility spells and turned-based movement (and that is probably wise, considering it will be easiest to enter the basement with only one character).
Many of the side rooms leading to Jelliwig (#17) will have wicker baskets with discarded plates for articles, which will help you with Jelliwig and the “Stop the Presses” quest.
Jelliwig the Printing Press
Jelliwig the Printing Press can be found in Baldur’s Mouth basement, where she is ready to run a negative story about the party. In order to avoid this, though, all you have to do is talk with Jelliwig and provide her with an alternative story. If you freed Dolly Dolly Dolly, the moonlantern pixie, back in the Shadow-Cursed Lands, then Jelliwig will agree to help immediately, otherwise you’ll have to talk her into it with a DC-15 Deception or Persuasion check (Barbarians and Sorcerers get a DC-10 Intimidation check as well), or force her to help you with a DC-20 Athletics or Sleight of Hand check.
Once you’ve gotten Jelliwig to agree to help, you’ll need to provide her with an article to print instead. Most of these articles are in wicker baskets around Baldur’s Mouth, but you’ll be looking for any of the following 3:
Adventurers, Out Best Hope for the City
Celebrate the Brave Heroes Who Slew General Ketheric
Make Big Money by Trading with Adventurers.
There are also numerous neutral and negative articles that can be found.
Peartree’s Murder Scene
A boarded up house, you can destroy the boards with any attack, though you should make sure to do so far out of sight of the patroling Flaming Fists and Steel Watchers. Inside, you’ll find a deceased Franc Peartree and, by moving a Traveller’s Chest, you’ll find a hatch leading to Peartree’s basement, locked with a DC-15 Sleight of Hand lock, though one of the bookshelves in the house contains a key. Peartree’s Chest Key can also be found under a loose floorboard, noticeable with a Passive Perception check.
In the basement, you can find the body of “Courageous Little Kimmabeth”, who has the Clown’s Severed Arm (important for Lucretious at the Circus of Last Days in Rivington) on her person. As well, you can find a DC-15 Sleight of Hand locked chest with two more Soul Coins.
There is also a Soul Coin in the mailbox.
Tusgront & Crime Alley
Approaching an alleyway, you will come across Tusgront. You can get past him without upsetting him and his posse by passing a Persuasion, Intimidation, or Deception check. If you have heard of Nine-Fingers before (say, at the confrontation near Rivington), then the check will be DC-15. Otherwise, it will be DC-20. If Jaheira is in your party, you can also bypass these checks. If you succeed, Tusgront will use his Guild Ring to on the Wall Slot next to him
There is a nearby wall slot. Inserting a Guild Ring into it will open up a path to the Thieves Guild in the Sewers. If Tusgront won’t open the way for you, you can pickpocket a ring of Tusgront, or find one in the house next to him, which can be unlocked (without being a crime) with a DC-15 Sleight of Hand check.
In the mailbox of the house next to Tusgront and above the entrance to the Sewers/Thieves Guild, you can find the Counting House Safe no. 8 Key.
Sahuagin Ambush
When you reach this area of the docks, you and the nearby fisherpeople will be ambushed by 7 Sahaugin, including one Sahuagin champion. These dangerous foes cannot be knocked back into the water, as they will simply exit it again and attack the following turn, so knockback attacks are especially uneffective.
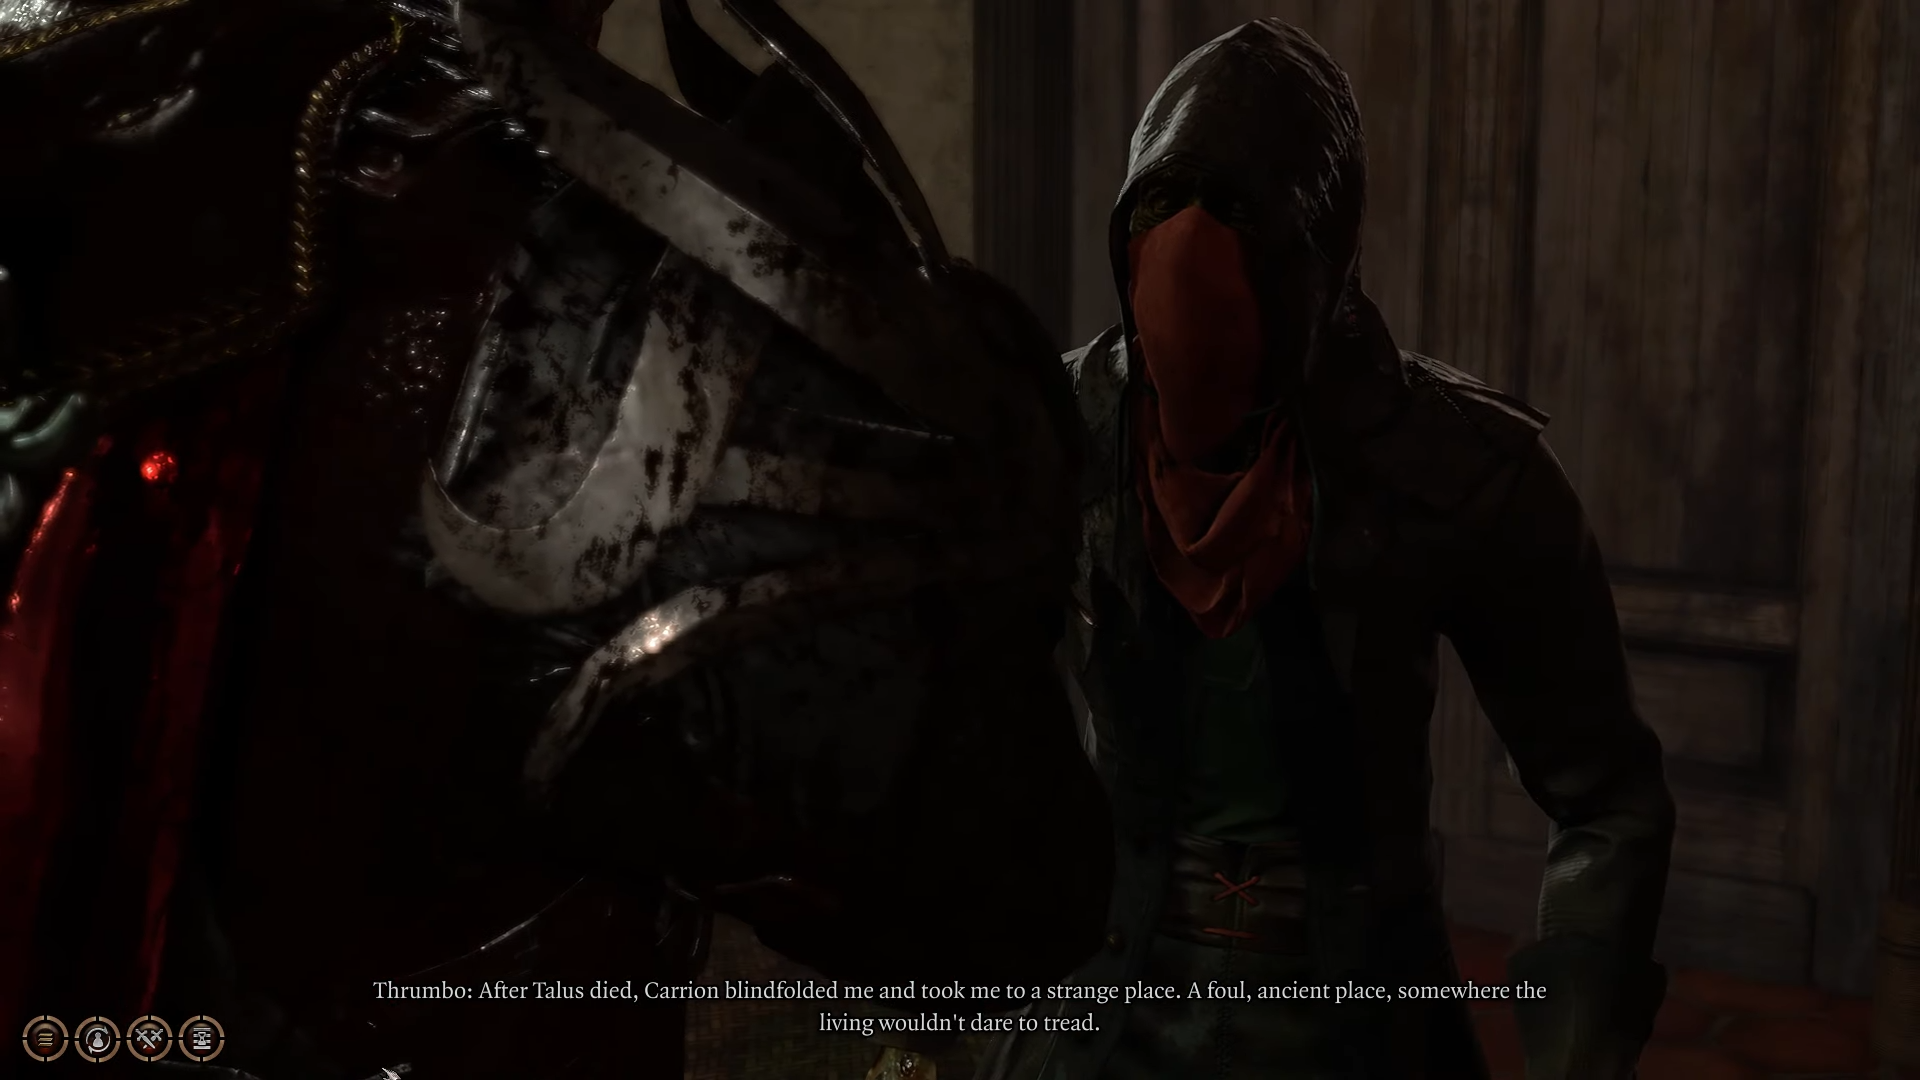
Thrumbo
In “Vonayn’s Home” near the water, you can open the wardrobe to find Thrumbo, a zombie who escaped from Mystic Carrion (#38). You can’t interact with him much until you’ve spoken to the Mystic, but after you have, you can use him to learn of Mystic Carrion’s missing organs, or can turn Thrumbo into him for payment (or both).
Above the wardrobe, you can find the key to the hatch leading to the smuggler’s basement (#22 to #24).
Trapped Passage
In the basement, passive Perception checks will notice three traps that can be disarmed with DC-15 Sleight of Hand checks. Two of these traps are in a hallway, and one is in the same room as the “Secret” Lever (#23).
“Secret” Lever
In a side room, you can find a not-so-secret lever. Shooting this lever will unlock a secret route toward some loot, information, and the Counting House Safe no. 6 Key.
Smuggler’s Loot
In addition to finding a Smuggler’s Note with some valuable information, you can also find a trapped chest at the end of this basement, requiring a DC-15 Sleight of Hand check to disarm. The loot in it is not incredibly valuable.
Hhune Mausoleum
the Hhune Mausoeum can be unlocked with the key found in a wardrobe in the Gith Hideout (#13), or with a DC-10 Sleight of Hand check.
Inside, you can notice tripwires with a Passive Perception check, and disarm them with DC-15 Sleight of Hand checks with Trap Disarm Toolkits. The Sarcophagus in the center of the room requires a DC-15 Strength check to move the lid, and it will contain a Golden key that will unlock a gilded chest in the Hhune Mausoleum’s hidden room.
At the foot of the sarcophagus, a Passive Perception check can notice a raise Marble Plate. Putting a lot of weight onto it (around 350 lbs.) will cause a hidden door to open. Just in front of the hidden room, you can pass a very difficult Passive Perception check in order to notice a cracked time, give you an Iron key.
The Gold and Iron keys can unlock a DC-15 Sleight of Hand locked Gilded Chest and a DC-10 Sleight of Hand locked Heavy Chest in this hidden room, respectively.
You can destroy a wall in Hhune Mausoleum, opposite the hidden room, to access the Gorion Mausoleum (#27).
Once inside, there are 3 Vent traps that you can notice with Passive Perception checks, that should be disarmed with DC-10 Sleight of Hand checks. After dealing with those, you can open the Sarcophagus with a DC-15 Strength check (opening the lid is the trigger for the traps). Inside are two Grand Mausoleum Offerings Keys, each to a different of the DC-20 Sleight of Hand-locked oppulent chests on the opposite side of the room.
There is also a crumbling journal in the side room of this Mausoleum giving some insight into Jergal and his connection to Withers.
Gorion Mausoleum
The Gorion Mausoleum can be unlocked with a DC-10 Sleight of Hand check.
Once inside, you can open the sarcophagus with a DC-15 Strength check.
You can enter a hole in the Gorion Mausoleum, next to the sarcophasgus, to access the Durinbold Mausoleum (#29), requiring you to use some kind of magic to become smaller.
You can destroy a wall in Gorion Mausoleum, up the stairs opposite those you enter, to access the Hhune Mausoleum (#25).
Mortuary
The most interesting part of the Mortuary is it’s cellar, located next to the entrance to the Durinbold Mausoleum (#29). With a key pickpocketed off Valmorba, or by unlocking the hatch with a DC-10 Sleight of Hand check, you can unlock the cellar.
In the cellar, you can find the Jar of Mystic Carrion’s Lungs, one of the organs you’ll need to destroy in order to defeat Mystic Carrion (#38).
Durinbold Mausoleum
You can unlock the Durinbold Mausoleum with a DC-10 Sleight of Hand check. Inside, you’ll find 4 sarcophagi: one belonging to Houndmaster Pol and 3 belonging to his hounds. Opening any of these (with a DC-15 Strength check) will summon their spirits, requiring you to dispatch them.
There is a hole in a side room of the Durinbold Mausoleum that connects to the Gorion Mausoleum (#27), requiring magic to become small enough to fit.
Buried Gothric Rillyn
You can dig up a mount of dirt with a screaming metal pipe coming up from the ground to rescue Gothric Rillyn, a noble who got on the wrong side of the “Stone Lord”. There is some decent loot in the coffin he can be found in.
Nina Dortmell/Bugthimble
Nine Dortmell is near the Grand Mausoleum entrance, and talking to her reveals she is trying to raise the corpse of her brother. Normally, this attempt fails, but if you teach her with a DC-10 Arcana check, or do it yourself (DC-18 for non-casters), then she will succeed, pitting you against two greater zombies, three regular zombies, two skeletons, and a Death Shepherd.
By digging up the grave next to Gorion Mausoleum, you can find Bugthimble, a kobold who has been rooting around and stealing from corpses. You can convince him to stop (and therefor claim the casket’s gold for yourself) with a DC-25 Deception or Intimidation check, a DC-18 Intimidation check if you know about Nine-Fingers, or a DC-15 Deception check if you say you don’t want the treasure and then claim it is because of “The Curse.”
Succeeding at any of these checks will cause Bugthimble to leave, but failing at any of them will cause him to become hostile, alongside many kobolds hiding in holes below.
Forge of the Nine/Dammon
If Dammon survived Acts 1 and 2, he can be spoken to here. If you have not yet upgraded Karlach’s heart twice, he can upgrade it using Infernal Iron here.
You can acquire a key from the mailbox leading to the “Diabolic Forge” (which itself doesn’t contain much of interesting), and then use it to enter a door on the west side of the building, connecting to an alley. There are valuable weapons here, but more importantly: there is a wall you can destroy behind some wooden crates, giving you access to the Devil’s Fee basement. There is an Oppulent Chest here (DC-18 Sleight of Hand to open, or the key from the shopkeeper upstairs) for rare alchemical ingredients, and a DC-20 Sleight of Hand-locked “Big Pot” containing an Infernal Marble.
This basement area will lead to behind the shopkeeper of Devil’s Fee, making gathering or pickpocketing the ingredients from her in order to access the House of Hope (C) much easier.
Wine Festival/Dolor
So long as you have found any of the many Bloodstained notes, you will come across a wine festival. Upon approaching you will see “Master Meztli” offering wine to Cora Highberry. You can warn her a serial killer is after her or ask to try the wine. Either will cause Meztli, who is actually Dolor, to trigger combat.
During this, 4 Doppelganger duplicates of Meztli/Dolor will fight you, while the real Dolor will try to use Dimension Door to escape (though this can be Counterspelled). If he succeeds at escaping, he will then go to try to murder the next target on his list: Figaro ‘Facemaker’ Pennygood (#52).
If you do manage to prevent Dolor from escaping with Dimension Door and kill him, you’ll find the password to enter the Murder Tribunal (#8) from Candulhallow’s Tombstones (#7).
Roger Highberry is in attendance here, and lives in the attached home. On him, you can loot or pickpocket the Counting House Vault no.4 Key.
Bonecloak’s Apothecary
Here, you can purchase alchemical goods, provided either Derryth or Baelen Bonecloack survived in the Myconid Colony in the Underdark (Baelen will need to have been rescued).
In the basement, you can find the a chest with a the Counting House Safe no. 3 Key, as well as many ingredients and a few interesting notes.
If Baelen perished in the Underdark, then you can ask one of several cats around the Apothecary to keep Derryth company using Speak With Animals.
Sorcerous Sundries
In order to obtain access, you will pass by Aradin, who will make vauge threats toward Dame Aylin, the Nightsong, and make it clear that Lorroakan, who owns Sorcerous Sundries and Razamith’s Tower above, is looking to kidnap her.
Inside, if Rolan survived Acts 1 and 2, he can be found here, tending to the shop. He will not be very happy to see you. Otherwise, it will be Lorroakan’s projection that will serve you.
Tolna Tome-Monger, at the back of the first floor, can reveal that there are some extremely rare books “in her office” after a successful DC-18 Deception, Persuasion, or Intimidation check.
Upstairs, you will be presented with 4 portals (as well as two offices that can lead to Lorroakan’s vaults). The 4 portals each represent a different answer to the question “What is the Nightsong?” (asked by a projection of Lorroakan) Going through any portal except the orange one with the plaque “The Nightsong is an immortal being, child of a deity” will result in you being downed and placed in front of the store. Going through the correct door will take you to Razamith’s Tower (D), where you’ll need to face off against Lorroakan, who will want the Nightsong.
Both the vaults accessible through the offices and this confrontation are served by our guides to Razamith’s Tower and Vaults (D).
Armoury & Frytz
The Stormshore Armoury is home to two shopkeepers, Gloomy Fentonson and Frytz the Firecracker. Frytz was once a close friend to Karlach, and so if you bring her along you will get plenty of unique dialogue and information about Karlach.
Felogyr’s Fireworks
Felogyr’s Fireworks is home to Avery Sonshal, who you might know from Rivington as the person who tried to smuggle exploding toys into refugee camps. Ask Avery abouve what he does for Gortash, and then you can either use the password obtained from Arfur Gregorio after discovering the Suspicious Toys in Rivignton, or pass a DC-15 Intimidation or Deception check, which will reveal some information about Gortash and his connection to the Gondians. Doing this will give players access to the second floor, giving you access to trade with the deadlier Clerk Tamara.
Avery can be pickpocketed or looted to obtain the Felogyr’s Fireworks Cellar Key (for either door leading to the cellar), the Felogyr’s Fireworks Workshop Key (to access the metal door leading upstairs), and the Counting House Vault no. 5 Key.
In the basement (which requires a DC-20 Sleight of Hand check without Felogyr’s Fireworks Cellar Key), you can find a tripwire that requires a DC-10 Sleight of Hand check to disarm, beyond which is a DC-10 Sleight of Hand-locked chest (that can be opened with Avery’s Storage Key) and a leverbehind some wooden crates. This lever opens the way to many Smokepowder Barrels, powerful explosives that can be useful generally, and specifically for destroying the Steel Watch Foundry (H).
The third floor is always restricted to you, and so being caught on the third floor will result in combat with the explosive-makers. On the third floor, you can find several notes indicating what the Iron Throne is, and making it clear what the “Motivators” are, carried by the Black Gauntlets in the Steel Watch Foundry (H).
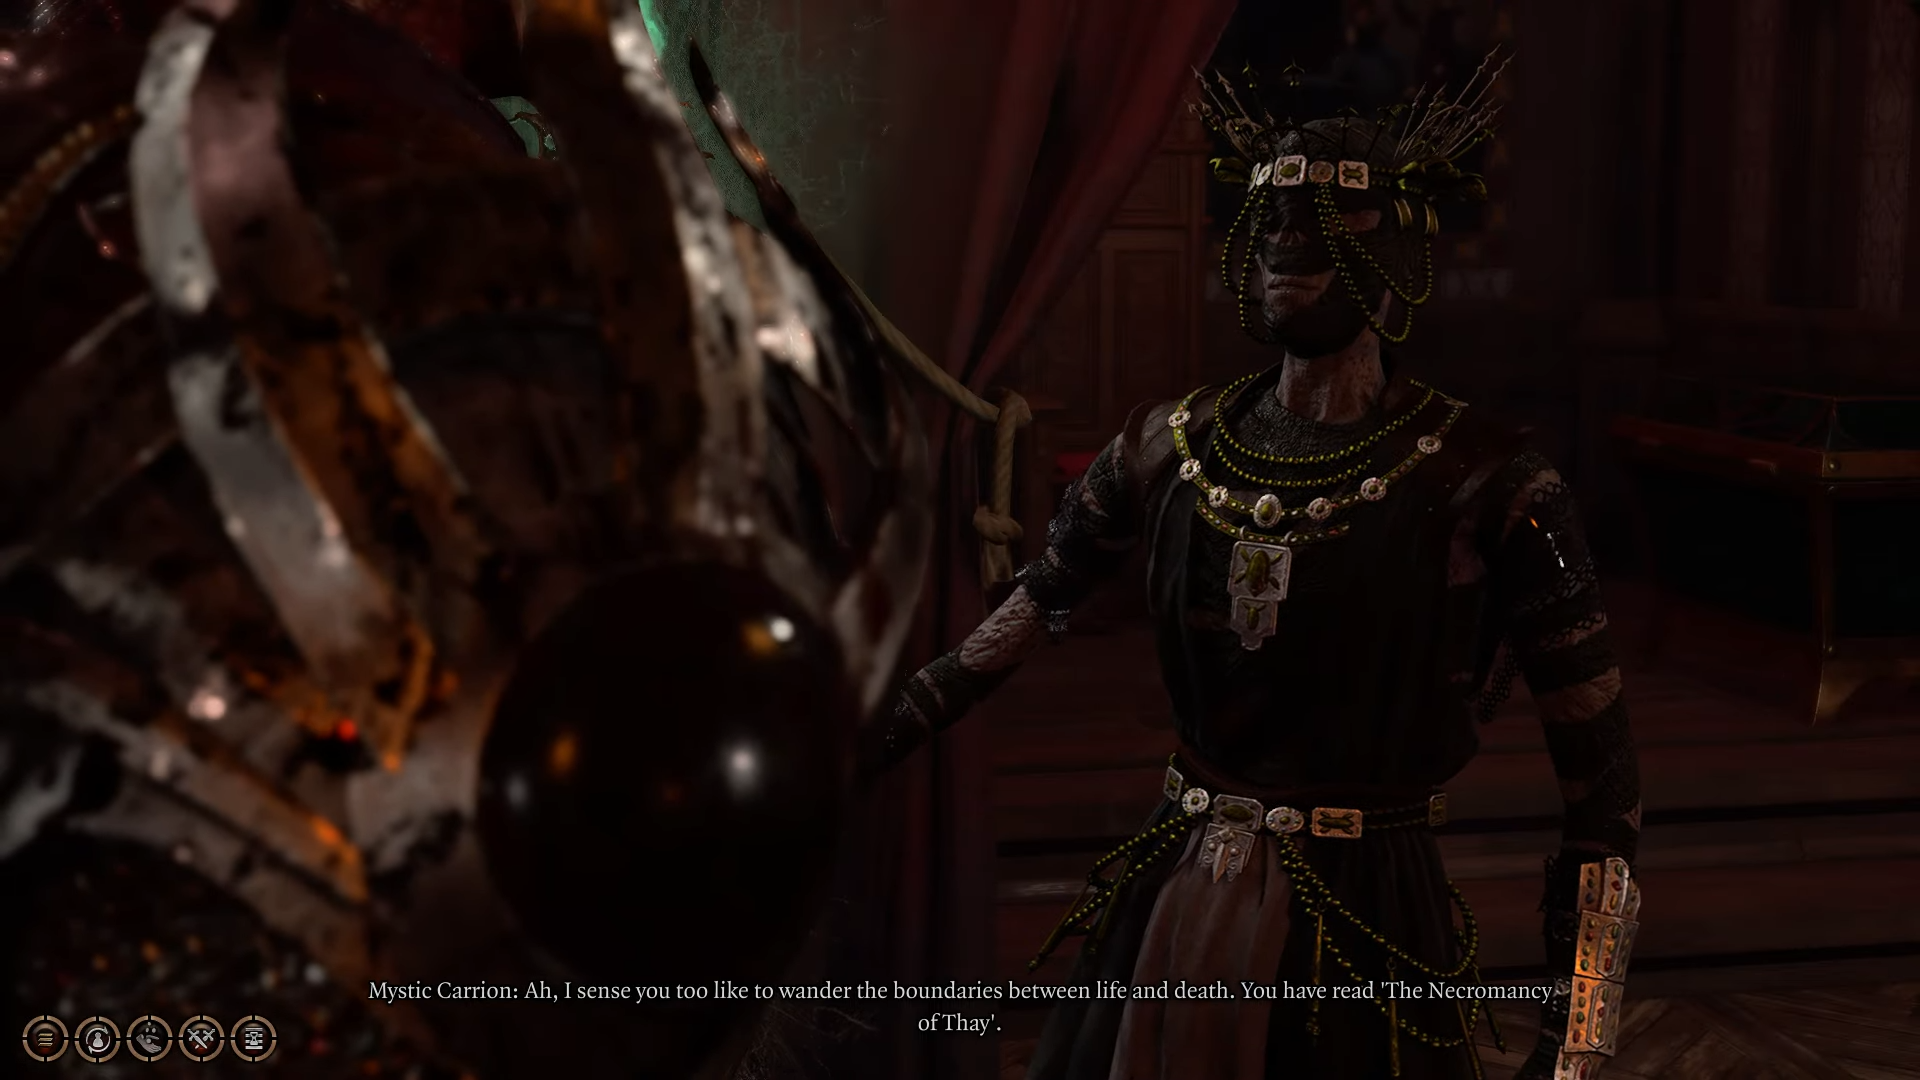
Mystic Carrion
You can enter Philgrave’s Mansion by either located the door disguised as a stone wall on the west side of the building and lockpicking it with a DC-25 Sleight of Hand check, or using the password you can obtain from the password found in the “Letter to Oskar Fervas” found at Lady Jannath’s Estate (#63). You can also enter through a hole in the wall on the east side of the Mansion.
Once inside, you will come into contact with Mystic Carrion, who acts as a shop. He will also task you with locating 3 zombies that escaped from his clutches. The most important of these is Thrumbo (#21), who you can find on the docks. If you decide to destroy Mystic Carrion instead of turning in the zombies, then you can travel to Mystic Carrion’s tomb in the Underdark in order to learn that his heart is inside Thrumbo (#21). Destroying it, either when you find it or after giving it back to Mystic Carrion (where he puts it in the basement (#39), will result in combat the next time you interact with Mystic Carrion.
There are several other organs that can be destroyed in order to make this fight easier. Two of them (the Liver and Brain) can be found in the same tomb as the information about the heart, and one of them (the Lungs) can be found in the Mortuary (#28).
Mystic Carrion is also the being that caused the curse at Lady Jannath’s Estate (#63), due to Oskar’s meddling. Mystic Carrion will sell the Torch of Revocation to the party for 3000 gold, or give it to them if they help find Thrumbo (#21), or it can be taken off of his body after defeating him in order to destroy the possessed portrait in Oskar’s Atelier (#65).
Philgrave’s Basement
You can access Philgrave’s basement by locating the secret door (with a Passive Perception check) on the second floor of the mansion. In the basement, you can find many potions, the Dark Amethyst (if you didn’t get it from the Whispering Depths), and the Jar of Mystic Carrion’s Heart (if you returned it to him).
Szarr Palace South Tower
On the central wall of Baldur’s Gate, you can enter a guardhouse. Climbing the ladder, and you’ll find yourself face to face with several thralls of Cazador. To avoid fighting them, you’ll need to succeed on a DC-15 Deception or Intimidation check, or just having Astarion with you. You can also de-enthrall Melony after the conversation.
In combat, all of the guards and giant rats will attack.
This tower is the only way to get to Szarr’s Palace (E).
Bloomridge Park Ambush
At the main entrance to the park, you will be warned by Manip Edenose that there is “business” in the park that shouldn’t be interfered with. And, lo and behold, in the northeast corner of Bloomridge Park, behind the statue of Balduran, you will be ambushed by a group of Bhaalites, led by a mysterious hooded figure. The ambush will not take place if you have already made an alliance with Orin.
You can spot the ambush ahead of time by approaching behind the Balduran statue and passing a Passive Perception check to notice a hiding Death’s Head of Bhaal Spaulder.
These Bhaalites will have “Unstoppable: 2”, meaning the first 2 attacks against them will deal only 1 damage. As such, multi-hit attacks like Magic Missile can deplete these reserves quickly. They will also prioritize civilians over hurting the party, giving you an opening (but requiring you to take extra steps if you want to save them).
After defeating the Bhaal cultists, Manip Edenosa (or a Flaming Fist, if Manip perished) will be used by the Netherbrain to allow it to speak through her to you. After this, Manip will die from the Netherbrain’s interference.
Lavernica’s Murder Scene
Across from the park, attached to the central wall, you can find the Groundkeeper Lavernica’s home. You can lockpick it (with a DC-10 Sleight of Hand check) in order to get inside.
You can open a cupboard within to find the Groundskeeper’s Hatch Key, which you can use to open the hatch to the basement. Once there, you’ll find the remains of a wild battle, with many corpses. At the center of a ritual circle, you can find Incontinentia Figgin, whose body has the Clown’s Severed Leg (which you can return alongside the other 6 clownish body parts to Lucretious in Rivington).
Crimson Draughts & Araj
If Araj Oblodra survived in Act 2 (at Moonrise Towers) and you donated blood to her, then she will be present here, having opened a shop called “Crimson Draughts.” In addition to selling potions and alchemical ingredients, she is still after your blood. If you gave some to her in Act 2, then she will have just succeeded in making progress toward her goal.
She will once again request your blood so that she can continue her experiments. She will be especially interested in Astarion‘s blood, like before, though Astarion will resent being told to give it to her.
She will offer you a Mysterious Potion. If you drink it, you will suffer a small amount of damage and cause a small explosion, giving you permanent access to the “Unstable Blood” trait, causing your blood to always be explosive (allowing you to use it for traps after becoming hurt).
After drinking the Mysterious Potion, you can return to Araj, who will ask that you hand over even more blood in exchage for a Sanguine Explosive, an extremely powerful grenade. Agreeing causes 2 damage to you, but refusing to donate more blood turns Araj hostile. You can return to Araj to donate more blood once per long rest, and can purchase 2 Sanguine Explosives each time.
Lora’s House
Here, you can find Lora, who is looking for her daughter, Vanra, who last went missing around the Blushing Mermaid (#48). Before heading there, though, you will wait to head to Old Garlow’s Place (#46) to get the Hag’s Bane recipe, required to rescue Vanra.
You need to talk to Lora before rescuing Vanra (currently in Auntie Ethel’s stomach (#50)) if you want the rewards for doing so.
Flymm’s Cobblers
Here, you can find Gortash’s parents, Sally and Dravo Flymm. Their minds are being controlled by Gortash, but you can use your Illithid powers to learn more about Gortash’s horrific past, and his connection to Raphael. They cannot be saved. While killing them might be the kind thing to do, killing either of them will cause Gortash to rebut your deal with him, if it is still active.
Old Garlow’s Place
If you saved Mayrina from Auntie Ethel in Act 1, then you can find her (in an interesting state) and a number of other members of her “Anti-Hag Support Group” here. When you arrive, you will need to convince the group that you aren’t a threat with a DC-15 Persuasion or Intimidation check. If you fail and the group turns hostile, you can sway them back to your side by attacking Jatlo, revealing his trickery.
Mayrina will be found upstairs, turned into a sheep. Talking to her with Speak With Animals will let you know that a doll is the cause of her fluffy transformation.
You can find the doll upstairs and destroy it. Using Remove Curse is the safest bet, as attacking it directly will harm Mayrina slightly.
Once Mayrina has been turned back into a person, she will reveal that Jatlo, secretly a servant of Auntie Ethel, turned her into a sheep. He will summon a number of minions, then attack the party, requiring you to dispatch him. You can also discover his treachery by pickpocketing a note off him.
You can find a wall safe on the first floor with a recipe to make “Hag’s Bane,” an item required in order to save Vanra from Auntie Ethel (#50) in the Blushing Mermaid (#48). Note that you will also need to speak to Lora (#44) before saving Vanra in order to receive the reward for rescuing her.
Rainforest’s Murder Scene
After either accessing the balcony or lockpicking the DC-10 Sleight of Hand-locked door (which is marked as “illegal” and does have patrolling guards nearby), you will find the scene of another murder within. You can find a Bloodstained Parchment nearby, if you haven’t already picked one up. You can also cast Speak With Animals to talk with Ratin Sesescor, though he has little to add to the situation.
In the basement, you will first come across a Mine and Tripwire, requiring a DC-10 Sleight of Hand check to disarm. Further in, you can find the body of Winslow Reginol, which you an loot in order to acquire the Clown’s Severed Foot (one of the seven body parts you can return to Lucretious in Rivington‘s Circus of the Last Days).
By passing a hard Passive Perception check, you can notice that one of the walls is actually false, and can open it. You can find Rainforest’s Chest Key and some other loot here, though to access the chest in question you will need to locate and disarm another DC-10 Sleight of Hand Tripwire and Mine.
In “Beehive’s General Goods” next door, you can pickpocket or loot the Counting House Safe no.7 Key on Oliver Tefoco.
The Blushing Mermaid
If you’ve spoken to Lora (#44), then you can talk to Captain Grisly to inquire about Vanra’s disappearance. Before you do so, it is a good idea to make sure you have some Hag’s Bane (the recipe for which can be found at Old Garlow’s Place (#46)), as it will be required to save Vanra… If you plan to do so, that is.
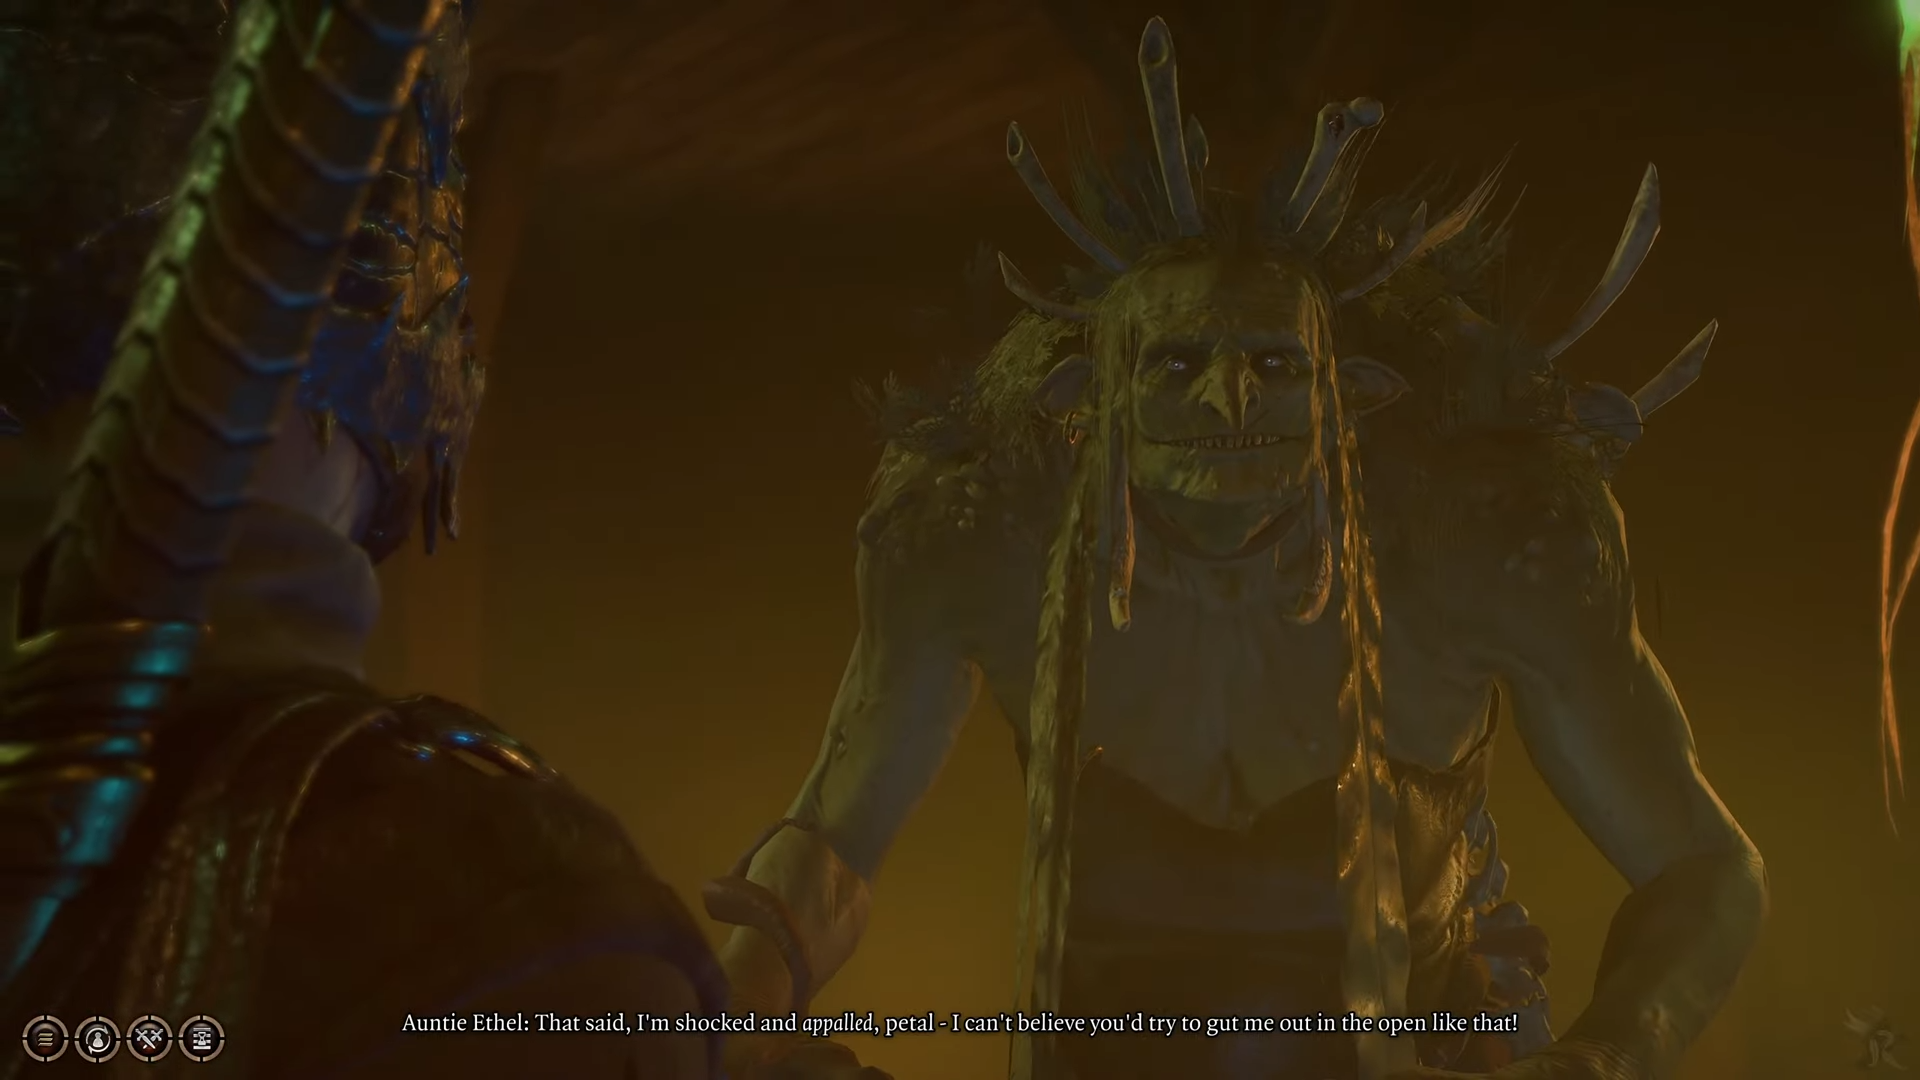
Captain Grisly will offer the party 3000 gold to kill Lora, who she believes has gone made and is dangerous. Refusing to do so (as Captain Grisly is lying) will cause Grisly to reveal that she is actually Auntie Ethel, who you likely met before in the Putrid Bog in Act 1. Her identity can be deduced through a note in Old Garlow’s Place (#46) as well.
You can find the Cellar Key behind the Bosun Gannet, which can be used to access the Cellar next to his position if the doors are locked.
After exposing her, she will try to make a deal with the players (so long as you didn’t kill her in Act 1): the player can choose to fight her (which will cause her to disappear, running to the basement, and turn many of the Redcaps disguised as patrons hostile), or can “make a deal,” after which Ethel will reiterate the same 3000-gold offer if the party kills Lora. If the party does kill Lora, then Auntie Ethel will be there to aid you in the final battle.
Captain Grisly & Masks
Following Auntie Ethel downstairs, you can continue through by realizing (with an Investigation check) that the wall on top of the kegs is an illusion you can walk through. There will be a set of Double Doors that you can unlock with a DC-15 Sleight of Hand check.
In the next room, there are a number of Peculiar Flowers that act as mines that can be disarmed with DC-10 Sleight of Hand check. Beyond them, 3 Masks and an enthralled Captain Grisly can be found here, and will be instantly hostile to the player if spotted. If you want to save her (and the other Masks), you will need to deal non-lethal damage to knock her out, or defeat Auntie Ethel first.
Captain Grisly has the Counting House Vault no. 1 Key on her. The Mask of Terror has a Mottled Key on him, which can be used to get through the DC-20 Sleight of Hand-locked door to Auntie Ethel (#50) (Which, if you can lockpick it or pickpocket the key, can be used to bypass this encounter).
In either case, you will come to an alcove to the north of the room, protected by a tripwire that requires a Passive Perception check to notice and a DC-10 Sleight of Hand check to disarm (or you can go around the broken wall). You’ll come to a “Wooden Wall” requiring a DC-20 Sleight of Hand check to lockpick open, or the Mottled Key from the Mask of Terror; opening this will lead to way to Auntie Ethel (#50).
Auntie Ethel
WARNING: before fighting Auntie Ethel, make sure you have already created some Hag’s Bane, using the recipe found at Old Garlow’s Place (#46), if you want to save Vanra for Lora (#44), who has already been eaten whole by Auntie Ethel. If you don’t have the Hag’s Bane, then you will need to knock Auntie Ethel out when defeating her, and then cut Vanra out.
If you come into this room before speaking to Captain Grisly about Vanra and triggering Auntie Ethel to flee, then she will not arrive until you attack one of the Pearlspore Bells. Otherwise, if she is here, she will be hostile toward you if you haven’t agreed to help her by killing Lora (#44).
In any case, if you fight Auntie Ethel, there are a few things to keep in mind. Firstly, you should always begin by throwing Hag’s Bane at Ethel, which will cause her to vomit up Vanra, saving her life, which you can speak with Lora (#44) about after the fight. Secondly, Auntie Ethel will summon any surviving masks (from #49), including Captain Grisly, to aid her in the fight. If you want to save these masks, especially Grisly, you’ll need to either deal non-lethal damage when you deplete her health bar, or defeat Auntie Ethel before her.
As for the actual fight, the most important thing to do is to destroy the three Pearlspore Bells around the room (two of which are in little cave-like alcoves jutting out from the room). In order to destroy these, you will need to either deal 55 damage in a single turn, or you will need to cancel their healing power. If any of them remain when Auntie Ethel is killed, then she will simply resurrect, so they should be your priority.
Golbraith
Golbraith is a former Mind-Flayer Hunter. Naturally, he can be good to talk to before planning your fight against the Netherbrain. Speaking to him in his home, you can assure him you know how to fight Mind Flayers, and he will give you Abdel’s Trusted Shield.
You can access his basement with a DC-20 Sleight of Hand check with Thieves’ Tools to unlock the hatch, or by pickpocketing (or looting) his Hatch Key from him. In the basement, you should make sure to send just someone with high Perception (to notice Marble Plates around) and high Sleight of Hand (to disarm the Marble Plates with DC-15 Sleight of Hand checks). Otherwise, you’ll need to deal with Cloudkill, which can be disabled by pressing the Button to the right/north of the rooms.
As for loot, there are a variety of weapons and books, the most notable of which being a Katana on left/south of the room from the entrance.
Figaro Pennygood
In addition to being a seller of clothing and dyes, Figaro ‘Facemaker’ Pennygood is also an assassination target for Dolor. If Dolor escapes the Wine Festival (#33), then he will head here and attempt to kill Figaro Pennygood. You can interrupt this attempted assassination by speaking to Figaro, giving you the chance to eliminate him. On his body, you’ll find the password to enter the Murder Tribunal (#8) from Candulhallow’s Tombstones (#7).
Next to the Facemaker’s Botique, you can find both the Glitter Gala and the Chromatic Scale, merchants that sell gems and music equipment, respectively. Omotaolo at the Glitter Gala has the Counting House Vault no.6 Key.
Grey Harbour Docks
At the Grey Harbour Docks, there are several things to uncover. On the east side of the docks, you can find a “Key to Buried Treasure” and an accompanying map, with a successful Passive Perception and DC-15 Constitution check. This treasure is located just north of Figaro Pennygood’s shop (#52).
On the northeast side of the dock, you can encounter a group of Nine-Fingers’ men, led by Big Huido. He will attempt to shoo you away, though you can convince him to let you peruse the shipment they are guarding with a DC-15 Intimidation check, or a DC-15 Deception check with 1000 gold. If you fail either check, or continue into the area after a warning, the posse will turn hostile. The shipment contains some rare alchemical ingredients and a piece of Infernal Iron.
On the west side of the dock, you can come across a ship guarded by a Steel Watcher. Sneaking aboard the ship, or defeating the Watcher, will let you on the ship. Notably, there are some false crates at the aft (rear) of the ship that, with a Passive Investigation check or by interacting with, you can reveal in order to uncover a crate with 6 Mind Flayer Parasite Specimens; the most of any single location in the game.
Flymm Cargo
To enter Flymm’s Cargo, you can lockpick a DC-20 Sleight of Handdoor on the east side of the building, or either of the DC-15 Sleight of Hand upper door to the south (which you’ll need to access by jumping, flying, or teleporting).
Inside, there are 5 Worgs that will be hostile as soon as they see you. Theyre is also a Key on the upper walkway, accessible from the south of the building, which can be used to unlock the doors around Flymm Cargo.
At the north of the warehouse, you can find a hatch leading to the basement, under some crates. This leads to the basement, which is the only way to access the Iron Throne (G). On your way to Redhammer (#55), you can also find a piece of Infernal Iron in a corner-turning hallway.
Redhammer
Redhammer is, essentially, the ferryman, piloting the submersible that heads down to the Iron Throne (G). You can convince him to trust why you’re there with a DC-15 Deception or Intimidation check. There are a variety of checks that can follow in order to convince him to take you down to the Iron Throne, such as a DC-15 to -20 Intimidation Check, a DC-10 to -15 Persuasion Check, or a DC-25 Deception check. Doing so will let you take the submersible down to the Iron Throne (G).
If you have interacted with the Water-Queen’s House (#72) enough to obtain the “Avenge the Drowned” quest, you can chose to call him out. If you suggest he “needs to face justice,” he will become hostile. Otherwise, you can question him with a DC-15 Intimidation check.
After this line of questioning, you can convince Redhammer to take you down to the Iron Throne, or can kill him to go down yourself. If you do go down to the Iron Throne with Redhammer, then when you come back, Allandra Grey from the Water-Queen’s House (#72) will demand you hand Redhammer over to them, allowing you to choose a side. If you allow Allandra to take him, you can find his corpse in the Water-Queen Celler (#73).
Counting House Docks
Behind the Counting House (F), you can find a group of Merchant Vessels, all being guarded by Cashguards and Steel Watchers. Being caught in the Counting House Docks will require you to talk your way out of being attacked or arrested, and will forcibly remove you to the front of the Counting House. However, if you can stay stealthy, there are quite a lot of valuable chests on each of the boats and on the docks themselves.
The chests on these boats all have randomized loot, and most are locked with DC-15 to DC-25 Sleight of Hand locks.
Quarantined Boat
At the far south of the docks, near the Water-Queen’s House, you can find a Quarantined Boat (officially called the “Lustrous Lass”. Stepping onto the boat requires you to pass a very difficult Constitution Saving Throw or else contract the Sea Plague, which gives you disadvantage on Checks and Saving Throws, and on Strength-based attacks. This will persist until you take a long rest, or until you kill the Cursed Imp hiding in the Gilded Chest.
Opening the Gilded Chest aboard will spawn a “Cursed Imp”, which reflects damage it takes back at the originator, times three. The easiest way to deal with this is to push the Imp overboard, drowning it; otherwise, you’ll need to tank a lot of your own damage to survive.
Once the Imp perishes, the Sea Plague will subside from the boat.
Upper City Entrance
Attempting to approach the Upper City Entrance will result in the Emperor warning you that you are not ready to take on the Netherbrain. As you approach, you will be afflicted with “Mindbroken” and “Stunned”, which will give you momentary pause. If you decide to keep going toward the gate, though, eventually, the Emperor will simply take control of you and put you back next to the Warp Point (W4), and chastize you again for trying to approach the Upper City.
Elerrathin’s Home
Make sure you bring Jaheira with for this return home: this is where Jaheira’s found family of harpers lives. Here, you can find Rion and Jord, as well as several younger children, all who treat Jaheira as a mother figure — with varying degrees of warmness.
In the greenhouse-like section at the back of the house, you can find a pin-shaped hole on the side of Jaheira’s desk. Using any of the Harp-Shaped Pins you can find along your journey will open this hatch, which leads to Jaheira’s Basement (#60). You can find one on the roof of Elerrathin’s Home, or you can pickpocket or convince Tate in the home to give you one.
Jaheira’s Basement
If you have Jaheira in your party, the four elemental orbs/traps in the basement will not activate. Otheriwse, you can simply move the a crate before the Frosted Orb to take it off a hidden pressure plate, deactivating the Orbs.
At the bottom of the runup, you can use Speak With Animals to speak to Jaheira’s various animal allies. After that, enter the hut. A Passive Perception check will some trapped, Loose Planks along the west wall, beneath a crate and near an oppulent chest. Disarm it witha DC-15 Sleight of Hand check to access a key, which you can use to unlock a DC-18 Sleight of Hand-locked Bookcase.
Behind this bookcase, you can find a chest with the unique weapons Belm and the Staff of the Realm, on a table you can find the Rite of the Timeless Body, and in the Display Case you can find Khalid’s Gift, a truly excellent amulet (especially now that you are in the curse-laden Act 3 of Baldur’s Gate 3).
Society of Brilliance Lodge
If you stole the Githyanki Egg from the Creche Y’llek and gave it to Lady Esther in the Mountain Pass, you can follow up on that at the Society of Brilliance’s Lodge. You’ll find that Ptaris, the Githyanki youth grown from said egg, massacred members of the Lodge. He will attack you as well, unless you can pass a DC-25 Persuasion, Intimidation, or Deception check.
If you did not give the Githyanki Egg to Lady Esther, then you will instead be asked by Blurg (at the front desk) with finding Omeluum (the friendly Mind Flayer you might’ve met at the Myconid Colony in the Underdark). Omeluum can be found and saved from the Iron Throne (G).
Lady Jannath’s Estate
If you did not rescue Oskar Fevreas from the Zhentarim Basement in Act 1, then there is nothing to note here aside from an art show.
However, if you did rescue Oskar, and thus have a quest to meet him in Baldur’s Gate, then you’ll come to find Lady Jannath’s Estate is haunted! The entire Estate is filled with Poltergeists. Thus: it is best to enter the house with the ability to See Invisibility, either from Volo’s eye work in Act 1, or from a potion or spell.
There are also many candelabras around the Estate that are haunted by Tormented and Vengeful Souls, and going near these candelabras will cause you to take small amounts of psychic damage.
Lastly, there are Cursed Skulls scattered throughout that cast Thunderwave when you approach, though they can be taken out with a ranged shot from a distance.
Jannath and Oskar
Huddled in their bedchamber, Lady Jannath and her newlywed husband Oskar Fervas can be found. Upon encountering them the first time, they will be attacked by Poltergeists. At the end of this, Oskar will become possessed, leaving you with the task of breaking the curse.
You can learn more about the curse by going to Oskar’s Atelier (#64), though you will ultimately need Mystic Carrion’s (#38) Torch of Revocation in order to cleanse the curse.
After dealing with the curse, provided Oskar survived, you can return to Jannath and Oskar. You can encourage Jannath to stay with Oskar, and if you do, then he will meet you in his Atelier (#64) to paint you a valuable portrait.
Lady Jannath has the High Security Vault no.2 Key for the Counting House on her.
Oskar’s Atelier
In Oskar’s Atelier, at the very top of the house, you can open a secret door by stealing the portrait of Jannath from the room and then combining it with the easel in the center of the room. This secret room contains a letter indicating Mystic Carrion’s (#38) connection to all of this, leading you there, as well as an obviously cursed portrait of a mysterious woman.
Returning to this portait with Mystic Carrion’s (#38) Torch of Revocation will allow you to equip it and hit the portrait with it. This will summon the ghost of Kerri Evenfield. She wants to kill Oskar for his romantic betrayal of her, and you will need to either pass a DC-15 Persuasion or Intimidation check to convince her to leave peacefully, oir else fight her. After saving Oskar, if you fought Kerri, then you can return to Oskar and Jannath: Jannath, who is furious, will demand to know more, and if you tell her the truth, she will break up with Oskar. Otherwise, if Oskar lives and their marriage remains intact, then he will paint a portrait for you as thanks in the Atelier (#63).
House of Grief
Regardless of whether Shadowheart killed the Nightsong at the end of the Gauntlet of Shar (and thus remains a Sharrite), or whether she saved the Nightsong and turned away from Shar, the House of Grief will be of much interest to her.
Talk to Mirie at the front of the House, then she will take you to the back room, where you will undergo the “mapping of the heart”. After this, so long as Shadowheart is present, a secret entrance into the secret Cloistre of the Sombre Emrace (starting at #66) will open, after the “mapping of the heart” with Viconia DeVir. Without Shadowheart, you can also enter the secret passage by uncovering it with a difficult passive Investigation check, or by murdering your way in.
Training Rooms
Immediately beyond the threshold into the Cloistre of the Sombre Embrace, you can find two rooms. These rooms can be opened with a DC-15 Sleight of Hand check with thieves tools, or by breaking down the stone walls or doors themselves leading into the rooms. There is some very minor loot in both of the training rooms, but they mostly serve to inform some of Shadowheart’s backstory.
Viconia DeVir & Sharrites
Viconia DeVir is the leader of the Sharrites in Baldur’s Gate. Her reaction to you will depend on your decision of whether to kill or free the Nightsong at the end of the Gauntlet of Shar, but it will largely follow the same structure. Viconia DeVir wants the artefact in the party’s possession, and only a DC-20 Intimidation or Persuasion check will cause her to back down.
After this, she will then demand that the party hand over Shadowheart. You can do so, or else you will need to fight Viconia. If Shadowheart killed the Nightsong (and is thus a Dark Justicar), she can convince some of the Sharrites to rally behind her, giving you several allies in the fight and the ability to place Shadowheart as the new head of the Cloister. Otherwise, you will simply need to defeat Viconia DeVir and all the Sharrites in the room.
This fight is not too tricky, so long as you can handle crowds using AOE attacks and good position. Once it is done, you will have the chance to kill or spare Viconia, though the outcome is the same regardless.
Armoury/Night Orchid Cave
The armoury contains several magical weapons. At the back of it, a wooden barricade can be destroyed in order to access the Night Orchid Cave, a cave (predictably) filled with Night Orchids, and an important part of Shadowheart’s forgotten childhood. You can also find the Hastily-Written Note here, which will explain the purpose of the Mirror of Loss (#70) so that you don’t have to try to guess it later.
Nocturne
In the dormitory of the Cloistre, you can find Nocturne. She was a childhood friend of Shadowheart (and perhaps more), and can help Shadowheart remember some of her past.
If Shadowheart becomes the master of the Cloistre (by being a Dark Justicar and defeating Viconia (#67), then she will remain around to sell some powerful, though not unique, items. If you defeated everyone at the Cloistre, though, then she will have no reason to remain around, and will leave after a long rest.
Behind Nocturne, there is a Jewelry Box with the High Security Vault no.8 Key for the Counting House.
Threshold of Loss
In order to enter the Threshold of Loss, you will need to either find the Silver Key on Sharran Fidelian Lamona’s body, pass a DC-30 Sleight of Hand lock, or surrender a sufficient amount of valuable items (worth 1000 gold, to be exact) to the scales in front of the Statue of Shar.
The Threshold of Loss will see Shadowheart faced with her parents, bound with dark magic. She will have the option to either mercy kill her parents, or save them.
If Shadowheart saves her parents, then she will forever remain burdened by her scar, and her parents will become camp followers. If she kills them, however, she will be free from the scar.
After you are done with this choice, you can approach the Mirror of Loss. If you read the Hastily Written Note in the Night Orchid Cave (#68), then you will already know how it works, otherwise you’ll need to make a DC-25 Religion or Arcana check to determine that.
Passing a subsequence DC-25 Religion check (which you can do once per character) will give you a chance to pray to Shar. If they succeed, then they can surrender memories to the Mirror, after which point they have a low chance of getting no reward, a low chance of getting +1 Charisma, and a high chance of getting +2 to an ability of their choice. This can be repeated until a character gets a +2, after which point they cannot attempt any further checks.
If Shadowheart is a Dark Justicar and kills her parents, then she will automatically get the +2 result. If she turned her back on Shar, however, then even with a successful roll, she can never receive anything from the Mirror.
Alternatively, they can surrender the Forbidden Knowledge that they acquired from the Necromancy of Thay in order to guarantee a +2 outcome.
If you do not make the prayer and don’t have the Forbidden Knowledge, then you will have a 20% chance of getting +1 Charisma in the subsequent dialogue.
Rioters & Volo
Near the Steel Watch Foundry, a group of rioters will have strung Volo up to a cart full of explosives. No matter what the party does, they will end up in conflict with the rioters. Once this happens, you will only have 4 turns to reach Volo before the cart he is on explodes, and so one of your party members should run to the cart quickly to “Aid” Volo, at which point he will run away and survive.
Aside from that, this combat with common ruffians is not too difficult.
If you save Volo, he will thank you by giving you a book back at camp. The book is relevant to Orin the Red’s quest, but… Like… It’s still just a book, Volo. Do better.
Water-Queen’s House
When you approach the Water-Queen’s House, you can learn that a funeral is taking place within it, but that you are allowed to attend. Speaking to the leader of the procession, Allandra Grey, will earn you the “Avenge the Drowned” quest, eventually leading you to Redhammer (#55) in Flymm Cargo’s Basement.
Placing any item in the Offering Chest by the found will also Bless the giver until the next Long Rest. This can be done for each party member, and works regardless of how little they donate. Taking anything out of this chest is seen as a crime.
In the forbidden second floor rooms, you can find an Opulent Chest containing the High Security Vault no.4 Key.
Cellar Guards
Entering past the very earliest part of the Water-Queen’s Cellar is forbidden, and so if you want to get past the puddle at the entrance, you’ll likely want to be Invisible. If you are caught, it will be considered trespassing, and you will be sent to the beginning of the subarea, if you aren’t attacked outright.
Water-Queen’s Treasure
There is a pile of treasure here, but looting it will anger the Wavemother, pelting you with an Ice Storm and spawning 5 Sahaugin from the nearby water source. This combat can also attract the attention of the Cellar Guards (#73), causing hostilities with the worshipers of the Wavemother (though this will not turn the others in the Water-Queen’s House (#72) hostile.
Hidden Treasure
At the back of the house, a Passive Perception check can notice that one of the rock walls is false, allowing you to go through it to get a small treasure on the other side.
Requiring a ritual to enter, you’ll need to discover the ritual or get Helsik at the front desk of the Devil’s Fee to help you, if you want to enter the House of Hope.
If you want Helsik’s help, you’ll need to blackmail her (or pay her 20,000 gold). Assuming you don’t want to pay, you’ll need to convince her to help you with a DC-20 Persuasion check, after which she will give you the ingredients to perform the ritual to enter the House of Hope, on the condition that you bring her back the Gauntlets of Hill Giant Strength. If you agree to do so, then you can make a DC-10 Intimidation check after returning with the Gauntlets to keep them anyway.
Alternatively, you can choose to steal the items you need from her (which might be best done by sneaking up behind her through the Forge of the Nine’s basement (#32).
Whether stolen or traded for, her Grimoire Bound in Imp Skin gives you the method through which you can access the House of Hope. You can also either steal or receive all the ingredients required to perform the ritual (though you can find all of these except for the Grimoire via other methods as well): a Coin of Mammon, an Infernal Marble, a Diamond, a Skull, and Incense.
You’ll need to head upstairs and throw or create water on the gargoyle to satiate it, preventing its trap from going off. Once inside Helsik’s room, you’ll find a ritual circle, with smaller circles around its edge. Following the archaically-worded directions in the Grimoire, you can open a portal. Simply place the following items in the following places:
On the western circle, place the Skull.
On the northeastern circle (closer to opposite the skull), place the Diamond.
On the southeastern circle (next to the diamond), place the Incense.
On the northwestern circle, place the Coin of Mammon.
In the center of the ritual circle, place the Infernal Marble.
Once all of these have been placed, a portal to the House of Hope will open. Once you enter, you will not be able to leave until you’ve completed the dungeon.
From Sorcerous Sundries, you can access both the Sorcerous Vaults (D1) through a portal in Tolna Tome-Monger’s office upstairs and to the left. It is forbidden to be here, so you may need to sneak.
By going through the portal next to the office, labelled with a plaque stating that the Nightsong is “…an immoirtal being, the child of a deity,” you can enter Razamith’s Tower (D2), where you can encounter Lorroakan, looking for the Nightsong.
Both of these locations have been combined into a single guide, for ease.
After getting past the Szarr’s guardhouse (#40), you can enter the Szarr’s Palace. It is highly recommended that you bring Astarion when you go through.
A huge bank, the Counting House can be entered from the Baldur’s Gate streets. If you can get downstairs (see our Counting House guide), you can then access the Counting House Vaults easily (#56)
Whether Redhammer (#55) agrees to take you down or you decide to go down yourself, a submersible in Fylmm Cargo’s Basement will take you to the Iron Throne prison, run by Gortash to threaten the Gondians in the Steel Watch Foundry (H). Once you go here, you burn all bridges with Gortash (as he will let you know), though you will have a single chance to turn back after you begin heading down. Otherwise, once you enter the Iron Throne, you will need to resolve everything there the first time.
The Steel Watch Foundry, where the Gondians are constructing and controlling the Steel Watch (at threat of death to both them and the prisoners in the Iron Throne), is at the west of the city. Outside the Foundry, Steel Watchers patrol the premises so that they can remove or attack interlopers, requiring some level of stealth or timing to enter without being harassed. The Steel Watch Foundry can be entered through a few places:
H1: The front door, which can be lockpicked and entered.
H2: A small hole, which can be entered by small characters or using magic.
H3: A side entrance can let you in, as can the skylights on the roof.
Share this article:
Graves
Graves is an avid writer, web designer, and gamer, with more ideas than he could hope to achieve in a lifetime. But, armed with a mug of coffee and an overactive imagination, he'll try. When he isn't working on a creative project, he is painting miniatures, reading cheesy sci-fi novels, or making music.
I’ve been following your excellent companion build guides for my first play through Regarding no. 70 & the Mirror of Loss, what would you/others here recommend?
Should I (A) turn the main damage dealing stat from 20 to 22 & then respec an Ability Improvement feat into something else. (22 going back down to 20)
(B) Keep at 22
(C) Put the +2 into something else like Constitution or Dex
Personally, I basically always advocate maxing the main Ability Score you are using the most, but there is an argument for increasing Dex (even if it isn’t your most used), specifically for characters who use Unarmored Defense and can get an AC boost out of it. Still, most of the time it will be best to get your main stat to 22, which is otherwise very difficult to reach.