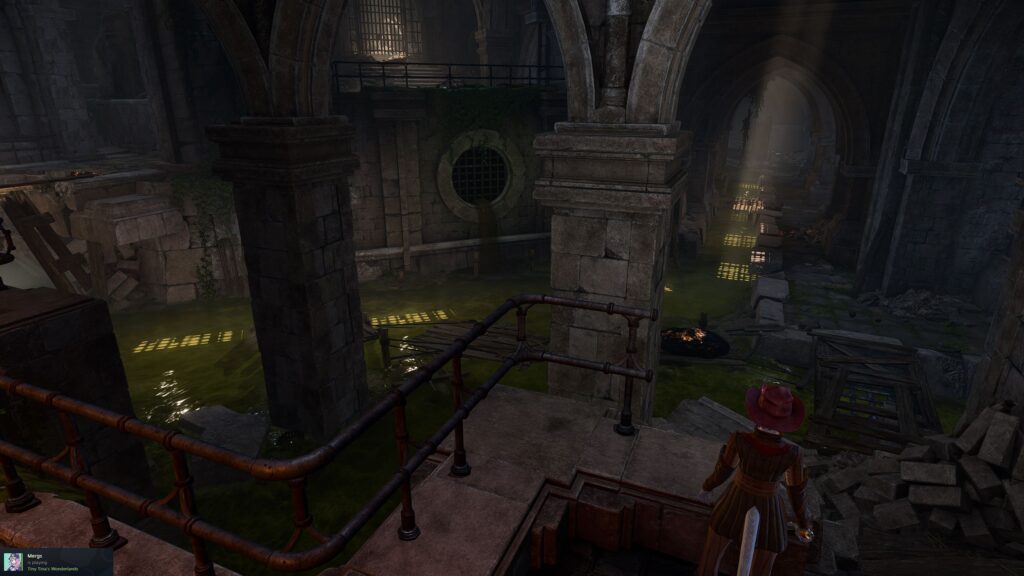
Underneath the great city of Baldur’s Gate (or at least, underneath it’s Lower City), you can find a large network of sewers, including the Guildhall of a certain powerful faction, thugs of various descriptions, an Undercity populated by Bhaal’s deadliest agents, and numerous subterranean denizens. This walkthrough will guide you through both the City Sewers in Baldur’s Gate 3, and the Undercity Ruins.
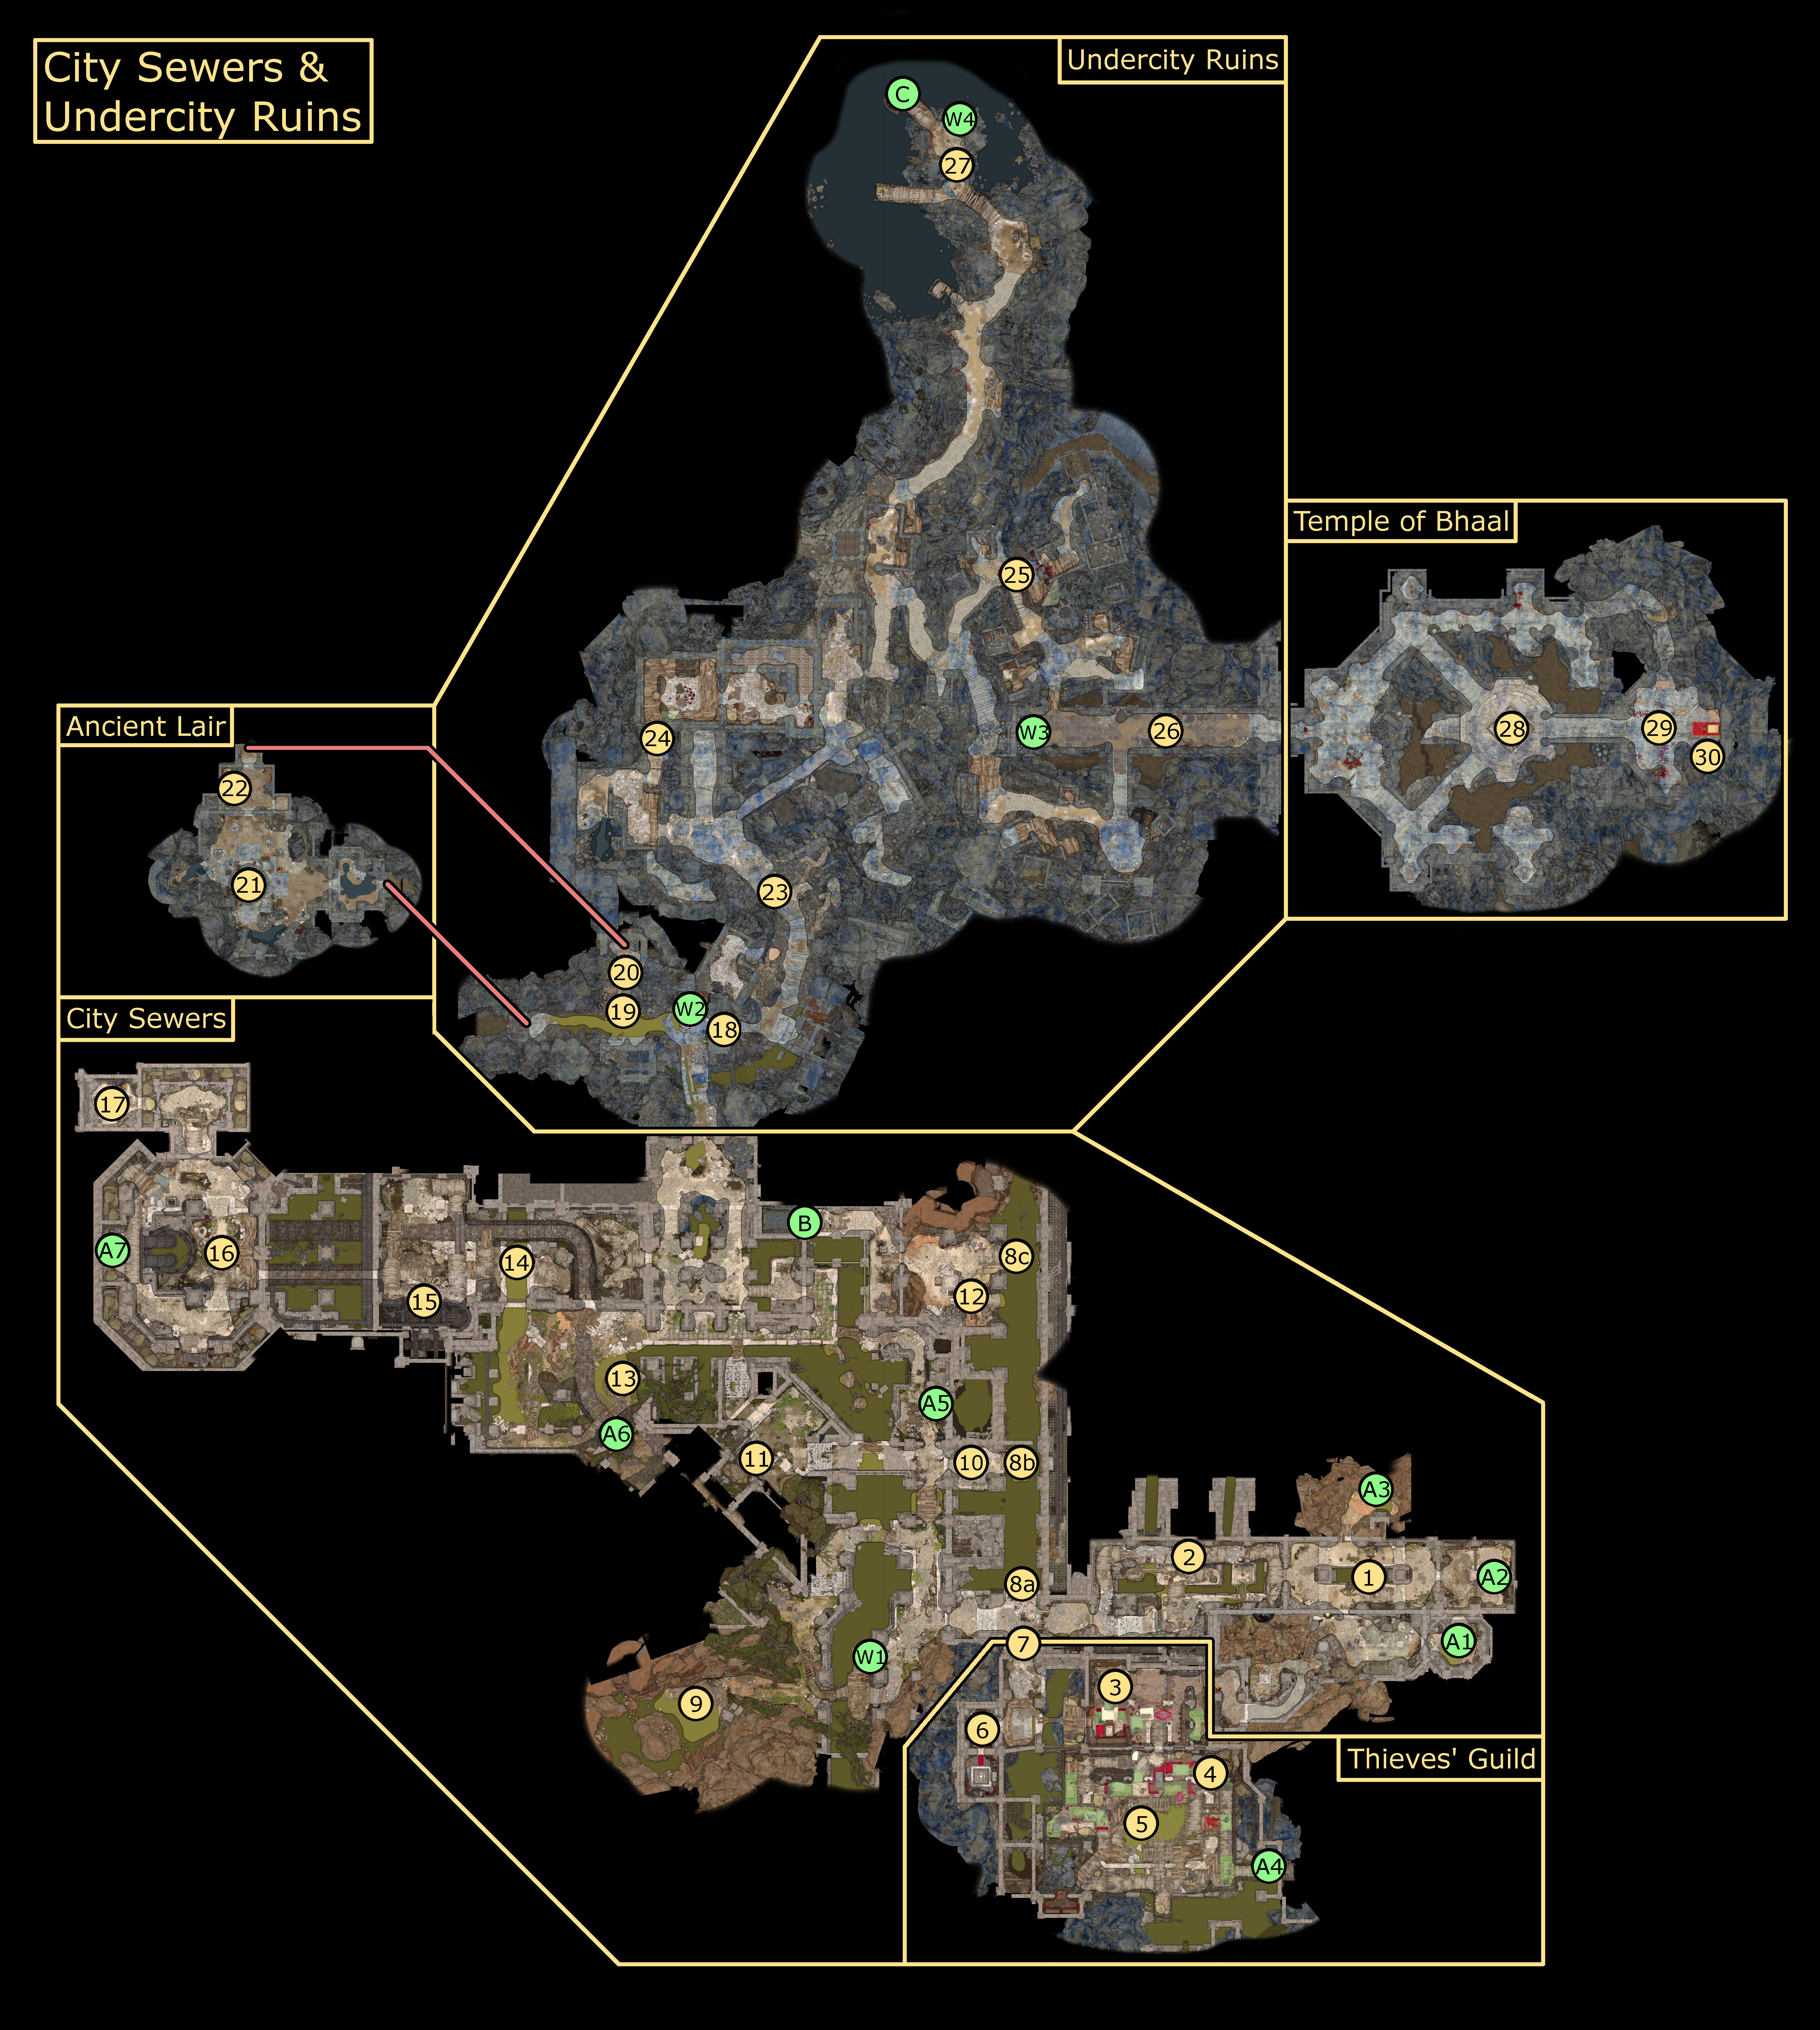
Map
Points of Interest
NOTE: By the time you reach the City Sewers, Orin will have kidnapped one of your companions back in Rivington, or Yenna if none of the available companions are at camp. As such, she will also appear as that companion (most often Lae’zel) in one of various places in the City Sewers, where she will quickly reveal her treachery before asking you to side with her to kill Gortash (in a deal mirroring Gortash’s from Wyrm’s Rock), after which point she will fight you in a duel in the Undercity (#28).
Orin will appear either near the Gas Filled Room (#1), Kith’rak Voss (#10), or the Undercity Door (#18).
Whether you agree to help her or not, you will need to find your way through the Undercity Door (#18) in order to confront her and save your kidnapped companion. Despite her threats, she will never kill her kidnapped victim before you reach her (#28).
Gas Filled Room
Most of the early entrances to the City Sewers connect to the Gas-Filled Room, which will poison characters with Noxious Fumes should they enter the clouds. You can use a ranged attack (or suffer the Fumes) to switch a level on the south side of the room, or can disable the Vents spewing the Fumes with a DC-10  Sleight of Hand check with Trap Disarm Toolkits.
This is one of the locations where Orin can confront the party.
Bhaalite Ambushers
You will come across a group of Bhaal cult members, led by the Death’s Head of Bhaal Blythe, attacking a group of refugees. When you come across them, they will be hostile to you unless you have made the deal with Orin, which will give you the option to join them. Refusing to join in their massacre, however, will break the pact with Orin, making you the target of not only this group of Bhaalites, but any others you might encounter in the city.
The Bhaalites are not particularly tough enemies, except for their “Aura of Murder”, which grants them ranks of “Unstoppable” (an effect which reduces all damage from an attack against them to 1, removing the charge of Stoppable). The Death’s Head starts with 2 ranks of Unstoppable, but her 3 Night Blades don’t start with any. The easiest way to deal with this is to simply attack the character with an action with multiple attacks, such as a Warlock’s  Eldritch Blast or
  Scorching Ray.
Nine-Fingers
When you first come across “Nine-Fingers” Keene, she will be arguing with her agent Uktar. It is clear that there is friction, caused by Nine-Fingers’ rivalry with the Stone Lord (#16), who you might learn is an old friend of one of your companions (and a familiar face in the Baldur’s Gate series). She will point you toward the Counting House, where she believes the Stone Lord is attempting a theft.
After meeting with the Stone Lord, you may want to return to Nine-Fingers to either let her know of the Stone Lord’s (#16) demise, or to side with her in the coming conflict with the Zhentarim (#4).
If you’ve recuited the Stone Lord as a companion, then you will need to convince him not to start a fight with Nine-Fingers in order to keep her as an alley.
Nine-Fingers Keene has the High Security Vault no.7 Key for the Counting House on her, which can be stolen or looted.
The Thieves’ Guildhall
To access the Thieves’ Guildhall, you either need to enter from the east in the Sewers, requiring you to get through a DC-20 Sleight of Hand-locked door, or from the Lower City by going through Tusgront or using a Guild Ring. You can also enter through the secret passage outside of Nine-Fingers’ Vault (#6), but this requires you to open it from the other side first.
The Thieves’ Guildhall has several low-tier merchants (except for Mol (#5), who sells better gear).
Importantly, it is here where the Zhentarim will attempt to take over the Guild from Nine-Fingers (#3), if their agents and the Stone Lord survived the battle deeper in the sewers (#18) (even if you recruited said Stone Lord). During this confrontation, you will have the chance to side with either the Zhentarim or Nine-Fingers, and will be rewarded by the victors for siding with them.
Mol
It is here where you are likely to find a familar face. If Mol survived Act 1 and 2 (which she can do even if everyone else at Last Light Inn perished, thanks to her deal with Raphael), then she will be here, making a name for herself with the Thieves’ Guild.
Turns out, though, she has made a contract with Raphael, which you can find in the House of Hope. If you steal if, presumably battling Raphael along the way, then you can return the contract to Mol. So long as you don’t tell her that you killed Raphael, then you can give her the contract. If you can convince her with a DC-15  Persuasion check after giving her this contract, she will side with you in the final battle.
Nine-Fingers’ Vault
In Nine-Fingers’ (#3) bedroom, you can find a wardrobe that doubles as a secret door. The key is one of two on Nine-Fingers (#3), or you can lockpick it with a DC-20 Sleight of Hand check. On the other side of this secret door, you can find a key to open an unpickable chest (or use Knock).
Across a small gap from the secret passage, you can find Nine-Fingers’ Vault. It requires a DC-30 Sleight of Hand check to open, or you can use the other key on Nine-Fingers to open it. There is a variety of random, expensive loot in both rooms, but opening the locked door in the vault itself (with a Sleight of Hand check) will close the main door on you. Thankfully, there is a button at the back of the second room, which you can press to open it back up.
Below the vault, you can find the above-mentioned chest, as well as a lever to open up a secret door (#7) next to to the Wooden Raft (#8).
Secret Door
From the secret alcove behind Nine-Fingers’ wardrobe, there is a Secret Door that can be opened with a nearby lever.
Wooden Raft
Going along a drainage channel, there is a wooden raft attached to a chain. This can be used to quickly traverse the City Sewers, bringing you to useful waypoints. To bring the raft to you, you can fire a ranged attack at the lever closest to your position. Once there, it is good to make sure all your party members are aboard, and then you can pull the lever in the direction you want to go.
The Wooden Raft has 3 possible stops:
- 8a: Near the Secret Door (#7) and Bhaalite Ambushers (#2), this stop on the raft is surrounded by tripwire Fire Traps, which can be disarmed with DC-15 Sleight of Hand checks.
- 8b: Near Kith’rak Voss (#10), this stop simply lets you off deeper into the Sewers.
- 8c: Near Lorna Esthelian (#12), this is the final stop on the Wooden Raft. This stop is the only way to access the back entrance to Cazador’s Dungeon (B), though the entrance will be inaccessible if you haven’t completed Szarr’s Palace yet. Orin, disguised as your kidnapped companion, can show up near here.
Arabella
if Arabella survived both Acts 1 and 2, and was told in camp (after meeting her in Reithwin Town) about her parents’ demise there, then she will be here. She doesn’t have much interaction, but will commit to helping you in the final battle.
Kith’rak Voss
After his attempted deal with Raphael, and you did not agree to Raphael’s conditions, then Kith’rak Voss will be waiting here. He is hoping for the party to somehow obtain the Orphic Hammer, which can be used to free the imprisoned Orpheus.
The hammer is in Raphael’s House of Hope, and if you acquire it, you can let Voss know that you have obtained it in order to receive the Silver Sword of the Astral Plain, a very powerful greatsword, as well as to guarantee Voss’s assistance in the final battle, should you free Orpheus.
Aelis & Sarin’s Skeleton
When you come across Aelis in the sewers, he will explain that he is there in hiding from Gortash, and some of the misfortune that has lead to, including the death of Sarin. A successful DC-18  Intimidation, Persuasion, or
  Deception check will assuage Aelis’s paranoia, getting him to stand down and let you approach the funeral he is holding for Sarin.
She is a skeleton, and missing her skull. You can find the Skull (#20) behind Voiceless Penitent Bareki (#19). If you bring the skull back and reattach it to Sarin’s Skeleton, her spirit (which will follow you after picking up the Skull) will be able to thank you, and give you the Chancer’s Carcanet amulet, after which point she will be at rest.
Stealing anything from Sarin’s Skeleton, returning to the funeral after convincing him to let you pass through, or failing the earlier check to calm Aelis, will lead to Aelis and the many denizens of the Sewers turning on you, including:
- Aelis Siryasius
- 2 Grease Elementals
- 5 Greaseballs
- 9 Grease Mephits
In a fight, the high amounts of Grease should be watched out for, as they are very likely to cause you to fall, forfeiting your turn and giving the many enemies a good chance to attack. Grease can also be hit with fire damage to make it explode — something that Aelis will use to his advantage. Aelis also has a key on him that can be used to unlock the DC-18 Sleight of Hand lock on the metal grate behind Sarin’s coffin.
Lorna Esthelian
You can find Lorna Esthelian next to the last stop of the Wooden Raft (#8). She is waiting for a party hosted by a suitor that you can learn (or might already know) is a vampire, one of Cazador’s brood. You can dissuade her from this, causing her to leave the Sewers and survive.
Dairow Vin
Sleeping in the Sewers, you can find Dairow Vin. A nearby note reveals that he drank many sleeping potions in order to sleep forever after the death of his husband. There is nothing you can do with Dairow Vin, and his presence appears to indicate cut content surrounding him.
Kevo Phogge Bhaalites
Going through the Sewers, you will encounter Kevo Phogge, a Bhaalite with a couple of followers. She will battle you no matter if you have agreed to assist Orin, requiring you to fight her. At the beginning of the fight, Kevo Phogge will summon a Murder of Crows, which will remain even if Kevo is defeated.
She also has 2 ranks of Unstoppable, like the earlier Bhaalites (#2), but those charges can be whittled down easily with any actions with multiple attacks. Not counting the crows, all the enemies in this combat have Aura of Murder, allowing them to gain Unstoppable stacks if they manage to kill any party members.
Sluice Valve
In order to open the Sluice, leading way to the Stone Lord & Zhentarim (#16), you will need to either succeed at a hard passive  Athletics check on the “Sluice Valve” at the far left, or else you will need to manipulate the Water Lever and Temperature Valves until both are in the green “Perfect” levels, according to the meters next to each. They rise at different levels, with the Temperature increasing faster than the Water level. If either are left on and hit the maximum levels, then the Sluice mechanism will break, requiring you to use the Emergency Release Valve to open the Sluice.
Stone Lord & Zhentarim
NOTE: The following section has a spoiler about who the “Stone Lord” really is.
Boo
If you save the Stone Lord (#16), then he will burst through a Stone Wall to the north of the Abandoned Cistern. After trying to burst through two more walls on the other side of the first, he will finally break a third and final wall, revealing the mighty, devastating, and adorable Boo. After the cutscene that follows, you will be able to recruit the Stone Lord.
Undercity Door
Passing through the Sewers and into an area with Dark Rocks, you will find the door to the Undercity Ruins. However, it will be sealed when you come across it. It cannot be lockpicked, and so can only be opened if you have dealt with the Murder Tribunal in the Lower City, requiring you to follow the “Investigate the Murders” quest. Once you have acquired the Amulet of Bhaal from the Tribunal, you can use it to open this door.
Voiceless Penitent Bareki
The Voiceless Penitent Bareki is a former comrade of Aelis and Sarin (#11), and has committed to never speak again. He does, however, serve as a shop, selling some surprisingly powerful items. Behind him, you can find Sarin’s Skull (#20), which can be returned to Sarin’s body near Aelis (#11).
Sarin’s Skull
In order to take Sarin’s Skull from the pouch behind Voiceless Penitent Bareki, you will need to steal it from behind him. This isn’t hard, as he does not face the puch. Once you do, a headless spirit will appear and follow you throughout the City Sewers. You can then bring the Skull to Sarin’s body (#20) in order to return her head to her spiritual form, rewarding you with Chancer’s Carcanet and turning Sarin’s body to “Sarin at Peace.”
Ancient Lair
By noticing the door near Voiceless Penitent Bareki (#19) with a Passive  Perception check, and then opening it with a DC-20 Sleight of Hand check using Thieves’ Tools, you can access the Ancient Lair.
If you open any of the chests in the lair, or the Sacrophagus at the center of the room, then you will be attacked by a horde of zombies and be afflicted with the “Spell Rot” condition, which will deal some damage whenever you cast a spell, with the damage increasing the higher the level of the spell. This curse will be removed when you leave the Ancient Lair.
For this combat, the Zombies, Servants, and Claws are all surprisingly strong enemies for the amount of them that there are, and so it is best to prepare any buffs before touching anything in the room. The Sarcophagus itself does have the Breaching Pikestaff, which might not be worth the hassle for many players.
If you do not tamper with the chests or Sarcophagus, you can head straight to the workshop to the north containing Mystic Carrion’s Organs (#21).
Mystic Carrion’s Organs
In the Workshop to the north of the Ancient Lair (#21), you can find two of Mystic Carrion’s Organs, his Brain and his Liver. These belong to Mystic Carrion in the Lower City, and if you destroy them (probably from a distance to avoid the massive damage they unleath), then he will be weaker when and if you fight him. You can also find a tablet that reveals that Thrumbo in the Lower City has Mystic Carrion’s Heart inside of him.
There is an exit from the workshop that leads to the door behind Voiceless Penitent Bareki (#19) and Sarin’s Skull (#20).
Path to Bhaal Ambush
After accessing the Undercity Ruins by resolving the Murder Tribunal in the Lower City, you will be ambushed by Bhaalites, led by Farslayer of Bhaal Ghislev. He will attempt to use Power Word: Kill on the party, but it will take 6 rounds before he is able to do so, meaning you will need to dispatch him before he activates it, or else instantly lose any party member below 100 HP. In addition, you will need to deal with several minions who will attack the party.
This entire ambush can be avoided by sneaking and jumping onto the rocky path to the south of the arena, heading to the Abandoned Buildings (#24). However, doing so will mean that you cannot access Orin the Red’s arena (#28), since the door will remain locked until the Farslayer is killed. It does, however, make it easier to sneak up on the Farslayer and better position yourself.
Abandoned Buildings
There isn’t much to see in the Abandoned Buildings, aside from them serving as a method to avoid the ambush from the Bhaalites (#23) and get a better position to fight the Farslayer there.
Trapped Corpses
North of the Temple of Bhaal Waypoint (W3), you can find a group of bodies, strewn around. Under each of these bodies, there is a Blast Mine, which can be spotted with a passive Perception check and disarmed with a DC-10 Sleight of Hand check. If any of them explode, they all will.
On Wilting Alex’s body amongst these, you can find the Clown’s Severed Head, which is the last piece of the body that you can bring back to Lucretious at the Circus of the Last Days in Rivington.
Trapped Bridge
East of the Temple of Bhaal Waypoint (W3), there is a Trapped Bridge. The traps (both the Pressure Plates and the “Sanguine Vents” can be noticed with a passive Perception check and disarmed with a DC-10 Sleight of Hand check. However, the Pressure Plates only activate the vents to dispense Unstable Blood, which will only be dangerous if exposed to fire.
At the end of the Bridge, you will come to the door leading to Orin the Red (#28), which you can open using the same method you used for the Undercity Door (#18), so long as the Farslayer of Bhaal (#23) was defeated.
Morphic Pool Docks
On the north side of the Undercity Ruins, you can find the Morphic Pool Docks. Using the boat at the end of the docks, you can go to confront the Netherbrain. Before you can, you will need to have all 3 Netherstones, as the Emperor will inform you, or else be doomed to failure.
There are also dozens of Cranium Rats scurrying around the docks, drawn to the Netherbrain. Approaching the boat to the Netherbrain will cause them all to turn hostile. They are best dealt with using Area of Effect attacks (time for Fireball?).
Once you decide to use the boat, there will be no turning back, and you will enter the endgame of Baldur’s Gate 3. If you have anything else to ask in Act 3, you should do so before taking the boat.
Orin the Red
After opening the door at the end of the Trapped Bridge (#26), you will come across Orin. On an altar in front of her, you will see your companion (or Yenna) that was kidnapped earlier. A dialogue will play. If you are playing as the Dark Urge and challenge Orin to a duel, or if you (Invisibly) went past her and used Speak With Dead on Helena, then you can convince Orin to fight you without killing her victim first. Otherwise, you will need to succeed on a DC-25 Deception, Persuasion, or Religion check to convince her to fight you before killing her victim.
Once the battle begins, Orin will transform into Bhaal’s avatar: the Slayer. She and the surrounding Bhaalites will attack you, making for a formidable fight. In addition to hitting extremely hard and having many AoE attacks, Orin, in the form of the Slayer, will have 6 stacks of Unstoppable, and will gain 1 more rank of Unstoppable every turn so long as at least one Reaper of Bhaal remains. These Reapers are encased in  Sanctuary, meaning that only AoE attacks can harm them. Death’s Heads (with 2 ranks of Unstoppable each) and Invokers around the arena will join in as well.
It is best to deal with the Reapers as soon as possible so that you can actually deal substantial damage to the Slayer. Meanwhile, attacking the Slayer while she still has ranks of Unstoppable should be done with actions that do multiple attacks at once, to remove those ranks. The Slayer’s health pool after Unstoppable is actually pretty manageable, and so once you’ve gotten through Unstoppable, taking her out as fast as possible should be a priority.
After you kill Orin, you can get the key to unlock her victim from the altar.
If you are playing as the Dark Urge, you can challenge Orin to a duel. During this duel, Orin will fight the Dark Urge 1-on-1. The other members of the Bhaal cult will not join in, meaning that Orin will only have her original stack of 6 Unstoppable, and will not gain any more.
The Chosen Altar
If you are playing as the Dark Urge, then Bhaal will give you a choice in this room: you can either accept Bhaal’s blessing or reject it entirely. If you accept, you will gain access to the Slayer form, and will be able to use Power Word: Kill one time (ever). This choice will cause  Minsc and
  Jaheira to take issue, and you will need to fight them either at the Temple’s Entrance, or immediately if they are in the party.
If you reject this offer, then the Dark Urge will be killed, but will be resurrected by Withers. Only now, you will finally be free of the Urge, being now redeemed of your past sins.
If you aren’t playing as the Dark Urge, then you can see the corpse of the Dark Urge (referred to as a “Fallen Bhaalspawn”) in this room, but will not have the same chance to become the Chosen of Bhaal.
Helena
You can find Helena in the corner of the Chosen’s Room. You can get interesting information from her using  Speak With Dead. If you do so before speaking to Orin (by sneaking past her), then you can leverage that information in order to convince Orin to fight you before killing her victim, giving you the chance to save them.
Exits
There are many entrances into the City Sewers from the Lower City, but no entrances into the Undercity Ruins from the Lower City:
You can only access this door after you have come out the other side, but it leads to Cazador’s Dungeon beneath Szarr Palace. From Cazador’s Dungeon, lock picking the DC-30 Sleight of Hand Locked Door (which has a key in Szarr Palace’s Attic) can access this. This entrance can only be reached using the Wooden Raft (#8).
Morphic Pool
At the Morphic Pool Docks (#27), you can interact with the boat there to head to the Morphic Pool. You must have all 3 Netherstones (or have Orin and Ketheric’s Netherstones and have Gortash accompany you) in order to continue.
Once you embark on the boat to the Morphic Pool, you can’t go back to anywhere in Act 3, so you should take care of everything you want to before you do. Taking this boat marks the beginning of the endgame of Baldur’s Gate 3.
Waypoints
There are 4 Waypoints in the City Sewers & Undercity Ruins:
- W1: City Sewers
- W2: Undercity Ruins
- W3: Temple of Bhaal
- W4: Morphic Pool Docks