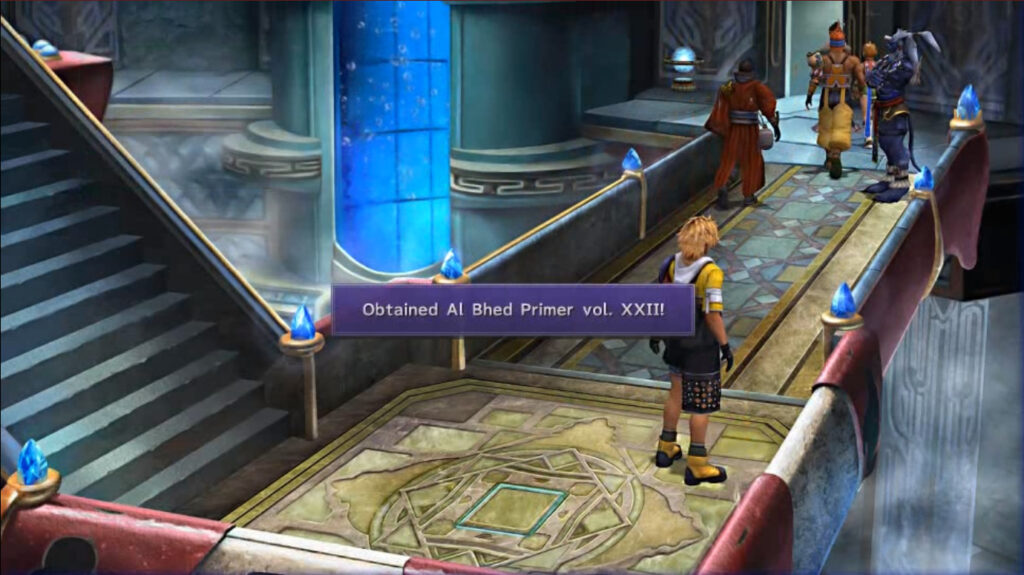
Like the Primers in the Al Bhed Home, you will permanently lose this one if you don’t pick it up now.
This is where you will see the missable Al Bhed Primer
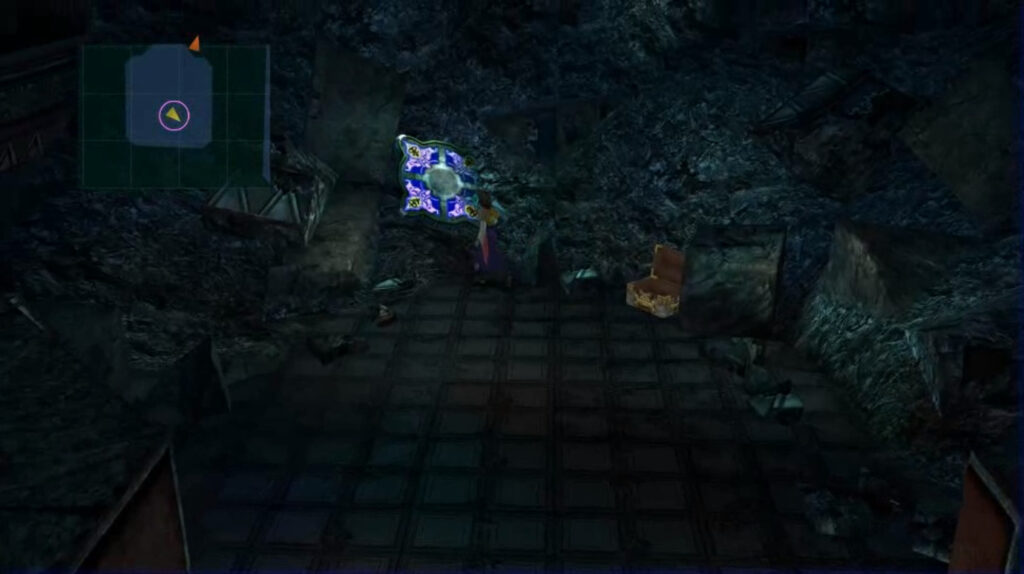
Continue down the path until you reach the Cloister of Trials.
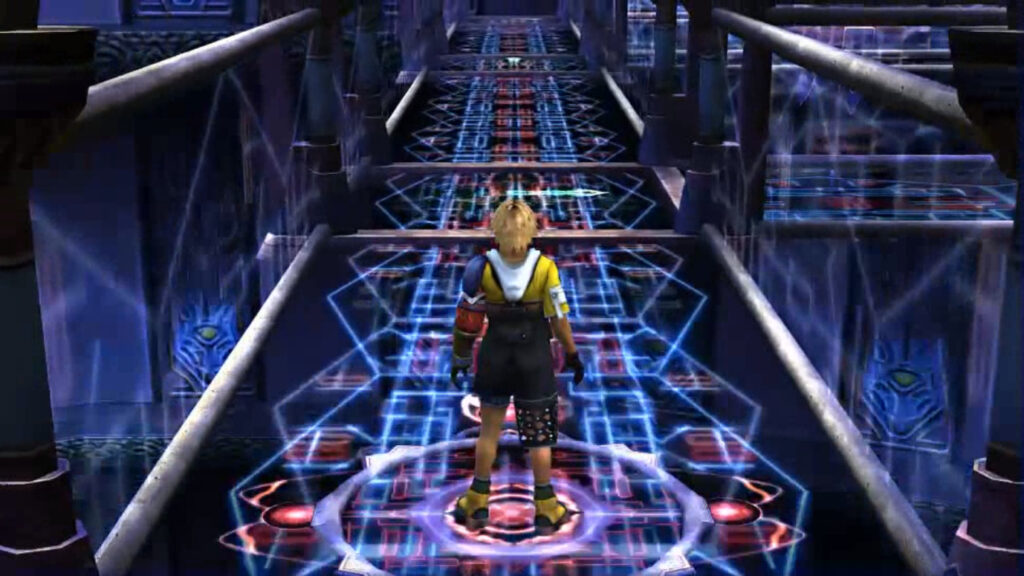
Bevelle Cloister of Trials
Operating the Pedestals and Platforms
Navigating in this Cloister can be tricky. In order to move between platforms, you must push a pedestal that has a Bevelle Sphere inside of it into the pathway, then ride the platform it creates until it takes you to another platform.
When encountering a split path, you will see a green glyph at the split with an arrow that is alternating directions. To go the way that you want, press when you are on top of the arrow, while it is pointing the way you want to go. The timing can be tricky with some of the splits, but spamming the button could help.
Bevelle Cloister Walkthrough
Push the pedestal forward to get started, then press when prompted to move forward. Go to the left platform on the second split.
Grab the Bevelle Sphere, then ride the pedestal until you see a glyph alternating between forward and backward.
Have the glyph turn you around, then go onto the left platform on the first split.
Place the Bevelle Sphere you are holding on the recess here, which will open a new path. Then, ride the pedestal off of the ledge to reset to your starting position.
Now go right on the first split, and go forward at the split down the ramp to reach the bottom platform.
Grab the Bevelle Sphere, then ride the pedestal back up to the middle floor. Now go to the right, then turn right on the third split to get onto that platform.
If you’re having trouble reaching this platform, turn right on the first split, then immediately turn around and make your way to the third split. Doing this will make the pedestal platform move slower, making the timing easier.
Place the Bevelle Sphere you are holding in the recess to open a new pathway (this is the only one you can walk across normally), but don’t walk through it yet.
Get back on the pedestal and take it off the ledge to reset your position in the middle floor. Then, take a right at the second split.
If you have trouble reaching this platform, use the trick of getting off on the first split again to slow down the pedestal.
Grab the Glyph Sphere, then ride the pedestal back to the third platform.
Walk through the pathway and put the Glyph Sphere on the wall to remove it. Then, grab the Destruction Sphere on the other side.
Make your way back to the platform on the second split (where you got the Glyph Sphere), and place the Destruction Sphere on the recess to open a new path.
This Cloister is unique — the Destruction Sphere doesn’t unlock a treasure, and this one is actually required to finish the puzzle. However, you can still miss a chest if you go towards the newly opened path immediately.
Go back to the third platform and grab the Bevelle Sphere. Ride the pedestal off of the edge again to reset your position.
Now, go right on the first split, and continue through the path until you are taken to a new room. Make sure you have 2 Bevelle Spheres with you to get the hidden treasure, as you will not be able to come back to this room.
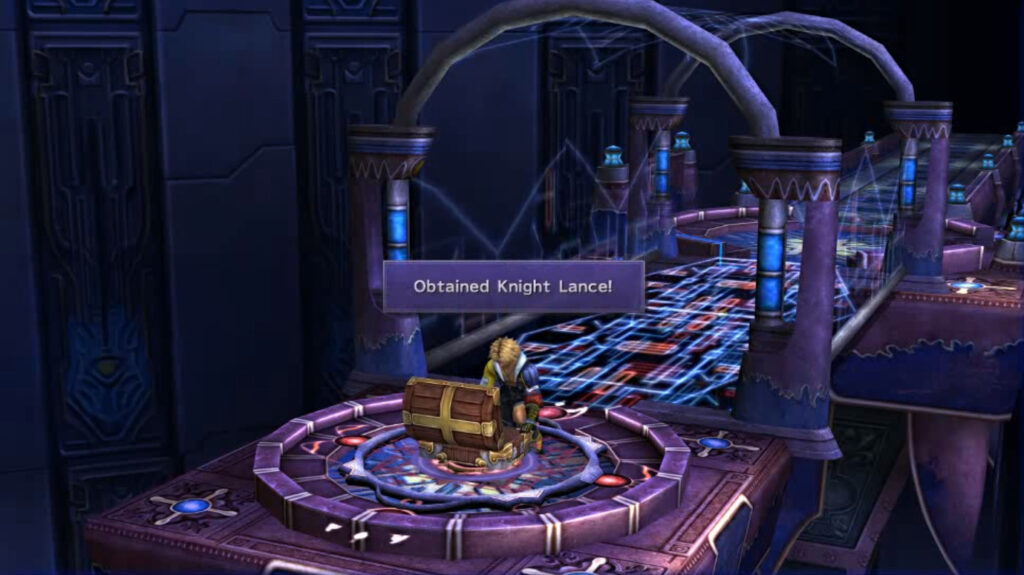
Place one of the Bevelle Spheres on the recess on top of the stairs to open a new path. Now, grab the treasure to receive an HP Sphere and reveal a shining platform.
Step on the shining platform to teleport the pedestal to you. Push it to the left to obtain the Knight Lance for Kimahri. Go back to the right path on the split to complete the Cloister.
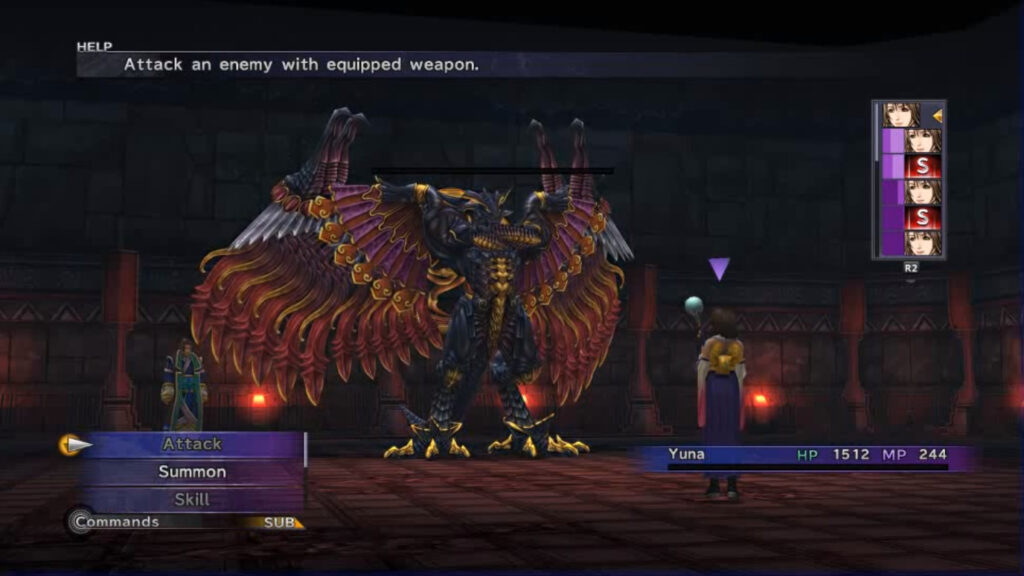
Once you go into the next room, you will see a series of cutscenes. As a result, you will gain Bahamut and be able to name him. After these cutscenes, your party will get split and you will be taken to a new area.
Via Purifico
When you regain control, you will be in control of Yuna and she will be alone. In this area you will be able to find Kimahri, Auron, and Lulu to rejoin the party (don’t worry: if you don’t get them, they will automatically rejoin when you go to the next area). Until you find them, you can take advantage of Yuna’s Aeons to make battles much easier. Bahamut in particular will be of major help — his Impulse attack will hit all enemies, and it is strong enough to kill many of them in one hit.
In the first room, take the path east until you reach a split, then go left until you find another room. Here you will find Kimahri and a chest containing a Mega-Potion. Continue north and follow the path to reach another room where you will find Auron. If you don’t want to locate any more items, you can head north to exit this area now and skip to the next section.
If you wish to continue exploring, head west and continue down the path until you see a split. Then, take a left and continue until you reach the next room. Head east from here, and you will find Lulu and a chest containing 2 White Magic Spheres.
Continue going south until you reach another room, where you will discover a glowing glyph and a chest with an Elixir. Touch the glyph to activate the teleportation devices in this area, then leave this room and head east (this will take you back to the beginning of the area).
Head north, ignoring teleportation platforms and going past the next room. Make a right at the first split you encounter to find a chest containing a Black Magic Sphere and a glyph. Step on the glyph to alter a teleportation platform, then head north, back to the second Save Sphere.
Take the path west again and head to the teleportation platform. The arrow on this platform will blink twice and then change direction. Once the arrow is pointing west, step on the platform to be transported to a new room. In this room you will find three chests, containing a Skill Sphere, a Lucid Ring, and 10,000 gil.
After you get everything, step on the teleportation glyph when the arrow is pointing east, and head east back to the second Save Sphere. Head north to go to the next area: once there, you will encounter a boss.
Isaaru
This fight is very similar to the ones against Belgemine earlier in the game, in the sense that you will only be able to fight with Yuna‘s Aeons. The main difference from those fights, however, is that you will be fighting three Aeons back to back.
Isaaru will summon his Ifrit, Valefor, and Bahamut, in that order (their names are Grothia, Pterya, and Spathi respectively). Every time he does so, you will be able to summon your choice of Aeon in turn. Something to keep in mind: you cannot summon the same Aeon that Isaaru has out.
How to Fight Grothia (Ifrit)
Grothia (Ifrit) will have his Overdrive gauge full as soon as he is summoned. Shiva or Bahamut will be able to do the most damage to him, since both of them have access to Ice spells. You can either Shield his Hellfire or, if your Aeon’s Overdrive gauge is full (or if you Grand Summon it), you can use yours first and try to kill him immediately. If he does survive, he should go down shortly after.
How to Fight Pterya (Valefor)
Pterya (Valefor) has no particular weakness, so you can summon whoever you want for this one. Bahamut will do the most damage to it, but the other three will have the advantage of being able to heal themselves. Just take her down quickly with whichever Aeon you choose to use.
How to Fight Spathi (Bahamut)
Spathi (Bahamut) will have a five-turn countdown to use his Mega Flare attack. Shiva will be your best bet here — she is quick and can heal herself if needed. If you see Spathi’s countdown go down to 1, use Shield before his next turn to take the Overdrive. Otherwise, just keep attacking until he goes down.
After the battle, you will see a cutscene, and the story will shift to where Tidus, Wakka, and Rikku are.
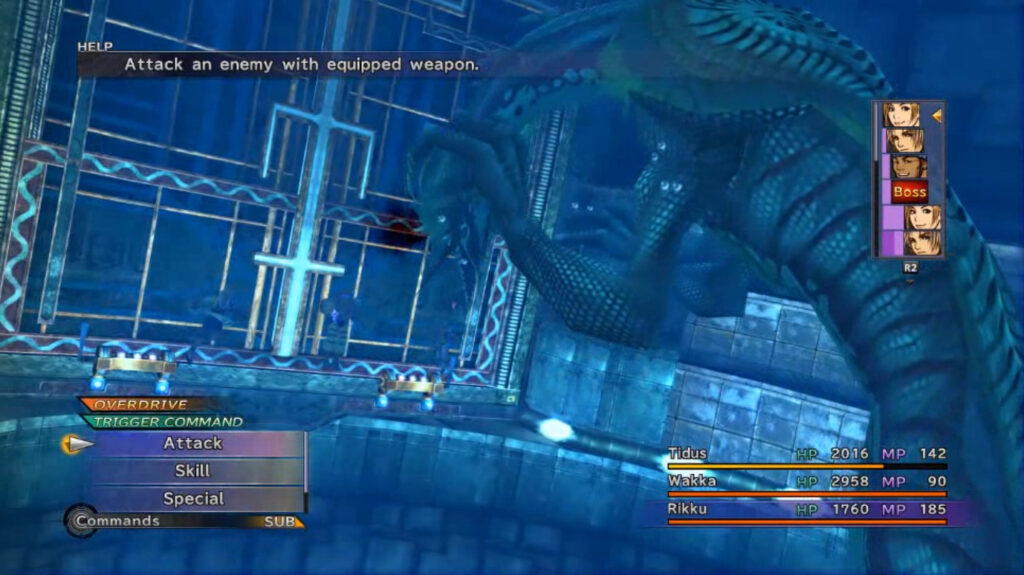
Via Purifico (Underwater)
You will now be back in control of Tidus, with only Wakka and Rikku joining your party. To the right of the Save Sphere will be a shop that looks like a chest, where you can buy any items you might need. If you have any weapons with the ‘Lightningstrike’ passive, it will help with the random battles in this area. Simply swim down the path until you see a second Save Sphere, then continue to begin a boss fight.
Evrae Altana
This is potentially the easiest boss in the game. Evrae Altana begins the battle inflicted with Zombie, meaning that healing items will damage it. If you give it 2 Phoenix Downs or X-Potions, you will defeat it and end the fight immediately.
If you wish to fight this battle without using this method, it is recommended that you give your party armor with ‘Stone Ward’ if possible: the boss’s first move will be Stone Gaze. Since you are underwater, if a party member gets Petrified by it, they will instantly shatter, taking them out of the fight completely. If it successfully Petrifies someone, it will only attack with Photon Spray afterwards, which hits the entire party. If not, it will alternate between the two attacks. Either way, it will counter all attacks with a physical attack.
Your party will have a Trigger Command to break the locks behind them. If you break both locks twice, Evrae Altana will no longer counter you. However, if you do this, you will lock yourself out of a couple of chests that you can get after the fight. Keep your party healed with Al Bhed Potions, and if no one gets Petrified the fight should go smoothly.
After the battle, assuming you didn’t close the gates during the fight, you will find two chests on the path out. One will contain a Rematch for Wakka, and the other will have an Avenger for Tidus. After this, just swim until you get out of this area. After some cutscenes, your two parties will reunite and you will be taken to a new area.
Highbridge
You will temporarily lose Kimahri from your party, and you will need to make your way back to Seymour. This area is actually a great place to grind some AP if you feel like your party is underleveled — just keep in mind that Kimahri will not be able to level here.
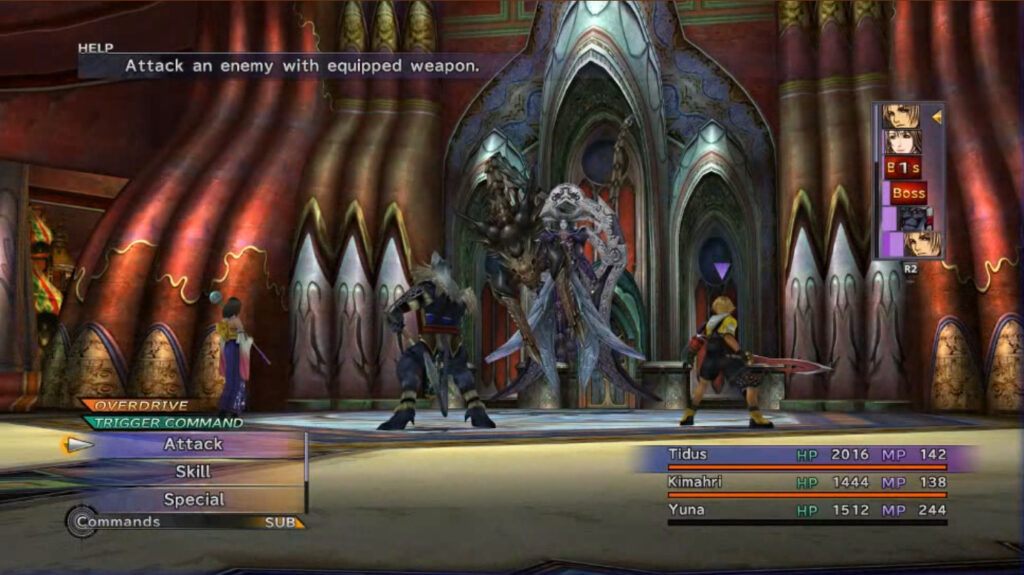
If you have any armor with ‘Stone Ward’ or ‘Stoneproof,’ they will be useful for the upcoming fight. When you reach Seymour, you will enter a boss fight with him. Kimahri will rejoin the party.
Seymour Natus
The boss will consist of Seymour Natus and his Mortibody. You can target both enemies, but there is no getting rid of the Mortibody. If you defeat it, it will automatically use Mortibsorption, which will drain HP from Seymour. The attack will drain 4000 HP at first, but the Mortibody’s max HP and the amount drained reduces each time it is defeated, until both go down to 1000 HP. The Mortibody will also cast Desperado if everyone in your party has the same buff (such as Haste), which damages and removes all positive status effects from your party.
Aeons will be mostly useless in this fight, because if one is summoned, Seymour will use Banish on his next turn, killing the Aeon instantly. If your Aeon has their Overdrive gauge full (or you have Grand Summon ready), you can summon them to use it for extra damage. Otherwise, there’s basically no point in summoning for this fight.
Tidus, Auron, and Yuna will have a Trigger Command to talk to Seymour. If Yuna uses it, her Magic Defense will increase for this fight, while Tidus and Auron will have their Strength increased. You can use Haste and Shell on two of your party members, and Magic Break on Seymour to make the fight easier. Casting Bio as soon as possible will also give you some extra damage throughout the fight.
Seymour Natus Phase One
In the first phase of the fight, Seymour will cast Multi ‘-Ra’ spells like he did in the previous fight, meaning he will cast spells twice on your party (such as Fira). Meanwhile, Mortibody will cast low-level elemental spells (like Blizzard) to your entire party. When you get Seymour’s HP under 24,000, he will begin Phase 2.
Seymour Natus Phase Two
Seymour will begin this phase by casting Protect on himself. If you learned Dispel, you can use it to remove it from him. Alternatively, if you learned Reflect, you can cast it on him before he gets to this phase, which will cause him to cast it on a party member (and it will be useful in the final phase as well).
Seymour will cast Break on your party members during this phase, inflicting Petrify on them, while the Mortibody will use Shattering Claw. If Shattering Claw is used on a member that is Petrified, they will shatter, completely removing them from the battle. If you don’t have any kind of resistance to the status effect, this can make the second phase very dangerous. Have Softs and Esuna ready to remove Petrify immediately, so you don’t risk anyone in your party getting shattered.
Seymour Natus Phase Three
Third phase will begin when Seymour’s HP drops below 12,000. He will now cast Flare on your party members, and Mortibody will cast Cura to heal him. This phase can be made much easier if you have Reflect, since you can cast it on Seymour to make the Curas bounce to a party member. Also, you can cast it on a couple of your party members to make Flare bounce back to Seymour. Keep your HP up and keep attacking Seymour, and he will go down.
After the battle, you will be taken back to the Macalania Woods.
Macalania Woods Revisited
You will not run into any random battles during this section. Talk to all of the party members when you gain control, then head south. Every path besides the southern one will be blocked, so head down there and you will find Kimahri. Talk to him and he will point to Yuna. Then, walk to the end to meet up with her (and see one of the most popular cutscenes in the game).
Afterwards, go north (where your party just came from) and get the chest to obtain a Lucid Ring for Yuna. Leave this area and head east to progress to the next one.
Share this article:
KainHighwind27
I'm a huge gamer who especially loves the Final Fantasy series. I will play just about any game, especially if it has anything resembling a Dragoon.