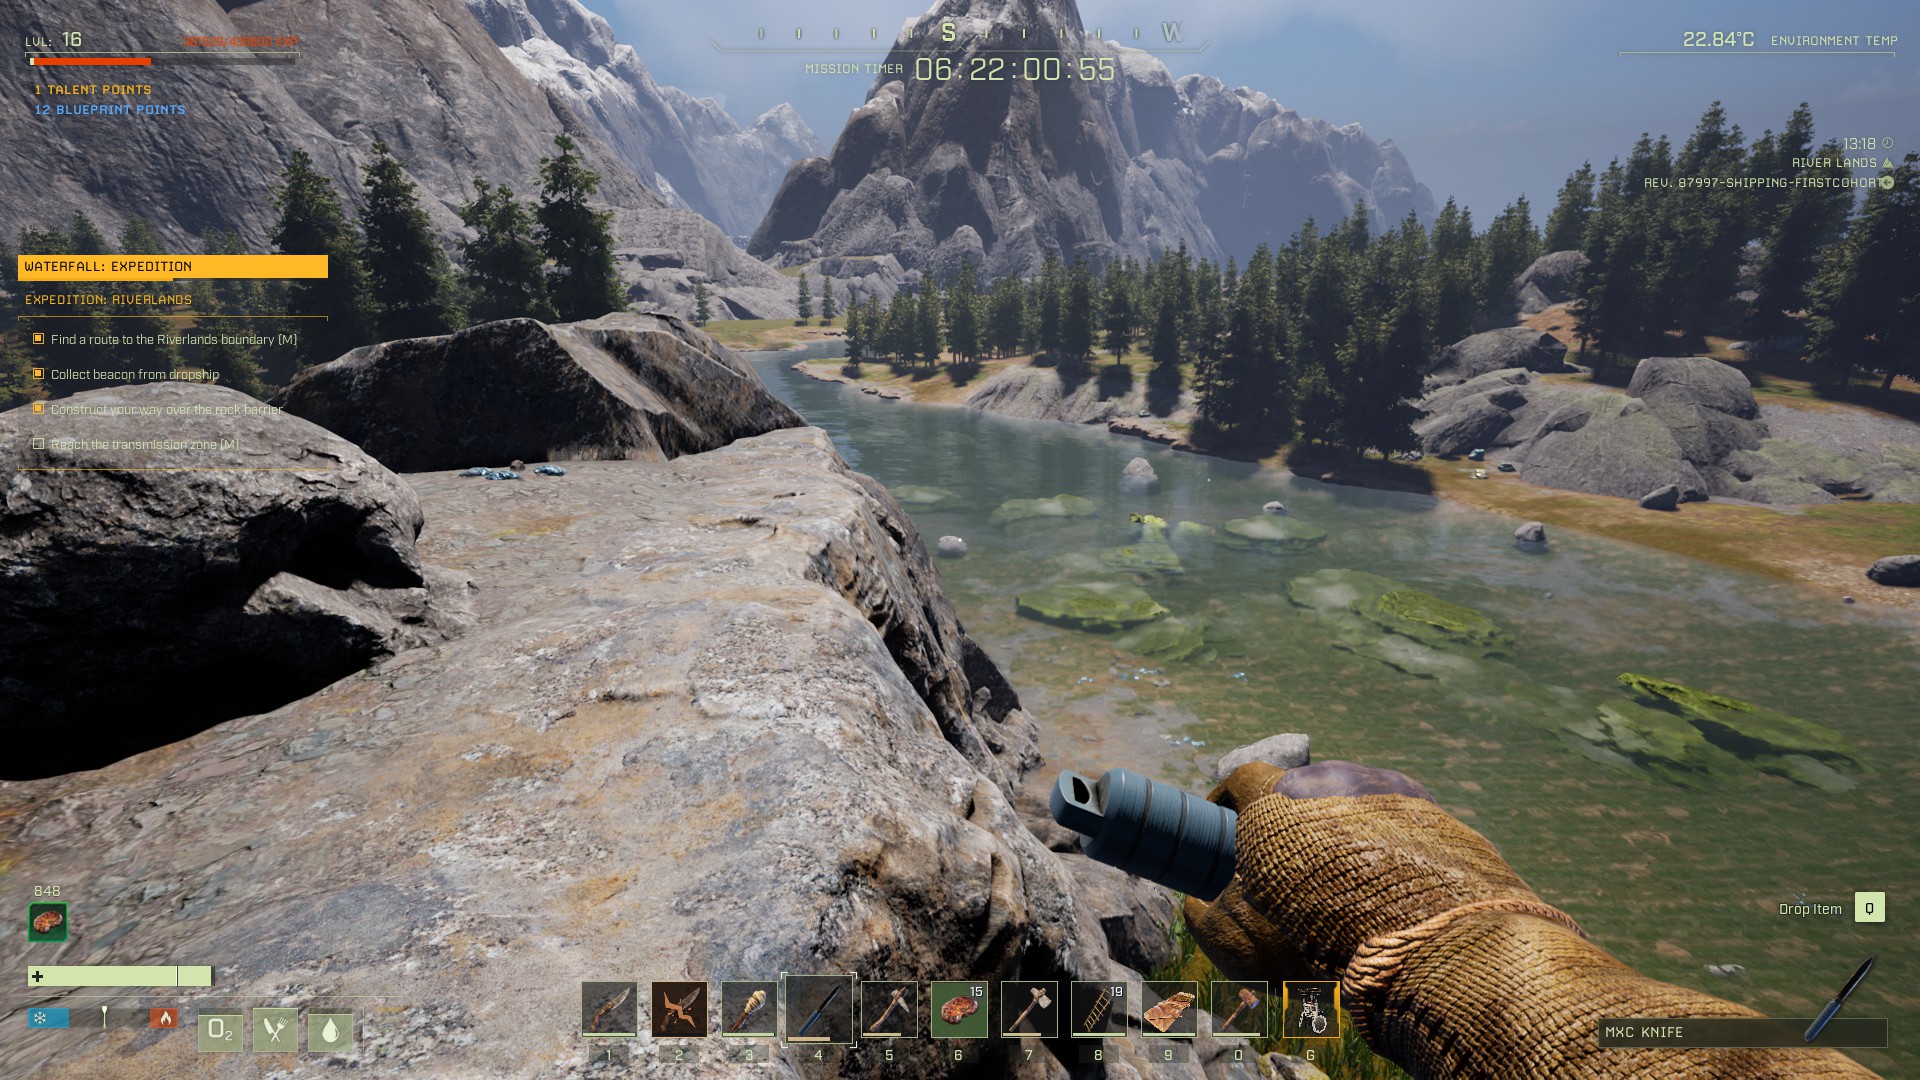
In the WATERFALL mission, you’ll be searching for a route to the Riverlands, in the hopes of finding — you guessed it — a source of exotics. This guide will first list the relevant details of the mission, and then provide a step-by-step walkthrough.
Prospect Details
Approximate time to complete: 1 hour with no deaths, 2 hours on average
To complete the objectives, you’ll need to first reach a marked area, then collect a supply pod, and then take it over a mountain pass and deploy it. Climbing the mountain pass will require some specific building techniques, and deploying the beacon requires you to build a platform for it in the water.
Deploying the beacon
Preparing for WATERFALL
Listed below is the absolute minimum requirement for completing the mission. If you don’t want to die to bears, you may want to do additional prep before you reach the forest (see Additional Prep section below).
Thatch or Wood Ladder — This is 100% required, so make sure you have this unlocked before you begin part 2 of this walkthrough
The following talents will dramatically increase your chances of survival. They are from the Solo tree, but if you’re not alone this mission isn’t so difficult and therefore these aren’t so important.
‘Tis But a Scratch [Solo – Solo]: 2 point
-10/15% resistance to physical damage. There are a lot of dangerous predators on this mission, and unless you’re very lucky, you’ll end up having to fight one.
Very, Very Quiet [Solo – Solo]: 1 point
-15% perceived threat while in stealth. If you want to avoid bears, you’ll want this.
Additional Prep
If you’re risk-averse, or simply hate dying, you’ll want to do some serious teching up before you attempt to cross the mountain pass and enter the Riverlands. There are bears between level 70 and 110 at both sides of the area you need to build over. It’s hard to give specific goals for equipment, since fighting bears solo is never safe, while fighting a bear with multiple players is usually fairly easy if you see it coming.
The Ghillie Armor is also a great choice if you have it unlocked, as it makes avoiding the dangerous predators in this mission significantly easier. That being said, your best bet if you want to be as prepared as possible is simply to craft the highest tier of weapons and armor that you currently have access to. There are a number of caves that you can access in the Desert Biome; this wonderful interactive map created by Finally Rage can point you to all the ore you’ll need.
All that being said, the safest strategy is simply to avoid incurring XP debt by leveling up before you enter the first forest biome, and then avoiding killing predators or otherwise gaining XP post-level up.
Mission Walkthrough
Note: Like many missions, this one ends once the final objective is completed; you don’t have to get anything back to the drop pod. If you make sure you’ve got an empty XP bar before you Part 3, you can let your character die once you’ve completed the mission, and therefore get back to the Drop Pod much quicker. If you do this, make sure you don’t have a spawn point set at a Bedroll.
Part 1: Leaving the Desert
This mission will drop you in the desert. Open your map and set a waypoint on the objective marker to the northwest, then start collecting nearby resources. In order of importance, here’s what you should craft:
Once you’ve killed a few animals, find a spot with some trees and bushes, and mine a nearby rock until you have the Stone needed for your Campfire. Cook at least a few pieces of meat, and collect wood from trees to craft the building pieces you need for your Portable Shelter. You’ll also want to collect at least 1 full stack of Oxite when you pass nearby deposits.
Be wary of sneaky cougars while in the desert, and try and sneak-attack headshot any predators in your path. Skin them and harvest their skeleton with your pickaxe, at least until you’ve got enough materials for a Bedroll and you have at least 50 Bone Arrows. Always check your surroundings before you begin harvesting anything, and every so often while doing so.
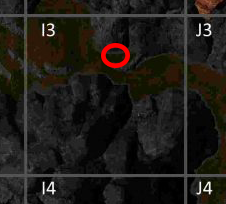
Use the map below to plan your path through the desert:
This route ensures you can refill your water before you enter the Forest
Part 2: Picking up the Beacon & Clearing the Way
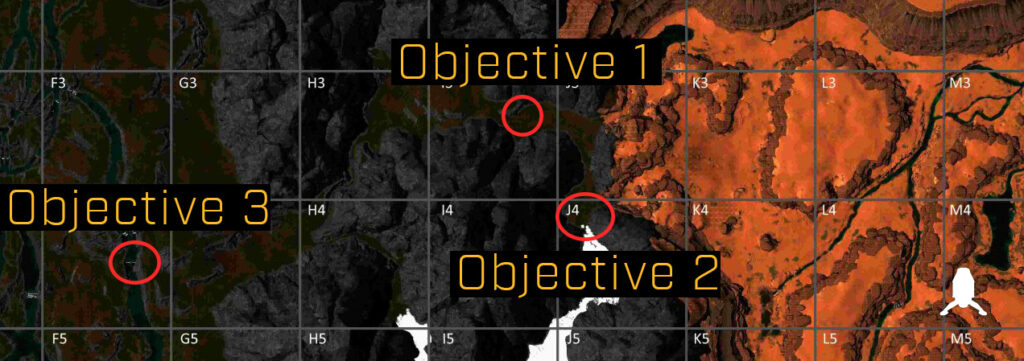
When you enter the Forest Biome, stick to the right (north) and hug the mountain to avoid the wolves and bears that prowl this area. Once you reach the first objective marker, you’ll get a radio call from Sol, and a supply crate icon will appear on your map in the upper left corner of J-4. You’ll want to grab that in a bit, but first you should set up your base. Continue into the western-most corner of this area, and then create a shelter, place a Bedroll inside, then set it as your spawn point. It’s probably near dark by now, so set down your campfire, activate it, and sleep through the night.
In the morning, open your map and locate the Supply Crate in J-4. Be wary of predators and hug the side of the mountain whenever possible. Grab the beacon from the supply crate by dragging it into your [G] slot on your hotbar. Then, head back the way to came, and start materials until you can craft at least 10 ladders and 20 Floors — wood or thatch is fine, whatever you have access to. Also make sure you’re collecting Berries now and throughout the mission, as they’ll be your main source of water.
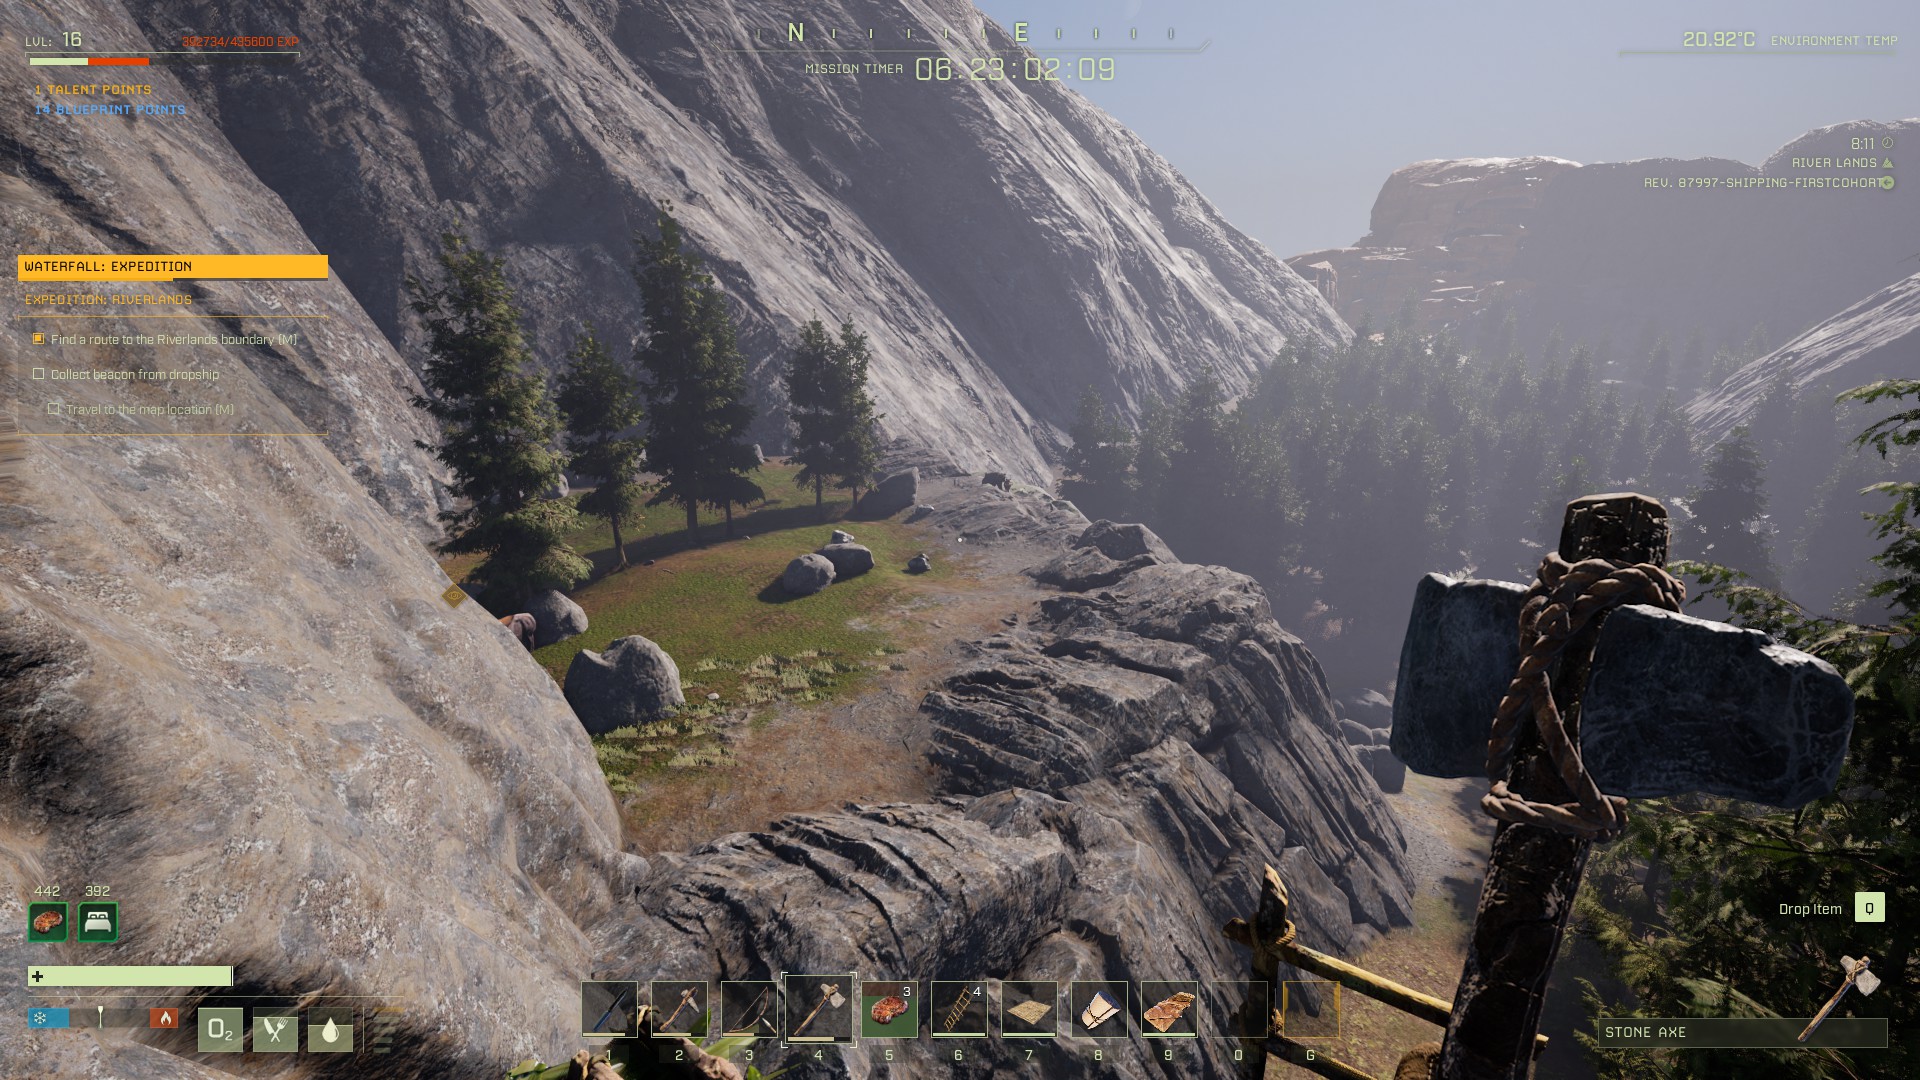
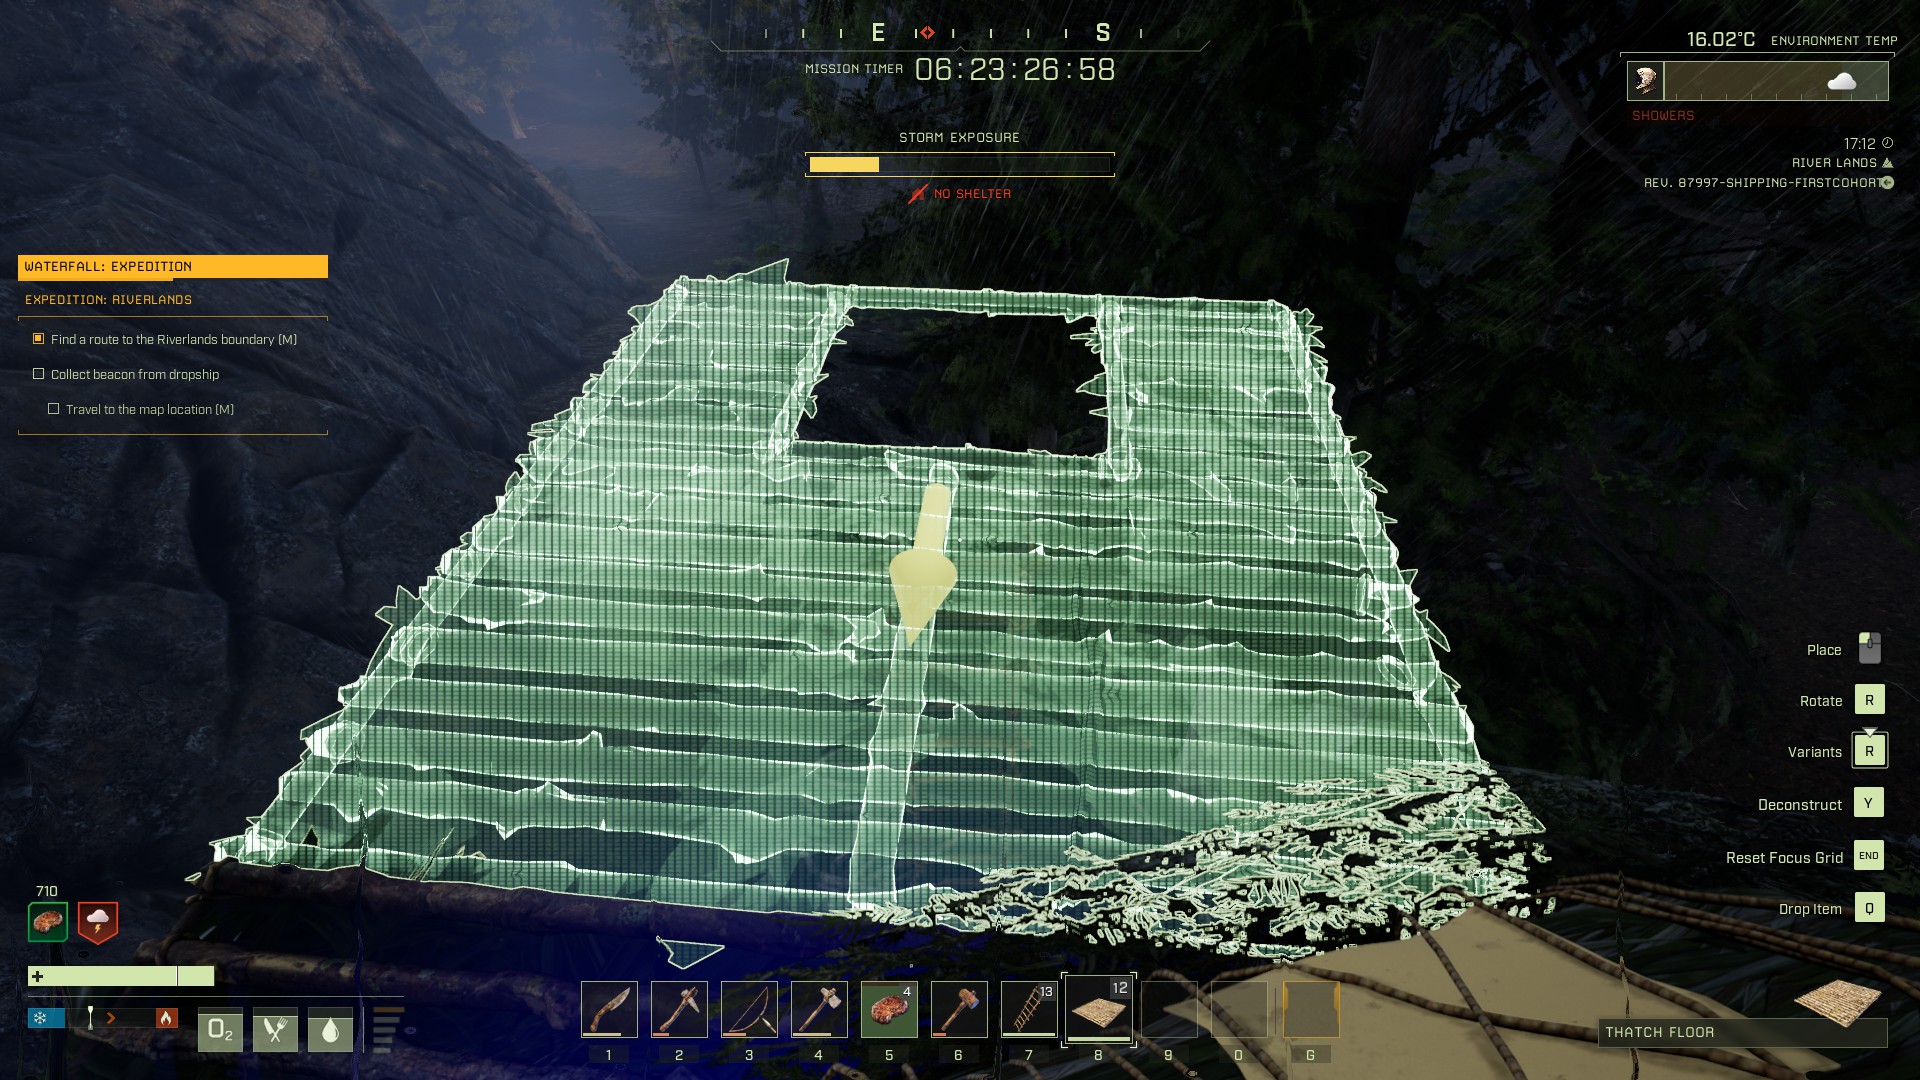
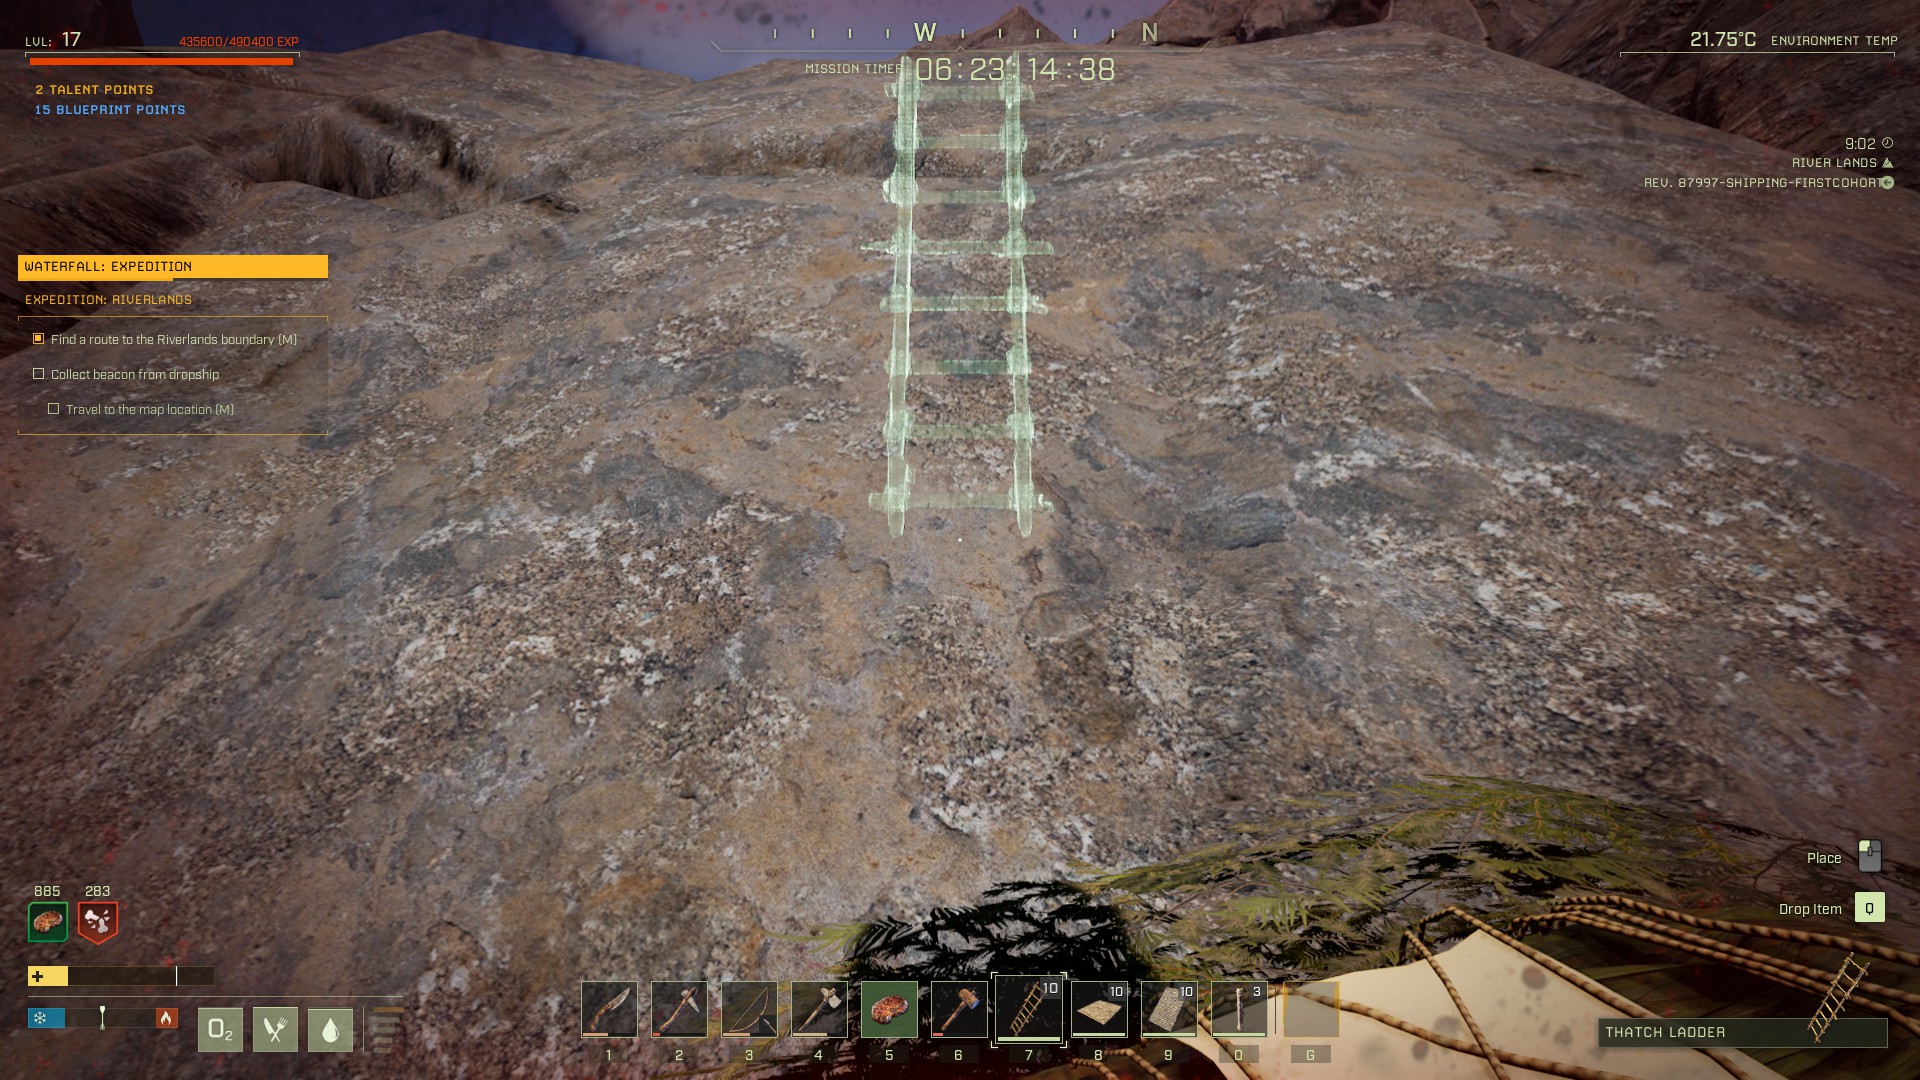
We need to get on top of the nearby raised section (the one in the northwest of the area), but there are predators up there, so we’ll clear them off first. In the westernmost part of the valley you’re in (in grid I-3), create a series of ladders and floors as seen below. Make sure you build out at least one section from the mountain (this will matter later), and try to get some distance from the raised area north of you. Don’t build more than 2 ladders high, since you’ll need to jump down later. Once you’re up there, replace the outermost floor tile with the trapdoor variant (hold R) — you’ll need to have the specific floor trapdoor blueprint unlocked to select the variant.
What you need to buildThe view you should haveAdding the floor w/ trapdoor
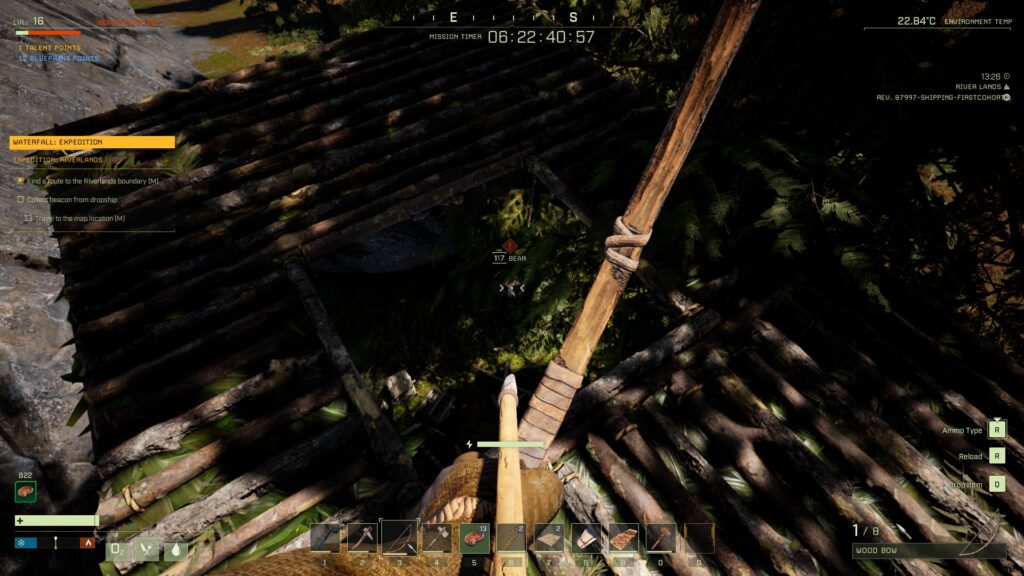
Make sure you have 50-100 arrows, then climb up your ladders and look for the bear up there on the raised area. If If you can’t find one, continue to the next section (but be ready to run back to your platform if you do find one); if there is one, pull it to your construction with arrows (ideally while already up on top of it). The bear will destroy your ladder, but you should be able to shoot him through your trapdoor with your bow. There may also be some wolves up there on the raised section; they can be handled in a similar fashion.If you stand on the floor nearest the cliff face, the bear can sometimes teleport up there to attack you, so stay one floor section out from the wall.
Part 3: Climbing the Mountain
If you are decently far into your current level (your XP bar is filled a significant amount) it’s a good idea to finish reaching the next level before continuing — your odds of surviving the next step on your first try are fairly low.
Once there are no more predators on the raised area, use ladders or floors built into the rock to climb up to the area pictured below:
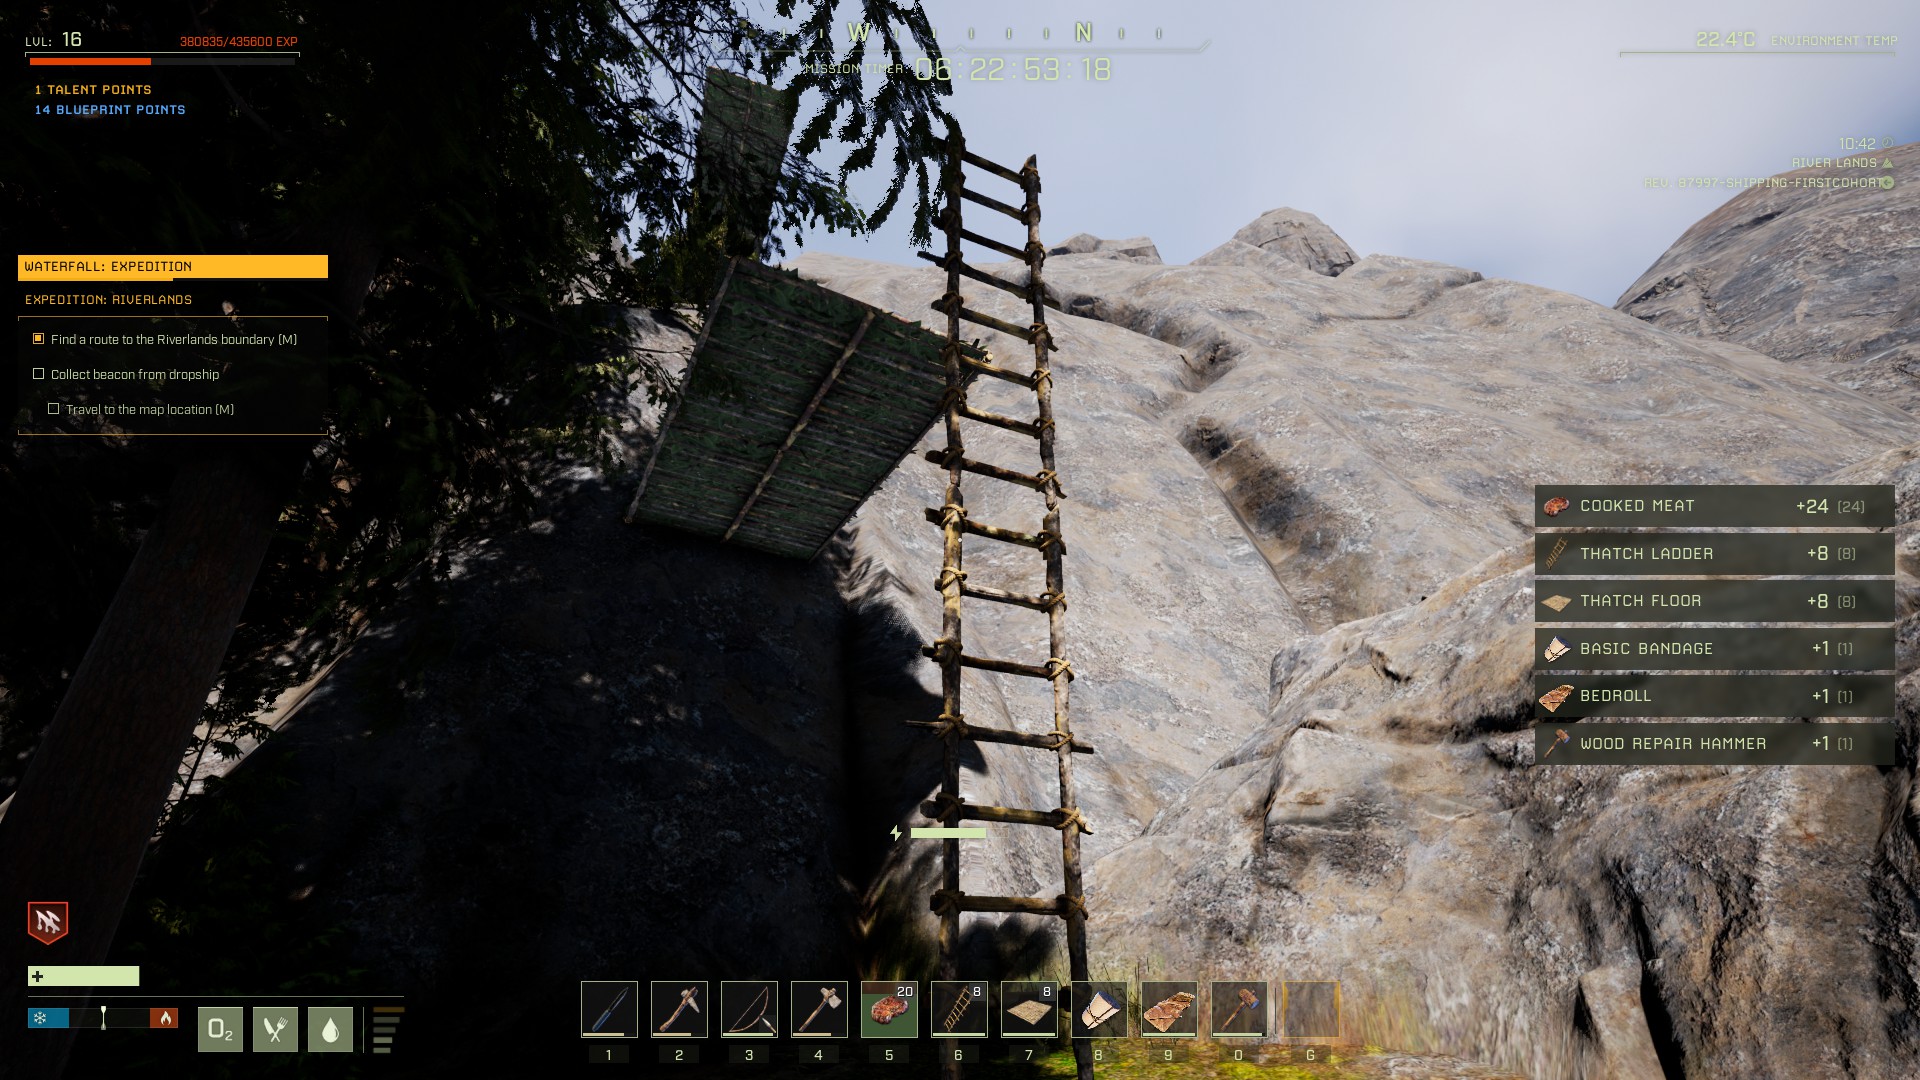
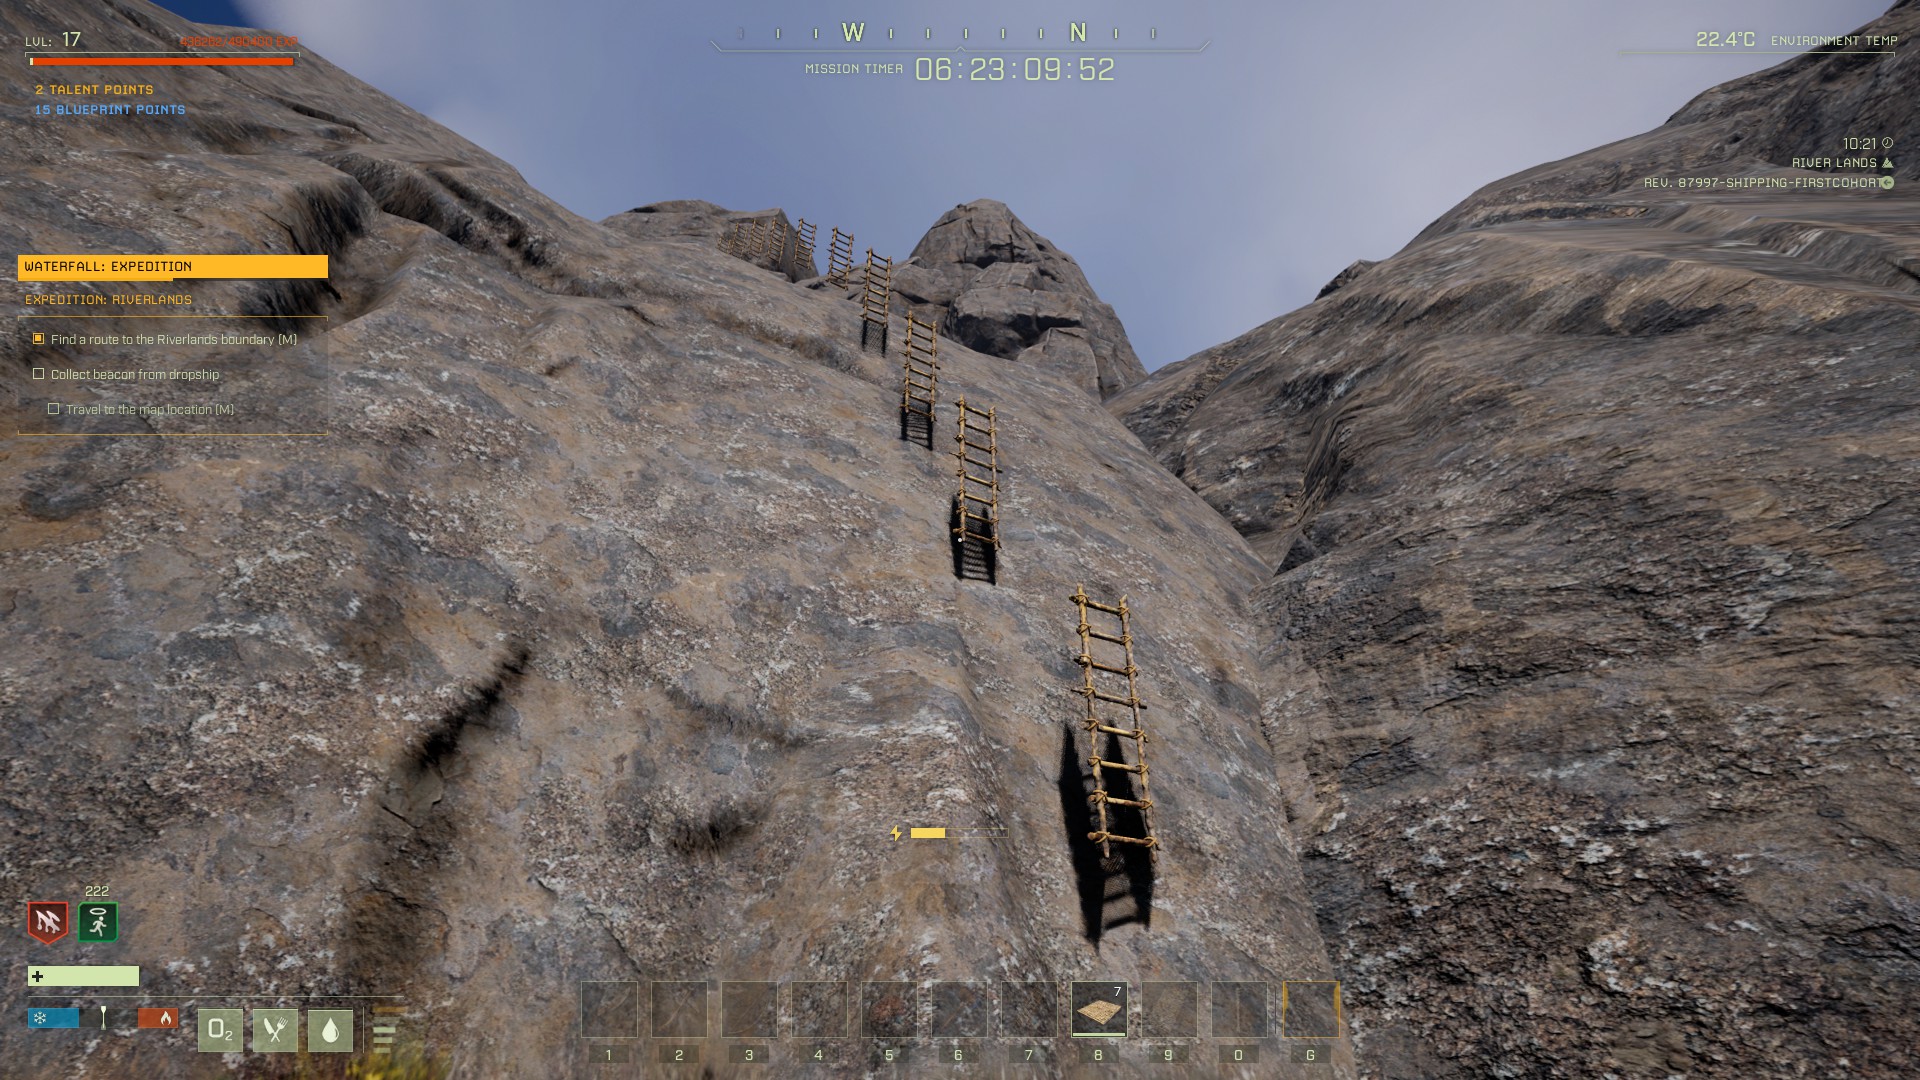
Then, make sure you have your ~10 ladders and ~20 floor pieces, and begin ascending the cliff face heading due west. You can do this by placing a ladder, climbing to the top (if you don’t move once you climb the last rung, you’ll stand on top of the ladder), and then placing another ladder. You can press F to grab ahold of the new ladder, even if it’s fairly far away — if it’s a little too far to reach, simply jump towards it and press F in mid-air.
Placing a ladderWhat the finished product will look like
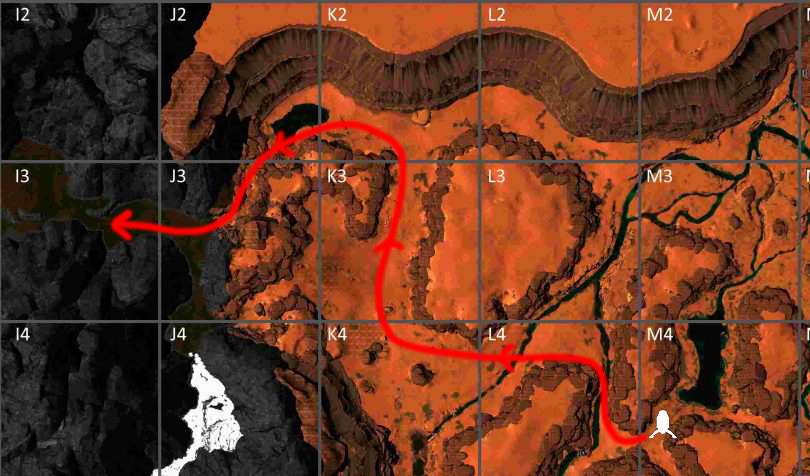
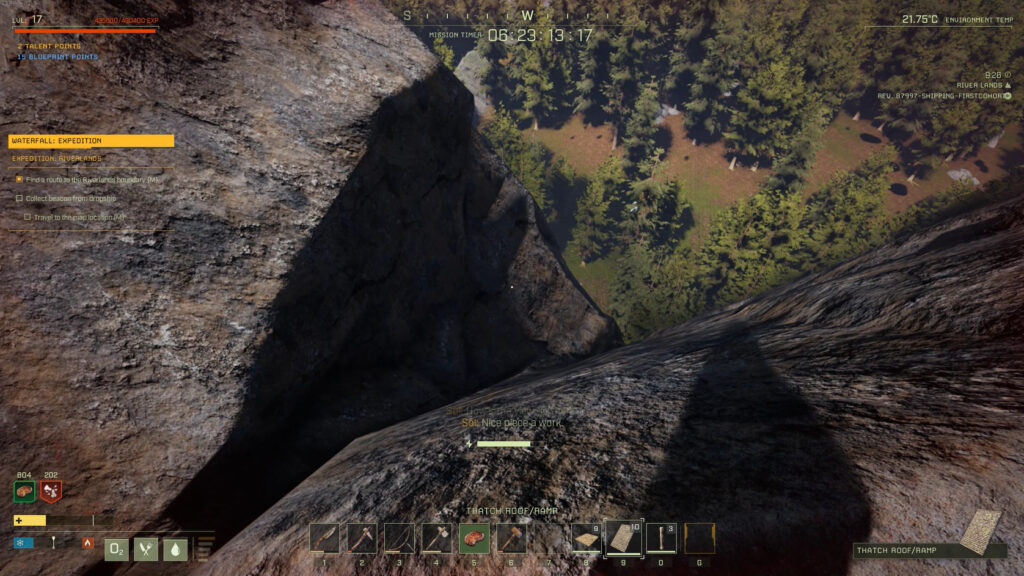
Continue up the cliff-face this way heading west and you’ll eventually reach the top. Keep going west/southwest a bit and you’ll see the area you need to drop down. While you can theoretically walk down by heading north and following a dangerous, narrow path, it’s actually easier and much faster to drop down to the valley floor by falling and placing floors beneath you as you go. Follow the cleft in the rock; it’s where you’ll want to fall down.
It can be scary, but it’s pretty easy to build fast enough to catch yourself as you fall. Make sure you’re full health before you attempt your drop. Here’s what it looks like (though I don’t recommend using the trapdoor floor like I did in the first bit):
The trick is to rapidly click the Left Mouse button as you fall, while aiming slightly away from the face of the mountain. That way, you’ll place a floor as soon as it’s possible. Before you fall the last bit, it’s best to survey the area, as some bears and wolves tend to spawn near where you’ll land.
Part 4: Deploying the Beacon
The rest of the missions is relatively simple. You’ll want to craft another Bedroll and shelter and set up a new spawn point in the Riverlands. Then, open your map and set your waypoint on the objective marker in F4, and start heading that way. Try to stick to open areas — if you have to move through dense woods or brush, crouch so you don’t stumble into a bear or wolf and end up mauled.
Once you reach the river, you’ll need to head to the midway point of the waterfall (it should be obvious where to go if you set your waypoint accurately).
You’ll need to set the beacon down on a platform at the indicated spot in the falls
Build a beam of some kind, place a floor on it, then press [G] to select the beacon and place it with left-click. Sol’s voiceover suggests that you need to activate it, but it seems to start automatically and complete your mission’s final objective after a moment.
At this point, it’s a fairly long and perilous journey back to the dropship. You have to go back the way you came, over the mountain — attempting to passe via the shortcut to the Arctic gives you an out-of-bounds warning. You can use the same technique to climb up the mountain, though since it’s steeper it tends to require more platforms (the ones you left behind on your way down should help with scaling back up). It’s much faster to simply level up if you’ve got XP in your bar, and then die to a predator (don’t forget to pick up any Bedrolls to ensure you spawn near your Drop Pod).
We hope this WATERFALL guide was helpful! Leave any questions or suggestions in the comments below, and good luck.
Share this article:
DanielD
Unabashed FromSoftware fanboy still learning to take his time with games (and everything else, really). The time he doesn't spend on games is spent on music, books, or occasionally going outside.
Just want to comment on this one and give you a big thumbs up on the other mission walkthroughs
This one i feel you have made it a bit more difficult than you have to 🙂
ladders and climbing up top is a disaster waiting to happen.. dont know how many times i have fallen down between the ladder and the rock etc. I’ve stopped using them.. might be me beeing impatient mind ye!
Use the angled roof instead!,, every time you want to turn a bit place a floor to anker then continue with the roof.
I made close to a highway both up and down the hill in 10 minutes. only reason it took so long is because I decided to make said highway.
Thanks for the feedback! Personally, I’ve found that the ladders are fairly fool-proof as long as you don’t press any movement keys once you’re climbing the final rung. Then you can safely stand the top of the ladder, place a new one, then press [F] and essentially teleport to the next ladder.
That being said, using ramps is certainly an option, and I appreciate you sharing your strategy 🙂
Janis
3 years ago
Hi! I am currently doing this mission and I can suggest before starting to climb, when you get in the spot to your right is a small rocky location which cannot be accessed by animals. But you can climb there. Go up and built normal shelter (advising also crafting bench etc.) AND most importantly build RAIN RESERVOIR and there you will have infinite amounts of water as rain showers happen.
Also when you go for the beacon, it is next to snow region – gather some snow and melt 🙂 No need to stress over berries. 🙂
KatC
2 years ago
Good job with the walkthrough, however, I did find that I was unable to pull the beacon into my G-slot. Had to take it in my inventory and when I got to the river and placed a platform I had to put the beacon in one of the slots of my hotbar so that I could place it on the platform. That worked!
JasonX
1 year ago
I discovered that now if you head back to your dropship after completing the mission, the mountain is gone. You can walk the way back without climbing the mountain again. Seems like they patched the mission regarding the completed state.
BobC
3 years ago
I picked up the beacon from the supply crate and it went into my inventory. Nothing I can do will get it to drop into the G-slot on the hot bar. I’m at the deployment site and can’t deploy the beacon. Any thoughts as to what I’m doing wrong?
Hey Bob, sounds like the beacon bugged, unfortunately. Deployables like the beacon, radar, drills, etc. all go in the G slot on the hotbar and can’t go in your inventory — or at least they aren’t supposed to be able to!
You need to pull the beacon from your inventory onto one of your ten hotbar slots, and then you can place it on the platform at the river location. That’s what finally worked for me.
Insum
1 month ago
If you save your game, then reload it and come back after planting the beacon. The mountain is gone and you don’t have to climb it again. That whole area has no mountain there at all once you’ve done that mission.


These guides are bar-none the best guides.
-A fellow FromSoft fan.
Thank you Dylan, your compliment means a lot (since it’s coming from someone who clearly has excellent taste).
Just want to comment on this one and give you a big thumbs up on the other mission walkthroughs
This one i feel you have made it a bit more difficult than you have to 🙂
ladders and climbing up top is a disaster waiting to happen.. dont know how many times i have fallen down between the ladder and the rock etc. I’ve stopped using them.. might be me beeing impatient mind ye!
Use the angled roof instead!,, every time you want to turn a bit place a floor to anker then continue with the roof.
I made close to a highway both up and down the hill in 10 minutes. only reason it took so long is because I decided to make said highway.
Keep upÃ¥ the good work! 🙂
Thanks for the feedback! Personally, I’ve found that the ladders are fairly fool-proof as long as you don’t press any movement keys once you’re climbing the final rung. Then you can safely stand the top of the ladder, place a new one, then press [F] and essentially teleport to the next ladder.
That being said, using ramps is certainly an option, and I appreciate you sharing your strategy 🙂
Hi! I am currently doing this mission and I can suggest before starting to climb, when you get in the spot to your right is a small rocky location which cannot be accessed by animals. But you can climb there. Go up and built normal shelter (advising also crafting bench etc.) AND most importantly build RAIN RESERVOIR and there you will have infinite amounts of water as rain showers happen.
Also when you go for the beacon, it is next to snow region – gather some snow and melt 🙂 No need to stress over berries. 🙂
Good job with the walkthrough, however, I did find that I was unable to pull the beacon into my G-slot. Had to take it in my inventory and when I got to the river and placed a platform I had to put the beacon in one of the slots of my hotbar so that I could place it on the platform. That worked!
I discovered that now if you head back to your dropship after completing the mission, the mountain is gone. You can walk the way back without climbing the mountain again. Seems like they patched the mission regarding the completed state.
I picked up the beacon from the supply crate and it went into my inventory. Nothing I can do will get it to drop into the G-slot on the hot bar. I’m at the deployment site and can’t deploy the beacon. Any thoughts as to what I’m doing wrong?
Hey Bob, sounds like the beacon bugged, unfortunately. Deployables like the beacon, radar, drills, etc. all go in the G slot on the hotbar and can’t go in your inventory — or at least they aren’t supposed to be able to!
I just finished this mission and it would only let me put it into the quick bar but i was able to select it using the number and deploy.
You need to pull the beacon from your inventory onto one of your ten hotbar slots, and then you can place it on the platform at the river location. That’s what finally worked for me.
If you save your game, then reload it and come back after planting the beacon. The mountain is gone and you don’t have to climb it again. That whole area has no mountain there at all once you’ve done that mission.