Welcome back, Warrior, and thank you for joining us once again for our coverage of Stranger of Paradise’s Main Mission walkthroughs. For this guide we will cover the ‘Phantoms of the Past,’ which takes place in an area inspired by a mountain that the fans of Final Fantasy X might remember scaling. As always, we will be pointing out the Mission’s secrets and providing tips for the level’s boss.
Let’s begin!
When you’re ready to begin the Mission, head over to the Hallowed Massif to start ‘Phantoms of the Past.’
Wayfarers’ Reverie
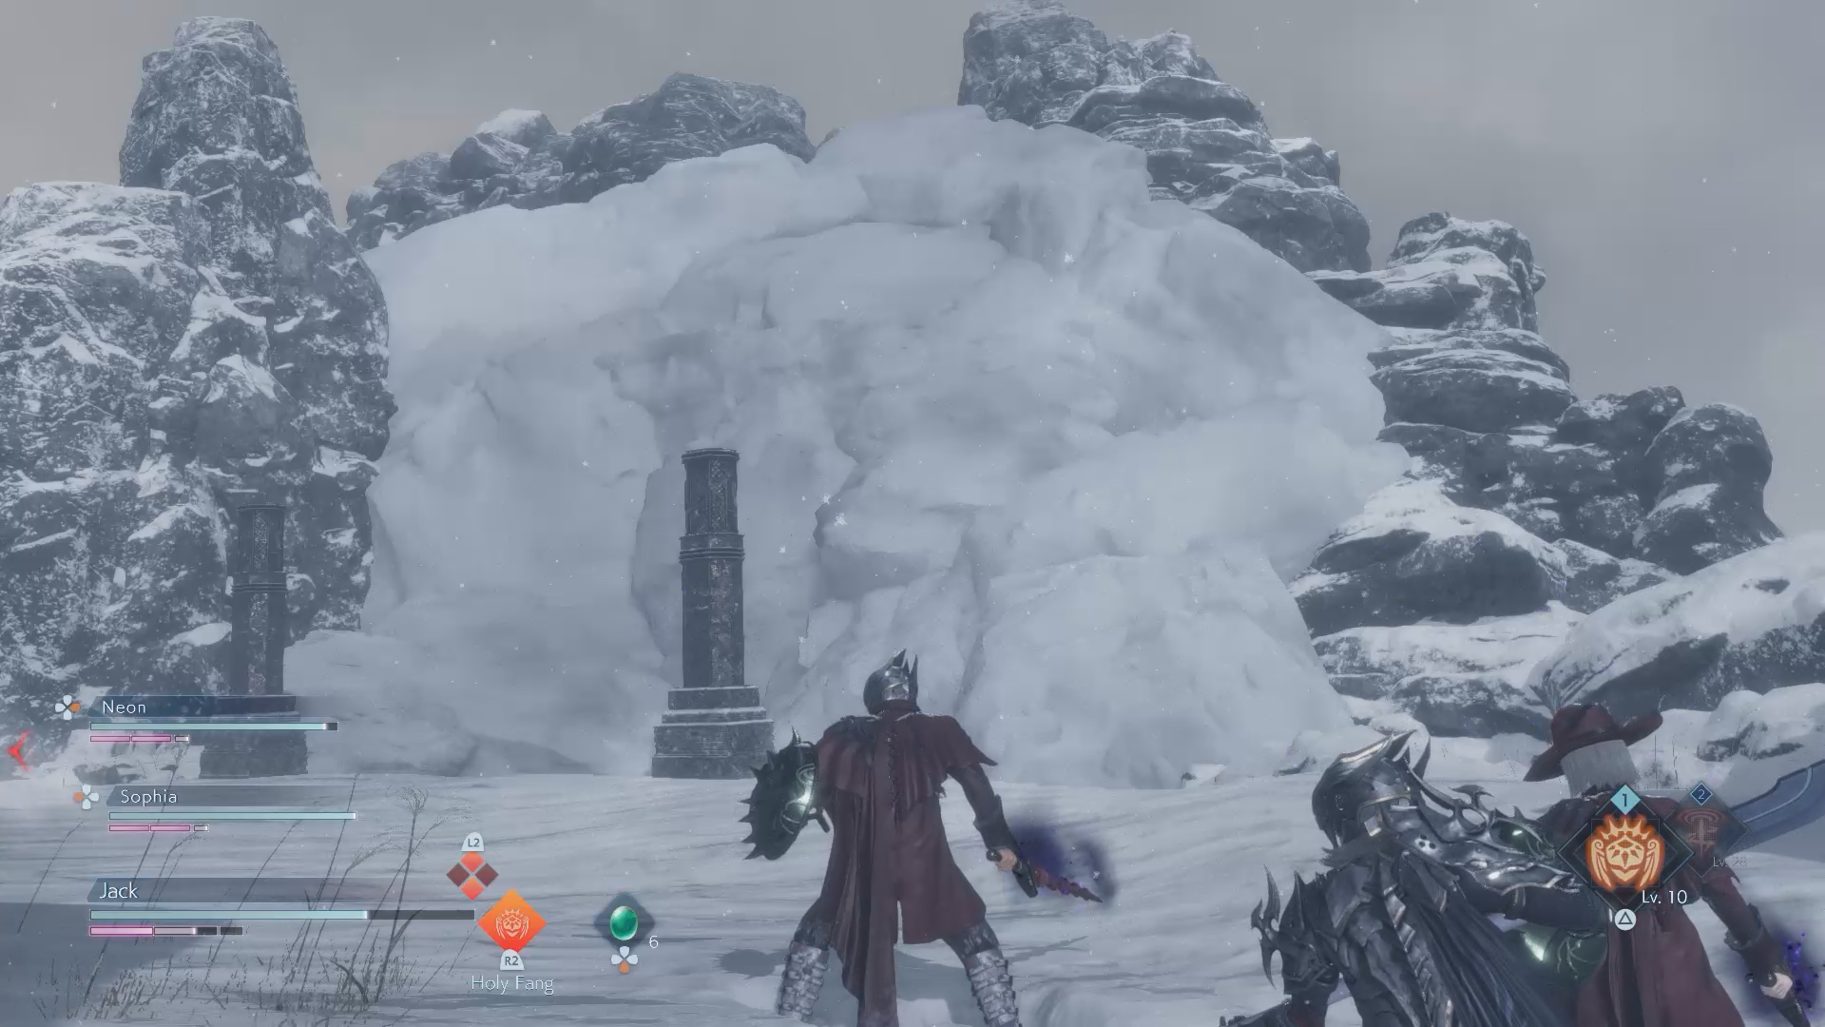
Go through the path until you reach an area with three Silver Lobos, and you will see a wall of ice to the right. Break the wall to reveal a purple sphere, then turn around and continue down the path until you find a Dark Vent — this one will be spawning more Silver Lobos. To the right of this area, you will notice a snow wall. Eventually, this wall will come down in an avalanche, damaging anyone it hits. Be careful not to get caught in this and destroy the Dark Vent. Then, break the wall of ice that the avalanche has revealed to enter a cave.
Go through the cave until you reach a split, and then turn left to grab a purple orb. Turn around and continue forward until you reach the end of the cave, and jump down the ledge. From here, turn left, then take a right, and grab the purple orb in this area. Turn around and make your way back to the split from the cave exit, and continue forward until you reach a Cube.
At the end of the path, you will find an Ogre, as well as a Silver Star Lobo that is assisted by two Silver Lobos. In addition, there will be another snow wall. Once the snow wall collapses into an avalanche, go into the cave it was blocking to continue.
Cavern of the Blessed Trials
Take the first right you see to find a chest, then turn around and continue down the main path. When you run into a split, turn right to find a purple orb and the Fool’s Missive VIII. Once you have everything, turn around and continue forward until you reach the other side of the cave.
Terminus of Calamity
Run forward until the floor breaks and you fall, and there will be a purple orb nearby. After you grab it, go into the nearby cave and climb two ropes — you will be back to where you were before you fell.
This time, turn right as soon as you can and continue forward. Grab the purple orb to the left you see on the way, and then take the turn right you will find shortly after to find another purple orb. Turn around and continue through the main path until you enter another cave and find a Cube.
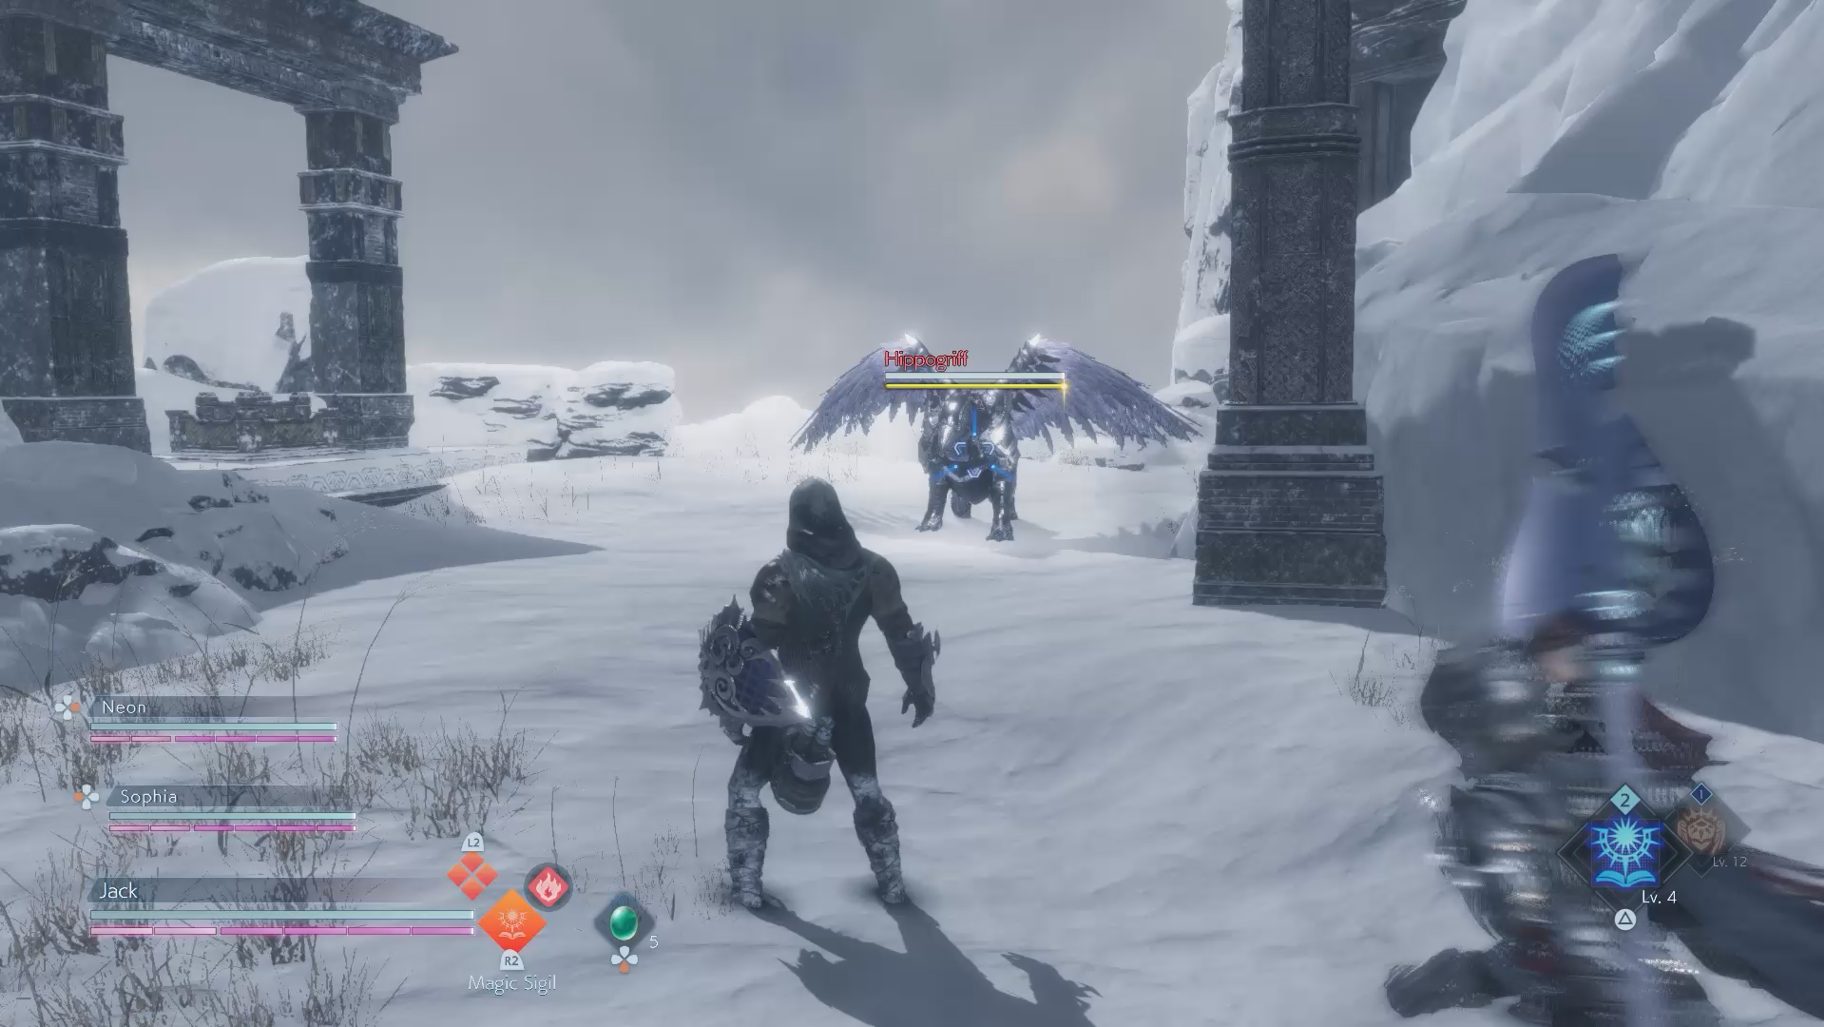
On the other side of this cave, you will find a Hippogriff guarding a Dark Vent. Killing this Hippogriff will grant you an Anima Shard, and the creature will respawn when you use a Cube, making this a great spot to farm Anima Shards if you want to. The Dark Vent itself doesn’t spawn any enemies, so just destroy it and enter the cave to continue.
Altar of Weary Blades
Take the branch off to the right shortly after entering the cave to find a purple orb, then turn around and continue down the main path. Continue forward when you reach a split, then immediately turn right to find a purple orb. Take the next right when you’re able to in order to find another purple orb, then turn around and take another right. Take a right one more time when you’re able to (you will see a Malboro).
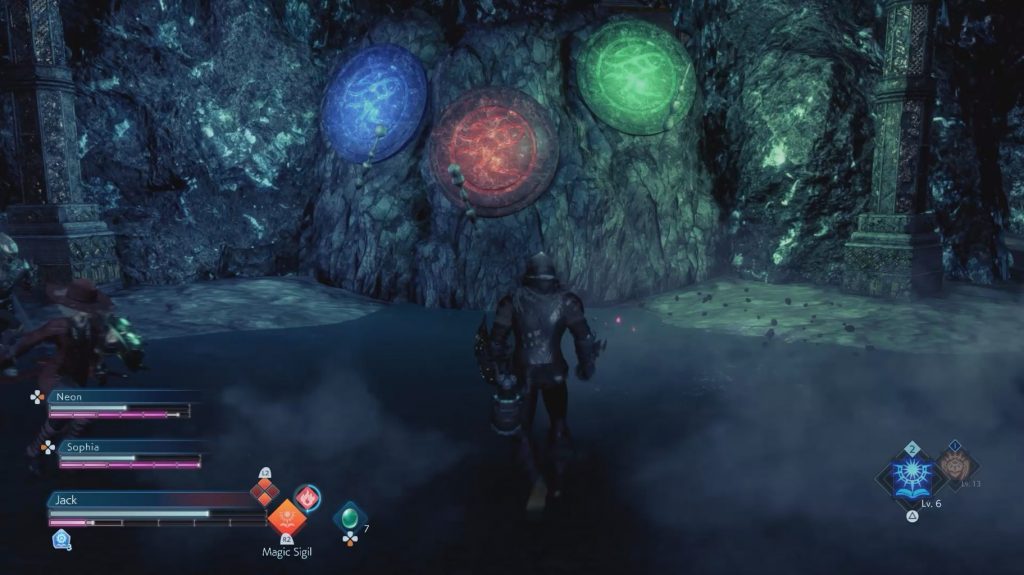
- Here you will see a wall with three emblems on it (these emblems should look very familiar to Final Fantasy X fans).
- In order to break this wall, you must destroy three Dark Vents — each one representing one of the three emblems.
- You will find these Dark Vents by going through the paths on both sides of the wall, and you can do these in any order.
- Once the three Dark Vents are destroyed, go to where the wall was and continue forward to find a Cube.
When you’re ready, head forward to fight the boss of this Mission.
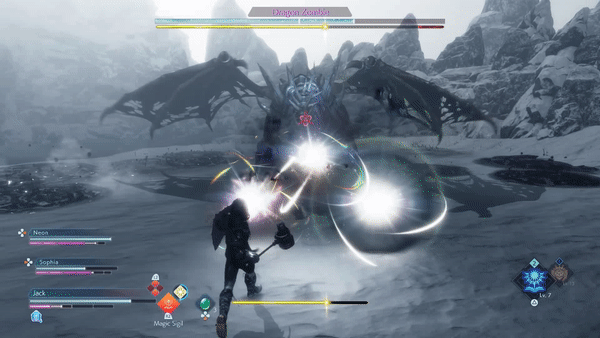
Dragon Zombie
Phase 1
The Dragon Zombie is a slow but powerful enemy that will constantly try to Poison you. Most of his attacks will cause black pools to spawn nearby — these pools will quickly inflict Poison on you if you stand in them. Many of his attacks are also unblockable.
- The Dragon Zombie can swipe at you up to two times
- He might also try biting you during these attacks
- He also has a spinning attack — during it, he will hit anyone around him with his tail
- Poison Breath will have him breath in a cone in front of him, quickly Poisoning you if you’re caught in it
- Spike Tail is an unblockable attack he will use if you’re behind him. This will have him slam his tail on you twice
- The Dragon Zombie can also use Deadly Stomp if you’re close to him. This is an unblockable attack where he will briefly fly up, before slamming back down on the ground
- Rush is another unblockable attack, where he will run from one side of the level to the other, damaging anyone he touches
Holy damage is amazing for this fight. Not only is the Dragon Zombie weak to it, the Holy spells will also cause any pools they come into contact with to dissipate, giving you more room to move around. The Monk’s Chakra Command Ability will also be useful in counteracting Poison if you get inflicted with it.
The safest place to attack him during this phase will be on his sides (since most of his attacks aim either in front or behind him). However, if you attack his head enough times, you will stagger him and remove his ability to spawn any pools during this phase.
Once you bring him to half HP or completely deplete his Break Gauge, Soul Burst him to break his tail and begin Phase 2.
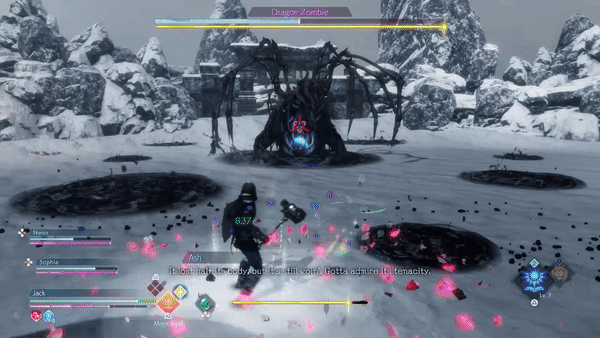
Phase 2
The Dragon Zombie will be mostly stationary during this phase. However, there will be a constant pool around his body, making it dangerous to get too close to him. He will also sprout six arms from his back, which he can use while swiping at you.
- Poison Breath acts differently during this phase. Now, he will begin the attack facing the floor, and move his head up to hit you with it directly
- The Dragon Zombie also gains the Icefall Ability. This will have him throw four ice blocks towards you (this can be stolen with a Soul Shield)
- If you get too far away from him, he will go underground, then emerge under you, dealing massive damage
Just like in the first phase, he will constantly cause black pools to spawn, which you can stop by dealing enough damage to his head. You can also stagger him by targeting the arms on his back and breaking them. Powerful magic attacks that deal AoE damage (such as Meteor) can break all of his arms almost immediately, and will nearly deplete his Break Gauge. Just be careful of him chasing you while charging a spell like this.