This guide is meant to walk you through The Stranger in a Strange Land quest on Terra-2 of The Outer Worlds: through your quest options and dialog information in particular. This guide will go in-depth on the general dialog options you have with each NPC you will encounter as a part of your quest, as well as the most important information they would reveal to you if you chose to invest time into asking questions.
Please be warned that the guide ahead contains spoilers for The Outer Worlds, lots and lots of spoilers, especially for dialog and plot development.
This quest is one of the two Main Quests you will find in the Emerald Vale. In the process of completing the Stranger in a Strange land you will also acquire Comes Now the Power questline, that addresses the political situation of the two settlements that exist in the region. This guide covers Stranger in a Strange Land quest, related to the mission of obtaining the power regulator for your ship. The Comes Now the Power is related to the question of Adelaide and her group of deserters, and if you are interested in that part of the questline, you can go and read that guide right now!
Note: the walkthrough was done on a Below Average Intelligence character, resulting in some [Dumb] dialog options being substituted for some of the standard dialog options.
Very High Strength and Perception, however, allowed for the pursuit of other options in their stead.
This guide quotes from the game heavily, but in fragments. You can also use this guide if you feel you might have missed something in your dialog encounters, without reloading your previous save.
This guide will omit secret or interesting locations on the map and other Easter Eggs that are not directly related to the quest, since those deserve their own guide.
You can refer to the Table of Contents to navigate between the different parts of the quest more quickly: the guide is organized around the quest updates and key interactions.
The parts that relate to the progression more directly that others have been bolded for your convenience.
Did we miss anything particularly interesting? Tell us in the comments or on our Discord server!
Stranger in a Strange Land: Receiving the Quest

“Phineas needs your help to set things right in Halcyon, but you’ll need transportation first.”
You do not have to worry about picking the quest up: this Main Quest is a part of the tutorial sequence following the initial cutscenes and the character creation. It is assigned to you upon your unforeseen “squashing” of the smuggler (Alex Hawthorne) you were supposed to meet at the landing location for your pad.
Phineas explains to you that you need to locate Hawthorne’s Ship nearby in order to acquire the necessary means of transportation. “Better you than the Board, eh?”
Find Hawthorne’s Ship
“The smuggler took your meeting location a bit too literally. Guess that means his ship is yours now, if you can find it.”
Following the tutorial, you will find yourself navigating deeper into the canyon, past a marauder corpse, then sneaking past canids and into the cave (don’t worry about failing that part), starting to discover your Tactical Time Dilation ability (explained by your prolonged frozen state by Phineas). You will keep going until you have no choice but to fall and take a bit of damage. If you have any points in Temperance, you don’t have to follow the tutorial’s directions and use the Inhaler: passive regeneration will take care of your HP.
Guard Pelham
 As you continue going into the cave, you will walk into a makeshift camp made among the old ship debris. A voice will call over, “Hey, you. Come here.”
Start of Dialog
A wounded man will attempt to recite Spacer Choice’s company’s slogan, with difficulty.
You will probably have 5 points in [Medical] to patch his wound, if you choose to do so. He will politely inform you that your assistance will be omitted from his report, since “Spacer’s Choice doesn’t like us accepting outside help.”
Upon investigation, you will learn that Pelham was on a patrol until he stumbled upon a marauder camp. His gun misfired through his side, leaving him critically wounded and forcing him to hide. Pelham is far from giving up, however, dedicated to his service to the company as long as he is alive. There is a suspicion, however, that Pelham is partially in the hiding due to the embarrassment of needing to beg his boss for Adrena-Time because of his wounded state (a rarer type of a consumable in the game).
Upon inquiry Pelham will describe marauders as “gibbering, flesh-eating, law-breaking, unemployed lunatics. With guns.” (Many more NPCs in the future will warn you that marauders are cannibals.)
Pelham will mention a “hullhead” that landed their ship in the open area, which is an illegal act according to the “Board’s law.” “That’s a real good way to attract marauders.” (Yes, you guessed it – that’s Hawthorne’s ship.)
Pelham will pridefully note that he barricaded himself with the canisters to be able to confront marauders, should they find him.
With 1 point in [Persuade], [Lie], or [Intimidate] (you have no other options presented), you can take Pelham’s mission of dealing with marauders or inspecting the landed ship yourself – he will give you his gun (Light Pistol) with a good amount of spare ammo (Light Ammo x111), “not counting the bullet in my side.”
If you took care of his wound, he will give you a Sentry Sabre as well.
He will promise, somewhat ironically, that all Spacer’s Choice weapons “are now thirty percent likely to malfunction.” The base chance of malfunctioning is left unmentioned. However, this bit of information will not affect your experience mechanically in any manner.
Finally, you can question Pelham about your location in the Emerald Vale if you want to hear him wondering if you hit your head. He will describe the nearby town, Edgewater, as the “prettiest place in the vale” where you can try “a can of our famous saltuna.” (Yeah”¦ right.)
Asking anything about the Hope, the ship Phineas rescued you from, will produce confusion. “The Hope? Is that some sort of fancy new drug? Are you with Auntie Cleo or something?” Pelham will warn you that he is not allowed to “fraternize” with Cleo’s workers. That’s all the information he can give you.
End of Dialog
As you use the pistol to shoot at the canisters blocking the path out of the cave, Phineas will react to the very loud noise over the radio and the device will malfunction, cutting communication. (Who knows why Phineas had nothing to say about your exchange with Pelham.)
Sneak behind Pelham and you can get a few consumables inside and around his tent. Kill him and you will get a 6% negative reputation with Spacer’s Choice if you have an Average Charm (yes, even though nobody saw you do it).
After this the tutorial will walk you through Tactical Time Dilation and you will need to fight or sneak your way through marauders upon your descent. Remember to shoot at the canisters inside the camp upon your first encounter and to loot the small camp afterwards: the more you gather right now, the more you can sell at Edgewater to get a head start.
Lieutenant Mercer
 As you descend from the final hill you will hear, “Hey! Get over here before you get yourself killed!”
Start of Dialog
That’s Lieutenant Mercer, and when you initiate dialog with her she will warn you about the marauders in the area and directly ahead. In addition, she will mention “landing violators”: specifically the “rungleech” that landed “without using an official Spacer’s Choice landing pad.” That is, Hawthorne and his ship.
From here on you can make an attempt to convince her to forget about the landing violation (unsuccessfully).
You can bring up “one of [her] teammates,” Pelham, and if you choose to confess that you patched his wound (if you did), she will lecture you on how you “shouldn’t have done that” for the same reason Pelham asked you to not disclose your assistance. Otherwise you can simply complain about his incompetence.
Or, you can tell her that you have dealt with some of the marauders she is talking about fairly easily. She will be shocked, but will quickly regain her composure: “I mean – yeah, of course! … I could round ’em up all by myself.”
After this she will promise to deal with the marauders surrounding the ship after “a couple of winks to catch [her] breath.”
The tone of this response and her body language confirms that she won’t actually help you unless you convince her.
The battle ahead ranges from fairly easy to a little hard depending on the difficulty you are playing with, but the only reward you will get from dealing with the situation yourself is a tiny amount of extra XP.
Thresholds of convincing Mercer and her colleague to attack marauders are very low: 5 points in [Persuade], [Lie], or [Intimidate] are enough and you almost certainly have that much.
Besides, you will get to lift Lieutenant’s spirits and determination with this: “It’s time we ”¦ file a full report! … And it’s gonna be fucking laminated!”
End of Dialog
Whatever you choose, you can loot marauder corpses along with a canid body and then step inside the ship. Mercer will be too focused on filing the report.
ADA
 Inside, you will be greeted with a plaque that reads “WELCOME ABOARD THE (UN)RELIABLE” and the board’s computer, ADA, speaking from an assumption that you are a marauder, warning you that there is nothing valuable for you to steal.
Should you walk around, lockpicking the locker, checking the sealed doors, the dining area, and the workshop equipment, ADA will throw around snarky comments and get irritated with you ignoring her. If you want to talk to her right away, you can find her in the navigation room immediately to your right as you enter.
As you do, she will ask you to “Please submit yourself to the authorities,” and get irritated if you approach the navigation console.
Start of Dialog
When you initiate dialog, she will introduce herself as “the Autonomous Digital Astrogator” of the ship. Still, she will retain her passively hostile attitude and warn you that she is “authorized to use violent retribution against unwanted solicitors” (a bit of a downgrade from being called a “marauder”?).
You can question her ability to do anything (“What are you going to do? Self-destruct?), insist on your innocence, or push back against her attitude, but the result will be the same: creating loud noises inside the ship ADA will try to make you believe that you are about to be ejected. The [Dumb] dialog response to her actions is “Great. I’m getting shot into space twice in one day.”
As nothing is happening following her countdown and your character seems to not have moved an inch, she will act disappointed and finally have a conversation with you.
With the next response either you or ADA will bring up Hawthorne as the captain of this ship and the manner in which you disclose the news of his unfortunate demise is up to you. You can simply state that he is dead or describe his gruesome state underneath your escape pod. Alternatively,
Whatever you choose to do, ADA will act sad and explain that she will need time to “process this information.”(The question of ADA’s ability to feel emotion and attachment to her captains will be something you can explore in your future conversations.) She will thank you for your patience and honesty.
However, she will return to the issue at hand immediately after this: if you want her to accept your orders, you must be Captain Hawthorne, as her programming dictates. You can [Dumb] “,” express understanding of the situation, or otherwise attempt to disagree: “Okay, but I’m not Hawthorne. Hawthorne is dead.” While it sounds like she understands what you are saying, she will try to explain your “death” as metaphorical back at you: “You wandered outside this ship and experienced a permanent, life-changing encounter. The old you is dead.” If you tell her your name, she will treat it as an “alias” that you took because you went undercover.
After the situation is resolved in favor of her wishes, she will welcome you back and explain the issue with the ship’s ability to operate. Apparently, the main drive of the Unreliable has suffered a critical power failure, forcing an emergency landing, and the damaged power regulator must now be replaced. The quest will update to reflect that.
To get a little bit of extra XP, you can use [Engineering 5] and flaunt your admirable reasoning that the regulator isn’t something to be found in a garage. Regardless, she will point out that the local worker settlement might be using one to power its electrical network.
ADA will then print you a new ID Cartridge and ask you to “Please try not to lose it this time.”
Whether you go along with this title (and you have an option to do so enthusiastically) or not, the dialog will end after this. She will wish you good luck and ask you to try and stay alive “this time.”
End of Dialog
If you did not level up before this interaction, you will reach Level 2 at this point and the most “tutorial-ey” part of the game will conclude, albeit you will continue receiving tips and some guidance on the world, combat, and skills when that information becomes relevant.
Find a Power Regulator
“The Unreliable’s power regulator has been damaged beyond repair and must be replaced. ADA suggested you seek help in the nearby settlement of Edgewater. Talk to whoever runs the town.”
Just as the quest implies, your next step will be to talk to the Edgewater’s administration.
If you choose to take a trip around the ship now, ADA will explain the locations and available tools to you. She will talk about Alex to you, which makes it clear that she differentiates between you and him despite the technical exchange you just had. You can’t access much due to the security lockdown that happened due to the power loss, but you can check out the crew’s quarters (“Alex preferred to travel alone. But he always had me.”) for your future companions, the Respecification Machine, and the workbench that you can mess around with right away. There are a couple of items you can pick up here and there.
Lieutenant Mercer

However, as you exit the ship, Lieutenant Mercer will initiate dialog with you.
Start of Dialog
She suspects that the ship is yours because you “walked in it like it was your ship.” (No, reloading and attempting to change your behavior to something less captain-ey way will not change this interaction.) She will threat docking your pay to cover the fine to the company.
The only negative effect you can acquire from this conversation is if you choose to attack Mercer instead of continuing the conversation: you will get a small negative reputation increase with Spacer’s Choice (6% if it’s just the lieutenant). There will be nothing particularly valuable on her body.
Whether you [Lie 5] and present yourself as a safety inspector, or admit that you don’t have a job, you will be able to proceed without needing to pay anything. She will apologize and point you to Constable Reyes in the town as her manager if you pick the former option, or waive your fee due to your help with marauders if you pick the latter.
End of Dialog
If you don’t fight with Pelham or Mercer until this point, your reputation with Spacer’s Choice will be neutral.
From this point, you need to reach Edgewater, but the gates are fairly close nearby. You can walk right through a small marauder camp or an ambush of a somewhat similar size in the canyon pass. You will get similar amounts of loot at both of the locations.
The most useful NPC to talk to outside of the town will be Silas the gravedigger, standing near two guards on the bridge right in front of the main entrance. He is also the one who can give you the A Small Grave Matter side quest, which will earn you a few extra bits and encourage you to explore the town and its inhabitants (which could in turn emotionally influence your decision in the main quest.)
Silas (Optional)

His way of noticing you will be “Whoa. Hey. Where’d you come from?”
Start of Dialog
Silas, like all other Spacer’s Choice affiliates you have interacted with so far, will warn you of marauders in the hills. In fact, if you approach Silas wearing marauder armor, he will warn you that “you’re liable to give some people the wrong idea.”
In the conversation with Silas you can tell him about your pod crashing “back in the hills,” eliciting confusion. Or ask him, “How do you know I’m not a marauder?” and get a bit of a compliment (“You talk to pretty for a marauder. Most of ’em just grunt and yell.”) Whether you do that or proceed with the conversation as normal, you can introduce yourself as yourself or as [Lie 1] Alex Hawthorne. He won’t shake your hand on the account of recently hauling corpses. You can also ask about the accompanying armed guards (answer is, because marauders), or starting snarky with “Do they pay you to chat with strangers?” (his answer won’t provide an answer.)
When Silas introduces himself as a Junior Inhumer for the town of Edgewater, you can [Dumb] reply with “Junior in humor? Like a comedian?” and have an amusing exchange: “Nah, I ain’t that fancy. I just dig holes in the ground and fill ’em with dead folk.”
If you ask him about the power regulator, he will redirect you to Reed Tobson, in the tower above the town’s cannery. That will update your quest marker.
If you continue the conversation or if you inquired about a job earlier on, Silas will offer you a task collecting overdue grave rent money as the A Small Grave Matter quest. The information regarding that quest will not be covered by this guide.
Collecting rent for the graves, as it turns out, is the company policy. “If it was up to me, I’d put the whole town ten feet under, free of charge.”
Afterwards, you can inquire about the town, marauders, the Hope, or his job. Silas will sound hopeful about the work or the plague ravaging the town (“We’re survivors. Loyal company folk braving the wilds.”), reveal that marauders have been raiding the graves (“Hence the armed guards”), dismiss the Hope as an “old rumor” and get nervous if you keep pressing the topic, or admit that he has been a gravedigger all his life after a curious attempt to count the years at first.
If you return to him still wearing your hibernation suit, he will point your outfit out to you.
End of Dialog
Now you can head inside the town, unless you are eager to rob some of the houses nearby, turn some of your junk into coin in the Emerald Vale General Store, pick up a bounty quest from the sheriff, and eventually head inside the Saltuna Cannery. If you want to learn more about the plague in the town, work on Silas’s quest, step inside the Sick House, or take a stroll through some of the alleyways to stumble upon the corpses.
Contradictory messages from the NPCs will combine with what you find to form a multi-faceted picture of a worn, perhaps even dying, mercilessly hard-working town of Edgewater.
Find a Power Regulator
If you enter through the main entrance
(below the tower and the worn Spacer’s Choice sign – albeit, exploring the rest of the facility has its own benefits, a “Kick Me” sign for SAM, and a vending machine), you will immediately face the elevator which will take you to the second floor and right into the middle of a conversation between Reed and Parvati.

Reed Tobson

The first thing you will hear inside the elevator will be: “Ms. Holcomb, I need you to explain this with less of the- the grease-monkey argot.” The doors will open. Parvati will apologize, trying to politely explain to Tobson that the reason for the delay behind fixing the factory’s oven is because the saltuna-programmed machine is being forced to cook something that is not saltuna (i.e., the non-saltuna ingredients that are attempted to be sold as saltuna are harming the operation.)
If you wait this long, Parvati will point out to Reed that “there’s someone here to see you.” He will insist that Parvati focuses back on the conversation: “Let’s start over. Walk me through the process. Show me where it’s going awry.” Parvati will try to explain the situation again, but Reed will express frustration and impatience as a response. That’s when the silence will hit and you can walk in to initiate dialog with Reed.
However, you could have done so at any point during their conversation, cutting it short.
Start of Dialog
Regardless of whether you wait or intrude immediately, Reed will make a remark to Parvati about your presence: “Really now, Parvati. I do wish you’d spoken up.”
You can direct the conversation to yourself immediately, or offer to wait until the two are finished to hear Parvati refer to the cannery as “Bess” and Reed react negatively to this act of “personification of company property” since it is “strictly contrary to the Spacer’s Choice code of conduct.” Then Reed will apologize and you can continue the conversation.
Introduce yourself by name and Reed will be confused as to why you are not wearing a uniform (“Shirt. Pants. Workboots. Company approved colors”). Whether you act confused or correct Reed is up to you, but he will ultimately admit to his mistake and explain that visitors to the town are rare.
If you buy the worker’s outfit in the general store and equip it, the question will be skipped.
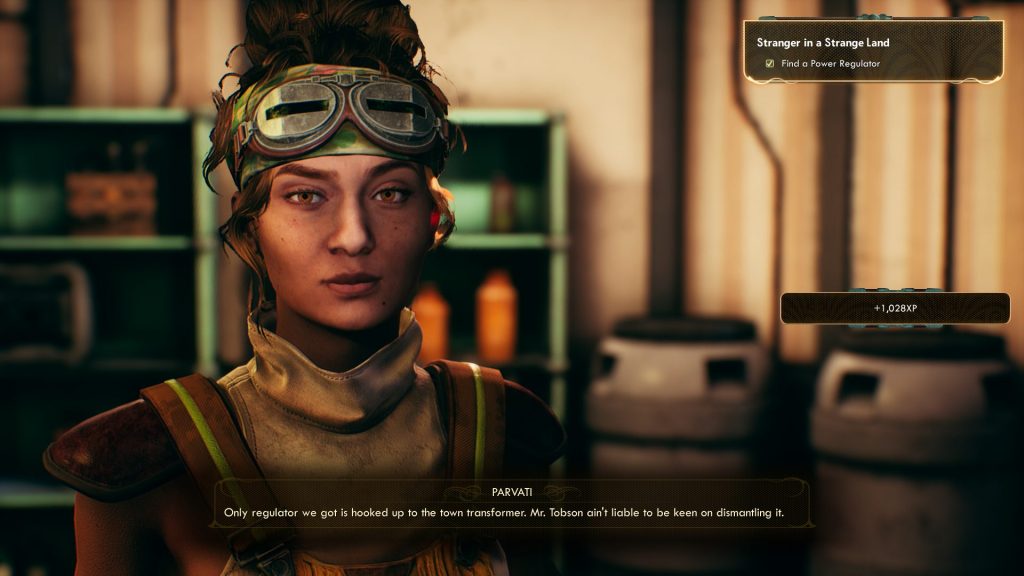
You can start the conversation about your ship needing a power regulator and Parvati will point out the one powering the town, and another amusing misunderstanding between her and Tobson will confirm just how much he struggles to understand any of the words that leave her mouth. Tobson will explain that while he can’t let you have the town’s power regulator, he knows the location of another one, and he knows how to retrieve it safely (apparently there was a man whose legs were still twitching when they buried him).
All of the other dialog options will lead to the discussion of rerouting power from the lab, whether you want to admit to Reed that you are looking for a power regulator or not.
He will try to sell you the idea that this other regulator is located at a “mostly abandoned” old botanical lab, and if you go to the geothermal plant and reroute the power over to the Edgewater, “you can have their regulator and be along on your way.”
If you didn’t mention the power regulator to Reed, he will explain that the old lab (built by Spacer’s Choice once upon a time) is “still eating up power from our plant,” and the Edgewater’s cannery really needs it. He can’t spare any workers for the task.
However, don’t shut down the conversation and run for the plant immediately: as you will learn when you inquire further, “The botanical labs are not legally inhabited, but there are people who live there.” Try to guess that these are marauders and Reed will correct your theory: “they’re deserters. Former workers. I need them back at their posts. I need them to come home.”
You can point out that these people won’t “take kindly to losing their power,” but Reed will offer an analogy of you being a parent “disciplining an unruly child,” selling it as an act of kindness.
Note that Reed is quick to ask something like this of a stranger, and Reed will reveal his affiliation with Scientism, a religion you will have a chance to encounter soon in the game. More specifically, Reed will return to the fact that you are a first visitor to the town in a long, long time. “Scripture tells us that nothing happens without reason.” If you ask Reed whether he is “a man of faith,” he will bring up the town’s vicar and the sermons that Reed thinks he should attend more frequently, followed by “But yes. I am a Scientician born and raised.” Noting the religion’s teaching that “hard work and difficulty fortify our spirit,” he will then reroute the conversation back to the “hard work” at hand.
If you want to make Reed jump a little bit, tell him that you “charge by the head.” Reed will explain that these deserters are the last people he would want you to kill. Instead, he hopes that cutting off their power will make them return to town. So, before doing anything at the geothermal plant, he wants you to talk to the group’s leader, Adelaide, and convince the deserters to come back by warning them that they are about to lose power.
You Main Quest log will update with Comes Now the Power quest and the task to “Deliver Reed’s Message.” Technically, this step is not necessary for the completion of the Stranger in a Strange Land quest and will not be covered in this guide. We have a separate guide that goes through your options for addressing the Adelaide-Reed situation prior to making your decision at the plant, so you should check it out!
If you ask for justification for his approach, he will admit that the town has failed to meet its production quota “in years.” If it happens this year as well, “the company might shut us down for good.” So, he wants the deserters back and working. You can note that Edgewater’s poor condition is a good reason for workers to walk out, and Reed will accept full responsibility for making these people leave: “I pushed them too hard.” Express doubts that Adelaide will want to come back, and Reed will begrudgingly accept the possibility of her followers returning on their own. Reed will make a strong argument for the reunification of two sides: “If we dissolve into factions, we will all perish separately.”
If you accept this task, Parvati will jump in, telling you that her father has told her “all about the plant” in an excited tone, thinking she might be of use to you. If you choose not to make any promises to Reed regarding his task, Parvati will try to offer herself as a knowledgeable guide in the Vale.
She holds back after offering this, nervously waiting for Reed’s feedback on the matter. Despite his hesitation, Reed will admit to Parvati’s talent and usefulness in the matter. He will give you the plant’s administrative passcode (a quest item) and then you can choose to either recruit or reject Parvati.
If you reject Parvati, Reed will at first attempt to convince you to take her, but ultimately she will awkwardly apologize and say she will be in her garage later. “Fixing stuff. Like I do.” However, she will remain in Reed’s office for now, as they continue their endless discussion about the cannery. From here you can recruit her if you swear to help Reed or, if you already did, she will confess that she is desperate to leave the town and recruiting her will not require any further words with Tobson.
Should you accept Parvati’s help, she will react in an excited manner, ready to depart immediately, and Reed will thank you for your help. “It is a lot to ask of a stranger, I know.”
If you wish, you can ask Reed about the town’s plague (albeit he will not be happy about the topic), learning about the medicine shortage and the difficult choice Reed has to make in choosing who to save. “It is not easy for me. And the moment it becomes easy is the moment I’m no longer fit to serve.” Reed will express that he cares about the survival of “the family” over the survival of “the individual.” Reed will, like the rest of the town, connect the plague to being “idle or lethargic or weak of spirit.” If you try to argue against this connection, Reed will reassure you that “it is a well-documented fact that the wealthiest in society do not suffer from ailments of the constitution.”
Finally, you can learn that Adelaide was “out only flavor specialist,” making the saltuna taste… well, edible. Instead of the glorious citrus saltuna the cannery has been “reduced to selling unflavored and spearmint.” You also get to hear about the corporate world’s famous cystypig and its flavorful tumors. You will learn more about this delicacy as you continue exploring the world. He will then admit that they do not make saltuna out of the intended ingredients since the fish is not native to the planet, and you can [Dumb] “Wow. Alien fish with every meal. Talk about living the high life.” Reed will assure you that they only eat once a day, unlike the rich people of Byzantium.
End of Dialog
From here, you can step into the elevator and go back down to the lobby.
Divert Power from the Geothermal Plant
“You’ve learned that there are power regulators in both the Edgewater cannery and a Botanical Lab elsewhere in the region, but neither can be removed unless power is routed away from them. Travel to the region’s geothermal plant and route the power away from one of the locations.
- Reed asked you to deliver a message to a woman named Adelaide McDevitt before you head into the geothermal plant.”
The quest to redirect the power inside the geothermal plant will now be tracked by both the Stranger in a Strange Land and Comes Now the Power, but the progression and the optional steps are more effectively logged by the latter.
To balance the length of this guide, the walkthrough of the geothermal plant has been placed under the Comes Now the Power guide.
There you can make a final decision of whether you want to talk to Adelaide and make your way to the power plant.
Retrieve the Power Regulator (From Botanical Lab)
“You diverted power from the Botanical Lab to Edgewater. The Botanical Lab is now without power. You should be able to salvage their power regulator now.”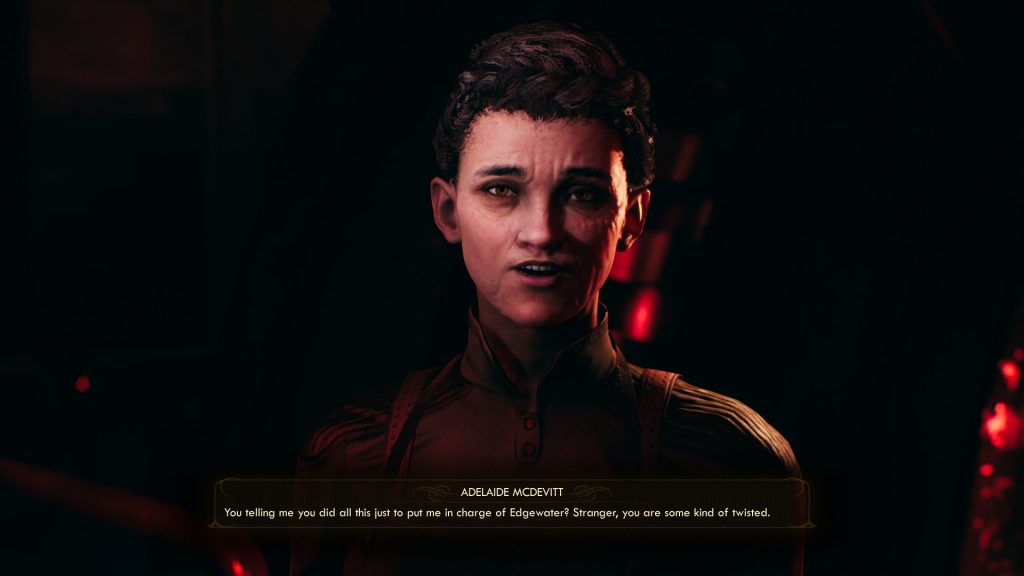 Now you have to manually locate the exit out of the plant
(you can’t fast travel from the location) and fast travel or walk to Botanical Lab in order to collect the power regulator for your ship.
When you walk into the power control room at the Deserter settlement, you will have to talk to Adelaide before collecting the regulator. There will be nobody attacking you following that conversation, but you can affect the future of both settlements with the steps you choose to take. See all of the interactions you can undertake in our Comes Now the Power guide.
Once you remove the power regulator, your quest log will update with “Return to the Unreliable” step.
Retrieve the Power Regulator (From Edgewater)
 “You diverted power from Edgewater to the Botanical Lab. Edgewater and its cannery are now without power. You should be able to salvage their power regulator now.”Now you have to manually locate the exit out of the plant
(you can’t fast travel from the location) and fast travel or walk to Edgewater in order to collect the power regulator for your ship.
When you walk into the power control room inside the cannery at Edgewater, you will have to talk to Reed before collecting the regulator. He will have his guards ready to open fire on you once you walk into the power room after that, unless you use intimidation.
Once you remove the power regulator, your quest log will update with “Return to the Unreliable” step.
Return to the Unreliable
“You have found a power regulator. Return to your ship.”
You can easily fast travel to the Landing Site on your map.
Once you approach the ramp (having obtained the power regulator), Parvati will get very excited and share her dreams about “flying on a real ship.” Whichever decision you made with rerouting the power, she will consider herself indentured to Spacer’s Choice. Convincing her to join your crew, if you wish to do so, will be very easy. The only way to make her not want to join you is to kill Reed and fail at making Parvati stay with you. Parvati will be very happy to call you her Captain, should you let her stay.
After you head in, walk towards ADA. She will comment on your decision. If you redirected power to the Lab, she will “appreciate you doing your part to hasten their demise.” If you helped the Edgewater, she will “applaud your willingness to invest your time in the local community.”
Tell ADA you have a power regulator and she will ask you whether you know how to install it. [Engineering 20] will make her happy that the ship has your expertise “in the event of another catastrophic engine failure.” If you ask her for a walkthrough, she will explain a very simple version of how to install the regulator. “Step four. Celebrate.” She will then direct you to the engine room across the cargo bay, up the ladder.
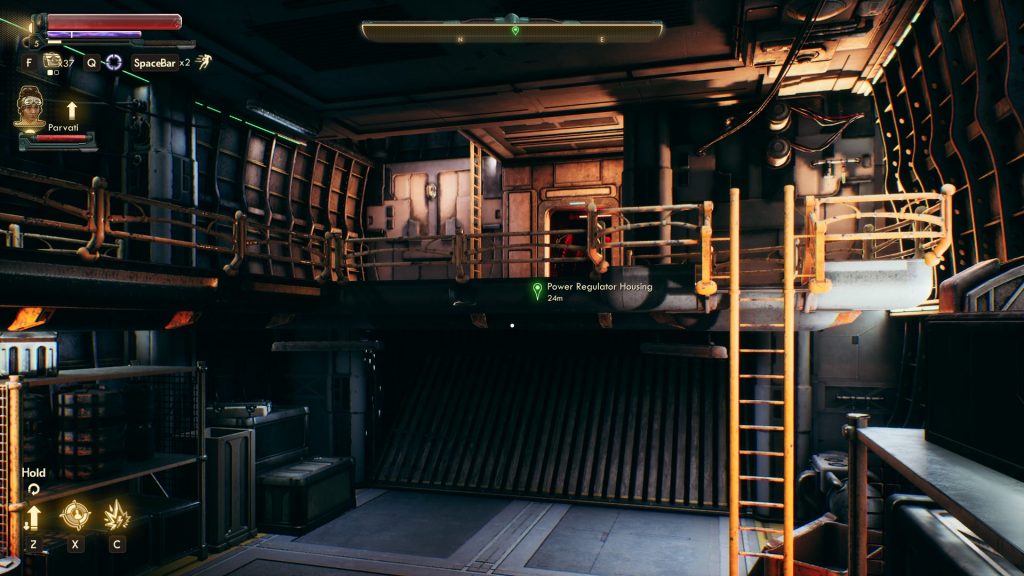
Walk inside and interact with the regulator housing on the left side.
The room will light up and the engine will start.
Speak with ADA
After you talk to ADA she will state that she is ready to bring the ship into the orbit. “This should prove an adequate test of our flight capabilities.”
You can proceed or make her pause for a moment while you finish your business.

The quest Stranger in a Strange Land will be COMPLETED:
“You retrieved the power regulator needed to fix the smuggler’s ship, and are now able to travel to other parts of the Halcyon System.”
After having a chat with Phineas and accepting the Passage to Anywhere quest, you can interact with the navigation panel and choose your new destination.
Good luck in your travels, Captain!