Welcome to our guide on how to find Survivors in Dead by Daylight! When you’re first learning Killer, it can sometimes be a challenge to even find Survivors, much less catch them and hook them. Therefore, the goal with this guide is to give you all the information you need to find those pesky Blendettes.
The first section of this guide explains all the technical aspects of locating Survivors, while the subsequent sections go over specific tactics and strategies for finding Survivors. While this guide is geared towards beginners, there’s stuff here that more experienced players may still find useful.
If you don’t care about the details and just want some specific tactics, head straight to the Start of the Trial section of this guide.
There are a few different cues that help Killers locate Survivors — some are obvious, but we’re going to go over all of them for the sake of completeness.
Loud Noise Notifications & Screams
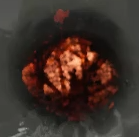
A loud noise notification
Loud Noise Notifications are a HUD indicator that appears only for Killers. Loud noise notifications occur if a Survivor performs a rushed action (entering/exiting a locker or vaulting while holding sprint) or misses a skill check within 48 meters of the Killer. Dropping a pallet will also cause a loud noise notification, as will a Survivor unhooking another Survivor.
The Killer will hear an explosion sound effect, and an explosion bubble where the notification occurred. If the notification is off-screen, a red arrow will indicate the direction of the notification.
Utilization of the loud noise notification — note the red arrow indicating direction of the sound
The loud noise notification doesn’t tell you what caused the noise, so you’ll have to use context to figure it out. If there’s no generator aura behind the notification bubble, then it must be a Survivor missing a healing skill check, a rushed action, or the Diversion perk.
Other Perks function similarly, but instead cause a Survivor to Scream. Screams will often reveal the Survivors location via Aura reveal, Loud Noise, or simply showing the Survivor — but not always, Sometimes, Screams are just screams, allowing the Killer to make a guess at where the Survivor is, but not giving an Aura, Loud Noise Notification, or otherwise revealing the Survivors location.
Perks That Affect Loud Noise Notifications & Screams
Killer Perks
Killer’s have a number of perks that create loud noise notifications or otherwise reveal the Survivor.
Deathbound [Executioner Perk] – Whenever a Survivor heals another Survivor for 1 Health State at least 32 meters away from you, Deathbound activates, causing the Survivor to scream and trigger a Loud Noise Notification — for the next 60 seconds, the Survivor suffers from the Oblivious Status Effect whenever they are farther than 16/12/8 meters from the healed Survivor.
Discordance [Legion Perk] – Generators within 64/96/128 meters that are being repaired by 2 or more survivors will be highlighted yellow, and will give a loud noise notification when first highlighted.
Dragon’s Grip [Blight Perk] – Damaging a Generator activates Dragon’s Grip for 30 seconds: The first Survivor to interact with the Generator will scream, revealing their for 4 seconds and inflicting the Exposed Status Effect for 60 seconds. Dragon’s Grip has a cooldown of 120/100/80 seconds.
Friends ’til the End [Good Guy Perk] – When you hook any Survivor that is not the Obsession, the following effects apply to the Obsession: Their Aura is revealed for 6/8/10 seconds, and they suffer from the Exposed status effect for 20 seconds. When you hook the Obsession, a random survivor will Scream and reveal their location, and become the new Obsession.
Hex: Face the Darkness [Knight Perk] – If there is a Dull Totem on the map, injuring a Survivor will activate and light that totem, cursing the injured Survivor: All other Survivors will scream every 35/30/25 seconds and reveal their Aura if they are outside of the Killer’s Terror Radius. This Perk deactivates if the cursed Survivor entries the Dying State or becomes Healthy, extinguishing the Totem.
Hoarder [Twins Perk] – If a Survivor Unlocks a Chest or picks up an Item within 32/48/64 meters of your location, Hoarder triggers a Loud Noise notification. This perk spawns 2 additional Chests in the Trial.
Infectious Fright [Plague Perk] – If a Survivor is put in the Dying State, all other Survivors within the Killer’s Terror Radius will scream and reveal tehir location for 4/5/6 seconds.
Iron Maiden [Legion Perk] – Survviors who exit a Locker scream and reveal their location for 4 seconds, and suffer from the Exposed status effect for 30 seconds. This perk increases Locker Search speed by 30/40/50%.
No Way Out [Trickster Perk] – Gain a token the first time you hook each Survivor. Survivors attempting to open an exit gate will trigger a loud noise notification, and the entity will block both exit gates for 12 seconds plus 6/9/12 seconds per token.
Scourge Hook: Hangman’s Trick [Pig Perk] – If a Survivor begins sabotaging a hook, it will trigger a loud noise notification. While carrying a Survivor, you will see the aura of any survivor within 2/4/6 meters of a hook.
Spies From the Shadows – Crows that are startled by Survivors within 20/28/36 meters will give a Loud Noise notification (5 second cooldown).
Tinkerer [Hillbilly Perk] – If any generator is repaired to 70%, a loud noise notification triggers on the generator and you gain Undetectable for 12/14/16 seconds.
Ultimate Weapon [Xenomorph Perk] – This Perk activates whenever you open a locker. For 30 seconds, Survivors that enter your Terror Radius will scream and reveal their location, and they’ll suffer from the Blindness status effect for 30 seconds. Ultimate Weapon has a 40/35/30 second cooldown.
Survivor Perks
Survivors have access to a handful of perks that can hide or create false loud noise notifications:
Bite the Bullet [Leon Kennedy Perk] – When healing, you make no noise. Failed healing skill checks don’t trigger a loud noise notification, and only regress progress by 3/2/1%.
Cut Loose [Thalita Lyra Perk] – After performing a Rushed Vault in a Chase, this Perk activates for 4/5/6 seconds: Loud Noise notifications and sound effects from Rushed Vaults and suppressed — performing another Rushed Vault resets the Perk’s timer. 45 second cooldown.
Deception [Elodie Rakoto Perk] – Attempting to open a locker while sprinting will instead trigger a loud noise notification for the Killer and prevent you from leaving scratch marks or pools of blood for 3 seconds.
Diversion [Adam Francis Perk] – Being in the Killer’s terror radius for 40/35/30 seconds will activate Diversion. While active, you may press the Active Ability button while crouched to throw a pebble, which will create scratch marks and a loud noise notification if within 20 meters of the killer. Diversion resets once you throw the pebble.
Quick and Quiet [Meg Thomas Perk] – Your next loud noise notification from a rushed action will be suppressed, with a 35/25/20 second cooldown.
Red Herring [Zarina Kassir Perk] – After repairing a generator for at least 3 seconds, it’s aura is highlighted for you in yellow until it is fully repaired, you start repairing another gen, or you enter a locker. Entering a locker will trigger a loud noise notification at the highlighted generator. 60/50/40 second cooldown.
Technician [Feng Min Perk] – Reduces the audible range of your reapir noises by -8 meters, and supresses Loud Noise notifications if you fail a Gen Repair Skill Check, but failing a skill check will instantly regress the Gen by 5/4/3% in addition to the default penalty.
Scratch Marks
This is the #1 way you’re going to find Survivors. When a Survivor runs, they leave scratch marks on the ground, and nearby walls. Scratch marks:
Brighten to full brightness over the first 1 second after they spawn
Last for 10 seconds by default
Start fading after 8 seconds on dark surfaces
Start fading after ~4 seconds on lighter surfaces
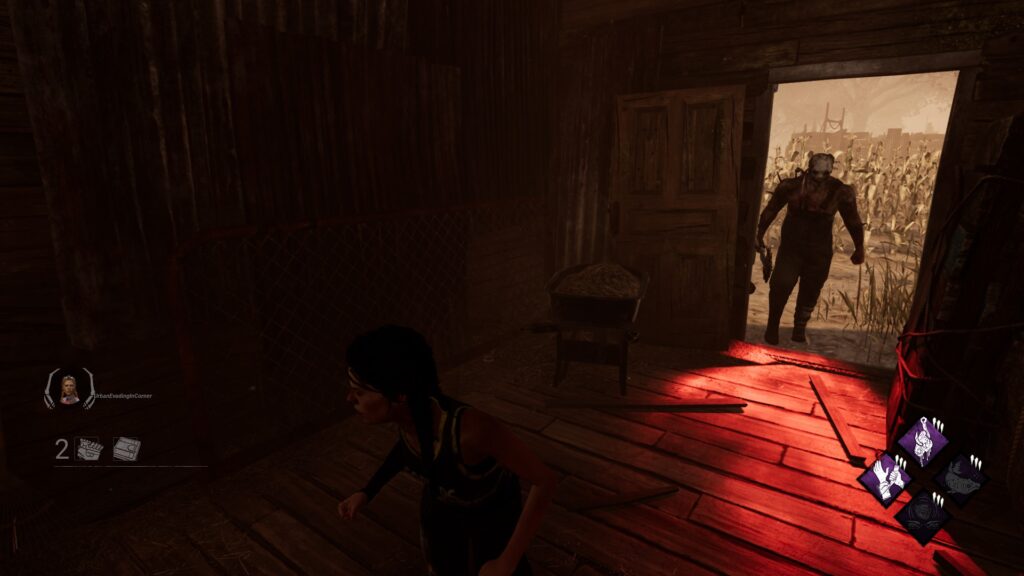
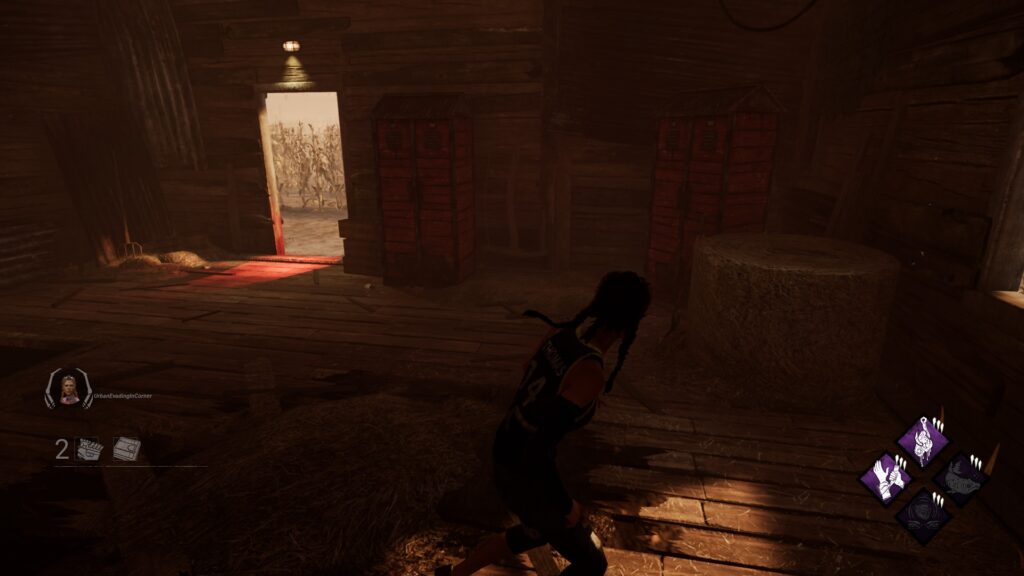
Scratch marks can sometimes be hard to read, but here it’s obvious the Survivor went through the doorway
Since it takes scratch marks up to 8 seconds to begin fading, you can’t immediately tell which direction a Survivor went from seeing them. You’ll need to either find some that are fading, or look for new ones popping up (or just use your best judgment on which way they probably ran — it’s usually away from you).
Perks That Affect Scratch Marks
Killer Perks
Currently, there is only one Killer Perk that affects Scratch Marks:
Predator [Wraith Perk] – Scratch marks left by Survivors will spawn slightly/moderately/considerably closer together.
It’s worth looking at this perk in more detail, since it changes the way scratch marks spawn considerably (like the perk says). Usually, scratch marks will spawn on nearby walls and other vertical surfaces that Survivors run past. Predator prevents this, which can actually make it harder to track Survivors. However, it does make it more obvious which direction a Survivor went — but that isn’t worth the disadvantages. I would suggest you never use this perk.
Survivor Perks
It’s important to know that there are ways for Survivors to prevent Scratch Marks from spawning. The ones you definitely need to be familiar with are Deception and Dance With Me, but it’s good to at least be aware of all of them. Here are all of the Survivor Perks that affect Scratch Marks:
Babysitter [Steve Harrington Perk] – When you unhook another Survivor, that Survivor won’t leave scratch marks or pools of blood for 4/6/8seconds, and you and the killer will see each other’s Aura for 4 seconds.
Dance With Me [Kate Denson Perk] – If you fast vault a window, or fast exit a locker, you won’t leave scratch marks for 3 seconds.
Deception [Elodie Rakoto Perk] – Attempting to open a locker while sprinting will instead trigger a loud noise notification for the Killer and prevent you from leaving scratch marks or pools of blood for 3 seconds.
Distortion [Jeff Johansen Perk] – You start the trial with 3 tokens. Each time the killer would see your aura, Distortion activates, consuming a token. Each time a token is consumed, you don’t leave scratch marks for 6/8/10 seconds and the Killer will be unable to see your aura.
Fixated [Nancy Wheeler Perk] – You can see your own scratch marks, and walk 10/15/20% faster.
Lightweight – Your scratch marks disappear 1/2/3 seconds sooner.
Lucky Break [Yui Kimura Perk] – When injured, Lucky Break activates, preventing you from leaving scratch marks or pools of blood for 40/50/60 seconds, after which Lucky Break is disabled for the remainder of the trial. Lucky Break deactivates when you are healthy or dying.
Poised [Jane Romero Teachable] – After a generator is completed, you don’t leave scratch marks for 6/8/10 seconds.
Self-Preservation [Yun-Jin Lee Perk] – When another Survivor is hit with a basic attack within 16 meters of you, Self-Preservation activates, preventing you from making grunts of pain, leaving scratch marks, or leaving pools of blood for 6/8/10 seconds.
Blood Pools
Injured Survivors will leave pools of blood, making them easier to track. There are a number of Survivor and Killer perks that interact with Blood Pools.
Perks That Affect Blood Pools
Killer Perks
Blood Echo [Oni Perk] -When you hook a Survivor all other injured Survivors suffer from the Haemorrhage Status Effect (which dramatically increases bleeding) until healed, and also causes the Exhausted Status Effect on all injured Survivors. Blood Echo can only trigger every 80/70/60 seconds.
Bloodhound [Wraith Perk] -Pools of Blood are brighter, and last 2/3/4 seconds longer than usual.
Sloppy Butcher – Hitting a Survivor with a basic attack causes Haemorrhage (extra bleeding) and Mangled (increased time to heal) Status Effects until the Survivor is fully healed.
Survivor Perks
Babysitter [Steve Harrington Perk] – When you unhook another Survivor, that Survivor won’t leave scratch marks or pools of blood for 4/6/8seconds, and you and the killer will see each other’s Aura for 4 seconds.
Lucky Break [Yui Kimura Perk] – When injured, Lucky Break activates, preventing you from leaving scratch marks or pools of blood for 40/50/60 seconds, after which Lucky Break is disabled for the remainder of the trial. Lucky Break deactivates when you are healthy or dying.
No Mither [David King Perk] – You suffer from the Broken (you are injured and unable to be healed) Status Effect for the entire trial. You do not bleed, and Grunts of Pain are reduced by 0/25/50%. You can completely recover from the dying state.
Self-Preservation [Yun-Jin Lee Perk] – When another Survivor is hit with a basic attack within 16 meters of you, Self-Preservation activates, preventing you from making grunts of pain, leaving scratch marks, or leaving pools of blood for 6/8/10 seconds.
Blood pools leave a much easier to follow trail than scratch marks
Crows
Crows are frequently underutilized information for both Survivors and Killers. Not only do they make noise andfly up into the air when disturbed by a player, but they also respawn and land back on their perch 15 seconds after being disturbed. If you see crows respawning and flying back down to their perch, you know someone must have recently passed by those crows.
Unlike scratch marks, crows are disturbed even when survivors are walking (or even crouching, if they get close enough.) Crows also like to appear and land near players that have been in the same spot for awhile, so if you see a crow land somewhere, it may also mean that someone is nearby.
There is one Killer perk that affects crows, as well as one Survivor perk:
Spies From the Shadows – Crows that are startled by Survivors within 20/28/36 meters will give a Loud Noise notification (5 second cooldown).
Calm Spirit [Jake Park Perk] – The chance of alerting nearby Crows is reduced by 80/90/100%, and you will no longer scream.
If you regularly struggle to find Survivors, I strongly suggest taking Spies From the Shadows, as it makes finding Survivors approximately 100% easier (unless for some weird reason they’re all running Calm Spirit).
The Start of the Trial
NOTE: For the examples in this section, we’re going to use the Sanctum of Wrath map, but the following info applies to pretty much every map.
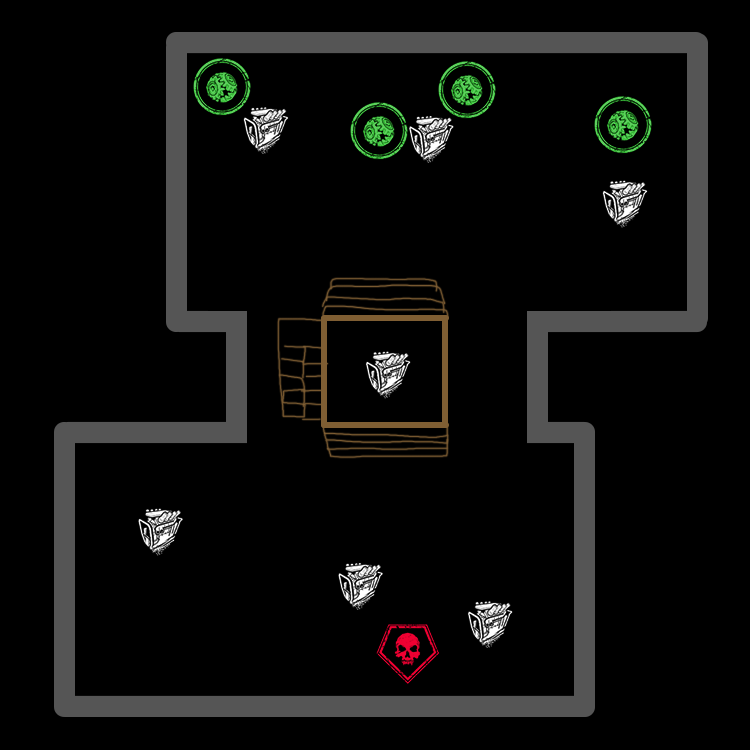
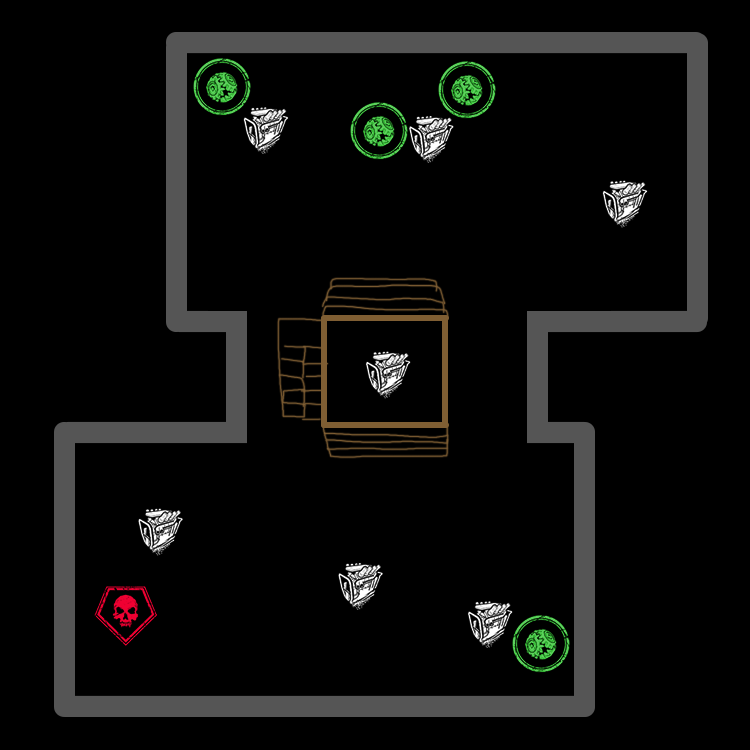
When you first spawn into the trial as Killer, try and figure out what corner/side of the map you are in. This matters quite a bit, because Survivors will tend to spawn on the opposite side(s) of the map from you:
A couple of possible spawns for the Killer and Survivors
If you aren’t sure where you are, look around quickly and try to see if you can find walls that lead to corners. Since you can see the auras of all the generators, their placement can be a good way to judge where the edges of the map are.
Since I can see two walls at a right angle behind me, I know which corner of the map I have spawned in
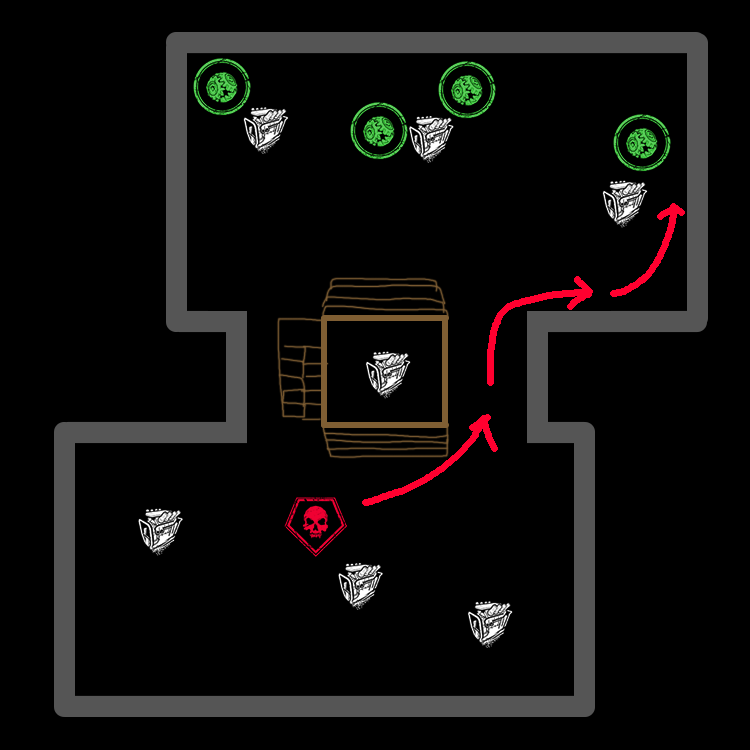
Once you’ve got a decent idea of where you are, you should immediately start heading towards the Survivors. You can safely ignore any generators that are very close to where you spawned, and instead move towards the far generators — but not through the middle of the map. Instead, have two goals in mind when approaching the first far generator:
Approach the first generator from an angle that will surprise the Survivor.
Approach the first generator from an angle that will force the Survivor into a corner, or towards the other far generators.
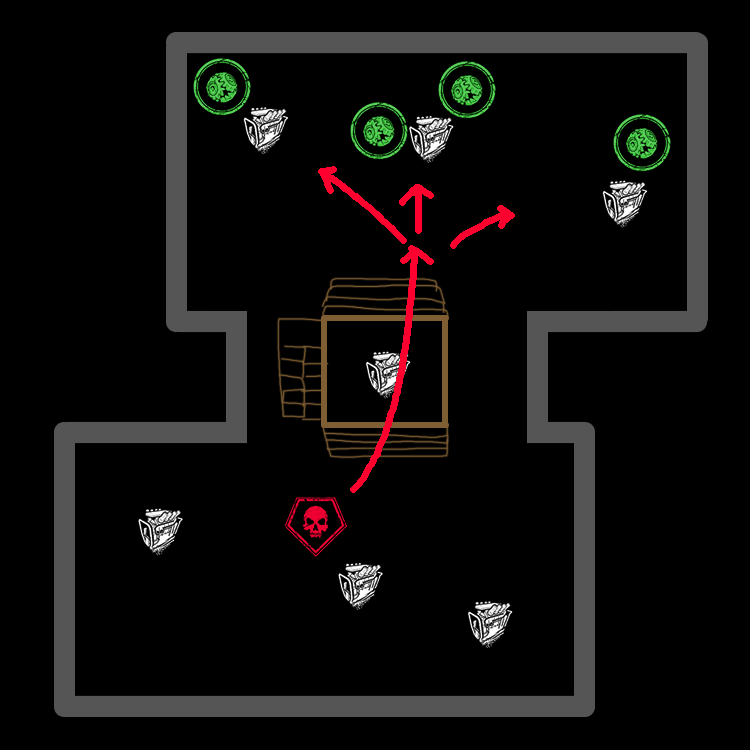
First, let’s look at how not to approach generators:
If you move through the middle of the map, you’ll likely be seen by one or more Survivors as you approach gensSurvivors will be able to split up and run to the other side of the map, or simply hide
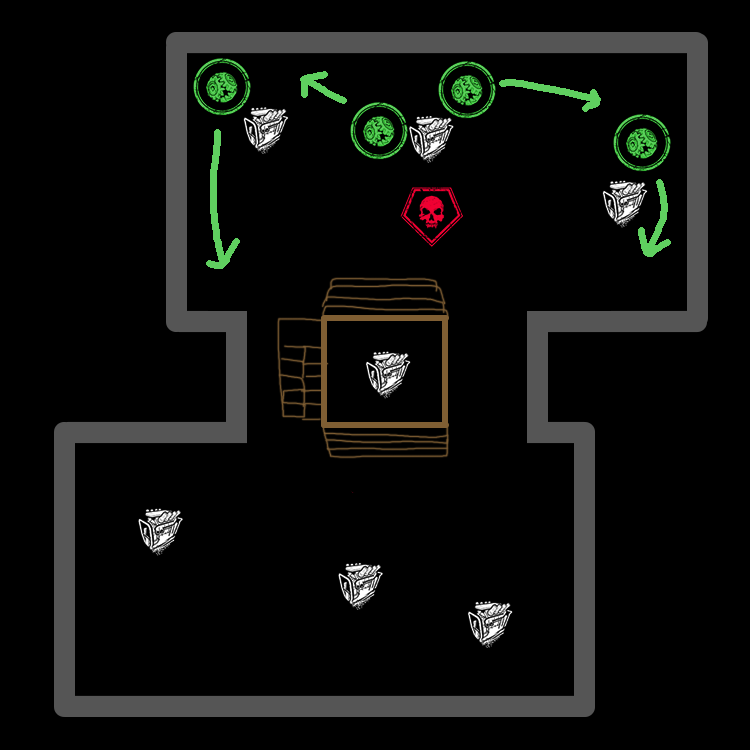
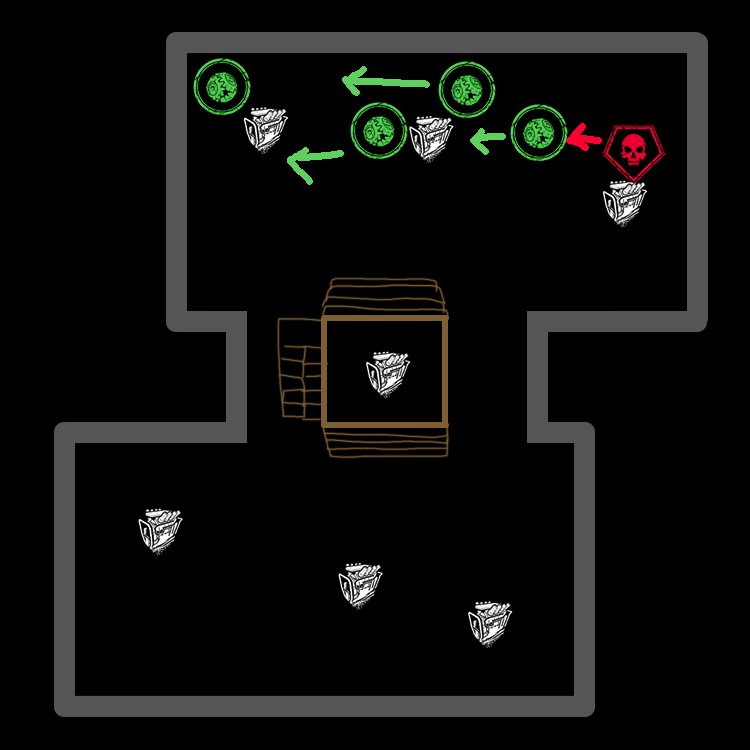
Here’s what you should do instead:
Approaching from the side of the map gives you the opportunity to surprise SurvivorsBy chasing the first Survivor you find towards the other generators, you can force some or all Survivors to stop working on generators
This technique provides two benefits: first, it can let you catch a Survivor unaware, potentially scoring you a hit. Second, it allows you to herd the Survivors to one side of the map, which means less Survivors working on generators!
Note: It’s important to be flexible when playing DBD, and you shouldn’t necessarily attempt to chase the Survior towards the other Survivors every time. Your strategy should vary depending on the Killer you’re playing as well as the perks you’re running. This strategy is simply a good way to help you find Survivors at the start of the game — it may not be the best strategy in every match.
Approaching from weird angles isn’t something you only want to do at the start of the trial, but throughout the match as well. Ideally, you should attempt to approach from the middle of the map sometimes, and from the sides sometimes, to keep Survivors guessing. This is especially true on stealth Killers that want to stalk their prey (The Shape, Ghostface, The Pig).
Hunting and Patrolling
Once you’ve gotten in a few chases, the Survivors will likely end up spread out over the map. Once this happens, you should focus on patrolling, and then hunting for Survivors that you suspect are near the gens you have chosen to patrol.
Patrolling
Patrolling refers to going from generator to generator, seeing which ones are being worked on and which aren’t. It’s important when patrolling to make mental notes of which generators are untouched, since it suggests Survivors are unlikely to be in the area.
Unlike the strategy suggested for the start of the trial, you may not want to waste time taking the long way around to approach generators from weird angles. The goal with patrolling is to apply pressure, forcing Survivors off of generators, and hopefully finding one to hunt and eventually chase.
If you’re lucky (or if you’re a stealth killer), you may be able to catch a Survivor on a generator, and not have to hunt for them. However, good Survivors will probably hear/see you coming, and attempt to run and/or hide before you reach the gen they were working on. In this case, you’ll have to go hunting once you find a generator that was clearly being worked on.
Kicking Generators
A regressing generator
It‘s usually a good idea to kick generators that have any repair progress when you come across them. This start regressing the generator’s progress. Additionally, next time you check the gen you’ll know if a Survivor has returned to it (because gens will stop regressing if a Survivor repairs them at all). Sometimes you can skip kicking a generator if you think you’ll miss your chance to catch a Survivor, but usually it’s best to just kick it.
If you’re having a hard time telling if a generator is regressing or not, you can walk up to it — if you don’t get the “Damage” prompt when standing directly in front of one of its sides, the gen is regressing.
Spine Chill
If you find that Survivors are basically always gone before you get near a gen, it’s very possible one or more of them are running the perk Spine Chill, which does a number of things, but most importantly alerts the Survivor if the Killer is looking in their direction while within 36 meters.
If you think people are hiding because of Spine Chill, you can play around it! Do so by not looking at the generators you’re approaching while patrolling:
By looking away from the generator and strafing towards it, you can surprise Survivors who are relying on Spine Chill
Using the Red Stain to Your Advantage
The red stain, which you can’t see as Killer, indicates which direction you’re facing. This lets Survivors know when you’re rounding a corner, and generally indicates to them which way you’re heading. You can therefore misdirect Survivors by not always walking in the direction you are facing.
You can do this just like in the image above with Spine Chill, by strafing or walking backwards. Really, this applies to any time you’re going around a corner where you think you’ll find a survivor — “moonwalk” around the corner (walk backwards while facing away from the direction you’re heading) to surprise Survivors, and you will sometimes find that they run right into you.
Note the red stain on the groundThe red stain can be seen even when the Killer isn’t visible to the Survivor
Hunting
If a generator has progress, and you don’t see a Survivor, then one is probably hiding nearby. Consider the direction you approached from, and then check hiding spots that would make the most sense to have hidden in. Look for scratch marks or crows being disturbed, and check behind obstacles near the generator.
If possible, check the area around the generator while moving toward the next generator on your patrol — if you can’t find a Survivor after a few seconds, it’s usually better to leave and come back.
Usually, checking lockers is a waste of time. However, if there are very few non-locker hiding spots, and you’re certain you’ve checked them, consider checking lockers if you’re confident there’s nowhere else a Survivor could have gone. This is usually only a good idea if there is a relatively exposed generator near a locker, and you saw no scratch marks and have checked all other possible hiding spots.
Try to balance looking in all directions with being able to actually see Survivors. You don’t want to stare in one direction, but if you move your camera too often, too quickly, you may miss spotting your prey.
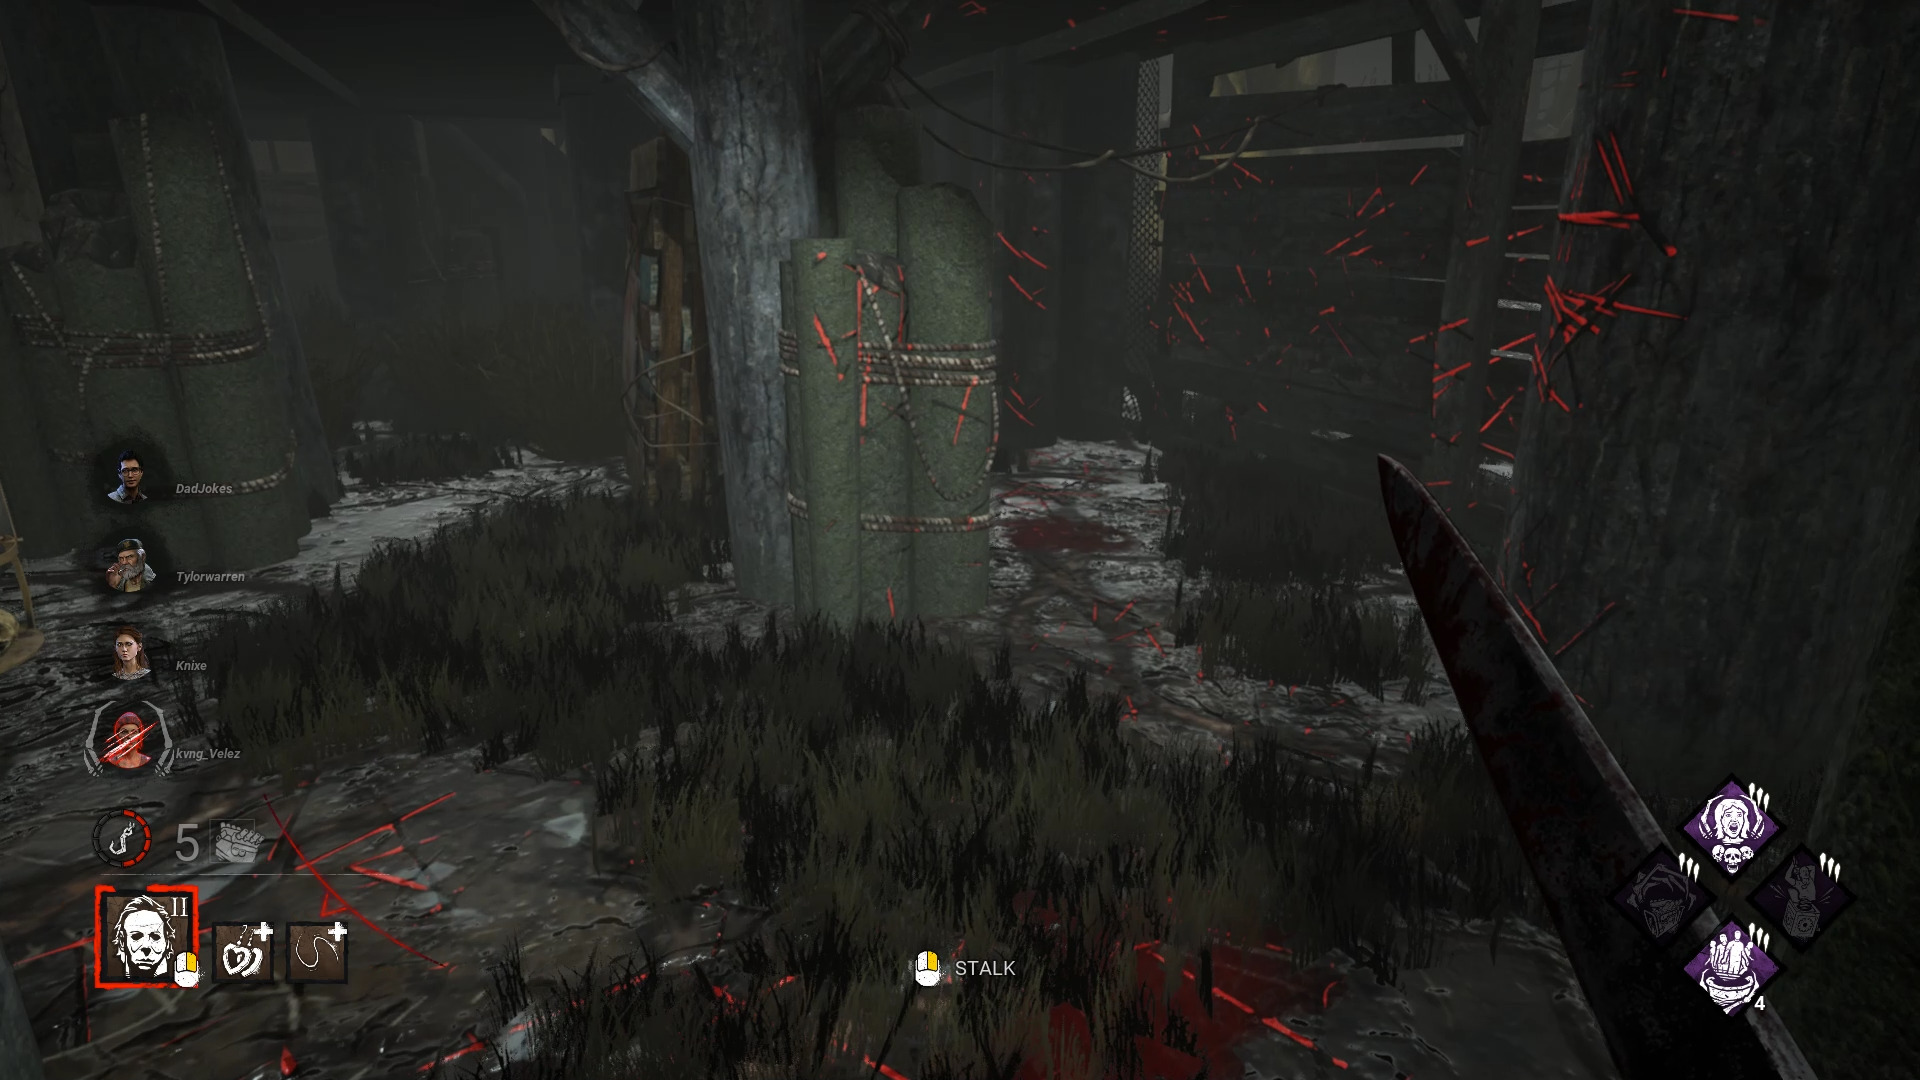
Can you spot the Survivor?
Loud Noise Notifications
As we discussed earlier in this guide, if a Survivor fails a skill check on a generator or while healing, you’ll receive a loud noise notification. This gives you a clear idea of where at least 1 Survivor is, which is invaluable information. However, it can sometimes be a better idea to not head directly to the loud noise notification, but to instead head to where someone might hide after making the loud noise.
However,if the loud noise notification came from a generator that you haven’t checked the progress of in a while, you should head right to itto make sure it doesn’t get finished. Then, you can go hunting for nearby Survivors.
Loud noise notifications can be a double-edged sword when playing Killer. You may be tempted to head straight to every loud noise notification you get, but there are issues with this for both beginner and advanced players: First, many Survivors, especially new Survivors, will immediately run away from a generator that someone fails a skill check on. Second, experienced survivors will frequently make loud noise notifications on purpose to distract the killer and draw them away from generators/injured teammates.
Listen Closely
Speaking of noise, there are a few other ways sound can help you locate Survivors. If you’re wearing good headphones, or running the Stridor perk (see below), you can hear Survivors breathing. If a Survivor is injured, they will frequently make loud grunts of pain, making them much easier to locate.
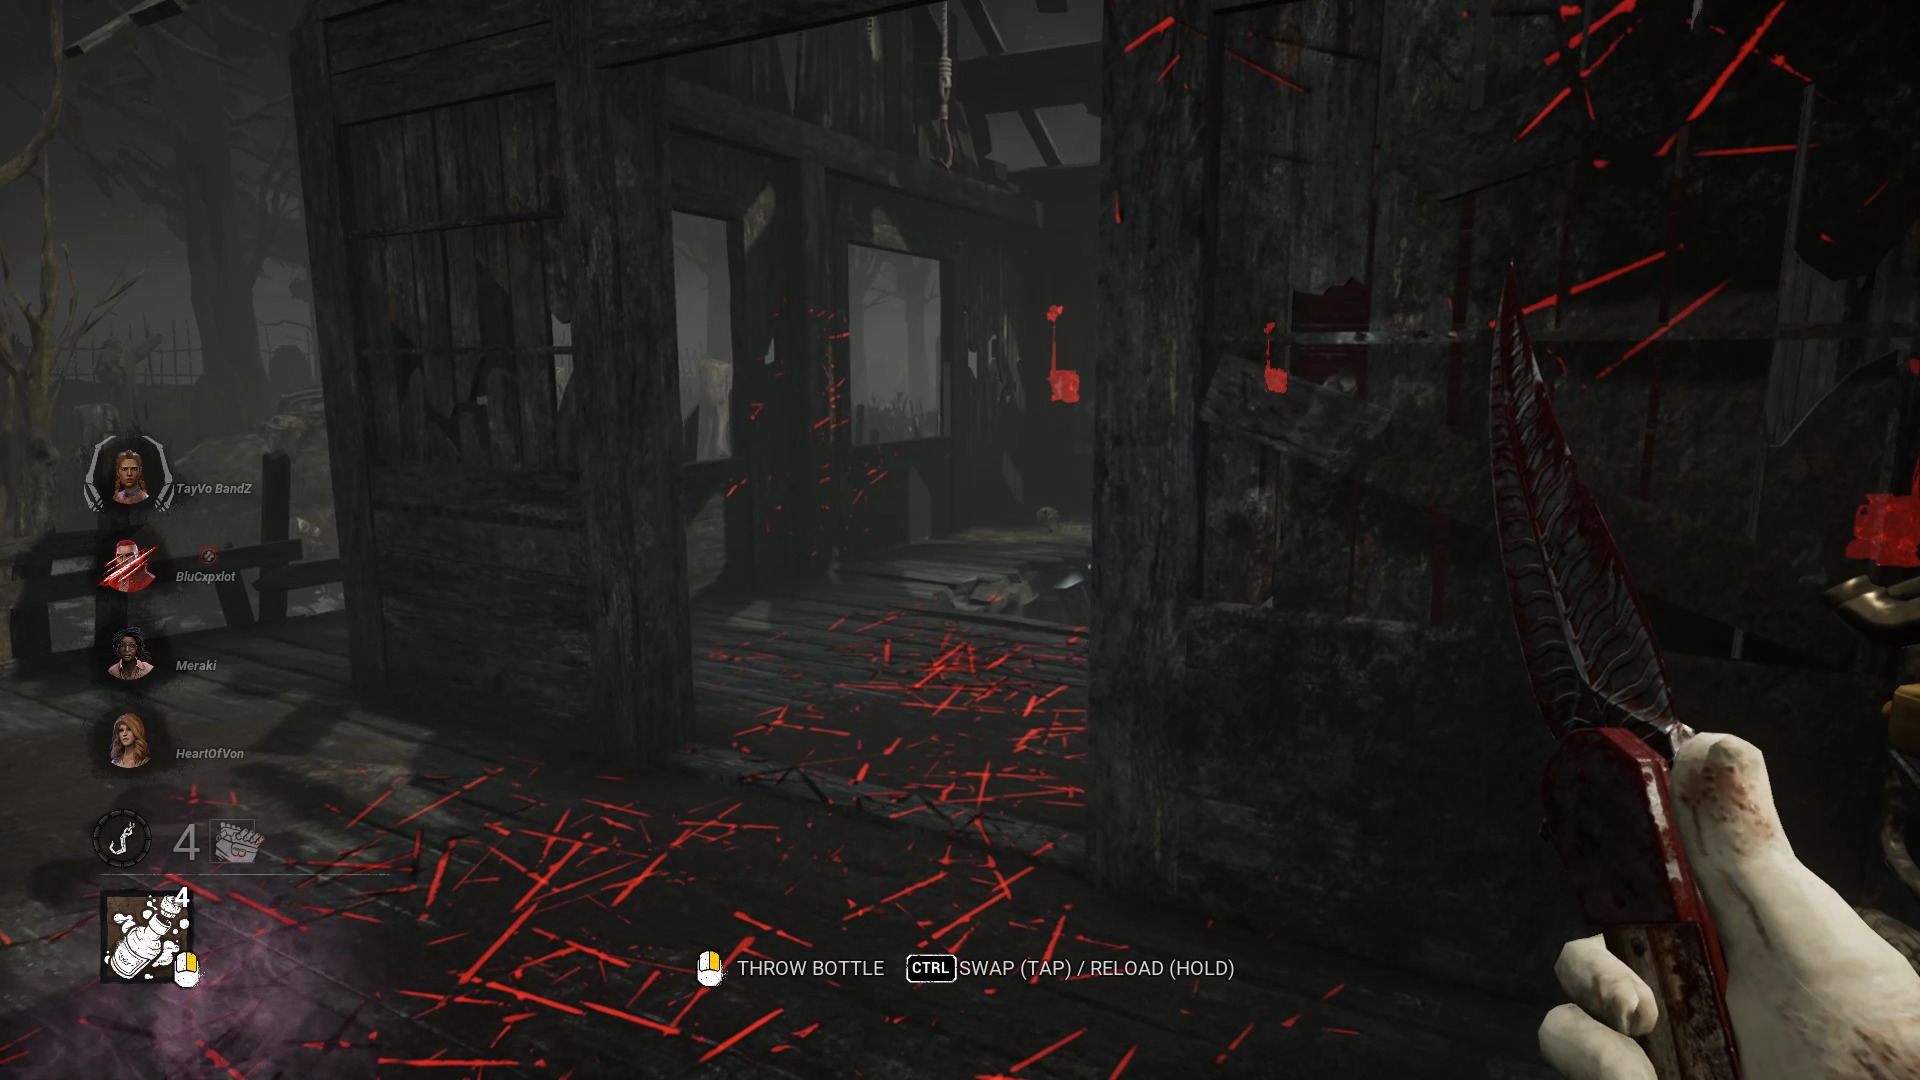
Claudette’s grunts of pain are so loud you can even hear them over the Clown’s bottles
Crows make noise when they are disturbed, so listening for their caws can help you track Survivors even if you don’t see the crows take off. There are also a few maps in the Backwater Swamp where a huge murder of crows hangs out on the main building or boat — when these crows are disturbed, it can be heard from across the map.
Generators get louder as they get closer to being fully repaired, and there are additional mechanical noises that Survivors make when fixing generators. Listening for these can help you determine if a generator on the other side of a wall or above/below you is being worked on. It can also help you determine the repair progress of the generator you can’t see.
Doubling Back
A tactic that can frequently catch Survivors off guard is doubling back to a generator you just checked. After failing to find a Survivor, act like you’re heading off to the next generator, then turn around and sneak around the side of the map to approach the generator from a weird angle. By doing this, you can frequently catch Survivors as they leave their hiding spot to return to the gen they were working on. You’ll need to head a fair distance away, at least far enough for your Terror Radius to get quieter, to get hiding-prone Survivors to leave their hiding spots and return to their generators.
Note that this works better on stealth Killers, though it can be an effective strategy on any Killer if done properly.
Creatures of Habit
Survivors are people just like you, and just like you, they probably have habits and styles that you’ll be able to identify after just a few encounters. Some Survivors love to hide in lockers, others like to hide close to their gen, while others will run away as soon as they hear the terror radius heartbeat. By paying attention to how Survivors behave, you can better predict their next move.
In that same vein,try not to be predictable yourself. We’ve already discussed mixing up the way you approach generators, but you can also vary how hard to search areas around generators, and how often you double back to gens.
We hope this guide was helpful! You should now know several tactics and strategies to help you find Survivors. If you have questions, comments, or just want to complain about Survivors who click their flashlights, let us know in the comments section below.
Share this article:
DanielD
Unabashed FromSoftware fanboy still learning to take his time with games (and everything else, really). The time he doesn't spend on games is spent on music, books, or occasionally going outside.


