Most of Dead by Daylight’s mechanics are fairly straightforward, but one aspect of the game that is not easy to understand is the Obsession mechanic.
In this guide, we’ll take a look at how a Survivor can become the Obsession, what it means, and everything else you might want to know about this sometimes confusing aspect of DBD. We’ll also review all of the Obsession Perks.
What is the Obsession?
The Obsession in a chase
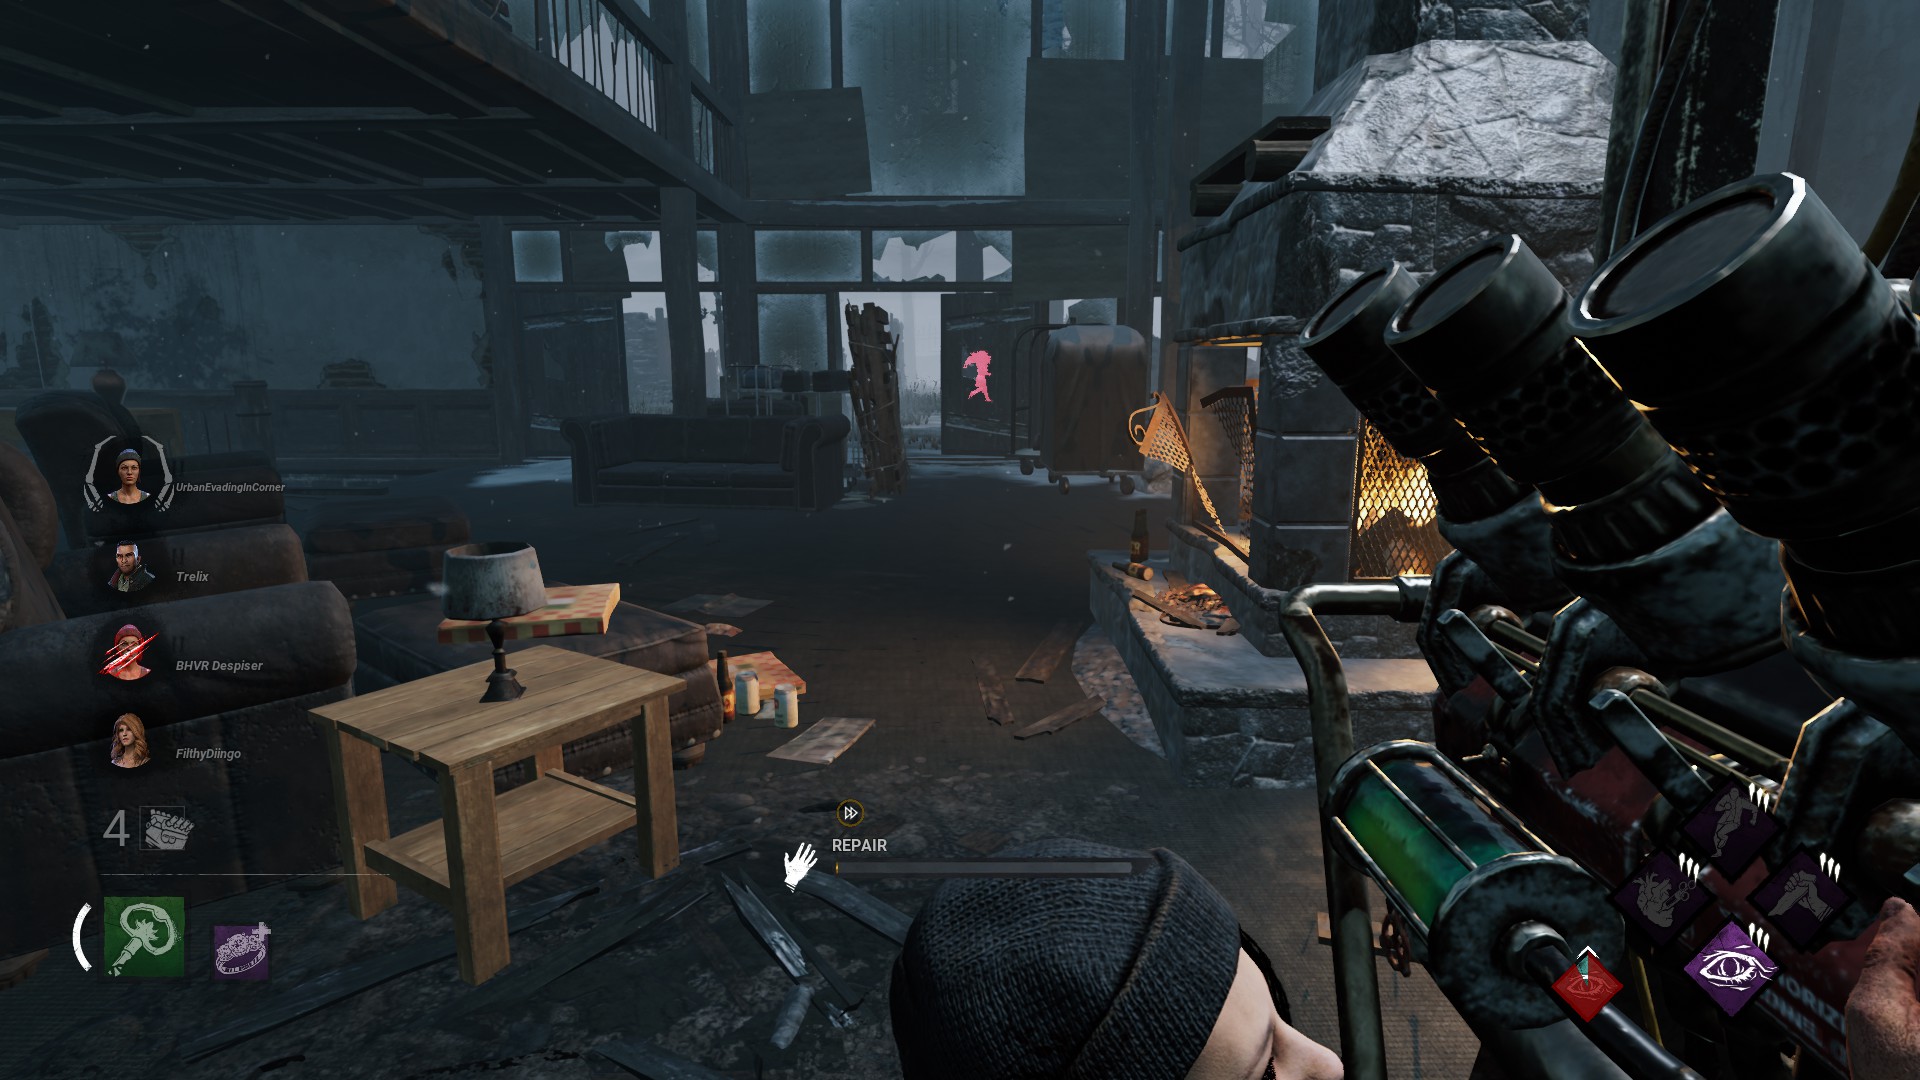
The Obsession is the Survivor that the Killer is currently “Obsessed” with. This player is clearly marked with the Obsession claws on either side of their character portrait. Only one player can be the Obsession at a time, but which player is the Obsession can change multiple times over the course of the game.
When the Obsession is in a chase, you’ll see the claws on either side of their portrait moving, which is useful information to have as a Survivor (it lets you know the Killer is otherwise occupied, and allows you to run around or do gens with less fear of being chased yourself).
Being the Obsession can be a good or a bad thing as a Survivor, depending on the Perks that you and/or the Killer are running. It’s also possible for there to be no Obsession when the game starts, which lets you know that no players are running Obsession Perks.
How to Become the Obsession
The primary way a Survivor becomes the Obsessions is due to a Perk they are running, or a Perk the Killer is running. Some Survivor Perks can increase the odds of you becoming the Obsession, or can cause you to become the Obsessions during the trial. There is also one add-on to the Key item that reduces your chances of becoming the Obsesion.
Anything that increases your chances of becoming the Obsession increases it by 100%, while anything that reduces the odds does so by-100%. However, the odds are relative to other Survivors’ odds, so having 100% odds does not guarantee that you will become the Obsession (since multiple players could be running a perk that increases their chances of becoming the Obsession). Stacking chance increasing/reducing Perks and Items will increase/decrease your chance of becoming the Obsession.
Obsession Perks
Both the Killer and the Survivor can run Perks that cause there to be an Obsession in the game. These Perks always interact with the Obsession in some way. All Obsession-related Perks are teachables.
Survivor Perks
Blood Pact [Cheryl Mason Shared Perk] – When you or the Obsession are injured, you both see each other’s auras. After healing or being healed by the Obsession, you both move 5/6/7% faster until you are no longe riwthin 16 meters of each other. If you are the Obsession, Blood Pact deactivates. Reduces your chances of being the Obsession.
This Perk is playable, but not very strong. The movement speed increase is decent, but not enough to outrun the Killer, and so the real benefit of this is being able to heal one another. Really, it’s better to just bring a Medkit and a different Perk.
Decisive Strike [Laurie Strode Shared Perk]– After being unhooked or unhooking yourself, Decisive Strike (DS) activates for the next 40/50/60 seconds. If you’re picked up or grabbed by the Killer while DS is active, you’ll get a Skill Check — hit it to escape the Killer’s grasp, stunning them for 3 seconds. If you repair a gen, heal someone or yourself, cleanse a totem, sabotage a hook, or unhook someone, DS wil deactivate. Deactives once the Exit Gates are powered. Increases your chances of being the Obsession.
This Perk is great if you’re afraid of being tunneled, but otherwise there are much stronger Perks to take. It is stronger when combined with Unbreakable — DS will prevent the Killer from picking you up if you’re downed right after being unhooked, while Unbreakable will let you get up if the Killer slugs you to counter your DS.
Decisive Strike from the Killer’s POV
For the People [Zarina Kassir Shared Perk] – You can press the Active Ability button while healing another Survivor without a Medkit to instantly heal them for 1 health state. You then become the Obsession, and gain the Broken status effect (injured and unable to heal) for 80/70/60 seconds. Only active while you’re at full health. Reduces your chances of being the Obsession.
You’re basically trading a health state with this one, so the time you save is arguably wasted. You could try to combine this with a perk like Resilience (for increased action speeds while injured) and Iron Will (so you can better hide while injured), but why bother? Other Perks (or a medkit) still let you heal plenty quick, and don’t leave you injured for a minute and a half.
Mettle of Man [Ash Williams Shared Perk] – After taking three Protection Hits, Mettle of Man activates and you gain the Endurance status effect (unable to be put in the dying state from the Injured state). The next time you are healed, if you are further than 12/140/16 meters away from the Killer, your aura is revealed to them. Increases the chances of being the Obsession.
This one requires aggressively altruistic play, but can be very rewarding if used effectively. Protection hits are most easily acquired by body-blocking the Killer when they are carrying a Survivor. You can even combine this with Flip-Flop (one of Ash’s other Perks) and Breakout potentially take two Protection Hits, going down but saving your teammate in the process. Once you get all 3 Protection Hits and this Perk activates, you’ll be able to surprise the Killer by taking an extra hit, extending the chase and buying your teammates even more time.
Object of Obsession [Laurie Strode Shared Perk] – If you’re the Obsession, your aura is revealed to the Killer for 3 seconds every 30 seconds. Whenever your aura is revealed to the Killer, their aura is also revealed to you. While the Killer can see you, your repairing, healing, and cleansing actions are increased by 2/4/6%. Increases your chances of being the obsession.
This Perk basically guaranteed that the Killer is going to find you, and probably come chase you. Take it only if you’re ready to loop. It is much safer when combined with Sole Survivor (see below), since it will make it harder for the Killer to read your aura. That being said, it gives you great information until they do chase you, and you can always use lockers if you need to hide. You can also put a generator between you and the Killer and hide that way as well. Another benefit of Object of Obsession (OOO) is that you can tell if the Killer is reading your aura (since it will reveal theirs at the same time), letting you know if they have Barbeque & Chili or some other aura reading Perk.
While it makes you a target (and makes you easier to find), Object of Obsession gives incredibly useful info as well
Sole Survivor [Laurie Strode Shared Perk]– Each time a Survivor other than you is killed or sacrificed, Sole Survivor gains one token, up to a maximum of 3. Each token provides a stacking 20/22/24 meter radius (up to 60/66/72) meter in which the Killer cannot read your Aura. If you’re the last Survivor, your Repair speed of Generators increases by +75%, and Hatch and Exit Gate opening speeds are increased by +50%%.
This Perk used to be used with Object of Obsession, but recent changes have made it less appealing. The amount of games in which you’ll want to prevent the Killer from reading your aura after multiple fellow Survivors have been killed is very small. That said, it will let you escape some games you otherwise wouldn’t thanks to the hatch and exit gate speed increase.
Add-ons
Unique Wedding Ring[Key]– Reveals the Obsession’s aura at all times. Reduces your chances of being the Obsession by 100%.
This isn’t too bad if you’re already taking a Key, but there are generally more interesting and useful items to bring to the trial with you (than a Key).
Judith’s Journal [Evil Within Add-on]– Increases your Stalk rate on the Obsession by +40%.
A generally-accepted strong Add-on for The Shape, this lets you build up your Stalk meter significantly faster when Stalking the Obsession.
Killer Perks
Dark Devotion [The Plague Shared Perk] – You become Obsessed with one Survivor. Whenever the Obsession loses a health state, Dark Devotion activates, causing them to emit your Terror Radius (32 meters) for the next 20/25/30 seconds. While the Obsession has your Terror Radius, you gain the Undectable status effect (you emit no Terror Radius and no Red Stain, and your aura cannot be read).
This Perk is not particularly strong, but can be a lot of fun. In short, injuring the Obsession will transfer your Terror Radius to them for 30 seconds. It’s not a ton of time, but you can really surprise Survivors while it’s active.
Dead Man’s Switch [The Deathslinger Shared Perk] – You become Obsessed with one Survivor. After hooking the Obsession, Dead Man’s Switch activates for the next 35/40/45 seconds. While it’s active, if a Survivor stops repairing a generator before it’s finished, that generator will be blocked while Dead Man’s Switch is active. Affected generators are highlighted by a white aura.
This Perk is useful in one very specific instance: if you hook the Obsession, then go chase two other Survivors off of a generator, one of them can’t sneak back and finish the gen. In other words, this Perk is bad — don’t use it.
If you like stacks, Dying Light can be satisfying to run, if not strong
Dying Light [The Shape Shared Perk] – You become Obsessed with one Survivor. Each time you hook a Survivor other than your Obsession, Dying Light gains one token. As long as the Obsession is alive, all other Survivors’s Reparing, healing, and sabotaging actions are slowed by 2/2.5/3% (up to 22/27.5/33%). The Obsession instead gains a 33% speed bonus to Unhoking and Healing actions.
This Perk is very similar to Thanatophobia in that it gives a stacking slowdown to Survivor actions. Thanatophobia gives 5% per injured Survivor — after hooking each non-Obsession Survivor once, Dying Light will slow Survivors by 9%, just under what you get if two Survivors are injured or hooked. The Perks are fairly comparable, and could even be combined. However, this tends to be a “win-more” perk; if you are getting hooks quickly enough for this to be useful, you’re probably going to win anyway.
Furtive Chase [The Ghost Face Shared Perk] – You become Obsessed with one Survivor. Each time you hook the Obsession, you benefit from the following effects for 14/16/18 seconds: Gain the Undetectable status effect, gain +5% Haste. Whenever the Obsession is rescued from the hook, their rescuer becomes the new Obsession.
Better since the rework, but still not very good except for in very specific, kinda memey builds. Haste out of chase is meh, and Undetectable for 18 seconds isn’t very good since you reveal your location when hooking a Survivor.
Friends ’til the End [The Good Guy Shared Perk] – When you hook any Survivor that is not the Obsession, the Obsesion’s Aura is revealed for 6/8/10 seconds, and they suffer from the Exposed status effect for 20 seconds. When you hook the Obsession, a random Survivor will scream and reveal their location, and then they’ll become the new Obsession.
This is a very strong perk— information perks are always welcome as a Killer, and while 20 seconds of Exposed isn’t that long, for Killers like Nurse and Dredge, it can be long enough to reach the Obsession and down them.
Game Afoot [The Skull Merchant Shared Perk] – When you hit the Survivor with the highest cumulative Chase time with a Basic Attack, they become the Obsession. While chasing the Obsession, you gain a 5% Haste status effect for 8/9/10 seconds after damaging a Generator, breaking a Wall, or breaking a Pallet.
This is a good perkon most Killers, especially Killers that have an easy time breaking Pallets in a chase (like Nemesis, Demo, etc). The speed boost can really catch Survivors off guard, especially the first time you do it to them during a chase.
Grim Embrace [The Artist Shared Perk] – Each time a Survivor is hooked for the first time, Grim Embrace gains 1 token and activates once you are at least 16 meters away from the hook — at 1-3 Tokens: Blocks all Generators for 8/10/12 seconds. At 4 Tokens: Blocks all generators for 40 seconds and reveals the Aura of the Obsession for 6 seconds.
This is a great slowdown perk, as the Gen blocking effect can be just what you need to go to the gen(s) with progress and scare Survivors off of them. If you do manage to get 4 tokens, the Perk becomes incredibly powerful.
Nemesis [The Oni Shared Perk] – Each time a Survivor blinds or stuns you, they become the Obsession. That Survivor suffers from the Oblivious status effect (unable to hear your Terror Radius) for 40/50/60 seconds and their aura is revealed to you for 4 seconds.
This Perk is fantastic if getting flashlight blinded or pallet stunned makes you really upset, because it’s designed to help you catch whoever did you wrong. Stuns/blinds last 2 seconds by default, so you’ll get 2 seconds where you can see the Survivor’s aura, and they won’t hear your Terror Radius for a whole minute. These two factors make it easier than usual to catch them, especially if you get tricky and pretend to leave, then double back and find them. You can take Enduring to make it even stronger to intentionally eat pallets, and Nemisis also combines very well with the following perk on this list, Play with Your Food.
Play with Your Food [The Shape Shared Perk] – You become Obsessed with one Survivor. Each time you let your Obsession escape a chase, PwYF gains a token, up to a maximum of 3. Each token applies a stacking 3/4/5% movement speed bonus (maximum 9/12/15%). Damaging a Survivor with a basic or special attack consumes 1 token. 10 second cooldown on gaining tokens.
Any Killer with a one-hit down ability can make excellent use of Play with Your Food, because it lets you build up an incredible speed boost, making it impossible for Survivors to escape your deadly attack. All you have to do is find the Obsession and let them get away a few you times — you can even chase them, look away (while still following them) until you get a token, then chase them again. When combined with Nemesis, it will grant you a token every time someone stuns/blinds you: Nemesis will make the person who stuns you the Obsession, and since you’re stunned, you lose the chase (with your new Obsession), granting you a PwYF token. Combine with Enduring and eat pallets for breakfast.
At max stacks, PwYF makes you pretty darn fast
Rancor [The Spirit Shared Perk] – You become Obsessed with one Survivor. Each time a generator is completed, your aura is revealed to the Obsession for 5/4/3 seconds, and all survivor’s auras are revealed to you for 3 seconds. Once the Exit Gates are powered, the Obsession suffers from the Exposed status effect (downable in one basic attack), and you can kill the Obsession by your own hand (kill them without hooking them).
This is similar to Bitter Murmer (it provides better info but for less time) until the last gen is powered, when it also becomes a discount Hex: No One Escapes Death. It makes getting at least one kill much easier, and the vision you get when a generator is completed is fairly useful as well. Since you can only see the Survivors for 3 seconds, high mobility Killers will find this more useful.
Remember Me [The Nightmare Shared Perk] – You become Obsessed with one Survivor. Each time you hit your Obsession with a basic atack, Remember Me gains a token. The time it takes to open the Exit Gates is increased by 6 seconds per token, up to a maximum of 12/18/24 additional seconds. The Obsession is unaffected by this penalty.
If you’re running a completely end-game focused build, this can be good. Otherwise, there are much better options to help you win the game before it ever gets to the Exit Gates.
Save the Best for Last [The Shape Shared Perk] – You become Obsessed with one Survivor. Each time you hit a survivor other than the Obsession with a basic attack, StBfL gains 1 token, to a maximum of 6/7/8 tokens. Sucessful basic attack cooldown is reduced by 4% per token, to a maximum of 24/28/32. Each time you hit the Obsesion with a basitc attack, StBfL loses 2 tokens. If the Obsession is killed, you can neither gain nor lose tokens.
This is one of those perks that you can take almost anytime, with any Killer that likes to use basic attacks. At max stacks, it nearly halves the time your Killer spends staring at/wiping off/twirling their weapon after a successful hit, which makes continuing the chase and potentially downing the Survivor much easier. Naturally, you’ll want to avoid attacking the Obsession as much as possible with this perk.
Even a few StBfL stacks let you catch Survivors much more quickly (it also helps when they run into the wall, of course)
Hopefully, you now have a clear understanding of how the Obsession mechanic works in Dead by Daylight! To share questions, comments, or obsessions, use the comment box below.
Share this article:
DanielD
Unabashed FromSoftware fanboy still learning to take his time with games (and everything else, really). The time he doesn't spend on games is spent on music, books, or occasionally going outside.
If they use obsession perks like “save the best for last” and hit the obsession they would lose their stacks. So its better to go for others and get the obsession endgame.


But why do killers not go for the obsession sometimes? I don’t get it.
If they use obsession perks like “save the best for last” and hit the obsession they would lose their stacks. So its better to go for others and get the obsession endgame.