Throughout your adventures in Skyrim you are sure to come across some strange and mysterious beings. Some of these will lead to fascinating quests in the name of Daedric Lords in which you will be rewarded nicely with Daedric Artifacts. Many of these artifacts including Mehrune’s Razor, Hircine’s Ring and more are very powerful and extremely useful items. They’re worth the hassle some of these quests put you through.
Quest: The Black Star
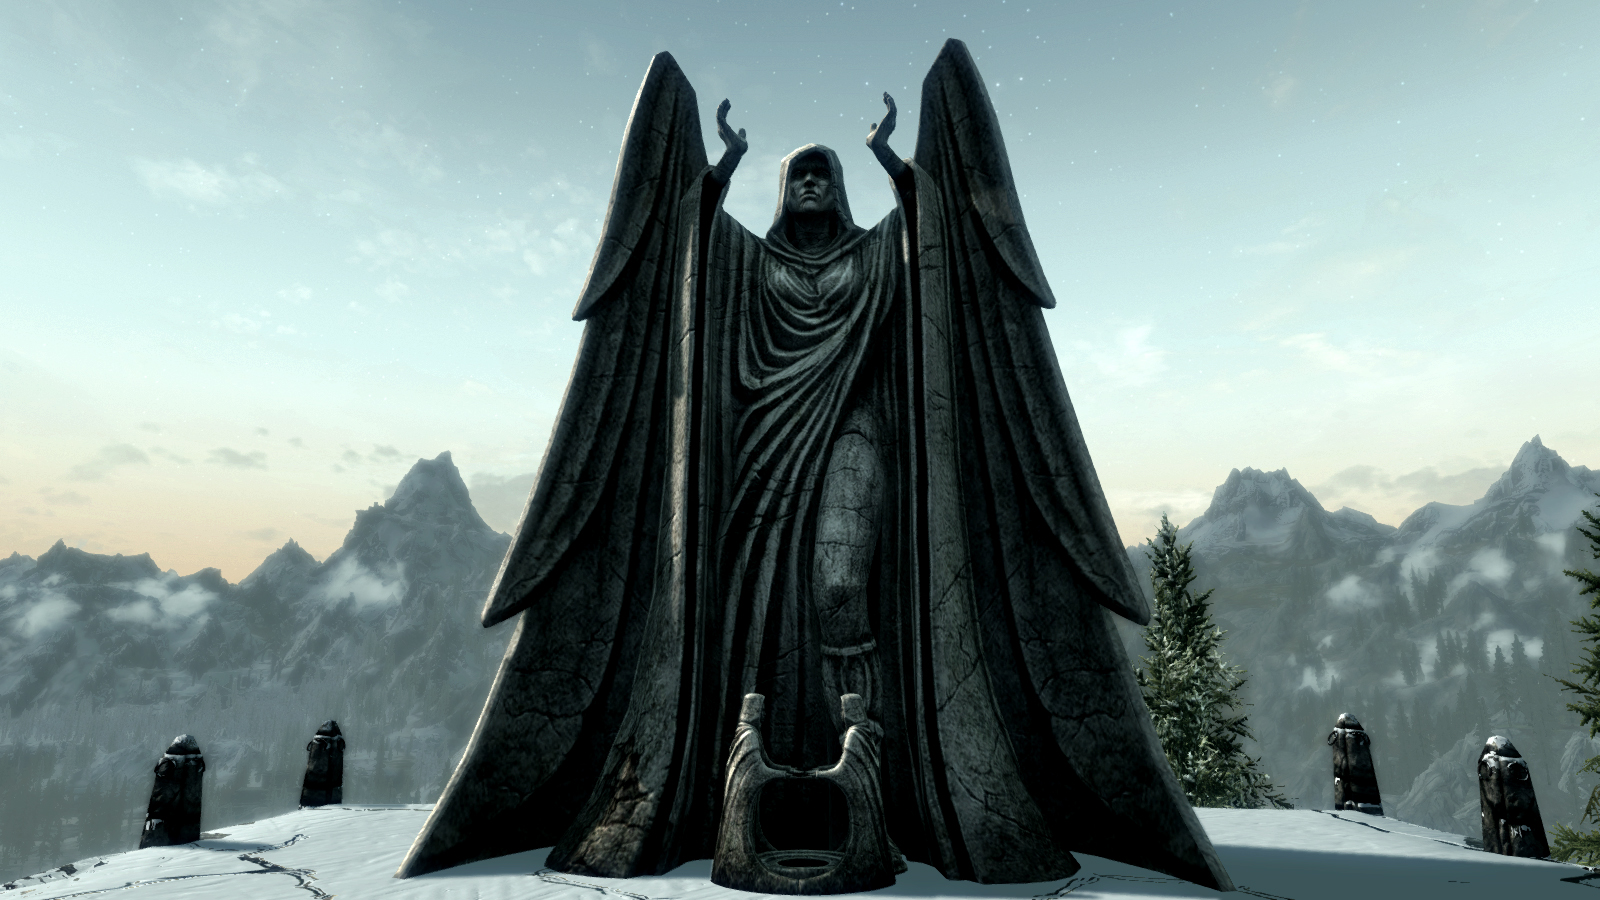
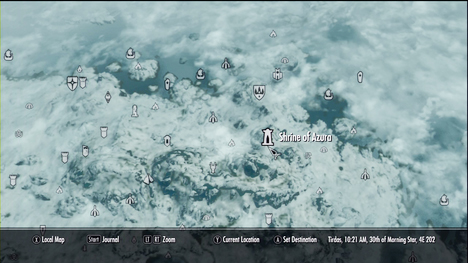
To begin this quest you’ll need to first speak to a barkeep, finding a barkeep in a major city like Solitude or Whiterun would be your best bet. After you find a barkeep ask them about rumors they have heard, keep asking until they mention something about the Shrine of Azura. They’ll most likely mention the Dunmer built this Shrine after fleeing Morrowind; which is an interesting story in and of itself. After they mention the shrine it will appear on your map, marking it will make it easier to find.
After you reach the Shrine you will want to speak with the Dunmer named Aranea. She’ll mention something about your destiny and ask you to assist her. Agree to help her. She mentions a man and a message “turn the brightest star as black as night.” – She’ll tell you to find an enchanter in Winterhold. Once you make it to Winterhold you can ask the townsfolk about the enchanter. They will mention the elven wizard that lives in the Frozen Hearth Inn. Approach the wizard and start a conversation with him; either persuade, bribe or intimidate him to get him to talk about Azura’s Star. He’ll give you a story on Azura’s Star. He will then mention a place called Ilinati’s Deep.
Once you make it into Ilinati’s Deep through the door on top of the sinking turret you’ll notice that it’s filled with skeletons wielding all sorts of weapons. Fight your way to a large spiral staircase and climb it. At the top you’ll notice Malyn Varen’s remains, in this chamber is the Broken Azura’s Star; pick it up. Climb the ladder to escape.
At this point you can either bring the star back to Nelacar or directly to Aranea. Both options lead to you being told that Malyn’s Soul must be removed from Azura’s Star before it can be used. This is when you yourself become soul trapped. Once you’re soul trapped you’re transported to the spiritual world of Azura’s Star. You will need to track down Malyn and defeat him, once you do this you will be transported out of the Star.
If you complete the quest by talking to Azura you’ll receive Azura’s Star and Aranea will become a follower. If you complete it for Nelacar you will receive The Black Star.
To begin this quest you must seek out the old beggar named Dervenin; he is easily recognized by his lack of eyes. Dervenin will give you a story about his master visiting the Blue Palace and having a cup of tea in the forbidden wing. Dervenin will then hand you a Hip Bone which you must hold on to.
Now you need to go to the Blue Palace and enter the Pelagius wing but before you do that you need to get the key. In order to get the key you must first visit the throne room which is upstairs, you can get there by taking either staircase upon entering Blue Palace. Once you’re up there you’ll overhear a story being told about a man named Varnius, this leads to the side quest: The Man Who Cried Wolf. After the story of Varnius is finished approached Una and she’ll give you the key to the Pelagius room. Alternatively you can speak to Falk Firebeard to get the key but he hassles you a bit.
Once you get the key head back downstairs and approach the locked door to the Pelagius Wing. Once you make it into the wing you’ll notice that it seems abandoned, continue to make your way through. You’ll be transported to another realm. Once in this new realm approach Pelagius the Mad as he speaks to Sheogorath. After their conversation Sheogorath dismisses Pelagius and begins to concentrate on you. Approach Sheogorath and give him Dervenin’s message. After your conversation with Sheogorath you must escape Pelagius’ mind. All of you weapons will be replaced by a Wabbajack.
Now you must venture to each part of Pelagius’ mind. Clearing each section of his psyche will allow you to escape. The first section you enter contains Pelagius’ Anger Tower and a man named Confidence. To clear this section you must zap Anger twice with the Wabbajack and then zap Confidence once. Continue to zap Confidence until he becomes man sized. This section is now clear.
In the next section you’ll see Pelagius the Suspicious sitting on his throne with a body guard on each side. Shoot either of the bodyguards and watch them both turn into wolves. This section is complete.
The final of the three sections deals with night terrors. You’ll see Pelagius sleeping in a bed, zap him to unleach his first night terror; a wolf. Zap the wolf and then zap Pelagius again. You’ll then see a Bandit Chief, zap him. This leads to a Hagraven – shoot her. Now zap Pelagius again which conjures a Flame Atronach. After the Atronach blast Pelagius again this leads to the final terror; a dragon priest, whom you will also need to zap.
Sheogorath will then transport you back to the Pelagius wing of the Blue Palace. Quest Complete.
To begin this quest you must visit the cemetery in Falkreath and speak to either Indara Caerelia or Mathies – the parents of the little girl whose funeral you’re interrupting. If you don’t see them at the cemetery chances are they are tending to their crops near their home. Once you speak to either of the parents they will mention that their daughter was murdered by a guy named Sinding. You must then visit the Falkreath Barracks and approach Sinding who happens to be locked up in one of the jail cells.
Sinding explains that he lost control of himself and blames it on the ring he received earlier which belongs to Hircine. Sinding wants to return the ring to Hircine. In order for this to happen Hircine must appear to you; Sinding mentions that you will need to slay they beast that roams the woods around Falkreath. You then must agree to take the ring to Hircine.
The beast in question is usually found near Peak’s Shadow Tower but it’s always on the move. The best way to take down the white stag is by using long-range weapons, either a bow or magic. The Aspect of Hircine will then appear for you, speak to it and you’ll be told Sinding is on the run. Hircine now wants you to hunt down Sinding so that you can retrieve Sinding’s skin as an offering.
You now have to make your way to the Bloated Man’s Grotto, you must enter and find Sinding. Upon entering you’ll notice a group of slain hunters lying in their own blood. A khajiit named J’Kier warns you of Sinding. You’ll then walk past a pond and as you pass you’ll see Sinding standing in front of the large red moon on a rock cliff. At this point you can either kill Sinding or wait and see what he has to say.
If you decide to kill Sinding you’ll be able to take the skin to Hircine whom will transform that skin into the Savior’s Hide, a legendary artifact. If you decide to side with Sinding you will then have to kill the hunters. After you help Sinding he will give you the Ring of Hircine. This ring allows you to transform into werewolf form once daily, you must already be a werewolf in order for the ring to work.
In order to start this quest you must visit Markarth and witness a murder in the market and then exit the city. Upon entering the city again you’ll head north along the streaming canal that runs through the streets until you spot a man named Vigilant Tyranus. Vigilant asks you if you have noticed anyone entering or leaving the dwelling he is standing in front of. Once you reply to his questions he will mention that he is about to go inside, you must offer to help him.
Once inside the house you’ll notice that it doesn’t seem to be abandoned. As you and Vigilant walk through the dwelling it becomes more apparent that someone is living here. This is when it begin to get a little spooky. Vigilant notices something strange is going on so he heads to the basement, this is a bad idea. You begin to hear a voice in your head after attempting to open the seal door. You must then go back upstairs and attempt to exit the house; the door is sealed and the voice is back. The voice tells you that you’re the stronger of the men in the house and he demands you kill the others, Vigilant hears the same voice in his head. Vigilant will shout at the voice telling it to stop.
At this point Vigilant can no longer take it and begins to turn on you; ready your weapon there’s going to be a fight. After you finish Vigilant head back to the basement and walk through the now unlocked door. There is what appears to be an altar downstairs, approach it and try to grab the dagger from it. Once you do this you will be trapped in a cage and the voice will come back. Molag Bal will talk to you, mention the blood and mace to him. He will then tell you about a priest that used to pray at this altar, you must go and find him.
Make you way to the dungeon that is now located on your map and find the priest named Logrolf the Willful. Free Logrolf and either persuade, bribe or intimidate him. He will eventually make his way to the house in Markarth as should you. Once inside Logrolf will make his way to the altar and Molag Bal will trap him there much like he did with you. Molag then asks you to beat Logrolf with the mace until he surrenders his soul. After he surrenders you must finish him with the mace.
After you kill Logrolf Molag will turn the mace into the Mace of Molag Bal.
To begin this quest visit either Kleppr or Frabbi in the Silver-Blood Inn in Markarth. Ask them about rumors in town until the mention that the Hall of the Dead in Markarth has been closed. They then tell you to speak to Brother Verulus about this matter. Brother Verulus is located in the Understone Keep in the western side of Markarth. Approach him and ask about the Hall of the Dead, you can either persuade, intimidate or bribe him. If you succeed using any of these tactics he will agree to let you inside the Hall of the Dead. He mentions that there is a reward if you get the strange happenings to stop in the hall.
Make your way to the Hall of the Dead using the key given to you by Verulus to get in. Walk through the abandoned halls until you find a woman named Eola, she happens to like the taste of rotting human flesh. Speak to Eola until she mentions going to Reachcliff Cave. After leaving the Hall of the Dead go back to Brother Verulus, because you cleaned the Hall of the Dead for him he will give you his amulet; The Amulet of Arkay.
Now make your way to Reachcliff cave where you’ll find Eola waiting for you. You can ask her to come inside with you. After you enter the cave you’ll notice it’s filled with Draugr of all shapes and sizes. After fighting off the first set of Draugr make your way through the tunnel in front of you. You’ll eventually end up in a larger passage with an open cavern and a couple of bridges. Make your way down the cave. Once down you will need to activate a wall handle and then pull a chain, this will lead to an exit. There are now more Dragur to defeat, after which you will need to speak to Eola again. Eola asks you to bring Verulus back to the cave, you can bribe him to come along.
Exit the cave and head towards Markarth in search of Verulus; he will either be in the Hall of the Dead or in Understone Keep. Convince the priest to follow you back to the cave. After entering the cave with Verulus make your way back to the ceremonial hall where you’ll notice a group of cannibals and Eola. Verulus will start to tire eventually falling asleep on the ritual table. Strike Verulus with a weapon to kill him. Consume some of his flesh, if you do this Eola will reward you with her ring; the Ring of Namira. Eola will also become a follower.
Before you start this quest you must be at least level 9. To begin you must find the stronghold called Largashbur which is located in the southwestern corner of the Rift. As you approach the stronghold you’ll notice a group of Orcs taking down a giant. Stand back and watch them fight. After the giant has fallen approach Atub and speak to her until she mentions that her tribe is in trouble. She mentions that the chief Yamarz has been cursed. Atub wants to perform a ritual but lacks certain materials needed; she needs Troll Fat and a Daedra Heart. Troll fat is some what easy to find and if money isn’t an issue you can visit Enthir in the College of Winterhold to obtain a Daedra heart.
After you get both materials return to Atub in the stronghold. Follow Atub through the settlement until you reach Yamarz. After meeting Yamarz Malacath the Deadric Prince begins to speak eventually requesting Shargol’s Warhammer. After speaking to Yamarz again he will mention that you need to come along with him to Fallowstone Cave which is located northeast of Riften. Once you reach the cave follow Yamarz inside. He will lead you through the cave as you assist him in fighting off the giants inside. Continue to follow Yamarz until he stops and tells you he is ready to fight the Giant Leader. He proposes a proposition before charging in; he asks if you would like to take down the giant yourself to make an extra bit of gold. You can either accept or tell him no and that he must do it to lift the curse.
After defeating the giant leader search his body and take Shagrol’s Warhammer. Return to the camp and depending on which option you chose before Yamarz is either dead or waiting at the camp for you. If Yamarz survives the giant attack he will attempt to kill you at the camp, kill him. Malacath will then tell you to place the Warhammer on the shrine. Once you do so you’ve completed the quest, Malacath will then give you Volendrung.
Once you reach level 10 you may begin this quest by entering the town of Falkreath and finding the blacksmith named Lod. Lod seems to be in need of a furry friend as he asks you to help him befriend a dog outside of town. Once you agree to find the dog, for free or for a reward, you must exit Falkreath. Once you locate the dog named Barbas you can either return him to Lod or keep him around as you continue the Daedric Quest.
Speak to Barbas, he’ll speak back. Barbas and his master seem to have gotten into a bit of an arguement, Barbas wants you to help him with this. Barbas asks you to head to Haemar’s Shame as he’ll be waiting there for you. Once you enter the cave you’ll notice a large population of Vampires, take them out. After making your way through the cave and finding the larger section with a central hole head down the hole. Beware of the Frostbite Spider located down here. After killing the spider make your way through the tunnels until you enter the main shrine chamber. Here you’ll find a few more vampires, kill them. After defeating the vampires activate the statue of Clavicus Vile.
Vile will speak to you, tell him you’ve brought Barbas with you. Seemingly Barbas is not welcomed back by Vile and instead Vile asks you to find an axe for him in Rimerock Burrow. Exit the shrine and begin your journey towards Rimerock Burrow. Once you make it to the burrow head inside prepare yourself to take down Sebastian Lart and his conjured friends. You’ll notice the Rueful Axe on the altar, take this axe back to Haemar’s Shame.
Activate Vile’s statue again. Vile then gives you the option to keep the axe if you use it to slay Barbas. If you slay Barbas you get the Masque of Clavicus Vile and the Rueful Axe.
In order to begin this quest you must be at least level 10. To start make your way to Bthardamz, the ancient Dwemer ruins, North of Markarth. Here you’ll encounter an Afflicted, this begins the quest. After killing and looting the Afflicted you must now make your way to Peryite Shrine. At the shrine you’ll see a Khajiit named Kesh the Clean. Speak to Kesh about Peryite eventually asking if you can speak to the Daedric Lord himself. Kesh tells you that he needs incense which you will have to find the ingredients for.
The ingredients go as follows:
Vampire Dust – Located in any Alchemy shop in town.
Deathbell Flower – Located in any Alchemy shop in town.
Silver Ignot – Located in Dragonsreach (Whiterun) and the Treasury House (Markarth).
Flawless Ruby – These are usually sold by merchants in the Hold capital cities.
Once you have all four ingredients return to Kesh. Kesh will take the ingredients and begin to mix them, you must now inhale his concoction. The aspect of Peryite will now begin to speak to you. After asking Peryite about the task he mentions a plague which infected a few Breton villages. He sent a monk named Orchendor to lead the afflicted to Bthardamz but instead Orchendor betrayed Peryite. Peryite wants you to find and kill Orchendor, you should then ask what you would receive in return for doing this task; Peryite mentions a Dwemer shield.
Make your way to Bthardamz and make your way down the stairs, activate the second level which removes the gate from your path. You can now enter Bthardamz Upper District. Head north through the district and either use a picklock on the novice lock or make your way around two areas containing some Afflicted. Go down the hallway past a room and down a slope to the piston chamber. This chamber is filled with Afflicted. Climb the stairs to the platform and activate the lever. The iron spears will unblock your path allowing you to use a stone walkway. Open the gold door and head west ending in a pipe room. Take the hall on the right which leads to a stone archway. Kill the Afflicted and enter the Bthardamz Workshop.
In the workshop search through the bedrooms for a note that has the exact location of Orchendor; it says he is inside the Bthardamz Arcanex. Head back to the Upper District and find the stone steps, make your way to the top. These will lead you to the Bthardamz Lower District. In the Lower district head down the hall past a gate to open a gold door. Head to the large coliseum from there cross the courtyard, go through the open gate and cross two stone platforms. There’s another open gate you must go through and then an arch with a level. Pass this and you’ll notice two staircases – take the staircase to the East which leads to the Bthardamz Study.
Once in the Study make your way south to a gold door. After the door go upstairs and enter through the gate to go back to the Lower District. From here head along the rooftop until you see a hall that goes south, take this to the Bthardamz Arcanex. In the Arcanex you’ll find yourself facing a Dwarven Centurion, be careful as he’s a worthy opponent. After the centurion climb the stairs down the hall, after reaching the top head through the gap in the wall to the North. You have now found Orchendor; he will attack on sight. After killing Orchendor search him for a key which allows you to easily escape Bthardamz. This key allows you to use the Bthardamz Elevator.
Make you way back to the Peryite Shrine and inhale Kesh’s mixture once more. Peryite will reward you with Spellbreak.
You must be level 12 to begin this quest. In order to start you must locate Meridia’s Beacon, it appears randomly throughout the world usually found in large chests. There is no fixed location for Meridia’s Beacon. Once you find this beacon you need to find Meridia’s Staute located on Mount Kikreath west of Solitude. Once you bring the beacon to the statue an aspect of Meridia will appear. She mentions a necromancer has a plan to raise the dead of Skyrim’s Civil War and rage a war on the living. You then enter her shrine in search for Malkoran the necromancer.
After Meridia returns you to Skyrim enter the door below her statue, this leads to Kilkreath Temple. Make your way through the temple until you see a pillar with a beacon of light shining on it; activate it. This release a gem which reflects the light, exit this room through the doorway underneath the dragon monument. Activate the pillar on the central steps. Now head south through a tunnel following the beam of light. Climb the wooden steps and activate the next pillar. Find the door leading to Kilkreath Balcony. On the balcony you must cross the bridge and enter the door at the end. Head up the stairs and enter the caged bridge and the jump to the raised pillar through the previously sealed door to the west.
In this chamber you want to head up the wooden stairs on the east side of the hall. This will lead you to the third pillar. Activate it and open the doors on the south wall. These doors lead to the Kilkreath Catacombs, venture forth! In the catacombs you’ll come across another pillar you need to activate, doing so unlocks the double doors. Go down to the main altar chamber to find Malkoran. Kill him and his friends. After defeating them approach the pedestal that contains the Dawnbreaker and take the sword. Meridia rewards you with Elemental Fury and Dawnbreaker.
You be be level 14 or higher to start A Night to Remember. To begin visit any of the larger taverns in Skyrim, eventually you should spot a man in a robe named Sam Guevenne. Sam will challenge you to a drinking game, drink 3 drinks. After winning the drinking game your character will black out and eventually wake up in the Temple of Dibella to a priestess named Senna. She’ll complain about the mess you made last night in which you must clean up. After picking up all of the items on the floor (Note: do not steal any items), you’ll notice you picked up a note with a list of items to repair a staff. Two of the three items on the list are also on the temple floor, pick them up.
After Senna is satisfied with your cleaning she will mention the town of Rorikstead, head there. Once in this small town you’ll need to approach a man named Ennis tending a field. Ennis is angry at you and rightfully so, you stole his prize winning goat and sold it to a giant, now you must get it back. The goat isn’t too far away but he’s being herded by his new giant friend, approach the goat, talk to it and RUN! The giant will not be happy with this and will attempt to attack you. After running away with the goat and returning to Ennis he will be pleased with you. Ennis now mentions “Ysolda” and “Whiterun”. You might remember her as the girl you had retrieved a Mammoth tusk for.
Once in Whiterun find Ysolda, she often wanders throughout the town. Ysolda mentions the wedding ring you took from her, you can either buy it there for 2000 gold or find it back seeing as you’re not getting married anymore. If you purchase the ring you are now directed to go to Morvunskar. Morvenskar is a stronghold filled with mages ready to shoot every and any type of magic at you. Once you make it inside Morvunskar head down the winding tunnels until you reach a large chamber. You’ll see a couple more weaker mages here as well as their apparent leader. Try to take out the weaker ones first without the leader noticing. Once you finish off these mages a portal will open, enter it. This portal leads to Misty Grove, it’s somewhat mystical here. Follow the lighted path in Misty Grove until you see a group of people sitting at a large table and of course Sam standing off to the side.
Sam tells you that you’ve earned the staff after all of your hard work. You bring him everything needed to repair it but that doesn’t matter Sam fixed it already. Sam then transforms into his true self – Sanguine the Daedric Lord of Revelry. After some conversation he will then hand you the Sanguine Rose, this allows you to summon a Dremora to fight by your side for 60 seconds.
Note: If you decided to find the ring instead of paying Ysolda you must venture to a small cottage south of Windhelm in the Eastmarch. Here is where you Fiancee lives with her friend Esmerelda. Ask your fiance, the Hagraven named Moira, for the ring. She’ll refuse. Kill her. After you get the ring head back to Ysolda and she’ll tell you to visit Morvunskar.
Begin this quest by entering the town of Dawnstar and searching for the person named Erandur. Erandur tells you about the nightmares and that the Daedric Lord Vaermina is responsible for them. Vaermina is stealing memories which leaves behind nightmares. You can now agree to go to the Nightcaller Temple.
Upon arriving at the temple Erandur will mention the history of the place and the Miasma, which was used by the temple priests to fiend against and Orc attack. Erandur fears that the Orcs will awaken once the temple is opened up again. Enter the temple with him. Once inside Erandur will lead the way, eventually casting a spell on a statue. Follow Erandur through the newly transparent wall. As you follow him you come upon a strange artifact, the Skull of Corruption. This artifact is causing the nightmares and happens to be protected by magic. The Orcs have awoken, fight them off.
After your little battle continue to follow Erandur. You’ll have to fight a couple more enemies shortly after. At this point you must ask Erandur what he’s looking for, he’ll mention a book called The Dreamstride. This book is found on the eastern side of the top floor located on a pedestal. Take the book and bring it back to Erandur. Erandur then leads you to the temple’s alchemy lab in search for Vaermina’s Topor. You can find the Topor by searching the three wooden shelves near the exit while Erandur heads upstairs. Return to Erandur, he’ll tell you to drink the potion.
Once you drink the potion you’ll be placed in a dreamstride of when the Orcs laid siege to this place. Once inside the dream Veren will tell you to release the Miasma, rush to it! After release the Miasma you will be snapped back to reality along side Erandur.Erandur will now lead you back to the place in your dream. Erandur eventually leads you to the two Brothers you saw in the dream. After a little conversation you’ll need to kill these two priests. Now you must approach Erandur, he will begin the ritual given to him by Lady Mara.
After the barrier around the Skull drops Vaermina will try to convince you to kill Erandur before he finished his ritual. If you kill Erandur you can take the Skull of Corruption for yourself. If you let Erandur finish his ritual he’ll become a powerful follower and assist you in your travels as you wish.
You must be at least level 15 to begin this quest. You must find Septimus Signus’s Outpost located in the Sea of Ghosts. His outpost is near a lonely rowboat and its entrance is carved into a fairly large iceberg. Enter and climb down the ladder, you’ll notice a mage studying a Dwemer artifact. Septimus tells you about Blackreach, a massive Dwemer city he wants you to explore. Ask him how to get there and he’ll had you two items which will help you find the place. Now you’re off to Alftand the Dwemer ruins southwest of Winterhold. Head to the Cathedral in Alftand and use the Attunement Sphere to open a gateway to Blackreach.
Once in Blackreach follow the stone path until you reach an elevator, use it to each the Tower of Mzark. In this tower you’ll notice an Oculory. Approach the top of the Oculory and activate the Lexicon Receptacle. Approach the pedestal controls at the top of the device. First press the pedestal to the right of the center pedestal with the chart on it until the pedestal to the left starts to glow blue. Now press the pedestal button on the one directly to the left of the center pedestal with the chart two times until the button on the far left begins to glow. Now press the newly glowing button, now something will drop from the ceiling, it’s an Elder Scroll. You must also take back the Lexicon so you can bring it back to Septimus.
Septimus now wants you to find the blood of the races related to the Dwemer. These races are High Elves, Dark Elves, Wood Elves, Falmer and Orcs. You must kill one of each. After gathering the blood you must return to Septimus once more. He’ll take the blood and open the giant Dwemer Lockbox. He races to the book inside until he turns into a pile of ashes. The book is now waiting for you, take it. You have a few options here. You can choose not to read the book and learn nothing or you can:
Read the Book of Might – +5 in Smithing, Heavy Armor, Block, Two-Handed, One-Handed and Archery.
Read the Book of Shadow – +5 in Light Armor, Sneak, Lockpicking, Pickpocket, Speech and Alchemy.
Read the Book of Magic – +5 in Illusion, Conjuration, Destruction, Restoration, Alternation, Enchanting .
The Daedra Prince will now want you to work with him, you can’t avoid it.
You must be level 20 to begin this quest. To start visit any city or village within Skyrim. As you enter the city a courier will tell you he has been looking for you and has a message, something about a new museum in Dawnstar. He tells you that the owner is giving out invitations and that you can meet him at his house in Dawnstar. Once you enter Dawnstar look for a man named Silus Versuius, he’ll tell you about his new museum; the Museum of the Mythic Dawn. Talk about the museum until he mentions a task for you.
Silus will give you a bit of a tour giving you commentary as you look at the cases. After the tour you can ask Silus about the task he has in mind for you. He mentions that a group came across Mehrune’s Razor, an artifact from the Daedra himself. The razor has been split into three pieces and Silus wants you to find them. Silus then hands you a note on each of the owners of these pieces.
Your first stop is Hag Rock Redoubt. Make your way past the Forsworn camp and into Dead Rock Crone. Climb the steps until you reach the top of Dead Rock Crone, head up stairs until you see a spiral stair case. Take the spiral staircase to the main floor. You’ll see an exit that happens to be block, make your way to the large chamber and fight your way to the lever. Pull the level and unblock the wooden exit door. This will take you to the top of Dead Rock Crone where you’ll meet Hagraven Drascua. After you kill her she’ll drop a Dead Crone Rock Key and the pommel. There is also a word wall here that contains Dismaying Shout.
Now you must make your way to Cracked Tusk Keep. This place is filled with Orcs so watch out. Once inside the fortification and after you take down the remaining orcs you have two options, take the unlocked door the the Southwest or the locked (adept) door to the west. Walk around the keep killing off Orcs until you spot Ghunzul, you’ll notice him by his large Two-Handed sword. Kill Ghunzul and take the Cracked Tusk Vault Key.
Now you must make your way down to the lower level of the stronghold. Make your way past the spikes by using the vault key or picking the lock. Now you can open the door to the Cracked Tusk Vaults. Pull the levers to release the spikes that block your path down here. You’ll see a small pillar with the shards from the razor on it, take them and make your way back to Skyrim.
You now have two of the three pieces needed to construct the razor, you’re now in search for the hilt. You must travel to Morthal and speak to a man named Jorgen. You can either persuade, bribe, intimidate (brawl) or pick the locks of his home. If you chose not to pick the locks he will eventually give you the keys to his house and the chest the hilt is located in. You now have the hilt.
Return to Silus with all three fragments. He mentions that he has the fourth and final piece to the dagger and wishes to go to the Shrine of Mehrunes Dagon. Once you make it to the shrine you must ask Mehrunes to make the razor whole again. As you approach the altar you’ll hear Mehrunes speaking to you. He wants you to kil Silus. If you kill Silus Mehrunes will require you to take on one more challenge. You must defeat two Dremora that come out of his shrine. After you defeat the two Dremora you are rewarded with Mehrune’s Razor.
If you allow Silus to live you receive a reward in the form of Gold Pieces from Silus.
Before you begin this quest you must be at least level 20, you also need to complete the quest Dragon Rising which is part of the main quest. Make your way to Whiterun and enter the Bannered Mare, speak to the inn keeper about the Jarl’s children. You are told Nelkir, the jarl’s son has become violent. You must find Nelkir in Dragonreach and speak to him. Nelkir mentions that the Lady of Whispers in the basement has been speaking to him. Head down to the basement and find the locked door in which the Lady of Whispers is speaking through. She wants you to unlock the door, make your way back to Nelkir.
Nelkir will then tell you that you must speak to either Balgruuf or Farengar Secret-Fire. At this point you can either pickpocket either of these two men or kill Farengar for this key. After you get the key head back down to the locked door. You will notice an Ebony blade sitting on the table and a book warning you not to take it. The blade is fairly weak to begin with but after you begin killing your friends with it becomes much more powerful as it absorbs their souls.
You must be level 30 or higher to start this quest. This quest is started by finding a book called Boethiah’s Proving, which is located randomly in the world. You will be directed to the Sacellum of Boethiah. Make your way up the mountain speaking to a Priestess of Boethiah, you will have a short conversation with her. You must find someone and convince them to follow you up to the shrine. Make them touch the the Pillar of Sacrifice and then kill them with a ceremonial dagger. We recommend you dupe a follower you don’t like all that much so it’s easier to sacrifice them.
Boethiah will take over the victims body and mentions a new task. She says the task will go to the one who exceeds the rest. It’s time to slay the other worshipers of Boethiah. After you slay them Beothiah will the posses another body, she mentions yet another task. She wants you to kill everyone at Knifepoint Ridge, she wants you to do this in a stealthy manner.
Once you approach Knifepoint Ridge slay everyone there and then clear out the mine located there. Make your way through the mine as stealthy as possible until you reach the Champion of Boethiah. Slay him anyway you can. After he dies loot his body of the Ebony armor and equip it to finish the quest.
Share this article:
Phill
Phill is a long time Elder Scrolls enthusiast who decided to create a community of his own. He is the founder of both The Skyrim Guild and The Shadowed Mare -- two of the earliest Skyrim and Elder Scrolls Online websites.
I got the rose staff way easier than that….on level 8 I don’t even know the name of all the town’s and haven’t discovered a third of the map but I got that artifact


I got the rose staff way easier than that….on level 8 I don’t even know the name of all the town’s and haven’t discovered a third of the map but I got that artifact