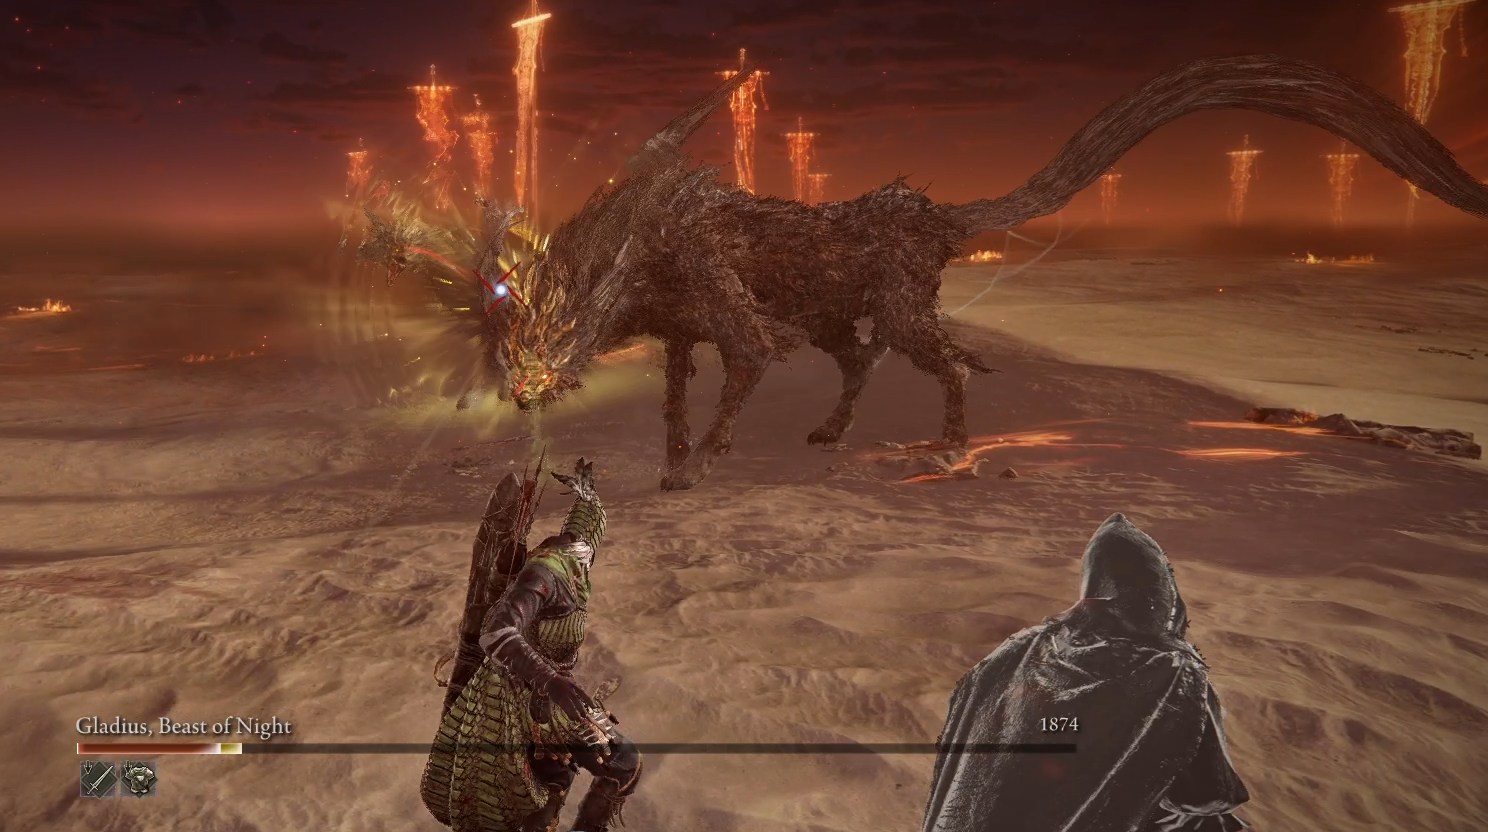
With Ironeye’s reliable sustained damage and defense via staying at distance, he is probably the best character to “farm” Relics (i.e., repeat a boss run). The easiest boss to farm is Tricephalos (Gladius, Beast of the Night), and this Ironeye Build comes with higher survivability and Holy damage specifically to ensure successful runs against it.
Build Summary
Type: Hybrid DPS/Support Build
Makes use of Holy damage and leans into support and survivability to be more flexible with expedition outcomes
Ironeye’s main weakness is his low damage output, so a lot of Ironeye builds prioritize his DPS. This approach shines best when at least one of your teammates is optimized for defense, but in repeated runs and especially in matchmaking runs, this isn’t as reliable. By going for a boss of reduced difficulty and targeting your toolkit for recovering from mistakes, you are more likely to succeed, which means that you get the best Relic drop at the end.
This build, perhaps even more so than others, will need to make best use of Ironeye’s playstyle tactics, which we outline in our How to Play Ironeye guide.
Holy Ironeye Best Relics
Best Effects:
Attacks Inflict [Status Effect] — Especially Holy
Increased rune acquisition for self and allies
Improved Stance-Breaking when Two-Handing
Dexterity +
Other Options:
Support:Flask also heals allies, Slowly restore HP for self and nearby allies when HP is low, etc.
Survival: HP Restoration upon Bow Attacks, Vigor +, Less Likely to Be Targeted, etc.
Consumables:Improved Throwing Pot Damage, Items confer effect to all nearby allies, etc.
Ultimate Arts Gauge +
This build doesn’t rely heavily on Relics and doesn’t make use of any Remembrance Relics, assuming that the build is used to farm these for future runs. If you have enough of the options listed above, prioritize them over effects like alterations of the starting weapon or item, or Skill Cooldown Reduction.
However, you can equip a Relic with the Ultimate Arts Gauge boost: while Marking tends to have very quick cooldown as is, you can make good use of your Ultimate for this build: if you play with strangers, expect some of them to be less aware of when they are about to go down, so an emergency resurrection might be needed more often than you would like.
Holy Ironeye Best Equipment
Main Hand Archetype: Epic/Upgraded to Epic*, Status Effect/Affinity Damage (ideally Holy), Barrage or Rain of Arrows
Understandably, you will want to deal Holy damage to Tricephalos, but any Affinity (but Fire) or Status Effect will greatly improve your DPS. This build assumes you not pursuing options that would allow you to upgrade your weapon to Legendary rarity, such as the Crater Shifting Earth event.
Here is the table of items that are likely to drop in a state closest to the ideal item:
Rank
Icon
Name
Base Rarity
Base Affinity/Effect
Ideal Changes
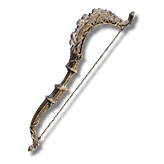
S
Erdtree Bow
Epic
Holy
None
A
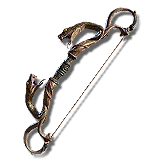
Serpent Bow
Epic
Poison
None
A
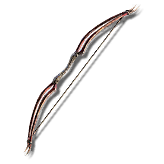
Horn Bow
Rare
Magic
Upgrade to Epic*
A
Black Bow
Epic
None
Has Status Effect
B
Red Branch Shortbow
Rare
None
Upgrade to Epic*, has Status Effect
B
Harp Bow
Rare
None
Upgrade to Epic*, has Status Effect
*Requires Smithing Stone [2], obtained from the Tunnels and occasionally sold by merchants
Clutch Option for Weapon:
Any Rare Bow, preferably upgraded to Epic (with Smithing Stone [2])
The more your weapon strays from the ideal, the more you should compensate for that damage: stock up on Holy Grease and Holy Water Pots. If your weapon has no status effects, make use of Exalted Flesh (+ Physical Attack).
Best Equipment Skills
Rain of Arrows
Barrage
Rain of Arrows is especially effective against slower/bigger targets, and helps with accumulating status effects. Same goes for Barrage, which can handle moving targets at the expense of not being able to get past shields (which is not frequently relevant, and doesn’t apply to Tricephalos).
Best Equipment Passives
Best:
Improved Holy Attack Power
Improved Stance-Breaking/Improved Stance-Breaking When Two-Handed
HP Restoration Upon Attacks
Less Likely to Be Targeted
Secondary Options:
Improved Ranged Weapon Attack, Improved Attack Power When Two-Handed/Wielding Two, Successive Attacks Improve Attack Power
Improved Dexterity/The Ironeye’s Grief
Improved Attack Power at Full HP — If you stay back and rarely take damage
Improved Dodging
Improved Stamina Recovery, Increased Maximum Stamina
It’s tempting to lean into DPS with exclusive Attack Power and Dexterity boosts, but the purpose of Holy Attack in this build is to deal stance damage to Tricephalos. Improve your stance-breaking and let your teammates land the crits on bosses.
Try to add some HP Restoration and Less Likely to Be Targeted to your item slots, if you spot them. You never know how a particular boss fight might go. If three of you are caught by a nasty AoE attack, it’s over.
Don’t worry about Improved Fire Negation as much with this build: Tricephalos does not have enough Fire attacks compared to, say, how much damage you can do with boosted Attack Power.
Off-Hand Ideas (Optional)
Seal Weapon with Order’s Blade (enchants RH with Holy) — note that this replaces the weapon skill
Seal with Heal, Great & Lord’s tier (heals self and allies)
Rare Shield — not Wooden Shield
Ironeye is very flexible with what they can carry and equip. If your party is not picking up higher-rarity caster weapons, you can carry one. Same goes for shields. Wooden Shields have lower Dexterity scaling compared to regular Shields. Of course, do not equip an off-hand item if you have a Weapon Passive that benefits two-handed wield.
Seals that enchant your Right-Hand weapon replace the weapon skill, as mentioned above. You can switch to Two-Hand wielding of your bow in between applying the Seal to get your bow skill back. You can perform a similar switch back and forth with shields, if using their skill.
Holy Ironeye Best Consumables
Rank
Icon
Name
Effect
S
Holy-Shrouding Cracked Tear
+ Holy attacks
A
Gold-Pickled Fowl Foot
+ Rune acquisition
B
Holy Water Pot
Inflict Holy damage
B
Warming Stone
Leave behind small AoE that restores HP
Other Options:
Any Grease — except Fire, for Tricephalos — if no Holy on main weapon
Exalted Flesh (+ Physical attacks) — if no Holy on main weapon
Any Throwing Pots — except with Fire Damage, for Tricephalos
Use Fire Damage consumables on other enemies and stock up on Holy Pots & Grease prior to Day 3. If you see a Gold-Pickled Fowl Foot, you can just use it right on the spot. Same goes for random Increased Rune Acquisition buffs you will spot in the wild. The higher your level, the better all of your stats are.
We already mentioned that Ironeye offers a higher rate of item drops as his passive, so definitely try to make use of your consumables.
Dormant Powers
Best Picks:
Attack Boost [Those Who Live in Death]
Improved Stance-Breaking
Survival:Increased Maximum HP, Improved Flask HP Restoration, etc.
Increased Rune Acquisition — Unless at the end of the run
Good Picks:
HP Restoration upon Successive Attacks
Improved Throwing Pots
Sudden Enemy Death upon Attacks
Improved Dodging
FP Restoration upon Successive Attacks — Use with Barrage Skill
Improved Stamina Recovery
As usual, focus on support, survival, and stance break. That being said, if you see the elusive Attack Boost for the boss type, definitely grab it (it’s an impressive 20% boost).
A Dormant Power that’s almost never worth taking is the Gradual Restoration by Flask. With it, consuming a Flask becomes a gradual health replenish, and in almost all cases you will benefit from Flasks being an emergency heal.
Location Priorities
Best locations to visit during the run:
Great ChurchesandRuins with Holy affinity
Churches
Other Options:
Castle
Main Encampment
Tunnels — if you need to upgrade a Rare weapon
No run is above visiting a Church, and if your intent is to farm a boss continuously, nothing quite saves a run like those extra Flask charges. Otherwise, remember to hit up Great Churches or Ruins if they are Holy, if you see any on the map (use detailed view). Both are a good target for Day 1.
If you aren’t sure where to go, Castle and Main Encampments are a good way to get some Runes. If your active weapons are Rare on Day 2, grab a Smithing Stone [2] from the Tunnels. Even if you run out of time, you can always perform the upgrade on Day 3 before facing the boss.
With your Passive Skill boosting Item drops, you don’t really need to visit Merchants quite as often. However, do check out the Day 3 Merchant in case he has any of your best Consumable picks on offer (except the Gold-Pickled Fowl Foot, of course, since you no longer need Runes).
Otherwise, priorities for most other Expeditions (see our guide on Completing Expeditions) still apply. Shifting Earth events are more deadly, so you might not want to risk them for these particular runs.
We hope you found this Ironeye Build useful! Did you have any luck finding the right items, or did you manage to put together something even better? Share with us in the comments below!
Share this article:
Mila Grish
Dedicated contributor at EIP Gaming and a part-time collector of books she will never have time to actually read. Jumps on the newest releases just as quickly as on the uncovered dusty collections from the basement. For her, shiny graphics can never be an excuse to not have a polished player experience or an immersive story.